Как подключить роутер
Перед настройкой роутера нам потребуется подключить устройство к кабелю провайдера, который при подключении услуги вам провел провайдер. Подключать данный кабель нужно в порт на роутере обозначенный отдельным цветом и подписанный как WAN, Ethernet, 0. В редких случаях может быть рисунок планеты. Кабель от провайдера должен быть подключен строго в порт, предназначенный для него, в порты Lan предназначенные для локальной сети его подключать не нужно, так услуга работать не будет. Пример изображение 1.

Изображение 1.
Далее нам нужно подключить к роутеру устройства по патч-корду или по wi-fi.
В комплекте с роутером идет меленький патч-корд, подключаем его в компьютер с одной стороны, с другой стороны подключаем в роутер в порт lan (Изображение 2). В роутере есть порты lan они так и подписаны (Изображение 1).

Изображение 2.
Если вдруг кабеля нет, то подключаем к роутеру компьютер или телефон по wi-fi. Данные для подключения к Wi-fi заводской сети роутера находятся на наклейке с обратной стороны роутера. Иногда сеть называется, как модель роутера, а пароль написан, как PIN: 12345678 будут написано именно 8 цифр. Увидеть это можно на изображении 3.

Изображение 3.
Как зайти в настройки роутера
Вариант 1 Посмотреть адрес входа в настройки на роутере
Для входа в настройки роутера нам понадобится посмотреть «IP-адрес» роутера.
Посмотреть его можно перевернув роутер, на дне будет наклейка, на ней ищем «IP-адрес», там будет, например, 192.168.0.1 или 192.168.1.1 и другие (Изображение 4 — 5). Если наклейки нет, то переходим к Варианту 2.

Изображение 4.

Изображение 5.
Вариант 2 Посмотреть адрес входа в настройки через компьютер
Для входа в настройки роутера нам понадобится посмотреть «IP-адрес» роутера если нет наклейки как в первом варианте.
Посмотреть его можно на компьютере, для этого подключаем роутер к компьютеру по патч-корду или по wi-fi.
Находясь на рабочем столе вашего ПК на клавиатуре потребуется нажать клавиши Windows + R, как на изображении 6.

Изображение 6.
Появится окно. (см. изображение 7)

Изображение 7.
В нем пишем control нажимаем OK. (смотри изображение 

Изображение 8.
В зависимости от настроек просмотра мы можем увидеть два типа значков. При выборе пункта просмотр категория отобразится так (смотри изображение 9). В таком случае мы заходим в пункт Сеть и Интернет.

Изображение 9.

Изображение 10.
Если в поле Просмотр выбраны крупные или мелкие значки, то сразу заходим в пункт центр управления сетями и общим доступом (смотри Изображение 11).

Изображение 11.
Далее выбираем пункт изменения параметров адаптера (смотри изображение 12).

Изображение 12.
В нашем случае подключение по кабелю. Если у вас подключение по Wi-fi проделываем с ним аналогичные действия (Смотри изображение 13).

Изображение 13.
Нажимаем правой кнопкой мыши по подключению, появляется контекстное меню в нем выбираем пункт состояние (смотри изображение 14).

Изображение 14.
Далее сведения (смотри изображение 15).

Изображение 15.
Нам нужен пункт шлюз. Это и будет адрес роутера (смотри изображение 16).

Изображение 16.
Настройка роутера
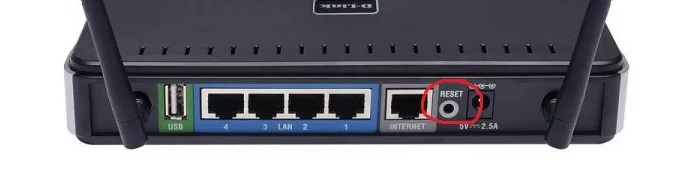
Рассматривается настройка нового роутера, купленного в магазине. Если роутер б/у, дали знакомые и т.д. Потребуется произвести сброс настроек до заводских. На уже подключенном в розетку роутере зажать кнопочку Reset, RST. И удерживать кнопку зажатой до момента, пока на роутере не моргнут все лампочки одновременно. Роутер сброшен.
Для настройки роутера нужно узнать его IP адрес, это можно сделать в разделе «Как зайти в настройки роутера». Для этого нам потребуется устройство, подключенное к роутеру кабелем, называемым патч-корд (идет в комплекте с купленным роутером имеет длину от 1 метра до 1,5 метра), либо устройство, подключенное по радиосигналу Wi-fi сеть.
Зная шлюз, теперь мы открываем браузер (программа для выхода в интернет, открытия интернет страничек), например Google Chrome. Набираем данный адрес в адресной строке браузера. Важно не путать адресную строчку (выделена красным) и поисковую (выделена оранжевым). (смотри изображение 17)

Изображение 17.
Когда адрес набран в адресной строке, как показано на картинке ниже. (смотри изображение 18).

Изображение 18.
На клавиатуре нажимаем клавишу enter. (Смотри изображение 19)

Изображение 19.
Когда перешли по адресу роутера видим окно авторизации изображение 20.

Изображение 20.
Заводские логин и пароль, для авторизации в web интерфейс роутера находится на наклейке с обратной стороны роутера (Изображение 21).
Если логин и пароль не подходят, то вероятно роутер уже был настроен, делаем сброс настроек как написано в начале раздела.

Изображение 21.
При первом входе в настройки роутера D-Link у вас выйдет быстрая настройка, если не вышла, то нажимаем сами (Изображение 22). После нажимаем кнопку «Далее».

Изображение 22.
Выбираем (Изображение 23). В поле «Провайдер» – страна Россия и провайдера ТТК, если не найдете провайдера, то оставьте без выбора. Нажимаем кнопку «Далее».

Изображение 23.
В списке подключений ищем нужное, а именно «Динамический IP» (Изображение 24). Нажимаем кнопку «Далее».

Изображение 24.
Оставляем как предлагает роутер и нажимаем кнопку «Далее» (Изображение 25).

Изображение 25.
Проверяем чтобы точно было указано: Тип подключения: Динамический IP-адрес (Изображение 26). Нажимаем кнопку «Применить».

Изображение 26.
Роутер сохраняет настройки, проверяет доступ в интернет и если все успешно, то выдаст вам следующий результат (Изображение 27). После успешной настройки нажимаем кнопку «Далее».

Изображение 27.
В пункте «Включить Яндекс DNS» — убираем галочку (Изображение 28). Нажимаем кнопку «Далее».

Изображение 28.
В пункте «Режим» — выбираем «Точка Доступа» (Изображение 29). Нажимаем кнопку «Далее»

Изображение 29.
В поле «Имя сети (SSID) 2,4ГГц» — указываем имя как будет называется сеть wi-fi на ваше усмотрение (желательно использовать английские буквы), если хотите можете оставить как предлагает роутер (Изображение 30). Нажимаем кнопку «Далее».

Изображение 30.
В поле «Сетевая аутентификация» — выбираем «Защищенная сеть» (Изображение 31).
В поле «Ключ безопасности 2,4ГГц» — прописываем пароль для сети wi-fi, можно использовать цифры и/или буквы (желательно использовать английские буквы), не менее 8 символов. Нажимаем кнопку «Далее».

Изображение 31.
В поле «Имя сети (SSID) 5ГГц» — указываем имя как будет называется сеть wi-fi на ваше усмотрение (желательно использовать английские буквы), если хотите можете оставить как предлагает роутер, но в конце нужно приписать 5G чтобы было легче различать разные режимы wi-fi. (Изображение 32). Нажимаем кнопку «Далее».

Изображение 32.
В поле «Сетевая аутентификация» — выбираем «Защищенная сеть» (Изображение 33).
В поле «Ключ безопасности 5ГГц» — прописываем пароль для сети wi-fi, можно использовать цифры и/или буквы (желательно использовать английские буквы), не менее 8 символов.
Пароль можно указать такой же, как и для wi-fi 2,4ГГц чтобы было легче запомнить. Нажимаем кнопку «Далее».

Изображение 33.
Роутер сохраняет настройки, выдаст вам следующий результат (Изображение 34). После успешной настройки нажимаем кнопку «Применить».

Изображение 34.
Если вы сделали все по инструкции, но интернет не появился. Потребуется позвонить по номеру 8-800-775-0775, для сброса привязки со стороны провайдера. Регистрация производится по MAC адресу оборудования. Оператора просим дословно: «Сбросьте привязку, подключили новое оборудование».
Всем, привет! И сегодня по утру ко мне прилетел почтовый голубь со странным вопросом: «Где можно посмотреть стандартный пароль от роутера D-Link». И тут сразу возникает вопрос – а что именно имел в виду отправитель. Как не странно, но четкого ответа тут нет — это или пароль от вай-фай, или ключ администратора. Второй необходим, чтобы зайти в Web-интерфейс внутрь «админки» и сделать там какие-то настройки.
Содержание
- Где находится
- Пароль не подходит
- Поменять пароль
- Новая прошивка
- Старая прошивка
- Помощь
- Задать вопрос автору статьи
Где находится
Теперь я вам отвечу на вопрос, как именно можно его найти. И сделать это, как не странно, очень просто – нужно перевернуть вам маршрутизатор кверху пузом и посмотреть на этикетку под ним. Иногда, конечно, вспомогательную бумажку печатают и сбоку. В общем нужно проявить себя сыщиком и найти её.
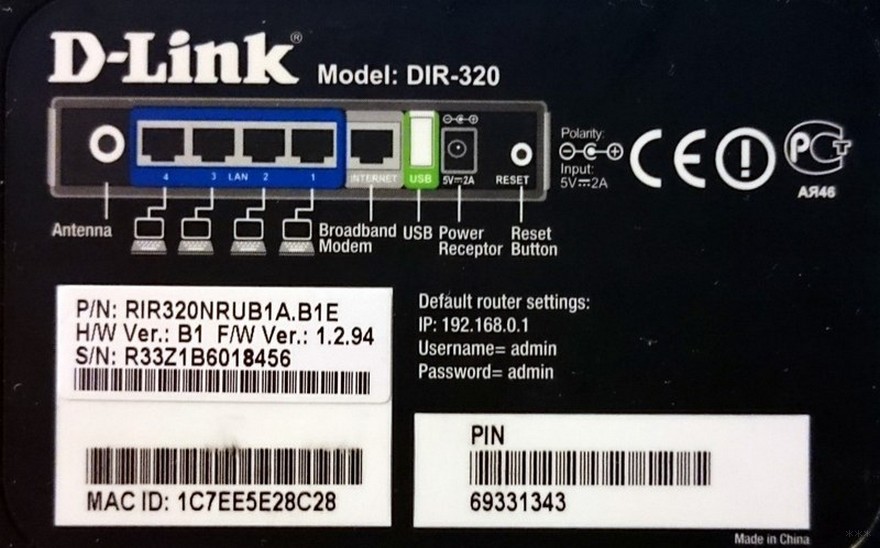
И так посмотрим – что там есть. Если вы ищите стандартные ключ от Wi-Fi, то на старых моделей он называется PIN и имеет чисто цифирную форму. При этом подключение идёт по типу WPS. На новых моделях обычно пароль находится отдельно в строке. Имя сети по умолчанию будет иметь вид полного названия модели роутера.
Теперь если вам нужен ключ от «админки» или Web-конфигуратора, для начала вам нужно туда войти. Для этого нужно подключиться к сети маршрутизатора. Это можно сделать по проводу вставив один конец провода в LAN порт. Или можно подключиться по WiFi. Далее открываем браузер и вписываем адрес, который также находится на этикетке. Чаще всего используется 192.168.0.1.
После этого вас должны попросить ввести логин и пароль. И эти данные также находятся на той самой бумажке. По умолчанию это:
- Логин: admin
- Пароль: admin
Пароль не подходит
В таком случае ещё раз проверьте, чтобы данные были введены верно. Очень часто бывает, что пользователь в конце ставит пробел или вводит данные по-русски – так как его не видно. Второй вариант – что пароль по умолчанию просто поменяли при первичной настройке.
Если вы его получили от друга и ранее вообще он у вас не работал – то нужно сбросить конфигурацию роутера до заводской. Для этого находим кнопку «Reset» на корпусе и зажимаем её на 10 секунд.
Если его настраивали работники провайдера, то стоит позвонить к ним и узнать, как именно ключ от Web-интерфейса они поставили. Но если они не скажут эти данные, нужно будет все равно сбрасывать аппарат до заводских настроек, а уже потом настраивать его заново.
Поменять пароль
У D-Link интернет-центров две прошивки, поэтому смотрите исходя инструкцию из того, что вы сейчас видите перед глазами. Есть старая и новая прошивка – мы рассмотрим обе.
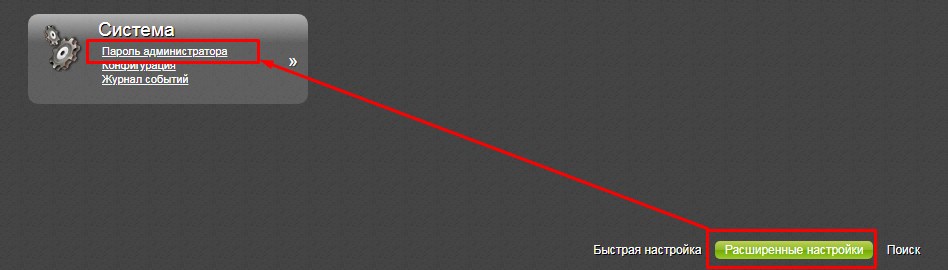
Новая прошивка
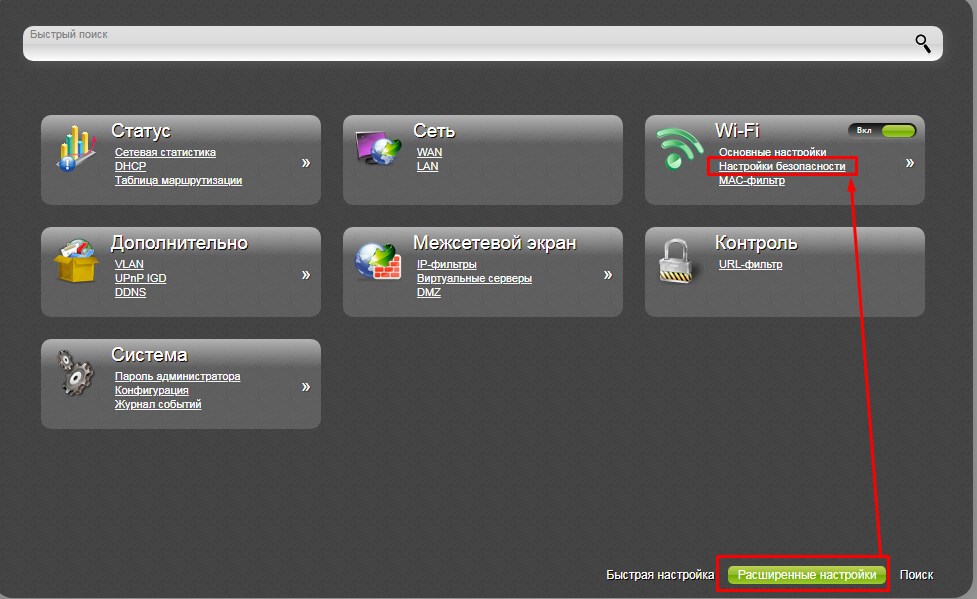
Для смены пароля от Wi-Fi сначала переходим в «Расширенные настройки», потом находим соответствующий раздел и нажимаем «Настройки безопасности».
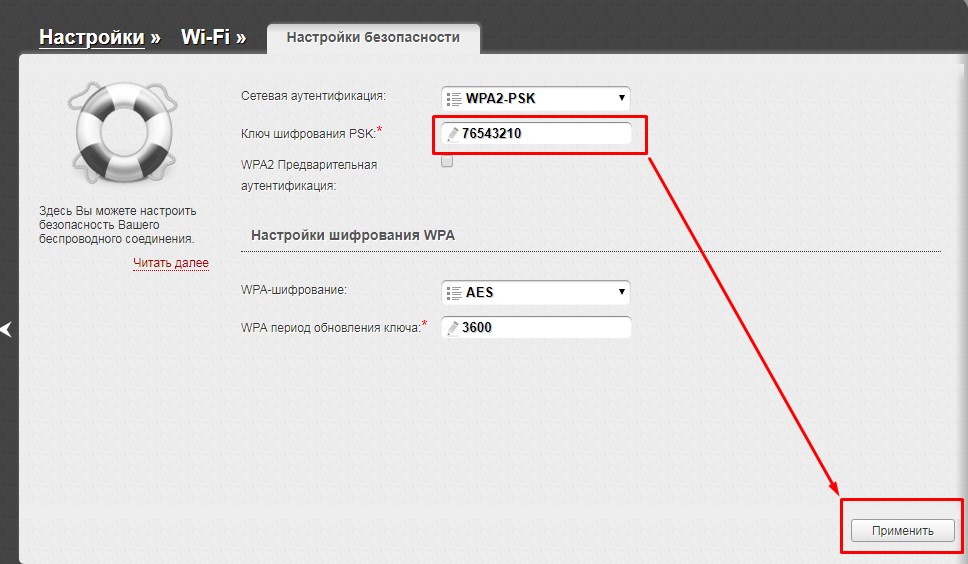
Меняем ключ и нажимаем «Применить».
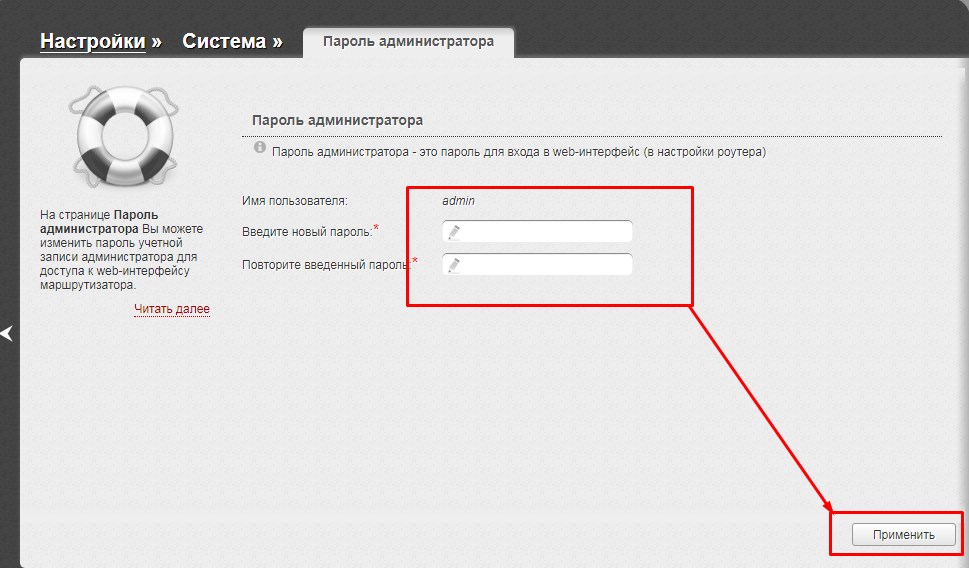
Для изменения пароля от этого интерфейса там же переходим в «Пароль администратора» в разделе «Система».
Два раза вписываем ключ и не забываем сохранить изменения.
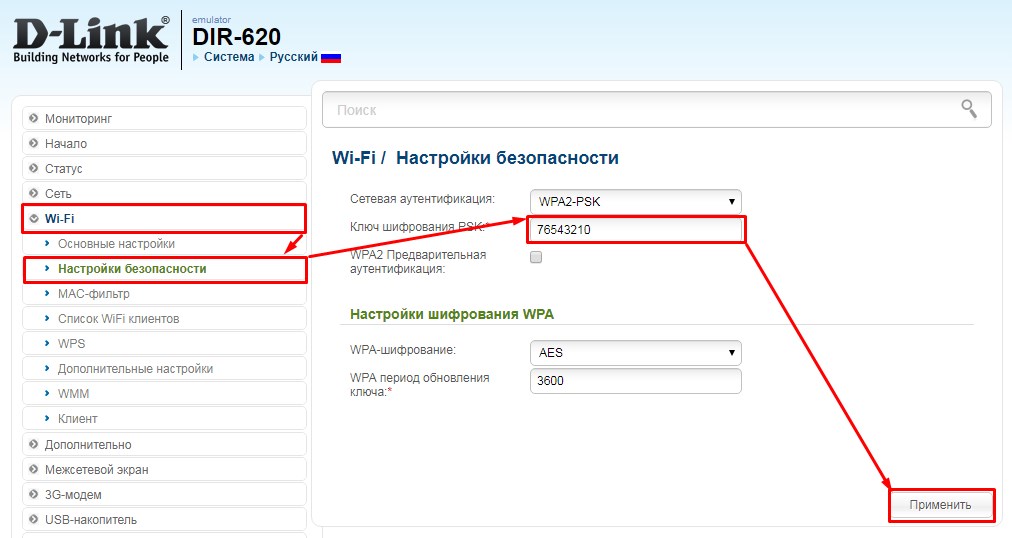
Старая прошивка
«Wi-Fi» – «Настройки безопасности». Теперь меняем ключ и сохраняемся.
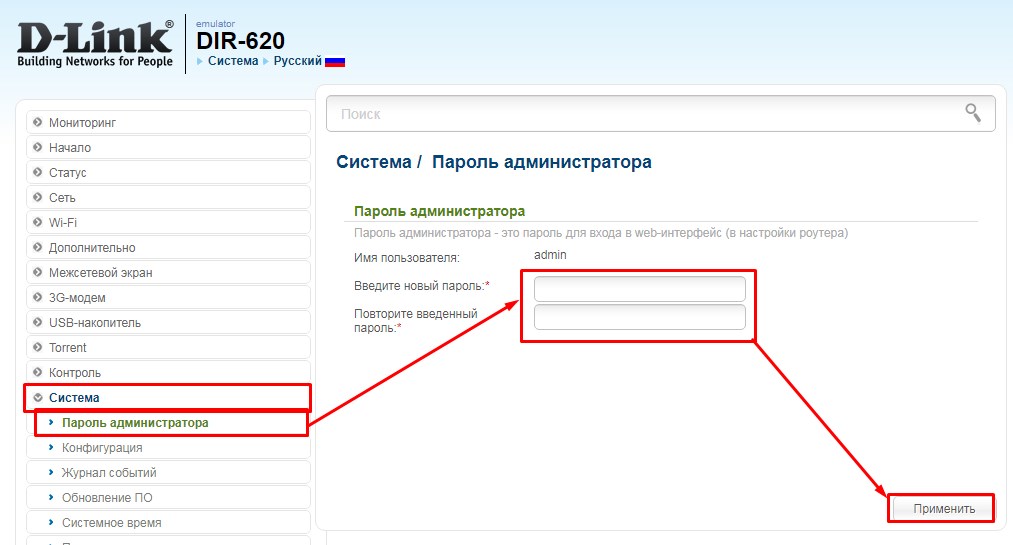
«Система» – «Пароль администратора». Устанавливаем данные и нажимаем «Применить».
Помощь
Если возникли какие-то трудности или вопросы – то пишите их в комментариях под статьей. Только пишите как можно подробнее – что у вас не получается и на каком шаге вылезла ошибка. Я постараюсь вам помочь. Также буду рад конструктивной критике и дополнениям.
The D-Link DIR-815 rev A1 router has 300mbps WiFi, 4 100mbps ETH-ports and 0 USB-ports.
Quick links:
Default password/Login
Login instructions
User Manuals
DIR-815 rev A1 router specifications (specs)
System specs
CPU: n/a
RAM: 32 MiB
Flash: 4 MiB
Custom firmwares: None
Connectivity
WiFi: 300mbps (abgn)
WiFi bands:
2.4GHz & 5GHz
WiFi throughput: n/a
WAN:
1 x 100mbps port
ETH:
4 x 100mbps ports
USB-ports: 0
D-Link DIR-815 review (quick overview)
Here is the quick comparison of how the D-Link DIR-815 compares to
other routers on our site:
For a full list of routers and how they compare to the DIR-815 rev A1, check the
Router Buying Guide which will help you buy the most
price-competitive router.
Hard reset instructions
for D-Link DIR-815 rev A1
If your DIR-815 rev A1 router is not working as it should, dropping connections or not
being
responsive, you should first do a reset of the router to see if the problems persist. Other
scenarios where you might want to reset your router is if you’ve forgotten the password or
misconfigured it and can’t get access anymore.
Your can reset your D-Link DIR-815 rev A1 in the following way(s):
With the reset button
- Locate the reset button on the back off the router
- While the unit is powered on, press the reset button with a sharp object (e.g. paperclip)
- Hold the button pressed for 10 seconds, then release.
- The unit will reboot by itself and once the WLAN light stops blinking the factory reset is done.
- You can now setup your router again through the user interface
The 30-30-30 reset
If the above instructions don’t work you can always try the 30-30-30 reset as follows:
- When router is powered on, press the reset button and hold for 30 seconds. (Use a paper
clip
or something sharp) - While holding the reset button pressed, unplug the power of the router and hold the
reset
button for 30 seconds - While still holding the reset button down, turn on the power to the unit again and hold
for
another 30 seconds.
This process usually works for resetting any router to it’s factory setting.
If that doesn’t work be sure to check out the
questions and answers incase someone else has had similar problems resetting their router.
Note: It is worth reading more about
how to reset routers with the 30 30 30 reset and what the risks and
considerations
are when resetting your router this way, instead of just rebooting it.
Default factory settings for D-Link DIR-815 rev A1
If you have performed a reset of your DIR-815 rev A1 device or not changed the defaults, you
should
be able to access it with the following settings:
Default Network name (SSID): dlink,dlink_media
Default Gateway IP: 192.168.0.1
D-Link login instructions
Default username: admin
D-Link router default password list
Default subnet mask: 255.255.255.0
Default DNS server: 192.168.0.1
Note: If you are using the default settings you should change them to increase
security and prevent unathorized access to your network.
How to login to the DIR-815 rev A1
To login to the DIR-815 rev A1 router and change
the settings, you can follow these steps:
- Make sure you are connected to the router’s network, either by Wi-Fi or ethernet cable.
- Open your browser and visit
http://192.168.0.1 - You should be prompted with a login dialogue.
- Enter the username:
admin
and if it requires a password, leave it empty or try withadmin/password
Note: If you have already changed the password use that instead. - You will now be logged in. If you haven’t yet changed the defaul password, we recommend that you change it first
thing you do after logging in.
If these instructions don’t work for your router, you can always try a factory reset to get the default, or try
some other common D-Link credentials, as they can
usually be shared across models/variants.
DIR-815 rev A1 Firmwares
Staying up to date with the latest firmware is a good idea to keep your router even more
secure
from various security flaws.
If you want to squeeze a little bit of extra functionality out of your router, consider
flashing
an open-source firmware like dd-wrt, openWRT or LEDE. Flashing a custom ROM can greatly
increase
the stability and functionality of your old router.
Following are the firmwares that we have identified existing for the D-Link DIR-815 rev A1:
D-Link stock firmware for the DIR-815 rev A1
Stock firmwares for the DIR-815 rev A1 are available under the download section on the
modem’s
support page. You can also refer
to the router’s manual for instructions on how to upgrade the firmware.
Similar routers
Report error on page
(If info is incorrect)
To get access to your D-Link DIR-815, you need the IP of your device, the username and password. You’ll find such information in the Manual of your D-Link DIR-815 router. But if you do not have the manual for your router or you do not want to read the whole manual to find the default login information then you can use the quick guide below. To get to the router login page it’s necessary that you are connected to the router.
D-Link DIR-815 Login Guide
- Open your web browser (e.g. Chrome, Firefox, Opera or any other browser)
- Type 192.168.0.1 (the default IP to access the admin interface) in the address bar of your internet browser to access the router’s web-based user interface.
- You should see 2 text fields where you can enter a username and a password.
- The default username for your D-Link DIR-815 is admin.
The default password is (blank). - Enter the username & password, hit «Enter» and now you should see the control panel of your router.

If above login credentials doesn’t work with your D-Link DIR-815 router then try this method
Try different ID/password combinations that are widely used by D-Link that you’ll find below. In this list are the most popular default username and password combinations used by D-Link. Sometimes the username and password doesn’t work that we mentioned in the top of this guide. Then you can try these username/password combinations below to get access to your D-Link DIR-815 wireless router.
| # | Username | Password |
| 1 | admin | (blank) |
| 2 | admin | |
| 3 | admin | admin |
| 4 | (blank) | (blank) |
| 5 | admin | password |
| 6 | (blank) | |
| 7 | n/a | n/a |
| 8 | (blank) | admin |
| 9 | admin | |
| 10 | n/a | (blank) |
| 11 | user | user |
| 12 | admin | telus |
| 13 | (blank) | private |
| 14 | admin | <blank> |
| 15 | root | admin |
| 16 | admin | root |
| 17 | admin | randomly generated |
| 18 | Admin | ‘blank’ |
| 19 | (blank) | public |
| 20 | admin | ‘randomly generated’ |
| 21 | C | 192.168.0.1 |
| 22 | admin | none |
| 23 | D Link 25 | (blank) |
| 24 | admin | user |
| 25 | D-Link | D-Link |
| 26 | admin | (configured in setup) |
| 27 | admin | year2000 |
| 28 | (blank) | (see notes) |
| 29 | public | |
| 30 | (label on the bottom of the router) | |
| 31 | (blank) | (sticker on the bottom of the device) |
| 32 | volcom75 | 1987197500 |
| 33 | n/a | admin |
| 34 | admin | public |
| 35 | 88612421 | 2421D |
| 36 | (blank) | 0 |
| 37 | admin | n/a |
| 38 | administrator | @*nigU^D.ha |
| 39 | (blank) | 211cmw91765 |
Default login IPs for my D-Link router
You tried different router IPs but nothing worked? Did you try the following IPs? In the list below we listed all known router IPs for the manufacturer D-Link. Maybe this will work for you.
| # | Default Router IP |
| 1 | 192.168.0.1 |
| 2 | 192.168.0.50 |
| 3 | 192.168.1.1 |
| 4 | 192.168.0.30 |
| 5 | 192.168.8.254 |
| 6 | 192.168.10.1 |
| 7 | 10.90.90.91 |
| 8 | 10.1.1.1 |
| 9 | 192.168.0.20 |
| 10 | 10.90.90.90 |
| 11 | 192.168.15.1 |
| 12 | 192.168.0.35 |
| 13 | 192.168.0.40 |
| 14 | 192.168.0.101 |
| 15 | 192.168.0.50:2000 |
| 16 | 192.168.0.32 |
| 17 | 192.168.0.10 |
| 18 | acquired via DHCP |
| 19 | 192.168.1.254 |
| 20 | 192.168.229.61 |
| 21 | 192.168.0.100 |
| 22 | 193.168.1.150 |
| 23 | 192.160.0.50 |
| 24 | 192.168.2.1 |
| 25 | 192.168.0.60 |
| 26 | 192.168.1. |
| 27 | 10.255.255.1 |
Nothing of the methods worked for me and I still not get access to my D-Link DIR-815!
All you need to do is to reset your DIR-815 modem. This can be done easily by clicking on the reset button at the back or at the bottom of your router. If you hold down this small button for approximately 20 seconds, (you may have to use a toothpick), then your modem will get restored to the factory settings. What you need to keep in mind is that when you reset your modem, you will lose your connection online. It is therefore better to take an expert’s assistance in this regard. Note: If you have not enough information, it is obviously recommended that you should get help from a person who has all the knowledge about this topic.
- Home
- D-Link
- DIR-815
Dlink DIR-815 router setup & security
- To login to Dlink DIR-815 Router, Open your web browser and type the default IP Address 192.168.0.1 in the address bar
- You should now see the router login page with 2 text fields where you can type a username and a password
- The default username for your Dlink DIR-815 router is Admin and the default password is blank
- In the login page of the router’s web user interface, type-in the username & password, hit «Login» and now you should see the Dlink DIR-815 router control panel

(Remember, you must be at home and connected to home WiFi to do this)
And no need to get your breathing rates high in case you have changed the username / password of Dlink DIR-815 and forgot them, as you can just reset the Dlink DIR-815 router by press-and-hold the reset button with a clip for about 15 seconds.
Dlink DIR-815 Quick links:
| Default username for Dlink DIR-815: | Admin | COPY |
| Default password for Dlink DIR-815: | blank |
2.Change Dlink DIR-815 Default Login and Password
Since, security of a network is vital, the first and foremost task is to change the Dlink DIR-815 router Default Login and Password to something more personal and secure.
Dlink DIR-815 Router Password Tips:
Choose a complex and hard-to-guess password for your D-Link which only you can remember
It should be something personal, like &ilostmyvirginity@30, so that you’ll never forget it. Ever
Protect it
The amount of protection directly depends on the password complexity, and the effort taken to protect that password on your Dlink DIR-815 router.
Usability first
Give Password for your Dlink DIR-815 router that you can remember (usability first). Of course, you can build a strong hash password with special characters, numbers, Greek, and Latin. But ultimately you’ll end up writing it on a sticky and putting it on the router, which defeats the purpose. Here is an example $lasttriptovegas0916
You did good so far. Now consider ⭐ Bookmarking this page. It always helps.
3.Change Dlink DIR-815 Default WiFi name (SSID) and WiFi Password and enable Network Encryption
Another small suggestion (as it has no impact on security), is to change the Dlink DIR-815 Default WiFi name (SSID) as it will make it more obvious for others to know which network they are connecting to.
Steps:
- Look for — SETUP (found in the menu bar at the top of the page) , and click on it
- Look for — WIRELESS SETTINGS (found in the left hand side menu bar), and click on it
Look for Network Name (SSID), this is the WiFi name of your Dlink DIR-815 Router. Do not use your name, home address, or other personal information (since this isn’t a Facebook status!) in the SSID name. (No Mr.Paul&Princy) A few funny WiFi name suggestions: I’m cheating on my WiFi!, FBI Surveillance Van #594 (scares away stupid criminals), Lord of the Pings …
Once you enter the name for your network, you have to enable WPA2-PSK encryption on your Dlink DIR-815 router. That’s the strongest encryption standard available for home networks.
Enter a new WPA Pre-Shared Key / WiFi Password – this is the password that you will use to connect to your home WiFi. Keep it to 16-20 characters (please!) don’t use the same password that you used for Dlink DIR-815 router login!
🤓 Geek out your guests. Print a Free WiFi QR Code Sticker for your fridge now
4.Update router firmware in Dlink DIR-815 and turn on Automatic Updates
Router software often contains critical bugs and security vulnerabilities; Check if your router has known vulnerabilities
Check — Dlink DIR-815
Its important that you turn on Automatic Firmware updates and always keep your Dlink DIR-815 router up-to-date. To turn on Automatic updates, Login to your Dlink DIR-815 router and look for the section which contains Automatic updates and turn it «ON»
And even if the router has auto-update, check every now and then to make sure it is actually working, and the router firmware is up-to-date. If your router manufacturer hasn’t released any updates to the firmware in the past 3-5 years, consider upgrading to a «newer» router
5.Security is a continuous process
Just keep in mind to change the passwords often or at least once in every 6 months! on your Dlink DIR-815 You don’t want the safety you have worked so hard for to fail just because of ignorance, negligence, or casual laziness! Time for a bulletin on the fridge, folks! We can remind you though? Enter your email below! Nope, we are not spammers!
Dlink DIR-815 Router Reset instructions
How to Reset the Dlink DIR-815 Router To Factory Default
To reset Dlink DIR-815 router,
- Turn on the Dlink DIR-815 router
- Look for the reset button. Few routers have a tiny hole and few others have a reset button.
- Press the Factory reset button with a straightened paperclip pin or something that gets through the tiny hole, and hold it for about 15 seconds! (till you see all the lights flashing)
- The Dlink DIR-815 router will reboot automatically. the unit has been reset and is ready to use. You can start from Step 1 in this guide to set it up.
Dlink DIR-815 Password Does not Work
Passwords find a way to not work! Or, in most cases, users find a way to forget them! In either case, look up the How to Reset the Dlink DIR-815 Router To Default Settings section
Forgot Password for Dlink DIR-815 Router
Incase if you have changed the default username and password of Dlink DIR-815 and forgot it, please see How to Reset the Dlink DIR-815 Router To Default Settings section
How to boost Dlink DIR-815 WiFi and overcome connectivity issues
1.Place the Dlink DIR-815 in a perfect spot
The perfect spot does it all; be it romance or your router! To avail the best signal and network connectivity, make sure you keep your Dlink DIR-815 router visible and not facing the wall or behind the curtains
2.Find a Good Wireless Channel Instead of Auto on your Dlink DIR-815 router
Auto-channels might fail you once in a while; believe that you’re smarter than the D-Link router! Find a seamless wireless channel instead of what the router finds automatically. This would ensure that your signal doesn’t interfere with that of your neighbors.
If you’re running a Windows-based PC, you can see what channels neighboring Wi-Fi networks are using.
- Press Start > type “cmd”. Open Command prompt
- In command prompt type netsh wlan show all
You will see a list of all wireless networks and the channels being used in your vicinity. instead of using “Auto” for the control channel, Pick the channel that has the lowest interference
3.Check the frequency of Dlink DIR-815
Check if Dlink DIR-815 has dual-band, the most commonly used band would be 2.4GHz; however, switching to 5GHz would bring out better results! It depends on your device though; if you’re running an old lad, you might have to switch back to the conventional
4.Hardwire gaming consoles / media streamers into your Dlink DIR-815 instead of WiFi
Gaming consoles/media streamers work better when connected through Ethernet cable of Dlink DIR-815; in fact, as you might not be moving your TV all over the house, why connect it to the Wi-Fi at all? The Gaming consoles / video streaming devices flood the network with data. This means that if possible, you should consider hardwire (using Ethernet cable) the devices that tend to consume a lot of bandwidth. Although this can sort of defeat the purpose of having wireless networks, it can actually help your overall network speed of Dlink DIR-815 if you can hardwire the bandwidth hogs.
5. Reboot Dlink DIR-815 on schedule
Here’s something important to note! On schedule, folks, reboot your Dlink DIR-815 router! Though routers are built to constantly be running at all times, simple tweaks like regular power cycling (a fancy way of saying, unplugging the power cord and shoving it back up) helps with most issues. Rebooting your Dlink DIR-815 can fix Internet connection problems, improve slow moving connections, and resolve wireless issues altogether. Try unplugging your D-Link modem on a quarterly basis to stay proactive (Never reset; always reboot router)