MikroTik — настраиваем Wi-Fi

Олег
- 12 сентября 2019
- Подробнее о MikroTik — настраиваем Wi-Fi

Быстрая настройка беспроводной сети на роутере MikroTik hAP AC lite RB952UI-5AC2ND. Этот роутер одновременно работает в двух диапазонах: 2.4 ГГц и 5 ГГц, соответственно, у нас будет два отдельных SSID. Процедура настройки Wi-Fi на других роутерах MikroTik аналогична.
Теги
- MikroTik
- network
MikroTik — reset
Олег
- 9 сентября 2019
- Подробнее о MikroTik — reset
Сбрасываем настройки роутера на заводские. Я буду делать сброс для роутера MikroTik hAP AC lite RB952UI-5AC2ND.
Теги
- network
- MikroTik
- special
Wi-Fi маршрутизатор MikroTik hAP AC lite RB952UI-5AC2ND
Олег
- 4 сентября 2019
- Подробнее о Wi-Fi маршрутизатор MikroTik hAP AC lite RB952UI-5AC2ND
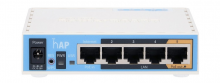
Двухдиапазонный (2.4 ГГц, 5 ГГц) Wi-Fi маршрутизатор MikroTik hAP AC lite (RB952Ui-5ac2nD) на процессоре Atheros QCA9531. Компактный, подходит для использования дома и в офисе. Операционная система RouterOS — мощный инструмент в руках специалиста, позволяет использовать обычный роутер для решения разного рода задач.
Теги
- MikroTik
- network
- hardware
- review
Друзья, добро пожаловать в очередную краткую инструкцию от Ботана из WiFiGid. Здесь вы наверняка узнаете про логин и пароль по умолчанию от MikroTik. База и возможные отклонения от стандартных сценариев.
А еще по яркой ссылке вверху этой статьи вы можете перейти на наш абсолютно бесплатный текстовый курс по настройке MikroTik. Да, там мы тоже рассматриваем стандартные логины и пароли, но кроме этого углубляемся в функционал роутеров, чтобы они отрабатывали себя на полную катушку.
Содержание
- Кратко
- Логин и пароль по умолчанию
- Не подходит – Правильный адрес входа
- Не подходит – Сброс настроек на заводские
- Задать вопрос автору статьи
Кратко
Логин: admin
Пароль: нет пароля (оставляем пустым)
IP-адрес: 192.168.88.1
Логин и пароль по умолчанию
Обычно, после первичной настройки пользователи задают свои логин и пароль (как минимум пароль). Так что дефолтные данные могут и не подходить вовсе. Дополнение читайте ниже.
Стандартная пара для всего оборудования MikroTik на базе RouterOS из коробки:
Логин: admin
Пароль:
Все правильно, никакой опечатки нет – пароль в состоянии по умолчанию действительно пустой (не отсутствует, а именно пустой). Так что при вводе в поле пароля ничего вводить не нужно. Эту же информацию можно узнать и на коробке (Login & Default Password). Но если не подходит – читаем ниже. Кстати, логин Админ тоже вполне себе могли и изменить… И внезапно системный логин admin вовсе может и не принадлежать к администратору. Но это уже другая история – если что-то подобное, тоже читайте ниже.
Не подходит – Правильный адрес входа
В моей практике был очень оригинальный случай – пользователь писал, что пытается зайти в конфигуратор, получает форму логина и пароля, сделал правильный сброс, а данные не принимаются. Куковали мы так еще очень долго, пока в тайной переписке он мне не скинул адрес входа – 192.168.1.1 – так я сразу понял, что человек просто пробует подключаться абсолютно к другому железу (в нашем случае это был роутер TP-Link).
И тут надо отметить два момента:
- Перед входом в настройщик вы должны быть подключены строго к маршрутизатору MikroTik (по проводу или Wi-Fi). Никаких других настроенных «вайфаев» или даже мобильного интернета – только MikroTik.
- Самый верный адрес для входа:
192.168.88.1
Конечно, можно войти и через WinBOX, но это уже другая история. Отсылаю вас к нашему курсу. Эта статья лишь про логин и пароль.
Не подходит – Сброс настроек на заводские
Но обычно пароль MikroTik не подходит по другой причине – он уже был ранее установлен на другой. И единственный разумный способ сделать его стандартным – сбросить на заводские настройки железно.
И тут нужно отметить – МикроТик заморочились и сделали сброс очень нестандартным. Т.е. нажать кнопку и подождать 3 секунды – здесь это не работает. Очень краткий принцип сброса (лучше посмотреть про свою модель ниже):
- Выключаем роутер из сети. Лампочки потухли.
- Ищем кнопку RESET (бывает вынесена, бывает на плате). Зажимаем ее.
- Подаем питание.
- Лампочки моргнут (возможен писк) – отпускаем RESET (не держим дольше, а то потратим время на еще одну переустановку системы, читайте ниже).
Запутанно? Так можно сбрасывать и до разных состояний, да и сами алгоритмы могут различаться. Именно поэтому у нас есть отдельная статья:
БОЛЬШАЯ СТАТЬЯ ПО СБРОСУ MIKROTIK НА ЗАВОДСКИЕ НАСТРОЙКИ
Ну вот и все. Очень надеюсь, что смог вам в оперативном порядке помочь. Если что – комментарии доступны ниже. В свободной форме помощи другим читателям принимают пожелания, предложения, вопросы. До скорых встреч!

Как зайти в настройки роутера Mikrotik?
Роутеры и маршрутизаторы фирмы mikrotik зарекомендовали себя как стабильные и безотказные устройства. К сожалению, они не получили такого распространения, как роутеры TP-Link или Huawei из за более высокой стоимости и сложности в настройках.
Тем не менее если вы стали обладателем сетевой продукции от mikrotik, то наверняка у вас возникает вопрос по ее настройке. А именно по поводу стандартного пароля для входа в настройки, а также ip адреса по умолчанию.
Как зайти в настройки роутера Mikrotik?
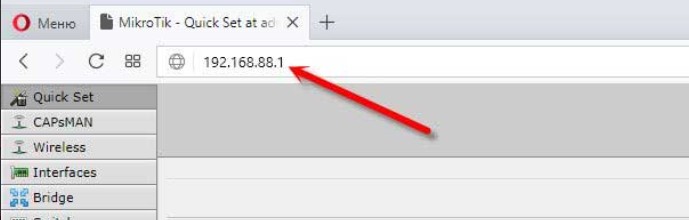
После того как сетевой кабель от роутера вставлен в сетевой порт компьютера или ноутбука, открываем любой браузер и в адресную строку вводим 192.168.88.1. Данный ip адрес является стандартным для любого сетевого устройства Mikrotik.
Стандартный адрес для входа в настройки MikroTik
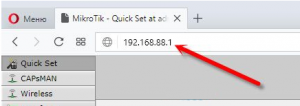
Затем нажимаем Enter и на экране отобразится окно авторизации, где будет предложено ввести комбинацию логин/пароль для входа в настройки.
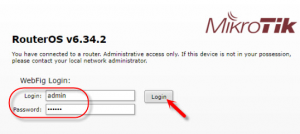
Запрос авторизационных данных
По умолчанию на всех роутерах и коммутаторах фирмы Mikrotik пароль для входа в настройки отсутствует! В поле “Login” нужно вводить “admin”, а поле “password” оставляете пустым! Далее нажимаете “Login” после чего вы попадете в начальное окно настройки роутера.
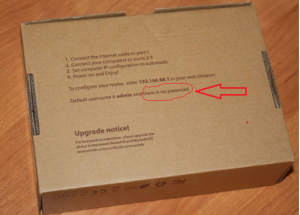
Указание на отсутствующий по умолчанию пароль для вход в настройки MikroTik на упаковке
Если у вас не получается попасть в настройки с пустым полем “Password”, значит ваш маршрутизатор уже пытались настроить и установили какой – то пароль.
В этом случае единственным вариантом будет сброс роутера на заводские настройки.
Как сбросить пароль на роутере MikroTik?
Для этого необходимо:
- Отключить питание роутера (вытащить вилку из розетки);
- Найти на корпусе роутера кнопку reset и нажать ее;
- Не отпуская reset, включить роутер в розетку (включить питание);
- Как только индикатор ACT заморгает отпустить кнопку Reset.
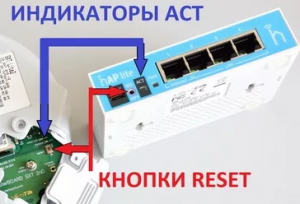
Пример расположения кнопки Reset и индикатора ACT на роутере MikroTik
Важно отпустить кнопку Reset именно тогда, когда ACT будет мигать. Если вы передержите reset нажатой до тех пор, когда ACT перестанет моргать, то роутер перейдет в режим переустановки операционной системы.
Connecting to the Router
There are two types of routers:
- With default configuration
- Without default configuration. When no specific configuration is found, IP address 192.168.88.1/24 is set on ether1 or combo1, or sfp1.
More information about the current default configuration can be found in the Quick Guide document that came with your device. The quick guide document will include information about which ports should be used to connect for the first time and how to plug in your devices.
This document describes how to set up the device from the ground up, so we will ask you to clear away all defaults.
When connecting the first time to the router with the default username admin and no password (for some models, check user password on the sticker), you will be asked to reset or keep the default configuration (even if the default config has only an IP address). Since this article assumes that there is no configuration on the router you should remove it by pressing «r» on the keyboard when prompted or click on the «Remove configuration» button in WinBox.
Router without Default Configuration
If there is no default configuration on the router you have several options, but here we will use one method that suits our needs.
Connect Routers ether1 port to the WAN cable and connect your PC to ether2. Now open WinBox and look for your router in neighbor discovery. See detailed example in Winbox article.
If you see the router in the list, click on MAC address and click Connect.
The simplest way to make sure you have absolutely clean router is to run
/system reset-configuration no-defaults=yes skip-backup=yes
Or from WinBox (Fig. 1-1):

Configuring IP Access
Since MAC connection is not very stable, the first thing we need to do is to set up a router so that IP connectivity is available:
- add bridge interface and bridge ports;
- add an IP address to LAN interface;
- set up a DHCP server.
Set bridge and IP address are quite easy:
/interface bridge add name=local
/interface bridge port add interface=ether2 bridge=local
/ip address add address=192.168.88.1/24 interface=local
If you prefer WinBox/WeBfig as configuration tools:
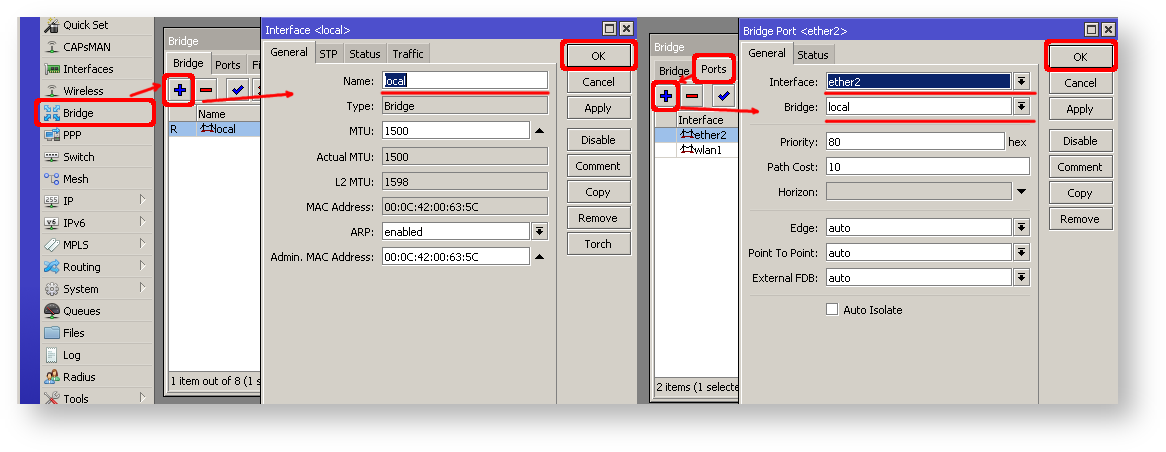
- Open Bridge window, Bridge tab should be selected;
- Click on the + button, a new dialog will open, enter bridge name local and click on OK;
- Select the Ports tab and click on the + button, a new dialog will open;
- select interface ether2 and bridge local form drop-down lists and click on the OK button to apply settings;
- You may close the bridge dialog.
- Open Ip -> Addresses dialog;
- Click on the + button, a new dialog will open;
- Enter IP address 192.168.88.1/24 select interface local from the drop-down list and click on OK button;

The next step is to set up a DHCP server. We will run the setup command for easy and fast configuration:
      [admin@MikroTik] /ip dhcp-server setup [enter]
      Select interface to run DHCP server on

      dhcp server interface: local [enter]
      Select network for DHCP addresses

      dhcp address space: 192.168.88.0/24 [enter]
      Select gateway for given network

      gateway for dhcp network: 192.168.88.1 [enter]
      Select pool of ip addresses given out by DHCP server

      addresses to give out: 192.168.88.2-192.168.88.254 [enter]
      Select DNS servers

      dns servers: 192.168.88.1 [enter]
      Select lease time

      lease time: 10m [enter]
Notice that most of the configuration options are automatically determined and you just simply need to hit the enter key.
The same setup tool is also available in WinBox/WeBfig:
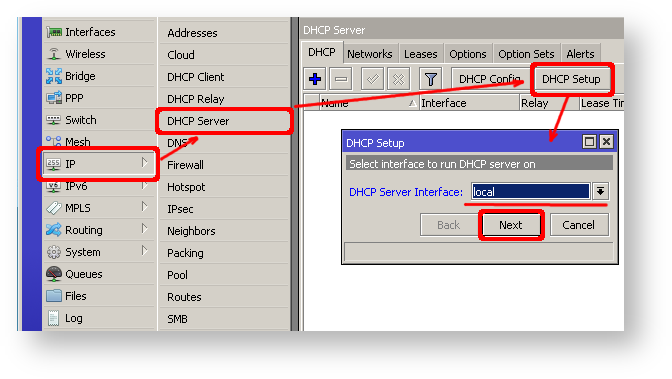
- Open Ip -> DHCP Server window, DHCP tab should be selected;
- Click on the DHCP Setup button, a new dialog will open, enter DHCP Server Interface local and click on Next button;
- Follow the wizard to complete the setup.
Now connected PC should be able to get a dynamic IP address. Close the Winbox and reconnect to the router using IP address (192.168.88.1)
Configuring Internet Connection
The next step is to get internet access to the router. There can be several types of internet connections, but the most common ones are:
- dynamic public IP address;
- static public IP address;
- PPPoE connection.
Dynamic Public IP
Dynamic address configuration is the simplest one. You just need to set up a DHCP client on the public interface. DHCP client will receive information from an internet service provider (ISP) and set up an IP address, DNS, NTP servers, and default route for you.
/ip dhcp-client add disabled=no interface=ether1
After adding the client you should see the assigned address and status should be bound
[admin@MikroTik] /ip dhcp-client> print
Flags: X - disabled, I - invalid
 #   INTERFACE           USE ADD-DEFAULT-ROUTE STATUS        ADDRESS
 0   ether1               yes yes               bound         1.2.3.100/24
Static Public IP
In the case of static address configuration, your ISP gives you parameters, for example:
- IP: 1.2.3.100/24
- Gateway: 1.2.3.1
- DNS: 8.8.8.8
These are three basic parameters that you need to get the internet connection working
To set this in RouterOS we will manually add an IP address, add a default route with a provided gateway, and set up a DNS server
/ip address add address=1.2.3.100/24 interface=ether1
/ip route add gateway=1.2.3.1
/ip dns set servers=8.8.8.8
PPPoE Connection
PPPoE connection also gives you a dynamic IP address and can configure dynamically DNS and default gateway. Typically service provider (ISP) gives you a username and password for the connection
/interface pppoe-client
  add disabled=no interface=ether1 user=me password=123 \
    add-default-route=yes use-peer-dns=yes
Winbox/Webfig actions:
- Open PPP window, Interfaces tab should be selected;
- Click on the + button, and choose PPPoE Client from the dropdown list, new dialog will open;
- Select interface ether1 from the dropdown list and click on the OK button to apply settings.
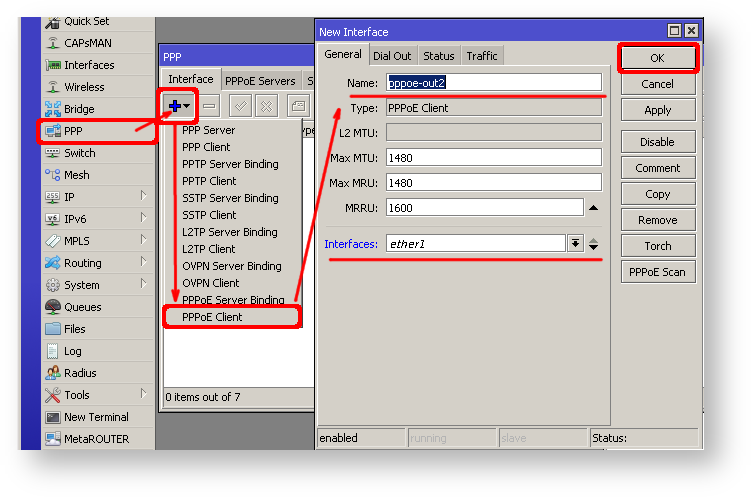
Further in configuration WAN interface is now pppoe-out interface, not ether1.
Verify Connectivity
After successful configuration, you should be able to access the internet from the router.
Verify IP connectivity by pinging known IP address (google DNS server for example)
[admin@MikroTik] > /ping 8.8.8.8
HOST                                     SIZE TTL TIME  STATUS
8.8.8.8                                    56  47 21ms
8.8.8.8                                    56  47 21ms
Verify DNS request
[admin@MikroTik] > /ping www.google.com
HOST                                     SIZE TTL TIME  STATUS
173.194.32.49                              56  55 13ms
173.194.32.49                              56  55 12ms
If everything is set up correctly, ping in both cases should not fail.
In case of failure refer to the Troubleshooting section
Protecting the Router
Now anyone over the world can access our router so it is the best time to protect it from intruders and basic attacks
User Password Access
MikroTik routers require password configuration, we suggest using a password generator tool to create secure and non-repeating passwords. With secure password we mean:
- Minimum 12 characters;
- Include numbers, Symbols, Capital and lower case letters;
- Is not a Dictionary Word or Combination of Dictionary Words;
/user set 0 password="!={Ba3N!40TуX+GvKBzjTLIUcx/,"
Another option to set a password,
We strongly suggest using a second method or Winbox interface to apply a new password for your router, just to keep it safe from other unauthorized access.
[admin@MikroTik] > / password
old password:
new password: ******
retype new password: ******
Make sure you remember the password! If you forget it, there is no recovery. You will need to reinstall the router!
You can also add more users with full or limited router access in /user menu
The best practice is to add a new user with a strong password and disable or remove the default admin user.
/user add name=myname password=mypassword group=full
/user remove admin
Note: login to the router with new credentials to check that the username/password is working.
MAC Connectivity Access
By default mac server runs on all interfaces, so we will disable default all entry and add a local interface to disallow MAC connectivity from the WAN port. MAC Telnet Server feature allows you to apply restrictions to the interface «list».
First, create an interface list:
[admin@MikroTik] > /interface list add name=listBridge
Then, add your previously created bridge named «local» to the interface list:
[admin@MikroTik] > /interface list member add list=listBridge interface=local
Apply newly created «list» (of interfaces) to the MAC server:
[admin@MikroTik] > tool mac-server set allowed-interface-list=listBridge
Do the same for Winbox MAC access
[admin@MikroTik] > tool mac-server mac-winbox set allowed-interface-list=listBridge
Winbox/Webfig actions:
- Open Interfaces → Interface List → Lists window and add a new list by clicking «+»;
- Input the interface list name «listBridge» into the Name field and click OK;
- Go back to the Interfaces → Interface List section and click «+»;
- Select «listBridge» from the dropdown List options and select «local» from the dropdown Interface options and click OK;
- Open Tools -> Mac Server window;
- Click on the «MAC Telnet Server» button, a new dialog will open;
- Select the newly created list «listBridge» from the dropdown list and click on OK button to apply settings.
Do the same in the MAC Winbox Server tab to block Mac Winbox connections from the internet.
Neighbor Discovery
MikroTik Neighbor discovery protocol is used to show and recognize other MikroTik routers in the network. Disable neighbor discovery on public interfaces:
/ip neighbor discovery-settings set discover-interface-list=listBridge
IP Connectivity Access
Besides the fact that the firewall protects your router from unauthorized access from outer networks, it is possible to restrict username access for the specific IP address
/user set 0 allowed-address=x.x.x.x/yy
x.x.x.x/yy — your IP or network subnet that is allowed to access your router.
IP connectivity on the public interface must be limited in the firewall. We will accept only ICMP(ping/traceroute), IP Winbox, and ssh access.
/ip firewall filter
  add chain=input connection-state=established,related action=accept comment="accept established,related";
  add chain=input connection-state=invalid action=drop;
  add chain=input in-interface=ether1 protocol=icmp action=accept comment="allow ICMP";
  add chain=input in-interface=ether1 protocol=tcp port=8291 action=accept comment="allow Winbox";
  add chain=input in-interface=ether1 protocol=tcp port=22 action=accept comment="allow SSH";
  add chain=input in-interface=ether1 action=drop comment="block everything else";
In case if a public interface is a pppoe, then the in-interface should be set to «pppoe-out».
The first two rules accept packets from already established connections, so we assume those are OK to not overload the CPU. The third rule drops any packet which connection tracking thinks is invalid. After that, we set up typical accept rules for specific protocols.
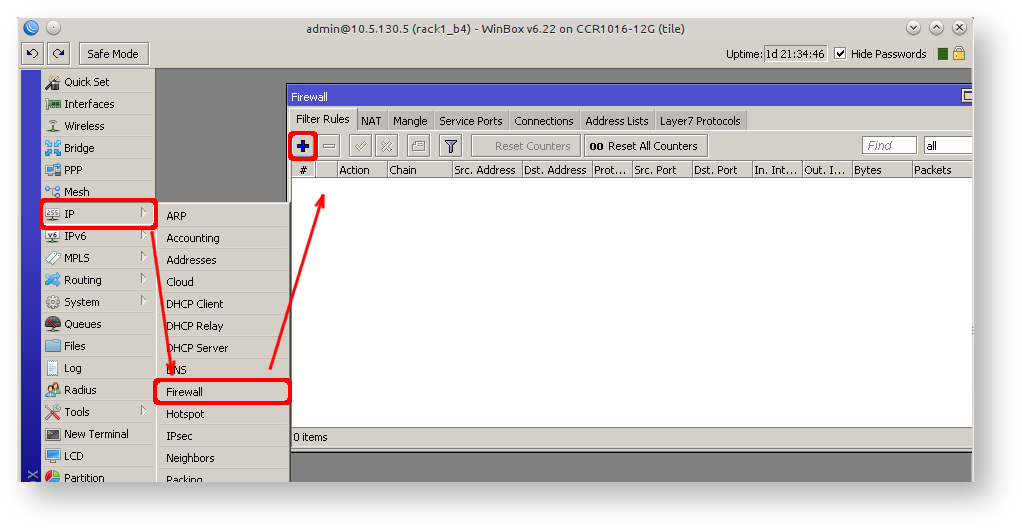
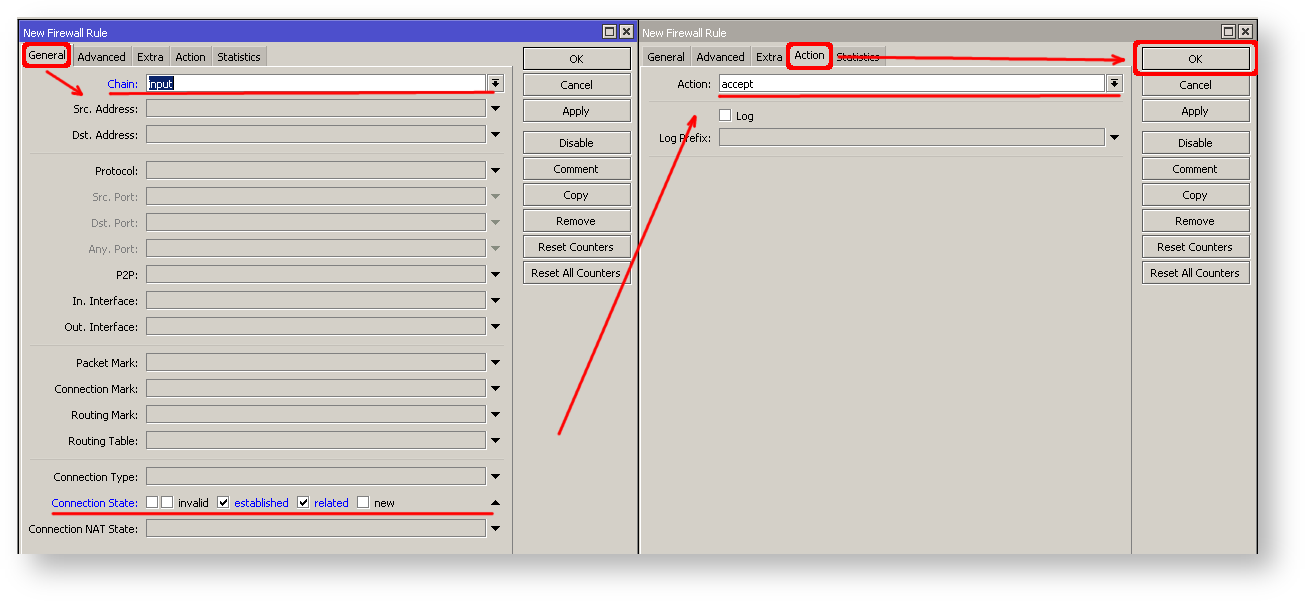
If you are using Winbox/Webfig for configuration, here is an example of how to add an established/related rule:
- Open Ip -> Firewall window, click on Filter rules tab;
- Click on the + button, a new dialog will open;
- Select chain input, click on Connection state, and select checkboxes for established and related;
- Click on the Action tab and make sure action accept is selected;
- Click on the Ok button to apply settings.
To add other rules click on + for each new rule and fill the same parameters as provided in the console example.
Administrative Services
Although the firewall protects the router from the public interface, you may still want to disable RouterOS services.
Most of RouterOS administrative tools are configured at the /ip service menu
Keep only secure ones,
/ip service disable telnet,ftp,www,api
Change default service ports, this will immediately stop most of the random SSH brute force login attempts:
/ip service set ssh port=2200
Additionally, each service can be secured by allowed IP address or address range(the address service will reply to), although more preferred method is to block unwanted access in firewall because the firewall will not even allow to open socket
/ip service set winbox address=192.168.88.0/24
Other Services
A bandwidth server is used to test throughput between two MikroTik routers. Disable it in the production environment.
/tool bandwidth-server set enabled=no
A router might have DNS cache enabled, which decreases resolving time for DNS requests from clients to remote servers. In case DNS cache is not required on your router or another router is used for such purposes, disable it.
/ip dns set allow-remote-requests=no
Some RouterBOARDs have an LCD module for informational purposes, set pin or disable it.
It is good practice to disable all unused interfaces on your router, in order to decrease unauthorized access to your router.
/interface print
/interface set x disabled=yes
Where «X» is a number of the unused interfaces.
RouterOS utilizes stronger crypto for SSH, most newer programs use it, to turn on SSH strong crypto:
/ip ssh set strong-crypto=yes
Following services are disabled by default, nevertheless, it is better to make sure that none of then were enabled accidentally:
- MikroTik caching proxy,
- MikroTik socks proxy,
- MikroTik UPNP service,
- MikroTik dynamic name service or IP cloud,
/ip cloud set ddns-enabled=no update-time=no
At this point, PC is not yet able to access the Internet, because locally used addresses are not routable over the Internet. Remote hosts simply do not know how to correctly reply to your local address.
The solution for this problem is to change the source address for outgoing packets to routers public IP. This can be done with the NAT rule:
/ip firewall nat
  add chain=srcnat out-interface=ether1 action=masquerade
In case if a public interface is a pppoe, then the out-interface should be set to «pppoe-out».
Another benefit of such a setup is that NATed clients behind the router are not directly connected to the Internet, that way additional protection against attacks from outside mostly is not required.
Port Forwarding
Some client devices may need direct access to the internet over specific ports. For example, a client with an IP address 192.168.88.254 must be accessible by Remote desktop protocol (RDP).
After a quick search on Google, we find out that RDP runs on TCP port 3389. Now we can add a destination NAT rule to redirect RDP to the client’s PC.
/ip firewall nat
  add chain=dstnat protocol=tcp port=3389 in-interface=ether1 \
    action=dst-nat to-address=192.168.88.254
If you have set up strict firewall rules then RDP protocol must be allowed in the firewall filter forward chain.
Setting up Wireless
For ease of use bridged wireless setup will be made so that your wired hosts are in the same Ethernet broadcast domain as wireless clients.
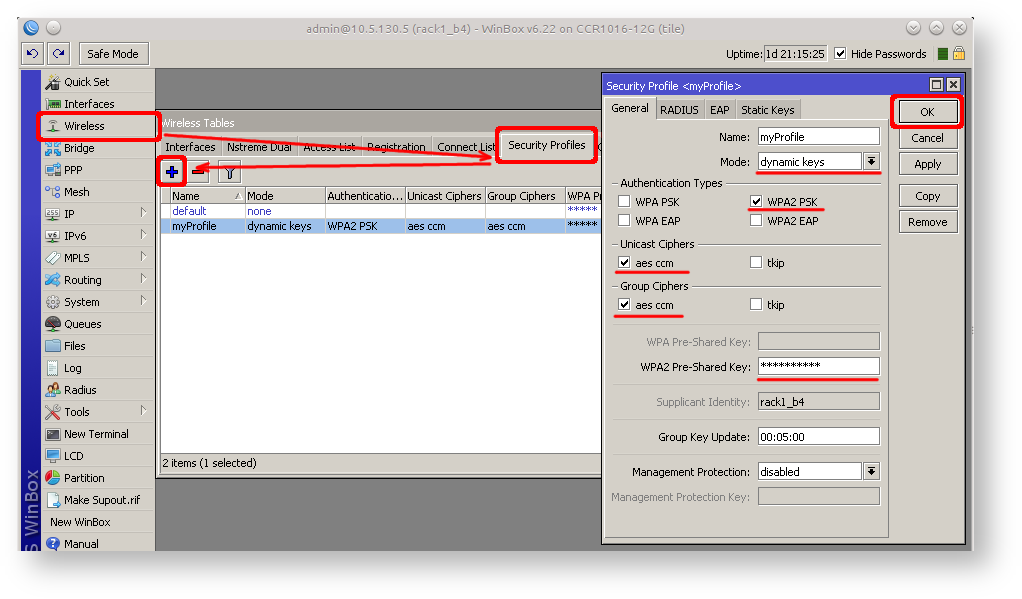
The important part is to make sure that our wireless is protected, so the first step is the security profile.
Security profiles are configured from /interface wireless security-profiles menu in a terminal.
/interface wireless security-profiles
  add name=myProfile authentication-types=wpa2-psk mode=dynamic-keys \
    wpa2-pre-shared-key=1234567890
in Winbox/Webfig click on Wireless to open wireless windows and choose the Security Profile tab.
If there are legacy devices that do not support WPA2 (like Windows XP), you may also want to allow WPA protocol.
WPA and WPA2 pre-shared keys should not be the same.
Now when the security profile is ready we can enable the wireless interface and set the desired parameters
/interface wireless
  enable wlan1;
  set wlan1 band=2ghz-b/g/n channel-width=20/40mhz-Ce distance=indoors \
    mode=ap-bridge ssid=MikroTik-006360 wireless-protocol=802.11 \
    security-profile=myProfile frequency-mode=regulatory-domain \
    set country=latvia antenna-gain=3
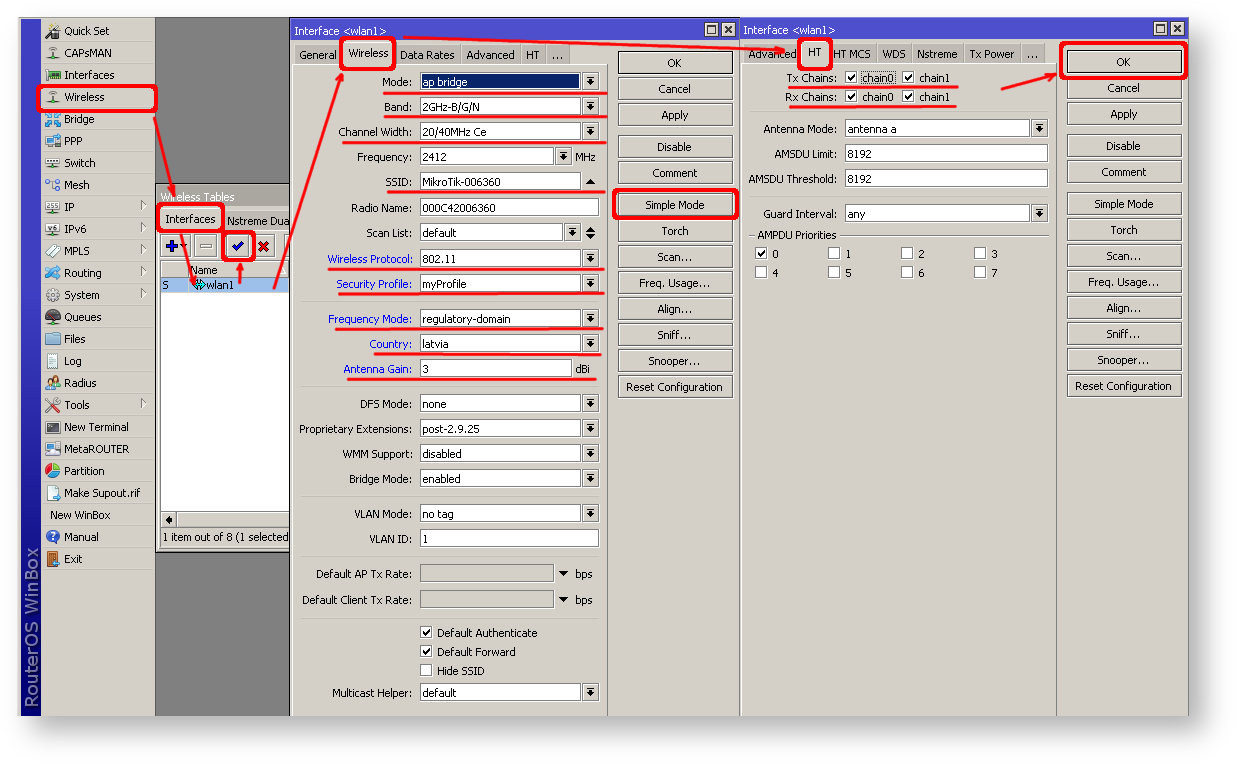
To do the same from Winbox/Webfig:
- Open Wireless window, select wlan1 interface, and click on the enable button;
- Double click on the wireless interface to open the configuration dialog;
- In the configuration dialog click on the Wireless tab and click the Advanced mode button on the right side. When you click on the button additional configuration parameters will appear and the description of the button will change to Simple mode;
- Choose parameters as shown in the screenshot, except for the country settings and SSID. You may want to also choose a different frequency and antenna gain;
- Next, click on the HT tab and make sure both chains are selected;
- Click on the OK button to apply settings.
The last step is to add a wireless interface to a local bridge, otherwise connected clients will not get an IP address:
/interface bridge port
  add interface=wlan1 bridge=local
Now wireless should be able to connect to your access point, get an IP address, and access the internet.
Protecting the Clients
Now it is time to add some protection for clients on our LAN. We will start with a basic set of rules.
/ip firewall filter
  add chain=forward action=fasttrack-connection connection-state=established,related \
    comment="fast-track for established,related";
  add chain=forward action=accept connection-state=established,related \
    comment="accept established,related";
  add chain=forward action=drop connection-state=invalid
  add chain=forward action=drop connection-state=new connection-nat-state=!dstnat \
    in-interface=ether1 comment="drop access to clients behind NAT from WAN"
A ruleset is similar to input chain rules (accept established/related and drop invalid), except the first rule with action=fasttrack-connection. This rule allows established and related connections to bypass the firewall and significantly reduce CPU usage.
Another difference is the last rule which drops all new connection attempts from the WAN port to our LAN network (unless DstNat is used). Without this rule, if an attacker knows or guesses your local subnet, he/she can establish connections directly to local hosts and cause a security threat.
For more detailed examples on how to build firewalls will be discussed in the firewall section, or check directly Building Your First Firewall article.
Blocking Unwanted Websites
Sometimes you may want to block certain websites, for example, deny access to entertainment sites for employees, deny access to porn, and so on. This can be achieved by redirecting HTTP traffic to a proxy server and use an access-list to allow or deny certain websites.
First, we need to add a NAT rule to redirect HTTP to our proxy. We will use RouterOS built-in proxy server running on port 8080.
/ip firewall nat
  add chain=dst-nat protocol=tcp dst-port=80 src-address=192.168.88.0/24 \
    action=redirect to-ports=8080
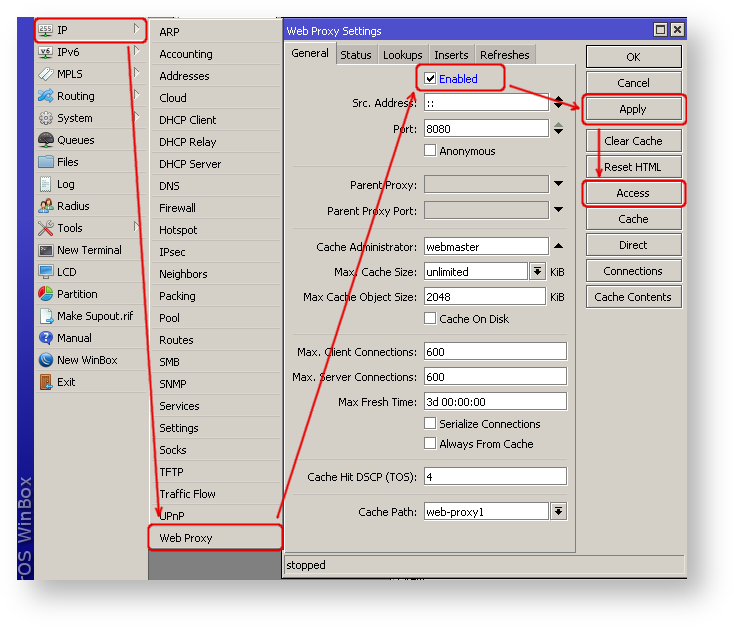
Enable web proxy and drop some websites:
/ip proxy set enabled=yes
/ip proxy access add dst-host=www.facebook.com action=deny
/ip proxy access add dst-host=*.youtube.* action=deny
/ip proxy access add dst-host=:vimeo action=deny
Using Winbox:
- On the left menu navigate to IP -> Web Proxy
- Web proxy settings dialog will appear.
- Check the «Enable» checkbox and click on the «Apply» button
- Then click on the «Access» button to open the «Web Proxy Access» dialog
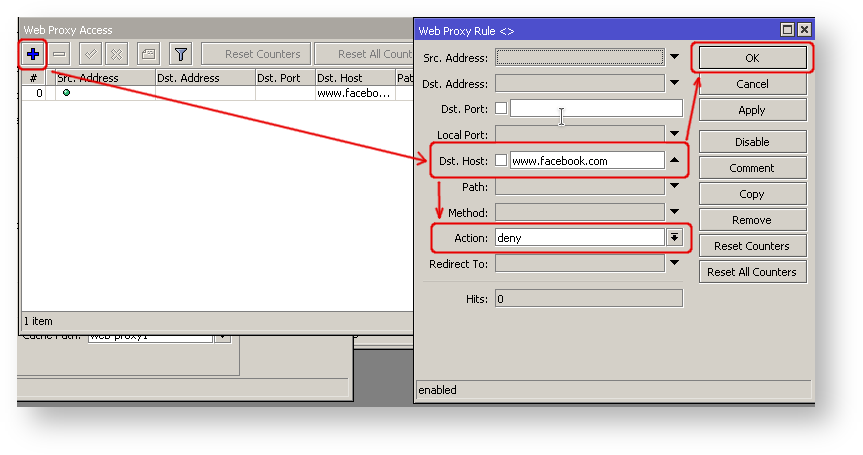
- In the «Web Proxy Access» dialog click on «+» to add a new Web-proxy rule
- Enter Dst hostname that you want to block, in this case, «www.facebook.com», choose the action «deny»
- Then click on the «Ok» button to apply changes.
- Repeat the same to add other rules.
Troubleshooting
RouterOS has built-in various troubleshooting tools, like ping, traceroute, torch, packet sniffer, bandwidth test, etc.
We already used the ping tool in this article to verify internet connectivity.
Troubleshoot if ping fails
The problem with the ping tool is that it says only that destination is unreachable, but no more detailed information is available. Let’s overview the basic mistakes.
You cannot reach www.google.com from your computer which is connected to a MikroTik device:
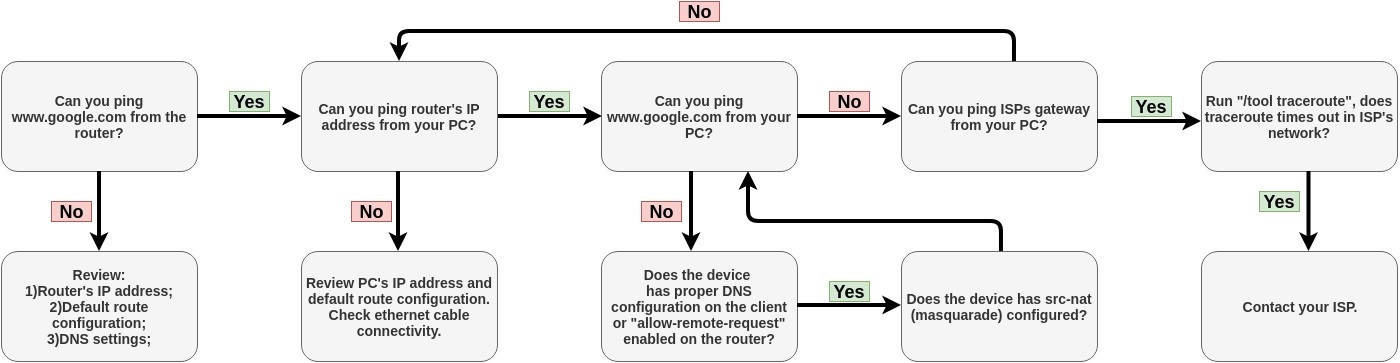
If you are not sure how exactly configure your gateway device, please reach MikroTik’s official consultants for configuration support.
Информация обновлена 3 октября 2023 г.
В большинстве роутеров MikroTik по умолчанию используется имя пользователя admin, пароль - и IP-адрес 192.168.88.1.
Эти учетные данные для MikroTik необходимы, чтобы осуществить вход в веб-интерфейс роутера MikroTik с целью изменения каких-либо настроек.
Поскольку некоторые модели не соответствуют стандартам, вы можете ознакомиться с ними в нижеприведенной таблице.
Под таблицей также приведены инструкции на те случаи, когда вы забыли свой пароль к роутеру MikroTik, необходимо сбросить роутер MikroTik к заводским настройкам по умолчанию или сброс пароля не работает.
Совет: Нажмите ctrl+f (или cmd+f на Mac) для быстрого поиска номера вашей модели.
Список паролей по умолчанию для MikroTik (актуально на Октябрь 2023)
Инструкции и общие вопросы
Забыли пароль к роутеру MikroTik?
Изменили имя пользователя и/или пароль своего роутера MikroTik и забыли их?
Не волнуйтесь: все роутеры MikroTik поставляются с заводским паролем по умолчанию, который можно восстановить, выполнив нижеприведенные инструкции.
Сброс пароля по умолчанию для роутера MikroTik
Если вы решите вернуть роутер MikroTik к заводским настройкам по умолчанию, вам следует выполнить сброс 30-30-30 следующим образом:
- Когда роутер MikroTik включен, нажмите и удерживайте кнопку сброса в течение 30 секунд.
- Удерживая кнопку сброса нажатой, отключите питание роутера и удерживайте ее еще в течение 30 секунд.
- Удерживая кнопку сброса нажатой, снова включите питание устройства и удерживайте ее еще в течение 30 секунд.
Теперь ваш роутер MikroTik должен быть сброшен к заводским настройкам. Воспользуйтесь таблицей, чтобы узнать их (скорее всего это будет admin / - ).
Если сброс к заводским настройкам не помог, ознакомьтесь с Руководством по сбросу настроек для MikroTik 30 30 30 .
Важно: для повышения безопасности вашего роутера после сброса к заводским настройкам не забудьте изменить имя пользователя и пароль по умолчанию, поскольку стандартные пароли можно легко найти в интернете (например, здесь).
Я по-прежнему не могу получить доступ к роутеру MikroTik, используя пароль по умолчанию
Поскольку роутеры MikroTik всегда должны возвращаться к заводским настройкам по умолчанию после сброса, убедитесь, что вы правильно выполнили инструкции по сбросу.
С другой стороны, всегда существует вероятность того, что ваш роутер поврежден и, возможно, требуется его ремонт или замена.