
Domains provide single user log on from any networked computer within the network perimeter. Here’s how to join a Windows 10 client to a domain.
A Domain-based network provides centralized administration of an entire network from a single computer called a server. Domains provide single user log on from any networked computer within the network perimeter. Users can access resources for which they have appropriate permission. While I do not want to go into the complexities of Domain networks, you can find out more by contacting your Network Administrator if you have difficulties connecting to your workplace domain.
To join a Domain, you must first ensure you have the following information and resources:
- A user account on the Domain, this information you can get from your Network Administrator.
- Name of Domain.
- A computer running Windows 10 Pro or Enterprise/Education editions
- Domain Controller must be running Windows Server 2003 (functional level or later).
- I discovered during testing that Windows 10 does not support Windows 2000 Server Domain Controllers.
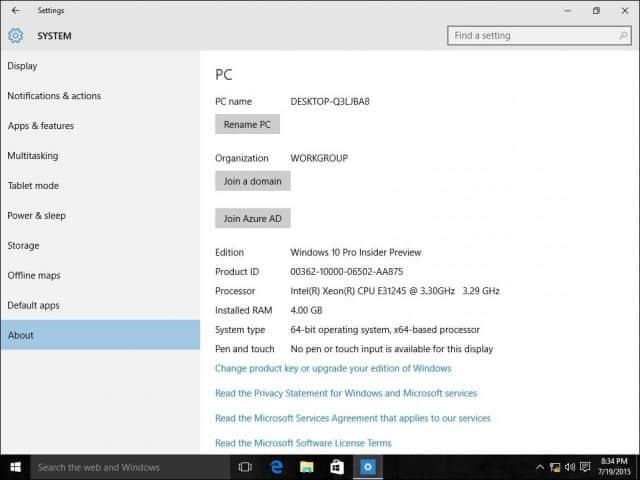
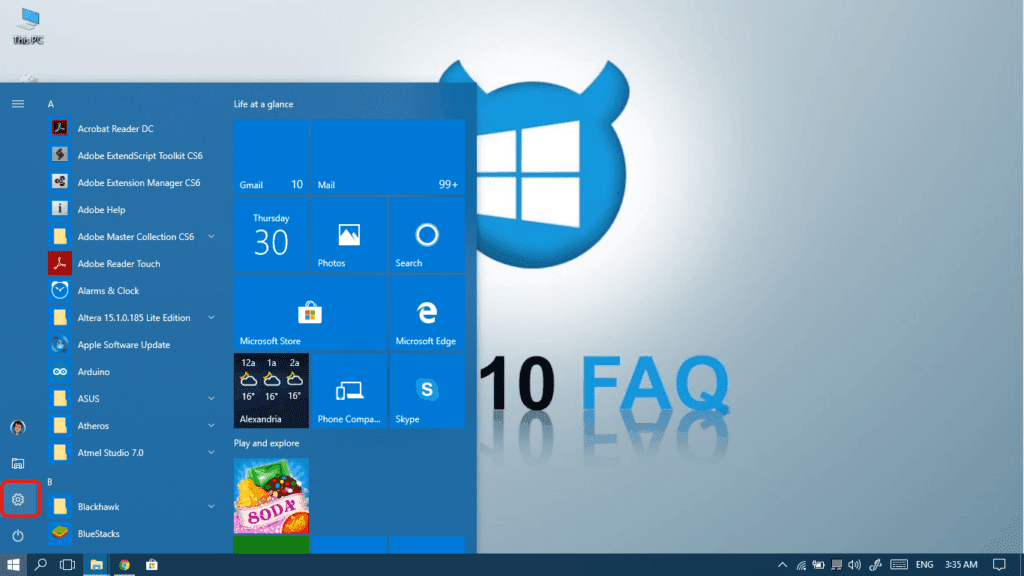
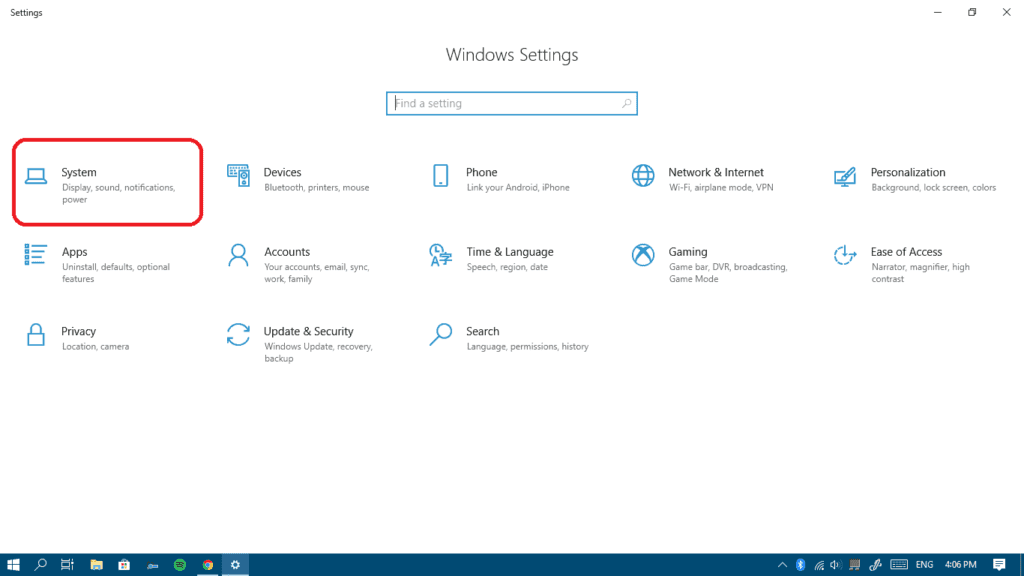
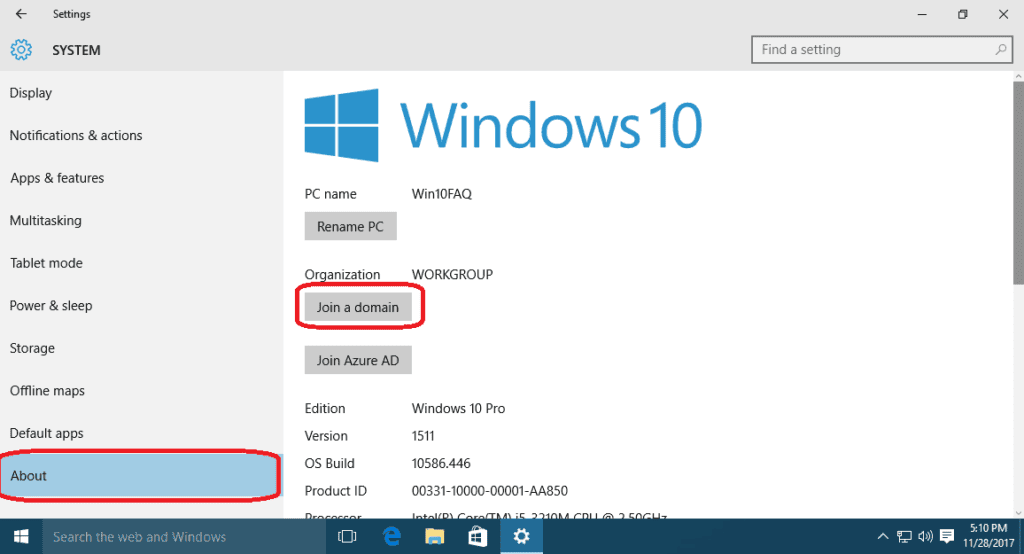
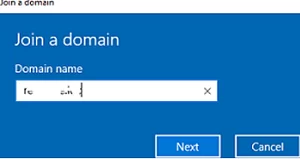
On the Windows 10 PC, go to Settings > System > About, then click Join a domain.
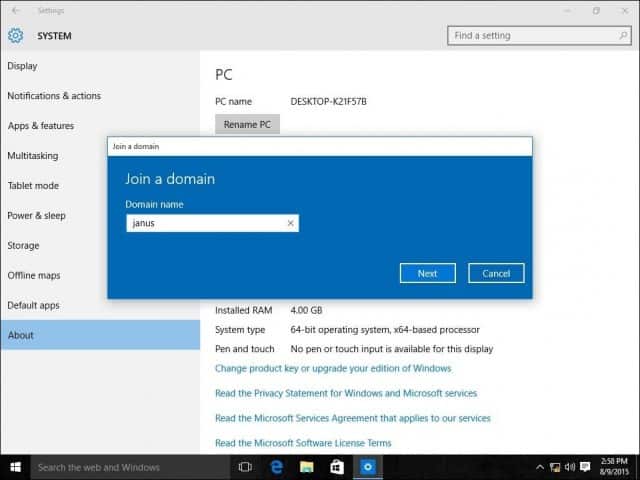
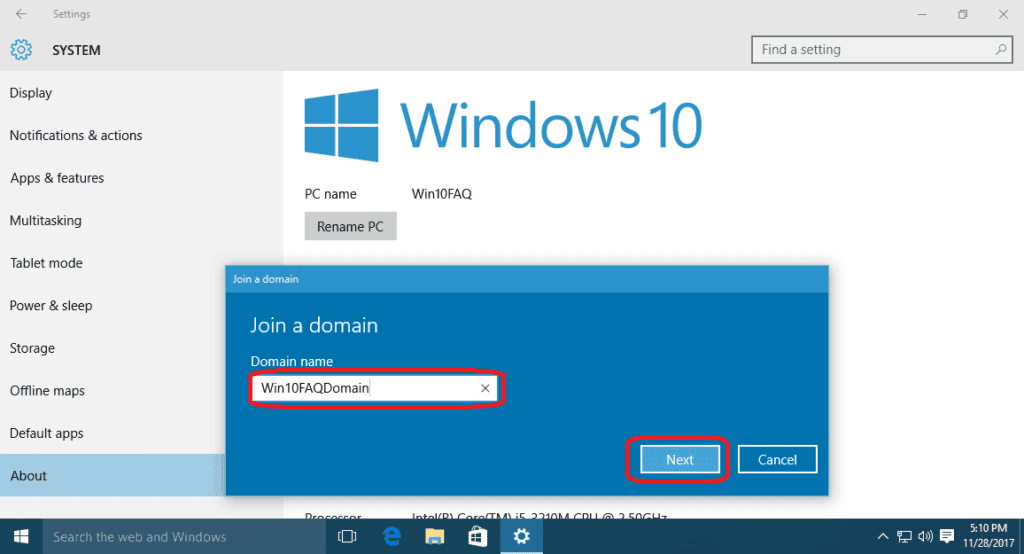
Enter the Domain name and click Next. You should have the correct domain info, but if not, contact your Network Administrator.
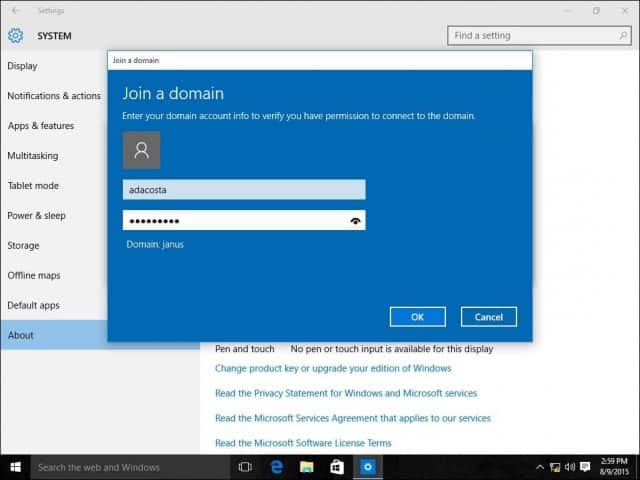
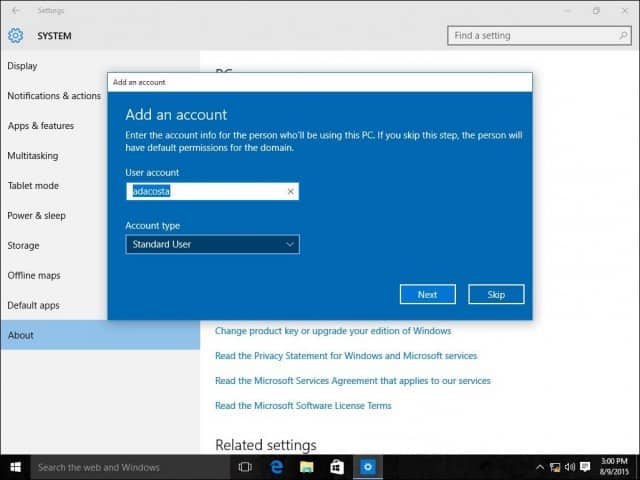
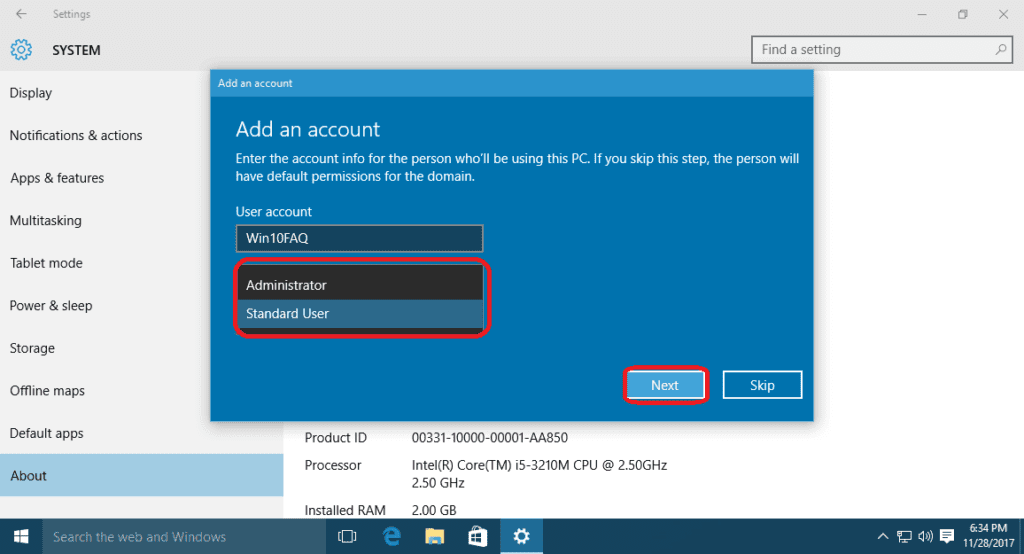
Enter account information that is used to authenticate on the Domain and then click OK.
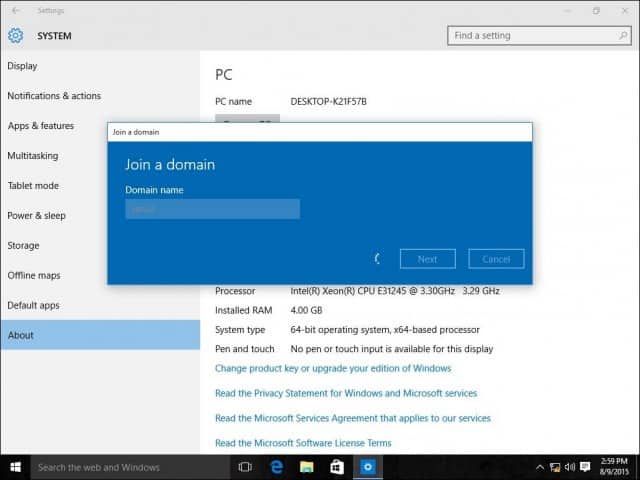
Wait while your computer is authenticated on the Domain.
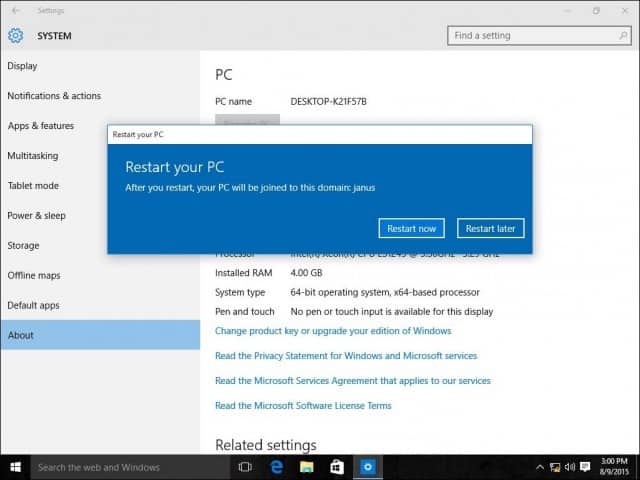
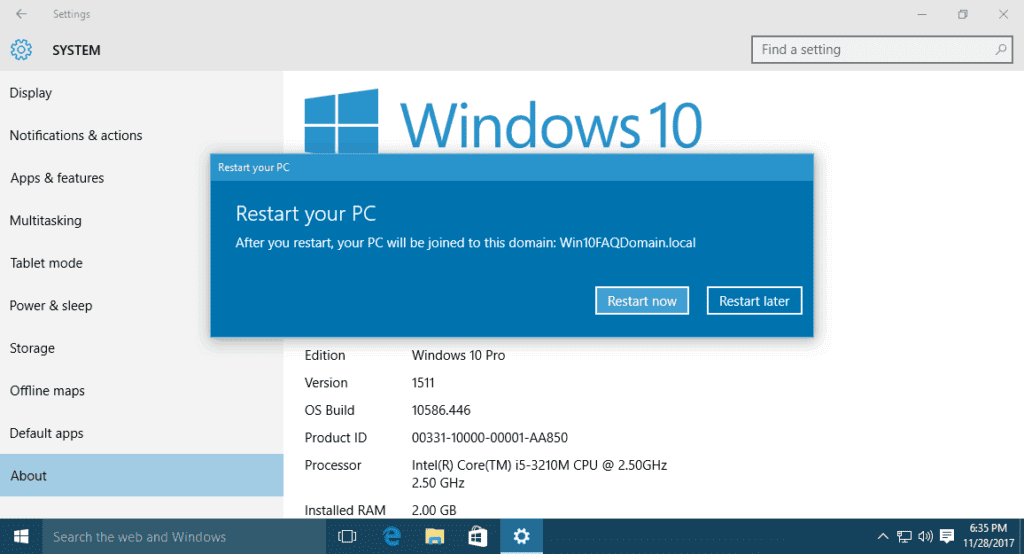
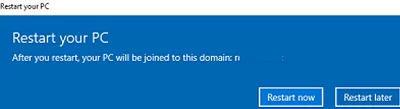
Click Next when you see this screen.
And then, you’ll need to restart to complete the process.
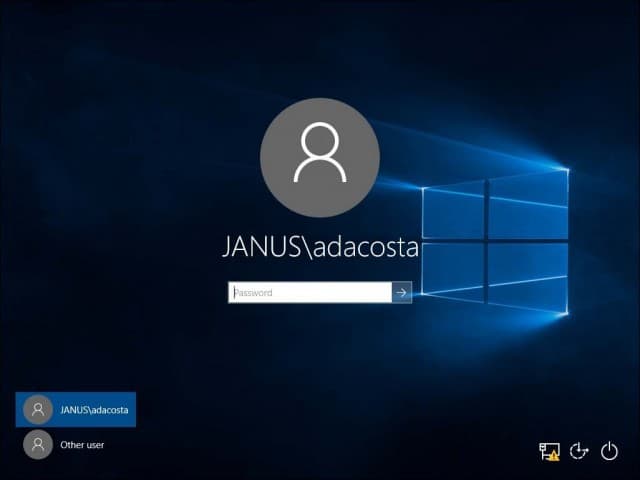
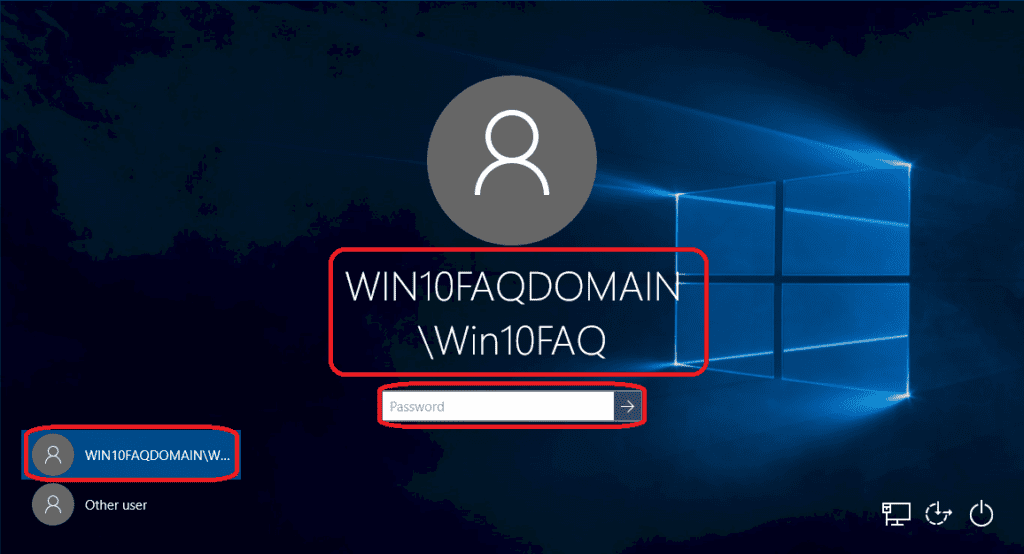
When the sign-in screen appears, you will notice the DOMAIN\User account is displayed. Enter your password, and you will now be logged onto your Domain.
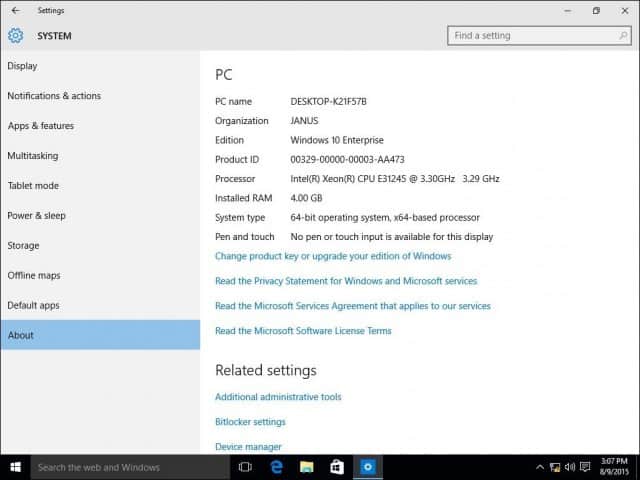
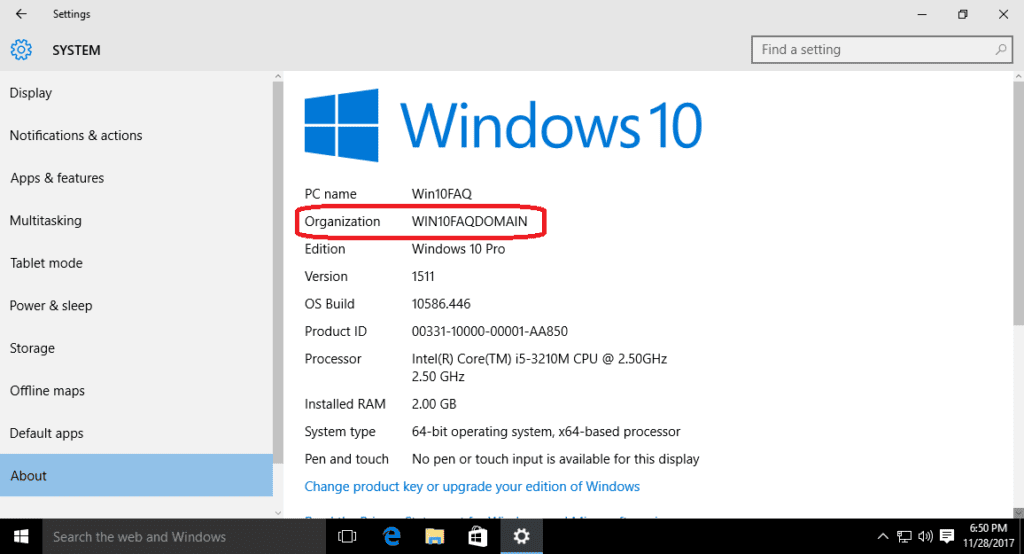
You will notice that once you are connected to the Domain, your About setting no longer lists options presented before. This is because the server centrally manages your computer.
Leaving the Domain or log into your local account
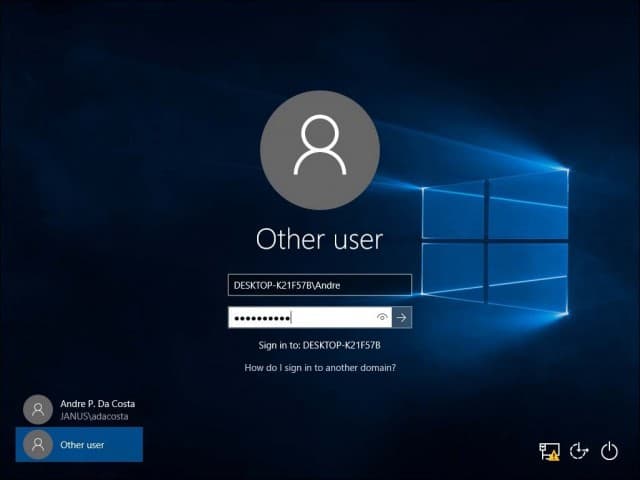
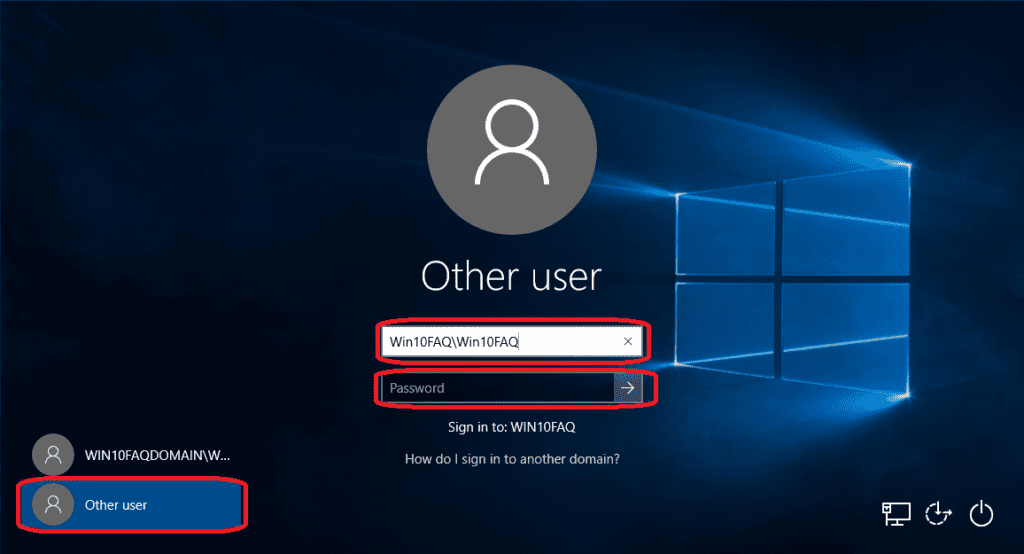
If a need arises where you need to leave the domain or log into your local account, you can easily do so. Log into your local account while your computer is joined to a Domain. Sign out of your machine at the sign-in screen, select “Other” user.
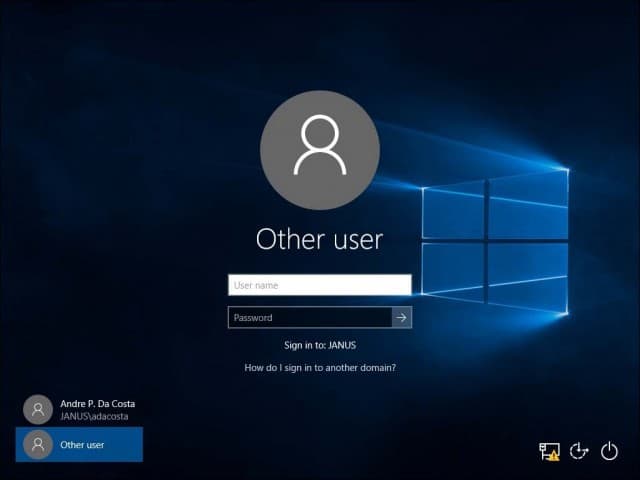
Enter the machine name followed by a backslash and then your local user account, as shown below.
Leave a Domain
To leave the Domain, sign in to your Local Account, click Start > Settings > System > About and then select Disconnect from the organization.

Please note, when you join a domain, you might be required to change your password on the first login.
Running Windows 11 instead? You can join a Windows 11 PC to a domain, too.
![]()
So, you want to learn how to join your Windows 10 PC to a domain?
Great! You’ve come to the right place then.
First, let’s start off with some definition.
What’s a domain?
A domain is a kind of network that allows you to login to your user from any computer on the network. The network has to contain at least one computer running Windows Server and the rest of them running Pro or Enterprise Windows versions. This can be very useful in many cases:
- A small office with no fixed computer for each employee.
- Even if they have fixed computers, you can watch their work and give different permissions to each of them from your server.
- A big company with a number of computer less than number of employees.
- Universities and schools.
So, you can simply sit on any computer, login with your username and password, submit your work and logout again.
And now, all you need to join the domain is:
- The domain name
- A username
- A password
- The server’s IP (That’s to make the connection more reliable)
Your domain administrator is the one responsible of creating a user on the server computer and give you all the previous information.
We’ll begin by setting the server’s IP as your Primary DNS. Follow us:
Got all that you need? Let’s join the domain then.
- Open Settings from your start menu.

- Select System.
- Select About from the left pane and click Join a domain.

- Enter the domain name you’ve got from your domain administrator and click Next.
- Enter the Username and Password you were provided and then click Ok.
- Select your user type: Administrator or Standard user (it’s standard user by default, if you don’t know what to pick just leave it as it is).
- Restart your computer now or later, it’s up to you, but it won’t take effect until you perform a restart.
- The first thing you’ll notice once your restart is complete is that your lock screen will look a little different. Enter your domain user’s password.
- In some cases, you’ll be asked to change your password immediately, it’s a feature your server administrator might have set. Otherwise, you may ask your server administrator to change your password when you need to.
- You will have to be a little patient and wait while everything gets ready, it’s like you’re on a new computer, but every change you’ll make from now on will be saved to this domain user and accessible from any other computer on the domain using your credentials.
- Now you’re logged in, go to your Settings -> System -> About, you’ll see that your computer is registered on the domain now.


How to login back to your local computer account?
Now, if you want to reach your initial local files and programs stored on the computer away from the domain, here’s how you can do it:
- Boot your computer or sign out to your lock screen.
- Select Other user from the bottom-left corner.
- Enter your machine name followed by a backslash then your local user. Enter your local machine password if you had one and press Enter. Here, my computer name was Win10FAQ and the default user on it was Win10FAQ so the resultant is Win10FAQ\Win10FAQ. If yours is Desktop-xxxxxx and your user is Joe for example so you’ll enter Desktop-xxxxxx\Joe
How to disconnect your computer from the domain?
Suggested Read: Windows 10 File Explorer
Frequently Asked Questions
Can you join a domain with Windows 10 Home Edition or not?
Sadly, no, Windows 10 Home Edition doesn’t allow you to join a domain, and its networking functions are severely limited. If you want to join a domain, you’ll have to upgrade to the Pro Edition or to one of the several Enterprise Editions out there.
Can an unactivated version of Windows join a domain?
Unoffiically, you can add an unactivated version of Windows to a domain. However, it’s something that Microsoft advises against, as it can possibly put the domain at risk. If you do want to add a non-activated machine to a domain, you should do so when the evaluation period has not expired yet.
How do I join a domain in Windows 10 using CMD (Command Prompt)?
Assuming you’re on a Windows 10 workgroup computer that can access an existing domain controller, you must perform the following actions:
1. Open up cmd.exe as administrator.
2. Run netdom join providing the following parameters.
Netdom requires a computer name right after the join parameter. If you’re using this command on other computers, replace the value with the variable %computername% to always represent the local computer.
It should look like this: netdom.exe join %computername% /domain:DomainName /UserD:DomainName\UserName /PasswordD:Password
3. Now restart the computer and the computer will be joined to the domain.
How do I join an offline domain?
This is a little more complicated than anyone would like to admit. Fortunately, Microsoft has been kind enough to create a page dedicated to this topic entirely. Click here to see it.
Final Thoughts and Conclusion
Joining a domain in Windows 10 and 11 isn’t at all difficult. With this guide, you should be able to join any domain of your choice as long as you have the latest version of either Windows 10 or Windows 11. Just follow the simple steps that we provided.
Hopefully, this article was able to help you join your Windows 10 or 11 PC to a domain! If you know of another way, please do share them with us in the comments below. Let other people read what you can suggest.
Do you got any other technical questions about you Windows 10 PC? Try visiting our website. You could find a topic that might help you about your concerns. Or you might have a direct question like How To Clear The Printer Queue In Windows 10.
В некоторых случаях требуется на компьютере, который включен в домен Active Directory войти не под доменной, а под локальной учетной записью. Большинству администраторов этот трюк знаком, но пользователи зачастую о нем не знают.
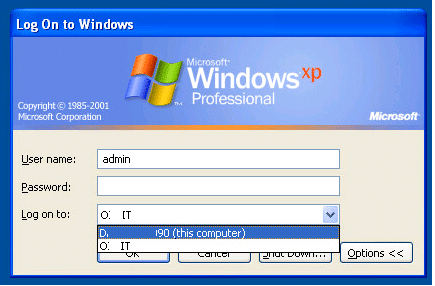
Немного предыстории. После того, как компьютер добавлен в домен Active Directory, вы можете войти в него под учетной записью домена или локального пользователя (если конечно локальная учетная запись не отключена и вход под ней не заблокирован через групповые политики). В Windows XP и Windows Server 2003 на экране входа в систему имелся раскрывающийся список «Вход в систему», в котором можно было выбрать в какой домен вы хотите войти, либо, если нужно зайти под локальной учетной, для этого нужно выбрать пункт
|
«Этот компьютер» — @Computer_Name (this computer) |
.
Однако в последующих версиях Windows это раскрывающийся список из интерфейса входа в систему убрали. Вместо этого списка на экране входа в систему, появилась небольшая кнопка «Как я могу войти в другой домен» (How to log on to another domain). Если вы нажмете эту кнопку, появится следующий совет.
|
Type domain name\domain user name to sign in to another domain.<br>Type РKZ—ТZI01K1\local user name to sign in to this PC only (not a domain |
)
|
Чтобы войти в другой домен, введите имя_домена\имя_пользователя_домена<br>Чтобы войти только на этот компьютер (не в домен), введите РKZ—ТZI01K1\локальное_имя_пользователя |
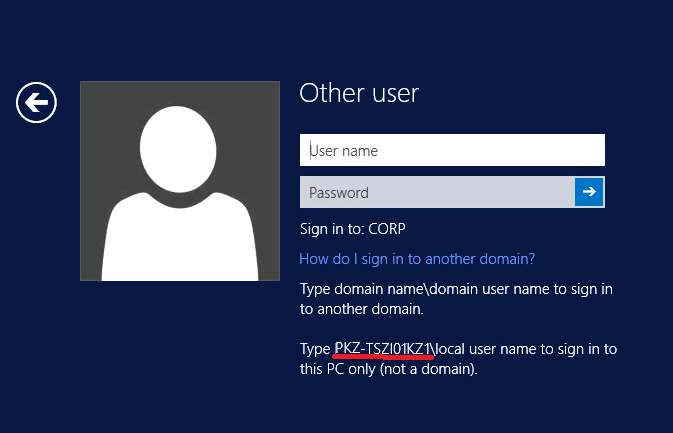
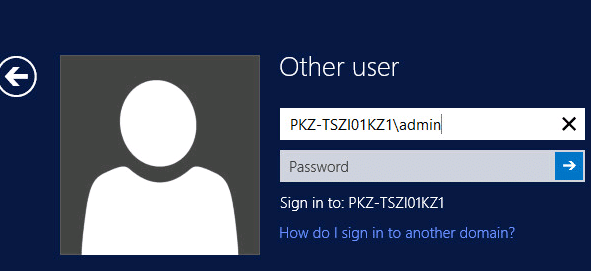
Как вы видите, в тексте сообщения присутствует имя данного компьютера (в нашем примере РKZ-ТZI01K1). И если вы хотите войти под локальной учетной записью, в поле с именем пользователя нужно указать имя локального пользователя в следующем формате РKZ-ТZI01K1\Administrator. Естественно, если имя компьютера довольно длинное и не несет смысловой нагрузки, его набор с клавиатуры может стать настоящим испытанием.
К счастью, есть простой способ, который позволит вам войти в систему под локальной учеткой без указания имени компьютера.
Секрет в том, что Windows использует символ точки (.) в качестве псевдонима для локального компьютера. Поэтому, если в поле с именем пользователя поставить
, то система будет считать, что вы хотите авторизоваться под локальной учеткой. Соответственно изменится поле Sign in to, вместо имени домена там уже будет указано имя данного компьютера.
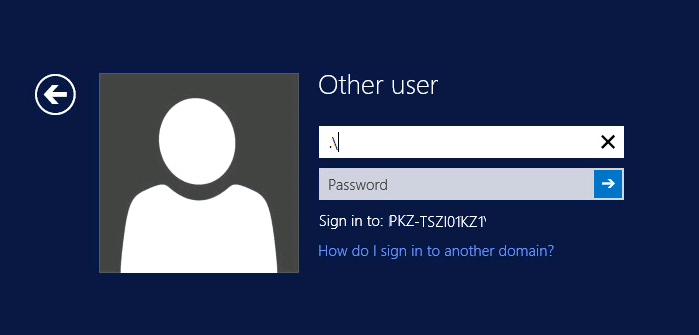
Теперь после
осталось набрать имя локальной учетной записи и пароль.
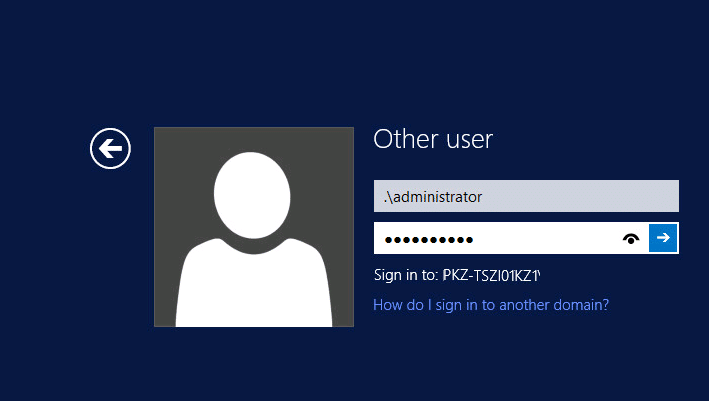
Этот небольшой трюк может использоваться для входа на доменный компьютер под локальной учетной записью во всех поддерживаемых версиях Windows, начиная с Windows Vista и заканчивая Windows 10 и Windows Server 2016.
Совет. Аналогичным образом можно авторизоваться на удаленном компьютере в рабочей группе под локальной учетной запись при доступе к общим файлам по протоколу SMB.
If you got Windows 11 machines running in your setup, you can join Windows 11 computer to domain. You can perform the Windows 11 domain join process using multiple methods.
When you set up an Active Directory Domain Controller server in your network, you can then join one or more Windows 11 machines to the Active Directory domain.
The Windows 11 AD domain join process adds your computer to active directory domain allowing the computers to access the resources within the domain.
Active Directory stores information about objects on the network and makes this information easy for administrators and users to find and use. Active Directory uses a structured data store as the basis for a logical, hierarchical organization of directory information.
If you are new to the concept of Active Directory, I recommend reading Overview of Active Directory Domain Services.
Using AD Domain Controller, you can centrally manage domain-joined Windows 11 PCs. You can create, configure and apply group policies to push various user and computer settings to a domain-joined Windows 11 computers.
In addition, you can also create and manage user accounts accessing the domain-joined Windows 11 computers and other resources of the Active Directory domain.
The steps used for Windows 11 domain join process is slightly different from the one that we used with Windows 10. However, it is not difficult and if you are a Windows admin, it shouldn’t make much difference.
You can join a Windows 11 computer to AD domain using multiple methods.
- Manually join Windows 11 computer to Active Directory Domain.
- Using PowerShell, add the Windows 11 computer to the domain.
- Join Windows 11 computer to domain using command line.
Table of Contents
Windows 11 AD domain Join Prerequisites
If you are planning to add or join Windows 11 computer to AD domain, here are the basic requirements.
- In order for a computer or server to join a domain, there must be communication with a DNS server that can locate at least one Domain Controller (DC).
- To find if a Windows 11 computer can communicate with the Domain Controller, either ping the DC using the FQDN or IP address.
- For joining Windows 11 computer to AD domain, you need to log in to the computer with local administrator account.
- Know your domain name before joining the Windows 11 computer to domain.
- You need an account to join the existing Windows 11 computer to a domain. Learn how to delegate permissions to allow a user to join a computer to an AD Domain.
Method 1 – Manually Join Windows 11 Computer to Domain
The domain join process of Windows 11 is simple. To join a Windows 11 computer to AD domain, you need to log in to the machine as local administrator. You must use domain administrator credentials while joining the machine to the domain.
On your Windows 11 computer, click Start and select Settings.

Now select System and then select About.

The About screen shows the Windows 11 device specifications. Look for Related links and select Domain or Workgroup.

You should now see the System Properties window. To rename the computer or change it’s domain or workgroup, click Change.

In this step, ensure your computer name is correct. You may change your computer name if required. Select Domain and enter the domain name to which your Windows 11 computer should join. Click OK.

To join your Windows 11 computer to domain, you must enter the credentials to add the machine to domain. Enter the username in the format domain\username and specify the password. Click OK.

If the supplied credentials are correct, the Windows 11 computer will be added to AD domain. Welcome to the domainname domain confirms that Windows 11 computer has been successfully joined to the domain. Click OK.

After you join any Windows device to AD domain, you must restart the computer. Click Restart Now.

After the reboot, do not log in with your local account. Instead, use your domain credentials to log in. Enter your domain credentials and press enter key.
Congratulations you are now logged in to Windows 11 with your domain credentials. The computer is now part of Active Directory domain.

Active directory admins can see the newly joined computers by opening the Active Directory users and computers console and selecting the computers OU.

Method 2 – Add Windows 11 Computer to Domain using PowerShell
You can join a Windows 11 workgroup computer to AD domain using PowerShell.
- Launch the PowerShell as administrator on Windows 11 computer.
- Run the following command to add or join Windows 11 computer to domain.
- Add-Computer -DomainName “Domain Name” -Credential “Domain Username”
- Press enter, and you will be prompted to enter your domain user password.
- Restart the computer to complete the domain join process.
Method 3 – Join Windows 11 to a Domain using Command line
You can use the command prompt to join Windows 11 computers to an Active directory domain.
- On Windows 11 computer, click Start, and launch the CMD as administrator.
- Run the following command to add Windows 11 to Domain.
- netdom join %computername% /domain:yourADdomain /UserD:username /PasswordD:specifypassword
- Restart the Windows 11 computer to complete the domain join.

Prajwal Desai is a Microsoft MVP in Intune and SCCM. He writes articles on SCCM, Intune, Windows 365, Azure, Windows Server, Windows 11, WordPress and other topics, with the goal of providing people with useful information.
This article describes how to join a Windows 10/11 or Windows Server 2022/2019/2016 computer to an on-premises Active Directory domain.
Contents:
- Before You Join Windows to an AD Domain
- Add Windows to the Domain Using System Properties GUI
- Joining Windows to a Domain via the Settings App
- How to Join a Computer to a Domain with PowerShell?
- Pre-staging a Computer Accounts in Active Directory
Before You Join Windows to an AD Domain
First, let’s look at the basic requirements and preparations that you need to make on your computer before you join an Active Directory domain:
- Only Pro, Education, Pro for Workstations, and Enterprise editions of Windows 10/11 can be joined to a domain. Note that the Active Directory domain is not supported in Home Editions;
- Your device needs to be connected to a local network and able to access at least one AD domain controller. We assume that your computer already has an IP address from the local subnet configured, with the IP addresses of the nearest domain controllers specified in the computer’s DNS settings (you can configure the network adapter settings manually or get them from the DHCP server);
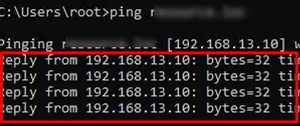
- Make sure that your computer can resolve the domain name and can access the domain controller:
ping woshub.loc
- The computer’s local time must be within five minutes of the domain controller’s time. The proper time synchronization is required for Kerberos authentication;
- Set the name of your computer (
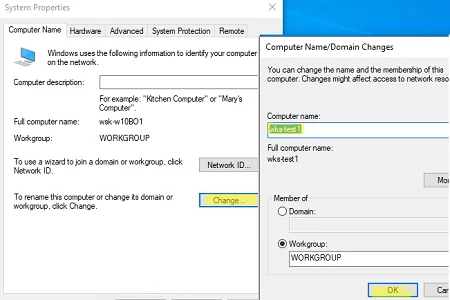
hostname) to be used in a domain. By default, Windows generates a computer name during installation. However, it’s best to change it to something more meaningful. You can change the computer name using the classic Control Panelsysdm.cpl. Click Change, enter a new computer name, and press OK. As you can see, the computer is now a member of the default WORKGROUP);
You can also use the PowerShell command to change the computer name:
Rename-Computer -NewName "wks-tst1"After you change the hostname, you must restart Windows.

Add Windows to the Domain Using System Properties GUI
You can add your computer to the domain using the classic Control Panel in Windows:
- Run
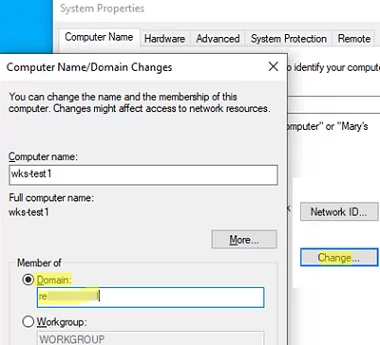
sysdm.cpland click Change; - Switch the Member of option to Domain and specify your domain’s name;
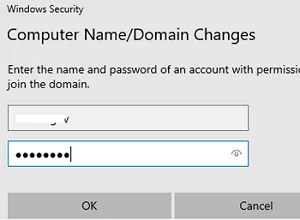
- You will be prompted to enter the name and password of a user with delegated administrative AD permissions to join computers to the domain. This may be a regular AD user (by default, any domain user can join up to 10 devices) or a privileged domain administrator account;
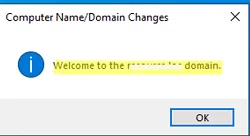
- The next thing you should see is the message Welcome to the woshub.loc domain;
- Restart your computer.
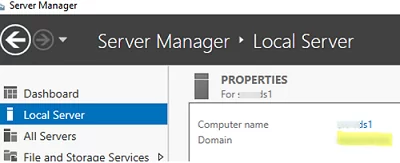
To join a Windows Server 2022/2019/2019 computer to an AD domain, you must open the System Properties dialog box from the Server Manager -> Local Server -> Domain.
After the computer restarts, the domain Group Policies will be applied to your computer, and you will be able to sign in using your domain user account.
Joining Windows to a Domain via the Settings App
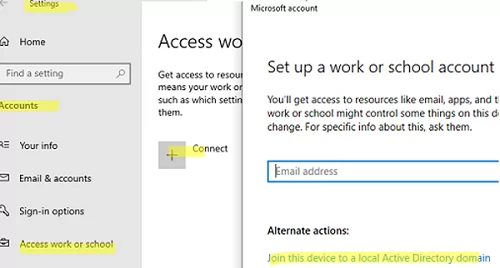
Newer versions of Windows 10 and Windows 11 let you join a computer to an AD domain from the Settings app panel.
- Go to Settings -> Accounts -> Access work or school -> and click Connect (for a quick jump to this Settings section, use the following URI shortcut command:
ms-settings:workplace); - Click the link below Alternate actions: Join this device to a local Active Directory domain;
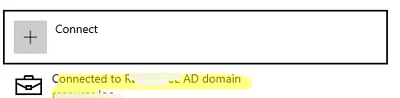
If your computer has already been added to the domain, you will see a notification, e.g. “Connected to WOSHUB AD domain“.
- Enter the domain name;
- Then specify a domain user credential;
- Skip the next step of adding the user to the Administrators group (you can add a user to the local Admins using GPO);
- You need to restart Windows to complete joining the domain.
How to Join a Computer to a Domain with PowerShell?
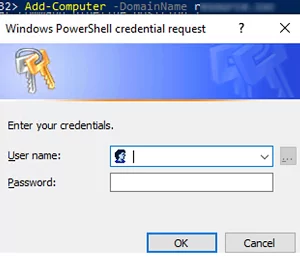
To join computers to an Active Directory domain, you can use the Add-Computer Powershell cmdlet. You can use this command to join a domain with a new hostname and immediately move the computer’s account to a specific OU.
For the simplest case, adding to a domain requires one command only:
Add-Computer -DomainName woshub.loc
Then enter your username and password in the pop-up window.
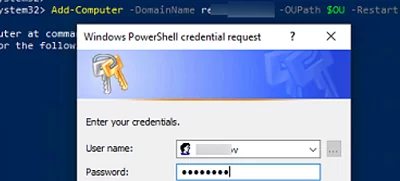
As mentioned earlier, you can immediately move your computer to a desired OU. In the -OUPath parameter, specify the target OU name in the distinguished name (DN) format:
$OU ="OU=Computers,OU=Munich,DC=woshub,DC=loc"
 Add-Computer -DomainName woshub.loc -OUPath $OU -Restart
The -Restart option means that you want to restart Windows immediately after completing the Add-Computer command.
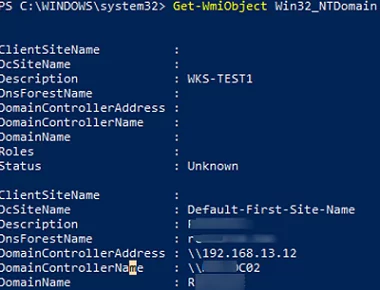
Once the system has been restarted, you can verify that your computer is now a member of the Windows domain by running the command
Get-WmiObject Win32_NTDomain
This command returns the domain name, AD site name, IP address, and domain controller name used to log on (Logon server).
You can also get your domain name with the command:
systeminfo | findstr /B "Domain"

You can also add a remote computer to the domain. To do this, you must specify the computer name in the -ComputerName parameter:
Add-Computer -ComputerName wks-mn14 -DomainName woshub.loc -Credential woshub\Administrator -LocalCredential wks-mn14\Admin -Restart –Force
Note that the Add-Computer command is missing from the built-in Microsoft.PowerShell.Management module in the new versions of PowerShell Core 6.x and 7.x.
Add-Computer: The term 'Add-Computer' is not recognized as a name of a cmdlet, function, script file, or executable program.
Check the spelling of the name, or if a path was included, verify that the path is correct and try again.
Suggestion [4,General]: The most similar commands are: Add-Computer, Stop-Computer, Get-ADComputer, New-ADComputer, Set-ADComputer, Add-Content, Rename-Computer, Add-Member.
Therefore, use powershell.exe instead of pwsh.exe to add a computer to the domain in this case.
You can also use the netdom.exe tool to join Windows to a domain. However, it requires the installation of the RSAT administration package on the client’s computer and is now very rarely used.
netdom join %computername% /domain:woshub.loc /UserD:woshub\admin /PasswordD:paSS321
In order to remove a computer from an Active Directory domain and return it to a workgroup, run the following PowerShell command
Remove-Computer
After you leave the domain, you will need to know the password of the local Administrator account to log onto this computer. Do you wish to continue?
[Y] Yes [N] No [S] Suspend [?] Help (default is "Y"): y

Pre-staging a Computer Accounts in Active Directory
By default, when you join new computers to a domain, they are placed in the built-in Computers container in the domain root. To manually move a computer account to a different OU (Organizational Unit), you can either drag and drop it or use the Move menu item.
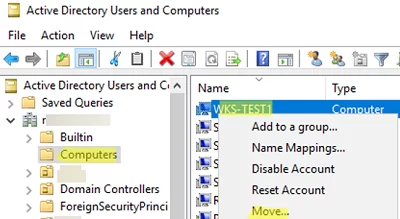
Ad administrator can pre-stage a computer account in Active Directory via the Active Directory Users and Computers dsa.msc snap-in (New -> Computer) or with the New-ADComputer cmdlet from the ActiveDirectory PowerShell module:
New-ADComputer -Name "wks-mn14" -SamAccountName "wks-mn14" -Path "OU=Computers,OU=Munich,DC=woshub,DC=loc"
When you manually create a computer account, make sure that the name you specify matches the hostname of the computer you are adding to the AD domain.
We recommend that you first perform an AD search for computers with the same name. If this name is already in use and you want to assign it to another computer, a solution would be to reset it. Right-click on the computer in AD and select Reset Account.
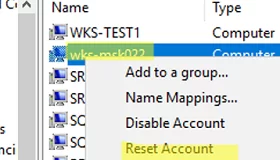
One more way to reset a computer account in AD is to use PowerShell
Get-ADComputer -Identity "computername" | % {dsmod computer $_.distinguishedName -reset}
This resets the domain computer password used to establish a trust relationship with AD.