A Complete Guide to Managing Users and Groups in Windows Server 2019
The robust operating system Windows Server 2019 is capable of efficiently managing users and groups. Any organisation must manage users and groups in Windows Server 2019 because it improves security and resource management.
This guide will cover effective user and group management in Windows Server 2019.
Establishing Users and Groups
Creating new users and groups is the first step in managing users and groups in Windows Server 2019.
Follow these steps to create a new user:
- Launch the «Local Users and Groups» section of the Server Manager console.
- From the context menu, click «Users» and choose «New User.»
- Type the user’s name, full name, description, and password in the «New User» dialogue box.
- To create a new user, click «Create.»
The steps below should be followed to create a new group:
- Launch the «Local Users and Groups» section of the Server Manager console.
- From the context menu, click «Groups,» then choose «New Group.»
- Enter the group name, description, and group type in the «New Group» dialogue box.
- To create the new group, click «Create.»
Taking care of Users and Groups
The next step is to manage new users and groups efficiently after they have been created.
Various tools are available in Windows Server 2019 to manage users and groups.
These tools consist of:
- Active Directory Users and Computers: This application is used for Active Directory user and group management.
- Local Users and Groups: On a local computer, users and groups are managed using this tool.
- PowerShell: PowerShell is an effective scripting language that can be used to manage users and groups.
Active Directory Users and Computers User Management
Follow these steps to manage users with Active Directory Users and Computers:
- Launch the console for Active Directory Users and Computers.
- Locate the container labelled «Users.»
- Double-click the user whose account you wish to manage.
- You can change a number of attributes, including the user’s name, description, password, and group membership, in the user’s properties dialogue box.
- To save the changes, click «OK.»
Using Active Directory Users and Computers for Group Management
The steps listed below can be used to manage groups with Active Directory Users and Computers:
- Launch the console for Active Directory Users and Computers.
- Select the «Groups» container from the list.
- Double-click the group that needs management.
- You can change a number of attributes, including the group’s name, description, membership, and scope, in the group’s properties dialogue box.
- To save the changes, click «OK.»
Using PowerShell for User and Group Management
An effective command-line interface for managing users and groups is offered by PowerShell.
Follow these steps to manage users and groups using PowerShell:
- Launch the PowerShell console.
- Use the «Get-ADUser» and «Set-ADUser» cmdlets to manage users.
- Use the «Get-ADGroup» and «Set-ADGroup» cmdlets to manage groups.
- Use the appropriate parameters to change different user and group attributes.
Managing Permissions for Users and Groups
Enhancing security and resource management requires managing user and group permissions.
Various tools are available in Windows Server 2019 to manage user and group permissions.
These tools consist of:
- File Explorer: File Explorer can be used to control folder and file permissions.
- Security Configuration Wizard: You can set up security settings on servers and applications using the Security Configuration Wizard.
- Group Policy: Group Policy allows users and groups to have their security settings customised.
File Explorer’s User and Group Permissions Management
2. Select «Security» from the tabs.
3. To change the permissions, click the «Edit» button.
4. You can edit the permissions for users and groups in the «Permissions for [file or folder]» dialogue box by adding or removing them.
5. To save the changes, click «OK.»
Utilizing Group Policy to Manage User and Group Permissions
The steps listed below can be used to manage user and group permissions using Group Policy:
- Launch the console for Group Policy Management.
- Make changes to an existing Group Policy Object (GPO) or create a new one.
- Select «Computer Configuration> Policies> Windows Settings> Security Settings> Local Policies> User Rights Assignment.»
- Double-click the user right that needs to be changed.
- You have the option to add or remove users and groups in the user right properties dialogue box.
- Press «OK» to save the modifications.
Conclusion
In conclusion, optimising security and resource management in an organisation requires managing users and groups in Windows Server 2019.
In order to effectively manage users, groups, and resources, Windows Server 2019 offers a variety of features and tools.
Using tools like Active Directory Users and Computers, Local Users and Groups, and PowerShell, we covered how to create and manage users and groups in Windows Server 2019 in this guide.
We also covered the use of tools like File Explorer, Security Configuration Wizard, and Group Policy for managing user and group permissions.
You can effectively manage users and groups in Windows Server 2019 and improve resource management and security in your company by following the instructions provided in this guide.
FAQs
- How do I define Windows Server 2019?
The robust operating system Windows Server 2019 is made for servers, and it offers many features and tools for efficiently managing users, groups, and resources.
- In Windows Server 2019, what role does managing users and groups play?
Enhancing security and resource management in an organisation requires managing users and groups in Windows Server 2019.
It aids in maintaining data integrity and limiting access to resources.
- What tools are available in Windows Server 2019 for managing users and groups?
Active Directory Users and Computers, Local Users and Groups, PowerShell, and other tools are available in Windows Server 2019 to manage users and groups.
- In Windows Server 2019, how do I manage user and group permissions?
In Windows Server 2019, tools like File Explorer, the Security Configuration Wizard, and Group Policy can be used to manage user and group permissions.
- What advantages does Windows Server 2019’s management of user and group permissions offer?
In Windows Server 2019, managing user and group permissions improves resource management and security within an organisation. It aids in regulating resource access, preserving data integrity, and preventing unauthorised access.
Even if you are leveraging Active Directory, you still need to understand how local users and groups work. Local users and groups provide a key role not only for maintenance but also for central administration.
In this section, you will see how to manage local users and groups on both Windows Server 2008 R2 full server installations and Server Core installations. You will also learn the default local users/groups and the default settings on these servers and how those settings impact your infrastructure.
1. Learn Default Local Users and Groups
Whether you are working with a Windows Server 2008 R2 full installation or with Server Core, managing local groups offers some great similarities. Starting with the default installations, both systems have the same default users and groups installed.
On your Windows Server 2008 R2 server, by default you have two user accounts that are created, Administrator and Guest.
-
Administrator is the default built-in account for administering the local machine. The Administrator account is by default the only account that is enabled.
-
Guest is the default built-in account for guest access to the system; however, the account is disabled by default.
Table 1 describes several other groups installed by default that you need to know.
| Group | Definition and Usage |
|---|---|
| Administrators | This group has unrestricted access to the local computer. This account is the main account to accomplish any task on a server. By default, the Administrator account is the only member of this group. |
| Backup Operators | This group, as the name suggests, is designed for the backup and restoration of files on the server. |
| Certificate Service DCOM Access | This group is allowed to connect to certificate authorities for enrollment in your preferred Public Key Infrastructure. |
| Cryptographic Operators | This group is allowed and authorized to perform cryptography operations on your server. These settings include the crypto settings in the IPsec policy of the Windows Firewall, among other settings. |
| Distributed COM Users | This group can activate and launch DCOM objects on the server. DCOM objects are used for the communications of the applications. |
| Event Log Readers | This group can work with and read the local event logs on the server. |
| Guests | Users of this group by default have the same access as the Users group, except for the Guest account, which is further restricted. By default, the only account in this group is the disabled Guest account. |
| IIS_IUSRS | This is the default group account for use with Internet Information Services. |
| Network Configuration Operators | Users in this group have some administrative privileges over managing the configuration of networking features on the server. |
| Performance Log Users | This group allows its users to schedule the logging of performance counters, enable trace providers, and collect event traces for the local server. The tasks can be performed locally or remotely. |
| Performance Monitor Users | This group can access the local performance counter data either locally or through remote administration. |
| Power Users | This group has limited administrative capabilities on the system and is primarily included for backward compatibility with previous operating systems. |
| Print Operators | These users can work with and administer printers on the local server system. |
| Remote Desktop Users | Users in this group are given the right to log on remotely to the server. |
| Replicator | This group is designed for file replication. |
| Users | Have limited administrative access to the system to prevent members from inadvertently making changes that can cause system-wide changes; however, users in this group can run and access most applications. |
Placing user accounts in these local groups will grant those users access to the proper permissions and responsibilities for the groups. The basic concept behind using groups allows you to assign permissions just once to the group, thus granting permissions to all the members in the group. This offers an easy way for you to delegate administration for your server. For example, if you want to have a user perform a daily backup of your server, you would simply need to add them to the Backup Operators group, and they would be granted the necessary rights to perform backup and restore operations.
2. Administer Local Users and Groups
Managing local user groups on your server is just a matter of loading the correct snap-in for the Microsoft Management Console (MMC). You can manage either a Windows Server 2008 R2 full server installation or a Server Core installation. However, if you want to manage the local users and groups on your Server Core installation with the MMC you will need to do that remotely. There are system commands allowing you to manage Server Core locally, and you will see those commands later in this section. To access the local user groups, you can go to the Control Panel to manage the accounts, or you may prefer a more thorough look at the users. You will see the local users and group management tools for both a full server and Server Core installation in the following steps.
-
Select Start => Run, type in MMC, and hit Enter. This loads a blank MMC, as shown in Figure 1.
Figure 1. Blank MMC

-
To perform work in any blank MMC, you need to load the appropriate snap-in. To load snap-ins, select File => Add/Remove Snap-In. This will load the Add Or Remove Snap-Ins dialog box, as pictured in Figure 2.
Figure 2. Adding snap-ins

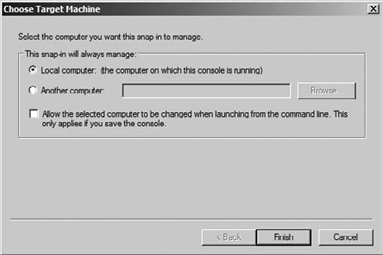
To manage your local users and groups, select the Local Users And Groups snap-in, and click the Add button. This will open the Choose Target Machine dialog box, as pictured in Figure 3.
Figure 3. Target machine

In the Choose Target Machine dialog box, you can either select the local computer to manage the users on the machine you’re running the console from or select the Another Computer radio button and enter either the IP address or the name of the computer you want to manage. This option will allow you to manage the local users and groups on a remote server such as Server Core, if you have the appropriate permissions. After you make your selection, click Finish to return to the Add Or Remove Snap-Ins dialog box.
-
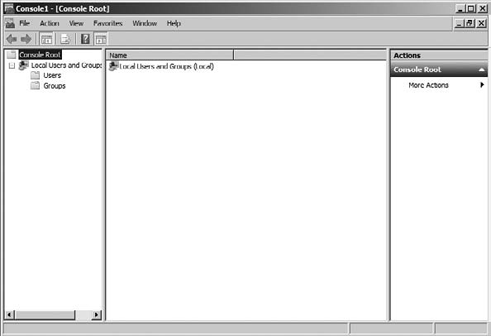
In the Add Or Remove Snap-Ins dialog box, click OK to load the snap-in into your MMC. Figure 4 shows a local users and group MMC.
Figure 4. Managing local users and groups
After you have loaded your snap-ins into the MMC, you can save your customized MMC for future use. To do so, select File => Save.


After you have loaded the MMC to manage local users and groups, you can easily work with your users and groups. Creating user IDs and groups, changing passwords, or other properties can all be easily done with the interface.
2.1. Create a Local User Account
When you create a local user account, you are granting the account access to the local server, which is a straightforward process:
-
Inside the Local Users And Group MMC you created in the previous procedure, right-click the Users container.
-
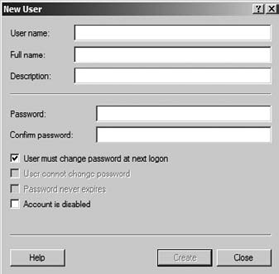
Select New User, which will display the New User dialog box, as shown in Figure 5.
Figure 5. New User dialog box

-
Type in the username, full name, and optional description, as well as the password. The password by default must follow the password complexity requirements listed in the “Default Password Requirements” sidebar. Additionally, you can mark the account disabled, if you know the account will not be in use for a period of time. You also have the following options regarding the setting of the initial password:
User Must Change Password At Next Log On This is the default setting, and you should consider keeping this check box enabled when you create a new user account. The only time you should clear this check box is when the account you are creating will be a service account for an application. This setting allows the user to set their own personal password when they log on to the system the first time. All you need to do as the administrator is set an initial temporary password for the user. You may want to know the passwords for your users in case a user leaves the company or is on vacation. In reality, as long as you know the administrator password, you have the administrative right to reset a password temporarily and gain access into an account. Although it is good to have this ability, you should exercise it with caution and only when the situation warrants it.
User Cannot Change Password By default this setting is grayed out and becomes available only when you clear the User Must Change Password At Next Log On setting, mentioned previously. This allows you to make sure the password for the account does not change. This is also good for service accounts for applications loaded on your server. This setting will also bypass any local machine password account policy.
Password Never Expires By default this setting is also grayed out, and like the previous setting, it becomes available only when the User Must Change Password At Next Log On setting is cleared. The setting, as the name implies, locks down the password. This setting also will bypass any local machine password policy.
-
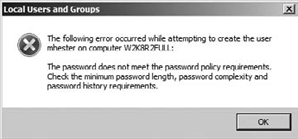
After you fill out the form, click Create to create the account. If your password does not meet the requirements for password complexity, you will see the screen in Figure 6.
Figure 6. Password complexity error

The default password requirements are the same for both the local user accounts and the Active Directory user accounts . The default password requirements for a Windows Server 2008 R2 server are as follows:
-
Cannot contain the user’s account name or parts of the user’s full name that exceed two consecutive characters
-
Be at least six characters in length
-
Contain characters from three of the following four categories:
English uppercase characters (A–Z)
English lowercase characters (a–z)
Base 10 digits (0–9)
Nonalphabetic characters (for example !, $, #, %)
-
-
If you have no more local users accounts to create, click Close. Otherwise, repeat steps 3 and 4 to continue creating local accounts on your server.
2.2. Create a Local Group
After you create your user accounts, you will most likely want to create groups to add your users to. Groups, as you may know, are used to grant permissions generally to files or printers located on the Windows Server 2008 R2 server. These local groups can be granted rights and permissions to resources only on the local server.
-
Inside the Local Users And Group MMC you created earlier, right-click the Groups container.
-
Select New Group, which will display the New Group dialog box, as shown in Figure 7.
Figure 7. New Group dialog box

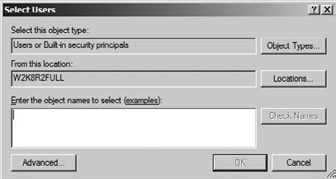
Type in the name of the new group and a description. To immediately add members to your group, click the Add button on the bottom of the screen. Clicking the Add button displays the Select Users dialog box, as shown in Figure 8.
Figure 8. Select Users dialog box

To add users, you can type them in the name text box. To verify the spelling of the user names you want to add, you can click Check Names, which will verify the usernames for you. You can also click the Advanced button, which will expand the dialog box to allow you to list all the user accounts on the system. This dialog box has a Find Now option to allow you to quickly list all the users on the system. If you click Find Now, you will see a screen similar to Figure 9.
Figure 9. Advanced selecting users

-
After you click Find Now, you will see a list of users on the system, as well as local system user and group accounts. Select the user or users you want to be in your group. To select multiple users, you can hold down the Ctrl key on your keyboard as you click. You could also select a list by using the Shift key. If you click the top item of your list, hold down the Shift key, and click the bottom item on your list, you will select all the items between and including your top and bottom selection.

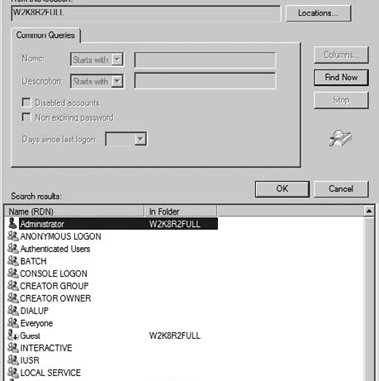
You may notice that when you were adding users to your group, you had several more accounts and groups that you did not create. These are special identity groups, and you cannot control the membership of these groups. Your users become members of these groups through the course of actions they perform on your servers or how they access servers, and the membership to these groups is temporary and normally changes given how the user will work with the system. System groups can be used to help set permissions based on how users access or interact with the server. Table 2 lists a few of the system groups you may encounter as you work with the server.
The groups that are not listed in the table are normally system groups that are reserved for the use of the operating system and the services running on your Windows Server 2008 R2 server. In particular, you need to pay particular attention to one special identity account, the SYSTEM account. The SYSTEM account represents the Windows Server 2008 R2 operating system. As you work with the files on your server and the user rights, you may encounter the SYSTEM account, and you should leave this account unmodified. If you make a change to the permissions or rights the SYSTEM account has on your server, you could disable your server, which may result in you reinstalling the operating system.
| Group | Description |
|---|---|
| Anonymous Logon | This represents when users do not use credentials of any kind to access the system. |
| Authenticated Users | Users are automatically placed in this group when they log on locally to the system. Leveraging this group is a great way to make sure only valid, authenticated users can gain access to resources. |
| Creator Owner | When a user creates an object, such as a file or folder on the server, they are put into the Creator Owner group for that object. Generally speaking, the Creator Owner user has full control over the created object. |
| Dialup | When a user connects to the server via a dial-up connection, such as a remote VPN connection, they are added to this group. |
| Everyone | Everyone is a member of this group regardless of how they access the server. |
| Interactive | When a user logs on locally to the server (in other words, they have physical access to the server and log on physically to the server), users are placed in this group. |
| Network | When a user accesses the server remotely over a network connection, such as when they connect to a file share, they are placed in this group. |
| Remote Interactive Logon | When a user accesses the server remotely with a local user ID and actively logs on to the system to perform remote tasks, such as when an administrator logs on to the server from a remote workstation, they are placed in this group. |
| System | This is the account group ID used by the Windows Server 2008 R2 operating system. |
| Terminal Server User | When users access the server using Remote Desktop Services, they are automatically placed in this group. |
2.3. Manage Your Local Users and Groups
After you are done creating your user groups, you will need to maintain and manage the local accounts. To begin managing local groups, just right-click the user or group you want to manage. They share some common tasks. When you right-click a user or group, you can delete, rename, open help, or view the unique properties for the object.
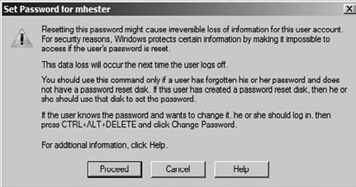
When you right-click the user, you can set a new password for the user. The only time you should set the password for an existing account is if the user has forgotten or lost their password. The user will lose access to information such as encrypted files, stored Internet passwords (although the user can re-create these with the new password), email that is encrypted with the user’s public key, and any stored certificates (again, new certificates can be issued to still grant access). The potential risk here is losing data in files that have been encrypted by the encrypted file system (EFS). If you have backed up your recovery keys, you will be able to retrieve data; however, if there is no backup of the keys, you will not be able to access the data.
When you right-click a user account, you are presented with the choice to set the password. When you select the option, you will receive the warning shown in Figure 10.
Figure 10. Setting password warning
When you right-click a group and select Add to Group, this will start the same process to add members to your group as used in the previous procedure when you created the group. Additionally, when you select the Properties option after you right-click the group, it will take you to the properties where you can use the Add Members dialog box.
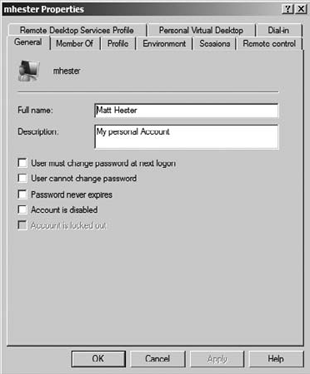
When you select the Properties option after you right-click will open a list of properties you can modify for the user account, as shown in Figure 11.
The properties listed here are part documentation and part account configuration. The tabs listed will allow you to configure basic username and description information and group membership. You can also set properties for Remote Desktop Services connections information, user profiles, home directory information, and dial-in access.
Figure 11. User properties
2.4. Manage Local Users and Groups on Server Core
You may not have access to a Microsoft Management Console, and you may need to make modifications to the local users and groups on a Windows Server 2008 R2 Server Core installation. You can add, delete, and modify all aspects of the local users and groups via the command prompt. Specifically, the net command is how you work with users and groups directly on Server Core. The net command will also work on a Windows Server 2008 R2 full server installation.
The net command has many functions, including starting and stopping services and configuring the IP address on the server. You will see in this section how to use the net command to work with your local users and groups.
All of the net commands begin with net; for users this will be followed by user, and for local groups this will be followed by localgroup. For example, to see the current list of your local users or local groups, type one of the following straightforward commands and hit Enter:
-
Use net user to see a list of local users.
-
Use net localgroup to see a list of local groups.
To add a user or local group to the system, the commands follow similar syntax. The commands will include the /add switch. For example, to add a user named Harold with a password of pass@word1 to your system, you would use the following command:
net user Harold pass@word1 /add
To add a local group called Writers to your server, you would use the following command:
net localgroup Writers /add
To add Harold to the Writers group, you would use the following command:
net localgroup Writers Harold /add
To see the current membership for the local group Writers, you would use the following command:
net localgroup Writers
The commands are straightforward and fairly intuitive to learn how to use. To learn more about commands to work with local users and groups, just use the built-in help system:
-
Use net user /? to learn more about working with users.
-
Use net localgroup /? to learn more about working with local groups.
Adding a user in Windows Server 2012 R2 is a straightforward process. To accomplish this task, you will need to use the Local Users and Groups tool available in the Computer Management console. Here are the steps you should take:
1. Open the Server Manager window by clicking on Start > Administrative Tools > Server Manager.
2. In the navigation pane on the left-hand side of the window, expand System Tools, then select Local Users and Groups from its drop-down menu.
3. Select Users from within Local Users and Groups, which will open up a list of current users for that particular system or domain group (depending on your server’s configuration).
4. Right click anywhere within this user list area, then select New User from the context menu that appears; alternatively, if you are using an older version of Windows Server such as 2003 or 2008R2 select Create new account instead when prompted with that same context menu option..
5. Enter a username and password for your new user in their respective fields before selecting Create to add them to your server’s local security database; also make sure to confirm any other settings/options related to creating this new account while still within this same window interface too!
Once these steps have been completed successfully, your newly created user should now be able to log into their own account on your Windows Server 2012 R2 machine without any further issues or problems occurring afterwards!
How to Create local admin account in Windows Server 2012 R2?
Creating a local administrator account in Windows Server 2012 R2 is a simple process that can be done in just a few steps. To get started, open the Server Manager window and select the “Tools” menu. Then, choose the “Computer Management” option from the drop-down list. In the Computer Management window, expand “Local Users and Groups” and click on “Users” to view all existing users on your machine. Next, right-click anywhere inside this list of users and select New -> User from the context menu. A new dialog box will appear where you can enter information about your new user such as username, password, full name etcetera. Once finished entering details for your user account, click Create followed by Close to save changes and finish creating an administrator account in Windows Server 2012 R2.
How do I Create a user account on my server?
Creating a user account on your server is an important step in establishing secure access to the system. To create a user account, you will need to complete the following steps:
1. Log into your server using administrator credentials.
2. Navigate to the Users section of your server’s control panel and select «Create New User«.
3. Input the desired username and password for the new user account, ensuring that both are strong and secure passwords.
4. Select any additional options or permissions you wish to assign to this user (e.g., file sharing, administrator privileges).
5. Confirm all information is correct before finalizing creation of the new user account by clicking “Save” or similar option in order for changes to take effect immediately.
6. Test out logging into your server with this newly created username and password combination in order verify successful setup of the new user account on your server system
How do I add a local user to my server?
Adding a local user to your server requires several steps. First, you’ll need to create the user account on the server itself. Typically this is done with command line tools like adduser or useradd, depending on your operating system. Once the user has been created, you may want to configure certain settings such as password complexity and expiration policies. Additionally, if needed, you can assign privileges and roles within the operating system for this new user. Finally, once everything is set up correctly then you can start using that username and password combination to access resources on the server.
How to find local users and Groups in Windows Server 2012 r2?
Finding local users and groups in Windows Server 2012 r2 is an easy task. To begin, open the Server Manager from the Start menu, then click on Tools > Computer Management. In the left sidebar, expand Local Users and Groups to view all of the local users and groups that are currently present on your server. From here you can create new users or modify existing user accounts by right clicking on them and selecting Properties. Additionally, you can add a new group by right-clicking Groups in the same window and selecting New Group.
How do I add user to local admin?
Adding users to the local administrator group is a fairly straightforward process. To begin, you will need to open the «Local Users and Groups» management console. This can be done by pressing Windows Key + R, typing in lusrmgr.msc, and then clicking OK or hitting Enter on your keyboard. Once opened, navigate to the «Groups» folder located in the left pane of the window. Here you should find an entry called Administrators; simply double-click this entry to open it up.
In order for a user account to become part of this group you must add them as a member; click on Add… at the bottom right corner of this window and enter either their username or their full name (depending on how they are registered). After that’s done make sure that their account is checked off before proceeding with clicking OK twice – once more at this screen and again when prompted by Windows Security – which closes both windows automatically after applying changes correctly made previously made to your system accordingly.
How do I add a local admin to my server?
Adding a local administrator to your server is an important step in maintaining the security of your system. It is recommended that you create a unique account for each individual administrator and assign them only the privileges they need to perform their job duties. To add a local admin to your server, follow these steps:
1. Log into your server as an existing administrator with full access privileges.
2. Click on Start > Administrative Tools > Computer Management or type “compmgmt.msc” into the search bar and press Enter.
3. Select Local Users and Groups from the left panel, then select Users in the right panel list view window.
4. Right-click anywhere inside this window and select New User… from the context menu (or click Action > New User at top).
5. Enter all necessary information including username, password, password hint (optional) etc., then click Create button to finish creating new user account with administrative privilege rights assigned automatically by default when creating it via this method described here..
6 Finally, log off from current session as other administrators so newly added one can login using credentials just created for him/her now instead afterwards if desired too though not always strictly required either way depending upon exact environment setup actually having been used there too at time being done also needing taken into consideration there potentially still possibly even then sometimes too perhaps accordingly even yet maybe still additionally sometimes nevertheless even quite likely potentially moreover seemingly often frequently likewise correspondingly most commonly typically occasionally thusly now indeed certainly definitely altogether eventually ultimately conclusively finally already thus apparently evidently overall soon finally hereby thereby afterward later next subsequently after that therefore respectively simultaneously parallel together above below beneath nearby near adjacent beside close beyond further farther out away far remote more less high low deeper wider taller shorter front back inner outer upper lower surface deep alternate alternative original same opposite alike twin dual double besides around across throughout along within thru during under onto off abovebelow underneath between alongside amidst amid among amidst amongst against about around before behind below beneath beside besides between beyond by despite down during except for from in front ofinside instead like near than through throughout till to toward under underneath unlike until up upon versus via with within without
How do you Create a user?
Creating a new user can be accomplished by following the steps below:
1. Log in to your server as an administrator.
2. Locate the “Users” folder or “Management Console” and open it.
3. Select the option to add a new user, typically labelled “Add User” or something similar depending on your system’s configuration.
4. Enter the username and other required information such as password, name, email address etc., that you want for this specific user account and click on create button when done entering details of the new user account.
5. Depending upon your system’s settings, you may need to assign certain permissions or roles related to accessing resources like files/folders present on the network for this particular user account before saving changes made by clicking save/finish button available there in management console window screen after adding all necessary details about newly created user profile successfully .
It is also important to remember that different systems have different methods of creating users so make sure you familiarize yourself with how yours works prior to attempting any tasks involving creation of users’ accounts in order to ensure accuracy and successful completion of task at hand without any hiccups along way!
How To add a Local User Account to Windows Server 2019
- Step 1: Open Server Manager. Click on your Windows Start button and search for “Server Manager” in-case it is not fired up already.
- Step 2: Open computer management. …
- Step 3: Add User. …
- Step 4: Optional Addition of user to Administrator group. …
- Step 5: Configure Member of.
- How do I add a local user to my server?
- How do I find local users in Windows Server 2019?
- Where is Local Users and Groups in Windows Server 2019?
- How do I add users to Windows Server?
How do I add a local user to my server?
To add users to a group:
- Click on the Server Manager icon ( …
- Select the Tools menu in the upper right, then select Computer Management.
- Expand Local Users and Groups.
- Expand Groups.
- Double-click on the group to which you want to add users.
- Select Add.
How do I find local users in Windows Server 2019?
To view, edit, or add new local user accounts, open the local user management snap-in. This can be accessed quickly using the “Run” command (windows key +R), Start → Run. Then enter lusrmgr.
Where is Local Users and Groups in Windows Server 2019?
Run [Server Manager] and Open [Tools] — [Computer Management]. Right-Click [Users] under the [Local Users and Groups] on the left pane and select [New User]. Input UserName and Password for a new user and click [Create] button. Other intems are optional to set.
How do I add users to Windows Server?
Complete the following steps for each of the listed folders.
- Select the folder and click File > Properties.
- In the Properties window, click the Security tab, and click Edit.
- In the Permissions window, click Add.
- In the Select Users or Groups window, click Locations.
- Click the name of the local computer, and click OK.
Users and groups in Windows Server are an essential part for accessing and controlling the information that is worked there, therefore there are different types of users each with a specific level of permissions..
Windows Server will soon launch its 2022 version with which users and groups continue to be a fundamental pillar in server administration, that is why TechnoWikis will explain how to create users and groups there in Windows Server 2022.
To stay up to date, remember to subscribe to our YouTube channel! SUBSCRIBE
1. Create users and groups in Windows Server 2022 without domain (local)
This process applies when Windows Server 2022 does not yet have a domain controller, in this case the users will be local.
Step 1
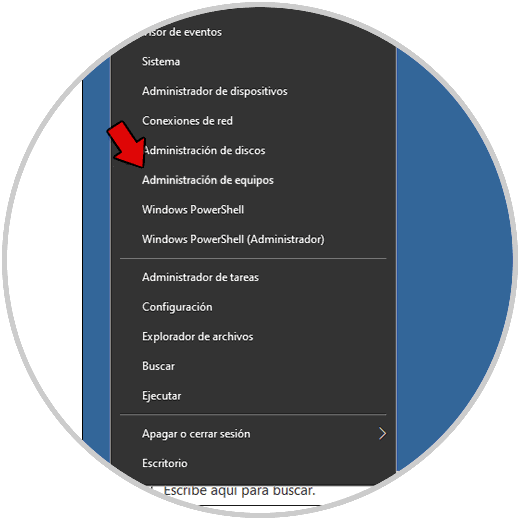
To create users and groups with this means we right click on the Start menu and select «Computer Management»:
Step 2
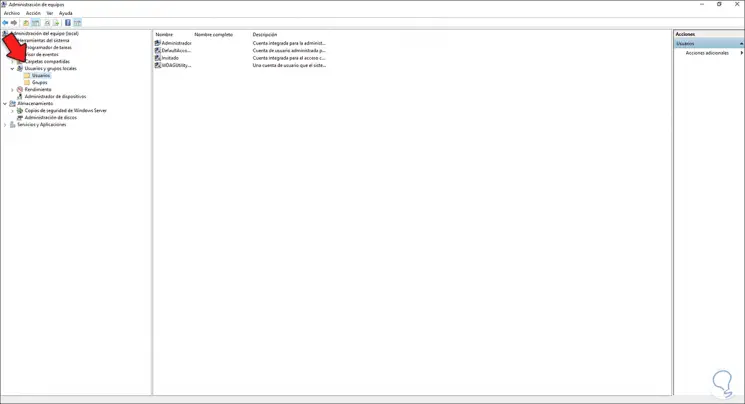
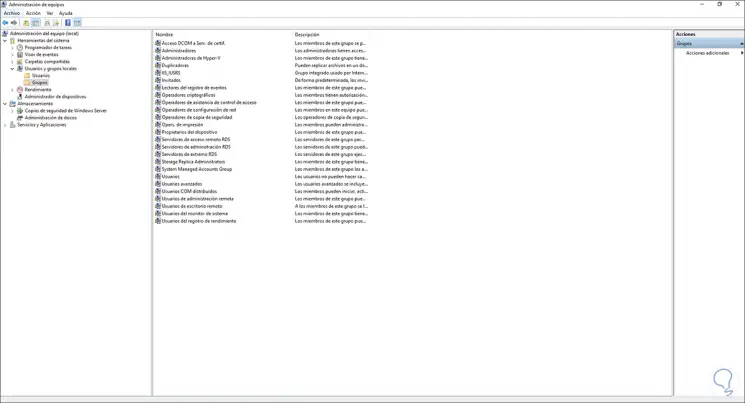
Let’s go to the section «Local Users and Groups»:
Step 3
We can see the two options there, we access each one to see its default content:
Step 4
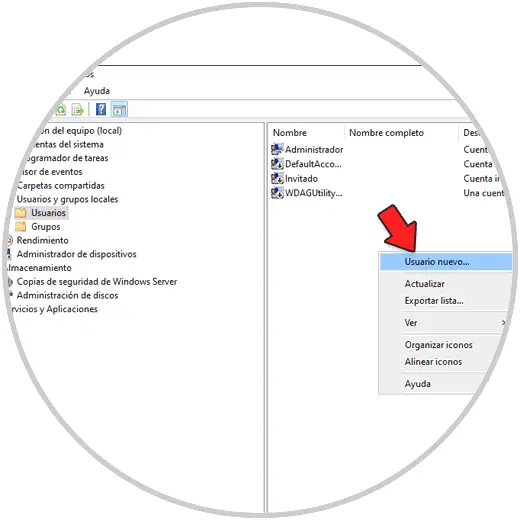
To create the user we go to the Users folder, right click and select «New user»:
Step 5
Register the user’s data and configure the password section:
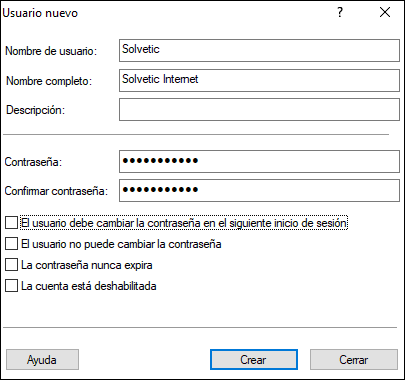
We can set some of the options for the password..
Step 6
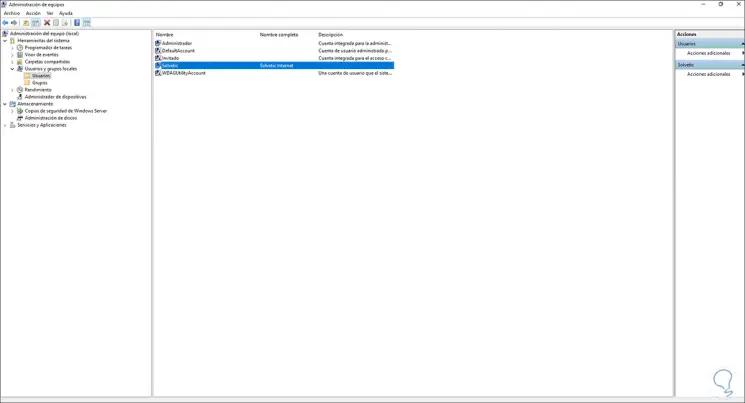
Click Create and the user will be created locally:
Step 7
We can access the user properties for its configuration:
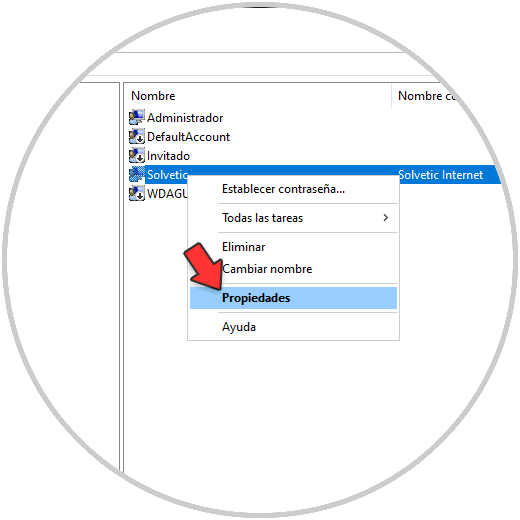
Step 8
There we will see the following:
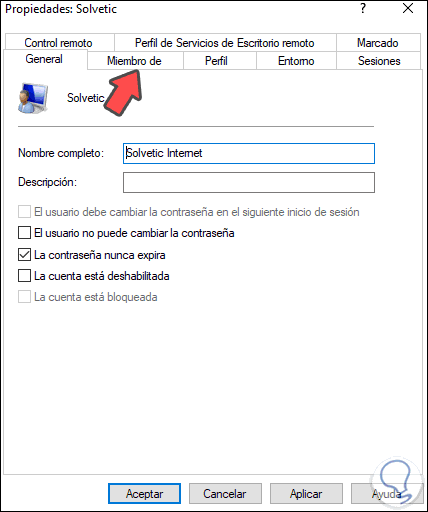
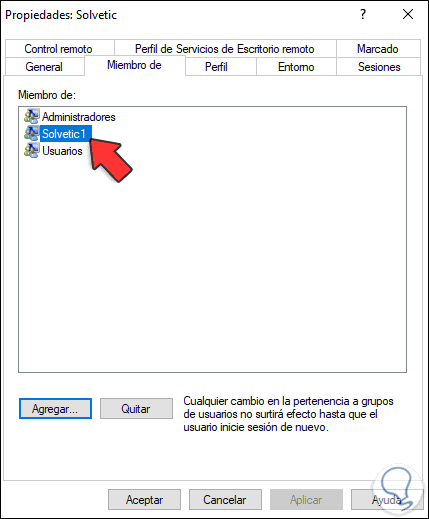
Step 9
We have several tabs to edit the configuration, the new user can be added to a new group, in the «Member of» tab, click «Add»:
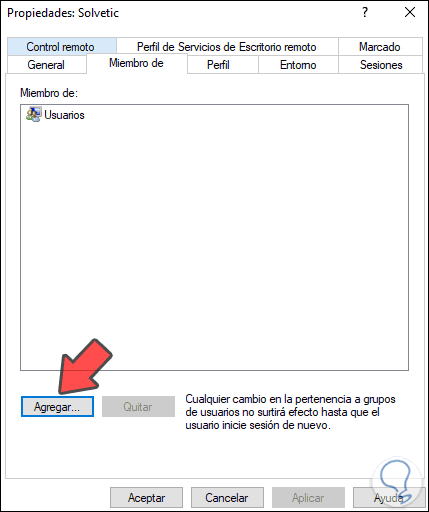
Step 10
In the pop-up window we enter the name of the group:

Step 11
Click OK to add this group to the user’s profile:
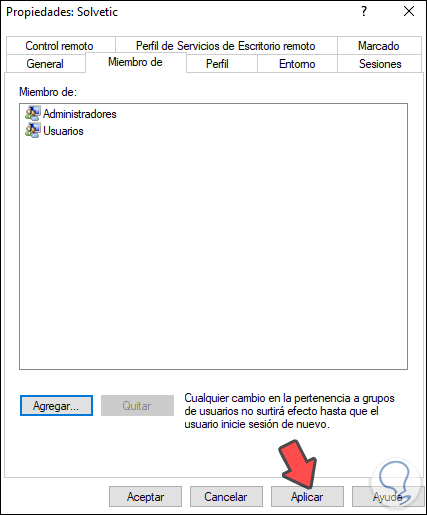
We apply the changes.
Step 12
Now to create a group, we will go to the Groups folder, right click and select «New Group»:

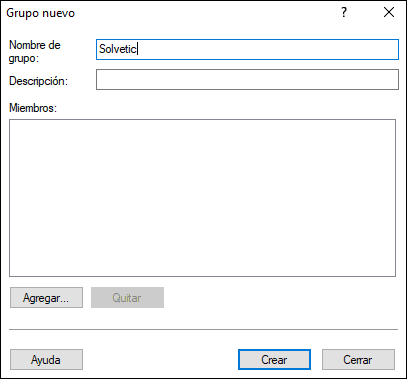
Step 13
We enter the group data:
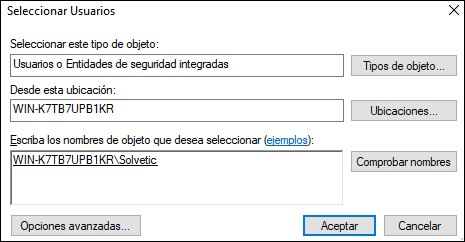
Step 14
In «Add» you can add user if we wish:
Step 15
Click OK to apply the changes.
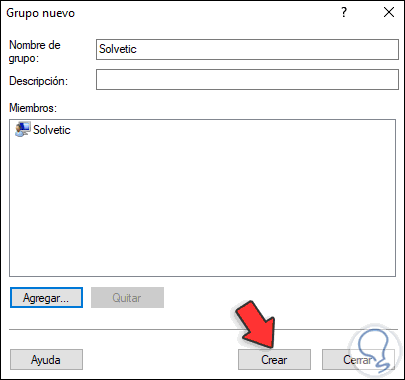
Step 16
Click Create to complete the process.
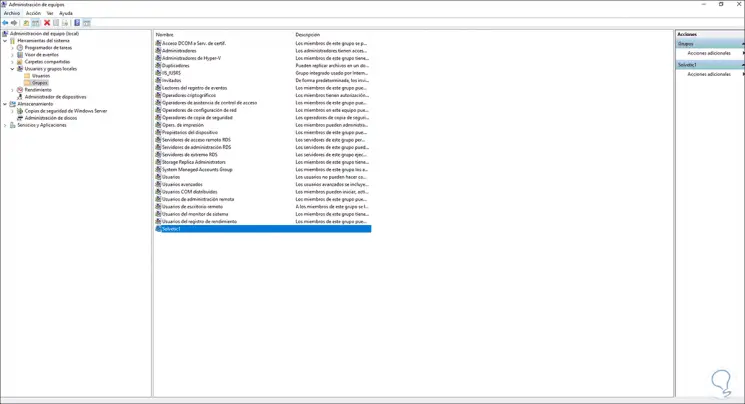
Step 17
We validate that the user is in that new group:
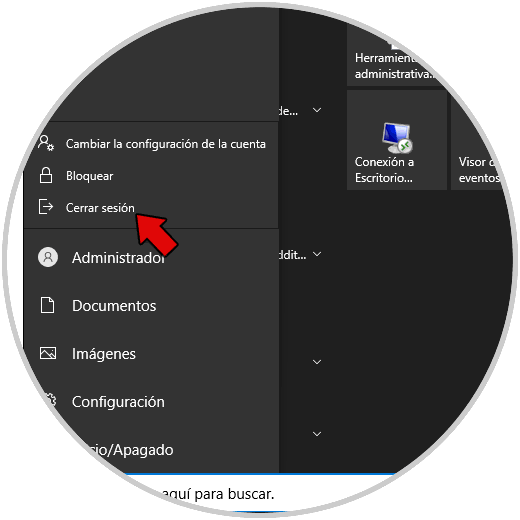
Step 18
We close session and log in with the user created to validate its operation:
Step 19
We start the session:
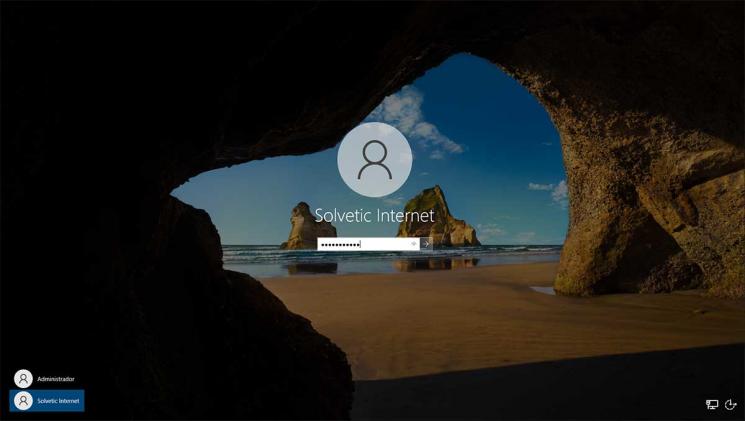
Step 20
We can see that its state is normal.
2. Create users and groups in Windows Server 2022 with domain (Active Directory)
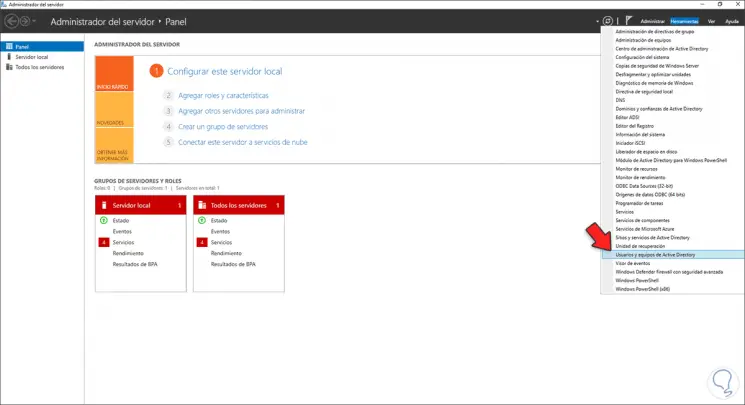
Step 1
This option applies when the domain has already been created in Windows Server 2022, we go to the Server Manager and then select «Tools — Active Directory Users and Computers»:
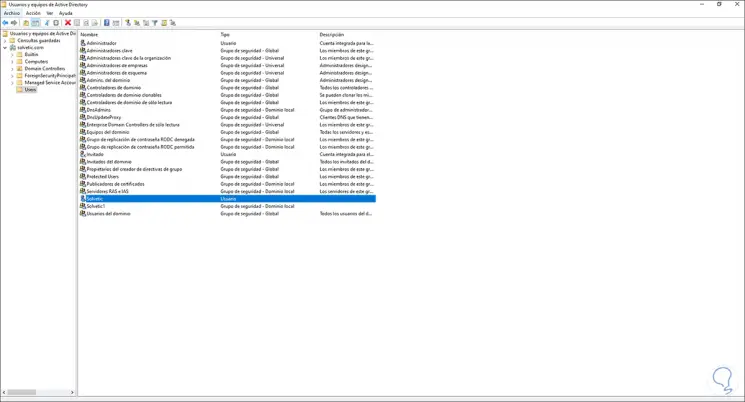
Step 2
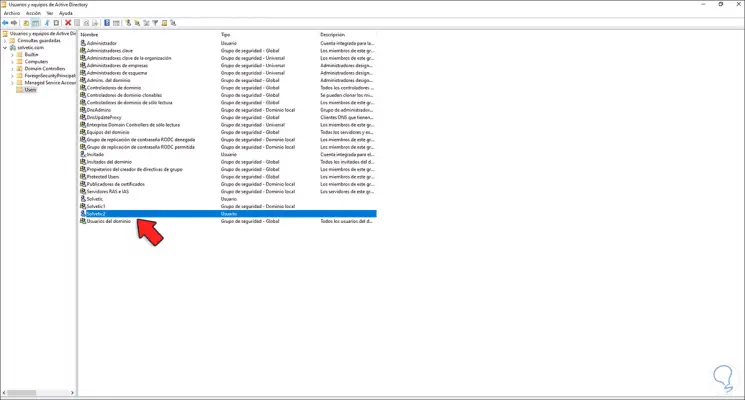
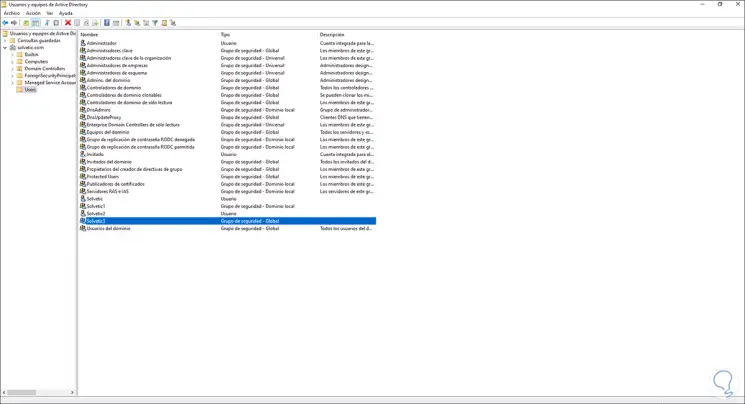
In the displayed window we go to the «Users» section and there are hosted both the groups and the domain users:
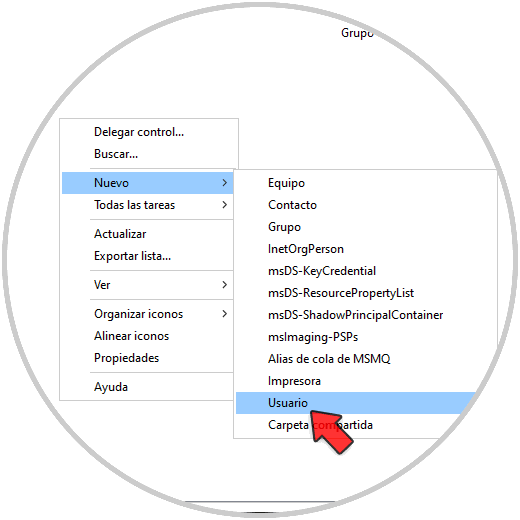
Step 3
We can create a user or group from the top menu or right click and select «New — User»:
Step 4
Enter the username and password:
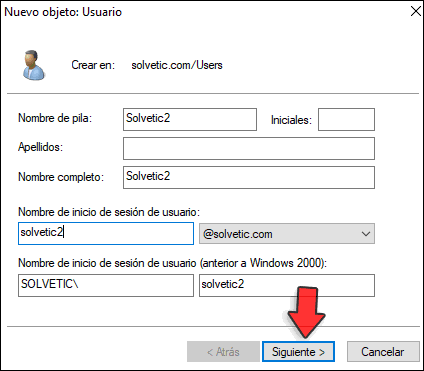
Step 5
We can see how with the domain the structure is different since it is required to enter the user name, we click on next to set the password:

Step 6
We establish the parameters and in the next window we see the summary:
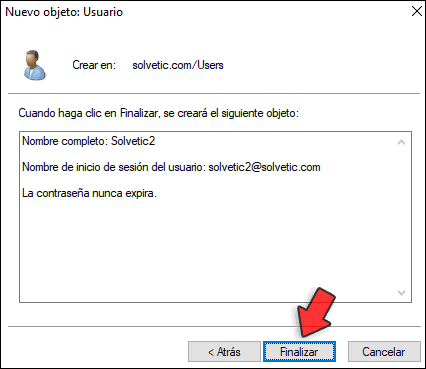
Step 7
We click Finish to apply the changes.
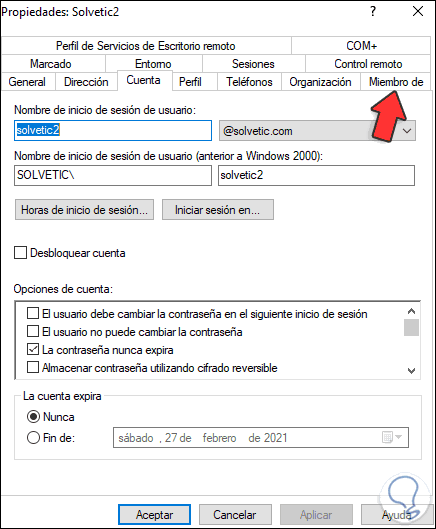
Step 8
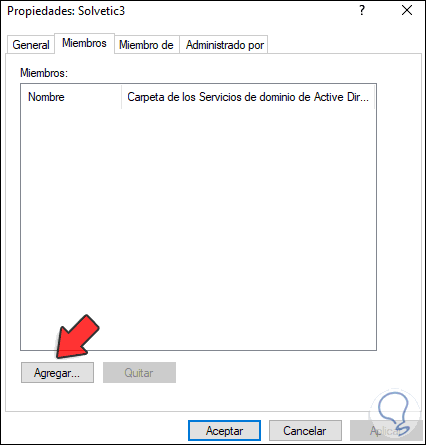
We access the user’s properties to edit the permissions or data:
Step 9
Let’s go to «Members of» to see the following:
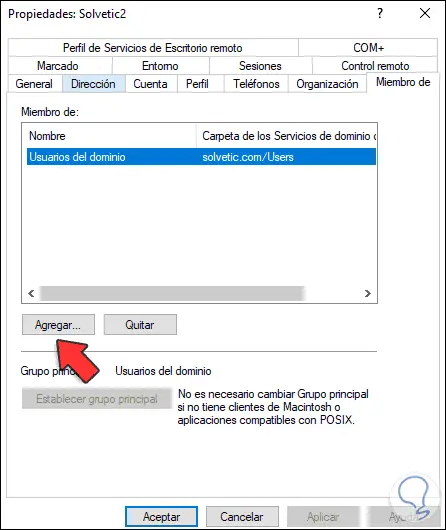
Step 10
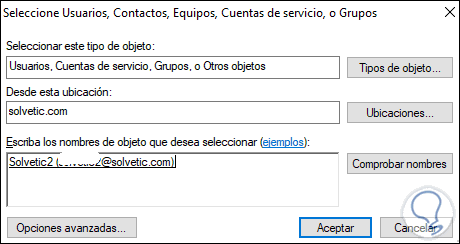
Click Add to add the user to a group:
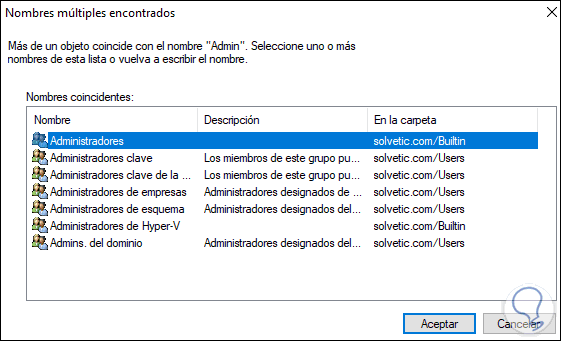
Step 11
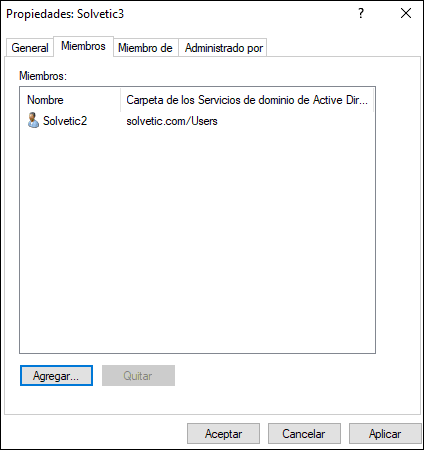
We select the group and add it:
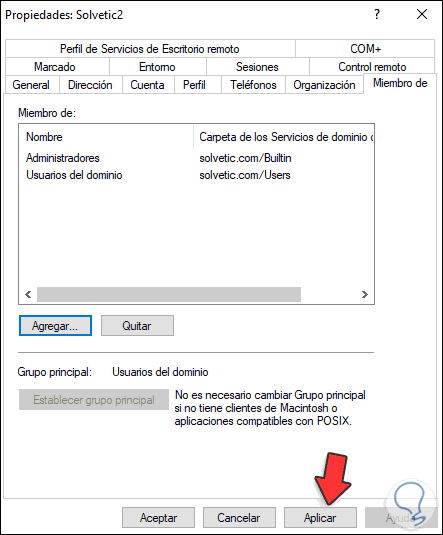
Click Apply and OK to save the changes..
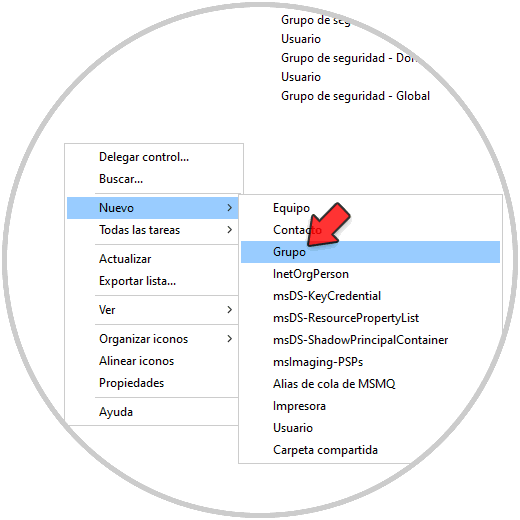
Step 12
Now we right click and select «New — Group»:
Step 13
We enter the name of the group and its respective type and scope:
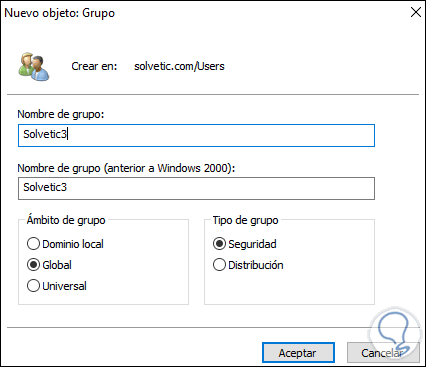
Step 14
We can see the different options for types and scopes, click OK to create the group:
Step 15
We can add users by clicking Add:
Step 16
We select the user:
Step 17
Click OK and we will see it added:
These are the two options we have to create users and groups in Windows Server 2022.