Начиная с Windows 2000 все операционные системы Windows включают в себя службу времени W32Time. Эта служба предназначена для синхронизации времени в пределах организации. W32Time отвечает за работу как клиентской, так и серверной части службы времени, причем один и тот же компьютер может быть одновременно и клиентом и сервером NTP (Network Time Protocol).
По умолчанию служба времени в Windows сконфигурирована следующим образом:
• При установке операционной системы Windows запускает клиента NTP и синхронизируется с внешним источником времени;
• При добавлении компьютера в домен тип синхронизации меняется. Все клиентские компьютеры и рядовые сервера в домене используют для синхронизации времени контроллер домена, проверяющий их подлинность;
• При повышении рядового сервера до контроллера домена на нем запускается NTP-сервер, который в качестве источника времени использует контроллер с ролью PDC-эмулятор;
• PDC-эмулятор, расположенный в корневом домене леса, является основным сервером времени для всей организации. При этом сам он также синхронизируется с внешним источником времени.
Такая схема работает в большинстве случаев и не требует вмешательства. Однако структура сервиса времени в Windows может и не следовать доменной иерархии, и надежным источником времени можно назначить любой компьютер. В качестве примера я опишу настройку NTP-сервера в Windows Server 2008 R2, хотя со времен Windows 2000 процедура не особо изменилась.
Запуск NTP сервера
Сразу отмечу, что служба времени в Windows Server (начиная с 2000 и заканчивая 2012) не имеет графического интерфейса и настраивается либо из командной строки, либо путем прямой правки системного реестра. Лично мне ближе второй способ, поэтому идем в реестр.
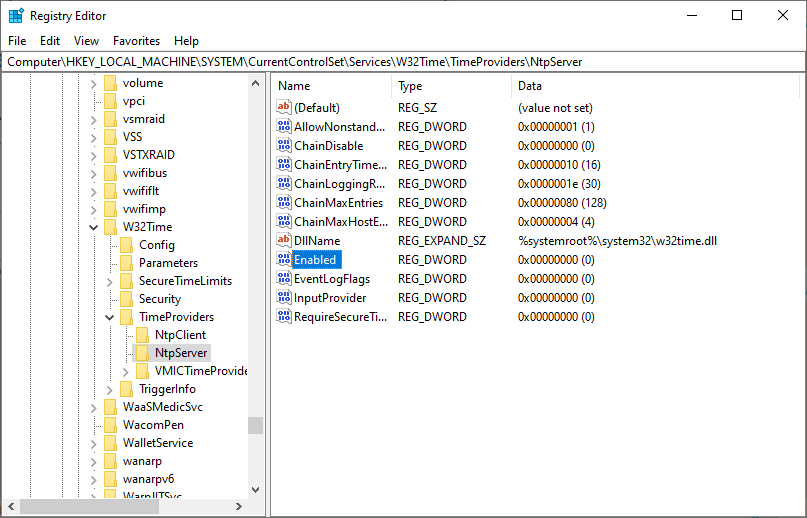
Итак, первым делом нам надо запустить сервер NTP. Открываем ветку реестра
HKLM\System\CurrentControlSet\services\W32Time\TimeProviders\NtpServer.
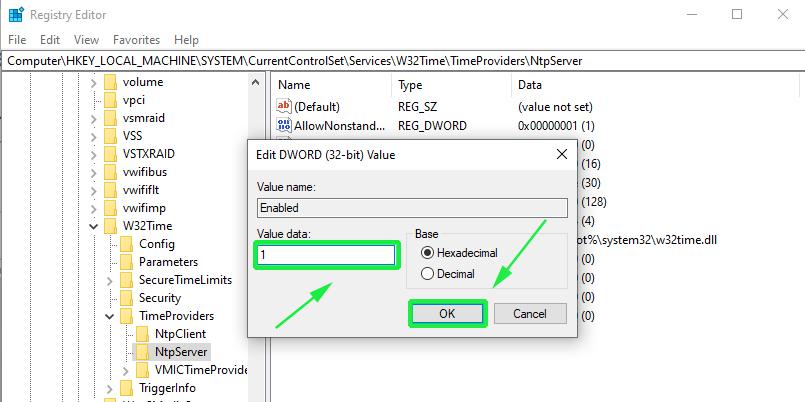
Здесь для включения сервера NTP параметру Enabled надо установить значение 1.

Затем перезапускаем службу времени командой net stop w32time && net start w32time

После перезапуска службы NTP сервер уже активен и может обслуживать клиентов. Убедиться в этом можно с помощью команды w32tm /query /configuration. Эта команда выводит полный список параметров службы. Если раздел NtpServer содержит строку Enabled :1 , то все в порядке, сервер времени работает.

Для того, чтобы NTP-сервер мог обслуживать клиентов, не забудьте на файерволле открыть UDP порт 123 для входящего и исходящего траффика.
Основные настройки NTP сервера
NTP сервер включили, теперь надо его настроить. Открываем ветку реестра HKLM\System\CurrentControlSet\services\W32Time\Parameters. Здесь в первую очередь нас интересует параметр Type, который задает тип синхронизации. Он может принимать следующие значения:
NoSync — NTP-сервер не синхронизируется с каким либо внешним источником времени. Используются часы, встроенные в микросхему CMOS самого сервера;
NTP — NTP-сервер синхронизируется с внешними серверами времени, которые указаны в параметре реестра NtpServer;
NT5DS — NTP-сервер производит синхронизацию согласно доменной иерархии;
AllSync — NTP-сервер использует для синхронизации все доступные источники.
Значение по умолчанию для компьютера, входящего в домен — NT5DS, для отдельно стоящего компьютера — NTP.
И параметр NtpServer, в котором указываются NTP-сервера, с которыми будет синхронизировать время данный сервер. По умолчанию в этом параметре прописан NTP-сервер Microsoft (time.windows.com, 0x1), при необходимости можно добавить еще несколько NTP-серверов, введя их DNS имена или IP адреса через пробел. Список доступных серверов времени можно посмотреть например здесь.
В конце каждого имени можно добавлять флаг (напр. ,0x1) который определяет режим для синхронизации с сервером времени. Допускаются следующие значения:
0x1 – SpecialInterval, использование специального интервала опроса ;
0x2 – режим UseAsFallbackOnly;
0x4 – SymmetricActive, симметричный активный режим;
0x8 – Client, отправка запроса в клиентском режиме.
При использовании флага SpecialInterval, необходимо установленное значение интервала в ключе SpecialPollInterval. При значении флага UseAsFallbackOnly службе времени сообщается, что данный сервер будет использоваться как резервный и перед синхронизацией с ним будут выполнятся обращения к другим серверам списка. Симметричный активный режим используется NTP-серверами по умолчанию, а клиентский режим можно задействовать в случае проблем с синхронизацией. Подробнее о режимах синхронизации можно посмотреть здесь, либо не морочиться и просто ставить везде ,0x1 (как советует Microsoft).

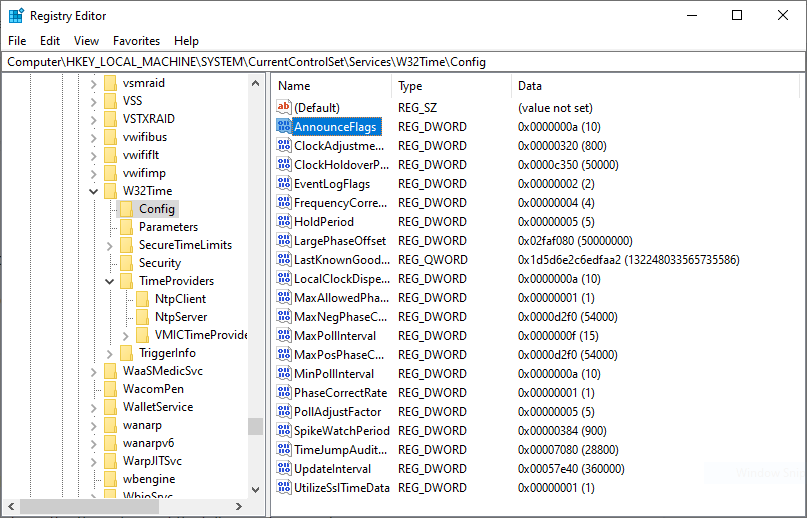
Еще один важный параметр AnnounceFlags находится в разделе реестра HKLM\System\CurrentControlSet\services\W32Time\Config. Он отвечает за то, как о себе заявляет NTP-сервер и может принимать следующие значения:
0x0 (Not a time server) — сервер не объявляет себя через NetLogon, как источник времени. Он может отвечать на NTP запросы, но соседи не смогут распознать его, как источник времени;
0x1 (Always time server) — сервер будет всегда объявлять о себе вне зависимости от статуса;
0x2 (Automatic time server) — сервер будет объявлять о себе только, если он получает надежное время от другого соседа (NTP или NT5DS);
0x4 (Always reliable time server) — сервер будет всегда заявлять себя, как надежный источник времени;
0x8 (Automatic reliable time server) — контроллер домена автоматически объявляется надежным если он PDC-эмулятор корневого домена леса. Этот флаг позволяет главному PDC леса заявить о себе как об авторизованном источнике времени для всего леса даже при отсутствии связи с вышестоящими NTP-серверами. Ни один другой контроллер или рядовой сервер (имеющие по умолчанию флаг 0x2) не может заявить о себе, как надежном источнике времени, если он не может найти источник времени для себя.
Значение AnnounceFlags составляет сумму составляющих его флагов, например:
10=2+8 — NTP-сервер заявляет о себе как о надежном источнике времени при условии, что сам получает время из надежного источника либо является PDC корневого домена. Флаг 10 задается по умолчанию как для членов домена, так и для отдельно стоящих серверов.
5=1+4 — NTP-сервер всегда заявляет о себе как о надежном источнике времени. Например, чтобы заявить рядовой сервер (не домен-контроллер) как надежный источник времени, нужен флаг 5.

Ну и настроим интервал между обновлениями. За него отвечает уже упоминавшийся выше ключ SpecialPollInterval, находящийся в ветке реестра HKLM\System\CurrentControlSet\services\W32Time\TimeProviders\NtpClient. Он задается в секундах и по умолчанию его значение равно 604800, что составляет 1 неделю. Это очень много, поэтому стоит уменьшить значение SpecialPollInterval до разумного значения, скажем до 1 часа (3600).

После настройки необходимо обновить конфигурацию сервиса. Сделать это можно командой w32tm /config /update. И еще несколько команд для настройки, мониторинга и диагностики службы времени:
w32tm /monitor – при помощи этой опции можно узнать, насколько системное время данного компьютера отличается от времени на контроллере домена или других компьютерах. Например: w32tm /monitor /computers:time.nist.gov
w32tm /resync – при помощи этой команды можно заставить компьютер синхронизироваться с используемым им сервером времени.
w32tm /stripchart– показывает разницу во времени между текущим и удаленным компьютером, причем может выводить результат в графическом виде. Например, команда w32tm /stripchart /computer:time.nist.gov /samples:5 /dataonly произведет 5 сравнений с указанным источником и выведет результат в текстовом виде.
w32tm /config – это основная команда, используемая для конфигурирования службы NTP. С ее помощью можно задать список используемых серверов времени, тип синхронизации и многое другое. Например, переопределить значения по умолчанию и настроить синхронизацию времени с внешним источником, можно командой w32tm /config /syncfromflags:manual /manualpeerlist:time.nist.gov /update
w32tm /query — показывает текущие настройки службы. Например команда w32tm /query /source покажет текущий источник времени, а w32tm /query /configuration выведет все параметры службы.
Ну и на крайний случай 🙁
w32tm /unregister — удаляет службу времени с компьютера.
w32tm /register – регистрирует службу времени на компьютере. При этом создается заново вся ветка параметров в реестре.
Creating a Standalone NTP Server With Windows
I must govern the clock, not be governed by it.” – Golda Meir
You probably already know that having accurate time set on all clients and servers is important. Very bad things happen when computer clocks disagree. Things like:
- Users cannot logon to a domain
- Applications overwrite new data with older versions
- Servers fail to synchronize data between each other, causing version conflicts
- Financial transactions become subject to dispute
- Regulatory requirements are not met
Luckily Windows has taken this into account. The Network Time Protocol (NTP) service has been built into Windows since Windows XP and Windows Server 2003, and most Unix and Linux implementations have supported NTP since they were first built.
Windows Client and Server Time Synchronization
Unfortunately most Windows implementations do not use NTP as it is not enabled in many situations. One of those situations is a non-domain joined server. An unjoined system can function as both a NTP server and client, but it doesn’t do either by default.
I’ve already written about configuring a standalone Windows computer to function as a NTP client. Another common need is to create a standalone NTP server that can provide time synchronization for unjoined Windows computers as well as other operating systems like Linux and Mac OSX.
Configuring Windows as a Standalone NTP Server
Windows implements the W32Time service as both an NTP client and server. The service is off by default. So configuring a system as an NTP server requires both enabling the W32Time service and configuring it as a server. The process is very simple.
First, use the Services console to locate the Windows Time service. It will likely be off as shown in Figure 1.
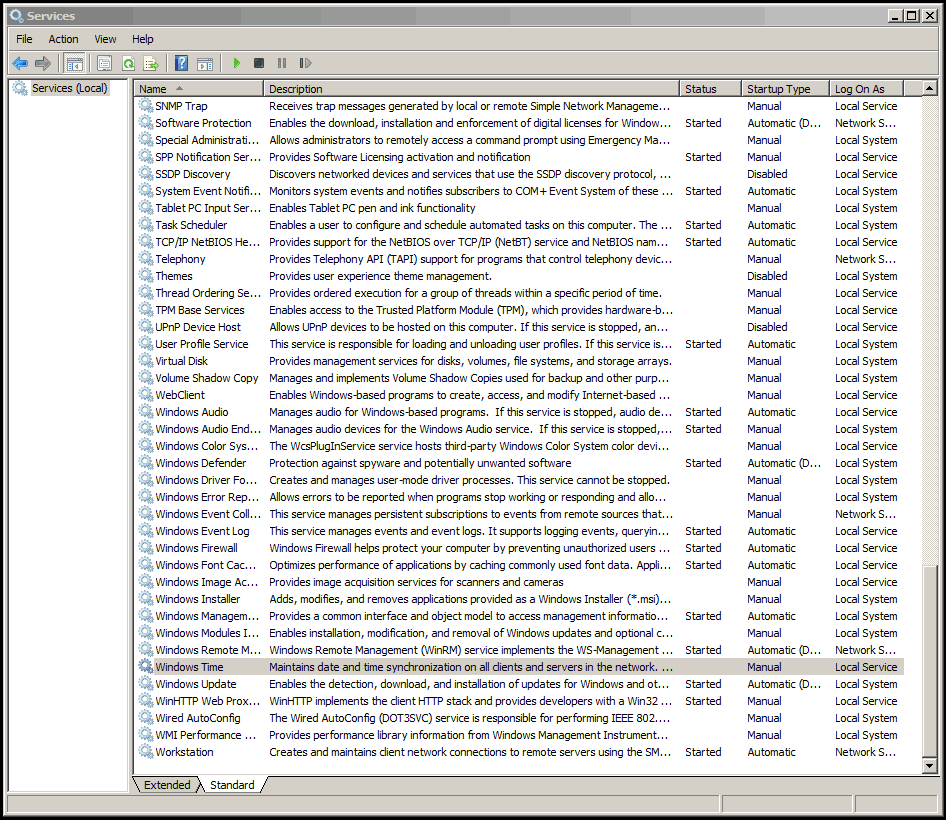
Figure 1. Windows Time is not yet enabled or started.
You need to both start the service and configure it for Automatic start as shown in Figure 2.
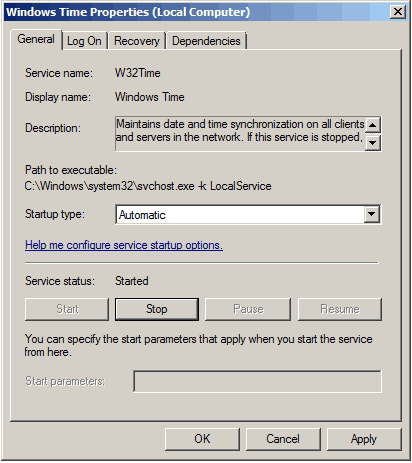
Figure 2. The W32Time service is started and configured for automatic start.
Enabling the NTP server service requires a quick registry modification. Open Regedit and navigate to HKEY_LOCAL_MACHINE \ System \ CurrentControlSet \ Services \ W32Time \ TimeProviders \ NtpServer and change Enabled from 0 to 1. This is shown in Figure 3.
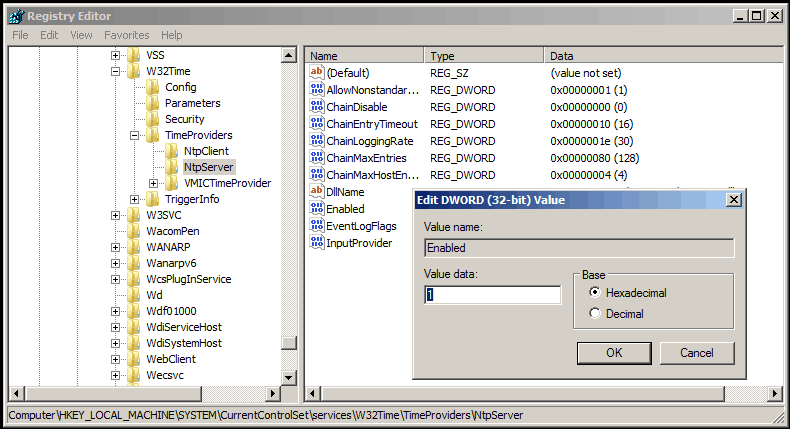
Figure 3. Changing the NtpServer Enabled value to 1.
The last step is to update the Windows Time service’s running configuration. You do this by opening a command prompt and typing the w32tm /config /update command. You can then verify that the NTP server service is enabled with the w32tm /query /configuration command. Both of these are shown in Figure 4.
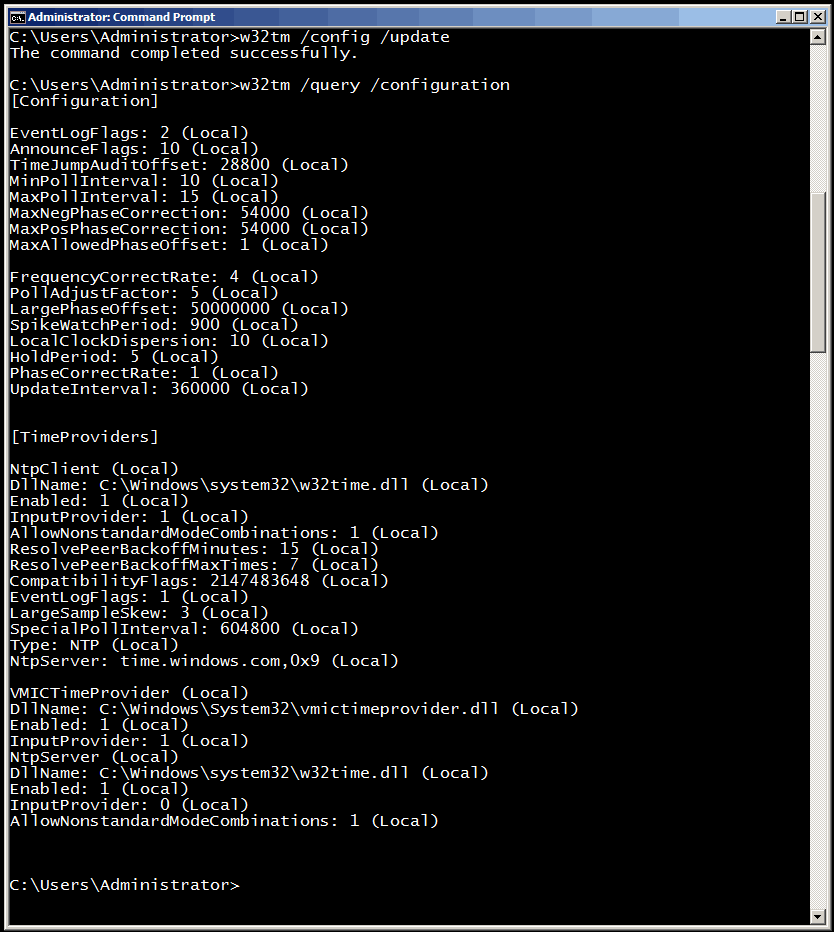
Figure 4. The output of the w32tm command.
Notice in the VMICTimeProvider section that Enabled is set to 1. That’s the flag that enables NTP server in Windows. Because that’s the running configuration, Windows is now running as a NTP server.
Enjoy,
Mike Danseglio -CISSP / CEH
Interface Technical Training – Technical Director and Instructor
Videos You May Like
Write a Comment
Timing is everything! There are thousands of NTP servers around the world. Both the protocol and the client-server program that runs on computers are referred to as NTP. Network Time Protocol (NTP) is an internet protocol used to synchronize with computer clock time sources in a network. Join us with this article to review the way you can Set NTP Server on Windows Server. A time-stamp data exchange takes place between the server and client, which aids in precisely setting the time on the client systems to match the time on the NTP server.
Since a discrepancy of even a fraction of a second can cause problems, accurate time for all devices on a computer network is important for many reasons. So, NTP Server supports time synchronization and is made to be very fault-tolerant and scalable. After buying Windows VPS, you might need to synchronize the machines on your network at the same time. Setting up NTP Server on Windows Server is what you can do perfectly at the end of this guide. Let’s get started to make your NTP Server ready to synchronize time across your network.
What is NTP Server and Why Set it Up?
NTP is a network protocol that enables you to synchronize clocks on devices over a network. It always makes sure that time differences between the server and client systems are minimized and that client systems are always in sync with the server. It listens on UDP port 123.
Many services and IT applications depend on proper time settings to work as intended, thus keeping your server’s clock accurate is crucial. These comprise, to name a few, database replication, monitoring and auditing applications, and logging services. Server time skew, and client time skew in general, is undesirable and frequently results in conflict in time-critical applications. It is recommended to install and enable an NTP server on your server in order to keep accurate time settings on your server and, by extension, throughout the network.
Set NTP Server on Windows is not that complicated. This tutorial helps you to install and enable the NTP server on your server quickly and simply.
You can easily use NTP on your Windows Time service to synchronize time across a network. Let’s go through the steps of this guide to learn how to Install and Configure NTP Server on Windows. Two different methods will be explained, and you can choose the one you prefer more.
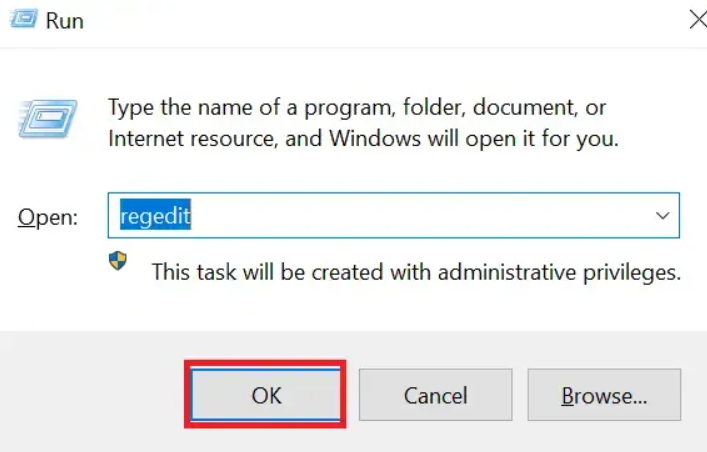
Step 1. Open Registry Editor
Search for the ”Run” application in the start menu. There, type in ”regedit” and press Enter.
There will appear a window similar to the one below.
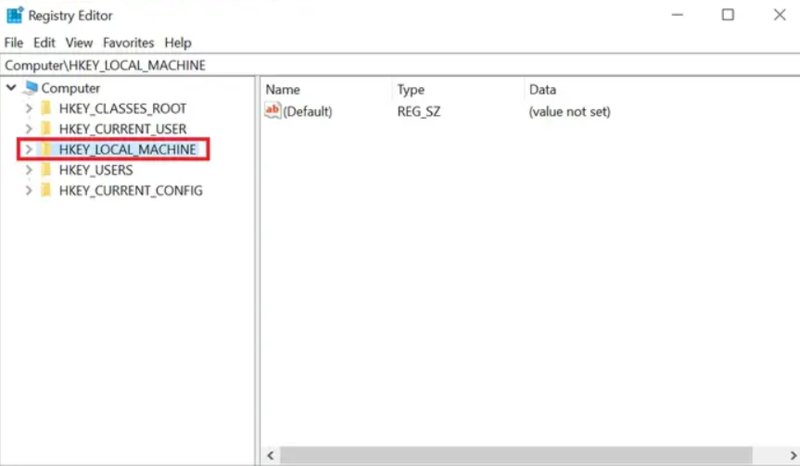
Step 2. Find NTP Server Files
Follow the below path to go to the NTP Server Configuration:
Computer>HKEY_LOCAL_MACHINE>SYSTEM>CurrentControlSet>Services>W32Time>TimeProviders>NtpServer.
You can see the tree’s end in the picture below. As you can see, the files we are looking for are on the right pane.

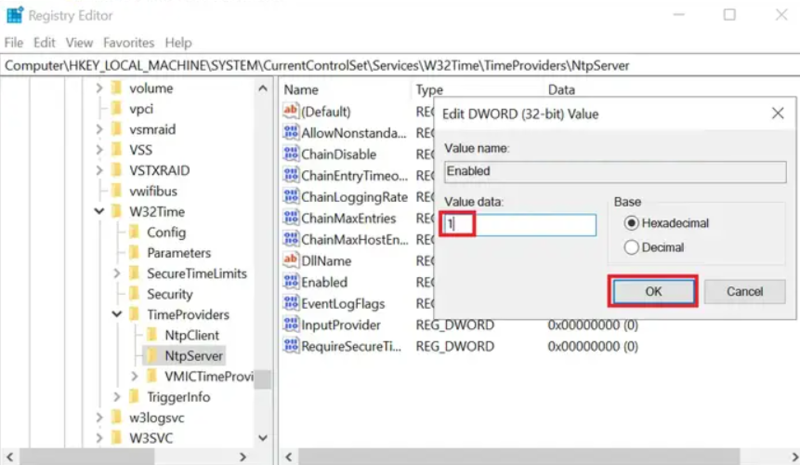
Step 3. Enable NTP Server
To open a tiny window, double-click the “Enabled” file. A section on the window titled “Value data” is there. As shown below, change the value from 0 to 1. After changing, click “OK”.
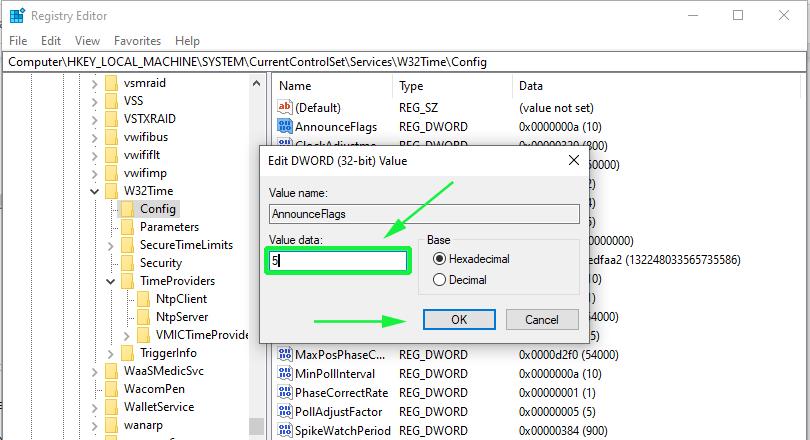
Step 4. Create the AnnounceFlags 5
First, let’s see what is AnnounceFlag?
This computer’s status as a trustworthy time server is controlled by entry. If a computer is not also designated as a time server, it cannot be certified as dependable. The default value for domain members is 10. The default value for stand-alone clients and servers is 10.
Follow the path below:
Computer>HKEY_LOCAL_MACHINE>SYSTEM>CurrentControlSet>Services>W32Time>
To go to the ”Config”:
Computer>HKEY_LOCAL_MACHINE>SYSTEM>CurrentControlSet>Services>W32Time>Config.
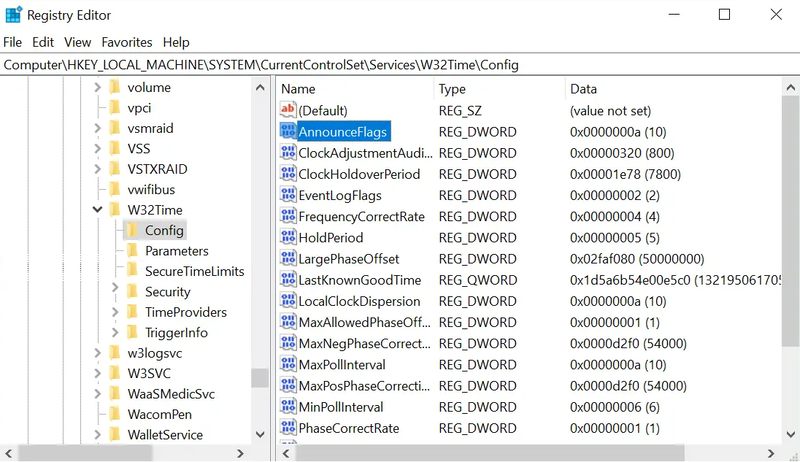
On the right pane, as seen above, you will find a file with the name “AnnounceFlags” while there. Double-click it. That will cause a tiny window akin to the one in Step 3 to open. Change the value from a to 5 under “Value data“.
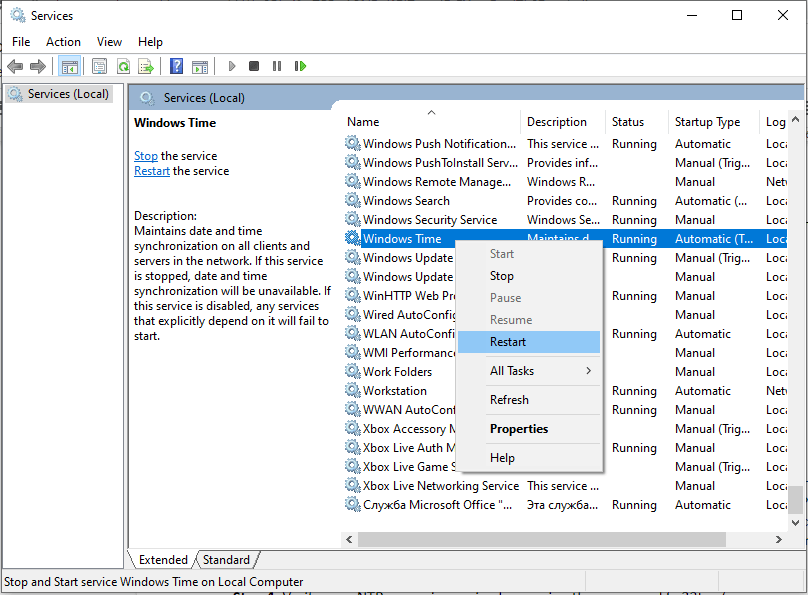
Step 5. Restart NTP Server
By pressing the Windows key and typing “Services,” the “Services” window will appear. Look for “Windows Time” once it has opened. Click “Restart” from the context menu when you right-click on it.

Step 6. Open UDP port 123 in the Firewall
Your Windows Server must have UDP port 123 open in order for NTP to connect to the clocks. Please check your firewall configuration if you can’t reach the servers. To complete this step, follow the How to open a Port on Windows VPS Firewall guide. Remember that this port is UDP and not TCP.
Configure NTP Using PowerShell
From Windows XP and Windows Server 2008 up to the most recent versions of each OS, PowerShell offers a command-line tool with the name w32tm.exe. You may set up your Windows PC to sync with online time servers using the w32tm.exe program. This is typically the tool of choice when configuring and keeping track of the time on your Windows Server installation. The command-line utility is very simple to use.
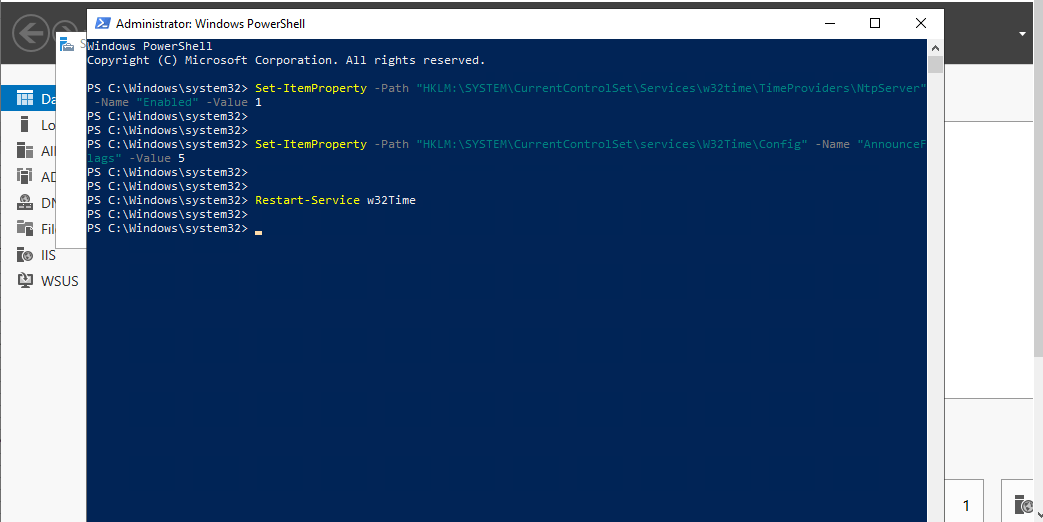
If you prefer to use PowerShell, the second method of this guide would be your preferred one to Set NTP Server on Windows. Just open your PowerShell as administrator and use the following commands to do all the steps of the previous method.
Enable NTP Server
Set-ItemProperty -Path "HKLM:\SYSTEM\CurrentControlSet\Services\w32time\TimeProviders\NtpServer" -Name "Enabled" -Value 1Create the AnnounceFlags 5
Set-ItemProperty -Path "HKLM:\SYSTEM\CurrentControlSet\services\W32Time\Config" -Name "AnnounceFlags" -Value 5Restart NTP Server
Restart-Service w32TimeRun the command below to allow NTP port: (If Firewall is running)
New-NetFirewallRule `
-Name "NTP Server Port" `
-DisplayName "NTP Server Port" `
-Description 'Allow NTP Server Port' `
-Profile Any `
-Direction Inbound `
-Action Allow `
-Protocol UDP `
-Program Any `
-LocalAddress Any `
-LocalPort 123
Most Used Commands to Configure NTP Server
Let’s review some useful commands while setting up NTP Server on Windows.
To check NTP configuration, run:
w32tm /query /configurationTo check NTP server list, type:
w32tm /query /peersTo force NTP server synchronization, run:
w32tm /resync /nowaitUse the command below to show the source of the NTP time:
w32tm /query /sourceTo show the status of NTP service, type:
w32tm /query /statusAt this point, you know everything you need to Set NTP Server on Windows Server.
How to Disable NTP Server on Windows Server?
To disable Windows Internet Time Update, follow the below steps:
1. Load Control Panel.
2. Click Date and Time.
3. Click the Internet Time tab.
4. Click Change settings.
5. Click to clear the checkbox to Synchronize with an Internet time server.
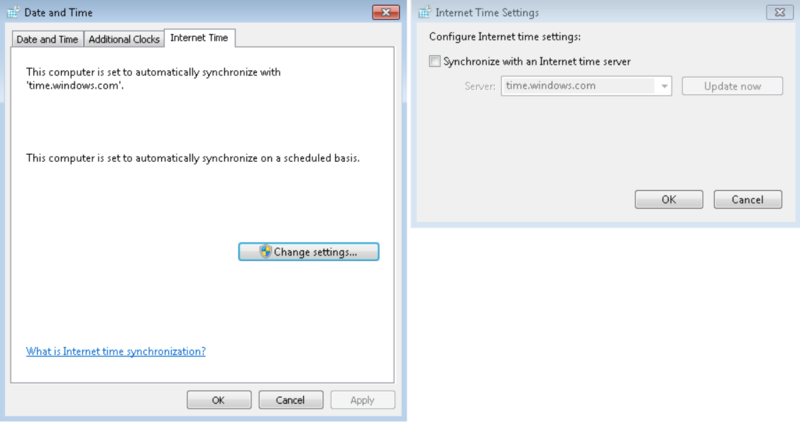
6. Click OK to save.
7. Close the Date and Time dialog box.
8. Close the Control Panel.
FAQ
A time-request exchange is started by the NTP client and the NTP server. The client can then determine the link latency, its local offset, and set its local clock to sync with the server computer’s clock.
Yes. Go to the «Internet Time» tab and select «Change Settings.» If you want the clock to sync automatically, click the «Synchronize with an internet time server» box; otherwise, uncheck it to set the clock manually.
It is always advised to select an NTP server that is located close to the device you wish to time-synchronize. It is also advised to use a server that is hosted by a reputable business or organization.
Conclusion
In this article, you earned How to Set NTP Server on Windows Server. As we promised, it was simple and straightforward to set up an NTP server on your Windows server instance. After setting up the NTP service on your server, Windows clients connected to the domain will synchronize with the domain controllers and other domain controllers in your environment. Keep in mind that if NTP is set up on a virtual machine, make sure it is configured to exclusively sync with the time service rather than the host system.
If you follow the steps of this guide properly then you can smoothly install and Set NTP Server on Windows without any errors but do not hesitate to contact us if you encounter any problems. Our technical support team will try their best to solve your problems.
Для синхронизации системных часов, серверов, рабочих станций, камер видео наблюдения, и других устройств в локальной сети.
Будем использовать локальный сервер точного времени с настроенным протоколом NTP (Network Time Protocol).
apt-get install ntp
Все настройки производятся в одном единственном файле ntp.conf.
Добавляем данные в него.
mcedit /etc/ntp.conf
разрешим доступ к серверу времени только из нашей локальной сети
echo "#Разрешим доступ к серверу времени только из нашей локальной сети
echo "restrict 192.168.0.0 mask 255.255.255.0 nomodify notrap nopeer ">> /etc/ntp.conf
Посмотрим конфигурационный файл ntp.conf
cat /etc/ntp.conf
если указанной ниже строки нет то добавляем ее или изменяем.
restrict default kod notrap nomodify nopeer noquery
* где:
restrict default — задает значение по умолчанию для всех рестриктов.
kod — узлам, которые часто отправляют запросы сначала отправить поцелуй смерти (kiss of death), затем отключить от сервера.
notrap — не принимать управляющие команды.
nomodify — запрещает команды, которые могут вносить изменения состояния.
nopeer — не синхронизироваться с хостом.
noquery — не принимать запросы.
restrict 192.168.0.0 mask 255.255.255.0 — разрешить синхронизацию для узлов в сети 192.168.0.0/24.
IP адреса 127.0.0.1 и ::1 позволяют обмен данные серверу с самим собой.
перезапускаем наш сервер NTP
service ntp restart
Для настройки автоматического запуска демона при загрузке системы, используйте специальную команду.
update-rc.d ntp defaults
Тестирование
Проверить состояние получения эталонного времени можно командой:
ntpq -pn
Ее вывод будет представлен в виде таблицы:
     remote           refid      st t when poll reach   delay   offset  jitter
==============================================================================
 0.debian.pool.n .POOL.          16 p    -   64    0    0.000    0.000   0.000
 1.debian.pool.n .POOL.          16 p    -   64    0    0.000    0.000   0.000
 2.debian.pool.n .POOL.          16 p    -   64    0    0.000    0.000   0.000
 3.debian.pool.n .POOL.          16 p    -   64    0    0.000    0.000   0.000
-195.141.190.190 10.17.10.20      3 u  520 1024  377   60.802    2.831   0.071
-213.141.154.170 89.109.251.22    2 u  999 1024  377   27.349    0.745   0.296
*89.175.20.7     .GPS.            1 u  35m 1024  376   28.392   -0.606   0.137
-85.21.78.8      89.175.22.41     2 u  937 1024  377   27.077   -0.428   0.496
+194.190.168.1   .GPS.            1 u  861 1024  377   30.165   -0.225  12.432
+85.21.78.91     89.109.251.23    2 u  743 1024  377   27.434   -0.619   0.247
В таблице указываются следующие параметры:
remote — адрес сервера точного времени (в этой графе отображаются серверы из списка в конфигурационном файле);
refid — вышестоящий сервер (тот, от которого сервер из предыдущей графы получает синхронизацию);
st — уровень (stratum) сервера;
t — тип пира (u- unicast, m- multicast);
when — время последней синхронизации;
poll — время в секундах, за которое демон NTP синхронизируется с пиром;
reach — состояние доступности сервера; после восьми успешных попыток синхронизации значение этого параметра становится равным 377;
delay — время задержки ответа от сервера;
offset — разница времени между нашим сервером и сервером синхронизации; положительное значение этого параметра означает, что наши часы спешат, отрицательное — что отстают;
jitter — смещение времени на удаленном сервере.
Слева от адреса сервера могут быть указаны следующие символы:
* сервер выбран для синхронизации;
+ сервер, пригодный для обновления (с которым можно синхронизироваться);
— с сервером синхронизироваться не рекомендуется;
х сервер недоступен.
Проверить, пригоден ли сервер из списка для синхронизации, можно при помощи утилиты ntpdate:
Устанавливаем ее
apt-get install ntpdate
и проверяем
ntpdate -q 127.0.0.1
server 127.0.0.1, stratum 2, offset -0.000000, delay 0.02563
 4 Dec 12:30:58 ntpdate[24565]: adjust time server 127.0.0.1 offset -0.000000 sec
В данном случае вывода видно, что сервер пригоден для синхронизации, его уровень — 2, смещение — 0.000000 мс, задержка — 0.02563 мс.
Настройка клиента в Linux
Для этих можно использовать 2 способа настройки — с помощью ntp или утилиты ntpdate.
NTP
Устанавливаем ntp:
Ubuntu / Debian:
apt install ntp
В настройка /etc/ntp.conf в качестве сервера оставляем только наш локальный сервер, например:
server 192.168.0.1
Остальные pool и server удаляем или комментируем.
Перезапускаем NTP:
service restart ntp
ntpdate
Утилита командной строки выполняет синхронизацию только при запуске. Для автоматизации процесса, добавляем задание в cron:
crontab -e
*/30 * * * * root /usr/sbin/ntpdate 192.168.0.1
* в данном примере задание будет выполняться каждые 30 минут. /usr/sbin/ntpdate — полный путь расположения утилиты, в разных системах может быть разным — проверить стоит командой which ntpdate.
Настройка клиента в Windows
В командной строке выполняем:
w32tm /config /manualpeerlist:"192.168.0.1,0x8" /syncfromflags:manual /update
Возможные ошибки
1. the NTP socket is in use, exiting
Данная ошибка возникает при попытке синхронизировать время с помощью ntpdate, когда в системе работает демон ntp.
Причина: NTP сокет в системе уже занят ntpd.
Решение: либо не использовать ntpdate, так как ntp умеет сверять время, либо отключить сервис ntpd командой service ntp stop.
2. Connection refused
Возникает при попытке выполнить команду ntpq -p.
Причина: нет разрешения на обращение к серверу.
Решение: проверьте, удастся ли выполнить запрос командой ntpq -pn 127.0.0.1 или ntpq -pn ::1. Также убедитесь, что настройка restrict позволяет серверу подключаться к самому себе по нужному протоколу.
3. no server suitable for synchronization found
Ошибка синхронизировать время с другим сервером синхронизации.
Причина: сервер синхронизации не доступен по одной из причин: 1) не работает или выключен, 2) установлен restrict, 3) на сервере не запущен ntpd, 4) нет сетевой доступности из-за проблем на сети или брандмауэра.
Решение:
Убедиться, что сервер доступен по сети.
Проверить настройки ntp.conf — наличие соответствующего restrict.
Проверить состояние сервиса командой service ntp status.
Проверить настройки брандмауэра — убедиться в наличие правила, которое разрешает UDP порт 123.
Network Time Protocol (NTP) runs on the Transport Layer port 123 UDP and enables accurate time synchronization for network computers. This irons out time inconsistencies on servers and clients during file logging or replication of server databases among other resources.
In this article, we’ll outline the process of installing, configuring, and querying an NTP server on Windows Server 2019.
NTP Server
NTP servers utilize the Network Time Protocol to send time signals to servers across the globe upon request. NTP servers use the Universal Time Coordinated (UTC) time source for time signal synchronization.
The main purpose of NTP servers is to provide time synchronization for servers and computer networks with other major network servers and clients across the globe. In turn, this streamlines communications and transactions all over the world.
Installing and Configuring an NTP Server on Windows Server 2019
The process of installing, configuring, and querying an NTP Server on Windows Server 2019 is quite straightforward.
Set the NTP service to Automatic option
To start off, Hit Windows Key + R to launch the Run dialogue. Next, type services.msc and hit ENTER.
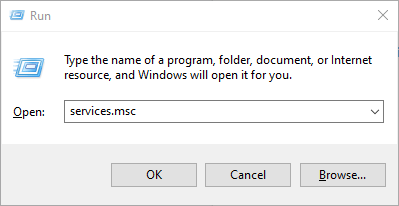
In the ‘Services’ window, locate the service ‘Windows Time’. Right-click and select the ‘Properties’ option as shown:
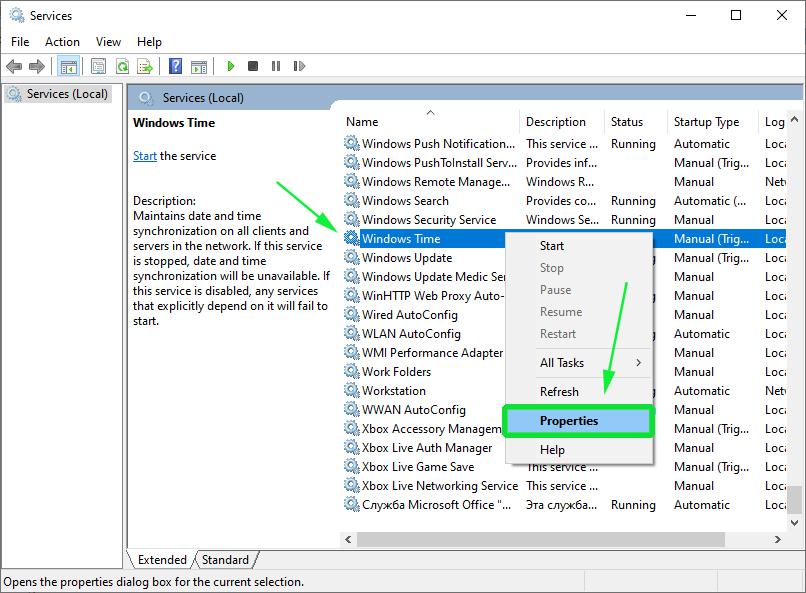
On the pop-up window, select the Startup type as ‘Automatic’.

Finally, click on ‘OK’ and then ‘Apply’.
Configuring NTP Server using Registry Editor
As before, launch the run dialogue by pressing Windows Key + R. Then type ‘regedit’ and hit ENTER.
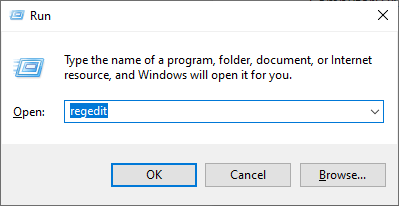
The Registry editor will be launched as shown:
Navigate to the path shown below:
Computer\HKEY_LOCAL_MACHINE\SYSTEM\CurrentControlSet\Services\W32Time\TimeProviders\NtpServer
On the right pane, locate and double-click the ‘Enabled’ file as shown:
Set the Value data to 1 and click OK.
Next, follow this path.
Computer>HKEY_LOCAL_MACHINE>SYSTEM>CurrentControlSet>Services>W32Time>Config
At the right pane locate the ‘Announce Flags’ file.
Double click on the file and set its value to 5 in the ‘Value Data’ section.
Finally, reboot the NTP server for the changes to take place. Head back to the services Window, right-click on ‘Windows Time’ and select ‘Restart’
Configuring NTP Server on Windows 2019 using Windows PowerShell
If you love working in Powershell, launch Powershell as Administrator and enable NTP server using the command:
Set-ItemProperty -Path “HKLM:\SYSTEM\CurrentControlSet\Services\w32time\TimeProviders\NtpServer” -Name “Enabled” -Value 1
Next, configure Announce Flags value as shown:
Set-ItemProperty -Path “HKLM:\SYSTEM\CurrentControlSet\services\W32Time\Config” -Name “AnnounceFlags” -Value 5
Finally, restart the NTP server using the command:
Restart-Service w32Time
Important Note: UDP port 123 must be open for the NTP server traffic to reach your Windows Server 2019. If the NTP servers are unreachable, you can check your firewall settings to fix this.
Other useful commands
- w32tm /query /configuration to check and shows the NTP server configuration.
- w32tm /query /peers for checking the list of NTP servers configured alongside their configuration status
- w32tm /resync /nowait to force-synchronize time with your NTP server.
- w32tm /query /source to show the source of the time.
- w32tm /query /status to reveal NTP time service status.
Final take
Now your Windows Server 2019 clock is synchronized with time the NTP server’s pool.ntp.org and works as NTP client. You can achieve full network and accompanying infrastructure time synchronization by synchronizing all network workstations, servers, routers, hubs, and switches.
Since NTP servers operate over the UDP protocol using TCP/IP, these network infrastructures must be working efficiently for effective NTP server operation. In case you want to make time servers on windows server 2019 hosted on a virtual machine, you should disable the virtual machine time synchronization settings and sync their time with the domain Windows Server 2019.