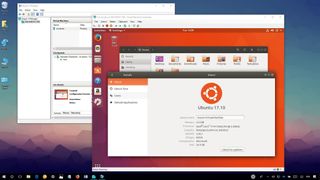
(Image credit: Windows Central)
Although it’s now possible to run a number of Linux distros natively on Windows 10, these environments can be somewhat limited in features and tools you can use. Also, you can only pick from three distros, including Ubuntu, SUSE Linux Enterprise, and OpenSUSE Leap, and you’re stuck with the command-line interface, which means that you can’t run any of the graphical experiences (e.g., GNOME, KDE, XFCE) or Linux-based graphical applications.
Of course, you can always install your favorite Linux distro on a second machine, but if you don’t have one, it’s still possible to run a full-blown version of Linux using a virtual machine (VM).
If you’re running Windows 10, you can enable Hyper-V on your device to create a VM to install your preferred distro whether you’re a developer or an enthusiast who just wants to know what’s the Linux fuzz all about.
In this Windows 10 guide, we’ll walk you through the steps to install most Linux distributions on virtual machines using Microsoft’s Hyper-V virtualization feature.
- Guide requirements
- How to enable Hyper-V on Windows 10
- How to create a virtual machine using Hyper-V
- How to install Ubuntu Linux using Hyper-V on Windows 10
Guide requirements
To run a Linux virtual machine on Windows 10, you’ll need the following:
- A computer with support for Hyper-V.
- An ISO file to install your preferred Linux distribution.
In this guide, we’ll be using Ubuntu version 17.10, which you can download from the official Ubuntu website. However, it’s possible to install version 16.04, which might be a more stable version of the open source project, and you can also install other distros, including:
- CentOS and Red Hat Enterprise Linux.
- Debian.
- SUSE.
- Oracle Linux.
- FreeBSD.
How to enable Hyper-V on Windows 10
Hyper-V is a virtualization technology from Microsoft available on Windows 10 Pro, Enterprise, and Education, and it allows you to create one or multiple virtual machines to install and run different OSes on the same physical hardware.
Verifying Hyper-V support
Although Hyper-V is part of Windows 10, there is a minimum hardware requirement a computer must meet to enable the feature.
- 64-bit CPU with Second Level Address Translation (SLAT).
- Processor must support VM Monitor Mode Extension (VT-c on Intel chips).
- 4GB of memory at a minimum.
In addition, you have to make sure the Virtualization Technology and Hardware Enforced Data Execution Prevention options are enabled on your system BIOS.
You can quickly verify your computer has the required support for Hyper-V using Systeminfo:
- Open Start.
- Search for Command Prompt and click the top result.
- Type the following command and press Enter:
systeminfo.exe - Under Hyper-V Requirements, if the result reads Yes, then you can run Hyper-V.
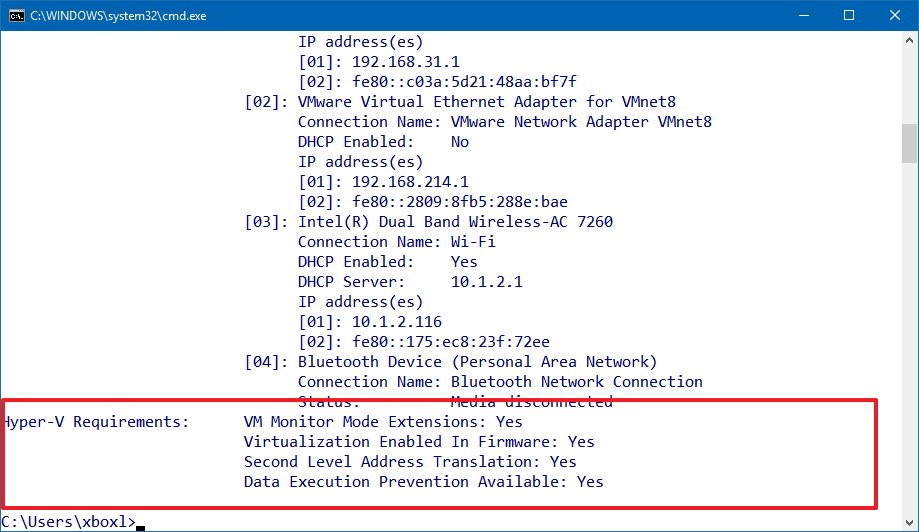
If the command displays No under Hyper-V Requirements, then your hardware doesn’t support this feature, or you need to make sure to enable it manually.
Enabling Hyper-V
Use the following steps to enable Hyper-V on Windows 10:
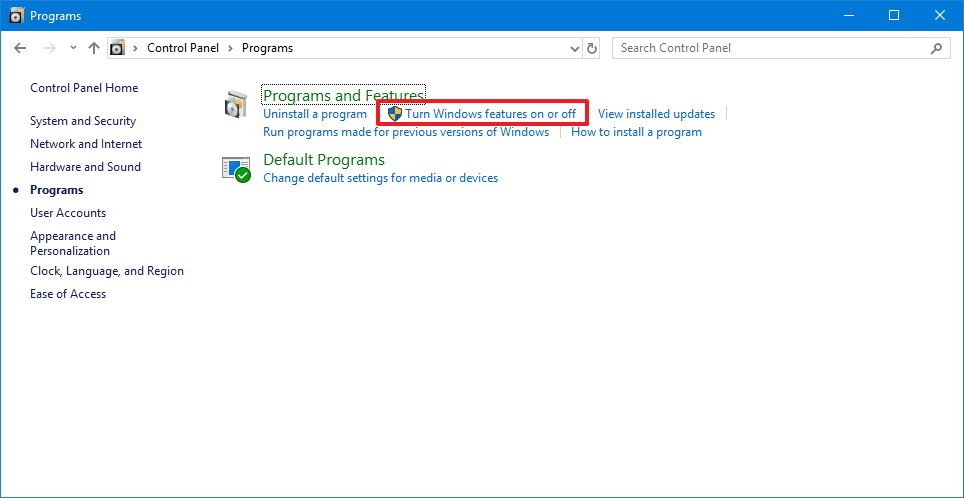
- Open Control Panel.
- Click on Programs.
- Click on Turn Windows features on or off.
- Check the Hyper-V option making sure: Hyper-V Management Tools and Hyper-V Platform are also selected.
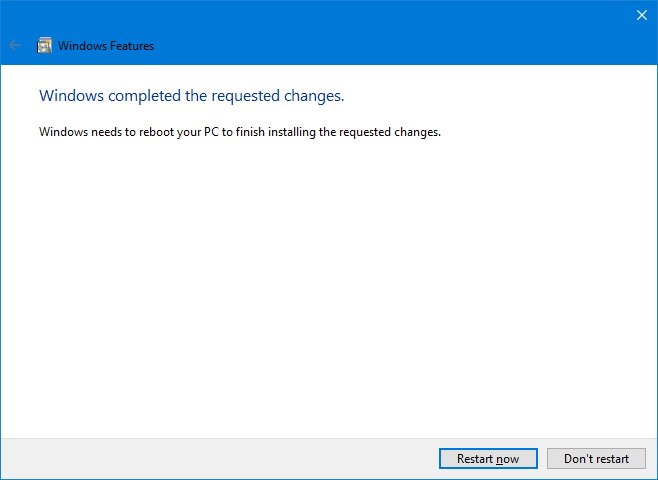
- Click OK to begin the process.
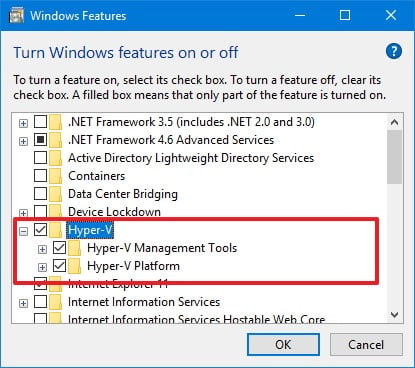
- After the installation completes, click Restart now to apply the changes.
How to create a virtual machine using Hyper-V
Once you’ve completed adding the virtualization layer to Windows 10, you’ll need to create a virtual machine for the Linux distribution you want to use.
However, before you do that, you must create a virtual switch to allow the VM to connect to the internet.
Creating a virtual switch
Use the following steps to configure a virtual switch on Hyper-V:
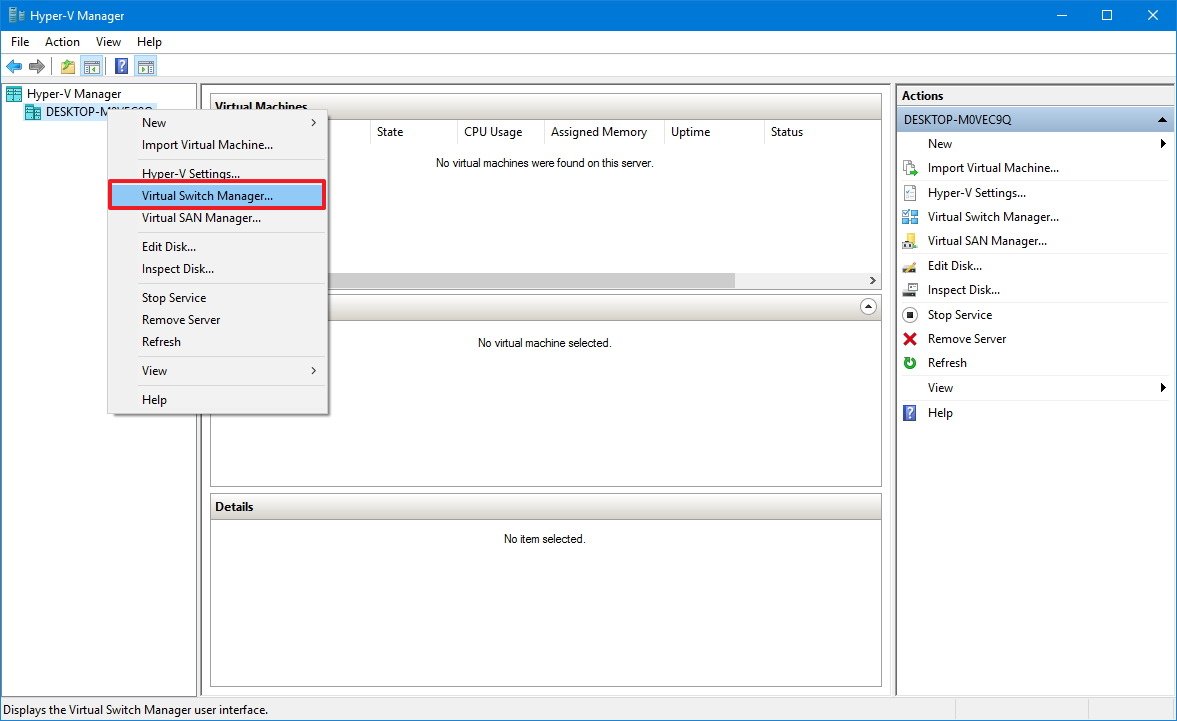
- Open Start.
- Search for Hyper-V Manager and click the top result.
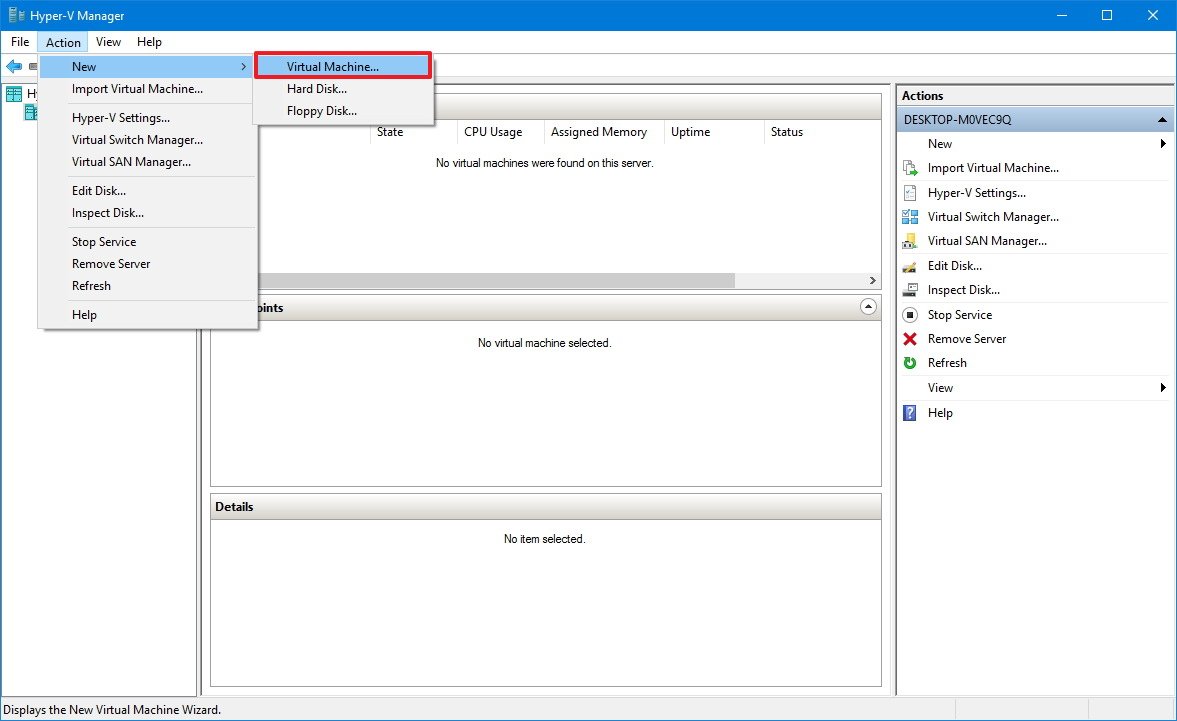
- Click on the Action menu.
- Select New and click on Virtual Switch Manager.
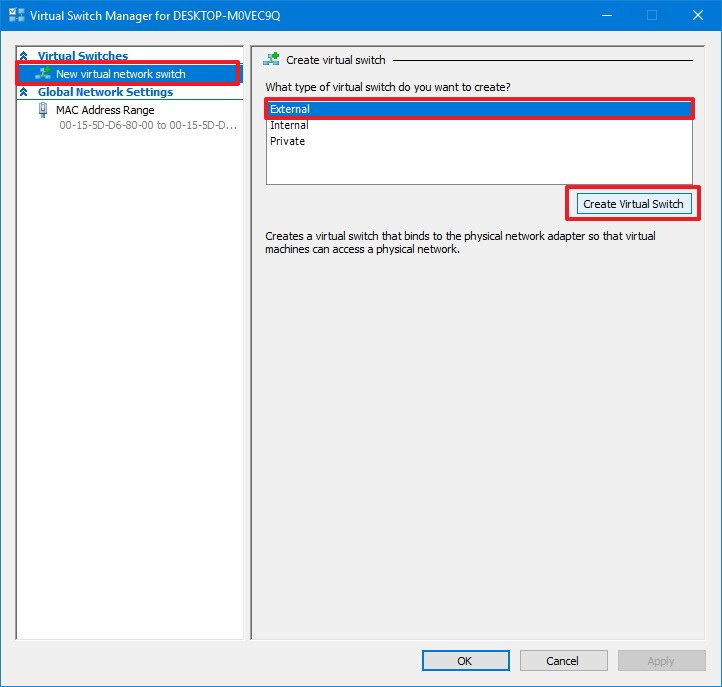
- On the left pane, select New virtual network switch.
- On the right, select External.
- Click the Create Virtual Switch button.
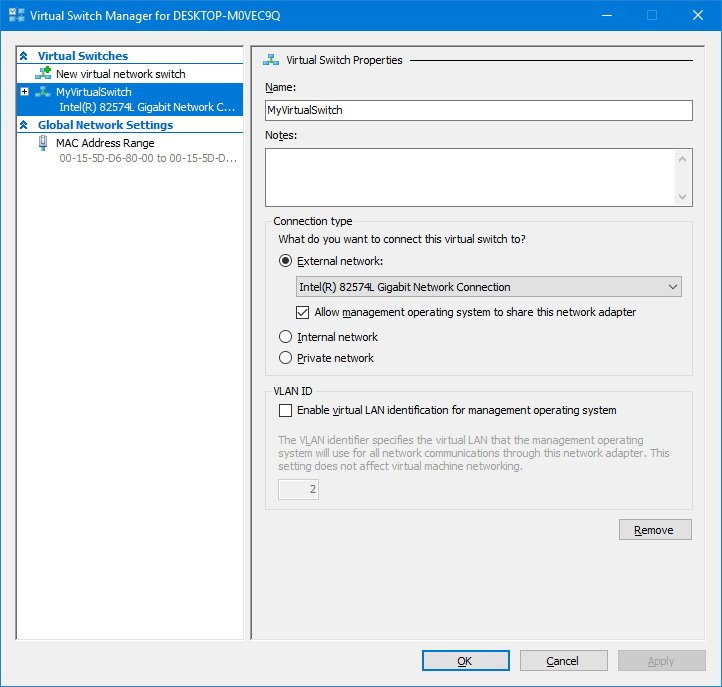
- Enter a new descriptive name for the switch (e.g., MyVirtualSwitch).
- Under connection type, make sure your network adapter is select on External network.
- Click Apply.
- Click OK.
Creating a virtual machine
After creating the virtual switch, you can proceed to create a new virtual machine:
- Open Start.
- Search for Hyper-V Manager and click the top result.
- Click on the Action menu.
- Select New and click on Virtual Machine.
- Click the Next button.
- Enter a descriptive name for your virtual machine (e.g., vm-ubuntu).
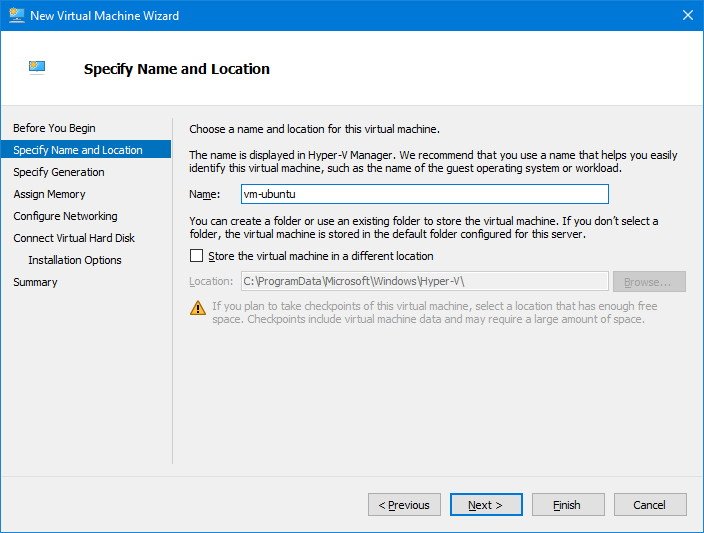
- Use the default location to store your virtual machine, or check the Store the virtual machine in a different location option to select a different path.
- Click Next to continue.
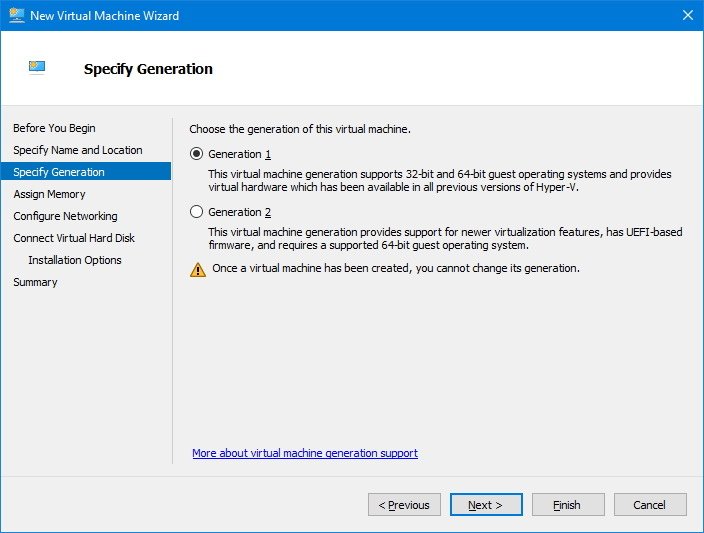
- You can leave the default Generation 1 option selected. Or you can select Generation 2 if you want a UEFI-based firmware.
- Click Next.
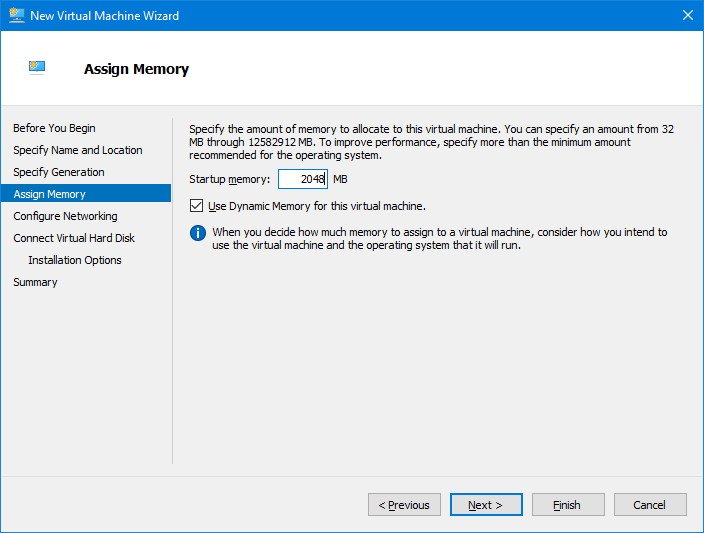
- Select the amount of RAM to allocate for your virtual machine. In the case of Ubuntu, you need a minimum of 2GB of memory.You can allocate as much memory as you want, but this setting will always depend on the physical memory available on your computer.
- Click Next.
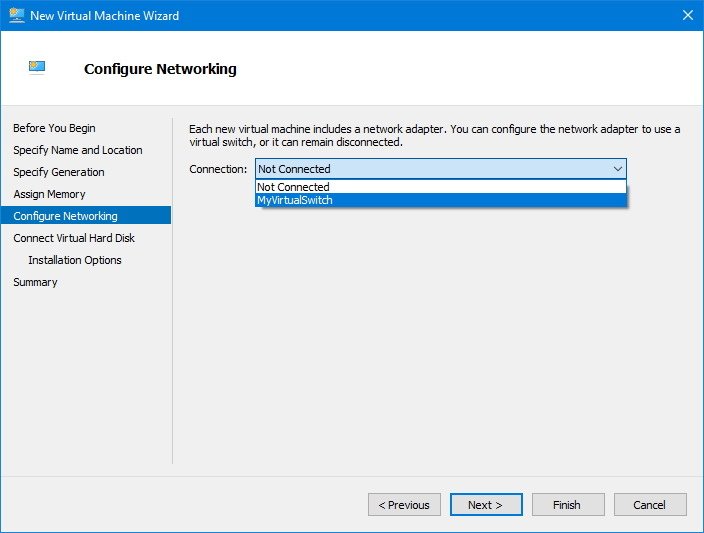
- Use the drop-down menu to select the virtual switch you created earlier.
- Click Next.
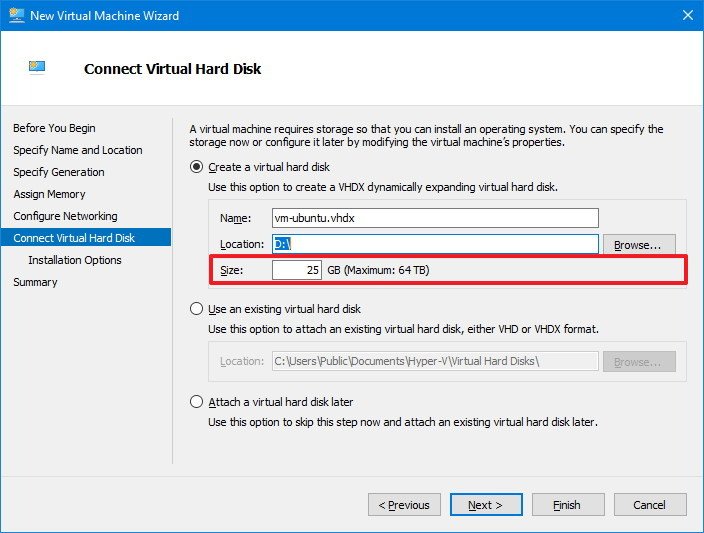
- You can leave all the default settings to create a virtual hard drive, but under Size make sure to allocated at least 25GB of storage, which is the minimum required to run Ubuntu.
- Click Next to continue.
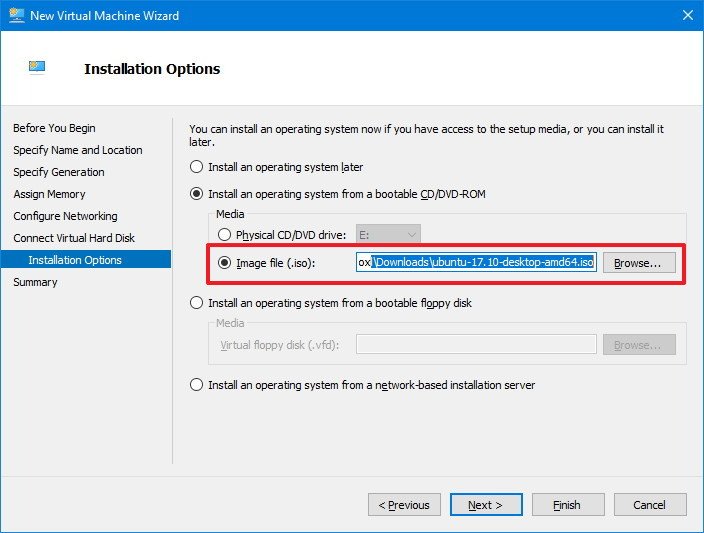
- On Installation options, select the Install an operating system from a bootable CD/DVD-ROM option.
- Select the Image file (.iso) option.
- Select the path for the ISO file with the Ubuntu installation files.
- Click Next.
- Click Finish.
How to install Ubuntu Linux using Hyper-V on Windows 10
The last step is to start the virtual machine and install the Linux distribution you want to use.
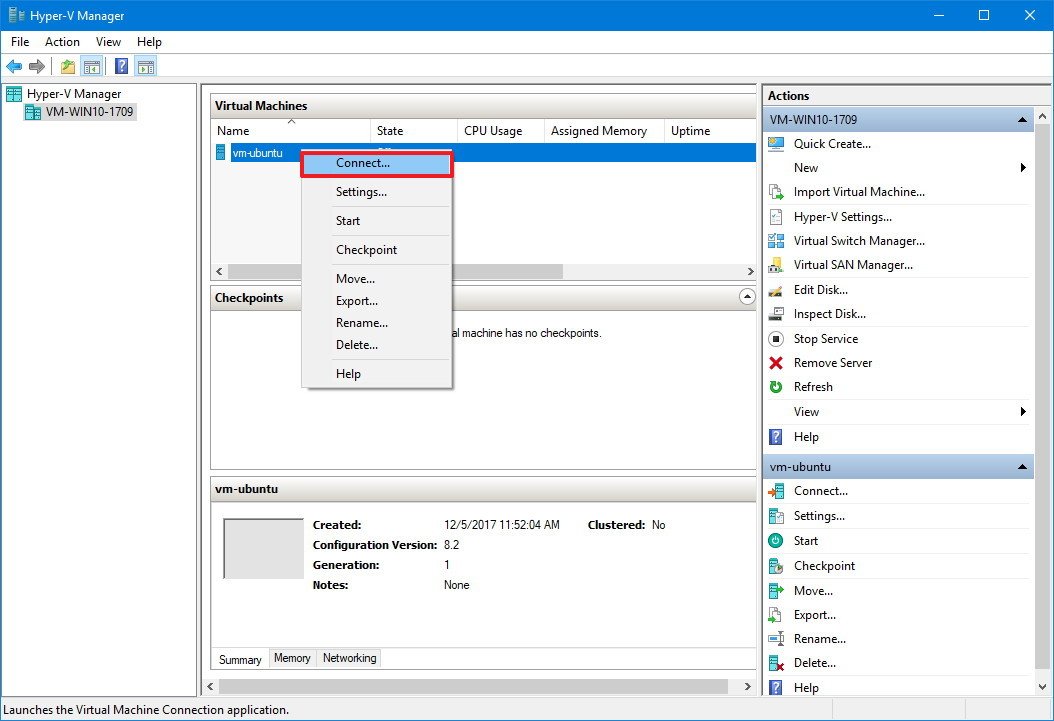
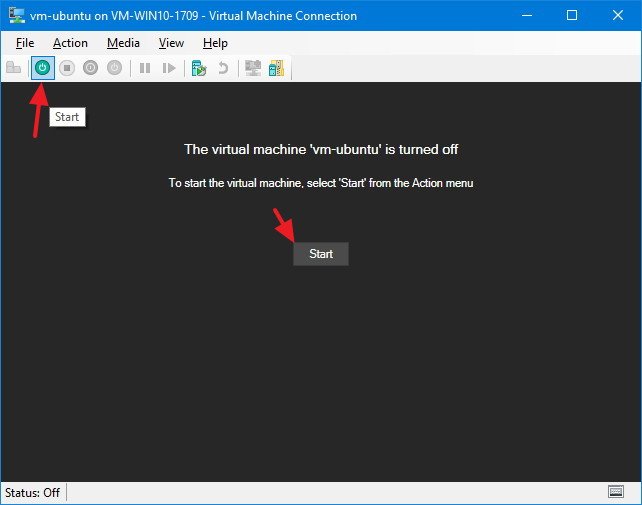
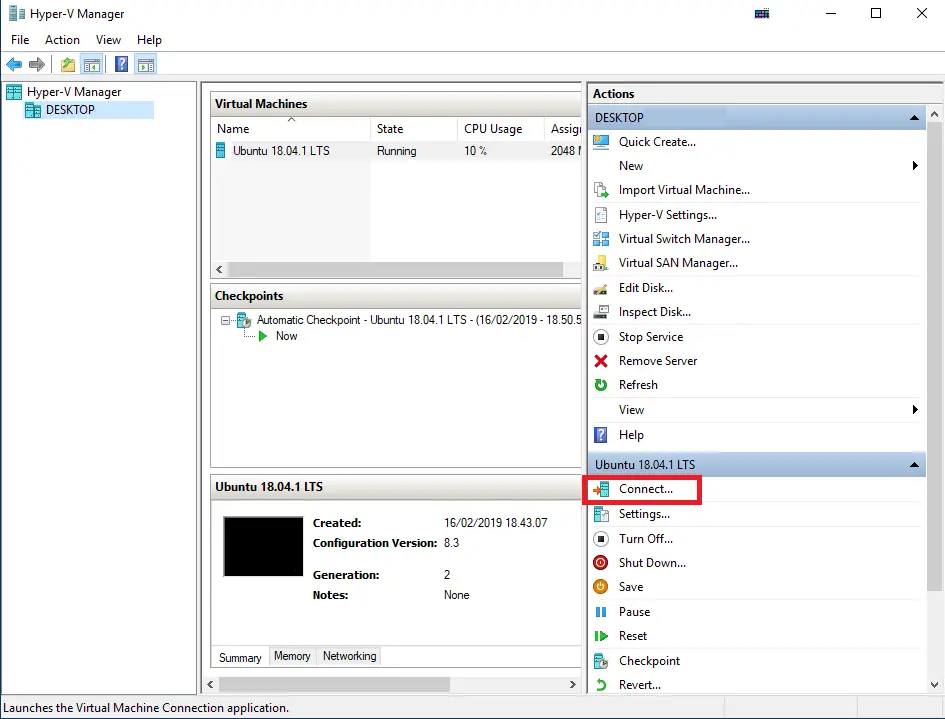
- On Hyper-V Manager, under Virtual Machine, right-click the newly created device, and select Connect.
- Click the Start (power) button.
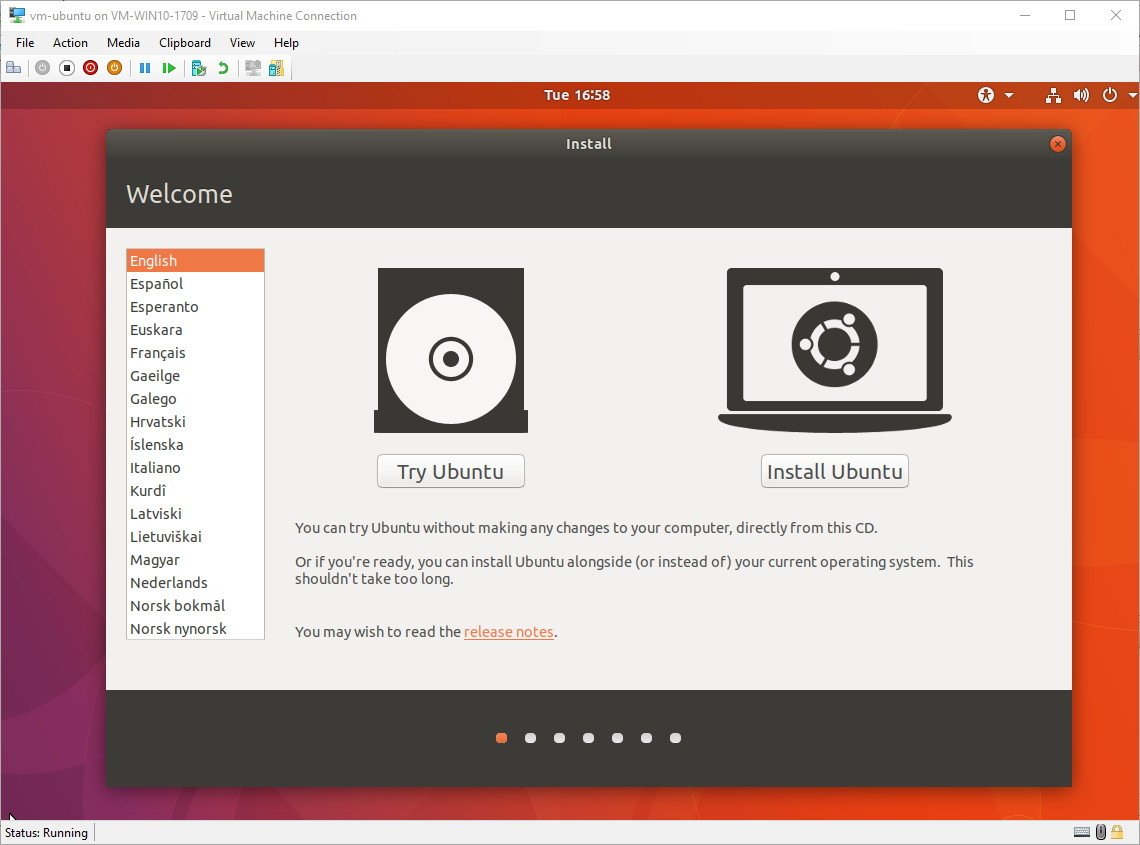
- Select your language.
- Click the Install Ubuntu button.
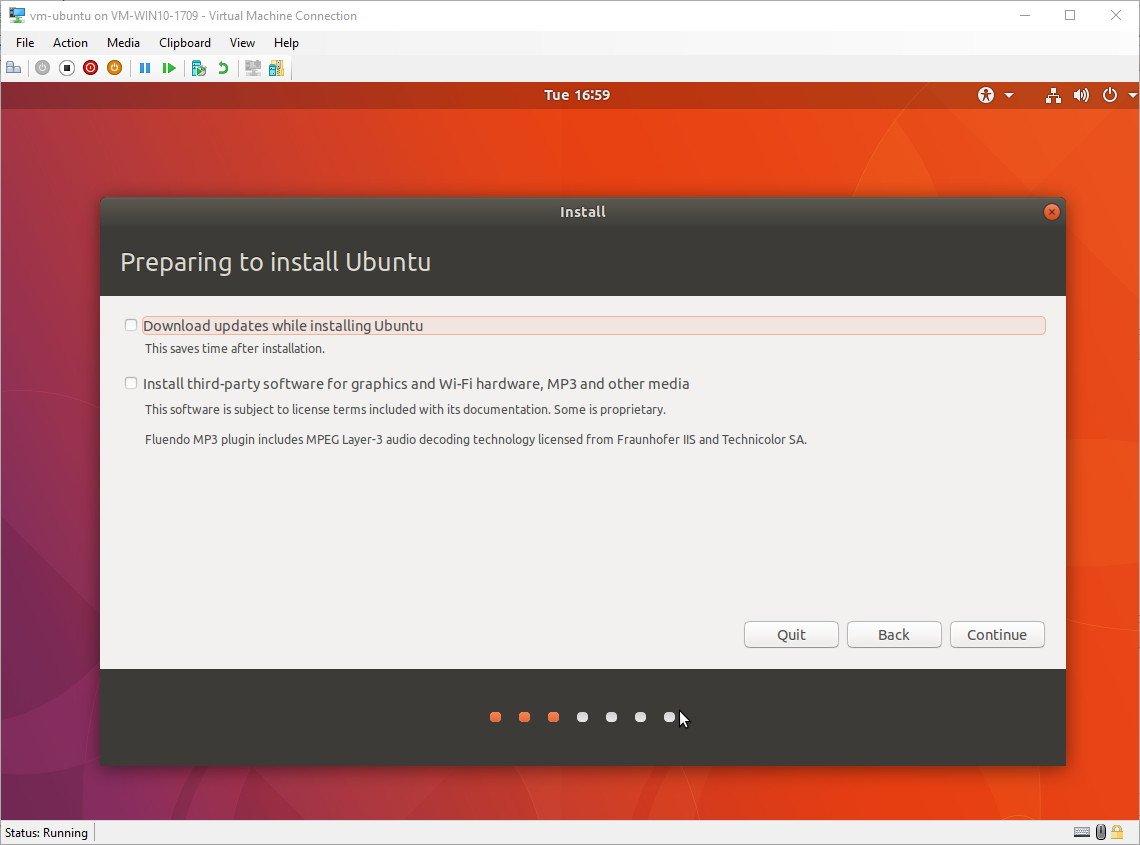
- Check the Install third-party software for graphics and Wi-Fi hardware, Flash, MP3 and other media option.
- Click Continue.
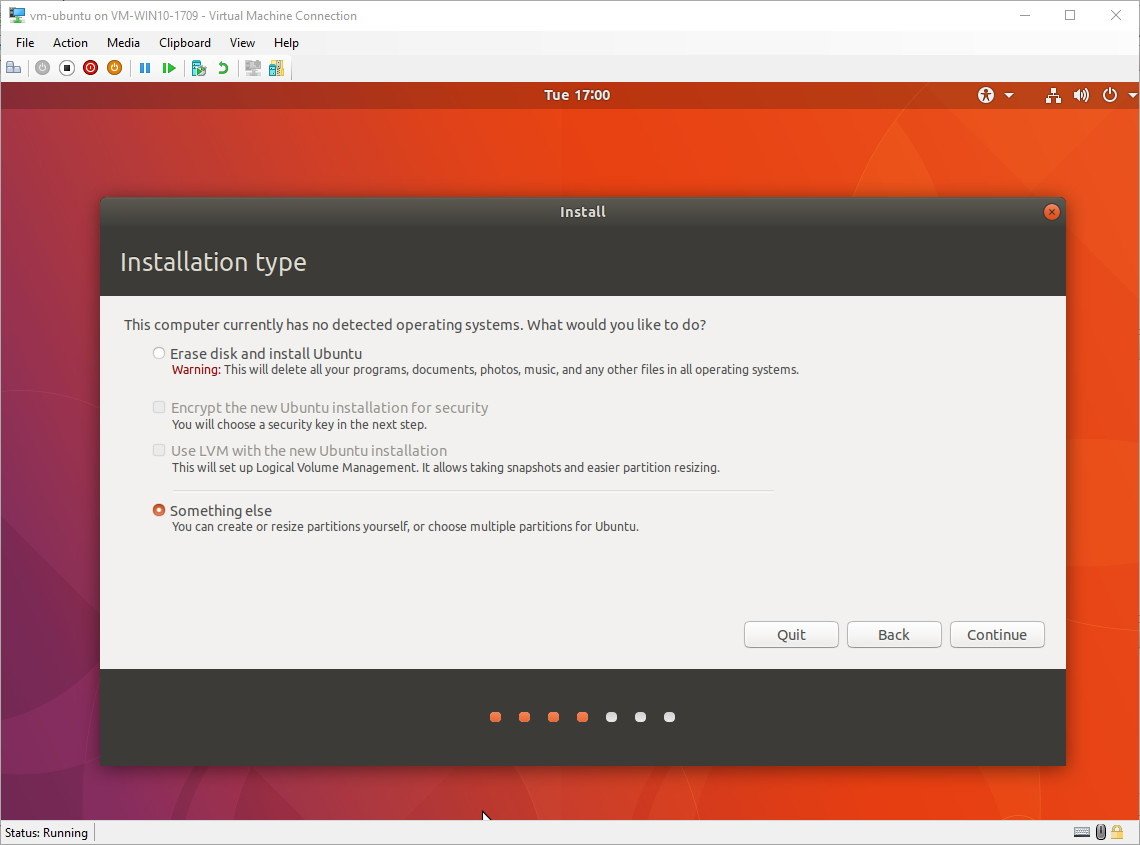
- Select the Something else option.
- Click Continue.
- Double-click the /dev/sda drive.
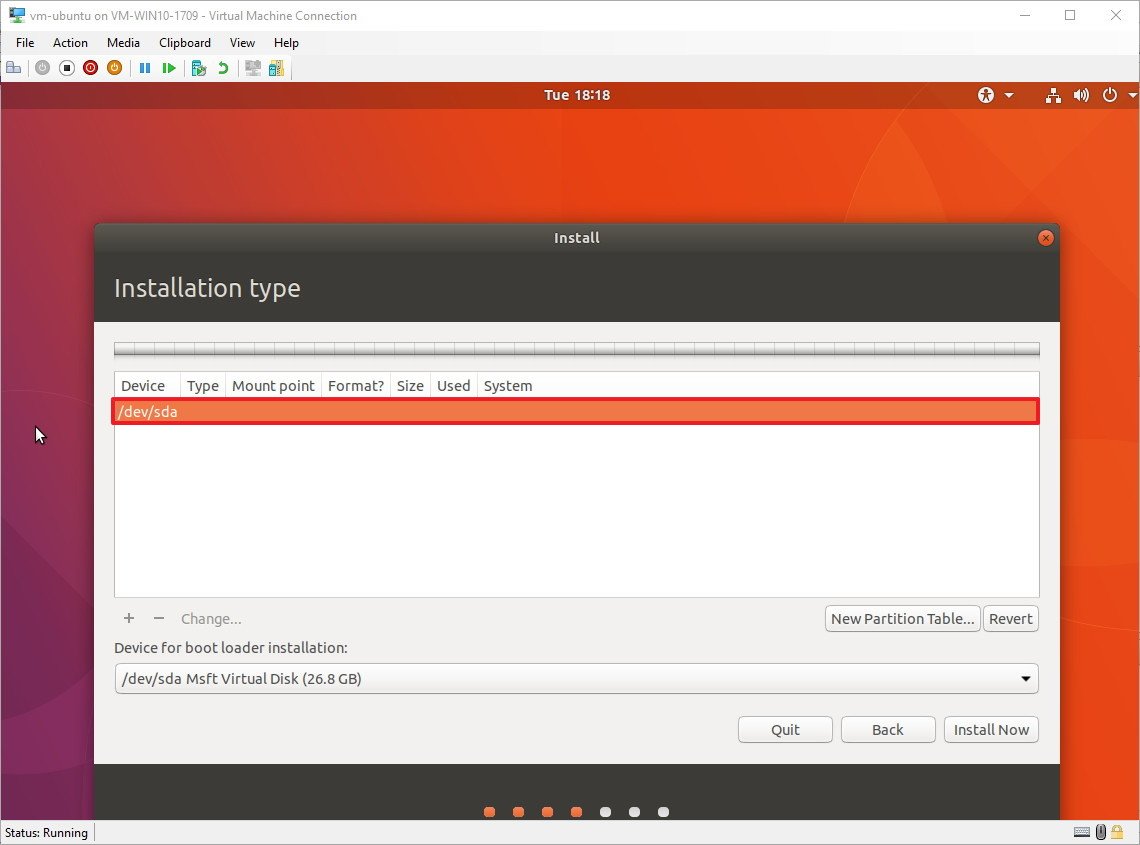
- Click Continue.
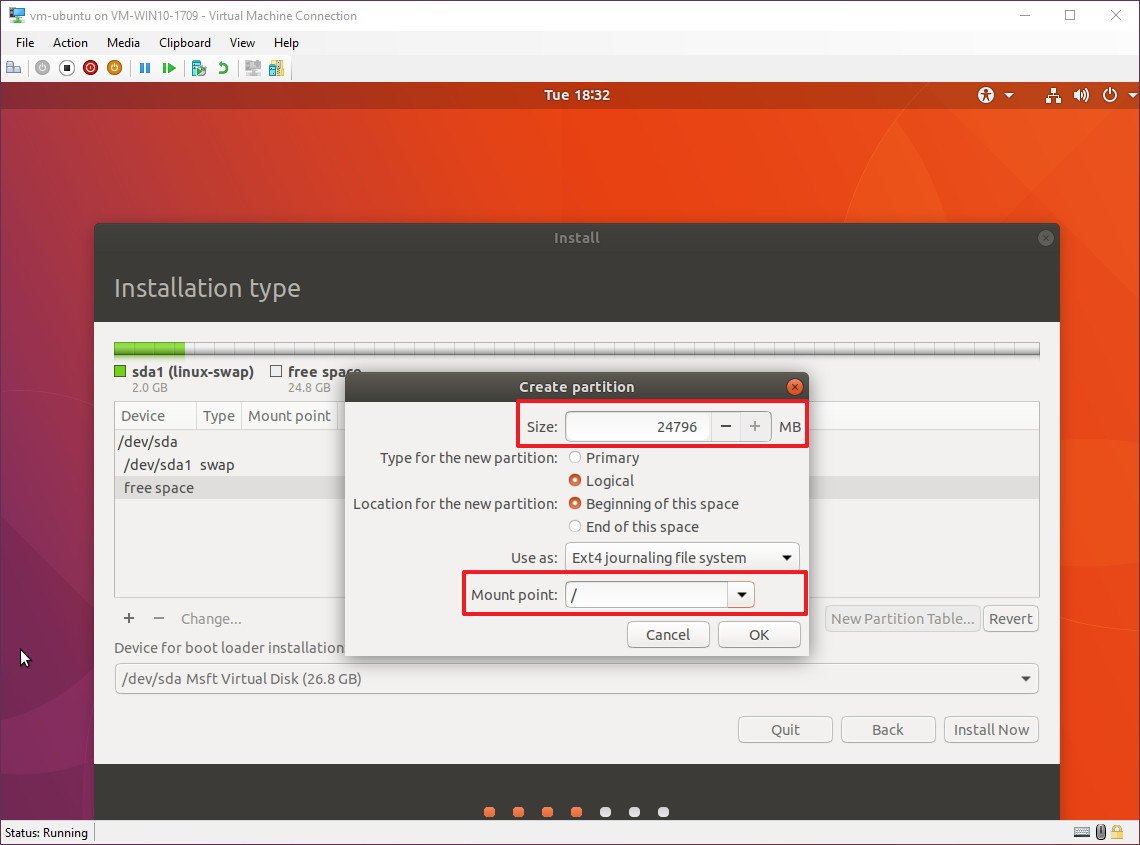
- Double-click free space.
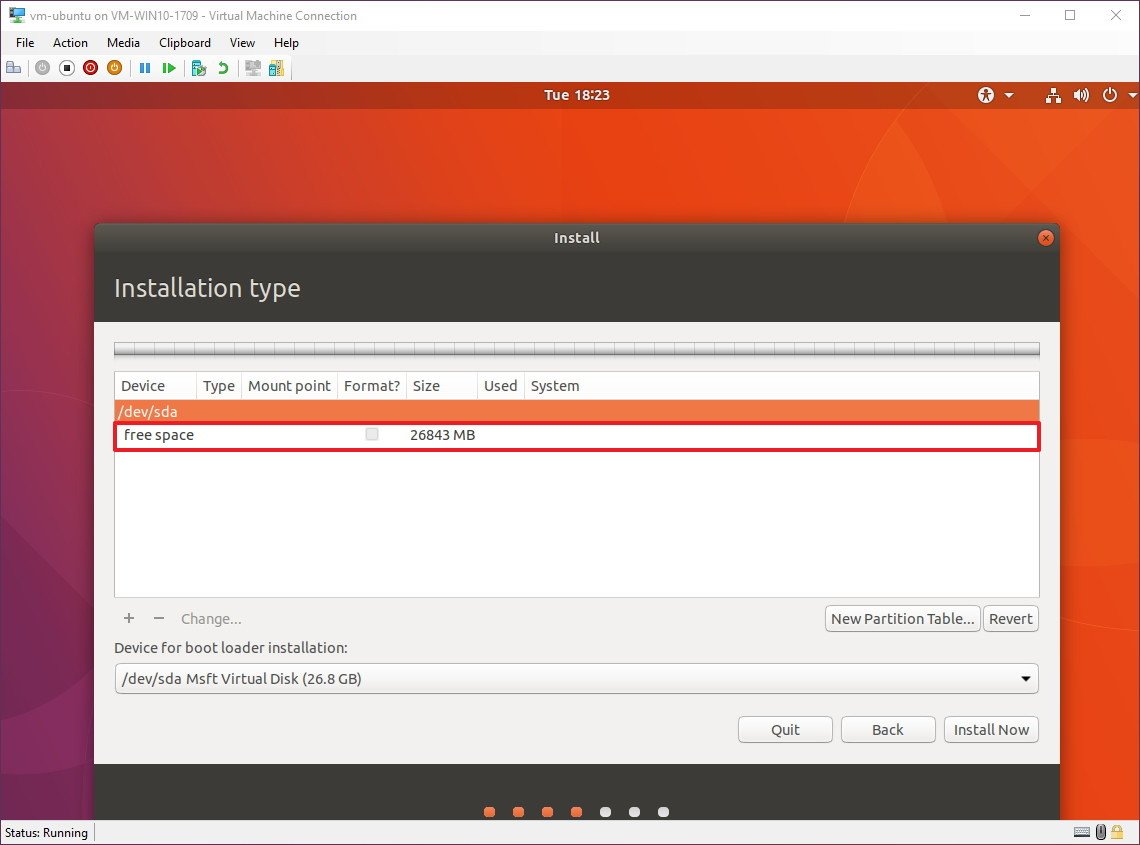
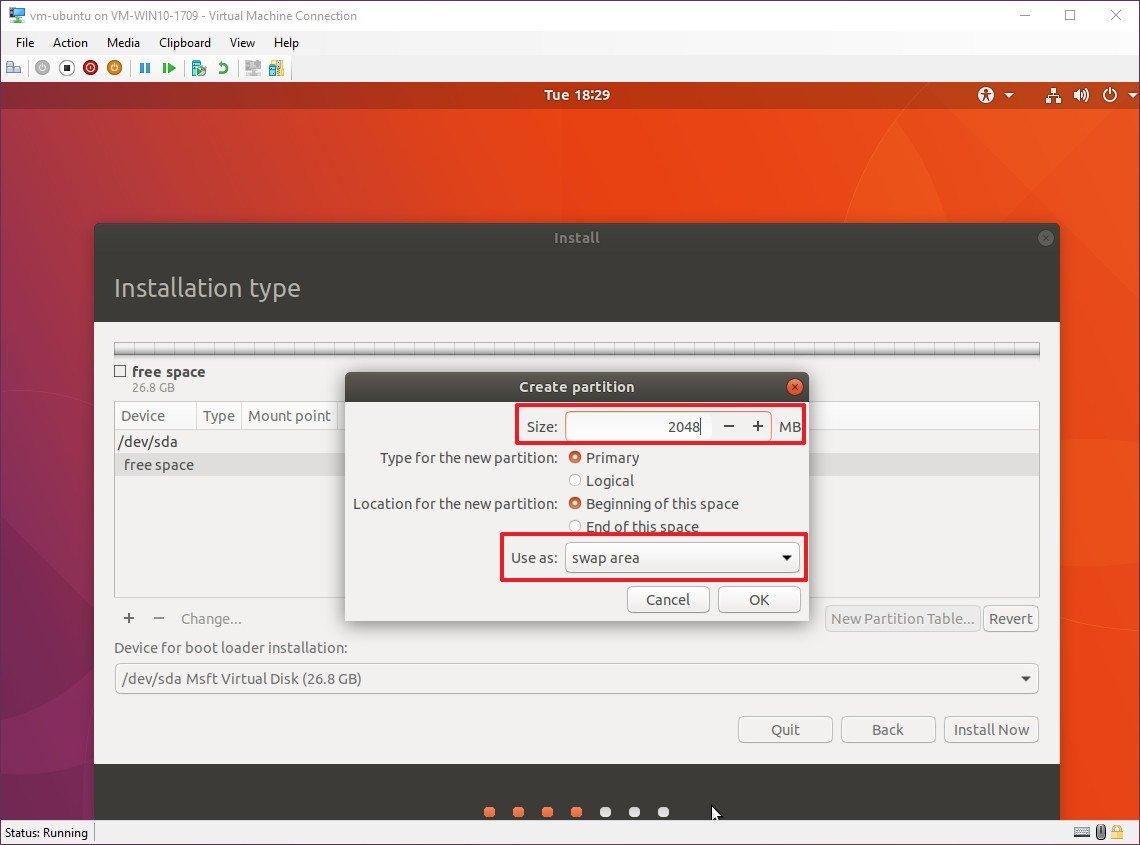
- Under «Use as,» use the drop-down menu and select Swap area to create a swap partition.
- Under «Size,» select the amount of space for the swap partition, which should be about 2x of the amount of RAM allocated for the virtual machine.
- Click OK.
- Double-click free space again.
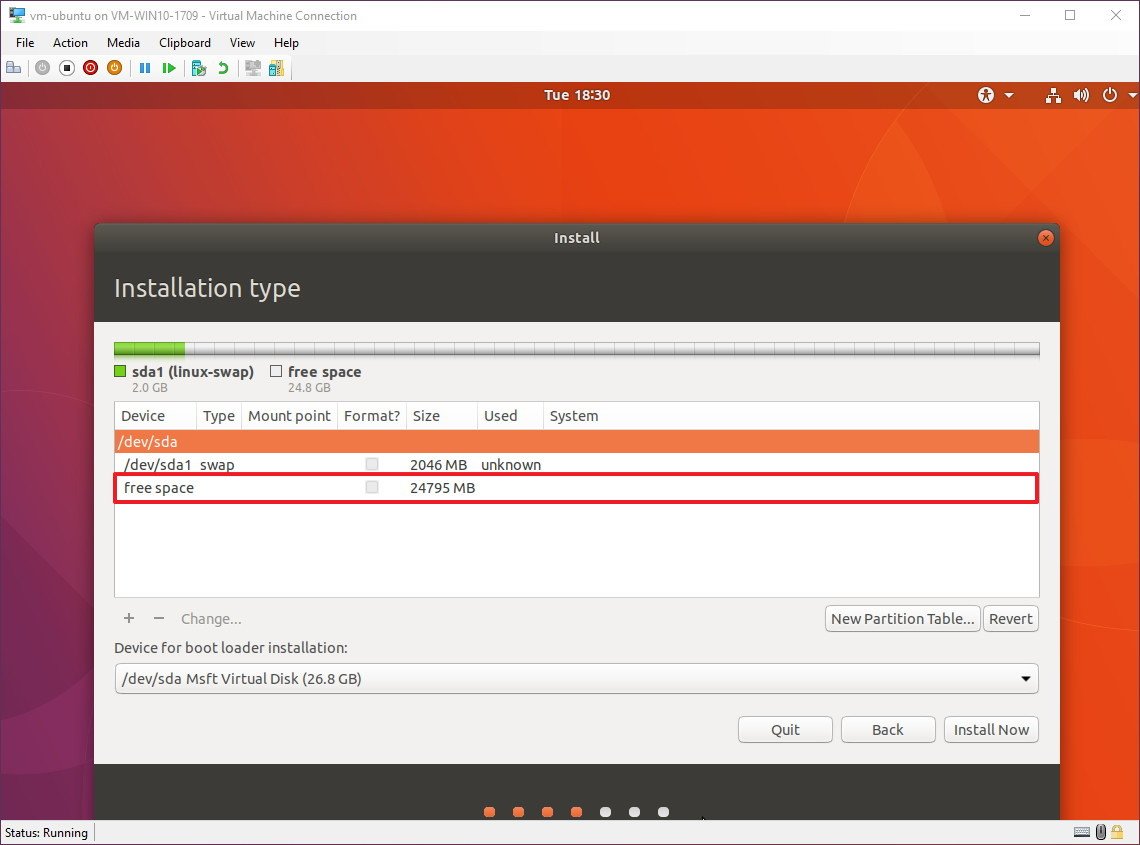
- Select the amount of space to allocate for the installation.
- Under «Mount point,» use the drop-down menu and select root /.
- Click OK.
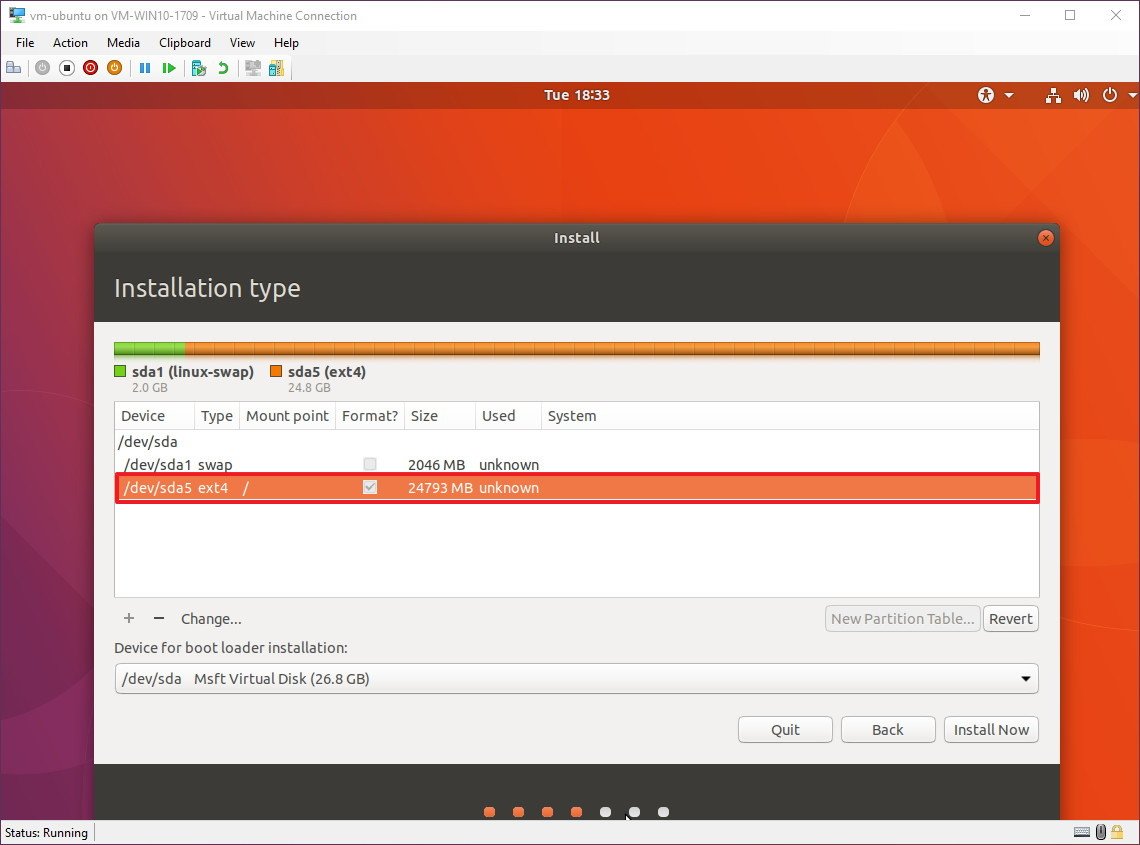
- Select the ext4 partition from the list.
- Click the Install Now button.
- Click Continue to install Ubuntu.
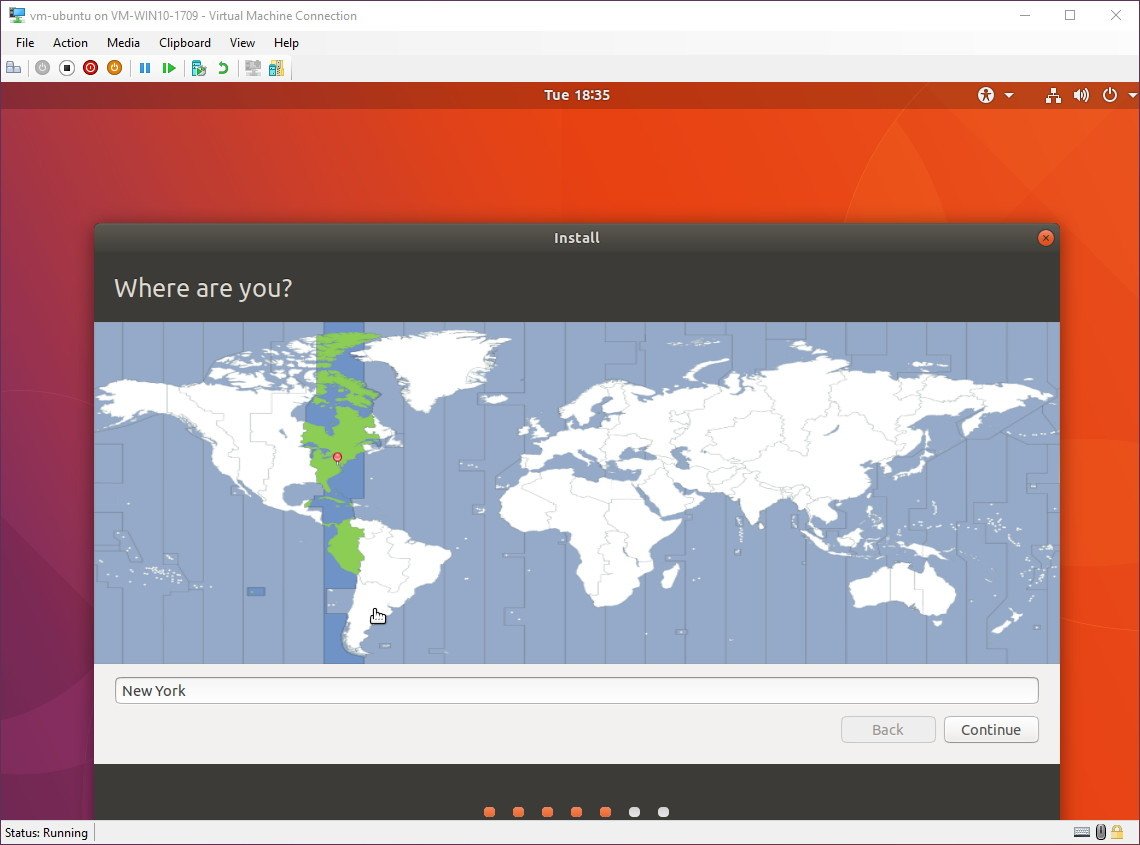
- Select your time zone.
- Click Continue.
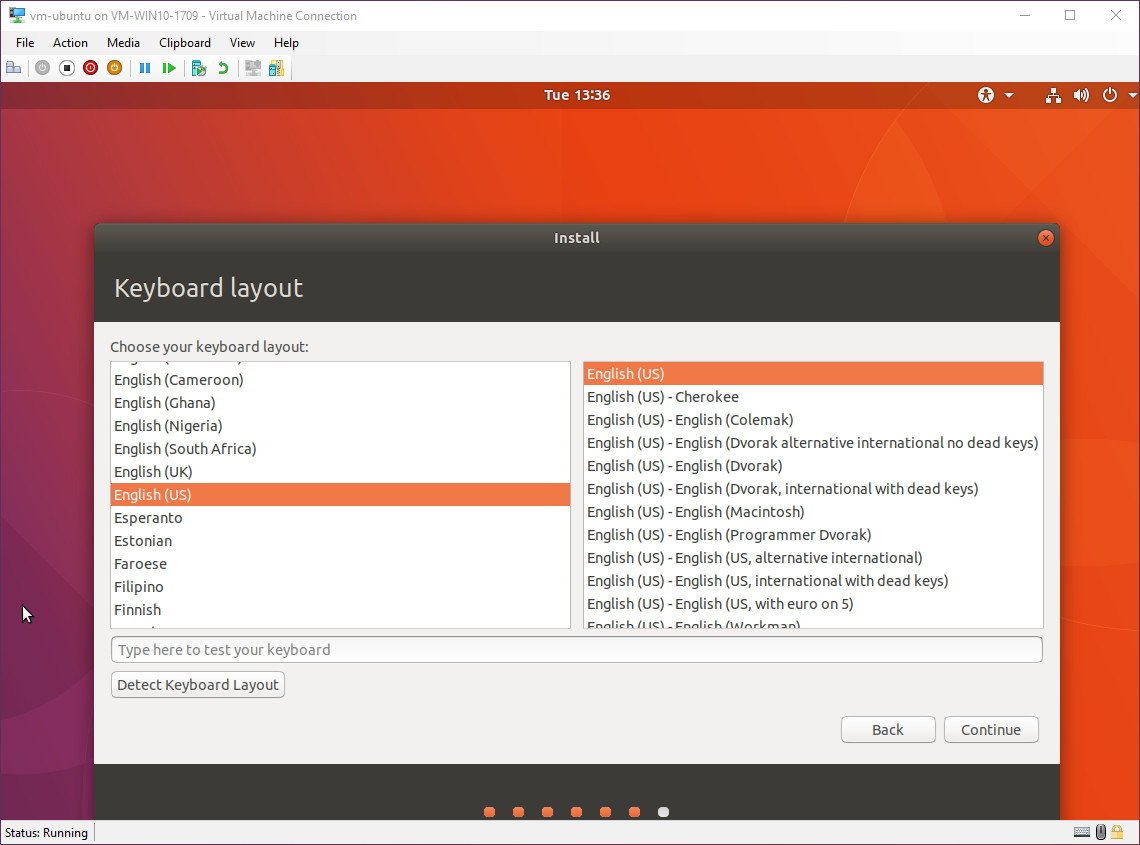
- Select the keyboard layout.
- Click Continue.
- Create a user account with your information.
- Click Continue.
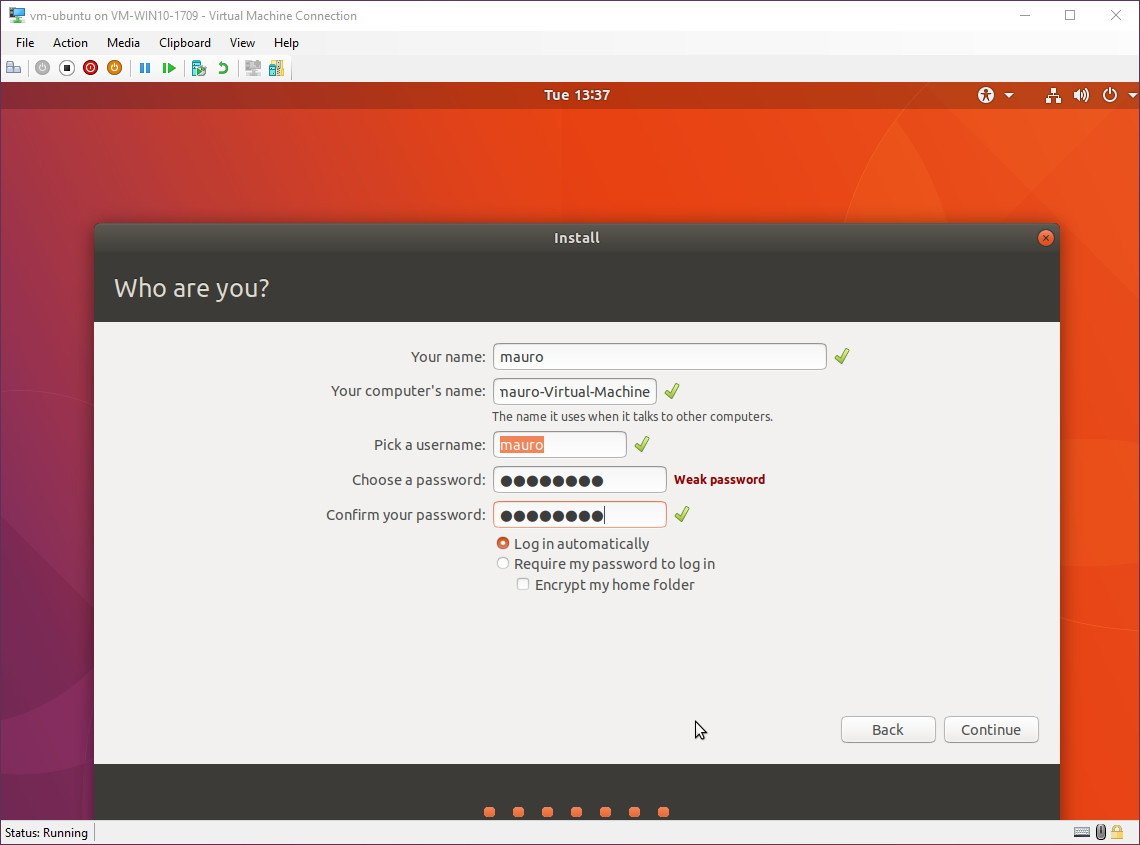
- Restart the virtual machine to finish the setup.Quick Tip: If during the final restart process, you get a message to remove the installation and press Enter, but hitting the key won’t restart the VM, just click the Turn off button and then turn it back on again.
After completing the steps, you can just turn on the VM and start using Ubuntu Linux alongside Windows 10.
While we’re focusing this guide setting up Ubuntu, you can also refer to these instructions to run other distributions of Linux.
More Windows 10 resources
For more helpful articles, coverage, and answers to common questions about Windows 10, visit the following resources:
- Windows 10 on Windows Central – All you need to know
- Windows 10 help, tips, and tricks
- Windows 10 forums on Windows Central
All the latest news, reviews, and guides for Windows and Xbox diehards.
Mauro Huculak is technical writer for WindowsCentral.com. His primary focus is to write comprehensive how-tos to help users get the most out of Windows 10 and its many related technologies. He has an IT background with professional certifications from Microsoft, Cisco, and CompTIA, and he’s a recognized member of the Microsoft MVP community.
Virtualization is not a new term to most of us, with the help of the Virtual Machine program on Windows 10 we can run and test various other operating systems just like one on some physical machine. There are many benefits of working with a Virtual Machine such as it allows us to test new systems safely, let’s use older software on old versions of Windows, or test unknown software with a second Windows without using the actual operating system. Here in this article, we will explain what is a virtual machine and for what purpose one should use which Virtual Machine platform?
What is a virtual machine?
Generally, on our PC or Laptop, we have only one operating system either Windows or Linux, however, what happens if we want to try out some other OS. For example, we have Windows 10 PC and want to try Ubuntu Linux, in such a scenario either you can set a boot manager that offers a selection of which operating system should be started when the system is booted. Well, this whole procedure is not only time-consuming and error-prone, moreover, if you don’t know how to do it properly it can even cause a breakdown of the system’s current OS.
However, this all doesn’t need anymore, we already have a technology called virtualization achieved using different hypervisor platforms for Windows, Mac OS, and Linux. Hypervisor programs such as Hyper-V, VMware Workstation, and Oracle VirtualBox are some popular ones that allow a virtual machine (VM) to run in isolation on a host system as if it were on a physical machine. For better compatibility, the VMWare and VirtualBox virtualizers also offer extensions that have to be installed on the guest system so that, for example, USB 3.0 or switching to the guest system is possible using the mouse focus alone. You can also know the difference between Type I and II Hypervisor and the best Type 1 virtualization platforms in the opensource category.
In clear words, the virtual machine (VM) running on our existing physical machine virtually has the ability to be executed like any other program on the desktop and can be displayed as a window or on a full screen. The OS which runs on VM known as guest OS and our physical machine’s main OS is called the host. Yes, a host that is taking care of guest requirements so that it could run properly. Guest can access the hardware and other attached peripheral devices.
In short, you can install everything within the virtual machine that would be executable on the real hardware. Regardless of whether it’s an old Windows XP, Linux, BSD, Solaris, OS / 2, macOS X, or the latest insider build of Windows 10.
Key Benefits of using Virtual Machines on Windows 10
1. Control on Resources
Well, the Virtualization platforms use the computing power and memory available on the host system, thus there would not be any massive loss in performance as compared to the expectation for running an OS on a real system. However, the major advantage is we can control the CPU performance and RAM allocation to installed Guests. This means, according to the demand it is possible to set how much RAM and CPU cores should be used by any particular guest OS. For example, we have two virtual machines one is Ubuntu Linux with GUI and the other is CentOS server CLI, of course, the GUI one needs more RAM and processing power than a command-line interface, hence we can customize the hardware resource on Hypervisors accordingly.


2. Networks with virtual machines
Guest machines get their network connectivity from the host machine, thus we can control its mode or turn it off to isolate the guest system completely from the outside world. There are multiple modes such as by default the network connection of the guest system is via “NAT” in which the client does not receive its IP from the main DHCP server or router whereas in “bridge mode” the guest system behaves like a normal PC, it receives its own IP address from the router and behaves like any other PC in the network.
You can use these network settings to determine how the VM is connected to the network, depending on the area of application.
Furthermore, we can set a shared folder that facilitates data exchange between the virtual machine and the host system. Access to the folder from the real system can also only be set up as “read” to prevent the attack of a virus from the guest system on the host system.
3. Ability to run an older OS like Windows XP on Windows 10
Many of us especially the new generation didn’t get a chance to experience one of the dominant operating systems of the world i.e Windows XP, thus if any of us want to try an old operating system then virtual machines are the best available way.
4. Test new Linux or trial versions of Windows Server
As we know there are hundreds of Linux variants and every month something new is developing, thus we cannot test all of them on our physical machines but on Virtual Machine, we can. Also, if you are learning Windows Server then trying it on VM with other couple guests’ VMs to simulate a real-life server-client environment will be quite easy.
Furthermore, we can safely try out new feature upgrades of Windows 10 that appear every six months in a virtual machine before having the new build installed on the real system.
5. Experience unknown applications
Although Windows 10 has now a sandbox feature to test software in an isolated environment, however, the moment we close the Sandbox window, it automatically resets everything. Therefore, if you want to safely test new programs or those unknown sources from the Internet for as long as you want then the virtual environment gives us that freedom.
6. Virus protection
Virtualization offers enough protection from various kinds of Viruses, as VM platforms keep different machines separate from each other. Therefore, those who are in the testing field or developing can test security programs safely, it is very unlikely that viruses will jump from the guest system to the host system.
7. Better usage of powerful hardware
Today’s processors even in the PC of home users are enough powerful that we couldn’t actually use their complete processing power. For example, a common i7 desktop with 12 GB RAM, we can’t use its complete power by just doing regular day to day tasks, in the same way, today’s servers are way competent than we think. Therefore, to not only proper usage of their powers & resources but to save electricity, space, and carbon footprint, virtualization helps a lot.
Best virtual machines free for Windows 10 32 or 64-bit
When it comes to Virtualization platforms for professional or home users of Windows 10 32-bit or 64-bit, then there are only a couple of or rather I say only three best possible options. Of course, Docker and Vagrant like platforms are there but inclined more towards advance and enterprise users. The market of virtualization solutions is getting bigger day by day but especially for server services in the cloud for example VMware Cloud, Google Cloud, Microsoft with Azure, VMWare Cloud, or other solutions with Infrastructure as a Service (IaaS) show.
However, regular users somewhere confined to only three solutions on Windows 10- Microsoft Hyper-V, Vmware Workstation, and Oracle Vmware. Hence, these are the only best virtualization solution available to fulfill the demands of Home and professional users.
Some people may say about Qemu but it is an emulator rather than a virtualizer (one that has access to the same hardware available on the system), thus Qemu cannot match the performance of Hypervisors. However, when we use Qemu with KVM Kernel-based Virtual Machine (KVM ) on Linux then it provides high performance and virtualization of any operating system at near-native speed. But unfortunately, KVM is a Linux kernel and only available for Linux platforms, thus, using Qemu on Windows 10 is out of the question.
1. VMWare Workstation Player
Vmware is not a new name in the world of Virtualization, they have been in the market for many years and offer a range of enterprise products, however, two products for which VMware is mainly known among the home and professional Windows 10 desktop users are VMWare Workstation Player and VMWare Workstation Pro. The difference lies in the range of functions and the price.
The best thing VMware Workstation Player (download) is free for personal usage, however, compared to the pro version, of course, lacks many functions. Well, that’s acceptable but it even lacks some functions which are available in open-source Oracle VirtualBox such as snapshots or the simultaneous execution of several VMs without opening a separate app again. Despite some limitations and especially the lack of snapshots, VMWare Workstation is better in terms of performance to VirtualBox on Windows 10 (it is my personal experience and could be different for others). Even it is quite easy to handle and also offers unattended installation for common Linux operating systems such as Ubuntu.

Creating VMs on VMware is not a cumbersome task, just create a new VM, define memory and hard disk space along with ISO of the Linux or Windows OS you want to install on it. It provides support to almost all available platforms from Windows 3.1 to Windows 10 including Linux distributions and also other systems such as MS-DOS, FreeBSD, Netware, or Solaris. VMware workstation player is available for Windows and Linux platforms. One thing that also needs to be noted that we can run Vmware Player along with Hyper-V installed Windows 10.
How to install Vmware workstation Player on Ubuntu Linux
2. Oracle VirtualBox
VirtualBox is popular not only due to its wide range of features but also because it is an open-source platform, thus can be used without any restrictions by home, professional users, and educational institutions. The virtualization software is available for Windows, Mac OS, Solaris, and Linux.
If we talk about guest OS supports, then VirtualBox has extensive compatibility with most of the available operating systems such as MS-DOS, Windows 3.1 to Windows 10, most Linux distributions, Solaris, BSD, OS / 2, and Mac OS X…
The user interface of VirtualBox has been improved quite a lot since the release of version 6 and ease of handling and usage of VM on it is no better or worse than that of VMWare Workstation Player.
On VirtualBox, we can perform various configurations such as hard drive, optical data storage device or ISO file, memory, network, USB, a shared folder for exchange with the host system, and much more.
One of the interesting features of VirtualBox is Snapshots, which are basically backup points that can be created, deleted, or cloned at any time. Snapshots are handy when we are installing some unknown software or upgrading our Virtual Guest OS, and incase if some problem occurs later, we can reset the system to the latest backup point. Just like Vmware, it is also possible to use VirtualBox side by side with Microsoft Hyper-V, however, performance toll will be there.

3. Microsoft Hyper-V
Hyper-V is also a free virtualizer from Microsoft that only available for Windows. However, only Pro editions of Windows 10 will have this feature; thus, if you are on Windows home, then you should go for the above-mentioned platforms. Apart from Windows 10, Windows Server 2016 or 2019 will also have it out of the box.
Also, your Windows or Server should be using a 64-bit processor with Second Level Address Translation (SLAT and at least 4GB of RAM to run Hyper-V, which is common in all modern systems.
The users can enable the Hyper-V feature either using PowerShell or via GUI “Turns Windows feature on or off” Settings.
Well, the quickest method is the command line, simply press Win+X and open Windows PowerShell (Admin) to run the below-given command:
Enable-WindowsOptionalFeature -Online -FeatureName Microsoft-Hyper-V -All
After that restart your PC or Server.
VM Setup on Hyper-V
We can use local stored ISO images to create VMs on Hyper-V and apart from that, there is also an option to Quickly create an evaluation version of Windows 10 Enterprise and three Ubuntu versions of virtual machines by downloading their files online. For other systems use ISO images from other systems via “Local installation source”.

A special feature of Hyper-V is the dynamic memory management. Here you set a minimum and maximum value. Hyper-V then uses the memory dynamically and does not block it when the VM is started. However, for newbies, Hyper-v will be a little bit complicated such as its Network Management is not like VMWare Workstation Player and VirtualBox. For example, by default, the virtual switch will be in NAT mode, and to have a bridge connection, you must first create a new virtual switch using the Hyper-V Manager.
Usage of created VMs is simple in Hyper-V, we can start, stop and stop them using corresponding buttons available in an icon bar.
Taking backup of Virtual Machine Guest OS is also possible using the Snapshot feature that is known as checkpoints in Hyper-V.
Which Virtual Machine should you use on Windows 10?
All three can be used to virtualize any existing popular operating system on Windows 10, however, if you want to narrow down your choice then that depends on your need and familiarity with Virtualization technology.
Hence, if you are a beginner then VirtualBox and VMWare Workstation Player are the best because of their interfaces and ease of usage. However, performance-wise I found VMware much better to run Linux distros on Windows 10 than VirtualBox whereas on the other hand users who are looking for a well-balanced and feature-rich platform then Oracle Virtualbox is good to go.
Well, advanced users, those who want a well-integrated virtualizer into the host operating system with a dynamic memory management feature to run several active VMs at the same time then Hyper-V would be the one to ponder upon.
Hyper-V vs VirtualBox: A basic comparison
Other Articles:
- How to check virtualization enabled on Windows 10
- Create and mount virtual disks on Windows
- How to Set up Virtual machines with QEMU
- Advantages and disadvantages of virtualization
- How to set VirtualBox Web Service as background
- Quick Steps to Create a Virtual Hard Drive
Время на прочтение
6 мин
Количество просмотров 13K
Операционная система Linux похоже в очередной раз пытается ворваться в жизнь российского пользователя. И многим Windows-пользователям хочешь – не хочешь приходится пытаться ужиться с данной операционной системой. Можно много говорить о том, что это все придирки, что операционные системы сейчас как близнецы, что проблемы с «пересаживанием» пользователя на Linux выдумки тех, кто его не разу не видел, но… Лучше всего приучать постепенно и дать пользователю возможность попробовать операционную систему «в деле» до того, как вы ее ему поставите.
Я буду вести повествование с точки зрения преподавателя, которому необходимо перейти на отечественный дистрибутив (в моем случае это будет один из школьных дистрибутивов семейства Альт). Это будет интересный вызов еще и с той точки зрения, что известные дистрибутивы имеют больше информации о своем использовании, а данный дистрибутив хоть и похож на остальные Linux, но имеет свои «самобытные» черты и особенности.
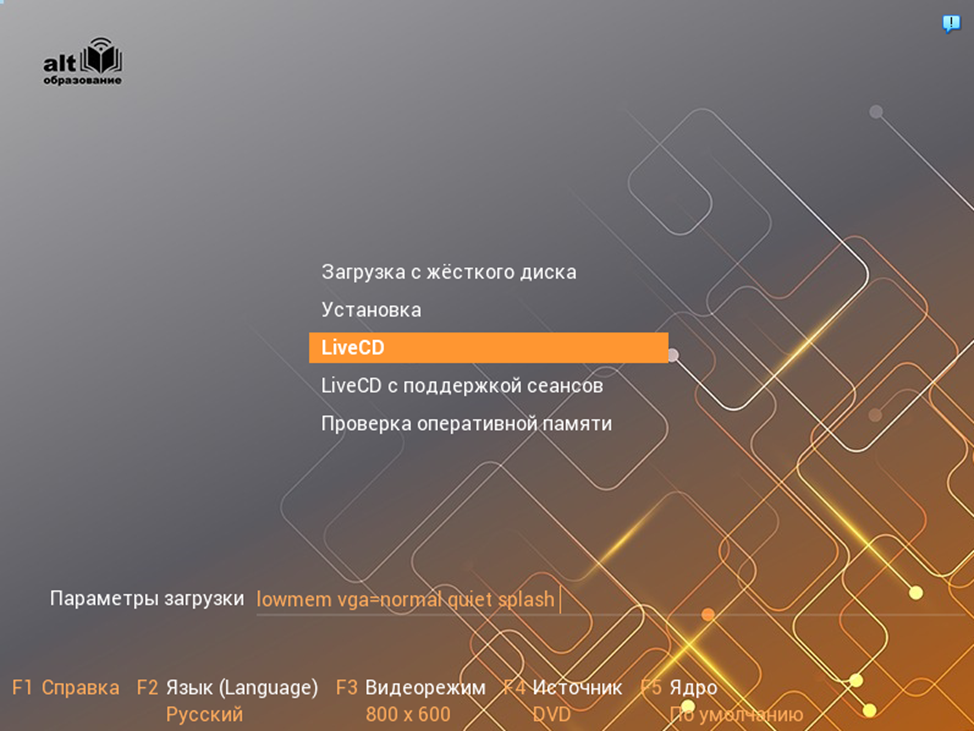
LiveCD (точнее LiveUSB)
Самый простой способ, но не лучший. Вы записываете установочный образ дистрибутива на USB-носитель и получаете также возможность запустить дистрибутив в Live-формате. Дистрибутив будет разворачиваться прямо с USB в память вашего компьютера, не меняя ничего на его дисках. В обычном LiveCD режиме вы получаете систему с «предзаданным» набором ПО и настроек, где все ваши изменения и данные будут уничтожены после завершения текущего сеанса. Чисто «на посмотреть». Да, можно загрузиться в режиме «LiveCD с поддержкой сеансов», но ваши возможности также будут ограничены объемом USB-диска и доустановка ПО (а тем более обновление системы до актуальной версии) вызовут проблемы, если вообще будет возможна.
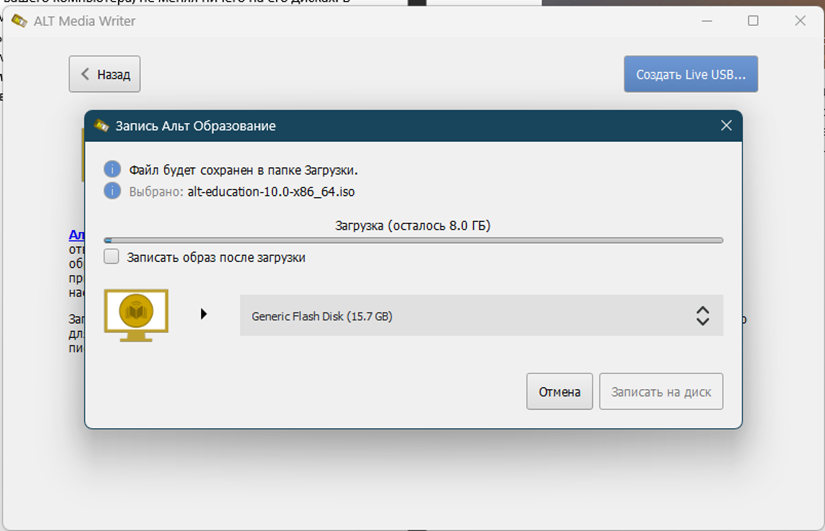
Сперва вам необходимо будет скачать и установить специализированный софт (я использовал программу от авторов дистрибутива ALT Media Writer) для создания USB‑диска. Далее вставляете в ПК «флешку» подходящего объема (я взял на 16 гигов, чтобы использовать режим сохранения сеансов) и запускаете программу. Затем вам нужно будет, нажав на три точки, выбрать нужный дистрибутив и затем просто нажав на кнопку Создать Live USB. После скачивания дистрибутива вам останется нажать на кнопку Записать на диск и загрузиться с созданного загрузочного USB-носителя.
VirtualBox
Следующий вариант предсказуем: виртуальная машина. Скачиваем и устанавливаем VirtualBox. Скачиваем дистрибутив операционной системы. Далее создаем новую виртуальную машину, куда подключаем скачанный iso-образ и ставим типа ОС Linux, а Версию Linux 2.6/3.x/4.x/5.x (64-bit).
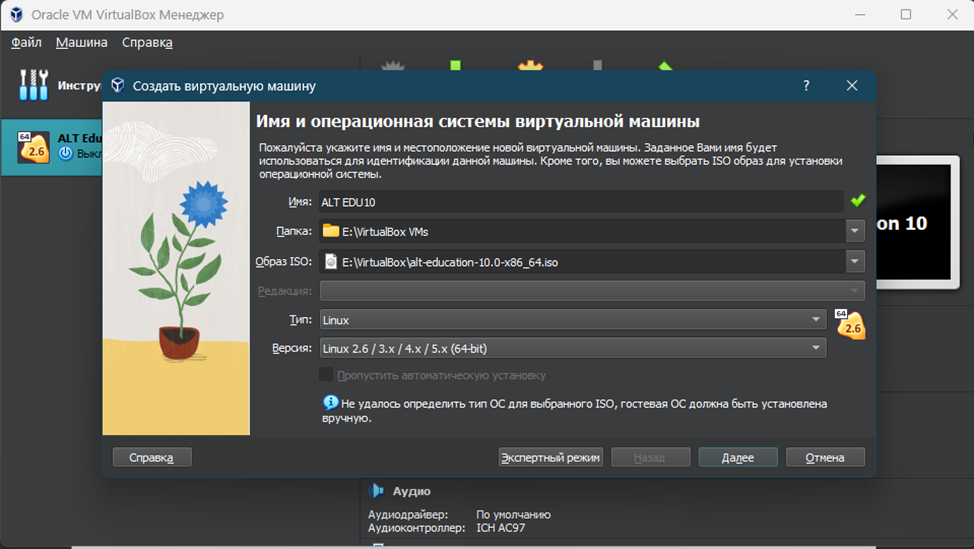
После выделяем необходимое количество ОЗУ и числа ядер процессора для виртуальной машины (рекомендую поставить на максимум зеленой зоны параметров) и создаем новый виртуальный жесткий диск. Для нашей ОС лучше установить объем в 60 Гб. Меньше будут проблемы с автоматическим разбиением, а больше вы скорее всего не заполните при тестировании.
Запускаем виртуальную машину и учимся устанавливать операционную систему Linux по инструкции. Здесь рекомендую выбрать на шаге Подготовка диска метод установки «Использовать неразмеченное пространство», а на шаге Установка системы не выбирать «Среда KDE5», если у вас ПК с 4 Гб ОЗУ или менее. Остальные пункты тут по желанию, например учителям 1–10 классов школ будет достаточно выбрать «Начальная школа» и «Средняя школа».
После установки вы загрузитесь в Linux и можете спокойно его «пробовать», не боясь сломать вашу Windows. Вы также можете пробросить в операционную систему подключенные к компьютеру через USB-порты устройства и есть шанс, что они там тоже заработают. Единственное что придется поколдовать с разными настройками. Ну и доступ к файловой системе «носителя» виртуалки вам придется реализовывать через Общие папки. Также можно забыть про полноценное 3D-ускорение, не говоря уже об ML.
Hyper-V
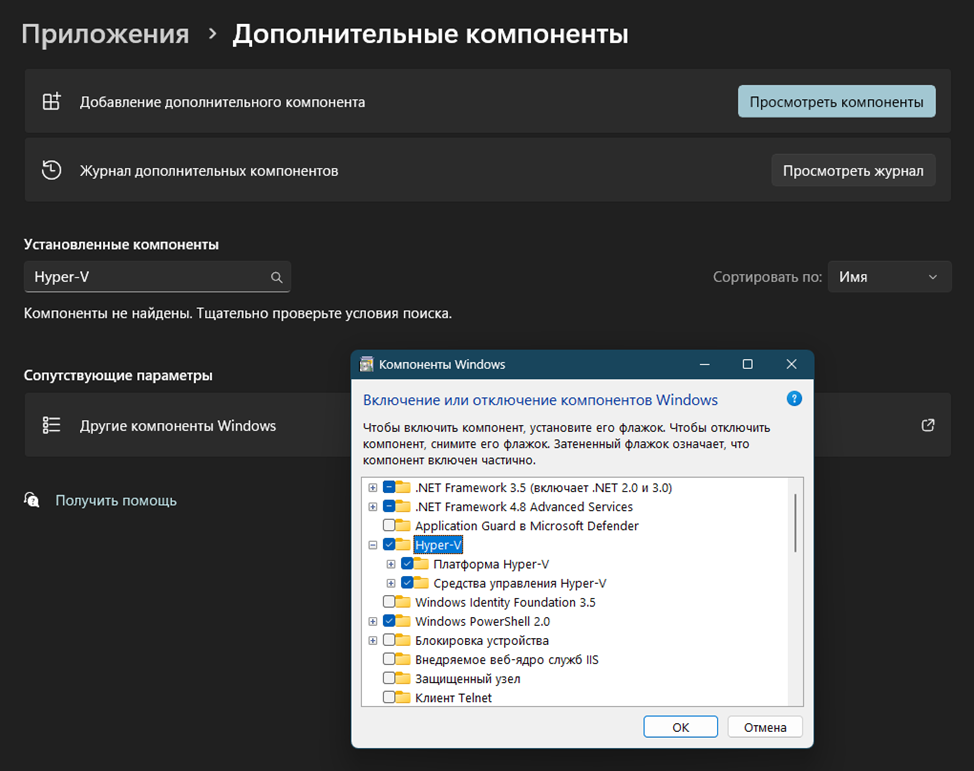
Если у вас Windows Pro версий 8 и старше (лучше, конечно, 10 или 11), то вы можете использовать «родную» виртуализацию от Microsoft. Это даст вам большую скорость работы и лучшую интеграцию с Windows. Для начала вам нужно будет добавить компоненты Hyper-V в вашу систему (Настройки – Приложения – Дополнительные компоненты – Hyper-V).
После вам нужно будет запустить Диспетчер Hyper-V и создать виртуальную машину через пункт Создать. Выбираем первое поколение ОС, объем ОЗУ виртуалки равный четверти объема ОЗУ на вашем компьютере, виртуальный жесткий диск на 60 Гб и подключаем iso-образ дистрибутива Linux. Затем подключаемся к созданной виртуалке, запускаем ее и устанавливаем Linux….
Вот тут меня лично ждал облом, так как я столкнулся с проблемой black screen и на рабочем ПК, так и не смог ничего увидеть. Виртуальная машина работала, но vmconnect не хотел к ней подключаться. Провозившись пару дней, перерыв кучу сайтов, перепробовав разные советы от настройки прав до смены порта подключения, я плюнул на эту затею (я грешу на видеокарту Radeon 6500 XT, у которой просто нет нужных блоков для кодинга/декодинга) и попробовал все сделать на ноутбуке. Только вот там стоит Win 10 Home, под которую нет Hyper-V.
Но мир не без добрых людей, и вуаля, у меня виртуалка с линукс, только в очень печальной конфигурации с 1 Гб ОЗУ. XFCE на ней работает, хоть и чуть тормознуто. В вашем случае, очень надеюсь, все пройдет более гладко.

Минусы у данного метода тоже есть: доступ к данным физического жесткого диска требует его отключения от основной системы (или придется расшаривать папки по сети) и работа с подключенными USB-устройствами возможна только в Расширенном сеансе и выборе второго поколения ОС при установке. У меня это на ноутбуке с данным дистрибутивом не получилось.
WSL2
Третий вариант позволяет больше «пощупать» внутренности и софт Linux, чем ее графическое окружение. В данном случае мы сделаем виртуалку через Windows Linux Subsytem. При этом мы сможем запускать все приложения нативно из меню Пуск, получать доступ к терминалу Linux прямо из терминала Windows, а также получать прямой доступ как к файловой системе Linux, так и к Windows в обоих направлениях. Плюс будет идти трансляция 3D-запросов графики от Linux в Windows, преобразуя в запросы DirectX и мы даже сможем выполнять вычисления на GPU.
Звучит заманчиво, но как это сделать. WSL вы сейчас можете установить из Microsoft Store, но вот дистрибутивы там ограничены популярными. Но и это можно поправить. Вот пошаговая инструкция:
1. В Hyper-V создаем виртуальную машину, но в настройках ставим объем виртуального диска 30 Гб и в Параметрах ВМ отключаем создание контрольных точек.
2. Ставим дистрибутив линукс, но на этапе Подготовка диска выбираем «Подготовить разделы вручную» и создаем единственный раздел на 30 Гб с монтированием в корень ( / ).
3. Ничего не выбираем из дополнительных пакетов, ставим как есть.
4. После установки необходимо будет загрузиться в дистрибутив, запустить Терминал, переключиться на root (su -) и прописать конфигурацию, чтобы включить использование systemd в WSL
echo -e “[boot]\nsystemd=true” >> /etc/wsl.conf
5. Завершить работу в виртуальной машине и скопировать файл виртуального диска VHDХ (он обычно находится в подпапке Virtual Hard Disk) куда-нибудь в другое место, чтобы подключить его к WSL. Главное не забудьте, что этот диск будет «разбухать» в процессе работы, поэтому копируйте его на носитель с достаточным свободным местом.
6. После этого можете удалить Hyper-V с вашего компьютера, убрав соответствующие галочки (см. ранее, как мы его ставили). WSL работает без установки его компонентов.
7. Подключаем наш виртуальный диск с Линукс к WSL
wsl --import-in-place ALTEDU10 <путь до вашего образа VHDX>
8. Проверяем, что дистрибутив добавился командой wsl -l (у меня стоит параллельно еще Ubuntu)
Дистрибутивы подсистемы Windows для Linux:
Ubuntu-20.04 (по умолчанию)
ALTEDU10
9. Пробуем запустить командой wsl -d ALTEDU10
Если все сделано правильно, то дистрибутив загрузится в командную строку и вы сможете с ним работать, как с обычным Linux. Более того, все ваши физические диски уже буду примонтированы в /mnt, устройства с компьютера будут доступны и в Linux, как и будет работать буфер обмена.
Если у вас до этого не было дистрибутивов Linux, то установленный дистрибутив встанет дистрибутивом по умолчанию и для его запуска достаточно будет набрать в консоли wsl.
Из замеченных минусов: дистрибутив загружается в root пользователя и слетает системная локаль. Второе лечится добавлением в конец файла .bashrc в каталоге /root следующей команды
export LANG=ru_RU.UTF-8
а первое переключением на пользователя командой
su - <имя пользователя>
Можно еще повозиться, настроить sudo для пользователя или вообще заморочиться входом в пользователя в режиме консоли, но мне хватает и такого режима. Может быть позже.
Linux-система получается полноценной, приложения, требующие X-сервер работают, система обновляется и это тот вариант, когда вам нужно попробовать те же серверные компоненты или посмотреть Linux-приложения, или получить доступ к каким-то языкам программирования, но в Linux.
Далее можно уйти в сторону контейнеризации или попробовать другие виртуальные машины, но это выходит за рамки моего повествования.
Если вы только начали свой путь разработчика и до сих используете операционную систему семейства Microsoft Windows, то уже наверняка столкнулись с ситуацией, когда ваш инструментарий отличается от того, что установлено у большинства людей из этой профессии. Чаще всего проблемы начинаются при работе в командной строке. Дело в том, что Windows не является POSIX-совместимой операционной системой, поэтому в ней отсутствует базовый набор прикладных программ, который необходим для разработки.
Несмотря на все написанное дальше, наша основная рекомендация — ставить полноценный Linux-дистрибутив, например, Ubuntu и полностью погружаться в него. Подавляющее большинство веб-проектов работает под управлением Linux-систем. А постоянное использование такой системы на домашнем и рабочем компьютере равносильно погружению в языковую среду при изучении иностранных языков.
Для новичков есть способ проще и быстрее — технологии виртуализации. Об этом и поговорим.
- Ubuntu из Microsoft Store
- Другие способы
Ubuntu из Microsoft Store
Если вы работаете на Windows версии не ниже 10 с архитектурой x64, то можно воспользоваться встроенным решением и установить слой совместимости (Windows Subsystem for Linux), а затем дистрибутив на основе Ubuntu Linux через магазин приложений Microsoft Store.
Подсистема WSL поставляется вместе с Windows, но не включена по-умолчанию. Чтобы её активировать, необходимо открыть PowerShell и ввести команду:
wsl --install
Также эта команда скачивает и устанавливает дистрибутив Ubuntu Linux. Скорее всего после завершения установки потребуется перезагрузить компьютер.
После перезагрузки найдите в меню Пуск приложение Ubuntu и запустите его.
Первый запуск может вызвать ошибку Error: 0x8007007e и предложение прочитать инструкцию по её решению https://aka.ms/wslinstall. Если хотите сэкономить время, то просто запустите PowerShell (не путать с cmd) от имени администратора и выполните следующую команду:
Enable-WindowsOptionalFeature -Online -FeatureName Microsoft-Windows-Subsystem-Linux
После этого компьютер попросит перегрузиться, а потом нужно снова запустить приложение Ubuntu. В случае удачной установки откроется интерпретатор командной строки с предложением ввести имя пользователя и пароль. Выглядеть это будет вот так:
Installing, this may take a few minutes...
Installation successful!
Please create a default UNIX user account. The username does not need to match your Windows username.
For more information visit: https://aka.ms/wslusers
Enter new UNIX username:
Данные логин и пароль никак не связаны с вашим пользователем в Windows, придумайте новые и не забывайте их. Чтобы изменить пароль Ubuntu в будущем, вам пригодится команда passwd
Обратите внимание на данные официальные инструкции от Microsoft, где рассмотрены не только установка и настройка WSL и Ubuntu, но так же рассказано о настройке окружения для разработки (VSCode, Git)
- Настройка среды разработки WSL
- WSL + VSCode
Другие способы
Если у вас нет возможности установить WSL, то можно использовать другие способы виртуализации для установки Linux. Смотрите другие наши гайды:
- VirtualBox
- Vagrant
Installing a Linux virtual machine on Windows 10 has never been easier. With earlier versions of Windows, users only had two options to use Linux.
The first was to go through the struggle of installing a dual-boot operating system if they wanted to toggle between Windows and Linux. That required a USB boot drive and shutting down the Windows OS first.
The other way was to purchase virtual machine software to install the operating system with. Although a more convenient method, the virtualization required a lot of processing power.
On top of that the user needed to download a compatible ISO file to run the operating system.
Now all you need to do to run a Linux VM on Windows 10, is use the Hyper-V capabilities and install Ubuntu inside the Hyper-V manager to launch it at any time with a few clicks.
We also made a video version of this guide on our YouTube channel, if you would rather follow along a video format:
Make sure your PC is capable of running a Linux VM
There are a few requirements to ensure that your PC is able to run the programs necessary. Thankfully it’s a very easy check.
Operating system wise, you need to have either a Pro, Enterprise, or Education version of Windows 10.
In order to check if your machine is capable of running a Linux virtual machine, you first need to open the command prompt.
You can do so by opening the start menu or by pressing the windows key on your keyboard, then typing in ‘cmd‘ and pressing enter.
Type ‘systeminfo‘ into the command prompt and press enter to execute the command. A bunch of information should show up, but you only need to care about the last four lines.

If all of them say Yes, you’re good to go!
Enable Hyper-V on Windows 10
Hyper-V is the key to installing a Linux or Ubuntu VM on Windows 10. It is a built-in alternative to a virtual machine software like VirtualBox.
The Hyper-V takes advantage of a new feature in Windows 10 called Virtual Desktop. If you want to learn more about how to use a Virtual Desktop to toggle between multiple desktops in your work space, check out our article about it.
Virtual Desktop combined with Hyper-V virtualization basically allows you to swap between your normal operating system desktop and a Linux desktop with one press of a button.
This way you can easily toggle between screens, copy text between the systems and much more.
First you need to open your start menu and type in ‘Turn Windows features on or off‘.
Once you see the option, click on it to go to the control panel. You should now see a small window with a bunch of folders with check-boxes next to them.
Look for the folder called ‘Hyper-V‘ and click on the plus next to it to expand its sub-folders.
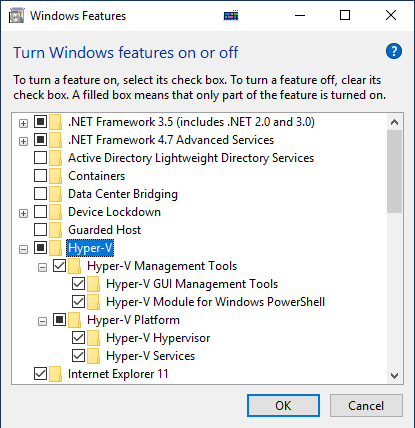
Tick every box under the Hyper-V folder and click OK.
Windows will the install the required package and included features. After this you will be prompted to restart your PC. You need to actually restart your machine for this to work, so we recommend you bookmark this page and come back when you have restarted.
Starting up Hyper-V Quick Create
Now that you’ve enabled Hyper-V and restarted your machine, you’re ready to run the Ubuntu VM on Windows 10.
Again, open up the start menu by pressing the windows key on your keyboard and type ‘Hyper-V’ into the search bar.
You should see an option called Hyper-V Quick Create, go ahead and start it up.
If you found the icon and it launched fine, you can move on the the next section to install Linux.
Can’t see the Hyper-V Quick Create shortcut?
This seems to be a very common occurrence, it even happened to us when trying to make this work for the first time. Thankfully a little research goes a long way and we’ve done it for you.
First, open up the start menu and look for a folder named Windows Administrative Tools. Look for Hyper-V Quick Create there.
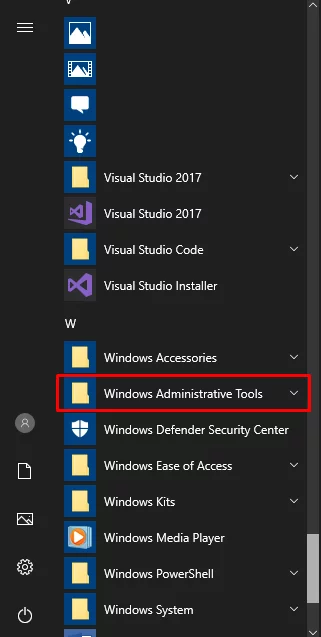
If you can’t find it in the above folder either, that means the tools just aren’t installed. This was the case for us as well.
To fix this, you need to download and install free Remote Server Administrator Tools for Windows 10. It is an official toolkit from Microsoft that should be included with every Windows 10 installation since 2018, but for some reason that is not always the case.
Download one of the installers from the above link and run it. You will need to restart your computer after it’s done.
Once you’ve done that, you should be able to find the Quick Create shortcut in the Windows Administrative Tools folder shown above.
If you can’t see it even after all the above steps, leave a comment below and we’ll help you out.
Install Linux on the Virtual Machine
Now that you’ve found the Quick Create shortcut, a window should pop up which allows you to choose which operating system you wish to download.
Although one of the options is a Windows 10 OS, it’s not a free license for Windows, but an evaluation copy that expires in a few days.
Select Ubuntu Linux from the list and click Create Virtual Machine. Windows will now automatically download and install the operating system.
After that’s done, the virtual Linux operating system will show up in a new window and you can continue on to set it up.
That’s all you need to run Ubuntu Linux fast and simple on Windows 10.
How to launch your Ubuntu Linux Virtual Machine faster
If you want to start up the machine faster, you can do so from the Hyper-V Manager.
You can open it up by typing that into the search bar in the start menu or look for it in the Windows Administrative Tools folder.
Once you open it up, you should be able to see your machine name on the left hand side. Choose it and it should show your newly created Ubuntu operating system in the Virtual Machines Box.
To launch the virtual machine, select it from the list and click on ‘Connect…‘ on the right hand side of the window.
Now your new Ubuntu Linux virtual machine should start up fast and easy.
You can use this same method to install and run any other VM on Windows 10 as well.
If you’re looking for more ways to take advantage of the new Windows 10 features, check out our article on window management on Windows 10.