С установкой MS Windows 2012R2 всё просто и более менее понятно. В интернете есть 1001 мануал по развертыванию домена на Windows как с помощью GUI так и средствами Powershell, поэтому повторять лишний раз не буду, оставлю только ссылку на офф. документацию, для любопытствующих и тех кто захочет освежить память.
Однако один важный момент в данном пункте всё таки есть. На сегодняшний день Samba не умеет работать со схемами каталога выше 2008R2.
Заголовок спойлера
Вернее разработчиками данная поддержка заявлена в качестве экспериментальной. Но на практике попытка ввода самбы в качестве второго DC в существующий домен Windows со схемой 69 — встретит вас следующей ошибкой
DsAddEntry failed with status WERR_ACCESS_DENIED info (8567, ‘WERR_DS_INCOMPATIBLE_VERSION’)
Проблема в том, что Windows 2012 и 2012R2 используют инструменты WMI для работы с доменами и лесами, стабильная поддержка которых анонсирована только к версии Samba 4.11, которая должна выйти до конца этого года.
Из этого следует, что единственным вариантом для введения самбы в домен AD, развернутый на 2012R2 сервере, является понижение схемы с 69 до 47. Разумеется на рабочей инфраструктуре без веских причин этого делать не надо, но у нас тут тестовый стенд, так что почему бы собственно и нет.
Ставим Альт Сервер 8.2. Во время установки выбираем профиль «Сервер Samba-DC (контроллер AD)». На развернутом сервере производим полное обновление системы, и устанавливаем пакет task-samba-dc, который потянет за собой всё необходимое
# apt-get install task-samba-dcЕсли вдруг task-samba-dc, вопреки заверениям документации Альта откажется ставить всё необходимое сам.
# apt-get install python-module-samba-DC samba-DC-common samba-DC-winbind-clients samba-DC-winbind samba-DC-common-libs libpytalloc-devel
Далее переходим к настройке Kerberos и получению тикета. Открываем файл krb5.conf, переходим в раздел [libdefaults], и приводим к следующему виду:
# vim /etc/krb5.conf dns_lookup_kdc = true
dns_lookup_realm = true
default_realm = TEST.LOCALЗапрашиваем билет
# kinit administrator
Password for administrator@TEST.LOCAL:
Проверяем список полученых тикетов Kerberos
# klist
Ticket cache: KEYRING:persistent:0:0
Default principal: administrator@TEST.LOCAL

Valid starting       Expires              Service principal
16.05.2019 11:51:38  16.05.2019 21:51:38  krbtgt/TEST.LOCAL@TEST.LOCAL
        renew until 23.05.2019 11:51:35
Теперь удаляем или переименовываем существующий конфиг самбы.
# mv smb.conf smb.conf.bak1И наконец вводим в домен AD вторым контроллером:
# samba-tool domain join test.local DC -U"TEST\administrator"Успешный ввод будет сопровождаться следующим логом
Finding a writeable DC for domain 'test.local'
Found DC DC1.TEST.LOCAL
Password for [TEST\administrator]:
Reconnecting to naming master e31d7da6-8f56-4420-8473-80f2b3a31338._msdcs.TEST.                           LOCAL
DNS name of new naming master is DC1.TEST.LOCAL
workgroup is TEST
realm is TEST.LOCAL
Adding CN=DC2,OU=Domain Controllers,DC=TEST,DC=LOCAL
Adding CN=DC2,CN=Servers,CN=Default-First-Site-Name,CN=Sites,CN=Configuration,DC                           =TEST,DC=LOCAL
Adding CN=NTDS Settings,CN=DC2,CN=Servers,CN=Default-First-Site-Name,CN=Sites,CN                           =Configuration,DC=TEST,DC=LOCAL
Adding SPNs to CN=DC2,OU=Domain Controllers,DC=TEST,DC=LOCAL
Setting account password for DC2$
Enabling account
Calling bare provision
Looking up IPv4 addresses
Looking up IPv6 addresses
No IPv6 address will be assigned
Setting up share.ldb
Setting up secrets.ldb
Setting up the registry
Setting up the privileges database
Setting up idmap db
Setting up SAM db
Setting up sam.ldb partitions and settings
Setting up sam.ldb rootDSE
Pre-loading the Samba 4 and AD schema
A Kerberos configuration suitable for Samba AD has been generated at /var/lib/sa                           mba/private/krb5.conf
Provision OK for domain DN DC=TEST,DC=LOCAL
Starting replication
Schema-DN[CN=Schema,CN=Configuration,DC=TEST,DC=LOCAL] objects[402/1426] linked                           _values[0/0]
Schema-DN[CN=Schema,CN=Configuration,DC=TEST,DC=LOCAL] objects[804/1426] linked                           _values[0/0]
Schema-DN[CN=Schema,CN=Configuration,DC=TEST,DC=LOCAL] objects[1206/1426] linke                           d_values[0/0]
Schema-DN[CN=Schema,CN=Configuration,DC=TEST,DC=LOCAL] objects[1608/1426] linke                           d_values[0/0]
Schema-DN[CN=Schema,CN=Configuration,DC=TEST,DC=LOCAL] objects[1743/1426] linke                           d_values[0/0]
Analyze and apply schema objects
Partition[CN=Configuration,DC=TEST,DC=LOCAL] objects[402/2240] linked_values[0/                           24]
Partition[CN=Configuration,DC=TEST,DC=LOCAL] objects[804/2240] linked_values[0/                           24]
Partition[CN=Configuration,DC=TEST,DC=LOCAL] objects[1206/2240] linked_values[0                           /24]
Partition[CN=Configuration,DC=TEST,DC=LOCAL] objects[1608/2240] linked_values[0                           /24]
Partition[CN=Configuration,DC=TEST,DC=LOCAL] objects[1772/2240] linked_values[2                           4/24]
Replicating critical objects from the base DN of the domain
Partition[DC=TEST,DC=LOCAL] objects[109/110] linked_values[26/29]
Partition[DC=TEST,DC=LOCAL] objects[394/5008] linked_values[29/29]
Done with always replicated NC (base, config, schema)
Replicating DC=DomainDnsZones,DC=TEST,DC=LOCAL
Partition[DC=DomainDnsZones,DC=TEST,DC=LOCAL] objects[42/42] linked_values[0/0]
Replicating DC=ForestDnsZones,DC=TEST,DC=LOCAL
Partition[DC=ForestDnsZones,DC=TEST,DC=LOCAL] objects[20/20] linked_values[0/0]
Exop on[CN=RID Manager$,CN=System,DC=TEST,DC=LOCAL] objects[3] linked_values[0]
Committing SAM database
Adding 1 remote DNS records for DC2.TEST.LOCAL
Adding DNS A record DC2.TEST.LOCAL for IPv4 IP: 192.168.90.201
Adding DNS CNAME record 6ff1df40-cbb5-41f0-b7b3-53a27dde8edf._msdcs.TEST.LOCAL                            for DC2.TEST.LOCAL
All other DNS records (like _ldap SRV records) will be created samba_dnsupdate o                           n first startup
Replicating new DNS records in DC=DomainDnsZones,DC=TEST,DC=LOCAL
Partition[DC=DomainDnsZones,DC=TEST,DC=LOCAL] objects[1/42] linked_values[0/0]
Replicating new DNS records in DC=ForestDnsZones,DC=TEST,DC=LOCAL
Partition[DC=ForestDnsZones,DC=TEST,DC=LOCAL] objects[1/20] linked_values[0/0]
Sending DsReplicaUpdateRefs for all the replicated partitions
Setting isSynchronized and dsServiceName
Setting up secrets database
Joined domain TEST (SID S-1-5-21-3959064270-1572045903-2556826204) as a DC
В оснастке ADUC должна появиться запись о новом DC в домене TEST.LOCAL, а в диспетчере DNS — новая А запись, соответствующая DC2.
Для начала проверим работу службы репликации каталогов (DRS)
# samba-tool drs showreplВсе попытки репликации в выводе должны быть успешными. В списке объектов KCC, в течение 15 минут после ввода, должен появится наш DC1 на Windows
Default-First-Site-Name\DC2
	DSA Options: 0x00000001
	DSA object GUID: 0e9f5bce-ff59-401e-bdbd-fc69df3fc6bf
	DSA invocationId: 017997b5-d718-41d7-a3f3-e57ab5151b5c

	==== INBOUND NEIGHBORS ====

	DC=ForestDnsZones,DC=test,DC=local
	        Default-First-Site-Name\DC1 via RPC
	                DSA object GUID: 60fb339d-efa3-4585-a42d-04974e6601b7
	                Last attempt @ Mon May 27 12:56:31 2019 MSK was successful
	                0 consecutive failure(s).
	                Last success @ Mon May 27 12:56:31 2019 MSK

	DC=DomainDnsZones,DC=test,DC=local
	        Default-First-Site-Name\DC1 via RPC
	                DSA object GUID: 60fb339d-efa3-4585-a42d-04974e6601b7
	                Last attempt @ Mon May 27 12:56:32 2019 MSK was successful
	                0 consecutive failure(s).
	                Last success @ Mon May 27 12:56:32 2019 MSK

	CN=Schema,CN=Configuration,DC=test,DC=local
	        Default-First-Site-Name\DC1 via RPC
	                DSA object GUID: 60fb339d-efa3-4585-a42d-04974e6601b7
	                Last attempt @ Mon May 27 12:56:32 2019 MSK was successful
	                0 consecutive failure(s).
	                Last success @ Mon May 27 12:56:32 2019 MSK

	DC=test,DC=local
	        Default-First-Site-Name\DC1 via RPC
	                DSA object GUID: 60fb339d-efa3-4585-a42d-04974e6601b7
	                Last attempt @ Mon May 27 12:56:32 2019 MSK was successful
	                0 consecutive failure(s).
	                Last success @ Mon May 27 12:56:32 2019 MSK

	CN=Configuration,DC=test,DC=local
	        Default-First-Site-Name\DC1 via RPC
	                DSA object GUID: 60fb339d-efa3-4585-a42d-04974e6601b7
	                Last attempt @ Mon May 27 12:56:33 2019 MSK was successful
	                0 consecutive failure(s).
	                Last success @ Mon May 27 12:56:33 2019 MSK

	==== OUTBOUND NEIGHBORS ====

	DC=ForestDnsZones,DC=test,DC=local
	        Default-First-Site-Name\DC1 via RPC
	                DSA object GUID: 60fb339d-efa3-4585-a42d-04974e6601b7
	                Last attempt @ Thu May 23 16:40:03 2019 MSK was successful
	                0 consecutive failure(s).
	                Last success @ Thu May 23 16:40:03 2019 MSK

	DC=DomainDnsZones,DC=test,DC=local
	        Default-First-Site-Name\DC1 via RPC
	                DSA object GUID: 60fb339d-efa3-4585-a42d-04974e6601b7
	                Last attempt @ Thu May 23 16:40:03 2019 MSK was successful
	                0 consecutive failure(s).
	                Last success @ Thu May 23 16:40:03 2019 MSK

	CN=Schema,CN=Configuration,DC=test,DC=local
	        Default-First-Site-Name\DC1 via RPC
	                DSA object GUID: 60fb339d-efa3-4585-a42d-04974e6601b7
	                Last attempt @ Thu May 23 16:40:08 2019 MSK was successful
	                0 consecutive failure(s).
	                Last success @ Thu May 23 16:40:08 2019 MSK

	DC=test,DC=local
	        Default-First-Site-Name\DC1 via RPC
	                DSA object GUID: 60fb339d-efa3-4585-a42d-04974e6601b7
	                Last attempt @ Thu May 23 16:40:08 2019 MSK was successful
	                0 consecutive failure(s).
	                Last success @ Thu May 23 16:40:08 2019 MSK

	CN=Configuration,DC=test,DC=local
	        Default-First-Site-Name\DC1 via RPC
	                DSA object GUID: 60fb339d-efa3-4585-a42d-04974e6601b7
	                Last attempt @ Mon May 27 12:12:17 2019 MSK was successful
	                0 consecutive failure(s).
	                Last success @ Mon May 27 12:12:17 2019 MSK

	==== KCC CONNECTION OBJECTS ====

	Connection --
	        Connection name: 6d2652b3-e723-4af7-a19f-1ee48915753c
	        Enabled        : TRUE
	        Server DNS name : DC1.test.local
	        Server DN name  : CN=NTDS Settings,CN=DC1,CN=Servers,CN=Default-First-Site-Name,CN=Sites,CN=Configuration,DC=test,DC=local
	                TransportType: RPC
	                options: 0x00000001
	Warning: No NC replicated for Connection!
Предупреждение «No NC replicated for Connection!» можно смело игнорировать. Оно появляется из за того, что при регистрации нового DC самба неверно устанавливает некоторые флаги репликации.
Так же неплохо будет проверить репликацию LDAP.
# samba-tool ldapcmp ldap://dc1.test.local ldap://dc2.test.local -UadministratorУказанная выше команда сравнит значения атрибутов объектов всего каталога на DC1 и DC2.
Пример успешной репликации
* Comparing [DOMAIN] context...

	* Objects to be compared: 249

	* Result for [DOMAIN]: SUCCESS

	* Comparing [CONFIGURATION] context...

	* Objects to be compared: 1750

	* Result for [CONFIGURATION]: SUCCESS

	* Comparing [SCHEMA] context...

	* Objects to be compared: 1739

	* Result for [SCHEMA]: SUCCESS

	* Comparing [DNSDOMAIN] context...

	* Objects to be compared: 42

	* Result for [DNSDOMAIN]: SUCCESS

	* Comparing [DNSFOREST] context...

	* Objects to be compared: 20

	* Result for [DNSFOREST]: SUCCESS
В ряде случаев атрибуты объектов на разных контроллерах могут отличаться, и вывод команды даст об этом знать. Но далеко не во всех случаях это будет признаком проблемы с репликацией.
Следующим этапом необходимо вручную настроить стабильную репликацию каталога SysVol.
Дело в том, что самба пока не поддерживает DFS-R, впрочем как не поддерживала более раннюю FRS. Поэтому для репликации между DC Samba и Windows единственным на сегодняшний день рабочим решением является односторонняя репликация средствами утилиты Robocopy из комплекта Windows Server 2003 Resource Kit Tools.
Разработчики самбы, во избежание проблем с совместимостью, рекомендуют сначала установить комплект утилит на обычную рабочую станцию, и после этого скопировать Robocopy на контроллер в папку «C:\Program Files (x86)\Windows Resource Kits\Tools\»
После установки, в планировщике задач на контроллере с Windows создаём задание на выполнение репликации со следующими параметрами:
— Выполнять для всех пользователей
— Триггер на выполнение Ежедневно каждые 5 минут в течение дня
— В действиях прописываем путь к утилите robocopy, в качестве аргументов указываем:
\\DC1\SYSVOL\test.local\ \\DC2\SYSVOL\test.local\ /mir /secВ конкретном случае копируем содержимое каталога SysVol с DC1 на DC2.
Перейти к содержанию
#LinuxDay4 – Вводим ALT Linux в домен Windows
На чтение 3 мин Опубликовано Обновлено
Следующий шаг после установки WPS офиса в списке был – ввод Linux в домен Windows
В данной статье будет рассмотрен вопрос как правильно ввести Linux машину в домен и “тюнинг” рабочего места.
Данная инструкция будет разбита на следующие шаги:
- Подготовительные шаги для ввода Linux в домен
- Ввод станции Linux в домен
- Подключение сетевых дисков
- Настройка окна авторизации при входе в систему
Как ввести в домен Alt Linux
Для того что ввести станцию в домен необходимо установить дополнительные пакеты и сделать определенные настройки:
- Выставляем на станции точное время (время не должно отличаться от времени на контроллере домена)
- Редактируем файл /etc/resolv.conf и прописываем там ДНС контроллера домена
search имя домена.lcl
nameserver днс контроллера домена - Еще проверяем и прописываем DNS контроллера домена тут /etc/net/ifaces/<interface>/resolv.conf
- проверяем файл HOST /etc/hosts
127.0.0.1 localhost.localdomain localhost
127.0.0.1 имякомпа.имядомена имякомпа - если вы во время установки системы не ввели имя станции, то можно переименовать компьютер сейчас /etc/sysconfig/network
- Запускаем обновление всех пакетов на Linux
apt-get update && apt-get dist-upgrade - Ставим доп пакеты которые позволят ввести станцию в домен
apt-get install task-auth-ad-sssd
- Заходим в настройки системы (или из терминала набираем AAC) и заходим в меню Аутентификация
- Переключаем чекбокс на пункт Active Directory и заполняем эти моля так:
Домен: ИМЯДОМЕНА.LCL
Рабочая группа: ИМЯДОМЕНА
Имя компьютера: имя компьютераPS соблюдайте регистр!!!
- Нажимаем ок, вводим логип и пароля администратора Домена
- Перезагружаем компьютер и проверяем )
Сейчас каждый подумает, что это сложно и долго, но если присмотреться, то все эти же действия мы делаем когда вводим в домен нашу станцию под Windows))) так что все не так и сложно!
Окно авторизации с логином
После ввода в домен станции, следующая глобальная проблема была с тем, что постоянно приходилось вводить логин и пароль и это очень не нравилось юзерам, а хотелось, что бы было как в windows , чтобы в окне авторизации автоматически стоял логин пользователя и оставалось ввести только пароль.

что бы в В Alt Linux такое сделать нужно сделать след:
- открыть файл /etc/lightdm/lightdm.conf
- находим строчку greeter-hide-users и после = пишем false (greeter-hide-users = false)


Теперь, после того как вы зайдете в систему под юзером, он запомнит его и при повторном входе у вас уже будет заполнено поле логин. все)

![]()
The Linux operating system has come a long way since 1991 when it was first introduced by Linux Torvalds as a free operating system. Today, some form of Linux is used in everything from high-end servers and virtual machines to IoT devices and embedded devices. More often than not, common database platforms such as Oracle, PostgreSQL, MySQL, and MongoDB are deployed on servers running Linux.
One notable exception was Microsoft SQL Server. That changed when Microsoft announced support for Linux starting with SQL Server 2017. However, Microsoft does not provide a straightforward way to integrate Linux hosts into Active Directory (AD), making it harder to manage them.
Fortunately, there is an easy way to integrate Linux with AD for cloud and on-premise Windows systems — by using realmd and System Security Services Daemon (SSSD).
Read this guide to learn how to integrate Linux with Active Directory. We’ll also cover how to join AD using realmd, what using SSSD is like, and how to map Linux unique identifiers (UIDs) and group IDs (GIDs) to site identifiers (SIDs) in AD.
A Brief Summary of Linux Interaction with Active Directory
As an introduction, here’s a brief summary of how Linux interacts with AD.
The main reasons to join a Linux machine to a Lightweight Directory Access Protocol (LDAP)-based directory service like Windows AD include:
- Business policies
- Access control
- Centralized identity management
When joining a Linux host to Active Directory (AD), two components are required:
- One to manage the central identity and authentication source (Active Directory)
- One to handle domain discovery and act as a middleman between the first component and the identity source
Over the years, there have been a few configuration options to join a Linux machine to AD. Most have been inconvenient to configure and required you to manually set up (SSSD to join domains. However, the realmd suite lets you complete the task without cumbersome configuration file editing.
How to Integrate a Linux Host into a Windows AD Domain
Now let’s walk through the steps of integrating a Linux host running on CentOS 8 into a Windows Active Directory (AD) domain configured on Windows 2012 R2 Server Standard Edition. (The reason we specify the versions and types of the Linux distribution and Windows Server is because there are subtle differences between versions of Linux and Windows. For example, in CentOS/RHEL 8, Network Time Protocol (NTP) client and server activities were managed using the ntp daemon, but in CentOS/RHEL 8, it has been replaced with the chrony daemon.)
Step 1: Ensure that the hostname and FQDN are specified.
Ensure that the hostname and the fully qualified domain name (FQDN) are specified in the /etc/hosts file. The hostname cannot be localhost, as it is mapped to the loop-back adapter 127.0.0.1. If you need to change the existing hostname, use the following command to change it to the desired name. There is no need to specify the FQDN as part of the hostname.
[root@oldhostname ~]# hostnamectl set-hostname <new_host_name>

[root@newhostname~]# echo 192.168.44.9 sblinmssql2019 >> /etc/hosts
Step 2: Specify the AD domain controller.
Specify the AD domain controller (DC) in the /etc/hosts file using the following command:
[root@newhostname~]# echo 192.168.xx.x sbad.sbits.net sbad >> /etc/hosts

[root@newhostname~]# ping sbad.sbits.net
Step 3: Ping the AD domain controller.
Ping the AD domain controller that was specified in Step 2 and make sure you get a ping response.
Step 4: Point the DNS server to the AD domain controller.
In my case, the DNS server needs to be pointed to the AD domain controller because my DC is also the DNS server for my domain, sbits.net.
Step 5: Configure the NTP server, if necessary.
If the primary DC that you are planning to use as the NTP server does not have the NTP server configured, follow the steps in the screenshot to configure and enable the NTP server on the primary DC.
Step 6: Install chrony and configure it to use a DC.
The Linux host needs to synchronize time with one of the DCs in the AD domain. In my case, there is only one domain controller, so the Linux host will be synchronizing the time with it.
If chrony is not already installed, install it and configure it to use the DC to synchronize the time. (If it is already installed, you will get a message reporting that.)
[root@newhostname~]# vi /etc/resolv.conf

[root@newhostname~]# systemctl restart NetworkManager
[root@sblinmssql2019~]# vi /etc/chrony.conf

  [root@sblinmssql2019~]# systemctl enable chronyd

  [root@sblinmssql2019~]# systemctl restart chronyd

  [root@sblinmssql2019~]# systemctl enable chronyd
If chrony is already installed, we need to edit thechrony.conf config file and set the time server to the AD domain controller and restart the chronyd service. If the service was not preinstalled, enable it to start up on reboot and ensure that the firewall is configured to allow NTP traffic after installation.
Once chronyd is configured and enabled, the timedatectl command will show whether the NTP service is active. After confirming that NTP service is active, run the chronyc sources command to confirm that it is using the domain controllers as the time server, as shown below.
Step 7: Install the Samba suite on Linux.
Next, install the Samba suite, including winbind, on the Linux host. The winbind service enables the Linux host to interact with the AD domain like a Windows host. After installation is complete, confirm that the packages shown in the screenshot below are installed.
Step 8: Modify the /etc/samba/smb.conf file to reflect the realm value.
Next, modify the /etc/samba/smb.conf file to reflect the realm value to the fully qualified domain name, and change the workgroup value to the name of the domain, as shown in the screenshot below.
[root@sblinmssql2019~]# yum -y install samba samba-client

[root@sblinmssql2019~]# yum -y install samba-winbind samba-winbind-clients
Step 9: Enable the winbind daemon on system reboot.
Enable the winbind daemon on system reboot using the systemctl command as shown in the screenshot below. Please note that there is no reason to reboot the Linux host, unlike Windows hosts.
Note: The realm parameter is the name of your domain. In this example, it is “sbits.net” and the workgroup parameter is set to “sbits”. The workgroup parameter can instead be set to the Windows default of “WORKGROUP” if you prefer. The security = ADS designates that this host is part of the AD domain. The winbind separator =+ specifies that the plus sign (+) will be used to separate the domain name and username. The traditional Windows separator is not compatible with Linux, and an escape character has to be used every time a username is specified with the domain prefix.
Step 10: Install the Kerberos realms package.
Install the Kerberos realms package using the yum command:
[root@sblinmssql2019~]# yum -y install krb5-workstation
Step 11: Add the Linux host to the AD domain.
Now, add the Linux host to the AD domain using the command below. It is highly likely that you will get the error “DNS update failed: NT_STATUS_INVALID_PARAMETER”.
In my case, even though I got the error, the Linux host was added to the AD domain. I reissued the command with the –no-dns-updates flag, and the error did not pop up.
Step 12: Change the security setting using DNS Manager.
If you do not want to encounter the error and would like to have the DNS update the information about the new Linux hosts, change the security setting using DNS Manager as shown below.
Step 13: Verify that the Linux computer object was added.
On the primary domain controller, verify that the Linux computer object was added by using the Active Directory Users and Computers tool.
Step 14: Confirm that the winbind service is running.
Confirm that the winbind service is running on the Linux host.
Step 15: Validate that the Linux host is part of the AD domain.
Validate that the Linux host is actually part of the AD domain and is able to communicate with the DC by using the wbinfo package to run encrypted RPC calls to the DC:
[root@sblinmssql2019~]# wbinfo -t    # verifies if encrypted RPC are supported

[root@sblinmssql2019~]# wbinfo – u  # enumerates AD the list of users

[root@sblinmssql2019~]# wbinfo – g  # enumerates AD the list of groups
Step 16: Ensure that winbind is selected as the authorization provider.
Next, we need to ensure that winbind is selected as the authorization provider by using the authselect select winbind –force command as shown below. The –force flag will overwrite the entries in the /etc/nsswitch. conffile.
Step 17: Ensure the passwd and group entries are listed to use winbind.
To ensure that Linux will use winbind for user authentication prior to local Linux authentication, make sure the passwd and group entries are listed to use winbind in the /etc/nsswitch.conffile.
Step 18: Use kinit to get a Kerberos TGT.
Finally, use kinit to try to get Kerberos Ticket Granting Ticket (TGT):
[root@sblinmssql2019~]# wbinfo -t    # kinit skumar@sbits.net

[root@sblinmssql2019~]# wbinfo – u  # klist
Chances are you will encounter the error shown in the screenshot above. If so, edit the /etc/krb5.conf file and change the setting as shown below:
Once the file is modified, there is no reason to start any services on the Linux host, and the ticket request should work fine.
You can verify it on the AD domain controller as well, as shown below:
Congratulations! You have added a Linux host to a Windows AD domain.
Joining AD Domains using realmd
Now that you know how to integrate Linux with an Active Directory domain, let’s turn to joining the AD domain. There’s a quick and easy way to set up SSSD to join domains without cumbersome configuration file editing: the realmd suite. This command-line tool can be used to manage enrollment in Kerberos realms, like Active Directory domains or IPA domains. The realmd system provides a clear and simple way to discover and join identity domains to achieve direct domain integration. It’s not too much of a lift, either, as realmd handles the configuration of complex underlying Linux system services, such as SSSD or winbind.
Realmd is also a great tool for access management, event management, configuring domain membership, achieving an integrated direct domain, and network and user SSH authentication. Many enterprise cybersecurity teams use realmd to reduce the attack surface by controlling who has access to what.
Follow these steps to join the Active Directory server using the realmd Desktop Bus (D-Bus) tool. These instructions work for all Linux distributions, including Fedora and Ubuntu.
- To add Linux to an Active Directory domain, ensure that your Linux host can communicate with the DC over the network. Proper DNS and hostname resolution are essential to this process.
- Next, install realmd using root access on your computer account and check to see if we’re already a member of a domain.
sudo apt install realmd

realm list
If realmd wasn’t previously installed, the output should be empty, indicating that:
- The host isn’t joined to AD or other domain services
- We don’t have any domain membership.
If the output lists a domain you’d like to leave, run the following as the domain administrator user account originally used to join the domain:
sudo realm leave example.com -U user@example.com
3. Next, we’ll want to discover our domain:
realm discover <domain_controller_hostname_or_ip_address>
The output is a list of packages that must be installed to join the domain:
example.com

  type: kerberos

  realm-name: EXAMPLE.COM

  domain-name: example.com

  configured: no

  server-software: active-directory

  client-software: sssd

  required-package: sssd-tools

  required-package: sssd

  required-package: libnss-sss

  required-package: libpam-sss

  required-package: adcli

  required-package: samba-common-bin
Realm discovery output may differ depending on your specific host and domain controller setup.
Note that realmd uses SSSD as its default Active Directory client software. SSSD allows local services to check with local user and credential caches in SSSD, but those caches may be taken from any remote identity prover, including AD, an LDAP directory, an identity management domain or a Kerberos realm.
If you don’t want to use SSSD, you can specify winbind to use Samba Winbind.
4. Confirm that the Windows server and Linux are on the same network. If they’re not, your Linux hosts won’t be able to join Active Directory. We highly recommend having a static IP address for the domain controller.
5. Once everything has been confirmed, go ahead and install the listed required packages (shown above) and then use the realm join command. This will do several things, including setting up the local machine for use with a specific domain and creating a host keytab file at /etc/krb5.keytab. It will also join Linux to the Windows domain using credentials with AD Domain Admin permissions:
sudo apt install sssd sssd-tools libnss-sss libpam-sss adcli samba-common-bin

sudo realm join --client-software=sssd <domain_controller_hostname_or_ip> -U <domain_admin>
When specifying the Domain Admin, we can just use the username instead of using example.comuser format, since we’re already specifying a domain controller in the command.
Additionally, we can use the –computer-ou parameter to specify the organizational unit for the computer to be joined to, using distinguished name format (for example, # realm join –computer-ou=”ou=Linux Computers,dc=example,dc=com”). Specifying –computer-ou is also great for creating directory computer accounts in non-default locations.
Note that an invalid hostname error can occur if a hostname isn’t set with the proper format. To resolve this, simply set the hostname properly:
sudo hostnamectl set-hostname '<new_hostname>'
6. After joining the domain, we can run realm list again to confirm success and review the domain info:
example.com

  type: kerberos

  realm-name: EXAMPLE.COM

  domain-name: example.com

  configured: kerberos-member

  server-software: active-directory

  client-software: sssd

  required-package: sssd-tools

  required-package: sssd

  required-package: libnss-sss

  required-package: libpam-sss

  required-package: adcli

  required-package: samba-common-bin

  login-formats: %U@example.com

  login-policy: allow-realm-logins
In this case, the login-formats property indicates that domain accounts will be specified in user@example.com format on this host, rather than domainuser format.
7. Finally, restart the SSSD service and use the command below to verify the Active Directory user information. The output should show a domain user’s UID, groups and more:
sudo service sssd restart

id user@example.com
That’s all there is to it! This is by no means a comprehensive guide for all the options you can manually perform and configure along the way; however, this is the quickest route to get Linux hosts joined to Active Directory using a modern approach.
Optional Steps
Once you’ve joined AD using realmd, you can take optional steps to customize your experience, such as tweaking realmd’s behavior and managing the properties of AD objects by using various options and tools. These include:
OS-Version
The os-version and os-name settings let you specify your operation system version and name. Specifically, you can use them to control the values that are placed in the computer account’s operatingSystemVersion and operatingSystem attributes.
AD Attribute Editor
This is a built-in graphical tool for managing the properties of AD objects, such as computers, users and groups. You can use it by installing the dsa.msc snap-in, which is part of the Windows Remote Server Administration Tools (RSAT).
Deny and Permit
The realm deny command denies local login by real accounts. You can use realm permit to restrict logins to certain accounts.
Changing the Default User Configuration
The realmd system allows you to modify the default user home directory and shell POSIX attributes. You can override the default directory and attributes by specifying the following options in the [users] section in the /etc/realmd.conf file:
- Default-shell: This defines the default user shell; it accepts any supported system shell.
- Default-home: This sets a template for creating a home directory for accounts with no home directory explicitly set.
Mapping Linux UIDs/GIDs to SIDs in Active Directory
You now know how to integrate Linux with Active Directory. However, we’re not done yet. We also need to touch on how POSIX UIDs and GIDs are mapped to SIDs in Active Directory, since Linux clients don’t have a concept of SIDs like Windows does.
Benefits of using SSSD rather than Winbind
As previously mentioned, realmd uses SSSD rather than winbind by default. One big benefit of this approach is that SSSD automatically handles POSIX UID/GID generation using the SID of each Active Directory user or group. If you keep the default SSSD settings on each Linux host that you join to the domain, then these UID and GID values should be mapped consistently across Linux hosts.
For example, in my lab, this result is consistent no matter which Linux machine I run it on, as long as the machines are joined to the same domain:
user@my-linux-host:~$ id user@example.com

uid=778006423(user@example.com) gid=778001234(domain users@example.com) groups=778001234 (domain users@example.com)
Another benefit of this approach is that UIDs and GIDs generated by SSSD can also be applied to the uidNumber and gidNumber attributes in Active Directory for users and groups. This allows applications that query these AD attributes to perform mapping of the UID or GID to the SID, ultimately resulting in the same AD users or groups being referenced regardless of whether a user or group is in use on a Windows or Linux system.
Viewing and Editing the uidNumber and gidNumber Attributes
To view the uidNumber and gidNumber attributes in Active Directory Users and Computers on Windows Server, make sure you have Advanced Features enabled under the View dropdown:
You’ll then be able to view and edit those fields in the user’s or group’s Properties menu on the Attribute Editor tab:
Listing All AD Users and Groups with their UIDs and GIDs
Depending on the number of users and groups in your domain, it may take a long time to manually assign uidNumber and gidNumber values. Although methods to programmatically populate these fields will be environment-specific, we can at least list all AD users and groups, with their UIDs and GIDs, using the getent command from a Linux host joined to the domain.
By default, getent will list only the users and groups on the local machine. Luckily, this can be modified by adding a line to your /etc/sssd/sssd.conf file and restarting SSSD. However, enabling this enumeration option can cause significant stress on the Active Directory server.
Typically, I like to step through this process outside of production hours, save the results, and then disable the full enumeration. Here’s how I do that:
- First, we add enumerate = True to sssd.conf, and then we restart the SSSD service:
echo "enumerate = True" | sudo tee -a /etc/sssd/sssd.conf &> /dev/null

sudo service sssd restart
Depending on the size of your Active Directory, it can take up to 10 minutes to complete the initial enumeration into the local cache. During this period, you’ll notice domain users and groups populating in the outputs from getent passwd and getent group, respectively.
2. Once enumeration to the local credential cache is complete, we can use the following commands to format the getent output (<domain> needs to be replaced with your domain name):
getent passwd | awk -F: '{print $1 "," $3 "," $4}' | grep <domain>

getent group | awk -F: '{print $1 "," $3}' | grep <domain>
The first command outputs each domain user with their UID and their GID in comma-separated format:
user@example.com,778006423,778001234
The second outputs each domain group with its GID in comma-separated format:
domain users@example.com,778001234
3. You can redirect the output to text or CSV files for parsing into Active Directory’s uidNumber and gidNumber attributes. With the UID and GID information in CSV format, you could create a script that imports each CSV and automatically updates uidNumber and gidNumber for Active Directory users and groups. For example, the following Windows PowerShell command adds the specified UID and GID to those attributes in AD:
Set-ADUser <ad_user> -Replace @{uidNumber="<uid>"; gidNumber="<gid>"}
With this command (and Set-ADGroup), you can easily generate a script that fits your environment and speeds up the process of mapping UIDs/GIDs to uidNumber and gidNumber in AD, which ultimately map to Windows SIDs.
4. Once you’ve saved the output from the getent commands, you can remove the enumerate value from sssd.conf and restart the SSSD service to prevent the expensive LDAP enumeration from occurring in the future:
sudo sed -i '/enumerate = True/d' /etc/sssd/sssd.conf

sudo service sssd restart
Conclusion
Linux hosts are often used for critical functions, so admins need to monitor these hosts, understand how they’re used, observe who accesses them and verify how they’re secured.
Admins need to especially be careful when joining Linux hosts to Active Directory. Remember, it takes only one compromised host or user for attackers to move laterally into admin rights in your domain, by exploiting issues like over-provisioned user access, weak passwords and open SMB/NFS shares.
One of the best ways to reduce cybersecurity risks is to use the Netwrix Active Directory Security Solution. Comprehensive and user-friendly, this software makes integrating Linux with Active Directory stress-free and simple. It includes:
- Preconfigured and customizable auditing, logging, analyzing and reporting jobs on both Unix/Linux and Active Directory
- Tools for protecting other parts of your infrastructure, including Google Cloud, network devices, virtualized systems and Kubernetes containers
Interested in experiencing the Netwrix difference? Request a free trial today.
FAQ
Can you join a Linux machine to Active Directory?
Yes. You can join any distro to an AD domain by manually connecting the SSSD client or using the realm join command.
How does Linux connect to Active Directory?
System Security Services Daemon (SSSD) provides a set of daemons to manage access to remote directory services and authentication mechanisms on Linux machines.
What is realmd in Linux?
realmd is a Linux system service that allows callers to configure network authentication and domain membership via SSSD or winbind services.
What is the sudo systemctl command?
The sudo systemctl command is the main management tool for controlling the init system. You can use the start command after it to start a systemd service.
What is the sudo apt-get update command?
The sudo apt-get update command is for downloading package information from all configured sources.
What is sudoers?
Linux and Unix administrators can use the sudoers file to allocate system rights to system users. In other words, it allows administrators to control who does what. You can find this file in /etc/sudoers.

Director of Technical Product Management at Netwrix. Farrah is responsible for building and delivering on the roadmap of Netwrix products and solutions.
Farrah has over 9 years of experience in the cybersecurity industry, having held multiple roles at Stealthbits including Quality Assurance Manager and Scrum Master.

![]() На большом количестве разных интернет-ресурсов можно встретить описание процедуры присоединения серверов на базе ОС Linux к домену Active Directory, и практически везде в таких описаниях в виде неотъемлемой части присутствует установка Samba с последующим использованием Winbind. Мы тоже не стали в этом плане исключением. В этой заметке я хочу рассмотреть пример использования альтернативного средства расширения функционала аутентификации и авторизации в Linux – службы SSSD (System Security Services Daemon), которая будет автоматически настроена с помощью пакета realmd (Realm Discovery). В этом примере нами будет настроена аутентификация и авторизация на сервере Debian GNU/Linux 8.6 (Jessie) с подключением к домену Active Directory (на базе Windows Server 2012 R2).
На большом количестве разных интернет-ресурсов можно встретить описание процедуры присоединения серверов на базе ОС Linux к домену Active Directory, и практически везде в таких описаниях в виде неотъемлемой части присутствует установка Samba с последующим использованием Winbind. Мы тоже не стали в этом плане исключением. В этой заметке я хочу рассмотреть пример использования альтернативного средства расширения функционала аутентификации и авторизации в Linux – службы SSSD (System Security Services Daemon), которая будет автоматически настроена с помощью пакета realmd (Realm Discovery). В этом примере нами будет настроена аутентификация и авторизация на сервере Debian GNU/Linux 8.6 (Jessie) с подключением к домену Active Directory (на базе Windows Server 2012 R2).
Общую информацию о SSSD можно получить здесь — FedoraProject Wiki – SSSD и здесь — FedoraHosted Wiki – sssd. На русском языке небольшое описание есть в статье Датавед — Настройка SSSD и интересный комментарий есть в ветке форума Pro-LDAP.ru — Сводка систем аутентификации. Меня же SSSD заинтересовала после того, как я наткнулся на пару интересных статей в блоге Red Hat, где SSSD рассматривается как более продвинутая альтернатива Winbind —Overview of Direct Integration Options и SSSD vs Winbind. Даже не взирая на то, что SSSD имеет некоторые ограничения, такие как, например, отсутствие поддержки NTLM (зачем он нужен, если есть Kerberos), эта штука всё равно выглядит интересно.
Как сказано в документе Configuring_sssd_with_ad_server поддержка Active Directory (AD) появилась в SSSD начиная с версии 1.9.0. Проверим версию доступную нам в репозиториях только что установленной Debian Jessie:
# apt-cache show sssd

Package: sssd
Version: 1.11.7-3
Installed-Size: 42
Maintainer: Debian SSSD Team
Architecture: amd64
Depends: python-sss (= 1.11.7-3), sssd-ad (= 1.11.7-3), sssd-common (= 1.11.7-3), sssd-ipa (= 1.11.7-3), sssd-krb5 (= 1.11.7-3), sssd-ldap (= 1.11.7-3), sssd-proxy (= 1.11.7-3)
Description-en: System Security Services Daemon -- metapackage
Provides a set of daemons to manage access to remote directories and authentication mechanisms. It provides an NSS and PAM interface toward the system and a pluggable backend system to connect to multiple different account sources. It is also the basis to provide client auditing and policy services for projects like FreeIPA. This package is a metapackage which installs the daemon and existing authentication back ends.
Multi-Arch: foreign
Homepage: https://fedorahosted.org/sssd/
Section: utils
Priority: extra
Filename: pool/main/s/sssd/sssd_1.11.7-3_amd64.deb
Size: 13248
...
Итак, имеющаяся в репозиториях Debian версия имеет поддержку AD, хотя и не является самой актуальной версией.
Предварительные требования
Прежде чем приступить к установке и настройке SSSD, убедимся в том, что на нашей Linux-системе корректно настроен DNS клиент, то есть, как минимум, в файле /etc/resolv.conf есть ссылки на DNS-серверы, которые отвечают за разрешение имён в домене Active Directory:
# cat /etc/resolv.conf

search ad.holding.com
nameserver 10.1.0.9
nameserver 10.6.1.8
Также, в силу того, что SSSD будет использовать Kerberos, нам нужно убедиться в том, что у нас корректно настроен NTP-клиент и время синхронизировано с контроллерами домена AD. Устанавливаем NTP-клиент и открываем на настраиваем его конфигурационный файл:
# apt-get install ntp
# nano /etc/ntp.conf
В файле меняем строчки указывающие на NTP-сервер. В качестве источника времени указываем контроллеры домена AD:
server 10.1.0.9 iburst
server 10.6.1.8 iburst
Перезапускаем службу ntp и проверяем статус синхронизации времени:
# service ntp restart
# ntpq -4 -p
# date -R
Синхронизация времени настроена и теперь можно приступать к настройке SSSD.
Установка realmd и присоединение к домену Active Directory
Для автоматизации создания конфигурации SSSD существует очень удобный инструмент – пакет realmd (Realm Discovery). Документацию об использовании этого инструмента можно найти по адресу freedesktop.org — realmd docs. Утилита realm, входящая в этот пакет способна автоматически обнаружить информацию о домене AD и поможет нам простым и удобным способом выполнить присоединение нашей Linux-системы к этому домену с автоматической настройкой системы аутентификации Linux (PAM/NSS) и её интеграцией с SSSD.
Установим пакет realmd:
# apt-get install realmd
Проверим как работает обнаружение домена, выполнив realm discover (подробности здесь)
# realm discover ad.holding.com --verbose

 * Resolving: _ldap._tcp.ad.holding.com
 * Performing LDAP DSE lookup on: 10.2.0.8
 * Performing LDAP DSE lookup on: 10.4.5.2
 * Performing LDAP DSE lookup on: 10.2.5.3
 * Successfully discovered: ad.holding.com
ad.holding.com
  type: kerberos
  realm-name: AD.HOLDING.COM
  domain-name: ad.holding.com
  configured: no
  server-software: active-directory
  client-software: sssd
  required-package: sssd-tools
  required-package: sssd
  required-package: libnss-sss
  required-package: libpam-sss
  required-package: adcli
  required-package: samba-common-bin
Как видим, из службы DNS по служебным SRV-записям успешно получена информация о домене и определён набор пакетов, которые нужно установить и настроить в систему для успешного подключения к домену.
Перед запуском процедуры автоматической установки и настройки пакетов с последующим присоединением к домену, при желании (опционально) мы можем настроить дополнительные параметры для работы утилиты realm. Для этого можно создать и настроить конфигурационный файл realmd.conf:
# touch /etc/realmd.conf
Информацию о поддерживаемых опциях файла можно найти в онлайн-справке, либо в локальной справке man realmd.conf. Например, зададим произвольные имя и версию ОС, которые будут отправлены в качестве значений атрибутов operatingSystem и operatingSystemVersion при создании учётной записи компьютера в домене AD
[active-directory]
os-name = Debian GNU/Linux
os-version = 8.6 (Jessie)
Теперь перейдём к процедуре присоединения нашего Linux-компьютера к домену с помощью команды realm join. В ходе выполнения этой процедуры будет выполнено несколько действий:
- Будет установлено ПО необходимое для присоединения и последующей авторизации в домене AD (пакеты adcli, libpam-sss, libnss-sss, sssd, sssd-tools);
- Будет создана учётная запись компьютера в домене AD;
- Будет сгенерирован keytab-файл /etc/krb5.keytab для поддержки Kerberos;
- Будет сконфигурирована и запущена служба sssd
- Будут настроены конфигурационные файлы PAM/NSS для поддержки доменной аутентификации
Пример выполнения команды:
# realm join --verbose --user=petya --user-principal="host/kom-app31.ad.holding.com@AD.HOLDING.COM" --computer-ou="OU=Linux Servers,OU=KOM,DC=ad,DC=holding,DC=com" kom-dc01.ad.holding.com
Все доступные к использованию опции можно посмотреть в онлайн-документации. В рассматриваемом нами примере Linux-компьютер с именем хоста KOM-APP31 будет присоединяться к домену AD.HOLDING.COM, а в процессе присоединения для создаваемой в домене учётной записи компьютера будет использоваться Organizational Unit (OU) Linux Servers\KOM\ad.holding.com. Присоединение к домену будет выполняться с использованием подключения к ближайшему к нам контроллеру домена kom-dc01.ad.holding.com. Обратите внимание на то, что если в качестве последнего параметра явно указан контроллер домена, то он и будет в дальнейшем использоваться в качестве источника проверки учётных данных. Если же вместо имени конкретного контроллера домена указать имя домена, то для определения контроллеров домена используемых для аутентификации в дальнейшем будет использоваться механизм авто-обнаружения по SRV-записям в DNS, что не всегда является желательной конфигурацией, хотя и сводит к минимуму возможные дополнительные правки конфигурационных файлов после «джойна». Помимо этого при вызове команды нами используется ряд опций:
- user – логин доменного пользователя с правами, достаточными для ввода компьютера в домен AD. От имени этого пользователя будет выполняться присоединение компьютера к домену и модификация атрибутов доменной учётной записи компьютера. В классической ситуации — это пользователь с правами администратора домена, так как именно администраторы домена по умолчанию в AD могут обновлять значение атрибута servicePrincipalName. Однако я не очень люблю для «попсовых» задач использовать привилегии такого уровня, поэтому здесь я использую рядового доменного пользователя, у которого есть права на создание и модификацию объектов типа Computer в OU указанном в опции computer-ou;
- user-principal – строка регистрации принципала Kerberos, которая будет использоваться для генерации keytab-файла и регистрации значений атрибута userPrincipalName в свойствах учётной записи компьютера в домене AD.
Теперь о том, зачем мы здесь используем эту опцию.
Указывать в явном виде такое значение, как используется в нашем примере, вовсе не обязательно, так как по сути утилита adcli, которая используется в фоновом режиме в процессе «джойна» должна сама регистрировать значение вида host/serverfqdn@REALM. Однако в нашем случае из репозиториев Debian автоматически устанавливается устаревшая версия (0.7.5-1) этой утилиты, которая имеет проблему описанную в статье adcli creates wrong kerberos keytab entry with uppercase HOST, то есть при генерации keytab-файла записи типа host/* создаются в верхнем регистре, то есть HOST/*. А это, в свою очередь, может в дальнейшем привести к проблеме использования keytab-файла такими службами как, например, sshd. Судя по документу Red Hat Bugzilla — Bug 1267319 этот баг исправлен в adcli версии 0.8.0-1, но так как у нас нет этого обновления, мы используем обходное решение, то есть в явном виде задаём нужный нам формат записи в опции user-principal.; - computer-ou – имя OU, в котором мы хотим создать учётную запись компьютера в домене. Если учётная запись уже существует, то она будет обновлена.
- verbose – понятное дело, подразумевает расширенный вывод информации о всех происходящих действиях.
Пример выполнения команды в моём конкретном случае:
 * Resolving: _ldap._tcp.kom-dc01.ad.holding.com
 * Resolving: kom-dc01.ad.holding.com
 * Performing LDAP DSE lookup on: 10.1.0.9
 * Successfully discovered: ad.holding.com
Password for petya:{здесь введём пароль пользователя}
 * Unconditionally checking packages
 * Resolving required packages
 * Installing necessary packages: adcli, libpam-sss, libnss-sss, sssd, sssd-tools
 * LANG=C /usr/sbin/adcli join --verbose --domain ad.holding.com --domain-realm AD.HOLDING.COM --domain-controller 10.1.0.9 --computer-ou OU=Linux Servers,OU=KOM,DC=ad,DC=holding,DC=com --login-type user --login-user petya --stdin-password
 * Using domain name: ad.holding.com
 * Calculated computer account name from fqdn: KOM-APP31
 * With user principal: host/kom-app31.ad.holding.com@AD.HOLDING.COM
 * Using domain realm: ad.holding.com
 * Sending netlogon pings to domain controller: ldap://10.1.0.9
 * Received NetLogon info from: KOM-DC01.ad.holding.com
 * Wrote out krb5.conf snippet to /var/cache/realmd/adcli-krb5-hRFuGh/krb5.d/adcli-krb5-conf-5nYX3C
 * Authenticated as user: petya@AD.HOLDING.COM
 * Looked up short domain name: KOM
 * Using fully qualified name: KOM-APP31
 * Using domain name: ad.holding.com
 * Using computer account name: KOM-APP31
 * Using domain realm: ad.holding.com
 * Calculated computer account name from fqdn: KOM-APP31
 * Generated 120 character computer password
 * Using keytab: FILE:/etc/krb5.keytab
 * Using fully qualified name: KOM-APP31
 * Using domain name: ad.holding.com
 * Using computer account name: KOM-APP31
 * Using domain realm: ad.holding.com
 * Looked up short domain name: KOM
 * Computer account for KOM-APP31$ does not exist
 ! Couldn't find a computer container in the ou, creating computer account directly in: OU=Linux Servers,OU=KOM,DC=ad,DC=holding,DC=com
 * Calculated computer account: CN=KOM-APP31,OU=Linux Servers,OU=KOM,DC=ad,DC=holding,DC=com
 * Created computer account: CN=KOM-APP31,OU=Linux Servers,OU=KOM,DC=ad,DC=holding,DC=com
 * Set computer password
 * Retrieved kvno '2' for computer account in directory: CN=KOM-APP31,OU=Linux Servers,OU=KOM,DC=ad,DC=holding,DC=com
 * Modifying computer account: dNSHostName
 * Modifying computer account: userAccountControl
 * Modifying computer account: operatingSystem, operatingSystemVersion, operatingSystemServicePack
 * Modifying computer account: userPrincipalName
 ! Couldn't set service principals on computer account CN=KOM-APP31,OU=Linux Servers,OU=KOM,DC=ad,DC=holding,DC=com: 00002083: AtrErr: DSID-03151785, #1:
        0: 00002083: DSID-03151785, problem 1006 (ATT_OR_VALUE_EXISTS), data 0, Att 90303 (servicePrincipalName)

 ! Couldn't authenticate with keytab while discovering which salt to use: KOM-APP31$@AD.HOLDING.COM: Client 'KOM-APP31$@AD.HOLDING.COM' not found in Kerberos database
 * Added the entries to the keytab: KOM-APP31$@AD.HOLDING.COM: FILE:/etc/krb5.keytab
 * Added the entries to the keytab: host/kom-app31.ad.holding.com@AD.HOLDING.COM: FILE:/etc/krb5.keytab
 * Added the entries to the keytab: HOST/KOM-APP31@AD.HOLDING.COM: FILE:/etc/krb5.keytab
 * Cleared old entries from keytab: FILE:/etc/krb5.keytab
 * Added the entries to the keytab: HOST/KOM-APP31@AD.HOLDING.COM: FILE:/etc/krb5.keytab
 * Added the entries to the keytab: RestrictedKrbHost/KOM-APP31@AD.HOLDING.COM: FILE:/etc/krb5.keytab
 * Cleared old entries from keytab: FILE:/etc/krb5.keytab
 * Added the entries to the keytab: RestrictedKrbHost/KOM-APP31@AD.HOLDING.COM: FILE:/etc/krb5.keytab
 * /usr/sbin/update-rc.d sssd enable
 * /usr/sbin/service sssd restart
 * Successfully enrolled machine in realm
В моём примере видно, что процесс ввода в домен завершился успешно, однако с заполнением атрибута servicePrincipalName в свойствах учётной записи компьютера в домене возникла проблема, так как указанному в опции —user пользователю petya банально не хватило прав на это действие. Об этом я в общем-то и писал выше, то есть проблему эту я создал себе сам для большего контроля над процессом. Чтобы исправить это, я выполню данное действие в домене вручную с помощью утилиты setspn с любой доменной Windows-машины уже с правами доменного администратора:
C:\> setspn -A HOST/kom-app31.ad.holding.com kom-app31

Проверка домена DC=ad,DC=holding,DC=com
Регистрация ServicePrincipalNames для CN=KOM-APP31,OU=Linux Servers,OU=KOM,DC=ad,DC=holding,DC=com
        HOST/kom-app31.ad.holding.com
Обновленный объект
Проверяем результат:
C:\> setspn -L kom-app31

Зарегистрирован ServicePrincipalNames для CN=KOM-APP31,OU=Linux Servers,OU=KOM,DC=ad,DC=holding,DC=com:
        HOST/kom-app31.ad.holding.com
Теперь можем приступить к проверке результатов работы realm join, хотя по большому счёту делать это имеет смысл только в случае «траблшутинга» или необходимости внесения в конфигурационные файлы дополнительных правок, чтобы учесть собственную специфику, как в нашем случае.
Проверяем результат работы realm join
В ходе присоединения к домену утилита realm автоматически выполнила установку нужных пакетов — adcli, libpam-sss, libnss-sss, sssd, sssd-tools. При этом, наша Linux-система осталась свободной от монструозной Samba с её Winbind, и это, в некоторой степени, не может не радовать. Более того, в системе мы даже не обнаружим классически привычного для Kerberos пакета krb5-user. Поэтому если мы, по какой-то причине, всё-таки заходим заглянуть внутрь сгенерированного keytab-файла, то нам придётся таки установить соответствующий пакет (по крайней мере другого способа посмотреть keytab я не знаю):
# apt-get install krb5-user
# klist -e -k -t /etc/krb5.keytab

Keytab name: FILE:/etc/krb5.keytab
KVNO Timestamp           Principal
---- ------------------- ------------------------------------------------------
   2 10/13/2016 10:52:10 KOM-APP31$@AD.HOLDING.COM (des-cbc-crc)
   2 10/13/2016 10:52:10 KOM-APP31$@AD.HOLDING.COM (des-cbc-md5)
   2 10/13/2016 10:52:10 KOM-APP31$@AD.HOLDING.COM (arcfour-hmac)
   2 10/13/2016 10:52:10 KOM-APP31$@AD.HOLDING.COM (aes128-cts-hmac-sha1-96)
   2 10/13/2016 10:52:10 KOM-APP31$@AD.HOLDING.COM (aes256-cts-hmac-sha1-96)
   2 10/13/2016 10:52:10 host/kom-app31.ad.holding.com@AD.HOLDING.COM (des-cbc-crc)
   2 10/13/2016 10:52:10 host/kom-app31.ad.holding.com@AD.HOLDING.COM (des-cbc-md5)
   2 10/13/2016 10:52:10 host/kom-app31.ad.holding.com@AD.HOLDING.COM (arcfour-hmac)
   2 10/13/2016 10:52:10 host/kom-app31.ad.holding.com@AD.HOLDING.COM (aes128-cts-hmac-sha1-96)
   2 10/13/2016 10:52:10 host/kom-app31.ad.holding.com@AD.HOLDING.COM (aes256-cts-hmac-sha1-96)
   2 10/13/2016 10:52:10 HOST/KOM-APP31@AD.HOLDING.COM (des-cbc-crc)
   2 10/13/2016 10:52:10 HOST/KOM-APP31@AD.HOLDING.COM (des-cbc-md5)
   2 10/13/2016 10:52:10 HOST/KOM-APP31@AD.HOLDING.COM (arcfour-hmac)
   2 10/13/2016 10:52:10 HOST/KOM-APP31@AD.HOLDING.COM (aes128-cts-hmac-sha1-96)
   2 10/13/2016 10:52:10 HOST/KOM-APP31@AD.HOLDING.COM (aes256-cts-hmac-sha1-96)
   2 10/13/2016 10:52:10 RestrictedKrbHost/KOM-APP31@AD.HOLDING.COM (des-cbc-crc)
   2 10/13/2016 10:52:10 RestrictedKrbHost/KOM-APP31@AD.HOLDING.COM (des-cbc-md5)
   2 10/13/2016 10:52:10 RestrictedKrbHost/KOM-APP31@AD.HOLDING.COM (arcfour-hmac)
   2 10/13/2016 10:52:10 RestrictedKrbHost/KOM-APP31@AD.HOLDING.COM (aes128-cts-hmac-sha1-96)
   2 10/13/2016 10:52:10 RestrictedKrbHost/KOM-APP31@AD.HOLDING.COM (aes256-cts-hmac-sha1-96)
Как видим, в нашем keytab-файле присутствуют записи. которые мы ранее указывали в опции —user-principal.
***
Проверим наличие настроенного утилитой realm файла /etc/sssd/sssd.conf. При необходимости можно сразу подправить файл, чтобы разрешить аутентификацию по коротким именам, например petya, то есть, без указания доменного суффикса в формате petya@ad.holding.com. Для этого можно либо убрать параметр «use_fully_qualified_names = True» либо в глобальную секцию «[sssd]» добавить доменный суффикс по умолчанию. Я выбираю второй вариант. Помимо этого мы можем добавить нужные нам дополнительные серверы аутентификации — контроллеры домена, расширив значение параметра ad_server и добавив, при необходимости, параметр ad_backup_server (подробнее здесь). Указывать в явном виде конкретные контроллеры домена может быть полезно в случае, если в домене много контроллеров и автоматический механизм обнаружения по SRV-записям в DNS возвращает далеко расположенные контроллеры, что может вызвать дополнительные задержки в процессе аутентификации. В итоге файл примет следующий вид:
[sssd]
domains = ad.holding.com
config_file_version = 2
services = nss, pam
default_domain_suffix = ad.holding.com

[domain/ad.holding.com]
ad_server = kom-dc01.ad.holding.com, kom-dc02.ad.holding.com
ad_backup_server = msk-dc01.ad.holding.com, msk-dc02.ad.holding.com
ad_domain = ad.holding.com
krb5_realm = AD.HOLDING.COM
realmd_tags = manages-system joined-with-adcli
cache_credentials = True
id_provider = ad
krb5_store_password_if_offline = True
default_shell = /bin/bash
ldap_id_mapping = True
use_fully_qualified_names = True
fallback_homedir = /home/%d/%u
access_provider = ad
Практика показала, что даже в случае явного указания контроллеров домена, в случае если в лесу AD несколько доменов, возможна ситуация, при которой поиск доменных пользователей не будет возвращать результатов. В таком случае в секцию [domain/ad.holding.com] можно попробовать добавить дополнительные параметры, ограничивающие поиск:
[domain/ad.holding.com]
...
subdomains_provider = none
ldap_idmap_default_domain_sid = S-1-5-21-xxx-xxx-xxx
Первый параметр отключает запросы к другим поддоменам внутри леса, а второй параметр определяет SID домена, в котором должен выполняться поиск. SID всех доменов в лесу AD можно легко получить на любом доменном Windows-компьютере с помощью PowerShell:
(Get-ADForest).Domains | %{Get-ADDomain -Server $_} | Select name, domainsid
***
Дополнительно пришлось столкнуться с ситуацией, когда при определении членства в группах безопасности для пользователя возвращался неполный перечень групп. Например команда id petya выводила только информацию об основной группе пользователя (например domain users). Обнаружилось и описание этой проблемы: sssd ticket 2667 — id_provider = ad requires ldap_use_tokengroups = False to see secondary groups. В качестве обходного решения этой проблемы предполагается отключение параметра ldap_use_tokengroups в секции домена:
[domain/ad.holding.com]
...
ldap_use_tokengroups = False
...
***
Ещё одна ситуация, с которой можно столкнуться в доменах Active Directory с большим количеством групп и пользователей – исчерпание пула idmap, используемого по умолчанию в SSSD. В таком случае команда типа getent group <имя группы> может не возвращать членство группы, а команда типа id <имя пользователя> может возвращать неполный список доменных групп пользователя. При этом, если запустить sssd интерактивно (службу предварительно нужно остановить) с расширенным дебагом…
# service sssd stop
# sssd -i --debug-level=3
…то в результате выполнения выше обозначенных команд можно обнаружить ошибку типа:
[sdap_idmap_sid_to_unix] (0x0080): Could not convert objectSID [SID пользователя/группы] to a UNIX ID
Для решения этой проблемы можно попробовать расширить используемый в SSSD по умолчанию размере пула idmap с 200000 до, например, 2000000. Делается это в секции описания домена в sssd.conf:
[domain/ad.holding.com]
...
ldap_idmap_range_size = 2000000
...
Подробнее об idmap и его границах в sssd можно почитать в man sssd-ad
***
Чтобы внесённые в sssd.conf изменения вступили в силу, перезапускаем службу sssd с очисткой кэшей sss:
# service sssd stop
# rm -f /var/lib/sss/db/*
# rm -f /var/lib/sss/mc/*
# service sssd start
Убедимся в том, что служба sssd успешно запущена и настроена на автоматический запуск:
# service sssd status

● sssd.service - System Security Services Daemon
   Loaded: loaded (/lib/systemd/system/sssd.service; enabled)
   Active: active (running)  since Tue 2016-10-14 23:10:13 MSK; 4s ago
  Process: 10310 ExecStart=/usr/sbin/sssd -D -f (code=exited, status=0/SUCCESS)
 Main PID: 10311 (sssd)
   CGroup: /system.slice/sssd.service
           ├─10311 /usr/sbin/sssd -D -f
           ├─10312 /usr/lib/x86_64-linux-gnu/sssd/sssd_be --domain ad.holding.com --debug-to-files
           ├─10313 /usr/lib/x86_64-linux-gnu/sssd/sssd_nss --debug-to-files
           └─10314 /usr/lib/x86_64-linux-gnu/sssd/sssd_pam --debug-to-files
...
***
Проверить то, что SSSD успешно прописан в качестве NSS/PAM провайдера можно, заглянув в ряд системных файлов — /etc/nsswitch.conf и /etc/pam.d/common-*. Файл nsswitch.conf привожу информативно без внесения в него каких-либо правок и убрав из вывода его комментарии, чтобы показать, что в нём появились вызовы sss:
passwd:         compat sss
group:          compat sss
shadow:         compat sss
gshadow:        files
hosts:          files dns
networks:       files
protocols:      db files
services:       db files sss
ethers:         db files
rpc:            db files
netgroup:       nis sss
Проверим файл /etc/pam.d/common-session. Внесём в этот файл дополнительную правку — в конец файла добавим строку определяющую директиву создания домашнего каталога в случае его отсутствия. Таким образом, для вновь подключаемых к серверу доменных пользователей автоматически будут создаваться домашние каталоги по шаблону указанному в параметре fallback_homedir в конфигурации sssd.conf. Результирующий файл (без вывода комментариев) получится следующий:
session [default=1]     pam_permit.so
session requisite       pam_deny.so
session required        pam_permit.so
session required        pam_unix.so
session optional        pam_sss.so
session optional        pam_systemd.so
session required        pam_mkhomedir.so umask=0022 skel=/etc/skel
Другие файлы, также без вывода комментариев, привожу чисто информативно, так как их правка не требуется, и нам лишь можно убедиться в том, что в указанных файлах есть вызовы библиотеки pam_sss.so.
Файл /etc/pam.d/common-auth :
auth    [success=2 default=ignore]      pam_unix.so nullok_secure
auth    [success=1 default=ignore]      pam_sss.so use_first_pass
auth    requisite                       pam_deny.so
auth    required                        pam_permit.so
Файл /etc/pam.d/common-account :
account [success=1 new_authtok_reqd=done default=ignore]        pam_unix.so
account requisite                       pam_deny.so
account required                        pam_permit.so
account sufficient                      pam_localuser.so
account [default=bad success=ok user_unknown=ignore]    pam_sss.so
Файл /etc/pam.d/common-password :
password        requisite                       pam_pwquality.so retry=3
password        [success=2 default=ignore]      pam_unix.so obscure use_authtok try_first_pass sha512
password        sufficient                      pam_sss.so use_authtok
password        requisite                       pam_deny.so
password        required                        pam_permit.so
Проверяем доступ к пользователям и группам Active Directory
Теперь можно проверить возможность получения информации о пользователе из домена AD. При желании можно проверить разные форматы представления учётной записи (с NetBIOS-именем домена, с доменным суффиксом в виде UPN):
# getent passwd petya
petya@ad.holding.com:*:1668597447:1668100510:Петя Резинкин:/home/ad.holding.com/petya:/bin/bash

# getent passwd KOM\\petya
petya@ad.holding.com:*:1668597447:1668100510:Петя Резинкин:/home/ad.holding.com/petya:/bin/bash

# getent passwd petya@ad.holding.com
petya@ad.holding.com:*:1668597447:1668100510:Петя Резинкин:/home/ad.holding.com/petya:/bin/bash
По аналогии проверяем то, что из домена нам возвращается информация об интересующей нас группе безопасности и входящих в эту группу доменных пользователях:
# getent group "KOM-SRV-Linux-Admins@ad.holding.com"

kom-srv-linux-admins@ad.holding.com:*:1668876454:petya@ad.holding.com,vovan@ad.holding.com
Как видим, всё в порядке. И при этом SSSD очень шустро и без граблей, с которыми мне ранее приходилось сталкиваться в Winbind, возвращает требуемые объекты каталога AD.
Ограничение доступа через доменные группы безопасности
Теперь нам нужно подумать о том, как ограничить доступ доменных пользователей для входа на наш Linux-сервер, так как в конфигурации по умолчанию все доменные пользователи, успешно прошедшие аутентификацию, смогут войти в нашу Linux-систему. Это подтвердит команда realm list, в которой нам нужно обратить внимание на строчку login-policy
# realm list

ad.holding.com
  type: kerberos
  realm-name: AD.HOLDING.COM
  domain-name: ad.holding.com
  configured: kerberos-member
  server-software: active-directory
  client-software: sssd
  required-package: sssd-tools
  required-package: sssd
  required-package: libnss-sss
  required-package: libpam-sss
  required-package: adcli
  required-package: samba-common-bin
  login-formats: %U@ad.holding.com
  login-policy: allow-realm-logins
Разрешим вход только для конкретной доменной группы, например KOM-SRV-Linux-Admins, с помощью команды realm permit:
# realm permit --groups KOM-SRV-Linux-Admins@ad.holding.com
В результате этой команды в конфигурационный файл /etc/sssd/sssd.conf в секции, описывающей подключение к соответствующему домену, будет внесено изменение:
...
[domain/ad.holding.com]
...
access_provider = simple
simple_allow_groups = KOM-SRV-Linux-Admins@ad.holding.com
Проверим то, как изменился вывод realm list:
# realm list

ad.holding.com
...
  login-policy: allow-permitted-logins
  permitted-logins:
  permitted-groups: KOM-SRV-Linux-Admins@ad.holding.com
Как видим, политика login-policy изменилась, и теперь присутствует явное указание разрешённой доменной группы доступа.
***
После настройки ограничения доступа совсем не лишним будет выполнить ряд простых тестов, чтобы убедиться в том, что эти ограничения действительно работают так как мы этого ожидаем. Например, сначала можно проверить возможность входа с доменным пользователем, включённым в группу доступа, затем другим доменным пользователем, но уже не входящим в группу доступа, затем локальным пользователем Linux-сервера и т.д. При проверке доменной аутентификации обратите внимание на то, что первый вход пользователя, ранее не обращавшегося к Linux-серверу может сопровождаться незначительной задержкой, однако все последующие входы будут выполняться молниеносно. Это связано с тем, что sssd имеет собственный механизм кэширования успешно проверенных учётных данных пользователя и способен выполнить аутентификацию даже в случае временной недоступности контроллеров домена.
Доступ к sudo
Для добавления возможности повышения привилегий с помощью команды sudo для доменных пользователей для простоты воспользуемся ранее упомянутой доменной группой безопасности KOM-SRV-Linux-Admins, хотя можно использовать и любую другую доменную группу, например с более узким составом членов.
Создадим файл, в котором будет описано разрешающее правило для sudo:
# touch /etc/sudoers.d/kom-srv-linux-admins
Обратите внимание на комментарии написанные в файле /etc/sudoers.d/README. Имя создаваемого файла не должно заканчиваться знаком «~» и иметь в своём составе точек. В файл добавим всего одну строку вида:
%KOM-SRV-Linux-Admins@ad.holding.com ALL=(ALL) ALL
Установим ограничивающие разрешения на созданный и настроенный файл:
# chmod 0440 /etc/sudoers.d/kom-srv-linux-admins
Проверяем результат. Войдя в систему от имени доменного пользователя, входящего в ранее разрешённую для sudo доменную группу KOM-SRV-Linux-Admins, пробуем выполнить любую команду с повышением привилегий через sudo:
petya@ad.holding.com@KOM-APP31:~$ sudo whoami
[sudo] password for petya@ad.holding.com: {вводим пароль пользователя petya}

root
Как видим, команда выполняется успешно с повышением привилегий.
В некоторых источниках, как например здесь приводится пример того, что для совместной работы sudo и sssd нужно устанавливать пакет libsss-sudo, хотя я такой пакет не устанавливал и sudo при этом работает, отталкиваясь от членства доменной группы безопасности. Поэтому надобность libsss-sudo для меня пока остаётся загадкой.
Удалённый доступ по протоколу SSH
Если говорить про SSH, то никакой специальной настройки sshd я не выполнял, так как по умолчанию ssh-сервер уже настроен на использование PAM, а тот в свою очередь был ранее автоматически настроен на использование доменной аутентификации с помощью утилиты realm.
Однако если вы захотите настроить Single sign-on (SSO) из Putty при подключении c Windows-машины по ранее описанной методике, то здесь без установки пакета kerb5-user, как я понял, опять же не обойтись.
# apt-get install krb5-user
В файле /etc/ssh/sshd_config достаточно раскомментировать и включить параметры GSSAPI:
...
# GSSAPI options
GSSAPIAuthentication yes
GSSAPICleanupCredentials yes
...
При этом AllowGroups можно не заполнять, так как будет использоваться членство групп описанное ранее в sssd с помощью realm permit. После правки перезапускаем службу ssh-сервера и проверяем работу SSO
# service ssh restart
<
p align=»center»>***
Резюмируя, можно сказать, что с помощью realmd и sssd настройка подключения Linux-машины к домену Active Directory несколько упрощается и становится более наглядной по сравнению с ранее описанным вариантом, а также не влечёт за собой необходимости использования Samba со «всеми вытекающими». Поэтому наверняка стоит задуматься об использовании данных инструментов для последующих «джойнов».
Дополнительные источники информации:
- FedoraHosted.org — sssd Wiki — Configuring_sssd_with_ad_server
- Red Hat Enterprise Linux Blog — SSSD-vs-Winbind
- RHEL7 Documentation — System Level Authentication Guide — 7.3. SSSD and Identity Providers (Domains)
- RHEL7 Documentation — System Level Authentication Guide — 7.2. SSSD and System Services
- Андрей Маркелов — Обзор Red Hat Directory Server и RHEL IdM
- jhrozek Blog — Anatomy of SSSD user lookup
- Alan D Moore Blog — Joining Debian 8 to Active Directory
- Датавед — Настройка SSSD
- Форум проекта Pro-LDAP.ru — Сводка систем аутентификации
- Сергей Яремчук — Подключаемся к Active Directory с помощью realmd
This tutorial will describe how you can join machines that run Linux Mint 17.1 OS to Windows 2012 Active Directory Domain Controller in order to authenticate remote accounts from AD back end identity provider to local Linux workstations with the help of SSSD service and Realmd system DBus service.
The System Security Services Daemon (SSSD) is a relative new service which provides cross-domain compatible methods for Active Directory users to authenticate to local machines using a combination of usernames and domain back end name to create the login identity, even if the Domain Controller goes offline (SSSD caches credentials).
REQUIREMENTS
- Windows Server 2012 configured as an Active Directory Domain Controller
- A Linux Mint 17.1 client machine which will be integrated to Windows PDC
Domain Settings:
- Domain Name:
caezsar.lan - Windows Server 2012 AD FQDN:
server.caezsar.lan - Windows Server 2012 AD IP Address:
192.168.1.130 - Linux Mint Hostname:
mint-desktop - Linux Mint IP Address: automatically assigned by DHCP
- Linux Mint first DNS IP Address: Manually assigned to point to AD PDC –
192.168.1.130
STEP ONE – Linux Mint Network Configuration
1. Before starting with installing the required services in order to integrate the local machine to the PDC Server, first we need to assure that Windows Domain Controller is reachable through DNS resolution on Linux Mint host by adding the DNS PDC IP Address on our Network Configuration. To achieve this goal, first open Network Settings, go to the Network Interface Card (in this case is the Wired Connection, but you can use a Wireless Connection also), open it for editing (hit the settings icon from bottom right) and add your PDC IP Address on IPv4 DNS filed (switch Automatic DNS to OFF) as illustrated in the following screenshots:

network settings
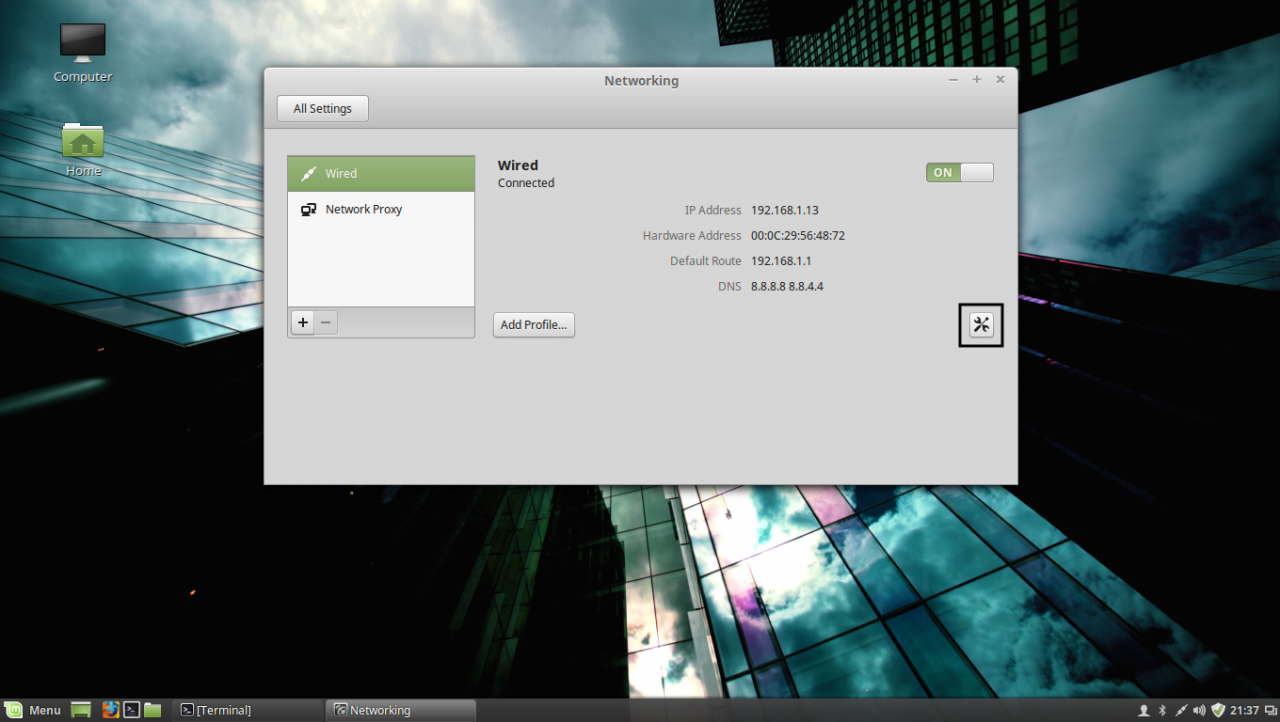
edit network interface settings
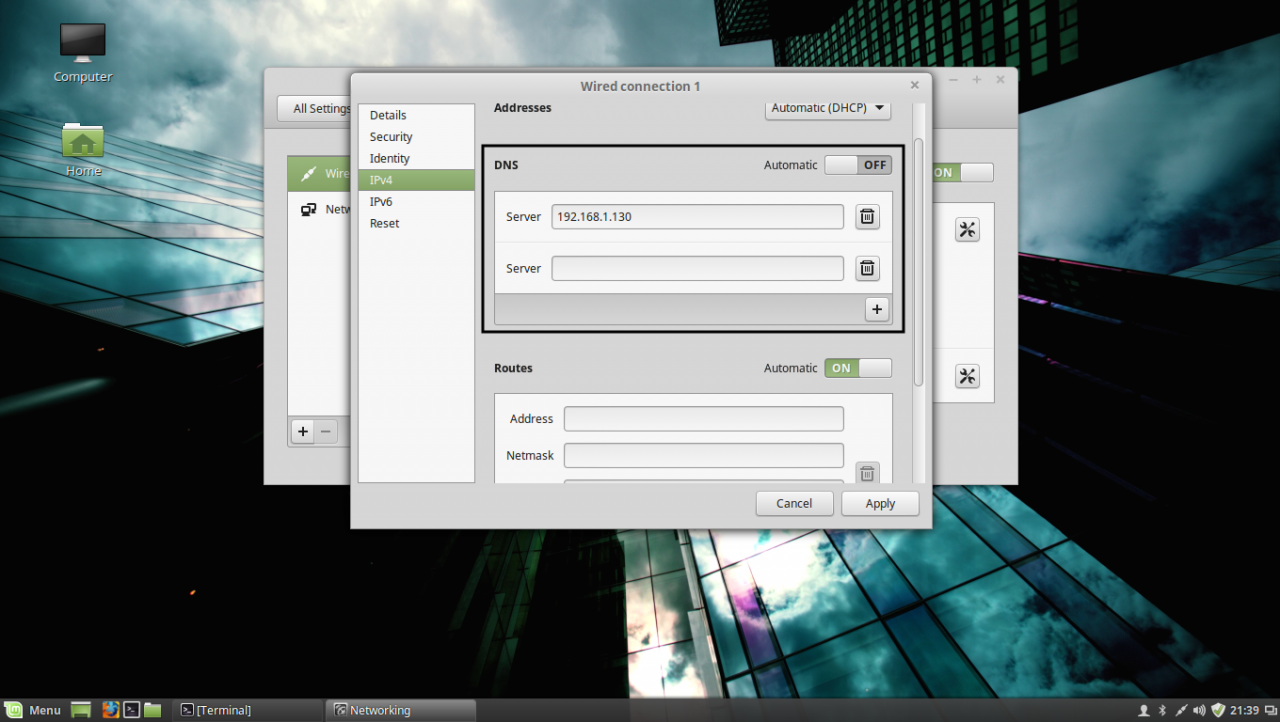
add DNS IP Address
If multiple Domain Controllers machines exists on your network then you can also add their IP Addresses on IPv4 DNS settings fields.
2. After you’re done, hit on Apply button and switch the edited Network Interface from ON to OFF and then back to ON in order to apply the new settings. After the network interface is started again, open a Terminal console and issue a ping command against your PDC domain name in order to verify if the settings are successfully applied and the domain name responds with the correct IP Address and FQDN of the PDC.
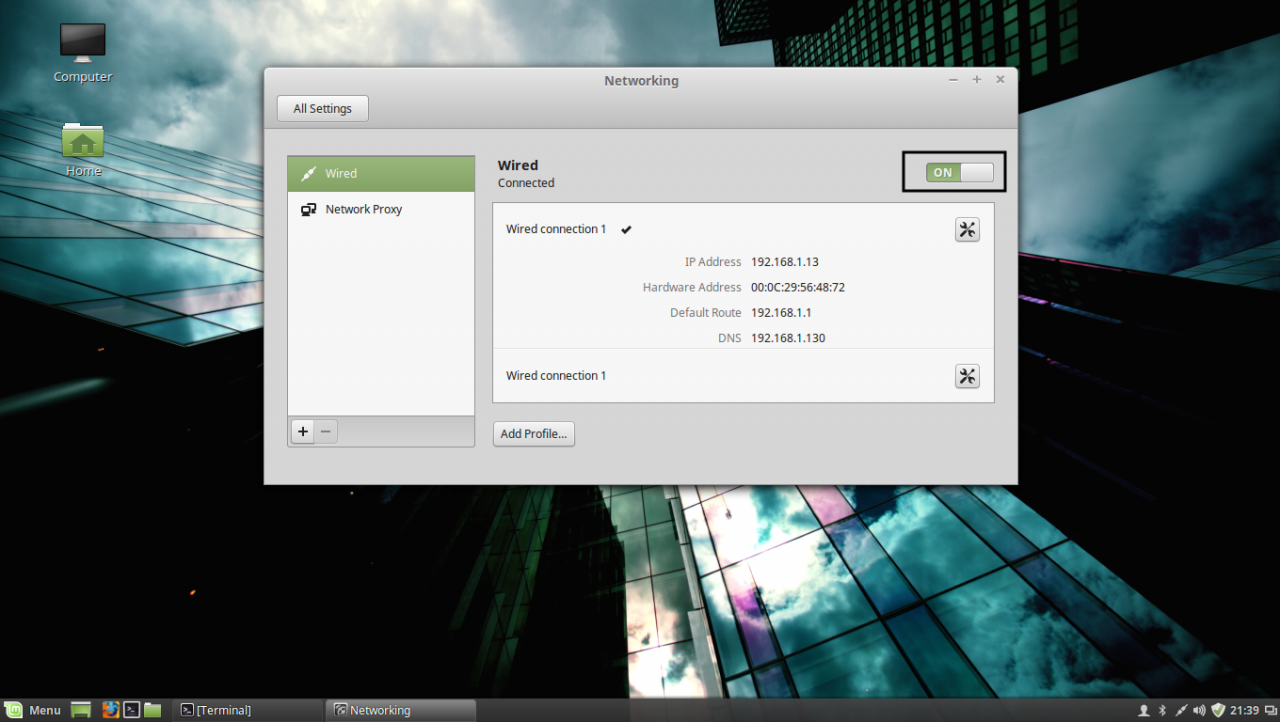
apply network settings
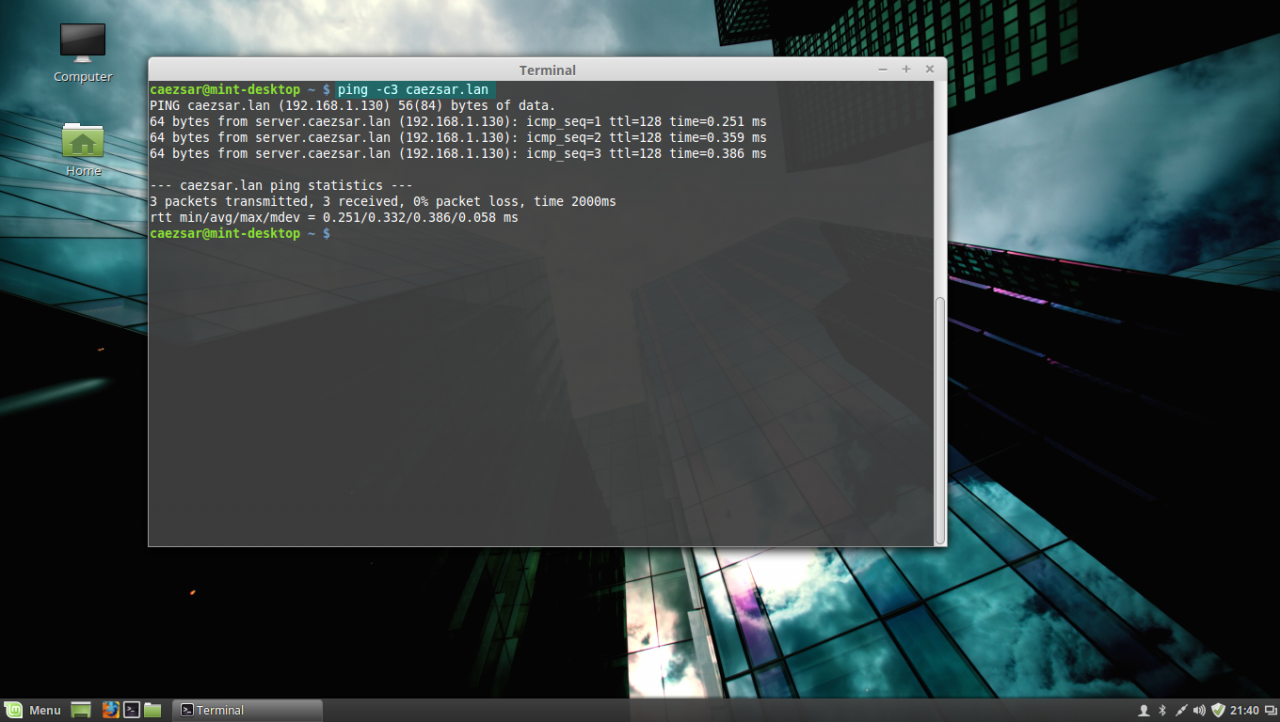
ping domain controller
If you want to avoid all this manual settings, then configure a DHCP server at your premises to automatically assign network settings, especially DNS entries, that will point to your Windows PDC IP Addresses needed for DNS resolution in order to reach the AD PDC.
STEP TWO – Install Required Software Packages
As presented at the beginning of this tutorial, in order to integrate a Linux Mint machine to an Active Directory Domain Controller you need to install the SSSD service along with the following software packages and dependency:
– SSSD service (responsible with back end realm authentication) with the following dependencies: sssd-tools (optional, but useful for sssd cache, user and groups manipulation), libpam-sss (PAM modules for local authentication) and libnss-sss (NSS modules for local DNS resolution)
– Realmd (system DBus service which manages domain integration and local resources permissions)
– The following Samba Modules: samba-common-bin and samba-libs (File sharing compatibility between Windows and Linux machines)
– Krb5-user (Client network authentication and communication with the PDC server)
– ADcli (Tools for joining domain and perform other actions on an AD)
– PackageKit (Linux cross-platform packages management for interoperabillity and user privileges for software installations)
3. Now, let’s start installing the above enumerated packages by opening a Terminal console on Linux Mint and issuing the following commands with sudo privileges:
First install Realmd and SSSD service:
sudo apt-get install realmd sssd sssd-tools libpam-sss libnss-sss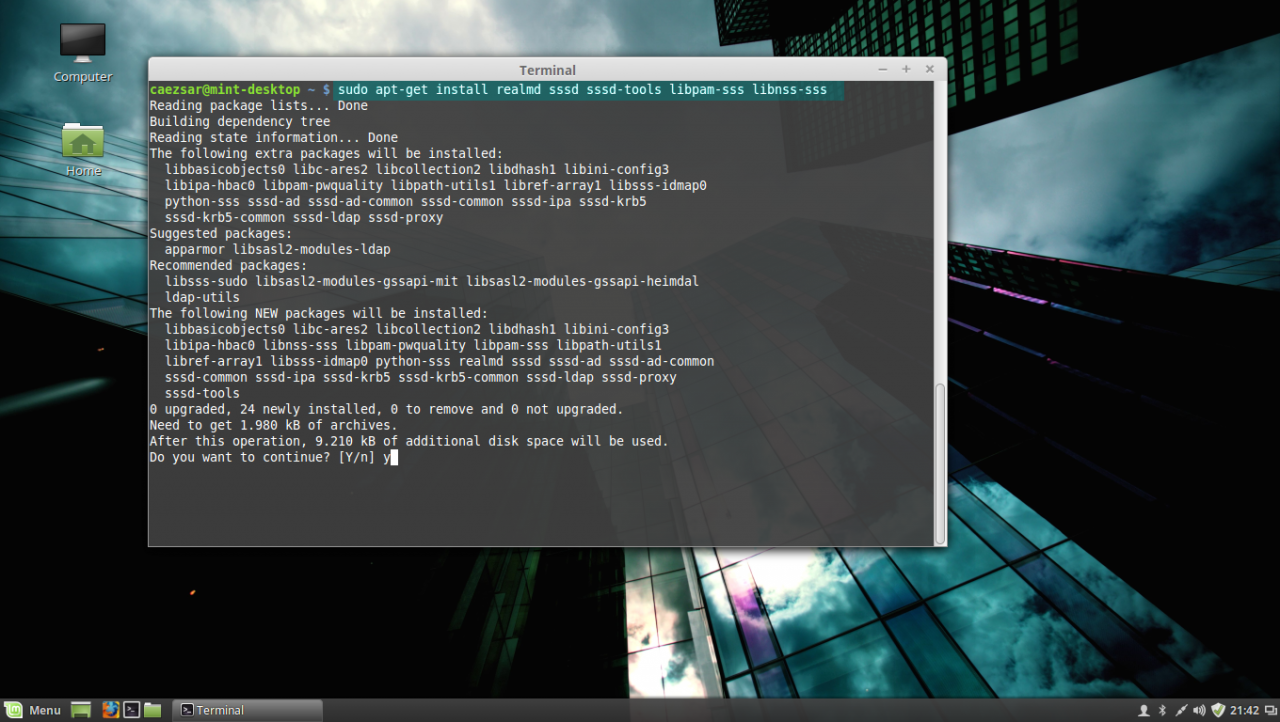
install realmd and sssd service
4. Next install Samba modules (by default this modules might be already installed on your system):
sudo apt-get install samba-libs samba-common-bin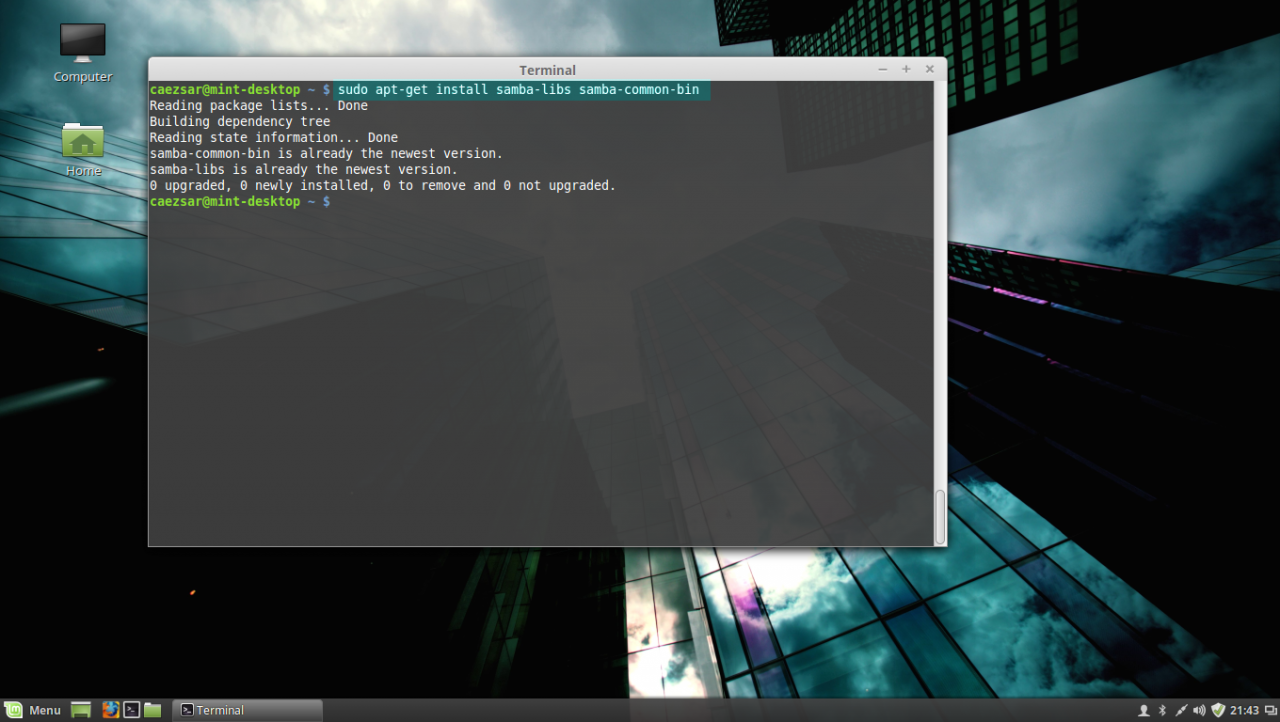
install samba modules
5. Last, install the other remained packages: krb5-user, adcli and packagekit. On krb5-user package, the installer will prompt you to enter the realm that will be used for Kerberos authentication. Use the name of the domain configured for your PDC with UPPERCASE (in this case the domain is CAEZSAR.LAN), then hit Enter key to continue further with the installation packages.
sudo apt-get install krb5-user adcli packagekit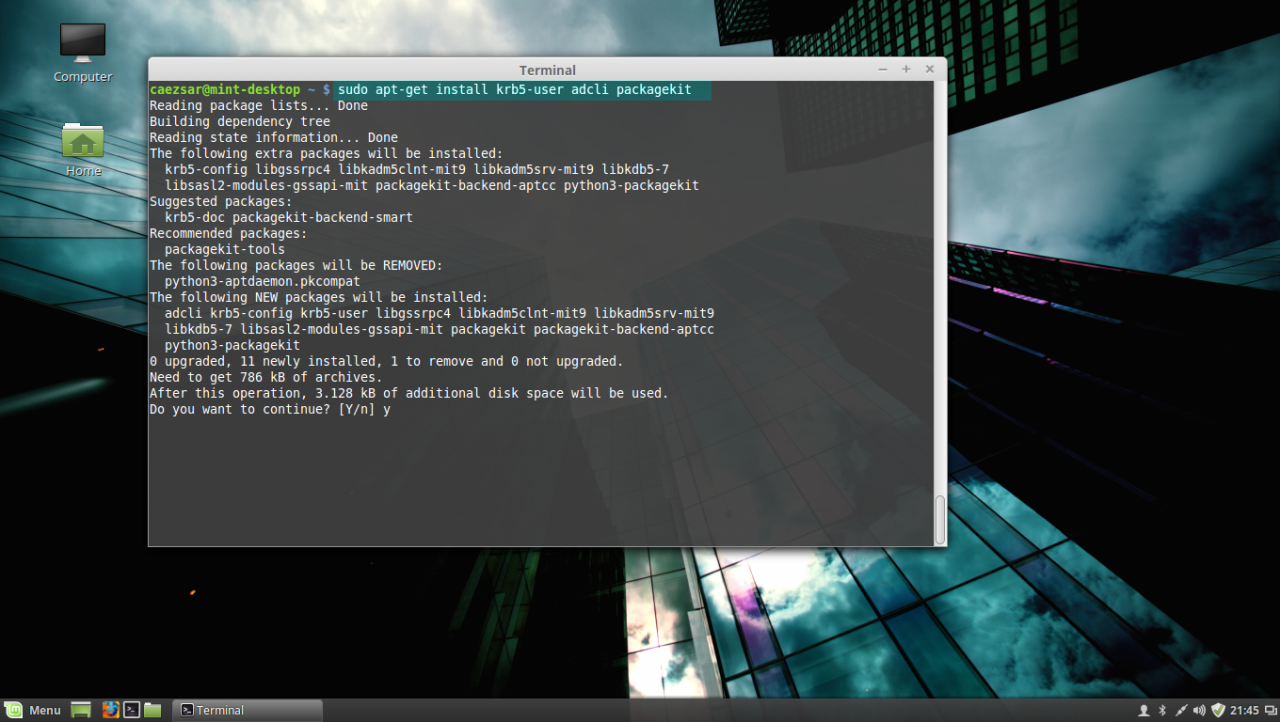
install kerberos, adcli and packagekit packages
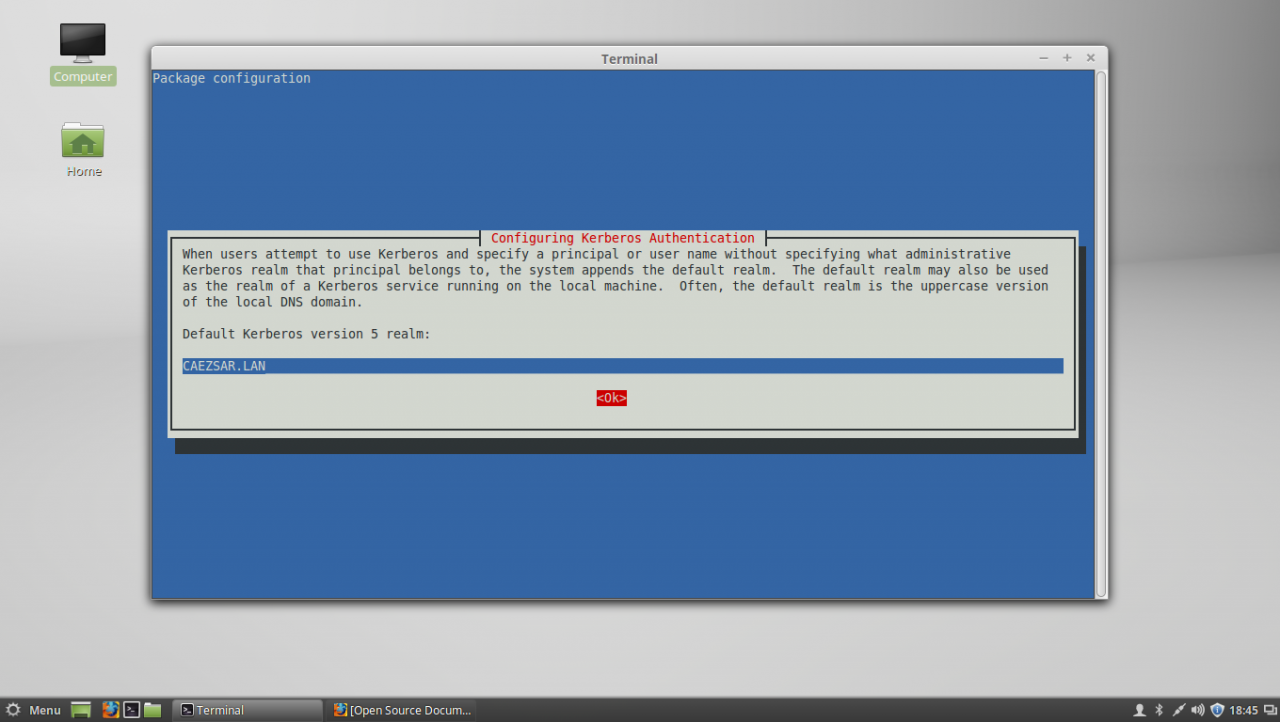
Configure Kerberos realm
STEP THREE – Edit Configuration Files for SSSD, Realmd and PAM
6. Next step before starting joining Linux Mint to Windows Server AD PDC is to configure the local services for AD network authentication. By default the SSSD service has no configuration file defined on /etc/sssd/ path. In order to create a default configuration file for SSSD service, issue the following command to create and simultaneous edit the file:
sudo nano /etc/sssd/sssd.confSSSD configuration file excerpt:
[nss]
filter_groups = root
filter_users = root
reconnection_retries = 3

[pam]
reconnection_retries = 3

[sssd]
domains = CAEZSAR.LAN
config_file_version = 2
services = nss, pam

[domain/CAEZSAR.LAN]
ad_domain = CAEZSAR.LAN
krb5_realm = CAEZSAR.LAN
realmd_tags = manages-system joined-with-adcli
cache_credentials = True
id_provider = ad
krb5_store_password_if_offline = True
default_shell = /bin/bash
ldap_id_mapping = True
use_fully_qualified_names = False
fallback_homedir = /home/%d/%u
access_provider = ad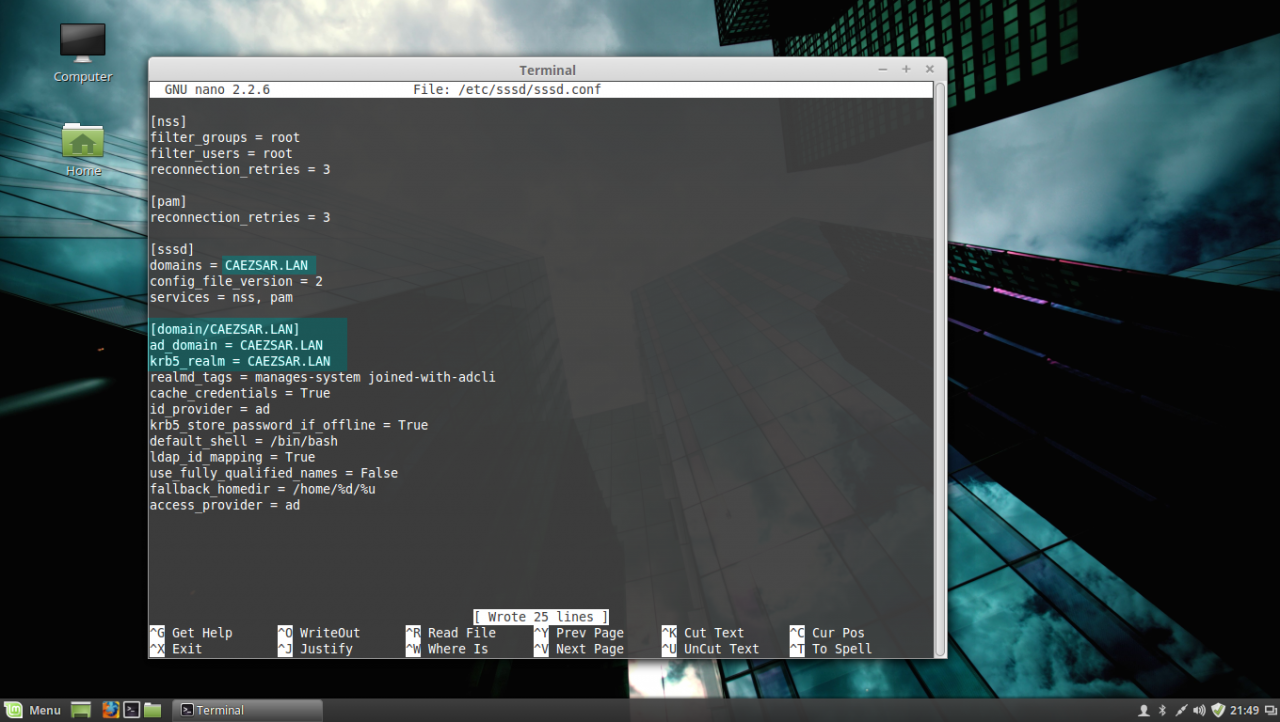
sssd configuration file
While editing the file make sure you replace domains, [domain/], ad_domain and krb5_realm parameters accordingly. Use the UPPERCASES as the above file excerpt suggests.
The fallback_homedir = /home/%d/%u parameter will cause the system to create home directories for all domain logged in users with the following path: /home/domain_name/domain_user, so practically all your domain users homes will be stored into a single directory named after your domain name on /home path. If you want to change this behavior so all domain users homes should be created as normal system users, /home/username, just remove %d variable and you’re done.
For other options and parameters concerning sssd.conf file run man sssd command.
After you finish editing the file, save it with CTRL+O , close it with CTRL+X and proceed further with the below instructions.
7. The next step is to create and edit a configuration file for Realmd in order to avoid some eventual package dependency problems by issuing the following command:
sudo nano /etc/realmd.confUse the following configurations for realmd file:
[service]

automatic-install = no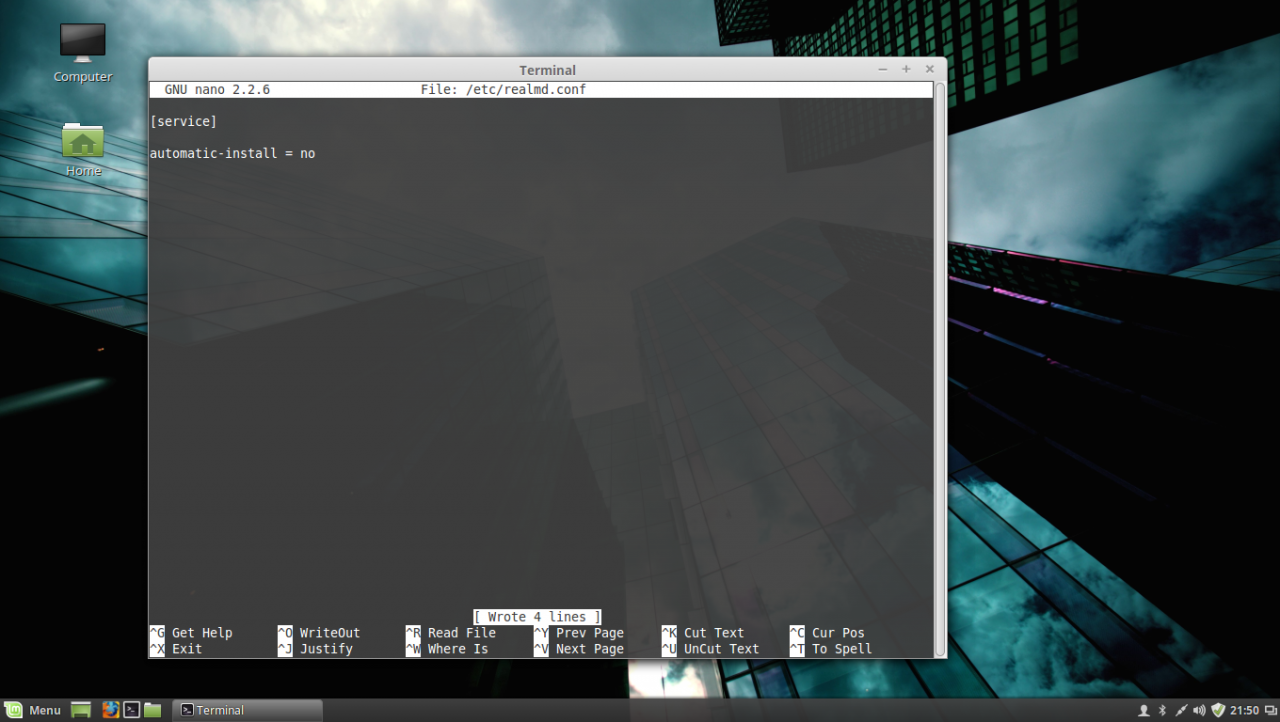
realmd conf file
After you add the above lines, save the file and close it.
8. The last file that you need to edit before joining the domain is the common-session PAM file. So, open this file for editing by running the below command and add the following line after the session optional pam_sss.so line in order for the system to automatically create home directories for the new authenticated AD users .
sudo nano /etc/pam.d/common-sessionAdd the following line as presented on the below screenshot:
session optional pam_mkhomedir.so skel = /etc/skel/ mask=0077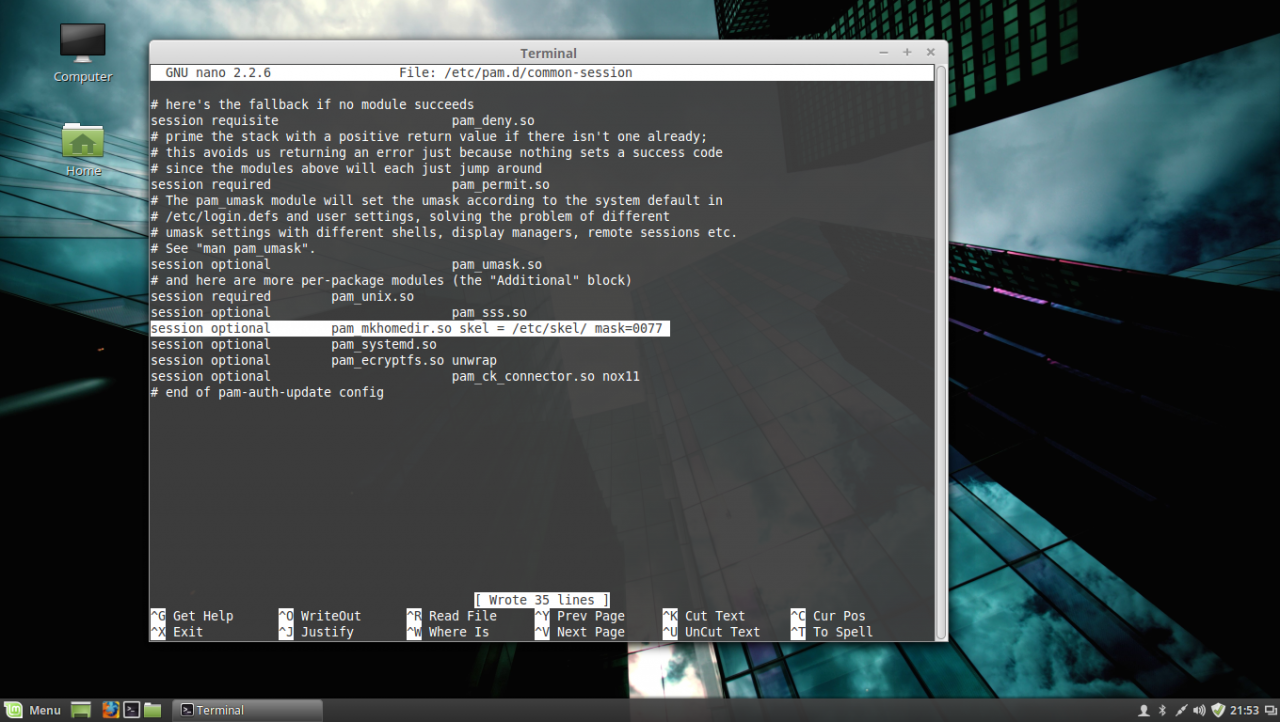
PAM common-session file
After you have edited the file, save it and close it, and proceed to the next step in order to make Linux Mint a part of the Windows Domain Controller.
STEP FOUR – Join Linux Mint to Windows Server 2012 Active Directory Domain Controller
9. Before joining the Linux Mint client to Windows PDC, first issue the discovery command against your domain name in order to view the complete realm configurations and a package list of software that must be installed on the client machine before you enroll it in the realm.
sudo realm discover domain.tld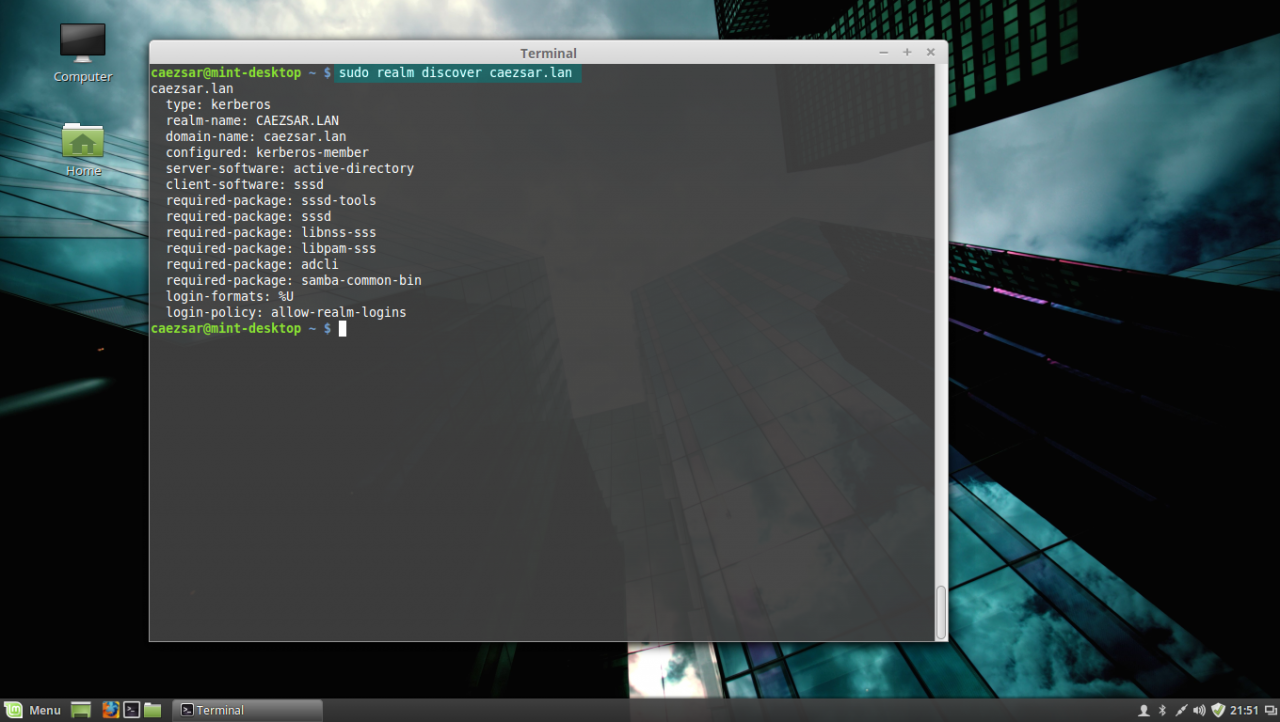
realm discover domain
10. If everything is correctly setup at the client side and the domain controller responds, issue the following command in order to integrate Linux Mint client machine to Windows Server 2012 AD PDC.
sudo realm join domain.tld -U domain_administrator --verbose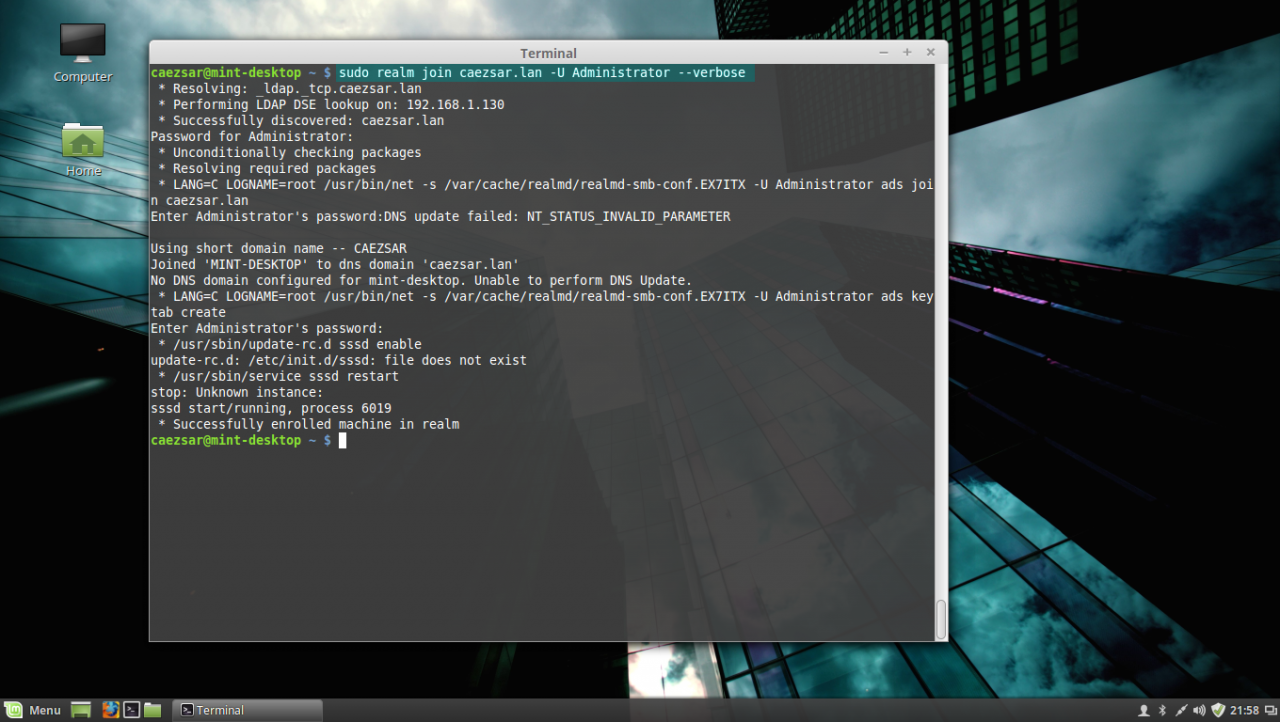
join AD domain
Use the -U option to specify an Active Directory administrative user with privileges to add machines on the server and the --verbose option to get debug output in case something goes wrong with the integration process.
Once the command returns successfully status and ads Linux Mint to AD you can use the sudo realm list command to view full details and the default configurations for your domain.

list realm
To manage sssd service use the following command switches (you don’t need to manually start the sssd service because it’s automatically started by the realmd when the machine is enrolled to realm):
sudo service sssd status|start|stop11. To check if the machine appears on the Domain Controller, go to your Windows Server 2012, open Active Directory Users and Computers utility and search your Linux Mint hostname.
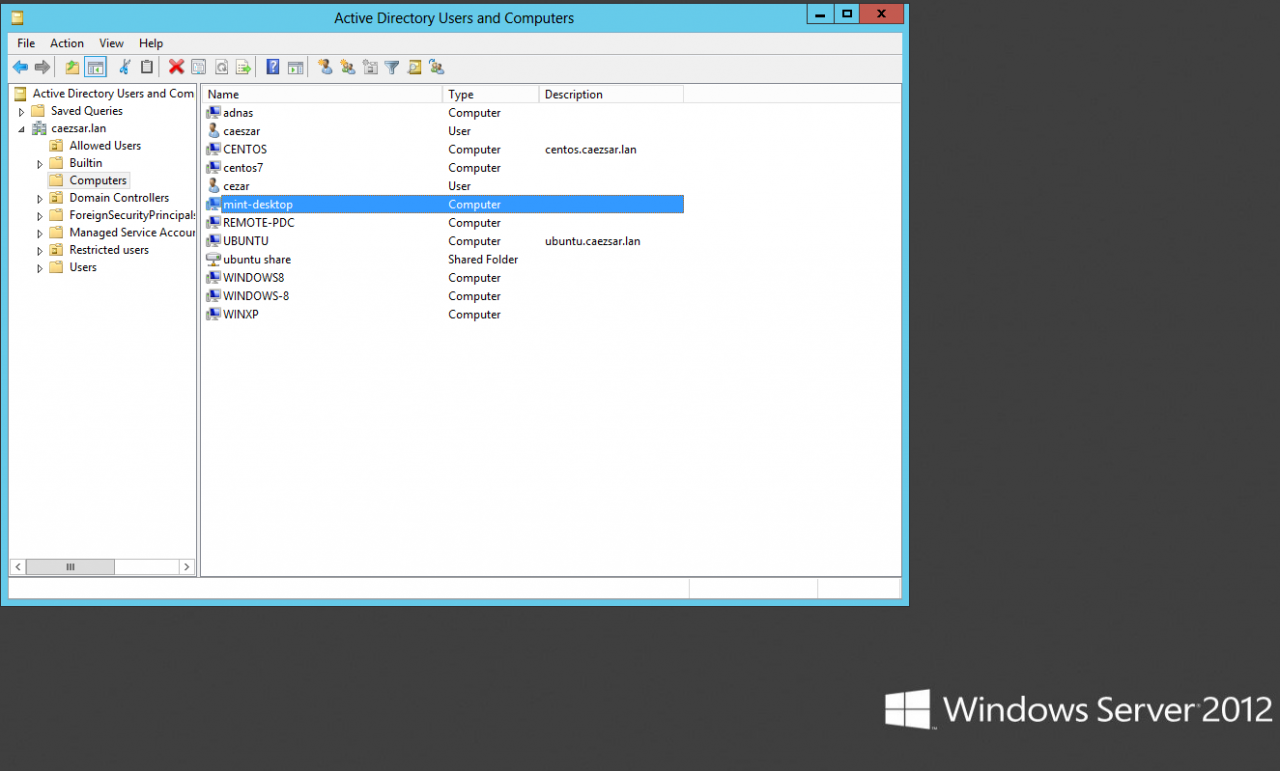
Active Directory Users and Computers
STEP FIVE – Log In on Linux Mint with Active Directory Accounts
12. To authenticate on Linux Mint with and an Active Directory user, first you need to add a permit rule on local policies in order to grant access for all realm users on local machine, by issuing the following command:
sudo realm permit --allTo grant access just for a specific AD user or group use the following command syntax:
sudo realm permit -u AD_usernamesudo realm permit -g AD_groupTo withdraw access for a user use the command with --x switch:
sudo realm permit domain --x domain\AD_username13. To perform Terminal console command line authentications on Linux Mint host with an Active Directory account, use double backslashes to escape the backslash which separates the domain string from user, as shown in the below syntax (you can append the dot domain or use just the domain string):
su - domain.tld\\AD_usernameor
su - domain\\AD_username
AD user login
ad user login without dot domain
14. To log in with an AD account on Linux using Putty or to perform Linux Mint MDM GUI logins use the following syntax:
domain\AD_username

domain.tld\AD_username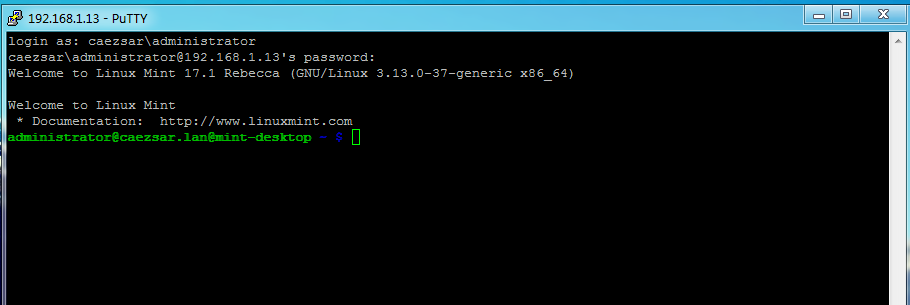
AD user Putty login
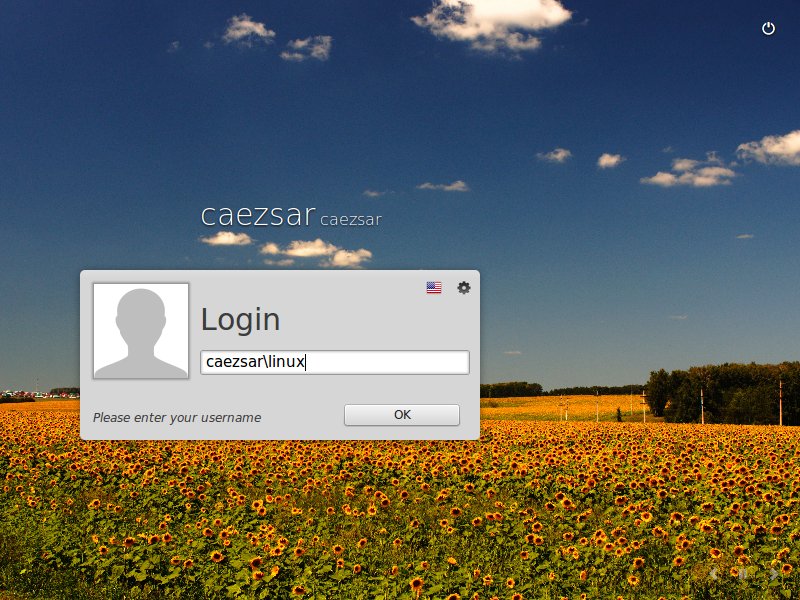
Ad user GUI login
15. In case you have issues with AD users authentication on Linux Mint Logon Screen, log in with a local user account and change the Login Window Theme from an HTML theme to a GDM theme, log out, hit Escape key is case the last logged in user appears on username Login filed and continue the authentication process with a AD account as presented above.
Use GDM theme

GDM login screen
STEP SIX – Add Root Permissions to AD Domain Admins Users
16. In case you want to allow all Active Directory Domain Admins to have full administrative permissions in order to execute any command with root privileges on the Linux Mint machine, open the local sudoers file for editing and add the following line:
sudo nano /etc/sudoersor
sudo visudoAdd this line after %sudo line:
%domain\ admins@domain.tld ALL=(ALL) ALL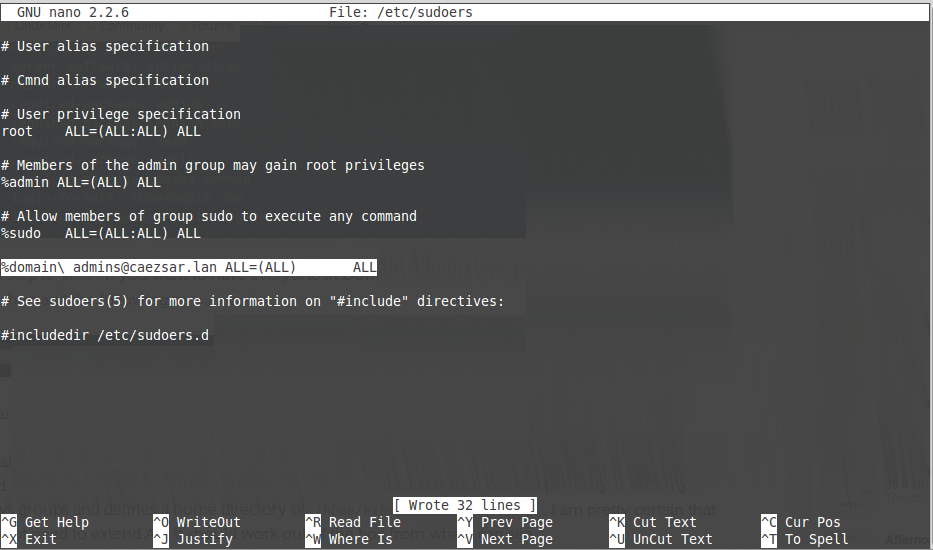
add domain admins root privileges
17. In case you don’t want your Linux Mint machine to be a part of the domain anymore, issue the following command to leave the domain:
sudo realm leave domain.tld -U AD_admin_user --verbose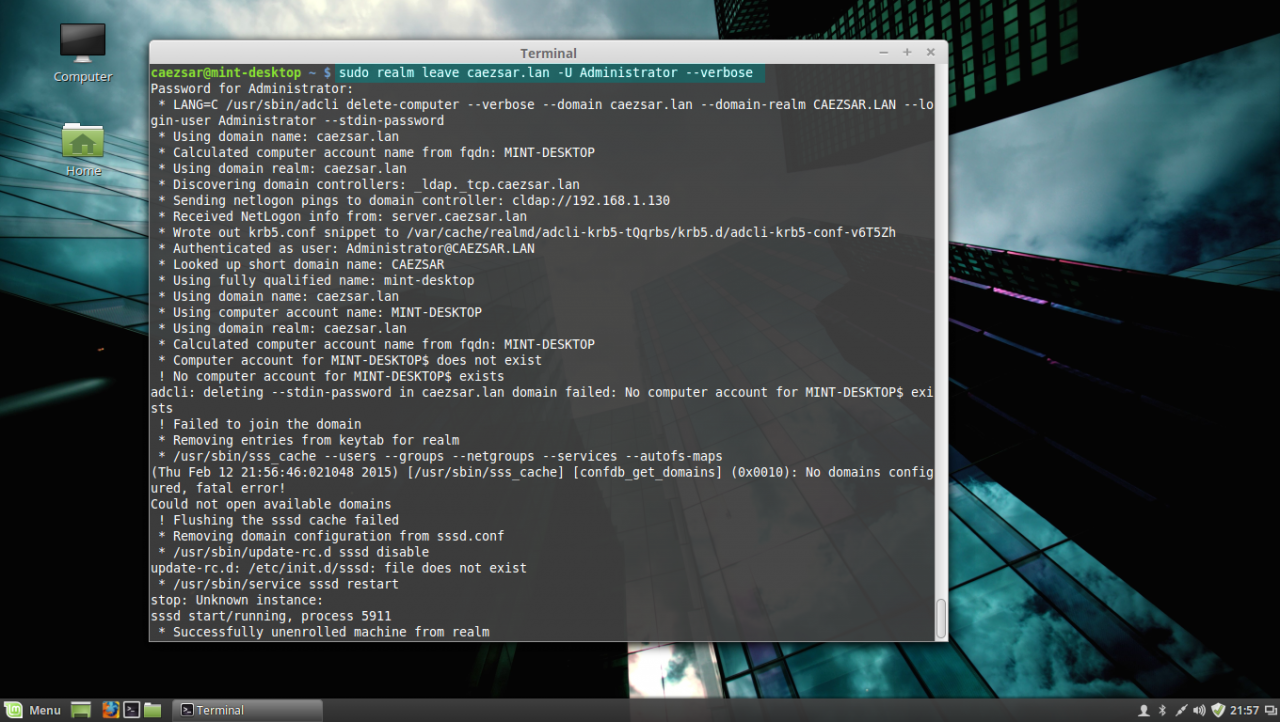
leave AD PDC
That’s all! Now, the machine running Linux Mint 17.1 is integrated as a part of Windows Active Directory Domain Controller and can successfully replace your old Windows XP machine, for which Microsoft has stopped its support, but keep in mind that some features and, especially, a huge part of Active Directory Group Policy, don’t apply on Linux systems.