Время на прочтение
4 мин
Количество просмотров 89K
Для полноценной работы с проектом на docker’е в WSL необходима установка WSL 2. На момент написания заметки ее использование возможно только в рамках участия в программе предварительной оценки Windows (WSL 2 доступна в сборках 18932 и выше). Так же отдельно стоит упомянуть, что необходима версия Windows 10 Pro для установки и настройки Docker Desktop.
Важно! В WSL 2 пропала острая необходимость в Docker Desktop для Windows 10. Как обходиться без него описано в пункте Про Docker в Ubuntu.
Первые шаги
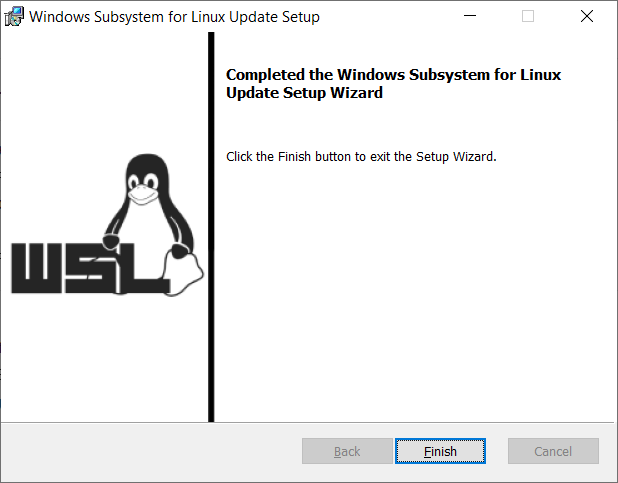
После вступления в программу предварительной оценки и установки обновлений необходимо установить дистрибутив Linux (в данном примере используется Ubuntu 18.04) и Docker Desktop с WSL 2 Tech Preview:
- Docker Desktop WSL 2 Tech Preview
- Ubuntu 18.04 из Windows Store
В обоих пунктах следуем всем инструкциям по установке и настройке.
Установка дистрибутива Ubuntu 18.04
Перед запуском Ubuntu 18.04 необходимо включить Windows WSL и Windows Virtual Machine Platform посредством выполнения двух команд в PowerShell:
Enable-WindowsOptionalFeature -Online -FeatureName Microsoft-Windows-Subsystem-Linux(потребует перезагрузку компьютера)Enable-WindowsOptionalFeature -Online -FeatureName VirtualMachinePlatform
После необходимо удостовериться, что мы будем использовать WSL v2. Для этого в терминале WSL или PowerShell последовательно выполняем команды:
wsl -l -v— смотрим, какая версия установлена в данный момент. Если 1, то движемся далее по спискуwsl --set-version ubuntu 18.04 2— для обновления до версии 2wsl -s ubuntu 18.04— устанавливаем Ubuntu 18.04 в качестве дистрибутива по-умолчанию
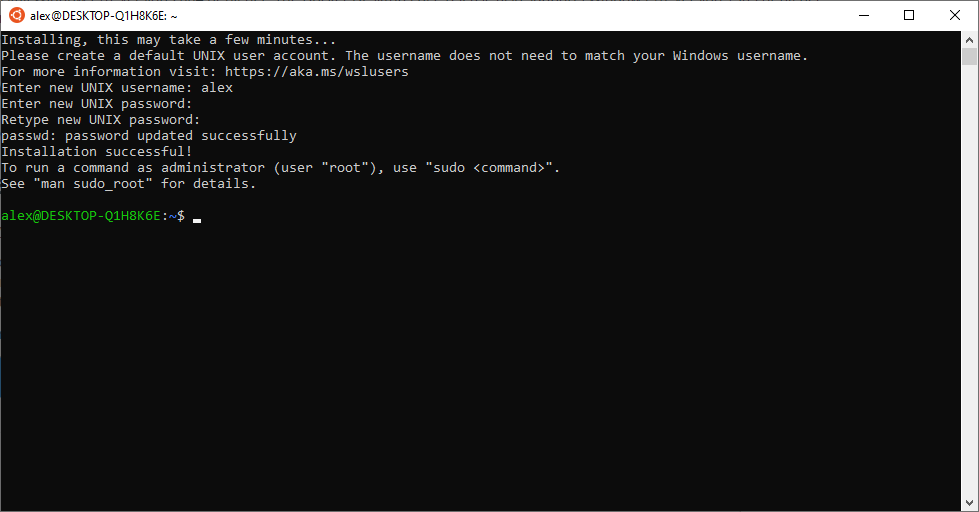
Теперь можно запустить Ubuntu 18.04, провести настройку (указать имя пользователя и пароль).
Установка Docker Desktop
Важно! В WSL 2 пропала острая необходимость в Docker Desktop для Windows 10. Как обходиться без него описано в пункте Про Docker в Ubuntu.
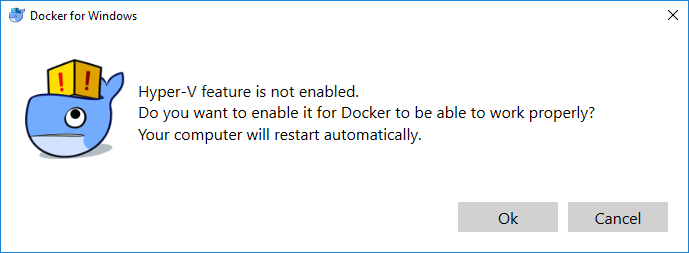
В процессе установки следуем указаниям. Компьютер потребует перезапуск после установки и при первом запуске для включения Hyper-V (из-за поддержки которого и требуется версия Windows 10 Pro).
Важно! Если Docker Desktop сообщит о блокировке со стороны firewall’а, идем в настройки антивируса и вносим следующие изменения в правила сетевого экрана (в данном примере в качестве антивируса используется Kaspersky Total Security):
- Проходим в Настройки -> Защита -> Сетевой экран -> Настроить пакетные правила -> Local Service (TCP) -> Изменить
- Из списка локальных портов удаляем порт 445
- Сохранить
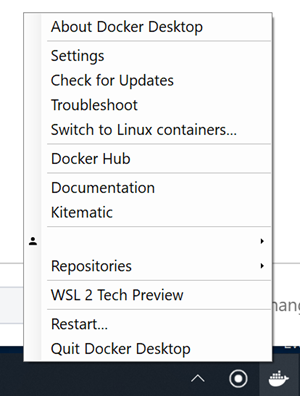
После запуска Docker Desktop в его контекстном меню выбираем пункт WSL 2 Tech Preview.
В открывшемся окне нажимаем кнопку Start.
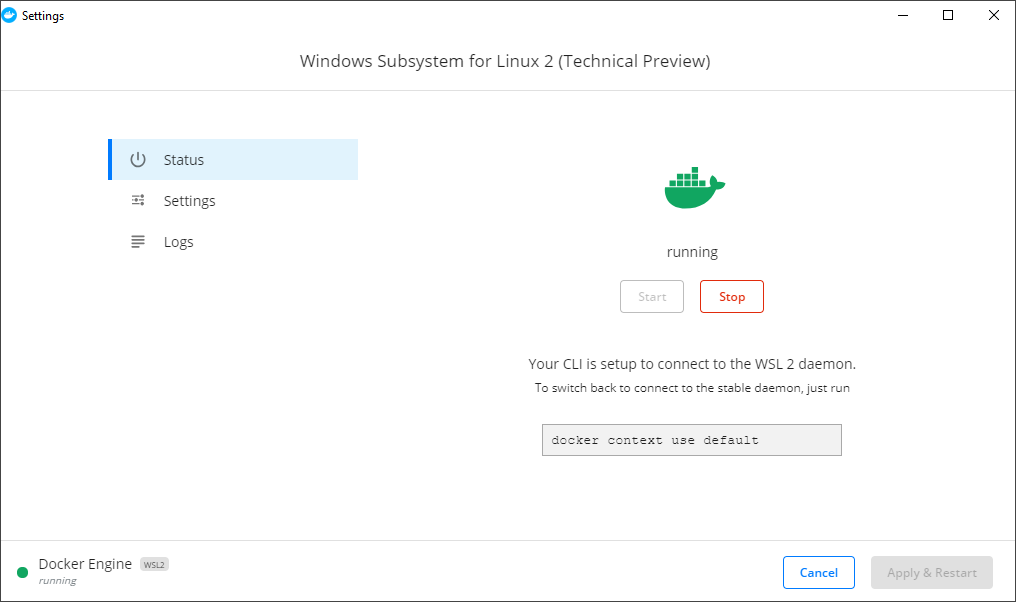
Теперь docker и docker-compose доступны внутри дистрибутива WSL.
Важно! В обновленном Docker Desktop теперь вкладка с WSL внутри окна настроек. Там включается поддержка WSL.

Важно! Помимо галочки активации WSL также необходимо в вкладке Resources->WSL Integration активировать Ваш WSL дистрибутив.

Запуск
Неожиданностью стали те многие проблемы, которые возникли при попытке поднять контейнеры проектов, расположенных в директории пользователя Windows.
Ошибки различного рода, связанные с запуском bash-скриптов (которые как правило стартуют при сборке контейнеров для установки необходимых библиотек и дистрибутивов) и прочих, обычных для разработки на Linux, вещей, заставили задуматься о размещении проектов непосредственно в директории пользователя Ubuntu 18.04.
.
Из решения предыдущей проблемы вытекает следующая: как работать с файлами проекта через IDE, установленную на Windows. В качестве «best practice» я нашел для себя только один вариант — работа посредством VSCode (хотя являюсь поклонником PhpStorm).
После скачивания и установки VSCode обязательно устанавливаем в расширение Remote Development extension pack.
После установки выше упомянутого расширения достаточно просто выполнить команду code . в директории проекта при запущенной VSCode.
В данном примере для обращения к контейнерам через браузер необходим nginx. Установить его через sudo apt-get install nginx оказалось не так просто. Для начала потребовалось обновить дистрибутив WSL посредством выполнения sudo apt update && sudo apt dist-upgrade, и только после этого запустить установку nginx.
Важно! Все локальные домены прописываются не в файле /etc/hosts дистрибутива Linux (его там даже нет), а в файле hosts (обычно расположенном C:\Windows\System32\drivers\etc\hosts) Windows 10.
Про Docker в Ubuntu
Как подсказали знающие пользователи в комментариях к заметке, docker внутри дистрибутива WSL 2 абсолютно работоспособен. Это позволяет не устанавливать Docker Desktop на Windows 10 и решает проблему с наличием версии Windows 10 Pro (необходимость в Pro возникает именно в связи с использованием Docker Desktop). Устанавливается согласно инструкциям с родного сайта:
- https://docs.docker.com/install/linux/docker-ce/ubuntu/
- https://docs.docker.com/install/linux/linux-postinstall/
- https://docs.docker.com/compose/install/
Если при выполнении команды docker начнет ругаться на демона, проверьте статус сервиса — в моем случае как и nginx он не запускается автоматически. Запустите его командой sudo service docker start.
Если в момент сборки вывалится ошибка «Service failed to build: cgroups: cannot find cgroup mount destination: unknown» попробуйте следующее решение (не мое, найдено мною, ссылка в источниках): sudo mkdir /sys/fs/cgroup/systemd; sudo mount -t cgroup -o none,name=systemd cgroup /sys/fs/cgroup/systemd.
Работа с проектом через PhpStorm
Чтобы обеспечить возможность работы с проектом в WSL через PhpStorm, необходимо сделать следующее:
- Запускаем командную строку Windows 10 от имени администратора;
- В командной строке Windows 10 выполняем команду
mklink /D C:\project_directory \\wsl$\Ubuntu\home\user\project_directory, которая создаст символьную ссылку на папку проекта.
После этого в IDE можно открыть проект по пути C:\project_directory
P.S. Дмитрий Симагин, спасибо за решение.
Источники
Более подробное описание каждого шага можно найти тут:
- https://code.visualstudio.com/docs/remote/wsl
- https://docs.docker.com/docker-for-windows/wsl-tech-preview/
- https://docs.docker.com/docker-for-windows/
- https://docs.microsoft.com/ru-ru/windows/wsl/wsl2-install
- https://docs.docker.com/install/linux/docker-ce/ubuntu/
- https://docs.docker.com/install/linux/linux-postinstall/
- https://docs.docker.com/compose/install/
- https://github.com/docker/for-linux/issues/219
1. Overview
It is now possible to run Docker containers on Windows 10 and Windows Server, leveraging Ubuntu as a hosting base.
Imagine running your own Linux applications on Windows, using a Linux distribution you are comfortable with: Ubuntu!
It is now possible to do so using the power of Docker technology and Hyper-V virtualization on Windows.
Originally authored by Mathieu Trudel-Lapierre.
2. Requirements
You will need a 64-bit x86 PC with 8GiB of RAM running Windows 10 or Windows Server, updated to include the Windows 10 Fall Creator update, released October 2017.
You will also need a recent installation of Docker.
Finally, you will need to make sure you have installed a program for decompressing the Ubuntu host container image, e.g. 7-Zip or XZ Utils
3. Install Docker for Windows
Download Docker for Windows from Docker Store.

Once downloaded, proceed with the installation steps, and either logout or reboot of your system as indicated by the installer.

After reboot, Docker will be started. Docker requires that the Hyper-V feature is enabled, so if necessary will ask you to enable it and restart. Click OK for Docker to enable Hyper-V and restart your system.
4. Download the Ubuntu container image
Download the latest Ubuntu container image for Windows from the Canonical Partner Images website
Once downloaded, extract the image, using e.g. 7-Zip, or XZ Utils:
C:\Users\mathi\> .\xz.exe -d xenial-container-hyper-v.vhdx.xz
5. Prepare the container environment
First, create two directories:

Create C:\lcow, which will be used as scratch space for Docker while preparing the containers.

Also create C:\Program Files\Linux Containers. This is where the Ubuntu container image will live.
You will need to give this folder extra permissions to allow Docker to use the images from it. Run the following Powershell script in an administrator Powershell window:
param(
[string] $Root
)
# Give the virtual machines group full control
$acl = Get-Acl -Path $Root
$vmGroupRule = new-object System.Security.AccessControl.FileSystemAccessRule("NT VIRTUAL MACHINE\Virtual Machines", "FullControl","ContainerInherit,ObjectInherit", "None", "Allow")
$acl.SetAccessRule($vmGroupRule)
Set-Acl -AclObject $acl -Path $Root
Save this file as set_perms.ps1 and run it:
TIP You may need to run ‘Set-ExecutionPolicy -Scope process unrestricted’ to be allowed to run unsigned Powershell scripts.

C:\Users\mathi\> .\set_perms.ps1 "C:\Program Files\Linux Containers"
C:\Users\mathi\>
Now, copy the Ubuntu container image .vhdx file that was decompressed at the previous step to uvm.vhdx under C:\Program Files\Linux Containers.
6. More Docker preparation
Docker for Windows requires some pre-release features in order to work with Hyper-V isolation. While these features are not yet available in the Docker CE installation that was done previously, the necessary files can be downloaded from master.dockerproject.org.

Retrieve dockerd.exe and docker.exe from master.dockerproject.org, and put the two programs somewhere safe, such as in your own folder. They will be used to start the Ubuntu container in the next step.
7. Run an Ubuntu container on Hyper-V
You’re now ready to start your container. First, open a Command-line prompt (cmd.exe) as Administrator, and start dockerd.exe with the right environment:
C:\Users\mathi\> set LCOW_SUPPORTED=1
C:\Users\mathi\> .\dockerd.exe -D --data-root C:\lcow
Docker already running?
If the Docker installer sets Docker to run automatically at boot, you may need to quit the already running daemon, via its toolbar icon, before running the above commands.
Then, start a Powershell window as Administrator; and run docker.exe, instructing it to pull the image for your container:
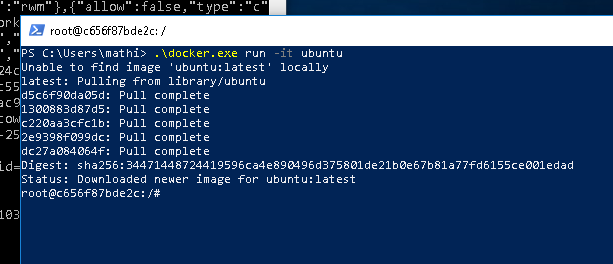
C:\Users\mathi\> .\docker.exe pull ubuntu


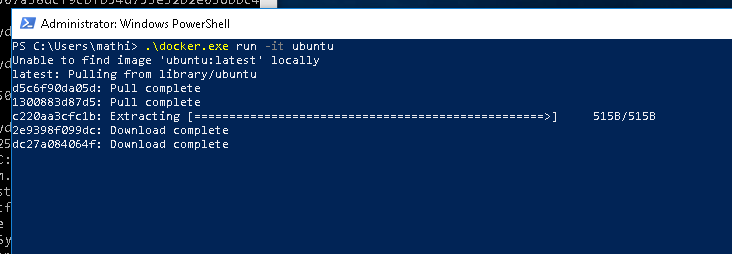
We can now finally start the container. Run docker.exe again, and tell it to run the new image:
C:\Users\mathi\> .\docker.exe run -it ubuntu
Congratulations! You have successfully set up your system to use containers with Hyper-V isolation on Windows, and have run your very own Ubuntu container.
8. Getting help
If you need some guidance getting started with the Ubuntu container images for Hyper-V, or if you get stuck, help is always at hand:
- Ask Ubuntu
- Ubuntu Forums
- IRC-based support
Was this tutorial useful?
Thank you for your feedback.
В этой заметке я расскажу как поставить Докер на Windows 10, но сначала я опишу установку Windows Subsystem for Linux. Работу с самим Докером я описывать не буду, сделаю это позже.
Установка WSL2 на Windows 10
Установка элементарная, главное проверьте чтобы ваш компьютер и Windows 10 отвечали минимальным требованиям.
UPD.
Для Windows 11 и Windows 10 (сборка 19041 и выше) для установки WSL достаточно одной команды (PowerShell с правами администратора):
wsl --installЭта команда включит все необходимые компоненты и установит дистрибутив Linux (по умолчанию Ubuntu), вам нужно будет только перезагрузить компьютер.
Подробный процесс установки описан на сайте Microsoft https://docs.microsoft.com/ru-ru/windows/wsl/install-win10 там же указаны минимальные требования.
Если коротко, то установка WSL2 на Windows 10 сводится к следующим шагам:
1) Запускаем PowerShell с правами администратора и включаем компонент «Подсистема Windows для Linux», для этого вводим команду:
dism.exe /online /enable-feature /featurename:VirtualMachinePlatform /all /norestart
2) Далее необходимо включить необязательный компонент «Платформа виртуальных машин», для этого в PowerShell с правами администратора выполняем команду:
dism.exe /online /enable-feature /featurename:VirtualMachinePlatform /all /norestart
Перезапускаем компьютер.
3) Скачиваем и устанавливаем пакет обновления ядра Linux https://wslstorestorage.blob.core.windows.net/wslblob/wsl_update_x64.msi
4) Выбираем WSL 2 в качестве версии по умолчанию, если этого не сделать новые дистрибутивы Linux будут установлены в WSL 1. Вновь запускаем PowerShell с правами администратора и добавляем команду:
wsl --set-default-version 2
Готово.
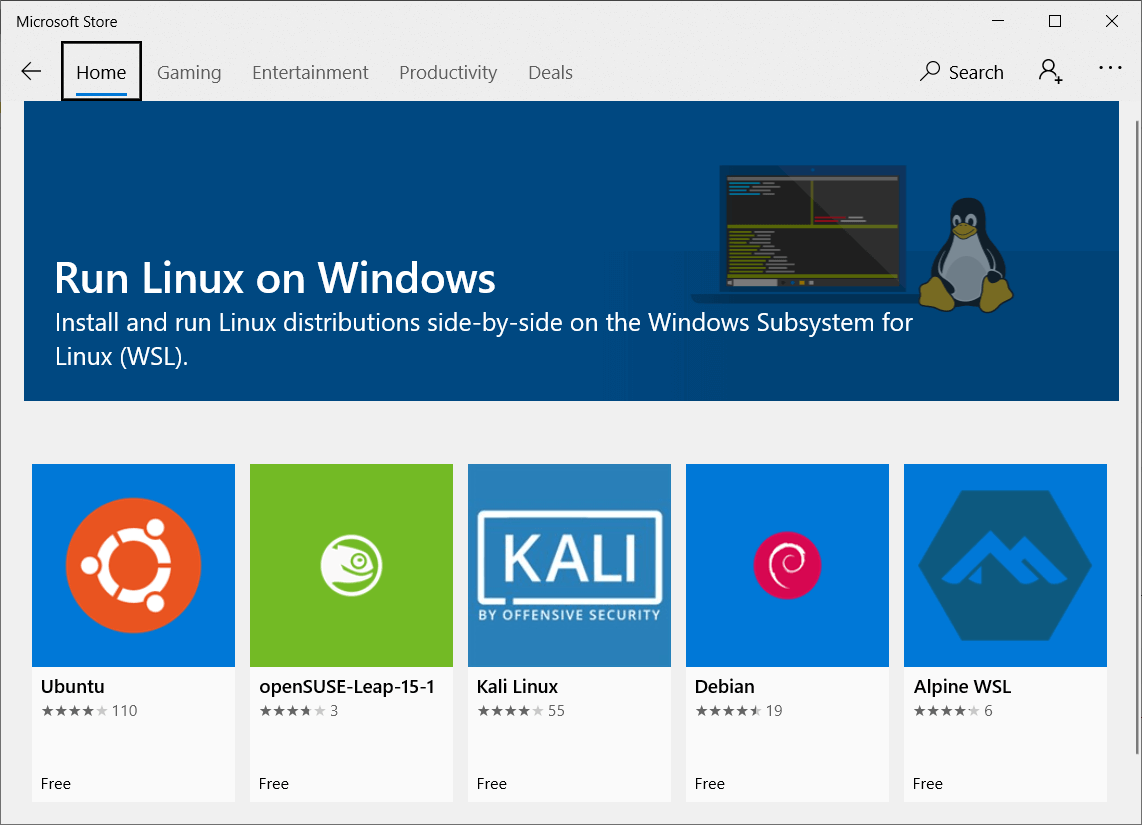
Далее нужно выбрать в магазине Microsoft Store нужный нам дистрибутив Linux и установить его, как обычное приложение из магазина. Я установил Ubuntu 18.04 (https://www.microsoft.com/store/apps/9N9TNGVNDL3Q)
После я запускаю установленную Убунту и задаю логин и пароль.
Все, Убунту можно закрыть.
Установка Docker на Windows 10
Теперь установим Docker Desktop WSL 2 backend, идем по ссылке https://hub.docker.com/editions/community/docker-ce-desktop-windows/ Скачиваем и устанавливаем Docker Desktop for Windows (stable).
Запускаем скачанный файл и производим обычную установку приложения Windows.
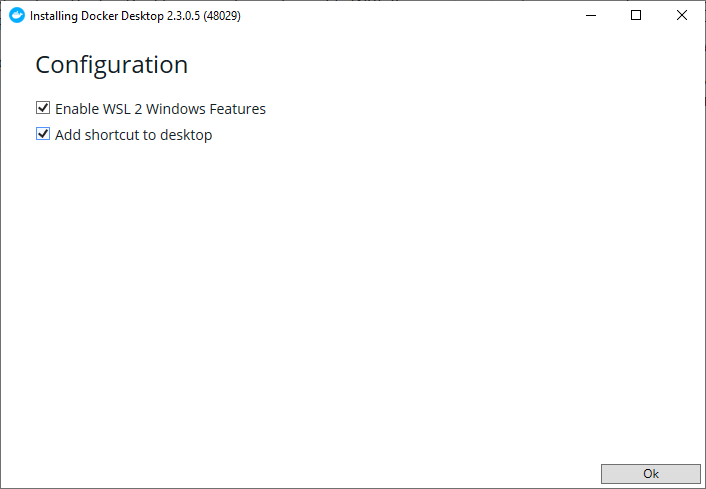
При установке убедитесь что установлена галочка на Enable WSL 2 Windows Features.
После установки следуйте инструкциям и перелогиньтесь в Windows, Докер запуститься при следующем входе в Windows, иногда в первый раз может понадобится довольно длительное время.
Когда он запустится, рекомендую в окне приветствия нажать Start и пройти небольшое обучение.
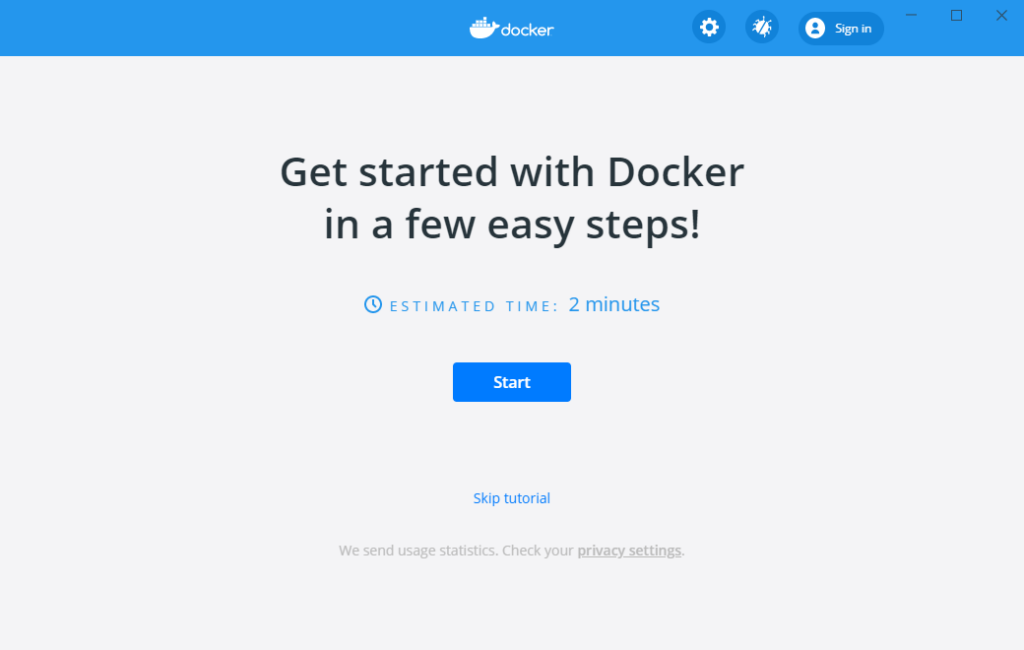
После обучающего урока у вас будет запущен ваш первый Docker контейнер.
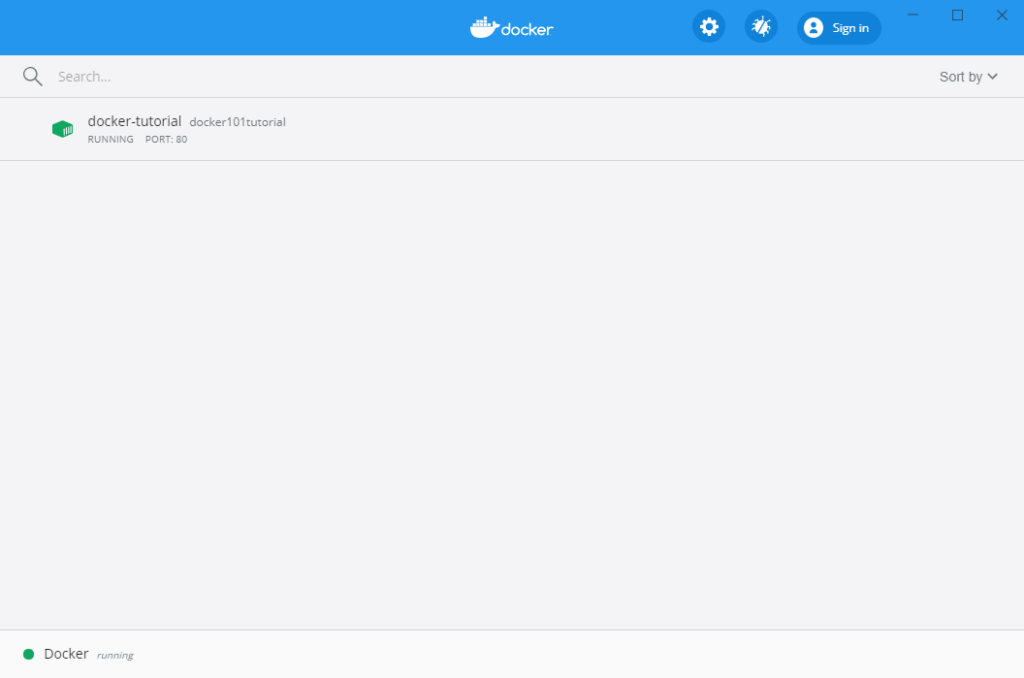
И теперь по адресу http://localhost/tutorial/ вы можете увидеть инструкцию по дальнейшей работе.
Теперь вы можете заниматься разработкой в Windows 10 использую Docker.
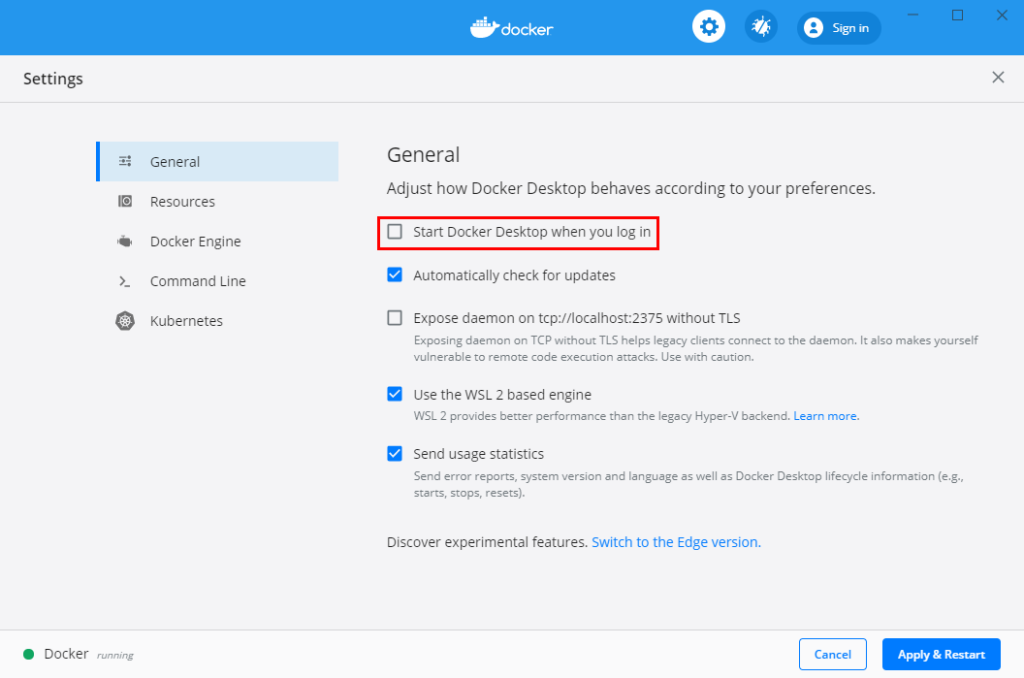
Кстати, я не хочу чтобы Докер запускался каждый раз при включении компьютера, поэтому в настройках я убрал галочку Start Docker Desktop when you log in.
dockerwsl
Docker Engine on WSL2
The manual is used to prepare an environment for the containerization training cycle at Future Processing.
Windows 10 Configuration
All commands should be run in shell with administrator privileges.
PowerShell was used to run the commands
Install WSL2 + Ubuntu
Microsoft simplified installation of WSL2 starting with Windows 10 version 2004 (see documentation for details).
- Open PowerShell terminal
- Install Ubuntu 20.04 LTS distribution
wsl --install --distribution Ubuntu-20.04 - Reboot
- Enter new UNIX username and password (new user will be created in Linux)
- Enjoy new Linux instance
Docker Engine
Important: To start the Docker service automatically follow the «Run Docker
when a WSL instance launches» section after successful installation
Choose and execute one of the available installation methods: scripted or
manually.
Scripted installation (preferred)
- Open PowerShell terminal
- Download setup.sh script
Invoke-WebRequest -uri https://raw.githubusercontent.com/FutureProcessing/Docker-WSL2/master/setup.sh -OutFile setup.sh - Execute the script
Expected output:
Docker Server version is xx.xx.xx - Stop WSL session
- Start WSL session
- Enjoy Docker Engine
Manual installation
- Start WSL session
- Download PGP Public Key
curl -fsSL https://download.docker.com/linux/ubuntu/gpg | sudo gpg --quiet --dearmor -o /etc/apt/trusted.gpg.d/docker-archive-keyring.gpg - Add APT source list
echo "deb [arch=amd64 signed-by=/etc/apt/trusted.gpg.d/docker-archive-keyring.gpg] https://download.docker.com/linux/ubuntu $(lsb_release -cs) stable" | sudo tee /etc/apt/sources.list.d/docker.list - Update APT package information
- Install Docker Community Edition
sudo apt install --yes docker-ce - Add current user do the
dockergroupsudo usermod -aG docker $(whoami)Note: For the new group to be used by your system, it is necessary to log out
- Stop WSL session
- Start WSL session
- Start Docker service
sudo service docker start - Check server version
docker info --format "Docker Server version is {{.ServerVersion}}"Expected output:
Docker Server version: xx.xx.xx
Run Docker when a WSL instance launches (the right way)
By default operating system running in WSL does not start services
automatically so Docker service is not running after reboot. One could execute
sudo service docker start command each time or automate that action using
following instruction.
Windows 11
If you have installed Windows 11, you can start docker using the Boot setting (link).
In WSL instance edit file /etc/wsl.conf and add the following content (file is
also accessible via \\wsl$\<distro-name>\etc\wsl.conf)
[boot]
command = service docker start
More information available here.
Windows 10
In previous versions of Windows you can use .profile file to automatically start the service if it’s not running.
Add the following line to ~/.profile file (\\wsl$\<distro-name>\home\<username>\.profile) or any shell configuration file you’re using (i.e. .bash_profile).
(sudo service docker status || sudo service docker start) > /dev/null
Ubuntu 20.10+ nftables issue
In ubuntu 20.10* due to incompatibility of Docker Engine with nftables, legacy
iptables should be used. To switch default iptables execute the following command and choose iptables-legacy
sudo update-alternatives --config iptables
Visual Studio Code
Download, install and run Visual Studio Code
https://code.visualstudio.com/Download
Remote — WSL
- Install Remote WSL extension.
(Pressctrl+pand executeext install ms-vscode-remote.remote-wsl) - In the bottom left corner, press the green button

- Select
Remote WSL: New Window


Windows terminal
- Download and install Windows Terminal
https://www.microsoft.com/en-us/p/windows-terminal/9n0dx20hk701 - Open Windows Terminal and select Ubuntu

Recomended plugins
- Docker
First Container
-
In Ubuntu execute following command
docker run -d -p 80:80 docker/getting-startedExpected output example
Unable to find image 'docker/getting-started:latest' locally latest: Pulling from docker/getting-started aad63a933944: Pull complete b14da7a62044: Pull complete 343784d40d66: Pull complete 6f617e610986: Pull complete Digest: sha256:d2c4fb0641519ea208f20ab03dc40ec2a5a53fdfbccca90bef14f870158ed577 Status: Downloaded newer image for docker/getting-started:latest ad77e95c178b1bdd3c752b45223e40b2f9a964a99cd6ee611043805518631d42 -
Visit http://localhost/tutorial
Docker Compose
Docker Compose is available as part of docker-compose-plugin package installed
as dependency to docker-ce package.
Docker Compose should be used as docker compose command. Command
docker-compose is deprecated.
Know Issues
Conflict with Docker Desktop. Docker Desktop may try to change the configuration
of the WSL distribution if it is the default.
~6 min read
In this post, I describe how to install WSL 2 to serve as the backend for Docker Desktop for Windows. Previously I’ve always worked with Linux in a Virtual Machine using something like VMWare or Virtual Box, but I decided to give Docker Desktop a try, and was pleasantly surprised by the experience!
I’ll start by describing how to install WSL 2 based on the install documents, then show how to install Docker Desktop. Finally, I show the the experience of running a container and how it looks in Docker Desktop.
Installing WSL2
The Windows Subsystem for Linux (WSL) is a way to run a full Linux environment on your Windows machine, without having to install a «heavier» virtual machine, such as Virtual Box, VM Ware, or Hyper-V. WSL 2 also provides a mechanism for running Docker (with Linux containers) on your Windows machine. We’ll install it as a prerequisite for Docker Desktop for Windows.
If you’re running Windows Home, WSL 2 is the only way to run Docker Desktop. On Windows Pro, you can also use Hyper-V, but that is deprecated now, so WSL 2 is the way to go in all cases.
1. Install WSL 1
We’ll start by installing WSL 1 by enabling the WSL feature.
Open PowerShell as Administrator (I hit the Start key, type powershell and hit ctrl+shift+enter to open an elevated command prompt). Run the following, to enable WSL 1
dism.exe /online /enable-feature /featurename:Microsoft-Windows-Subsystem-Linux /all /norestart
You should see the following:
> dism.exe /online /enable-feature /featurename:Microsoft-Windows-Subsystem-Linux /all /norestart

Deployment Image Servicing and Management tool
Version: 10.0.19041.746

Image Version: 10.0.19042.804

Enabling feature(s)
[==========================100.0%==========================]
The operation completed successfully.
That enables WSL, but we’re going to enable the newer WSL 2 version, which Docker Desktop can use to run the VM it needs to run containers.
2. Enable the Virtual Machine feature
WSL 2 uses a lightweight VM, so you need to enable the Virtual Machine feature available in Windows 10 version 1903 and higher. In the same, elevated command prompt, run:
dism.exe /online /enable-feature /featurename:VirtualMachinePlatform /all /norestart
You should see something like the following:
> dism.exe /online /enable-feature /featurename:VirtualMachinePlatform /all /norestart
Deployment Image Servicing and Management tool
Version: 10.0.19041.746

Image Version: 10.0.19042.804

Enabling feature(s)
[==========================100.0%==========================]
The operation completed successfully.
3. Restart
Time to restart your machine to ensure everything is registered correctly.
4. Install the WSL 2 update
Download the WSL2 Linux kernel update package for x64 machines and install it.
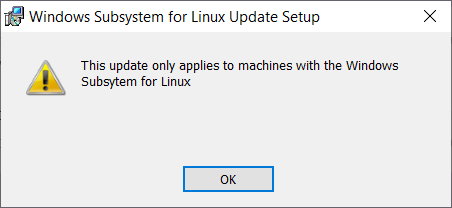
Note, if you see the following error when running the update, make sure you’ve restarted your machine afer installing the WSL 1 and VM features:
The installer runs very quickly, and hopefully you’ll see a confirmation screen, something like the following:
5. Set WSL 2 as your default version
This is an easy step, just run wsl --set-default-version 2 in any PowerShell window:
>wsl --set-default-version 2
For information on key differences with WSL 2 please visit https://aka.ms/wsl2
6. (Optional) Install a Linux distribution
We actually don’t need to install a Linux distribution to use Docker Desktop, but if you want to shell into Linux directly, you’ll need to install one. You can install a distribution directly from the Microsoft Store.
The first time you launch the distribution, the distribution will extract and install, and you’ll need to set a username and password.
7. (Optional) Add to Windows Terminal
If you’re using Windows Terminal (you should be!) you can configure it to open your WSL distribution. The easiest way to do this is to open up the settings.json file and reset it. You can do this by deleting the contents of the file—Terminal will automatically repopulate it with the defaults, which will include a tab for WSL.
Obviously you won’t want to lose your setting customisations, so make sure to backup the contents of the file first!
You’re looking for WSL in the profiles list—add that to you profile list, and you’ll be able to quickly open up your WSL instance from Windows Terminal!
That’s the prerequisite starter for Docker Desktop covered, so now lets get to the main course!
Installing Docker Desktop for Windows
1. Download and Install
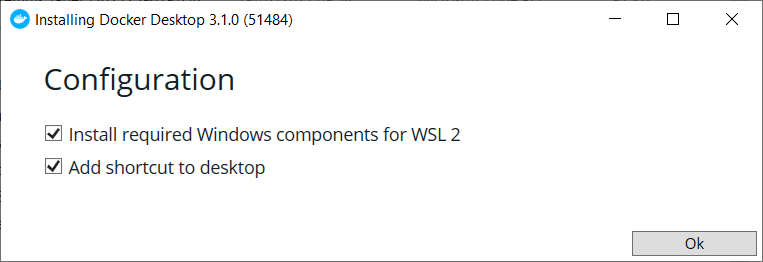
Head to the Docker Desktop website and download the Installer for Windows.. This is a hefty ~500MB, but once it’s finished, run the installer.
On the first screen, ensure you keep «Install required components for WSL 2» checked:
After clicking OK, the installer will unpack a whole load of files:
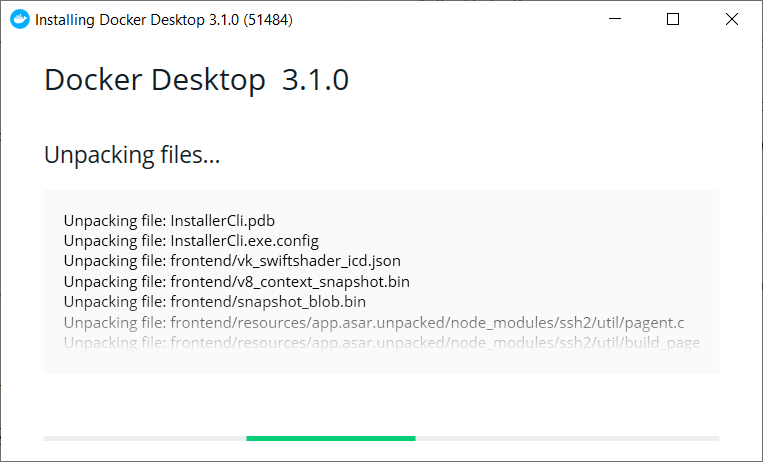
Before finally prompting you to log out of your Windows account to complete the installation:
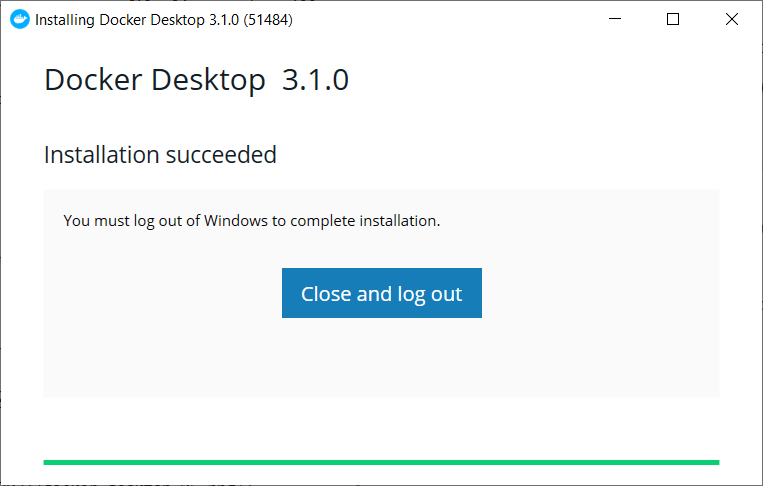
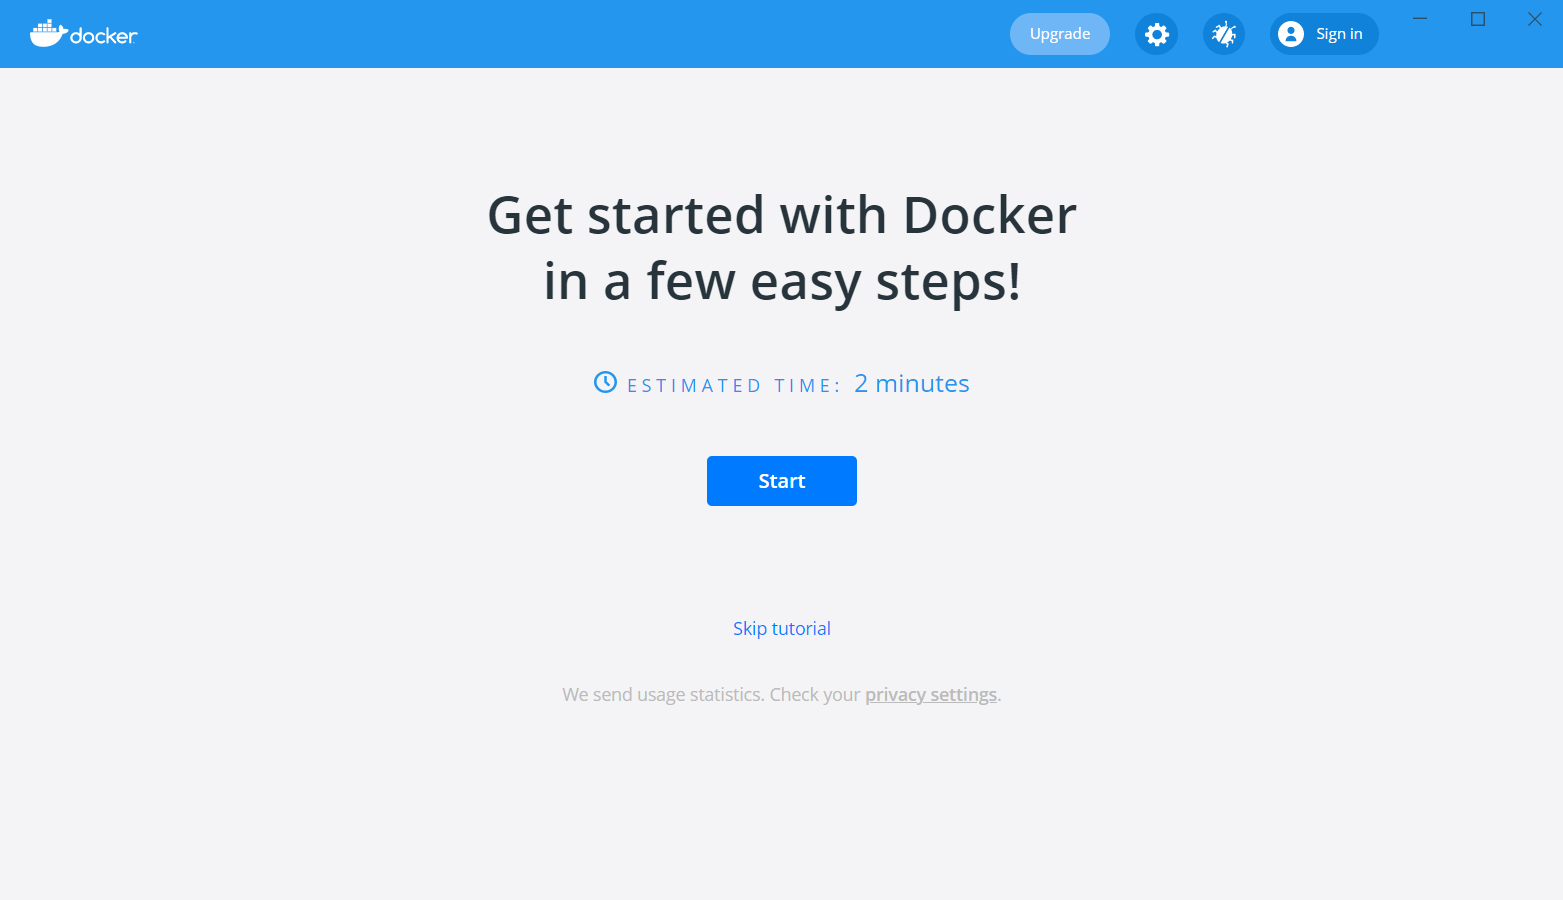
2. Logout and back in
The Docker Desktop installer will automatically log you out of your Windows account on completion. When you sign back in, you’ll get a notification that Docker is starting the Linux Containers WSL 2 backend. Eventually, the main Docker Desktop window will pop up, and offer you a tutorial
3. Give it a try!
With Docker Desktop installed, you now have the docker command available in your command prompt:
> docker

Usage:  docker [OPTIONS] COMMAND

A self-sufficient runtime for containers

Options:
...
Now it’s installed, let’s take it for a spin!
Trying out Docker Desktop for Windows
For simplicity, we’ll run one of the .NET 5.0 sample apps available on DockerHub:
docker run -it --rm `
    -p 8000:80 `
    --name my-sample `
    mcr.microsoft.com/dotnet/samples:aspnetapp
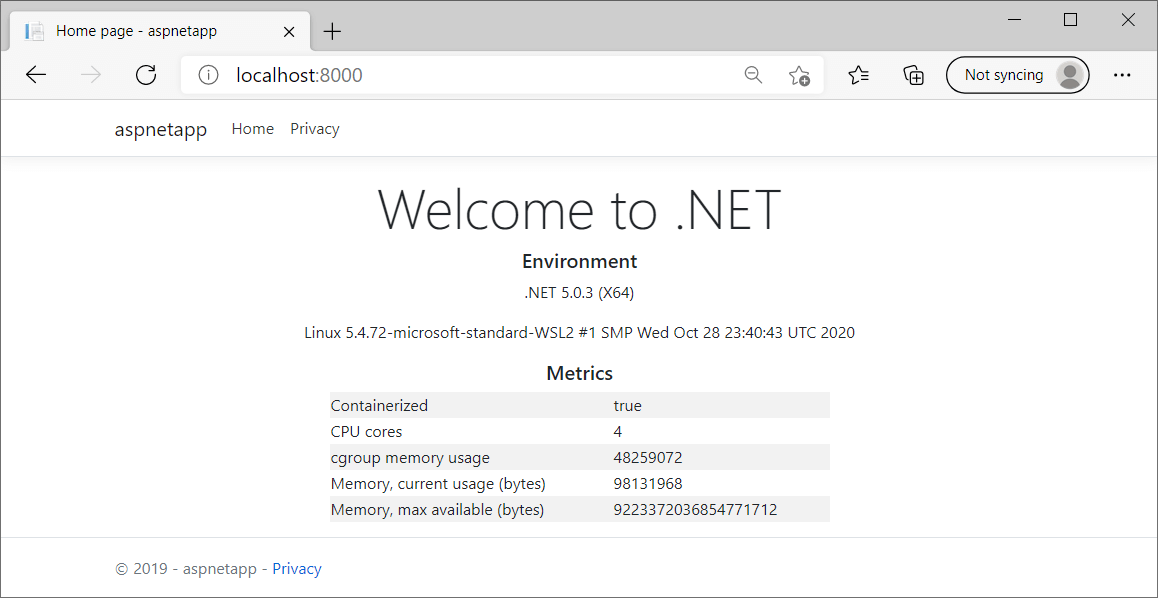
This is a simple Razor Pages app, packaged in a Docker image, and ready to run. You can see the Dockerfile for the app here. When you run the above command Docker will pull the image, run it and start listening:
Unable to find image 'mcr.microsoft.com/dotnet/samples:aspnetapp' locally
aspnetapp: Pulling from dotnet/samples
45b42c59be33: Extracting [=========================>                         ]  13.57MB/27.1MB
752dcc4c3a04: Download complete
5ccb476d6b8b: Download complete
513626bd05cb: Downloading [======================>                            ]  472.8kB/1.
...
Status: Downloaded newer image for mcr.microsoft.com/dotnet/samples:aspnetapp
info: Microsoft.Hosting.Lifetime[0]
      Now listening on: http://[::]:80
If you navigate to http://localhost:8000/, you’ll see the app running there—a Linux container, running on Windows 🤯
The interesting thing, which I didn’t realise until I installed it, is that Docker Desktop for Windows installs a very nice UI for managing your containers!
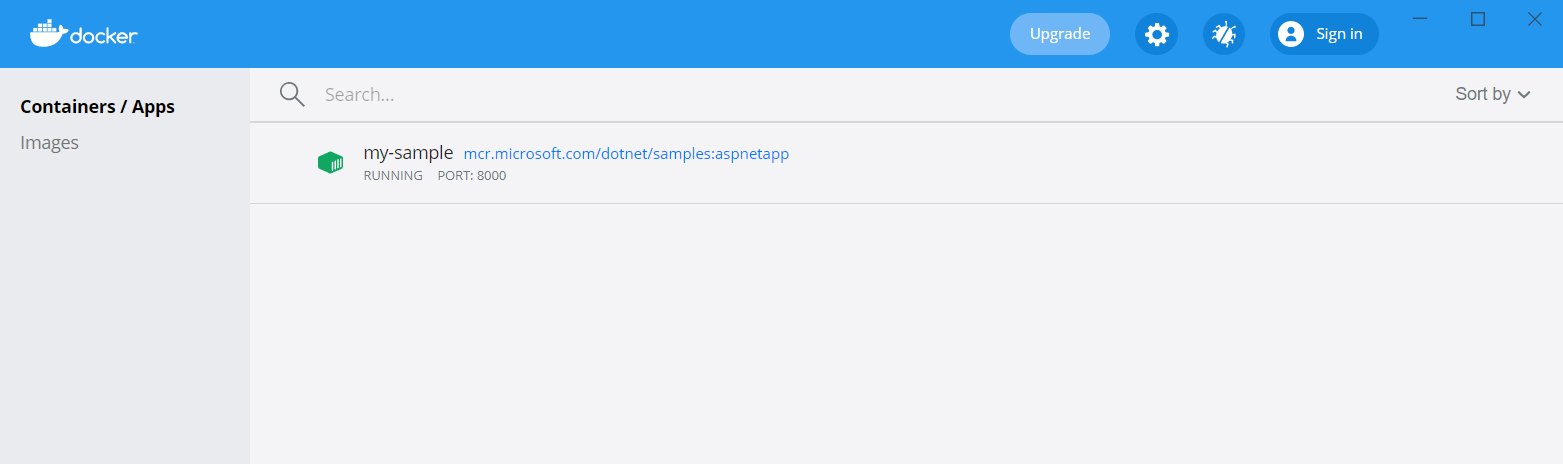
If you click on the my-sample container row, you’ll see the logs for the container:

You can also inspect the environment variables, view stats about the container, or click CLI to open a shell inside (exec into) the container! You can do all these things from the command line obviously, and if you’re automating things, that’s definitely the right option. For casual or local development, personally I find you can’t beat a nice GUI!
Summary
In this post I described how to Install WSL, upgrade it to WSL 2, and how to install Docker Desktop. This requires a restart of Windows and a logout which is a bit annoying, but otherwise it went very smoothly. The Docker Desktop UI also looks very handy, in particular the ability to exec into a container—I’m always getting the CLI command wrong, so that will be very unseful!
Andrew Lock | .Net Escapades
![]() Want an email when
Want an email when
there’s new posts?