(Image credit: Windows Central)
Although it’s now possible to run a number of Linux distros natively on Windows 10, these environments can be somewhat limited in features and tools you can use. Also, you can only pick from three distros, including Ubuntu, SUSE Linux Enterprise, and OpenSUSE Leap, and you’re stuck with the command-line interface, which means that you can’t run any of the graphical experiences (e.g., GNOME, KDE, XFCE) or Linux-based graphical applications.
Of course, you can always install your favorite Linux distro on a second machine, but if you don’t have one, it’s still possible to run a full-blown version of Linux using a virtual machine (VM).
If you’re running Windows 10, you can enable Hyper-V on your device to create a VM to install your preferred distro whether you’re a developer or an enthusiast who just wants to know what’s the Linux fuzz all about.
In this Windows 10 guide, we’ll walk you through the steps to install most Linux distributions on virtual machines using Microsoft’s Hyper-V virtualization feature.
- Guide requirements
- How to enable Hyper-V on Windows 10
- How to create a virtual machine using Hyper-V
- How to install Ubuntu Linux using Hyper-V on Windows 10
Guide requirements
To run a Linux virtual machine on Windows 10, you’ll need the following:
- A computer with support for Hyper-V.
- An ISO file to install your preferred Linux distribution.
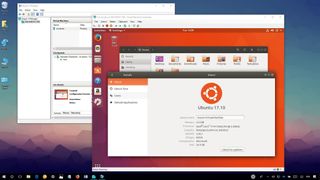
In this guide, we’ll be using Ubuntu version 17.10, which you can download from the official Ubuntu website. However, it’s possible to install version 16.04, which might be a more stable version of the open source project, and you can also install other distros, including:
- CentOS and Red Hat Enterprise Linux.
- Debian.
- SUSE.
- Oracle Linux.
- FreeBSD.
How to enable Hyper-V on Windows 10
Hyper-V is a virtualization technology from Microsoft available on Windows 10 Pro, Enterprise, and Education, and it allows you to create one or multiple virtual machines to install and run different OSes on the same physical hardware.
Verifying Hyper-V support
Although Hyper-V is part of Windows 10, there is a minimum hardware requirement a computer must meet to enable the feature.
- 64-bit CPU with Second Level Address Translation (SLAT).
- Processor must support VM Monitor Mode Extension (VT-c on Intel chips).
- 4GB of memory at a minimum.
In addition, you have to make sure the Virtualization Technology and Hardware Enforced Data Execution Prevention options are enabled on your system BIOS.
You can quickly verify your computer has the required support for Hyper-V using Systeminfo:
- Open Start.
- Search for Command Prompt and click the top result.
- Type the following command and press Enter:
systeminfo.exe - Under Hyper-V Requirements, if the result reads Yes, then you can run Hyper-V.
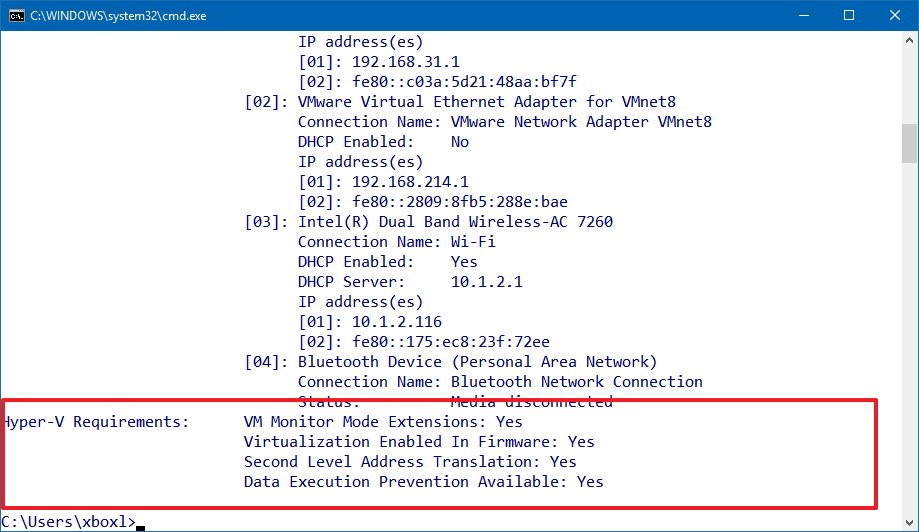
If the command displays No under Hyper-V Requirements, then your hardware doesn’t support this feature, or you need to make sure to enable it manually.
Enabling Hyper-V
Use the following steps to enable Hyper-V on Windows 10:
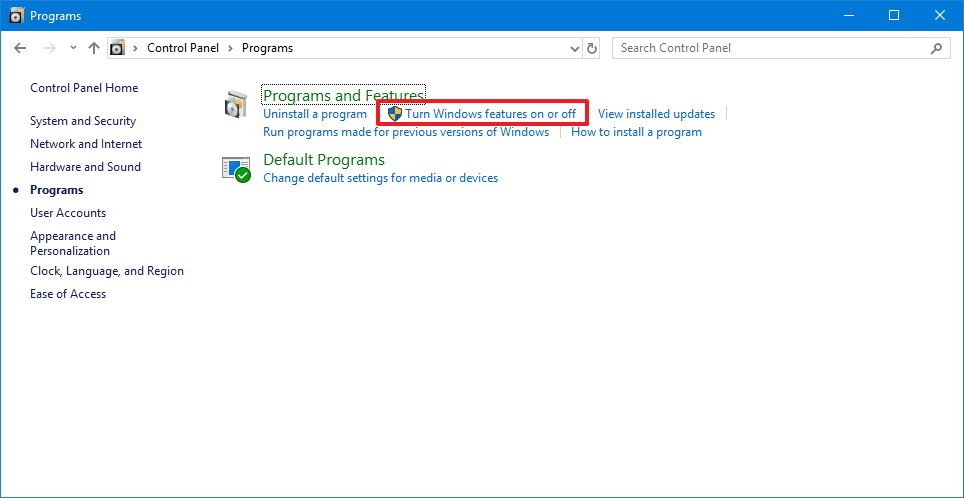
- Open Control Panel.
- Click on Programs.
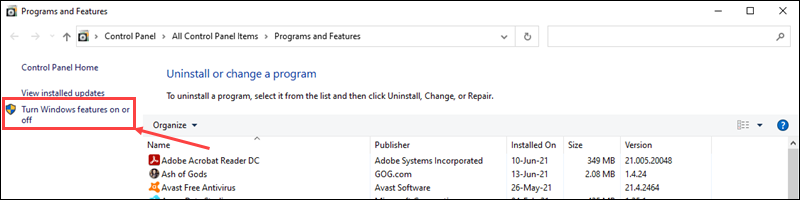
- Click on Turn Windows features on or off.
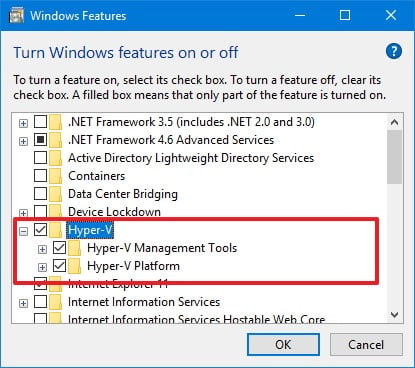
- Check the Hyper-V option making sure: Hyper-V Management Tools and Hyper-V Platform are also selected.
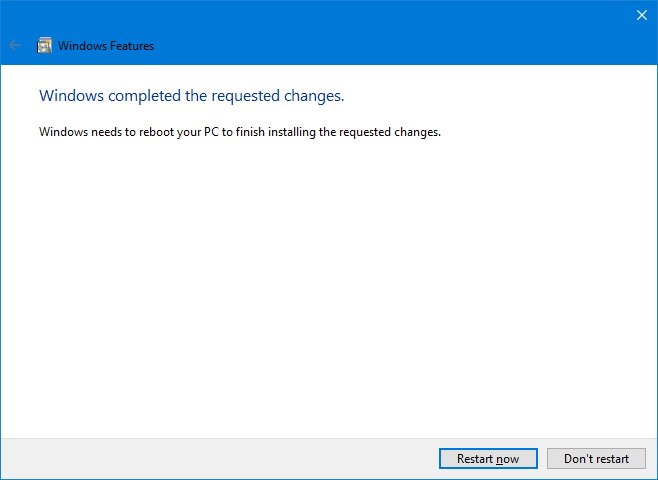
- Click OK to begin the process.
- After the installation completes, click Restart now to apply the changes.
How to create a virtual machine using Hyper-V
Once you’ve completed adding the virtualization layer to Windows 10, you’ll need to create a virtual machine for the Linux distribution you want to use.
However, before you do that, you must create a virtual switch to allow the VM to connect to the internet.
Creating a virtual switch
Use the following steps to configure a virtual switch on Hyper-V:
- Open Start.
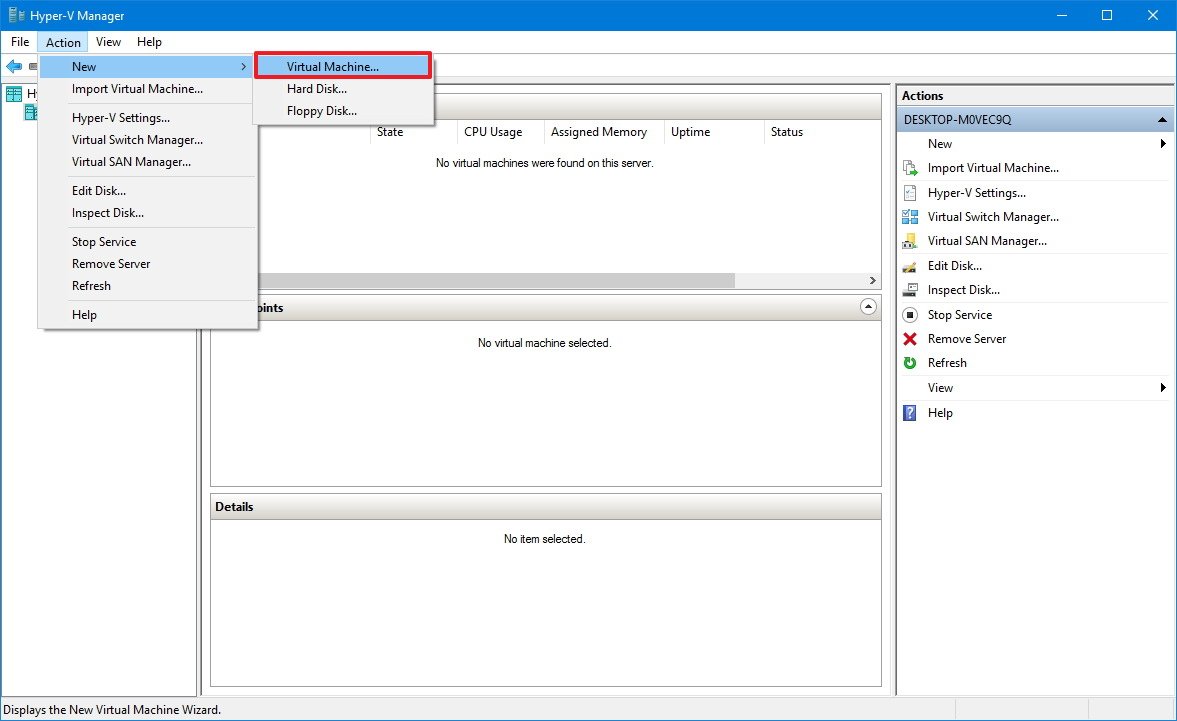
- Search for Hyper-V Manager and click the top result.
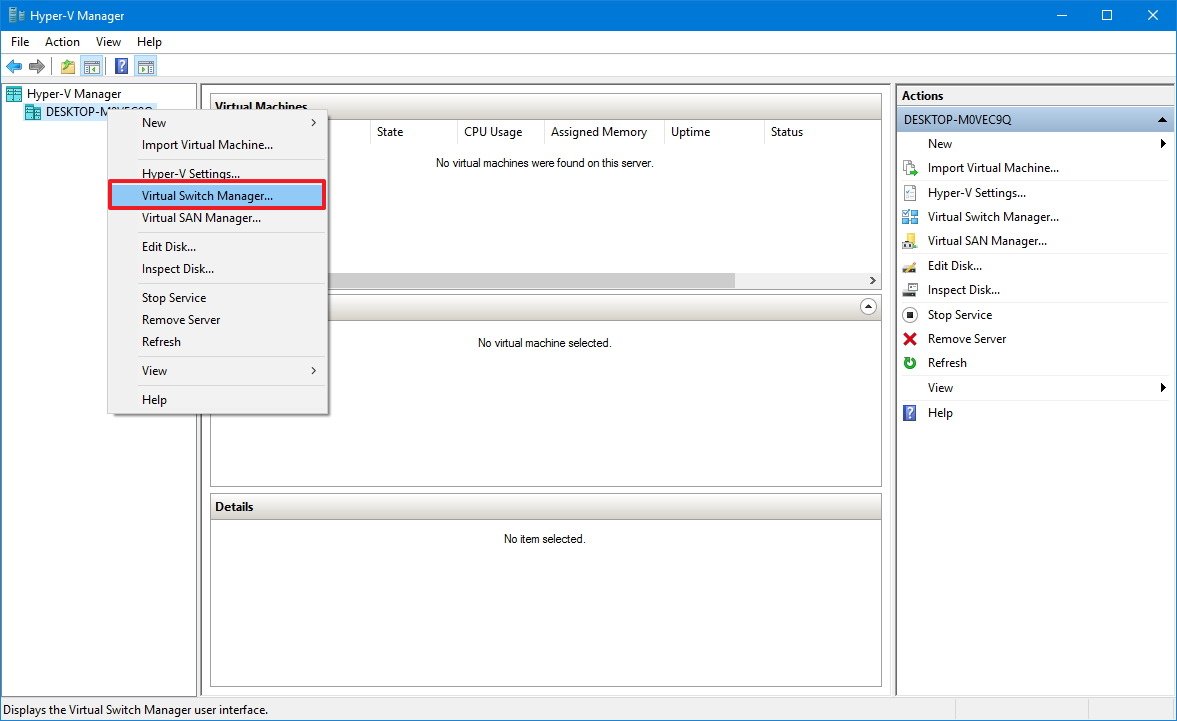
- Click on the Action menu.
- Select New and click on Virtual Switch Manager.
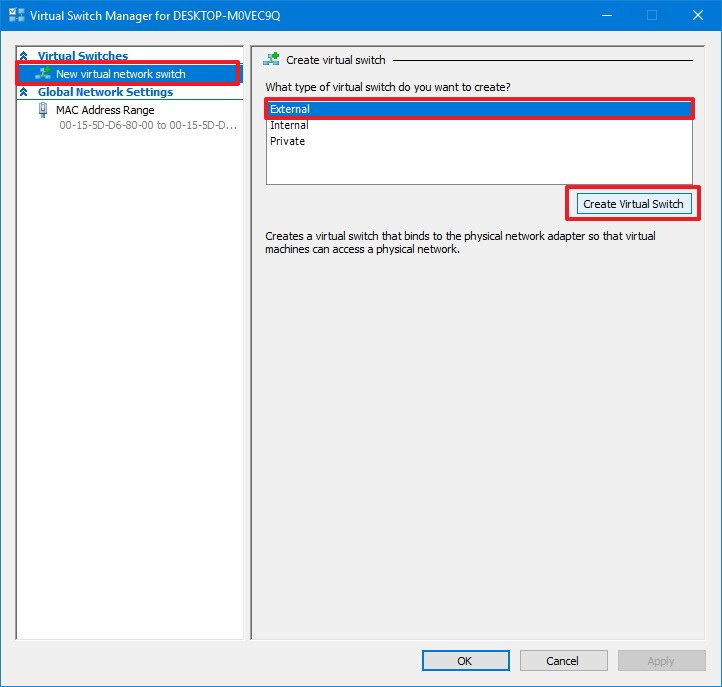
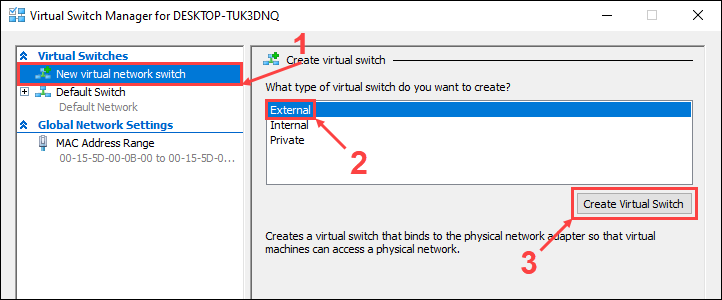
- On the left pane, select New virtual network switch.
- On the right, select External.
- Click the Create Virtual Switch button.
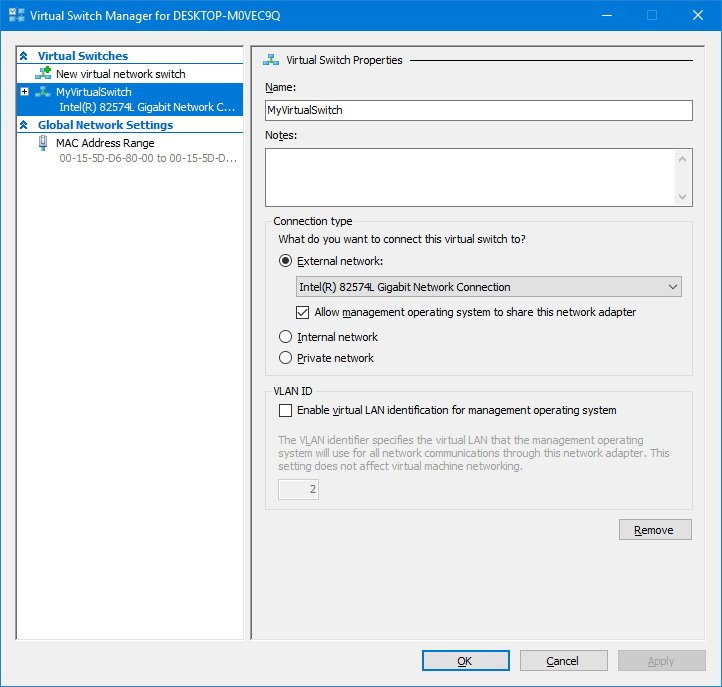
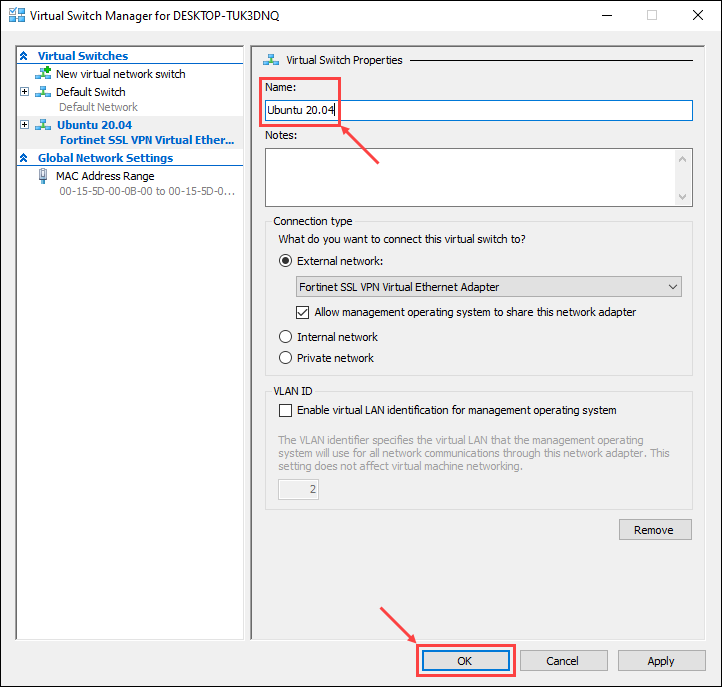
- Enter a new descriptive name for the switch (e.g., MyVirtualSwitch).
- Under connection type, make sure your network adapter is select on External network.
- Click Apply.
- Click OK.
Creating a virtual machine
After creating the virtual switch, you can proceed to create a new virtual machine:
- Open Start.
- Search for Hyper-V Manager and click the top result.
- Click on the Action menu.
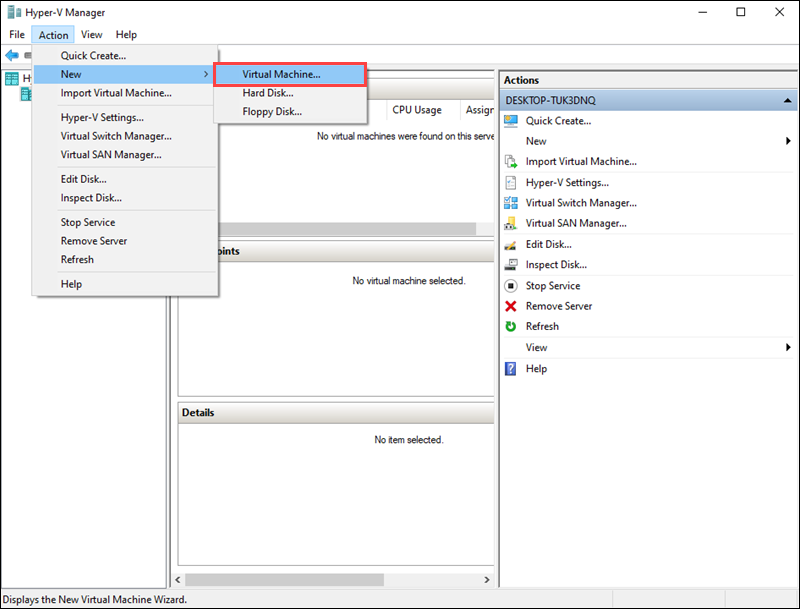
- Select New and click on Virtual Machine.
- Click the Next button.
- Enter a descriptive name for your virtual machine (e.g., vm-ubuntu).
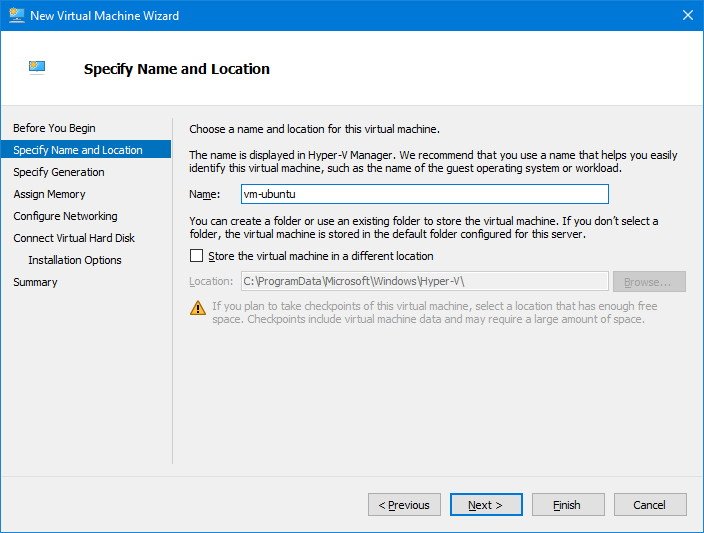
- Use the default location to store your virtual machine, or check the Store the virtual machine in a different location option to select a different path.
- Click Next to continue.
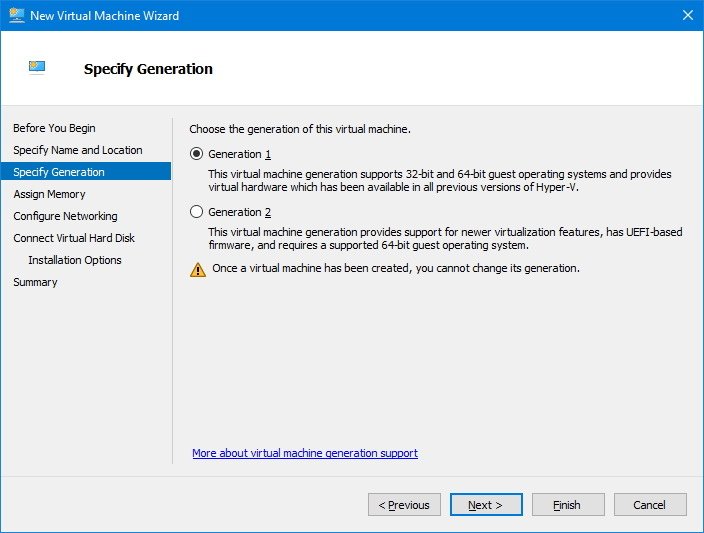
- You can leave the default Generation 1 option selected. Or you can select Generation 2 if you want a UEFI-based firmware.
- Click Next.
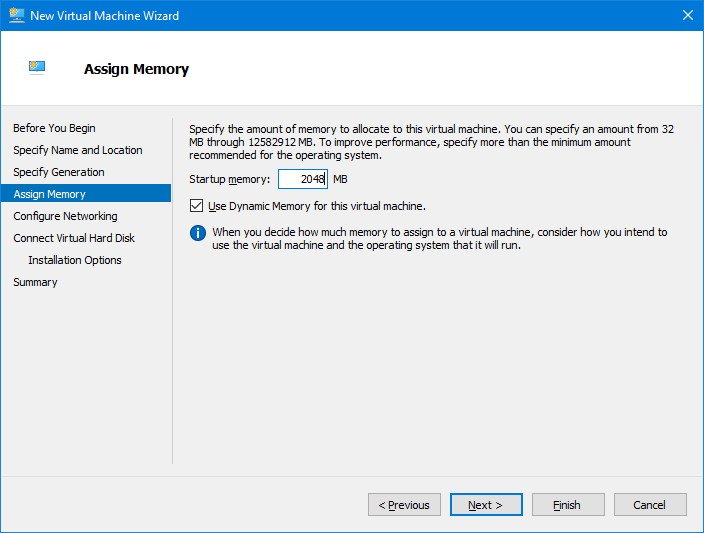
- Select the amount of RAM to allocate for your virtual machine. In the case of Ubuntu, you need a minimum of 2GB of memory.You can allocate as much memory as you want, but this setting will always depend on the physical memory available on your computer.
- Click Next.
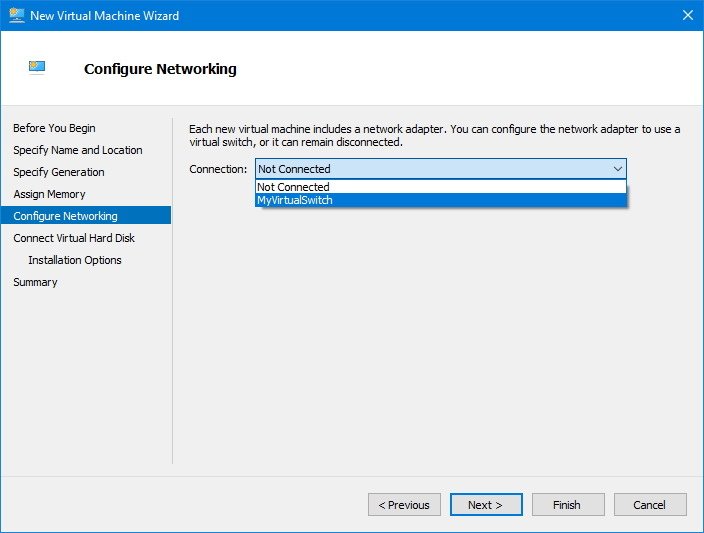
- Use the drop-down menu to select the virtual switch you created earlier.
- Click Next.
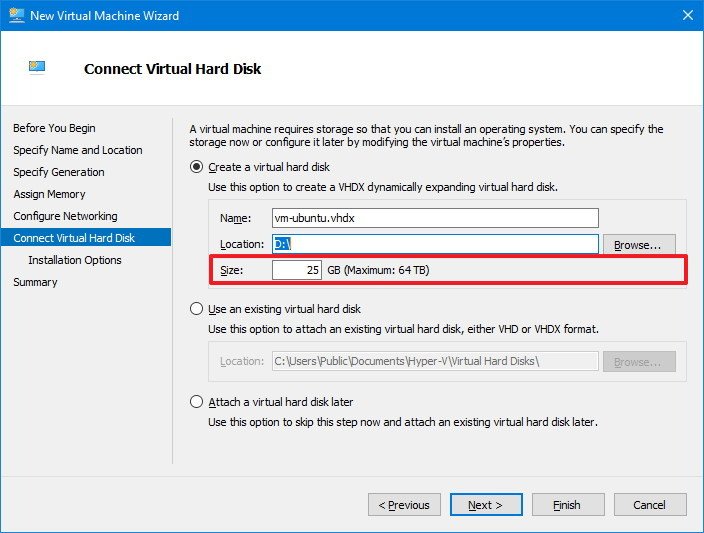
- You can leave all the default settings to create a virtual hard drive, but under Size make sure to allocated at least 25GB of storage, which is the minimum required to run Ubuntu.
- Click Next to continue.
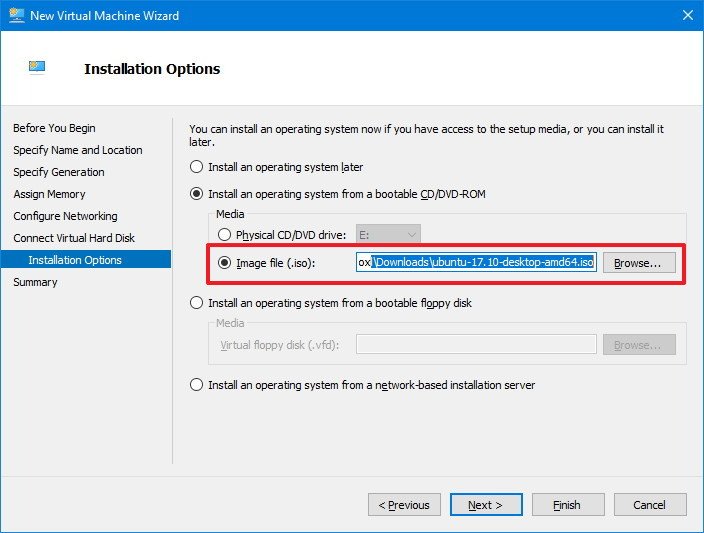
- On Installation options, select the Install an operating system from a bootable CD/DVD-ROM option.
- Select the Image file (.iso) option.
- Select the path for the ISO file with the Ubuntu installation files.
- Click Next.
- Click Finish.
How to install Ubuntu Linux using Hyper-V on Windows 10
The last step is to start the virtual machine and install the Linux distribution you want to use.
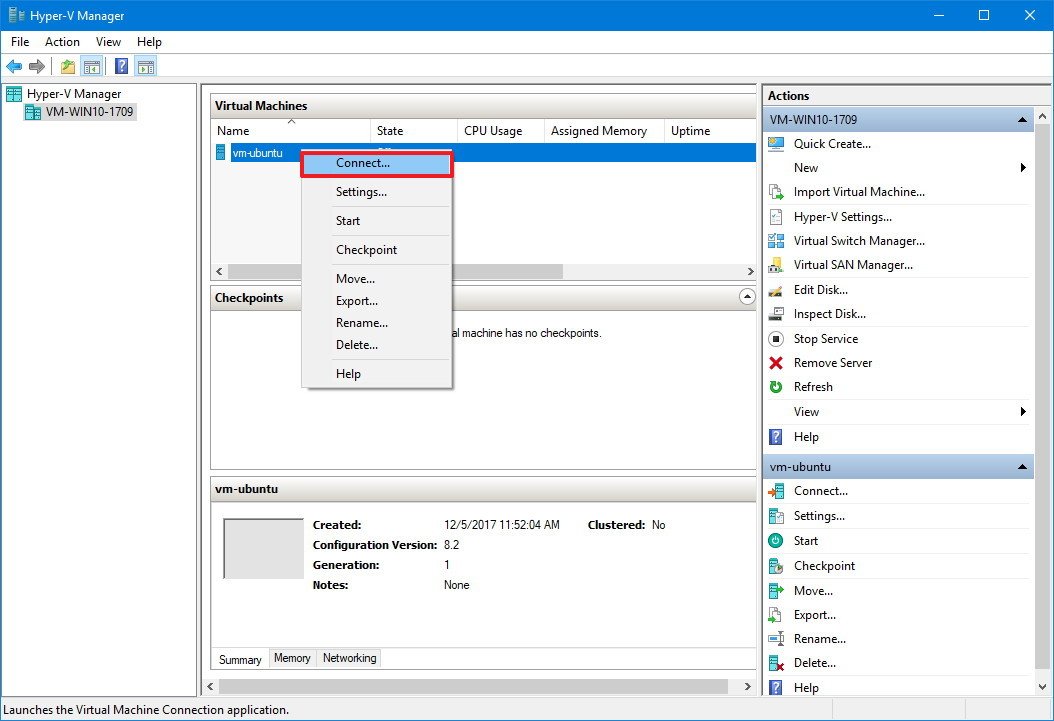
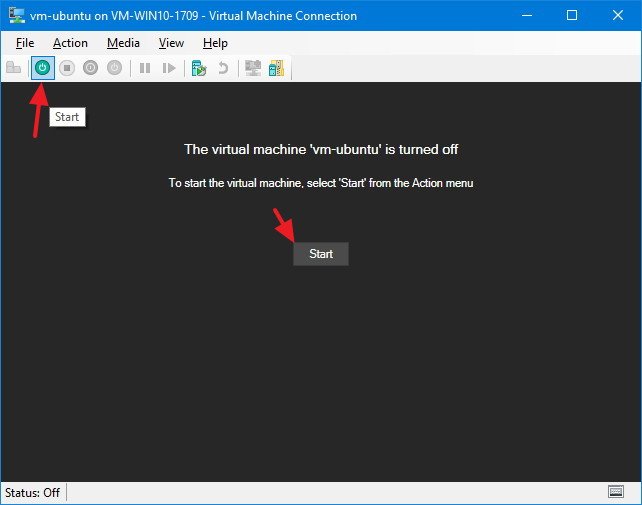
- On Hyper-V Manager, under Virtual Machine, right-click the newly created device, and select Connect.
- Click the Start (power) button.
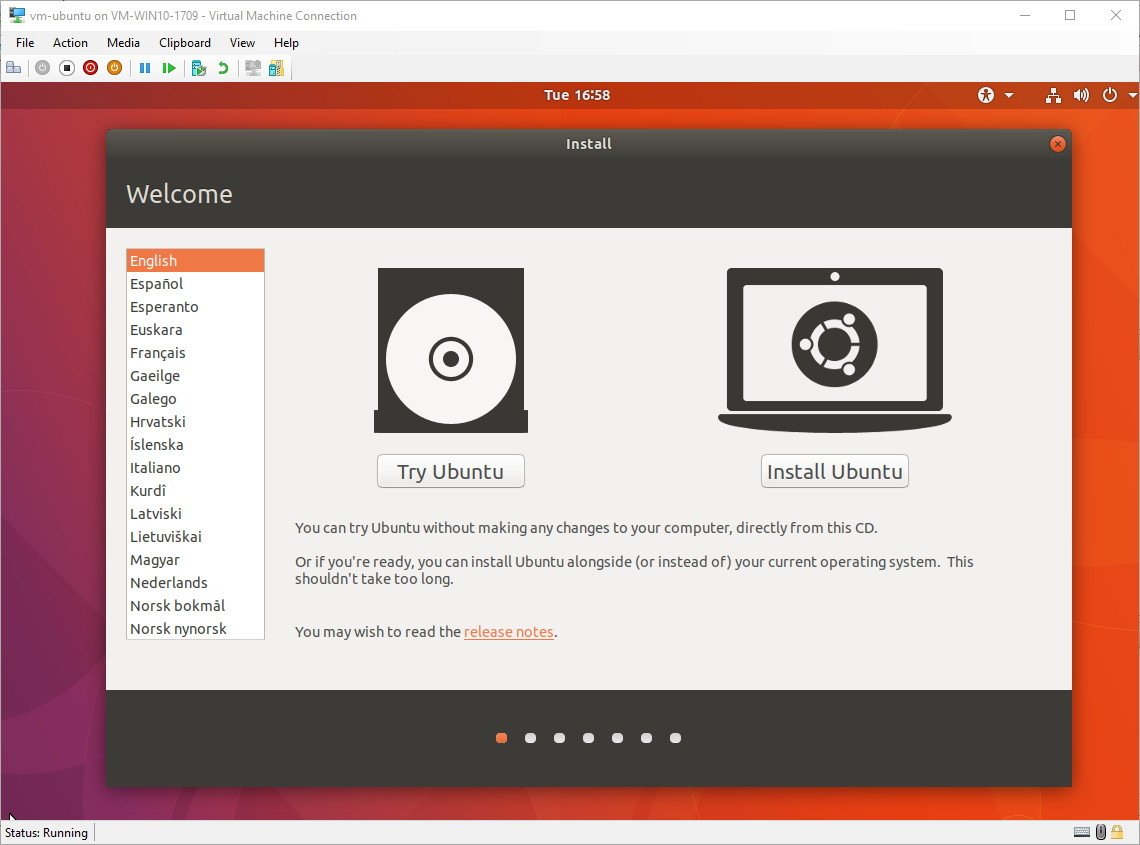
- Select your language.
- Click the Install Ubuntu button.
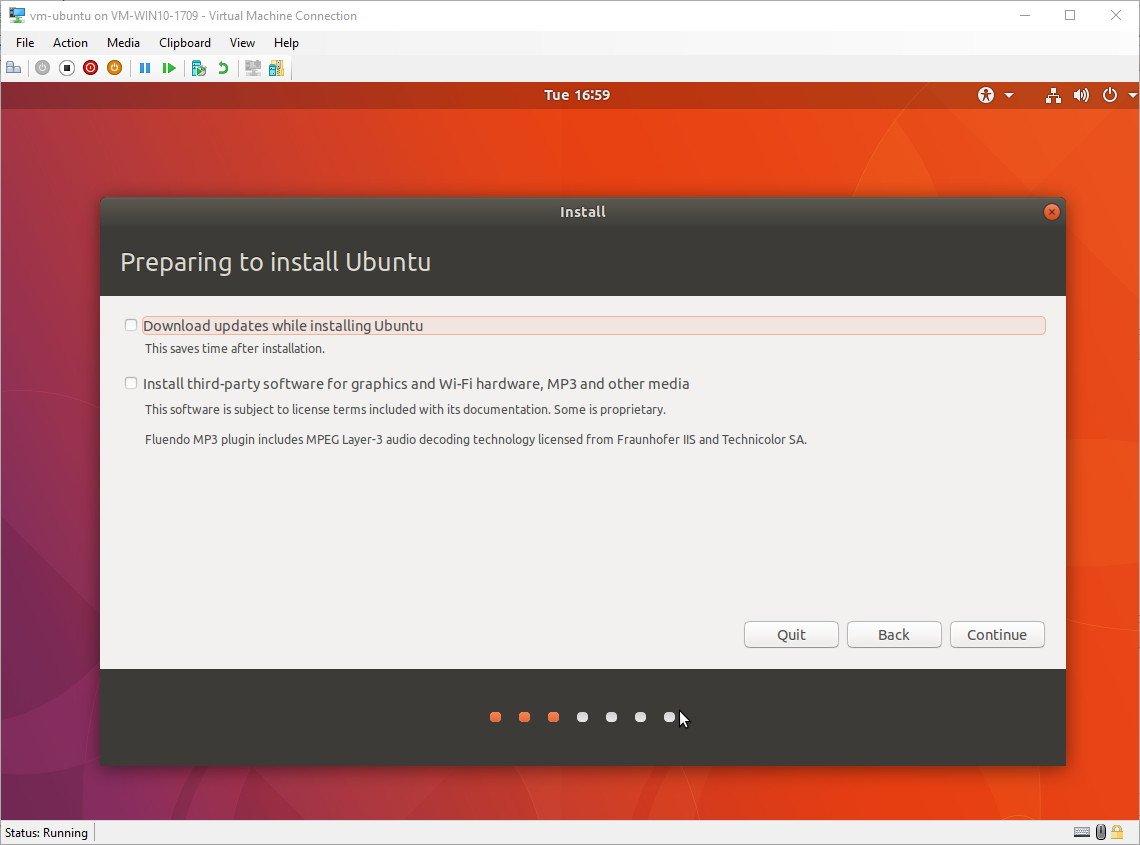
- Check the Install third-party software for graphics and Wi-Fi hardware, Flash, MP3 and other media option.
- Click Continue.
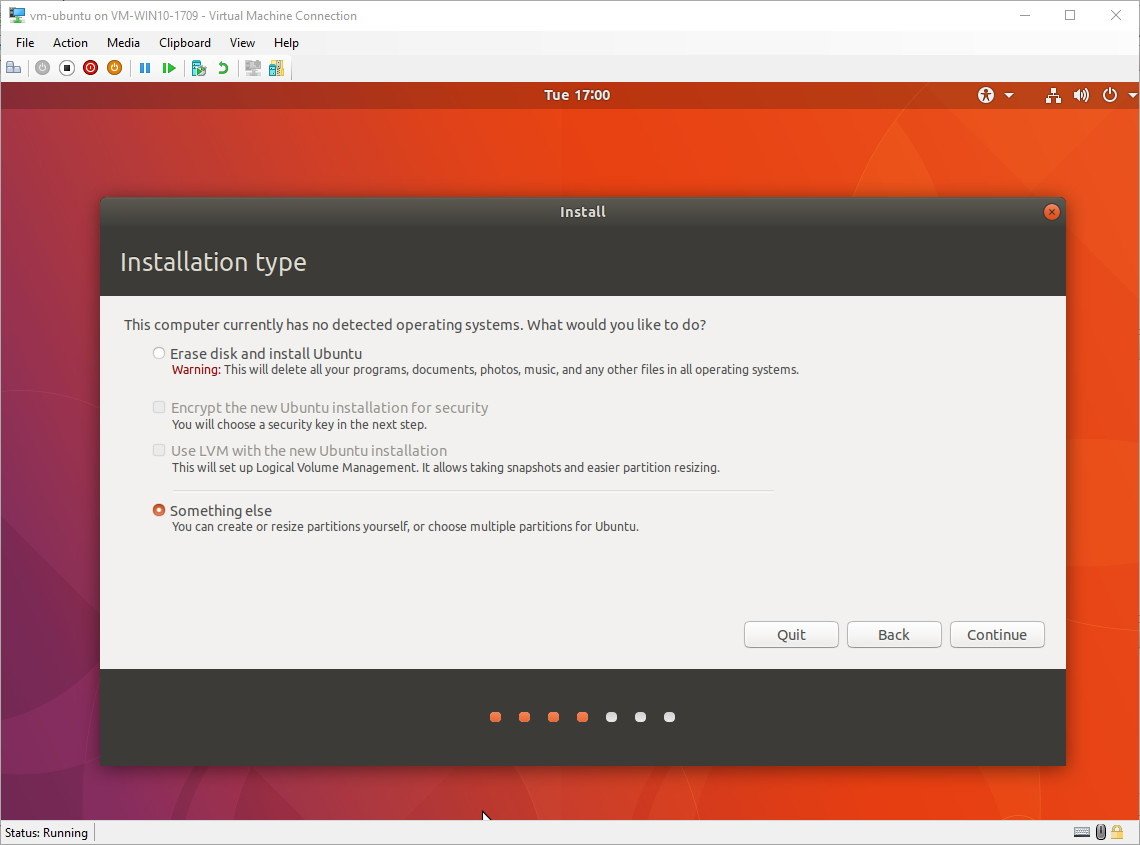
- Select the Something else option.
- Click Continue.
- Double-click the /dev/sda drive.
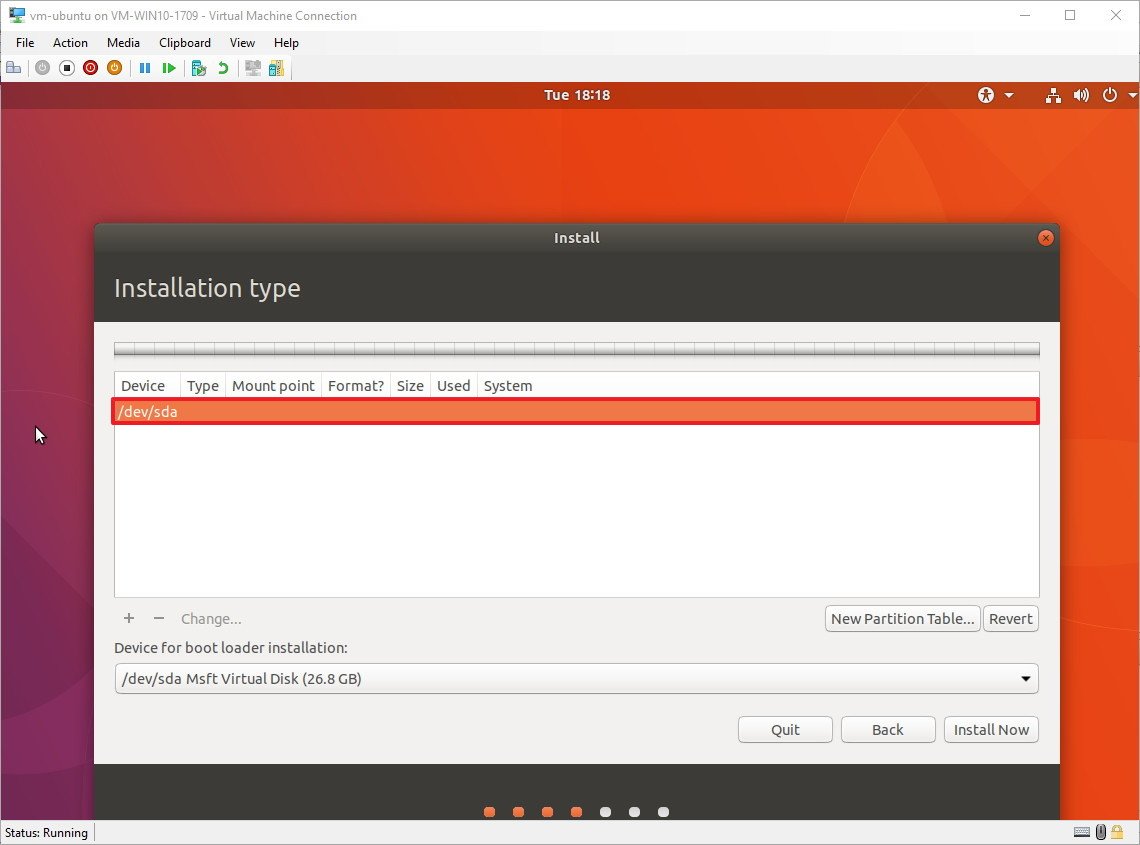
- Click Continue.
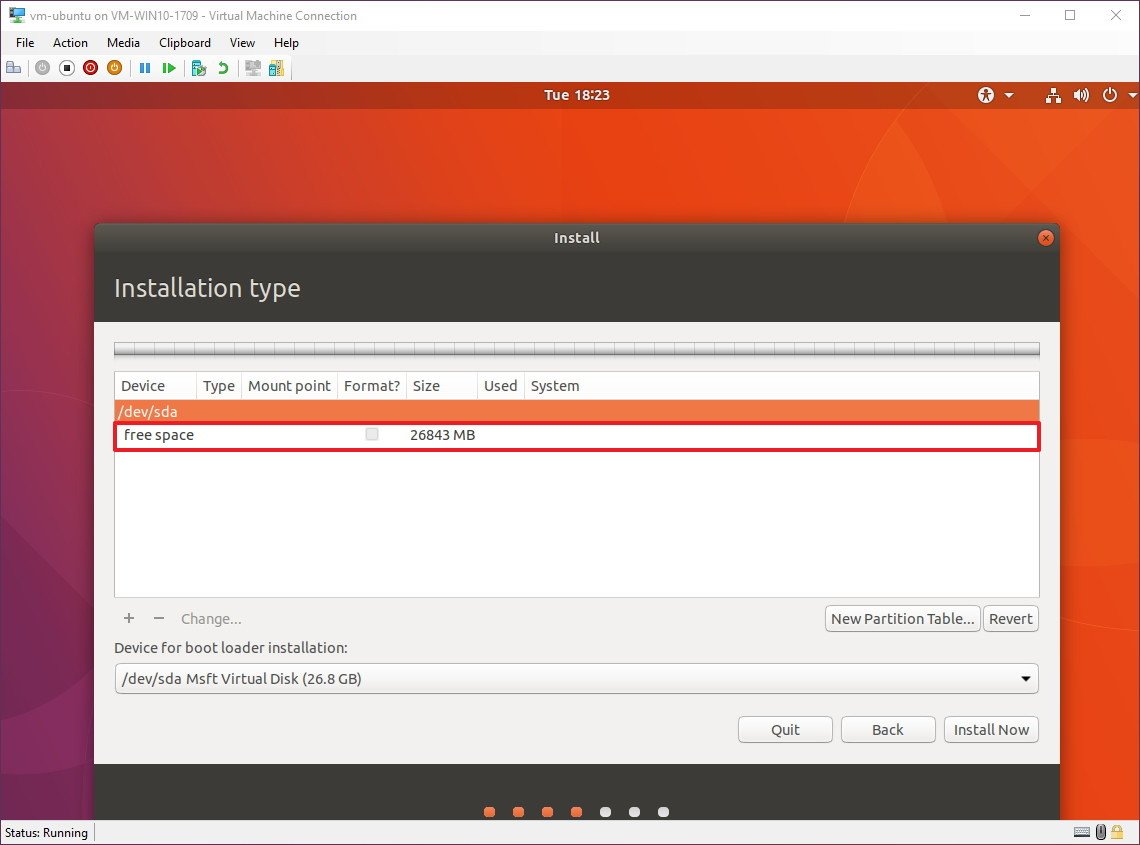
- Double-click free space.
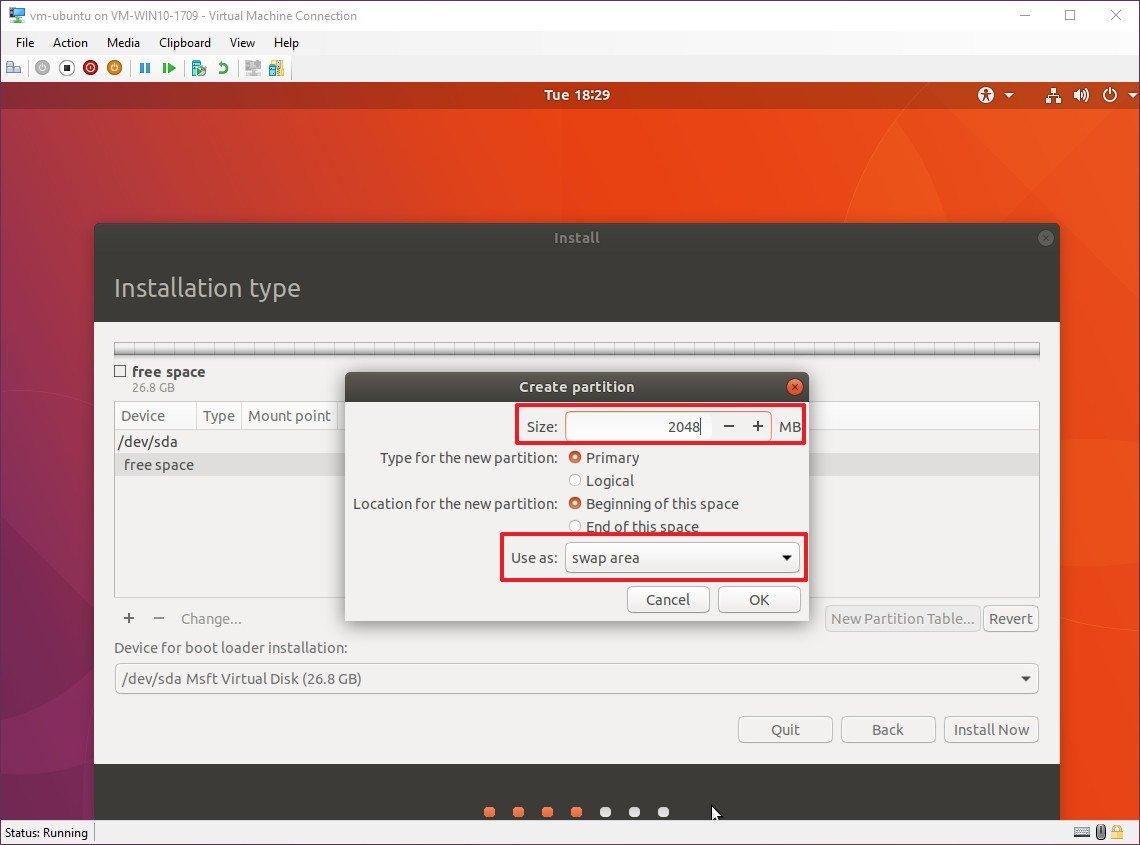
- Under «Use as,» use the drop-down menu and select Swap area to create a swap partition.
- Under «Size,» select the amount of space for the swap partition, which should be about 2x of the amount of RAM allocated for the virtual machine.
- Click OK.
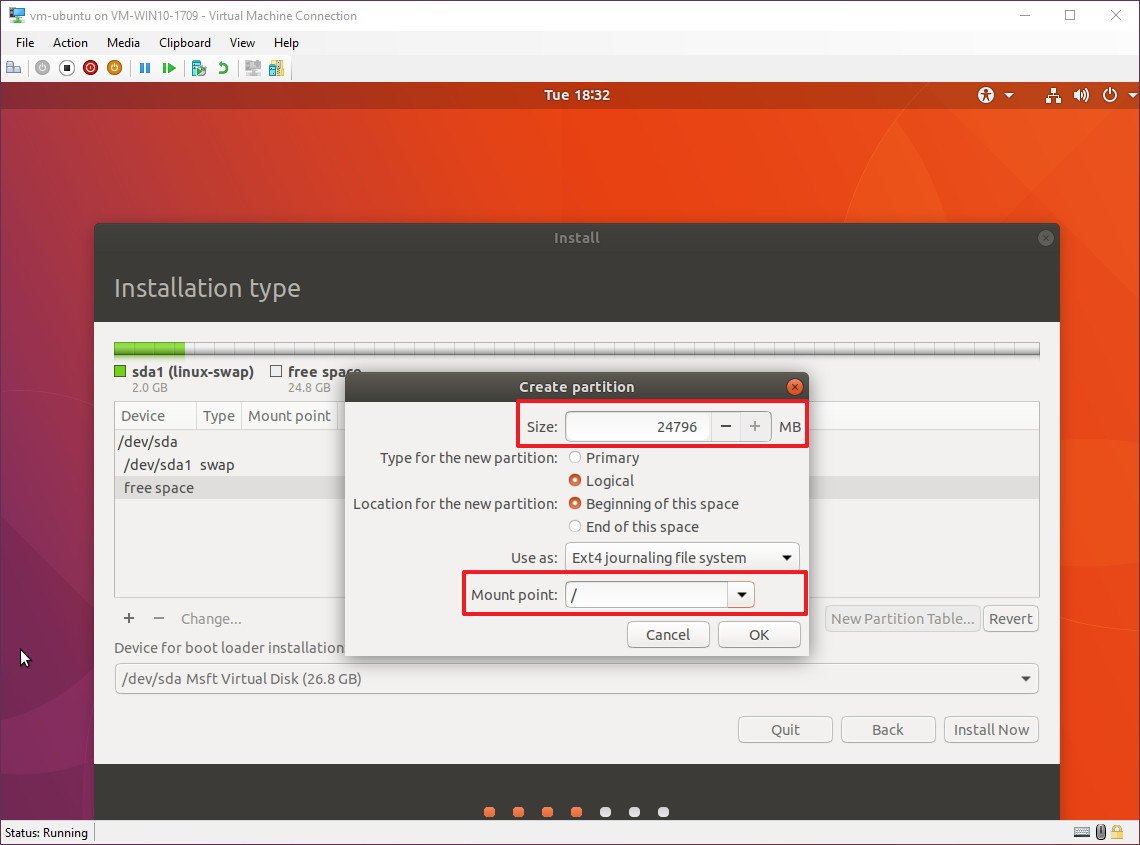
- Double-click free space again.
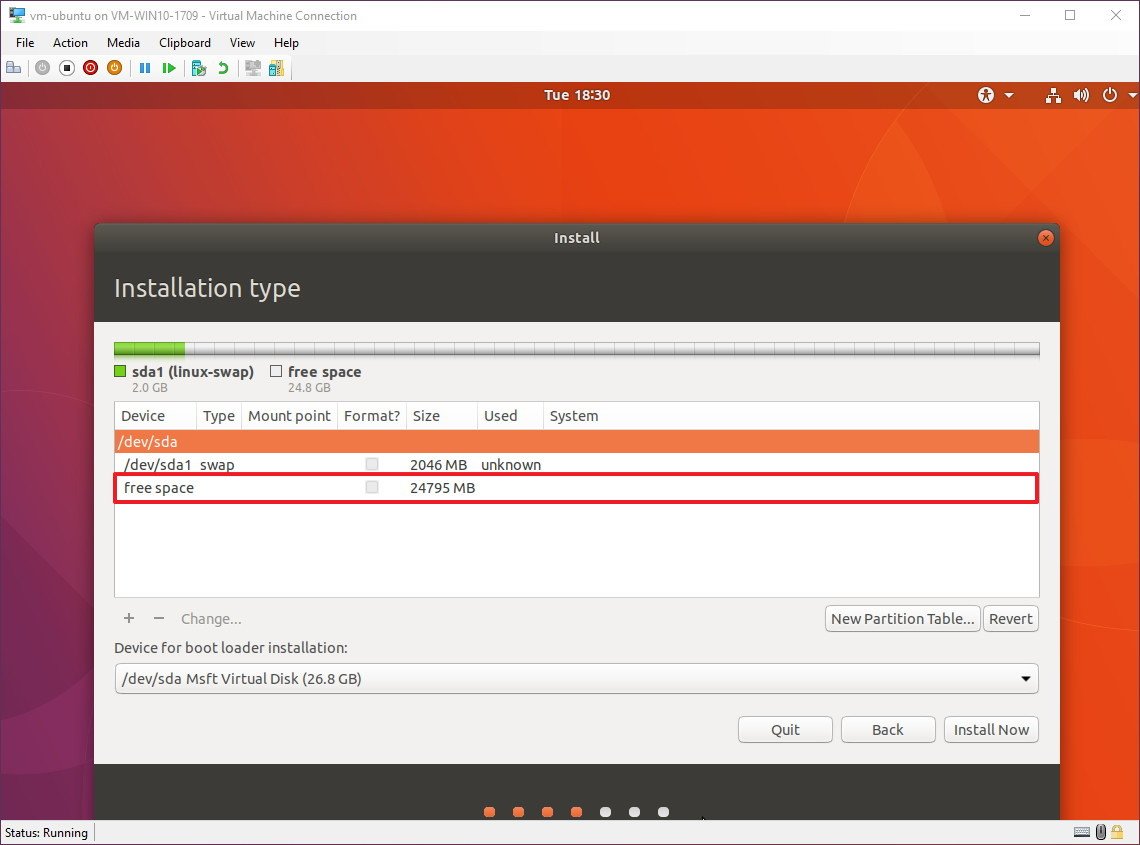
- Select the amount of space to allocate for the installation.
- Under «Mount point,» use the drop-down menu and select root /.
- Click OK.
- Select the ext4 partition from the list.
- Click the Install Now button.
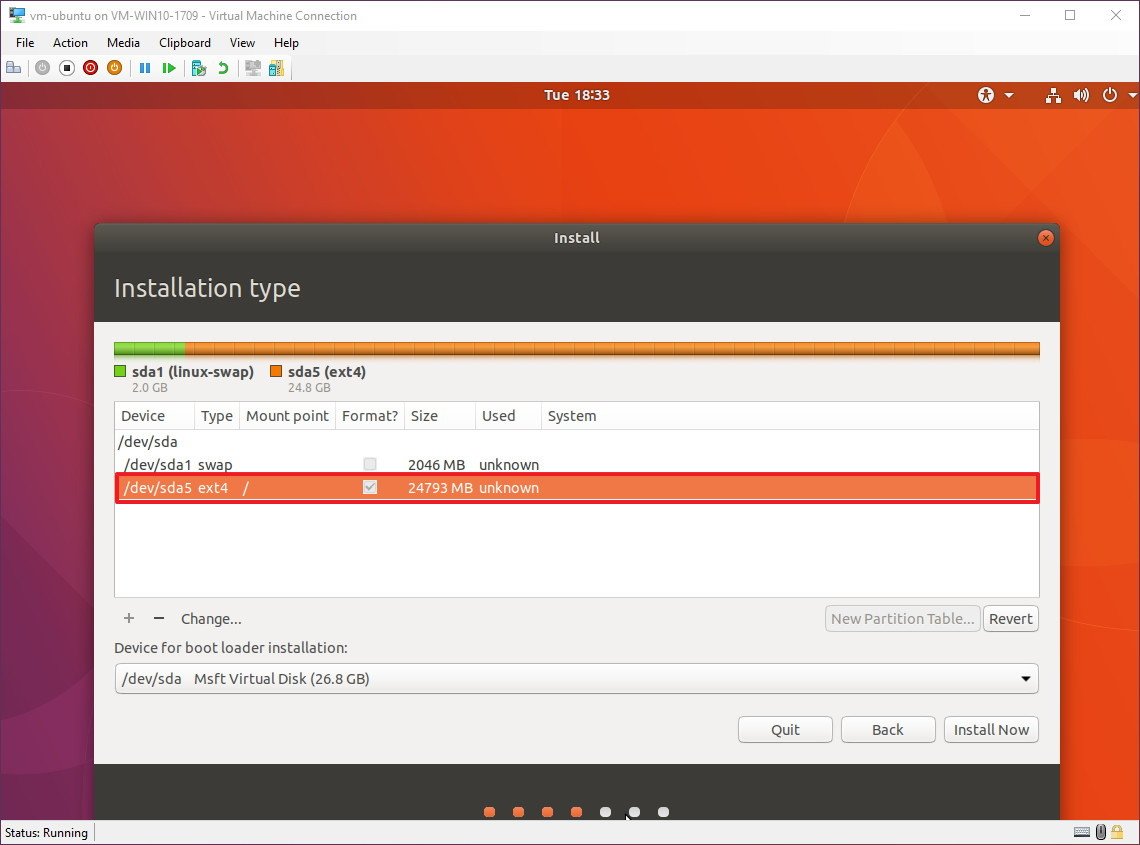
- Click Continue to install Ubuntu.
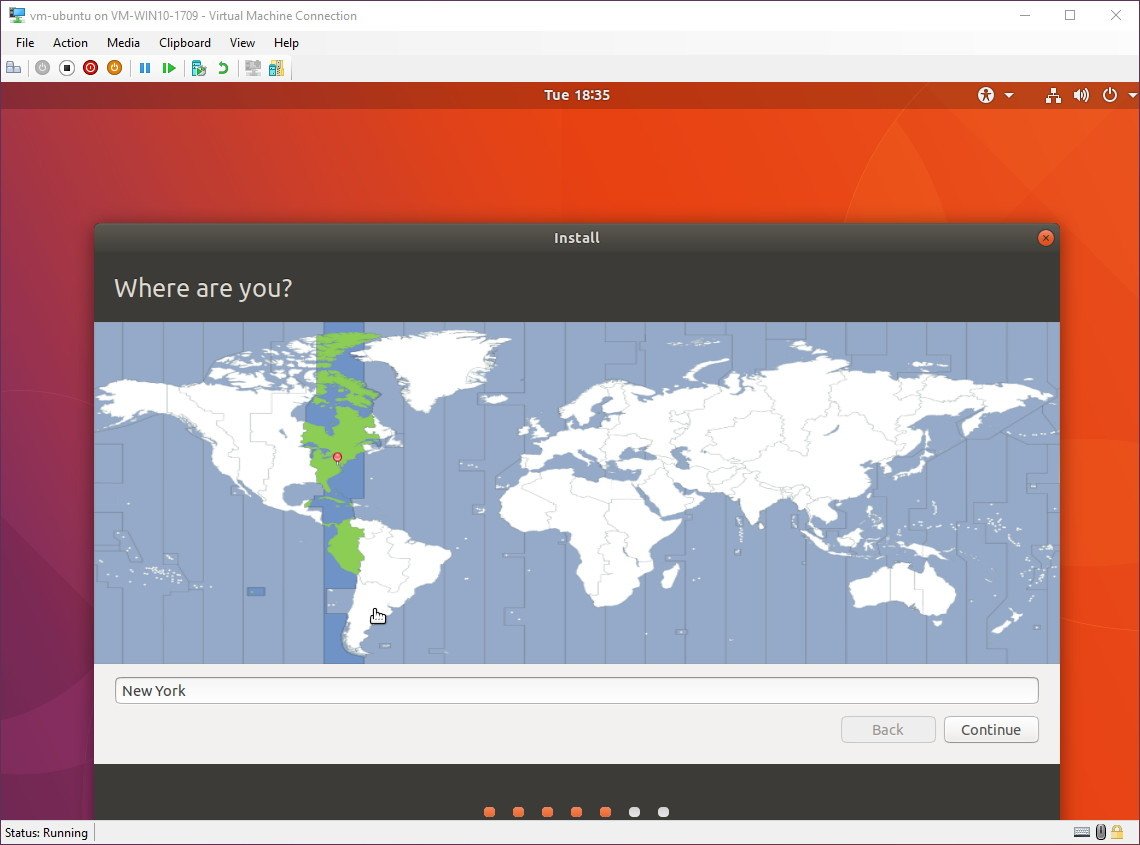
- Select your time zone.
- Click Continue.
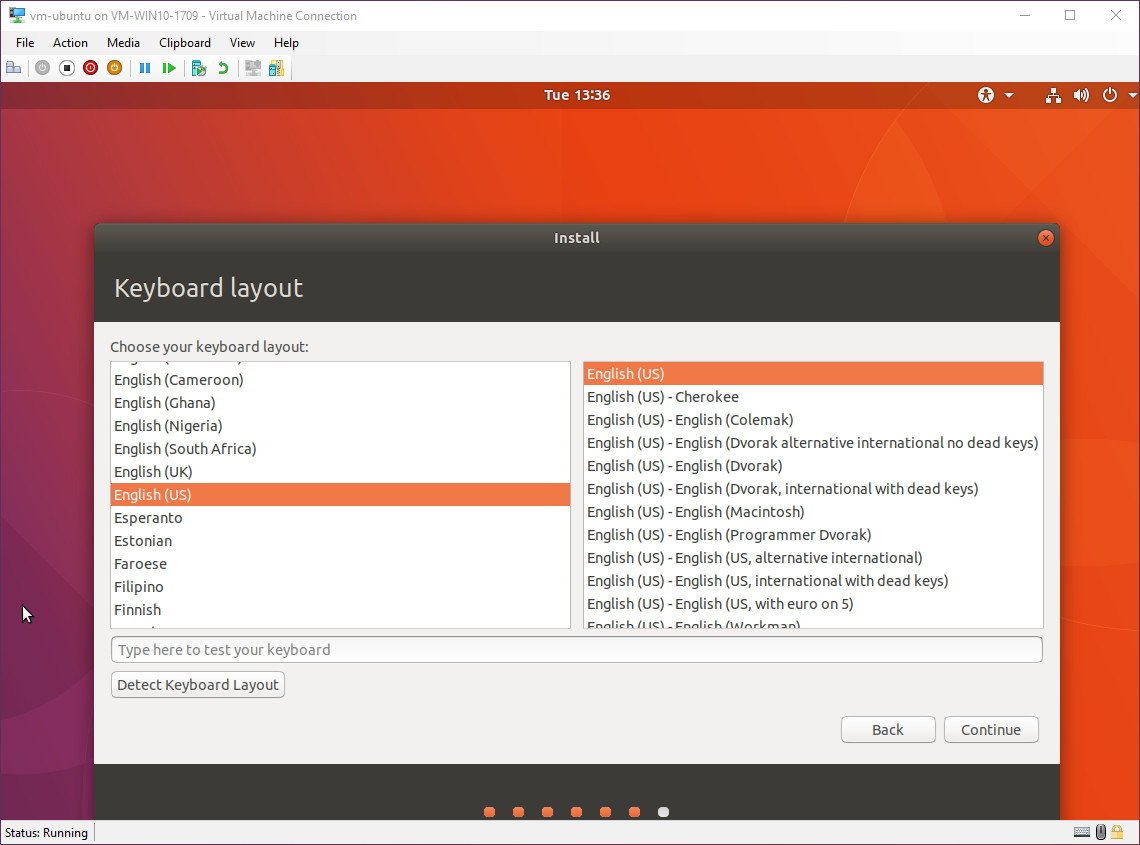
- Select the keyboard layout.
- Click Continue.
- Create a user account with your information.
- Click Continue.
- Restart the virtual machine to finish the setup.Quick Tip: If during the final restart process, you get a message to remove the installation and press Enter, but hitting the key won’t restart the VM, just click the Turn off button and then turn it back on again.
After completing the steps, you can just turn on the VM and start using Ubuntu Linux alongside Windows 10.
While we’re focusing this guide setting up Ubuntu, you can also refer to these instructions to run other distributions of Linux.
More Windows 10 resources
For more helpful articles, coverage, and answers to common questions about Windows 10, visit the following resources:
- Windows 10 on Windows Central – All you need to know
- Windows 10 help, tips, and tricks
- Windows 10 forums on Windows Central
All the latest news, reviews, and guides for Windows and Xbox diehards.
Mauro Huculak is technical writer for WindowsCentral.com. His primary focus is to write comprehensive how-tos to help users get the most out of Windows 10 and its many related technologies. He has an IT background with professional certifications from Microsoft, Cisco, and CompTIA, and he’s a recognized member of the Microsoft MVP community.
Introduction
Since the introduction of Windows 10 Fall Creators Update, it’s possible to run Ubuntu natively on Windows 10. However, there are limitations to running Ubuntu natively on Windows, such as being restricted to using the command-line interface.
Hyper-V offers a built-in way of creating and managing virtual machines on Windows 10. It allows you to install a distribution of Linux, including Ubuntu.
In this tutorial, we will go over the step-by-step process of installing Ubuntu 20.04 on a virtual machine using Hyper-V on Windows 10.
Prerequisites
- A system running Windows 10
- An account with administrator-level privileges
Hyper-V Ubuntu Installation Guide
Following the steps outlined below, you can enable Hyper-V and start using it to create an Ubuntu virtual machine:
STEP 1: Enable Virtualization in BIOS
Using Hyper-V requires virtualization enabled in the motherboard’s BIOS. The exact steps of this process will vary depending on the model of your motherboard.
1. Open the BIOS by rebooting your computer and pressing the BIOS button (F1, F2, F10, F12, or Delete, depending on the motherboard model) when prompted.
2. The virtualization settings are located under the CPU or Advanced BIOS Settings category, depending on your system.
Note: The virtualization settings have different names on different systems. Look for items like Hyper-V, SVM, Vanderpool, VT-X, Intel Virtualization Technology, or AMD-V.
3. Once you enable the appropriate settings, use the Save and Exit option to confirm the changes.
STEP 2: Enable Hyper-V
Before setting up the virtual machine, you need to enable Hyper-V in Windows settings:
1. Open the Windows Start menu, and select the Settings window.
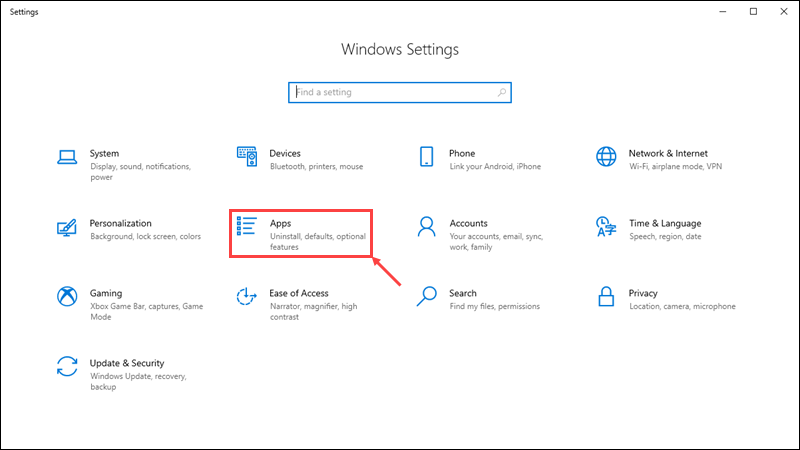
2. Click the Apps tile to open application settings.
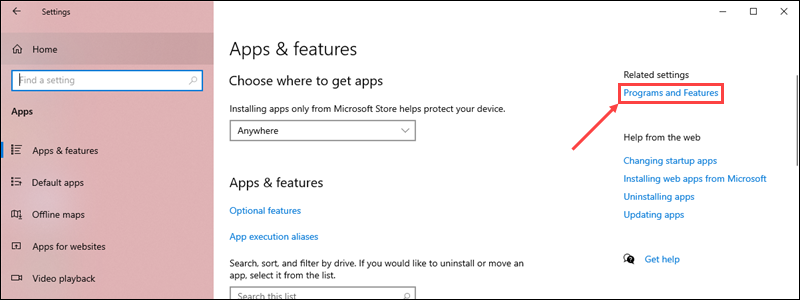
3. On the right-hand side, click the Programs and Features link.
4. In the Programs and Features window, click the Turn Windows features on or off link on the left-hand side.
5. Scroll down and check the Hyper-V option, along with the Hyper-V Management Tools and Hyper-V Platform sub-options.
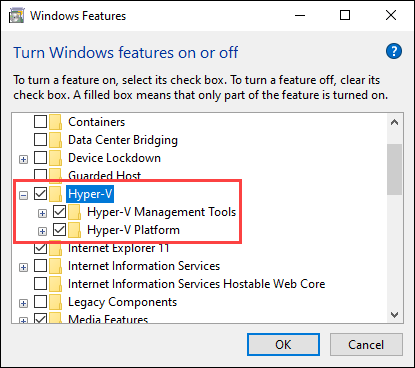
6. Click OK to confirm the changes.
7. Restart your computer.
STEP 3: Create a Virtual Switch
After enabling Hyper-V, create a virtual network switch for the virtual machine to use:
1. In the Start menu, navigate to the Windows Administrative Tools folder and open Hyper-V Manager.
2. Right-click on the name of your system on the left-hand side of the Hyper-V Manager window. Select the Virtual Switch Manager option from the drop-down menu.

3. In the Virtual Switch Manager window, select the New virtual network switch option on the left-hand side. Set the virtual switch type to External and click Create Virtual Switch.
4. Enter a name for the new virtual switch. In this example, we will be using Ubuntu 20.04. Click OK to finish setting up the virtual switch.
5. A new window might appear prompting you to apply network changes. Click Yes to confirm.

STEP 4: Install Ubuntu 20.04
Hyper-V offers two options when creating a new virtual machine:
- The Quick Create option lets you use a wizard to automatically download an operating system and install it on a virtual machine.
- You can also manually set up a new virtual machine and install an operating system from your hard drive or external media.
We will go over the process of installing Ubuntu 20.04 using both options:
Quick Create
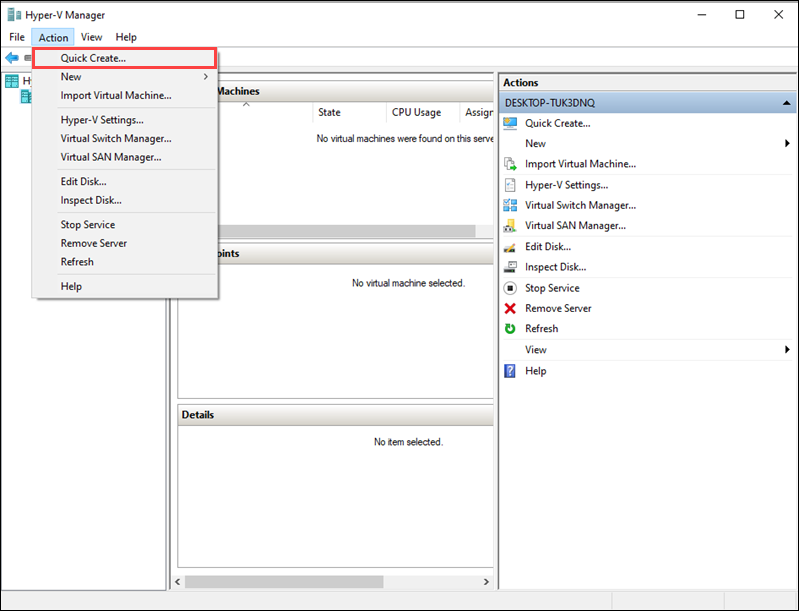
1. In the Action drop-down menu, click Quick Create to start the quick create wizard.
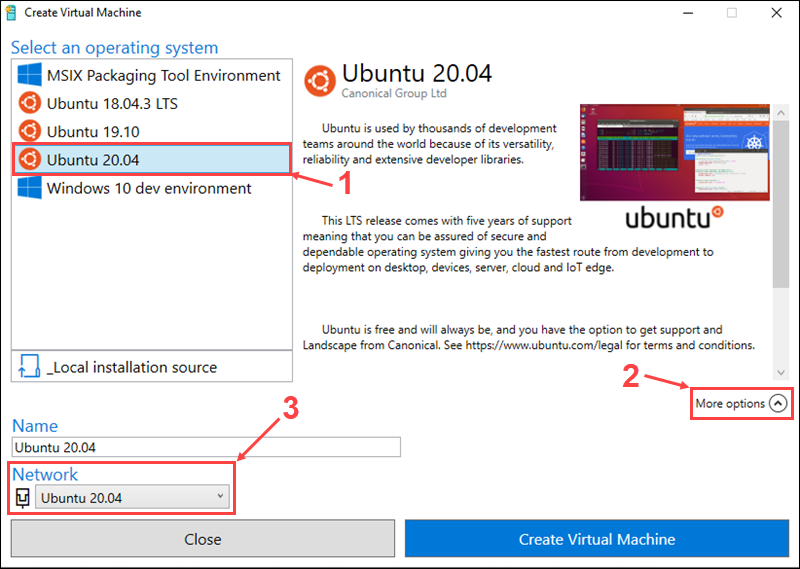
2. On the left-hand side, select Ubuntu 20.04 from the list of operating systems.
3. Click More options to set up a name for the new virtual machine and select the Ubuntu 20.04 virtual switch in the Network menu.
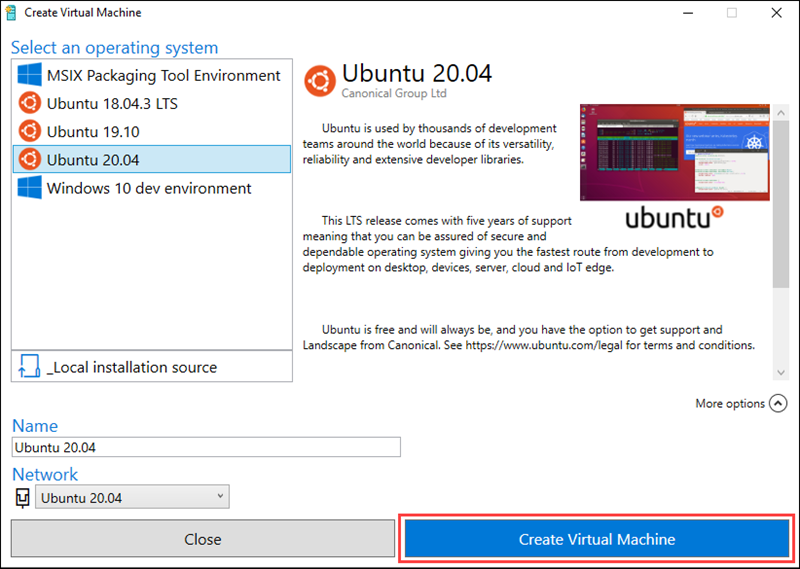
3. Click Create Virtual Machine to start the setup process. Hyper-V will automatically download and install Ubuntu.
4. Once the installation is done, use the Connect button to start up your virtual machine or the Edit settings… button to change settings.
Manually
1. Before you start setting up a new virtual machine, download the Ubuntu 20.04 installation image from the official Ubuntu website.
2. In the Action drop-down menu, select New and click Virtual Machine.
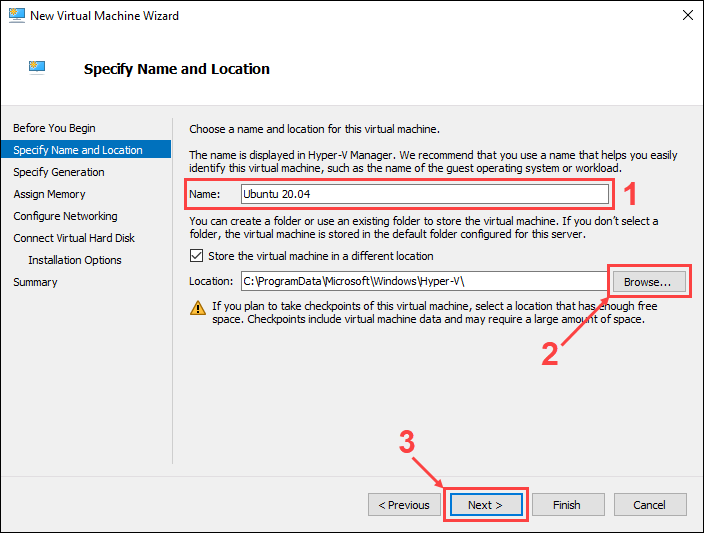
3. In the New Virtual Machine Wizard, click Next to start setting up the new virtual machine.
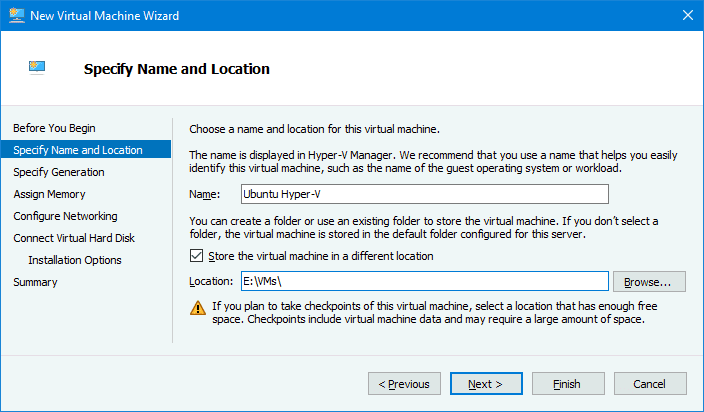
4. Choose a name and install location for the new virtual machine, then click Next to proceed.
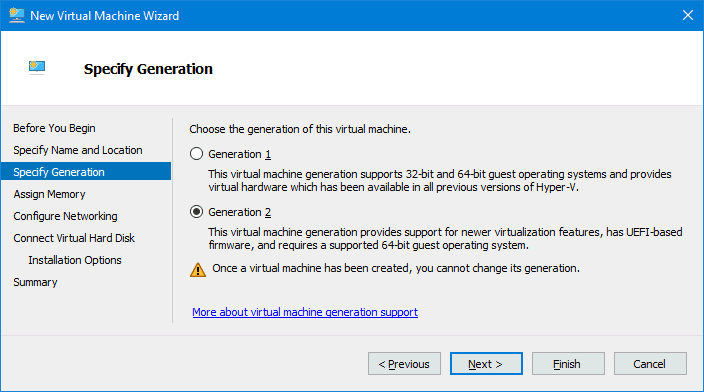
5. Choose the generation for the new virtual machine, then click Next.
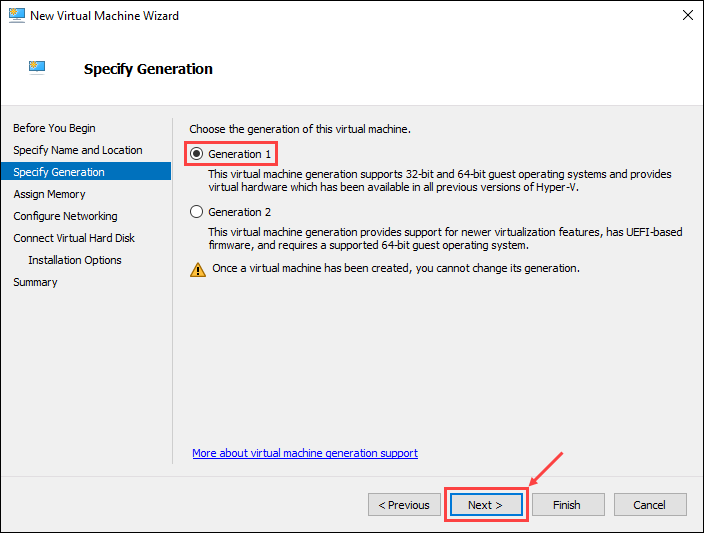
Note: Learn the difference between type 1 and type 2 hypervisors in our article What is a Hypervisor.
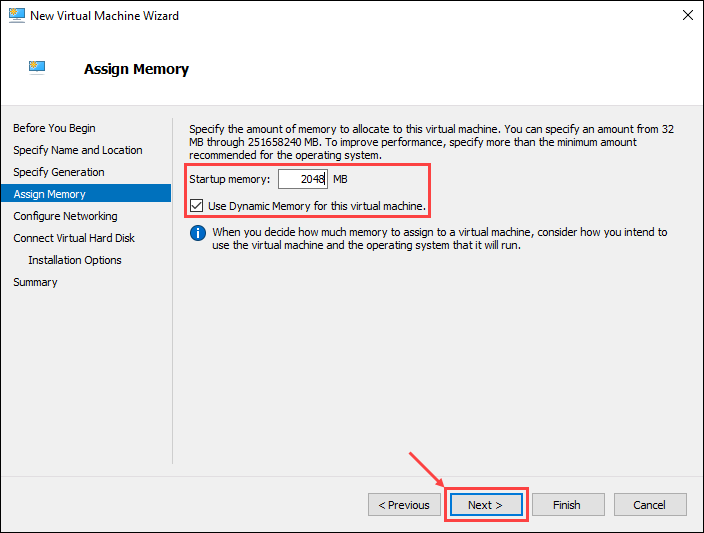
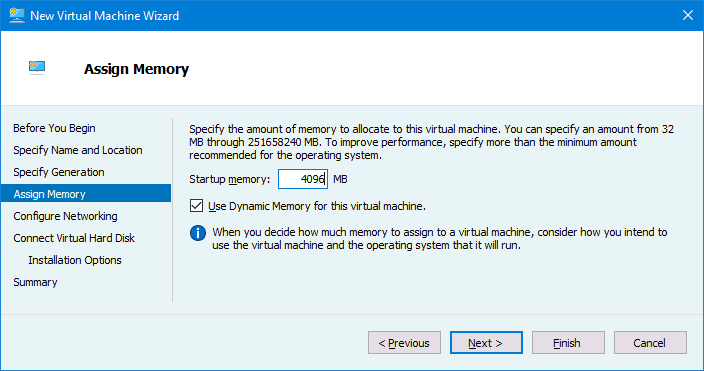
6. Assign the amount of memory to allocate to the virtual machine. Use at least 2 GB of memory and enable the use of dynamic memory. Click Next to continue.
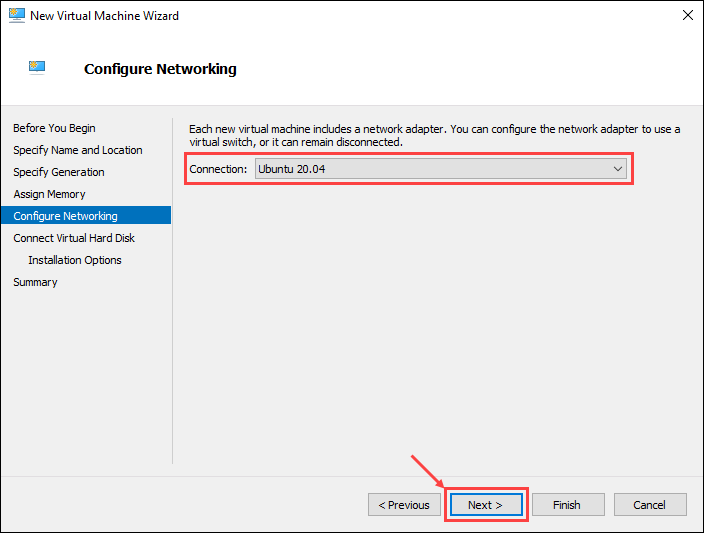
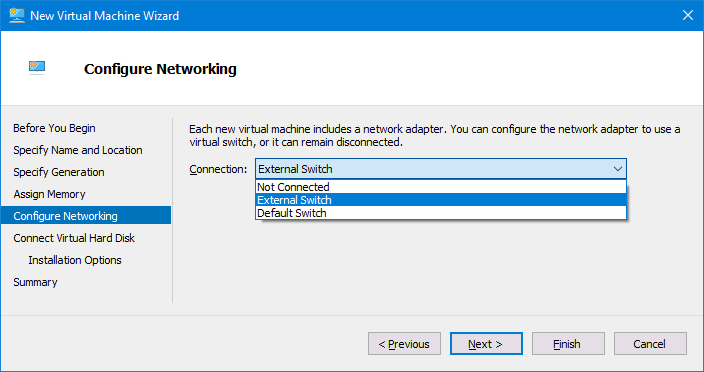
7. Choose Ubuntu 20.04 as the virtual network switch, then click Next.
8. Use the Create a virtual hard disk option to create a new hard disk for the virtual machine. Assign at least 20 GB of hard disk space and click Next to continue.
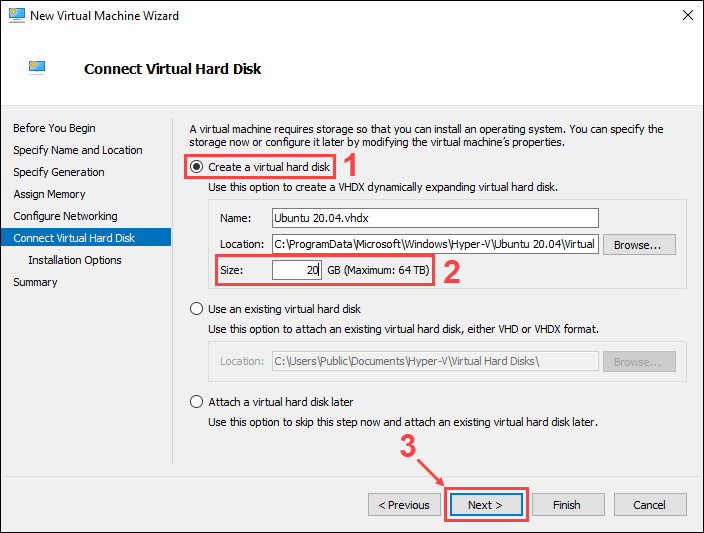
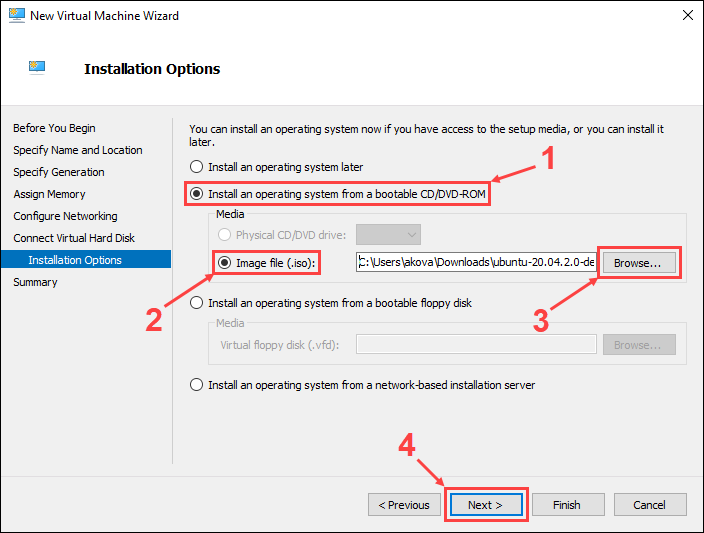
9. Under the Install an operating system from a bootable CD/DVD-ROM option, choose Image file (.iso) and select the Ubuntu image you downloaded previously. Click Next to continue.
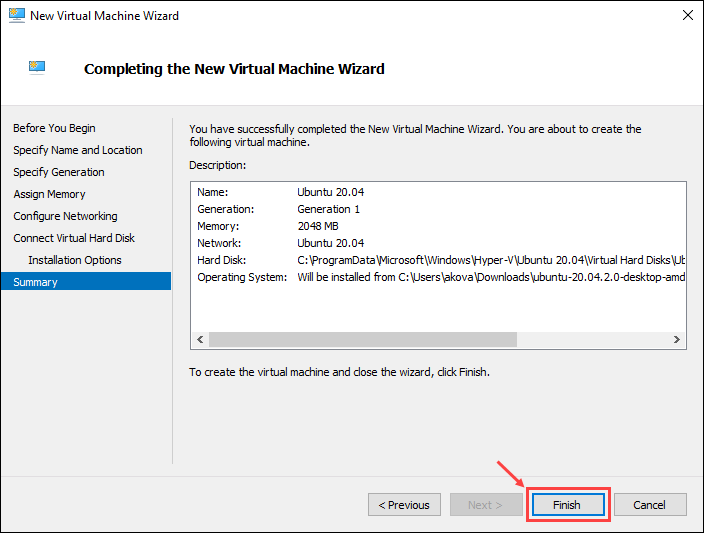
10. The final step offers a summary of the new virtual machine setup. Click Previous to make any changes or click Finish to create the virtual machine.
STEP 5: Start the Virtual Machine
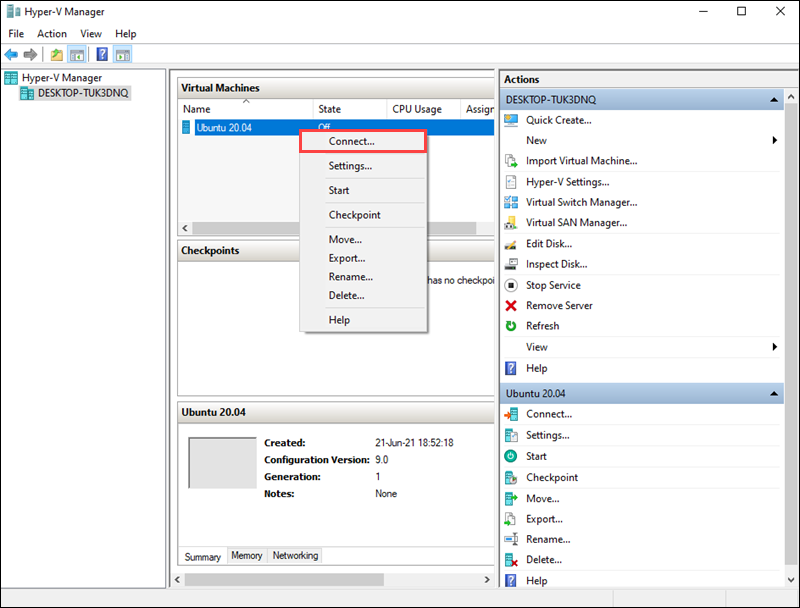
The new virtual machine appears in the Hyper-V Manager window. Right-click on the virtual machine name and click Connect to start it up.
Conclusion
After following this tutorial, you should have Hyper-V enabled, and a new virtual machine with Ubuntu 20.04 installed and ready to use.
Contents
-
Hyper-V
- What is Hyper-V?
- Why Hyper-V?
-
Enabling Hyper-V
- Windows Editions
- Hyper-V System Requirements
- Hyper-V Graphical Install
- Hyper-V PowerShell Install
- Hyper-V Admin Center (Windows 10 Server)
-
Installing Ubuntu on Hyper-V
- Using Quick Create
- Using an Ubuntu CD image (.ISO)
Hyper-V
What is Hyper-V?
Hyper-V is a native type 1 hypervisor developed by Microsoft for the Windows family of operating systems, similar to Xen or VMWare ESXi.
Hyper-V was first released for Windows Server 2008, and is available without additional charge since Windows Server 2012 and Windows 8.
For more information on the difference between type 1 and type 2 hypervisors, click here.
Why Hyper-V?
Hyper-V allows Ubuntu to be run in parallel or in isolation on Windows operating systems. There are several use-cases for running Ubuntu on Hyper-V:
- To introduce Ubuntu in a Windows-centric IT environment.
- To have access to a complete Ubuntu desktop environment without dual-booting a PC.
-
To use Linux software on Ubuntu that is not yet supported on the Windows Subsystem for Linux.
Enabling Hyper-V
Windows Editions
Ubuntu on Hyper-V can be enabled on the following Windows operating systems:
- Windows 10 Pro
- Windows 10 Enterprise
- Windows 10 Education
- Windows 10 Server
Hyper-V is not included in Windows 10 Home, which can be upgraded to Windows 10 Pro.
Hyper-V System Requirements
The following are additional system requirements for Hyper-V:
- A 64-bit processor with Second Level Address Translation (SLAT)
- CPU support for virtualization extensions and virtualization enabled in the system BIOS/EFI
- Minimum of 4 GB of memory, recommended 8 GB
- Minimum of 5 GB of disk space, recommended 15 GB
Hyper-V Graphical Install
-
Right click on the Windows Start button and select ‘Apps and Features’
-
Select ‘Programs and Features’ on the right under Related Settings
-
Select ‘Turn Windows Features on or off’
-
Select ‘Hyper-V’ and click OK
-
Restart when prompted
Hyper-V PowerShell Install
-
Open a PowerShell console as Administrator
-
Run the following command: Enable-WindowsOptionalFeature -Online -FeatureName Microsoft-Hyper-V -All
- Restart when prompted
Hyper-V Admin Center (Windows 10 Server)
See official Microsoft documentation.
Installing Ubuntu on Hyper-V
There are different methods for installing Ubuntu on Hyper-V depending on your use-case. Read each of the descriptions of the following methods and then determine the best for your needs
Using Quick Create
The recommended method for installing Ubuntu on Hyper-V is to use the curated Ubuntu image from the Hyper-V Quick Create Gallery. This method is ideal for desktop development on Ubuntu and for users interested in running a complete Ubuntu desktop environment. The Ubuntu image from the Quick Create Gallery includes pre-configured features, such as clipboard sharing, dynamic resolution display, and shared folders.
-
Enable Hyper-V as described above.
-
Open ‘Hyper-V Manager’ by:
- Click on the Windows Start button, expand the ‘Windows Administrative Tools’ folder, and click ‘Hyper-V Manager’, or
- Click the Windows key and type ‘Hyper-V’ and click ‘Hyper-V Manager’ or select with your keyboard arrow keys and press ‘Enter’
-
In the future, the Quick Create tool can be accessed directly using the above methods, but it is useful to know where Hyper-V Manager is because it is where you will come back to manage your Ubuntu VM.
-
On the ‘Actions’ pane click ‘Quick Create’ and the Quick Create tool will open.
-
Select a version of Ubuntu from the versions on the left. A build of the most recent LTS version of Ubuntu and the most recent interim release are provided. If you are developing for Ubuntu server or an enterprise environment, the LTS version is recommended. If you would like to use the latest versions of software in Ubuntu, the interim release is recommended.
-
Click ‘Create Virtual Machine’ and wait for the VM image to be downloaded.
-
Click ‘Connect’ to open a connection to your VM.
-
Click ‘Start’ to run your VM.
-
Complete the final stages of Ubuntu install, including selection of a username.
Using an Ubuntu CD image (.ISO)
It is also possible to install Ubuntu on Hyper-V using a CD image .ISO. This is useful if you are running Ubuntu Server and do not require an enhanced desktop experience. Note that the enhanced features of the Quick Create images are not enabled by default when you perform a manual install from an ISO.
-
Download an Ubuntu ISO from an official Ubuntu source.
-
Enable Hyper-V as described above.
-
Open ‘Hyper-V Manager’ by:
- Click on the Windows Start button, expand the ‘Windows Administrative Tools’ folder, and click ‘Hyper-V Manager’, or
-
Click the Windows key and type ‘Hyper-V’ and click ‘Hyper-V Manager’ or select with your keyboard arrow keys and press ‘Enter’
-
On the ‘Actions’ pane click ‘Quick Create’ and the Quick Create tool will open.
- Click ‘Change installation source’ and select the ISO file you downloaded before. If you want to give your virtual machine a more descriptive name, click the ‘More options’ down arrow on the bottom right and change ‘New Virtual Machine’ to something more useful, such as ‘Ubuntu Server 18.04 LTS’.
-
Click ‘Create Virtual Machine’ and wait for the virtual machine to be created.
-
Click ‘Connect’ to open a connection to your VM.
-
Click ‘File’ in the menu bar, chose ‘Settings’, click the ‘Security’ tab and under Secure Boot select ‘Microsoft UEFI Certificate Authority’, then ‘Apply’ and ‘OK’ to return to your VM.
-
Click ‘Start’ to run your VM.
-
Complete the manual installation of Ubuntu.
CategoryEnterprise
Using the Enhanced session mode in Microsoft Hyper-V Manager is a more convenient way of managing VMs than the basic session mode in VMConnect. The Enhanced session mode uses Remote Desktop Protocol (RDP) to allow you to attach host machine resources (drives, USB devices, printers, etc.) to VMs. When using this mode, certain actions become available to you like the ability to resize a VM screen, copy-pasting text from a host to a guest, and the other way, etc.
Enabling Enhanced session mode is simple on Windows running as the guest OS on Hyper-V, as Windows comes with the Remote Desktop feature. However, for Linux distributions running as guest operating systems on Hyper-V, remote desktop is not preconfigured. Ubuntu 20.04 LTS, which is quite popular these days, is often deployed on Hyper-V VMs, in particular, when you can’t install Linux as the host OS. Read on to learn how to use Hyper-V in the enhanced session mode to run Ubuntu on Windows.
Creating and Configuring a VM
Let’s look at how to create and configure an Ubuntu 20.04 VM from scratch in Hyper-V. In this blog post, I’m using Windows 10 Pro version 20H2 with Hyper-V installed. The hostname of my Windows 10 host machine is home-pc. You have to enable Hyper-V before you can run the Ubuntu VM. If you don’t have Hyper-V installed on your Windows host, read how to install Hyper-V on Windows 10 and Windows Server 2019.
In order to create a new VM in Hyper-V, open Hyper-V Manager, right-click your host machine name and, in the context menu, click New > Virtual Machine.

The New Virtual Machine Wizard opens. You can skip the Before You Begin step.
Specify Name and Location. Enter a virtual machine name, for example, Ubuntu Hyper-V. Select the Store the virtual machine in a different location checkbox, and select the folder where you want to store VM files, for example, E:\VMs\. Hit Next at each step of the wizard to continue.
Specify Generation. Select the generation of the new VM. It is better to select Generation 2 because more features are available and limits are higher. Generation 2 VMs use UEFI. Read more about Hyper-V Generation 1 and Generation 2 VMs.
Assign Memory. Specify the amount of memory available to the VM. I select 4096 MB, which is enough to run Ubuntu without performing heavy tasks. Select the checkbox to Use Dynamic Memory for this virtual machine. The more memory you assign to the VM, the more convenient the work. Don’t assign all the memory of your computer to the VM; leave memory for the host operating system. If you run other VMs simultaneously with this Linux VM, remember that other VMs also need memory.
Configure Networking. Select a virtual switch to which the virtual network adapter of the VM will be connected. If you have not created any virtual switches, you can do it later and edit the VM configuration.
Connect Virtual Hard Disk. Click Create a virtual hard disk. Enter the virtual disk name, for example, Ubuntu Hyper-V.vhdx. Define the location of the virtual disk file. You should select the location in your directory used to store Hyper-V VMs. In my case, the selected directory is E:\VMs\Ubuntu Hyper-V\Virtual Hard Disks\. Set the virtual disk size. I select 15 GB for my Ubuntu 20.04 VM used for testing purposes.

Installation Options. Select Install an operating system from a bootable image file. Click Browse and select the location of the Ubuntu 20.04 ISO installation image. The Ubuntu version I’m going to install is 20.04.2. You can download the installation image from the official Ubuntu website.

Summary. Check configuration summary, and click Finish to finish the new VM creation.

Open the settings of the Ubuntu Hyper-V virtual machine that you have already created. Right-click the Ubuntu Hyper-V VM in Hyper-V Manager and, in the context menu, hit Settings.

In the navigation pane, select Security in the Hardware section, and deselect the Enable Secure Boot checkbox. Secure boot is not needed for this virtual machine. You can check and edit other VM settings if needed. Click OK to save settings and close this window.

Installing Ubuntu 20.04 on a VM
Once the new virtual machine has been created, you should install Ubuntu 20.04 as a guest operating system on this VM. Power on the VM, the Ubuntu 20.04 installer should boot from the attached ISO installation image. The installation process of Ubuntu Linux is explained in details in the blog post about installing Linux on Hyper-V.
I’ll focus on two installations steps only. In this example, I select Normal installation with the option to Download updates while installing Ubuntu 20.04.
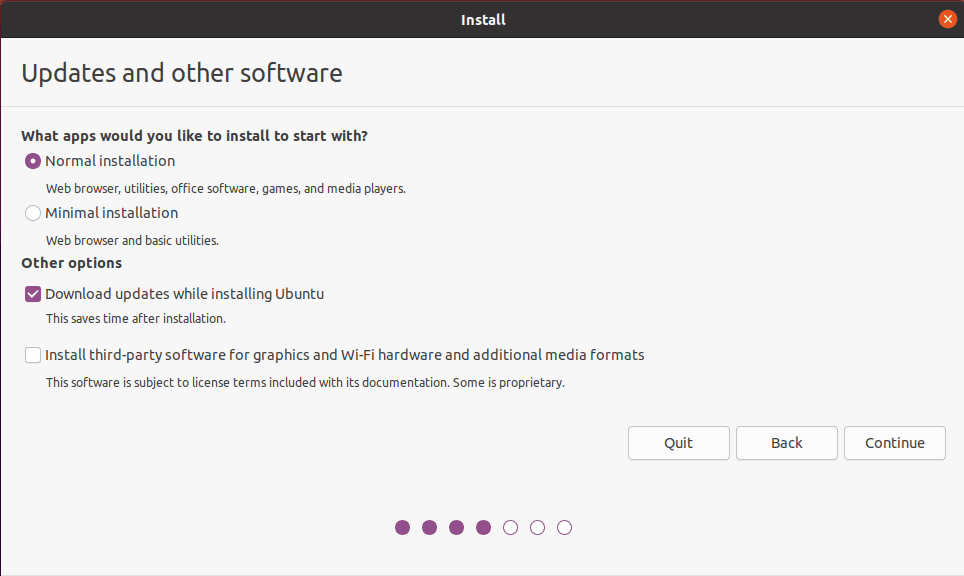
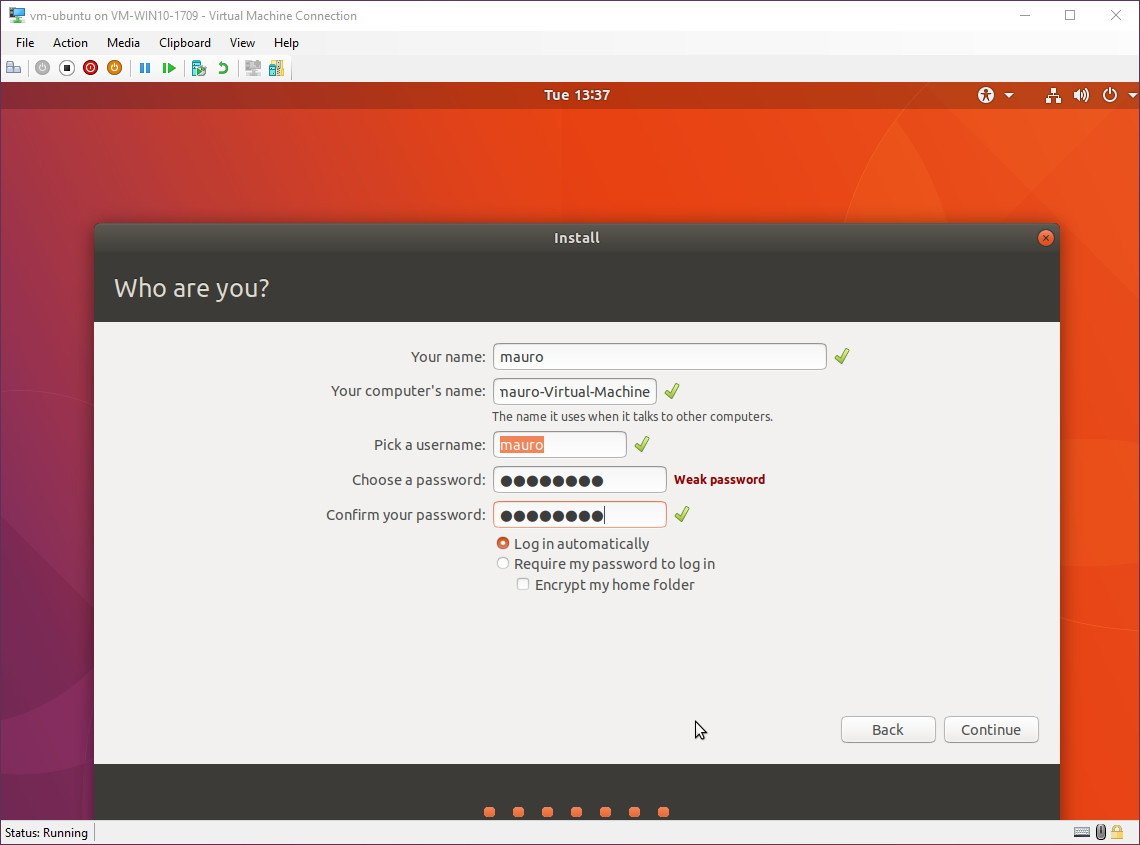
The important option that you should select is require the password to log in on the “Who are you?” step of the installation. Using the enhanced session mode for the Ubuntu VM in Hyper-V is not available if the Log in automatically option is selected.

Ubuntu Hyper-V integration services are part of the Linux distribution, and you don’t need to install the downloaded package provided by Microsoft manually.
Post Installation Configuration in Ubuntu
There are important things to do after installing Ubuntu 20.0. You have to download and run the script to configure Ubuntu 20.04 installed on a Hyper-V VM as a guest OS to make the enhanced session mode work.
Open the console (terminal) in Ubuntu 20.04.
Go to the Downloads directory:
cd ~/Downloads/
Download the updated script for Ubuntu 20.04:
wget https://raw.githubusercontent.com/Hinara/linux-vm-tools/ubuntu20-04/ubuntu/20.04/install.sh
Add execution permissions to the downloaded install.sh script file:
sudo chmod +x install.sh
Run the script with the root privileges:
sudo ./install.sh

When execution of the script is finished, you are prompted to reboot Ubuntu 20.04 and run the script again after reboot.

Reboot the Linux machine:
init 6
After reboot, open the terminal, go to the directory where the script is located, and run the script once again:
cd ~/Downloads/
sudo ./install.sh
Reboot your Ubuntu virtual machine when execution of the script is finished.

Configuration on the Host Windows Machine Running Hyper-V
You have to allow the enhanced session mode in general Hyper-V settings. Otherwise, the enhanced session mode icon will be inactive in the VM window. Open Hyper-V Manager, right-click the name of your host Windows machine on which Hyper-V is installed, and, in the context menu, click Hyper-V Settings.

Select the Enhanced Session Mode Policy in the navigation pane, and then select the Allow enhanced session mode checkbox. Hit OK to save Hyper-V settings and close the window.

Now you should set Hyper-V to enable the enhanced session mode using the HvSocket for the “Ubuntu Hyper-V” VM on which Ubuntu 20.04 is installed.
Run this command in PowerShell (as administrator) on the host Windows machine running Hyper-V:
Set-VM -VMName <your_vm_name> -EnhancedSessionTransportType HvSocket
Use double quotas if the VM name contains spaces. In my case the command is:
Set-VM -VMName “Ubuntu Hyper-V” -EnhancedSessionTransportType HvSocket

You may see the following error:
Set-VM : A parameter cannot be found that matches parameter name ‘EnhancedSessionTransportType’.
At line:1 char:30
+ Set-VM -VMName “Ubuntu20-04” -EnhancedSessionTransportType HvSocket
+ ~~~~~~~~~~~~~~~~~~~~~~~~~~~~~
+ CategoryInfo : InvalidArgument: (:) [Set-VM], ParameterBindingException
+ FullyQualifiedErrorId : NamedParameterNotFound,Microsoft.HyperV.PowerShell.Commands.SetVM
This error can occur if you use the old version of PowerShell, which doesn’t support new cmdlets and parameters.

In this case, follow this recommendation: Try to update your host Windows operating system to Windows Server 2019, Windows 10 1803, or newer. If you cannot update the operating system, update Windows PowerShell to a newer version that includes the needed cmdlets and features.
You may need to reboot the Hyper-V host (don’t forget to run the last command to enable the enhanced session mode for Ubuntu 20.04 for Hyper-V in PowerShell). Stop and start the Linux VM. When Ubuntu is booted, you should see a window with VM display configuration and other options of the enhanced session mode. Click Show options, and select the needed resources in the Local resources tab to connect the host resources to the guest OS (Ubuntu 20.04 in our case) of the VM. It is recommended that you uncheck printers for the first time to reduce the probability of issues.

Enter the username and password of your Ubuntu user in the Xorg login window. Notice that the enhanced session mode button is now active in the virtual machine window.

Now you should see the GUI (graphical user interface) and Desktop of Ubuntu 20.04. Try to use the shared clipboard and other sharing features, and changing screen resolution in the VM.

If you see a black screen after entering your credentials, the reason can be the following: A user has been already logged in to the desktop session of Ubuntu. Log out the user and end that session. Then try to connect to Ubuntu by using the enhanced session mode and Xrdp in Hyper-V. You can reboot the Ubuntu VM and connect to Ubuntu with the enhanced session mode.
If the enhanced session option is not available for your Ubuntu 20.04 guest in Hyper-V, try to edit the xrdp.ini configuration file located in /etc/xrdp. You should edit the file with root privileges. Edit two lines in the xrdp.ini file.
Change these parameters:
port=3389 to port=vsock://-1:3389
use_vsock=true to use_vsock=false
This issue should be fixed for Ubuntu 20.04.1.
Read also the blog post about configuring RDP on Linux to learn more about manual configuration.
Conclusion
Ubuntu Linux is a great operating system that is convenient, reliable, and widely used around the world. If you use Windows that is installed on your computer as a host OS, you can run Ubuntu on a Hyper-V VM. This blog post has explained how to enable the enhanced session mode for a virtual machine running Ubuntu 20.04 in Hyper-V. Windows 10 20H2 is used in this tutorial as the host machine. You can perform the same configuration on Windows Server 2019. The enhanced session mode provides you with additional features to work with the VM more conveniently. The main point of configuration is running the configuration script in the Ubuntu guest.
If you use Hyper-V VMs, don’t forget to perform Hyper-V backup to protect data of your virtual machines. Download the Free Edition of NAKIVO Backup & Replication, and back up VMs on your Hyper-V hosts.
Постараюсь дать максимально подробный ответ. Пока сочинял, получилась целая статья. Надеюсь, материал вам пригодится.
Вместо предисловия
Компания Microsoft не особо заботится об улучшении классического функционала Windows 10, предпочитая вкладывать усилили в будущее платформы UWP, но иногда кое-что из старого арсенала пополняет новыми возможностями. В числе такого арсенала — встроенный в редакции системы, начиная с Pro, штатный гипервизор Hyper-V, в своё время доставшийся Windows 8.1 по наследству от серверной линейки Windows. Относительно недавно в нём появилась упрощённая возможность создания виртуальной машины с Ubuntu 18.04 LTS. Причём с предустановленным сервером XRDP для поддержки расширенного подключения по протоколу RDP. Не всё, увы, в этой истории гладко, есть нюансы. Но, обо всём подробнее ниже.
Поддержка Linux
Hyper-V давно поддерживает Linux, причём отдельные дистрибутивы типа Ubuntu могут быть установлены на виртуальные машины 2-го поколения. Такие отдельные дистрибутивы устанавливаются так же, как и Windows, никакой принципиальной разницы в настройках самой виртуальной машины нет. Разве что в параметрах машин 2-го поколения перед их запуском необходимо отключать функцию безопасной загрузки.

Единственный, но немаловажный нюанс, который делает Hyper-V в плане поддержки Linux неконкурентоспособным гипервизором по сравнению с VirtualBox и VMware – доступ к виртуальной машине даже 2-го поколения только в рамках обычного ограниченного подключения. В терминологии самого Hyper-V — базового сеанса. Тогда как VirtualBox и VMware в среде хостовой Windows позволяют полноценно взаимодействовать с гостевой Linux за счёт внедрения в неё дополнений.
Расширенное подключение по протоколу RDP
Обычное подключение к виртуальной машине (базовый сеанс) заточено под максимальную выжимку производительности, но имеет ряд ограничений:
- Разрешение экрана машины только 1024х768, его нельзя изменить, можно только масштабировать с потерей качества изображения;
- Отсутствие звука;
- Односторонний буфер обмена для текста, работающий по направлению из хост-системы в гостевую.
Расширенное подключение к виртуальной машине (расширенный сеанс) осуществляется посредством протокола Microsoft RDP для подключения к удалённому рабочему столу. И вот он уже предлагает полноценное взаимодействие с гостевой ОС:
- Выбор любого разрешения экрана, включая поддерживаемое монитором в среде хост-системы;
- Поддержку двух и более мониторов;
- Двусторонний буфер обмена текстом и файлами;
- Поддержку звука, принтеров, разделов диска и внешних носителей, прочих устройств, отображаемых в хост-системе.
Использовать расширенное подключение можно только для машин с гостевыми Windows 8.1 и 10. Для Windows 7 (в редакциях не ниже Pro) необходимо внутри гостевой ОС разрешать удалённые подключения.
И подключаться к ней по RDP из среды хост-системы.
По этому же принципу можно подключаться по протоколу RDP к гостевым Linux. Только в таковые предварительно необходимо внедрить сервер, поддерживающий протокол Microsoft RDP. Таким сервером является программное обеспечение XRDP. Внедрить его в пару кликов юзабильным способом не получится, без годного мануала здесь не обойтись никак. И вот Microsoft берёт на себя все эти хлопоты: компания предлагает нам готовое решение — установку Ubuntu со встроенным сервером XRDP. С помощью которого можно полноценно работать с гостевой Ubuntu в расширенном сеансе. Более того, такое готовое решение предлагается в рамках упрощённого формата создания виртуальных машин.
Упрощённый формат создания виртуальных машин
Упрощённый формат создания виртуальных машин появился в Hyper-V после того, как «Десятка» обновилась до версии 1709. Изначально этот процесс предусматривал просто упрощённую процедуру создания машин с гостевыми Windows — лишённую пошагового мастера с детализацией параметров. В упрощённом формате виртуальные компоненты задаются автоматически, исходя из оптимального распределения физических ресурсов компьютера. В этом формате Hyper-V даже научился автоматически создавать виртуальный коммутатор, он же сетевой адаптер. Позже Microsoft, очевидно, позаимствовав идею у Parallels Desktop, добавила в такой упрощённый формат ещё и поставку дистрибутива гостевой ОС.
Удобно ведь: в едином процессе и дистрибутив с Интернета подгружается, и машина с оптимальными настройками создаётся. Правда, платить за такое удобство придётся захламлённостью папки «Temp» в каталоге «AppData» — именно туда без вариантов Hyper-V качает файлы установки гостевых ОС. И таких гостевых ОС на данный момент две:
- Среда разработки Windows 10 – ознакомительная 90-дневная редакция Enterprise с предустановленными компонентами для разработчиков;
- Linux Ubuntu 18.04.1 LTS – стабильная версия с долгосрочной поддержкой (в течение 5 лет с даты релиза).
Ну а теперь к делу. В консоли Hyper-V жмём «Быстро создать».
Выбираем Ubuntu 18.04.1 LTS. Можем заглянуть в дополнительные параметры.
Здесь по умолчанию заданы имя виртуальной машины и коммутатор (сетевой адаптер). И только их можно изменить. Путь размещения файлов машины на диске в упрощённом формате выбрать нельзя, будет тот, что указан в общих настройках Hyper-V. Но после создания машины при необходимости её можно будет перенести в указанное место. В итоге жмём «Создать виртуальную машину».
Ожидаем, пока скачается дистрибутив Ubuntu.
Он скачался, машина создалась, можем посмотреть её параметры. И при необходимости что-то изменить.
Убирать галочку с безопасной загрузки, кстати, не нужно. Она должна быть убрана по умолчанию, Microsoft этот момент учла. При желании можем переместить файлы машины куда нужно на диске.
И, собственно, можем включать.
Установка Ubuntu
При включении машины увидим этап выбора региональных настроек Ubuntu. Выбираем язык.
Далее — раскладку клавиатуры.
Локацию.
Создаём профиль. В графу «Your Name» вводим своё имя. Имя компьютера и имя пользователя в графе «Pic a username» подтянутся автоматически, но последнее можно подкорректировать и установить минимальное значение. Поскольку его вместе с паролем придётся постоянно вводить вручную при подключении по RDP. В расчёте на работу с RDP нельзя выбирать автоматический вход в систему – «Log in automatically». Необходимо оставить значение по умолчанию и каждый раз авторизоваться.
Далее пару минут система будет настраиваться.
И как только всё будет готово, окно расширенного подключения по RDP само появится.
Подключение по RDP
В окошке запуска расширенного сеанса выбираем разрешение экрана и нажимаем «Подключить».
Вводим имя пользователя и пароль в форму авторизации XRDP.
Важно: окно авторизации XRDP не предусматривает возможность смены раскладки клавиатуры. Англоязычная раскладка, которая нужна для ввода данных авторизации латиницей, должна быть установлена (!) в хост-системе.
И переключиться на английскую раскладку необходимо до запуска окна XRDP. Если в хост-системе установлена русская раскладка, в форме авторизации XRDP жмём «Cancel». Меняем раскладку на английскую. Повторно подключаемся.
Ну и сможем уже работать с Ubuntu.
Русификация Ubuntu
Дистрибутив Ubuntu со встроенным XRDP Microsoft поставляет только с англоязычной локализацией. Потому в настройках системы необходимо внедрить русскоязычный пакет локализации. Как это делается, подробно описано на официальном сайте системы, это сразу же первая позиция выдачи в поисковиках по запросу «Ubuntu русификация».
Проблемы
Реализация поставки компанией Microsoft дистрибутива Ubuntu со встроенным XRDP для Hyper-V – молодой проект, соответственно, сырой. Гостевая Ubuntu на данный момент не поддерживает звук, возможны проблемы с подключением сети и доступом по RDP. С жалобами пользователей и реакцией на них сотрудников Microsoft можно ознакомиться на официальном блоге компании:
https://blogs.windows.com/buildingapps/2018/09/17/run-ubuntu-virtual-machines-made-even-easier-with-hyper-v-quick-create/