This tutorial will describe how you can join machines that run Linux Mint 17.1 OS to Windows 2012 Active Directory Domain Controller in order to authenticate remote accounts from AD back end identity provider to local Linux workstations with the help of SSSD service and Realmd system DBus service.
The System Security Services Daemon (SSSD) is a relative new service which provides cross-domain compatible methods for Active Directory users to authenticate to local machines using a combination of usernames and domain back end name to create the login identity, even if the Domain Controller goes offline (SSSD caches credentials).
REQUIREMENTS
- Windows Server 2012 configured as an Active Directory Domain Controller
- A Linux Mint 17.1 client machine which will be integrated to Windows PDC
Domain Settings:
- Domain Name:
caezsar.lan - Windows Server 2012 AD FQDN:
server.caezsar.lan - Windows Server 2012 AD IP Address:
192.168.1.130 - Linux Mint Hostname:
mint-desktop - Linux Mint IP Address: automatically assigned by DHCP
- Linux Mint first DNS IP Address: Manually assigned to point to AD PDC –
192.168.1.130
STEP ONE – Linux Mint Network Configuration
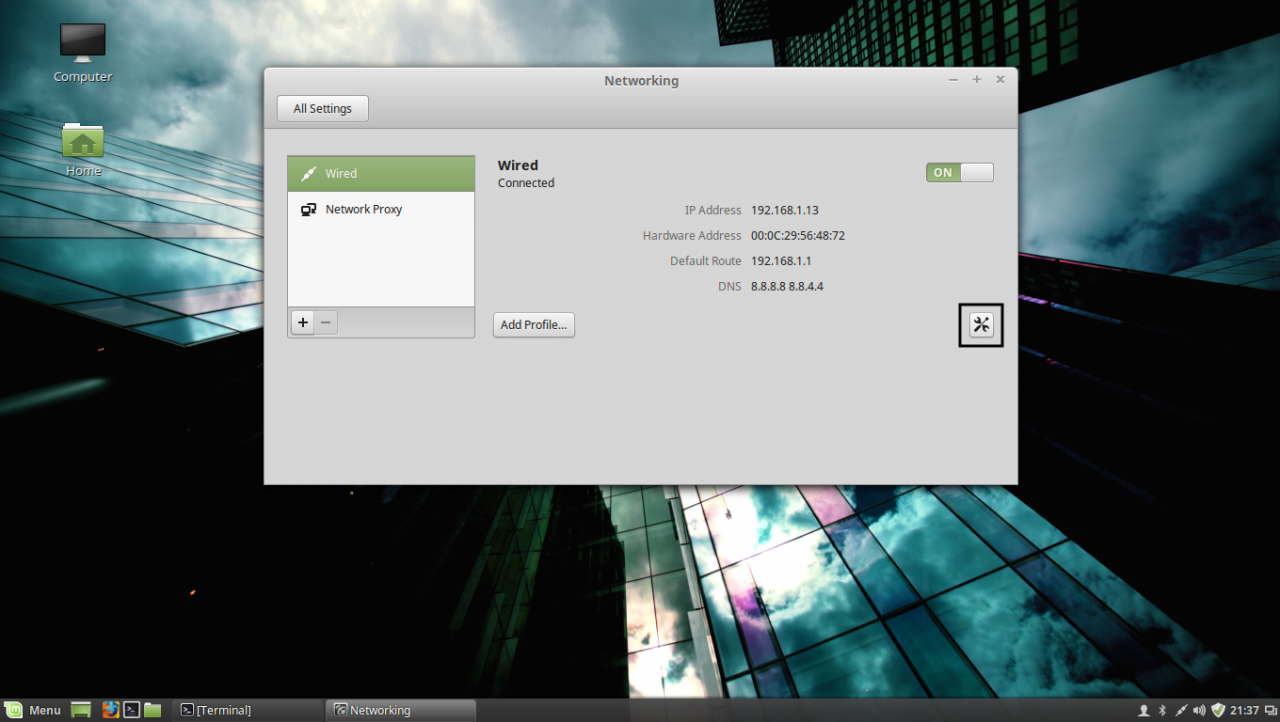
1. Before starting with installing the required services in order to integrate the local machine to the PDC Server, first we need to assure that Windows Domain Controller is reachable through DNS resolution on Linux Mint host by adding the DNS PDC IP Address on our Network Configuration. To achieve this goal, first open Network Settings, go to the Network Interface Card (in this case is the Wired Connection, but you can use a Wireless Connection also), open it for editing (hit the settings icon from bottom right) and add your PDC IP Address on IPv4 DNS filed (switch Automatic DNS to OFF) as illustrated in the following screenshots:
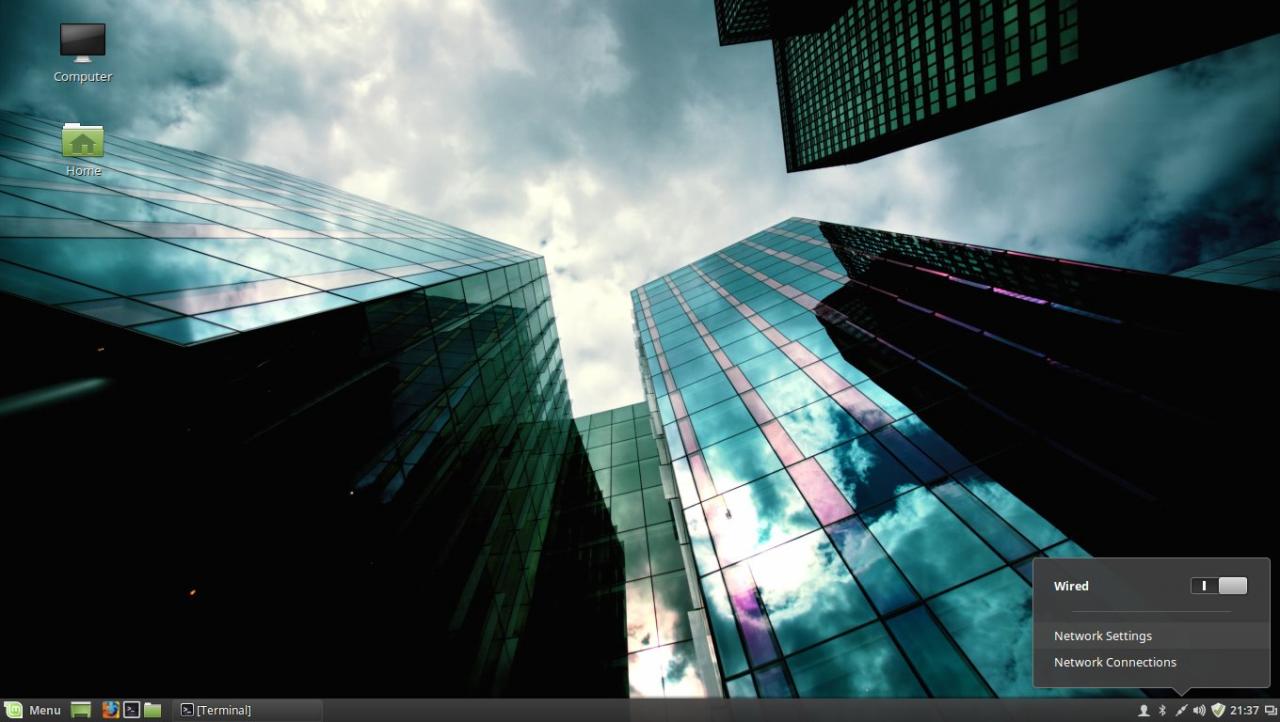
network settings
edit network interface settings
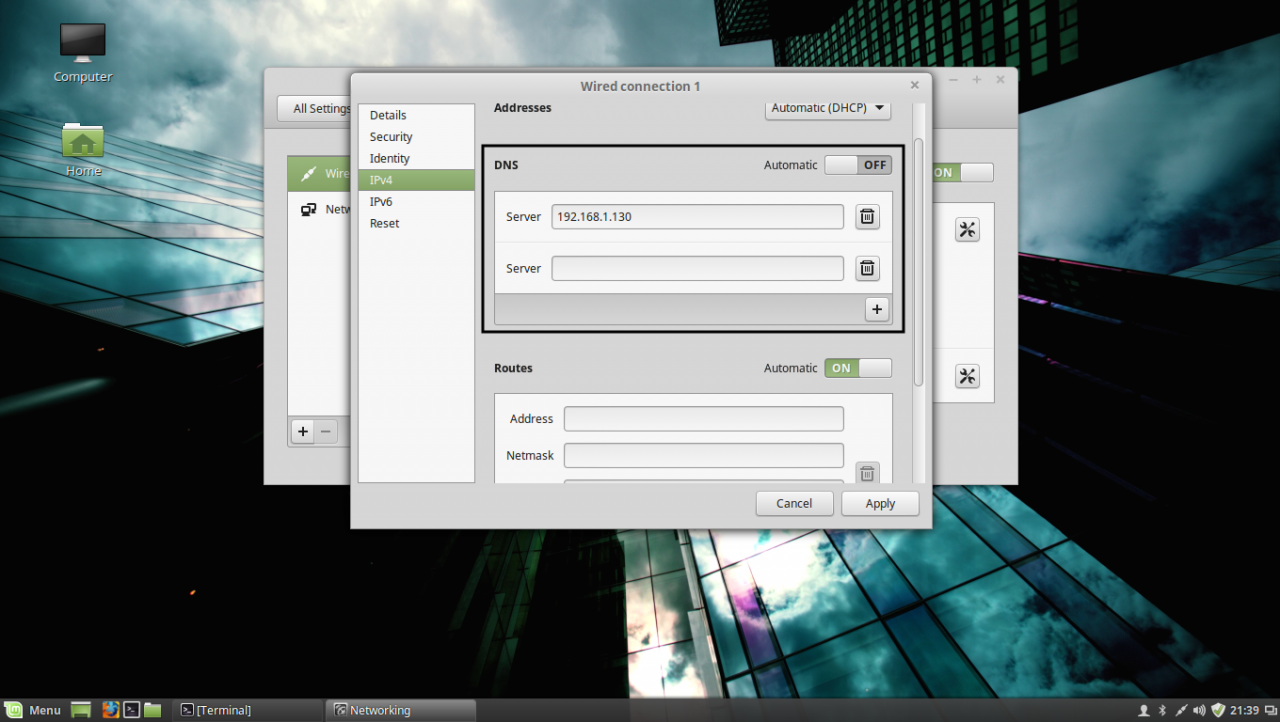
add DNS IP Address
If multiple Domain Controllers machines exists on your network then you can also add their IP Addresses on IPv4 DNS settings fields.
2. After you’re done, hit on Apply button and switch the edited Network Interface from ON to OFF and then back to ON in order to apply the new settings. After the network interface is started again, open a Terminal console and issue a ping command against your PDC domain name in order to verify if the settings are successfully applied and the domain name responds with the correct IP Address and FQDN of the PDC.
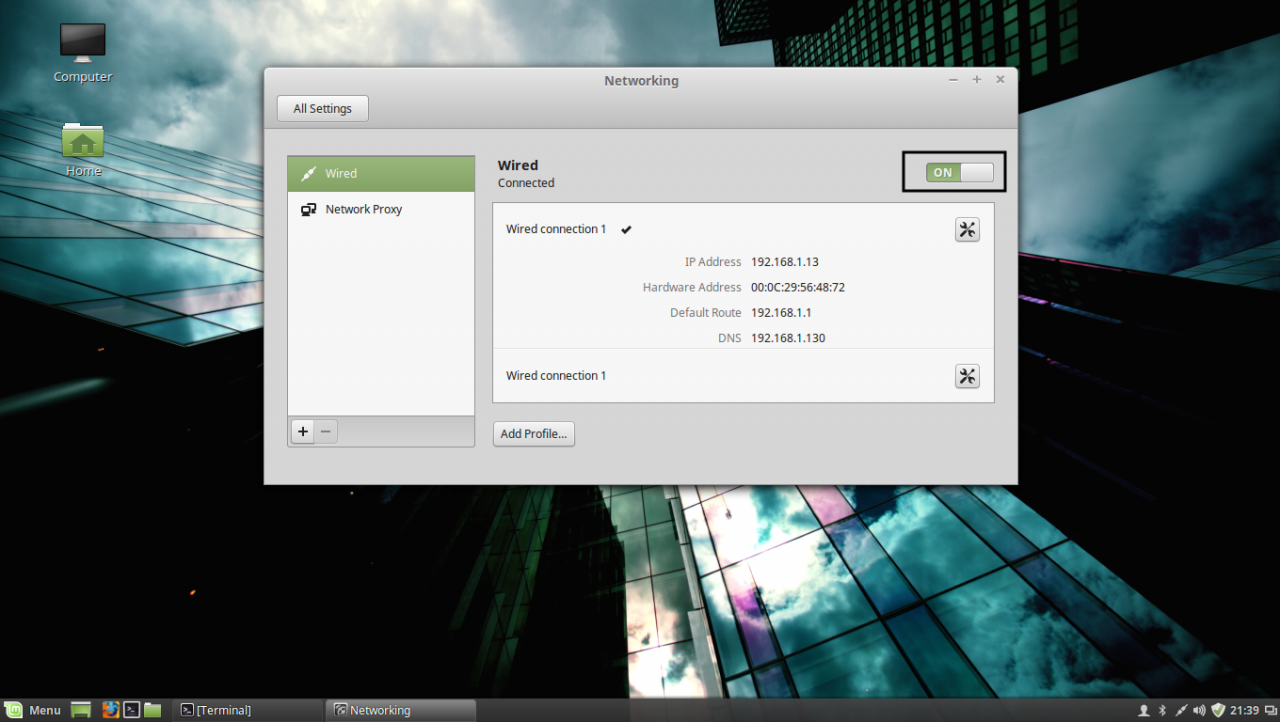
apply network settings
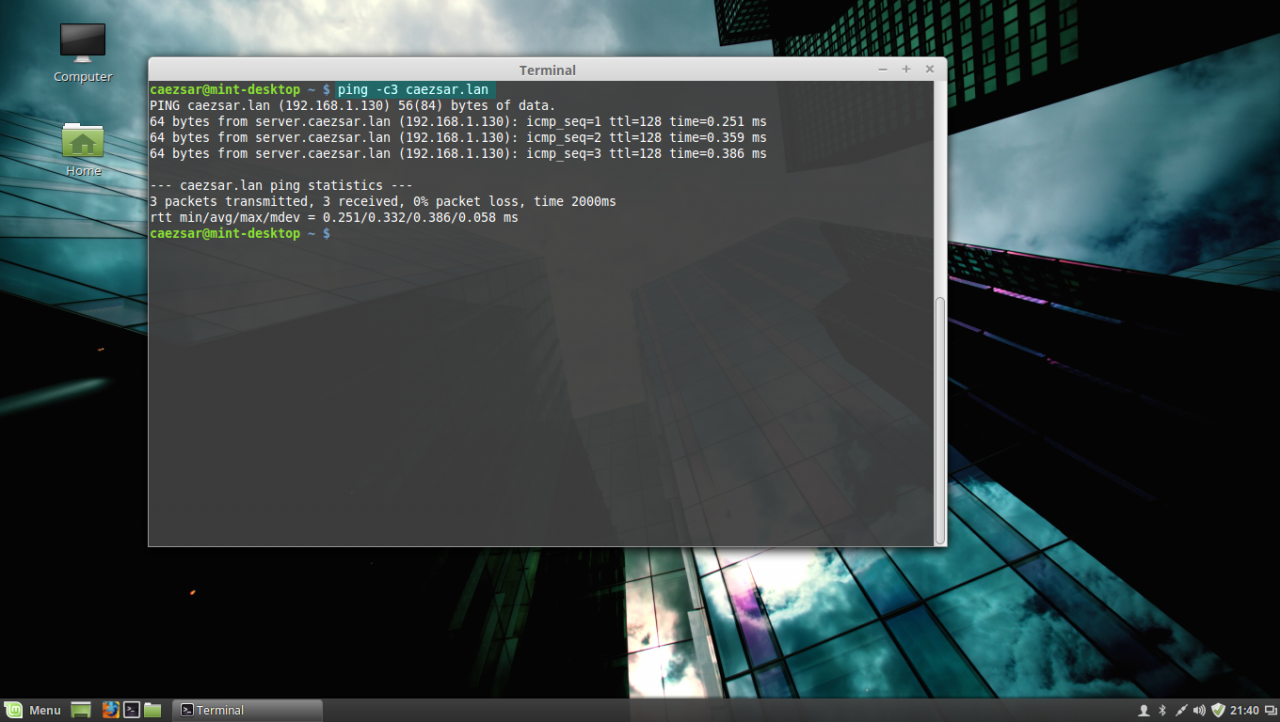
ping domain controller
If you want to avoid all this manual settings, then configure a DHCP server at your premises to automatically assign network settings, especially DNS entries, that will point to your Windows PDC IP Addresses needed for DNS resolution in order to reach the AD PDC.
STEP TWO – Install Required Software Packages
As presented at the beginning of this tutorial, in order to integrate a Linux Mint machine to an Active Directory Domain Controller you need to install the SSSD service along with the following software packages and dependency:
– SSSD service (responsible with back end realm authentication) with the following dependencies: sssd-tools (optional, but useful for sssd cache, user and groups manipulation), libpam-sss (PAM modules for local authentication) and libnss-sss (NSS modules for local DNS resolution)
– Realmd (system DBus service which manages domain integration and local resources permissions)
– The following Samba Modules: samba-common-bin and samba-libs (File sharing compatibility between Windows and Linux machines)
– Krb5-user (Client network authentication and communication with the PDC server)
– ADcli (Tools for joining domain and perform other actions on an AD)
– PackageKit (Linux cross-platform packages management for interoperabillity and user privileges for software installations)
3. Now, let’s start installing the above enumerated packages by opening a Terminal console on Linux Mint and issuing the following commands with sudo privileges:
First install Realmd and SSSD service:
sudo apt-get install realmd sssd sssd-tools libpam-sss libnss-sss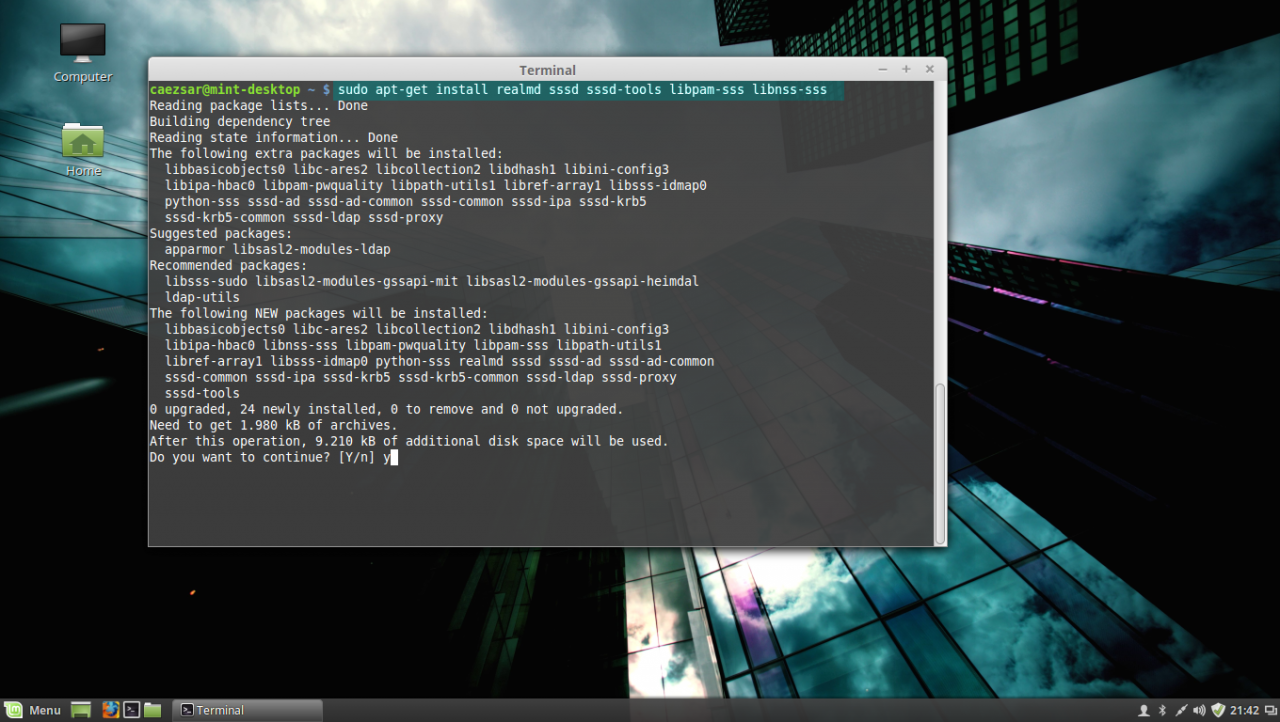
install realmd and sssd service
4. Next install Samba modules (by default this modules might be already installed on your system):
sudo apt-get install samba-libs samba-common-bin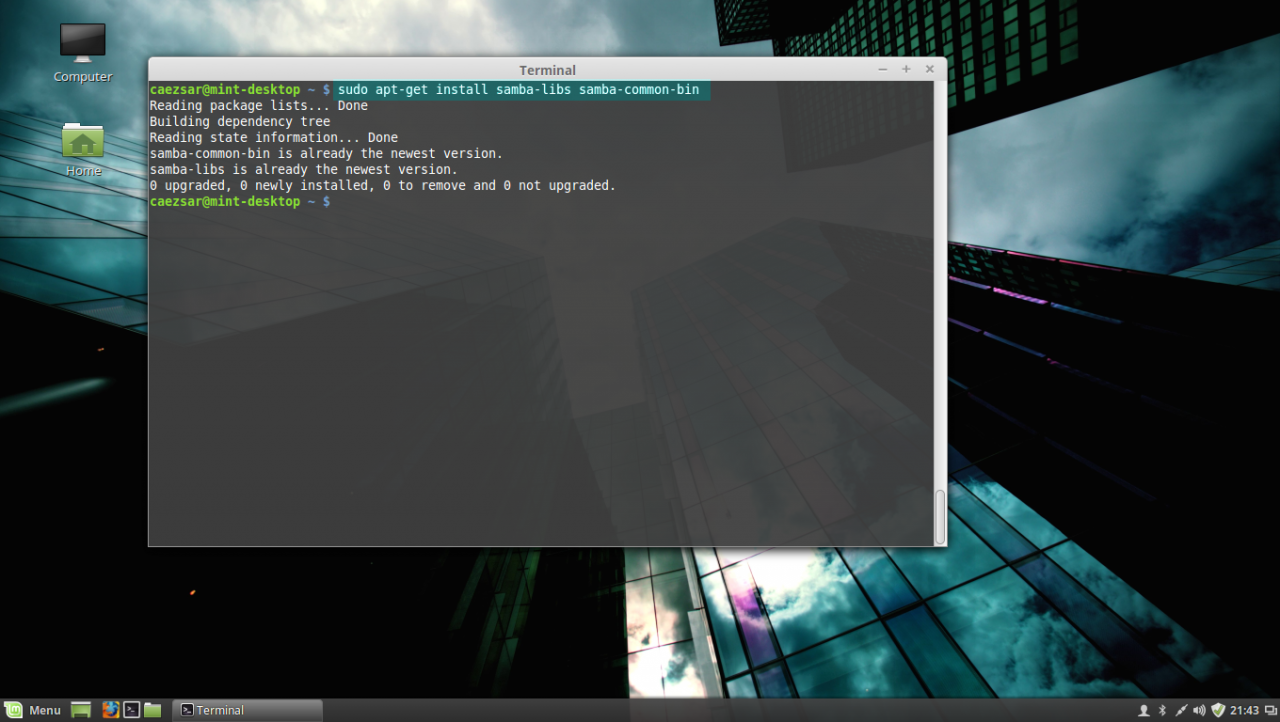
install samba modules
5. Last, install the other remained packages: krb5-user, adcli and packagekit. On krb5-user package, the installer will prompt you to enter the realm that will be used for Kerberos authentication. Use the name of the domain configured for your PDC with UPPERCASE (in this case the domain is CAEZSAR.LAN), then hit Enter key to continue further with the installation packages.
sudo apt-get install krb5-user adcli packagekit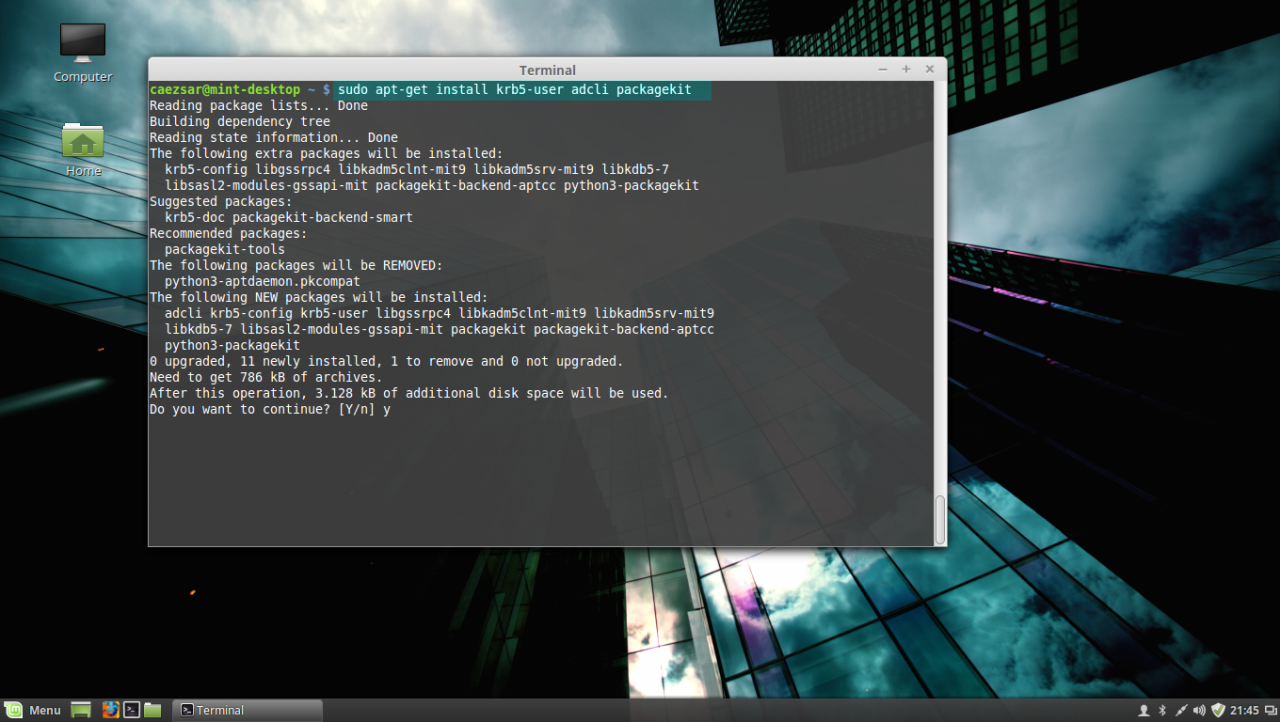
install kerberos, adcli and packagekit packages
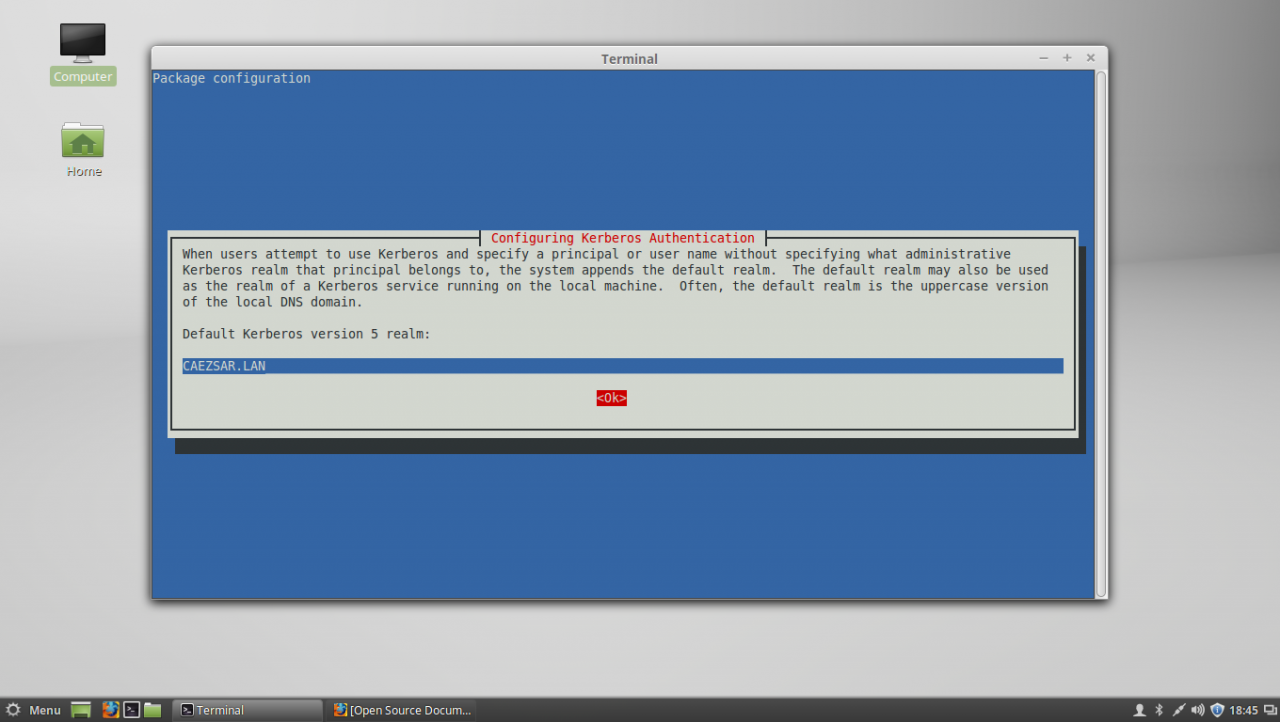
Configure Kerberos realm
STEP THREE – Edit Configuration Files for SSSD, Realmd and PAM
6. Next step before starting joining Linux Mint to Windows Server AD PDC is to configure the local services for AD network authentication. By default the SSSD service has no configuration file defined on /etc/sssd/ path. In order to create a default configuration file for SSSD service, issue the following command to create and simultaneous edit the file:
sudo nano /etc/sssd/sssd.confSSSD configuration file excerpt:
[nss]
filter_groups = root
filter_users = root
reconnection_retries = 3

[pam]
reconnection_retries = 3

[sssd]
domains = CAEZSAR.LAN
config_file_version = 2
services = nss, pam

[domain/CAEZSAR.LAN]
ad_domain = CAEZSAR.LAN
krb5_realm = CAEZSAR.LAN
realmd_tags = manages-system joined-with-adcli
cache_credentials = True
id_provider = ad
krb5_store_password_if_offline = True
default_shell = /bin/bash
ldap_id_mapping = True
use_fully_qualified_names = False
fallback_homedir = /home/%d/%u
access_provider = ad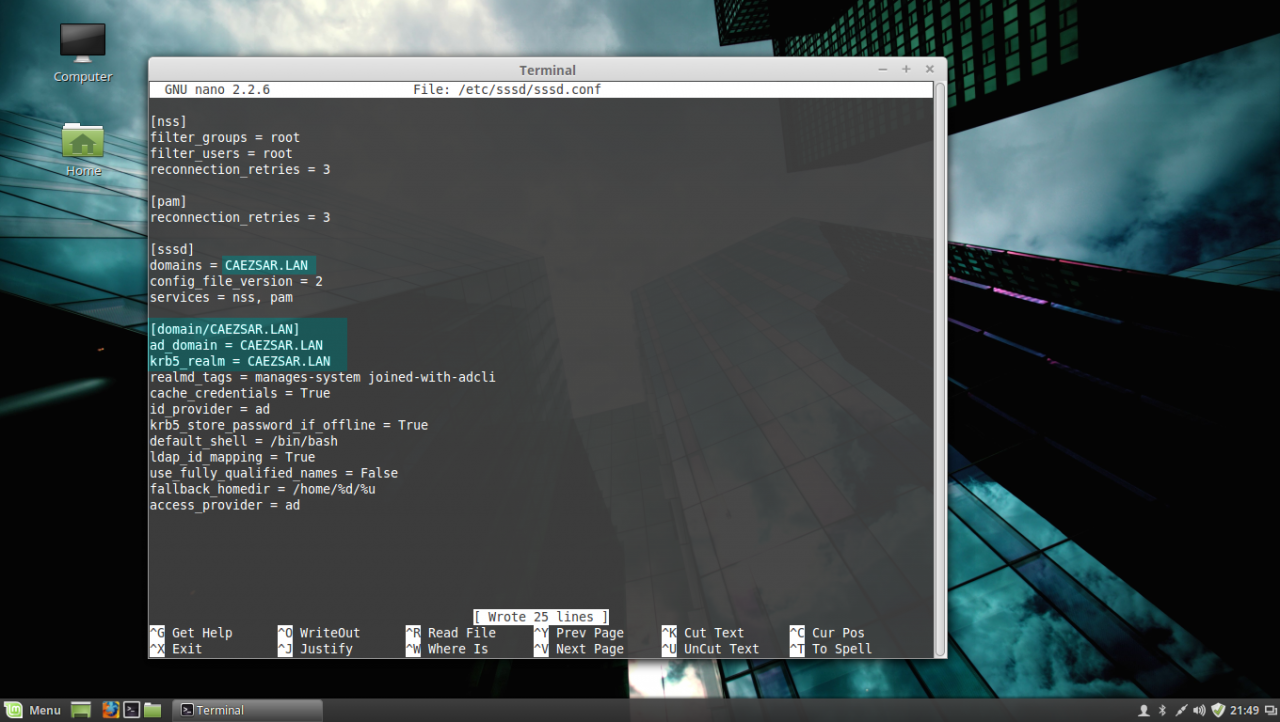
sssd configuration file
While editing the file make sure you replace domains, [domain/], ad_domain and krb5_realm parameters accordingly. Use the UPPERCASES as the above file excerpt suggests.
The fallback_homedir = /home/%d/%u parameter will cause the system to create home directories for all domain logged in users with the following path: /home/domain_name/domain_user, so practically all your domain users homes will be stored into a single directory named after your domain name on /home path. If you want to change this behavior so all domain users homes should be created as normal system users, /home/username, just remove %d variable and you’re done.
For other options and parameters concerning sssd.conf file run man sssd command.
After you finish editing the file, save it with CTRL+O , close it with CTRL+X and proceed further with the below instructions.
7. The next step is to create and edit a configuration file for Realmd in order to avoid some eventual package dependency problems by issuing the following command:
sudo nano /etc/realmd.confUse the following configurations for realmd file:
[service]

automatic-install = no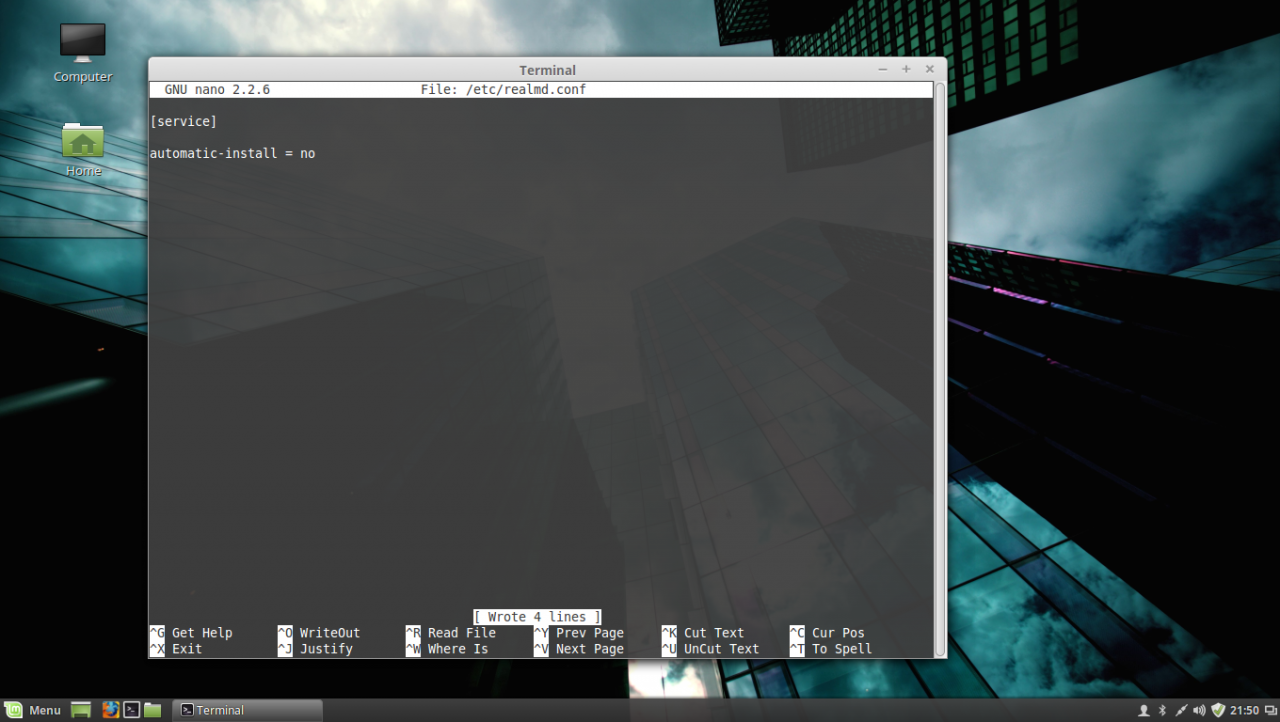
realmd conf file
After you add the above lines, save the file and close it.
8. The last file that you need to edit before joining the domain is the common-session PAM file. So, open this file for editing by running the below command and add the following line after the session optional pam_sss.so line in order for the system to automatically create home directories for the new authenticated AD users .
sudo nano /etc/pam.d/common-sessionAdd the following line as presented on the below screenshot:
session optional pam_mkhomedir.so skel = /etc/skel/ mask=0077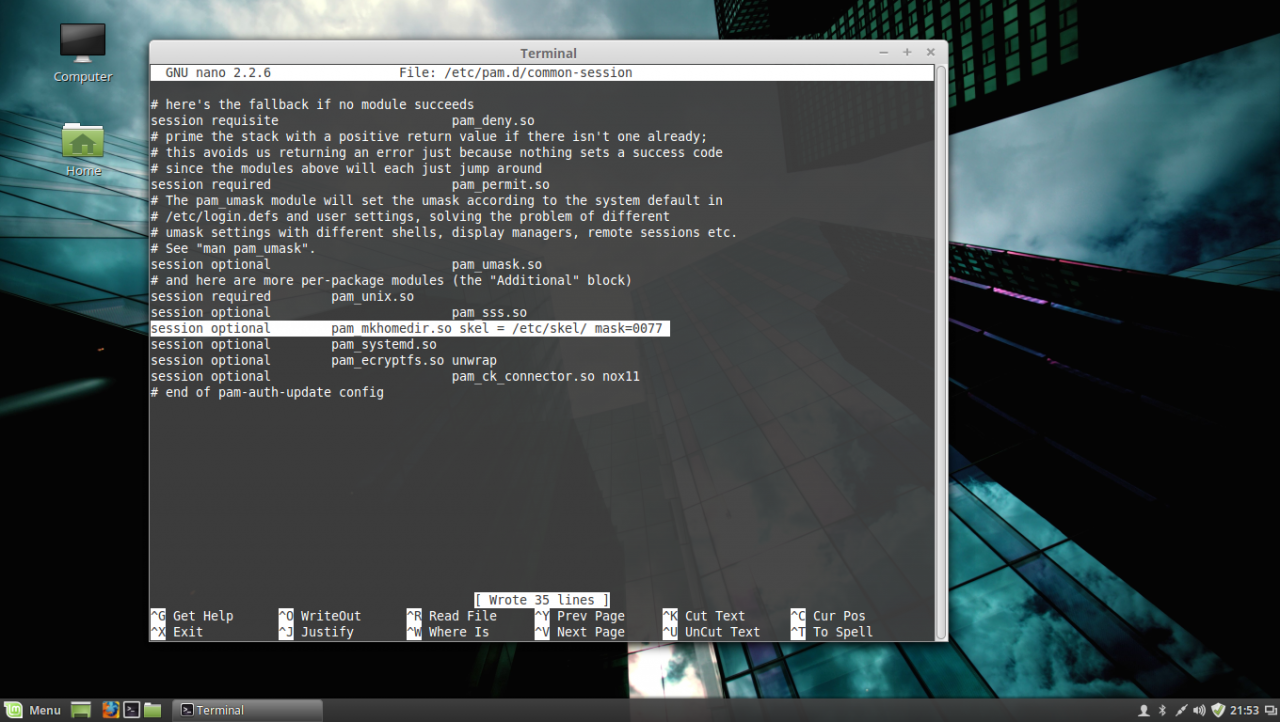
PAM common-session file
After you have edited the file, save it and close it, and proceed to the next step in order to make Linux Mint a part of the Windows Domain Controller.
STEP FOUR – Join Linux Mint to Windows Server 2012 Active Directory Domain Controller
9. Before joining the Linux Mint client to Windows PDC, first issue the discovery command against your domain name in order to view the complete realm configurations and a package list of software that must be installed on the client machine before you enroll it in the realm.
sudo realm discover domain.tld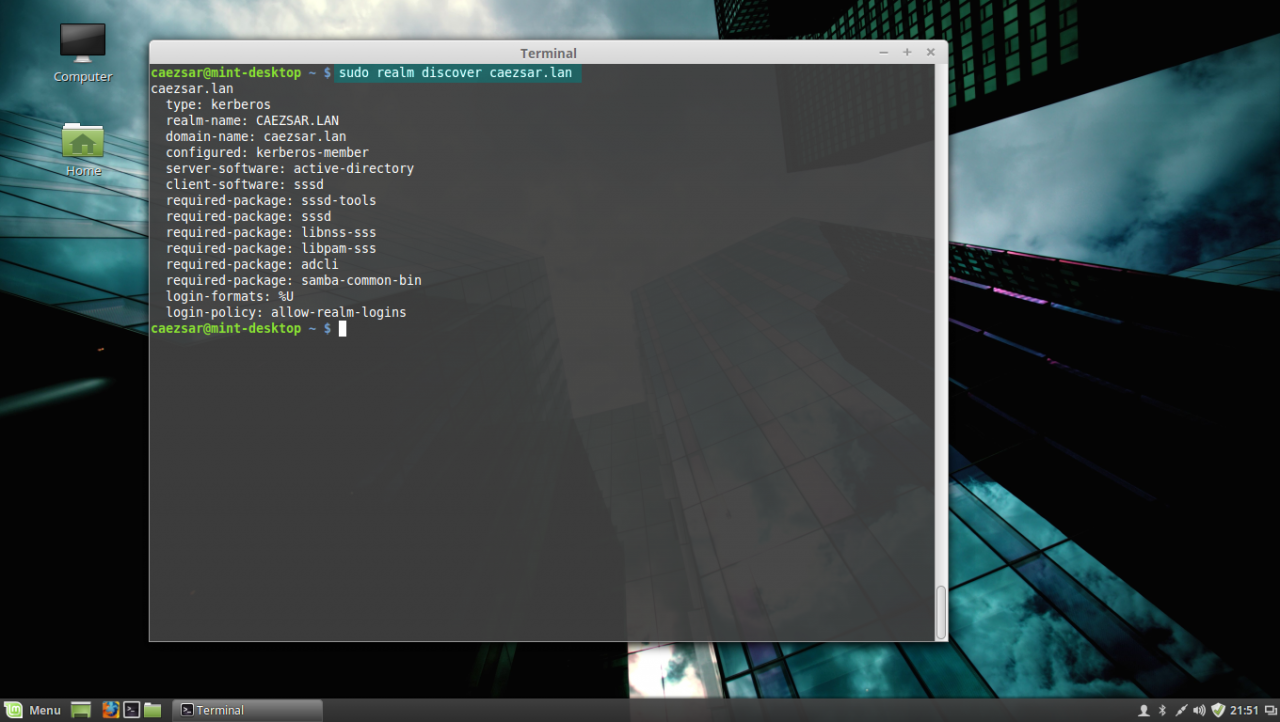
realm discover domain
10. If everything is correctly setup at the client side and the domain controller responds, issue the following command in order to integrate Linux Mint client machine to Windows Server 2012 AD PDC.
sudo realm join domain.tld -U domain_administrator --verbose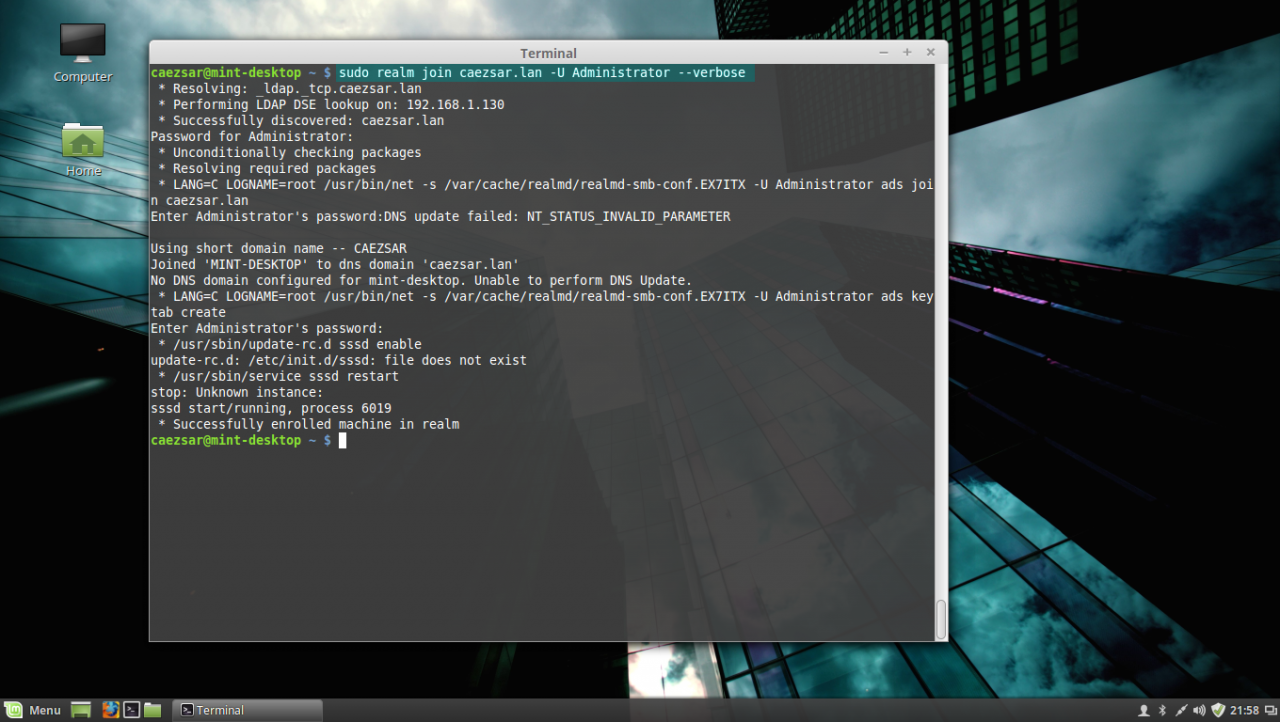
join AD domain
Use the -U option to specify an Active Directory administrative user with privileges to add machines on the server and the --verbose option to get debug output in case something goes wrong with the integration process.
Once the command returns successfully status and ads Linux Mint to AD you can use the sudo realm list command to view full details and the default configurations for your domain.

list realm
To manage sssd service use the following command switches (you don’t need to manually start the sssd service because it’s automatically started by the realmd when the machine is enrolled to realm):
sudo service sssd status|start|stop11. To check if the machine appears on the Domain Controller, go to your Windows Server 2012, open Active Directory Users and Computers utility and search your Linux Mint hostname.
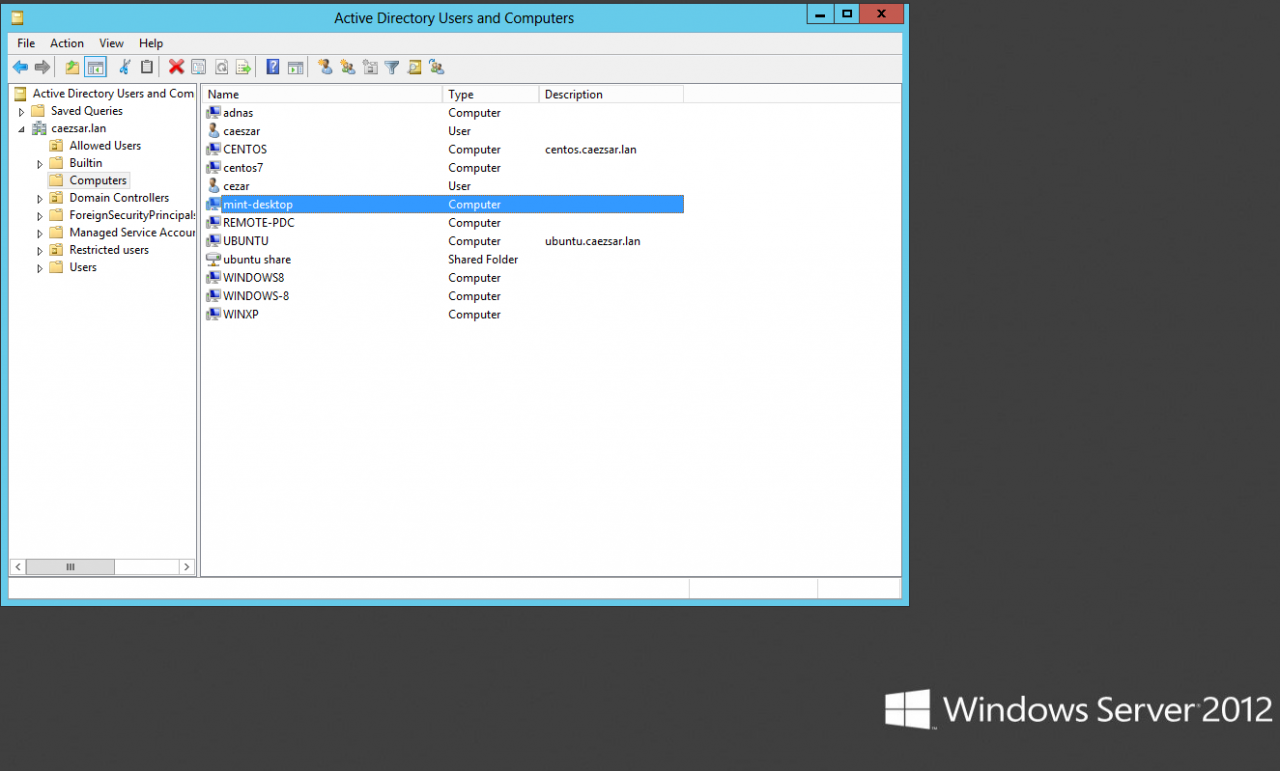
Active Directory Users and Computers
STEP FIVE – Log In on Linux Mint with Active Directory Accounts
12. To authenticate on Linux Mint with and an Active Directory user, first you need to add a permit rule on local policies in order to grant access for all realm users on local machine, by issuing the following command:
sudo realm permit --allTo grant access just for a specific AD user or group use the following command syntax:
sudo realm permit -u AD_usernamesudo realm permit -g AD_groupTo withdraw access for a user use the command with --x switch:
sudo realm permit domain --x domain\AD_username13. To perform Terminal console command line authentications on Linux Mint host with an Active Directory account, use double backslashes to escape the backslash which separates the domain string from user, as shown in the below syntax (you can append the dot domain or use just the domain string):
su - domain.tld\\AD_usernameor
su - domain\\AD_username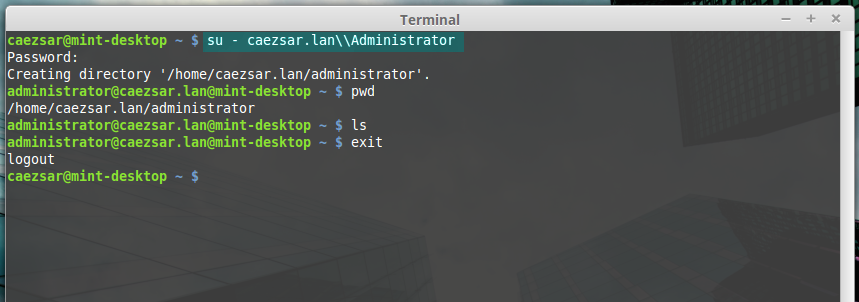
AD user login
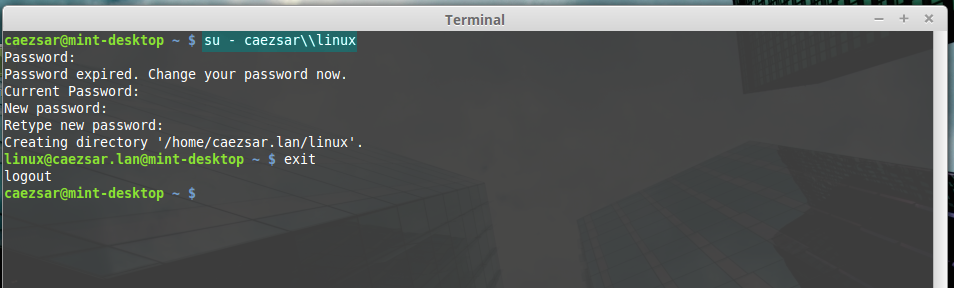
ad user login without dot domain
14. To log in with an AD account on Linux using Putty or to perform Linux Mint MDM GUI logins use the following syntax:
domain\AD_username

domain.tld\AD_username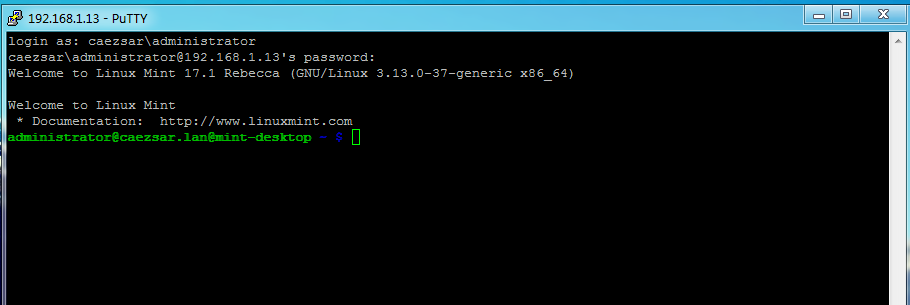
AD user Putty login
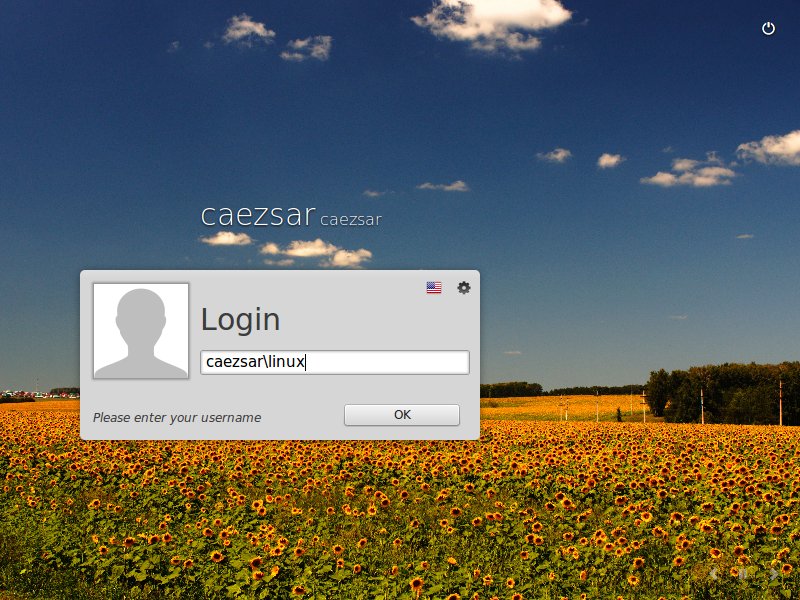
Ad user GUI login
15. In case you have issues with AD users authentication on Linux Mint Logon Screen, log in with a local user account and change the Login Window Theme from an HTML theme to a GDM theme, log out, hit Escape key is case the last logged in user appears on username Login filed and continue the authentication process with a AD account as presented above.
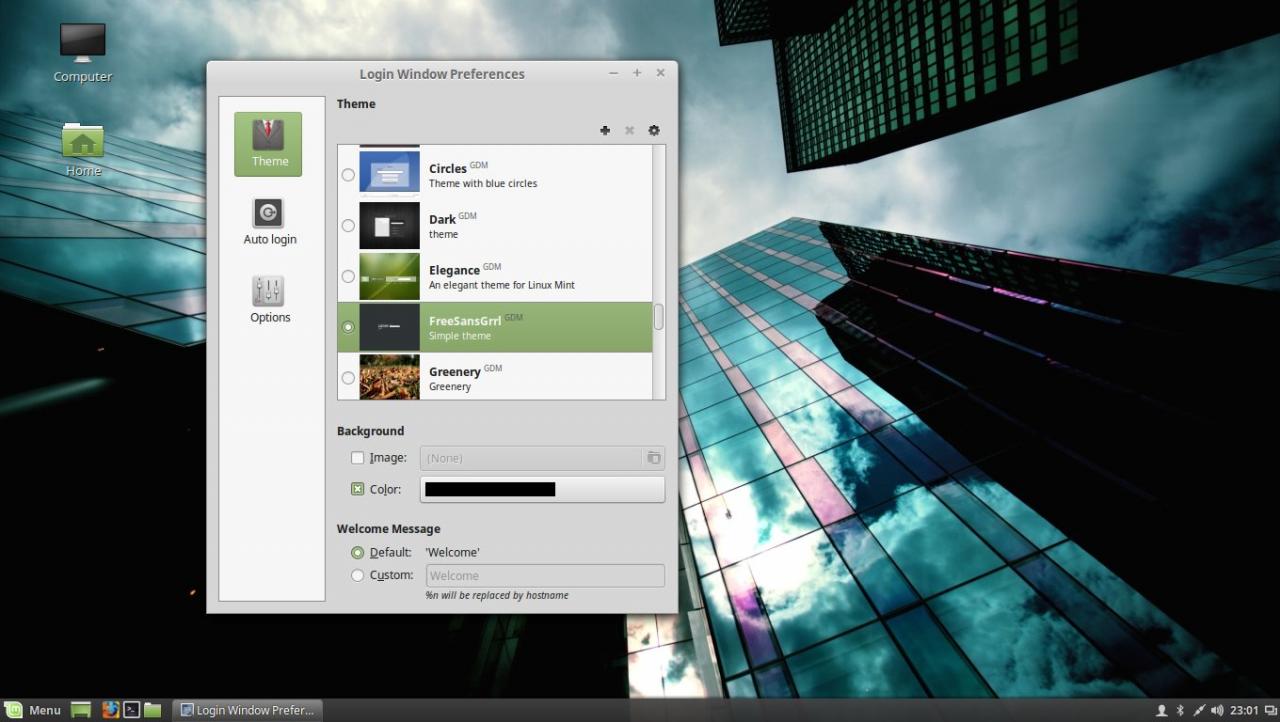
Use GDM theme

GDM login screen
STEP SIX – Add Root Permissions to AD Domain Admins Users
16. In case you want to allow all Active Directory Domain Admins to have full administrative permissions in order to execute any command with root privileges on the Linux Mint machine, open the local sudoers file for editing and add the following line:
sudo nano /etc/sudoersor
sudo visudoAdd this line after %sudo line:
%domain\ admins@domain.tld ALL=(ALL) ALL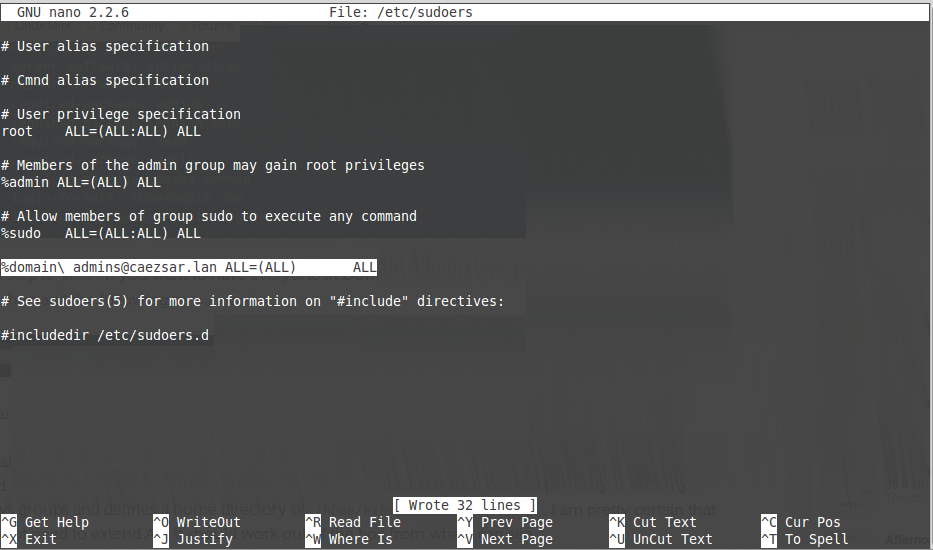
add domain admins root privileges
17. In case you don’t want your Linux Mint machine to be a part of the domain anymore, issue the following command to leave the domain:
sudo realm leave domain.tld -U AD_admin_user --verbose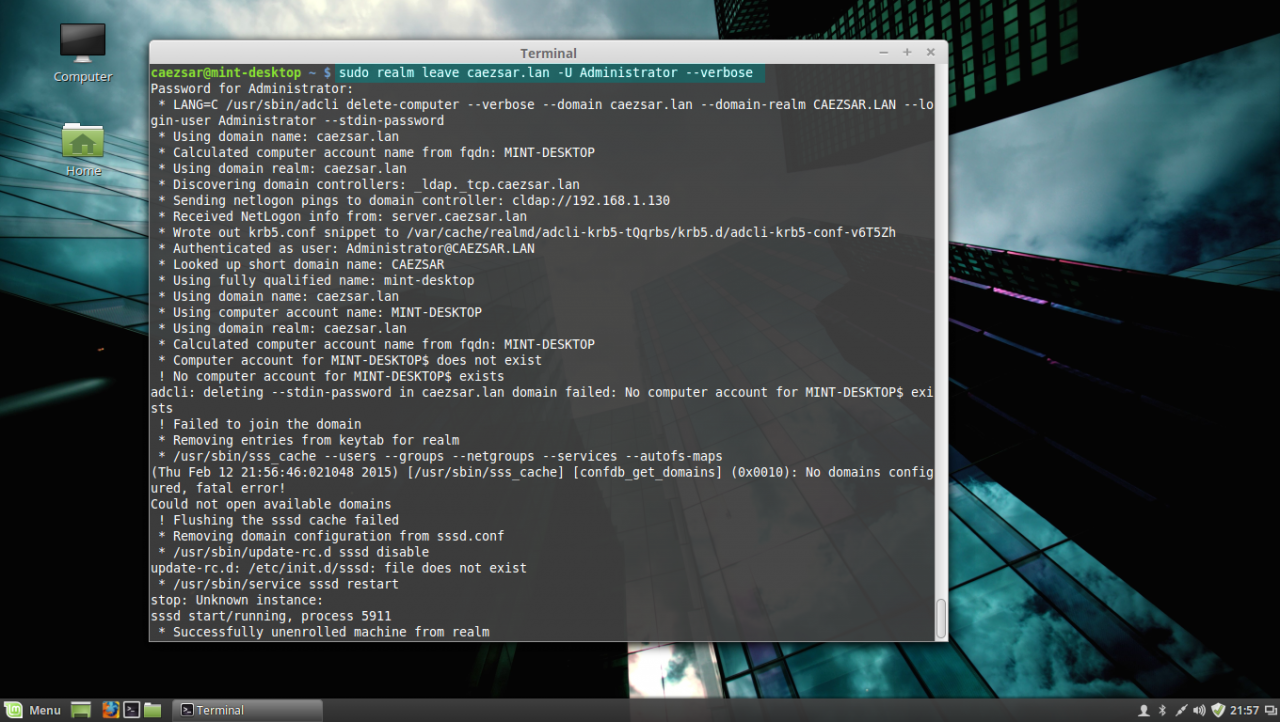
leave AD PDC
That’s all! Now, the machine running Linux Mint 17.1 is integrated as a part of Windows Active Directory Domain Controller and can successfully replace your old Windows XP machine, for which Microsoft has stopped its support, but keep in mind that some features and, especially, a huge part of Active Directory Group Policy, don’t apply on Linux systems.
TL;DR
Here are all the steps needed to add your Linux Mint computer to a Windows Active Directory Domain. For more detail, and explanation, please read The Rest of the Story.
|
|
Restart your computer, then edit krb5.conf.
|
|
|
|
Edit realmd.conf.
|
|
|
|
Edit timesyncd.conf.
|
|
|
|
|
|
Discover the realm you want to join.
|
|
Test your credentials.
|
|
Join the Active Directory Domain.
|
|
Edit sssd.conf.
|
|
|
|
Restart the SSSD Service.
|
|
Finally, update your login screen.
Restart your computer, and you should able to log in using your Active Directory Credentials.
Update 8/30/2019: Click here to see some optional, final steps you could take.
The Rest of the Story
I work for a “Windows Shop”, or “.Net Shop”. Call it what you like, but it boils down to no Linux to be found. Fortunately, my work environment is flexible, so I decided to take on the challenge to put Linux only on my work laptop, and get it up and running.
Things like snaps have been extremely helpful in getting the software I need on my machine, and LibreOffice has come a long way. Everything else, like Office 365 for email, just needs a web browser. And in case I run into any edge cases, I do have Windows 10 on a VirtualBox image, but all that is outside of the scope of this article.
My very first step to tackle was Windows Active Directory Integration with a Linux machine; I needed to be able to use my Active Directory credentials to log into my Linux laptop.
Spoiler alert. I got it to work!  And I’m very excited to be able to use Linux at home and now at work!
Read on to see how I did it.
Steps Toward Awesome
First, I would like to give credit where credit is due. This article was extremely helpful in guiding me in getting everything set up.
Step 0: Install the Needed Packages
Open up your terminal, and enter the text below to get the needed packages installed.
|
|
The krb5-user package will prompt for the Active Directory “realm”, and you’ll want to enter your realm in all CAPS.

After I installed the packages, I went ahead and restarted my machine.
Step 1: Edit Your krb5.conf File
Start by opening krb5.conf:
|
|
You can replace the contents of the current file with the text below.
Note: Values inside the double brackets (i.e. — [[value]]), need to be replaced with the correct values for your environment. Replace the value, and additionally, remove the double brackets. (i.e. — domain = [[my-domain.com]] –> domain = awesome.com)
|
|
To finish up this step, run:
Step 2: Edit Your realmd.conf File
Now open up your realmd.conf file.
|
|
Copy and paste the text below into the file. You can of course replace the values for “os-name” and “os-version”.
|
|
Step 3: Edit Your timesyncd.conf File
You should be used to editing files by now in this tutorial, so here we go again. Open up your terminal, and enter the text below.
|
|
All you need to do is change the “NTP” value to the address of your local Network Time Protocol (NTP) Server. You may have to ask your Network Administrator for the server address, and if you are the Network Administrator, I hope you know the address of your NTP Server 
|
|
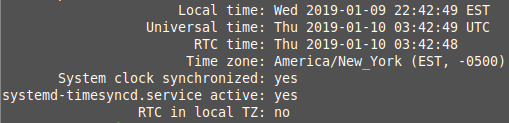
Now you’ll need to update your local network time. Your local computer time needs to be within five minutes of the Kerberos (authentication) Server. So the clock times need to match, or you won’t be able to log in.
You’ll need to run the following commands in order to make sure your date and time are up-to-date.
|
|
Now you can check the status of your local date and time synchronization.
And your results should be similar to the screenshot below.
Step 4: Test Your Credentials
Even though your computer may not be bound to the Active Directory yet, you can now test your login credentials to make sure everything is set up correctly so far.
Run the command below.
|
|
Successful results should look similar to the output below.
|
|
You can now try to “test” your login credentials. Do that by running the commands below, and enter your Active Directory password when prompted.
You can verify that your login attempt worked by running this next command.
If that worked, your results should look similar to the screenshot below.

Be sure to destroy your Kerberos token when you’re done.
Step 5: Join the Active Directory Domain
Time to join your Active Directory. You’ll need a Network Administrator, or someone with a Network Admin username/password in order to get your computer joined to the Active Directory realm.
Enter the text below into your terminal, and don’t forget to replace the values in the double brackets (along with the brackets).
|
|
You’ll enter the Network Administrator username, and you’ll be prompted for the password.
|
|
After the Network Administrator password has been entered, the rest of the output should look similar to this:
|
|
Step 6: Edit Your sssd.conf File
Open up sssd.conf for editing
|
|
Copy and paste the text below into the file. Again, don’t forget to replace the values in the double brackets (along with the brackets).
|
|
Save the file, then close the text editor, and run the command below.
|
|
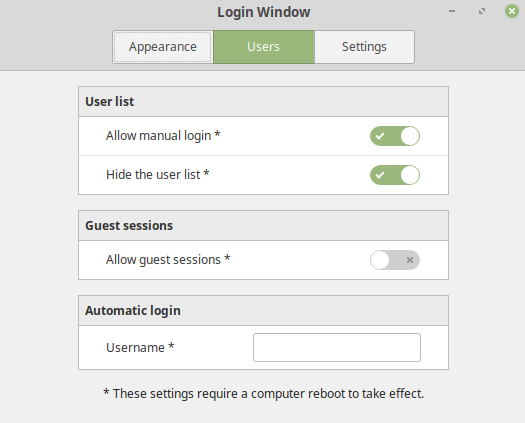
Step 7: Modify Your Login Window
And now for our last step. This is specific for Linux Mint.
Start by opening the Login Window settings, as seen in the screenshot below.

Now make sure you settings look like this:
Conclusion
Those are the steps. If anything is unclear, let me know in the comments below. Hope this is helpful
Update 8/30/2019
So this is an optional step that may not have to happen in every scenario. Upon logging in with your Active Directory User, you may discover that you do not have the rights to do anything. So, you will have to log in with a local administrator account, and add your domain account to the following groups by running these commands:
|
|
End of Line.
Для ввода LinuxMint в домен Windows нужно скачать и установить пакет от команды PowerBroker Open project (ранее называлась Likewise Open). На странице загрузки заполняем регистрационную форму и получаем на почту ссылку на скачивание пакетов. Если вам нужна демо версия с полным функционалом то нужно поставить галочку в самом низу формы регистрации. Меня полностью устраивает функционал бесплатной версии.
По ссылке полученной на почту заходим на страницу скачивания пакетов. Скачиваем последний стабильный релиз под свою битность ОС.

В терминале переходим в директорию в которую был закачан пакет(у меня это /home/michael) и выдаем ему права на выполнение, затем устанавливаем.
# cd /home/michael
# sudo chmod +x pbis-open-8.5.0.153.linux.x86_64.deb.sh
# sudo ./pbis-open-8.5.0.153.linux.x86_64.deb.sh
На все вопросы отвечаем ‘yes’. После установки откроется окно ввода компьютера в домен.
Нужно ввести имя компьютера и название домена. Повторно запустить окно ввода в домен можно командой.
# sudo /opt/pbis/bin/domainjoin-gui
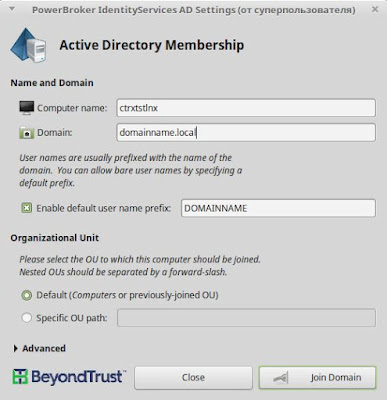
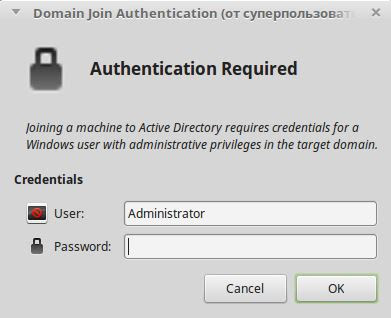
Нажать Join Domain и ввести учетные данные пользователя имеющего права на ввод в домен Windows в открывшемся окошке.
После ввода в домен нужно перезагрузить компьютер и можно входить с доменными учетными данными.
Как правильно задавать вопросы
Правильно сформулированный вопрос и его грамотное оформление способствует высокой вероятности получения достаточно содержательного и по существу ответа. Общая рекомендация по составлению тем: 1. Для начала воспользуйтесь поиском форума. 2. Укажите версию ОС вместе с разрядностью. Пример: LM 19.3 x64, LM Sarah x32 3. DE. Если вопрос касается двух, то через запятую. (xfce, KDE, cinnamon, mate) 4. Какое железо. (достаточно вывод inxi -Fxz в спойлере (как пользоваться спойлером смотрим здесь)) или же дать ссылку на hw-probe 5. Суть. Желательно с выводом консоли, логами. 6. Скрин. Просьба указывать 2, 3 и 4 независимо от того, имеет ли это отношение к вопросу или нет. Так же не забываем об общих правилах Как пример вот
-

alex_vag
- Сообщения: 8
- Зарегистрирован: 07 дек 2021, 09:14
- Контактная информация:
Ввод в домен
07 дек 2021, 09:31
Доброго времени суток.
Подскажите пожалуйста, как ввести Cinnamon в домен Windows?
Или может Mint лучше подходить для этих целей?
П.С. Очень желательно актуальные маны. Ибо полно устаревшей информации
-

WWolf
- Сообщения: 3661
- Зарегистрирован: 14 фев 2018, 00:51
- Решено: 27
- Откуда: Краснодар
- Благодарил (а): 1633 раза
- Поблагодарили: 1156 раз
- Контактная информация:

Ввод в домен
#2
07 дек 2021, 10:27
alex_vag писал(а): ↑
07 дек 2021, 09:31
Ибо полно устаревшей информации
что устарело?
-

rogoznik
- Сообщения: 9787
- Зарегистрирован: 27 июн 2017, 13:36
- Решено: 124
- Откуда: Нижний Тагил
- Благодарил (а): 759 раз
- Поблагодарили: 1897 раз
- Контактная информация:

Ввод в домен
#3
07 дек 2021, 10:46
alex_vag писал(а): ↑
07 дек 2021, 09:31
Cinnamon
Desktop Environment
alex_vag писал(а): ↑
07 дек 2021, 09:31
Mint
Дистрибутив(ОС)
DE в домен ввести не получится — т.к. это только пользовательское окружение
ОС — в домен ввести можно


-
alex_vag
- Сообщения: 8
- Зарегистрирован: 07 дек 2021, 09:14
- Контактная информация:
Ввод в домен
#4
07 дек 2021, 11:07
rogoznik писал(а): ↑
07 дек 2021, 10:46
ОС — в домен ввести можно
Отлично. Где можно посмотреть инфу «для чайников», как ввести именно эту ОС в домен?
Задача чтобы можно было работать с машины Linux с сетевыми ресурсами под Windows.
-
WWolf
- Сообщения: 3661
- Зарегистрирован: 14 фев 2018, 00:51
- Решено: 27
- Откуда: Краснодар
- Благодарил (а): 1633 раза
- Поблагодарили: 1156 раз
- Контактная информация:
Ввод в домен
#5
07 дек 2021, 11:11
-
alex_vag
- Сообщения: 8
- Зарегистрирован: 07 дек 2021, 09:14
- Контактная информация:
Ввод в домен
#6
07 дек 2021, 11:14
Да, видел.
Вопрос — этот вариант актуален для Cinnamon и Mate ?
Или только для одной из версий?
-
WWolf
- Сообщения: 3661
- Зарегистрирован: 14 фев 2018, 00:51
- Решено: 27
- Откуда: Краснодар
- Благодарил (а): 1633 раза
- Поблагодарили: 1156 раз
- Контактная информация:
Ввод в домен
#7
07 дек 2021, 11:16
alex_vag, с такими вопросами думаю не стоит вам лезть в доменные политики…
у вас даже основных понятий нет о линукс и с чем его едят…
-
alex_vag
- Сообщения: 8
- Зарегистрирован: 07 дек 2021, 09:14
- Контактная информация:
Ввод в домен
#8
07 дек 2021, 11:21
WWolf писал(а): ↑
07 дек 2021, 11:16
у вас даже основных понятий нет о линукс и с чем его едят…
Согласен, зашёл не с той стороны. Но, жизнь заставила, что-то делать надо. Остальное в процессе приложиться ![]()
-

ilikethat
- Сообщения: 506
- Зарегистрирован: 14 дек 2019, 01:46
- Решено: 9
- Благодарил (а): 112 раз
- Поблагодарили: 110 раз
- Контактная информация:

Ввод в домен
#9
07 дек 2021, 12:21
alex_vag, расскажите плиз, а какой сценарий использования такой машины на linux в домене windows?
Для чего Вы будите её использовать?
PS Когда ко мне приходят заказчики с бредовой задачей, начинаю спрашивать, зачем это нужно.
В большинстве случаев выясняется, что проблема одна, но для ее решения придумывается другое «гениально-гуманитарное» решение, которое и озвучивают мне.
-
alex_vag
- Сообщения: 8
- Зарегистрирован: 07 дек 2021, 09:14
- Контактная информация:
Ввод в домен
#10
07 дек 2021, 12:29
ilikethat писал(а): ↑
07 дек 2021, 12:21
Для чего Вы будите её использовать?
Рабочая станция, с доступом ко внутренним сетевым ресурсам Windows домена. Работа с файлами *.doc и *.xls + Запуск 1с (под Linux, без Wine).
-
ilikethat
- Сообщения: 506
- Зарегистрирован: 14 дек 2019, 01:46
- Решено: 9
- Благодарил (а): 112 раз
- Поблагодарили: 110 раз
- Контактная информация:
Ввод в домен
#11
07 дек 2021, 12:46
alex_vag, а зачем это делать на Linux?
-
alex_vag
- Сообщения: 8
- Зарегистрирован: 07 дек 2021, 09:14
- Контактная информация:
Ввод в домен
#12
07 дек 2021, 12:47
ilikethat писал(а): ↑
07 дек 2021, 12:46
а зачем это делать на Linux?
«Правомерное использование лицензионного П/О»… т.д.
-
ilikethat
- Сообщения: 506
- Зарегистрирован: 14 дек 2019, 01:46
- Решено: 9
- Благодарил (а): 112 раз
- Поблагодарили: 110 раз
- Контактная информация:
Ввод в домен
#13
07 дек 2021, 12:56
alex_vag,
О бесплатной 1с для Linux я не слышал.
Бесплатный LibreOffice прекрасно ставится на Windows.
То есть сэкономили на лицензии Windows 10 pro? Тысяч 7 рублей.
Гениально(С)
-
WWolf
- Сообщения: 3661
- Зарегистрирован: 14 фев 2018, 00:51
- Решено: 27
- Откуда: Краснодар
- Благодарил (а): 1633 раза
- Поблагодарили: 1156 раз
- Контактная информация:
Ввод в домен
#14
07 дек 2021, 13:04
ilikethat писал(а): ↑
07 дек 2021, 12:56
То есть сэкономили на лицензии Windows 10 pro? Тысяч 7 рублей.
Гениально(С)
ну тут может быть и нюанс — ты под санкциями и тебе винду не продают ![]()
ilikethat писал(а): ↑
07 дек 2021, 12:56
О бесплатной 1с для Linux я не слышал.
она полюбому куплена, а под линукс клиент уже штампуют на ура…
-
alex_vag
- Сообщения: 8
- Зарегистрирован: 07 дек 2021, 09:14
- Контактная информация:
Ввод в домен
#15
07 дек 2021, 13:11
WWolf писал(а): ↑
07 дек 2021, 13:04
ну тут может быть и нюанс — ты под санкциями и тебе винду не продают
Очень может быть….
WWolf писал(а): ↑
07 дек 2021, 13:04
она полюбому куплена, а под линукс клиент уже штампуют на ура…
Безусловно!
-
Chocobo
- Сообщения: 10015
- Зарегистрирован: 27 авг 2016, 22:57
- Решено: 215
- Откуда: НН
- Благодарил (а): 814 раз
- Поблагодарили: 3006 раз
- Контактная информация:

Ввод в домен
#16
07 дек 2021, 13:34
В соседнем топике недавно подтвердили актуальной данной ссылки
Так что должно быть норм.
alex_vag писал(а): ↑
07 дек 2021, 11:14
этот вариант актуален для
Этот вариант должен быть достоаточно актуален для Убунту, на которой в свою очередь базируется Linux Mint.
Графические окружения Mate/Cinnamon/Gnome и прочие тут участвуют в меньшей степени, все настраивается ниже уровнем.
Потом уже могут быть некоторые различия именно со стороны UI взаимодействия.
Что же касается сценариев использования, то возможно работа со сложными мсофисными документами не самая сильная сторона либры и похожих офисных пакетов, но это уже другая история)


-
alex_vag
- Сообщения: 8
- Зарегистрирован: 07 дек 2021, 09:14
- Контактная информация:
Ввод в домен
#17
07 дек 2021, 13:41
Chocobo писал(а): ↑
07 дек 2021, 13:34
Графические окружения Mate/Cinnamon/Gnome и прочие тут участвуют в меньшей степени, все настраивается ниже уровнем.
Пасиб! ![]()

Как мне ввести в домен Linux машину. Не важно какой дистрибутив Mint, Ubuntu, Debian(они самые распространенные).
Для этого установим пакеты
sudo apt-get install sssd
Отредактируйте файл sudo nano /etc/sssd/sssd.conf, добавив следующую информацию:
[sssd]
config_file_version = 2
services = nss, pam
domains = ИМЯ_ДОМЕНА
[pam]
[nss]
[domain/ИМЯ_ДОМЕНА]
ad_domain = ИМЯ_ДОМЕНА
krb5_realm = ИМЯ_ДОМЕНА
krb5_server = ИМЯ_КОНТРОЛЛЕРА_ДОМЕНА
Добавьте Linux Mint в домен Windows командой: sudo realm join ИМЯ_ДОМЕНА
Отредактируйте файл sudo nano /etc/resolv.conf, добавив следующую информацию:
search your.domain.name
nameserver 1.2.3.4 #IP вашего сервера DNS(Контроллера домена)
nameserver 1.2.3.5
После выполнения этих шагов, Linux Mint будет успешно подключен к домену Windows и пользователи смогут аутентифицироваться через домен.
Наконец выполнить вход под пользователем
sudo realm join -U ПОЛЬЗОВАТЕЛЬ your.domain.name