While Linux has proliferated extensively in the server arena in the recent past, client networks are still dominated by Windows devices. This means, things that we take for granted in a client environment such as DDNS are not as matured as they are in Windows environment. One may ask whether the recent surge in Linux based clients such as IoT devices has changed this equation. But the nature of these devices is different from Windows based clients that they mostly rely on outbound connection to internet. Since they seldom require other hosts to initiate connection to them, their operation doesn’t rely much on Dynamic DNS.
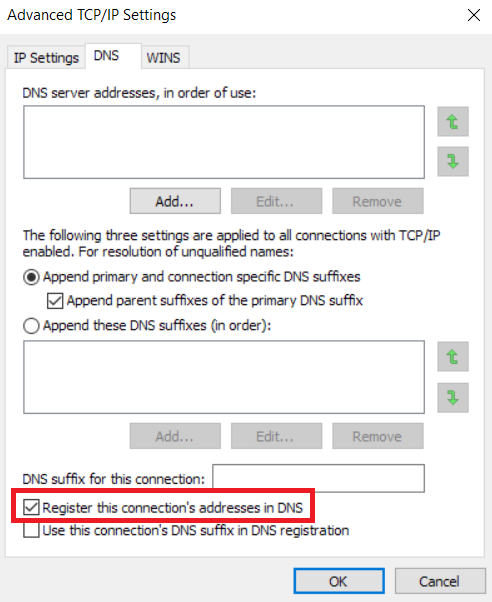
So, what does it take to make a Linux client register dynamically in a Windows environment? At its basic, the entire process relies on Dynamic DNS as explained in RFC2136. In a traditional windows environment with AD, this process is taken care by client OS. Every time a Windows PC gets an IP address from DHCP server, it would send a DNS Update (Opcode = 5) request to its registered DNS server. Performed manually, this is same as typing “ipconfig /registerdns” at an elevated command prompt. This behaviour can be modified by accessing DNS section of Advanced TCP/IP settings of a network adapter.
When we ask a Linux client to do the same (later I will explain how it can be configured to ask), it won’t work unless the DNS server is configured to accept “Insecure updates” (Which is a major security risk if you need to ask).
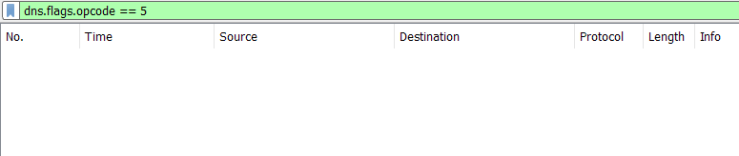
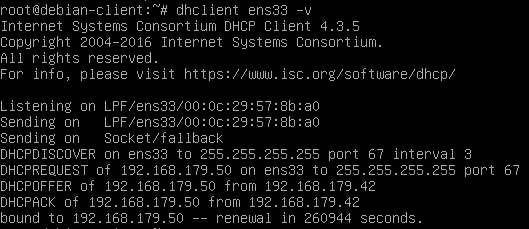
Take a look at the capture of Linux client performing DNS update, you can see that the server comes back with a UPDATE REFUSED response.

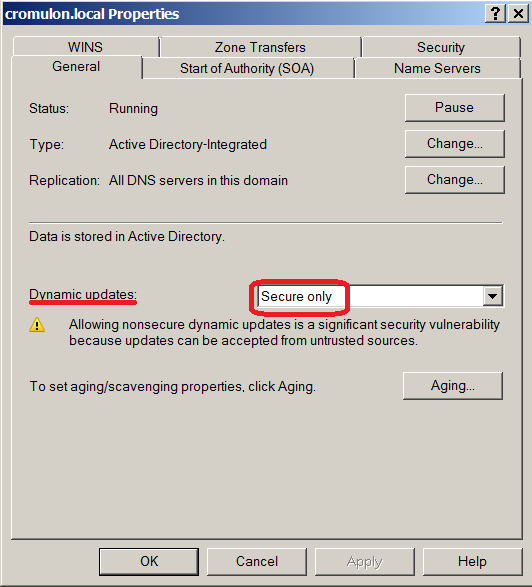
This is because our DNS server is enabled with secure updates which means only authenticated clients can send update.
The client is expected to send a transaction signature along with the update request. There are different types of signatures such as a TSIG resource or the SIG(0) or GSS-TSIG signatures. In Windows world however, only GSS-TSIG signatures as described in RFC3645 are understood and accepted.
Looking at a capture from a Windows PC joined to domain, one can see the Windows Device sending Update request with GSS-TSIG resource.

Given this background, let us explore some of the options available to setup DDNS for Linux based clients. In this series of posts, I will explore 3 options:
- Configure DHCP server to perform DNS registration on behalf of the clients
- Join the Linux devices to AD domain and configure them to dynamically update
- Setup a new sub-domain running a dedicated Linux BIND server and configure DNS forwarding on Microsoft DNS server.
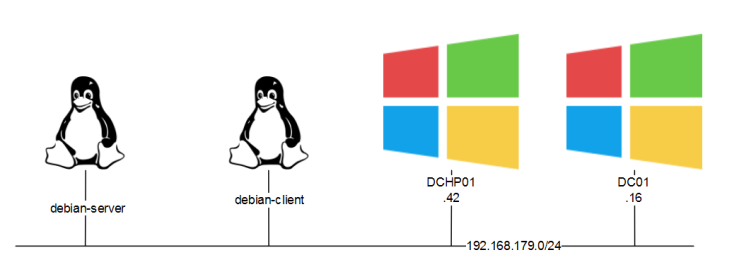
Our environment has the following setup:
- Microsoft Active Directory environment with DNS server installed in Domain controller and a DHCP server running separately on a different host. All are running on Windows Server 2008 R2.
- DNS is configured to accept only Secure updates.
- Two Linux devices running Debian Stretch operating system. One of them will act as DNS server in one of the scenarios.
The solutions we discuss should meet the following objectives:
- Update DNS when the device gets an IP address
- Perform periodic update to DNS server to protect against expiry
- Fully automated with very little or no hand-coding on client devices, assume no automation tools like Puppet or Chef
- Scalable to hundreds or thousands of devices
Point 3 is important to me since I had to work out a solution at work where we are using hundreds of Raspberry Pi’s, all booting the same image cloned on to flash disks. So, editing config files on each of them is not an option (we will come to this later).
Configuring DHCP server to perform DNS registration on behalf of the clients
This is the simplest and most reliable solution of the available options. This method makes use of DHCP option 81 as defined in RFC4702, which is used to convey a client’s FQDN to a DHCP server as part of DHCP process.
An aside: RFC doesn’t mandate whether a DHCP server should register client’s DNS or not. It is left to site-specific policies, which may differ per the security context of the site.
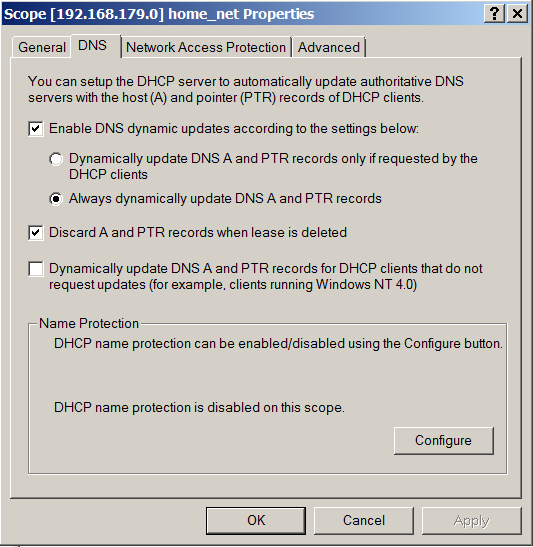
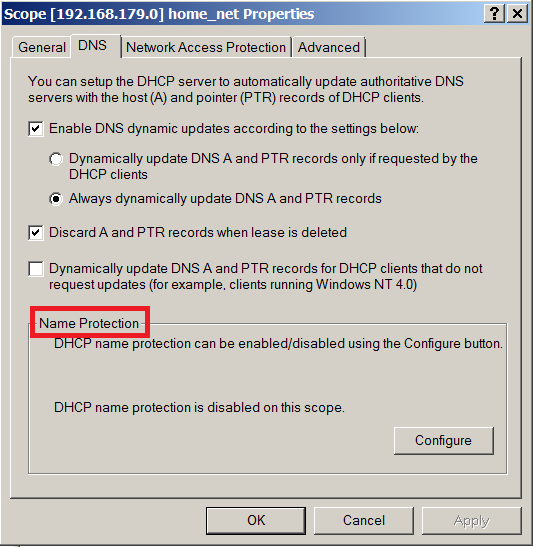
The default setting in a Microsoft DHCP server scope is as follows (Right click on scope name -> Properties to reach here):
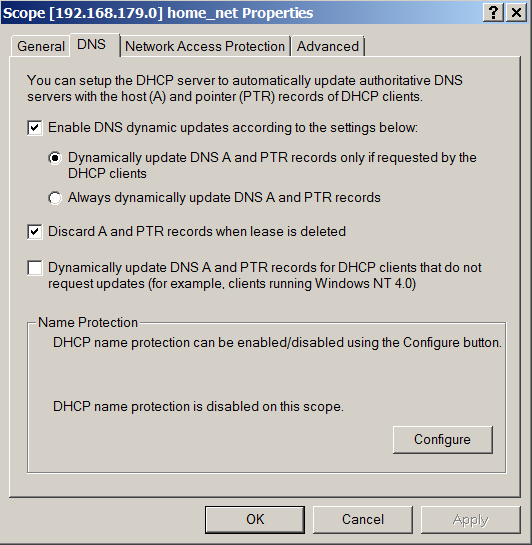
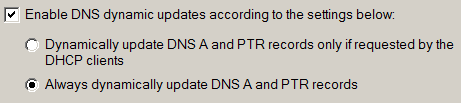
Understandably, this only updates to DNS server if requested by the client. What happens if we select the option to “Always dynamically update DNS A and PTR records”? Is that what we want?
If you trigger a DHCP request from the client, you will notice that this doesn’t work.
This setting merely controls whether a DHCP server should update ‘A’ record or not. The label “Always dynamically update DNS A and PTR records” is misleading since it applies only for the clients that request a DNS update. By default, a client is responsible for updating the A record and DHCP server is responsible for updating the PTR record. Selecting the second option forces DHCP server to update A record as well. But the prerequisite is that the client should request for DNS update.
The two options above correspond to the two cases discussed in RFC4702

For our Linux clients, the option we need is the last check box. Let us turn this on and trigger a DHCP request from our client.

When we check the DNS server, we can see that the A record successfully is created.

On the capture, we can see secure DNS update message being sent from the DHCP server (Note that the DNS clients always tries insecure updates first and gets rejected by the server).

For a home environment, this is almost enough. But for production environments, with multiple DHCP servers, this is not enough. The problem is that, in such setup the DHCP server becomes the owner of the A and PTR records (see below). It is fine as long as the DHCP server is alive to create and remove records. But when it goes down, its peer DHCP server won’t be able to do anything about those records.
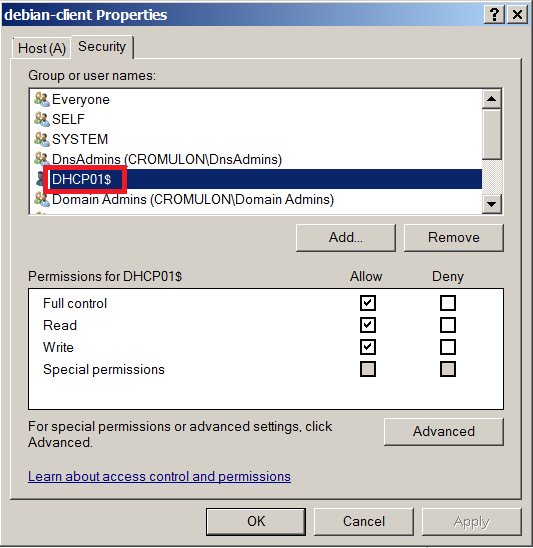
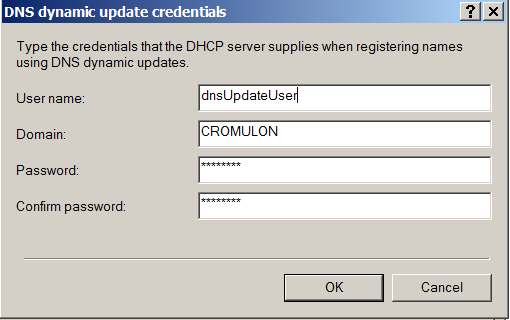
This link explains the issue in more detail. Let us follow the advice, create a dedicated user account for updating DNS and delete the old record with DHCP server as owner. Do not grant any extra privilege to this account. Just adding to DNSUpdateProxy group should be sufficient (Right click on IPv4 -> Properties -> Advanced).
As usual, let us go ahead to trigger an update.
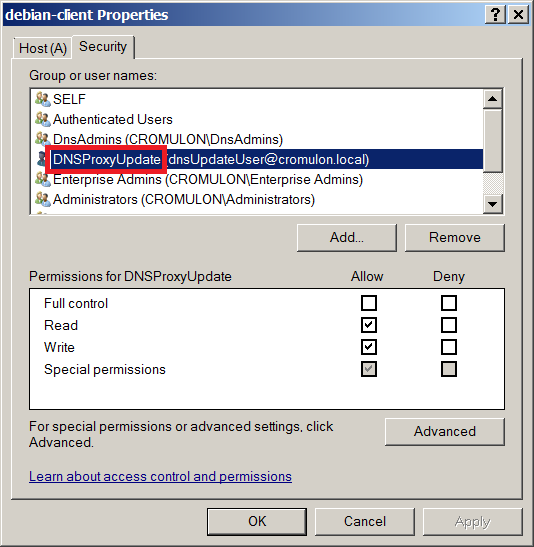
As expected, new A and PTR record gets created.

If we check the ownership, we can find that the record is owned by DNSProxyUpdate group.
Finally, let us discuss the option called “Name Protection” at the bottom of the dialog box.
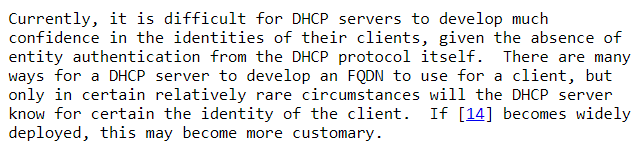
This forces DHCP server to manage the entire lifecycle of your client’s A and PTR records. If you are going to let your DHCP server manage client’s A record, I don’t see any reason to keep this disabled. It will also protect you from “Name Squatting” by offline clients. RFC4701 describes the problem as:

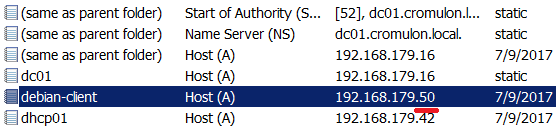
Let us see what it means to turn on this option. First, we keep it disabled and bring two clients online with same hostname, one after other. All is well when the first client comes online and gets an IP address 192.168.179.50.

DNS also gets updated accordingly.
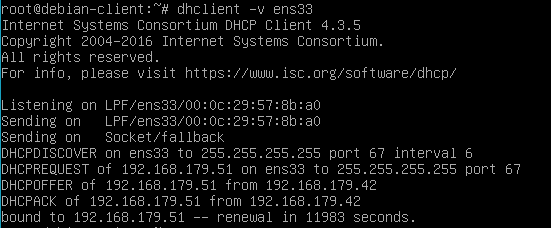
Let us bring another Linux client online and change the hostname to same as this host. Then perform a DHCP request from this host.

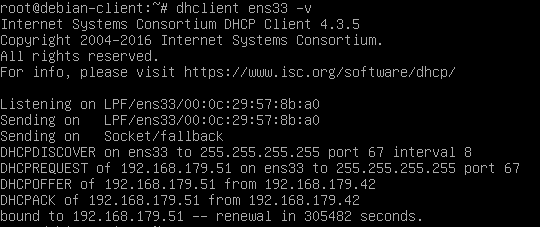
DHCP server assigns IP address 192.168.179.51 and sends an update to DNS server. Note that the DHCP server makes no fuss about two hosts sharing the same hostname. For all it knows, it could be the same host with multiple interfaces.

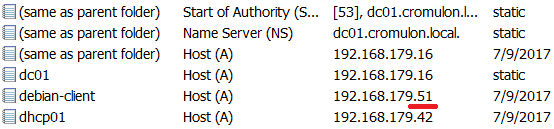
On the DNS sever side, we see that it accepts this update without any hesitation. The only problem is that this overwrites the existing record, while the client is still online. So, anyone trying to talk the first node ends up talking to the second node.
Clearly, DHCP server is not a reliable source of identity. RFC4703 briefly mentions the inability of DHCP server to provide any sort of assurance.
Let us see what happens when we enable “Name Protection”.
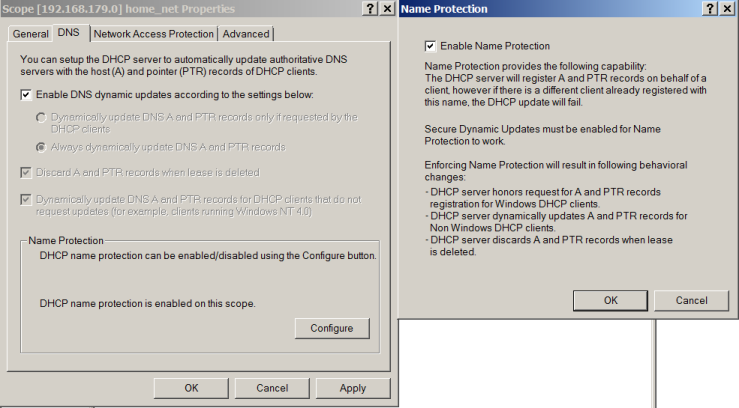
As soon as we enable this option, first thing we notice is that all other options are greyed out. This is because, with Name Protection enabled, it is always the responsibility of DHCP server to perform both A record and PTR record updates.
Let us wipe the slate clean, by releasing IP address from both the clients and deleting the existing DNS & DHCP records.
Now when you bring the first Linux client online, you can see that the DHCP server performs a new type of record registration called DHCID.

A new record type DHCID appears in the DNS server.

Let us bring up the impostor and request DHCP address. It gets an IP address of 192.168.179.51.
As usual, DHCP server is very generous about having two hosts sharing the same hostname.

But no new DNS entry is created.

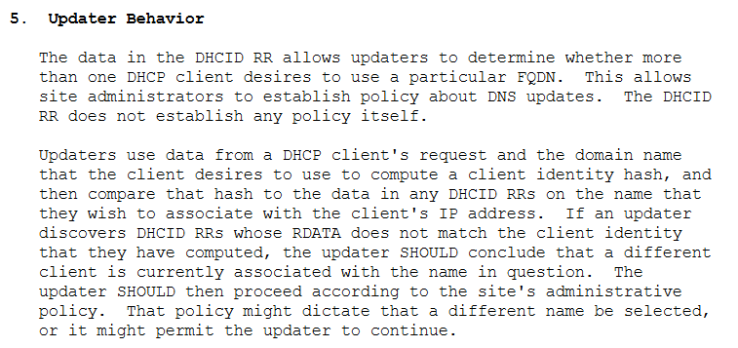
Looking at the capture, we can see that the DNS registration fails with a response that RRset does not exist.

This message means that DHCID value calculated from the new update packet doesn’t match with any DHCID RR’s stored in the server. This behaviour is described in RFC4701.
This is as much as we need to know about configuring a Microsoft DHCP server to perform Dynamic DNS for Linux clients. In the upcoming posts, let us explore the other two options.
Значение службы DNS многие не учитывают, фактически, эта служба является краеугольным камнем в работе сети интернет в целом и локальных сетей в частности, мы в свою очередь, будем оперировать менее глобальными масштабами и настроем данную службу в нашей локальной сети.
Идея проста, мы настроим разрешение имен внутри локальной сети, а в случае обращения к сайтам в сети интернет, то запросы будут передаваться вышестоящим DNS серверам, для разрешения имен сайтов.
Я не буду рассказывать назначение данной службы, о том как она работает можно прочитать в Википедии. Скажу только что эта служба иерархическая.
Как я писал раньше, у нас есть сервер который мы будем обвешивать функционалом, я уже рассказал как настроить его в качестве шлюза и о том как настроить работу службы DHCP, для раздачи IP адресов клиентам в локальной сети. В этот раз я расскажу о том как настроить на нем сервер DNS, ранее я уже писал, о том как настроить кеширующий DNS сервер для локальной сети, но было это уже довольно давно и я решил обновить статью, за одно добавив в нее, немного функционала.
Как всегда напоминаю что, данный функционал заводить на шлюзе не обязательно, все будет работать и так, но если добавить, то все должно работать, намного лучше, хотя с точки зрения конечного пользователя, разница будет не заметна.
Дополнительным плюсом это будет автоматическое создание прямой и обратной DNS зоны, для клиентских устройств локальной сети. Аналогичный процесс используется в сетях под управлением MS Windows в среде Active Directory. Там службы DNS и DHCP тесно интегрированы между собой т.е клиентский ПК подключившись к сети и получивший IP адрес автоматически получает DNS запись вида hostname.domainname.tld это добавляет удобства в случае необходимости подключения по имени а не по IP-который дтуднее запомнить, дополнительным плюсом является создание обратной зоны которая позволяет проводить обратный процесс -разрешение имени по IP, что может быть полезно в случае поиска устройсва если известен его IP адрес, то узнав его имя можно сразу понять о ком идет речь.
Собственно, подобную схему мы и реализуем, основной идеей всего этого будет полная автоматизация данного процесса для IT специалиста т.к. DHCP сервер будет создавать прямую и обратную зоны-автоматически.
Предполагается что:
1) Операционная система Ubuntu 12.04 установлена, хотя на Debian будет также работать ничуть не хуже.
2) Сервер настроен в качестве шлюза по статье: Настройка шлюза локальной сети, на базе Ubuntu 12.04
3) Также на указанном сервере настроена служба DHCP по статье: Настройка DHCP
сервера под управлением Ubuntu 12.04
Первым делом, нам необходимо удалить пакет dnsmasq — который был установлен по статье, Настройка шлюза локальной сети, т.к надобность в нем отпадает, вместо него у нас будет использоваться Bind9.
Поднимаем права до root:
sudo suaptitude purge dnsmasqУстановка DNS сервера
Установим Bind:
aptitude install bind9Теперь генерируем ключ, для обновления DNS записей:
dnssec-keygen -a HMAC-MD5 -b 128 -r /dev/urandom -n USER DHCP_UPDATERПроверим что у нас получилось:
cat Kdhcp_updater.*.private|grep KeyНам выдаст нечто подобное (у вас ключ получится другим)
Key: cYqlx8g/jLcIxXFDpqrxZw==
Его нам необходимо записать, т.к. он нам еще пригодится.
Переходим к настройкам Bind9, для начала отредактируем файл name.conf.option:
nano /etc/bind/named.conf.optionsТуда добавляем следующие строки:
forwarders {
        8.8.8.8;
     };

    listen-on {
      127.0.0.1;
      192.168.10.1;
    };
Рассмотрим более подробно то что мы написали:
В пункте forwarders мы указали, вышестоящие DNS сервера, куда будет передаваться запрос в случае если информации о запрошенном URL не будет найдено в собственной базе, в нашем случае, это DNS сервер google, но можно указать те которые нужны вам, например DNS сервер вашего провайдера.
В пункте listen-on указываем IP адреса, которые будет обслуживать наш DNS сервер, это localhost и интерфейс по которому подключена наша локальная сеть 192.168.10.1, запросы на другие IP адреса обслуживаться не будут, эту функцию можно рассматривать как дополнительную возможность по снижению нагрузки на наш сервер т.к. запросы из вне-не обслуживаются.
Переходим к редактированию файла name.conf.local:
nano /etc/bind/named.conf.localДобавми туда следующее:
key DHCP_UPDATER {
        algorithm HMAC-MD5.SIG-ALG.REG.INT;
        secret "cYqlx8g/jLcIxXFDpqrxZw==";
};

zone "example.net" IN {
        type master;
        file "/var/lib/bind/forward.db";
        allow-update { key DHCP_UPDATER; };
};

zone "10.168.192.in-addr.arpa" IN {
        type master;
        file "/var/lib/bind/reverse.db";
        allow-update { key DHCP_UPDATER; };
};
Рассмотрим написанное, более подробно:
Пункт key DHCP_UPDATER содержит информацию о ключе, который мы генерировали в самом начале.
Пункт zone «example.net»-зона, которую обслуживает наш DNS сервер, в нашем случае example.net (многие советуют использовать зону .local, я этого делать не рекомендую т.к. avahi daemon с данными зонами не работает, да и Microsoft также крайне не рекомендует использовать зону local, в своей, свежей, документации к Windows 2k8 )
Также там описывается тип зоны- master и путь к файлу где будут храниться данные зоны, последний пункт разрешает обновление данного файла, только с использованием ключа.
Пункт zone «10.168.192.in-addr.arpa» отвечает за создание зоны обратного просмотра, назначение остальных пунктов, думаю, вы уже поняли.
Теперь нам необходимо создать сами файлы, в которых будут храниться данные зоны example.net.
Они будут располагаться в /var/lib/bind/ сделано это по одной постой причине-группа bind не имеет права на запись в /etc/bind/, а начинать менять права на системные директории, не очень хорошая идея.
Переходим с созданию файла настроек зоны, для начала, создадим зону прямого просмотра назовем его forward.db:
nano /var/lib/bind/forward.dbС содержимым:
$TTL 86400      ;       1 day
example.net.    IN      SOA     srv01.example.net. admin.example.net. (
                                20110103        ; Serial
                                10800           ; Refresh
                                3600            ; Retry
                                604800          ; Expire
                                86400           ; Minimum TTL
                        )

                IN      NS      srv01.example.net.
                IN      A       192.168.10.1
localhost       IN      A       127.0.0.1
srv01           IN      A       192.168.10.1
Из содержимого понятно что наша зона example.net, в которой присутствует DNS сервер (он же шлюз) с именем srv01, который имеет IP адрес 192.168.10.1. Других записей делать не будем т.к. их будет добавлять DHCP сервер автоматически.
Если вдруг вам понадобится создать запись в ручную, то достаточно добавить строку с именем и IP адресом узла локальной сети.
Теперь создадим файл зоны обратного просмотра, чтобы не выдумывать ничего, назовем его reverse.db
nano /var/lib/bind/reverse.dbС содержимым:
$TTL 86400      ;       1 day
10.168.192.in-addr.arpa. IN SOA srv01.example.net. admin.example.net. (
                        20110104        ; Serial
                        10800           ; Refresh
                        3600            ; Retry
                        604800          ; Expire
                        3600 )          ; Minimum

        IN      NS      srv01.example.net.
1       IN      PTR     example.net.
1       IN      PTR     srv01.example.net.
Выходим и перезапускам bind
/etc/init.d/bind9 restart
Теперь нам необходимо проверь работоспособность нашего сервера локально.
Проблема заключается в том что наш сервер по умолчанию использует DNS настройки которого по получил по сети и соответственно он ничего не знает о локальном DNS сервере, которые крутится на нем же-это нам необходимо исправить.
Если мы полезем, править resolv.conf то в Ubuntu 12.04 нас поджидает большой сюрприз в виде надписи:
# Dynamic resolv.conf(5) file for glibc resolver(3) generated by resolvconf(8)
# DO NOT EDIT THIS FILE BY HAND — YOUR CHANGES WILL BE OVERWRITTEN
Которая говорит нам о том что: resolv.conf нельзя редактировать и что он создается динамически, а все внесенные в него изменения будут перезаписаны!
В общем его править нельзя, мы будем править сам шаблон этого файла, который находится в /etc/resolvconf/resolv.conf.d/ нас интересует файл head, вот его мы и будем править:
nano /etc/resolvconf/resolv.conf.d/headДобавляем в него:
domain example.net
search example.net
nameserver 127.0.0.1
Более опытные уже догадались что это ничто иное как DNS суффикс и домен для поиска по умолчанию, а также IP адрес локального DNS сервера.
У данной схемы есть еще одно преимущество- если настройки сети получаются нашим шлюзом от DHCP сервера провайдера, то DNS сервер провайдера добавляется в конце списка, после строки nameserver 127.0.0.1, таким образом, наш локальный DNS всегда является приоритетным, а в случае выхода его из строя, запросы начинают идти к DNS провайдера, автоматически!
Перезапустим сеть:
/etc/init.d/networking restartПробуем определить наш DNS сервер:
dig srv01В ответ получаем нечто подобное:
; <<>> DiG 9.8.1-P1 <<>> srv01
;; global options: +cmd
;; Got answer:
;; ->>HEADER<< — opcode: QUERY, status: NXDOMAIN, id: 56977
;; flags: qr rd ra; QUERY: 1, ANSWER: 0, AUTHORITY: 1, ADDITIONAL: 0;; QUESTION SECTION:
;srv01. IN A;; AUTHORITY SECTION:
. 812 IN SOA a.root-servers.net. nstld.verisign-grs.com. 2012080300 1800 900 604800 86400;; Query time: 44 msec
;; SERVER: 127.0.0.1#53(127.0.0.1)
;; WHEN: Fri Aug 3 13:28:45 2012
;; MSG SIZE rcvd: 98
Значит ответы присылаются, это хорошо.
Проверим самоопределение имени нашего сервера:
nslookup srv01В ответ получим
Server: 127.0.0.1
Address: 127.0.0.1#53Name: srv01.example.net
Address: 192.168.10.1
Эту операцию, также, можно выполнить и через host, сделав запрос вида:
host srv01Если имя преобразовано в IP значит зона прямого просмотра работает нормально.
Теперь проверим зону обратного просмотра:
nslookup 192.168.10.1Нам выдаст:
Server: 127.0.0.1
Address: 127.0.0.1#531.10.168.192.in-addr.arpa name = srv01.example.net.
1.10.168.192.in-addr.arpa name = example.net.
Если ответ получен, значит обратное разрешение имен, также, работает.
Можно считать половину дела сделанным…
Настраиваем динамическое обновление зон DHCP сервером.
Если вы настраивали DHCP сервер, по моему руководству, ссылка на которое есть в начале этой статьи, то у вас в конфигурационном файл должна присутствовать запись:
subnet 192.168.10.0 netmask 255.255.255.0 {
range 192.168.10.10 192.168.10.254;
option domain-name-servers 192.168.10.1;
option domain-name "example.net";
option routers 192.168.10.1;
option broadcast-address 192.168.10.255;
default-lease-time 604800;
max-lease-time 604800;
}
Мы ее немного подправим, а именно заменим option domain-name на example.net
перед диапазоном адресов нашего DHCP сервера, добавляем следующее:
nano /etc/dhcp/dhcpd.confЗа одно добавим строку update-static-leases on; которая отвечает за автоматическое создание прямой и обратной зоны для клиентов с зарезервированным IP, без нее записи придется создавать в ручную, а мы этот процесс автоматизируем.
ddns-update-style interim;
update-static-leases    on;
key DHCP_UPDATER {
algorithm hmac-md5;
secret "cYqlx8g/jLcIxXFDpqrxZw==";
}

zone example.net. {
primary 127.0.0.1;
key DHCP_UPDATER;
}

zone 10.168.192.in-addr.arpa. {
primary 127.0.0.1;
key DHCP_UPDATER;
}
В результате всех действий, у вас должен получиться конфигурационный файл вида:
ddns-update-style interim;
update-static-leases    on;
key DHCP_UPDATER {
algorithm hmac-md5;
secret "cYqlx8g/jLcIxXFDpqrxZw==";
}

zone example.net. {
primary 127.0.0.1;
key DHCP_UPDATER;
}

zone 10.168.192.in-addr.arpa. {
primary 127.0.0.1;
key DHCP_UPDATER;
}

subnet 192.168.10.0 netmask 255.255.255.0 {
range 192.168.10.10 192.168.10.254;
option domain-name-servers 192.168.10.1;
option domain-name "example.net";
option routers 192.168.10.1;
option broadcast-address 192.168.10.255;
default-lease-time 604800;
max-lease-time 604800;
}
Остальные настройки, оставляем как они были представлены в руководстве по настройке DHCP сервера.
Перезапустим DNS и DHCP сервер:
/etc/init.d/bind9 restart
/etc/init.d/isc-dhcp-server restart
Подключаем наш клиентский ПК к локальной сети, предположим что его имя test01 он получит IP от нашего DHCP сервера, а DHCP сервер создаст DNS запись вида test01.example.net.
Пробуем выполнить запрос по имени
nslookup test01
нам должен возвращаться IP адрес который получила клиентская машина от DHCP сервера.
Ну и преобразование IP адреса в имя, также должно работать.
Во время работы данной связки, у нас будут создаваться файлы в директории /var/lib/bind с расширением .jnl, они создаются автоматически, создавать или удалять их не нужно.
Выглядеть это будет так как на скриншоте:

Теперь работы по настройке данной схемы можно считать успешно завешенными.
На этом все.
Возникли предложения по улучшению или вопросы, прошу в комментарии, нашли ошибку, пишите в личку…
Для того, чтобы linux машина регистрировала себя в Windows DNS после получения IP адреса по DHCP нужно сделать следующее.
На linux машине
Centos/RedHat:
в /etc/sysconfig/network-scripts/ifcfg-eth0 добавить
DHCP_HOSTNAME=manager-pc
Лучше использовать только имя хоста, без домена.
Перезапустить сеть:
systemctl restart network
Говорят, что добавление DHCP_HOSTNAME в /etc/sysconfig/network тоже работает.
Ubuntu:
$ sudo vi /etc/dhcp/dhclient.conf
добавить:
send host-name "manager-pc"; или send host-name = gethostname();
Лучше использовать только имя хоста, без домена.
Сохранить, обновить адрес:
$ sudo dhclient eth0

$ sudo dhclient interface-name
Таким образом мы заставим DHCP Client при запросе IP адреса передавать имя хоста.
На DNS сервере:
На Windows сервере нужно поставить галочку “Dynamically update DNS A and PTR records for DHCP client that do not request updates (for example, clients running Windows NT 4.0)” в свойствах сервера или домена Start > Admin Tools > DHCP > [server] > IPv4 > Scope > Properties > DNS.
ъЕсли при этом нужно поменять имя хоста:
hostname manager-pc
в /etc/hostname
manager-pc
в /etc/hosts добавить
127.0.0.1 localhost localhost.localdomain localhost4 localhost4.localdomain4 manager-pc manager-pc.domain.ru
::1 localhost localhost.localdomain localhost6 localhost6.localdomain6
I have several Ubuntu machines (mostly 8.04) that I would like to register their hostnames (or desired hostnames) with my main DNS server running on Windows 2000 so that I can access these machines from any other machine using that DNS server by hostname. Windows clients can do this automatically with the MS client or manually with ipconfig /registerdns. How do I do the equivalent in Linux? I don’t necessarily want to register them with the domain using Likewise Open, unless that is the only way to send DNS entries to the Windows server.
These are static IP’s. I realize I could add the DNS entries on the Windows side manually as well, but I’m not actually in charge of that Windows DNS server.
![]()
jldugger
14.4k20 gold badges77 silver badges129 bronze badges
asked Jun 4, 2009 at 20:50
![]()
Sorry, I forgot to put in the question
that these are static IP’s. I realize
I could add the DNS entries on the
Windows side manually as well, but I’m
not actually in charge of that Windows
DNS server.
If you don’t have control of the DNS server, and if the DNS isn’t set up to allow non-secure updates, and it isn’t set up to update based on DHCP assignments, and you have a static address, then you are probably out of luck.
Since this system has a static address, is there some reason you can’t just contact the person who runs the DNS server and ask them to add a record for your system?
![]()
TRiG
1,1813 gold badges13 silver badges30 bronze badges
answered Jun 4, 2009 at 21:43
![]()
ZoredacheZoredache
131k41 gold badges278 silver badges420 bronze badges
1
If you want the Linux machines to update DNS themselves, then the DNS zone(s) must be configured for nonsecure dynamic updates. Then if you have the Samba client installed, you can update the record manually like this:
net ads dns register -P
I’m not sure if this command requires you to be on the domain though.
answered Jun 4, 2009 at 21:02
![]()
Mike ConigliaroMike Conigliaro
3,1952 gold badges25 silver badges24 bronze badges
3
Have you considered configuring your Windows DHCP server to update DNS entries from the DHCP leases? This could achieve the desired result without any changes on the DNS server or Linux side of things.
answered Jun 4, 2009 at 20:54
![]()
Kevin KuphalKevin Kuphal
9,1441 gold badge35 silver badges41 bronze badges
2
This was resolved here using the standard Linux utility nsupdate and initial collaboration from your DNS server administrator.
![]()
answered Jun 15, 2016 at 12:02
![]()
fcmfcm
4221 gold badge3 silver badges13 bronze badges
1
You must log in to answer this question.
Not the answer you’re looking for? Browse other questions tagged
.
Not the answer you’re looking for? Browse other questions tagged
.
I feel a need to blog about this today because it took several days to figure
out, but the solution was trivial.
The scenario: my company has a Windows 2003 Domain Controller running DHCP,
DNS and Active Directory services. We use an Untangle box as our gateway to
the Internet. All of this works just great for Windows machines on the
network, where everyone can use names like “host” to refer to each other’s
machines.
However, the Linux boxes until now have been second-class citizens. They are
able to get IP address via DHCP, but Windows knows nothing about their
hostnames. Nearly all of our Linux boxen run CentOS 5, which is to say, Redhat
5 (RHEL).
The solution, it turns out, is two-fold:
-
On the Windows Domain Controller, go to the admin page for “Active
Directory Users and Computers”. Under “Users” for your domain, create a new
user named something like “dhcp4dns”. Pick a random password. -
On the same machine, go to the admin tool for DHCP and right-click on your
domain and select Properties. Click on the DNS tab and check everything,
while also selecting “Always dynamically update DNS A and PTR records”.
Then click on the Advanced tab and its Credentials… button. Here enter
the details for the user you created in step 1. -
This step is for CentOS: For every Linux box, edit the file
/etc/sysconfig/networking/devices/ifcfg-eth0(or whichever interface faces
your local network).
Add the following line to that file, replacing hostname with your unqualified
hostname:
DHCP_HOSTNAME=_hostname_
Now just reset networking on the Linux box:
# ifdown eth0 ; ifup eth0
Voila, your Windows server should now see the Linux box’s name just like
everyone else on the network.