Quick Links
- What You Need to Know About Windows 10’s Bash Shell
- How to Install Bash on Windows 10
- How to Use The Bash Shell and Install Linux Software
- Bonus: Install the Ubuntu Font for a True Ubuntu Experience
Key Takeaways
First, enable the Windows Subsystem for Linux (WSL) from the Features window or via the «wsl —install» command. After rebooting your PC, install Ubuntu or any other Linux distribution of your choice from the Microsoft Store.
The Windows Subsystem for Linux, introduced in the Anniversary Update, became a stable feature in the Fall Creators Update. You can now run Ubuntu, openSUSE, a remix of Fedora, and plenty of others on Windows, with more Linux distributions coming soon.
What You Need to Know About Windows 10’s Bash Shell
How Windows Subsystem for Linux 1 (WSL1) Works
Windows 10 offers a full Windows Subsystem intended for Linux (WSL) for running Linux software. This isn’t a virtual machine, a container, or Linux software compiled for Windows (like Cygwin). It’s based on Microsoft’s abandoned Project Astoria work for running Android apps on Windows.
Think of it as the opposite of Wine. While Wine allows you to run Windows applications directly on Linux, the Windows Subsystem for Linux allows you to run Linux applications directly on Windows.
Microsoft worked with Canonical to offer a full Ubuntu-based Bash shell environment that runs atop this subsystem. Technically, this isn’t Linux at all. Linux is the underlying operating system kernel, and that isn’t available here. Instead, this allows you to run the Bash shell and the exact same binaries you’d normally run on Ubuntu Linux. Free software purists often argue the average Linux operating system should be called «GNU/Linux» because it’s really a lot of GNU software running on the Linux kernel. The Bash shell you’ll get is really just all those GNU utilities and other software.
While this feature was originally called «Bash on Ubuntu on Windows,» it also allows you to run Zsh and other command-line shells. It now supports other Linux distributions, too. You can choose openSUSE Leap or SUSE Enterprise Server instead of Ubuntu, and there is a remix of Fedora available.
There are some limitations here. It won’t officially work with graphical Linux desktop applications. Not every command-line application works, either, as the feature isn’t perfect.
How Windows Subsystem for Linux 2 (WSL2) Works
Windows Subsystem for Linux 2 (WSL2) is designed to provide the exact same user experience as its predecessor, but the similarities mostly end there.
WSL2 runs a full Linux Kernel in an extremely efficient virtual machine. Just like WSL1, WSL2 allows you use a range of different Linux Distros including, Ubuntu, Debian, Kali, openSUSE, Fedora, and others. That also means that most any Linux application, package, or command will work without an issue.
WSL2 supports GUI applications on Windows 11.
How to Install Bash on Windows 10
This feature doesn’t work on the 32-bit version of Windows 10, so ensure you’re using the 64-bit version of Windows. It’s time to switch to the 64-bit version of Windows 10 if you’re still using the 32-bit version, anyway.
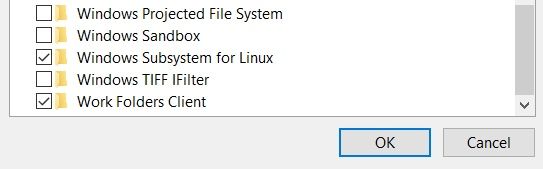
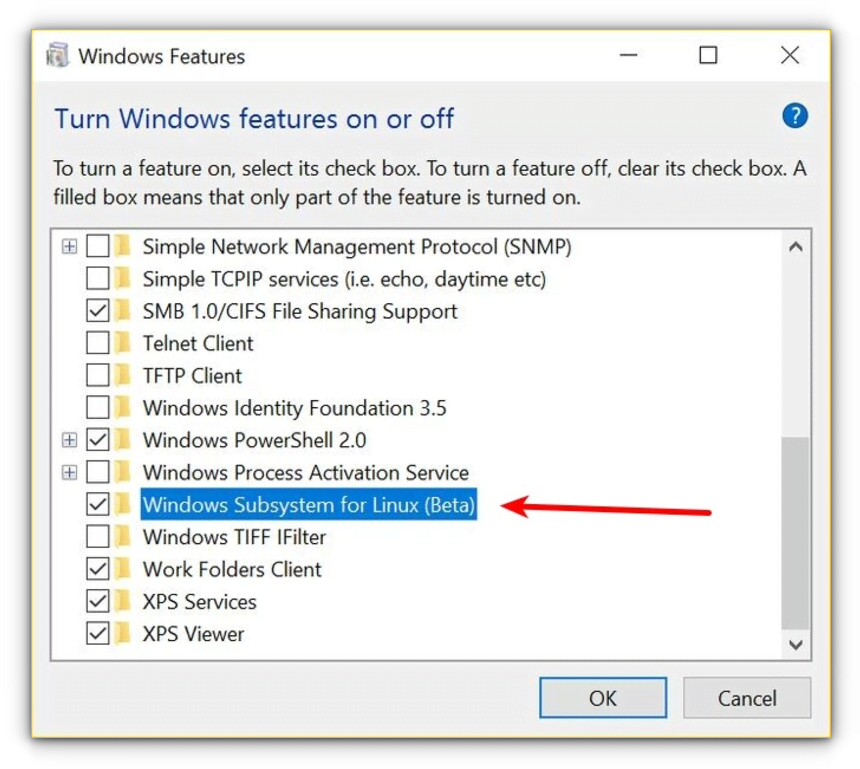
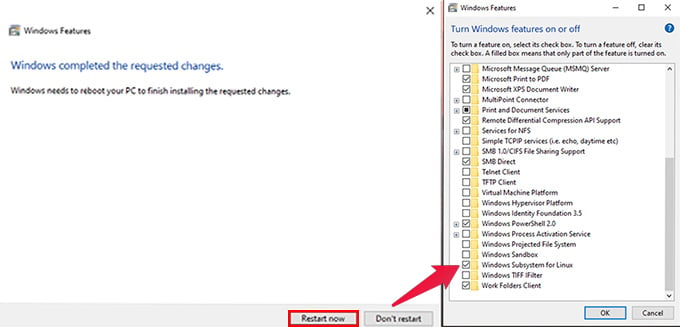
Assuming you have 64-bit Windows, to get started, head to Control Panel > Programs > Turn Windows Features On Or Off. Enable the «Windows Subsystem for Linux» option in the list, and then click the «OK» button.
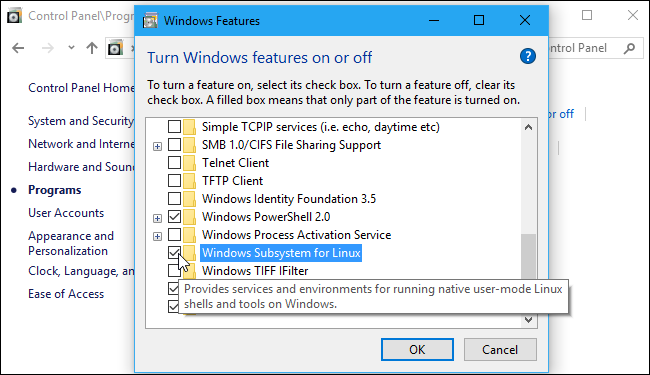
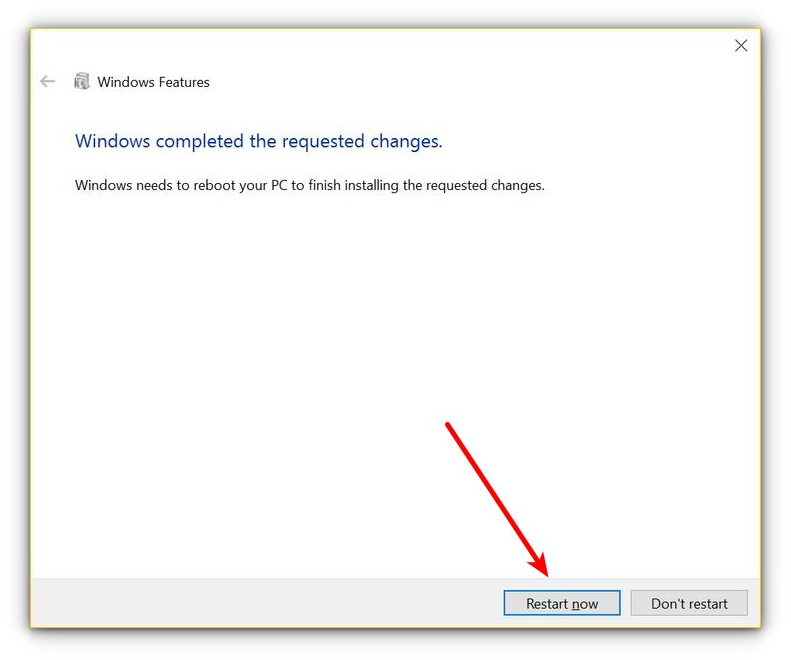
Click «Restart now» when you’re prompted to restart your computer. The feature won’t work until you reboot.
Starting with the Fall Creators Update, you no longer have to enable Developer Mode in the Settings app to use this feature. You just need to install it from the Windows Features window.
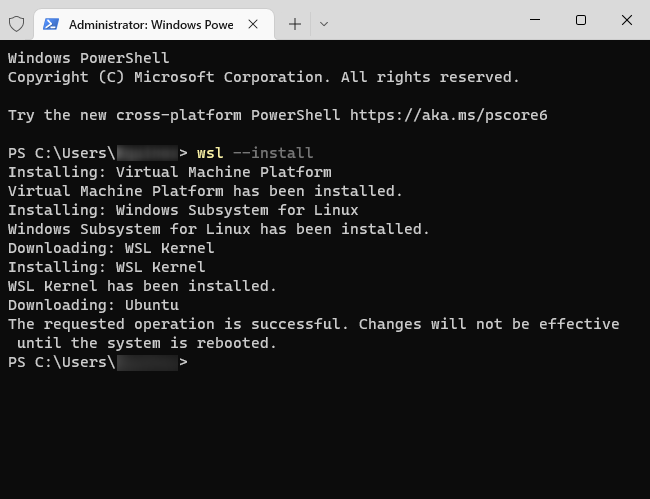
Alternatively, you can also install it using PowerShell. Launch PowerShell as an Administrator, then enter:
wsl --install
It’ll take a few minutes to download and install all of the required components — after it does, you need to restart your computer.
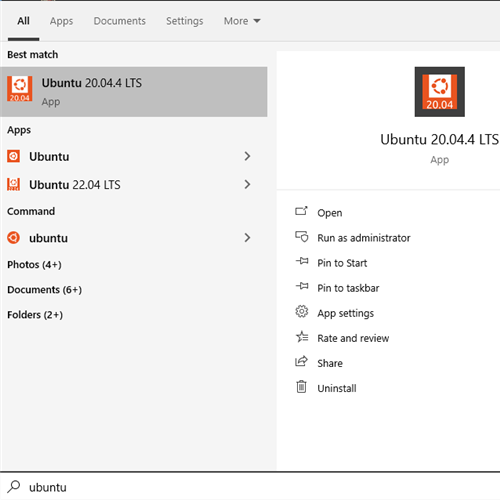
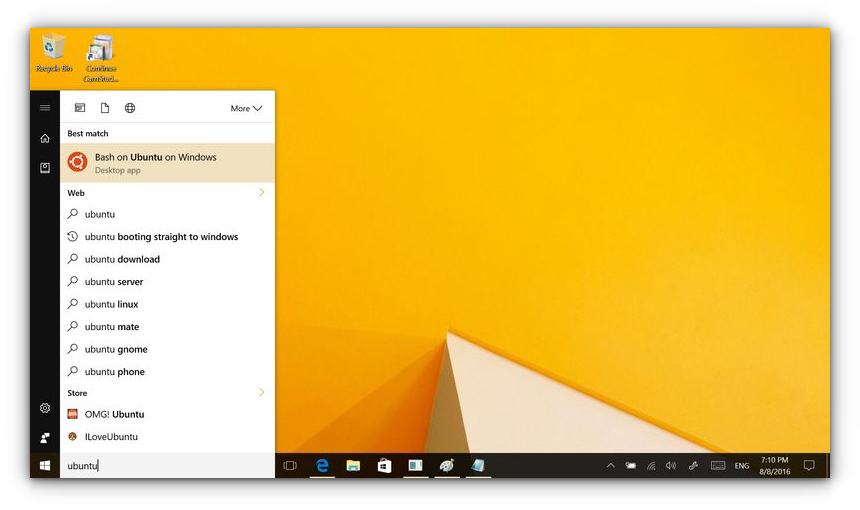
After your computer restarts, open the Microsoft Store from the Start menu, and search for «Linux» in the store.
Starting with the Fall Creators Update, you can no longer install Ubuntu by running the «bash» command. Instead, you have to install Ubuntu or another Linux distribution from the Store app or using the wsl --install -d <Distribution> command.
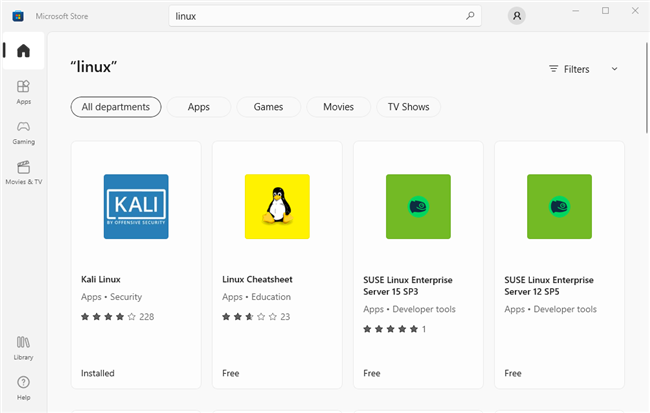
You’ll see a list of every Linux distribution currently available in the Windows Store. As of the Fall Creators Update, this includes Ubuntu, openSUSE Leap, and openSUSE Enterprise, with a promise that Fedora will arrive soon.
Debian, Kali, and a remix of Fedora are now available in the Store. Search for «Debian Linux,» «Kali Linux,» or «Fedora Linux» to find and install them.
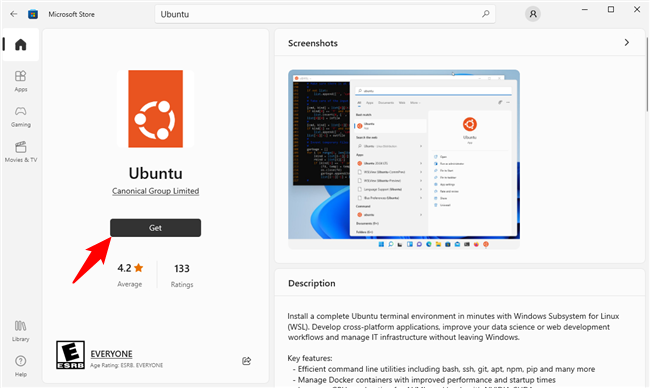
To install a Linux distribution, click it, and then click the «Get» or «Install» button to install it like any other Store application.
If you’re not sure which Linux environment to install, we recommend Ubuntu. This popular Linux distribution was previously the only option available, but other Linux systems are now available for people who have more specific needs.
You can also install multiple Linux distributions and they’ll each get their own unique shortcuts. You can even run multiple different Linux distributions at a time in different windows.
How to Use The Bash Shell and Install Linux Software
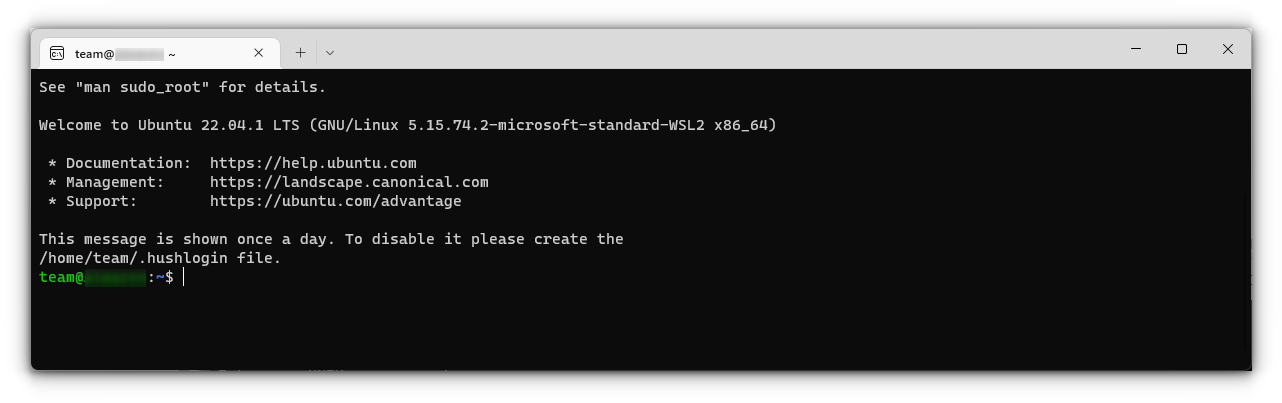
You now have a full command-line bash shell based on Ubuntu, or whatever other Linux distribution you installed.
Because they’re the same binaries, you can use Ubuntu’s apt or apt-get command to install software from Ubuntu’s repositories if you’re using Ubuntu. Just use whatever command you’d normally use on that Linux distribution. You’ll have access to all the Linux command line software out there, although some applications may not yet work perfectly.
To open the Linux environment you installed, just open the Start menu and search for whatever distribution you installed. For example, if you installed Ubuntu, launch the Ubuntu shortcut.
You can pin this application shortcut to your Start menu, taskbar, or desktop for easier access.
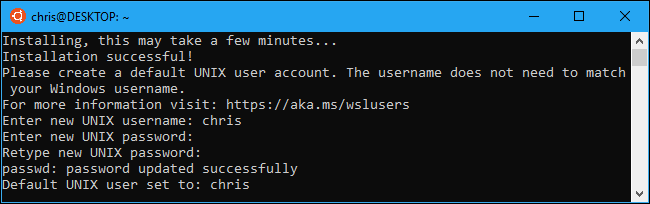
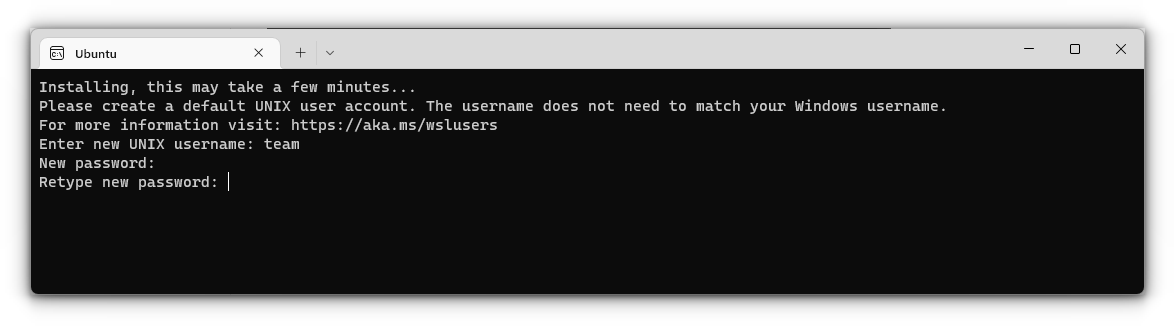
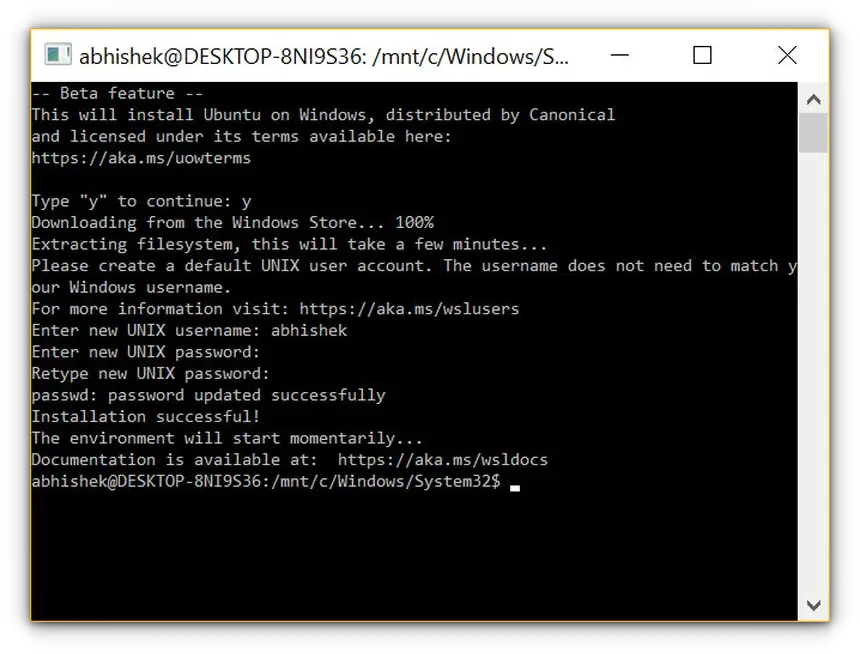
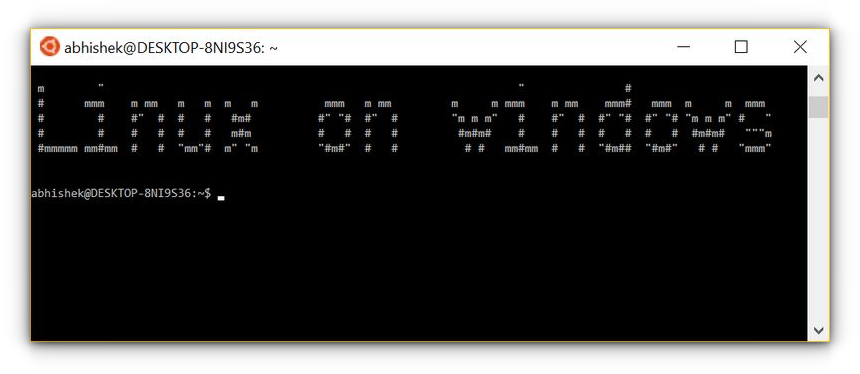
The first time you launch the Linux environment, you’re be prompted to enter a UNIX username and password. These don’t have to match your Windows username and password, but will be used within the Linux environment.
For example, if you enter «bob» and «letmein» as your credentials, your username in the Linux environment will be «bob» and the password you use inside the Linux environment will be «letmein» — no matter what your Windows username and password are.
You can launch your installed Linux environment by running the wsl command. If you have multiple Linux distributions installed, you can choose the default Linux environment this command launches.
If you have Ubuntu installed, you can also run the ubuntu command to install it. For openSUSE Leap 42, use opensuse-42 . For SUSE Linux Enterprise Sever 12, use sles-12 . These commands are listed on each Linux distribution’s page on the Windows Store.
You can still launch your default Linux environment by running the bash command, but Microsoft says this is deprecated. This means the bash command may stop functioning in the future.
If you’re experienced using a Bash shell on Linux, Mac OS X, or other platforms, you’ll be right at home.
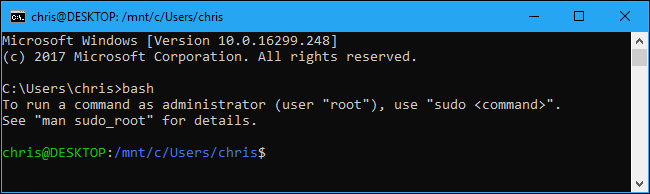
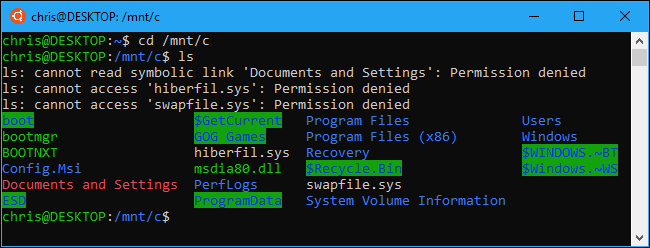
On Ubuntu, you need to prefix a command with sudo to run it with root permissions. The «root» user on UNIX platforms has full system access, like the «Administrator» user on Windows. Your Windows file system is located at /mnt/c in the Bash shell environment.
Use the same Linux terminal commands you’d use to get around. If you’re used to the standard Windows Command Prompt with its DOS commands, here are a few basic commands common to both Bash and Windows:
- Change Directory:
cdin Bash,cdorchdirin DOS - List Contents of Directory:
lsin Bash,dirin DOS - Move or Rename a File:
mvin Bash,moveandrenamein DOS - Copy a File:
cpin Bash,copyin DOS - Delete a File:
rmin Bash,delorerasein DOS - Create a Directory:
mkdirin Bash,mkdirin DOS - Use a Text Editor:
viornanoin Bash,editin DOS
It’s important to remember that, unlike Windows, the Bash shell and its Linux-imitating environment are case-sensitive. In other words, «File.txt» with a capital letter is different from «file.txt» without a capital.
For more instructions, consult our beginner’s guide to the Linux command-line and other similar introductions to the Bash shell, Ubuntu command line, and Linux terminal online.

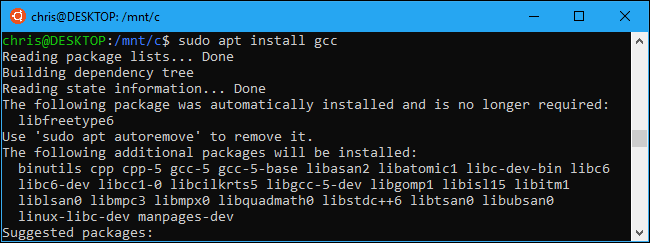
You’ll need to use the apt command to install and update the Ubuntu environment’s software. Be sure to prefix these commands with sudo , which makes them run as root—the Linux equivalent of Administrator. Here are the apt-get commands you’ll need to know:
- Download Updated Information About Available Packages:
sudo apt update - Install an Application Package:
sudo apt install packagename(Replace «packagename» with the package’s name.) - Uninstall an Application Package:
sudo apt remove packagename(Replace «packagename» with the package’s name.) - Search for Available Packages:
sudo apt search word(Replace «word» with a word you want to search package names and descriptions for.) - Download and Install the Latest Versions of Your Installed Packages:
sudo apt upgrade
If you installed a SUSE Linux distribution, you can use the zypper command to install software instead.
After you’ve downloaded and installed an application, you can type its name at the prompt, and then press Enter to run it. Check that particular application’s documentation for more details.
Bonus: Install the Ubuntu Font for a True Ubuntu Experience
If you want a more accurate Ubuntu experience on Windows 10, you can also install the Ubuntu fonts and enable them in the terminal. You don’t have to do this, as the default Windows command prompt font looks pretty good to us, but it’s an option.
Here’s what it looks like:
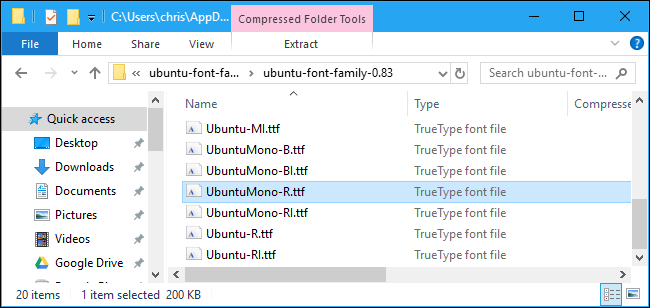
To install the font, first download the Ubuntu Font Family from Ubuntu’s website. Open the downloaded .zip file and locate the «UbuntuMono-R.ttf» file. This is the Ubuntu monospace font, which is the only one used in the terminal. It’s the only font you need to install.
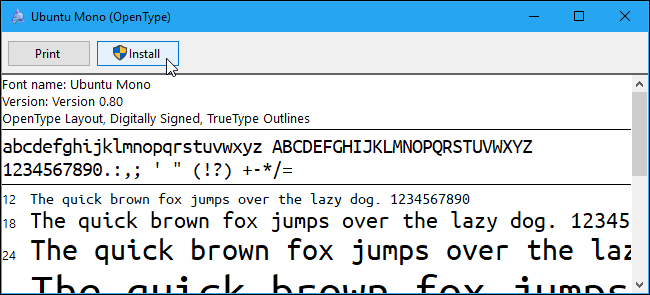
Double-click the «UbuntuMono-R.ttf» file and you’ll see a preview of the font. Click «Install» to install it to your system.
To make the Ubuntu monospace font become an option in the console, you’ll need to add a setting to the Windows registry.
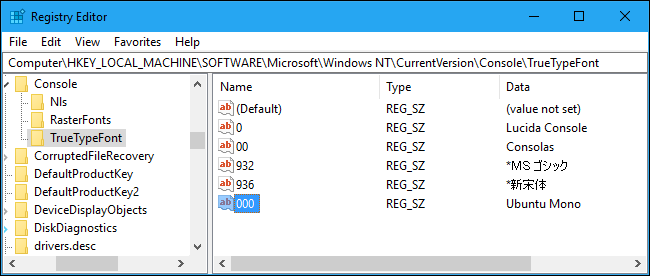
Open a registry editor by pressing Windows+R on your keyboard, typing regedit , and then pressing Enter. Navigate to the following key or copy and paste it into the Registry Editor’s address bar:
HKEY_LOCAL_MACHINE\SOFTWARE\Microsoft\Windows NT\CurrentVersion\Console\TrueTypeFont
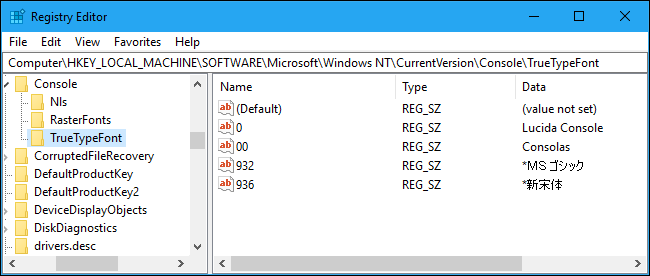
Right-click in the right pane and select New > String Value. Name the new value 000 .
Double-click the «000» string you just created, and then enter Ubuntu Mono as its value data.
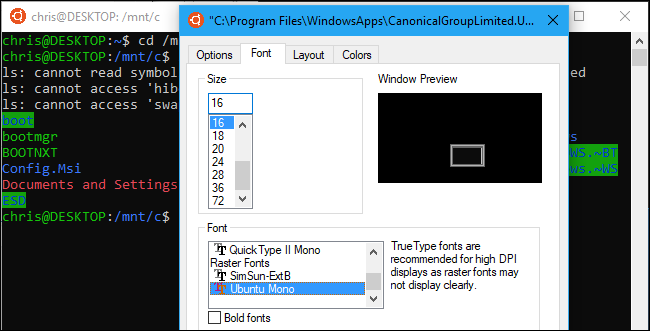
Launch an Ubuntu window, right-click the title bar, and then select the «Properties» command. Click the «Font» tab, and then select «Ubuntu Mono» in the font list.
Software you install in the Bash shell is restricted to the Bash shell. You can access these programs from the Command Prompt, PowerShell, or elsewhere in Windows, but only if you run the bash -c command.
Linux on Windows is a reality, thanks to the partnership between Canonical (parent company of Ubuntu) and Microsoft.
When Microsoft’s CEO announced that the Bash shell was coming to Windows, several people couldn’t believe it. #BashOnWindows trended on Twitter for days; such was the impact of this news.
But Bash on Windows (or Windows Subsystem for Linux) was not available to everyone immediately. People had to install the Windows 10 technical preview to install Linux on Windows 10.
That’s not the case anymore; it is pretty easy to install and use WSL now!
📋
This tutorial was tested with the latest Windows 11 version 22H2, and build 22621.819. You might need to update your Windows installation if you have an older build to follow everything in this tutorial.
What is Bash on Windows?
Bash on Windows provides a Windows subsystem, and Linux runs atop it. It is not a virtual machine or an application like Cygwin. It is a complete Linux system inside Windows 10/11. It allows you to run the same Bash shell you find on Linux. You can run Linux commands inside Windows without installing a virtual machine or dual-boot Linux and Windows.
You install Linux inside Windows like a regular application. This is a good option if your main aim is to learn Linux/UNIX commands.
Check for System Compatibility
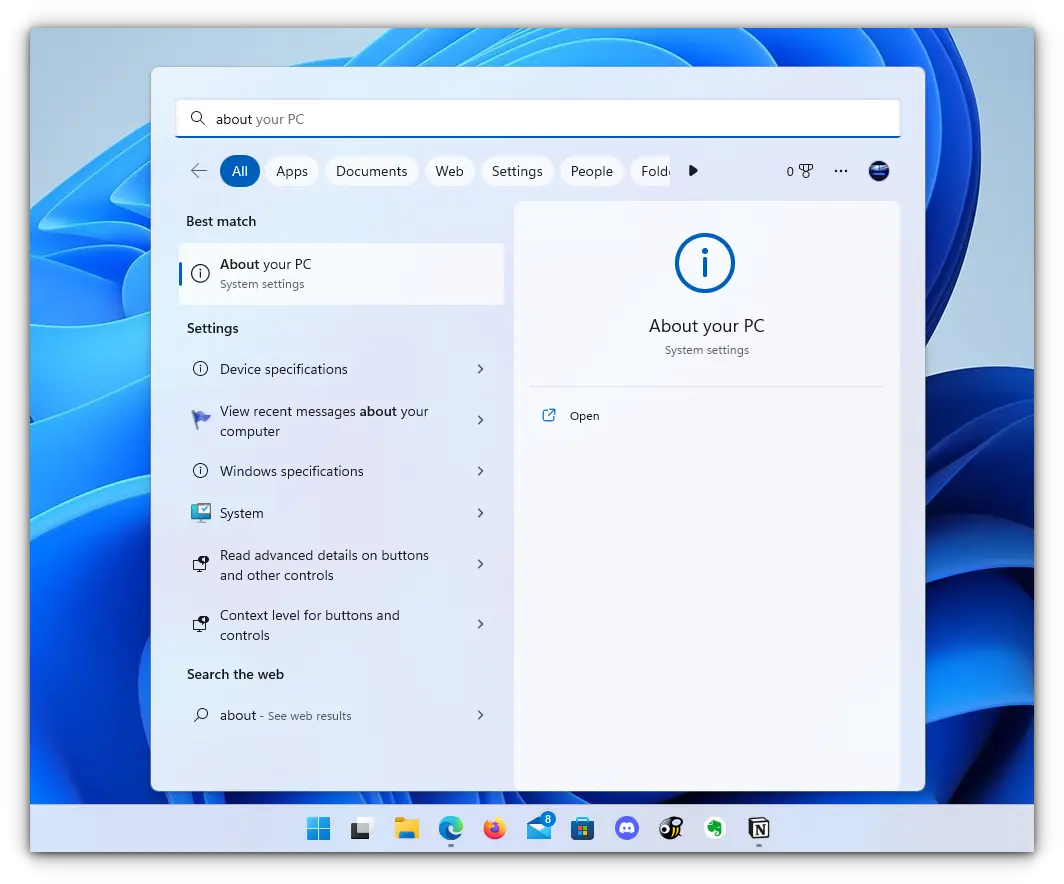
You must be running specific versions of Windows for the different features described in this article. Requirements necessary for a particular feature to work are described under its titles. To check your Windows version, search for about in the start menu.
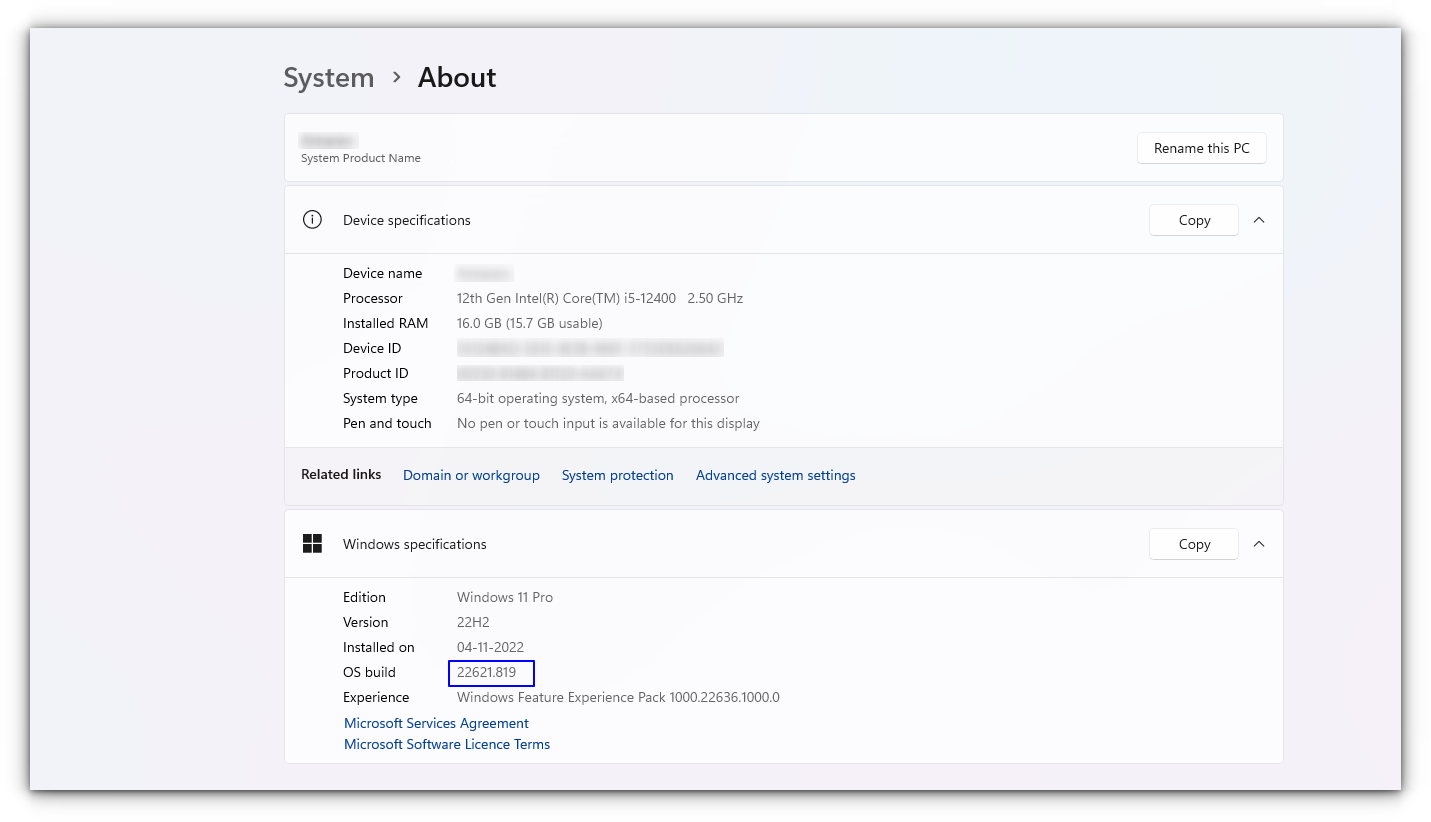
Here, you can see the build of your PC, as shown in the screenshot below. Make sure it is matching with the respective requirements described under various sub-headings here in this article.
- You must be running Windows 10 version 1607 (the Anniversary update) or above.
- WSL only runs on 64-bit versions 32-bit versions are not supported.
Install Bash in Newer Windows 10 and 11
The good thing is that the latest set of upgrades, including the stable release of WSL v1.0 released from Windows, makes it easier to install Bash on Windows.
There are two ways you can go about it:
- You can get it in one click from Windows Store.
- Choose to use the command-line.
1. Install WSL Using the Microsoft Store
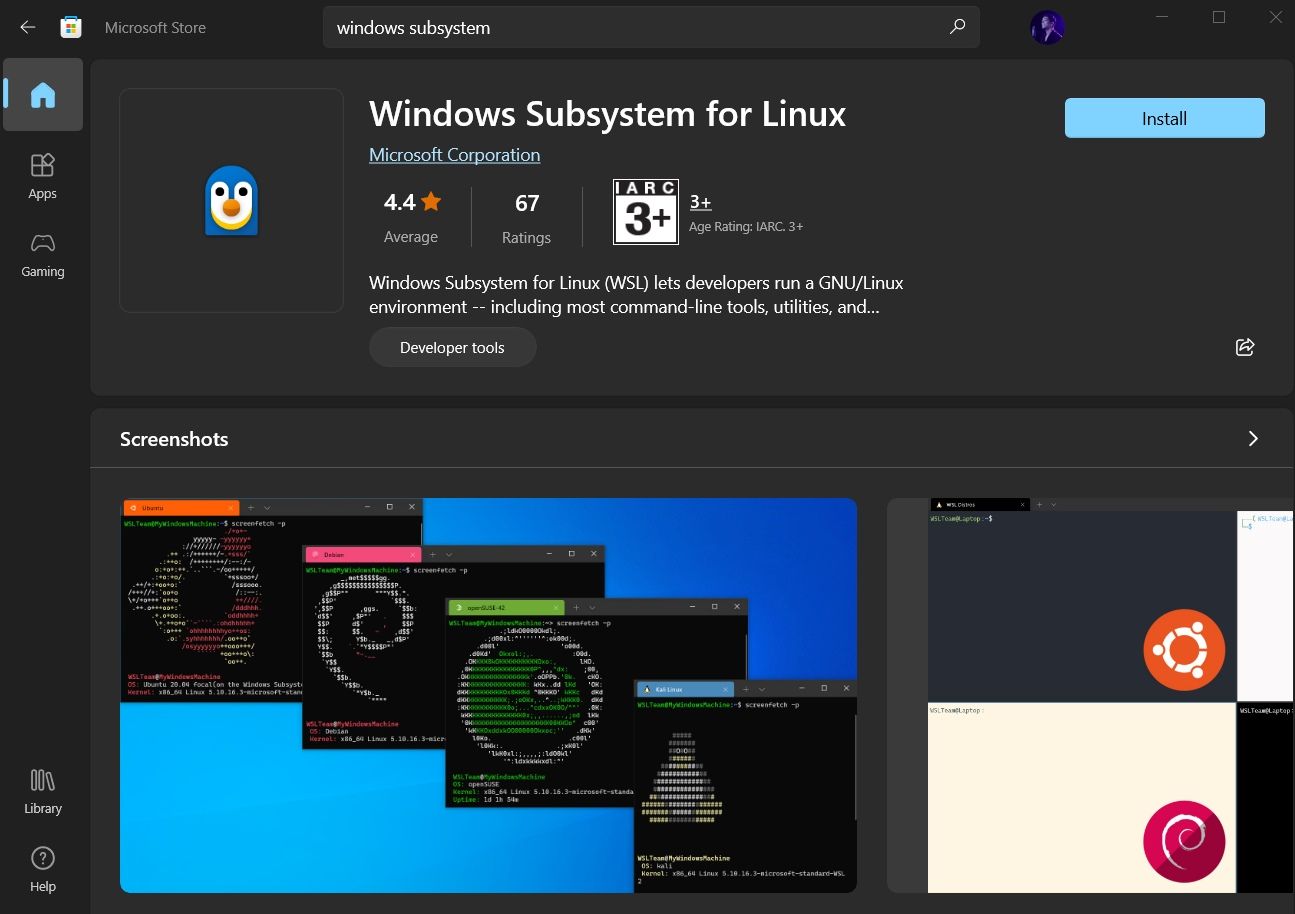
Launch the Microsoft Store and search for «Windows subsystem«.
Install it, and you’re done with the first step. Next, you have to install a Linux distribution.
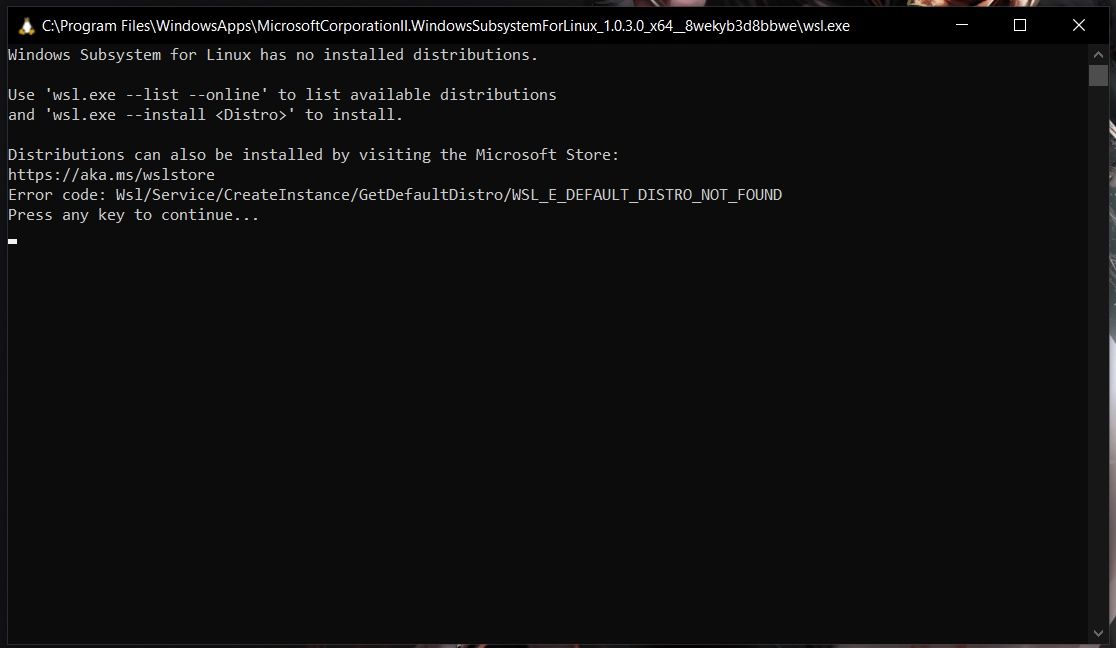
So, if you try to open WSL, you will get to see a window informing you that no distribution is installed.
Similar to WSL, search for the distribution on Microsoft Store, and then install it.
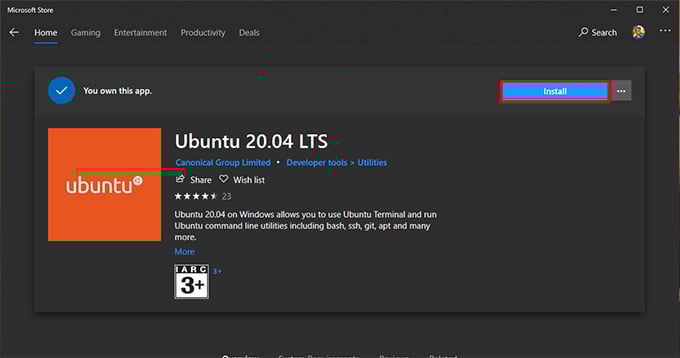
For instance, I installed Ubuntu from the store as shown in the image below:
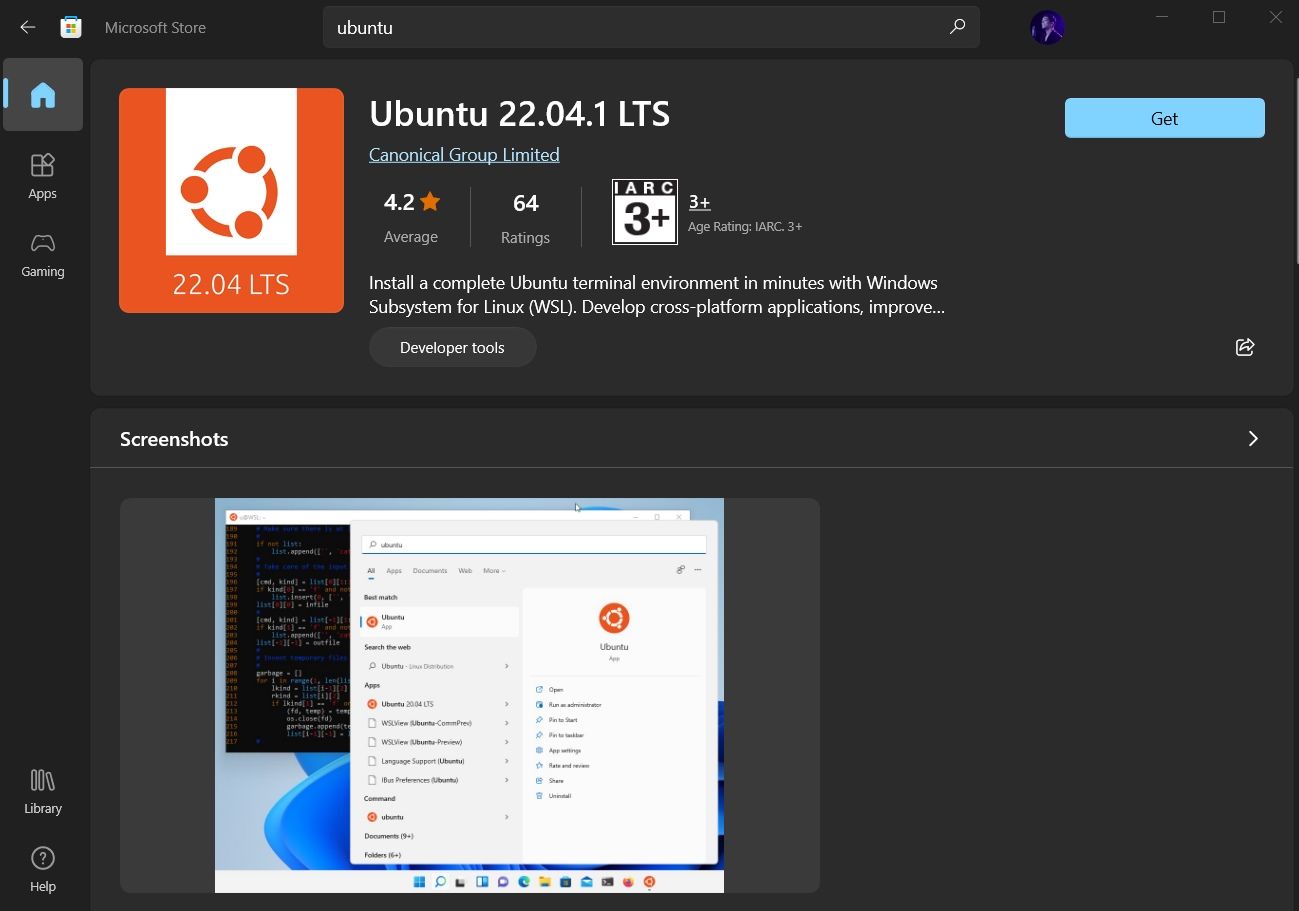
And, then proceed to «Open» it and it will automatically start installing. The procedure is same for any distribution you choose.
We then have to configure it, which is discussed right after installing it through the command line.
2. Install WSL and the default distribution using the command-line
In WSL, the default distribution is Ubuntu (which can be changed). To install, open Powershell as an administrator.
For this, search for Powershell in the start menu, right-click on Powershell and select Run as Administrator.
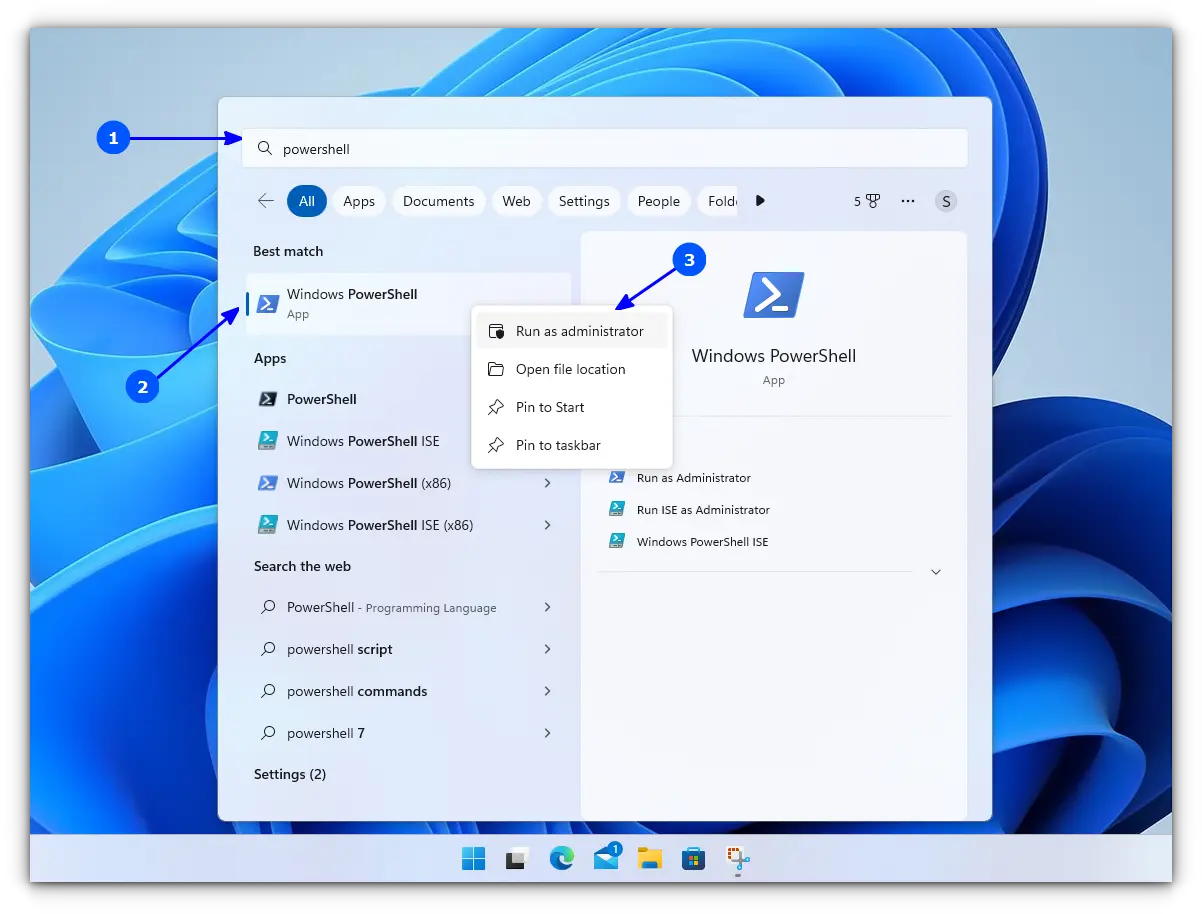
Inside Powershell, enter the following command to install WSL, along with all necessary features and the default distribution, that is, Ubuntu.
wsl --installOnce finished downloading and installing, you need to reboot to apply the changes.
Whether you installed WSL and Ubuntu using the Microsoft Store or the command line, you need to configure it.
Here’s how it is done:
🛠️ Configure the newly installed Ubuntu
After rebooting, search for Ubuntu in Start Menu and open it.

It will ask you to enter a UNIX Username and Password. Enter these details and press enter key.
You will now be inside the terminal window of Ubuntu.
Once logged in, you need to update the installed Ubuntu. For this, enter the following commands one by one:
sudo apt update
sudo apt full-upgrade
After completing the update, you are good to go with Ubuntu in WSL.
Install Bash on Older Windows
If you have the minimum requirements mentioned in the beginning but are running an older Windows build, the previous method may not be supported. So there is a manual installation method.
Also, there are both WSL1 and WSL2 available. WSL2 offers some upgraded functionalities but has some minimum requirements to run:
- For x64 systems: Version 1903 or later, with Build 18362 or later.
- For ARM64 systems: Version 2004 or later, with Build 19041 or later.
So this brings us to two possibilities to install:
- Install Ubuntu with WSL1
- Install Ubuntu with WSL2
1. Install Ubuntu with WSL 1
This is a relatively simple procedure for those with a system incompatible with WSL2. First, you need to enable the Windows Subsystem for the Linux feature. This can be done through the command line. Open Powershell as an administrator and enter the following command:
dism.exe /online /enable-feature /featurename:Microsoft-Windows-Subsystem-Linux /all /norestartOr, to do this via GUI, follow the steps below:
- Search for Windows Features in Start Menu.
- Turn on Windows Subsystem for the Linux feature.
- Reboot your system.
- Open the Windows store and search for the distribution of your choice to install.
Once installation is completed, open the Ubuntu app from the start menu. It will take a couple of seconds to install. You will be prompted to enter a username and password. Provide those credentials, and you are good to go with Ubuntu in WSL1.
2. Install Ubuntu with WSL 2
It is recommended to use WSL2 instead of WSL1 if you have support. To install Ubuntu with WSL2, you need to make sure that the Windows Subsystem for Linux feature is turned on. For this, as in the above case, execute the following command in an elevated Powershell:
dism.exe /online /enable-feature /featurename:Microsoft-Windows-Subsystem-Linux /all /norestartReboot the device once the command is completed.
After this, you need to enable the Virtual Machine Platform feature. Open the Powershell with admin privileges and enter the following command:
dism.exe /online /enable-feature /featurename:VirtualMachinePlatform /all /norestartOnce again, restart the device to complete the WSL install and update to WSL 2.
Now, download the Linux Kernel Update Package for x64 machines from the official website. If you are using ARM64 devices, use this link to download the latest kernel update package.
If you are not sure about the device architecture, enter the command below in Powershell to get the type:
systeminfo | find "System Type"When the file is downloaded, double-click on it and finish the installation of the Kernel update package.
Now, open PowerShell and run this command to set WSL 2 as the default version when installing a new Linux distribution:
wsl --set-default-version 2Once WSL2 is set as the default version, you can now install the Linux distribution of your choice.
Go to Windows Store and install Ubuntu, as described in the earlier steps. and the rest of the procedure is already described above.
Enjoy Linux inside Windows.
🔧 Troubleshooting Tip 1
«The WSL optional component is not enabled. Please enable it and try again.»
You may see an error like this when you try to run Linux inside Windows 10:
The WSL optional component is not enabled. Please enable it and try again.
See https://aka.ms/wslinstall for details.
Error: 0x8007007e
Press any key to continue...
And when you press any key, the application closes immediately.
The reason here is that the Windows Subsystem for Linux is not enabled in your case. You should enable it as explained in this guide. You can do that even after you have installed Linux.
🔧 Troubleshooting Tip 2
Installation failed with error 0x80070003
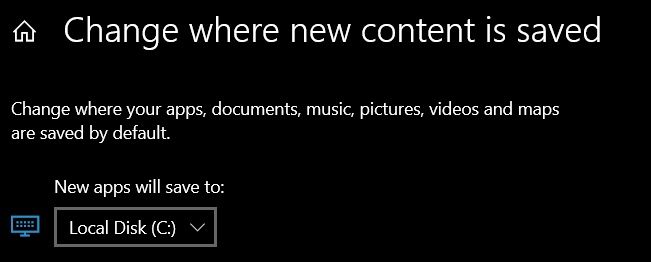
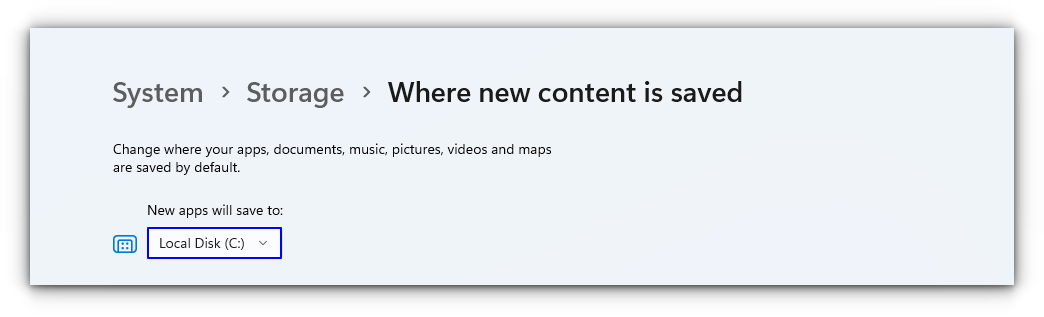
This is because Windows Subsystem for Linux only runs on the system drive i.e. the C drive. You should ensure that when you download Linux from the Windows Store, it is stored and installed in the C Drive.
On Windows 10, go to Settings -> Storage -> More Storage Settings -> Where new content is saved: Change where new content is saved and select C Drive here.
On Windows 11, go to Settings -> System -> Storage -> Advanced storage settings -> Where new content is saved and select C Drive here.
🔧 Troubleshooting Tip 3
«Failed to attach disk Error»
Sometimes, this error will appear when we reinstall the Ubuntu in WSL.
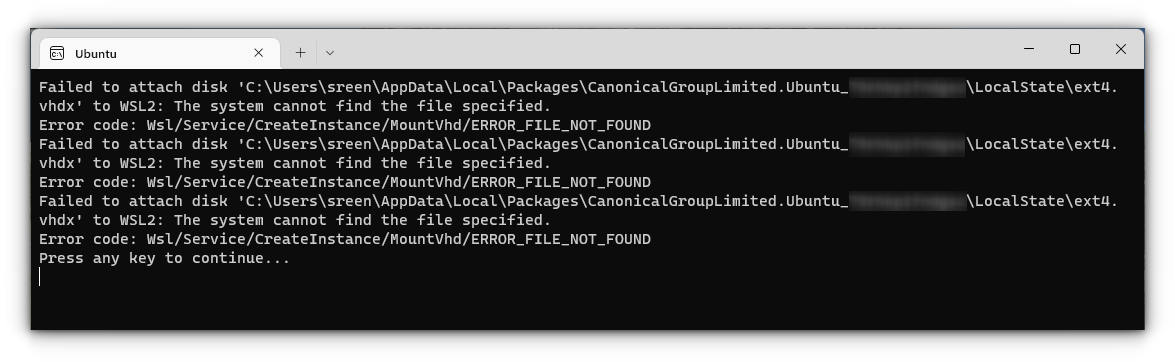
In this case, open Powershell and run the following command:
wsl -l -vThis will list the installed Linux systems. Find the name of the system, that is throwing the error, in my case Ubuntu. Now run the following command:
wsl --unregister UbuntuYou can restart the ubuntu app and it will run without any issues.
You can refer to more common troubleshooting methods from the official website.
Run GUI Apps On Windows Subsystem for Linux
The ability to run GUI apps on Windows Subsystem for Linux was introduced with the WSL 2 release in May 2020.
Windows Subsystem for Linux (WSL) with WSL2 now supports running Linux GUI applications (X11 and Wayland) on Windows in a fully integrated desktop experience. This allows you to install Linux applications and seamlessly integrate them into Windows desktop, including features like “pin to taskbar”.
📋
One crucial point is that you must be on Windows 10 Build 19044+ or Windows 11 to access this feature.
Step 1: Enable/Update WSL 2
This procedure has been explained in the above section and you can refer to it.
Step 2: Download and Install Graphics drivers
To run GUI apps, you need to install appropriate graphics drivers. You can use the following link to download the drivers according to your provider.
- Intel GPU Driver for WSL
- AMD GPU Driver for WSL
- NVIDIA GPU Driver for WSL
Once installed, you are all done.
Step 3: Install some GUI Apps
Now, go to your Ubuntu app and install any GUI app using the APT package manager. You should note that running apps from other sources like flatpak are problematic within WSL.
For this article, I installed the Gedit text editor using the following command:
sudo apt install gedit -yThis will install several MB of packages including required libraries. Once completed, you can run the following command to start the GUI Gedit app in Windows.:
gedit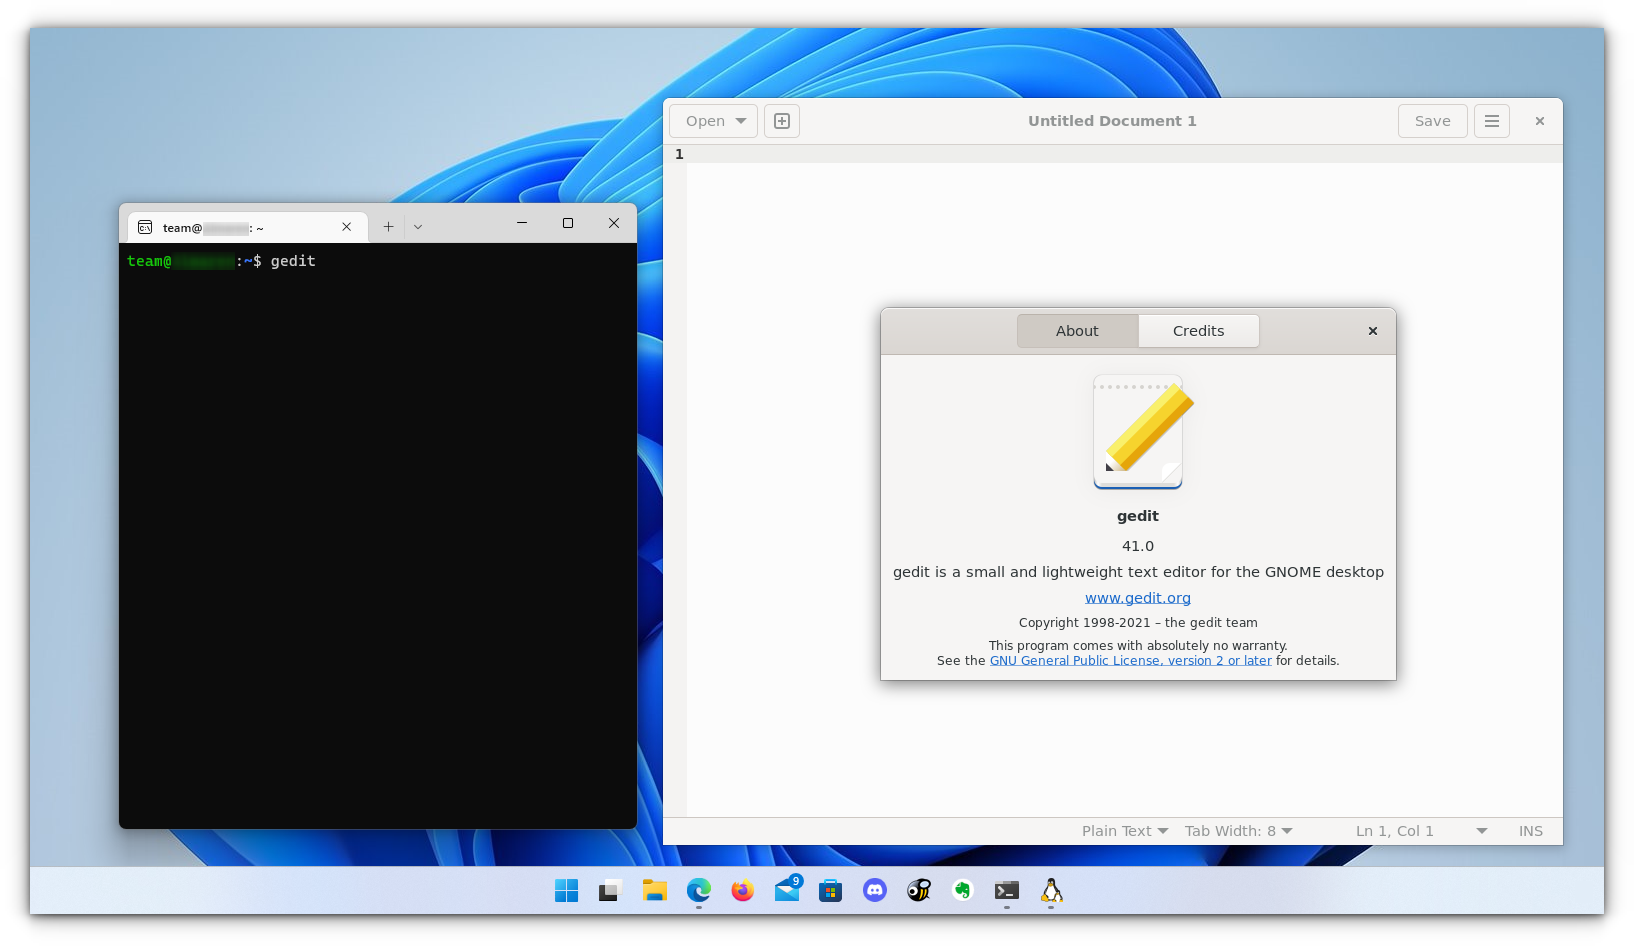
Similarly, you can install all the popular applications available to Linux, including Nautilus file manager, GIMP, etc. For more about running GUI applications in WSL, you can refer to the official documentation.
Install Linux Bash Shell on other older Windows 10
If you cannot get the Fall Creator’s update on Windows 10 for some reason, you can still install it if you have the Anniversary update of Windows 10. But here, you’ll have to enable developer mode. I still recommend upgrading to the Fall Creator’s update or the latest Windows 10 2004 version update though.
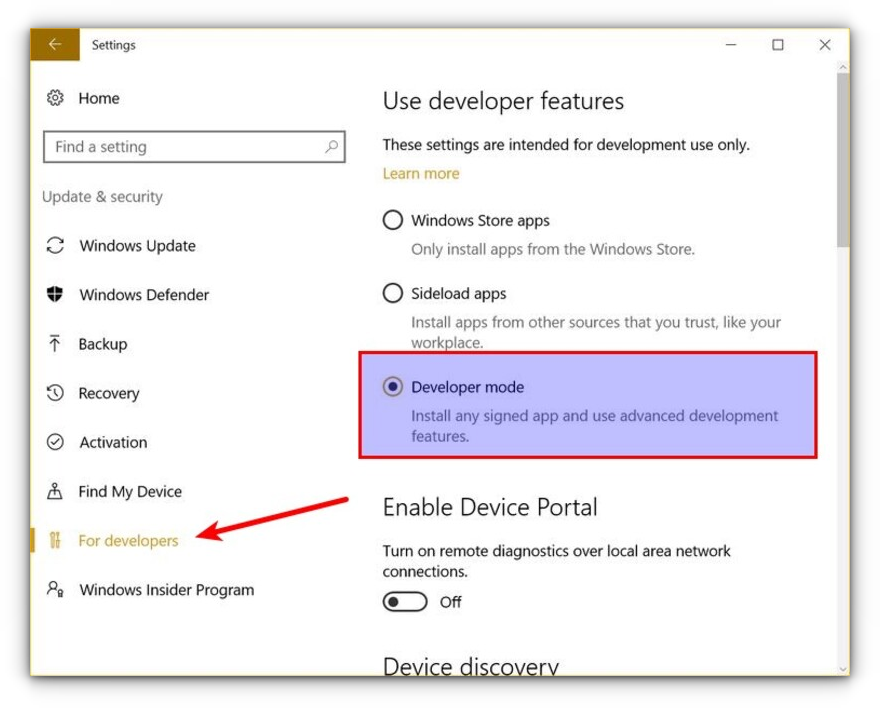
Press Windows Key + I to access Windows system settings. Here, go to Update & Security:
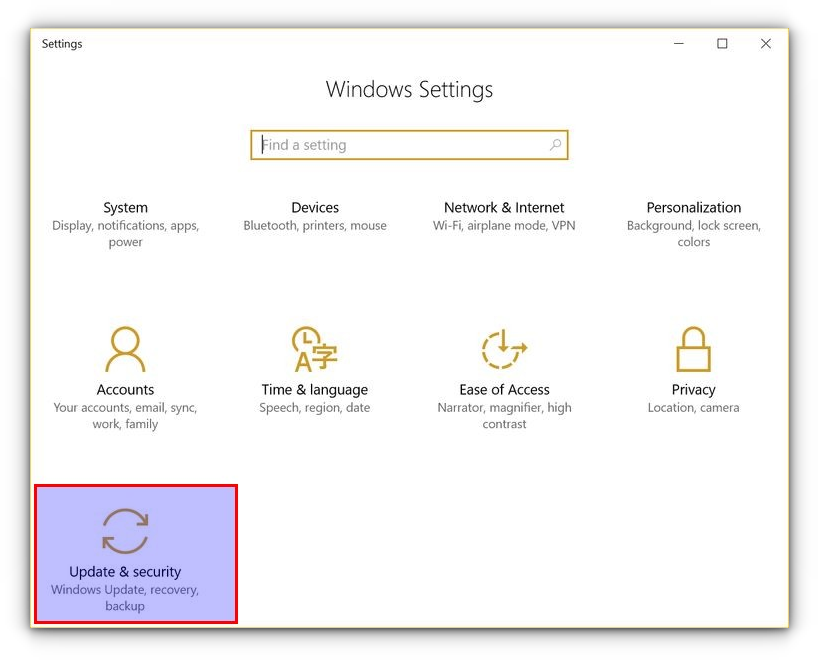
From the left side pane, choose “For developers.” You’ll see an option for “Developer mode.” Enable it.
Now search for Control Panel and in Control Panel, click on “Programs”:
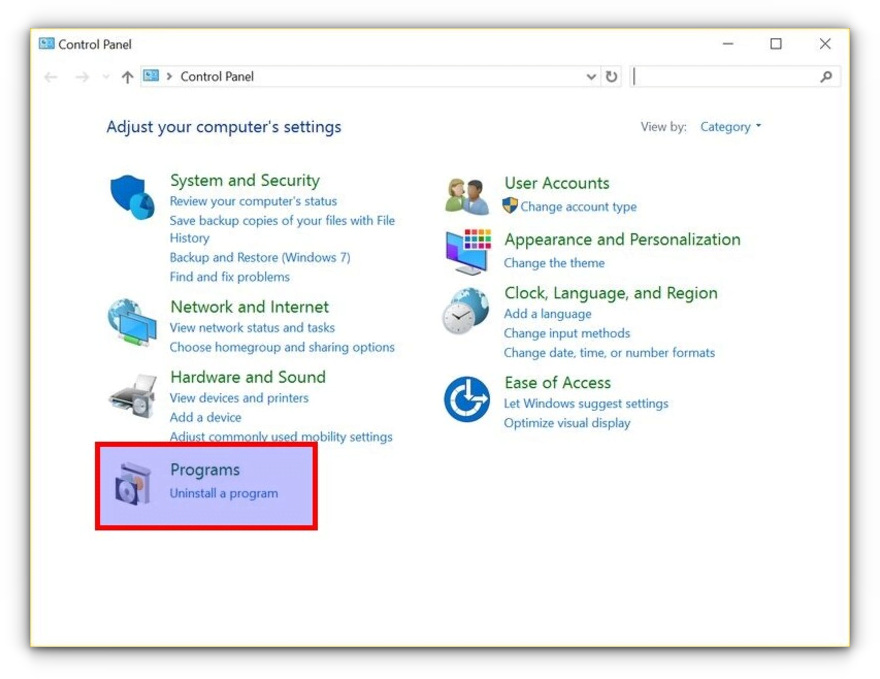
In Programs, click “Turn Windows features on or off”:
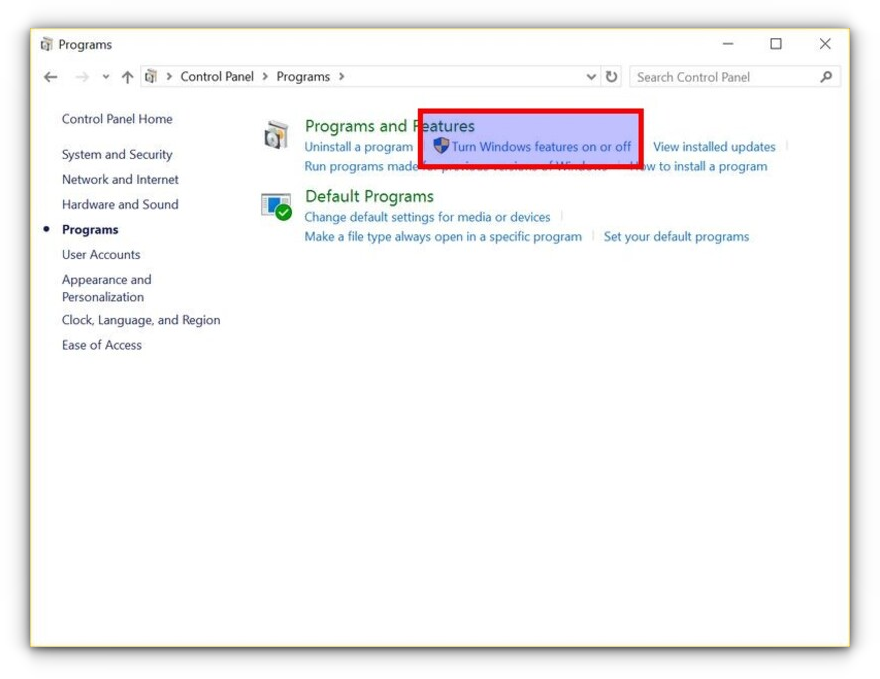
When you do this, you’ll see several Windows features. Look for “Windows Subsystem for Linux” and enable it.
You’ll need to restart the system after doing this.
After restarting the computer, click the start button and search for “bash”.
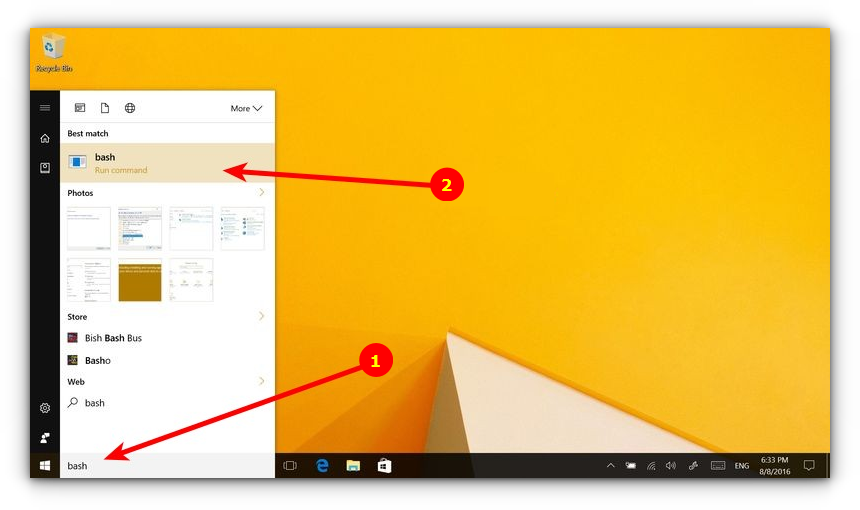
When you run it for the first time, you’ll be given the option to download and install Ubuntu. You’ll be asked to create a username and password during this process. It will install an entire Ubuntu Linux system, so have patience as it will take some time in downloading and installing Linux on Windows.
Once this is done, go back to the Start menu and search for Ubuntu or Bash.
Now you have a command line version of Ubuntu Linux. You can use apt to install various command line tools in it.
💬 I hope you find this tutorial helpful for installing bash on Windows and experimenting with Linux GUI apps on Windows. No wonder WSL lets you play with Linux inside of Windows. If you have questions or suggestions, feel free to ask.
 В Windows 10 появилась новая возможность для разработчиков — оболочка Ubuntu Bash, позволяющая запускать, устанавливать приложения Linux, использовать скрипты bash прямо в Windows 10, все это называется «Подсистема Windows для Linux». В версии Windows 10 1709 Fall Creators Update доступны уже три дистрибутива Linux для установки. Во всех случаях требуется 64-разрядная система для установки.
В этой инструкции — о том, как установить Ubuntu, OpenSUSE или SUSE Linux Enterprise Server в Windows 10 и некоторые примеры использования в конце статьи. Следует также учитывать, что есть некоторые ограничения при использовании bash в Windows: например, нельзя запускать GUI приложения (правда, сообщают об обходных путях с помощью X server). Кроме этого, командами bash нельзя запустить Windows-программы, несмотря на наличие полного доступа к файловой системе ОС.
Установка Ubuntu, OpenSUSE или SUSE Linux Enterprise Server в Windows 10
Начиная с версии Windows 10 Fall Creators Update (версия 1709) установка подсистемы Linux для Windows несколько изменилась по сравнению с тем, что было в предыдущих версиях (для предыдущих версий, начиная с 1607, когда функция была представлена в бета-версии, инструкция — во второй части этой статьи). Также обратите внимание, что в Windows 10 2004 можно установить Kali Linux с графическим интерфейсом.
Теперь необходимые шаги выглядят следующим образом:
- Прежде всего, необходимо включить компонент «Подсистема Windows для Linux» в «Панель управления» — «Программы и компоненты» — «Включение и отключение компонентов Windows».

- После установки компонентов и перезагрузки компьютера, зайдите в Магазин приложений Windows 10 и загрузите оттуда Ubuntu, OpenSUSE или SUSE Linux ES (да, теперь доступно три дистрибутива). При загрузке возможны некоторые нюансы, о которых далее в примечаниях.

- Запустите загруженный дистрибутив как обычное приложение Windows 10 и выполните первоначальную настройку (имя пользователя и пароль).


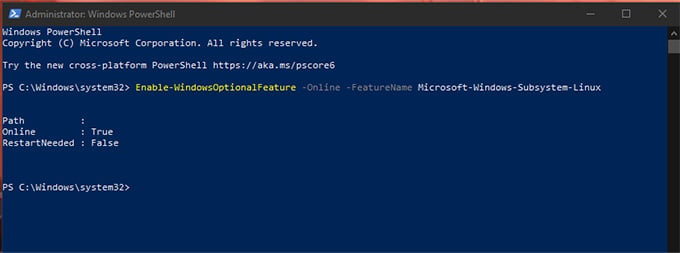
Для включения компонента «Подсистема Windows для Linux» (первый шаг) можно использовать команду PowerShell:
Enable-WindowsOptionalFeature -Online -FeatureName Microsoft-Windows-Subsystem-Linux
Теперь несколько примечаний, которые могут быть полезны при установке:
- Вы можете установить сразу несколько дистрибутивов Linux.
- При загрузке дистрибутивов Ubuntu, OpenSUSE и SUSE Linux Enterprise Server в русскоязычном магазине Windows 10 заметил следующий нюанс: если просто ввести название и нажать Enter, то нужных результатов в поиске не оказывается, но если начать вводить и затем нажать по появляющейся подсказке, автоматически попадаешь на нужную страницу. На всякий случай прямые ссылки на дистрибутивы в магазине: Ubuntu, OpenSUSE, SUSE LES.
- Запускать Linux можно и из командной строки (не только с плитки в меню Пуск): ubuntu, opensuse-42 или sles-12
Установка Bash в Windows 10 1607 и 1703
Для того, чтобы установить оболочку bash, выполните следующие простые действия.
- Зайдите в параметры Windows 10 — Обновление и безопасность — Для разработчиков. Включите режим разработчика (должен быть подключен Интернет для загрузки необходимых компонентов).

- Зайдите в панель управления — Программы и компоненты — Включение или отключение компонентов Windows, отметьте пункт «Подсистема Windows для Linux».

- После установки компонентов, введите в поиске Windows 10 «bash», запустите предлагаемый вариант приложения и выполните установку. Вы можете задать свое имя пользователя и пароль для bash, либо использовать пользователя root без пароля.


По завершении установки вы можете запускать Ubuntu Bash на Windows 10 через поиск, или создав ярлык для оболочки там, где вам требуется.

Примеры использования Ubuntu Shell в Windows
Для начала отмечу, что автор не является специалистом по bash, Linux и разработке, а примеры ниже — просто демонстрация того, что в Windows 10 bash работает с ожидаемыми результатами для тех, кто разбирается в этом.
Приложения Linux
Приложения в Windows 10 Bash можно устанавливать, удалять и обновлять с помощью apt-get (sudo apt-get) из репозитория Ubuntu.

Использование приложений с текстовым интерфейсом ничем не отличается от такового на Ubuntu, например, вы можете установить Git в Bash и использовать его привычным образом.

Скрипты bash
Вы можете запускать скрипты bash в Windows 10, создать их можно в имеющемся в оболочке текстовом редакторе Nano.

Скрипты bash не могут вызвать программы и команды Windows, но возможен запуск скриптов и команд bash из bat файлов и сценариев PowerShell:
bash -c "команда"
Также вы можете попробовать запускать приложения с графическим интерфейсом в Ubuntu Shell в Windows 10, на этот счет в Интернете уже имеется не одна инструкция и суть способа сводится к использованию Xming X Server для вывода GUI приложения. Хотя официально возможность работы с такими приложениями Майкрософт не заявлена.
Как было написано выше, я не тот человек, который может в полной степени оценить ценность и функциональность нововведения, но вижу как минимум одно применение для себя: различные курсы Udacity, edX и другие, связанные с разработкой проходить будет куда проще, работая с необходимыми инструментами прямо в bash (а в этих курсах обычно демонстрируется работа именно в терминале MacOS и Linux bash).
Windows is the Most Popular Operating System for Desktops and Laptops. Whereas developers and professionals love Linux. You would have run Linux OS distros inside Windows using a Virtual Machine. With Windows 10, you have an additional feature to run Linux on Windows without having a Virtual Machine. Since there is no Virtual Machine instance, there is no system overload.
Here, we will talk about WSL (Windows Subsystem for Linux) to get a Linux Bash shell on Windows and run Linux commands without installing a Virtual Machine.
Content
- What is WSL (Windows Subsystem for Linux)
- Setting up WSL on Windows 10
- Upgrade to WSL 2
- Install Ubuntu on Windows 10 without Virtual Machine
- Enable GUI for Windows Subsystem for Linux
- Access Linux Desktop with Remote Desktop Connection
- Open Linux Terminal Anywhere
- Shared Folders for Windows & Linux
- Wrapping Up: Linux on Windows 10
What is WSL (Windows Subsystem for Linux)
The WSL or Windows Subsystem for Linux feature enables running Linux command-line tools and utilities on top of Windows. Using WSL, you can install your favorite Linux distro under the hoods of Windows. Also, these distros will include most CLI (Command Line Interface) tools, utilities, and applications.
The most interesting part is that everything in Linux will run without any modifications. Let’s see what all things you can do with this Linux Terminal on Windows:
- Choose and install your favorite Linux Distro from Microsoft Store.
- Run the most common Command Line tools such as grep, sed, and other ELF-64 binaries.
- Bash shell script support.
- Run different services such as Apache, PostgreSQL, etc.
- Install extra tools with the Linux default package manager.
- Invoke Windows apps from a Unix-like shell.
- Run Linux Workflows inside Windows.
- Develop Linux Applications using the power of Windows tools
- Manage IT infrastructure by running a cloud server distro inside Windows.
Related: 14 Best Portable Linux Distro to Boot and Run from USB
Setting up WSL on Windows 10
We need to tweak Windows a little bit to set up a WSL or Windows Subsystem for Linux. We have to enable WSL Feature in Windows first:
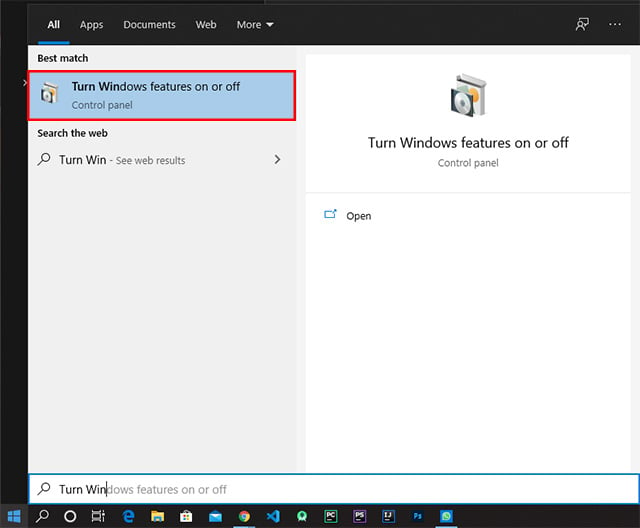
- Click on Start, and Search and open “Turn Windows Features on or off“.
- In the popped-up window, find and enable “Windows Subsystem for Linux“.
- Click “OK.“
- Once the changes are applied, save your work and click on “Restart.”
Or you can use Powershell to enable the feature. When prompted, run the following command in PowerShell (Admin) and restart the computer.
Enable-WindowsOptionalFeature -Online -FeatureName Microsoft-Windows-Subsystem-Linux
After completing the new feature update, your PC will be ready to run Linux on Windows. Now let’s see how to install your favorite Linux Distribution in Windows with WSL.
Related: 10 Best Lightweight Linux Distros to Revive Old Computer (2019)
Upgrade to WSL 2
To switch your version of WSL to WSL 2, you have to tweak Windows with some Powershell commands. Let’s see how.
We can upgrade the version of a specific WSL Distro or the whole Distro at once. Now, Open Powershell as Administrator by following the method mentioned above. Run the following commands in Powershell Window.
As the first step, Download WSL2 Kernel Update from Given Link.
https://wslstorestorage.blob.core.windows.net/wslblob/wsl_update_x64.msi
Install the setup as same as you do for other apps. Then proceed with the following.
For Specific Linux on Windows
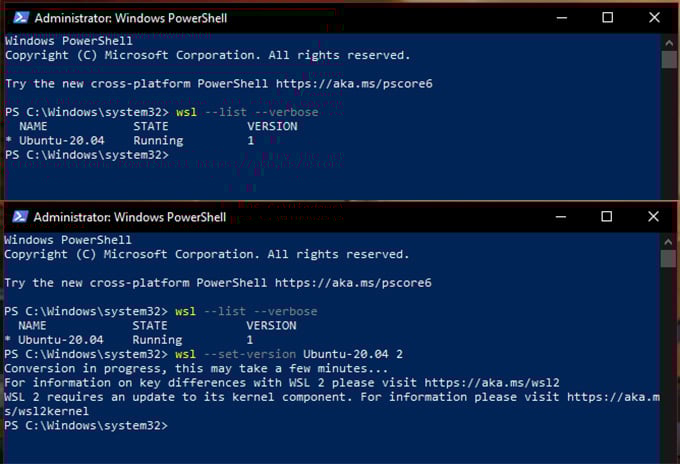
To list out installed Linux distributions. If you don’t have any yet, follow the next section.
wsl --list --verbose
To set the version to WSL 2:
wsl --set-version <distribution name> <version>
Example:
wsl --set-version Ubuntu-20.04 2
For Global WSL for Windows
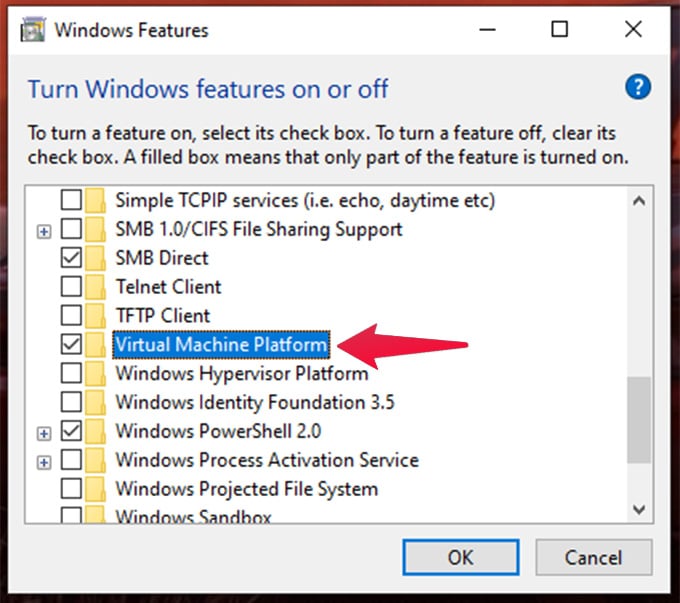
To enable WSL 2 as the global default, we must enable one more additional feature in Windows Features.
- Open the Windows Features window.
- Check the checkbox near the feature called “Virtual Machine Platform“.
- Click on OK.

- Wait for the changes to apply.
- Restart your computer when prompted.
After restarting, open Powershell as Administrator and run the following command. Then restart your computer to update the feature from WSL 1 to WSL 2.
wsl --set-default-version 2

Here it is. Now proceed with installing your favorite Linux Distro in Windows.
Install Ubuntu on Windows 10 without Virtual Machine
WSL supports various Linux distributions. You can install any of the Linux distros listed below:
- Ubuntu LTS(Base)
- Ubuntu 20.04 LTS
- Kali Linux
- Debian
- OpenSUSE Leap
- SUSE Linux Enterprise Server
Here, we are going to install Ubuntu 20.04 LTS. You can choose any distro of your choice.
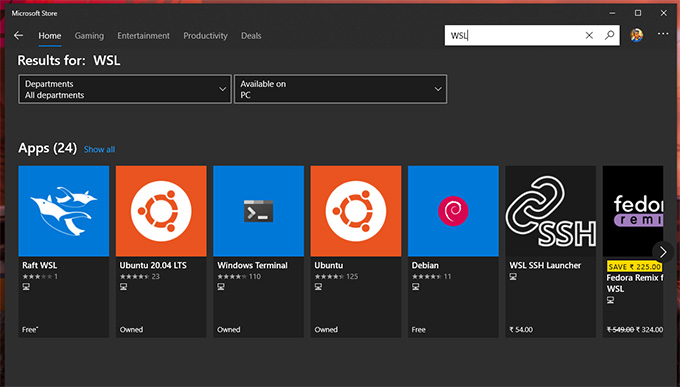
- Open Microsoft Store.
- Search for “WSL” in the search box in the top right corner.
- Click on “Ubuntu 20.04 LTS” or any other distro listed above.
- Click on Get > Install.
- Wait until the installation is finish.
Now that Ubuntu 20.04 LTS is ready for its first launch. You can either click on the launch button in Microsoft Store or launch from the Start Menu.
The first setup will take some time to register the Ubuntu environment with WSL. Once that’s finished, the prompt will ask for the Username and Password for your Linux Shell. Enter and complete the setup.
After, you can try your favorite Linux commands in this Ubuntu Shell. By default, the home directory of this Windows 10 Linux will be clean and tidy. Hence it gives all the freedom to the user for customizations.
Run the following commands in Ubuntu Terminal to check if the system is up to date.
sudo apt update
sudo apt dist-upgrade
The “update” command is used to update the Ubuntu repositories. And the “dist-upgrade” command upgrade packages with all their dependencies. Wait for them to complete.
Now you can install any tools and apps your need in this Ubuntu Environment.
Related: How to Share Clipboard Data Between Android and Ubuntu (Linux)
Enable GUI for Windows Subsystem for Linux
We can run Linux GUI apps in our Windows Environment itself. To enable GUI on Windows 10, Linux Terminal needs to install some tools in both environments. For the time being, we have to use thirty-party apps to run the GUI in Windows 10 Linux Terminal.
Installing the X Server Utility
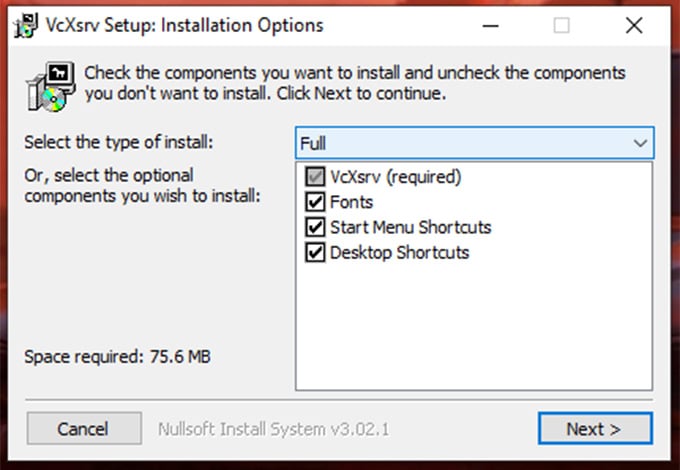
X Server provides almost everything needed to interact with the Linux WSL on Windows. This includes all graphical resources and keyboard/mouse events. The best option available for now is the VcXsrv Windows X Server.
- Download and install the VcXsrv from the link given below. https://sourceforge.net/projects/vcxsrv/
- Run the setup, and choose “Full” in the selection box to install the complete X Server Utility.

- Once install finishes, launch XLaunch from Start Menu.
- This will lead you to a couple of configurations.
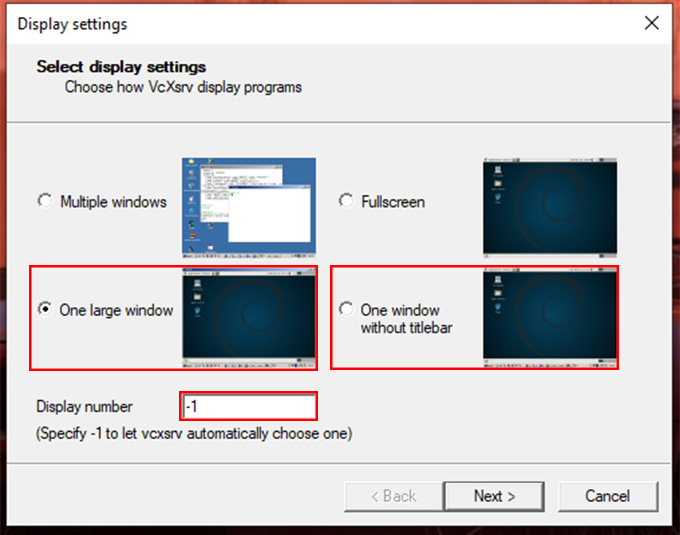
- On the “Display Settings” window, choose “One Large Window” or “One Window without title bar.” Leave the Display number as “-1”. Click Next.

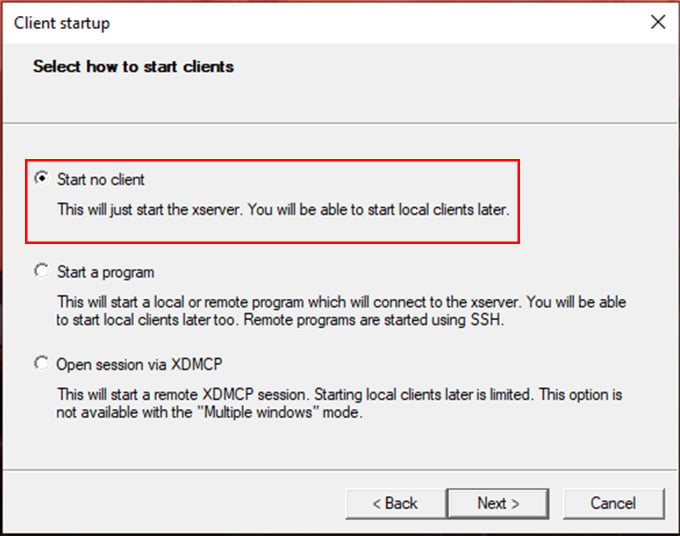
- In the next window, choose “Start no client” and click on Next.

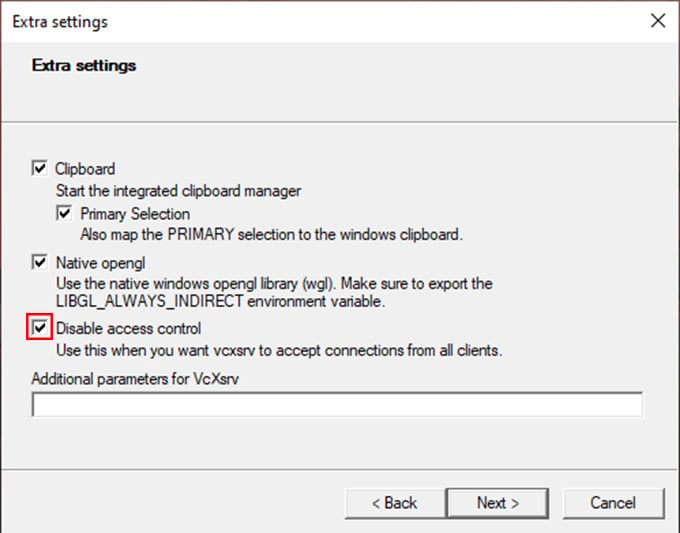
- On the “Extra Settings” window, check the “Disable access control” option. This will avoid the “Permission Denied” errors while running GUI apps.

- To avoid running into errors later, save the configuration from the next window. Also, always ensure you are running the X Server with this saved configuration.
- Click on Finish. A Security alert will follow up. Make sure both Private and Public are checked. And Click on Allow Access.

- Close the black window opened up for now because we got to do a little more on the Linux side, also.

Configure Display Manager in Linux
Now we have to enable Linux to communicate with X Server utility, and of course, this happens over the local network.
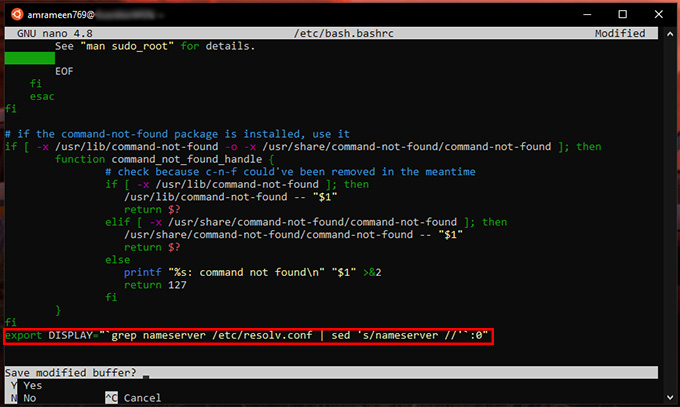
Simply copy and paste the following command in the Linux Terminal for Windows and press Enter.
For WSL 1:
export DISPLAY=:0
export LIBGL_ALWAYS_INDIRECT=1
For WSL 2:
export DISPLAY="`grep nameserver /etc/resolv.conf | sed 's/nameserver //'`:0"
export LIBGL_ALWAYS_INDIRECT=1
This is to set the Display environment of Linux to use the IP address of Windows Host as both WSL and Windows are not in the same network device.
Then enter the following to check whether your host IP is changed or not.
echo $DISPLAY
This step is very important so that the WSL can communicate with X Server on each launch. To run this command on each startup of the Linux Terminal, you can include it in/etc/bash.bashrc file. Follow the steps below:
Run the following to open the file with Nano editor in the Linux Terminal with Superuser privileges. Enter your password when prompted.
sudo nano /etc/bash.bashrc
Add the following to the end of the file. Use the Down Arrow key to navigate the cursor. After copying the code, please right-click the mouse button to paste it inside the Terminal Window.
For WSL 1:
export DISPLAY=:0
export LIBGL_ALWAYS_INDIRECT=1
For WSL 2:
export DISPLAY="`grep nameserver /etc/resolv.conf | sed 's/nameserver //'`:0"
export LIBGL_ALWAYS_INDIRECT=1
Then press Ctrl + X to exit. The prompt will ask you to save the buffer. Press the Y key. And then press Enter key. From now, each time you open the Linux Terminal on Windows, the Display Host IP is set to Windows Host IP.
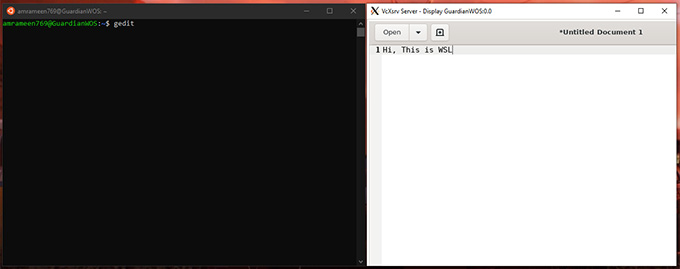
Installing a Linux GUI app
Let’s install and test a Linux GUI app inside the Ubuntu WSL terminal to ensure everything is working. For the Demo, I am using Gedit Text Editor. You can use any one of your choices.
To install Gedit, follow the commands below:
sudo apt install gedit
This will install all xserver utilities needed for the GUI app to run inside the Native Linux Environment along with Gedit. Press Y when the prompt asks for confirmation.
After finishing the installation, find the saved XServer configuration. Double Click on the file to start the X Server with a saved configuration. Make sure the X Server’s Blank Window is running in the background. Then switch to the Linux Terminal, and start the Gedit by running the following command:
gedit
The Gedit GUI will be opened in the X Server Window. You can now do whatever you do with a native Linux GUI App. Always ensure XLaunch is running before launching any GUI Apps on Windows Desktop Environment.
That’s all about Enabling GUI on Linux Terminal for Windows. Now, there is another way to interact with WSL distros with RDP(Remote Desktop Protocol) Connection. Let’s have a look at it.
Related: 10 Best Linux Games to Play In 2021
Access Linux Desktop with Remote Desktop Connection
Since Linux supports RDP, we can also connect to Linux Desktop through Remote Desktop Clients. For this, we need to install a Linux Desktop environment in the Linux On Windows first. I am going ahead with xfce4 since it is one lightweight Linux environment.
Enter the command:
sudo apt install xfce4
The setup will ask you to choose a display manager for Linux. Choose gdm3 or lightdm. And Press Enter.
Also, we need to initialize a graphical login interface for the RDP connection from Microsoft Remote Desktop. For this, install and start a service called xrdp in the Linux Terminal.
For Ubuntu:
sudo apt install xrdp
sudo service xrdp start

The start command will ask for network access. Click Allow access to accept.

To check whether it is running, perform the following command:
service xrdp status
Then we have to find out the IP address of the Ubuntu Machine. For that, run:
ip a
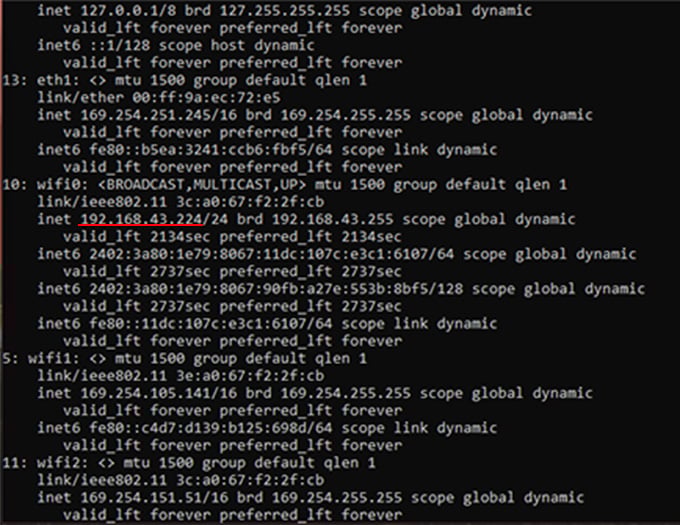
Copy the IP address of your adapter, which supports “MULTICAST, BROADCAST.” Use Ctrl + Shift + C to copy from the Linux Terminal for Windows.
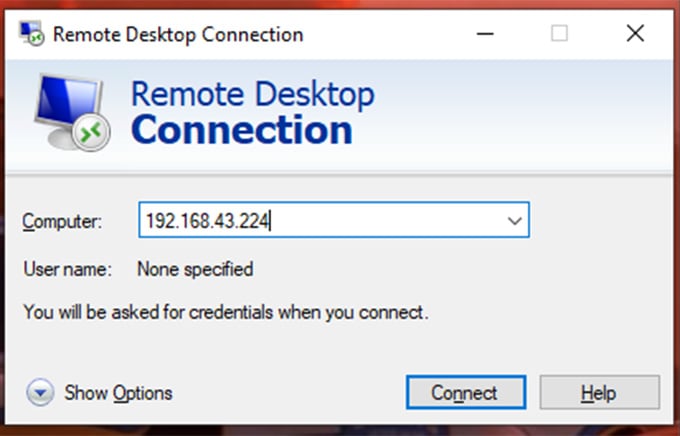
- Then click on the Start menu on Windows, and type “mstsc”.
- Paste the copied IP address in the “Computer” field.

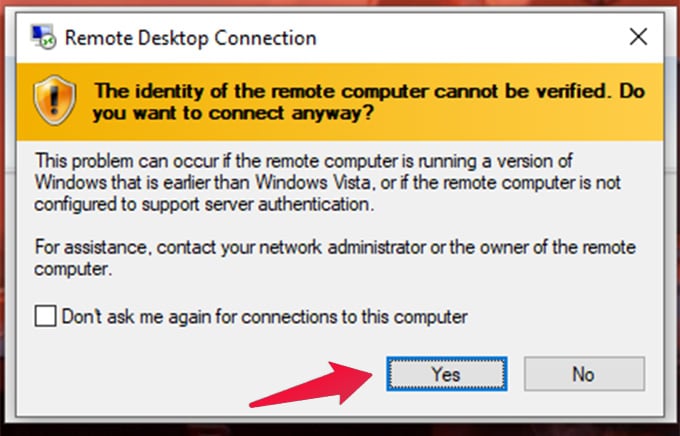
- Click on Connect. Then, click Yes on the next prompt. You will be redirected to the Xrdp login.
- Enter your Linux username and password, and click Ok.

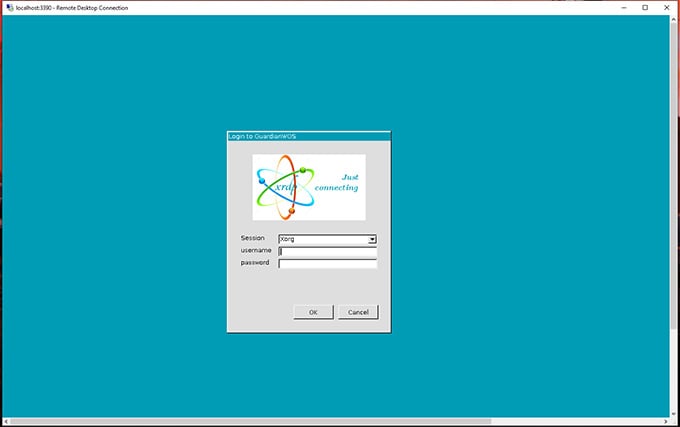
If this fails with a message shown below, check out the following method.
Your computer could not connect to another console session on the remote computer because you already have a console session in progress.
Let’s configure Xrdp a little bit. Run the following commands in sequence.
sudo cp /etc/xrdp/xrdp.ini /etc/xrdp/xrdp.ini.bak
sudo sed -i 's/3389/3390/g' /etc/xrdp/xrdp.ini
sudo sed -i 's/max_bpp=32/#max_bpp=32\nmax_bpp=128/g' /etc/xrdp/xrdp.ini
sudo sed -i 's/xserverbpp=24/#xserverbpp=24\nxserverbpp=128/g' /etc/xrdp/xrdp.ini
sudo service xrdp restart
Then, again try to connect to Linux on Windows with Microsoft Remote Desktop Client as described above.
There you go. A complete Linux Desktop Environment under Windows Desktop.
Open Linux Terminal Anywhere
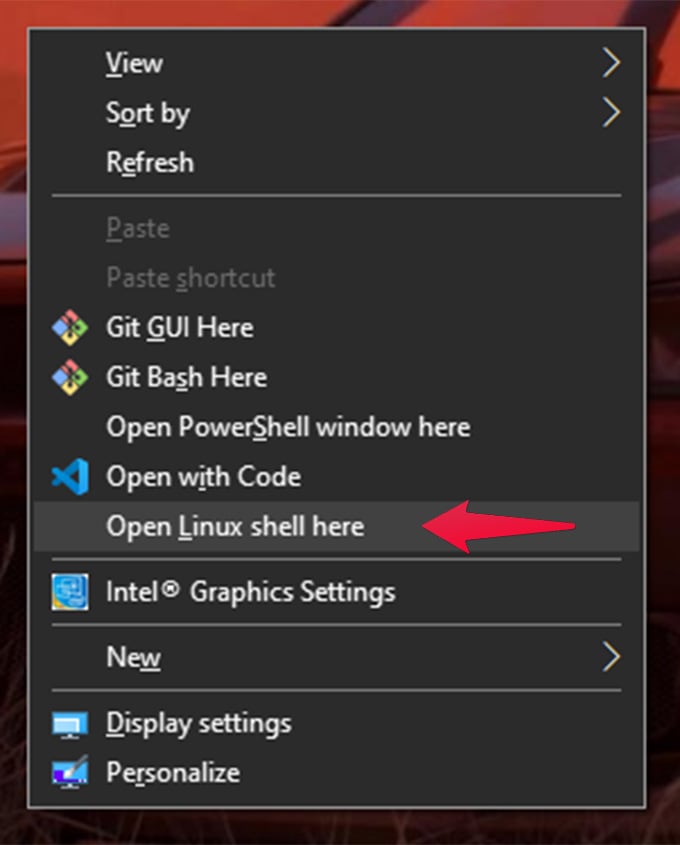
To open up Linux Terminal anywhere on Windows:
- Press Shift + Right Click on the plain area of any folder.
- Click on Open Linux shell here.

- The Linux Terminal will open for the Folder you are currently in.
Related: Get Hyper Terminal on Windows 7 and 8
The WSL folders and files are stored in Windows as Shared Network Drives. We are going to access those files through some simple steps. Tweaking the “Shared Folder” with Linux on Windows:
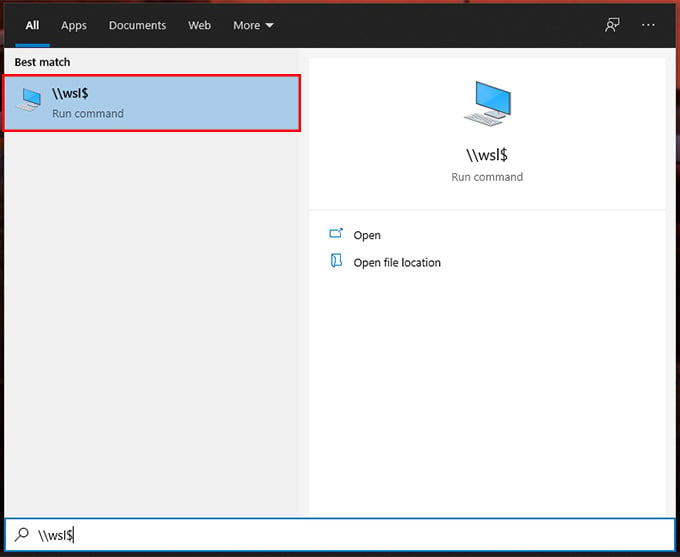
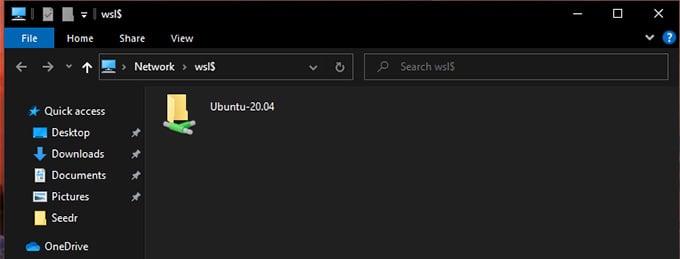
- Click on Start Menu.
- Type in \\wsl$ and press Enter.

- A network drive will be shown with the name of your Installed Version of Linux.

- Open the folder, and you will find the Linux root folder and files.
- Now you can manage WSL files and folders right from Windows.
Wrapping Up: Linux on Windows 10
WSL provides many handy features to a normal Windows user to taste the flavors of Linux. This feature can help you do more with your needs. This enables a lot of Linux-only features inside Windows. WSL is the perfect choice for you if you want to run Linux on Windows 10 without making an overload your computer.
Disclosure: Mashtips is supported by its audience. As an Amazon Associate I earn from qualifying purchases.
Linux Bash Shell is a powerful and versatile shell that can be used to manage your computer’s tasks. It is available as a free download from the internet, and it can be installed on Windows 10 using the following steps:
- Open the Start Menu and type » Linux Bash Shell “.
- When the Linux Bash Shell window opens, type » install “.
- Follow the prompts to install the Linux Bash Shell on your Windows 10 computer.
- Once the Linux Bash Shell has been installed, open it up by typing » start “.
- Type “Shell” into the text field in the top left corner of the Linux Bash Shell window, and then click on OK .
What You Need to Know About Windows 10’s Bash Shell
RELATED: Everything You Can Do With Windows 10’s New Bash Shell
How Windows Subsystem for Linux 1 (WSL1) Works
Windows 10 offers a full Windows Subsystem intended for Linux (WSL) for running Linux software. This isn’t a virtual machine, a container, or Linux software compiled for Windows (like Cygwin). It’s based on Microsoft’s abandoned Project Astoria work for running Android apps on Windows.
Think of it as the opposite of Wine. While Wine allows you to run Windows applications directly on Linux, the Windows Subsystem for Linux allows you to run Linux applications directly on Windows.
Microsoft worked with Canonical to offer a full Ubuntu-based Bash shell environment that runs atop this subsystem. Technically, this isn’t Linux at all. Linux is the underlying operating system kernel, and that isn’t available here. Instead, this allows you to run the Bash shell and the exact same binaries you’d normally run on Ubuntu Linux. Free software purists often argue the average Linux operating system should be called “GNU/Linux” because it’s really a lot of GNU software running on the Linux kernel. The Bash shell you’ll get is really just all those GNU utilities and other software.
While this feature was originally called “Bash on Ubuntu on Windows,” it also allows you to run Zsh and other command-line shells. It now supports other Linux distributions, too. You can choose openSUSE Leap or SUSE Enterprise Server instead of Ubuntu, and there is a remix of Fedora available.
There are some limitations here. It won’t officially work with graphical Linux desktop applications. Not every command-line application works, either, as the feature isn’t perfect.
How Windows Subsystem for Linux 2 (WSL2) Works
Windows Subsystem for Linux 2 (WSL2) is designed to provide the exact same user experience as its predecessor, but the similarities mostly end there.
WSL2 runs a full Linux Kernel in an extremely efficient virtual machine. Just like WSL1, WSL2 allows you use a range of different Linux Distros including, Ubuntu, Debian, Kali, openSUSE, Fedora, and others. That also means that most any Linux application, package, or command will work without an issue.
RELATED: How Do I Know if I’m Running 32-bit or 64-bit Windows?
This feature doesn’t work on the 32-bit version of Windows 10, so ensure you’re using the 64-bit version of Windows. It’s time to switch to the 64-bit version of Windows 10 if you’re still using the 32-bit version, anyway.
Assuming you have 64-bit Windows, to get started, head to Control Panel > Programs > Turn Windows Features On Or Off. Enable the “Windows Subsystem for Linux” option in the list, and then click the “OK” button.
Click “Restart now” when you’re prompted to restart your computer. The feature won’t work until you reboot.
Alternatively, you can also install it using PowerShell. Launch PowerShell as an Administrator, then enter:
It’ll take a few minutes to download and install all of the required components — after it does, you need to restart your computer.
After your computer restarts, open the Microsoft Store from the Start menu, and search for “Linux” in the store.
RELATED: What’s the Difference Between Ubuntu, openSUSE, and Fedora on Windows 10?
You’ll see a list of every Linux distribution currently available in the Windows Store. As of the Fall Creators Update, this includes Ubuntu, openSUSE Leap, and openSUSE Enterprise, with a promise that Fedora will arrive soon.
To install a Linux distribution, click it, and then click the “Get” or “Install” button to install it like any other Store application.
If you’re not sure which Linux environment to install, we recommend Ubuntu. This popular Linux distribution was previously the only option available, but other Linux systems are now available for people who have more specific needs.
You can also install multiple Linux distributions and they’ll each get their own unique shortcuts. You can even run multiple different Linux distributions at a time in different windows.
How to Use The Bash Shell and Install Linux Software
RELATED: How to Install Linux Software in Windows 10’s Ubuntu Bash Shell
You now have a full command-line bash shell based on Ubuntu, or whatever other Linux distribution you installed.
Because they’re the same binaries, you can use Ubuntu’s apt or apt-get command to install software from Ubuntu’s repositories if you’re using Ubuntu. Just use whatever command you’d normally use on that Linux distribution. You’ll have access to all the Linux command line software out there, although some applications may not yet work perfectly.
To open the Linux environment you installed, just open the Start menu and search for whatever distribution you installed. For example, if you installed Ubuntu, launch the Ubuntu shortcut.
You can pin this application shortcut to your Start menu, taskbar, or desktop for easier access.
The first time you launch the Linux environment, you’re be prompted to enter a UNIX username and password. These don’t have to match your Windows username and password, but will be used within the Linux environment.
For example, if you enter “bob” and “letmein” as your credentials, your username in the Linux environment will be “bob” and the password you use inside the Linux environment will be “letmein” — no matter what your Windows username and password are.
RELATED: How to Set Your Default Linux Distribution on Windows 10
You can launch your installed Linux environment by running the wsl command. If you have multiple Linux distributions installed, you can choose the default Linux environment this command launches.
If you have Ubuntu installed, you can also run the ubuntu command to install it. For openSUSE Leap 42, use opensuse-42 . For SUSE Linux Enterprise Sever 12, use sles-12 . These commands are listed on each Linux distribution’s page on the Windows Store.
You can still launch your default Linux environment by running the bash command, but Microsoft says this is deprecated. This means the bash command may stop functioning in the future.
If you’re experienced using a Bash shell on Linux, Mac OS X, or other platforms, you’ll be right at home.
On Ubuntu, you need to prefix a command with sudo to run it with root permissions. The “root” user on UNIX platforms has full system access, like the “Administrator” user on Windows. Your Windows file system is located at /mnt/c in the Bash shell environment.
Use the same Linux terminal commands you’d use to get around. If you’re used to the standard Windows Command Prompt with its DOS commands, here are a few basic commands common to both Bash and Windows:
Change Directory: cd in Bash, cd or chdir in DOS List Contents of Directory: ls in Bash, dir in DOS Move or Rename a File: mv in Bash, move and rename in DOS Copy a File: cp in Bash, copy in DOS Delete a File: rm in Bash, del or erase in DOS Create a Directory: mkdir in Bash, mkdir in DOS Use a Text Editor: vi or nano in Bash, edit in DOS
RELATED: Beginner Geek: How to Start Using the Linux Terminal
It’s important to remember that, unlike Windows, the Bash shell and its Linux-imitating environment are case-sensitive. In other words, “File.txt” with a capital letter is different from “file.txt” without a capital.
For more instructions, consult our beginner’s guide to the Linux command-line and other similar introductions to the Bash shell, Ubuntu command line, and Linux terminal online.
You’ll need to use the apt command to install and update the Ubuntu environment’s software. Be sure to prefix these commands with sudo , which makes them run as root–the Linux equivalent of Administrator. Here are the apt-get commands you’ll need to know:
Download Updated Information About Available Packages: sudo apt update Install an Application Package: sudo apt install packagename (Replace “packagename” with the package’s name.
) Uninstall an Application Package: sudo apt remove packagename (Replace “packagename” with the package’s name.
) Search for Available Packages: sudo apt search word (Replace “word” with a word you want to search package names and descriptions for.
) Download and Install the Latest Versions of Your Installed Packages: sudo apt upgrade
If you installed a SUSE Linux distribution, you can use the zypper command to install software instead.
After you’ve downloaded and installed an application, you can type its name at the prompt, and then press Enter to run it. Check that particular application’s documentation for more details.
Bonus: Install the Ubuntu Font for a True Ubuntu Experience
If you want a more accurate Ubuntu experience on Windows 10, you can also install the Ubuntu fonts and enable them in the terminal. You don’t have to do this, as the default Windows command prompt font looks pretty good to us, but it’s an option.
Here’s what it looks like:
To install the font, first download the Ubuntu Font Family from Ubuntu’s website. Open the downloaded .zip file and locate the “UbuntuMono-R.ttf” file. This is the Ubuntu monospace font, which is the only one used in the terminal. It’s the only font you need to install.
Double-click the “UbuntuMono-R.ttf” file and you’ll see a preview of the font. Click “Install” to install it to your system.
RELATED: Learning to Use the Registry Editor Like a Pro
To make the Ubuntu monospace font become an option in the console, you’ll need to add a setting to the Windows registry.
Open a registry editor by pressing Windows+R on your keyboard, typing regedit , and then pressing Enter. Navigate to the following key or copy and paste it into the Registry Editor’s address bar:
Right-click in the right pane and select New > String Value. Name the new value 000 .
Double-click the “000” string you just created, and then enter Ubuntu Mono as its value data.
Launch an Ubuntu window, right-click the title bar, and then select the “Properties” command. Click the “Font” tab, and then select “Ubuntu Mono” in the font list.
Software you install in the Bash shell is restricted to the Bash shell. You can access these programs from the Command Prompt, PowerShell, or elsewhere in Windows, but only if you run the bash -c command.