Are you having trouble changing the speed of the link on your Windows 10 computer? If so, you’re not alone. Many people have difficulty navigating Windows 10’s menus and settings to make changes to the speed of the link. Fortunately, this guide will walk you through the steps of changing your link speed on Windows 10 so you can enjoy a faster connection. Keep reading to learn more.
How To Change Link Speed Windows 10?
1. Right-click on the Start button. Select Network Connections.
2. Right-click on the network adapter you want to change and select Properties.
3. Select the Configure button. Select the Advanced tab.
4. Under the Property section, select the Link Speed & Duplex option.
5. Select the Value drop-down menu and select the desired link speed.
6. Click the OK button. Close the Network Connections window.
7. Reboot the computer to apply the changes.

Changing Link Speed in Windows 10
Knowing how to change link speed in Windows 10 can be useful for troubleshooting network issues and improving network performance. Link speed refers to the rate at which data is transmitted across the network, and it is important to be able to adjust it if necessary. In this article, we’ll go over the steps that you need to take in order to change the link speed in Windows 10.
Accessing Network Adapter Properties
The first step to changing the link speed in Windows 10 is to access the Network Adapter Properties. To do this, open the Control Panel, then select “Network and Sharing Center”. Next, click on “Change adapter settings”. This will bring up a window with a list of all of your network adapters. Select the network adapter that you would like to change the link speed for, and then right-click on it. This will bring up a menu with various options, including “Properties”. Select this option to open up the Network Adapter Properties window.
Opening the Advanced Tab
Once you have opened the Network Adapter Properties window, you will need to navigate to the Advanced tab. This tab will allow you to adjust various settings related to the network adapter, including the link speed. To access the Advanced tab, click on the “Advanced” tab at the top of the window.
Changing Link Speed
Once you have opened the Advanced tab, you will see a list of settings that you can adjust. Locate the setting for “Link Speed” and click on it. This will open up a window that allows you to select the desired link speed. Select the link speed that you would like to use and then click “OK” to save your changes.
Verifying Link Speed Changes
Once you have made your changes, you can verify that the link speed has been changed by running a speed test. You can find a variety of speed test tools online, or you can use the Windows 10 Network Speed Test app. Run a speed test and verify that the link speed is set to the desired value.
Troubleshooting
If you are having trouble changing the link speed in Windows 10, you may need to troubleshoot the issue. The first step is to make sure that the network adapter is up to date. To do this, open the Device Manager and locate the network adapter. Right-click on it and select “Update Driver”. This will allow you to download and install the latest driver for the network adapter.
Using Command Prompt
In some cases, you may need to use the Command Prompt to change the link speed. To do this, open the Command Prompt and type in the following command: “netsh interface set interface name=”” link speed=”. Replace the network adapter name and the desired speed with the appropriate values. Once the command has been entered, press Enter to execute it. This will change the link speed for the specified network adapter.
Using PowerShell
Finally, you can also use PowerShell to change the link speed in Windows 10. To do this, open PowerShell and type in the following command: “Set-NetAdapterBinding -Name “” -LinkSpeed ”. Replace the network adapter name and the desired speed with the appropriate values. Once the command has been entered, press Enter to execute it. This will change the link speed for the specified network adapter.
Top 6 Frequently Asked Questions
Q1. What is the purpose of changing link speed in Windows 10?
A1. The purpose of changing the link speed in Windows 10 is to optimize the speed and performance of the network connection. For example, if you are using a wireless connection, the link speed can be adjusted in order to improve the signal strength and speed of the connection. This can be useful for streaming video or downloading large files, as a faster connection will result in less buffering and faster download speeds.
Q2. What are the different link speeds available?
A2. The different link speeds available depend on the type of network connection you are using. For example, if you are using a wired connection, the speeds available may range from 10 Mbps to 1 Gbps. For wireless connections, speeds may range from 54 Mbps to 600 Mbps. It is important to note that the maximum speed achievable will depend on the router and signal strength of the connection.
Q3. How do I change the link speed in Windows 10?
A3. In order to change the link speed in Windows 10, you will need to access the Network and Sharing Center. To do this, go to the Start Menu, type ‘Network and Sharing Center’ and press Enter. From here, you can select your network connection and change the speed settings in the Properties menu.
Q4. What should I do to ensure the best connection speed?
A4. In order to ensure the best connection speed, it is important to make sure that the router is up to date and that the signal strength is strong. Additionally, if you are using a wireless connection, it is important to make sure that there are no obstacles blocking the signal, such as walls or furniture.
Q5. Is it possible to change the link speed in Windows 10 without a router?
A5. No, it is not possible to change the link speed in Windows 10 without a router. The link speed is determined by the router, so in order to change the link speed, you will need to access the router settings.
Q6. Is it possible to change the link speed in Windows 10 for a wireless connection?
A6. Yes, it is possible to change the link speed in Windows 10 for a wireless connection. To do this, you will need to access the Network and Sharing Center, then select your wireless connection and adjust the speed settings in the Properties menu. It is important to note that the maximum speed achievable is dependent on the router and signal strength of the connection.
Configuring Speed and Duplex in Windows
Changing the link speed of your Windows 10 computer is easy, and it can save you time and frustration when dealing with slow or unreliable connections. By following the simple steps outlined in this article, you can configure your Windows 10 computer to use the optimal link speed for your specific connection. With the correct link speed set, you can ensure that you are getting the best possible performance out of your connection.
Настройка скорости и дуплекса сетевого соединения в операционной системе Windows 10 может оказаться не такой простой задачей. Важно правильно выбрать значения этих параметров, чтобы добиться максимальной производительности и стабильности вашей сети.
Скорость определяет, как быстро данные передаются через ваше сетевое соединение. Важно выбрать подходящую скорость, учитывая спецификации вашей сетевой аппаратуры и условия подключения. Обычные значения скорости включают 10 Мбит/с, 100 Мбит/с, 1 Гбит/с и так далее.
Дуплекс относится к способу передачи данных по сети. Полудуплексный режим позволяет передавать данные только в одном направлении за раз, в то время как полнодуплексный режим позволяет одновременную двухстороннюю передачу данных. Правильный выбор дуплекса зависит от вашей сетевой аппаратуры и подключения. В большинстве случаев рекомендуется использовать полнодуплексный режим.
Важно отметить, что настройки скорости и дуплекса должны быть согласованы с конфигурацией других устройств в сети, таких как маршрутизаторы, коммутаторы и сетевые карты. Неправильные настройки могут привести к низкой производительности, потере пакетов данных и другим проблемам соединения.
При выборе значений для скорости и дуплекса в Windows 10 рекомендуется обращаться к документации вашей сетевой аппаратуры или консультироваться с производителем. Также вы можете провести тестирование для определения оптимальных настроек скорости и дуплекса для вашей сети.
Содержание
- Как выбрать скорость и дуплекс в Windows 10?
- Разбор понятий
- Рекомендации по выбору скорости
Как выбрать скорость и дуплекс в Windows 10?
В Windows 10 есть возможность настройки скорости и дуплекса подключенного сетевого устройства. Эти параметры влияют на передачу данных между компьютером и сетевым устройством, и правильная настройка может повысить производительность вашей сети.
Для выбора скорости и дуплекса в Windows 10, следуйте следующим шагам:
1. Откройте «Панель управления» и выберите «Устройства и принтеры».
2. Щелкните правой кнопкой мыши на сетевом устройстве, для которого нужно изменить настройки, и выберите «Свойства».
3. Во вкладке «Драйвер» нажмите на кнопку «Дополнительно».
4. В открывшемся окне найдите секцию «Скорость» и выберите желаемую скорость передачи данных из доступных вариантов.
5. Затем, найдите секцию «Дуплекс» и выберите режим работы — полудуплекс или полный дуплекс, в зависимости от ваших требований и возможностей сетевого устройства.
6. Нажмите «ОК», чтобы сохранить изменения.
После этого, новые настройки скорости и дуплекса должны быть применены к выбранному сетевому устройству. Однако, учтите, что не все сетевые устройства поддерживают все возможные комбинации скорости и дуплекса.
Если вы не уверены, какие настройки выбрать, рекомендуется выбрать «Автоматически», чтобы система сама определила наиболее подходящие параметры для вашего сетевого устройства.
Разбор понятий
Перед тем как выбрать значение для скорости и дуплекса в Windows 10, полезно понять, что означают эти термины.
Скорость соединения (или скорость передачи данных) определяет количество данных, которые могут быть переданы через сетевое соединение за определенный период времени. Скорость может быть измерена в битах в секунду (bps) или в байтах в секунду (Bps).
Дуплексное соединение определяет возможность передачи данных в обоих направлениях одновременно. В полудуплексном режиме данные могут передаваться только в одном направлении за один период времени, в то время как в полный дуплекс можно передавать данные одновременно и в обоих направлениях.
При настройке сетевого соединения в Windows 10 можно выбрать различные значения для скорости и дуплекса, в зависимости от требований и возможностей сетевого оборудования.
- Автоматическое определение скорости и дуплекса (Auto Negotiation) позволяет сетевому оборудованию самостоятельно определить оптимальные параметры для соединения.
- Фиксированная скорость и дуплекс (Forced Speed and Duplex) требует ручной установки значения скорости и дуплекса сетевого соединения. Здесь необходимо указать конкретные значения, которые будут использоваться.
Выбор значения для скорости и дуплекса должен быть основан на требованиях вашей сети и возможностях сетевого оборудования. Если вы не знаете оптимальные значения, рекомендуется использовать автоматическое определение скорости и дуплекса.
Рекомендации по выбору скорости
При настройке сетевого подключения в Windows 10 очень важно выбрать правильное значение для скорости соединения. Оно определяет скорость передачи данных между вашим компьютером и сетью.
Автоопределение: Рекомендуется выбрать опцию «Автоопределение» для скорости, если у вас нет специфических требований к скорости соединения. В этом случае операционная система сама определит наиболее оптимальное значение для вас.
10 Мбит/с: Если вы используете старое сетевое оборудование или ваш интернет-провайдер предоставляет ограниченную скорость, то рекомендуется выбрать значение 10 Мбит/с. Это позволит избежать возможных проблем с соединением и обеспечит стабильную передачу данных.
100 Мбит/с: Если ваше сетевое оборудование и интернет-провайдер поддерживают более высокие скорости, рекомендуется выбрать значение 100 Мбит/с. Это позволит вам получить более быстрый доступ к сети и более быструю передачу данных.
1 Гбит/с: Если у вас есть современное сетевое оборудование и вы подключены к высокоскоростной сети, то можно выбрать значение 1 Гбит/с. Это обеспечит максимально возможную скорость передачи данных и позволит вам полностью использовать доступные ресурсы сети.
Следует отметить, что выбор значения скорости может зависеть от конкретной сетевой среды и требований вашего приложения или работы. Поэтому, если у вас возникли сомнения или вопросы, всегда рекомендуется проконсультироваться с IT-специалистом или провайдером услуг.
Configuring Speed and Duplex in Windows*
Navigate to the Device Manager .
Open Properties on the adapter you would like to configure.
Click the Link Speed tab.
Select the appropriate speed and duplex from the Speed and Duplex pull down menu.
Click OK.
How do I Change my Ethernet Speed Windows 10?
Modify the Ethernet Card Speed and Power Management
Rightclick on Ethernet and then select Properties. Click Configure. Click the Advanced tab and set the Ethernet card Speed & Duplex settings to 100 Mbps Full Duplex. Note: The option in the Property field may be named Link Speed & Duplex or just Speed & Duplex.
How do I Change my LAN Speed from 100 to 1000 Windows 10?
Go to the icon of the taskbar.
Locate the icon Internet.
Press on network and internet settings.
Click on Ethernet.
Click change adapter options.
Double click on Ethernet. There, you get the speed, it can be 100 mbps or 1Gbps.
Why is my Internet Speed only 100mbps?
This is common. Incidents such as rolling over the cable with an office chair, or stepping on it, or closing a door on it, can all cause a Cat 5e cable to revert to 100 Mbps link speeds when it was previously working at Gigabit speeds. Try different ports on your access point hub, switch, router.
How do I Change my Ethernet Speed to 1Gbps?
In the window where the speed was indicated, click on properties.
Make sure that the Microsoft Network Client option is checked.
We click on configure.
We go to advanced options and look for Speed & Duplex.
We have to change the value by 1.0 Gbps Full Duplex.
Press accept.
How to Check your Computer’s Network Interface Speed
Open Networking and Sharing Center .
Click on blue text next to Connections:
Review the speed on the PC.
If the Speed is any value less than 1.0 Gbps → Click Properties
Click Configure
Click Advanced → Under Property select Speed & Duplex
How do I Check Duplex Settings?
Rightclick on Ethernet and then select Properties. Click Configure. Click the Advanced tab and set the Ethernet card Speed & Duplex settings to 100 Mbps Full Duplex. Note: The option in the Property field may be named Link Speed & Duplex or just Speed & Duplex.
What should I Set my Speed and Duplex At?
If the speed is 10 or 100 Mbps, use half duplex.
If the speed is 1,000 Mbps or faster, use full duplex.
How do you Know if its Half or Full Duplex?
A full -duplex device is capable of bi-directional network data transmissions at the same time. Half-duplex devices can only transmit in one direction at one time. With half-duplex mode, data can move in two directions, but not at the same time.
How do I Change my Ethernet Speed?
Go to Control Panel > Network and Sharing Center > Change adapter settings.
Right click on the appropriate Local Area Connection and click Properties.
Click Configure.
Go to the Link Speed tab, and in the Speed and Duplex section, select 1.0Gbps full duplex, and click okay.
How can I Speed up my Network Adapter?
Disable File and Printer Sharing for Microsoft Networks.
Enter a thirdparty DNS server address manually.
Improve throughput using Jumbo Frames.
Increase traffic regulation efficiency with Flow Control.
Enable Receive Side Scaling.
Select speed and duplex of your connection.
How to Change Link Speed of Ethernet Adapter Windows 11
If the Ethernet Network status window in Windows 11 or Windows 10 shows 100 Mbps (sometimes 10 Mbps) as the speed value, and you are attempting to change it to 1 Gbps, this guide will explain why you are seeing 100 Mbps instead of 1 Gbps and what you can do to upgrade your network to Gigabit Ethernet.
Note: If you are looking for a step-by-step guide on how to force change your computer’s Ethernet speed from 100 Mbps to 1 Gbps or vice versa using the “Speed and Duplex setting” in Windows 11/10, see the instructions in this guide instead: Ethernet Internet Speed Capped at 100 Mbps (Fix).
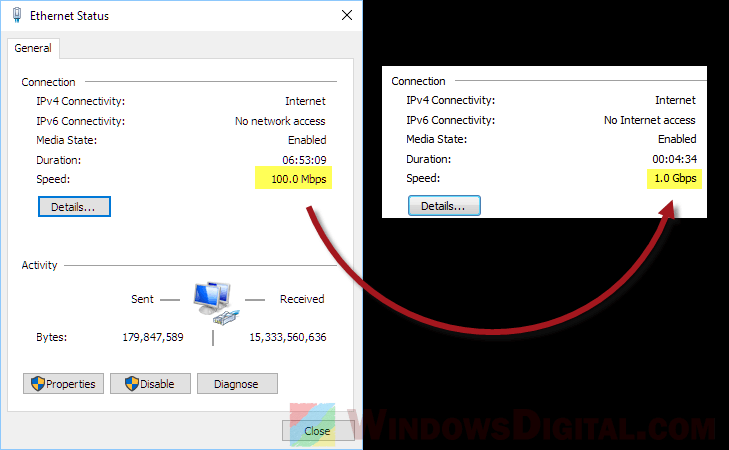
Why am I seeing 100 Mbps instead of 1 Gbps in Windows 11/10?
The internet speed available today, in most countries, can range from 10 Mbps to 10 Gbps. 100 Mbps to 1 Gbps are the most common range of fiber broadband speeds provided by most ISPs in the world. When you upgrade your broadband to, for example, 1 Gbps, you don’t always get the 1 Gbps if your hardware doesn’t meet the requirement.
The speed value in the Ethernet status window in Windows 10 or Windows 11 shows only the maximum speed your hardware can achieve. As a matter of fact, you cannot change the value manually yourself. It will automatically adapt and change to the highest supported speed value based on the connected hardware, from your Ethernet LAN adapter, to the cable, the router and the BTU modem.
In other words, all of the mentioned hardware have to meet the requirement to support 1 Gbps bandwidth in order for your adapter to show and actually run on 1 Gbps. If either one of the hardware supports only up to 100 Mbps, your speed will be capped at 100 Mbps regardless of how fast and powerful your other hardware are (sometimes can be as slow as 10 Mbps if you have an antique hardware part). Here’s a list of hardware that will affect the internet speed.
- Ethernet LAN adapter
- Ethernet cable
- Router / Hub
- Modem
Read: Ethernet Not Working in Windows 11 (Fix)
Cat6 / Cat5e vs Cat5 / older cables
The most common reason that the Ethernet status shows only 100 Mbps is that you are using a Cat5 or older Ethernet cable instead of the newer Cat5e or Cat6 cable. Cat5 cable supports only up to 100 Mbps, whereas a Cat5e cable can support up to 1 Gbps and Cat6 up to 10 Gbps.
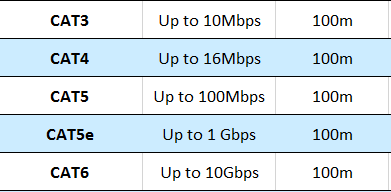
If your ISP is providing you with internet speed of faster than 100 Mbps, you may have to check on your Ethernet cable and make sure they are at least Cat5e cable (preferably Cat6) for Gigabit connection.
Related: Windows 11 Ethernet “Unidentified Network” (How to Fix)
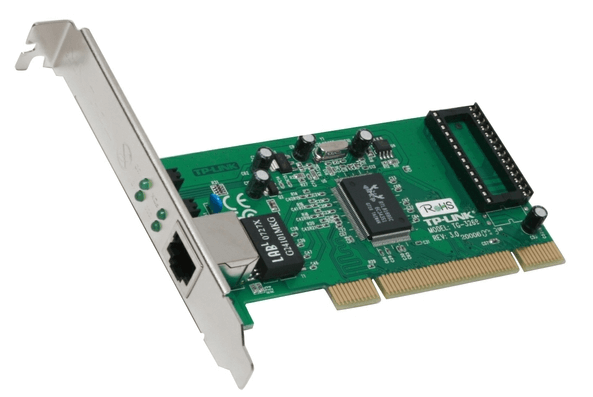
Gigabit LAN Adapter, Router and Modem
Most PCIe or USB Ethernet adapters or the on-board built-in adapters in recent years usually support Gigabit connection. If yours is not too old, it should support Gbps connection. You can do a search of your adapter’s name on any search engine to look for the maximum speed it supports.
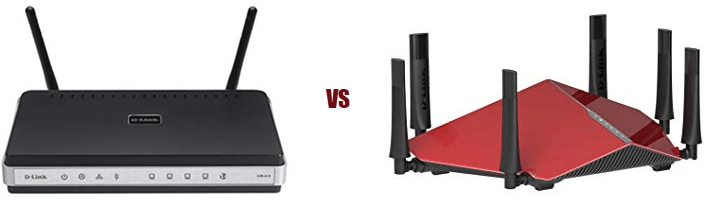
The router is among the most common reasons your internet speed is capped at 100 Mbps despite your ISP giving you more. Some old routers, even those released a few years back, still support only up to 10/100 Mbps. Some may show 300 Mbps, but the port is still capped at 100 Mbps. You’ll need a Gigabit supported router for speed faster than 100 Mbps, such as the D-link DIR-615 (supports only up to 100 Mbps) vs. DIR-895L (Gigabit router).
The BTU modem, usually supplied by your ISP, can also be one of the reasons your speed is capped at 100 Mbps. You may have to contact your ISP to see if it can support the speed you’re getting from them.
The Ethernet status window will show 1 Gbps only if all the devices mentioned above support the speed. For instance, if the cable was the issue and you have finally switched to a Cat6 cable, the value should automatically change to 1 Gbps when all the hardware meets the requirements to run at that speed.
It’s important to note that this article only covers LAN wired connections and not wireless or Wi-Fi. Wireless and Wi-Fi connection speed has a different cap based on different hardware, such as the Wi-Fi adapter.
How to change Ethernet speed from 100Mbps to 1Gbps using “Speed & Duplex”
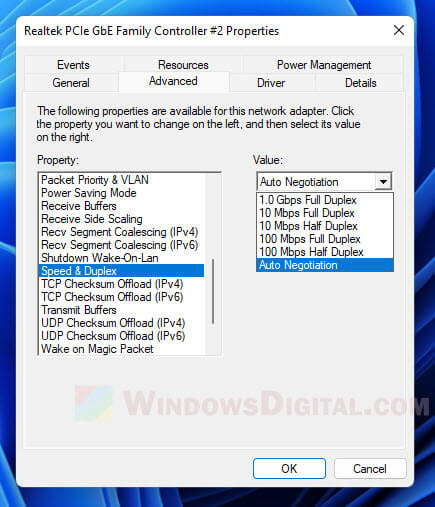
In Windows 11 or Windows 10, you can configure the Ethernet speed through a setting called Speed and Duplex. This setting should be set to Auto-negotiation by default. If your network equipment supports Gigabit network and is configured correctly, auto-negotiation will automatically provide a 1.0 Gbps link speed.
The Speed and Duplex setting is typically used to resolve issues when the adapter cannot establish the desired link speed with an older switch, or if the switch does not support auto-negotiation. In such cases, you can manually set the Speed and Duplex setting to match the link partner. Here’s how:
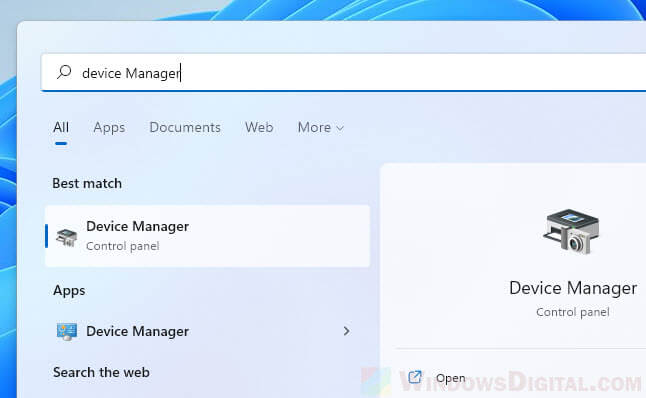
- Open the Start menu and search for “Device Manager“. Click to open it (Windows 11).

- Locate and expand the Network adapters category.
- Right-click on your Ethernet adapter and select Properties.

- Click the Advanced tab and select Speed & Duplex from the Property column.
- Under Value, click the drop-down menu and select the appropriate speed and duplex setting.


If adjusting the Speed and Duplex settings does not help in changing the network speed from 100 Mbps to 1 Gbps, there may be other factors affecting the connection. As mentioned earlier in this article, these factors can include the Ethernet cable type, limitations of the network switch or router, or issues with the Ethernet adapter itself. Ensure you are using a Cat5e or higher category Ethernet cable, as lower category cables may not support higher speeds.
Additionally, check the specifications of your network switch or router to verify that it supports 1 Gbps speeds. If your hardware is compatible but the issue persists, consider updating the Ethernet adapter’s drivers or consulting the manufacturer.
Changing the link speed in Windows 10 is an essential part of maintaining a fast and reliable internet connection. Whether you’re using an Ethernet connection or a wireless connection, it’s important to know how to adjust the speed settings in order to get the best performance out of your device. In this guide, we’ll walk you through the steps to change the link speed on Windows 10, including how to identify the current speed, how to change the speed, and how to troubleshoot any problems that may arise.
Changing link speed in Windows 10 is fairly straightforward. To do so:
- Click the “Start” button and type “Control Panel” in the search bar.
- Click “View Network Status and Tasks” under the “Network and Internet” option.
- Click “Change Adapter Settings” on the left pane.
- Right click on the connection for which you want to change the speed and select “Properties”.
- Click on the “Configure” button next to the network card.
- Go to the “Advanced” tab.
- Select the “Speed & Duplex” option from the Property dropdown.
- Choose the speed from the “Value” dropdown.
- Click the “OK” button.

How to Change Link Speed in Windows 10?
The link speed of your internet connection can be changed in Windows 10, allowing you to increase the speed at which you can access the internet. This can be useful for activities such as streaming video or downloading large files. This guide will explain how to adjust the link speed in Windows 10.
Check the Current Link Speed
Before changing the link speed, it is important to check what it is currently set to. This can be done by following the steps below:
1. Right-click the Start menu and select Device Manager.
2. Expand the Network Adapters category.
3. Right-click the network adapter that is being used, and select Properties.
4. Select the Advanced tab, and select Link Speed.
The current link speed will be displayed in the Value box.
Change the Link Speed
Once the current link speed has been determined, it can be changed by following the steps below:
1. Right-click the Start menu and select Device Manager.
2. Expand the Network Adapters category.
3. Right-click the network adapter that is being used, and select Properties.
4. Select the Advanced tab and select Link Speed.
5. Select the desired link speed from the list of available options.
Verify the New Link Speed
Once the link speed has been changed, it is important to verify that the new speed is being used. This can be done by following the steps below:
1. Right-click the Start menu and select Device Manager.
2. Expand the Network Adapters category.
3. Right-click the network adapter that is being used, and select Properties.
4. Select the Advanced tab, and select Link Speed.
This time, the Value box should show the new link speed.
Check Network Performance
Once the new link speed has been set, it is important to check the performance of the network to make sure that the new speed is being used. This can be done by following the steps below:
1. Open the Command Prompt by pressing the Windows key and typing Command Prompt.
2. In the Command Prompt, type ping www.google.com and press Enter.
3. Wait for the results to be displayed.
The results should show the amount of time it took for the data to be sent and received, which is an indication of the network performance.
Check Network Adapter Settings
In some cases, the link speed may be limited by the settings of the network adapter. This can be checked by following the steps below:
1. Right-click the Start menu and select Device Manager.
2. Expand the Network Adapters category.
3. Right-click the network adapter that is being used, and select Properties.
4. Select the Advanced tab and select Link Speed.
5. Select the desired link speed from the list of available options.
6. Select the desired link speed from the list of available options.
The current settings of the network adapter will be displayed in the Value box.
Check Router Settings
In some cases, the link speed may be limited by the settings of the router. This can be checked by following the steps below:
1. Open the web browser and navigate to the router’s settings page.
2. Log in with the administrator credentials.
3. Navigate to the Advanced Settings page.
4. Check the settings for the link speed.
The router’s settings page should indicate the maximum link speed that is supported by the router.
Check Network Cables
In some cases, the link speed may be limited by the quality of the network cables. This can be checked by following the steps below:
1. Disconnect the network cable from the router.
2. Inspect the cable for any signs of damage.
3. Check the connectors for any signs of corrosion or dirt.
4. Reconnect the cable and check the link speed.
If the cable is damaged or dirty, it should be replaced to ensure maximum link speed.
Related Faq
How to Change Link Speed Windows 10?
Answer: To change the link speed on Windows 10, you need to access the Windows Network Connections menu. This can be done by typing “Network Connections” in the search bar at the bottom left of the screen. You will find a list of network adapters you currently have installed on your computer. Right click on the network adapter you wish to change the link speed for and click on “Properties.” Once you are in the Properties window, you will see a list of items in the middle of the window. Select the “Configure” button, and you will see the “Link Speed & Duplex” option. Here, you can select the speed you want the connection to run at, usually 10 or 100 Mbps. Once you’ve selected the speed, click “OK” and the changes will be saved.
What is the Default Link Speed?
Answer: The default link speed for most network adapters is usually 10 Mbps. This is the most common link speed and is good for most basic home and office networks. If you require higher speeds, you can change the link speed to 100 Mbps.
What is the Maximum Link Speed?
Answer: The maximum link speed for most network adapters is 1000 Mbps, or 1 Gbps. This is the fastest speed available and is usually used for high-speed networks with a lot of data traffic.
How Do I Check my Current Link Speed?
Answer: You can check your current link speed by accessing the Windows Network Connections menu. This can be done by typing “Network Connections” in the search bar at the bottom left of the screen. You will see a list of network adapters you currently have installed on your computer. Right click on the network adapter you wish to check the link speed for and click on “Properties.” Once you are in the Properties window, you will see a list of items in the middle of the window. Select the “Configure” button, and you will see the “Link Speed & Duplex” option. Here, you can see the current speed your connection is running at.
What is Duplex?
Answer: Duplex is an option that allows for faster data transmission over a network. When enabled, the network adapter can both send and receive data at the same time, increasing the speed of the connection. This can be enabled or disabled in the “Link Speed & Duplex” option in the Properties window.
Do I Need to Restart my Computer After Changing the Link Speed?
Answer: No, you do not need to restart your computer after changing the link speed. The changes will be applied immediately after clicking “OK” in the Properties window. However, if you are having any issues with the connection, it is recommended to restart the computer to ensure the changes have taken effect.
Is it Possible to Change the Link Speed in the Command Prompt?
Answer: Yes, it is possible to change the link speed in the Command Prompt. To do this, type “netsh interface ipv4 set global autotuning=disabled” in the Command Prompt window. This will disable the auto-tuning feature, which can affect the link speed. Once disabled, you can then type “netsh interface ipv4 set subinterface “” mtu=1458 store=persistent” to set the link speed to the desired value. After typing this into the Command Prompt, the link speed should be changed.
Configuring Speed and Duplex in Windows
Changing your link speed on Windows 10 is a quick and easy process that can be completed in a few simple steps. With the right information and a few clicks of the mouse, you can increase or decrease your link speed according to your own needs. This process can help you get the most out of your internet connection and ensure that you are using the best possible speed for your tasks. Whether you need to increase or decrease your link speed, this guide offers a fast and straightforward way to do so on Windows 10.