Windows 11 во время завершающего этапа настройки требует наличия сетевого подключения к Интернету. Windows 11 нужен доступ к Интернету для подключения к вашей учетной записи Microsoft и получения последних обновлений безопасности. Если на компьютере отсутствуют сетевые адаптеры (Wi-Fi или Ethernet), в хранилище драйверов не найдены драйвера для установленного сетевого адаптера или компьютер находится в изолированной сети, вы не сможете завершить установку Windows 11.
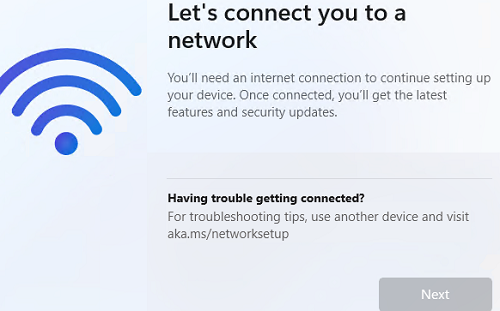
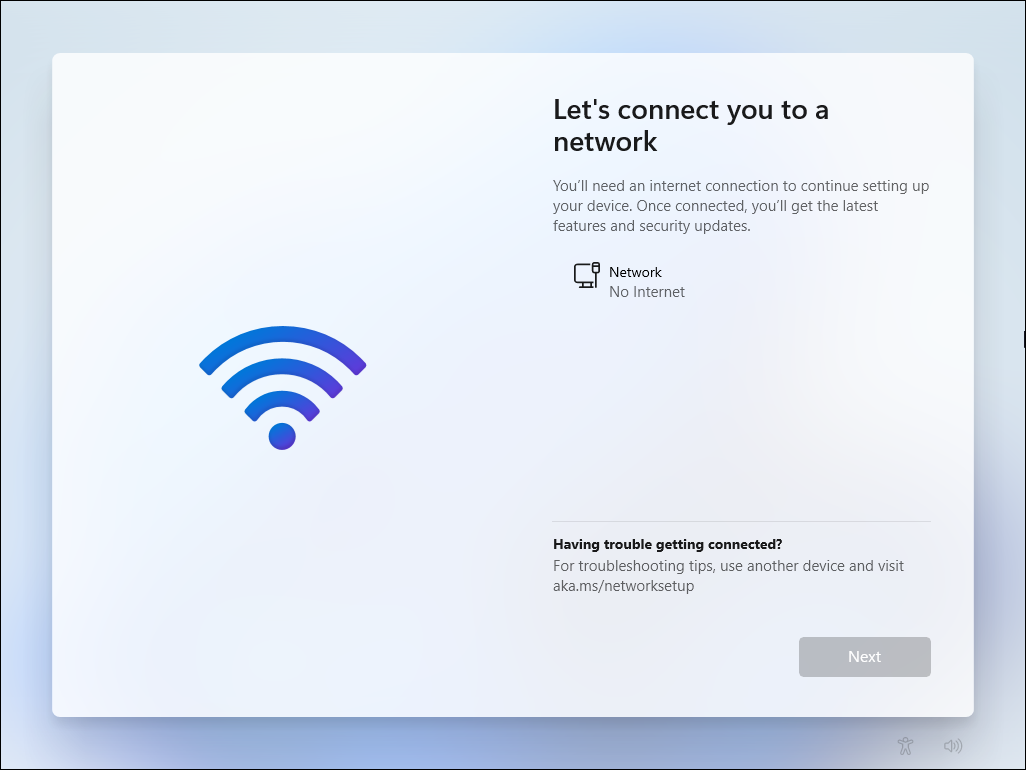
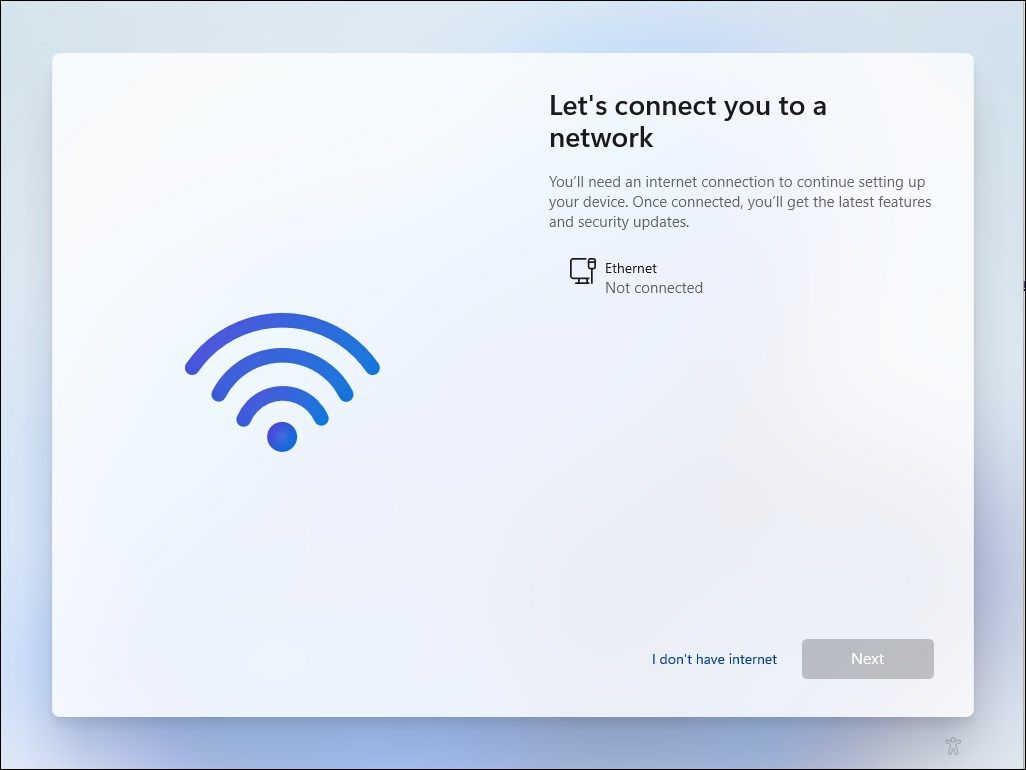
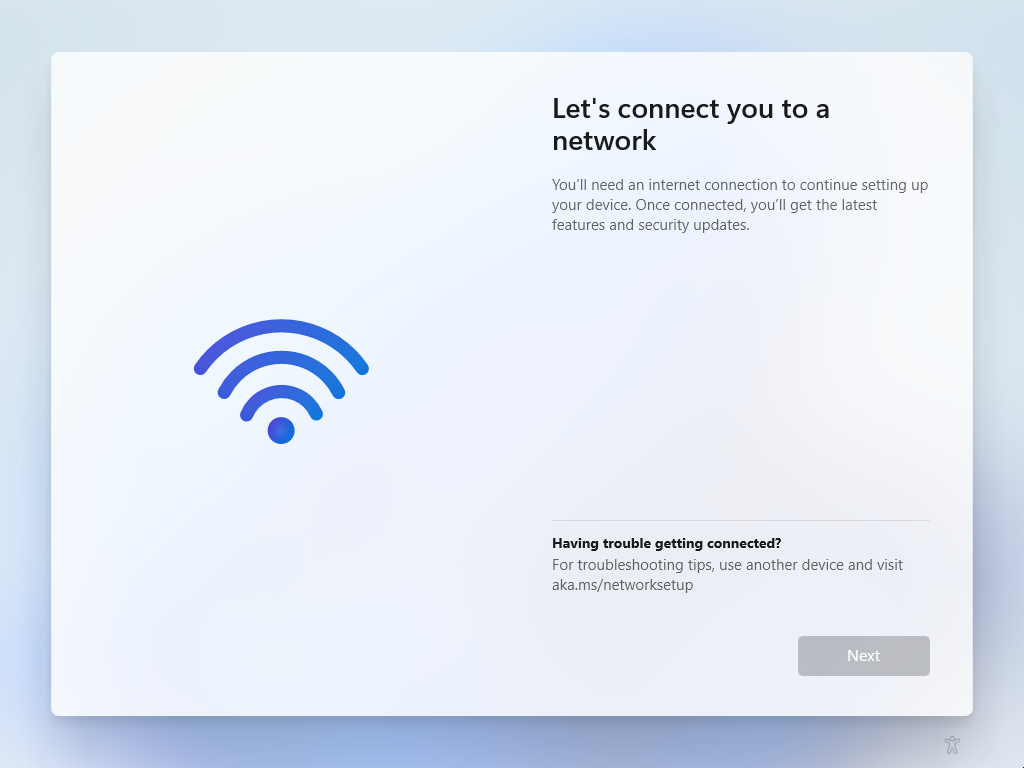
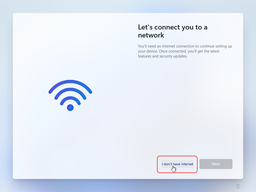
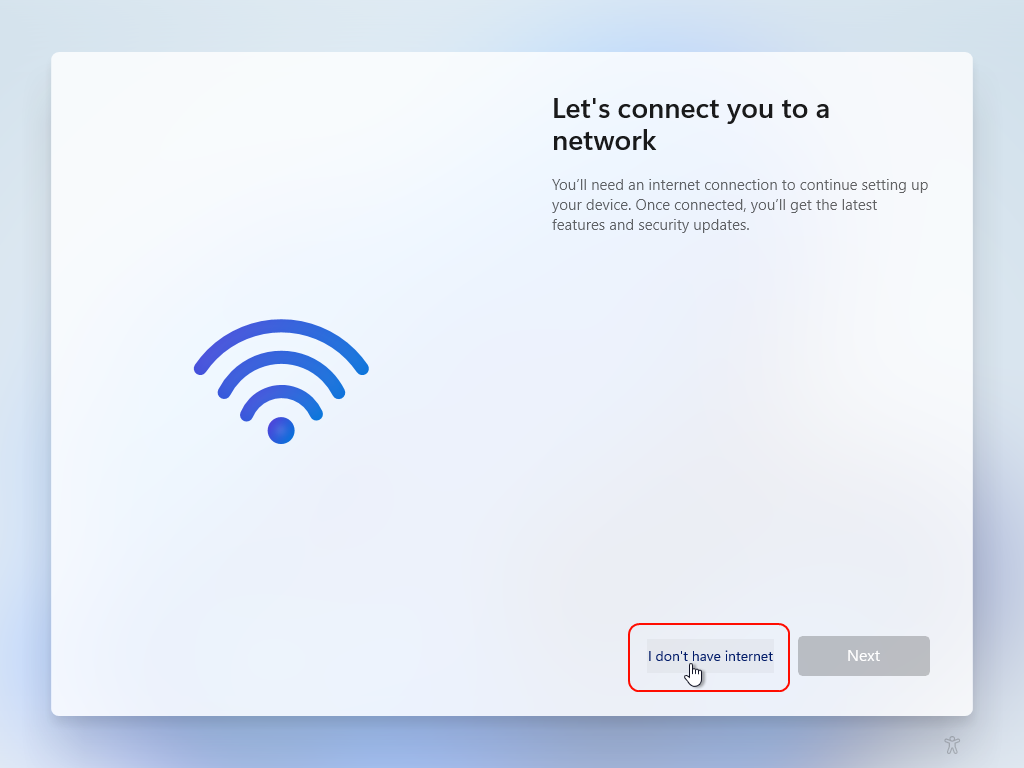
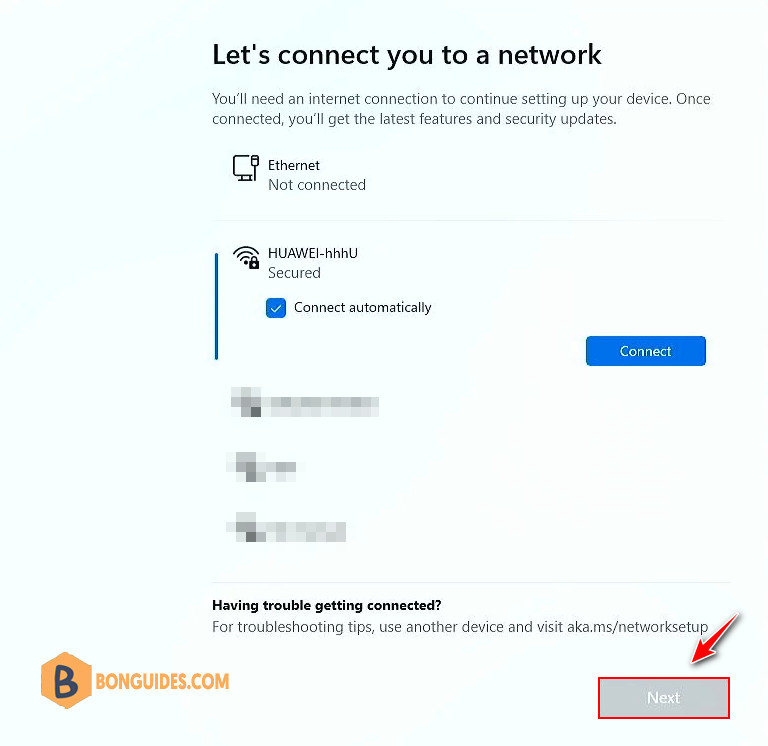
Let’s connect you to a network.
You’ll need an internet connection to continue setting up your device. Once connected, you’ll get the latest features and security updates.
Давайте подключим Вас к сети
Чтобы продолжить настройку устройства, требуется подключение к Интернету. После подключения вы будете получать последние функции и обновления для системы безопасности.
При этом кнопка продолжения настройки Windows становится неактивной, и вы не можете закончить установку ОС.
В этом случае вы можете:
Содержание:
- Установить Windows 11 с локальной учетной записью
- Загрузить сетевые драйвера во время установки Windows 11
- Добавить сетевые драйвера в установочный образ Windows
Установить Windows 11 с локальной учетной записью
Вы можете продолжить установку Windows 11 с локальной учетной записью:
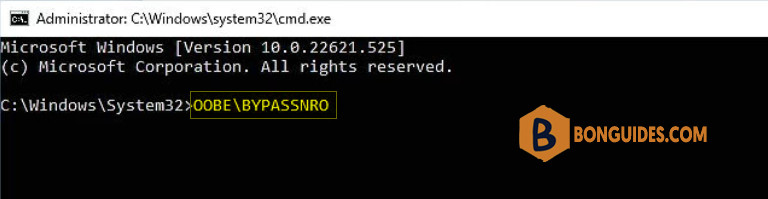
- Нажмите
Shift+F10
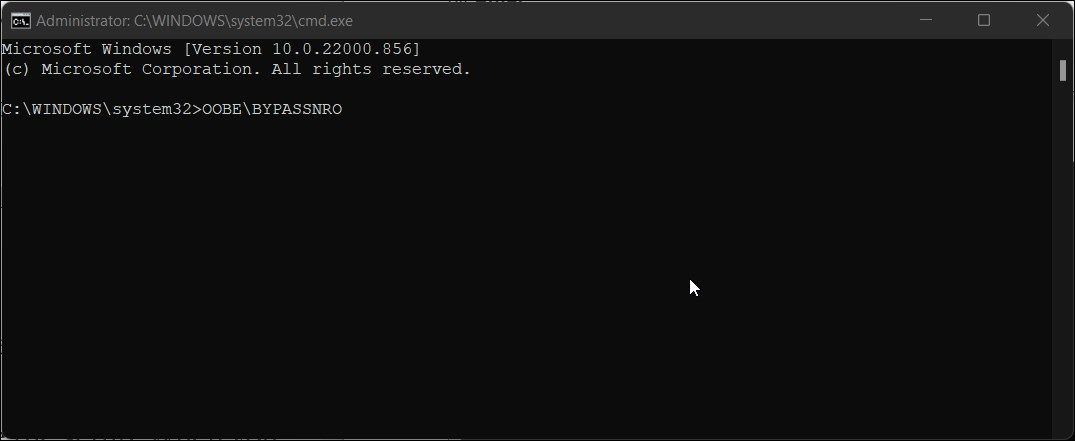
на экране установки чтобы открыть командую строку; - Выполните команду:
oobe\bypassnro - После перезагрузки компьютера на экране OOBE появится кнопка I don’t have Internet. Нажмите ее, чтобы продолжить установку в режиме Limited setup, где вам будет предложено создать локального пользователя;

- После входа в Windows вы можете установить отсутствующие драйвера для сетевого адаптера с USB флешки.
Загрузить сетевые драйвера во время установки Windows 11
Если на вашем компьютере/ноутбуке имеются подключенные сетевые адаптеры Wi-Fi/LAN, драйвера для которых отсутствуют в установочном образе Windows, вы можете установить необходимые драйвера прямо в процессе установки Windows.
Сначала нужно идентифицировать модель сетевого адаптера на вашем компьютере. Эту информацию можно найти в спецификации вендора или определить самостоятельно.
На экране установки нажмите сочетание клавиш
Shift+F10
и выполните команду
devmgmt.msc
. Откройте свойства неизвестного устройства, перейдите на вкладку Details, выберите свойство Hardware IDs, скопируйте значение из списка.
По найденным VEN и DEV идентификаторам вы сможете определить модель сетевого адаптера и найти для него драйвер на сайте производителя.

Скачайте драйвер и извлеките его на USB флешку. Подключите флешку к компьютеру с Windows 11.
Нажмите
Shift+F10
на экране завершения установки Windows 11 чтобы открыть командную строку.
Проверьте букву диска, которую Windows назначила вашей USB флешке:
wmic logicaldisk get volumename,name
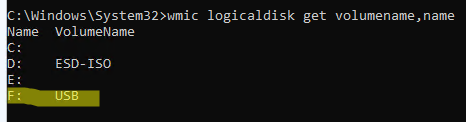
В нашем примере USB диску назначена буква F:.
Чтобы установить в Windows все драйвера с флешки (определяются по INF файлам), выполните команду:
pnputil /add-driver f:\*.inf /subdirs

Пересканируйте устройства компьютера:
pnputil /scan-devices
Закройте командную строку и перезагрузите компьютер. При следующей загрузке Windows 11 должна автоматически определить сетевой адаптер и установить для него драйвер из хранилища драйверов. После этого вы сможете продолжить установки Windows 11.
Добавить сетевые драйвера в установочный образ Windows
Чтобы не устанавливать драйвера вручную, вы можете интегрировать драйвера в установочный ISO/WIM образ Windows 11 (подробнее описано в статье по ссылке).
Windows 11 Home forces you to connect to Microsoft’s services on setup, but what if the internet is down? Here’s how to set up Windows 11 offline.
Microsoft requires your system to have an active internet connection to complete the Windows 11 setup. It asks you to log into your Microsoft account to download critical updates and new features before you can start using your freshly installed Windows operating system.
This becomes an issue if you want to use a local user account or don’t have an active internet connection during setup. Luckily, there are a few workarounds to skip the Windows 11 network setup. Here we show you how to bypass this restriction and complete the Windows 11 setup without an internet connection.
Why Does Windows 11’s Setup Require an Internet Connection?
According to Microsoft, you need an active internet connection to perform updates and download and use some features. In addition, Windows 11 Home edition requires a Microsoft Account to complete device setup on first use.
However, this may not be feasible due to many reasons. First, you may want to use a local user account, but connecting to the Internet will force you to log in with a Microsoft account. The second potential issue is the missing WiFi drivers to connect to the network. Finally, the unavailability of a working Internet connection is another reason you may want to bypass this restriction.
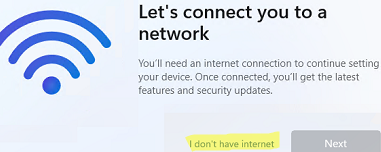
In Windows 10, bypassing this restriction was easy. You could click on the «I don’t have internet» option and proceed to create a local user account and complete the setup.
Windows 11, however, stops at the «Let’s connect you to a network» screen with the «Next» button grayed out. Windows 11 Pro, Enterprise and Education users can click on «I don’t have internet» and proceed to complete the setup with a local user account; however, Home edition users don’t have this option.
Here are a few workarounds to install Windows 11 Home without an active Internet connection.
1. Bypass Out-of-the-Box-Experience (OOBE) Internet Requirement
You can bypass the Let’s connect you to a network screen using the OOBE \BYPASSNRO command in Command Prompt.
When executed, it runs an existing CMD script, bypassnro.cmd, stored in the System32 folder to modify the Windows registry. This modification allows you to complete the Windows 11 setup without an Internet connection.
To complete the Windows 11 setup without internet:
- Make sure your computer is not connected to the Internet.
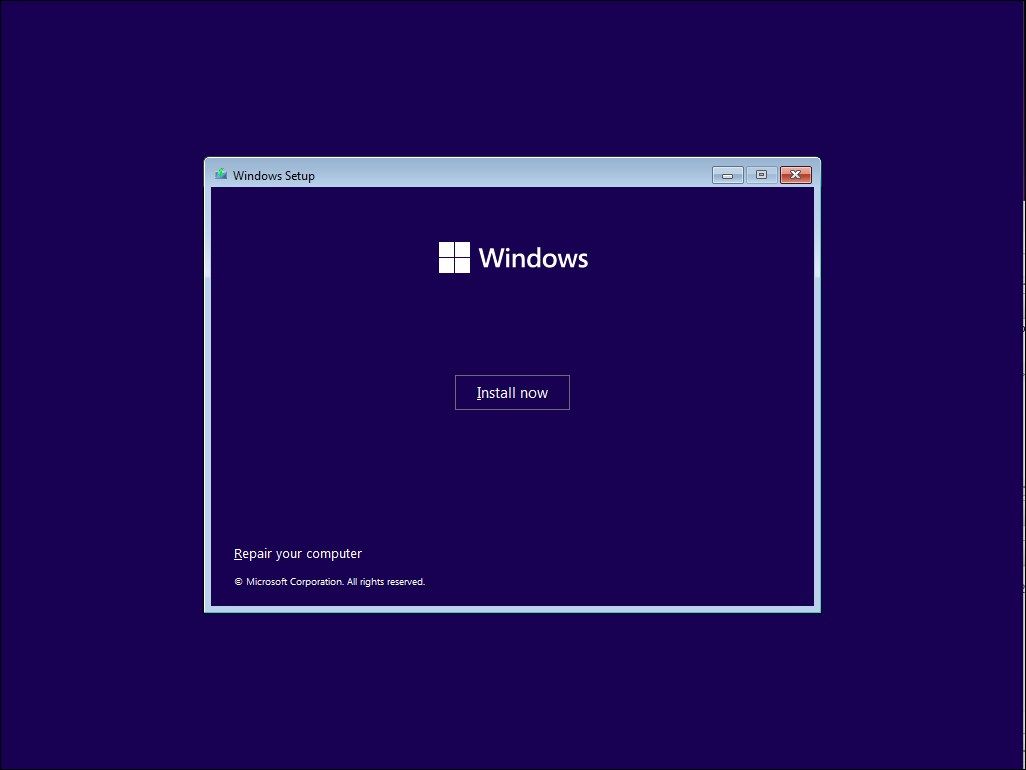
- Next, boot your computer with the Windows installation media. Skip to Step 9 below if you are already on the Let’s connect you to a network screen.
- When the Windows Setup dialog appears, select your preferred language, time, and keyboard input layout and click Next.

- Click Install Now.
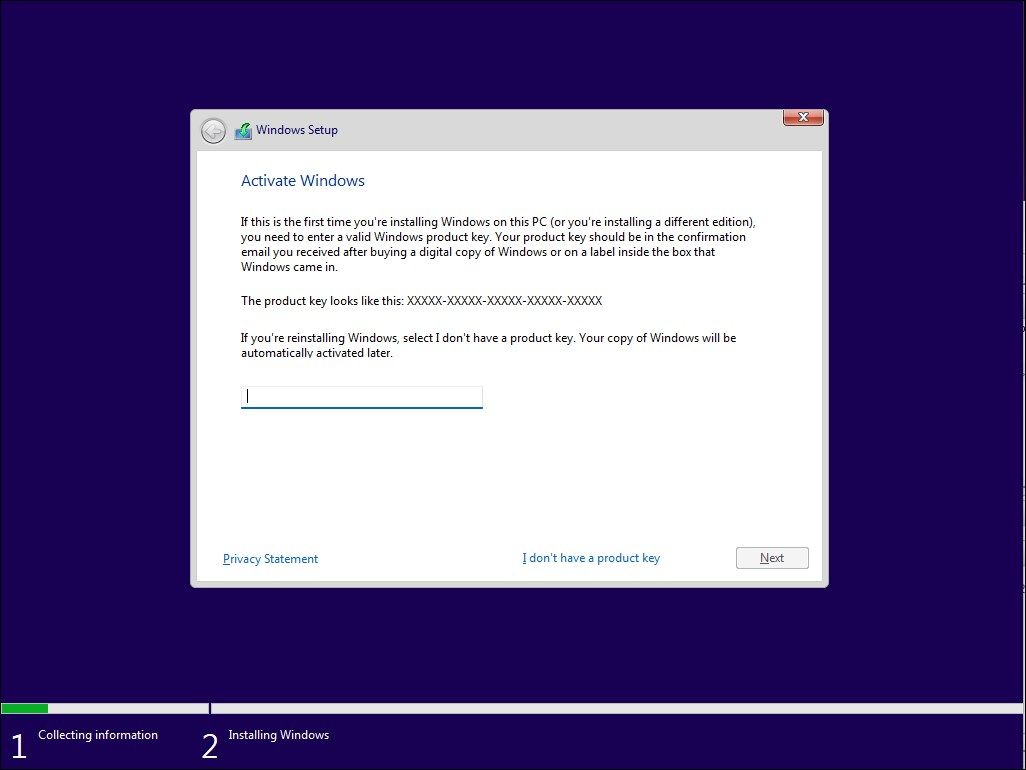
- Enter your product key. If you don’t have a product key, click the I don’t have a product key link in the bottom right corner. If you are upgrading from Windows 10 and had Windows 11 previously installed, the operating system will automatically recognize and validate the Windows product key linked to your computer hardware.
- Next, if prompted, select the edition of Windows 11 you want to install.
- Check the box to accept terms and click Next.
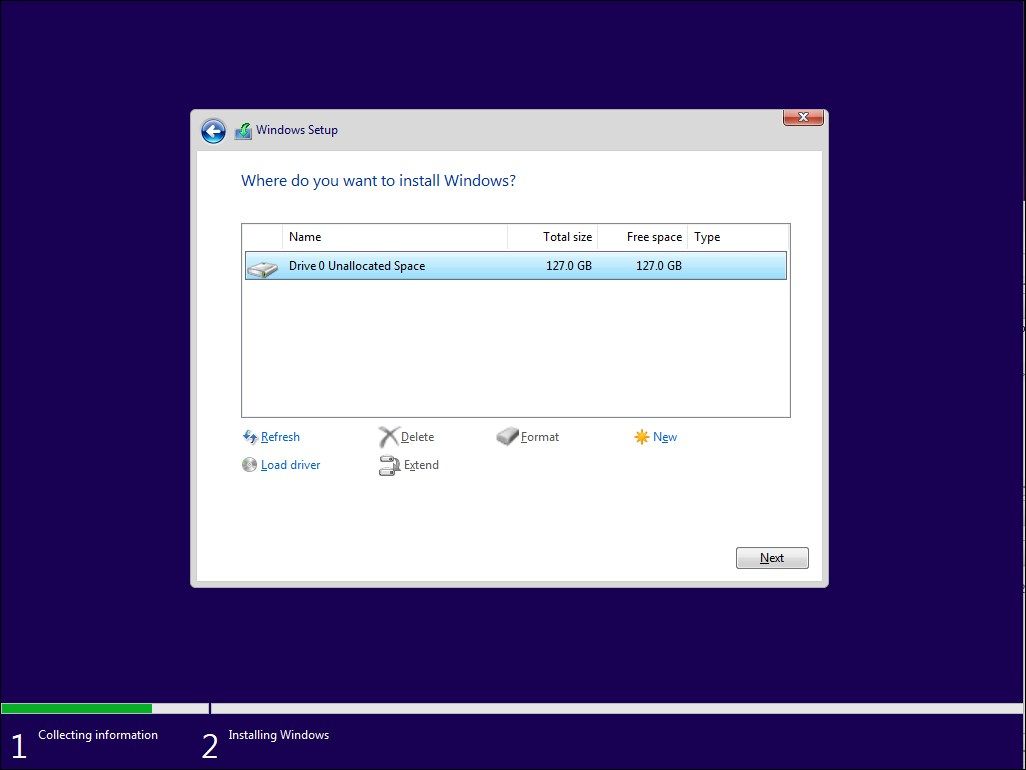
- Select Custom: Install Windows Only (Advanced).
- Select the installation drive and click Next. Wait for Windows to finish installation and restart your computer.
- In the setup screen, select your region and keyboard layout.
- Once in the Let’s connect you to a network screen, press Shift + F10 to launch the Command Prompt.

- In the Command Prompt window, type the following command and press Enter:
OOBE\BYPASSNRO - Upon successful execution, your system will restart and relaunch the OOBE dialog.
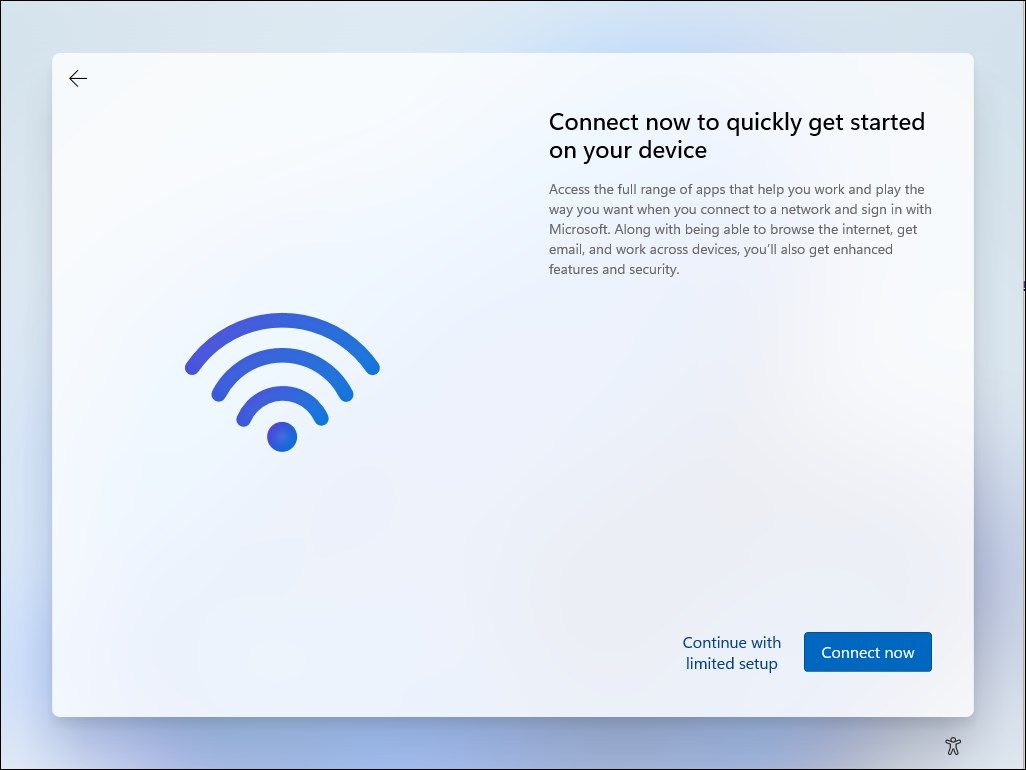
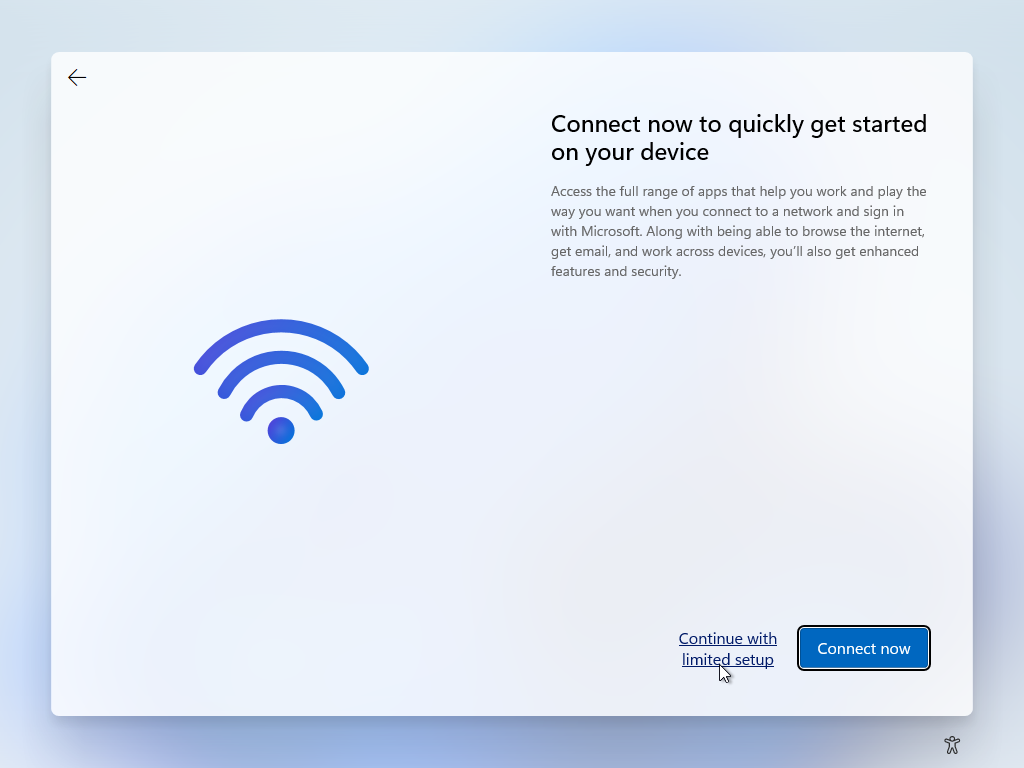
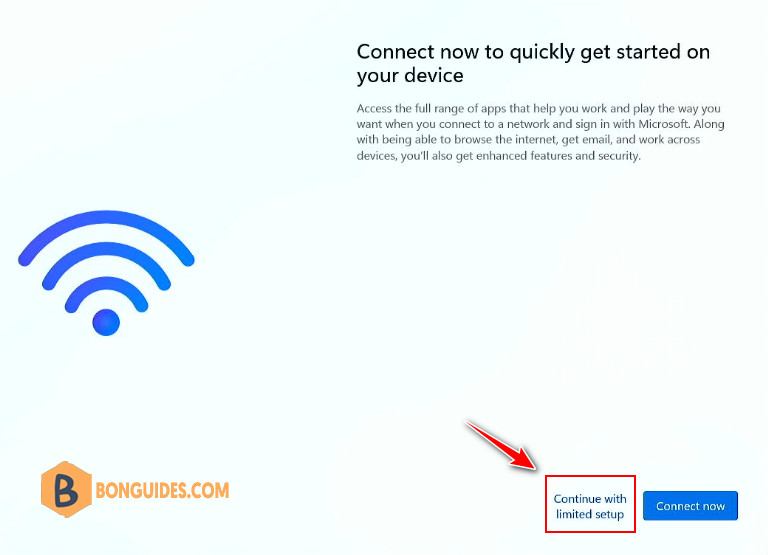
- Follow the on-screen instructions to complete the setup. When you reach the Let’s connect you to a network screen, click on I don’t have Internet option.
- Next, click on Continue with limited setup.
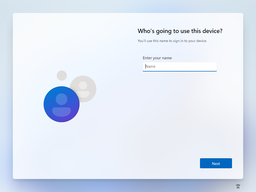
- Accept the License Agreement and proceed to create your local user account.
Make sure to add security questions. This will help you recover your local user account in case you forget your password. Once done, follow the on-screen instructions to complete the setup.
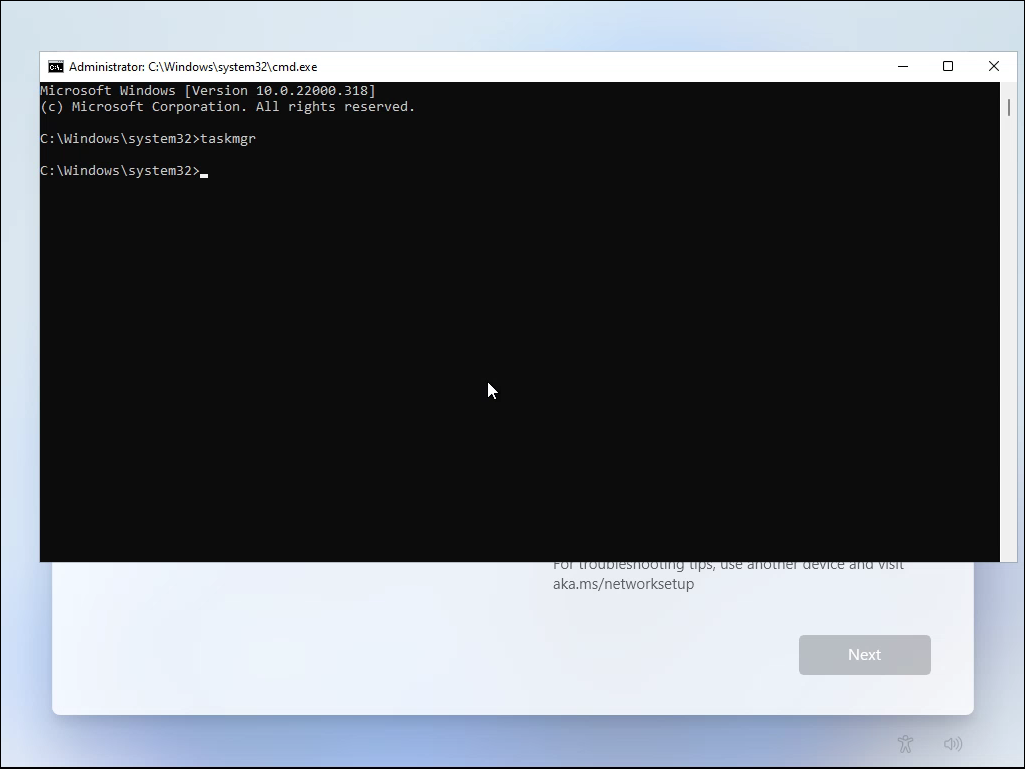
2. End Network Connection Flow Process Using Task Manager
You can bypass the «let’s connect you to a network» screen by killing the oobenetworkconnectionflow.exe process using the Windows Task Manager.
Since you already have Windows 11 installed at this stage, you can launch the Task Manager on top of your setup wizard using Command Prompt and kill the process.
To skip the Windows 11 network setup using Task Manager:
- Assuming you are in the Let’s connect you to a network screen, press Shift + F10 to launch the Command Prompt.
- In the Command Prompt window, type taskmgr and hit enter to launch Task Manager.

- Alternatively, use the Ctrl + Shift + Esc shortcut to launch Task Manager without Command Prompt.
- Click More Details to open Task Manager in full view.
- In the Processes tab, locate Network Connection Flow. Use the search bar in Task Manager to find the Network Connection Flow process.
- Select the Network Connection Flow process and then click the End task button. Wait for the process to end and then close the Task Manager.
- Type exit in the Command Prompt and hit enter.
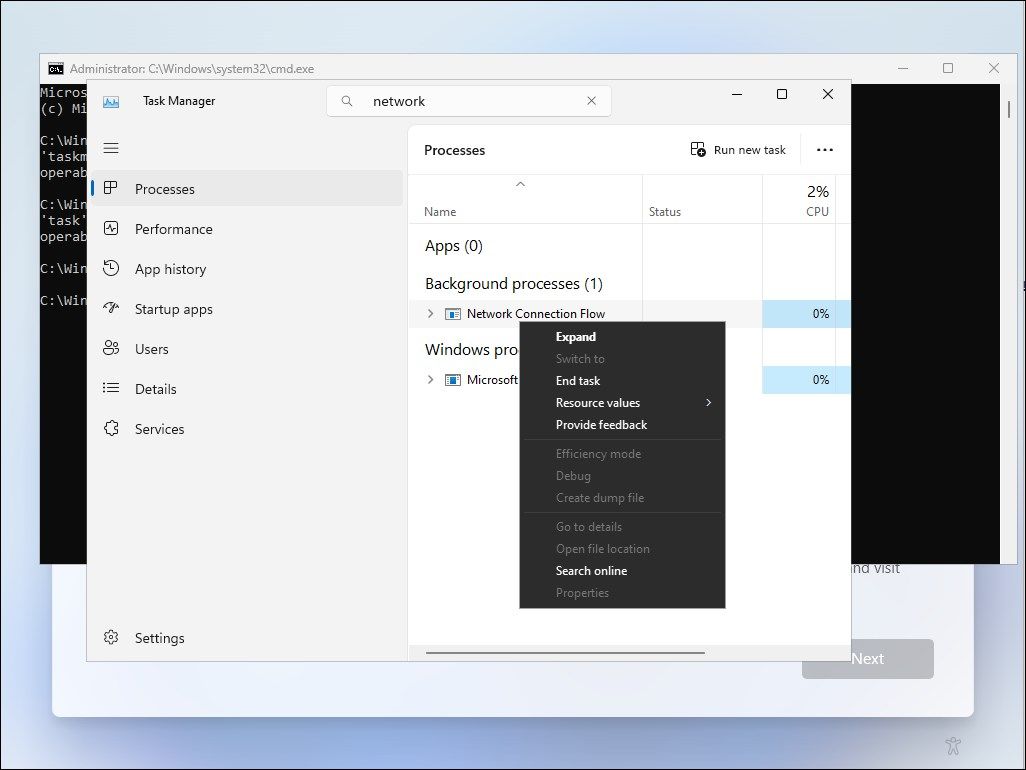
Now you will be back in the setup wizard. It will show some loading animation and then proceed to the next step. Here enter your name and password to create a local user account in Windows 11 and complete the setup.
3. Directly Kill Network Connection Flow Using the Command Prompt
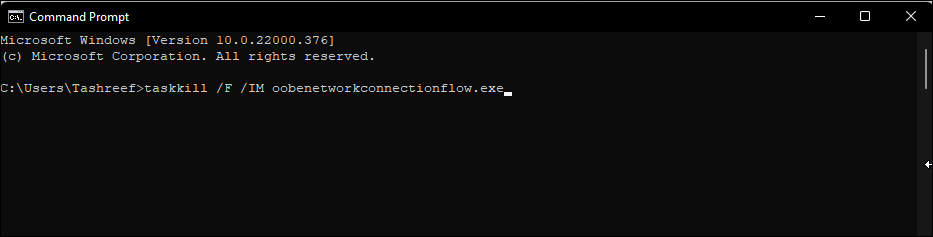
If you are unable to end the Network Connect Flow through Task Manager, you can directly kill it using the Command Prompt. Here’s how to do it.
- At the Let’s connect you to a network screen, press Shift + F10 to launch Command Prompt.
- In the Command prompt window, type the following command and hit enter to execute:
taskkill /F /IM oobenetworkconnectionflow.exe - Once executed, close the Command Prompt window to continue with the setup.
4. Skip Let’s Connect You to a Network Page with Alt + F4
This workaround is more of a hit-or-miss but seems to have helped a few users. When at the Let’s connect you to a network screen, press the Alt + F4 keyboard shortcut to close the mandatory Internet connection required window. Incidentally, you can use this shortcut to close active windows/programs when working on your desktop as well.
For more such handy shortcuts, explore our ultimate guide to Windows 11 keyboard shortcuts.
If successful, Windows 11 will skip the current screen and move to the next step. Once you’re past this step, you can create a local user account and then complete the setup.
Completing the Windows 11 Setup Without Internet Access
You can follow one of the four methods listed above to skip the let’s connect you to a network window and complete the Windows 11 setup without the internet.
That said, once you finish the setup and create a local user account, connect to the Internet to download critical security updates and features. You may also notice a few missing icons after the initial setup. Windows will download these icons when you connect to the Internet next time.
During the first run of freshly installed Windows 11, “Let’s Connect You To a Network” screen appears. There is no obvious way in GUI to skip this screen, but you would like to skip it anyway (for example, because drivers for your network adapter are not installed yet).
To skip this screen, you need to create a special registry value (BypassNRO) in the registry key associated with OOBE, and restart your computer to re-enter this phase of Windows 11 setup. All of this can be done solely from the command line, and the rest of this article explains exactly how.
| Contents |
|
1. Symptoms of the problem
During the first run of freshly installed Windows 11, the following screen appears
(“Let’s Connect You To a Network”):

2. Solution in a nutshell
“Let’s Connect You To a Network” screen is displayed by Windows component
known as OOBE (“out-of-box experience”), which usually activates during the
first run of Windows after completion of the Windows setup.
OOBE, like the rest of Windows, is configured via the Windows Registry, in particuar via the
HKEY_LOCAL_MACHINE\SOFTWARE\Microsoft\Windows\CurrentVersion\OOBE
registry key.
To bypass “Let’s Connect You To a Network” screen, in the aforementioned
registry key, you need to create BypassNRO registry value of
type REG_DWORD and set it to 1.
This task is made more difficult by the absence of the Windows GUI (and thus, the lack of mainstream
registry editing tools) during the OOBE phase of Windows setup. Fortunately, the command line is
available, so the problem can be solved using command line based registry editing tools.
3. Step by step guide
1) Press Shift+F10 to open console window:
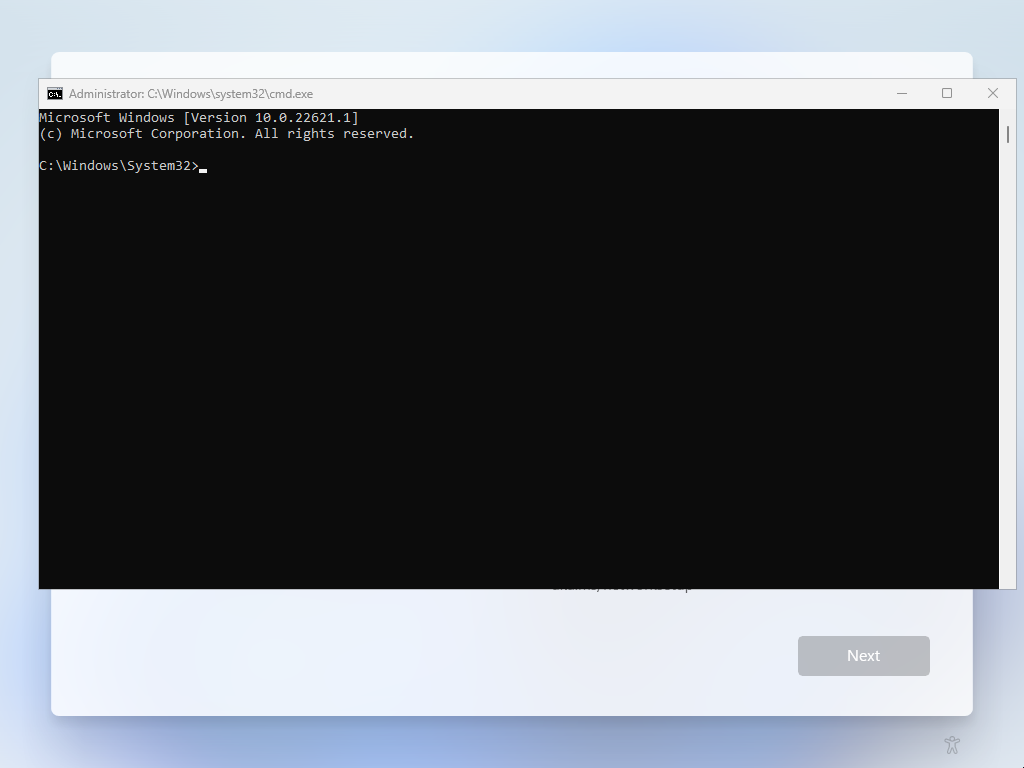
2) Click on the title of newly opened console window to move keyboard input focus to it.
3) Enter the following command into the console window and press Enter
key to run it:
reg add HKLM\SOFTWARE\Microsoft\Windows\CurrentVersion\OOBE
/v BypassNRO /t REG_DWORD /d 1

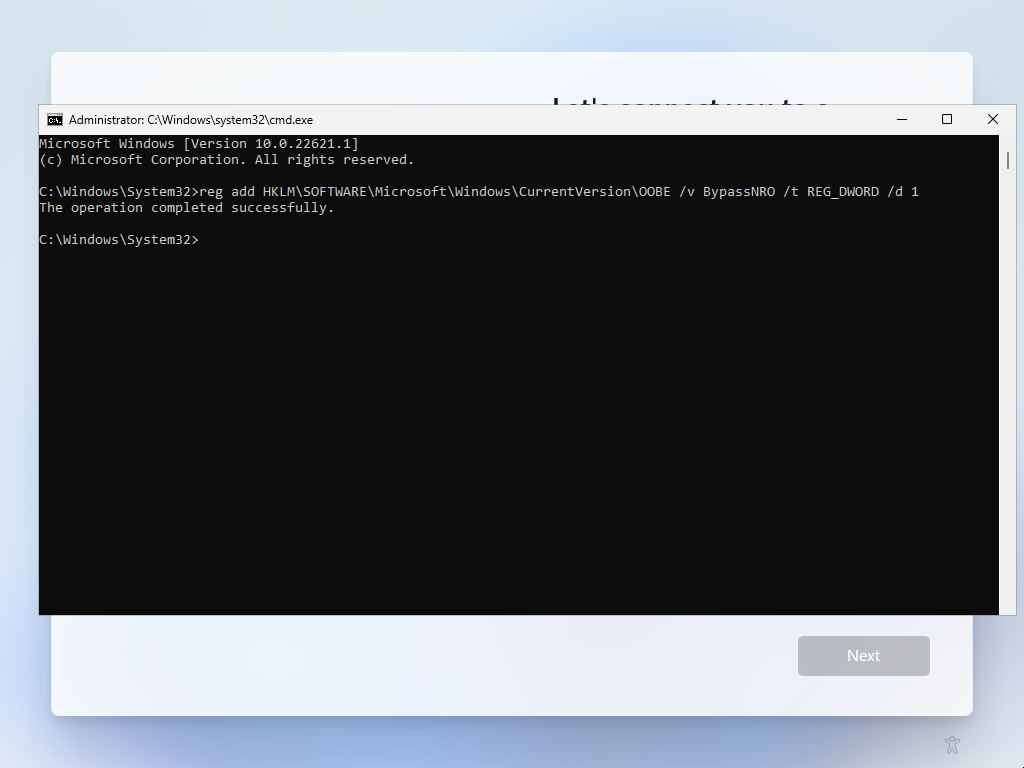
4) Enter shutdown /r command into the console window
and press Enter key to reboot Windows from console:
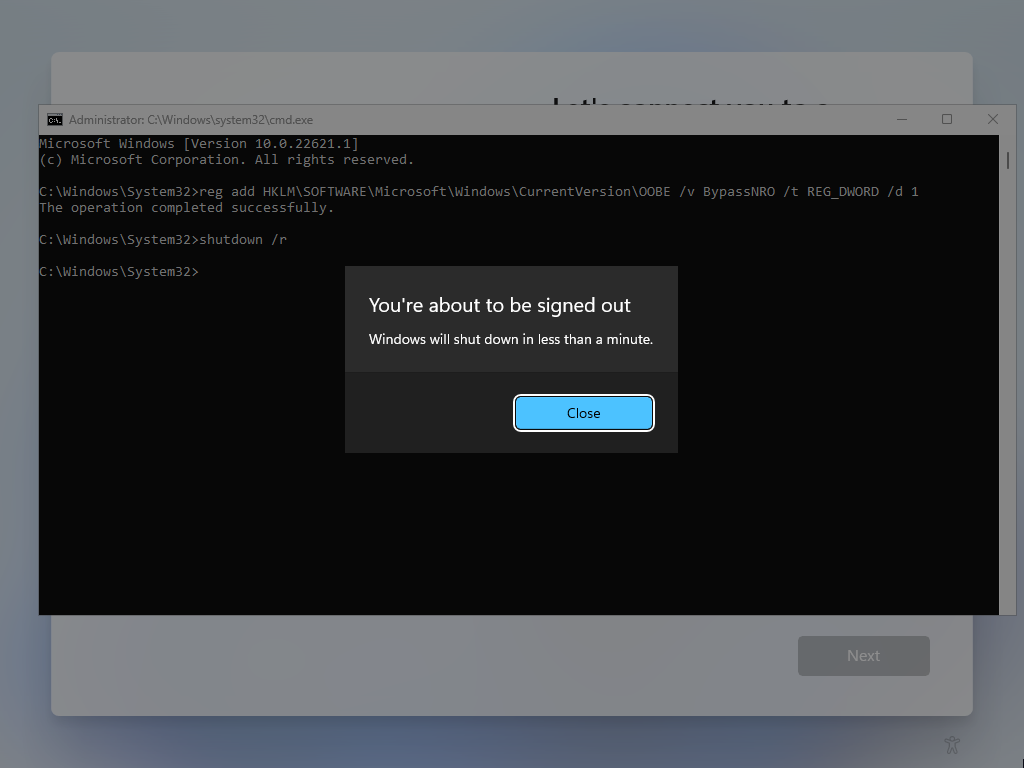
5) When Windows 11 reboots and re-enters OOBE phase, it will allow you to proceed
without connecting to a network and then will ask create an offline user account.
For extra reliability, it’s recommended to unplug the network cable here:


4. Alternative way
Using FlashBoot Free, you can prepare
Windows 11 Setup media with these modifications permanently baked in to the Windows Registry.
Starting from version 3.3n, FlashBoot displays the following page when preparing Windows 11
installation USB thumbdrive (by default, all these options are unticked):

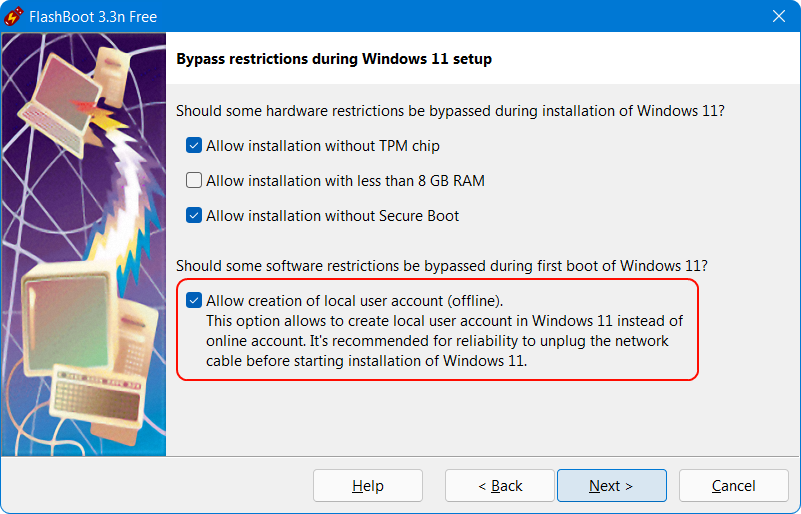
Table of Contents
Since Microsoft wants users to connect their computers with a Microsoft account, the company is making changes to the initial Windows 11 setup to make it nearly impossible to continue configuring a new device or clean installation without an internet connection.
If the setup detects that the device doesn’t have a network connection, you will land on the Oops, you’ve lost internet connection page. If you click the Retry button, you will get a prompt to connect to the internet.
You could easily skip this requirement in older releases and continue offline with a local account, but this will no longer be possible on Windows 11 22H2 and later. However, for those who may not have an internet connection at the time of the installation or want a more traditional offline experience, there is a workaround to bypass the requirement and finish configuring the out-of-box experience without an internet connection, whether you are setting up Windows 11 Pro or Windows 11 Home.
In this post, we will be setting up Windows 11 22H2 without an internet connection. These instructions will walk you through the steps to perform a clean installation, but the workaround will also work when setting Windows 11 on any method that may require completing the out-of-box experience.
Install Windows 11 without internet connection
1. On the Oops, you’ve lost internet connection or Let’s connect you to a network page, use the keyboard shortcut to bring up Windows Command Prompt window.
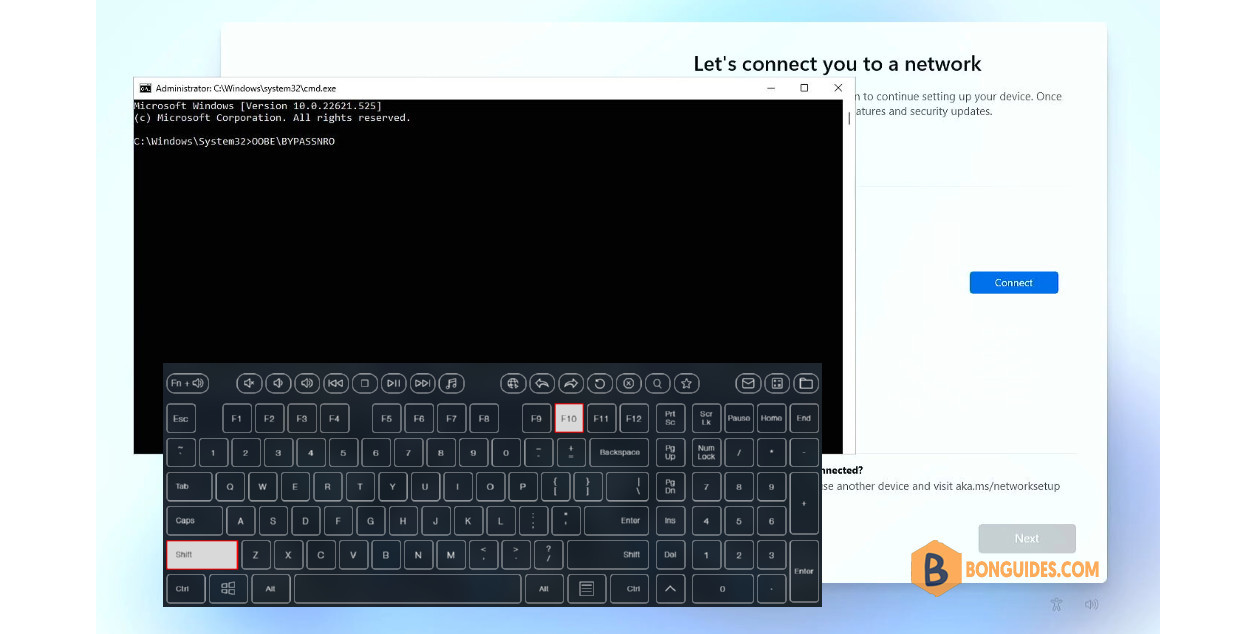
2. In Command Prompt, type the OOBE\BYPASSNRO command to bypass network requirements on Windows 11 and press Enter.
3. The computer will restart automatically, and the out-of-box experience (OOBE) will start again.
Note
Note: You will need to select the region and keyboard settings one more time to get to the network connection page.
4. Click the I don’t have internet option.

5. Click the Continue with limited setup option.
6. Click the Accept button (if applicable). And Now you will see the window to configure the name of the default local account on Windows 11.


Contents
- 1 Fix Or Skip Lets Connect You To A Network Windows 11
- 2 Let’s Connect You To A Network Windows 11 Solved!
- 2.1 Conclusion
- 2.1.1 Related image with fix or skip lets connect you to a network windows 11
- 2.1.2 Related image with fix or skip lets connect you to a network windows 11
- 2.1 Conclusion
Welcome to our blog, where Fix Or Skip Lets Connect You To A Network Windows 11 takes the spotlight and fuels our collective curiosity. From the latest trends to timeless principles, we dive deep into the realm of Fix Or Skip Lets Connect You To A Network Windows 11, providing you with a comprehensive understanding of its significance and applications. Join us as we explore the nuances, unravel complexities, and celebrate the awe-inspiring wonders that Fix Or Skip Lets Connect You To A Network Windows 11 has to offer. 11 and shows to network cant you and steps internet connection- or internet setup a screen bypass to setup can skip you without want connection internet you to to page connect follow or connect continue dont 11 windows lets When windows below
How To Skip Network Setup Step On Windows 11 Let S Connect You To A
How To Skip Network Setup Step On Windows 11 Let S Connect You To A
Report abuse hi bob, i am sumit here to assist you with this question. maybe the driver isn’t having the right band with the driver it came with. can you try your mobile hotspot? in windows 11 home, you need internet for the first time setting your device. sumit available 6 pm 8 am pst. When windows 11 setup shows “let’s connect you to a network” screen and you can’t or don’t want to connect to internet, you can follow below steps to skip or bypass internet connection page and continue windows 11 setup without internet connection:.

How To Skip Network Connection During Windows 11 Installation Skip
How To Skip Network Connection During Windows 11 Installation Skip
Windows 11 requires an internet connection to finish the initial setup (out of box experience (oobe)) for the home and pro editions starting version 22h2, but there’s a way to bypass the requirement. Type taskmgr, and hit enter. click on the processes tab. locate the network connection flow process. right click on it and select end task. the “let’s connect you to a network’ prompt should disappear. create a new local account when prompted. conclusion. Select custom: install windows only (advanced). select the installation drive and click next. wait for windows to finish installation and restart your computer. in the setup screen, select your. Select start > settings > network & internet, then turn on wi fi. next, select more options ( >) next to wi fi, then select show available networks. if a network you expect to see appears in the list, select it, then select connect . open wi fi settings. see if you can use the wi fi network to get to websites from a different device.

How To Bypass The Windows 11 Let S Connect You To A Network Screen
How To Bypass The Windows 11 Let S Connect You To A Network Screen
Select custom: install windows only (advanced). select the installation drive and click next. wait for windows to finish installation and restart your computer. in the setup screen, select your. Select start > settings > network & internet, then turn on wi fi. next, select more options ( >) next to wi fi, then select show available networks. if a network you expect to see appears in the list, select it, then select connect . open wi fi settings. see if you can use the wi fi network to get to websites from a different device. You can also try turning off airplane mode or disconnecting the vpn you’re using. you can do this by going to settings > network and internet > vpn and toggling everything off. as you can see in the above image, turning off airplane mode is easy. the vpn option is a few options up. select it and toggle everything off. The fastest way to restart from the desktop is to right click the start button and go to shut down or sign out > restart . verify wi fi is turned on or the ethernet cable is securely attached to the computer and modem router. this is absolutely necessary and will result in no internet connectivity if unaddressed.

How To Fix Lets Connect You To A Network Windows 11 Issue Techs Gizmos
How To Fix Lets Connect You To A Network Windows 11 Issue Techs Gizmos
You can also try turning off airplane mode or disconnecting the vpn you’re using. you can do this by going to settings > network and internet > vpn and toggling everything off. as you can see in the above image, turning off airplane mode is easy. the vpn option is a few options up. select it and toggle everything off. The fastest way to restart from the desktop is to right click the start button and go to shut down or sign out > restart . verify wi fi is turned on or the ethernet cable is securely attached to the computer and modem router. this is absolutely necessary and will result in no internet connectivity if unaddressed.

How To Reset Network Connections Windows 11 Youtube
How To Reset Network Connections Windows 11 Youtube
Let’s Connect You To A Network Windows 11 Solved!
Let’s Connect You To A Network Windows 11 Solved!
let’s connect you to a network windows 11 solved! if you have been bothered by this screen when trying to boot up a new pc then you are not alone. here are 2 simple ways you you’ll need an internet connection to continue setting up your device. once connected, you’ll get the latest features and security how to fix stuck on let’s connect you to a network when installing windows 11 10 | install windows 11 without internet | let’s this tutorial video shows you how to bypass the ‘let’s connect you to a network» screen in windows 11. this forces you to sign in the text version of this video: cara skip setup windows 11 bagian network. how to fix stuck on let’s connect you to a network when installing windows 11 | install windows 11 home without an internet here is how you can bypass the requirement of an internet connection. just press shift f10 at the cmd window type taskmgr and hello friends when we install windows 11 facing an unexpected error let’s connect you to a network but next option is dim and hello !!!! in this video i had expained how to bypass windows 11 requirement of internet connection during setup,as well as when installing windows 11, there is a possibility that there is no network connection. so how do you bypass the connecting to
Conclusion
Having examined the subject matter thoroughly, it is clear that the article delivers helpful knowledge regarding Fix Or Skip Lets Connect You To A Network Windows 11. Throughout the article, the author demonstrates a wealth of knowledge about the subject matter. Notably, the discussion of X stands out as particularly informative. Thank you for this post. If you have any questions, feel free to contact me via email. I look forward to hearing from you. Additionally, below are a few relevant articles that might be helpful: