
The DHCP Lease Time is a crucial part of your DHCP configuration on your networks. However, users are wondering about what it exactly is and how to set it up. In this post, we’ll clarify how it works and what the suggested settings are based on your networks.
Are you interested in learning more about networks and how to configure them? You’re in the right place. Here at SoftwareKeep, we provide guides written for users to better understand how networks and systems work. Need any assistance? Don’t hesitate to contact us.
What is the DHCP lease time? How is it used?
A DHCP-assigned IP address is not permanent and expires in about 24 hours. This is what’s referred to as a DHCP lease time. Unless modified from default settings, DHCP servers assume that your IP address is temporary and expires after a set amount of time.
This practice can be extremely beneficial as IP addresses become available for other devices to use when needed. This creates a more streamlined system and makes staying organized a whole lot easier.
Here is an example of how this scenario works in action:
You connected two devices to the network, computer A and computer B. The DHCP server assigns unique, static IP addresses to both devices. By default, these IP addresses would be static meaning that only those two devices can use them.
The next day, if you connect computer C as a new device, it’d require an entirely new unique IP address, which is a waste of resources.
On the other hand, when using DHCP lease time, the IP address of computers A and B would become available for computer C (or any other device on the network) after a specified amount of hours. This means that already existing IP addresses that have expired can be allocated to a new device.
This is one of the best practices of DHCP lease time and the most important benefit of utilizing the feature.
How to check your DHCP lease time on Windows
The DHCP lease time can be configured to any amount of time, however, it’s set to 24 hours by default. If you want to check your current time period configuration, follow the guide below.
You can check the current DHCP lease time on your Windows system by looking at your IP configuration with the Command Prompt. This process is easy and can be done by anyone — simply follow the steps below.
- Open the Command Prompt in one of the following ways:
- Open the Search function in your taskbar, or alternatively use the Ctrl + S keyboard shortcut to bring up the search bar and look up “Command Prompt”.

- When you see it in the results, right-click on it and choose Run as Administrator.
- Press the Windows + R keys on your keyboard to bring up the Run utility. Type in “cmd” and press the Ctrl + Shift + Enter keys on your keyboard. By doing so, you’re launching the Command Prompt with administrative permissions.

- Press the Windows + X keyboard shortcut, then select Command Prompt (Admin).
- Open the Search function in your taskbar, or alternatively use the Ctrl + S keyboard shortcut to bring up the search bar and look up “Command Prompt”.
- When prompted by the User Account Control (UAC), click Yes to allow the app to launch with administrative permissions.
- Need help? Check out our How to make a local user an administrator in Windows 10 guide.
- Once the Command Prompt has opened, type in the following command and press Enter on your keyboard to execute it: ipconfig /all

- Scroll down until you see the Lease Obtained and Lease Expires lines. Here, you should notice the dates listed. The difference between these dates is the current configuration of your computer.
- For example, in the image below, you can see that the expiration date is a year after the IP address has been first obtained. This means that the DHCP lease time has been configured to be exactly 1 year.
- After taking a look at this, you can exit out of the Command Prompt.


How to modify the DHCP lease time period
To change the default lease time period, you’ll need to have access to your router login credentials. If necessary, get in touch with an administrator for assistance. If you simply want to renew, skip to the next section of our guide.
- Open any web browser of your choice while connected to the network/server. Most routers can be accessed by typing 192.168.1.1 or 192.168.0.1 into the address bar. If unsure, check your router’s manual for instructions on how to connect.

- Once the router’s page has loaded, you’ll be asked to log in with the correct credentials. If you don’t know the login information, check your router’s manual or get in touch with a network or server administrator.
- After you’ve signed in, go to your router’s Settings menu and search for the Network/LAN Settings or DHCP Settings section. If you can’t find it, refer to your user manual for more details.
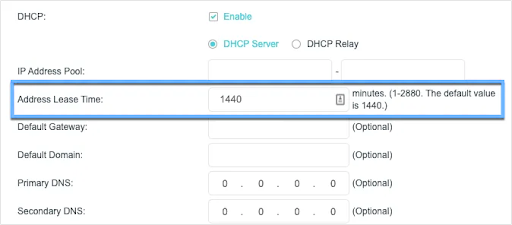
- The DHCP lease value is referred to in several ways. This value is known as the Address lease period on a TP-Link router, for example. For this sort of router, you can set the time in minutes up to a limit of 2880 (the equivalent of 48 hours).
- You can modify the value to any period of time within your routers’ limits. The maximum period can be longer or shorter depending on your model. Once again, you should be able to find details in your user manual.

- You can modify the value to any period of time within your routers’ limits. The maximum period can be longer or shorter depending on your model. Once again, you should be able to find details in your user manual.
- Save your settings before exiting the router page. After modifying your DHCP lease time, the new time will be applied to all devices connected to the network.


How to renew your DHCP lease on Windows
If your DHCP lease period has changed, you can compel any connected devices to release and renew the DHCP lease. Any modifications to your time period will be applied immediately as a result of this.
- Open the Command Prompt in one of the following ways:
- Open the Search function in your taskbar, or alternatively use the Ctrl + S keyboard shortcut to bring up the search bar and look up “Command Prompt”. When you see it in the results, right-click on it and choose Run as Administrator.
- Press the Windows + R keys on your keyboard to bring up the Run utility. Type in “cmd” and press the Ctrl + Shift + Enter keys on your keyboard. By doing so, you’re launching the Command Prompt with administrative permissions.
- Press the Windows + X keyboard shortcut, then select Command Prompt (Admin).
- When prompted by the User Account Control (UAC), click Yes to allow the app to launch with administrative permissions.
- Need help? Check out our How to make a local user an administrator in Windows 10 guide.
- Once the Command Prompt has opened, type in the following command and press Enter on your keyboard to execute it: ipconfig /release

- Next, type in the following command and press Enter on your keyboard to execute it: ipconfig /renew
- Your lease time should be renewed after performing these steps. This will apply the new time period you set in the previous guide, allowing your device(s) to use the same IP address on the network for a custom amount of time.


Final thoughts
If you need any further help with Windows or DHCP, don’t hesitate to reach out to our customer service team, available 24/7 to assist you. Return to us for more informative articles all related to productivity and modern-day technology!
Would you like to receive promotions, deals, and discounts to get our products for the best price? Don’t forget to subscribe to our newsletter by entering your email address below! Receive the latest technology news in your inbox and be the first to read our tips to become more productive.
You may also like
» What is YourPhone.Exe in Windows 10?
» What is the WMI Provider Host? Is it Safe?
» What is the WSAPPX Service and How to Fix WSAPPX High Disk Usage
В этой статье поговорим про DHCP
DHCP (Dinamic Host Configuratin Protocol) – прикладной протокол, позволяющий сетевым устройствам автоматически получать IP-адреса и другие параметры, необходимые для работы в сети TCP/IP.
Наибольшее распространение DHCP сервер получил в IPv4 сетях. Это не означает, что в IPv6 сетях DHCP сервер не используется, но в основном DHCP мы рассматриваем в рамках IPv4 протокола.
Работает DHCP по модели клиент-сервер.
Следует его использовать только в доверенных сетях.
Например, даже если вы получили прямой L2 канал от оператора связи, он не является полностью безопасным, так как находится под управлением третьих лиц и в его работу могут вмешиваться другие специалисты, которые могут подвергать вашу сеть угрозам.
Работает в одном широковещательном домене.
Номер RFC 1531/2131
Принцип работы DHCP сервера.
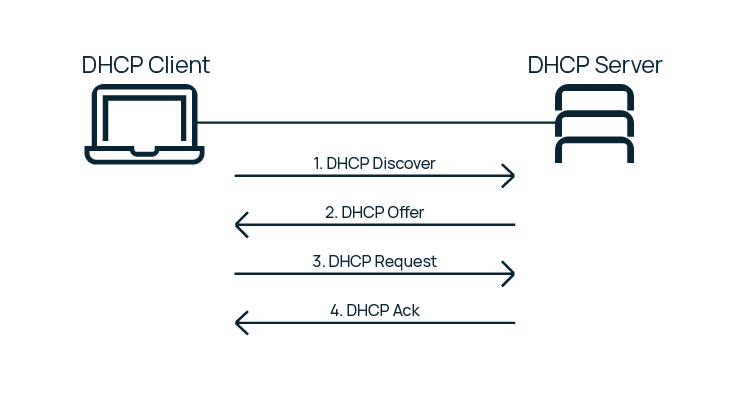
Данная иллюстрация описывает основные этапы взаимодействия клиента и сервера.
- Клиент посылает широковещательный запрос IP-адреса DHCP Discover.
- От сервера приходит DHCP Offer (предложение клиенту параметров настройки сети).
- Клиент отправляет DHCP Request (в котором сообщает согласие и уточняет у сервера, что предложение с параметрами актуально).
- Сервер отправляет DHCP Ack – подтверждение резервирования параметров.
DORA
Discovery
src-mac=,dst-mac=,protocol=udp,src-ip=0.0.0.0:68,dst-ip=255.255.255.255.:67
Offer
src-mac=,dst-mac=,protocol=udp,src-ip=:67,dst-ip=255.255.255.255:67
Request
src-mac=,dst-mac=,protocol=udp,src-ip=0.0.0.0:68,dst-ip=255.255.255.255.:67
Acknowledgment
src-mac=,dst-mac=,protocol=udp,src-ip=:67,dst-ip=255.255.255.255:67
Запрос Discovery всегда работает broadcast-ом, а все последующие запросы могут работать как broadcast, так и unicast на мак адрес клиента.
Дополнительные DHCP сообщения
Также DHCP сервер может отправлять дополнительные особые DHCP сообщения.
DHCPNAK — отправляется сервером вместо окончательного подтверждения. Такой отказ может быть отправлен клиенту, если аренда запрашиваемого IP истекла или клиент перешел в новую подсеть.
DHCPRELEASE — Клиент отправляет это сообщение, чтобы уведомить сервер об освобождении занимаемого IP. Иными словами, это досрочное окончание аренды.
DHCPINFORM — Этим сообщением клиент запрашивает у сервера локальные настройки. Отправляется, когда клиент уже получил IP, но для правильной работы ему требуется конфигурация сети. Сервер информирует клиента ответным сообщением с указанием всех запрошенных опций.
DHCP Client Identification
DHCP-сервер может отслеживать ассоциацию аренды с конкретным клиентом на основе идентификации.
- Идентификация может быть достигнута двумя способами:
- Основана на “caller-id” option (dhcp-client- identifier from RFC2132)
- На основе МАС-адреса, если параметр «caller- id» не указан
DHCP lease time
Аренда DHCP может быть назначена практически любой продолжительности от нуля секунд до бесконечности.
- Какая продолжительность аренды имеет смысл для любой данной подсети или для любой конкретной установки, зависит от типов обслуживаемых хостов:
- Для общественного места с общим WiFi имеет смысл приравнять время аренды к среднему времени нахождения клиента
- Для корпоративных клиентов имеет смысл увеличивать время аренды — для возможного обслуживания DHCP сервера без влияния на клиентов
- Настраивается параметрами:
- default-lease-time 600;
- max-lease-time 7200;
DHCP options
lease
Клиенту могут быть выданы различные опции для автоматизации его настроек.
Для работы в сети клиенту требуется не только IP, но и другие параметры DHCP — например, маска подсети, шлюз по умолчанию и адрес сервера.
Опции представляют собой пронумерованные пункты, строки данных, которые содержат необходимые клиенту сервера параметры конфигурации.
- Дадим описания некоторым опциям:
- Option 1 — маска подсети IP;
- Option 3 — основной шлюз;
- Option 6 — адрес сервера DNS (основной и резервный);
- Option 51 определяет, на какой срок IP-адрес предоставляется в аренду клиенту;
- Option 55 — список запрашиваемых опций. Клиент всегда запрашивает опции для правильной конфигурации. Отправляя сообщение с Option 55, клиент выставляет список запрашиваемых числовых кодов опций в порядке предпочтения.
DHCP-сервер старается отправить ответ с опциями в том же порядке.
Набор опций можно посмотреть в документации к DHCP серверу.
На этом, знакомство с DHCP сервером закончено.
Еще видео:
Action в Mikrotik ip firewall filter — accept, log, add to address list
Action в Mikrotik ip firewall filter — drop, fasttrack connection, jump, passtrough, reject, tarpit
Address List в Mikrotik
Принцип «Если-То» в Firewall MikroTik, Вкладки «General», «Advanced», «Extra», «Action»
Ручная Настройка Default Firewall Filer Rules
Port Knocking в Mikrotik Firewall Filter
Packet Flow Diagram в Mikrotik
Настройка Honeypot в Mikrotik
Настройка L2TP сервера в MikroTik
Добавление маршрутов с помощью CMAK
Настройка времени аренды (lease time) в роутере особенно важна для обеспечения безопасности и эффективности интернет-соединения. Этот параметр определяет, как долго IP-адрес будет назначен устройству, подключенному к роутеру. Если lease time установлен слишком низким, устройства будут часто запрашивать новый IP-адрес, что приведет к нестабильному соединению. Если же время аренды установлено слишком высоким, адреса могут быть заблокированы неактивными устройствами, что приведет к неправильному распределению ресурсов.
Для настройки времени аренды в роутере, следуйте этим простым шагам:
- Откройте браузер и введите IP-адрес роутера в адресной строке. Обычно это 192.168.0.1 или 192.168.1.1. Введите свое имя пользователя и пароль для входа в настройки роутера. Если вы не знаете эти данные, обратитесь к инструкции, поставляемой с роутером.
- Войдите в раздел настроек DHCP (Dynamic Host Configuration Protocol), обычно он находится в меню «LAN» или «Network Settings».
- Найдите опцию «Lease Time» или «Lease Duration» и установите требуемое время аренды. Обратите внимание, что время может быть указано в секундах, минутах, часах или днях. Рекомендуется установить время аренды в пределах от нескольких часов до нескольких дней.
- Сохраните изменения и перезагрузите роутер, чтобы новые настройки вступили в силу.
Не забывайте, что правильная настройка времени аренды в роутере помогает обеспечить стабильное и безопасное интернет-соединение для всех подключенных устройств. Используйте рекомендации вышеперечисленных шагов для оптимальной настройки параметра lease time в вашем роутере.
Содержание
- Продлить или установить время аренды в роутере: подробная настройка
- Что такое время аренды (lease time) в роутере?
- Как это влияет на ваше подключение к сети?
- Шаги по установке или продлению времени аренды:
- Подключение к роутеру
- Настройка времени аренды в интерфейсе роутера
Продлить или установить время аренды в роутере: подробная настройка
Время аренды (lease time) в роутере определяет, как долго будет предоставлен IP-адрес устройствам подключенным к сети. Это очень полезная функция, которая может быть использована для оптимизации работы вашей сети, поэтому важно знать, как продлить или установить время аренды.
Чтобы продлить или установить время аренды в роутере, выполните следующие шаги:
- Откройте веб-браузер и введите IP-адрес роутера в адресной строке. По умолчанию, IP-адрес роутера часто является «192.168.1.1» или «192.168.0.1». Нажмите Enter, чтобы открыть веб-интерфейс роутера.
- Введите имя пользователя и пароль для входа в веб-интерфейс роутера. Если вы не знаете эти данные, обратитесь к руководству пользователя вашего роутера или свяжитесь с поставщиком услуг интернета.
- Найдите раздел «DHCP» или «LAN» в настройках роутера. В этом разделе вы сможете настроить параметры времени аренды.
- Найдите настройку «Lease Time» или «Address Lease Time». Это параметр, который определяет время аренды IP-адреса. Обычно он может быть выражен в секундах, минутах, часах или днях.
- Выберите желаемое время аренды. Если вы хотите, чтобы IP-адрес был предоставлен навсегда, введите «0» или «infinity». Если вы хотите, чтобы время аренды было ограничено, введите соответствующее значение.
- Сохраните изменения и перезагрузите роутер, чтобы применить новые настройки.
Примечание: Установка слишком короткого времени аренды может привести к частым разрывам подключения и нестабильной работе сети. Выбирайте время аренды, учитывая потребности вашей сети и количество устройств, которые подключены к роутеру.
Что такое время аренды (lease time) в роутере?
Установка времени аренды в роутере позволяет ограничить доступ к сети определенным устройствам на определенное время. Это может быть полезно, если вы хотите предоставить доступ к Wi-Fi только временным гостям или ограничить использование сети определенными устройствами.
Как это влияет на ваше подключение к сети?
Настройка времени аренды (lease time) в роутере имеет прямое влияние на ваше подключение к сети. Время аренды определяет период, в течение которого устройствам будет выделяться IP-адрес с роутера.
При коротком времени аренды, каждое устройство будет часто запрашивать новый IP-адрес. Это может привести к некоторым задержкам в работе сети и увеличению нагрузки на роутер. Более длительное время аренды может привести к тому, что некоторые IP-адреса могут оставаться неиспользуемыми, если устройство перестает использовать сеть.
Оптимальное время аренды зависит от размеров вашей сети и числа подключенных устройств. Если у вас небольшая домашняя сеть с небольшим числом устройств, то рекомендуется выбрать более длинное время аренды, чтобы уменьшить нагрузку на роутер. Если же у вас большая компания с большим числом устройств, то может быть предпочтительнее использовать более короткое время аренды, чтобы уменьшить вероятность исчерпания доступных IP-адресов.
Если время аренды не соответствует потребностям вашей сети, это может привести к проблемам с подключением устройств к сети или к снижению скорости работы сети.
Поэтому, при настройке времени аренды в роутере, важно учитывать размеры сети и число подключенных устройств, чтобы обеспечить оптимальную производительность и стабильность вашей сети.
Шаги по установке или продлению времени аренды:
Для установки или продления времени аренды в роутере выполните следующие шаги:
| Шаг 1: | Откройте веб-браузер на устройстве, подключенном к роутеру, и введите IP-адрес роутера в адресной строке. IP-адрес обычно указан на нижней стороне роутера или в документации. |
| Шаг 2: | Введите имя пользователя и пароль для административного доступа к роутеру. Если вы не знаете имя пользователя и пароль, обратитесь к документации по роутеру или свяжитесь с вашим интернет-провайдером. |
| Шаг 3: | Найдите настройки DHCP (Dynamic Host Configuration Protocol) или LAN (Local Area Network) в административном интерфейсе роутера. Эти настройки отвечают за управление временем аренды IP-адресов. |
| Шаг 4: | Установите или измените значение времени аренды в соответствии с вашими предпочтениями. Время аренды обычно измеряется в минутах или часах. |
| Шаг 5: | Сохраните изменения и перезагрузите роутер, чтобы применить новые настройки. |
После выполнения этих шагов временная аренда IP-адресов в вашем роутере будет установлена или продлена в соответствии с выбранным вами значением.
Подключение к роутеру
1. Убедитесь, что ваш компьютер подключен к роутеру через сетевой кабель или Wi-Fi.
2. Откройте веб-браузер и введите IP-адрес роутера в адресной строке. Обычно адрес равен 192.168.1.1, но может отличаться в зависимости от модели роутера.
3. В появившемся окне введите имя пользователя и пароль для входа в настройки роутера. Если вы не знаете данные для входа, попробуйте стандартные комбинации логина и пароля, такие как «admin» и «admin» или «admin» и «password».
4. После успешного входа вы попадете в настройки роутера, где сможете изменить параметры аренды времени (lease time).
Настройка времени аренды в интерфейсе роутера
Настройка времени аренды (lease time) в роутере позволяет установить период, в течение которого устройства подключенные к сети роутера получают IP-адрес.
Для того чтобы настроить время аренды, следуйте инструкциям:
- Откройте браузер и введите адрес роутера в адресную строку. Обычно это 192.168.0.1 или 192.168.1.1. Нажмите клавишу «Enter», чтобы открыть страницу настроек роутера.
- Введите логин и пароль для доступа к интерфейсу роутера. Обычно эти данные указаны на задней панели роутера или в инструкции к нему.
- В интерфейсе роутера найдите раздел «DHCP» или «LAN» (название может отличаться в зависимости от модели роутера).
- В разделе «DHCP» найдите опцию «Lease Time» или «Время аренды». Часто это выпадающий список с несколькими настройками времени (например, 1 час, 4 часа, 8 часов, 24 часа). Выберите подходящую настройку или введите свое значение вручную.
- Сохраните внесенные изменения, нажав кнопку «Сохранить» или «Применить». Роутер перезагрузится с новыми настройками времени аренды.
Теперь у вас настроено время аренды в интерфейсе роутера. Устройства, подключенные к сети роутера, будут автоматически получать IP-адрес на установленное время, после чего им может потребоваться повторная аренда IP-адреса.
Usually, DHCP is preferred over static IPs as you do not have to worry about individually assigning addresses to each device on the network. That’s also why DHCP is enabled (by default) on most systems today.
One thing to note here is that the IP is only leased for a certain time and will expire if not renewed. When this happens, the IP returns back to the DHCP pool. Now, this address becomes available for the DHCP server to lease to newer devices in the network.
If you’re keen to know more, here’s a detailed guide that discusses how a DHCP server leases IP to different devices on the network, its renewal process, and whether or not you can modify the lease duration.
Table of Contents
Basics to DHCP Lease Time
DHCP lease time indicates how long your device keeps the same IP before its renewal or expiry. During this period, the DHCP server reserves this IP for that specific device and won’t assign it to any other client, preventing possible conflicts.
For example, 1 hour lease time means the device can hold the allocated IP address for 1 hour. The client can renew the IP anytime during the lease period by sending a renewal request message. But if the criterion is reached and the device fails to renew its configuration, it may lose the IP and has to restart the process to get a new IP.
The main purpose of DHCP lease time is to specify a duration until which a client can use the IP address. This ensures that no device will hold the address for an indefinite time.
On an enterprise network, the network administrator configures the DHCP lease time. On a typical SOHO router, if you have access to the router settings, you get the option to change the default lease time.
How Does DHCP Lease Time Generation & Renewal Work?
The client device receives the lease time, IP address, and other additional information, like Default Gateway, Subnet Mask, DNS servers, etc. This process is called the DHCP lease negotiation or the DORA process.

The process starts after a client requests an IP by sending a Discover message. It is usually a broadcast message. One or more DHCP servers can offer the device with an IP.
Now, the client sends a final request (as a broadcast message) to claim the offered IP and related configurations. Once the DHCP server acknowledges this request, the client finally gets the IP for a certain period (lease time).
The client keeps using the leased IP address for half of its validity time (50%). Then, it attempts to renew its lease by sending a unicast message to the DHCP server. Only if the request is acknowledged its timers get refreshed.
However, if the DHCP server sends a NAK message, the client has to reinitiate the lease negotiation process to get a new IP address. In case the server doesn’t respond or is offline, the device keeps using the IP address until the rebinding time (at 87.5%).
The same process repeats in this state—the only difference is that the device sends a broadcast message. Now, every other DHCP server in the network can acknowledge the lease extension request.
Well, the client can still choose to release and renew the IP manually anytime during the lease period. The individual sections below should give you a much more technical understanding of this subject.
What are unicast and broadcast messages?
If a message from a client reaches a specific device on the network, it’s called a unicast message. On the other hand, messages reaching every device on the network is called broadcast message.
For example, if a client forwards a certain packet as a broadcast message, it will reach every station (can be both client and server). However, if it only reaches a specified device (let’s say, a DHCP server), this is a unicast message.
DHCP Lease Negotiation/DORA Process
DORA is simply the abbreviation for Discover-Offer-Request-Acknowledge. These are the messages that flow between the server and the client. In case the DHCP server is on a different network, a DHCP relay agent handles these messages.

Let’s say, you have connected a new device on a network. Now, this device (client) broadcasts a DHCPDISCOVER message that reaches all the devices on the network. Think of this as the device asking for an IP address from an accessible DHCP server.
In some cases, the device can even include a ‘parameter request list’ option in the DHCPDISCOVER message. Here, the client may mention a particular IP it’s interested in and the lease time it wants to take.

Let’s test this on network monitoring software. While I’ve used Wireshark, you may opt for anyone you like. You should notice that the source IP is 0.0.0.0 as the device hasn’t been assigned any IP address yet. The destination is 255.255.255.255 indicating a broadcast message.
Along with that, you can also check other parameters and options, like transaction IDs, client and server identifiers, relay agent addresses, packet lengths, and more. In case you see 0.0.0.0 in the Relay Agent address field, note that there’s no agent involved (both the client and server are on the same network).
Note: The DHCP protocol utilizes UDP port 67 for the servers and UDP 68 for the clients. You may check the source and destination ports from the User Datagram Protocol section in Wireshark.

Now, every DHCP server (that received the DHCPDISCOVER message) might respond with a DHCPOFFER packet. Think of this as the DHCP server offering an IP address to the client.
Since the servers are yet unknown which client requires this IP, it broadcasts the message that reaches all the other devices.
Here, the source IP address is going to be the DHCP server address. In most cases, this is simply your router’s IP. The destination will likely be 255.255.255.255 (indicating broadcast message).
However, the DHCP server may send a unicast DHCPOFFER message if your device was previously configured to the DHCP server. In such a case, the server will offer the requested IP and other parameters that match the previous configuration.

Monitoring the packet, you’ll see that the source IP is the DHCP server address. Unlike the broadcast message in the previous case, the destination IP field will show your device’s IP (indicating it’s unicast).

Based on this DHCPOFFER packet, the client will now respond with a DHCPREQUEST message. Basically, this is your device requesting the DHCP server to assign the offered IP address to it.
Since other servers could also be trying to communicate with this client, it has to broadcast the request packet. By doing so, the others now know that the device will only take an IP from the specified DHCP server.

As the client is yet to be assigned this IP address, the Source field still shows 0.0.0.0. Also, since this is a broadcast message, the Destination field will be 255.255.255.255.
Note: If the client had previously included the parameter request list in the DHCPDISCOVER message, it must include the same when sending a DHCPREQUEST message. In case it requests an invalid IP, the DHCP server will respond with a NAK packet, sometimes with an additional error message.

The final message (which can be either unicast or broadcast) is from the DHCP server. It acknowledges the client with a DHCPACK packet along with other configurations (including the lease time).

If it’s a broadcast message, the Destination field will still show 255.255.255.255. But if the server knows the device’s IP and MAC address, it should display the offered IP.
DHCP Lease Renewal Process

For the client to keep using the same IP address, it needs to renew its lease time. As mentioned earlier, the process starts automatically when the validity time reaches 50%, which is called the renewal timer (T1).
For example, if the lease time is set to 24 hours, the client keeps on using this IP for 12 hours. Once the T1 timer is hit, a DHCPREQUEST packet is sent as a unicast message to the DHCP server asking to renew the lease time.

The device keeps using the address until the DHCP server responds. In case the server is down or not responding, it will continue using the leased IP until the rebinding timer (T2). During the process, it keeps attempting to reach the same DHCP server (9 hours in this example).
If the server responds with an ACK message, it’s basically extending the client’s lease time. When this happens, the renewal process restarts (gets back to the binding state), meaning the device uses the new lease until T1 and again, requests for renewal.
In case the server replies with a NAK message, it’s basically asking the client to stop using the leased IP address. Therefore, it returns to the INIT state and starts the DORA process again to obtain a new lease.

Once the lease time reaches 87.5% (T2), the client device sends a DHCPREQUEST packet again. But this time, it sends a broadcast message hoping to communicate with any DHCP server in the network.
In case the original DHCP server replies with an ACK, only the lease time is refreshed. But if another server responds with an ACK, your device will obtain a new IP address. In either of the cases, the process returns to the binding state.
If the client receives a NAK reply, it has to restart the DORA process. In case there’s no response from the DHCP server at all, it continues using the IP until the expiry (in this example, 3 hours). After that, it has to restart the negotiation to obtain a new IP.
This is generally the case with the IPv4 addresses. However, if you’re using IPv6, it changes the leased IP to a deprecated state. While this is not recommended, it can prevent applications from possible disruptions. When this happens, these apps will continue using the same old IP address until their necessary task is completed.
Also, the renewal can be triggered manually using the ipconfig /renew command. If you run the ipconfig /release command, the device will give up the lease. The DHCP server can now assign this address to a new device.

When doing so, the client is basically sending a DHCPRELEASE packet to the DHCP server. Think of this as the device releasing the leased IP back to the server. As you can see above, this returns the client to the INIT state, and the negotiation process begins (from the DHCPDISCOVER message again).
But if you renew it immediately, the device will likely obtain the same IP for an extended period. While just renewing would extend the lease for only a certain period, releasing and renewing will reobtain the IP with a new lease time.
You can certainly change the lease time from the related settings on your DHCP server. Most home routers have an embedded DHCP server within them. In that case, you need first to access the router settings to configure this option.
Below is the step-by-step guide on how to do it. The steps may vary on different routers. Here, I am using TP-Link Archer A7 for demonstration.
- First of all, open up any web browser and enter your router’s IP address.

If you’re unaware of this, just launch Command Prompt and execute theipconfigcommand. Look for the Default Gateway option under your adapter.
- Once you’re on the router’s login page, enter the correct username and password to log in.

If you’re unsure about this, you may check the router sticker to get the default credentials. This could also be available online–just search for your router model. - Now, move to the Advanced option and expand Network.

- Select the DHCP server option from the left pane.

- Switch to the right and under Settings, get to the Address Lease Time field to check the default value. This is usually different for every DHCP server. As you can see below, mine is 120 minutes (2 hours).

- To modify the lease time, simply edit the value.
- Finally, press the Save button.


While some DHCP servers even allow you to set the lease time to unlimited, it might not be supported by others. In the case of embedded DHCP servers on routers, you can find the minimum and maximum value next to the Address Lease Time field.
If you have set up DHCP on a Windows server, its default value is 8 days. To change this, you may expand IPv4 or IPv6 and open up the Scope folder’s properties. Here, you can configure the lease time based on days, hours, and minutes.
Note that clients can only view and renew the lease period. So, if you are a Windows user, you can not change the lease time. I’ve already discussed how you can release and renew your IP addresses earlier.

To identify the lease period, just execute the ipconfig /all command and check the Lease Obtained and Lease Expired fields. The former indicates when the DHCP server leased the current IP to your device, and the latter displays the time it will expire.
DHCP Lease Time Best Practises
When configuring or modifying DHCP lease time, there are several things to consider. You need to keep in mind the number of users in the network, the types of clients, the types of connected devices, how much traffic your network can handle, and more.
Certainly, it’s difficult to determine a setting that’s ideal for every situation. You need to test different lease times to find the best one that suits your networking environment.
Below are some of the best practices that most network administrators prefer. This should help you in choosing the optimal DHCP lease time:
- If you have set up a Wi-Fi network in a busy place where there’s frequent incoming and outgoing traffic, you may settle for shorter lease times. This ensures that a new device won’t have to wait for others to release its IP or expire. It would be ideal to set the lease time somewhere between 30 minutes to 1 hour.
- You may opt for shorter lease times in networking environments where the clients do not frequently utilize their devices. For example, if a user is only active for an hour or two on his/her smartphone, leasing IP addresses that last longer wouldn’t be a wise idea. I recommend opting for a few hours (3-4 hours or even less).
- In case you have a limited number of IP addresses in the DHCP pool, this also calls for shorter lease times (somewhere between 1 hour and 1 day). This way, unused devices get disconnected, and a newer device will obtain its lease. However, if you have enough IP addresses in the DHCP pool, opting for longer lease times would be ideal.
- If you’re at home and have a limited number of devices, you may reserve a specific IP address for every one of them. Otherwise, set a longer DHCP lease time here (8 days to unlimited if possible).
- In case you’re unsure about your network configuration, you do not have to worry much. Just leave the lease time to default or set the standard period (i.e. 24 hours).
At the end of the day, it’s up to you to decide between short and long DHCP lease times. Personally, I recommend opting for shorter ones in networks where the traffic is transient and requires more security. But choose longer lease times if you have sufficient IPs and the devices connected in the network are usually permanent.
Lease time в роутере – это параметр, который определяет время, в течение которого DHCP-сервер (Dynamic Host Configuration Protocol) выделяет IP-адрес устройству в локальной сети. Когда устройство запрашивает IP-адрес у DHCP-сервера, сервер выделяет этот адрес на определенное время, которое указано в настройках Lease time.
Lease time важен для правильного функционирования сети, поскольку позволяет контролировать количество доступных IP-адресов в сети и предотвращать их неэффективное использование. Когда устройство покидает сеть или отключается, DHCP-сервер освобождает выделенный IP-адрес, чтобы другие устройства могли его использовать.
Часто в настройках роутера можно задать значение Lease time от нескольких минут до нескольких дней. Краткий Lease time может быть полезен в ситуациях, когда в сети постоянно появляются новые устройства, а IP-адреса временно их выделяются. Длительный Lease time может быть полезен для статичных устройств, которым требуется постоянное подключение к сети.
Важно отметить, что время Lease time указывается в секундах, поэтому при задании значения необходимо помнить о правильных преобразованиях. Например, если вы хотите установить срок аренды в 1 день, то значение Lease time должно быть равно 86400 (24 часа * 60 минут * 60 секунд).
Знание и правильное настройка Lease time в роутере позволяют эффективно управлять IP-адресами в сети и предотвращать пересечение адресов устройств. Установив соответствующее значение Lease time, вы можете улучшить производительность вашей сети и обеспечить ее стабильную работу.
Содержание
- Что такое Lease time в роутере?
- Значение и назначение Lease time
- Влияние на работу сети
Что такое Lease time в роутере?
Lease time играет важную роль в динамической адресации на сети. Он позволяет эффективно управлять IP-адресами и предотвращать их исчерпание. Короткий Lease time позволяет быстро освобождать неиспользуемые IP-адреса и перераспределять их между устройствами. Длинный Lease time, наоборот, обеспечивает более стабильное подключение устройств и сокращает сетевой трафик, связанный с обновлением аренды.
Lease time можно настроить в настройках роутера. Обычно его значение указывается в секундах или минутах. Рекомендуется выбирать оптимальное время, учитывая размер сети, количество устройств и потребности пользователей. Важно учесть, что слишком короткий Lease time может привести к частым обновлениям IP-адресов и увеличению сетевой нагрузки.
Выводя всё в конце, Lease time – это параметр, определяющий время аренды IP-адреса для устройства на сети. Он позволяет эффективно управлять IP-адресами и максимизировать использование ресурсов сети. Выбор правильного Lease time является важной задачей при настройке и оптимизации роутера.
Значение и назначение Lease time
Для правильной настройки сетевых устройств и обеспечения безопасности и эффективности сети очень важно правильно установить значение Lease time. Продолжительность срока аренды должна быть определена в соответствии с требованиями и конкретными потребностями организации.
Если значение Lease time установлено коротким, например, на несколько минут, то это может вызвать частые обновления IP-адреса, что может вызвать задержки в работе сети и увеличение трафика сети. С другой стороны, если значение Lease time слишком долгое, то это может привести к неэффективному использованию доступных IP-адресов.
Когда срок аренды IP-адреса приближается к окончанию, сетевое устройство обращается к DHCP-серверу, чтобы продлить аренду или получить новый IP-адрес. DHCP-сервер затем принимает решение, продлевать ли аренду или нет, и назначает новый срок аренды, основываясь на своих настройках и текущей загрузке сети.
Установка оптимального значения Lease time является важным аспектом настройки сети. Она должна быть синхронизирована с другими настройками сети и потребностями организации, чтобы обеспечить эффективное и безопасное функционирование сети.
Влияние на работу сети
Опция Lease time в роутере играет важную роль в работе сети. Задавая время аренды IP-адреса, данная опция определяет, как долго устройство будет иметь доступ к сети. В свою очередь, это влияет на эффективность и управление сетевым трафиком.
Когда устройство подключается к роутеру, роутер назначает IP-адрес с определенным Lease time – временем аренды. В течение этого времени устройство имеет полный доступ к сети и может обмениваться данными с другими устройствами.
По истечении времени аренды, роутер может либо продлить срок аренды для данного устройства, либо освободить IP-адрес и назначить его другому устройству. Если роутер освобождает IP-адрес, то устройство теряет соединение с сетью до тех пор, пока не будет получен новый IP-адрес.
Выбор правильного значения Lease time может значительно повлиять на работу сети. Короткий срок аренды может привести к частой смене IP-адресов устройств, что затрудняет управление сетевым трафиком. С другой стороны, длительный срок аренды может привести к неэффективному использованию доступных IP-адресов.
Рекомендуется выбирать значение Lease time, которое соответствует особенностям сети и потребностям устройств. Например, для домашней сети, где устройства редко подключаются или отключаются, можно выбрать достаточно длинный срок аренды. В офисной сети, где устройства подключаются и отключаются чаще, может быть целесообразно выбрать более короткий срок аренды.
Итак, правильное настройка Lease time в роутере позволяет оптимизировать работу сети, обеспечивать стабильное подключение устройств и эффективно управлять доступными IP-адресами.