Loading
How to setup a LAN port from DSL router as WAN input for internet access using only the web interface on OpenWrt.
OpenWrt is a Linux based, embedded operating system for networking devices. Besides being open source, it is highly configurable and versatile. This post will show how to configure one of the LAN ports as WAN input (for xDSL routers, which have the WAN internally connected to the modem). There are no opensource drivers for ADSL op OpenWrt and this feature is therefore unavailable. It doesn’t matter anyway, since DSL limited in bandwidth and is losing its popularity.
Many DSL routers are in fact more powerful platforms, with improved hardware, than ordinary routers. If you want to connect the router to wired LAN internet this is what you should do. I’ve done this on a router with a development snapshot installed (the difference is that development versions do not come with web interface preinstalled). If you have a regular release, you can skip LuCI installation, as you already have access to the web interface of the router.
Install LuCI
Important! If you are using a stable release of OpenWrt (which is what you should be using) skip this part. LuCI is already installed. Manual installation is required only on development snapshots.
LuCI is the web interface server used by OpenWrt. First of all you need internet. Connect the router in the home network (wired LAN) and use the serial port to access OpenWrt console (yes, the hardware serial port). I recommend the CH340G USB to serial TTL converter (cheapest possible, less than 1 USD) with the jumper set to 3.3 V. Find your device on OpenWrt table of hardware and identify serial port pins. Connect only ground, RX and TX lines and start a PuTTY session on the serial port, with 115200 baud, 8N1 settings. If, when the router is booting, you get nothing printed in console, switch RX and TX connections.
Temporarily, the router will be set as a client in your wired LAN. This is very simple to do — just write (or paste) the following commands in the serial console:
uci set network.lan.ipaddr=192.168.1.15
uci set network.lan.gateway=192.168.1.1
uci set network.lan.dns=8.8.8.8
uci commit network
reboot
Adjust IP address and gateway depending on your local network configuration. The IP should not be allocated to another device and it should be in the range of allowable addresses for your local network device. You just set a fixed IP. After it reboots, the router will have access to the internet. You can test this by issuing ping commands in the serial console. It’s time to install the web interface. Run these commands in serial console:
opkg update
opkg install luci
/etc/init.d/uhttpd start
Using any computer connected to the same local network as the OpenWrt router, open the browser and go to the IP address you set earlier (192.168.1.15 in my example). You should see LuCI login screen.

OpenWrt (LEDE for a while) LuCI login screen
Click on Login button, then follow the warning message and set a password for the router.
Create VLAN
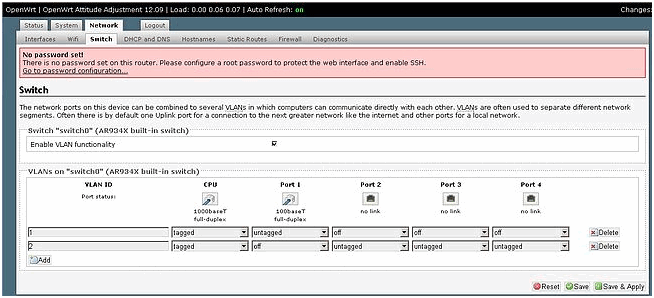
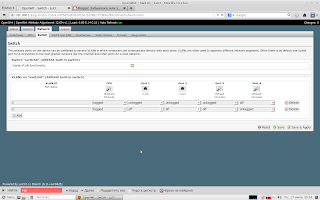
To be able to set a port of the switch as WAN (wide area network) port, you need to create a virtual LAN (VLAN) for it. There is already one VLAN which includes all available ports (physical wired LAN ports and the CPU port). To add an additional VLAN, go to Network — Switch and click the Add button to add another VLAN. You should have two VLANs with IDs 1 and 2. VLAN 1 will remain the switch LAN. VLAN 2 will be configured for WAN access.
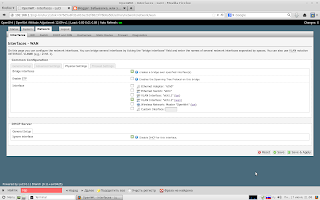
Now, the port that you want to make WAN must be off (disabled) in VLAN 1 and used in VLAN 2 (untagged). The rest of the switch ports that will be used for local clients must be untagged in VLAN 1 and disabled (off) in VLAN 2. Only the CPU port must be tagged in both VLANs. Have a look at the following screenshot, which sets LAN port 1 as WAN.

WAN port on second VLAN
Once you are done, click Save button.
Network protocol
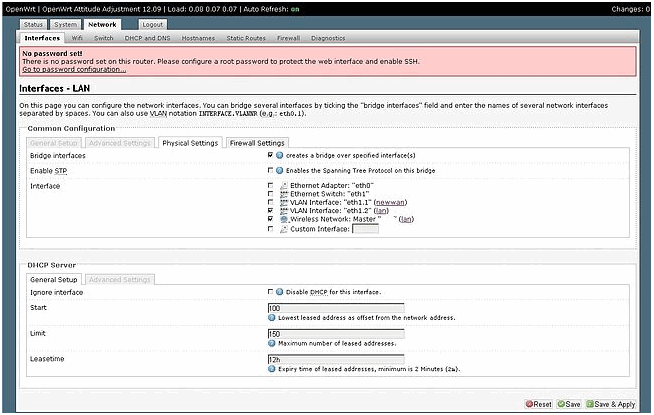
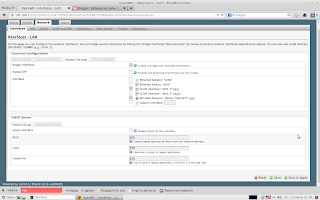
VLAN 1 (eth0.1) is your LAN network. The most used configuration here is DHCP server (meaning you connect devices to it and those devices get an IP address from OpenWrt). Go to Network — Interfaces and edit the default LAN (br-lan).
- Common Configuration: General setup:
- Protocol: Static address
- IPv4 address: 192.168.2.1 (or whatever address you want to access LuCI). If you want to have a well configured network, with access to the main router (gateway), make sure this address is different and not in the range of the DHCP addresses of the gateway (i.e. if your main router is at 192.168.1.1, set OpenWrt router at 192.168.2.1)
- Use custom DNS servers: 192.168.2.1, 8.8.8.8 and add 8.8.4.4 (optional, that’s what I prefer; note that the first server is the IP of the router). If you do add DNS servers, if you want .lan domains to work, make sure the first DNS server is your router’s.
- Common Configuration: Physical settings:
- Bridge interfaces: should already be checked
- Interface: make sure VLAN 1 and WiFi are there (
eth0.1andwlan0)
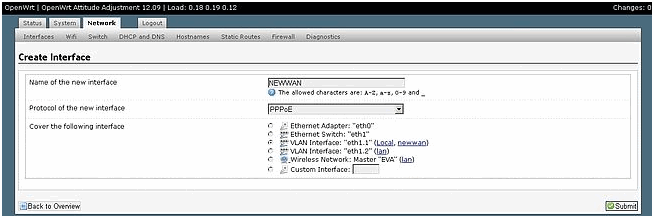
Save, but do not apply yet. Once you apply these settings, your device turns into a router and you’ll have to connect to it as a LAN client (if you used 192.168.2.1 as OpenWrt address, clients will be given addresses in this range: 192.168.2.xxx). Let’s have WAN port configured too. VLAN 2 (eth0.2) has only one port and from the WAN side, your OpenWrt router is just a client in a bigger network. Return to Network — Interfaces and click Add new interface with the following settings.
- Name of the new interface: whatever you want here, I chose
wwan - Protocol of the new interface: DHCP client. PPPoE is also a valid choice if needed.
- Create a bridge over multiple interfaces: No (unchecked)
- Cover the following interface: the VLAN with WAN port, VLAN 2 in my case (
eth0.2)
Click Submit, apply all settings (top right button) and make proper connections. OpenWrt web interface is now available only to LAN clients (wired or wireless).
Internet access
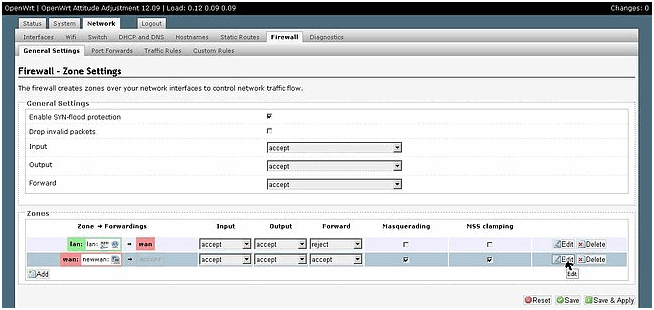
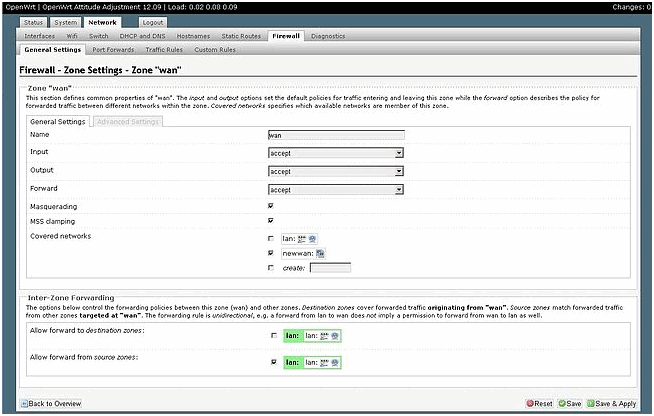
In case you do not have internet access, firewall and DNS servers should be checked. Go to Network — Firewall and:
- Edit LAN zone and make sure it allows forwarding to WAN zone
- Edit WAN zone: reject input and forward, turn on masquerading and MSS clamping and let it forward traffic from LAN

Firewall configuration for WAN
This is how your firewall configuration should look (see this forum thread). Now, let’s go to Network — DHCP and DNS. In Server Settings — General Settings — DNS forwardings you can add server IPs 8.8.8.8 and 8.8.4.4 (that’s not important to you, but it allows OpenWrt operating system to connect to the internet).
The OpenWrt router is now ready to use.
Имеется домашний роутер на openwrt. Интерфейсы: 4 lan, 1 wan, 1 wifi. Как сделать так что бы было 5 lan, 1 wifi, т.е. просто свич (очень нужен 1 бесплатный порт) и точка доступа?
Предеполагаю что разделе switch надо убрать vlan’ы. 
Этого достаточно? Или требуется еще что-то где-то прописать?
-
Вопрос задан
-
10007 просмотров
Зачастую в openwrt физические порты LAN определяются как eth1, а порт WAN как eth0. Поэтому нужно:
1. Заходим в Network — Interfaces и удаляем интерфейс WAN.
2. Там же на интерфейсе LAN нажимаем Edit, заходите в раздел Physical settings и добавляете галочки так, чтобы у вас они стояли напротив eth0, eth1 и wlan0 (Wireless network). Тем самым вы объедините все 5 проводных портов и беспроводной интерфейс в один мост. То есть получите обычный свитч без WAN порта.
3. Заходите в настройки vlan и отключаете так как вы и планировали.
Пригласить эксперта
-
Показать ещё
Загружается…
09 окт. 2023, в 20:54
100000 руб./за проект
09 окт. 2023, в 20:31
30000 руб./за проект
09 окт. 2023, в 19:26
1500 руб./в час
Минуточку внимания
Содержание
- 1 Переназначаем WAN порт
- 1.1 Создаем новый интерфейс NEWWAN
- 1.2 Настраиваем Firewall
- 2 Второй вариант перебросить порт WAN через консоль
Во время грозы сгорел WAN порт на TP-Link TL-WR-841N. В этой ситуации есть возможность назначить один из LAN портов в качестве WAN. В стоковой прошивке, к сожалению нельзя переназначить порты, поэтому переходим на альтернативную прошивку.
Первым делом нужно скачать прошивку OpenWRT для Вашей модели роутера, и запускаем процесс прошивки.
По завершении обновления идем на 192.168.1.1 и попадаем на обновленный веб-интерфейс роутера.
Переназначаем WAN порт
Для этого идем Network — Switch и создаем два vlan 1 смотрит tagget на ЦПУ и untagget на порт желающий стать новым WANом, 2 vlan tagget на ЦПУ и untagget на все оставшиеся порты.
Обратите внимание, что Порт 1 указанный как новый WAN, реально является 4 портом роутера.
Нажимаем Save&Apply
Создаем новый интерфейс NEWWAN
Следующим этапом открываем Network — Interfaces, удаляем старый WAN и создаем новый интерфейс NEWWAN и направляем его на VLAN Interface: «eth1.1» и настраиваем подключение, например PPPoE.
Возвращаемся в Network — Interfaces, нажимаем редактировать LAN.
На закладке Physical Settings устанавливаем галочки напротив:
- VLAN Interface: «eth1.2»
- Wireless Network: Master «OpenWrt» — это WiFi
Настраиваем Firewall
Открываем Network — Firewall, редактируем WAN в разделе Covered networks: NewWan, на закладке General Settings разрешаем все, нажимаем Save&Apply.
Нажимаем System — Reboot и проверяем.
Второй вариант перебросить порт WAN через консоль
Пример из 5-ти портового роутера:
# uci get network.eth0_0.ports
1 2 3 4 5
# uci get network.eth0_1.ports
0 5
Посмотреть текущее назначение можно так:
uci get network.eth0_0.ports
uci get network.eth0_1.ports
Посмотреть все настройки сети:
uci show network
Проблема грянула нежданно (ну как обычно), после грозы сгорел Wan порт на моём тополе (Tp-Link TL-WR841nd rev8.1). Погуглив — нашёл лекарство: установка альтернативной прошивки. Пробовал dd-wrt — не впечатлило, пересел на OpenWrt, как пересесть с одного wrt на другой опишу в другой статье.
Для установки и настройки с коробочной прошивки нам понадобится:
1) Прошивка (OpenWrt под Вашу железку, не важно тополь или длинк)
2) Терпение и внимательность.
Итак, на первый вопрос идём спрашивать гугл, на второй, после firmware upgade, заходим на роутер, набрав дефолтный ип в браузере (192.168.1.1) и далее по порядку:
1) устанавливаем пару логин-пароль. (деле желательно после выполнения каждого дейссствия нажимать Save&Apply)
2) перехаодим Network -> Switch, там мы видим картинки активных соединений, и кстати, номера портов будут отличатся от тех, что написаны на железке!.
3) создаём новый влан под цфрой 2, как на картинке
4) Переходим в Network -> Interfaces и видим наши сетевушки.
5) настраиваем lan. для этого нажимаем edit, закладка physical settings и делаем как на картинке(если интерфейса нет — создаём в поле custom interface):
6) теперь настраиваем wan, не забываем про General setup («настройки интернета») далее тоже как на картинке:
Теперь неодходимо проверить конфиг файл, т.к. не всегда он прописывается как хотелось бы нам. У меня заработало вот так (айпи статический, вторичный днс-гугл):
onfig interface ‘loopback’
option ifname ‘lo’
option proto ‘static’
option ipaddr ‘127.0.0.1’
option netmask ‘255.0.0.0’config interface ‘lan’
option type ‘bridge’
option proto ‘static’
option netmask ‘255.255.255.0’
option ipaddr ‘192.168.1.1’
option _orig_ifname ‘eth1 wlan0’
option _orig_bridge ‘true’
option ifname ‘eth1.1’config interface ‘wan’
option _orig_ifname ‘eth0’
option _orig_bridge ‘false’
option proto ‘static’
option ipaddr ‘тут.ваш.ip.адр’
option netmask ‘тут.ваша.маска.0’
option gateway ‘тут.ваш.ip.шлюза’
option broadcast ‘тут.ваш.ip.255’
option dns ‘тут.ваш.днс.сервер 8.8.8.8’
option ifname ‘eth1.2’config switch
option name ‘switch0’
option reset ‘1’
option enable_vlan ‘1’config switch_vlan
option device ‘switch0’
option vlan ‘1’
option vid ‘1’
option ports ‘0t 1 2 3’config switch_vlan
option device ‘switch0’
option vlan ‘2’
option vid ‘2’
option ports ‘0t 4’
PS после всего я не ожидал результатов, проц конечно греется адски (ну а как же иначе, у него часть явно сгорела, разбирал), НО:
Пакетов: отправлено = 755, получено = 755, потеряно = 0
(0% потерь)
Приблизительное время приема-передачи в мс:
Минимальное = 0мсек, Максимальное = 17 мсек, Среднее = 1 мсек
И это на шлюз провайдера через вай-фай, такого на стоковой не было никогда. обычно есть пару провалов до моего тополя, ну и первые 5-7 пингов всегда были больше 10 мсек, а тут с начала от 1 и ниже. В общем пока доволен, если сгорит проц — уже не жалко.