FAQ
Как настроить VPN сервер с переадресацией портов?
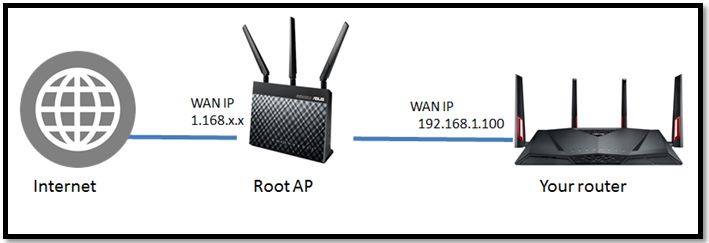
Когда WAN IP адрес Вашего роутера использует Приватный или Виртуальный IP адрес (private / virtual IP address), Ваш роутер может использовать беспроводную сеть как показано на рисунке ниже. Ваш роутер подключается к Интернет. Ваш роутер соединяется с Интернет, используя другой маршрутизатор (здесь мы его называем как Корневая точка доступа «the Root AP»). Корневая точка доступа присваивает IP адрес Вашего роутера. В этом случае, Вам придется настроить проброс портов, NAT Сервер или Виртуальный сервер на корневой точке доступа для подключения Вашего роутера к интернет по VPN.
VPN тоннель и номера портов
|
VPN server |
Port |
|
PPTP |
TCP 1723, Other 47 |
|
OpenVPN |
UDP 1194 |
|
IPSec |
UDP 500, UDP 4500 |
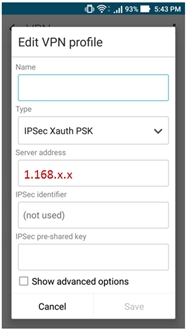
Ниже объясняется, как настроить переадресацию портов на маршрутизаторе ROOT AP. Для примера, настроим главный роутер (Root AP). С IP-адресом WAN маршрутизатора ASUS — 1.168.x.x и с IP-адрес 192.168.1.100 для второстепенного маршрутизатора.
Примечание: (1) Вы должны иметь разрешение на изменение настроек Root AP. Если у вас нет таких полномочий, обратитесь к администратору сети.
(2) Настройки могут отличаться от различных маршрутизаторов. Чтобы получить подробные инструкции, обратитесь к руководству пользователя Root AP.
Шаг 1: Войдите в Веб-интерфейс Вашего роутера и перейдите на страницу Network Map для проверки WAN IP адрес.
Шаг 2: Настройте главный роутер «Root AP».
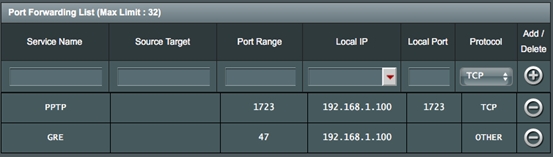
Войдите в веб-графический интерфейс главного маршрутизатора Root AP и настройте параметры Переадресации портов (Port Forwarding) / Виртуальный сервер (Virtual server) / NAT сервер, как показано ниже.
PPTP VPN: на экране Port Forwarding (Перенаправление портов) установите для туннеля PPTP: Local Port (Локальный порт) на 1723 и Протокол (Protocol) — TCP, а потом для туннеля GRE введите Диапазон портов (Port Range) — 47 и Протокол (Protocol) — Other.
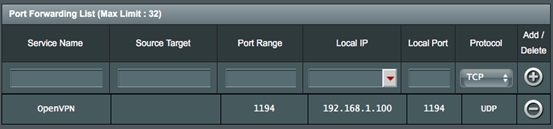
OpenVPN: на экране Port Forwarding (Перенаправление портов) установите локальный порт 1194 и протокол — UDP для туннеля OpenVPN.
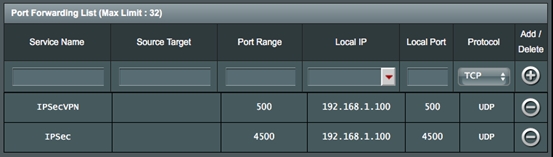
IPSecVPN: на экране Port Forwarding (Перенаправление портов), для тоннеля IPSecVPN установите локальный порт на 500 и протокол — UDP, а потом, для туннеля IPSec установите локальный порт на 4500 и протокол UDP.
Шаг 3: На экране VPN соединение на своем мобильном устройстве или ПК введите IP-адрес WAN домена главного маршрутизатора (Root AP) или DDNS в поле сервера VPN.
Пример:
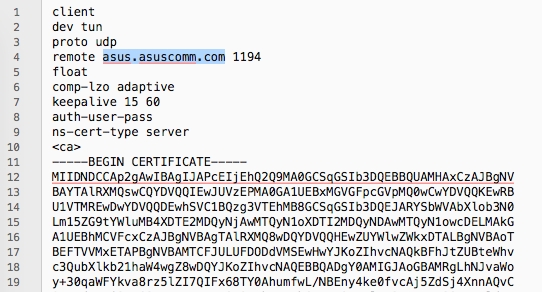
Если Вы используете OpenVPN, откройте файл конфигурации OpenVPN с помощью текстового редактора, а затем измените адрес на IP-адрес или DDNS интерфейса WAN удаленного главного роутера (Root AP), как выделено синим цветом на скриншоте ниже.
Важно: если тип подключения WAN на главном роутере (Root AP) — PPTP / L2TP / PPPoE, возможно, возникнут проблемы с подключением к VPN.
Эта информация была полезной?
Yes
No
- Приведенная выше информация может быть частично или полностью процитирована с внешних веб-сайтов или источников. Пожалуйста, обратитесь к информации на основе источника, который мы отметили. Пожалуйста, свяжитесь напрямую или спросите у источников, если есть какие-либо дополнительные вопросы, и обратите внимание, что ASUS не имеет отношения к данному контенту / услуге и не несет ответственности за него.
- Эта информация может не подходить для всех продуктов из той же категории / серии. Некоторые снимки экрана и операции могут отличаться от версий программного обеспечения.
- ASUS предоставляет вышеуказанную информацию только для справки. Если у вас есть какие-либо вопросы о содержании, пожалуйста, свяжитесь напрямую с поставщиком вышеуказанного продукта. Обратите внимание, что ASUS не несет ответственности за контент или услуги, предоставляемые вышеуказанным поставщиком продукта.

Шаг 1.
К сожалению, многие роутеры не поддерживают L2TP подключение с IPSec (шифрованием), поэтому его необходимо отключить на стороне сервера.
Зайдите в настройки VPNext сервера с помощью утилиты SoftEther VPN Server Manager (см. инструкцию) и в настройках L2TP/IPSec поставьте галочку напротив пункта “Enable L2TP Server Function (Raw L2TP with No Encryptions)”.
Нажмите “ОК” для сохранения изменений.

Шаг 2.
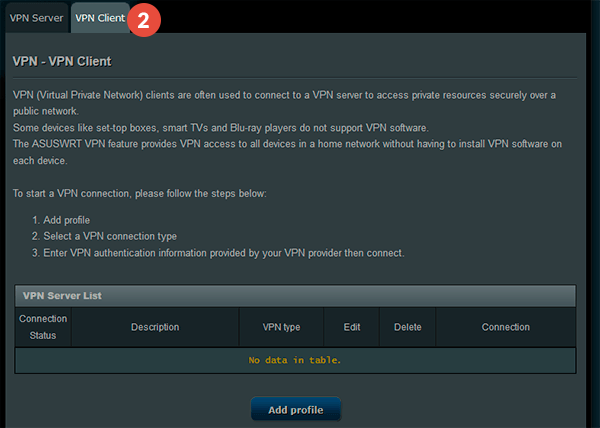
Зайдите в интерфейс управления роутером.
В меню слева выберите пункт “VPN”, перейдите на вкладку “VPN-клиент” и нажмите кнопку “Добавить профиль”.

Шаг 3.
Выберите вкладку “L2TP” и укажите настройки:
- “Описание” – любое удобное вам имя подключения;
- “VPN сервер” – IP-адрес, полученный в письме;
- “Имя пользователя” – имя пользователя, заданное вами при первоначальной настройке VPNext сервера;
- “Пароль” – пароль, заданный вами при первоначальной настройке VPNext сервера;
(Не путать с логином/паролем от Личного Кабинета).
Нажмите “ОК”.

Шаг 4.
Нажмите “Activate” напротив созданного подключения.

In this tutorial we will show you how to set up L2TP VPN on Asus Routers but first let’s see what are our requirements and recommendations.
This tutorial is created using an ASUS RT-N66U model. The other ASUS routers settings may vary. In case you have a different router model, consider this tutorial as an example. Contact us if you can not setup your router and please share with us screen shots with your settings.
Requirements
In order to set up the L2TP VPN you will need:
- A CactusVPN account. If you don’t have one you can try our services for free.
- Your VPN username, password and VPN server address. You can find them in your account on our website, by going to Settings.
Recommendations
By setting up a L2TP VPN on Asus router your IP will be changed but your traffic will NOT be encrypted. That happens because the connection does not use IPSec. We recommend using OpenVPN.
If you still want to set up L2TP VPN manually, go step-by-step through following instructions:
L2TP VPN Setup instructions
-
To start set up L2TP VPN on Asus routers you first have to connect to it. For that you have to put in your browser the following address: http://192.168.1.1 (If this doesn’t work, please consult your router’s manual to find what is the Default Gateway Address). Also you have to set your network connection to obtain IP address automatically if you connect to your router via Ethernet.
-
Click on VPN (1) button in the Advanced Settings box.

-
Click on VPN Client tab (2).
-
Click on Add profile button (3) from the VPN Client tab.
-
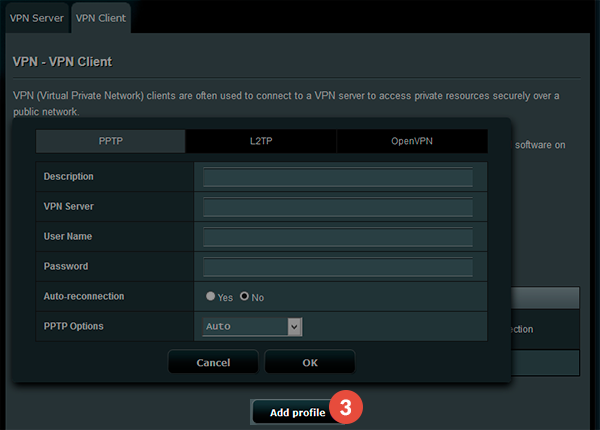
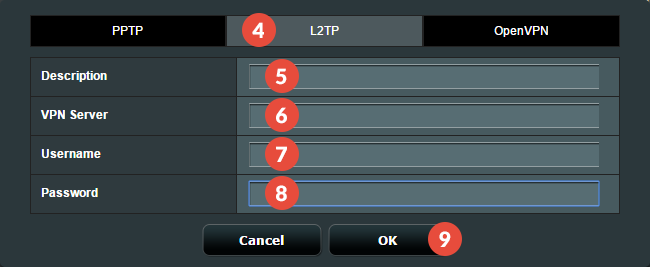
Select the L2TP option (4) selected and fill in the settings for your VPN connection:
Description (5): Name your connection
VPN Server (6): Enter here the IP address of the VPN server you want to connect to.
You can find IP addresses of all our servers in your account on our website, by going to Settings.
Username (7): Your VPN Username
Password (8): Your VPN password
You can find your VPN username and password in your account on our website, by going to Settings -> VPN Username & Password. Make sure you use your VPN username and password and NOT the website account credentials (What is the difference?).
Click on OK button (9).
-
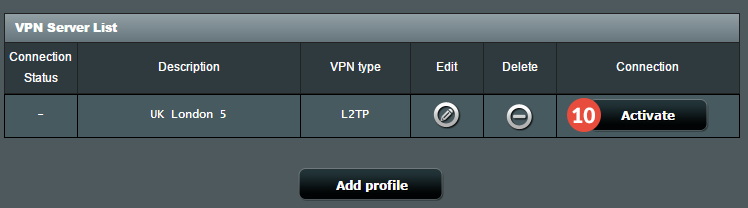
Click on Activate button (10).
VPN and Smart DNS Services
Protect online privacy, secure your connection and access blocked websites
Try CactusVPN For Free
How to setup L2TP/IP Sec VPN on Asus routers
How to setup L2TP VPN in ASUS DLS AC68U Router
The first step that should be done in order to start ASUS DLSAC68U Router Setup is to access the control panel of the router. You can do that by typing the following IP address in your browser – http://192.168.1.1 Asus should have provided the username and password for accessing the control panel in the manual or on the back of the router.
To make everything prepared for installing a VPN, you must, first of all, go to the WAN tab which is located in the menu to the left. Afterwards, click to the Internet connection button which is located on the upper menu. You will be shown an option to modify settings of DNS. The steps below show you how and what to edit.
- Select „Automatic IP“ for Wan Connection Type.
- The options for WAN, NAT and UPnP should be enabled
- Check “No“ for connecting to DNS Server automatically
- DNS Server1: 208.67.222.222
- DNS Server2: 8.8.8.8
- Select „Aggressive Mode“ on DHCP query frequency
- Double-check to make sure that all the ASUS DLS AC68U Router settings changed above are correct.
The next step in setting up L2TP VPN on ASUS DLS AC68U Router involves choosing the tab VPN which is also located in the menu on the left. Afterwards, you should click the VPN Client option in the top menu and then click „Add a profile“ option that will be displayed.
Clicking that will result in a new window where you need to edit setting fields, thus creating a VPN network profile. Follow the next steps.
- From the window on top choose L2TP as an option.
- You can basically type anything in the Description box. A suggestion would be – LimeVPN.
- In the VPN Server, enter – us.limevpn.com
- Type your LimeVPN username in the Username field.
- Type your LimeVPN password in the Password field.
- If the auto-reconnection option is available choose „Yes“.
- Click OK
With this, you successfully managed to setup VPN on ASUS DLS AC68U Router.
Note: To be able to configure your ASUS router using L2TP, be sure your network has DHCP support with working Internet Connection.
- Access your router’s web management page.
- From ASUS management interface, please select «WAN» option from «Advanced Settings» section in left side menu.
- In «WAN — Internet Connection» page, select «WAN Connection Type» as «L2TP» and keep all other fields on their default values in «Basic Config» section.
- In «WAN IP Setting«, select «Get WAN IP Automatically» to «Yes«.
- For «WAN DNS Settings» you can select «Connect to DNS Server automatically» to «Yes» or «No» setup your DNS entries manually using Google Public DNS («8.8.8.8″ for DNS Server 1 and «8.8.4.4″ for DNS Server 2 or OpenDNS «208.67.220.220» and «208.67.222.222«).
- In «Account Setting«, add your RapidVPN credentials in «PPP Username» and «Password» fields. «Additional pppd options» must remain blank.
- In «Special Requirement from ISP» section add RapidVPN server IP or name in «VPN Server» field (depending your assigned server location — Example: usnv.rapidvpn.net or IP assigned)
Note: To see your server IP address, login here with your username and password. - Click on «Apply» button and enjoy using RapidVPN on your ASUS router!
