![]()
How to Setup L2TP VPN on Windows Server 2019
-
View Larger Image


Introduction
In this blog article we are going to discuss about How to setup L2TP VPN over IPSec on Windows Server 2019 using Routing and Remote Access Service server role. A VPN is short form of virtual private network, which gives us a privacy, anonymity and security over public internet. A VPN service masks our ISP IP so your online actions are virtually untraceable. A VPN can also be used to connect computers to isolated remote computer networks that is usually inaccessible, by using the Internet or another intermediate network.
Microsoft servers provided with RRAS server roles for implementing such remote access services. The full form of RRAS is Routing and Remote Access Service. It is a suite of network services in the Windows Server family that enables a server to perform the services of a conventional router.It is also a Windows proprietary server role, that supports remote user or site to site connectivity by using virtual private network or dial-up connections. So using RRAS we can convert a regular Windows Server as VPN server. Microsoft RRAS server and VPN client supports PPTP, L2TP, IPSec, SSTP and IKEv2 based VPN connections. Using RRAS as VPN remote users can connect to their company organisation networks internally and securely over public internet.
L2TP ( Layer 2 Tunneling Protocol )
L2TP or Layer 2 Tunnelling Protocol is a tunnelling protocol which originated by the merger of Microsoft (PPTP) and Cisco L2F. By default L2TP does not provide strong encryption or authentication by itself. So we use another protocol called IPsec in conjunction with L2TP. IPsec stands for Internet Protocol security. The IPsec protocol provides very strong encryption to data exchanged between the VPN server and with the VPN client machine.
When setting up a more secure VPN tunnels we commonly use L2TP along with IPsec. L2TP/IPsec together supports either computer certificates or a Pre-shared key as the authentication method. The Ports need to Open is UDP ports 500, 4500, 50 and 1701.
System Configuration We Used.
Used Windows server 2019 which is covert as a VPN SSTP server.
Used Windows 10 client PC for connecting to Windows VPN server 2019.
Another thing is we are settings up this L2TP VPN on windows server 2019 which only have one Network interface. So this blog article can be implemented on Most of VPS ( Virtual Private Server) provided by Hosting Providers or with the Cloud Windows VMs.
Additionally we are using the Pre-shared key as the authentication method when enabling L2TP/IPsec.
Here I have divided the whole steps in to different parts. Lets get started. Even though we are performing the install on Windows server 2019, you can refer this article for Windows server 2016 and windows server 2012.
Part:1 Install Remote Access Server role on Windows Server 2019
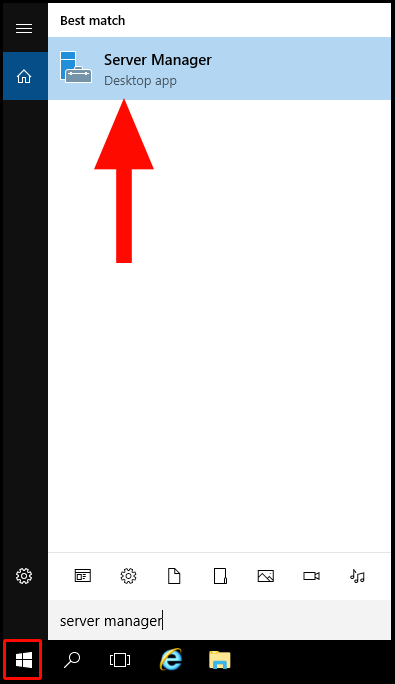
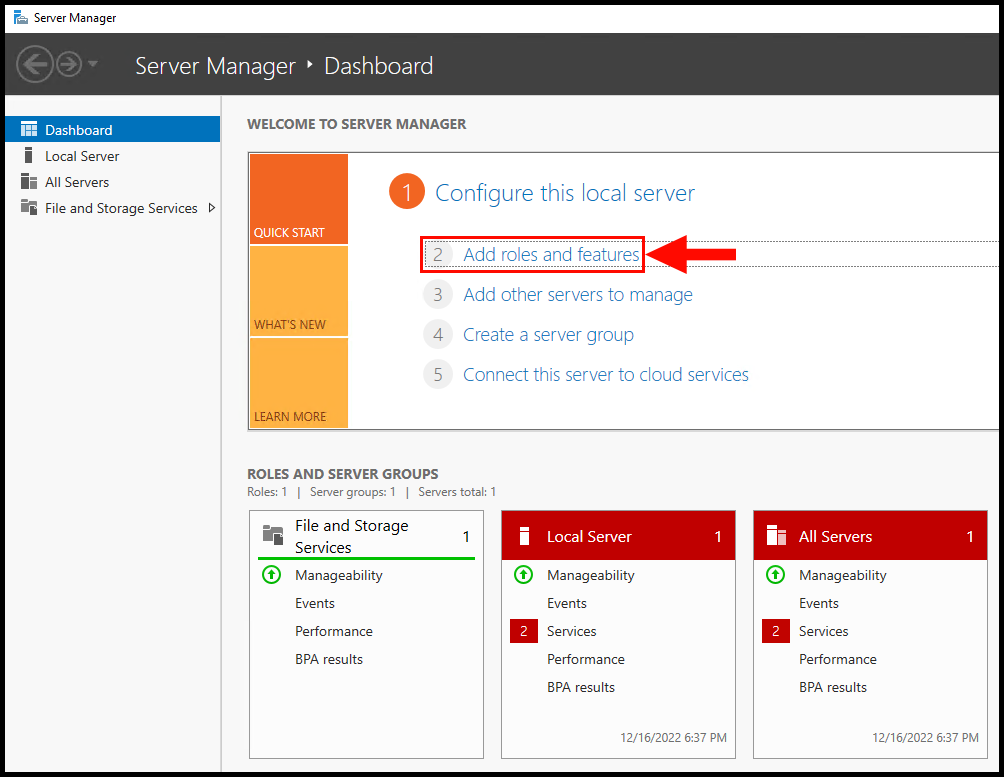
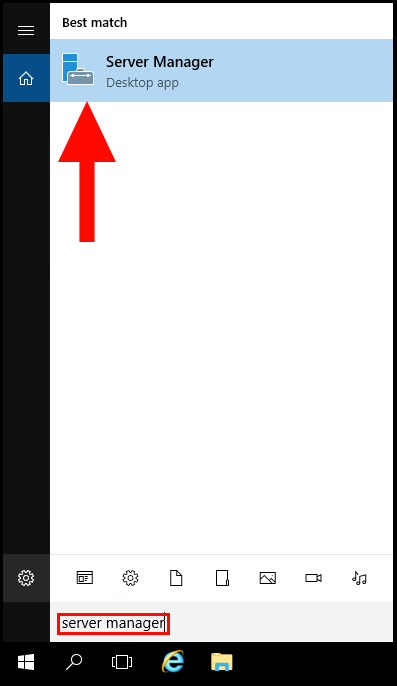
Log into the Windows Server 2019 > Click Windows Start Icon >> Click Server Manager.

Click Add Roles And Features

Click Next

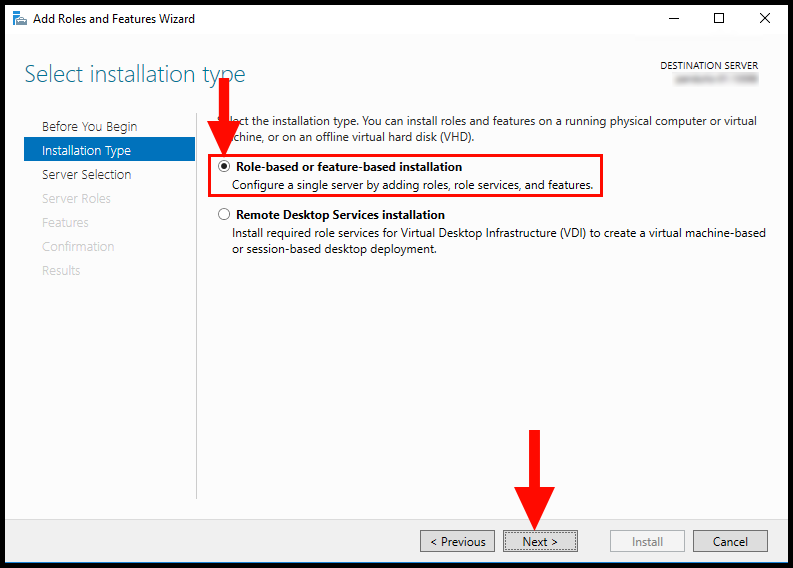
Choose the Installation Type as ” Role based or feature based installation and click Next.

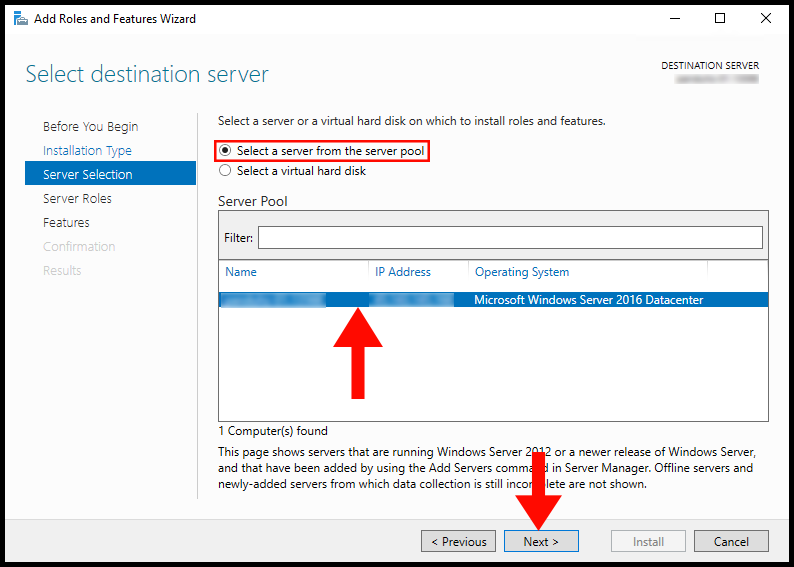
From Server selection, choose “select a server from the server pool” and click Next.

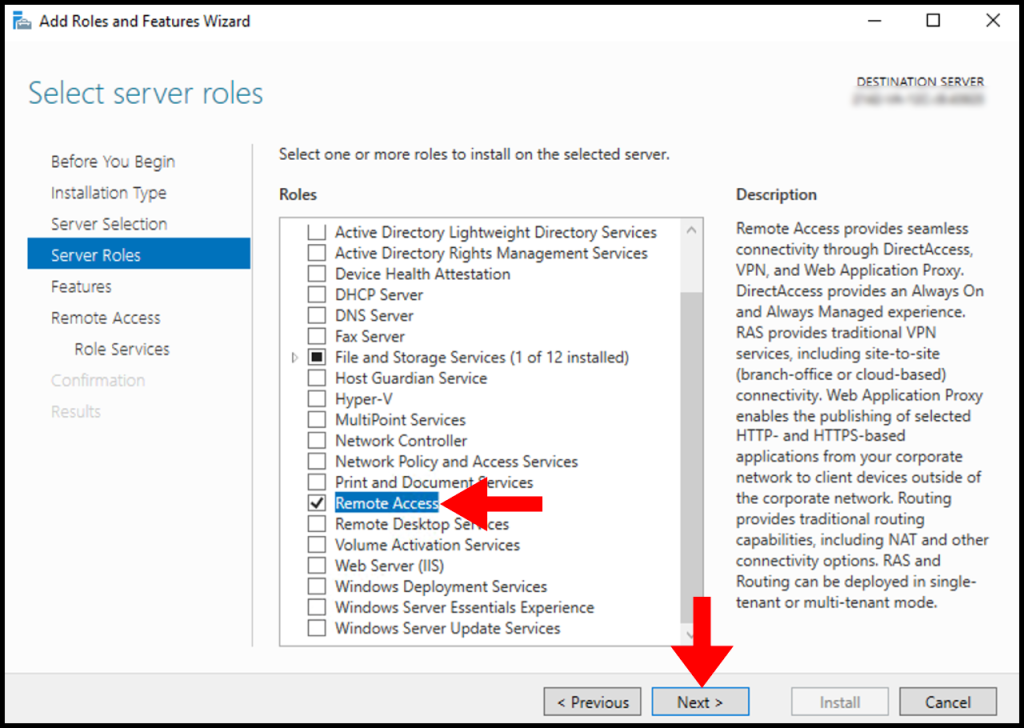
From Server Role choose ” Remote Access” and click Next.

Leave Features section as it is and click Next.

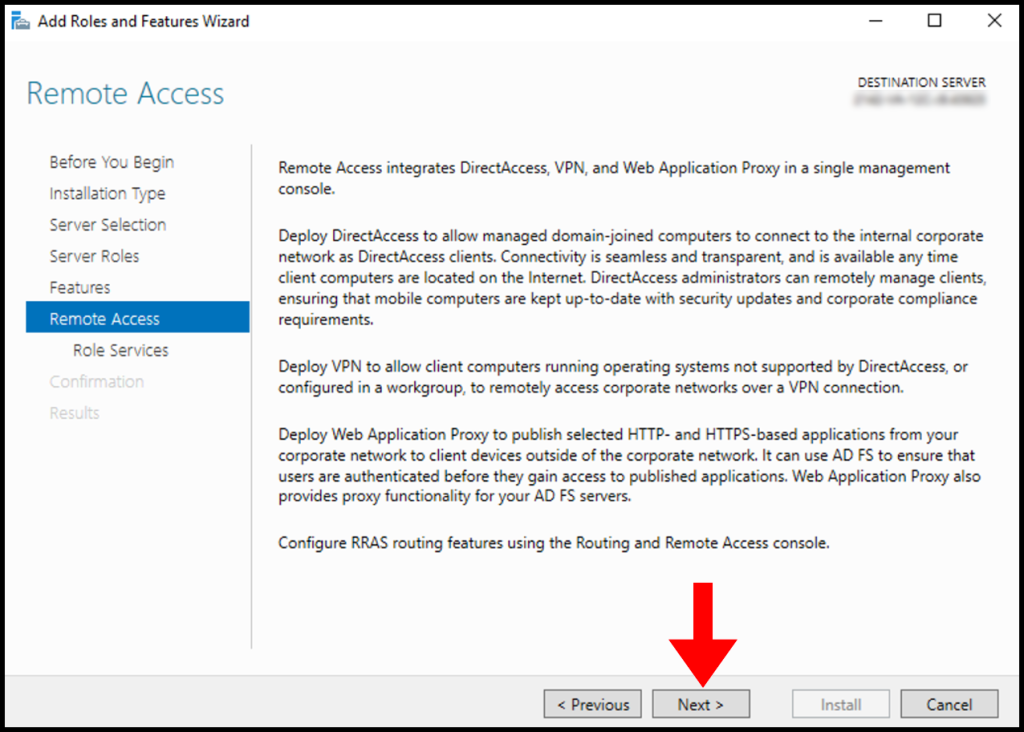
Click Next on Remote Access section.

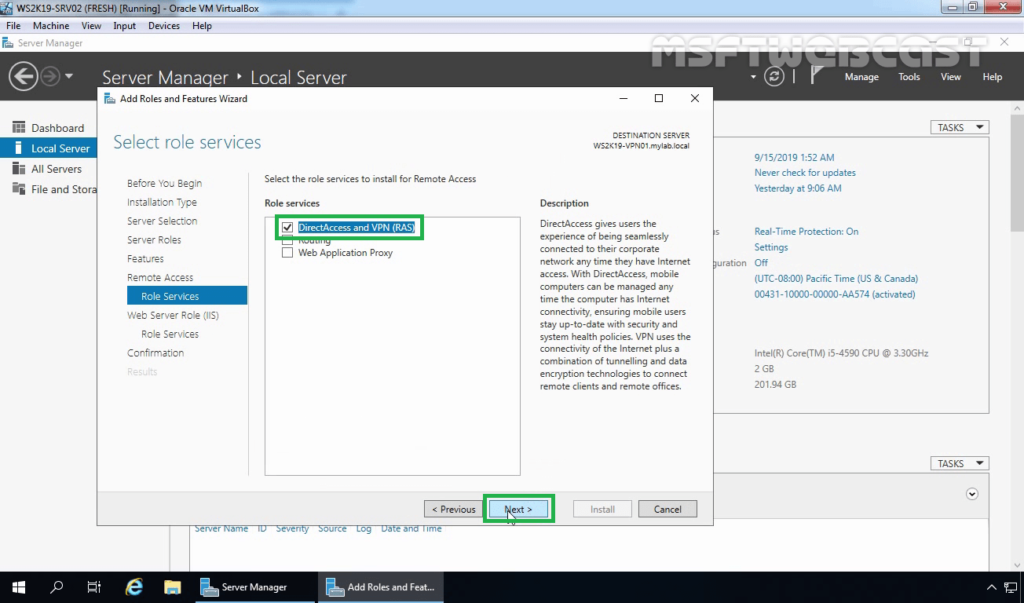
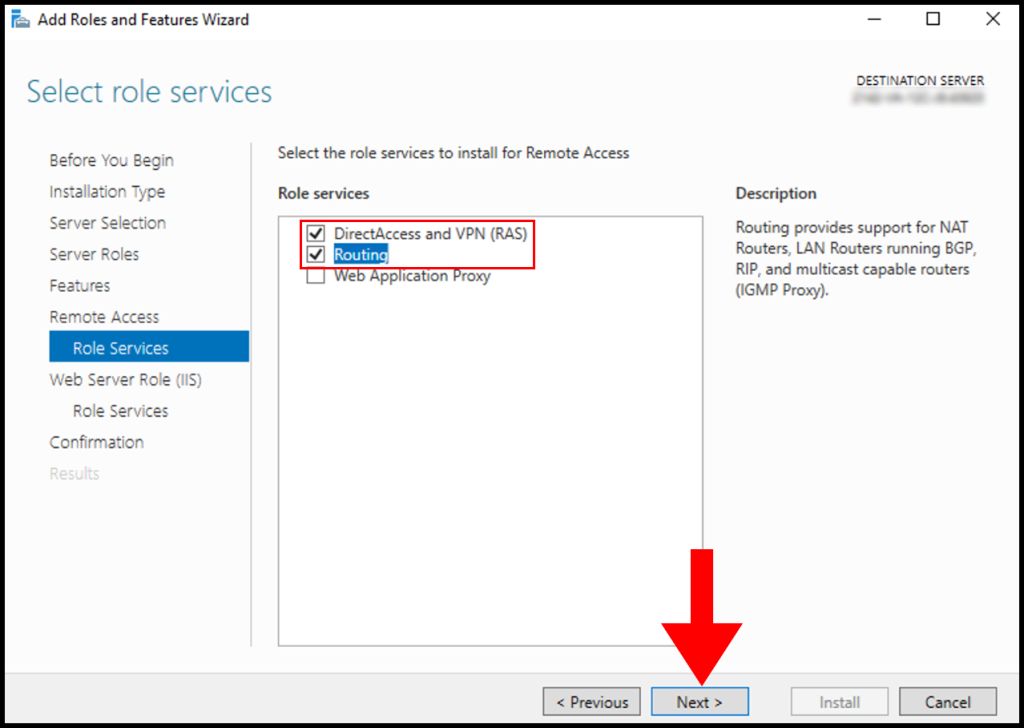
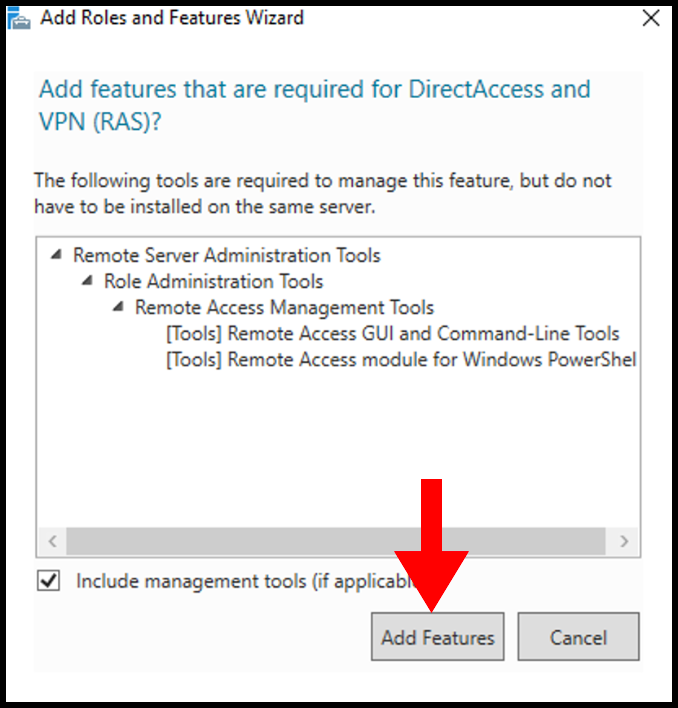
Under Role Services choose “Direct Access and VPN (RAS) and Routing and click Next. A popup window will appear for confirming the features that need to be installed for Direct Access and VPN. Confirm it by clicking “Add Features”.


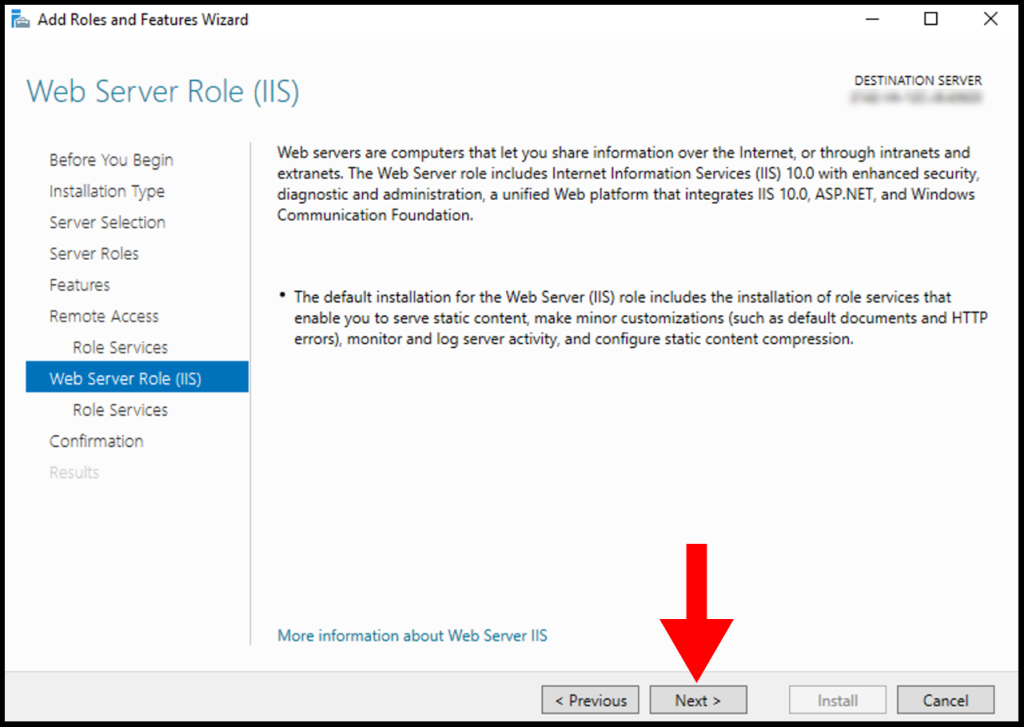
Under Web Server Role (IIS) Section click Next.

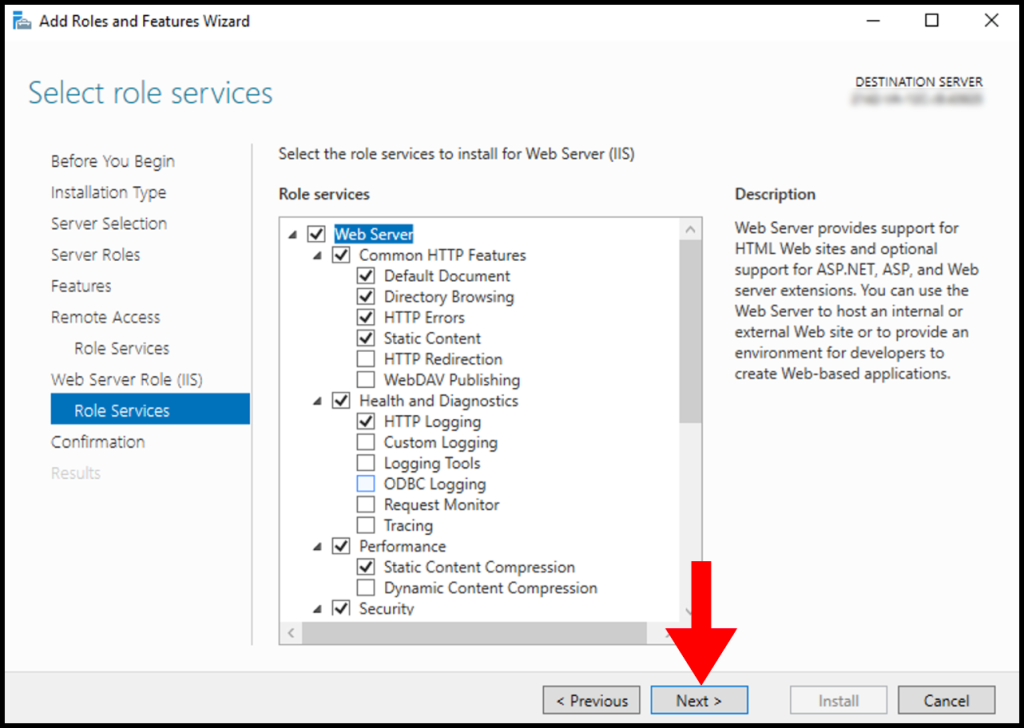
Under IIS Role services section leave the default one and Click Next.

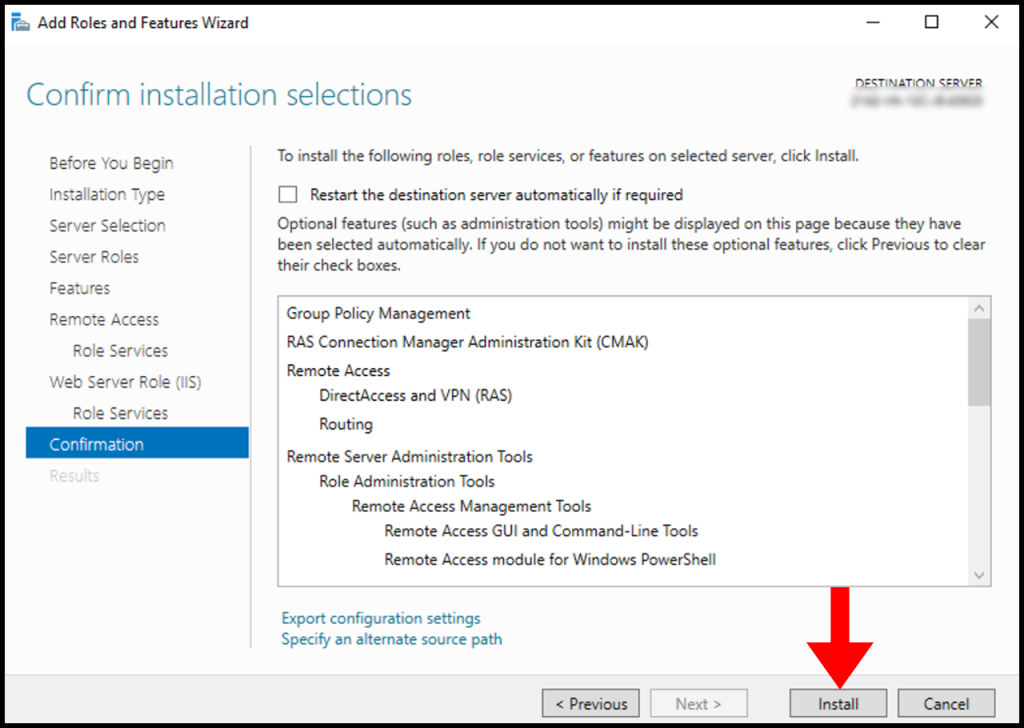
Under Final Confirmation section click Install.

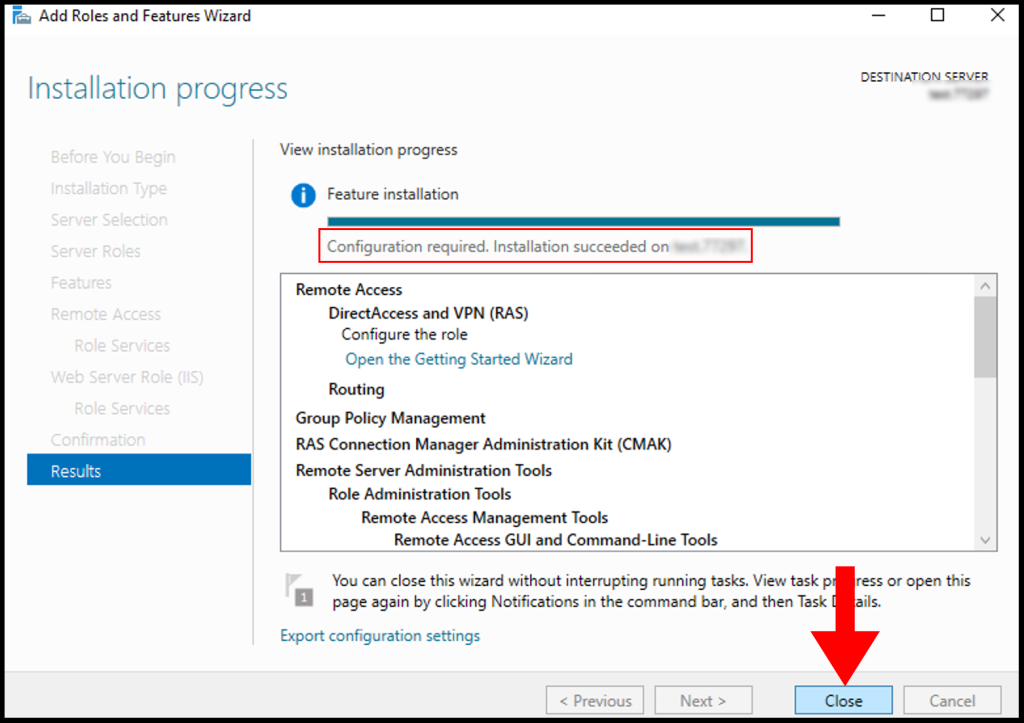
The Remote Access server role install will start automatically and normally it will get completed with in few Minutes. Once the installation succeeded click close.

Part:2 Create Additional Loopback Network Adaptor On Windows Server 2019
Its for skipping the error while running Configuring Remote Access Wizard and the error will be like below.
Less than two network interfaces were detected on this machine. For standard VPN server configuration at least two network interfaces need to be installed. Please use custom configuration path instead.
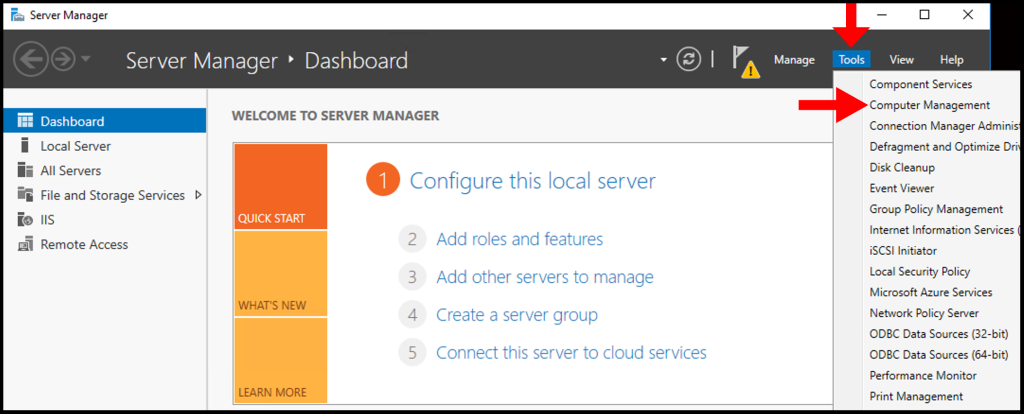
Under Server Manager click Tools >> Computer Management.

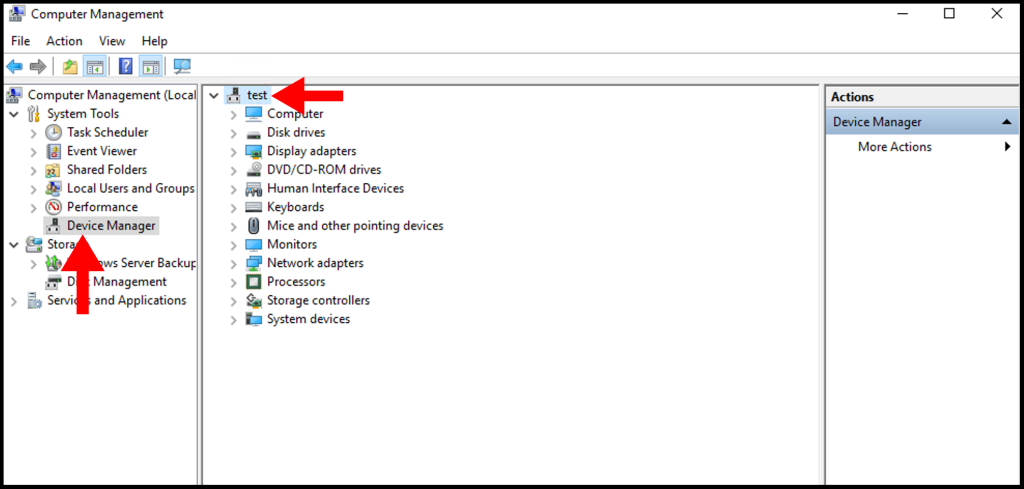
From Computer Management window Click Device Manager >> Click VM name from Right side.

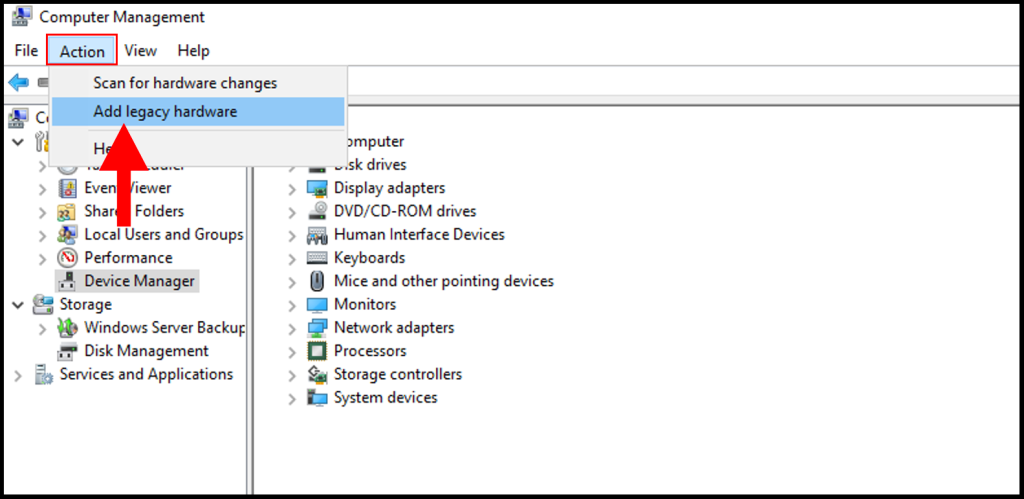
Under Actions tab >> Click “Add legacy Hardware”

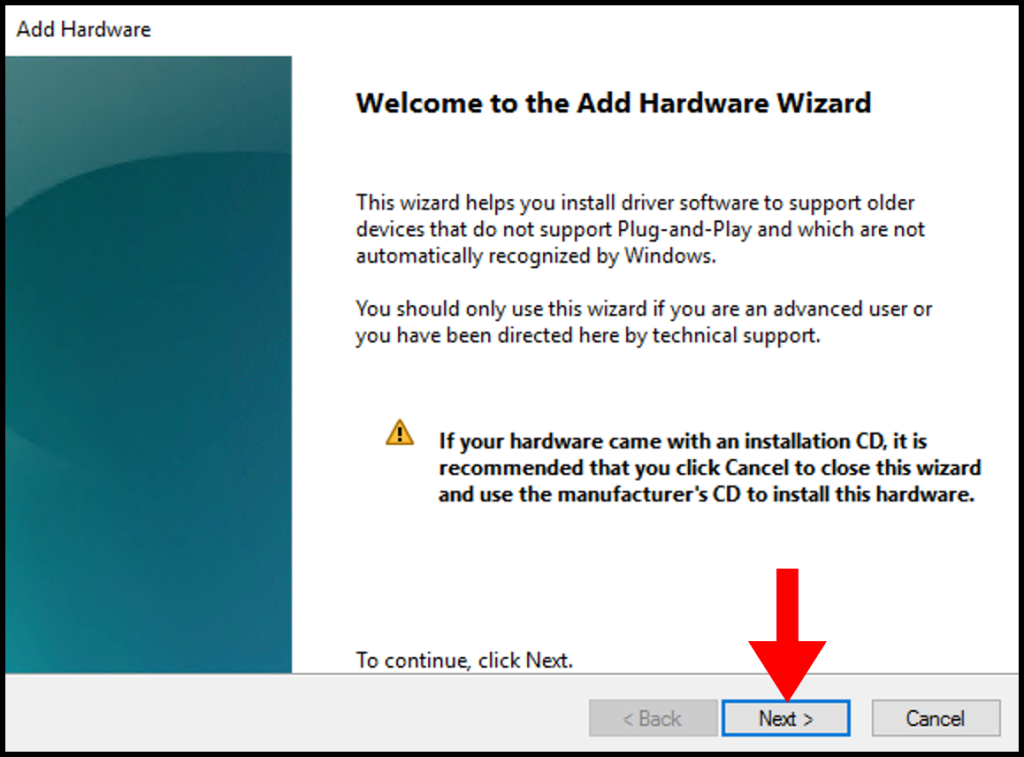
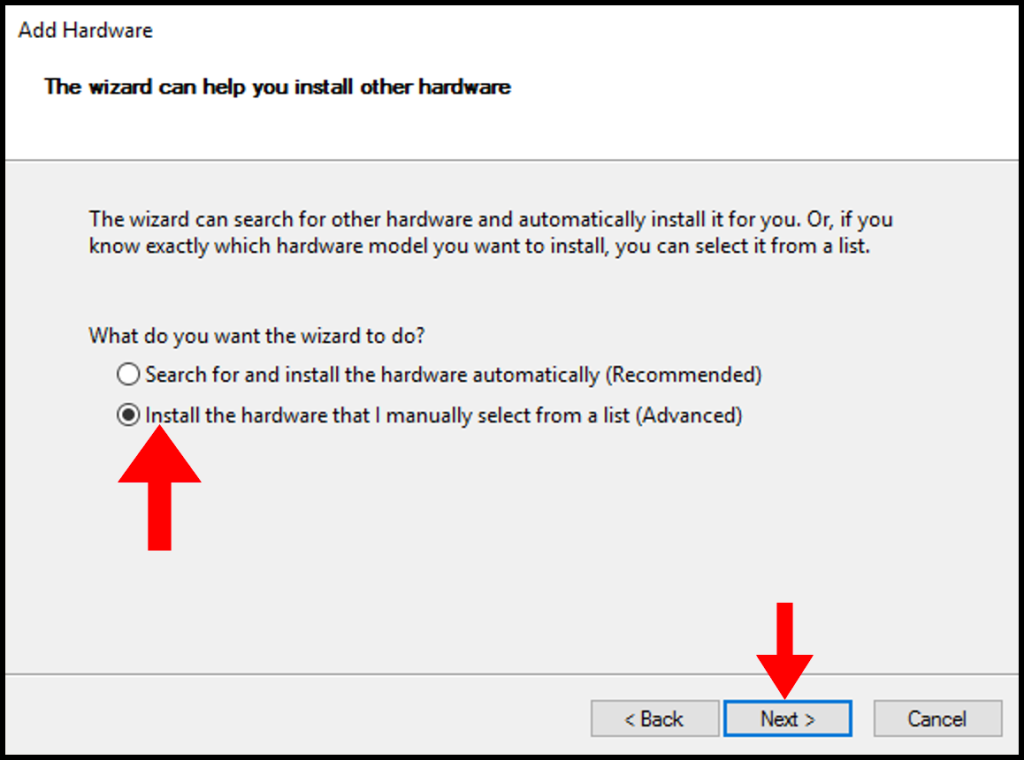
A add Hardware wizard will open and click Next.

Choose option ” Install the hardware that I manually select from a list ” and click Next.

Choose “Network Adaptors” and click Next.

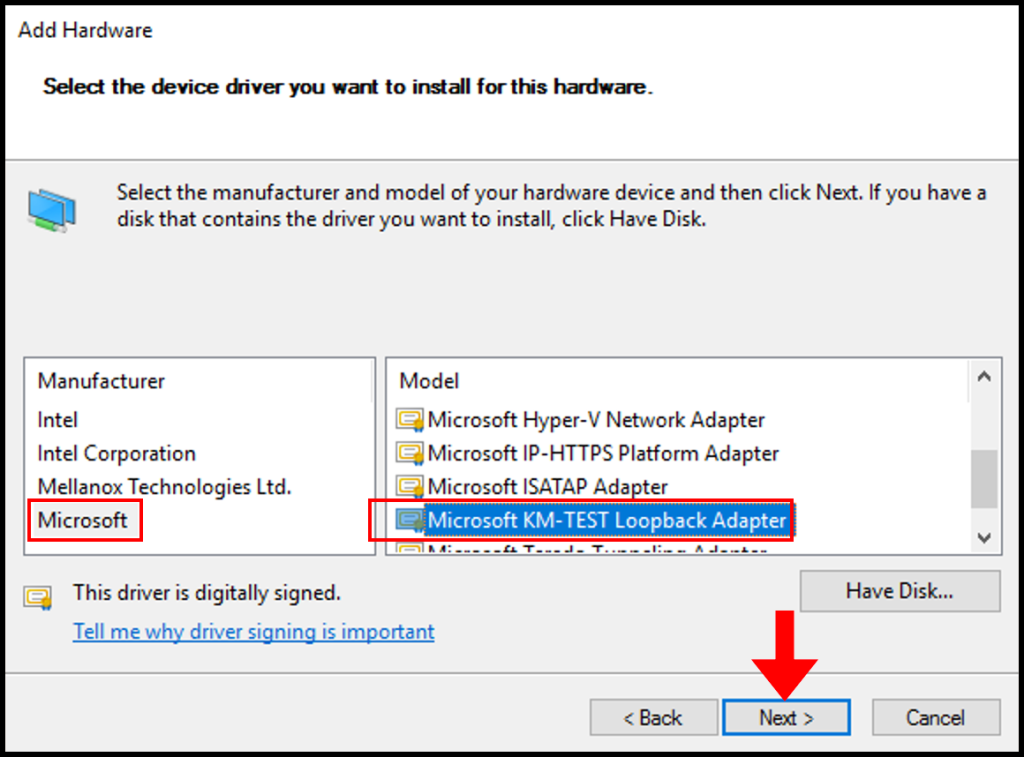
Choose “Microsoft” as Manufacturer and ” Microsoft KM-TEST Loopback Adaptor ” as Model. Click Next.

Confirm the Install by clicking Next.

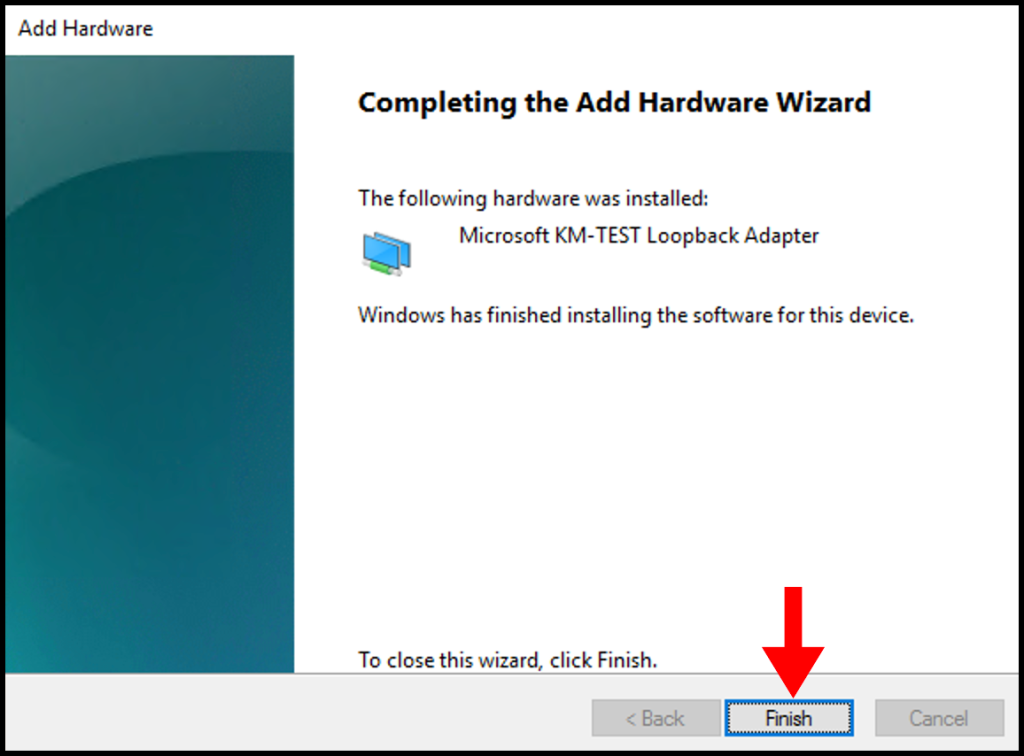
Once the install got completed close the install wizard by clicking Finish.

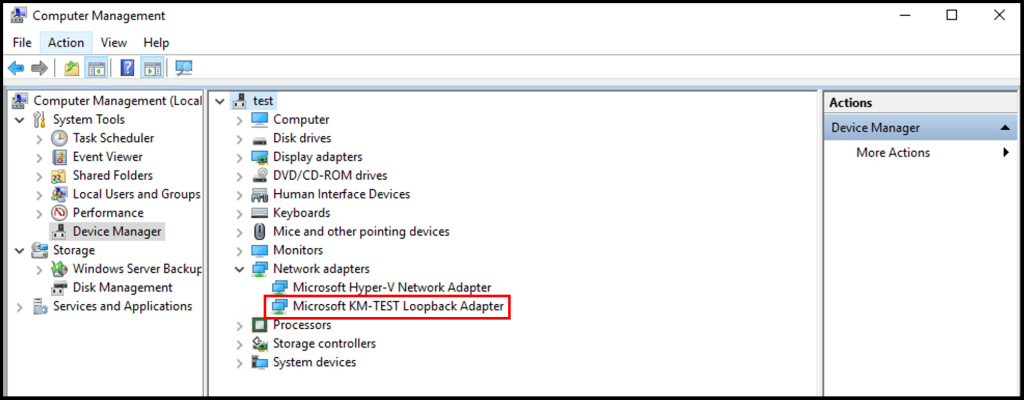
Now, we can confirm the new network adaptor install from the Computer Management panel itself. For that click Device Manager >> Click VM name >> Expand Network Adaptors, there we can see the newly added LoopBack Network adaptor available.

Part:3 Configuring Remote Access Service VPN on Windows Server 2019
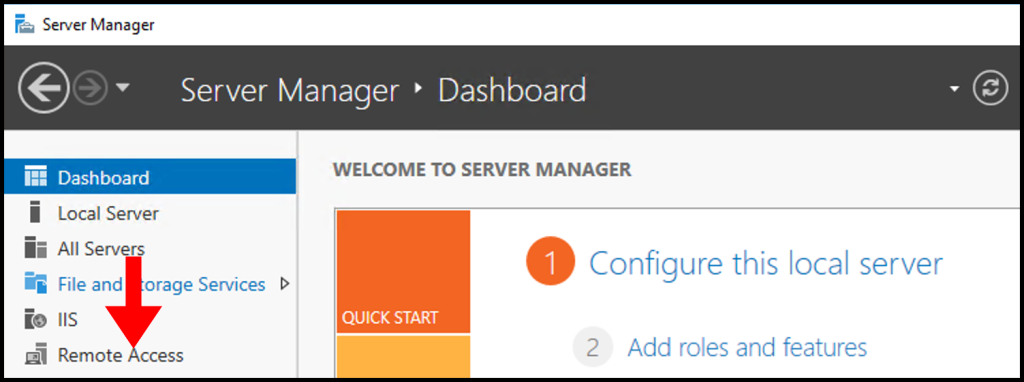
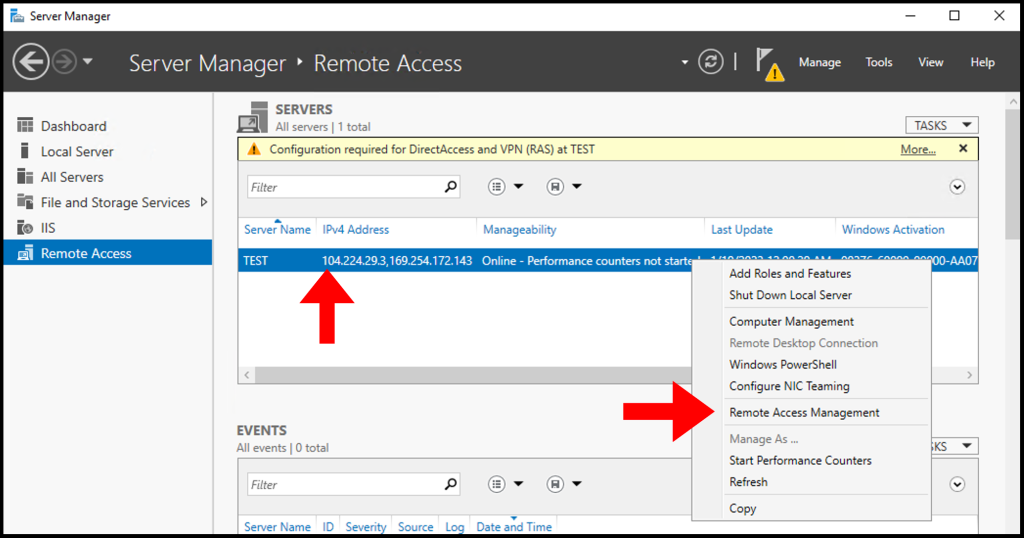
From Server Manager Choose Remote Access >> Right click the Server name >> Choose Remote Access Management.

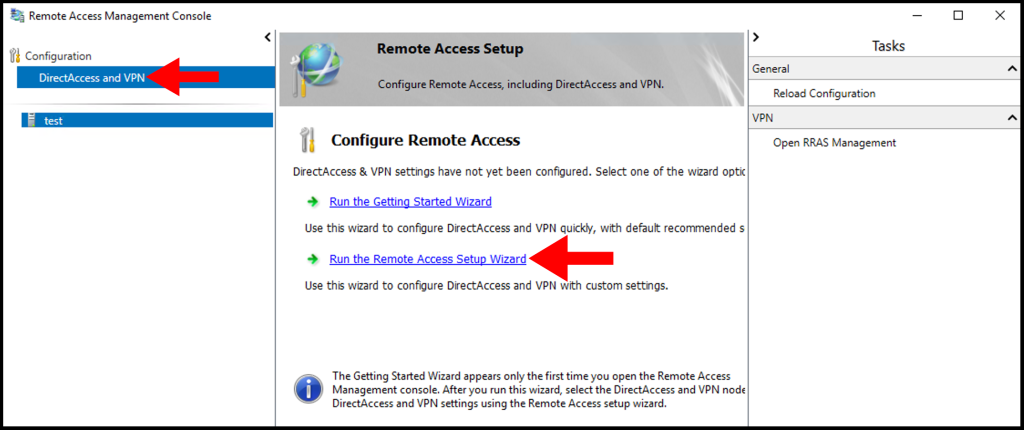
Under “Direct Access And VPN” Click “Run the Remote Access Setup Wizard”

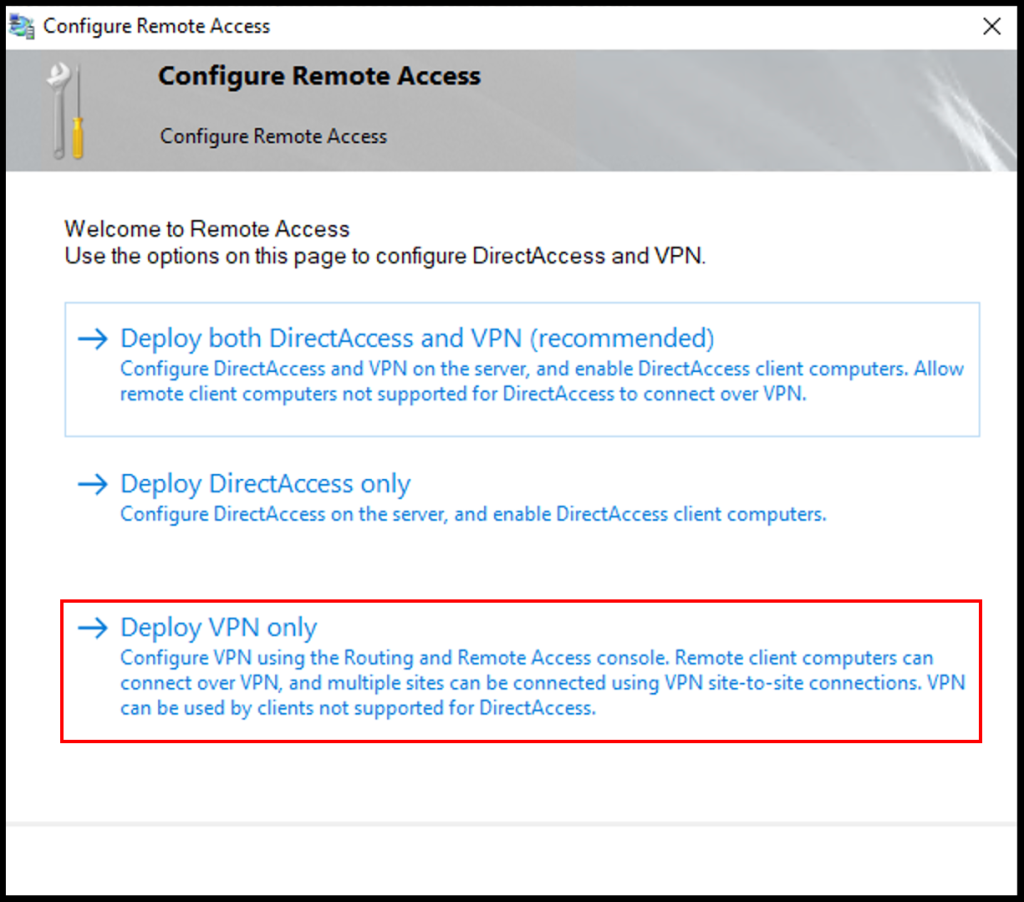
The Configure remote Access wizard will open Click “Deploy VPN only”

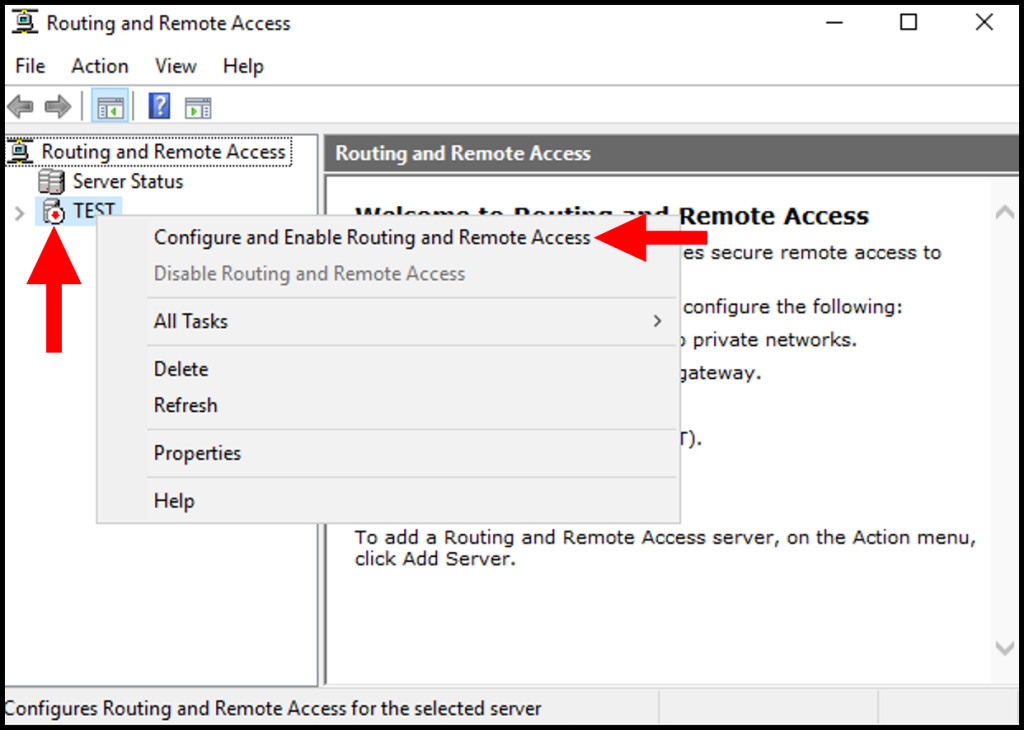
In the Routing and Remote Access Console , right click server name and choose ” configure and Enable routing and remote access ” option.

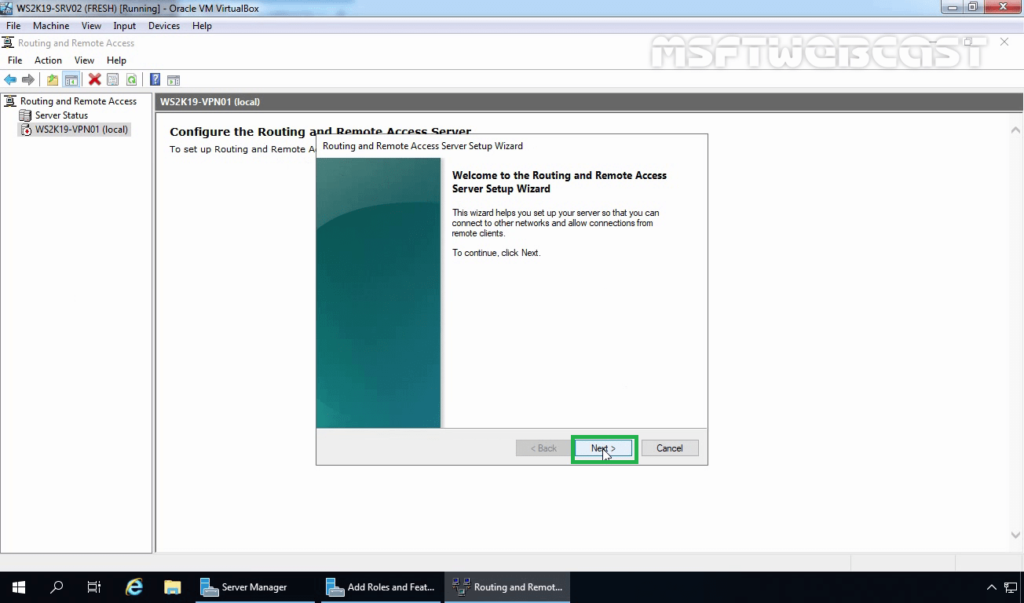
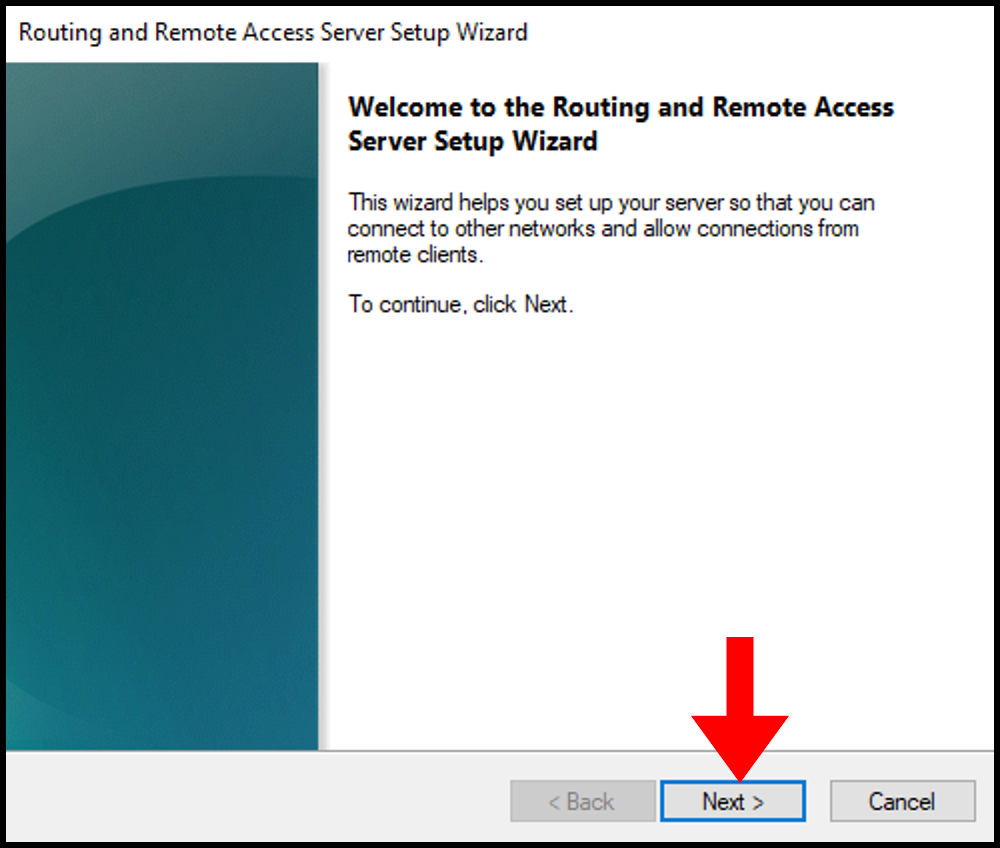
Click Next on Routing and Remote access server setup wizard.

Choose Virtual private network( VPN) access and NAT option. Click Next.

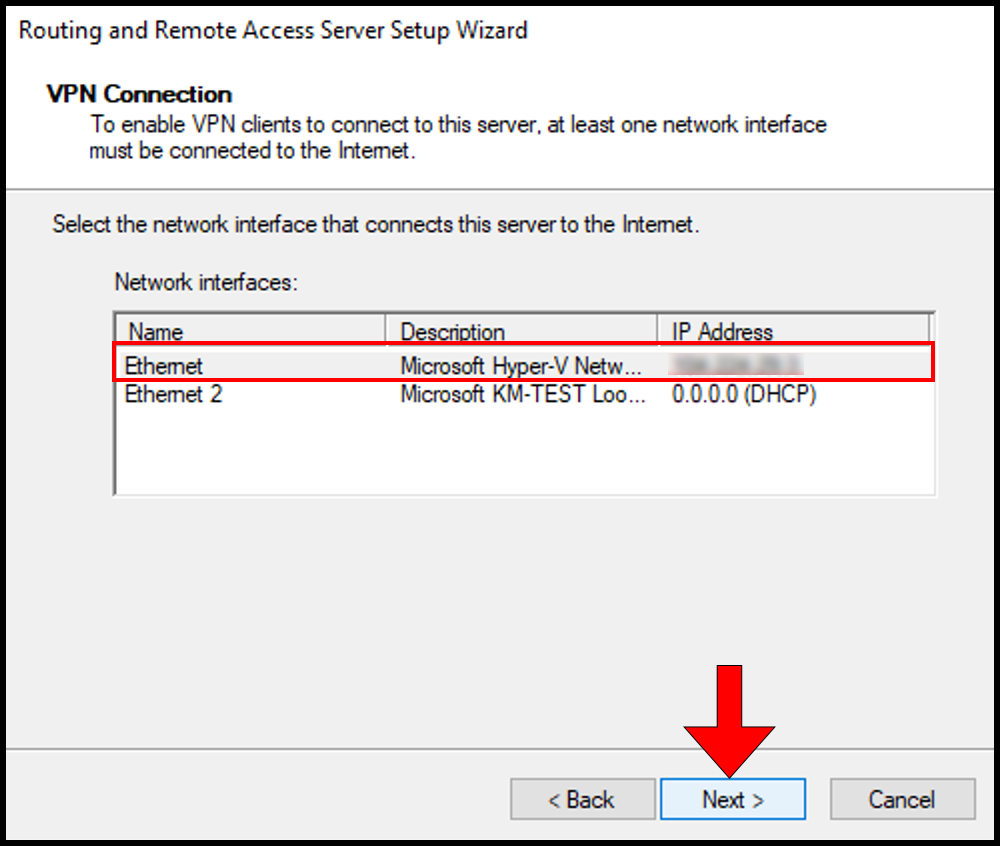
In the select Network Interface section, choose the network adaptor where our public IP configured and click Next.

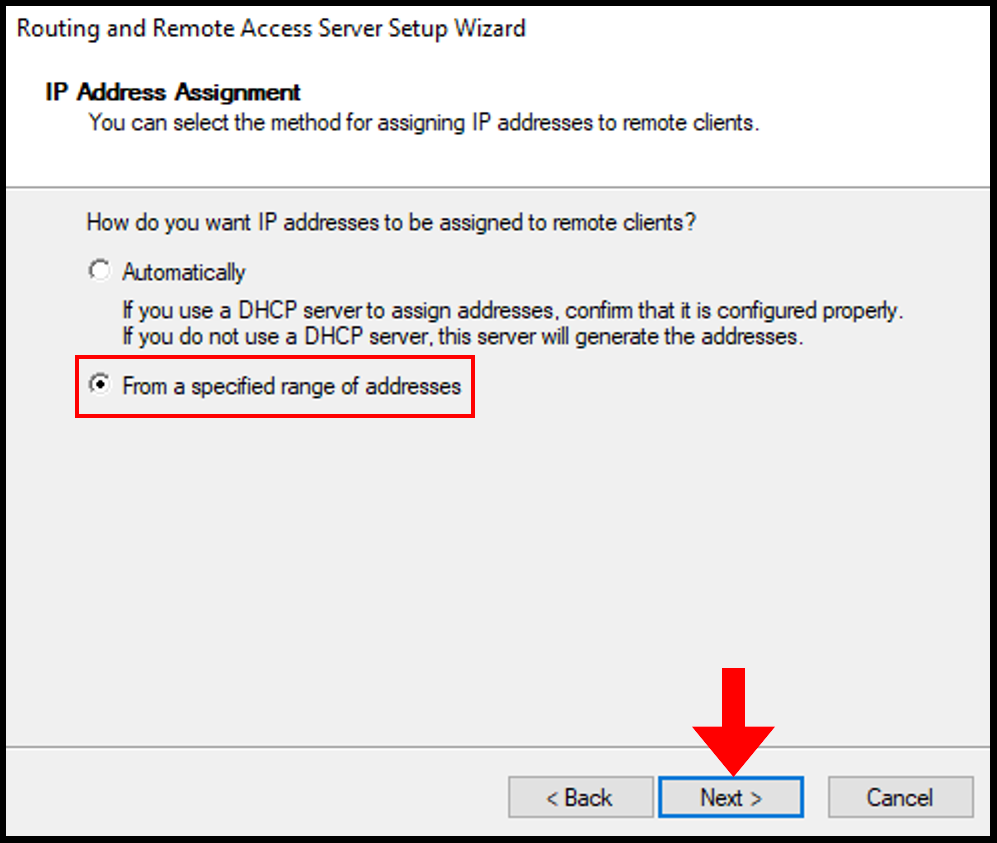
In the IP address Assigned section, choose ” from a specified range of address” and Click Next. Here we are trying to define the private IP address that server give to remote VPN click PC after successful connection.

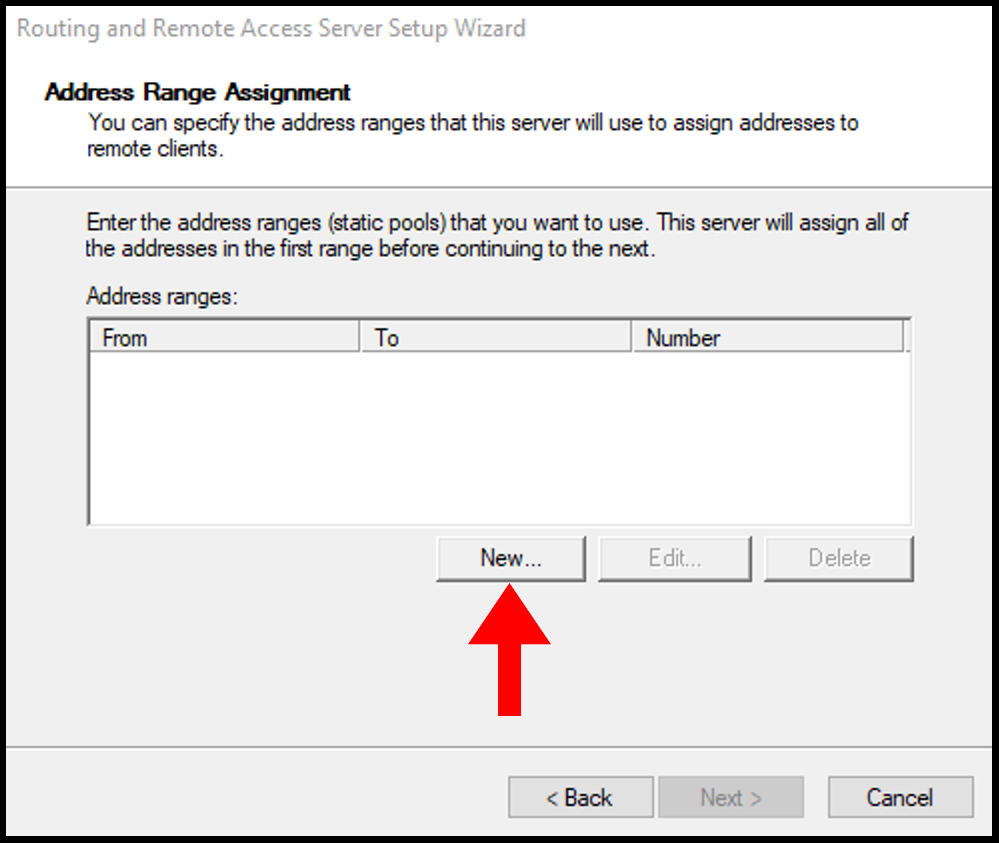
Click New button.

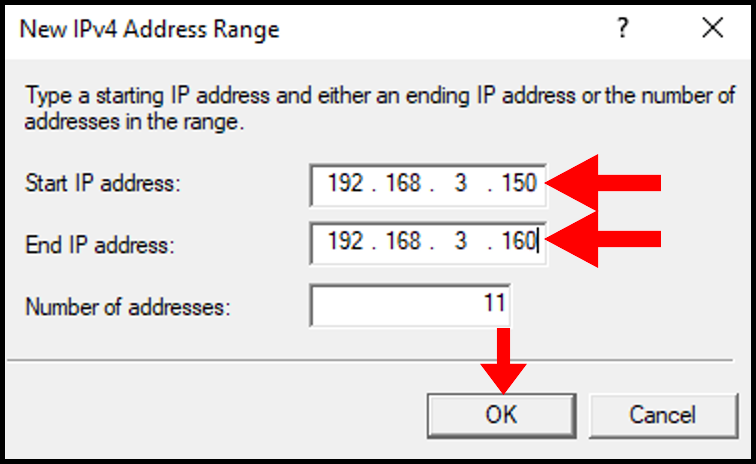
Give the starting and ending private IP range in the corresponding fields. Click Ok. We are giving IPs starting from 192.168.3.150 to 192.168.3.160.

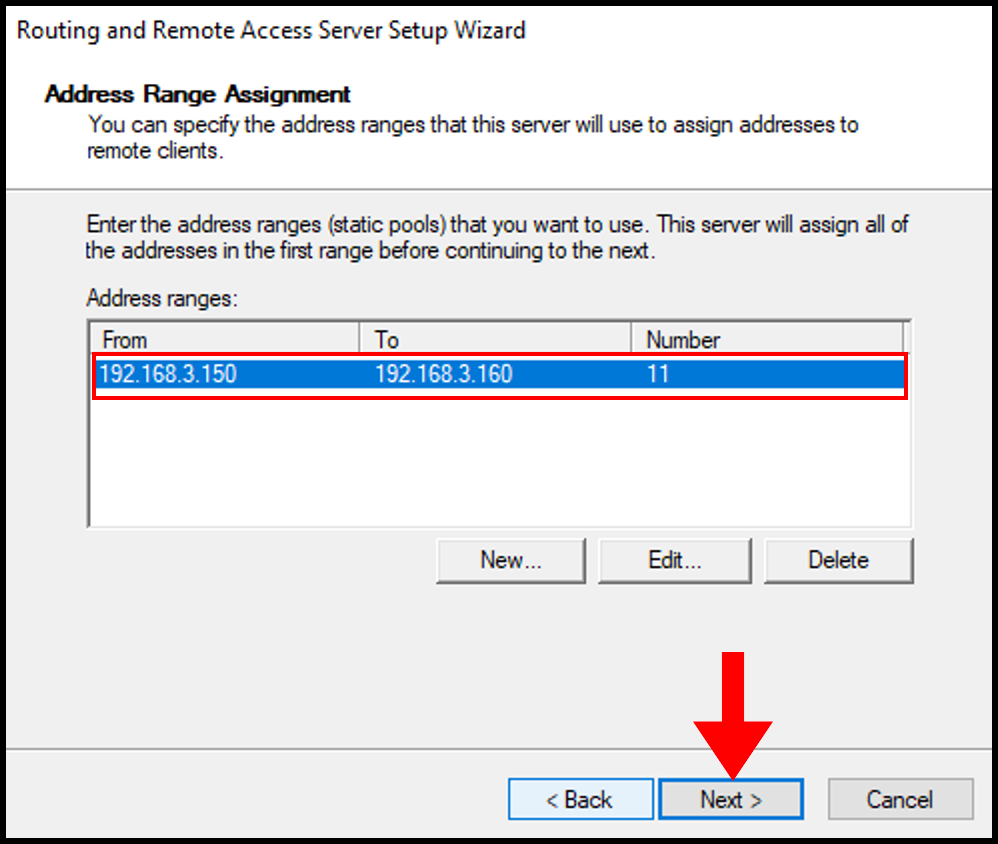
Now we will see the assigned range and click Next.

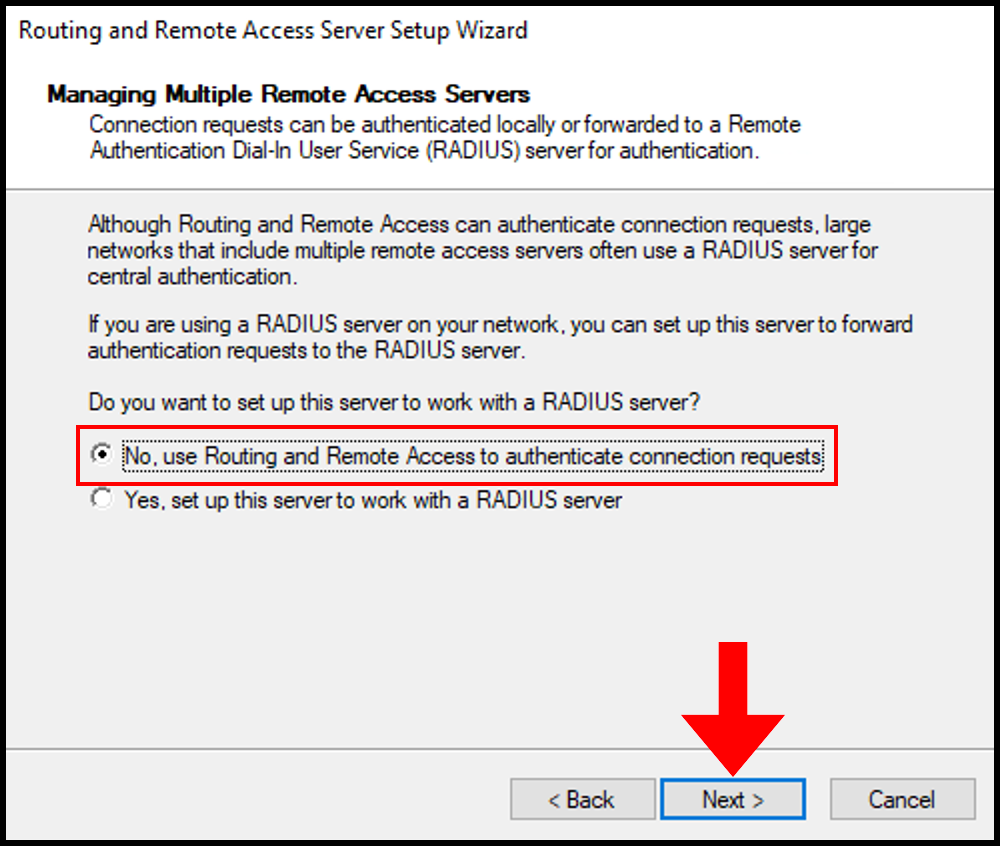
In the Do you want to setup this server to work with a radius server question section, select “No, use Routing and Remote Access to authenticate connection requests” and Click next.

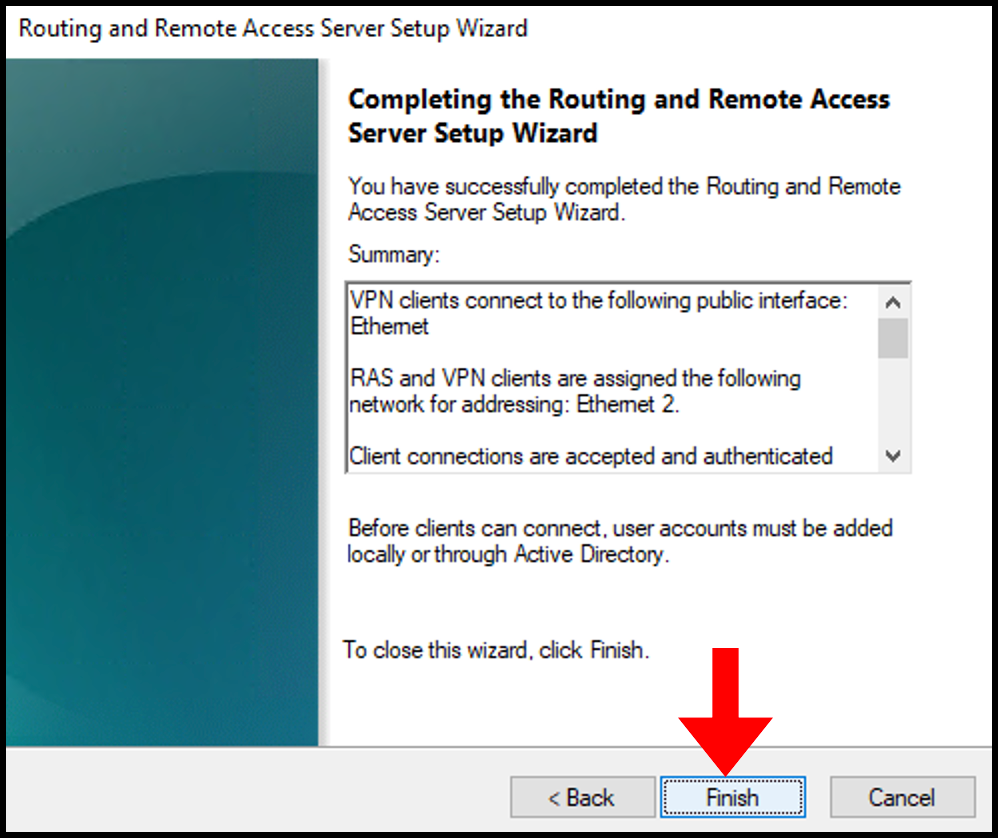
Click Finish on Completing the Routing and Remote Access server setup wizard.

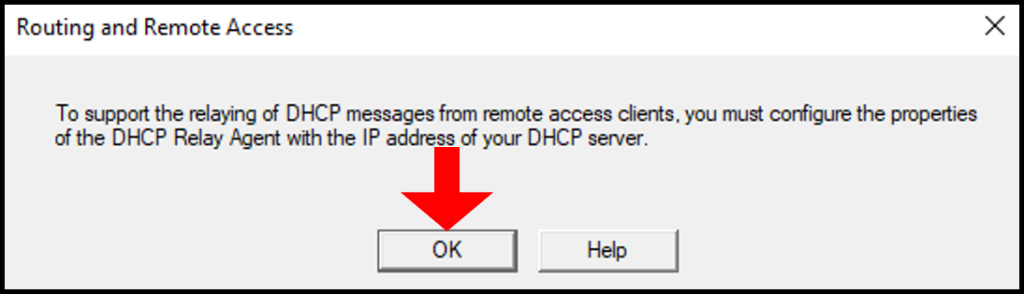
Click Ok.

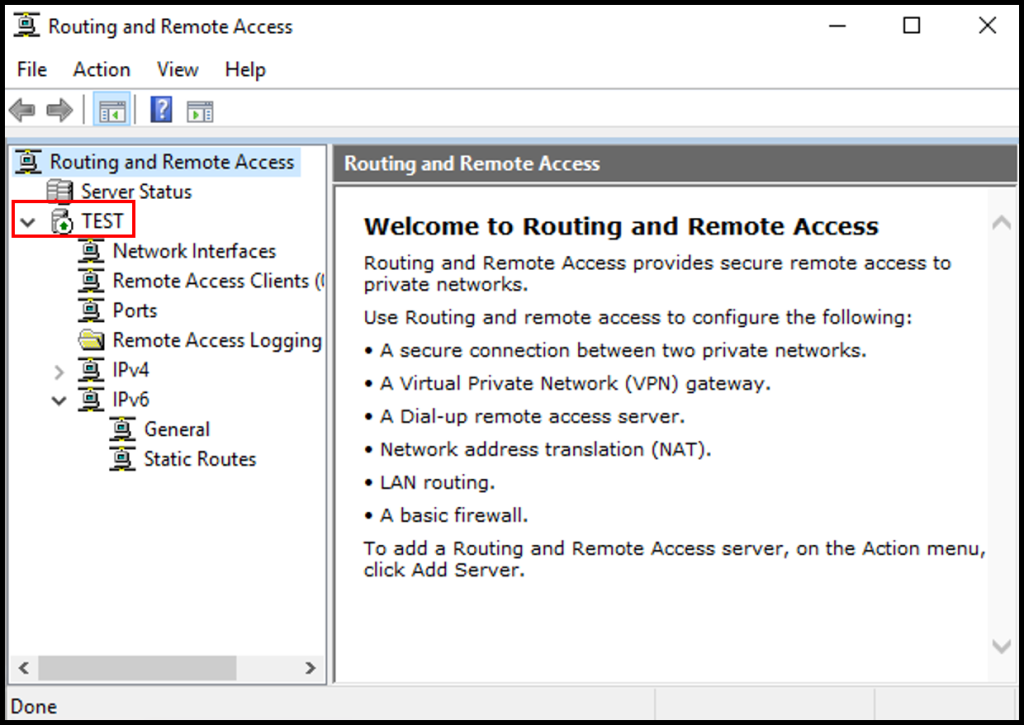
This completes the configuration of Routing and Remote Access Server. Now we can see a green up arrow next to server hostname and which shows the Routing and Remote access server service started successfully.

Part:4 Enabling L2TP/IPsec VPN on Windows Server 2019
Here as we said earlier we enable L2TP/IPsec using Pre-Shared Key through Routing and Remote Access Properties.
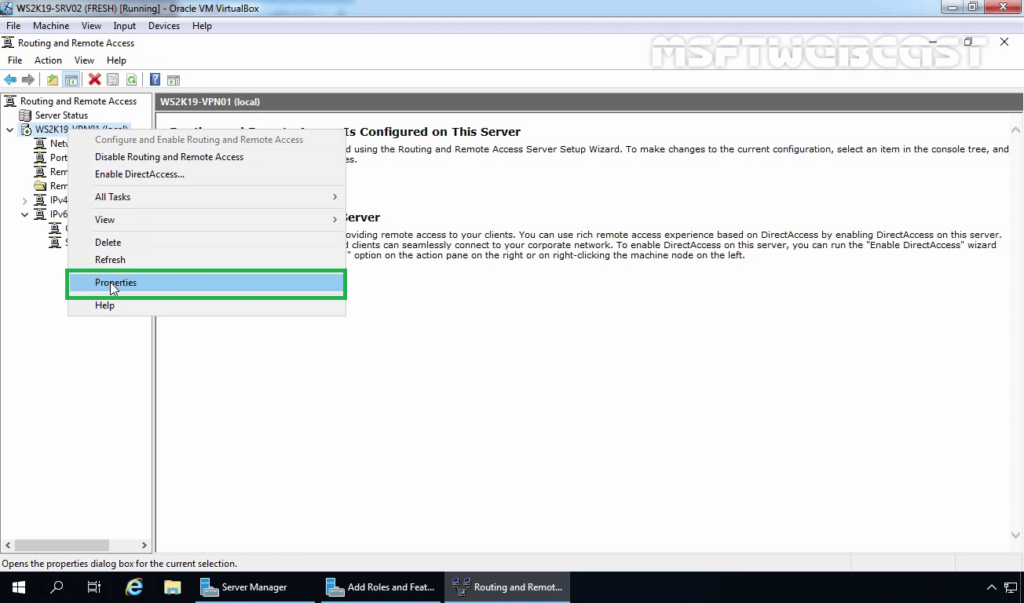
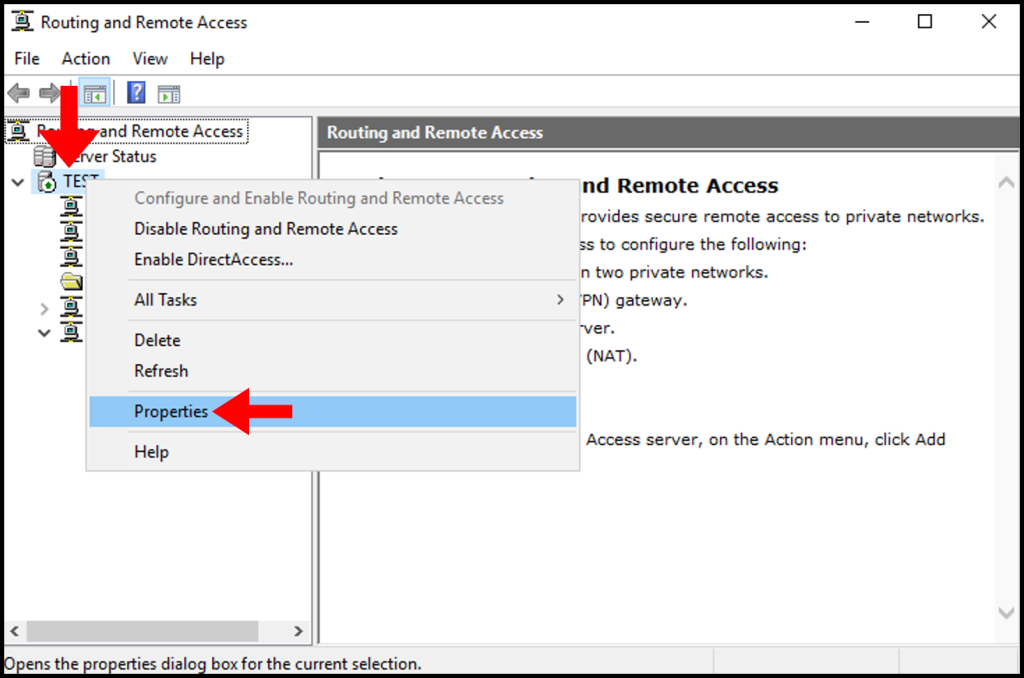
In Routing and Remote Access Manager >> right click Server name and choose Properties.

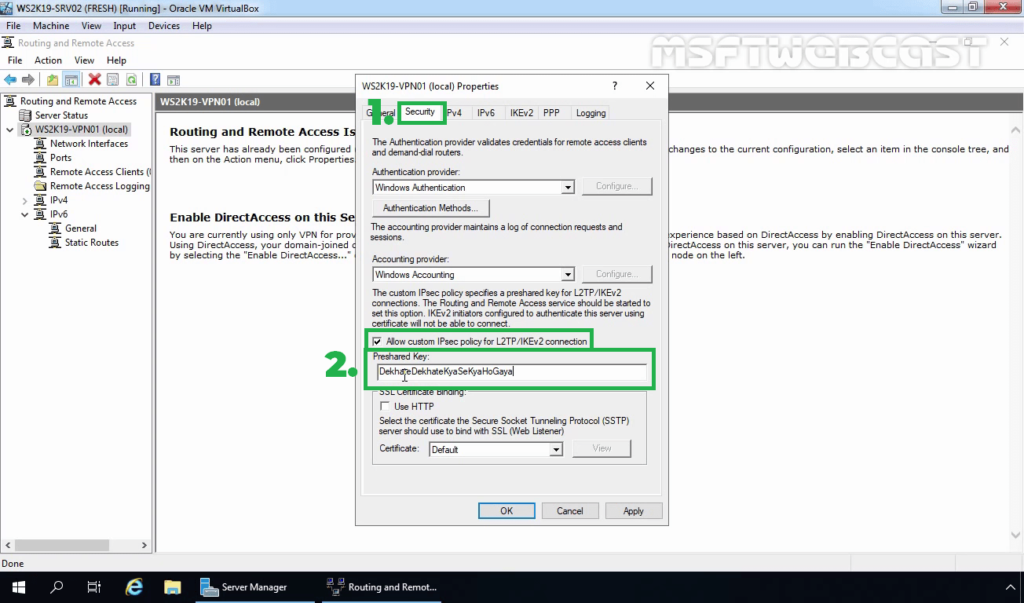
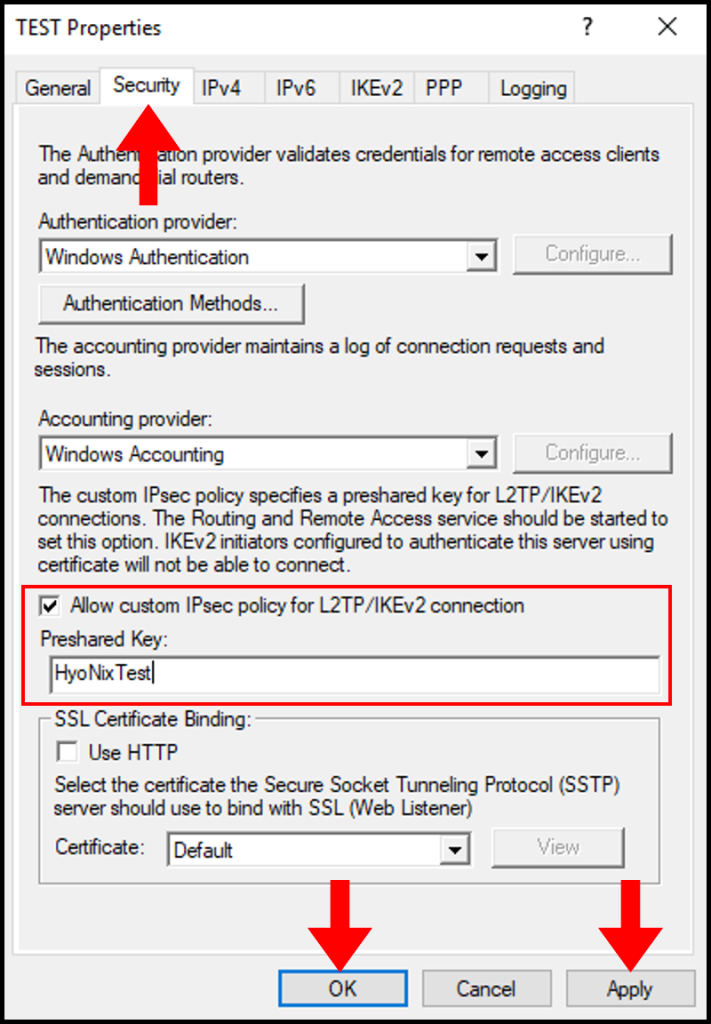
Under Security Tab , Enable “Allow custom IPsec policy for L2TP/IKEv2 Connection”. In the preshared key box give any key. Make sure a its complex one. Click Apply and OK.
Also note down this key because we need to share this key with the vpn client users. Then only the VPN remote client connections over L2TP/IPsec will be successful.

Confirm the restart of routing and remote access service by clicking Yes.


Part:5 Allow Remote Access to our VPN server through Public Network Adaptor.
For maintain the access to the VPN server over remote desktop we need to allow the remote access port over our public network adaptor itself through routing and remote access properties section. Otherwise we will loss the access to the server through remote desktop because we only have one Network interface available on server for both VPN traffic and for the remote access.
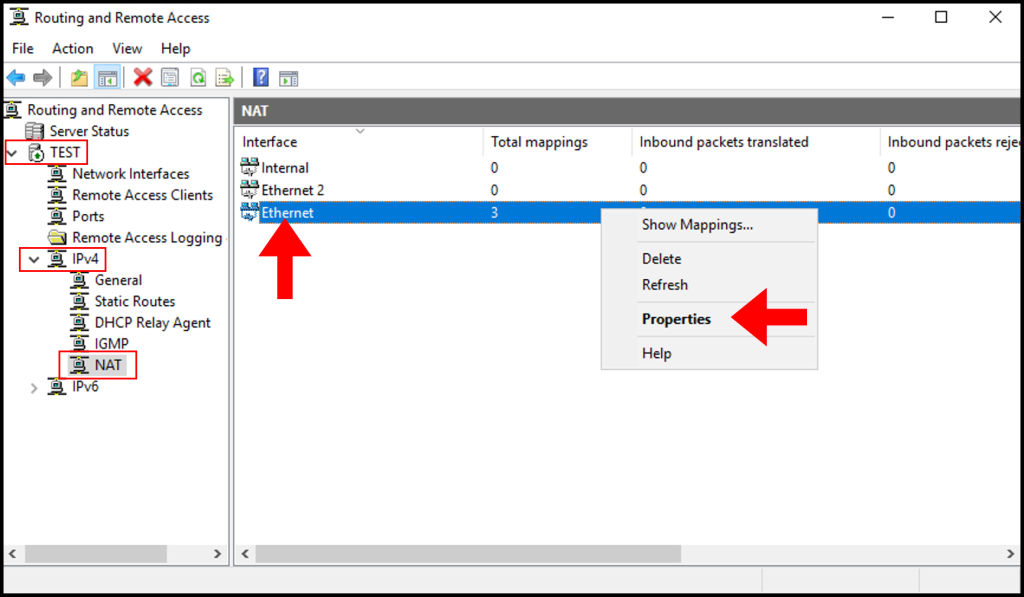
In the Routing and Remote Access Manager , Expand Server name >> Expand IPv4 >> Choose NAT >> Right Click Our Public Network Adaptor and choose Properties.

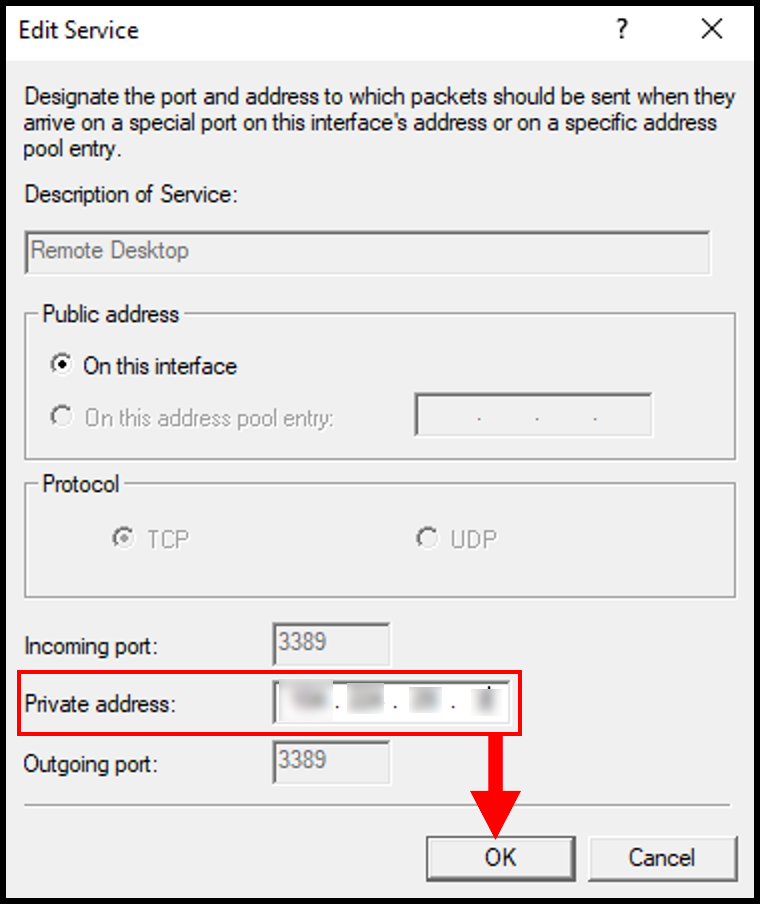
Select ” Remote Access” , A pop up window will appear, in the Private Address filed give our server public IP address and click OK. After that click Apply and OK.
If you have different RDP port, you need to create a new allow rule by clicking add option.


Part:6 Allow VPN remote access for the Users.
In this part we are giving a existing user on VPN server for remote access. Then only if we give the logins of these server users to remote VPN clients, they can successfully connect to server through VPN.
Go to the Computer Management Section >> Expand Local users and Groups >> Choose Users >> Right click a user where we wish to give VPN access and choose properties.

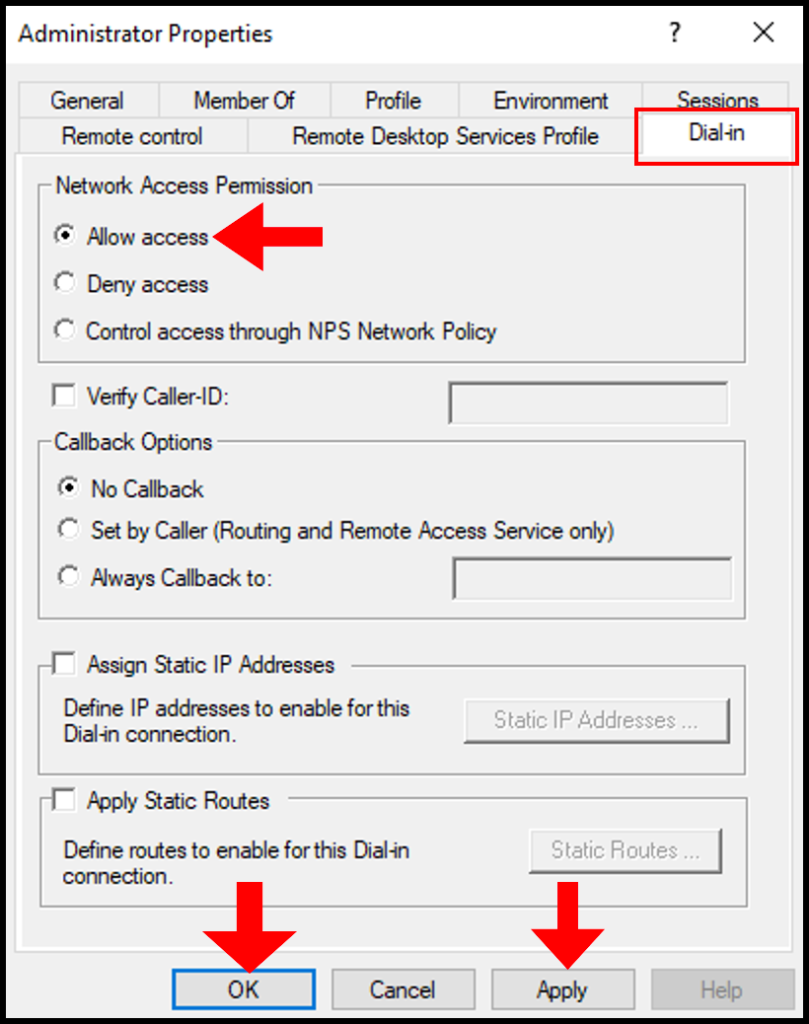
Under “Dial- In” tab >> Choose “Allow Access”. Click Apply and Ok.

Part:7 Allow VPN ports on Windows Firewall.
In this part we are allowing the ports used by the VPN server for communication on windows firewall. Otherwise the remote VPN clients won’t be able to communicate with the VPN server.
Now issue below power shell commands to allow ports in windows firewall.
Now if we look at the windows firewall inbound section , we can see the ports are allowed.


This Completes the L2TP/IPsec VPN server setup on Windows server 2019. Now Lets Proceed with the Remote VPN Client Windows 10 PC setup and Try to Establish a VPN server connection.
Step:8 Test L2TP/IPsec VPN configuration.
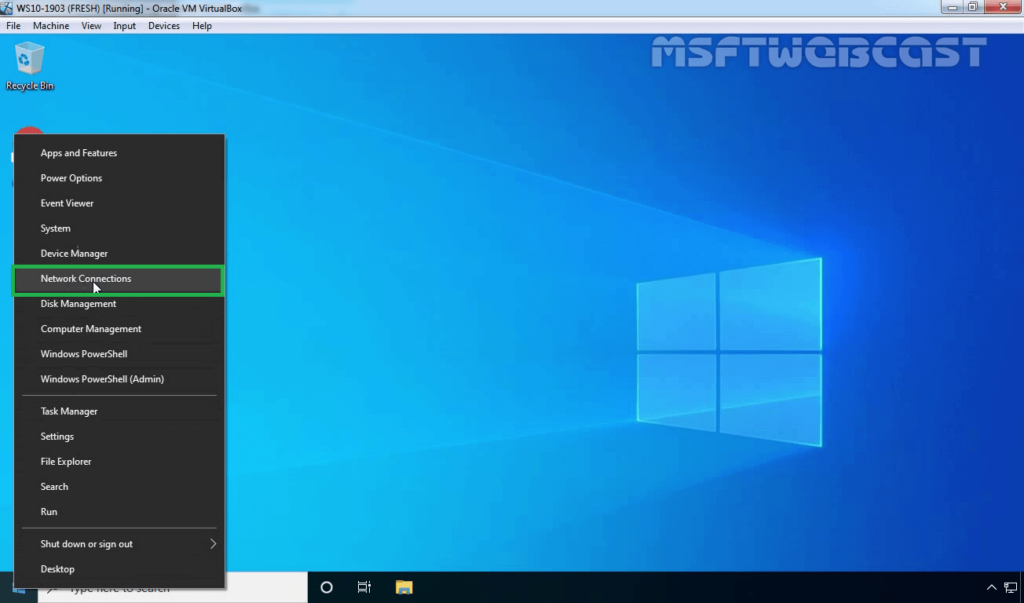
For that , lets add VPN connection. For that open Network and Internet settings.

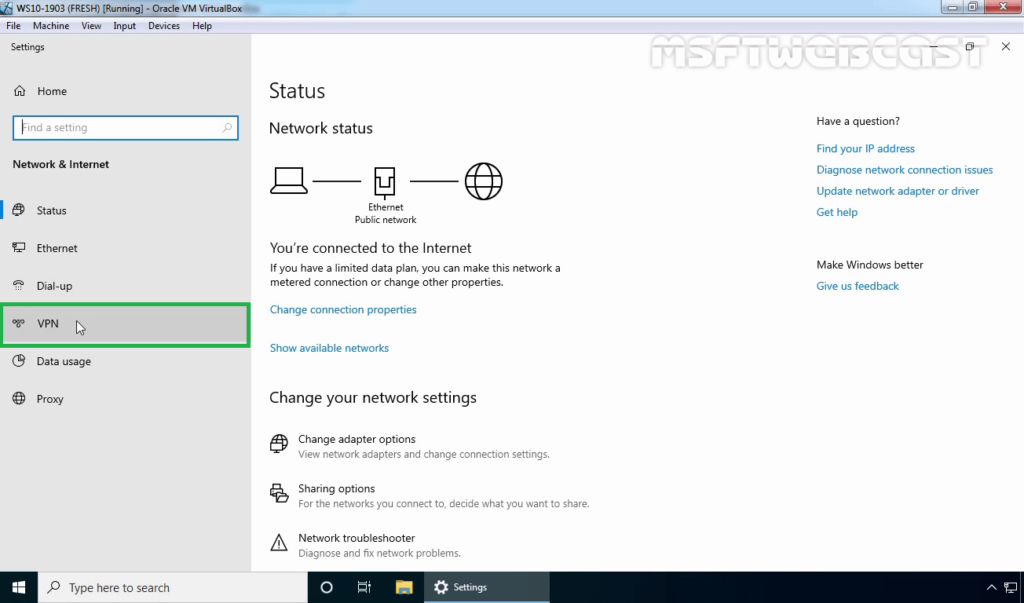
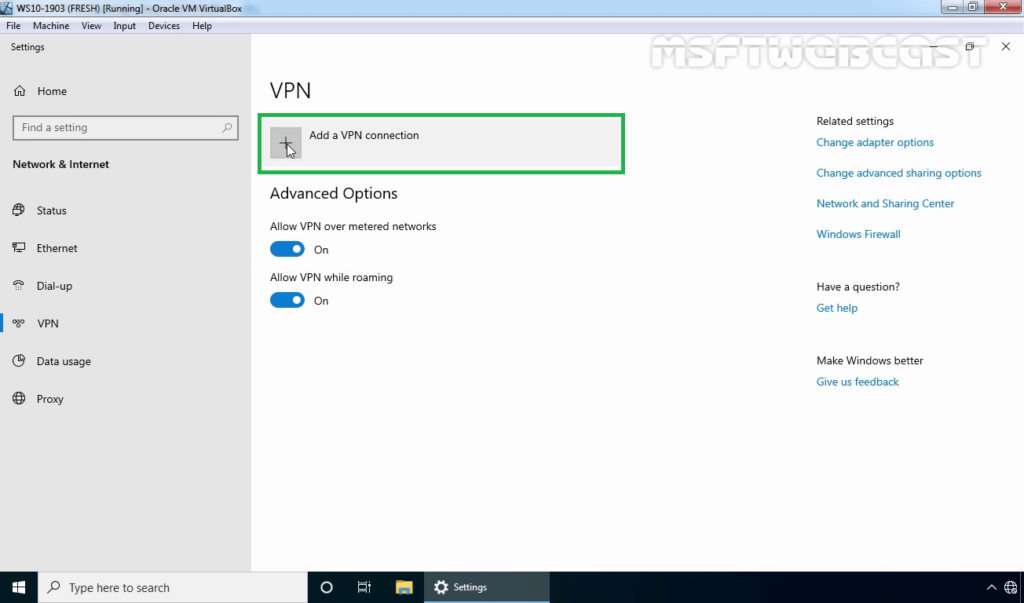
Under VPN >> Click Add a VPN connection.

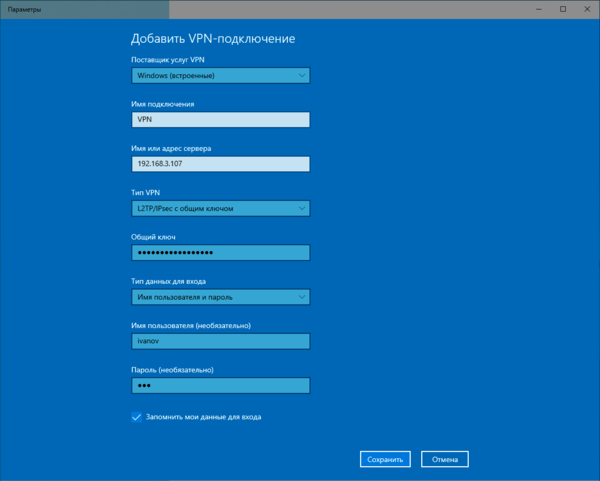
Choose VPN Provider as Windows built in
In Connection Name field , give any Name
In Server name or Address field give VPN Server IP
Select VPN type as L2TP/IPsec with Preshared Key
In the Preshared Key box give our same Preshared key used in the server at the Part:4
Type of sign in info as Username and Password
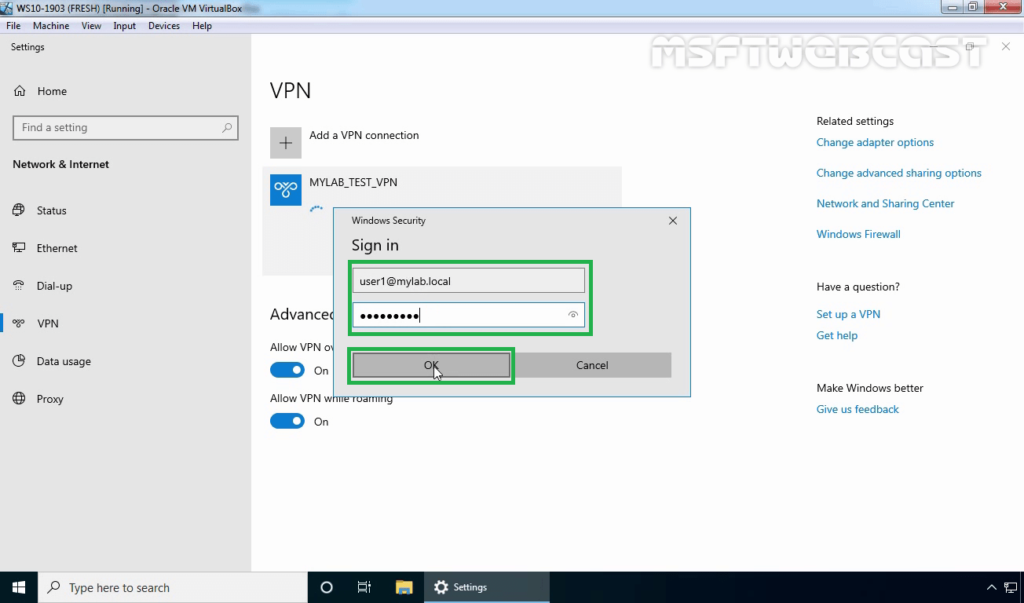
Gave our VPN username and password. Click Save.

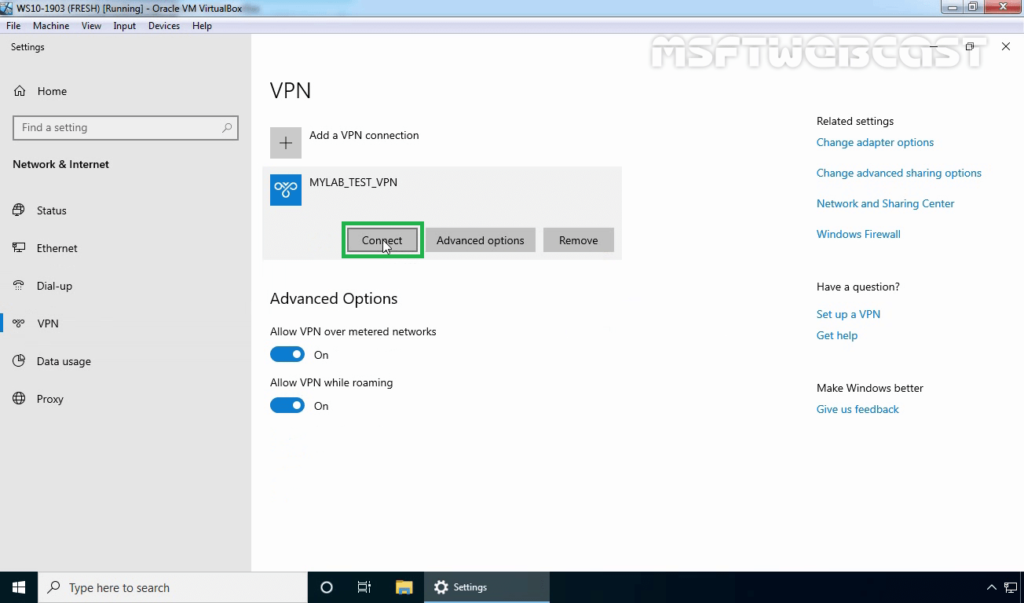
Click connect for our saved VPN client settings.

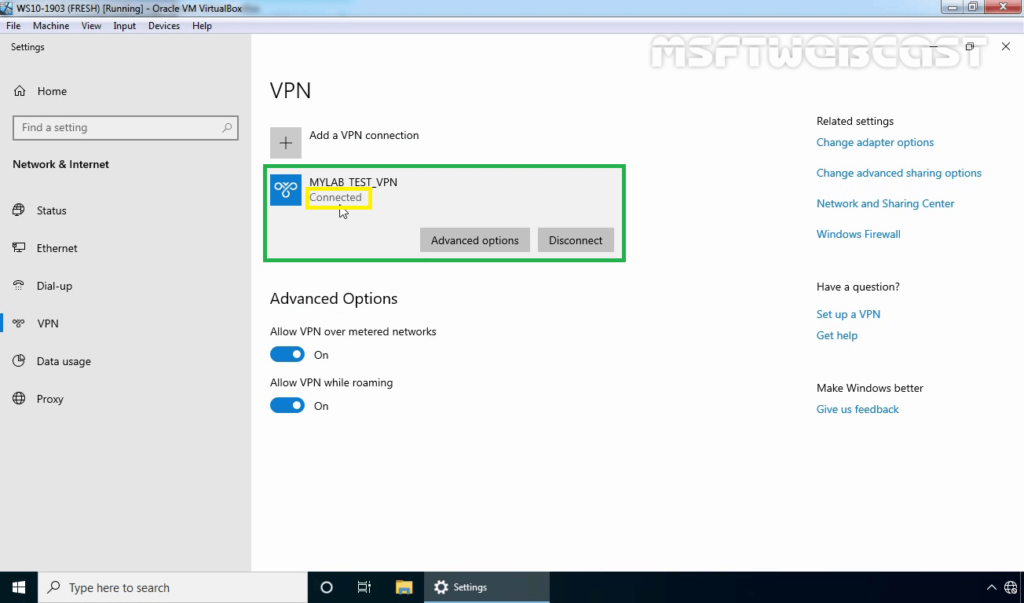
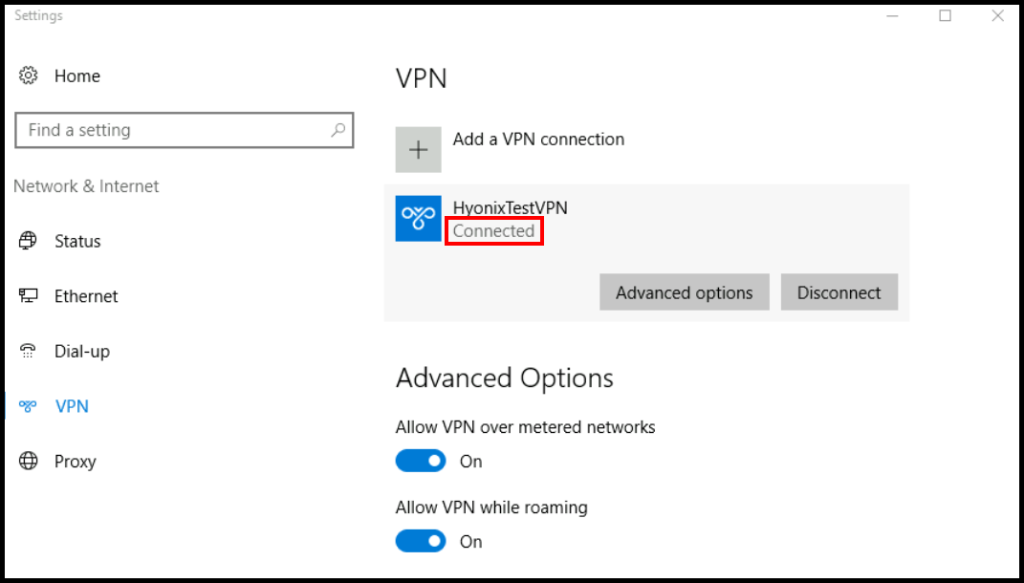
Now we will see the VPN status as connected.

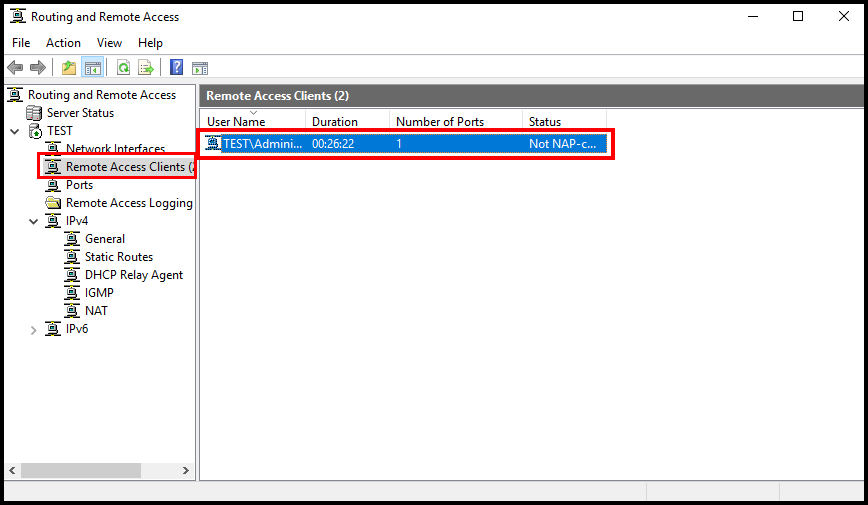
Two other ways to confirm the VPN connection is successful is go back to VPN server 2019 and Open Routing and Remote Access Manager >> From there Expand our server name >> Choose Remote Access client, and in the right side we can see a active connection.

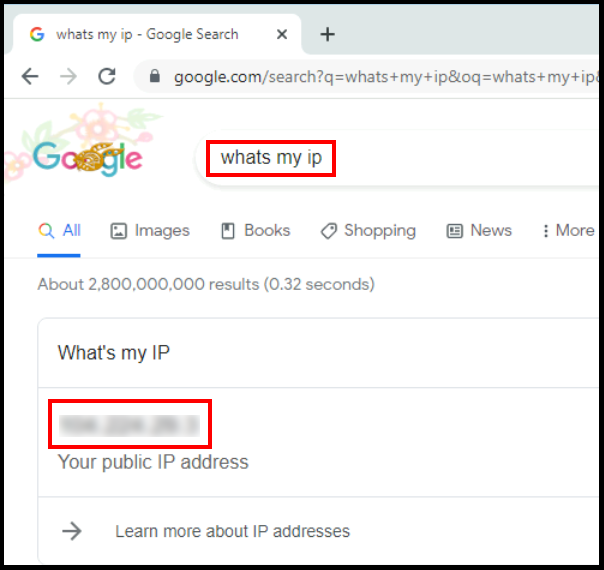
Another option to confirm the successful VPN connection is , open a browser in Windows 10 PC and search the what is my IP and it will show the public ISP IP as VPN server IP. Which means all the internet traffic from client side is routing through our VPN server.

This Concludes the settings up L2TP/IPsec VPN on Windows server 2019. I hope this blog article is informative. Leave your thoughts in the comment box.
Share This Story, Choose Your Platform!
Related Posts
Page load link
Go to Top
In this article, we will learn the steps on How to Setup L2TP/IPsec VPN with a Pre-Shared key on Windows Server 2019.
What is a VPN?
A Virtual Private Network (VPN) is a secure network tunnel that allows you to connect to your private network from internet locations. So, you can access and use your internal resources based on assign permission.
Layer 2 Tunneling Protocol (L2TP):
L2TP is the industry standard when setting up secure VPN tunnels. L2TP supports either computer certificates or a Pre-shared key as the authentication method for IPsec. L2TP/IPsec VPN connections provide data confidentiality, data integrity, and data authentication.
Understanding the SSTP Test Lab:
- WS2K19-DC01: Domain Controller and DNS.
- WS2K19-VPN01: Member Server.
- WS10-CLI01: Windows 10 Client Machine.
Step:1 Install Remote Access Server role on Windows Server 2019:
1. The first step is the installation of the Remote Access Server role. Open Server Manager Console and start role and feature installation wizard. Select the Remote Access Server role.

2. On select role services, select DirectAccess and VPN (RAS) role service. Click Next and finish the installation.
3. When the installation finished, click on close.
Step:2 Configure L2TP/IPsec VPN on Windows Server 2019:
4. On Member Server, Open Server Manager. Click on Tools and select Routing and Remote Access Console.
5. Right-click on the Server name and select Configure and Enable Routing and Remote Access.

6. On Welcome screen, click Next.
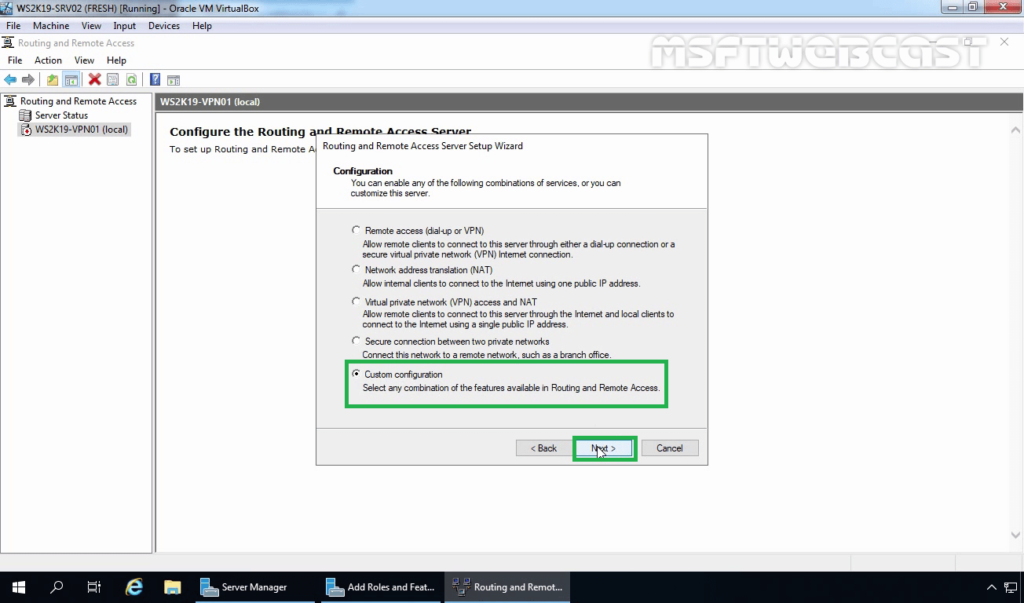
7. On the Configuration page, select the Custom configuration radio button. Click Next.
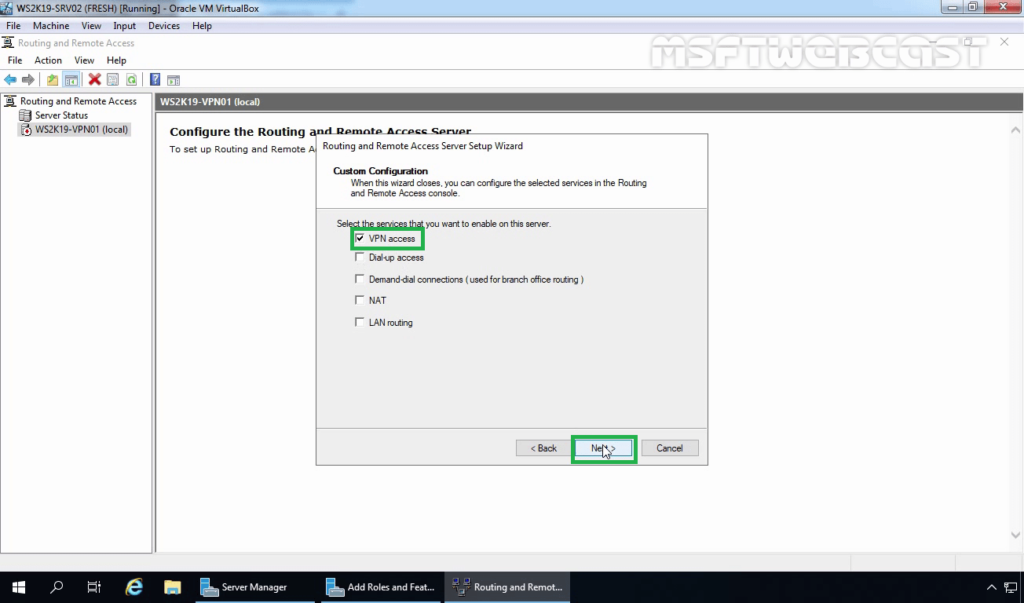
8. On select the service page, select VPN Access. Click Next.
9. After clicking on the Finish, it will ask you to start the service. Click on Start service.
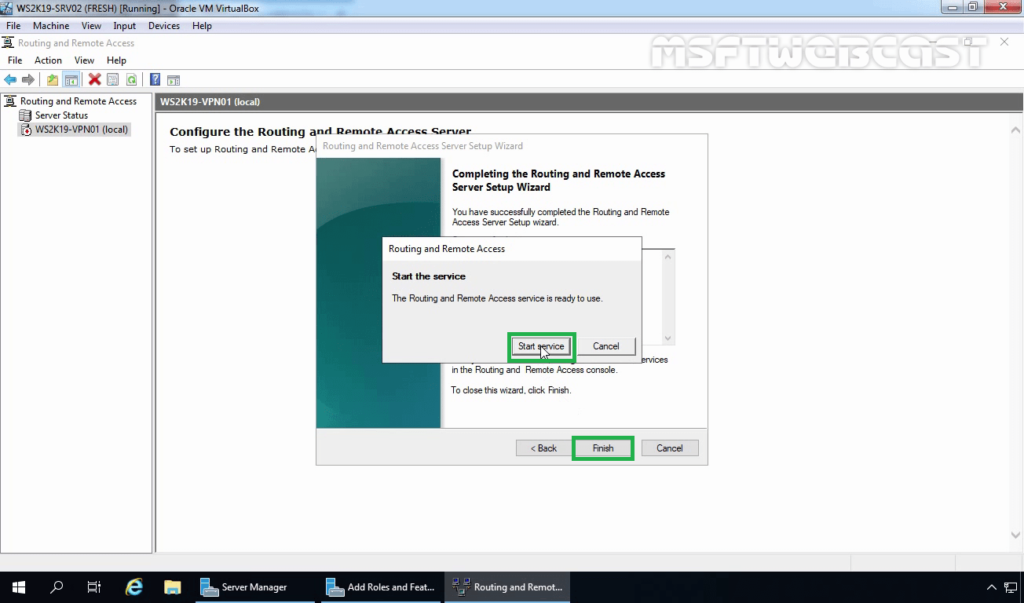
10. Now you will see a green up arrow beside your server name.
Step:3 Configure Pre-Shared Key for IPsec Authentication.
To configure the Pre-shared Key for L2TP/IPsec VPN, we need to set up specific settings in the VPN server’s properties section.
11. Right-click on the server name and click on Properties.
12. On the Security tab, select the checkbox Allow Custom IPsec Policy for L2TP/IKEv2 Connection. Specify a strong Pre-Shared Key for L2TP/IPsec VPN connection.
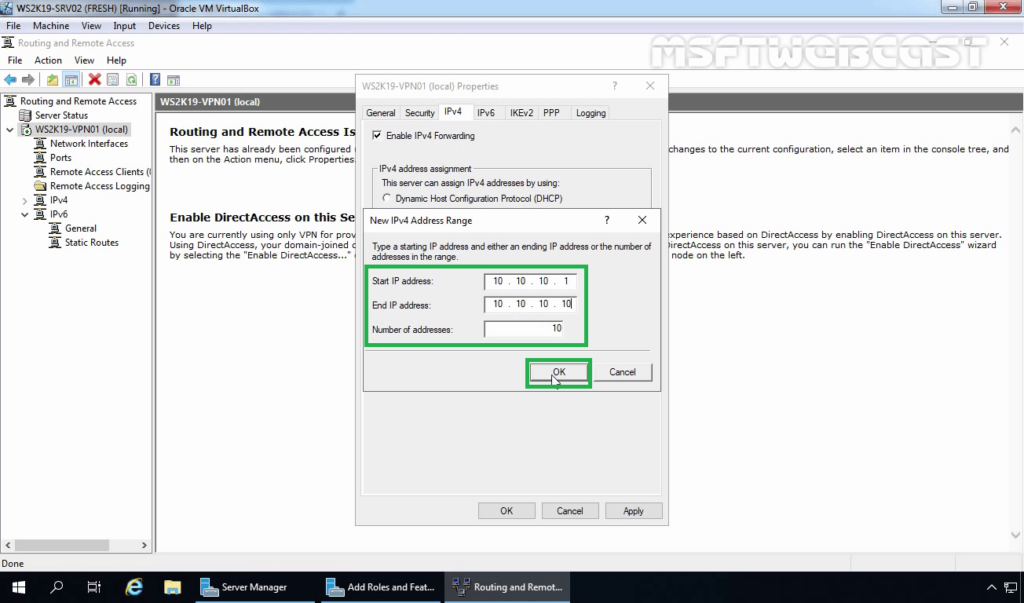
13. Click on IPv4 Tab. Select the Static Address Pool radio button. Click on Add button.
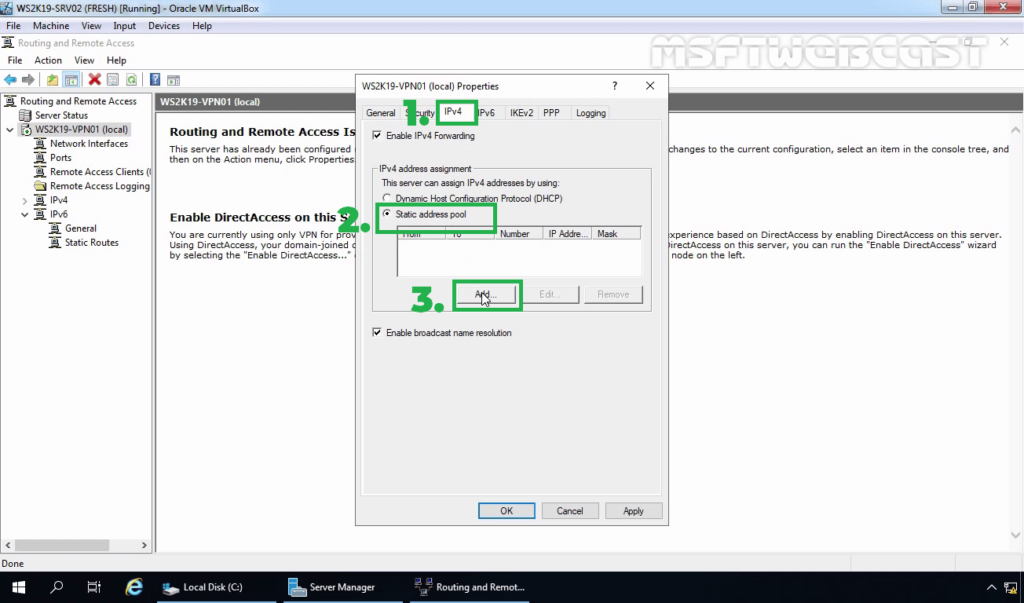
14. Specify the IP address range. Click on OK.
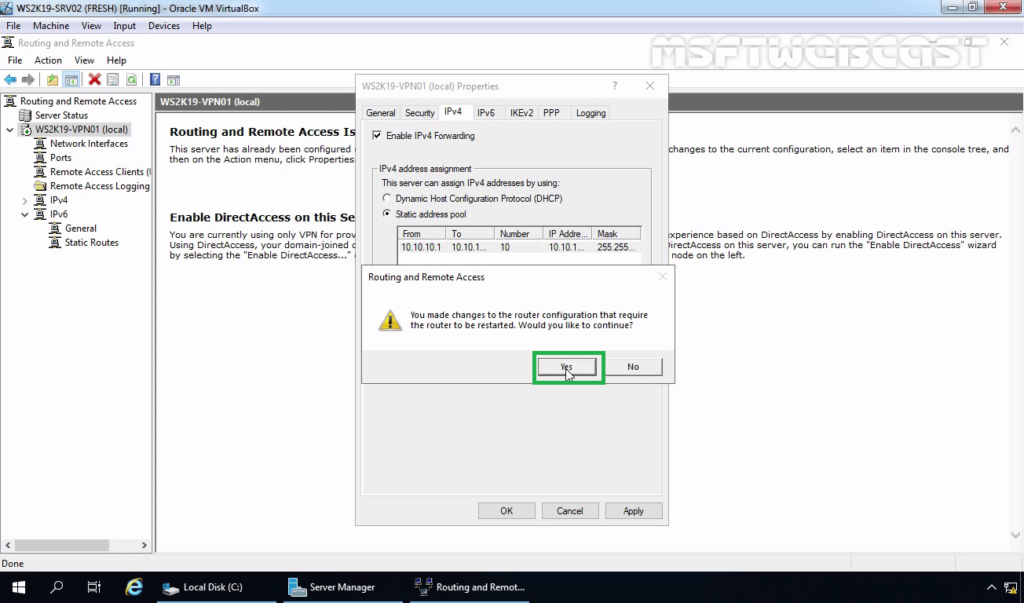
15. Click on Apply to save the changes to the VPN server. It will ask to restart the Routing and Remote Access service. Click on yes to do so.
Step:4 Create AD User and allow dial-in access:
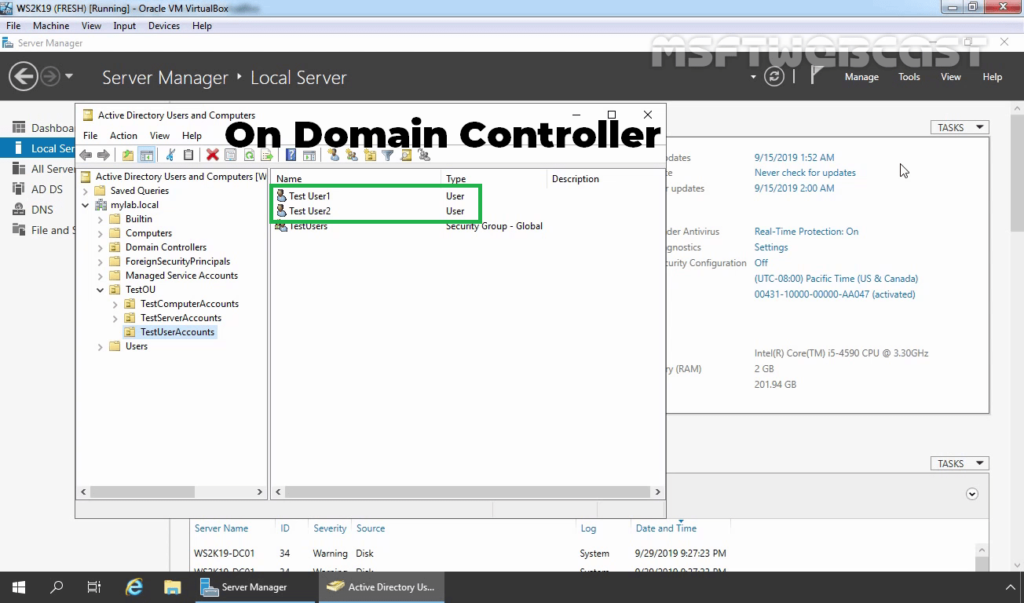
16. On Domain Controller, Open Active Directory Users and Computers snap-ins. Create AD users name Test User1 and Test User2.
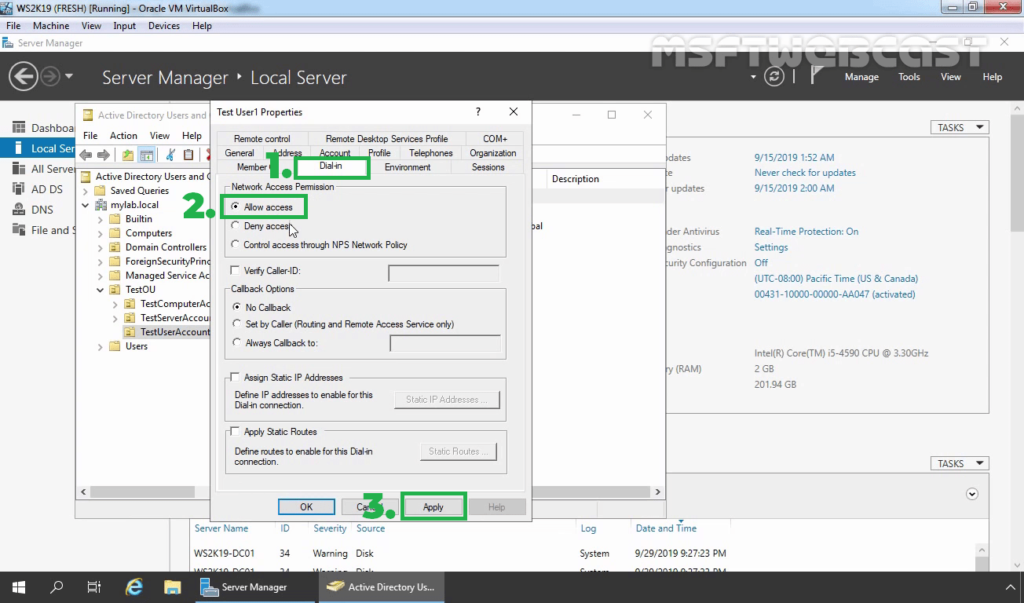
17. Enable dial-in access for selected VPN users by opening the user properties and selecting Allow access on the tab Dial-in.
Note: If you want, you can configure Network Policy Server to allow VPN users to connect to the VPN server running on Windows Server 2019.
Step:5 Setup a VPN Connection for L2TP/IPsec VPN:
On Windows 10 client machine, we need to create a new VPN connection.
18. Right-click on the Start button and select Network Connections.
19. On left-pane, click on VPN.
20. Click on add a new VPN connection.
21. Specify the required information for the VPN connection.
- VPN Provider: Windows (Built-in)
- Connection Name: Name of your choice
- Server Name or IP Address: Public IP Address of VPN server
- VPN Type: L2TP/IPsec with Pre-shared key
- Pre-Shared Key: Specify the key which we had assign on VPN Server.
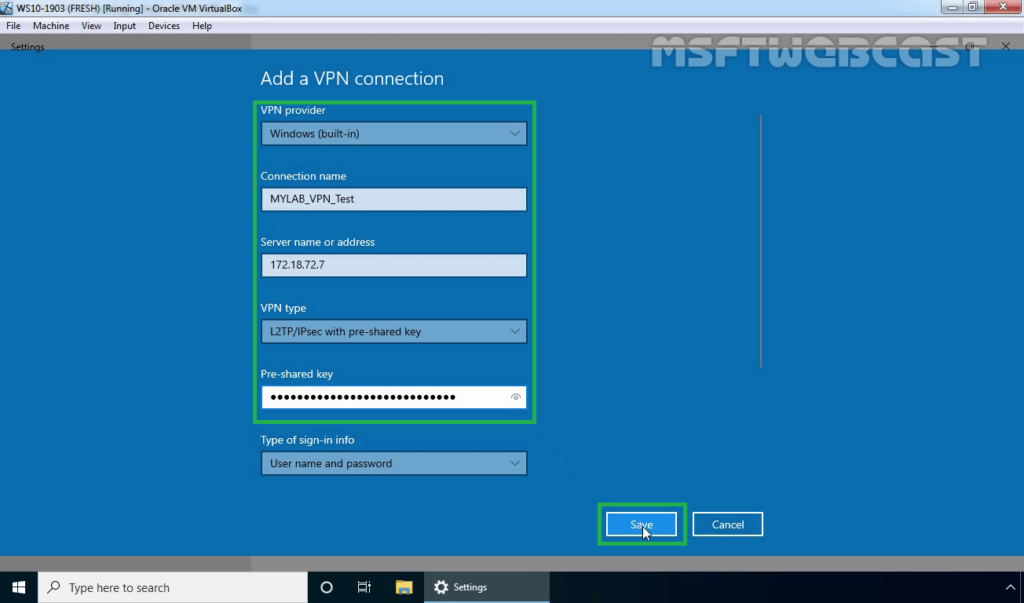
22. Click on Save.
Step:6 Test L2TP/IPsec VPN Connection:
23. Click on VPN connection and select Connect.
24. Specify a username and password to connect the VPN server. Click OK to connect.
25. Verify the VPN connection is successfully connected with the VPN server using the L2TP/IPsec protocol.
Step:7 Monitor L2TP/IPsec VPN Connection:
On Windows 10 Client Machine:
26. Press Windows Key and R key together. At Run menu type ncpa.cpl and press enter to open Network Connection console.
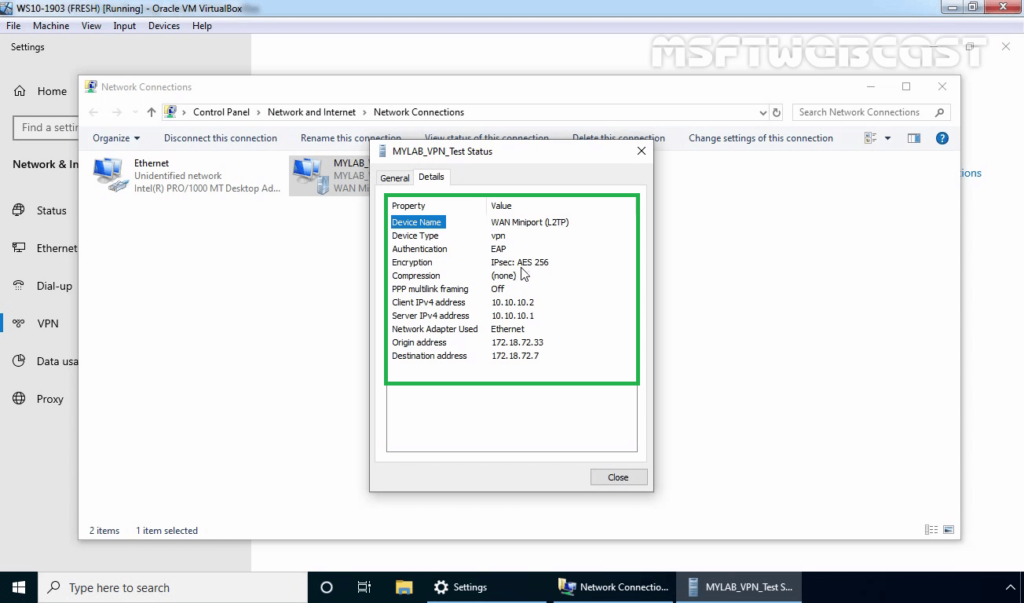
27. Right-click on VPN connection and click on the Status button.
28. Click on details to see information about VPN connection like Authentication Method, Encryption Mod, etc.
On VPN Server:
29. Press Windows Key and R key together. At Run menu type wf.msc and press enter to open Windows Defender Firewall and Advanced Security console.
30. Expand Monitoring, Expand Security Associations. Expand and Click on Main Mode.
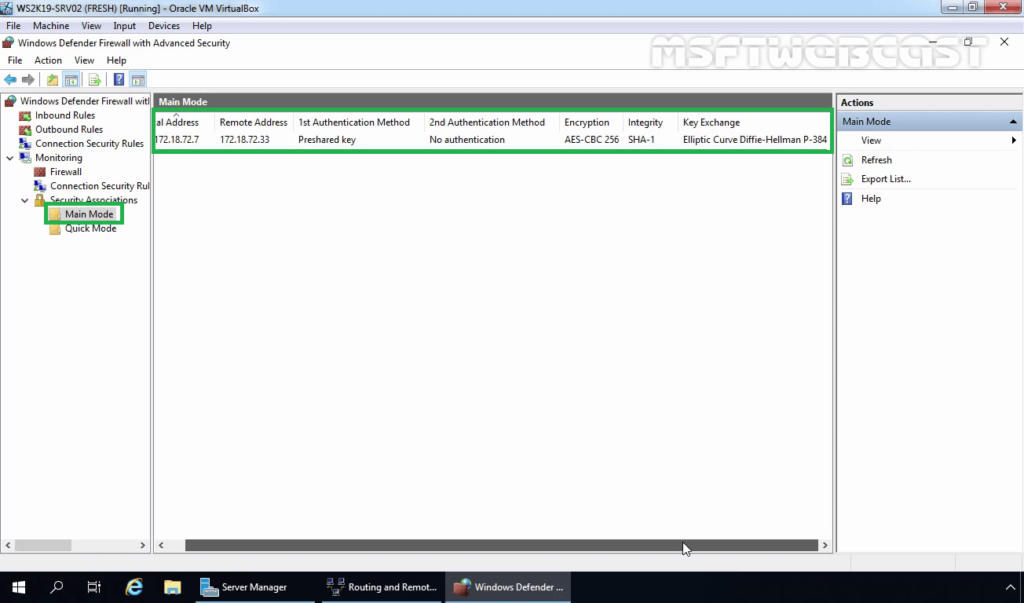
You can verify the authentication method and Encryption Standard for IPsec main mode connection.
- Authentication Method: Pre-Shared Key.
- Encryption Standard: AES-CBC 256 Bit
- Integrity Algorithm: SHA-1
- Key-Exchange Mode: Elliptic Curve Diffie-Hellman P-384.
31. Also, check Quick Mode Tunnel Information.
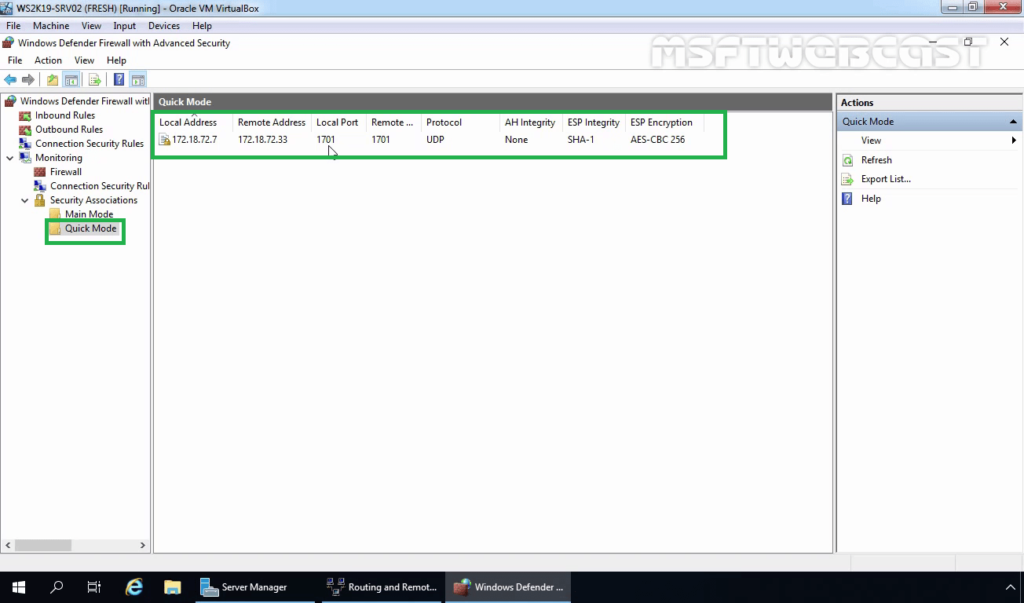
- Local Address: Local IP Address of VPN Server.
- Remote Address: VPN Client IP Address.
- Local Port: UDP 1701
- Remote Port: UDP 1701
- ESP Integrity Mode: SHA-1
- ESP Encryption Mode: AES -CBC 256 Bit
In this post, we have learned the steps to setup L2TP/IPsec VPN with a Pre-shared key on Windows Server 2019 and Windows 10.
Thank you for reading. Have a nice day.
Post Views: 4,894
 Платформа Windows Server остается одной из наиболее популярных серверных платформ, в том числе и для реализации решений удаленного доступа. Служба маршрутизации и удаленного доступа (RRAS) позволяет быстро и достаточно просто развернуть VPN-сервер практически для любых нужд. Сегодня мы еще раз вернемся к этому вопросу и рассмотрим, как создать на базе Windows Server PPTP или L2TP сервер для удаленного доступа, как наиболее востребованный сценарий на сегодняшний день.
Научиться настраивать MikroTik с нуля или систематизировать уже имеющиеся знания можно на углубленном курсе по администрированию MikroTik. Автор курса, сертифицированный тренер MikroTik Дмитрий Скоромнов, лично проверяет лабораторные работы и контролирует прогресс каждого своего студента. В три раза больше информации, чем в вендорской программе MTCNA, более 20 часов практики и доступ навсегда.
Почему именно эти типы подключения? Потому что они наиболее просты в реализации и поддерживаются широким спектром клиентов что называется «из коробки». Однако следует помнить, что PPTP не является на сегодняшний день безопасным и имеет слабые алгоритмы шифрования, но при этом он наиболее производительный из VPN-протоколов и имеет минимальные накладные расходы. Кроме того, его поддержка исключена из операционных систем Apple.
Оптимальным вариантом будет использование L2TP/IPsec подключения, которое сочетает в себе простоту, поддержку практически любыми клиентскими ОС и устройствами вместе с неплохим уровнем безопасности, обеспечиваемым IPsec. А так как настройка сервера для этих видов подключений практически идентична, то мы решили объединить их в одну статью.
Установка и настройка службы маршрутизации и удаленного доступа
Для начала работы с VPN в среде Windows Server вам потребуется установить роль Удаленный доступ, это делается стандартными средствами и не должно вызвать затруднений.
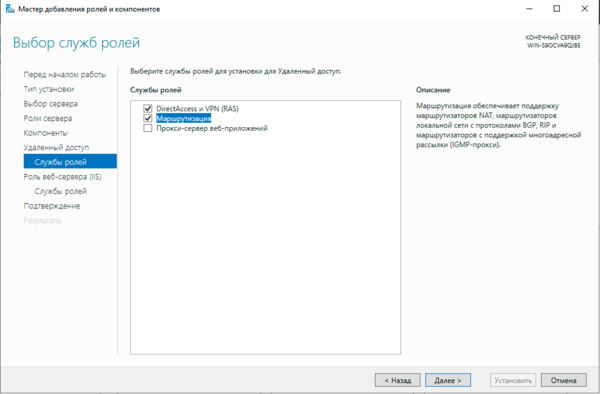
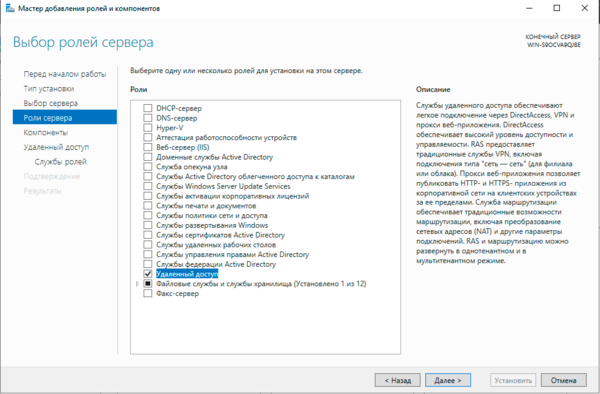 В Службах ролей выбираем Маршрутизация, роль DirectAccess и VPN (RAS) будет добавлена автоматически.
 После установки роли Удаленный доступ ее следует настроить, проще всего это сделать, нажав на значок с желтым треугольником в Диспетчере серверов и выбрать в появившемся списке пункт Запуск мастера начальной настройки.
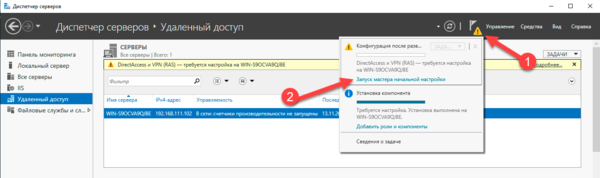 В появившемся окне выбираем пункт Развернуть только VPN.

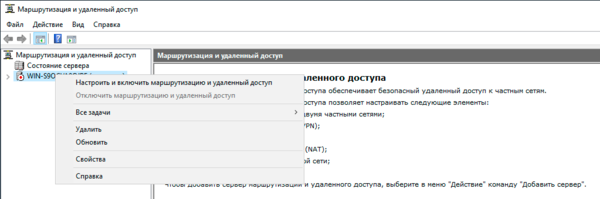
Затем в оснастке Маршрутизация и удаленный доступ щелкаем правой кнопкой мыши по строке с сервером и выбираем в выпадающем меню Настроить и включить маршрутизацию и удаленный доступ.
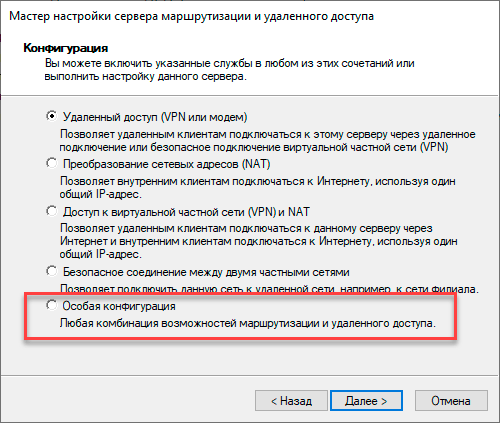
 После чего появится хорошо знакомое окно мастера настройки, предлагающее сразу несколько типовых конфигураций, однако у него есть свои особенности, например, если у вашего сервера всего один сетевой интерфейс, то настроить вариант Удаленный доступ (VPN или модем) мастер вам не даст. Поэтому выбираем самый нижний пункт — Особая конфигурация.
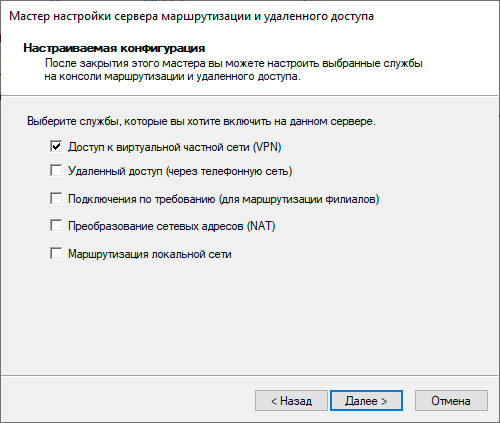
 В следующем окне достаточно поставить галочку Доступ к виртуальной частной сети (VPN) и завершить работу мастера.
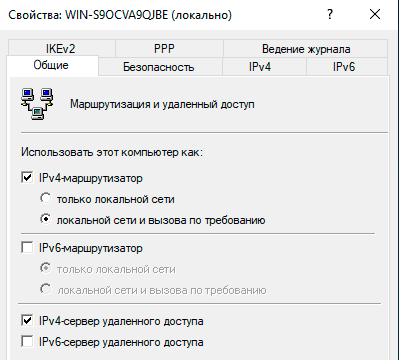
 После завершения работы мастера служба Маршрутизации и удаленного доступа будет запущена и можно приступить к настройке сервера удаленного доступа. Если же данная служба у вас уже установлена и настроена в иной конфигурации, то щелкните правой кнопкой по строке сервера и выберите Свойства, в открывшемся окне на закладке Общие установите опции: IPv4-маршрутизатор локальной сети и вызова по требованию и IPv4-сервер удаленного доступа.
 Настройка PPTP и/или L2TP сервера удаленного доступа
 Настройка PPTP и/или L2TP сервера удаленного доступа
Откроем оснастку Маршрутизация и удаленный доступ и перейдем к свойствам сервера через одноименный пункт в меню правой кнопки мыши, прежде всего убедимся, что настройки на закладке Общие соответствуют приведенным на скриншоте выше. Затем переключимся на закладку Безопасность и убедимся, что в качестве Поставщика службы проверки подлинности стоит Windows — проверка подлинности, а Поставщик учета — Windows-учет, еще ниже установим флаг Разрешить пользовательские политики IPsec для L2TP- и IKEv2-подключения и в поле Общий ключ укажите парольную фразу для предварительного ключа.
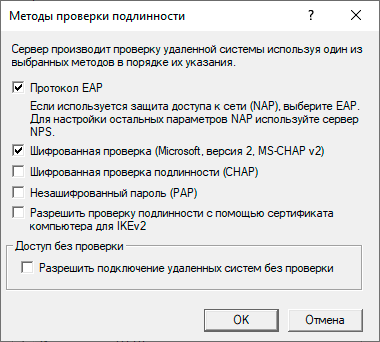
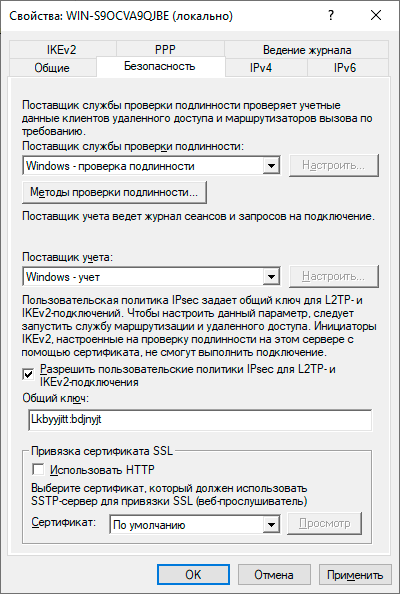 Нажав на кнопку Методы проверки подлинности откроем окно, в котором выберем только Протокол EAP и Шифрованная проверка (Microsoft, версия 2, MS-CHAP v2), остальные протоколы не являются безопасными и должны быть отключены.
 На закладке IPv4 укажем опцию Назначение IPv4-адресов — Статический пул адресов и добавим новый пул для выдачи адресов из него удаленным клиентам. Количество адресов должно быть не менее количества клиентов плюс один адрес, так как первый адрес из пула присваивается серверу. Что касается самого диапазона адресов, то его выбор зависит от конфигурации сети, если вы будете использовать маршрутизацию, то он не должен пересекаться с локальной сетью, если же хотите использовать ProxyARP, то наоборот, должны выделить принадлежащий локальной сети диапазон. В нашем случае используется второй вариант.

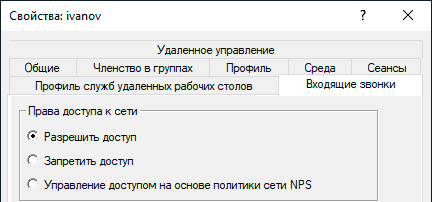
На этом настройка сервера может считаться законченной, следующим шагом следует разрешить подключения нужным пользователям, для этого в свойствах пользователя перейдем на закладку Входящие звонки и в блоке Права доступа к сети укажем Разрешить доступ. Теперь указанный пользователь может подключаться к нашему серверу используя свои учетные данные.
 Также не забудьте проверить настройки брандмауэра, чтобы убедиться, что правила Маршрутизация и удаленный доступ GRE-входящий, PPTP-входящий (для PPTP) и L2TP-входящий (для L2TP) включены.
 Proxy ARP
 Proxy ARP
Сетевое взаимодействие в пределах одной IP-сети осуществляется на канальном (L2) уровне, в сетях Ethernet для этого используются MAC-адреса устройств. Для того, чтобы выяснить MAC-адрес узла по его IP применяется протокол ARP (Address Resolution Protocol), использующий широковещательные запросы, на которые отвечает только обладатель указанного IP-адреса. Выдавая удаленным клиентам адреса из диапазона основной сети мы как бы помещаем их в общую IP-сеть, но так как VPN — это соединение точка-точка, ARP-запросы от удаленных клиентов в сеть попадать не будут, единственный узел который их получит — сам VPN-сервер.
Для решения данной проблемы используется технология Proxy ARP, которая, как понятно из названия, представляет прокси-сервер для ARP-запросов, позволяя удаленным клиентам работать так, как будто бы они действительно находились в одной сети, без каких-либо дополнительных настроек. При использовании RRAS никаких дополнительных действий делать не нужно, Proxy ARP работает по умолчанию.
VPN-сервер за NAT
Так как мы используем Windows Server, то с большой долей вероятности он будет находиться внутри сетевого периметра и нам понадобится настроить проброс портов на маршрутизаторе. Для этого нужно четко понимать, как работает VPN-соединение и какие порты и протоколы следует передавать.
Начнем с PPTP, прежде всего клиент устанавливает управляющее TCP-соединение на порт 1723, затем, после успешной аутентификации создается соединение для передачи данных с использованием протокола GRE.
Таким образом для работы PPTP-сервера за NAT нужно:
- пробросить порт 1723 TCP
- разрешить прохождение GRE-трафика
С первым понятно, а вот с GRE могут возникнуть затруднения. Если вы используете маршрутизатор на базе Linux, то обратитесь к следующей нашей статье, если оборудование Mikrotik, настроенное по нашей инструкции, то достаточно пробросить только 1723 TCP, прохождение GRE будет разрешено конфигурацией брандмауэра, в остальных случаях следует обратиться к документации на свою модель маршрутизатора.
С L2TP сложнее, точнее не с ним самим, а с IPsec, который не поддерживает NAT. Для обхода этих ограничений используется протокол NAT-T, который инкапсулирует пакеты IPsec в UDP, позволяя успешно проходить через NAT. Поддержка данного протокола включена по умолчанию практически во всех ОС, кроме Windows. Для включения поддержки NAT-T следует внести изменения в реестр, найдите ветку:
HKEY_LOCAL_MACHINE\SYSTEM\CurrentControlSet\Services\PolicyAgentИ создайте в ней параметр DWORD c именем AssumeUDPEncapsulationContextOnSendRule и значением 2.
Это можно быстро сделать при помощи PowerShell:
Set-ItemProperty -Path "HKLM:SYSTEM\CurrentControlSet\Services\PolicyAgent" -Name "AssumeUDPEncapsulationContextOnSendRule" -Type DWORD -Value 2 -ForceПосле чего систему следует перезагрузить. Данные изменения нужно внести как на сервере, так и на клиенте.
При установлении L2TP/IPsec соединения между узлами прежде всего создается зашифрованный IPsec-канал, для этого используется протокол обмена ключами IKE (порт 500 UDP) и протокол NAT-T (порт 4500 UDP), затем уже внутри безопасного IPsec-соединения поднимается L2TP-туннель на порт 1701 UDP и происходит аутентификация пользователя.
Обратите внимание, аутентификация пользователя в L2TP, в отличии от PPTP, происходит внутри защищенного IPsec-канала, что делает данный тип соединения более безопасным.
Таким образом для работы L2TP/IPsec сервера за NAT нужно:
- пробросить порт 500 UDP
- пробросить порт 4500 UDP
- внести изменения в реестр для включения NAT-T как на сервере, так и на клиенте (только для Windows)
Вопреки распространенному заблуждению порт 1701 UDP пробрасывать не нужно.
Настройка VPN-подключения в Windows
С одной стороны это простой вопрос, с другой — имеются определенные тонкости, на которые мы как раз и обратим внимание. В Windows 10 для первичной настройки VPN-подключения служит современное приложение, которое предельно простое и не охватывает дополнительных настроек.
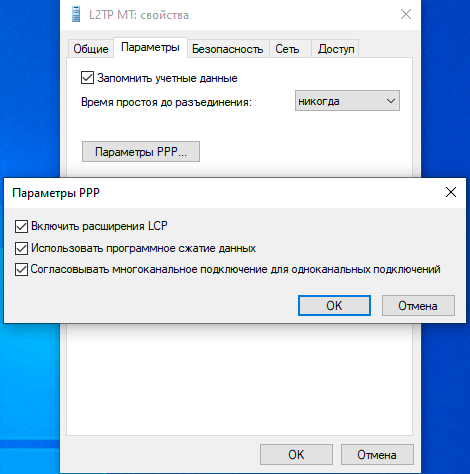
 Поэтому после того, как вы создадите в нем подключение, следует перейти к его свойствам и на закладке Параметры — Параметры PPP установить в открывшемся окне все флажки. Это позволит использовать все возможности протокола PPP и получить оптимальное качество связи. Обратите внимание, что данные опции должны также поддерживаться со стороны сервера, в противном случае их использование в одностороннем порядке может привести к ошибкам при установлении связи.
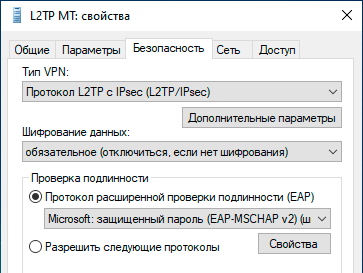
 Затем на закладке Безопасность установите в Шифрование данных — обязательное, а в пункте Проверка подлинности выберите Протокол расширенной проверки подлинности (EAP).
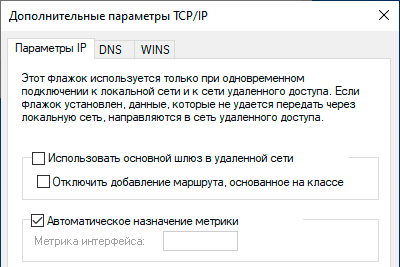
 И наконец на закладке Сеть перейдите в свойства протокола IP версии 4 (TCP/IP 4) и нажмите Дополнительно, в открывшемся окне снимите флаг Использовать основной шлюз в удаленной сети, в противном случае весь исходящий трафик будет направлен в туннель.
 После чего можем подключаться и пробовать получить доступ к ресурсам удаленной сети, если вы все сделали правильно, то проблем возникнуть не должно.
Настройка VPN-подключения в Linux
В данной части нашего материала мы будем рассматривать настройку клиентских Linux-систем при помощи графического окружения и Network Manager, настройка серверных систем выходит за рамки текущей статьи. В качестве примера мы будем использовать Ubuntu, но все сказанное будет справедливо для любых основанных на Debian систем, а с некоторыми уточнениями — для любых дистрибутивов.
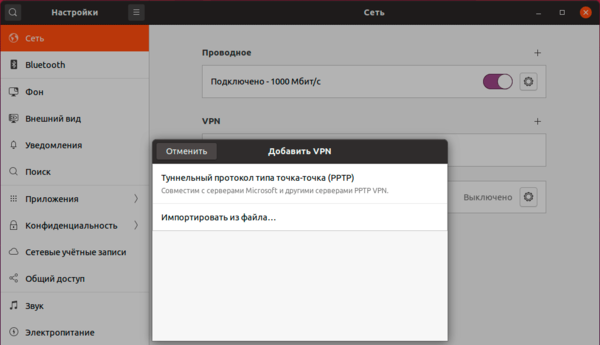
Поддержка PPTP присутствует практически в любом дистрибутиве по умолчанию. Достаточно перейти в Настройки — Сеть и добавить новое VPN-подключение.
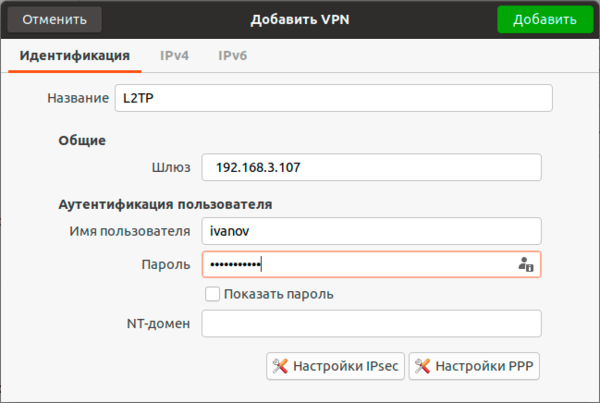
 Заполняем основные настройки: адрес сервера, имя и пароль пользователя.
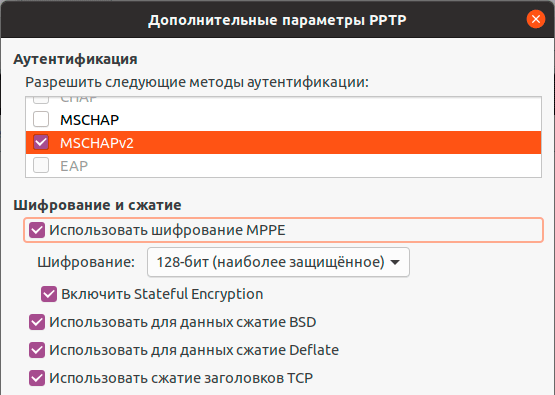
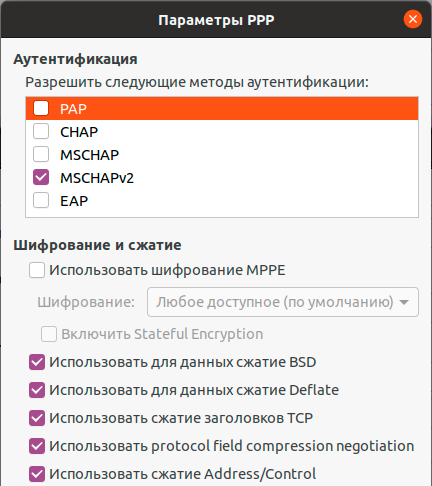
 Затем нажимаем кнопку Дополнительно и в открывшемся окне в разделе Аутентификация оставляем только MSCHAPv2, обязательно включаем Использовать шифрование MPPE и выбираем ниже 128 бит (наиболее защищенное), также устанавливаем флаг Включить Stateful Encryption для уменьшения накладных расходов на шифрование. Флаги сжатия оставляем включенными.
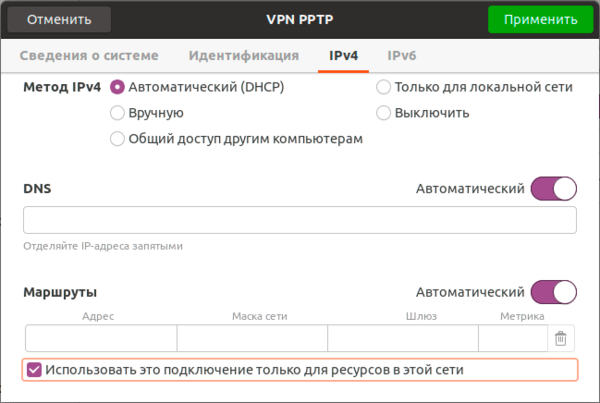
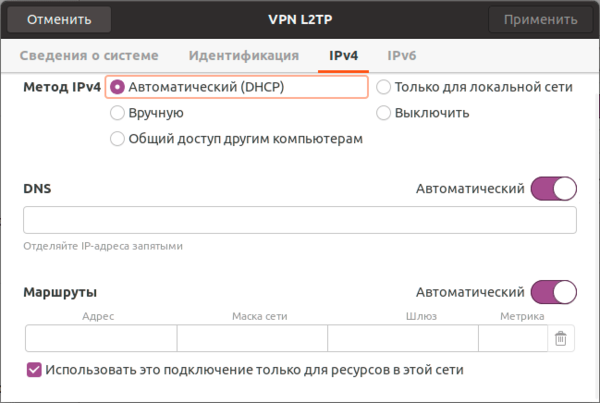
Закрываем данное окно с сохранением данных и переходим на закладку IPv4, где в разделе Маршрутизация устанавливаем флаг Использовать это подключение только для ресурсов этой сети, в противном случае в туннель пойдет весь трафик узла.
На этом настройка подключения завершена, можно подключаться.
Для работы с L2TP потребуется установить дополнительные пакеты:
apt install network-manager-l2tp-gnomeПосле чего в доступных типах подключения появится L2TP. Основные настройки ничем не отличаются от PPTP, также адрес сервера, имя и пароль пользователя.
 Затем откроем Настройки PPP, в разделе Аутентификация также выберем только MSCHAPv2, а вот опции шифрования оставляем выключенными, так как чистый L2TP шифрования не использует, для защиты канала здесь применяется IPsec. Флаги сжатия также оставляем установленными по умолчанию.
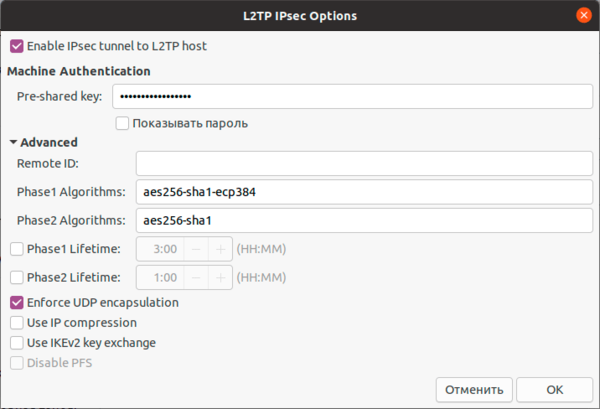
 Затем переходим в Настройки IPsec, это наиболее сложная и ответственная часть настроек, так как от них напрямую зависит безопасность соединения. В поле Pre-shared key введите Общий ключ, а ниже потребуется указать используемые шифры. Большинство материалов в сети интернет копируют друг у друга откровенно старые и слабые наборы шифров, что не соответствует реалиям сегодняшнего дня, хотя соединение с такими значениями будет работать. Мы же будем использовать максимально безопасные значения, для этого в поле Phase1 Algorithms укажите aes256-sha1-ecp384, а в поле Phase2 Algorithms — aes256-sha1.
Также имеет смысл установка флага Enforce UDP Encapsulation, который принудительно включает NAT-T, в случае если вы точно знаете, что ваш сервер находится за NAT, без этой опции протокол включается автоматически при обнаружении первого устройства с NAT.
Сохраняем настройки и переходим на вкладку IPv4, где также в разделе Маршрутизация ставим флаг Использовать это подключение только для ресурсов этой сети, чтобы направить в туннель только трафик для сети офиса.
 На этом настройка закончена, можно подключаться.
Научиться настраивать MikroTik с нуля или систематизировать уже имеющиеся знания можно на углубленном курсе по администрированию MikroTik. Автор курса, сертифицированный тренер MikroTik Дмитрий Скоромнов, лично проверяет лабораторные работы и контролирует прогресс каждого своего студента. В три раза больше информации, чем в вендорской программе MTCNA, более 20 часов практики и доступ навсегда.
Virtual Private Network (VPN) secures your network by providing a secure connection tunnel. You can also use VPN services to access the public network through a secure VPN network to avoid exposing your public network information. We will learn how to set up a PPTP/L2TP VPN on Windows Server 2019.
We advise using at least a 4core 8gb server for a PPTP/L2TP VPN server, you may experience connection issues with servers with lower configurations.
Install Routing & Remote Access Server Role
In this section, we will walk through the steps to install routing and remote access to allow direct access from the remote devices on the Windows server.
1. To start, log in to your Windows Server and navigate to the search by pressing the Windows button in the bottom left corner. Then search Server Manager and select the application, Server Manager.
2. Once the Server Manager window is open, click on Add Roles and Features.
3. Then, the Add Roles and Features Wizard screen will appear. Click Next to move on from the Before You Begin tab.

4. Next, in the Installation Type tab, select Role-based or feature-based installation. Then, click Next to continue.
5. Now in the Server Selection tab, select your Windows Server and then click Next to continue.
6. In the Server Roles tab, select Remote Access. Then, click on Next to continue setting up Remote Access.
7. On the Features tab, refrain from making any modifications, then click Next to proceed.
8. In the Remote Access tab, click on Next to move on with setting up Remote Access.
9. Next, in the Role Services tab, select DirectAccess & VPN (RAS) and Routing, then click on Next.
A pop-up will appear to confirm the features that will need to be installed to set up DirectAccess and VPN (RAS). You can confirm by clicking Add Features.
9. Then, skip the Web Server Role (IIS) tab by clicking on Next.
10. In the Web Server Role (IIS) Role Services section, leave everything as default and then click on Next.
11. In the Confirmation screen, you will see the summary of components that will be installed on the Windows server. Finally, click on Install.
12. Once the installation is complete, you may close the window by clicking on Close.
Add Loopback Network Adapter to Windows Server
In this section, we will be adding a Loopback Network Adapter to the Windows server to avoid the error message as shown below.
Less than two network interfaces were detected on this machine. For standard VPN server configuration, at least two network interfaces need to be installed. Please use a custom configuration path instead.
1. To start, open Server Manager by using Windows search and searching for Server Manager.
2. Once the Server Manager window is open, click on Tools in the top right-hand corner. From the drop-down menu, click Computer Management.
3. Then in the Computer Manager window, click on Device Manager from the left-hand menu, and in the middle menu make sure your VM menu is expanded as seen below.
4. Then, in the top left-hand corner click Action, and a drop-down menu will appear. From the drop-down menu, select Add legacy hardware.
5. Once the Add Hardware window appears, click Next to continue.
6. Next, click on the Install the hardware that I manually select from a list (Advanced) button. Then, click the Next button.
7. In the next screen, utilize the scroll function to locate and select Network adapters. Afterward, click Next to move on.

8. In the next screen, under the Manufacturer options select Microsoft, and under the Model options select Microsoft KM-TEST Loopback Adapter. Click Next to move on.
9. The next page is a confirmation of the hardware that we will be installing, click Next to continue.

10. After the installation is complete, click Finish to close the wizard.
11. To confirm the installation was successful, we can see it in the Computer Management window and check under Network Adapters.
Configure Remote Access Service on Windows Server
In this section, we will be going over how to configure the Remote Access Service on your Windows Server to set up a PPTP/L2TP VPN on a Windows Server
1. To start, in the Server Manager Window select Remote Access.
2. Next, right-click your Server Name and from the menu select Remote Access Management.
3. Once the Remote Access Management Console window opens, select DirectAccess and VPN from the menu on the left-hand side. Then, select Run the Remote Access Setup Wizard under Configure Remote Access.
4. Next, the Configure Remote Access window will open. Then, click Deploy VPN only.
5. The Routing and Remote Access window will appear, right-click your server name and select Configure and Enable Routing and Remote Access from the options listed.
6. Then, the Routing and Remote Access Server Setup Wizard will open. Click Next to move forward.
7. On the next page, select Virtual private network (VPN) access and NAT from the presented options and click Next once done.

8. Then, on the VPN Connection page select the Network interface where the server’s public IP is configured. In this case, we will be selecting Ethernet. Once you have selected your network interface, click Next to move on.
9. Next, on the IP Address Assignment page we will select From a specified range of addresses. Then, click Next to continue.
10. In the next screen, select New to define the range of private IP addresses that the server will give to the remote VPN.
11. In the New IPv4 Address Range, select a range of Internal IP Addresses and input the starting IP address and ending IP address. You can select a range from these lists. Then, click OK to move on.
12. Now, we can see our Address Range populated on the Address Range Assignment page. Then, click Next.
13. On the next page, select No, use Routing and Remote Access to authenticate connection requests since we will not be using a RADIUS server. Click Next to move on.
14. On the next page, click Finish to move on.
15. A message will be prompted, click OK to close it out. Now you have completed configuring Routing and Remote Access Server Setup Wizard.
16. To verify that Routing and Remote Access has been configured, you can check via the Routing and Remote Access window we opened earlier in this section. The server name will now have a green up arrow as seen below.
Enable L2TP/IPsec VPN on Windows Server
In this section, we will go over how to enable L2TP/IPsec using a pre-shared key through Routing and Remote Access properties to set up a PPTP/L2TP VPN on a Windows Server.
1. In the Routing and Remote Access window we opened in the last section, right-click on your server name in the left-hand menu. Then select Properties from the options presented.
2. In the properties window, check the box for Allow custom IPsec policy for L2TP/IKEv2 connection and enter a made-up key under Preshared Key. Then, click OK and Apply.
Make sure to note down your Preshared key as you will need it later.
3. You will then need to click OK on the pop-up.
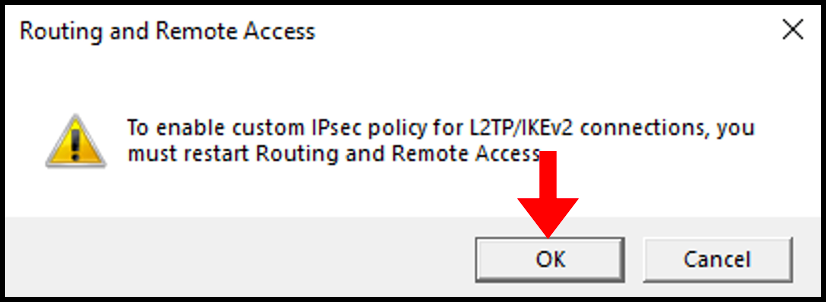
4. Lastly, restart your Windows VPS.

Allow Remote Access to VPN via Public Network Adapter
To be able to use Remote Desktop to access the server and have VPN service running simultaneously, we will need to allow the Remote Access port over a Public Network Adapter.
1. In the Routing and Remote Access, expand the server name, IPv4, and Nat from the left-hand side as seen below. In the middle screen, right-click on the Public Network Adapter. Then, select Properties.
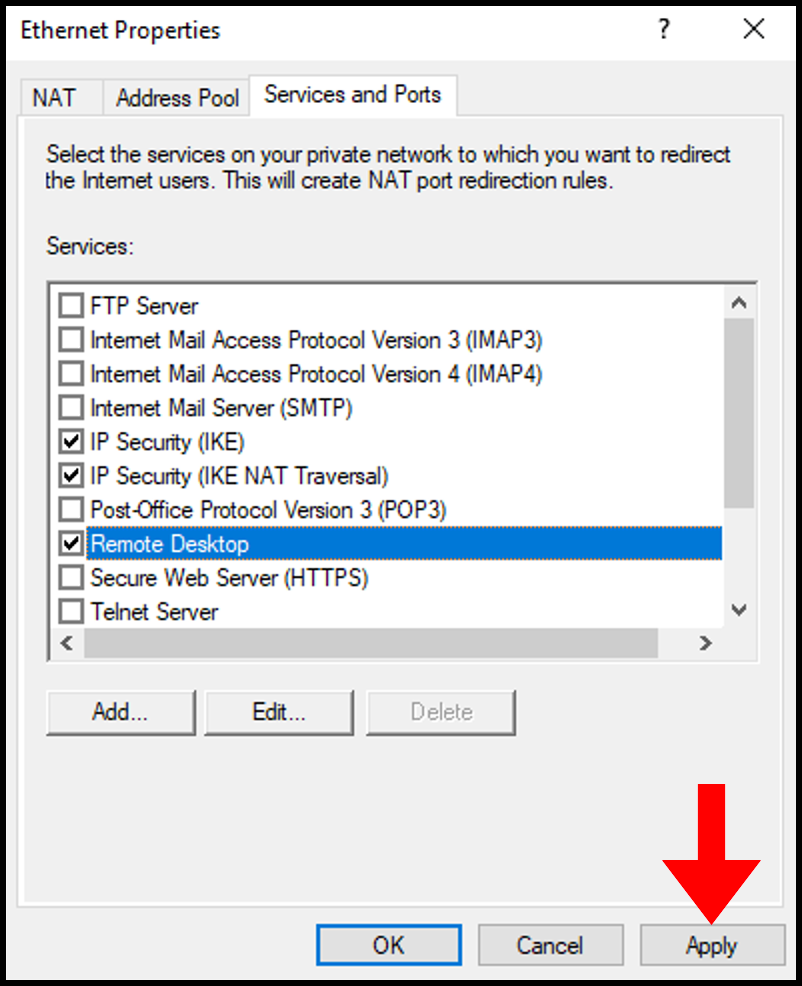
2. In the Ethernet Properties window, navigate to the Services and Ports tab. Then, scroll down and select Remote Desktop.
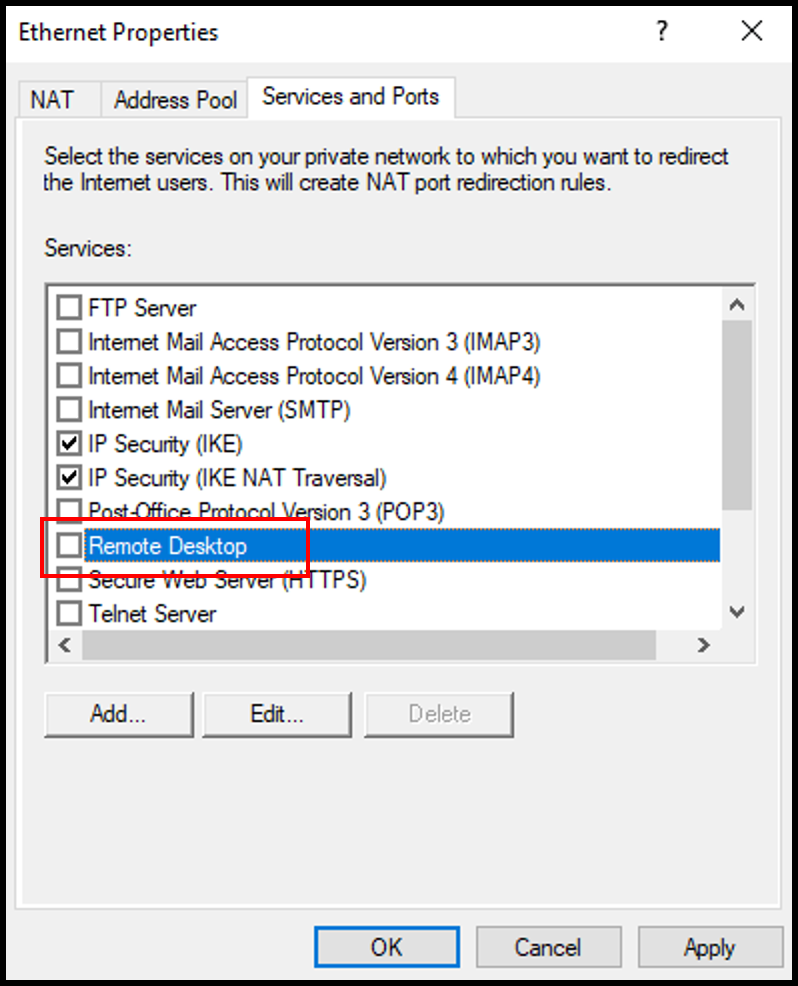
3. In the pop-up window, enter your server’s public IP address in the Private address section. Click OK to continue.
4. Once done, click Apply and OK on the Ethernet Properties screen to save and close the window.
Allow VPN Remote Access to Users
In order to allow other devices to connect to our VPN server we will need to allow Network access permissions for certain users. In this guide, we will be allowing the user Administrator network access.
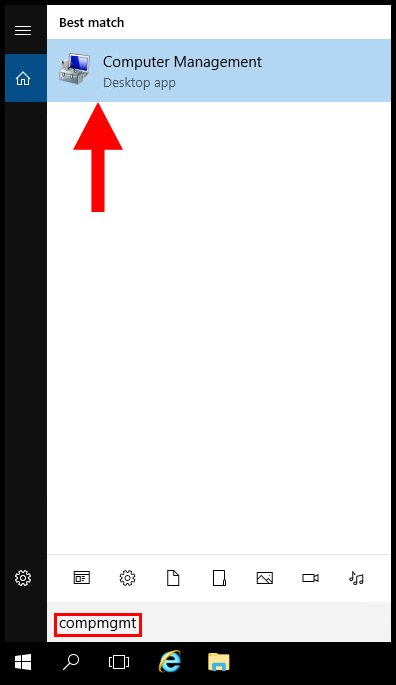
1. First, open Computer Manager by searching in the Windows search function.
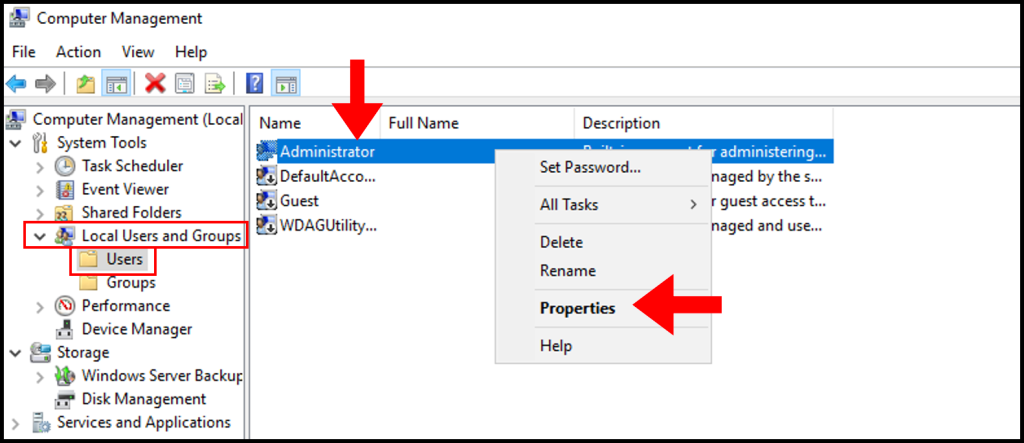
2. In the Computer Management window, expand Local Users and Groups from the left-hand menu, then select Users. In the middle screen, right-click Administrator and click Properties.
3. In the Administrator Properties window, navigate to the Dial-in tab. Then under Network Access Permission, click Allow access. Now click Apply and OK to save and close the screen.
Allow VPN Ports through Windows Firewall
In this section, we will be going over how to allow VPN through the Windows server firewall. If this is not done, VPN clients will not be able to communicate with the VPN server.
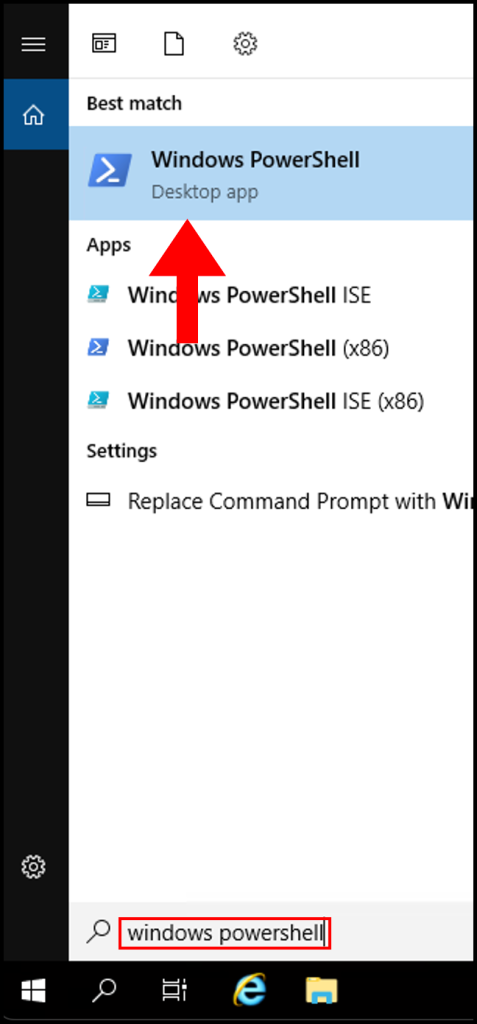
1. First, open Windows PowerShell through the Windows search function.
2. Next, in the PowerShell terminal enter the following command and click your Enter key.
New-NetFirewallRule -DisplayName "VPNTCP" -Direction inbound -Profile Any -Action Allow -LocalPort 1723,1701,443 -Protocol TCP
New-NetFirewallRule -DisplayName "VPNUDP" -Direction inbound -Profile Any -Action Allow -LocalPort 500,4500,50,1701 -Protocol UDP
New-NetFirewallRule -DisplayName "GRE" -Direction inbound -Protocol 47 -Profile Any -Action Allow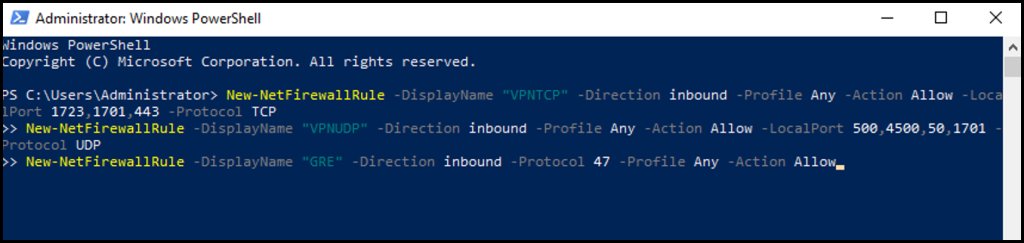
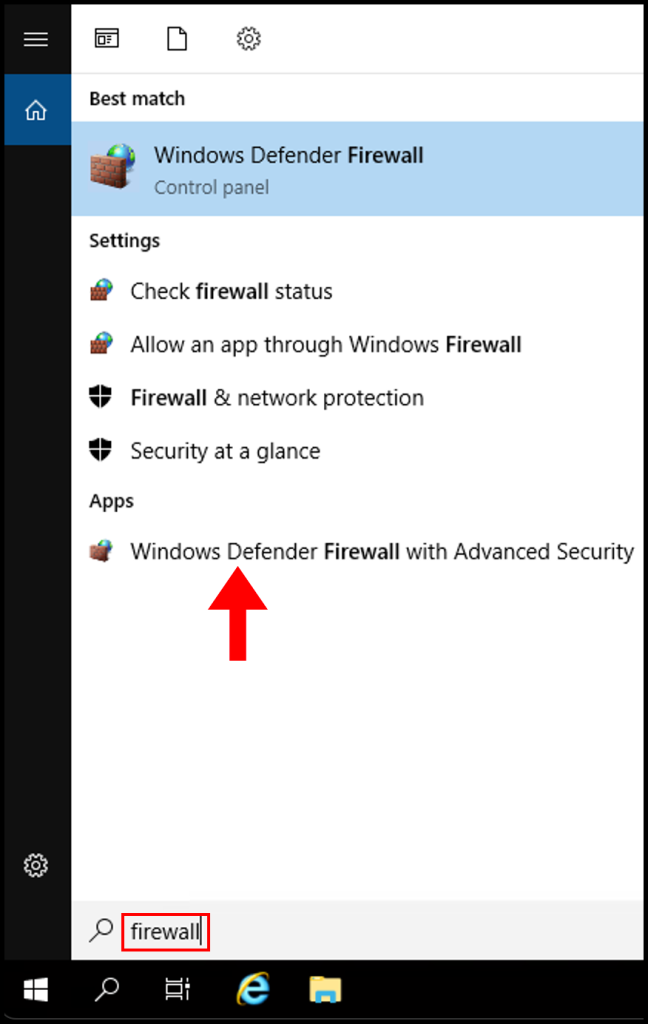
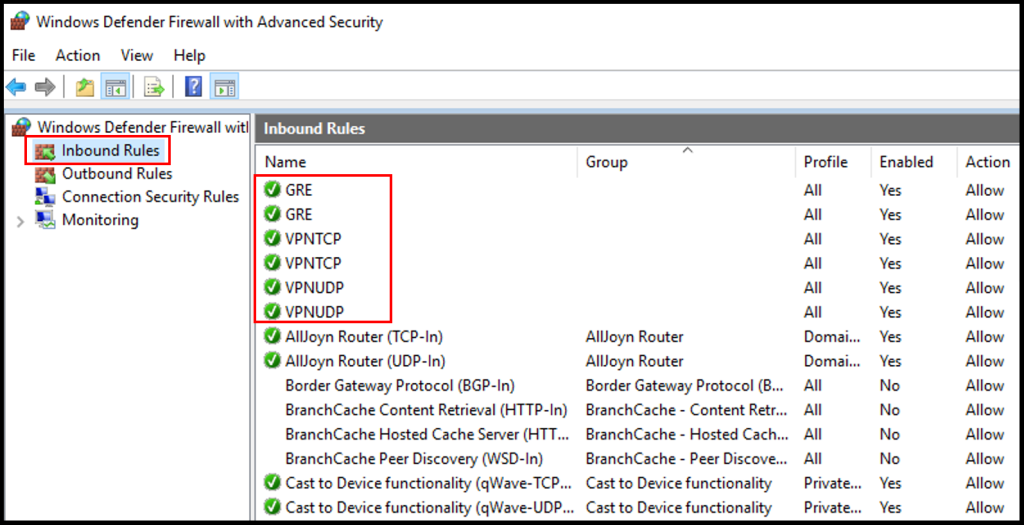
3. To confirm this worked, we can check the Windows Firewall Inbound where we can see the ports are allowed. Search for Firewall in the Windows search function and click Windows Defender Firewall with Advanced Security.
4. Once the Windows Defender Firewall window is open, check that GRE, VPNTCP, and VPNUDP have green check next to them. Now we have successfully completed how to set up PPTP/L2TP VPN on Windows Server.
Connecting to PPTP/L2TP VPN on Windows
In this article, we will go over how to connect to the VPN server on your Windows device and test that the VPN configuration is working.
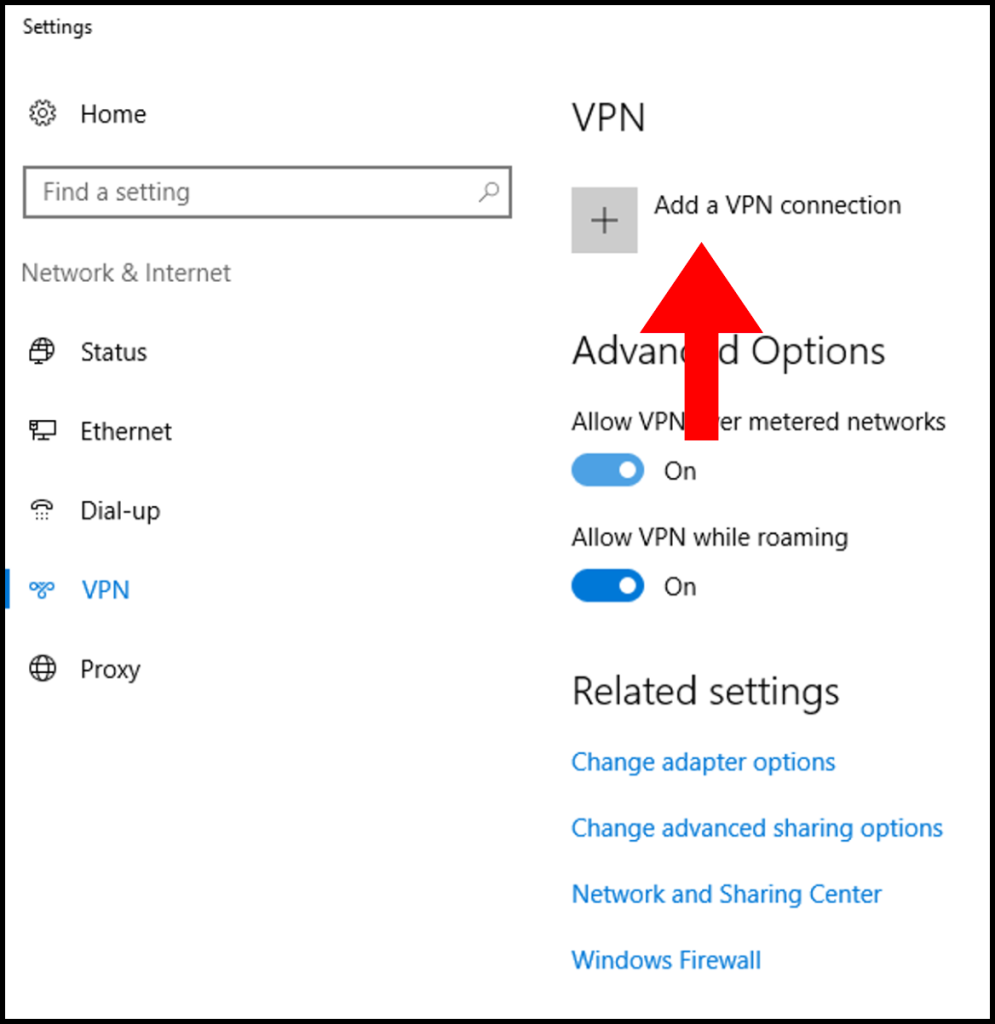
1. On your Windows device, search for VPN in Windows and click Change virtual private networks (VPN).
2. Then in the next window, click the button Add a VPN connection.
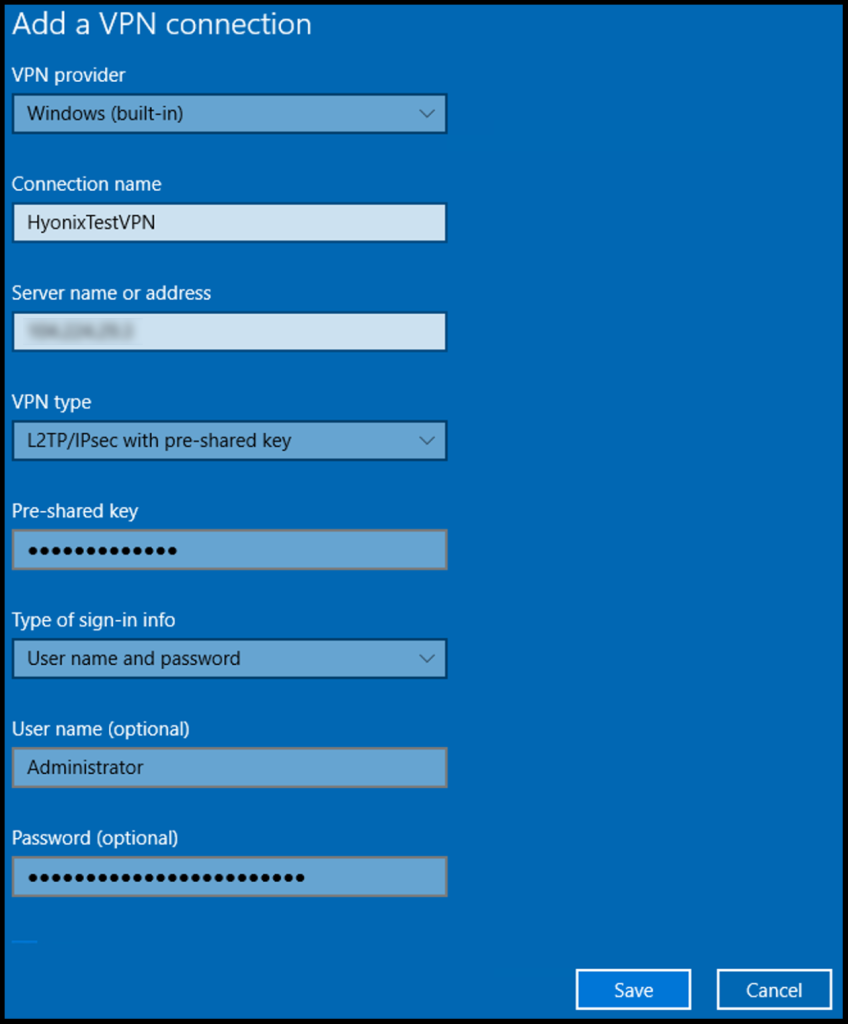
3. In the next screen, fill out the below information as shown below. Once done, click Save.
VPN Provider: Windows (built-in)
Connection Name: Any name you’d like to label it as
Server name or address: The IP Address of the VPN server
VPN Type: L2TP/IPsec with pre-shared key
Pre-shared key: Enter the pre-shared key we defined in an earlier section
Type of sign-in info: User name and password
User name (Optional): Login username of the VPN server
Password (Optional): Password of the VPN server
4. Next, click the VPN that we have added and then click Connect to connect to the VPN.
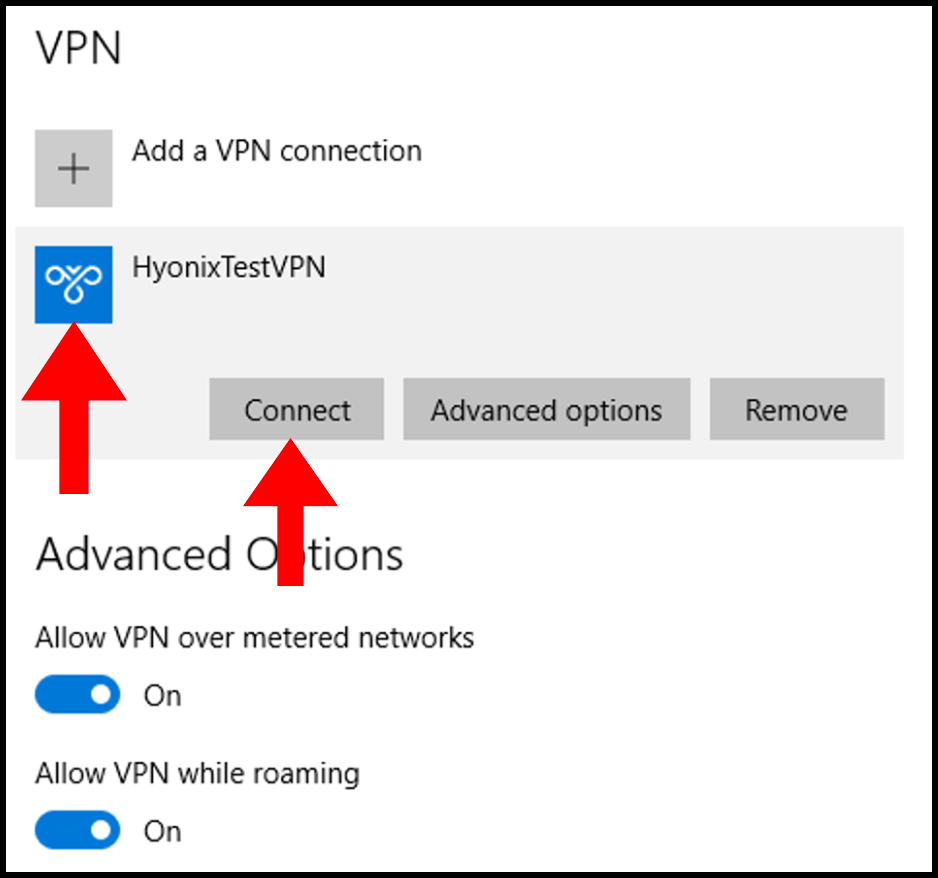
5. Finally, you will be able to see that we are connected to the VPN when it says Connected under the VPN name as seen below.
6a. One way to verify that you have successfully connected to the VPN server is by connecting to the VPN server and opening the Routing and Remote Access window and selecting Remote Access Clients. You will then see a connected client to the VPN server.
6b. Another way to verify the VPN connection is by checking the IPv4 address on the client device. You can do this by going on your browser and looking up whats my ip? and the IP that is shown should be the VPN server’s IP address.
Connecting to PPTP/L2TP VPN on macOS
In this article, we will go over how to connect to the VPN server on your macOS device and test that the VPN configuration is working.
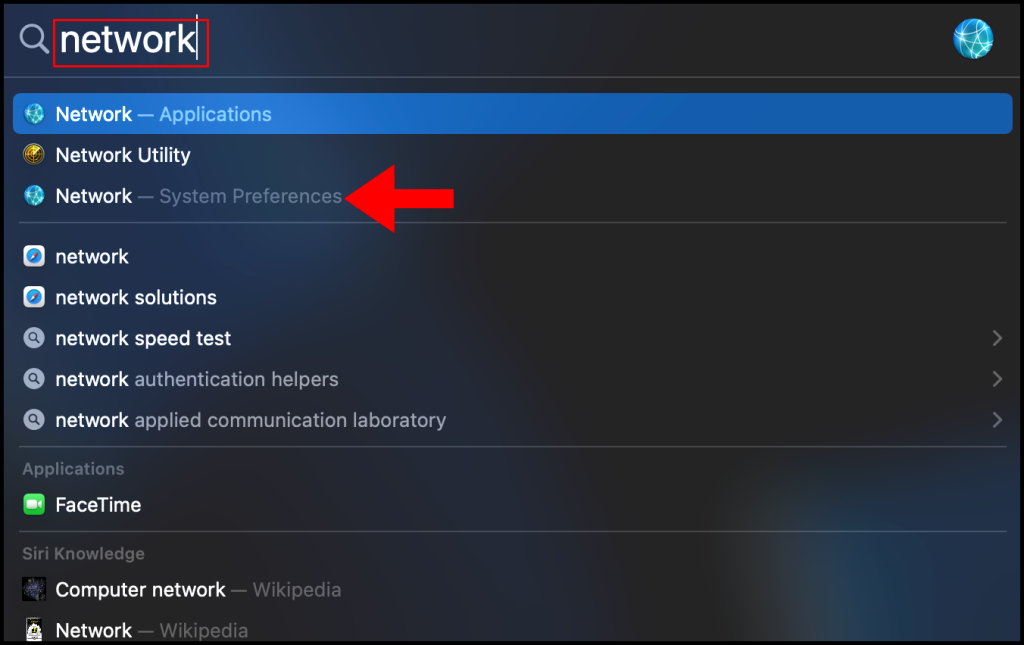
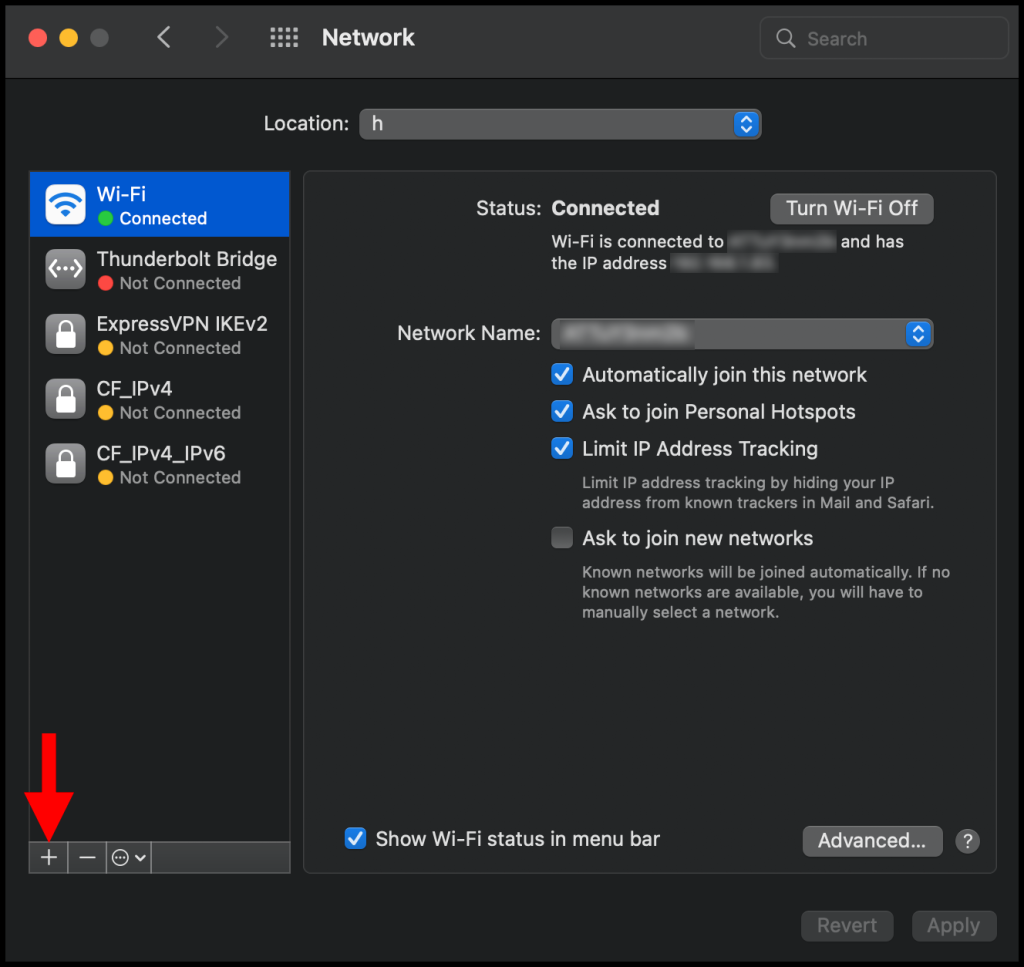
1. To start, use the finder feature (cmd + space-bar) to search and open Network – System Preferences.
2. In the Network window, click the + button on the bottom left corner as seen below.
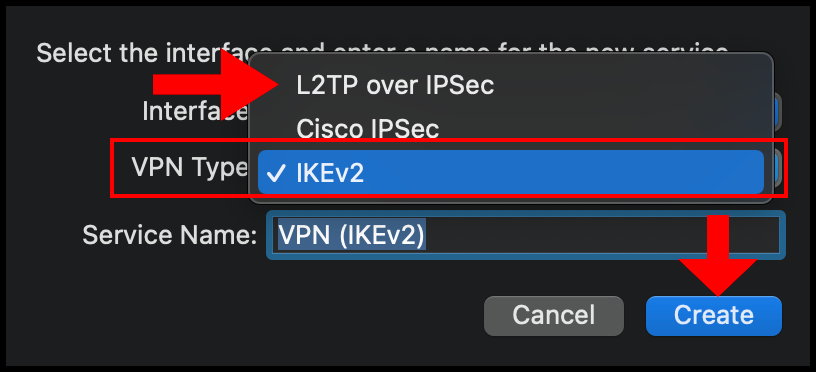
3. In the pop-up, click the drop-down next to Interface and select VPN from the menu.

4. Then select the drop-down for VPN Type and select L2TP over IPSec. Optionally, you can also enter a custom Service Name. Click Create to move on.
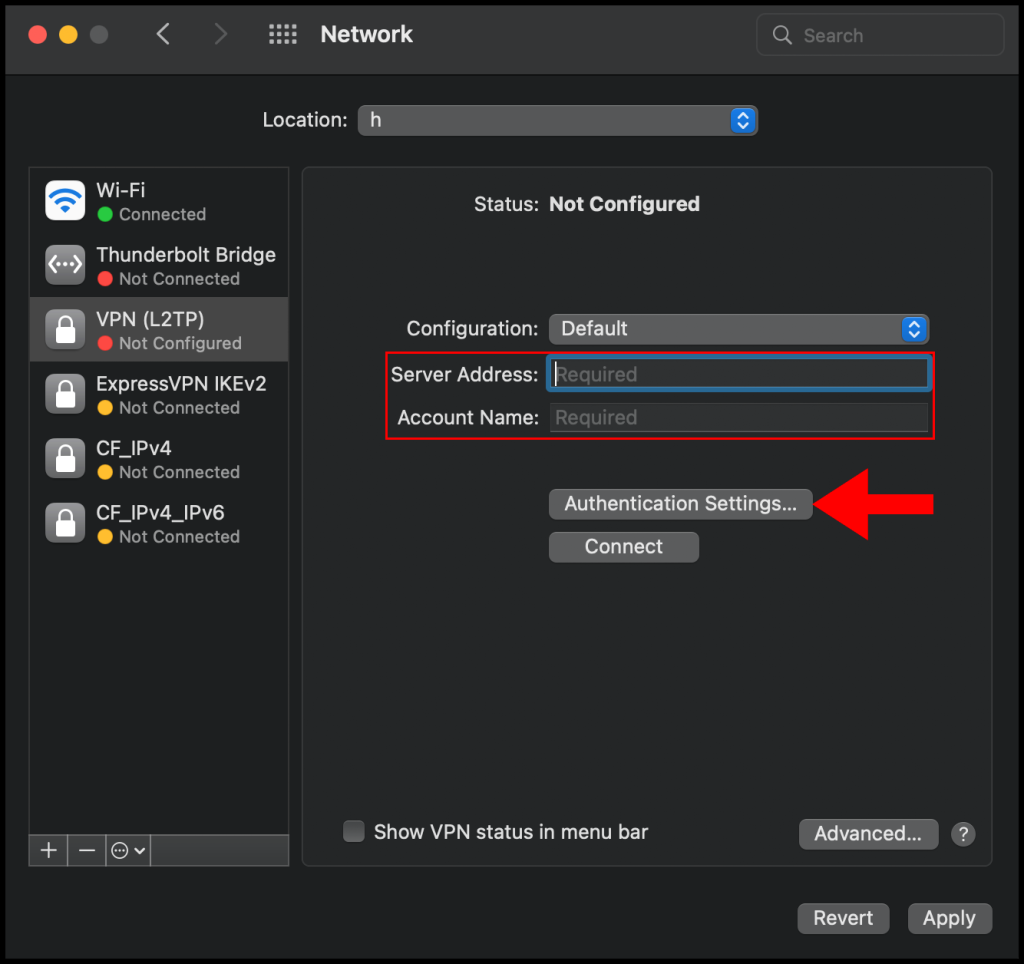
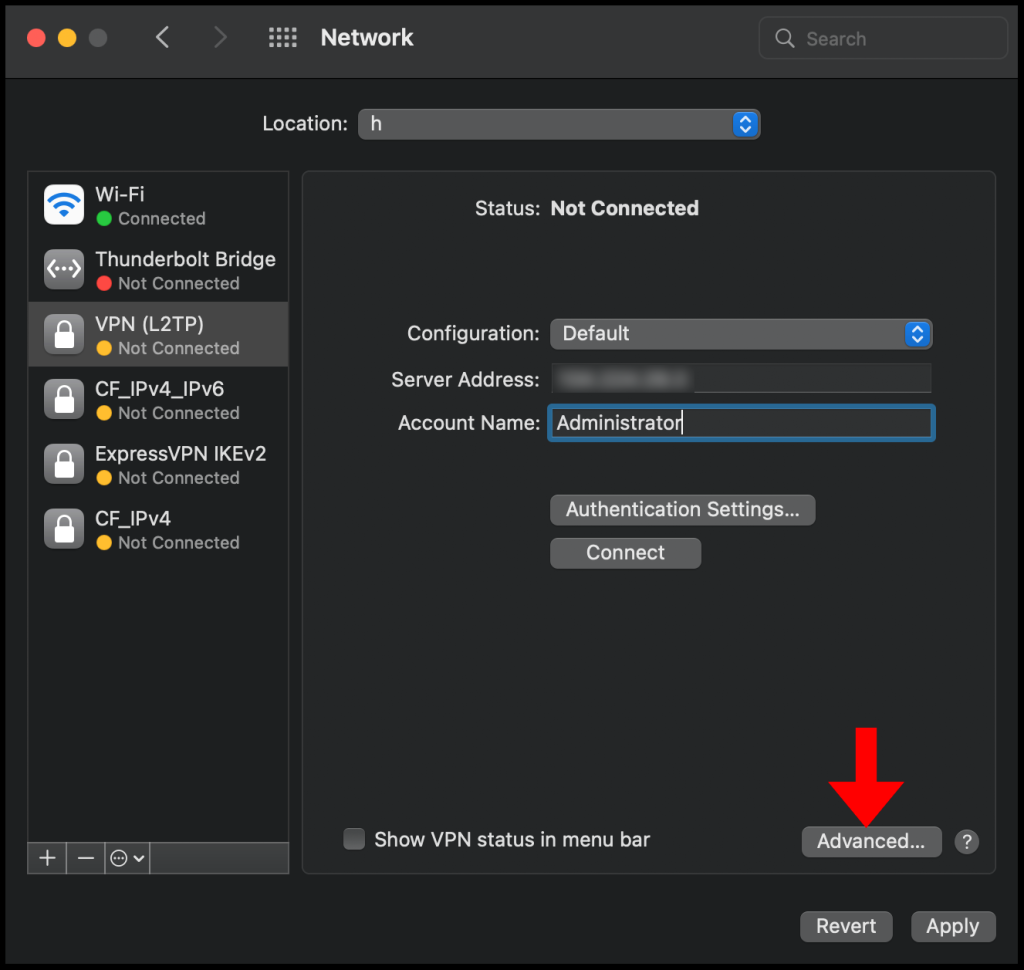
5. Then in the next configuration window, enter the VPN server’s IP address in the Server Address text field and enter the username you use to log in to the VPN server in the Account Name text field. Once you’re done click Authentication Settings to continue the setup.
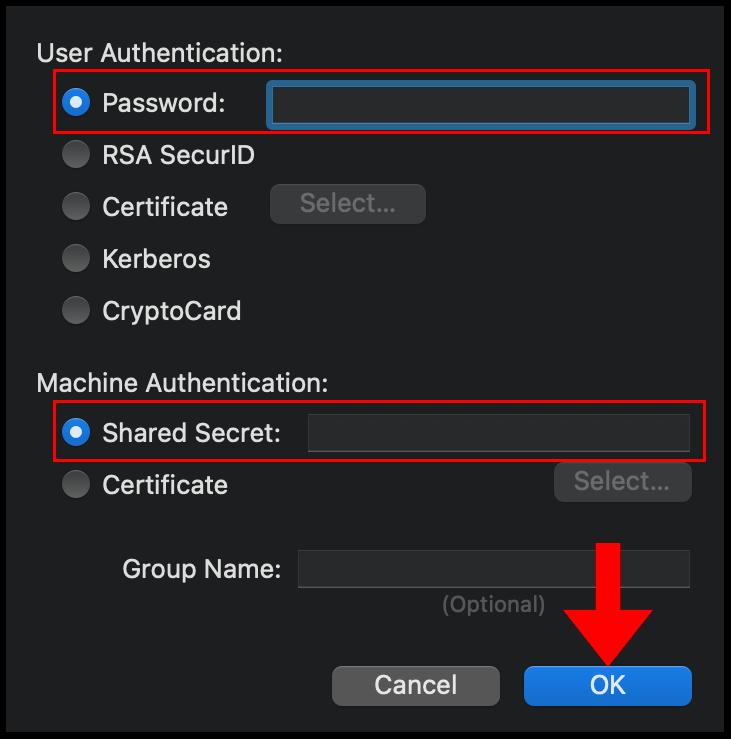
6. In the Authentication Settings menu, select Password for User Authentication and then enter the password you use to log in to the VPN server, select Shared Secret under Machine Authentication and enter the pre-shared secret key you set on your VPN server in the earlier sections. Click OK to finish configuring the Authentication Settings.
7. Now click Advanced to go to the advanced network settings.
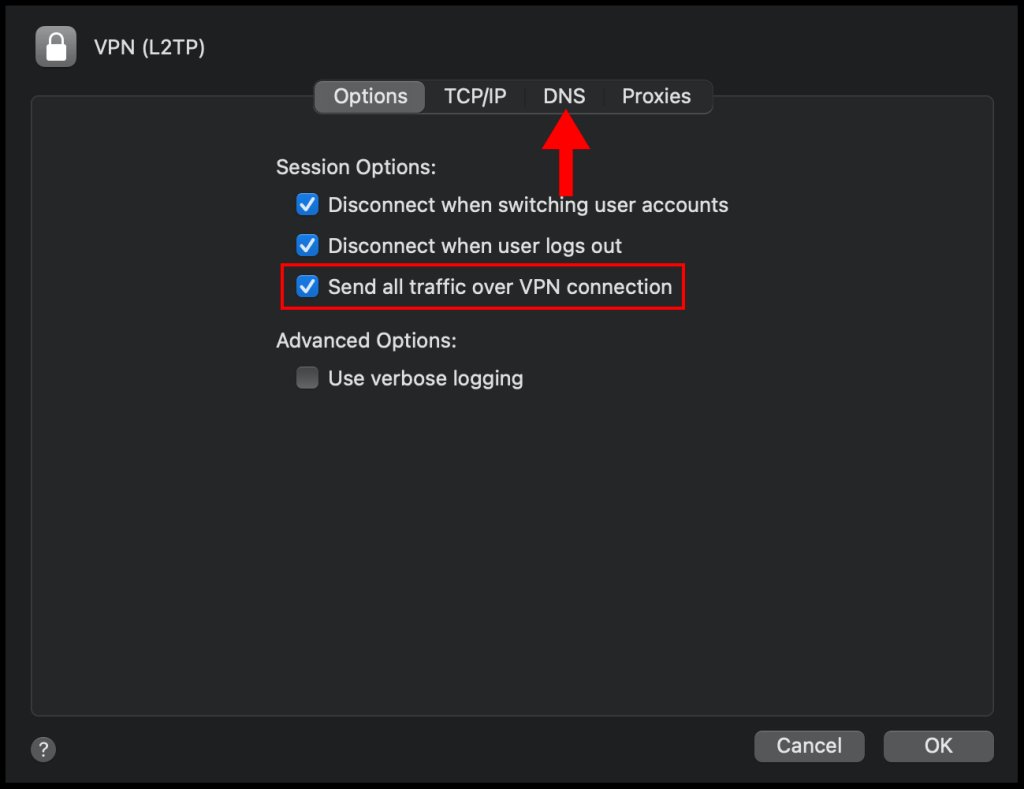
8. In the Advanced window, check the box next to Send all traffic over VPN connection and then navigate to the DNS tab.
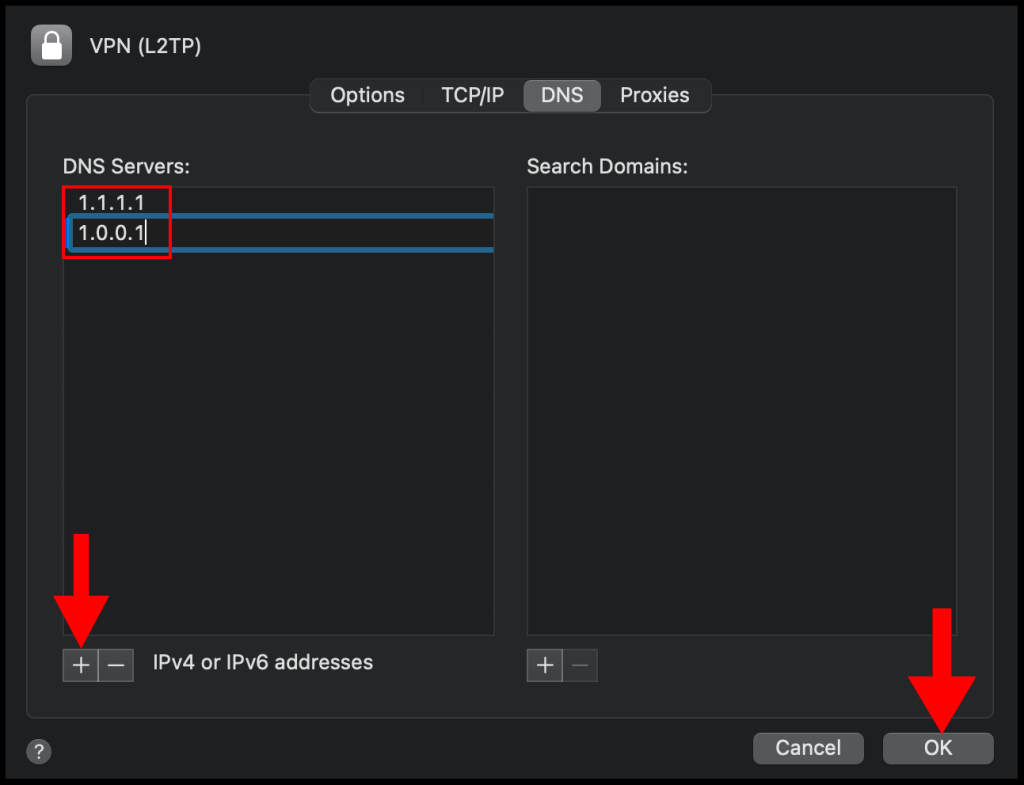
9. On the DNS section, click the + button on the left-hand corner and add the following DNS servers 1.1.1.1 and 1.0.0.1, then click OK to close out of the window.
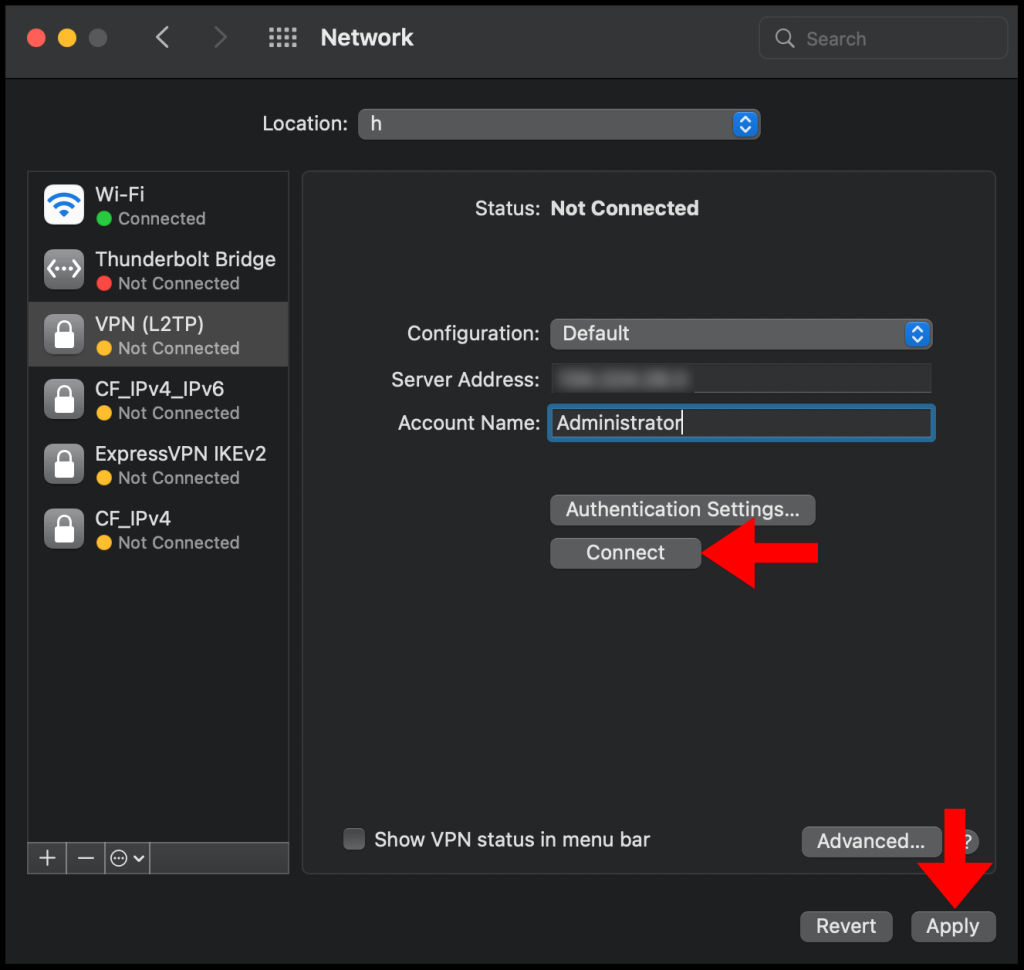
10. Lastly, click Apply and then click Connect to connect to your VPN. We have successfully set up and connected to the VPN on a macOS device.
A Virtual Private Network (VPN) is used to securely create a tunnel for data between your local computer to a remote server. On Windows Server 2019, you can configure a VPN to provide network access to connected clients and allow connected devices to communicate securely.
This guide explains how to set up a fresh Windows Server 2019 as an L2TP over IPSec, or a PPTP VPN, using the routing and remote access feature. Layer 2 Tunneling Protocol (L2TP) with IPSec offers robust encryption for connections to the server. On the other hand, the Point to Point Tunneling Protocol (PPTP) is simple to deploy but not as secure.
To set up the VPN server, we shall use the built-in Routing and Remote access feature, which offers a graphic interface to configure remote networking features such as Dial-up, LAN routing, NAT, and VPN.
Requirements
-
Deploy a Windows Server 2019 Instance on Vultr
-
Remotely connect to the server and log in as an Administrator
Create a New VPN User
For the VPN service to work well, it must authenticate with a valid user account to the server. So, you need to create a new user on the server.
Click Tools under server manager and select Computer Management from the drop-down list to create a new user.
Once the computer management window pops up, expand Local Users and Groups from the left pane and right-click Users to select New User on the sub-menu.

Under the New User dialog box, enter a username, full name, and password for the VPN user, then click create and close the window.

The new user will now be listed on the list of active server users, right-click on the new user and select properties.
Under the user properties window, navigate to the Dial-in tab and click Allow access under Network Access Permission. Click OK for changes to take effect.

Install the Routing and Remote Access Features
Procedure 1: Through Server Manager
From the Windows start menu, open Server Manager, click Manage, then select Add Roles and Features from the drop-down list.
From the open window, click next and select Role-based or feature based installation, then select your server from the pool. Select Remote Access, Remote Access Administration from the list of server roles.

Next, select DirectAccess and VPN (RAS) and Routing from the features list, then click to Install IIS, which is required for remote access to work well.

Procedure 2: Using Windows PowerShell
You can also install Remote Access from Windows Powershell.
From the Windows start menu, open an Administrative Powershell, then install Remote access by pasting the following code to the console.
Install-WindowsFeature RemoteAccess

Install-WindowsFeature DirectAccess-VPN -IncludeManagementTools

Install-WindowsFeature Routing -IncludeManagementTools


Your output should be similar to:


PS C:\Users\Administrator> Install-WindowsFeature RemoteAccess

>> Install-WindowsFeature DirectAccess-VPN -IncludeManagementTools

>> Install-WindowsFeature Routing -IncludeManagementTools


Success Restart Needed Exit Code      Feature Result

------- -------------- ---------      --------------

True    No             Success        {Remote Access}

True    No             Success        {RAS Connection Manager Administration Kit...

True    No             Success        {Routing}
Configure Routing and Remote Access
Open Server Manager and click Tools on the top toolbar. From the drop-down list, select Remote Access Management.

In the open Routing and Remote Access window, right click on your server name just below Server status, then select Configure and Enable Routing and Remote Access from the drop-down menu.
Now, select Custom configuration to configure remote access manually.

Select VPN Access and NAT as services you want to enable on your server, click next to finish the configuration, and start the service.

Setup a PPTP VPN
Now that Remote Access is running, you can set up your PPTP VPN. To get started, you must assign connected clients** static IP Addresses to avoid possible connection issues. To do this, right-click on your server under the Routing and Remote Access window and select Properties from the drop-down list.

Click IPV4 in the Open Window, then select Static address pool. Now, click Add to craft a new IP Address range from the open pop-up window. In this guide, we use the range 10.0.0.1 to 10.0.0.50, and the server will automatically calculate the number of available addresses.

Click OK to save your static IP Address configuration. You will be prompted to restart Routing and Remote Access for changes to apply; simply click OK.
Configure NAT and enable PPTP
We need to configure Network Address Translation (NAT) for connected clients to use the Internet. On the left pane of the same routing and remote access window, expand the IPv4 options under your server. Right-click on NAT and select New Interface.

Under the open dialog window, select Public interface and enable NAT on the interface.
Next, navigate to Services and Ports and click VPN Gateway (PPTP) from the drop-down list.

Click Edit to set a Private address for the VPN service, change the current address 0.0.0.0 to 127.0.0.1, and click OK to save.

Finally, click OK to save all changes, then right-click on your server from the left pane and click Restart under the All Tasks sub-menu.

This will restart routing and remote access services making your server ready for incoming VPN connections.
Configure Windows Firewall to accept Incoming PPTP VPN Connections
Click Tools from the Windows server manager and select Windows Defender Firewall with Advanced Security from the drop-down list.
Under the open Windows Defender Firewall with Advanced Security window, select Inbound Rules on the left pane, then click New Rule on the right pane.

In the open new Inbound rule wizard, click Predefined and select Routing and Remote Access from the list.

Under predefined rules, choose Routing and Remote Access (PPTP-In), click next to allow the connection, then finish for the new Firewall rule to be applied and test your new PPTP VPN server.

Test your PPTP VPN
Using your personal computer (PC) or Smartphone, go to Networks, Add a new VPN and select PPTP as the VPN type. Then, enter the VPN username and password created earlier to connect.
In this guide, we cover and test the PPTP VPN on a Windows 10 PC. To get started, click the start menu and search for Control Panel, then, click Network and Internet.
Under Network and Internet, open the Network and Sharing Center and click Set up a new connection or network.

Under the open window, select Connect to a workplace and click Use my Internet connection (VPN).
Then, enter your server’s public IP Address (Check your Vultr server dashboard), assign the connection a name, and click create.

Now, on the left pane, click Change adapter settings, then right click your created VPN interface and select Properties.

Under the pop-up, click Security, then choose Point to Point Tunneling Protocol (PPTP) under Type of VPN.
Finally, under Allow these protocols, select CHAP and MS-CHAP v2, then click OK to apply changes.

Your new VPN is configured successfully. Click the network connection icon on the taskbar, select your VPN on the list and click Connect to enter the VPN username and password created earlier to establish a connection to your new PPTP VPN server.

Setup L2TP with IPSEC
Open server manager, click Tools, and open Remote Access Management, then right-click your server on the left pane to select Properties from the drop-down list.
Under server properties, navigate to the Security tab, and click Allow custom IPSec policy for L2TP/IKEv2 connection to enter your new pre-shared key.
In this guide, we use 12345678, choose something stronger, then navigate to IPV4 to set a static address pool and click OK to apply changes.

Keep note of the pre-shared key (PSK) since it will be required for every user establishing a connection to the VPN server.
From the left pane, expand the IPV4 sub-menu and right-click on NAT, then select New Interface. If you set PPTP earlier, click NAT and edit the existing interface you already created.
Navigate to the Services and Ports tab and select VPN Gateway [L2TP/IPSec], then click edit to change the private address from 0.0.0.0 to 127.0.0.1. Click OK to save changes and restart remote access from the left pane under All Tasks.
This will restart Routing and Remote Access, then save the applied L2TP configurations.
Allow L2TP Connections through Windows Firewall
Open Windows Defender with Firewall, select inbound rules and add a new rule. Select Predefined and from the list, choose Routing and remote access.
Under Predefined rules, select Routing and Remote Access [L2TP-In] and click next.

Finally, allow the connection and click Finish to apply the new Firewall rule.
Connect and Test Your L2TP VPN server
In this guide, we test the new L2TP with IPSec VPN on a mac. To get started, open System Preferencesand click Network.
Under the Network Preferences window, click the + sign and select VPN under the Interface dialog box. Then, choose L2TP with IPSec as the VPN Type and assign your connection a name.

Click create, then enter your public server IP Address (server address) and username (Account name). Next, click Authentication Settings to enter your account password and Pre-shared key (Shared secret) created earlier.

Next, click Advanced and select Send all Traffic over VPN Connection, then click Apply, and finally click Connect to establish a connection with your new L2TP VPN server.

Conclusion
You have set up a VPN on your Windows server 2019 instance; you can choose to create both PPTP and L2TP VPNs with different users connecting through your server without any limitations.
For every connected device, they will be able to access the Internet through your server and interact with other connected computers.