Summary
Standards: RFC 2661
L2TP is a secure tunnel protocol for transporting IP traffic using PPP. L2TP encapsulates PPP in virtual lines that run over IP, Frame Relay and other protocols (that are not currently supported by MikroTik RouterOS). L2TP incorporates PPP and MPPE (Microsoft Point to Point Encryption) to make encrypted links. The purpose of this protocol is to allow the Layer 2 and PPP endpoints to reside on different devices interconnected by a packet-switched network. With L2TP, a user has a Layer 2 connection to an access concentrator — LAC (e.g., modem bank, ADSL DSLAM, etc.), and the concentrator then tunnels individual PPP frames to the Network Access Server — NAS. This allows the actual processing of PPP packets to be separated from the termination of the Layer 2 circuit. From the user’s perspective, there is no functional difference between having the L2 circuit terminate in a NAS directly or using L2TP.
It may also be useful to use L2TP just as any other tunneling protocol with or without encryption. The L2TP standard says that the most secure way to encrypt data is using L2TP over IPsec (Note that it is default mode for Microsoft L2TP client) as all L2TP control and data packets for a particular tunnel appear as homogeneous UDP/IP data packets to the IPsec system.
Multilink PPP (MP) is supported in order to provide MRRU (the ability to transmit full-sized 1500 and larger packets) and bridging over PPP links (using Bridge Control Protocol (BCP) that allows to send raw Ethernet frames over PPP links). This way it is possible to setup bridging without EoIP. The bridge should either have an administratively set MAC address or an Ethernet-like interface in it, as PPP links do not have MAC addresses.
L2TP includes PPP authentication and accounting for each L2TP connection. Full authentication and accounting of each connection may be done through a RADIUS client or locally.
MPPE 128bit RC4 encryption is supported.
L2TP traffic uses UDP protocol for both control and data packets. UDP port 1701 is used only for link establishment, further traffic is using any available UDP port (which may or may not be 1701). This means that L2TP can be used with most firewalls and routers (even with NAT) by enabling UDP traffic to be routed through the firewall or router.
L2TP Client
Sub-menu: /interface l2tp-client
Properties
| Property | Description |
|---|---|
| add-default-route (yes | no; Default: no) | Whether to add L2TP remote address as a default route. |
| allow (mschap2 | mschap1 | chap | pap; Default: mschap2, mschap1, chap, pap) | Allowed authentication methods. |
| connect-to (IP; Default: ) | Remote address of L2TP server |
| comment (string; Default: ) | Short description of the tunnel. |
| default-route-distance (byte; Default: ) | Since v6.2, sets distance value applied to auto created default route, if add-default-route is also selected |
| dial-on-demand (yes | no; Default: no) | connects only when outbound traffic is generated. If selected, then route with gateway address from 10.112.112.0/24 network will be added while connection is not established. |
| disabled (yes | no; Default: yes) | Enables/disables tunnel. |
| keepalive-timeout (integer [1..4294967295]; Default: 60s) | Since v6.0rc13, tunnel keepalive timeout in seconds. |
| max-mru (integer; Default: 1460) | Maximum Receive Unit. Max packet size that L2TP interface will be able to receive without packet fragmentation. |
| max-mtu (integer; Default: 1460) | Maximum Transmission Unit. Max packet size that L2TP interface will be able to send without packet fragmentation. |
| mrru (disabled | integer; Default: disabled) | Maximum packet size that can be received on the link. If a packet is bigger than tunnel MTU, it will be split into multiple packets, allowing full size IP or Ethernet packets to be sent over the tunnel. Read more >> |
| name (string; Default: ) | Descriptive name of the interface. |
| password (string; Default: «») | Password used for authentication. |
| profile (name; Default: default-encryption) | Used PPP profile. |
| user (string; Default: ) | User name used for authentication. |
| use-ipsec (yes | no; Default: no) | When this option is enabled, dynamic IPSec peer configuration and policy is added to encapsulate L2TP connection into IPSec tunnel. |
| ipsec-secret (string; Default: ) | Preshared key used when use-ipsec is enabled. |
Quick example
This example demonstrates how to set up L2TP client with username «l2tp-hm», password «123» and server 10.1.101.100
[admin@dzeltenais_burkaans] /interface l2tp-client>add name=l2tp-hm user=l2tp-hm password=123 \
\... connect-to=10.1.101.100 disabled=no
[admin@dzeltenais_burkaans] /interface l2tp-client> print detail
Flags: X - disabled, R - running
 0    name="l2tp-hm" max-mtu=1460 max-mru=1460 mrru=disabled
      connect-to=10.1.101.100 user="l2tp-hm" password="123"
      profile=default-encryption add-default-route=no dial-on-demand=no
      allow=pap,chap,mschap1,mschap2
L2TP Server
Sub-menu: /interface l2tp-server
This sub-menu shows interfaces for each connected L2TP clients.
An interface is created for each tunnel established to the given server. There are two types of interfaces in L2TP server’s configuration
- Static interfaces are added administratively if there is a need to reference the particular interface name (in firewall rules or elsewhere) created for the particular user.
- Dynamic interfaces are added to this list automatically whenever a user is connected and its username does not match any existing static entry (or in case the entry is active already, as there can not be two separate tunnel interfaces referenced by the same name).
Dynamic interfaces appear when a user connects and disappear once the user disconnects, so it is impossible to reference the tunnel created for that use in router configuration (for example, in firewall), so if you need persistent rules for that user, create a static entry for him/her. Otherwise it is safe to use dynamic configuration.
![]()
Note: in both cases PPP users must be configured properly — static entries do not replace PPP configuration.
Server configuration
Sub-menu: /interface l2tp-server server
Properties
| Property | Description |
|---|---|
| authentication (pap | chap | mschap1 | mschap2; Default: mschap1,mschap2) | Authentication methods that server will accept. |
| default-profile (name; Default: default-encryption) | default profile to use |
| enabled (yes | no; Default: no) | Defines whether L2TP server is enabled or not. |
| max-mru (integer; Default: 1450) | Maximum Receive Unit. Max packet size that L2TP interface will be able to receive without packet fragmentation. |
| keepalive-timeout (integer; Default: 30) | If server during keepalive-timeout period does not receive any packets, it will send keepalive packets every second, five times. If the server still does not receive any response from the client, then the client will be disconnected after 5 seconds. Logs will show 5x «LCP missed echo reply» messages and then disconnect. Available starting from v5.22 and v6rc3. |
| max-mtu (integer; Default: 1450) | Maximum Transmission Unit. Max packet size that L2TP interface will be able to send without packet fragmentation. |
| use-ipsec (no | yes | require; Default: no) | When this option is enabled, dynamic IPSec peer configuration is added to suite most of the L2TP road-warrior setups. When require is selected server will accept only those L2TP connection attempts that were encapsulated in the IPSec tunnel. |
| ipsec-secret (string; Default: ) | Preshared key used when use-ipsec is enabled |
| mrru (disabled | integer; Default: disabled) | Maximum packet size that can be received on the link. If a packet is bigger than tunnel MTU, it will be split into multiple packets, allowing full size IP or Ethernet packets to be sent over the tunnel. Read more >> |
To enable L2TP server:
[admin@MikroTik] interface l2tp-server server> set enabled=yes
[admin@MikroTik] interface l2tp-server server> print
          enabled: yes
          max-mtu: 1450
          max-mru: 1450
             mrru: disabled
   authentication: pap,chap,mschap1,mschap2
  default-profile: default-encryption
[admin@MikroTik] interface l2tp-server server>
Monitoring
Monitor command can be used to monitor status of the tunnel on both client and server.
[admin@dzeltenais_burkaans] /interface l2tp-client> monitor 0
     status: "connected"
     uptime: 7h24m18s
  idle-time: 6h21m4s
   encoding: "MPPE128 stateless"
        mtu: 1450
        mru: 1450
Read-only properties
| Property | Description |
|---|---|
| status () | Current L2TP status. Value other than «connected» indicates that there are some problems establishing tunnel.
|
| uptime (time) | Elapsed time since tunnel was established. |
| idle-time (time) | Elapsed time since last activity on the tunnel. |
| encoding () | Used encryption method |
| local-address (IP Address) | IP Address of local interface |
| remote-address (IP Address) | IP Address of remote interface |
| mru (integer) | Negotiated and used MRU |
Application Examples
Connecting Remote Client
The following example shows how to connect a computer to a remote office network over L2TP encrypted tunnel giving that computer an IP address from the same network as the remote office has (without any need of bridging over EoIP tunnels)
Consider following setup:
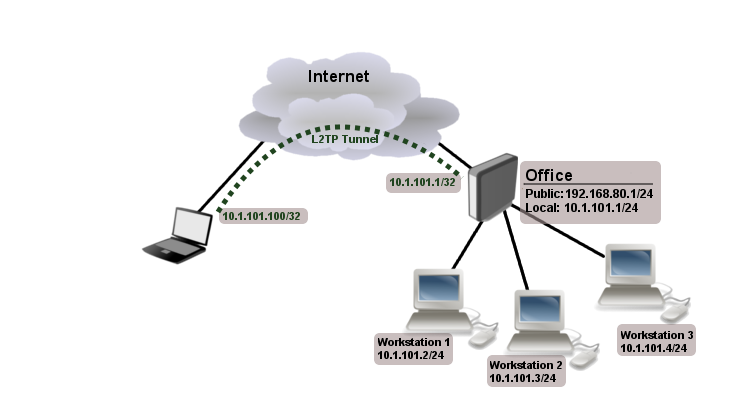
Office router is connected to internet through ether1. Workstations are connected to ether2.
Laptop is connected to the internet and can reach Office router’s public IP (in our example it is 192.168.80.1).
First step is to create a user
[admin@RemoteOffice] /ppp secret> add name=Laptop service=l2tp password=123
local-address=10.1.101.1 remote-address=10.1.101.100
[admin@RemoteOffice] /ppp secret> print detail
Flags: X - disabled
  0   name="Laptop" service=l2tp caller-id="" password="123" profile=default
      local-address=10.1.101.1 remote-address=10.1.101.100

[admin@RemoteOffice] /ppp secret>
Notice that L2TP local address is the same as routers address on local interface and remote address is from the same range as local network (10.1.101.0/24).
Next step is to enable L2TP server and L2TP client on the laptop.
[admin@RemoteOffice] /interface l2tp-server server> set enabled=yes
[admin@RemoteOffice] /interface l2tp-server server> print
            enabled: yes
            max-mtu: 1460
            max-mru: 1460
               mrru: disabled
     authentication: mschap2
    default-profile: default-encryption
[admin@RemoteOffice] /interface l2tp-server server>
L2TP client from the laptop should connect to routers public IP which in our example is 192.168.80.1.
Please, consult the respective manual on how to set up a L2TP client with the software you are using.
![]()
Note: By default Windows sets up L2TP with IPsec. To disable IpSec, registry modifications are required. Read more >>
At this point (when L2TP client is successfully connected) if you will try to ping any workstation from the laptop, ping will time out, because Laptop is unable to get ARPs from workstations. Solution is to set up proxy-arp on local interface
[admin@RemoteOffice] interface ethernet> set ether2 arp=proxy-arp
[admin@RemoteOffice] interface ethernet> print
Flags: X - disabled, R - running
  #    NAME                 MTU   MAC-ADDRESS         ARP
  0  R ether1              1500  00:30:4F:0B:7B:C1 enabled
  1  R ether2              1500  00:30:4F:06:62:12 proxy-arp
[admin@RemoteOffice] interface ethernet>
After proxy-arp is enabled client can now successfully reach all workstations in local network behind the router.
Site-to-Site L2TP
The following is an example of connecting two Intranets using a L2TP tunnel over the Internet.
Consider following setup:
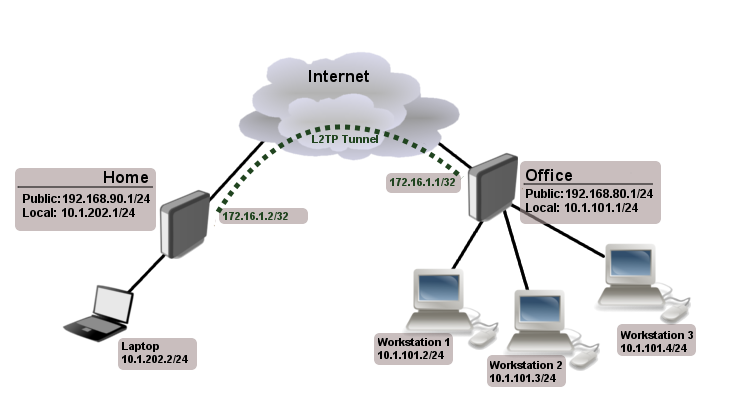
Office and Home routers are connected to internet through ether1, workstations and laptops are connected to ether2.
Both local networks are routed through L2TP client, thus they are not in the same broadcast domain. If both networks should be in the same broadcast domain then you need to use BCP and bridge L2TP tunnel with local interface.
First step is to create a user
[admin@RemoteOffice] /ppp secret> add name=Home service=l2tp password=123
local-address=172.16.1.1 remote-address=172.16.1.2 routes="10.1.202.0/24 172.16.1.2 1"
[admin@RemoteOffice] ppp secret> print detail
Flags: X - disabled
  0   name="Home" service=l2tp caller-id="" password="123" profile=default
      local-address=172.16.1.1 remote-address=172.16.1.2 routes="10.1.202.0/24 172.16.1.2 1"

[admin@RemoteOffice] /ppp secret>
Notice that we set up L2TP to add route whenever client connects. If this option is not set, then you will need static routing configuration on the server to route traffic between sites through L2TP tunnel.
Next step is to enable L2TP server on the office router and configure L2TP client on the Home router.
[admin@RemoteOffice] /interface l2tp-server server> set enabled=yes
[admin@RemoteOffice] /interface l2tp-server server> print
            enabled: yes
            max-mtu: 1460
            max-mru: 1460
               mrru: disabled
     authentication: mschap2
    default-profile: default-encryption
[admin@RemoteOffice] /interface l2tp-server server>
[admin@Home] /interface l2tp-client> add user=Home password=123 connect-to=192.168.80.1 disabled=no
[admin@Home] /interface l2tp-client> print
Flags: X - disabled, R - running
 0 R  name="l2tp-out1" max-mtu=1460 max-mru=1460 mrru=disabled connect-to=192.168.80.1 user="Home"
       password="123" profile=default-encryption add-default-route=no dial-on-demand=no
       allow=pap,chap,mschap1,mschap2
[admin@Home] /interface l2tp-client>
On home router if you wish traffic for the remote office to go over tunnel you will need to add a specific static route as follows:
[admin@Home] /ip route> add dst-address=10.1.101.0/24 gateway=l2tp-out1
After tunnel is established and routes are set, you should be able to ping remote network.
Basic L2TP/IpSec setup
This example demonstrates how to easily setup L2TP/IpSec server on Mikrotik router (with installed 6.16 or newer version) for road warrior connections (works with Windows, Android And iPhones).
First step is to enable L2TP server:
/interface l2tp-server server
set enabled=yes use-ipsec=required ipsec-secret=mySecret default-profile=default
required is set to make sure that only IPSec encapsulated L2TP connections will be accepted.
Now what it does is enables L2TP server and creates dynamic ipsec peer iwth specified secret
[admin@MikroTik] /ip ipsec peer> print
 0  D address=0.0.0.0/0 local-address=0.0.0.0 passive=yes port=500
      auth-method=pre-shared-key secret="123" generate-policy=port-strict
      exchange-mode=main-l2tp send-initial-contact=yes nat-traversal=yes
      hash-algorithm=sha1 enc-algorithm=3des,aes-128,aes-192,aes-256
      dh-group=modp1024 lifetime=1d dpd-interval=2m dpd-maximum-failures=5
![]()
Note: Care must be taken if static ipsec peer configuration exists.
Next step is to create VPN pool and add some users.
/ip pool add name=vpn-pool range=192.168.99.2-192.168.99.100

/ppp profile
set default local-address=192.168.99.1 remote-address=vpn-pool

/ppp secret
add name=user1 password=123
add name=user2 password=234
If there are strict firewall policies, do not forget to add rules which accepts l2tp and ipsec.
/ip firewall filter
add chain=input protocol=udp port=1701,500,4500
add chain=input protocol=ipsec-esp
Now router is ready to accept L2TP/IpSec client connections.
L2TP/IpSec with static IPSec server setup
Ipsec/L2TP behind NAT
Consider setup as illustrated below
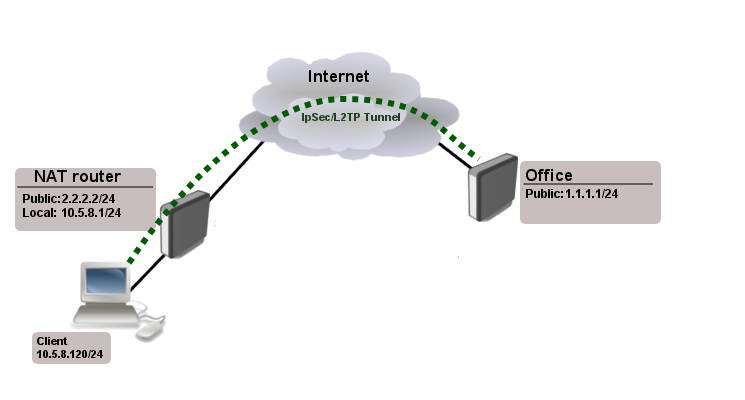
Client needs secure connection to the office with public address 1.1.1.1, but server does not know what will be the source address from which client connects. It is so called road-warrior setup.
Our client will also be located behind the router with enabled NAT.
For the setup RouterOS router will be used as the client device behind NAT (it can be any device: Windows PC, Smartphone, Linux PC, etc.)
IP Connectivity
On the server:
/ip address
add address=1.1.1.1/24 interface=ether1

/ip route
add gateway=1.1.1.2
On the clients router:
/ip address
add address=2.2.2.2/24 interface=ether1
add address=10.5.8.0/24 interface=ether2

/ip route
add gateway=2.2.2.1

/ip firewall nat
add chain=srcnat action=masquerade out-interface=ether1
On the client:
/ip address
add address=10.5.8.120/24 interface=ether1
L2TP Config
On the server:
/interface l2tp-server server
set enabled=yes profil=default

/ip pool
add name=l2tp-pool ranges=192.168.1.2-192.168.1.20

/ppp profile
set default local-address=192.168.1.1 remote-address=l2tp-pool

/ppp secret
add name=l2tp-test password=test123456
On the client:
/interface l2tp-client
add connect-to=1.1.1.1 disabled=no name=l2tp-out1 password=password user=l2tp-test
IpSec Config
On server side:
/ip ipsec proposal
set [ find default=yes ] enc-algorithms=3des,aes-128,aes-192,aes-256
/ip ipsec peer
add generate-policy=yes hash-algorithm=sha1 nat-traversal=yes secret=test123456
RouterOS as client:
/ip ipsec proposal
set [ find default=yes ] enc-algorithms=aes-128
/ip ipsec peer
add address=1.1.1.1/32 hash-algorithm=sha1 nat-traversal=yes secret=test123456

/ip ipsec policy
add dst-address=1.1.1.1/32 protocol=udp sa-dst-address=1.1.1.1 \
      sa-src-address=10.5.8.120 src-address=10.5.8.120/32
Notice that nat-traversal is enabled. This option is required because Ipsec connection will be established through the NAT router otherwise Ipsec will not be able to establish phase2.
![]()
Warning: Only one L2TP/IpSec connection can be established through the NAT. Which means that only one client can connect to the sever located behind the same router.
Apple iOS (iPhone/iPad) Client
You must choose L2TP as VPN type in iOS to connect to the IPsec/L2TP server on RouterOS (this includes the default IPsec server created by QuickSet VPN checkbox).
Read More
- BCP (Bridge Control Protocol)
- MikroTik RouterOS and Windows XP IPSec/L2TP
[ Top | Back to Content ]
Всем привет. Сегодня мы поговорим про протокол L2TP: как он работает, его преимущества, недостатки, а также как его настроить бесплатно. Layer 2 Tunneling Protocol (Протокол туннелирования второго уровня) – работает на канальном уровне и по сути объединяет в себе два известных протокола: L2F и PPTP.
Используется для создания VPN в глобальной сети интернет. Но так как не имеет должного уровня шифрования и аутентификации – не используется самостоятельно. Имеет свои плюсы и минусы по сравнению с другими конкурентами: PPTP, OpenVPN и SSTP. Теперь поподробнее.
Про бесплатную настройку всех известных VPN – смотрим варианты тут.
Содержание
- Более подробно
- Сравнение с PPTP
- Сравнение с OpenVPN
- SSTP
- Задать вопрос автору статьи
Более подробно
Проблема данного протокола в том, что он не обеспечивает должной конфиденциальности информации, поэтому его редко когда используют в «соло». Обычно для шифрования пакетов данных вместе с L2TP соединением используют IPsec – поэтому чаще всего можно увидеть приставку: L2TP/IPsec.
IPsec шифрует данные в два захода по AES алгоритму шифрования, что делает связку L2TP/IPsec очень надежным туннелем в VPN мире, но из-за этого он медленнее чем те же Open VPN и SSTP. Ещё проблема в том, что данная технология использует пятисотый UDP-порт, который часто блокируется файрволлами.
Плюс данной технологии в том, что она очень просто настраивается и интегрирована почти во все операционные системы, начиная с Windows и заканчивая мобильными iOS и Android. Не нужно устанавливать какие-то дополнительные программные обеспечения. Да и настройки достаточно простые.
Если говорить строго про L2TP, то данный протокол выполняет две функции:
- Создание тоннеля, по которому можно передавать данные.
- Упаковка PPP пакетов данных, с помощью которых можно передавать по туннелю всю информацию.
Но мы помним, что основной протокол при этом UDP – если даже пакет не дойдет до адресата, он не будет отправлен повторно.
- Клиент L2TP легко настраивается на любом устройстве, так как не требует установки каких-то дополнительных программ.
- Есть во всех ОС.
- За счет двухступенчатой инкапсуляции пакетов – максимально безопасный.
- Работает медленно.
- Файерволл маршрутизатора может блокировать данный туннель, поэтому нужна дополнительная настройка по открытию 500-порта UDP.
Сравнение с PPTP
PPTP (протокол туннелирования точка-точка) – стандартный протокол в построении VPN сетей. Так как использует 128-битное шифрование гораздо быстрее чем L2TP/IPsec. В далекие 1999 годы из-за уязвимости аутентификации MS-CHAP v.2 была взломана. Поэтому считается менее надежным вариантом. С другой стороны, она также легко настраивается, интегрирована во всех ОС и повсеместно используется во многих компаниях.
- Есть во всех ОС.
- Прост в конфигурации.
- Быстрая работа за счет простых алгоритмов шифрования
- Считается ненадежным из-за уязвимостей в алгоритмах аутентификации.
Сравнение с OpenVPN
Новый протокол, который используется не так давно как конкуренты. В работе использует библиотеки OpenSSL и протоколы SSLv3/TLSv1. Самым главным плюсом является то, что данный протокол настраивается с различных сторон. Можно даже переназначить используемый порт и протокол. Можно даже использовать TCP туннелирование.
Также из-за используемой библиотеки OpenSSL есть огромное множество возможностей использовать различные типы шифрования от AES до Camelia. И работает он в разы быстрее чем IPsec.
Самая главная проблема вытекает из главного преимущества – сложность настроек. Плюс OpenVPN не интегрирован в системы, поэтому нужно устанавливать дополнительное программное обеспечение. Мало того, после установки программы для подключения и работы нужно произвести хирургическую конфигурацию для обеспечения надежной работы. Именно поэтому обычно в работе как раз и используются конфигурационные файлы.
- Быстрый.
- Надежный и безопасный.
- Имеет огромное множество настроек.
- Очень гибкий при работе с NAT.
- Имеет много алгоритмов шифрования за счет встроенной библиотеки OpenSSL.
- Сложный в настройках – поэтому используются файлы с уже предустановленными конфигурациями.
- Необходима установка программного обеспечения.
SSTP
Протокол, который изначально был интегрирован в Windows компанией Microsoft. Имеет отличную библиотеку шифрования с используемым протоколом SSL третьей версии. Так же как и OpenVPN имеет гибкие настройки. Интегрирован во все современные системы «Окон».
- Безопасность.
- Интеграция в ОС Linux и Windows.
- Достаточно быстрый в использовании.
- Не поддерживается продукцией Apple.
Сегодня подключения к интернету по локальной или виртуальной сети на основе беспроводных технологий стали очень популярными и среди обычных пользователей, и среди корпоративных клиентов. Неудивительно, ведь при установке такого защищенного соединения обеспечивается наилучшая защита передаваемых и принимаемых данных, а проще говоря, исходящего и входящего трафика. Одним из самых распространенных типов можно назвать использование протокола L2TP-соединения. Что это такое и как настроить соединение на его основе самостоятельно, далее и предлагается разобраться. Принципиально ничего такого, что бы отличалось от создания обычного подключения на основе беспроводных технологий, тут нет, однако многие специалисты советуют соблюсти несколько условий и принять к сведению некоторые рекомендации, чтобы избежать типичных ошибок.
L2TP-соединение: что это?
Для начала рассмотрим, что собой представляет данный тип подключения к интернету или по сети с использованием именно такого типа доступа. На самом деле протокол L2TP является одной из разновидностей установки доступа в интернет на основе VPN с применением так называемого туннелирования.
При подключении компьютеров к интернету таким способом обеспечивается максимально возможная конфиденциальность. И достигается это не только потому, что доступ к туннелю блокируется, но и потому, что все данные на входе и на выходе шифруются. Плюс ко всему – наличие проверочных ключей с обеих сторон. Иными словами, не зная автоматически генерируемых ключей, украсть или просмотреть информацию никто не может. К тому же, как уже понятно, она находится в зашифрованном виде.
Обязательные условия для работы подключения
Но это были всего лишь краткие теоретические сведения, так сказать, для общего развития. Теперь перейдем к практическим действиям и рассмотрим использование L2TP-соединения. Что это за технология, думается, немного понятно, так что основные действия по созданию такого подключения от стандартной настройки VPN практически ничем отличаться не будут.
Однако перед тем, как заниматься подобными действиями, обратите внимание на несколько обязательных пунктов, без соблюдения которых создаваемое подключение не то что работать не будет, его даже создать не получится. Основные критерии таковы:
- операционная система не ниже Windows Vista (рекомендуется), хотя в XP настройка тоже возможна;
- наличие адреса корпоративного сервера, к которому предполагается произвести подключение;
- наличие логина и пароля для входа в сеть.
Начальный этап создания соединения
Итак, сначала необходимо войти в «Центр управления сетями и общим доступом» (вызвать данный раздел можно либо из стандартной «Панели управления», либо через меню ПКМ на значке сети в системном трее (слева от часов и даты).
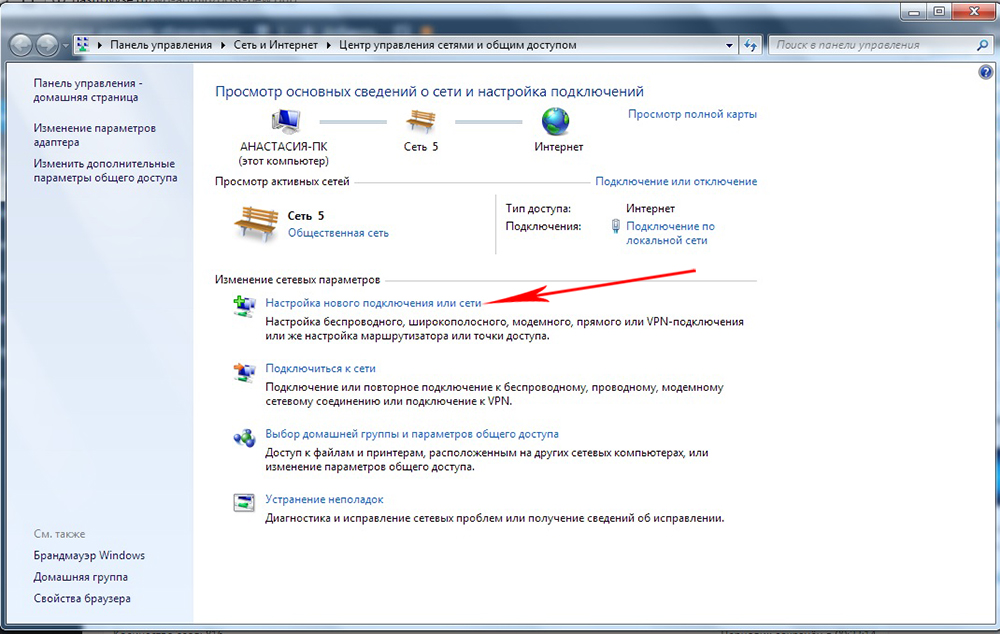
Здесь необходимо использовать гиперссылку создания нового сетевого подключения и выбрать подключение к рабочему месту. Далее будет предложено использовать либо имеющееся подключение через VPN, либо прямой набор номера.
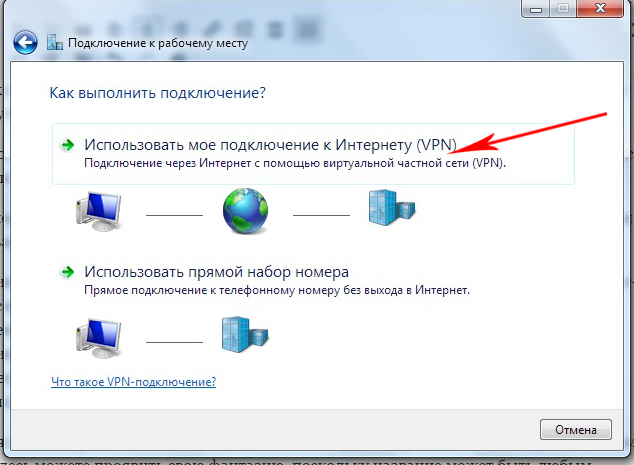
Выбирайте первый, поскольку использование второго имеет смысл только в том случае, если связь осуществляется через оператора мобильной связи с использованием модема.
Далее вопрос о том, как настроить L2TP-соединение, предполагает выбор отложенного подключения, а не немедленной установки связи (такое действие рекомендовано, но обязательным не является, и единого решения по этому поводу нет).
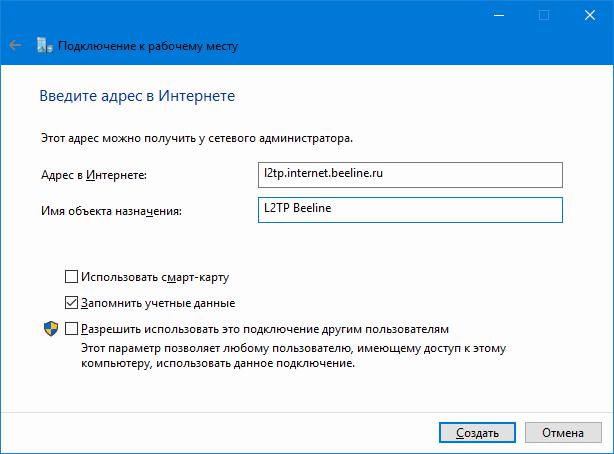
На следующем этапе будьте особо внимательны, поскольку точность ввода адреса сервера здесь играет первостепенную роль. Вписываете адрес, вводите произвольное название нового соединения (тип местоназначения), после чего в чекбоксе ставите флажок на запоминание введенных данных (это избавит вас от постоянного ввода информации при последующих входах). Далее просто нажимаете кнопку создания подключения, после чего оно появится в разделе сетевых настроек и в системном трее.
Настройка L2TP-соединения: установка типа VPN
Теперь самое главное. Новое подключение вроде бы и создано, но без дополнительных настроек работать оно может некорректно.
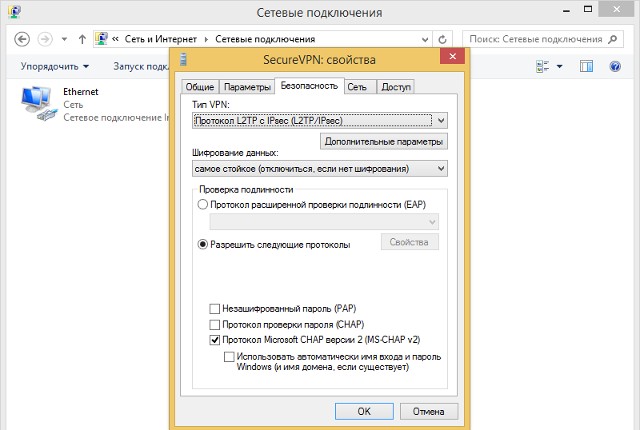
Используйте свойства соединения через меню ПКМ, а затем на вкладке безопасности для типа соединения L2TP выберите одноименный протокол с IPsec (уровень защиты). Это тоже обязательный параметр. Все остальные настройки, предлагаемые к использованию по умолчанию, в принципе, можно оставить без изменений.
Иногда на некоторых нестандартных моделях маршрутизаторов нужно будет в параметрах веб-интерфейса указать тип соединения PPTP L2TP, однако при использовании обычных роутеров и ADSL-модемов такие действия не требуются.
Возможные ошибки и сбои
Что же касается появления ошибок и сбоев при установке подключения к интернету через созданное соединение, тут проблем может быть сколько угодно. Самая главная состоит в обычной невнимательности пользователя, который просто неправильно вписал адрес сервера или ввел недействительные логин и пароль.
Второй момент, на который следует обратить внимание, — свойства протокола IPv4. В его параметрах и настройках в обязательном порядке должно быть указано автоматическое получение всех адресов, включая и IP, и DNS. Кроме того, для локальных адресов должно быть отключено использование прокси. Имейте в виду, что со статическими IP беспроводные технологии работать не хотят. Единственный вариант – подключение нескольких терминалов, объединенных в локальную или виртуальную сеть через один L2TP-сервер (в этом случае логины и пароли присваиваются каждой машине).
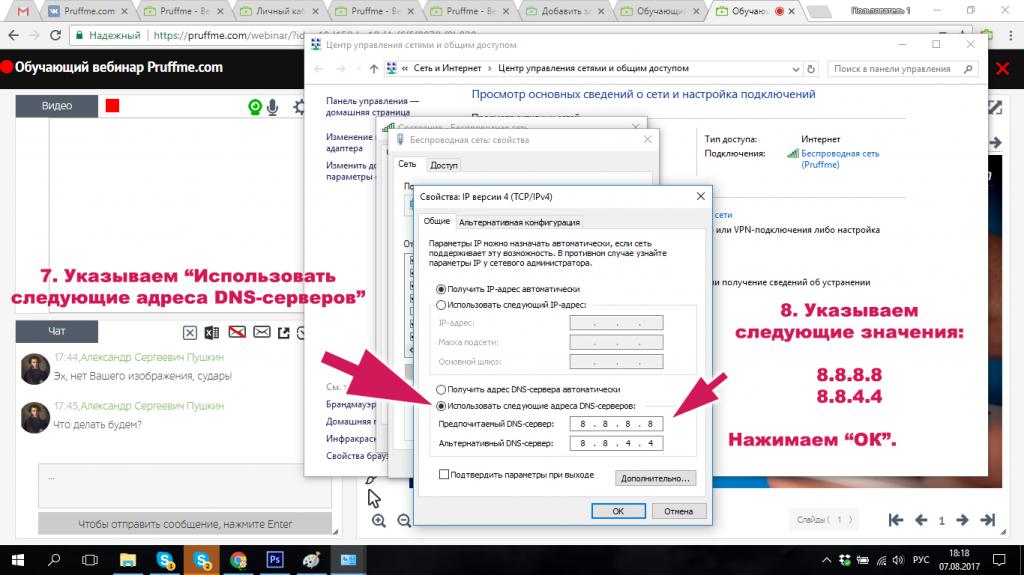
Наконец, если и при такой постановке вопроса возникают ошибки, попробуйте использовать бесплатные DNS-адреса для предпочитаемого и альтернативного сервера, предоставляемые, например, Google (сочетания четверок и восьмерок).
Вместо послесловия
Вот, собственно, и все, что касается L2TP-соединения. Что это за технология и как установить соответствующее подключение, думается, уже понятно. Если внимательно посмотреть на практические действия, все они представляют собой стандартную процедуру создания VPN-подключения. Разница состоит только в том, что обязательно нужно указать адрес соответствующего сервера и выбрать протокол с предпочитаемым уровнем защиты. Настройки маршрутизаторов в данном материале не рассматривались принципиально, поскольку в большинстве случаев можно обойтись и без их изменения.
From Wikipedia, the free encyclopedia
In computer networking, Layer 2 Tunneling Protocol (L2TP) is a tunneling protocol used to support virtual private networks (VPNs) or as part of the delivery of services by ISPs. It uses encryption (‘hiding’) only for its own control messages (using an optional pre-shared secret), and does not provide any encryption or confidentiality of content by itself. Rather, it provides a tunnel for Layer 2 (which may be encrypted), and the tunnel itself may be passed over a Layer 3 encryption protocol such as IPsec.[1]
History[edit]
Published in August 1999 as proposed standard RFC 2661, L2TP has its origins primarily in two older tunneling protocols for point-to-point communication: Cisco’s Layer 2 Forwarding Protocol (L2F) and Microsoft’s[2]
Point-to-Point Tunneling Protocol (PPTP). A new version of this protocol, L2TPv3, appeared as proposed standard RFC 3931 in 2005. L2TPv3 provides additional security features, improved encapsulation, and the ability to carry data links other than simply Point-to-Point Protocol (PPP) over an IP network (for example: Frame Relay, Ethernet, ATM, etc.).
Description[edit]
The entire L2TP packet, including payload and L2TP header, is sent within a User Datagram Protocol (UDP) datagram. A virtue of transmission over UDP (rather than TCP) is that it avoids the «TCP meltdown problem».[3][4] It is common to carry PPP sessions within an L2TP tunnel. L2TP does not provide confidentiality or strong authentication by itself. IPsec is often used to secure L2TP packets by providing confidentiality, authentication and integrity. The combination of these two protocols is generally known as L2TP/IPsec (discussed below).
The two endpoints of an L2TP tunnel are called the L2TP access concentrator (LAC) and the L2TP network server (LNS). The LNS waits for new tunnels. Once a tunnel is established, the network traffic between the peers is bidirectional. To be useful for networking, higher-level protocols are then run through the L2TP tunnel. To facilitate this, an L2TP session is established within the tunnel for each higher-level protocol such as PPP. Either the LAC or LNS may initiate sessions. The traffic for each session is isolated by L2TP, so it is possible to set up multiple virtual networks across a single tunnel.
The packets exchanged within an L2TP tunnel are categorized as either control packets or data packets. L2TP provides reliability features for the control packets, but no reliability for data packets. Reliability, if desired, must be provided by the nested protocols running within each session of the L2TP tunnel.
L2TP allows the creation of a virtual private dialup network (VPDN)[5] to connect a remote client to its corporate network by using a shared infrastructure, which could be the Internet or a service provider’s network.
Tunneling models[edit]
An L2TP tunnel can extend across an entire PPP session or only across one segment of a two-segment session. This can be represented by four different tunneling models, namely:
- voluntary tunnel
- compulsory tunnel — incoming call
- compulsory tunnel — remote dial
- L2TP multihop connection[6]
L2TP packet structure[edit]
An L2TP packet consists of :
| Bits 0–15 | Bits 16–31 |
|---|---|
| Flags and Version Info | Length (opt) |
| Tunnel ID | Session ID |
| Ns (opt) | Nr (opt) |
| Offset Size (opt) | Offset Pad (opt)…… |
| Payload data |
Field meanings:
- Flags and version
- control flags indicating data/control packet and presence of length, sequence, and offset fields.
- Length (optional)
- Total length of the message in bytes, present only when length flag is set.
- Tunnel ID
- Indicates the identifier for the control connection.
- Session ID
- Indicates the identifier for a session within a tunnel.
- Ns (optional)
- sequence number for this data or control message, beginning at zero and incrementing by one (modulo 216) for each message sent. Present only when sequence flag set.
- Nr (optional)
- sequence number for expected message to be received. Nr is set to the Ns of the last in-order message received plus one (modulo 216). In data messages, Nr is reserved and, if present (as indicated by the S bit), MUST be ignored upon receipt..
- Offset Size (optional)
- Specifies where payload data is located past the L2TP header. If the offset field is present, the L2TP header ends after the last byte of the offset padding. This field exists if the offset flag is set.
- Offset Pad (optional)
- Variable length, as specified by the offset size. Contents of this field are undefined.
- Payload data
- Variable length (Max payload size = Max size of UDP packet − size of L2TP header)
L2TP packet exchange[edit]
At the time of setup of L2TP connection, many control packets are exchanged between server and client to establish tunnel and session for each direction. One peer requests the other peer to assign a specific tunnel and session id through these control packets. Then using this tunnel and session id, data packets are exchanged with the compressed PPP frames as payload.
The list of L2TP Control messages exchanged between LAC and LNS, for handshaking before establishing a tunnel and session in voluntary tunneling method are

L2TP/IPsec[edit]
Because of the lack of confidentiality inherent in the L2TP protocol, it is often implemented along with IPsec. This is referred to as L2TP/IPsec, and is standardized in IETF RFC 3193. The process of setting up an L2TP/IPsec VPN is as follows:
- Negotiation of IPsec security association (SA), typically through Internet key exchange (IKE). This is carried out over UDP port 500, and commonly uses either a shared password (so-called «pre-shared keys»), public keys, or X.509 certificates on both ends, although other keying methods exist.
- Establishment of Encapsulating Security Payload (ESP) communication in transport mode. The IP protocol number for ESP is 50 (compare TCP’s 6 and UDP’s 17). At this point, a secure channel has been established, but no tunneling is taking place.
- Negotiation and establishment of L2TP tunnel between the SA endpoints. The actual negotiation of parameters takes place over the SA’s secure channel, within the IPsec encryption. L2TP uses UDP port 1701.
When the process is complete, L2TP packets between the endpoints are encapsulated by IPsec. Since the L2TP packet itself is wrapped and hidden within the IPsec packet, the original source and destination IP address is encrypted within the packet. Also, it is not necessary to open UDP port 1701 on firewalls between the endpoints, since the inner packets are not acted upon until after IPsec data has been decrypted and stripped, which only takes place at the endpoints.
A potential point of confusion in L2TP/IPsec is the use of the terms tunnel and secure channel. The term tunnel-mode refers to a channel which allows untouched packets of one network to be transported over another network. In the case of L2TP/PPP, it allows L2TP/PPP packets to be transported over IP. A secure channel refers to a connection within which the confidentiality of all data is guaranteed. In L2TP/IPsec, first IPsec provides a secure channel, then L2TP provides a tunnel. IPsec also specifies a tunnel protocol: this is not used when a L2TP tunnel is used.
Windows implementation[edit]
Windows has had native support (configurable in control panel) for L2TP since Windows 2000. Windows Vista added 2 alternative tools, an MMC snap-in called «Windows Firewall with Advanced Security» (WFwAS) and the «netsh advfirewall» command-line tool. One limitation with both of the WFwAS and netsh commands is that servers must be specified by IP address. Windows 10 added the «Add-VpnConnection» and «Set-VpnConnectionIPsecConfiguration» PowerShell commands. A registry key must be created on the client and server if the server is behind a NAT-T device. [1]
L2TP in ISPs’ networks[edit]
L2TP is often used by ISPs when internet service over for example ADSL or cable is being resold. From the end user, packets travel over a wholesale network service provider’s network to a server called a Broadband Remote Access Server (BRAS), a protocol converter and router combined. On legacy networks the path from end user customer premises’ equipment to the BRAS may be over an ATM network.
From there on, over an IP network, an L2TP tunnel runs from the BRAS (acting as LAC) to an LNS which is an edge router at the boundary of the ultimate destination ISP’s IP network.[a]
RFC references[edit]
- RFC 2341 Cisco Layer Two Forwarding (Protocol) «L2F» (a predecessor to L2TP)
- RFC 2637 Point-to-Point Tunneling Protocol (PPTP)
- RFC 2661 Layer Two Tunneling Protocol «L2TP»
- RFC 2809 Implementation of L2TP Compulsory Tunneling via RADIUS
- RFC 2888 Secure Remote Access with L2TP
- RFC 3070 Layer Two Tunneling Protocol (L2TP) over Frame Relay
- RFC 3145 L2TP Disconnect Cause Information
- RFC 3193 Securing L2TP using IPsec
- RFC 3301 Layer Two Tunneling Protocol (L2TP): ATM access network
- RFC 3308 Layer Two Tunneling Protocol (L2TP) Differentiated Services
- RFC 3355 Layer Two Tunneling Protocol (L2TP) Over ATM Adaptation Layer 5 (AAL5)
- RFC 3371 Layer Two Tunneling Protocol «L2TP» Management Information Base
- RFC 3437 Layer Two Tunneling Protocol Extensions for PPP Link Control Protocol Negotiation
- RFC 3438 Layer Two Tunneling Protocol (L2TP) Internet Assigned Numbers: Internet Assigned Numbers Authority (IANA) Considerations Update
- RFC 3573 Signaling of Modem-On-Hold status in Layer 2 Tunneling Protocol (L2TP)
- RFC 3817 Layer 2 Tunneling Protocol (L2TP) Active Discovery Relay for PPP over Ethernet (PPPoE)
- RFC 3931 Layer Two Tunneling Protocol — Version 3 (L2TPv3)
- RFC 4045 Extensions to Support Efficient Carrying of Multicast Traffic in Layer-2 Tunneling Protocol (L2TP)
- RFC 4951 Fail Over Extensions for Layer 2 Tunneling Protocol (L2TP) «failover»
See also[edit]
- IPsec
- Layer 2 Forwarding Protocol
- Point-to-Point Tunneling Protocol
- Point-to-Point Protocol
- Virtual Extensible LAN
References[edit]
- ^ See example of reseller ISPs using L2TP.
- ^ IETF (1999), RFC 2661, Layer Two Tunneling Protocol «L2TP»
- ^ «Point-to-Point Tunneling Protocol (PPTP)». TheNetworkEncyclopedia.com. 2013. Retrieved 2014-07-28.
Point-to-Point Tunneling Protocol (PPTP) [:] A data-link layer protocol for wide area networks (WANs) based on the Point-to-Point Protocol (PPP) and developed by Microsoft that enables network traffic to be encapsulated and routed over an unsecured public network such as the Internet.
[permanent dead link] - ^ Titz, Olaf (2001-04-23). «Why TCP Over TCP Is A Bad Idea». Retrieved 2015-10-17.
- ^ Honda, Osamu; Ohsaki, Hiroyuki; Imase, Makoto; Ishizuka, Mika; Murayama, Junichi (October 2005). «Understanding TCP over TCP: effects of TCP tunneling on end-to-end throughput and latency». In Atiquzzaman, Mohammed; Balandin, Sergey I (eds.). Performance, Quality of Service, and Control of Next-Generation Communication and Sensor Networks III. Vol. 6011. Bibcode:2005SPIE.6011..138H. CiteSeerX 10.1.1.78.5815. doi:10.1117/12.630496. S2CID 8945952.
- ^ Cisco Support: Understanding VPDN – Updated Jan 29, 2008
- ^ IBM Knowledge Center: L2TP multi-hop connection
External links[edit]
Implementations[edit]
- Cisco: Cisco L2TP documentation, also read Technology brief from Cisco
- Open source and Linux: xl2tpd, Linux RP-L2TP, OpenL2TP, l2tpns, l2tpd (inactive), Linux L2TP/IPsec server, FreeBSD multi-link PPP daemon, OpenBSD npppd(8), ACCEL-PPP — PPTP/L2TP/PPPoE server for Linux
- Microsoft: built-in client included with Windows 2000 and higher; Microsoft L2TP/IPsec VPN Client for Windows 98/Windows Me/Windows NT 4.0
- Apple: built-in client included with Mac OS X 10.3 and higher.
- VPDN on Cisco.com
Other[edit]
- IANA assigned numbers for L2TP
- L2TP Extensions Working Group (l2tpext) — (where future standardization work is being coordinated)
- Using Linux as an L2TP/IPsec VPN client
- L2TP/IPSec with OpenBSD and npppd
- Comparison of L2TP, PPTP and OpenVPN
L2TP (Layer 2 Tunneling Protocol) — это протокол, который используется для создания виртуальной частной сети (VPN), позволяющей обеспечить безопасное и зашифрованное соединение между клиентом и сервером. Он предоставляет возможность передачи данных через публичную сеть, сохраняя их конфиденциальность.
Особенностью L2TP является то, что он работает на уровне канала передачи данных (Data Link Layer) модели OSI, позволяя создавать «туннель» между двумя конечными точками. В этом туннеле данные передаются внутри специальных пакетов, которые затем передаются по публичной сети безопасным образом. Такое соединение обеспечивает высокую степень безопасности и конфиденциальности передаваемых данных.
Преимущества L2TP соединения на роутере:
1. Безопасность данных. Протокол L2TP использует сильное шифрование для защиты данных, передаваемых по соединению. Это позволяет предотвратить несанкционированный доступ к информации и обеспечить сохранность данных.
2. Гибкость и совместимость. L2TP является широко распространенным протоколом и поддерживается большинством операционных систем. Это означает, что вы можете использовать L2TP на разных устройствах и платформах, а также настроить его на большинстве современных роутеров.
3. Удобство использования. Настройка L2TP соединения на роутере не требует специальных навыков или знаний. Это простой и практически автоматический процесс, который может быть выполнен даже начинающими пользователями.
4. Расширенные возможности. L2TP предлагает дополнительные функции, такие как возможность передачи голоса и видео в реальном времени, а также поддержку IPv6.
В целом, L2TP соединение на роутере представляет собой надежное и удобное средство для обеспечения безопасности вашей сети и передаваемых данных.
Содержание
- Что такое L2TP соединение на роутере?
- Определение L2TP соединения
- Особенности L2TP соединения
- Преимущества L2TP соединения
- Как настроить L2TP соединение на роутере?
- Ключевые моменты использования L2TP соединения
Что такое L2TP соединение на роутере?
Основная особенность L2TP заключается в том, что он сочетает в себе протоколы L2F (Layer 2 Forwarding) и PPTP (Point-to-Point Tunneling Protocol), что позволяет обеспечить более надежное и безопасное соединение.
Одним из преимуществ L2TP соединения на роутере является возможность создания шифрованного туннеля между удаленными сетями или компьютерами, что позволяет передавать данные через открытую сеть без риска несанкционированного доступа или перехвата информации.
Другим преимуществом L2TP соединения на роутере является его совместимость с различными типами устройств и операционных систем, включая Windows, macOS, iOS, Android и другие. Это делает L2TP популярным выбором для создания VPN-соединений, которые позволяют обеспечить безопасную связь между удаленными компьютерами или сетями.
В заключение, L2TP соединение на роутере является мощным инструментом для создания защищенных и надежных VPN-соединений. Он обеспечивает шифрование данных и совместим с большинством устройств и операционных систем. L2TP протокол обеспечивает устойчивую передачу данных через общую сеть, обеспечивая безопасность и конфиденциальность ваших соединений.
Определение L2TP соединения
В L2TP соединении используются два компонента: L2TP Access Concentrator (LAC) и L2TP Network Server (LNS). LAC выполняет инициализацию и аутентификацию клиента, а LNS является сервером, который принимает подключения от клиентов и устанавливает туннель. L2TP работает на уровне канала передачи данных (Data Link Layer) в модели OSI.
Основные принципы работы L2TP состоят в том, что данные, отправляемые от клиента к серверу, маркируются и упаковываются в пакеты L2TP и затем передаются внутри IP-пакета. Таким образом, L2TP позволяет использовать маршрутизацию и защиту, предоставляемую IP-протоколом, для передачи данных через общедоступные сети.
L2TP поддерживает различные методы аутентификации и шифрования данных, включая использование протоколов PAP (Password Authentication Protocol) и CHAP (Challenge-Handshake Authentication Protocol) для аутентификации клиента и протокола IPSec (IP Security) для шифрования данных внутри туннеля.
L2TP широко применяется в сетях корпоративного класса, где требуется безопасное и надежное удаленное подключение к корпоративным ресурсам. Он также может использоваться для создания виртуальных локальных сетей (VLAN), объединяющих удаленные места работы или филиалы компании в единую сеть.
Особенности L2TP соединения
Основные особенности L2TP соединения:
- Безопасность: L2TP шифрует данные, передаваемые между устройствами, обеспечивая высокий уровень защиты от несанкционированного доступа.
- Гибкость: L2TP позволяет использовать различные протоколы для передачи данных, включая IP, Ethernet и Frame Relay.
- Совместимость: L2TP работает с множеством сетевых устройств, включая роутеры, коммутаторы и серверы VPN.
- Масштабируемость: L2TP поддерживает подключение большого числа клиентов к одному серверу VPN, что позволяет организовывать удаленный доступ для сотрудников.
- Прозрачность: L2TP абстрагирует сетевые протоколы от конечных устройств, что позволяет клиентам использовать разные сетевые технологии без взаимодействия с протоколом L2TP.
Важно отметить, что L2TP является частью стека протоколов IPsec, который обеспечивает дополнительные механизмы безопасности и аутентификации данных.
В целом, L2TP соединение предоставляет надежное и защищенное средство для создания виртуальной частной сети (VPN) между удаленными устройствами, что позволяет организациям обмениваться данными через общедоступные сети, минимизируя риски безопасности и обеспечивая конфиденциальность передаваемой информации.
Преимущества L2TP соединения
Преимущества L2TP соединения на роутере связаны с его функциональностью и уровнем безопасности. Вот несколько преимуществ, которые оно предлагает:
1. Высокий уровень защиты данных: L2TP (Layer 2 Tunneling Protocol) включает в себя протокол IPSec, который обеспечивает шифрование данных и аутентификацию. Это делает L2TP соединение надежным и защищенным от вмешательства или прослушивания со стороны третьих лиц.
2. Широкая совместимость: L2TP является стандартным протоколом и поддерживается большинством операционных систем, включая Windows, Mac, iOS и Android. Это позволяет использовать L2TP соединение на различных устройствах без проблем совместимости.
3. Возможность преодоления NAT: L2TP позволяет преодолевать ограничения NAT (Network Address Translation), что позволяет работать сетевым устройствам, находящимся за межсетевым экраном или роутером со встроенной функцией NAT. Таким образом, L2TP обеспечивает более гибкое подключение и обмен данными между удаленными сетевыми устройствами.
4. Поддержка удаленного доступа: L2TP соединение позволяет удаленным пользователям получать доступ к корпоративным сетям или домашним сетям через интернет. Это делает возможным работу из любого места и в любое время, обеспечивая свободу и гибкость при организации работы.
Все эти преимущества делают L2TP соединение на роутере надежным, безопасным и удобным способом связи между удаленными сетевыми устройствами.
Как настроить L2TP соединение на роутере?
Для настройки L2TP соединения на роутере вам понадобится выполнить несколько простых шагов:
Шаг 1: Подключите компьютер к роутеру с использованием Ethernet-кабеля или подключитесь к роутеру через беспроводное соединение.
Шаг 2: Откройте веб-браузер и введите IP-адрес вашего роутера в адресную строку. Введите логин и пароль администратора роутера, чтобы получить доступ к настройкам.
Шаг 3: Найдите раздел настроек VPN (виртуальная частная сеть) в меню роутера. Обычно он находится в разделе «Настройки» или «Сеть».
Шаг 4: В настройках VPN выберите протокол L2TP и введите необходимые параметры соединения, такие как адрес сервера, имя пользователя и пароль. Обратитесь к вашему провайдеру или администратору сети для получения этих данных.
Шаг 5: Сохраните внесенные изменения и перезагрузите роутер, чтобы применить новые настройки.
Шаг 6: Теперь вы должны быть подключены к сети с использованием L2TP соединения. Убедитесь, что ваше устройство настроено на использование этого соединения и проверьте его работоспособность.
Настройка L2TP соединения на роутере довольно проста и позволяет вам установить защищенное соединение с другими устройствами и сетями. Это особенно полезно, когда вы хотите обмениваться конфиденциальной информацией или работать из удаленного офиса.
Ключевые моменты использования L2TP соединения
L2TP (Layer 2 Tunneling Protocol) соединение на роутере предоставляет возможность установления безопасного канала связи между удаленными сетями или устройствами. Вот несколько ключевых моментов использования L2TP соединения:
1. Безопасность передачи данных: L2TP использует протокол шифрования для защиты передаваемых данных. Это позволяет обеспечить конфиденциальность и целостность информации, обмениваемой между устройствами.
2. Расширяемость и совместимость: L2TP является расширяемым протоколом, который может работать с различными сетевыми технологиями. Он совместим с протоколами IP, Ethernet и другими технологиями передачи данных.
3. Установка виртуального закрытого соединения: L2TP устанавливает виртуальное закрытое соединение между двуми сетями или устройствами. Это позволяет передавать данные через общедоступную сеть, но при этом сохранять безопасность передачи.
4. Поддержка удаленного доступа: L2TP соединение позволяет удаленным пользователям получить доступ к сети или ресурсам, находящимся за границей своей локальной сети. В результате, пользователи могут работать с данными и ресурсами, расположенными в другой сети, с минимальными затратами на время и деньги.
5. Повышение производительности сети: Использование L2TP соединения на роутере может повысить производительность сети за счет оптимизации передачи данных. Протокол L2TP позволяет устанавливать оптимальные маршруты для передачи данных, что может ускорить процесс передачи информации.
6. Надежность соединения: L2TP соединение обеспечивает высокую надежность передачи данных. Протокол L2TP использует проверку целостности и механизмы восстановления соединения, чтобы обеспечить доставку данных даже при возникновении сбоев или ошибок.
В целом, использование L2TP соединения на роутере представляет собой надежное и безопасное решение для передачи данных между удаленными сетями и устройствами. Этот протокол позволяет обеспечить конфиденциальность, целостность и доступность информации, обмениваемой между различными устройствами.