
Configuring Disk Quota (windows Server 2012 R2)
Welcome to this step by step tutorial, you will be learning about How to Configure Disk Quota using File Server Resource Manager (FSRM) on Windows Server 2012 R2.
File Server Resource Manager is a pack of tools for Windows Server® 2008 or above that allows administrators to control and manage the quantity and type of data files that is stored on their network or servers.
Disk Quota is a tool part of the FSRM Pack of tools. It helps to Manage the capacity of a storage device on the server or network.
The Step by step process below shows how to Install Configure Disk Quota
Prerequisite: Ensure you have a Domain Network configured and at least one client computer for testing after configuration. Also, ensure FSRM is Installed and Configure File Share or DFS for central file storage to ensure Disk Quota works effectively.
Task Performed: DC1 (Domain Controller installed with Server 2012 R2) and a Client Computer (Installed with Windows 10)
Configure Disk Quota on DC1
Step 1
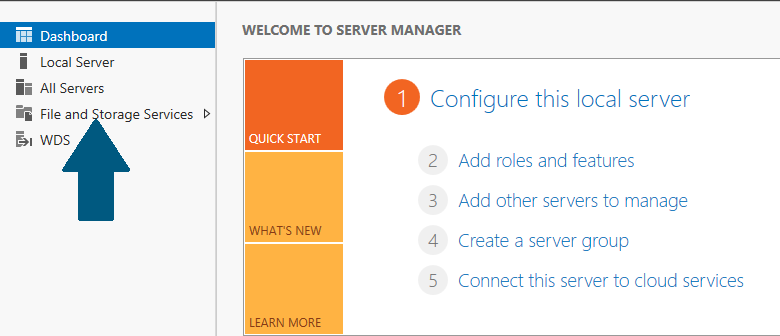
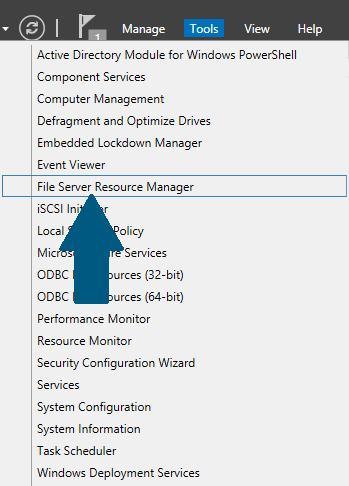
Go to Server Manager

Step 2
On the Server Manager Console. Select “Tools” on the right top corner and choose “File Server Resource Manager”

Step 3
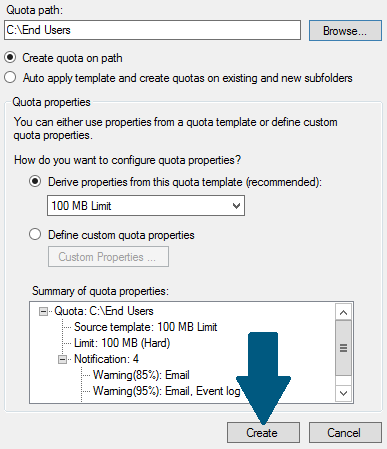
On the File Server Resource Manager console, select “Quota Management -> Quotas”, Then Right-Click on “Quotas”. Select “Create Quota”

Step 4
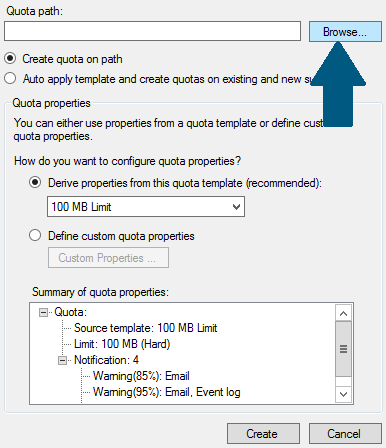
Browser for Quota Path

Step 5
Select “Define Custom Quota Properties” and choose “custom Properties”

Step 6
Under the “Space Limit” Section, specify your preferred limit and choose “Ok”

Step 7
Select “Create”

Step 8
Save as a template with your preferred name. Our is “Graphic files template” and choose ‘OK’
We are done.

Next is to test the Quota selected by Storing Files with the greater limit capacity you have specified on the path and see our quota in operation.
See also, How to configure DFS Namespace and Replication, Server 2012
Watch the Disk Quota Configuration Tutorial video below;

Vinay
No one that stays in his comfort zone ever secures a future.
The File Server Resource Manager is a role in Windows Server 2012 R2 which is used to enable quotas on shared folders. This article will explain how to share a folder and enable quota using the File Server Resource Manager. Specifically, you will learn:
- Configuring File Server Resource Manager.
- Sharing a folder using File and Storage Services.
- Enabling quota on shared folder.
Prerequisites
Following are prerequisites for this tutorial:
- The administrator account has a strong password.
- Static IP is configured.
- Latest windows updates are installed.
- Firewall is turned off.
Configuring File Server Resource Manager
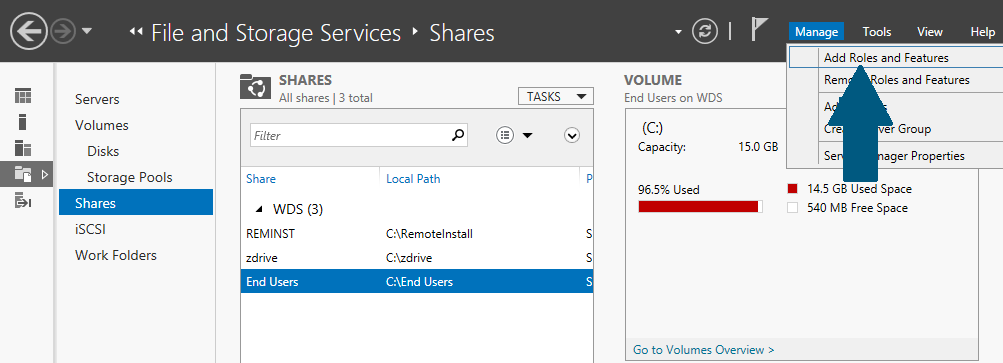
Step 1: Open server manager dashboard, click Manage -> Add Role and Features.
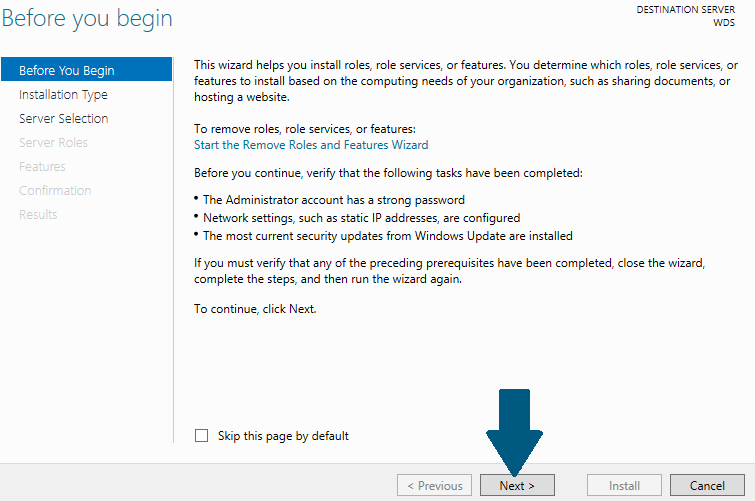
Step 2: Click Next.
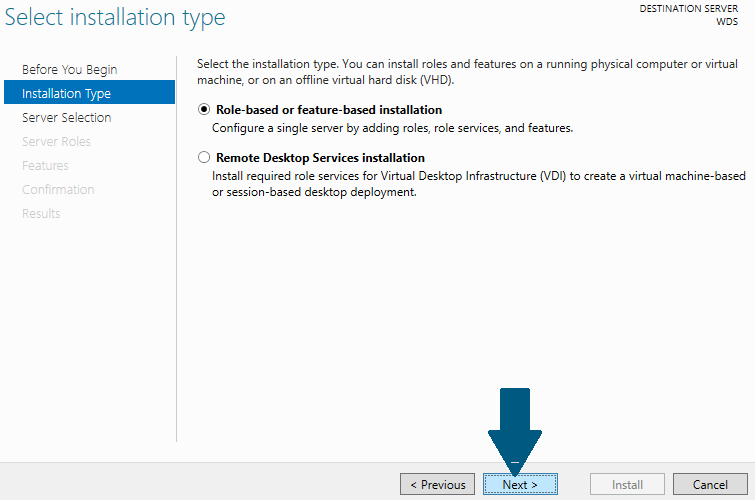
Step 3: Choose Role-based or feature-based installation and click Next.
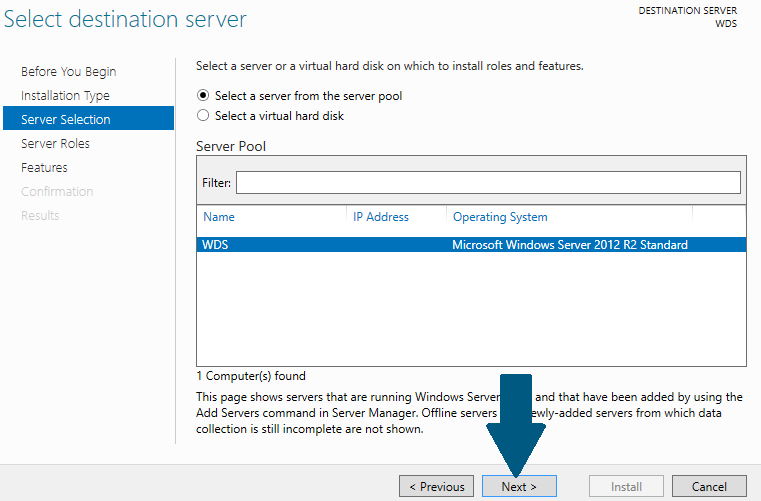
Step 4: Click Next.
Step 5: Expand File and Storage Services -> File and iSCSI Services -> File Server Resource Manager. Click Next.
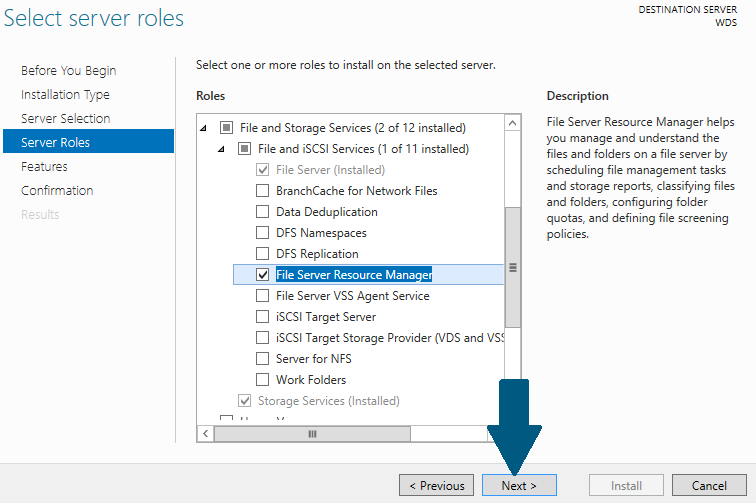
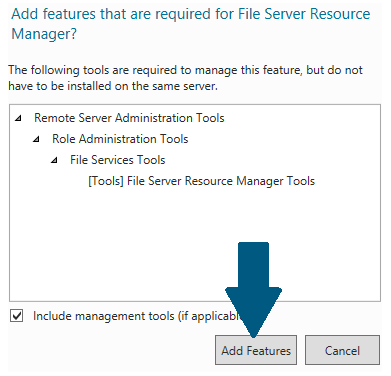
Step 6: Click Add Features.
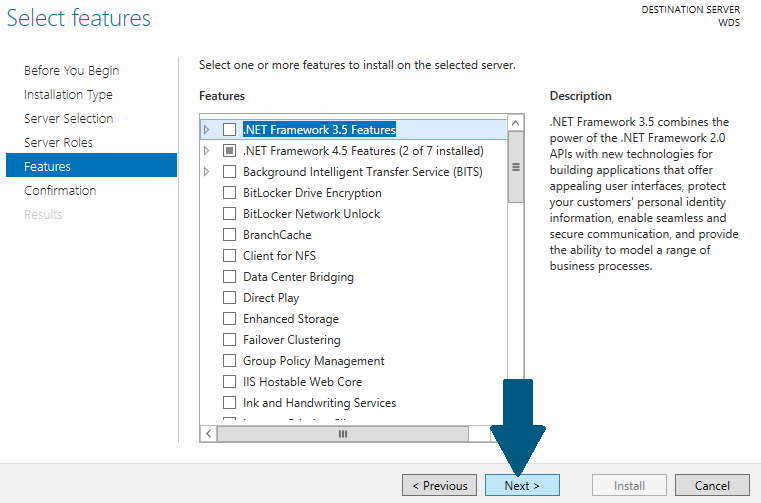
 Step 7: Choose .NET Framework and then Click Next.
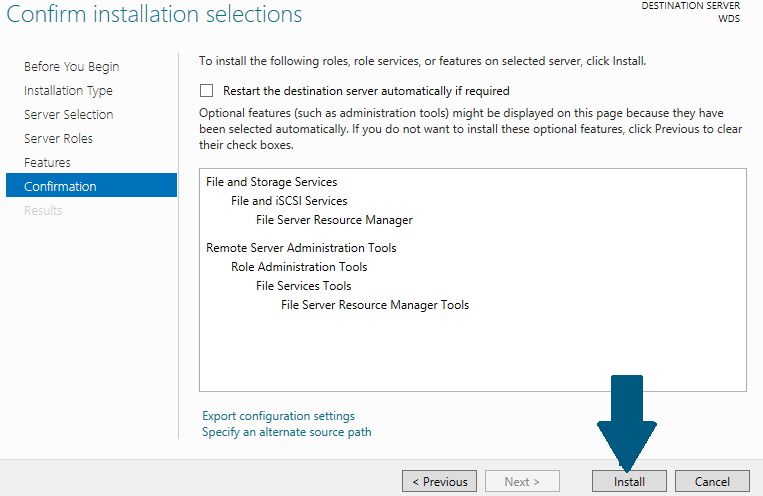
Step 8: Click Install.
Sharing a Folder using File and Storage Services
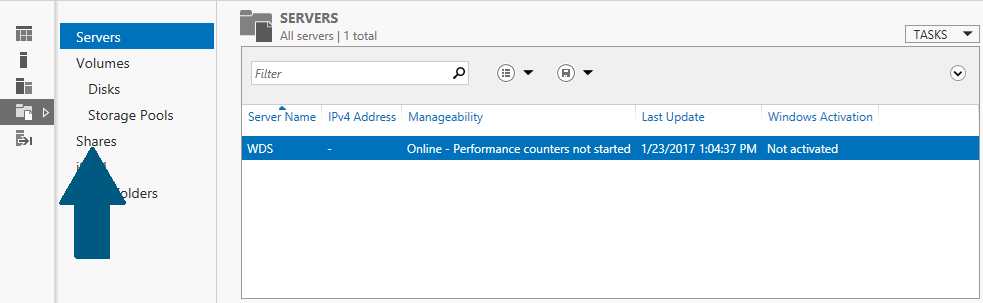
Step 1: Open server manager dashboard, click File and Storage Services.
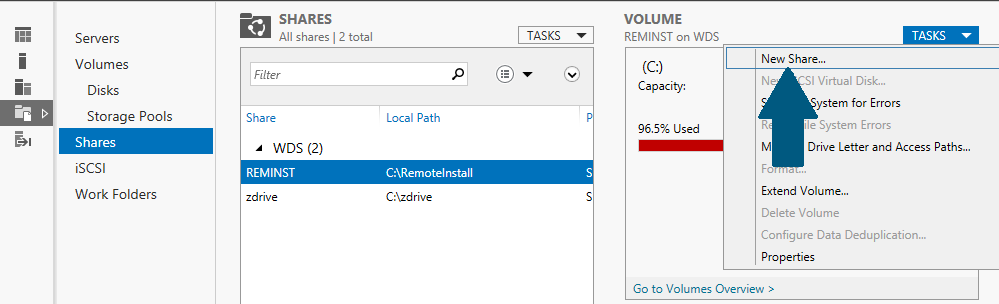
Step 2: Click Shares.
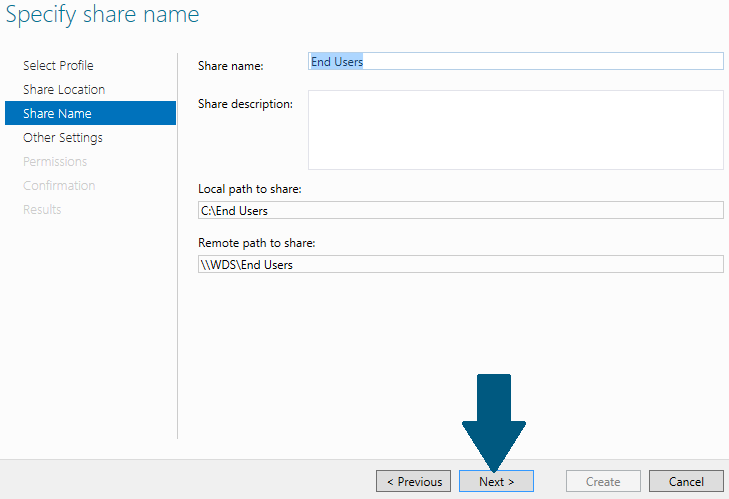
Step 3: Click Tasks -> New Share.
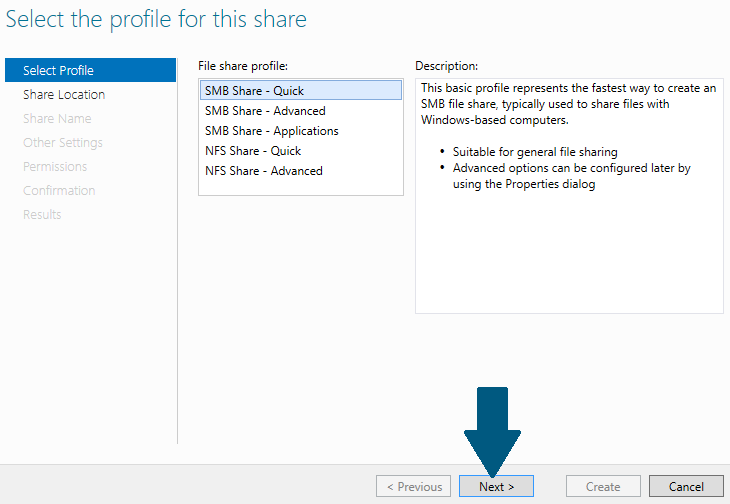
Step 4: Choose SMB Share — Quick. Click Next.
Step 5: Click Browse.
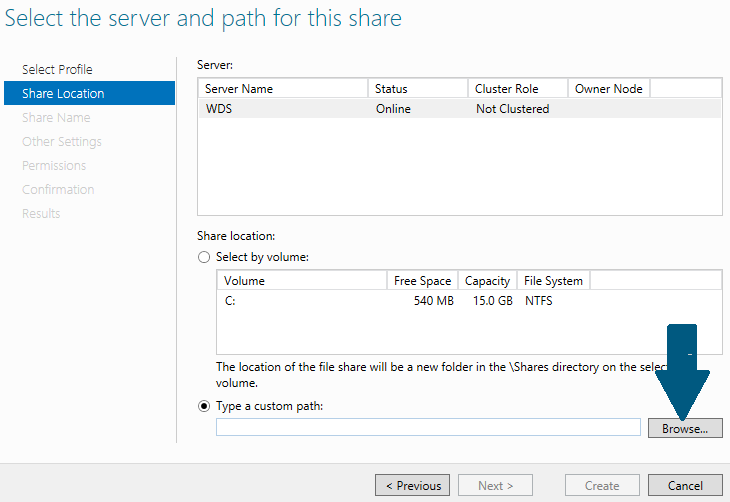
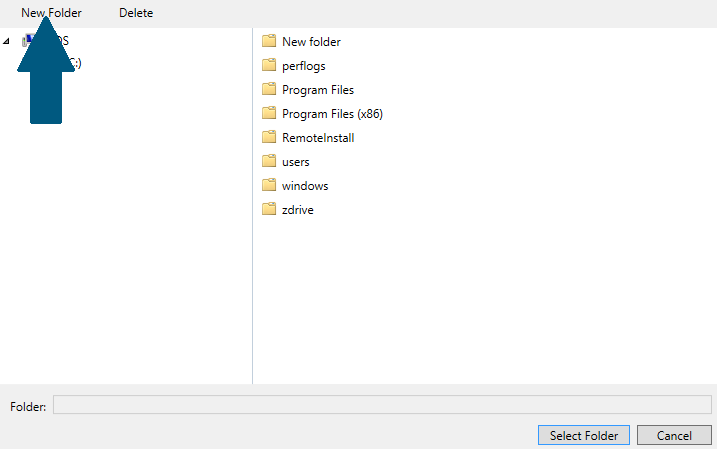
Step 6: Click New Folder and name it.
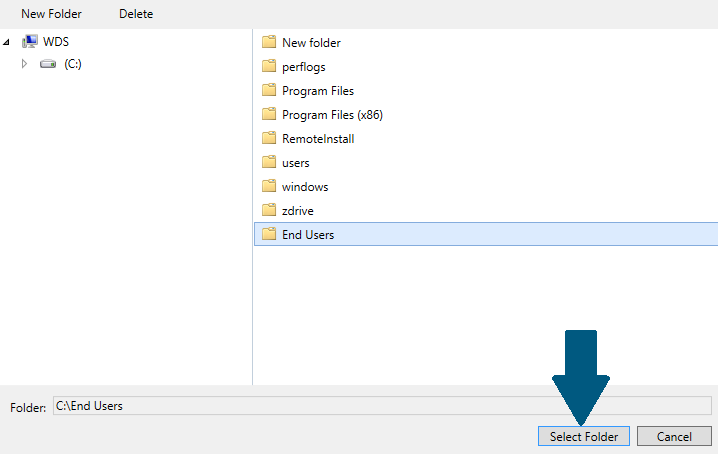
Step 7: Choose the folder created in step 6 and click Select Folder.
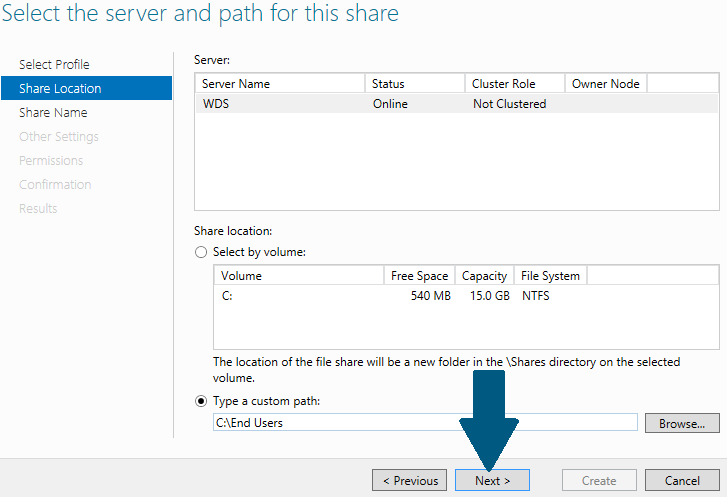
Step 8: Click Next.
Step 9: Click Next.
Step 10: Check Enable access-based enumeration and click Next.
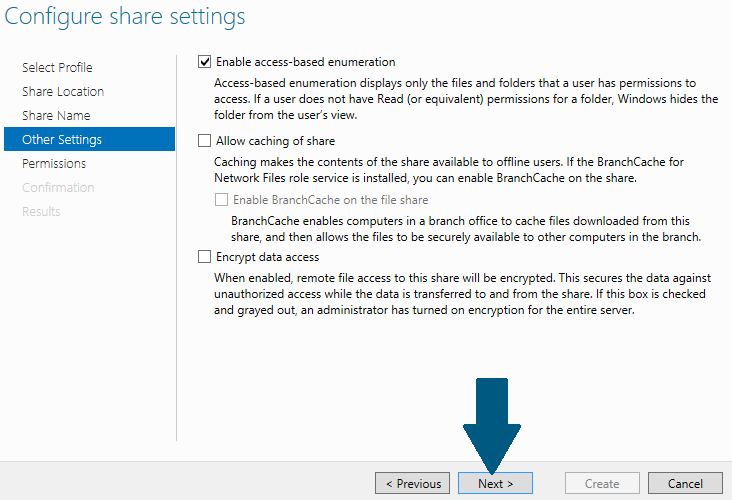
Step 11: Click Next.
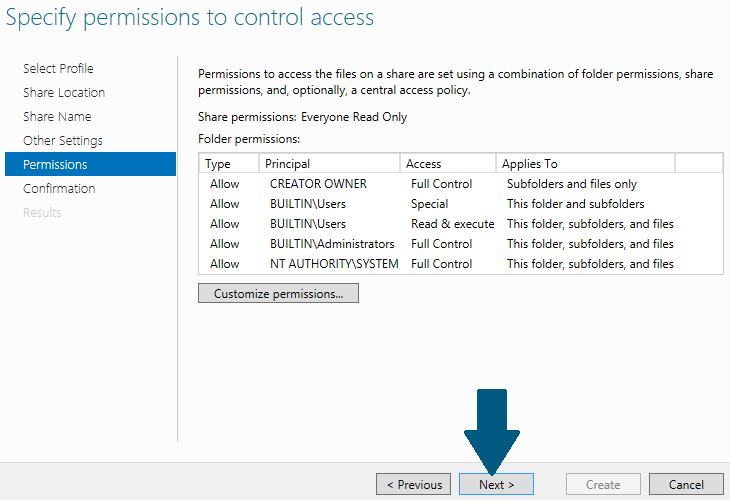
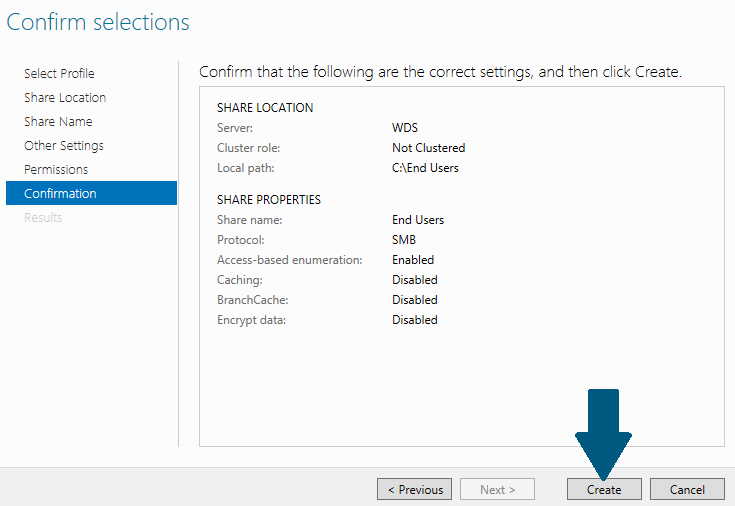
Step 12: Click Create.
Enabling Quota on Shared Folder
Step 1: Open server manager dashboard, click Tools -> File Server Resource Manager.
Step 2: Expand File Server Resource Manager -> Quota Management. Click Create Quota…

Step 3: Click Browse and provide the path of the shared folder.
Step 4: Choose Drive properties from this quota template (recommended): and choose the template from the drop down. Click Create.
Conclusion Quota management is a useful feature which allows you to set a storage limit on a shared folder. When you finished this article, you might want to further explore a file screening provided by the File Server Resource Manager.
Дисковые квоты позволяют администраторам Windows контролировать сколько места используют пользователи на файловой системе серверов и рабочих станций. ОС Windows Server поддерживает два типа квотирования: квотирование на базе File Server Resource Manager (дисковые квоты FSRM) и NTFS квоты. Хотя FSRM квотирование и является более гибким и удобным, но в некоторых простых случаях эффективно можно использовать и NTFS квоты. Например, для ограничения размеров каталогов перемещаемых профилей (но не User Profile Disks) и перенаправляемых домашних папок на RDS серверах, личных каталогов пользователей на FTP сервере, личных каталогов на сайтах IIS и т.д. В этой статье мы рассматриваем как настроить дисковые квоты пользователям в Windows.
Содержание:
- Дисковые NTFS квоты в Windows
- Настройка дисковых NTFS квоты в Windows 10 / Windows Server 2016
- Настройка дисковых квот с помощью групповых политик
- Управление дисковыми квотами из командной строки/PowerShell
Дисковые NTFS квоты в Windows
С помощью дисковых квот Windows вы можете ограничить максимальный размер файлов и папок каждого пользователя так, чтобы он не превысил установленного лимита и не занял своими данными весь диск. Принадлежность фалов и каталогов определяется в соответствии с владельцем объекта файловой системы NTFS. Дисковые квоты работают как на северных, так и на клиентских версиях Windows.
Основные особенности и ограничения NTFS-квот:
- Квотирование может быть применено только целиком к конкретному тому (разделу), отформатированному в файловой систем NTFS (на ReFS томах квотирование не работает);
- Квоты действуют на всех пользователей, хранящих свои данные на данном разделе. Нельзя применить квоту на группу пользователей или отдельный каталог. В этом случае лучше использовать FSRM квоты;
- Принадлежность файлов пользователю определяется по его владельцу (owner) файла, заданного в дескрипторе защиты NTFS;
- По умолчанию Windows сканирует раздел с включенным квотированием и пересчитывает суммарный размер файлов каждого пользователя 1 раз в час;
- При использовании NTFS-компрессии, учитывается оригинальный размер файлов (до сжатия).
Можно выделить следующие сценарии использования дисковых квот:
- Мониторинг использования дисков – просмотр статистики использования пользователями места на диске сервера;
- Мониторинг и оповещение – в дополнении к первому сценарию, при превышении квоты в Event Viver записывается событие с информацией о пользователе и квоте.
- Контроль использования диска — при превышении квоты пользователь не может сохранять новые файлы.
Настройка дисковых NTFS квоты в Windows 10 / Windows Server 2016
Рассмотрим пример настройки NTFS квот на диске с данными пользователей на примере Windows Server 2016. Во всех предыдущих версия Windows (начиная с Windows 2003) дисковые NTFS квоты настраиваются аналогично.
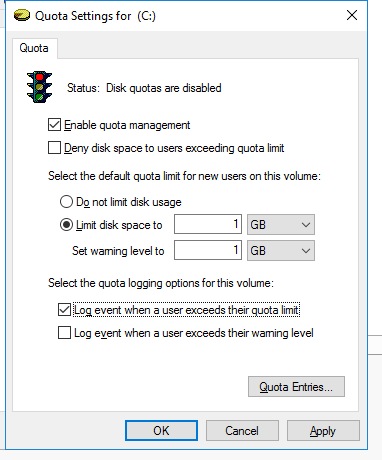
Откройте окно свойства диска, на котором нужно включить квоты и перейдите на вкладку Quota. Затем нажмите на кнопку Show Quota Settings: 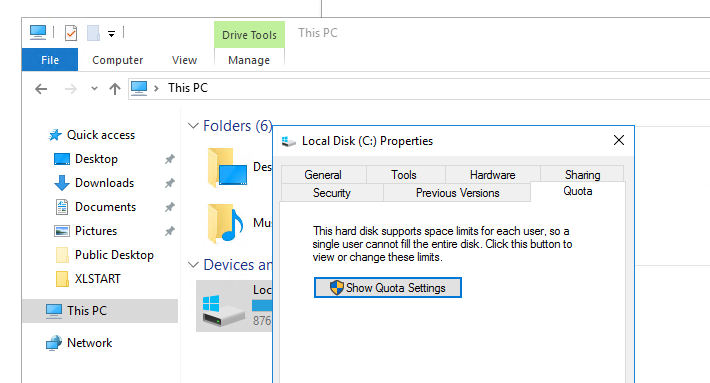 Чтобы включить квоты для данного тома, установите чекбокс Enable quota management.
Дальнейшие опции следует выбрать в зависимости от желаемого сценария использования квот:
- Deny disk space to users exceeding quota limit – запретить запись на диск пользователям, превысившим лимит;
- Limit disk space to — задать лимит на суммарный размер файлов одного пользователя;
- Log event when a user exceeds their quota limit – записывать в Event Viewer событие при превышении квоты пользователем;
- Log event when a user exceeds their warning level – записывать в журнал события при приближении к указанному порогу.
Не рекомендуется сразу включать правило запрета записи при превышении лимита. Лучше сначала оценить текущее использование пользователями места на диске пользователями. В нашем примере мы хотим, чтобы каждый пользователь мог использовать не более 1 Гб места на диске сервера.
Сохраните изменения (Apply). Через некоторое время (в зависимости от размера диска и количества файлов), Windows подсчитает суммарное использования диска каждым пользователем.
Нажмите на кнопку Quota Entries. Перед вами появится таблица, в которой указаны квоты и текущий размер занятого места каждым пользователем (файлы которых найдены на файловой системе). Здесь вы сразу видите, какие пользователи уже превысили свои квоты на диске.
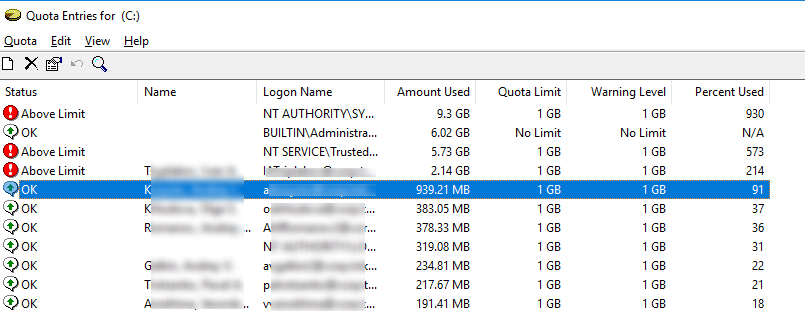
По умолчанию для всех пользователей устанавливаются одинаковые квоты. Из окна Quota Entries вы можете создать, увеличить или отключить стандартную квоту для конкретного пользователя.
Чтобы NTFS квоты не применялись к определенной учетной записи, нужно открыть свойства записи в таблице квот (Properties) и установить опцию Do not limit disk usage.
Важно. Обязательно следует отключить квотирование для системных учётных записей NT Service\TrustedInstaller и NT AUTHORITY\SYSTEM, иначе Windows может работать некорректно. 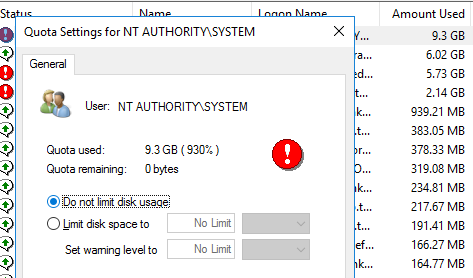
Из окна со список квот вы можете экспортировать настройки квот, а затем импортировать и применить их для другого диска или компьютера.
Если вы хотите вывести список файлов, которые учитываются в квоте конкретного пользователя, нужно выбрать пункт Delete.
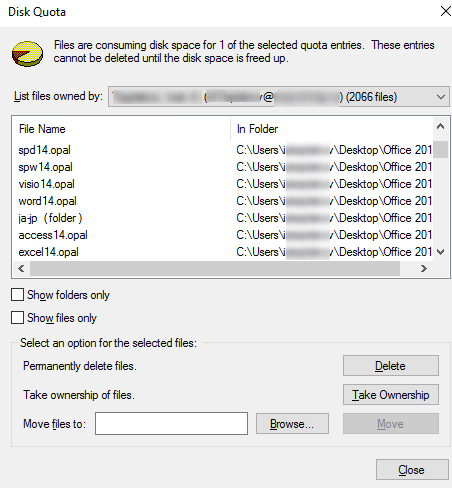
Из этого диалогового окна можно сменить владельца файла (Take ownership), удалить (Delete) или переместить файл (Move).
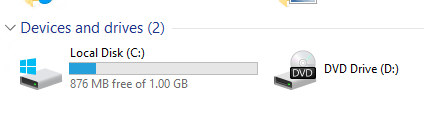
После того, как навели порядок с мягкими квотами в режиме аудита, можно включать опцию Deny disk space to users exceeding quota limit. Это включит режим жестких квот. Теперь пользователи не смогут превысить выделенное им место на диске. Обратите внимание, что размер диска в сессии пользователя теперь отображается с учетом дисковой квот. В этом примере для моего аккаунта на диске C:\ свободно
876 Мб
из 1 Гб квоты.
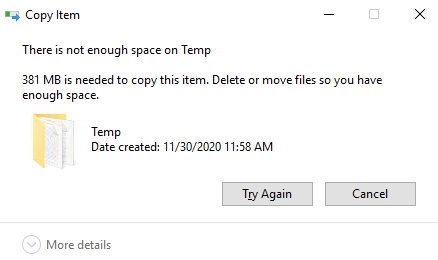
При превышении квоты пользователь получает сообщение:
There is not enough space on ….
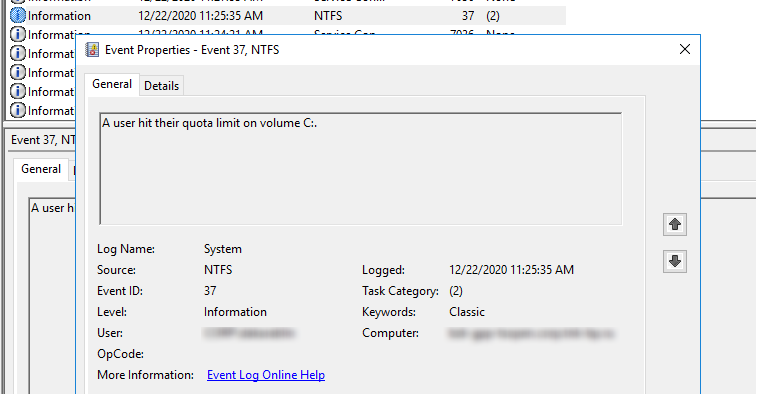
Одновременно в журнале системы фиксируется событие с EventID 37, source: Ntfs:
A user hit their quota limit on volume C:
Настройка дисковых квот с помощью групповых политик
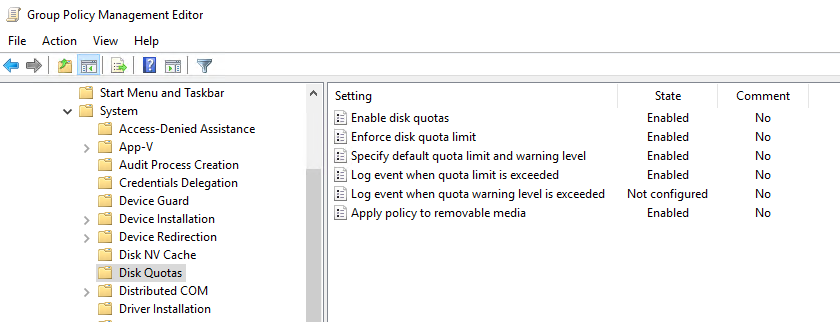
Вы можете управлять настройками дисковых квот на компьютерах и серверах домена с помощью групповых политик. Параметры настройки квот находятся в разделе GPO Computer Configuration -> Administrative Templates -> System -> Disk Quotas. Чтобы включить дисковые квоты, аналогичные рассмотренным выше, задайте следующие политики:
- Enable Disk Quotas: Enable
- Enforce Disk Quota Limit: Enable
- Default Quota Limit And Warning Level: Enable (Default quota limit/warning level: 1 Gb)
- Log Event When Quota Limit Exceeded: Enable
- Apply Policy To Removable Media: Enable (если нужно применять квоты для съёмных носителей, в том числе USB флешкам)
Осталось назначить такую GPO на OU с компьютерами/серверами, на которых нужно внедрить дисковые квоты и дождаться обновления политик.
Дисковые квоты, настроенные через GPO применяются для всех дисков компьютера. Нельзя настроить исключения для определенных пользователей.
Управление дисковыми квотами из командной строки/PowerShell
NTFS-квотами можно управлять из командной строки Windows с помощью команы fsutil quota.
Чтобы включить мягкую квоту для диска, используйте команду:
fsutil quota track E:
Для включения жесткой NTFS квоты, выполните:
fsutil quota enforce E:
Для отключения дисковых квот используется команда:
fsutil quota disable E:
Чтобы получить текущие настройки квот для указанного диска, выполните:
fsutil quota query e:
Получить список пользователей, чьи квоты на диске уже превышены:
fsutil quota violations
Чтобы изменить пороги квот для определенного пользователя, используйте команду:
fsutil quota modify E: 3000000000 200000000 corp\aaivanov
Размер квот указывается в байтах (в этом примере 3 Гб). Первое значение – максимальный размер данных пользователя на диске (жесткая квота, limit), второе — лимит, при котором появляются предупреждения (warning level).
Узнать частоту обновления (перерасчета) дисковых квот (в секундах):
fsutil behavior query quotanotify
По умолчанию квоты обновляются раз в час

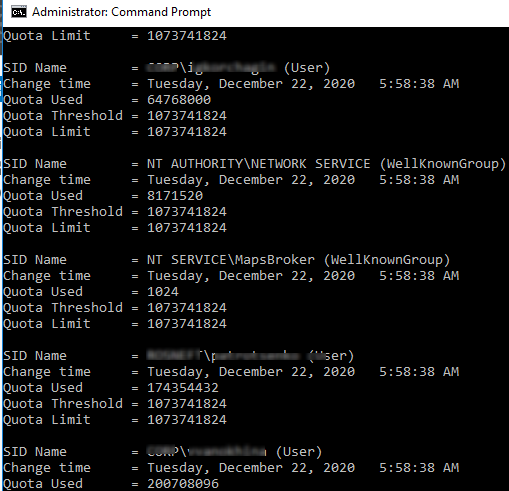
В PowerShell нет встроенных командлетов для управления NTFS квотами на диске. Однако вы можете управлять ими через WMI класс Win32_DiskQuota. Например, следующий PowerShell скрипт выведет информацию о текущих квотах пользователей.
$strComputer = "."
$colItems = get-wmiobject -class "Win32_DiskQuota" -namespace "root\CIMV2" -computername $strComputer
foreach ($objItem in $colItems) {
write-host " Used: " $objItem.DiskSpaceUsed
write-host "Limit: " $objItem.Limit
write-host "Quota Volume: " $objItem.QuotaVolume
write-host "Status: " $objItem.Status
write-host "User: " $objItem.User
write-host "Warning Limit: " $objItem.WarningLimit
}
Contents
- 1 Disk Quota Management And Configuration On Windows Server 2012r2 2016
- 2 How To Configure Disk Quota In Windows Server 2012 R2 | 2016 | 2019 | Quota Management Server 2016
- 2.1 Conclusion
- 2.1.1 Related image with disk quota management and configuration on windows server 2012r2 2016
- 2.1.2 Related image with disk quota management and configuration on windows server 2012r2 2016
- 2.1 Conclusion
Whether you’re here to learn, to share, or simply to indulge in your love for Disk Quota Management And Configuration On Windows Server 2012r2 2016, you’ve found a community that welcomes you with open arms. So go ahead, dive in, and let the exploration begin. Manager select step manager 5- the and click manager on file on then go for manager server on step server quota Step resource quota tools right file quotas- console- step 4 the on gt top management to server right quotas 3 quota create console corner server resource select step browser path select 2 1 choose the
Disk Quota Management And Configuration On Windows Server 2012r2 2016
Disk Quota Management And Configuration On Windows Server 2012r2 2016
Quota management is a valuable feature that enables users to restrict the storage capacity of shared resources in windows server 2016. if you create quotas, you will limit the space allocated to a volume or a folder—allowing you to practice capacity management conveniently. quota management in windows server 2016. Article 07 29 2021 6 contributors feedback applies to: windows server 2022, windows server 2019, windows server 2016, windows server 2012 r2, windows server 2012, windows server 2008 r2 configure e mail settings if you plan to send threshold notifications or storage reports by e mail. configure e mail notifications.
Disk Quota Management And Configuration On Windows Server 2012r2 2016
Disk Quota Management And Configuration On Windows Server 2012r2 2016
07 29 2021 7 contributors feedback applies to: windows server 2022, windows server 2019, windows server 2016, windows server 2012 r2, windows server 2012, windows server 2008 r2 on the quota management node of the file server resource manager microsoft ® management console (mmc) snap in, you can perform the following tasks:. Open the disk properties window, on which you want to enable quotas, go to the quota tab. then click show quota settings: to enable the quotas for this volume, check enable quota management. the following options may be checked depending on the scenario of quota usage:. Step 1 go to server manager step 2 on the server manager console. select “tools” on the right top corner and choose “file server resource manager” step 3 on the file server resource manager console, select “quota management > quotas”, then right click on “quotas”. select “create quota” step 4 browser for quota path step 5. Learn windows server create a quota article 07 29 2021 5 contributors feedback in this article to create a quota that is based on a template additional references applies to: windows server 2022, windows server 2019, windows server 2016, windows server 2012 r2, windows server 2012, windows server 2008 r2.
Disk Quota Management And Configuration On Windows Server 2012r2 2016
Disk Quota Management And Configuration On Windows Server 2012r2 2016
Step 1 go to server manager step 2 on the server manager console. select “tools” on the right top corner and choose “file server resource manager” step 3 on the file server resource manager console, select “quota management > quotas”, then right click on “quotas”. select “create quota” step 4 browser for quota path step 5. Learn windows server create a quota article 07 29 2021 5 contributors feedback in this article to create a quota that is based on a template additional references applies to: windows server 2022, windows server 2019, windows server 2016, windows server 2012 r2, windows server 2012, windows server 2008 r2. Specifies the drive name followed by a colon or the guid in the format volume {guid}. sets the limit (in bytes) at which warnings are issued. this parameter is required for the fsutil quota modify command. sets the maximum allowed disk usage (in bytes). this parameter is required for the fsutil quota modify command. Quota management is a valuable feature that allows you to restrict the storage capacity of shared resources in windows server 2016. step 1: start by logging into the windows server 2016. then, on the server manager’s dashboard, click on “manage” and select “add roles and features. step 2: on the.
Disk Quota Management And Configuration On Windows Server 2012r2 2016
Disk Quota Management And Configuration On Windows Server 2012r2 2016
Specifies the drive name followed by a colon or the guid in the format volume {guid}. sets the limit (in bytes) at which warnings are issued. this parameter is required for the fsutil quota modify command. sets the maximum allowed disk usage (in bytes). this parameter is required for the fsutil quota modify command. Quota management is a valuable feature that allows you to restrict the storage capacity of shared resources in windows server 2016. step 1: start by logging into the windows server 2016. then, on the server manager’s dashboard, click on “manage” and select “add roles and features. step 2: on the.
Disk Quota Management And Configuration On Windows Server 2012r2 2016
Disk Quota Management And Configuration On Windows Server 2012r2 2016
How To Configure Disk Quota In Windows Server 2012 R2 | 2016 | 2019 | Quota Management Server 2016
How To Configure Disk Quota In Windows Server 2012 R2 | 2016 | 2019 | Quota Management Server 2016
join this channel to get access to perks: channel uckkbzrvqgtfzmk3t3gx56va join. video series on advance networking with windows server 2019: this video guide will show you how to share a folder and info level: intermediate presenter: eli the computer guy date created: april 23, 2013 length of class: 17:47′ research server 2016 and 2012 r2 file server resource manager add and configure file server resource manager is a windows server donate us : paypal.me microsoftlab set quota disk for users on server 2012 r2 1. prepare dc11 : domain controller dc12 steps to configure disk quotas in windows server 2012 r2. hello friends today i am going to show you. how to enable quotas for users over active directory. let’s start step by step thank configuring disk quotas on server 2012. more online it training at itpro.tv. this video shows how to configure disk quota using file server resource manager service on windows server 2012 r2. this video show you about disk quota management on windows server 2012 tips get more video update: in this video demonstration i will show you how to setup ntfs disk quota (quota management) in windows 10 os.
Conclusion
After exploring the topic in depth, it is evident that article provides informative insights about Disk Quota Management And Configuration On Windows Server 2012r2 2016. Throughout the article, the author demonstrates a deep understanding about the subject matter. Notably, the section on Z stands out as a highlight. Thank you for taking the time to this post. If you have any questions, please do not hesitate to reach out via the comments. I am excited about hearing from you. Moreover, here are a few related articles that might be interesting:
Related image with disk quota management and configuration on windows server 2012r2 2016
Related image with disk quota management and configuration on windows server 2012r2 2016
Configure Disk Quota Using FSRM (Windows Server 2012 R2)
Go to Server Manager .
On the Server Manager Console.
On the File Server Resource Manager console, select “Quota Management > Quotas”, Then RightClick on “Quotas”.
Browser for Quota Path.
Select “Define Custom Quota Properties” and choose “custom Properties”
How can I Create and Enable Disk Quotas in Server 2012?
Create a quota
In the left pane of File Server Resource Manager, expand Quota Management and click Quotas. In the Actions menu on the far right of FSRM, click Create Quota. In the Create Quota dialog, click Browse to select the folder to which you want to apply the quota.
How do you Set Disk Quotas?
Click Start and then click Computer.
In the right pane , rightclick the drive on which you want to configure the quotas and then click Properties.
Click the Quota tab and then click Show Quota Settings.
Select the Enable Quota Management check box.
How do I Enable and Configure User Disk Quotas in Windows?
Open File Explorer Windows key + E.
Click on This PC.
Under «Devices and drives,» rightclick the drive you want to limit and select Properties.
Click on the Quota tab.
Click the Show Quota Settings button.
Check the Enable quota management option.
How do I Increase File Server Quota?
Windows Server offers a builtin tool called the File Server Resource Manager that can do exactly that. To create a quota, open the File Server Resource Manager tool by selecting it from the Server Managers list of tools. Once the console opens, expand the Quota Management container.