Чему вы научитесь
- Применять основные принципы разработки настольных приложений на C# с использованием Windows Forms.
- Разрабатывать графический интерфейс пользователя с помощью элементов управления, меню и диалоговых окон.
- Обрабатывать различные события, связанные с взаимодействием пользователя с приложением.
- Использовать разнообразные компоненты Windows Forms для решения различных задач, таких как работа с файлами, отображение данных и построение графиков.
- Строить полноценное приложение с учетом требований к функциональности, дизайну и безопасности.
О курсе

Windows Forms для начинающих: разработка на C#
Вы хотите создать свое собственное приложение с графическим интерфейсом на Windows?
Тогда этот курс для вас!
В нем вы научитесь основам разработки на C# с использованием Windows Forms — библиотеки, которая позволяет создавать окна, кнопки, меню, списки и другие элементы управления. Вы узнаете, как работать с формами, контейнерами, элементами управления, меню и панелями инструментов. После успешного освоения курса вы сможете создавать свои собственные приложения на C# с Windows Forms, которые будут выглядеть профессионально и функционально. В этом курсе вы создадите свое первое приложение на C# с Windows Forms, используя Visual Studio.

Для кого этот курс
Для начинающих разработчиков приложений.
Для людей изучающих C#.
Для заинтересованных в создании своего приложения.
Начальные требования
Минимальные навыки C#
Установленная Visual Studio
Наши преподаватели
Как проходит обучение
Вы будете получать теоретические знания и практические навыки по работе с формами, элементами управления, меню и остальными элементами.
Вы также будете решать тесты, чтобы проверить свои знания и умения. В конце курса вы создадите свое собственное приложение на C# с Windows Forms по готовому дизайну в Figma.
Программа курса
Сертификат
Выдается платформой Stepik
Что вы получаете
Сколько стоит обучение
Часто задаваемые вопросы
Расскажите о курсе друзьям
https://stepik.org/course/174065/promo
Последнее обновление: 28.01.2023
-
Глава 1. Введение в Windows Forms
-
Первое приложение с .NET CLI
-
Первое приложение в Visual Studio
-
Создание графического приложения
-
-
Глава 2. Работа с формами
-
Основы форм
-
Основные свойства форм
-
Добавление форм. Взаимодействие между формами
-
События в Windows Forms. События формы
-
Создание непрямоугольных форм. Закрытие формы
-
-
Глава 3. Контейнеры в Windows Forms
-
Динамическое добавление элементов
-
Элементы GroupBox, Panel и FlowLayoutPanel
-
TableLayoutPanel
-
Размеры элементов и их позиционирование в контейнере
-
Панель вкладок TabControl и SplitContainer
-
-
Глава 4. Элементы управления
-
Кнопка
-
Метки и ссылки
-
Текстовое поле TextBox
-
Элемент MaskedTextBox
-
Элементы Radiobutton и CheckBox
-
ListBox
-
Элемент ComboBox
-
Привязка данных в ListBox и ComboBox
-
Элемент CheckedListBox
-
Элементы NumericUpDown и DomainUpDown
-
ImageList
-
ListView
-
TreeView
-
TrackBar, Timer и ProgressBar
-
DateTimePicker и MonthCalendar
-
PictureBox
-
WebBrowser
-
Элемент NotifyIcon
-
Окно сообщения MessageBox
-
OpenFileDialog и SaveFileDialog
-
FontDialog и ColorDialog
-
ErrorProvider
-
-
Глава 5. Меню и панели инструментов
-
Панель инструментов ToolStrip
-
Создание меню MenuStrip
-
Строка состояния StatusStrip
-
Контекстное меню ContextMenuStrip
-
-
Глава 6. Привязка и паттерн Model-View-ViewModel
-
Введение в привязку. Форматирование значения привязки
-
Привязка объектов. Интерфейс INotifyPropertyChanged
-
DataContext
-
Паттерн Model-View-ViewModel
-
Команды и взаимодействие с пользователем в MVVM
-
Параметры команды
-
- Глава 1. Введение в Windows Forms
- Первое приложение с .NET CLI
- Первое приложение в Visual Studio
- Создание графического приложения
- Глава 2. Работа с формами
- Основы форм
- Основные свойства форм
- Добавление форм. Взаимодействие между формами
- События в Windows Forms. События формы
- Создание непрямоугольных форм. Закрытие формы
- Глава 3. Контейнеры в Windows Forms
- Динамическое добавление элементов
- Элементы GroupBox, Panel и FlowLayoutPanel
- TableLayoutPanel
- Размеры элементов и их позиционирование в контейнере
- Панель вкладок TabControl и SplitContainer
- Глава 4. Элементы управления
- Кнопка
- Метки и ссылки
- Текстовое поле TextBox
- Элемент MaskedTextBox
- Элементы Radiobutton и CheckBox
- ListBox
- Элемент ComboBox
- Привязка данных в ListBox и ComboBox
- Элемент CheckedListBox
- Элементы NumericUpDown и DomainUpDown
- ImageList
- ListView
- TreeView
- TrackBar, Timer и ProgressBar
- DateTimePicker и MonthCalendar
- PictureBox
- WebBrowser
- Элемент NotifyIcon
- Окно сообщения MessageBox
- OpenFileDialog и SaveFileDialog
- FontDialog и ColorDialog
- ErrorProvider
- Глава 5. Меню и панели инструментов
- Панель инструментов ToolStrip
- Создание меню MenuStrip
- Строка состояния StatusStrip
- Контекстное меню ContextMenuStrip
- Глава 6. Привязка и паттерн Model-View-ViewModel
- Введение в привязку. Форматирование значения привязки
- Привязка объектов. Интерфейс INotifyPropertyChanged
- DataContext
- Паттерн Model-View-ViewModel
- Команды и взаимодействие с пользователем в MVVM
- Параметры команды
Помощь сайту
YooMoney:
410011174743222
Перевод на карту
Номер карты:
4048415020898850
В ходе курса вы научитесь работать с C# .NET Windows Forms, а также создадите приложение с дизайном и подключением к базе данных. Вы изучите как подключать программы к базе данных, поработайте с MySQL, а также создадите красивый дизайн для приложения.
Полезные ссылки:
- Курс по языку C#;
- Курс по созданию сайта на C#;
- Скачать Visual Studio.
Информация про C#
Благодаря незаурядной мощности языка, на него пал выбор разработчиков движка Unity. Сегодня является одним из топовых движков для игр на Windows. Выпуск и активное использование движка пошли на руку C#, который стал ещё популярнее.
После базового изучения принципов работы с языком и его синтаксисом, можно сразу перейти к углублённому изучению библиотек и смежных технологий. Большинство современных проектов пишутся с их привлечением, на чистом C# работают редко.
Если сравнить С# с прочими языками, его можно назвать довольно молодым, хотя за плечами уже пройден немалый путь. Впервые полноценная версия языка появилось после выхода Microsoft Visual Studio .NET, событие датируется февралём 2002 года. На сегодня актуальная версия — C# 7.0, выпущенная 7.03.2017 параллельно с Visual Studio 2017.

В C# используется синтаксис, сильно напоминающий Си и приближённый к С++, Java. Если есть познания в одном из перечисленных языков, изучить C# станет значительно легче.
C# это объектно-ориентированный язык, который немало позаимствовал из С++ и Java. Для примера, С# обладает поддержкой наследственности, полиморфизма, повторную загрузку операторов, статической типизации. Такой подходит помогает в решении распространённых задач в сфере разработки крупных приложений, сохраняющих гибкость, расширяемость и масштабируемость. C# всё ещё развивается, после каждого дополнения в языке появляются новые функции, преимущественно довольно полезные. Среди них: асинхронная работа, переменное связывание, лямбды и т. п.
Какова роль .NET?
Если речь заходит о C#, часто подразумеваются технологии, связанные с платформой .NET (WPF, ASP.NET). То же самое справедливо в обратном направлении, говоря про .NET, думают про C#. Безусловно, понятия имеют жёсткую взаимосвязь, но не являются синонимами. C# — это язык, созданный для взаимодействия с фреймворком .NET. Тем не менее .NET – это довольно широкое понятие.

Сейчас вспоминаются слова Билла Гейтса, не дословно, но смысл таков: «Платформа .NET – лучшее творение Microsoft». Может так и есть, ведь фреймворк очень мощный и постоянно используется в разработке приложений.
Ключевые черты платформы:
- Работает параллельно с разными языками. Популярностью С# во многом обязан общеязыковой среде CLR. Сейчас платформа способна работать с С#, VB.NET, C++, F#, но и на этом список не заканчивается, ведь она работает с диалектами, что привязаны к .NET (наподобие Delphi.NET). После компиляции кода с любого из перечисленных языков, вся интерпретируется в общий язык CIL – это своеобразный ассемблер для .NET. Такой подход позволяет использовать несколько языков для создания подключаемых модулей программы;
- Кроссплатформенность. Данную платформу реально переносить, хоть и есть отдельные ограничения. Сегодня актуальная версия фреймворка работает на всех поддерживаемых Виндовс: от Windows Vista до «десятки». За счёт проекта Mono появилась возможность разрабатывать программы под Linux (различные дистрибутивы), Android и iOS;
- Обширная библиотека классов. .NET Framework обладает единой, унифицированной библиотекой классов, с которой работают все поддерживаемые языки. Библиотека классов пригодится при создании любых программ: от блокнота до огромного веб-сайта;
- Масса встроенных технологий. Среда CLR в сочетании с библиотекой классов – это основа для большого пакета вспомогательных технологий. Их могут использовать все программисты во время разработки приложений. В качестве примера, при взаимодействии с базами данных можно использовать технологию ADO.NET. Во время создания графических редакторов с многочисленными функциями удобно использовать WPF. Во время веб-разработки наверняка используют ASP.NET.

Стоит упомянуть об одной особенности фреймворка и языка – автоматическая очистка хлама в памяти. Таким образом отпадает необходимость вспоминать, и вручную задавать код для высвобождения занятой памяти. Среда CLR без дополнительных команд позаботится о сборе мусора и его удалении.
План курса
В ходе курса мы с вами будем изучать Windows Forms. Это платформа, на основе которой можно строить программы с графическим интересом, но при этом лишь под Windows. Мы изучим саму платформу, научимся добавлять различные объекты, добавлять к ним обработчики событий, а также познакомимся с добавлением баз данных и реализацией их внутри нашего проекта.
Сразу стоит сказать, что для создания красивого интерфейса вам стоит взглянуть на фреймворк C# WPF. На сайте также будут уроки по данной платформе, но прежде чем к ней приступить вам необходимо будет разобраться с
Windows Forms
.
Дополнительные курсы
На нашем сайте вы можете найти дополнительные курсы по языку C#. Все курсы представлены на этой странице.

So far we have seen how to work with C# to create console based applications. But in a real-life scenario team normally use Visual Studio and C# to create either Windows Forms or Web-based applications.
A windows form application is an application, which is designed to run on a computer. It will not run on web browser because then it becomes a web application.
This Tutorial will focus on how we can create Windows-based applications. We will also learn some basics on how to work with the various elements of C# Windows application.
Windows Forms Basics
A Windows forms application is one that runs on the desktop computer. A Windows forms application will normally have a collection of controls such as labels, textboxes, list boxes, etc.
Below is an example of a simple Windows form application C#. It shows a simple Login screen, which is accessible by the user. The user will enter the required credentials and then will click the Login button to proceed.

So an example of the controls available in the above application
- This is a collection of label controls which are normally used to describe adjacent controls. So in our case, we have 2 textboxes, and the labels are used to tell the user that one textbox is for entering the user name and the other for the password.
- The 2 textboxes are used to hold the username and password which will be entered by the user.
- Finally, we have the button control. The button control will normally have some code attached to perform a certain set of actions. So for example in the above case, we could have the button perform an action of validating the user name and password which is entered by the user.
C# Hello World
Now let’s look at an example of how we can implement a simple ‘hello world’ application in Visual Studio. For this, we would need to implement the below-mentioned steps
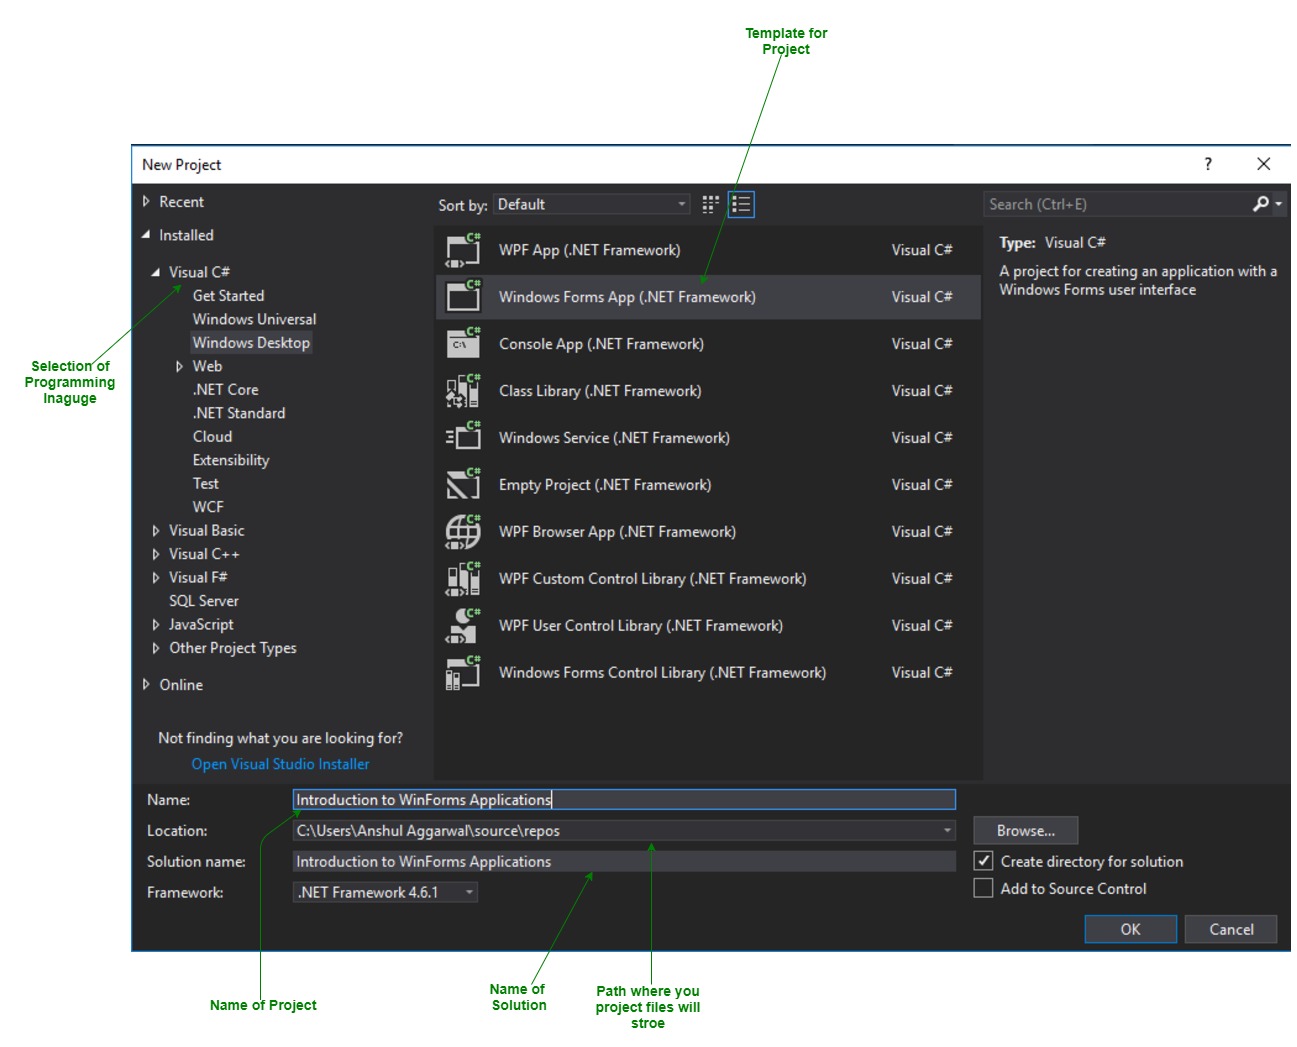
Step 1) The first step involves the creation of a new project in Visual Studio. After launching Visual Studio, you need to choose the menu option New->Project.

Step 2) The next step is to choose the project type as a Windows Forms application. Here we also need to mention the name and location of our project.

- In the project dialog box, we can see various options for creating different types of projects in Visual Studio. Click the Windows option on the left-hand side.
- When we click the Windows options in the previous step, we will be able to see an option for Windows Forms Application. Click this option.
- We will give a name for the application. In our case, it is DemoApplication. We will also provide a location to store our application.
- Finally, we click the ‘OK’ button to let Visual Studio create our project.
If the above steps are followed, you will get the below output in Visual Studio.
Output:-

You will see a Form Designer displayed in Visual Studio. It’s in this Form Designer that you will start building your Windows Forms application.

In the Solution Explorer, you will also be able to see the DemoApplication Solution. This solution will contain the below 2 project files
- A Form application called Forms1.cs. This file will contain all of the code for the Windows Form application.
- The Main program called Program.cs is default code file which is created when a new application is created in Visual Studio. This code will contain the startup code for the application as a whole.
On the left-hand side of Visual Studio, you will also see a ToolBox. The toolbox contains all the controls which can be added to a Windows Forms. Controls like a text box or a label are just some of the controls which can be added to a Windows Forms.
Below is a screenshot of how the Toolbox looks like.

Step 3) In this step, we will now add a label to the Form which will display “Hello World.” From the toolbox, you will need to choose the Label control and simply drag it onto the Form.

Once you drag the label to the form, you can see the label embedded on the form as shown below.

Step 4) The next step is to go to the properties of the control and Change the text to ‘Hello World’.
To go to the properties of a control, you need to right-click the control and choose the Properties menu option

- The properties panel also shows up in Visual Studio. So for the label control, in the properties control, go to the Text section and enter “Hello World”.
- Each Control has a set of properties which describe the control.

If you follow all of the above steps and run your program in Visual Studio, you will get the following output
Output:-

In the output, you can see that the Windows Form is displayed. You can also see ‘Hello World’ is displayed on the form.
Adding Controls to a form
We had already seen how to add a control to a form when we added the label control in the earlier section to display “Hello World.”
Let’s look at the other controls available for Windows forms and see some of their common properties.
In our Windows form application in C# examples, we will create one form which will have the following functionality.
- The ability for the user to enter name and address.
- An option to choose the city in which the user resides in
- The ability for the user to enter an option for the gender.
- An option to choose a course which the user wants to learn. There will make choices for both C# and ASP.Net
So let’s look at each control in detail and add them to build the form with the above-mentioned functionality.
Group Box
A group box is used for logical grouping controls into a section. Let’s take an example if you had a collection of controls for entering details such as name and address of a person. Ideally, these are details of a person, so you would want to have these details in a separate section on the Form. For this purpose, you can have a group box. Let’s see how we can implement this with an example shown below
Step 1) The first step is to drag the Groupbox control onto the Windows Form from the toolbox as shown below

Step 2) Once the groupbox has been added, go to the properties window by clicking on the groupbox control. In the properties window, go to the Text property and change it to “User Details”.

Once you make the above changes, you will see the following output
Output:-

In the output, you can clearly see that the Groupbox was added to the form. You can also see that the text of the groupbox was changed to “User Details.”
Label Control
Next comes the Label Control. The label control is used to display a text or a message to the user on the form. The label control is normally used along with other controls. Common examples are wherein a label is added along with the textbox control.
The label indicates to the user on what is expected to fill up in the textbox. Let’s see how we can implement this with an example shown below. We will add 2 labels, one which will be called ‘name’ and the other called ‘address.’ They will be used in conjunction with the textbox controls which will be added in the later section.
Step 1) The first step is to drag the label control on to the Windows Form from the toolbox as shown below. Make sure you drag the label control 2 times so that you can have one for the ‘name’ and the other for the ‘address’.

Step 2) Once the label has been added, go to the properties window by clicking on the label control. In the properties window, go to the Text property of each label control.

Once you make the above changes, you will see the following output
Output:-

You can see the label controls added to the form.
Textbox
A textbox is used for allowing a user to enter some text on the Windows application in C#. Let’s see how we can implement this with an example shown below. We will add 2 textboxes to the form, one for the Name and the other for the address to be entered for the user
Step 1) The first step is to drag the textbox control onto the Windows Form from the toolbox as shown below

Step 2) Once the text boxes have been added, go to the properties window by clicking on the textbox control. In the properties window, go to the Name property and add a meaningful name to each textbox. For example, name the textbox for the user as txtName and that for the address as txtAddress. A naming convention and standard should be made for controls because it becomes easier to add extra functionality to these controls, which we will see later on.

Once you make the above changes, you will see the following output
Output:-

In the output, you can clearly see that the Textboxes was added to the form.
List box
A Listbox is used to showcase a list of items on the Windows form. Let’s see how we can implement this with an example shown below. We will add a list box to the form to store some city locations.
Step 1) The first step is to drag the list box control onto the Windows Form from the toolbox as shown below

Step 2) Once the list box has been added, go to the properties window by clicking on the list box control.

- First, change the property of the Listbox box control, in our case, we have changed this to lstCity
- Click on the Items property. This will allow you to add different items which can show up in the list box. In our case, we have selected items “collection”.
- In the String Collection Editor, which pops up, enter the city names. In our case, we have entered “Mumbai”, “Bangalore” and “Hyderabad”.
- Finally, click on the ‘OK’ button.
Once you make the above changes, you will see the following output
Output:-

In the output, you can see that the Listbox was added to the form. You can also see that the list box has been populated with the city values.
RadioButton
A Radiobutton is used to showcase a list of items out of which the user can choose one. Let’s see how we can implement this with an example shown below. We will add a radio button for a male/female option.
Step 1) The first step is to drag the ‘radiobutton’ control onto the Windows Form from the toolbox as shown below.

Step 2) Once the Radiobutton has been added, go to the properties window by clicking on the Radiobutton control.

- First, you need to change the text property of both Radio controls. Go the properties windows and change the text to a male of one radiobutton and the text of the other to female.
- Similarly, change the name property of both Radio controls. Go the properties windows and change the name to ‘rdMale’ of one radiobutton and to ‘rdfemale’ for the other one.
One you make the above changes, you will see the following output
Output:-

You will see the Radio buttons added to the Windows form.
Checkbox
A checkbox is used to provide a list of options in which the user can choose multiple choices. Let’s see how we can implement this with an example shown below. We will add 2 checkboxes to our Windows forms. These checkboxes will provide an option to the user on whether they want to learn C# or ASP.Net.
Step 1) The first step is to drag the checkbox control onto the Windows Form from the toolbox as shown below

Step 2) Once the checkbox has been added, go to the properties window by clicking on the Checkbox control.

In the properties window,
- First, you need to change the text property of both checkbox controls. Go the properties windows and change the text to C# and ASP.Net.
- Similarly, change the name property of both Radio controls. Go the properties windows and change the name to chkC of one checkbox and to chkASP for the other one.
Once you make the above changes, you will see the following output
Output:-

Button
A button is used to allow the user to click on a button which would then start the processing of the form. Let’s see how we can implement this with an example shown below. We will add a simple button called ‘Submit’ which will be used to submit all the information on the form.
Step 1) The first step is to drag the button control onto the Windows Form from the toolbox as shown below

Step 2) Once the Button has been added, go to the properties window by clicking on the Button control.

- First, you need to change the text property of the button control. Go the properties windows and change the text to ‘submit’.
- Similarly, change the name property of the control. Go the properties windows and change the name to ‘btnSubmit’.
Once you make the above changes, you will see the following output
Output:-

Congrats, you now have your first basic Windows Form in place. Let’s now go to the next topic to see how we can do Event handling for Controls.
C# Event Handling for Controls
When working with windows form, you can add events to controls. An event is something that happens when an action is performed. Probably the most common action is the clicking of a button on a form. In C# Windows Forms, you can add code which can be used to perform certain actions when a button is pressed on the form.
Normally when a button is pressed on a form, it means that some processing should take place.
Let’s take a look at one of the event and how it can be handled before we go to the button event scenario.
The below example will showcase an event for the Listbox control. So whenever an item is selected in the listbox control, a message box should pop up which shows the item selected. Let’s perform the following steps to achieve this.
Step 1) Double click on the Listbox in the form designer. By doing this, Visual Studio will automatically open up the code file for the form. And it will automatically add an event method to the code. This event method will be triggered, whenever any item in the listbox is selected.

Above is the snippet of code which is automatically added by Visual Studio, when you double-click the List box control on the form. Now let’s add the below section of code to this snippet of code, to add the required functionality to the listbox event.

- This is the event handler method which is automatically created by Visual Studio when you double-click the List box control. You don’t need to worry about the complexity of the method name or the parameters passed to the method.
- Here we are getting the SelectedItem through the lstCity.SelectedItem property. Remember that lstCity is the name of our Listbox control. We then use the GetItemText method to get the actual value of the selected item. We then assign this value to the text variable.
- Finally, we use the MessageBox method to display the text variable value to the user.
One you make the above changes, and run the program in Visual Studio you will see the following output
Output:-

From the output, you can see that when any item from the list box is selected, a message box will pops up. This will show the selected item from the listbox.
Now let’s look at the final control which is the button click Method. Again this follows the same philosophy. Just double click the button in the Forms Designer and it will automatically add the method for the button event handler. Then you just need to add the below code.

- This is the event handler method which is automatically created by Visual Studio when you double click the button control. You don’t need to worry on the complexity of the method name or the parameters passed to the method.
- Here we are getting values entered in the name and address textbox. The values can be taken from the text property of the textbox. We then assign the values to 2 variables, name, and address accordingly.
- Finally, we use the MessageBox method to display the name and address values to the user.
One you make the above changes, and run the program in Visual Studio you will see the following output
Output:-

- First, enter a value in the name and address field.
- Then click on the Submit button
Once you click the Submit button, a message box will pop, and it will correctly show you what you entered in the user details section.
Tree and PictureBox Control
There are 2 further controls we can look at, one is the ‘Tree Control’ and the other is the ‘Image control’. Let’s look at examples of how we can implement these controls
Tree Control
– The tree control is used to list down items in a tree like fashion. Probably the best example is when we see the Windows Explorer itself. The folder structure in Windows Explorer is like a tree-like structure.
Let’s see how we can implement this with an example shown below.
Step 1) The first step is to drag the Tree control onto the Windows Form from the toolbox as shown below

Step 2) The next step is to start adding nodes to the tree collection so that it can come up in the tree accordingly. First, let’s follow the below sub-steps to add a root node to the tree collection.

- Go to the properties toolbox for the tree view control. Click on the Node’s property. This will bring up the TreeNode Editor
- In the TreeNode Editor click on the Add Root button to add a root node to the tree collection.
- Next, change the text of the Root node and provide the text as Root and click ‘OK’ button. This will add Root node.
Step 3) The next step is to start adding the child nodes to the tree collection. Let’s follow the below sub-steps to add child root node to the tree collection.

- First, click on the Add child button. This will allow you to add child nodes to the Tree collection.
- For each child node, change the text property. Keep on repeating the previous step and this step and add 2 additional nodes. In the end, you will have 3 nodes as shown above, with the text as Label, Button, and Checkbox respectively.
- Click on the OK button
Once you have made the above changes, you will see the following output.
Output:-
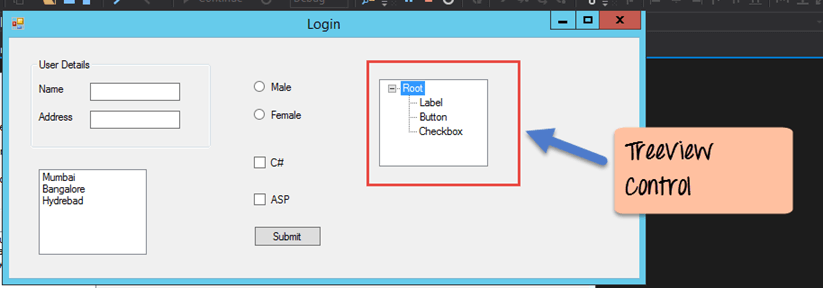
You will be able to see the Tree view added to the form. When you run the Windows form application, you can expand the root node and see the child nodes in the list.
PictureBox Control
This control is used to add images to the Winforms C#. Let’s see how we can implement this with an example shown below.
Step 1) The first step is to drag the PictureBox control onto the C# Windows Form from the toolbox as shown below

Step 2) The next step is to actually attach an image to the picture box control. This can be done by following the below steps.

- First, click on the Image property for the PictureBox control. A new window will pops out.
- In this window, click on the Import button. This will be used to attach an image to the picturebox control.
- A dialog box will pop up in which you will be able to choose the image to attach the picturebox
- Click on the OK button
One you make the above changes, you will see the following output
Output:-

From the output, you can see that an image is displayed on the form.
Summary
- A Windows form in C# application is one that runs on the desktop of a computer. Visual Studio Form along with C# can be used to create a Windows Forms application.
- Controls can be added to the Windows forms C# via the Toolbox in Visual Studio. Controls such as labels, checkboxes, radio buttons, etc. can be added to the form via the toolbox.
- One can also use advanced controls like the tree view control and the PictureBox control.
- Event handlers are used to respond to events generated from controls. The most common one is the one added for the button clicked event.
Windows Forms is a Graphical User Interface(GUI) class library which is bundled in .Net Framework. Its main purpose is to provide an easier interface to develop the applications for desktop, tablet, PCs. It is also termed as the WinForms. The applications which are developed by using Windows Forms or WinForms are known as the Windows Forms Applications that runs on the desktop computer. WinForms can be used only to develop the Windows Forms Applications not web applications. WinForms applications can contain the different type of controls like labels, list boxes, tooltip etc.
Creating a Windows Forms Application Using Visual Studio 2017
- First, open the Visual Studio then Go to File -> New -> Project to create a new project and then select the language as Visual C# from the left menu. Click on Windows Forms App(.NET Framework) in the middle of current window. After that give the project name and Click OK.
 Here the solution is like a container which contains the projects and files that may be required by the program.
 - After that following window will display which will be divided into three parts as follows:
- Editor Window or Main Window: Here, you will work with forms and code editing. You can notice the layout of form which is now blank. You will double click the form then it will open the code for that.
- Solution Explorer Window: It is used to navigate between all items in solution. For example, if you will select a file form this window then particular information will be display in the property window.
- Properties Window: This window is used to change the different properties of the selected item in the Solution Explorer. Also, you can change the properties of components or controls that you will add to the forms.
- Now to add the controls to your WinForms application go to Toolbox tab present in the extreme left side of Visual Studio. Here, you can see a list of controls. To access the most commonly used controls go to Common Controls present in Toolbox tab.
- Now drag and drop the controls that you needed on created Form. For example, if you can add TextBox, ListBox, Button etc. as shown below. By clicking on the particular dropped control you can see and change its properties present in the right most corner of Visual Studio. In the above image, you can see the TextBox is selected and its properties like TextAlign, MaxLength etc. are opened in right most corner. You can change its properties’ values as per the application need. The code of controls will be automatically added in the background. You can check the Form1.Designer.cs file present in the Solution Explorer Window.
- To run the program you can use an F5 key or Play button present in the toolbar of Visual Studio. To stop the program you can use pause button present in the ToolBar. You can also run the program by going to Debug->Start Debugging menu in the menubar.
 Here the solution is like a container which contains the projects and files that may be required by the program.
 In the above image, you can see the TextBox is selected and its properties like TextAlign, MaxLength etc. are opened in right most corner. You can change its properties’ values as per the application need. The code of controls will be automatically added in the background. You can check the Form1.Designer.cs file present in the Solution Explorer Window.
C# Windows Forms is a graphical user interface (GUI) framework that enables developers to create desktop applications for the Windows operating system. Windows Forms applications are created using the C# programming language and the .NET framework. They are built by dragging and dropping controls such as buttons, text boxes, labels, and other user interface elements onto a form.
- The Windows Forms framework provides a rich set of controls that developers can use to build applications with. These controls are designed to provide a consistent and familiar user interface for Windows users. Developers can customize the appearance and behavior of these controls by setting various properties and handling events.
- To create a Windows Forms application in C#, you can use Microsoft Visual Studio, which is an integrated development environment (IDE) that provides a visual designer to create and layout the user interface elements. The visual designer is a drag-and-drop interface for building your UI, and you can easily configure each control’s properties through a user-friendly interface.
- In addition to the visual designer, Visual Studio also provides a code editor that enables developers to write the C# code for the application’s logic. Developers can handle events and perform tasks such as data validation, data manipulation, and business logic implementation.
- Windows Forms applications are versatile and can be used to create various types of applications such as data entry, management, and reporting applications, as well as games and multimedia applications.
Overall, Windows Forms applications provide an easy-to-use and familiar graphical user interface for Windows users, making it an ideal choice for building desktop applications that require a high degree of interactivity and user engagement.
Last Updated :
04 May, 2023
Like Article
Save Article