Вам нужен доступ к файлам приложения, установленного из магазина Microsoft Store? Вот краткое руководство, которое поможет вам в этом процессе.
Приложения Microsoft Store работают как любое другое приложение в вашей системе. Однако при установке они хранятся в отдельной директории. По умолчанию место установки приложений Microsoft Store не отображается.
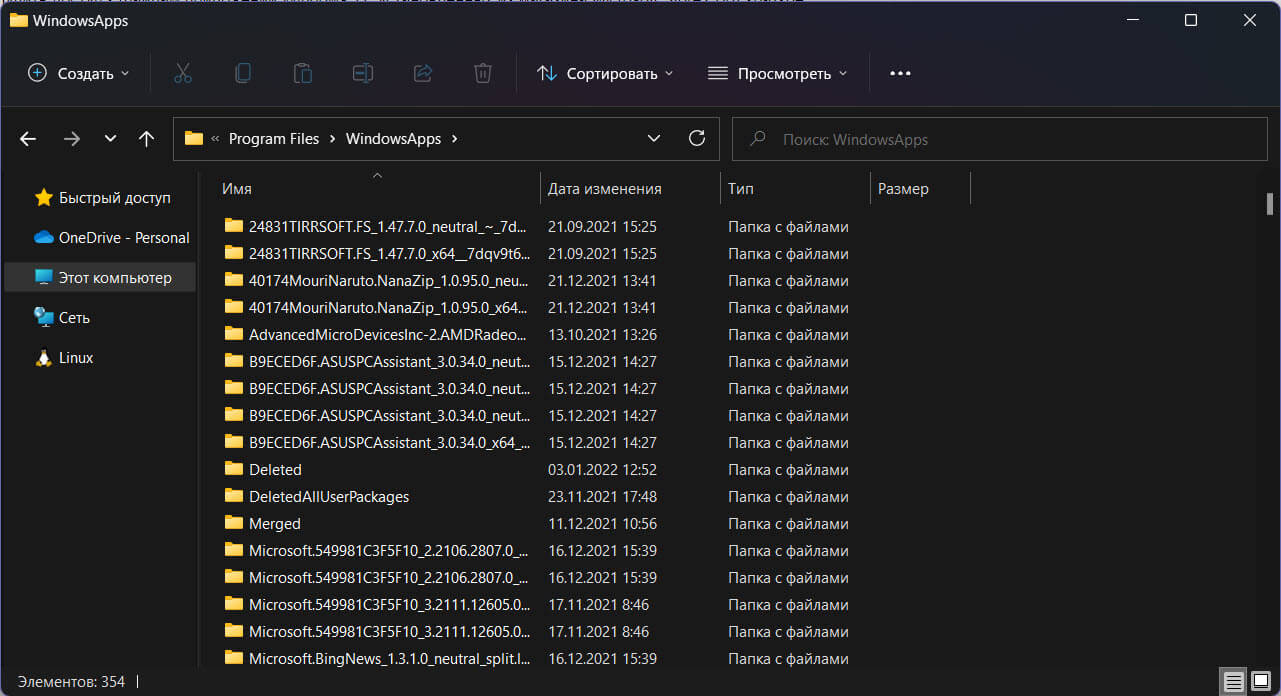
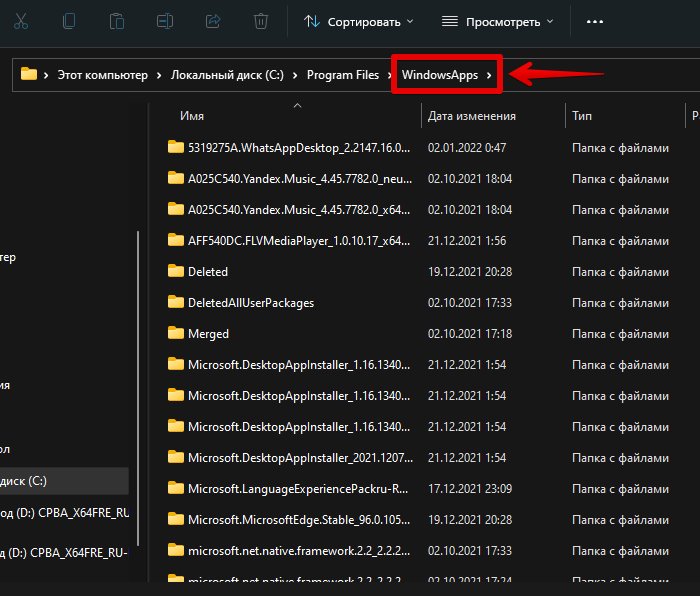
Приложения, загруженные из Microsoft Store, сохраняются на диске, где установлена Windows в каталоге «Program Files» папка «WindowsApps». Эта папка по умолчанию скрыта, но, при желании, можно легко получить доступ к ее содержимому.
Обычному пользователю может показаться, что включение отображения скрытой папки может нанести вред системным файлам, но это не так; многие папки скрыты, потому что содержат техническую информацию, которая не нужна обычному пользователю, либо содержат отчеты о сбоях или другие диагностические данные, которые опять же не очень полезны если вы не продвинутый пользователь.
Как в Windows 11 открыть папку «WindowsApps» и стать ее владельцем
Шаг 1: Чтобы отобразить папку «WindowsApps», содержащую установочные файлы приложений Microsoft Store, откройте «Этот компьютер», в проводнике Windows, вы можете использовать сочетание клавиш Win E.
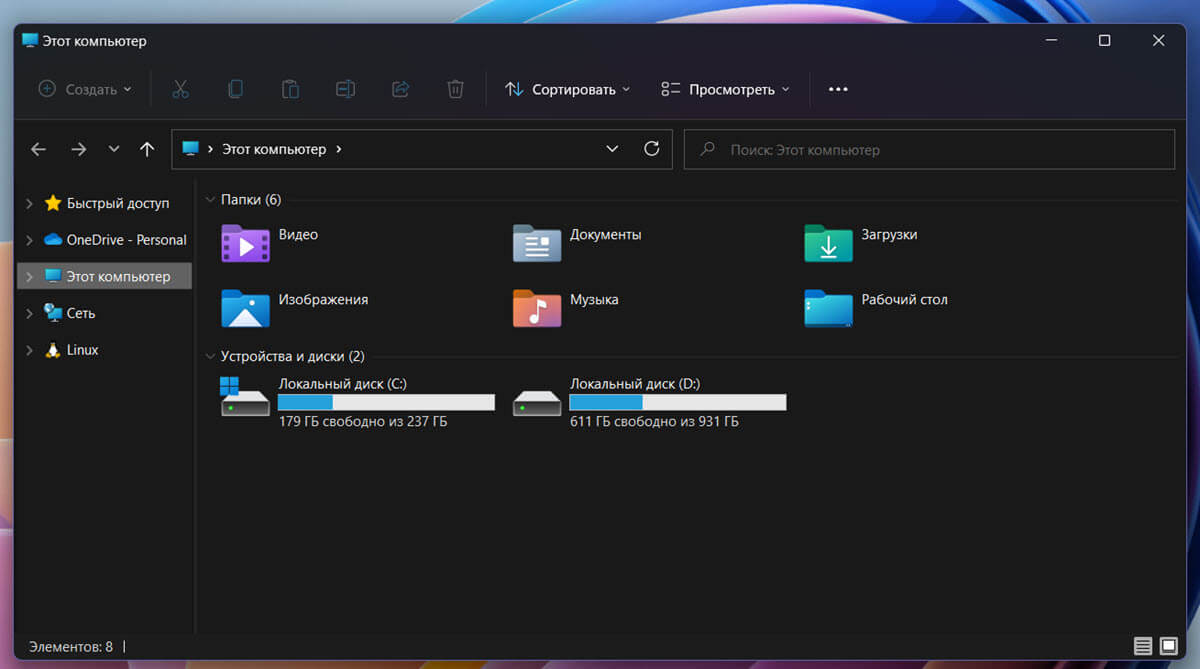
Шаг 2: Затем дважды кликните диск, на котором установлена Windows 11, чтобы открыть его.
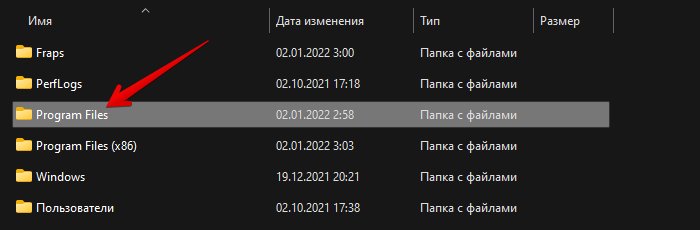
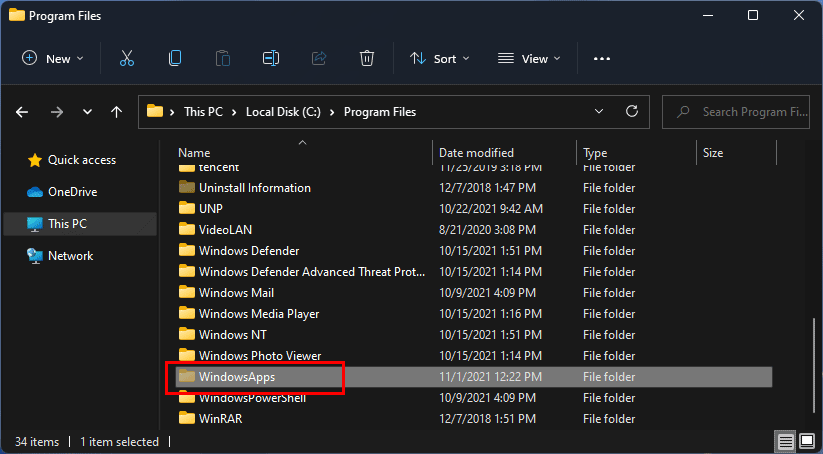
Шаг 3: В следующем окне, найдите в списке папку «Program Files» и дважды кликните по ней, чтобы открыть.
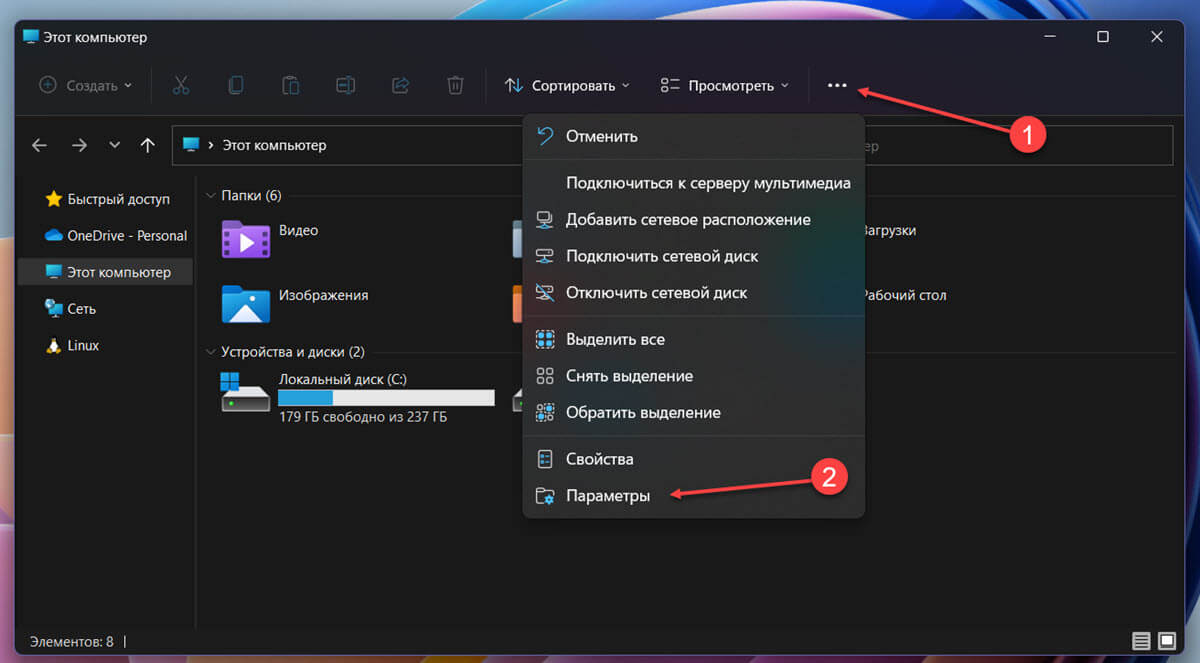
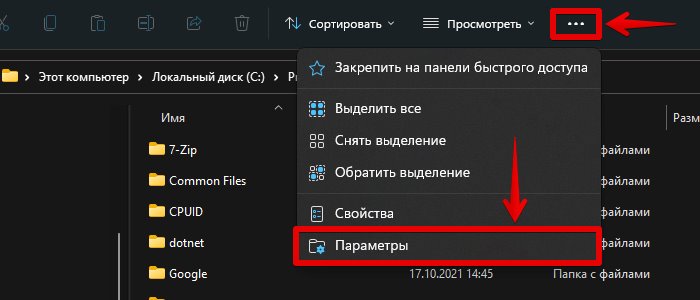
Шаг 4: После этого в меню окна проводника нажмите значок с многоточием (три горизонтальные точки). Затем в контекстном меню выберите опцию «Параметры». На вашем экране откроется отдельное окно.
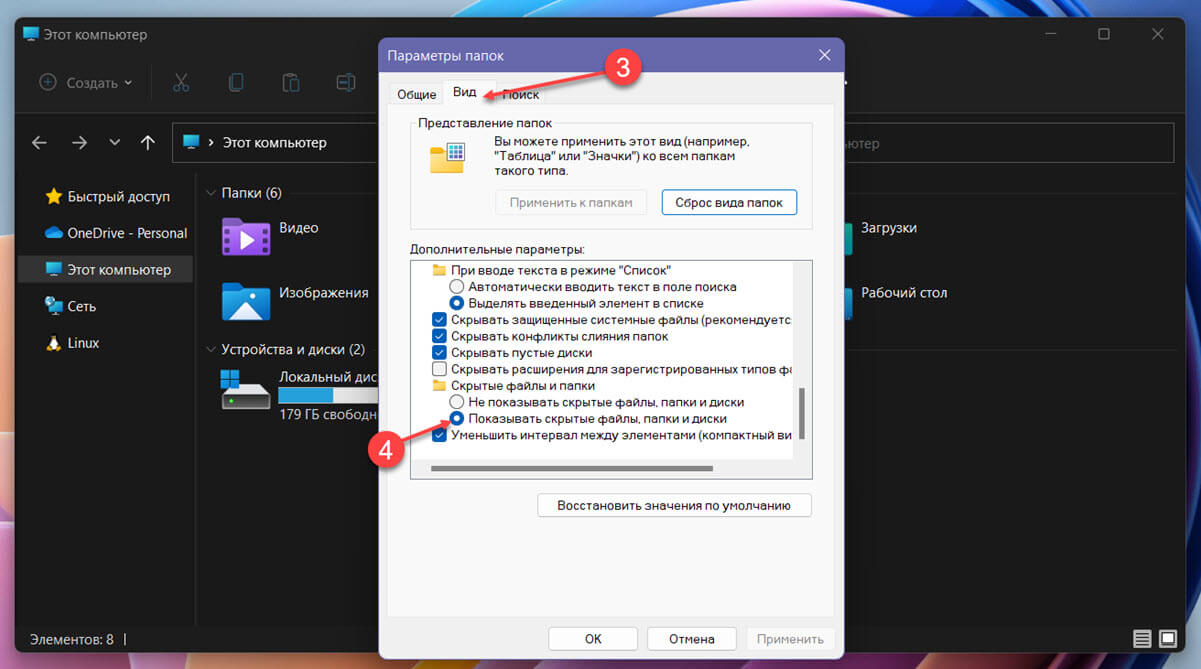
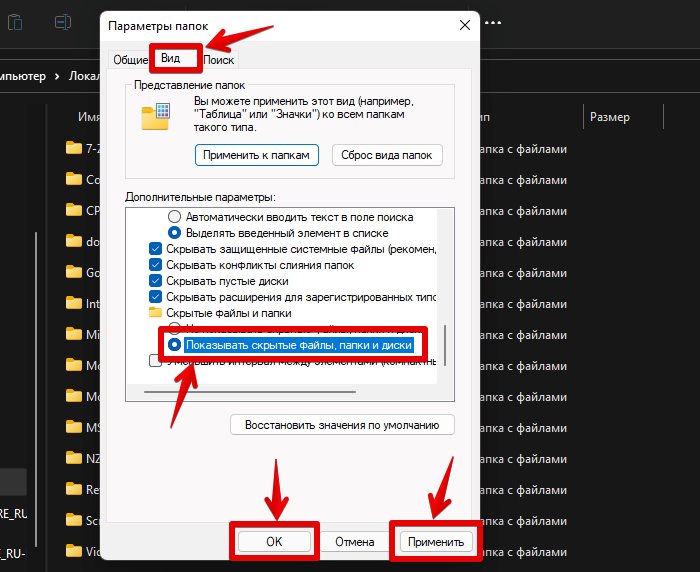
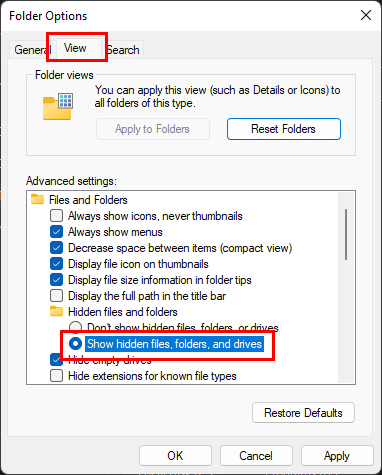
Шаг 5: В отдельно открывшемся окне перейдите на вкладку «Вид» и найдите параметр «Скрытые файлы и папки» в разделе «Дополнительные параметры:». Затем установите флажок перед строкой «Показывать скрытые файлы, папки и диски».
Шаг 6: Нажмите кнопку «Применить», чтобы сохранить изменения, а затем нажмите кнопку «ОК», чтобы закрыть окно.
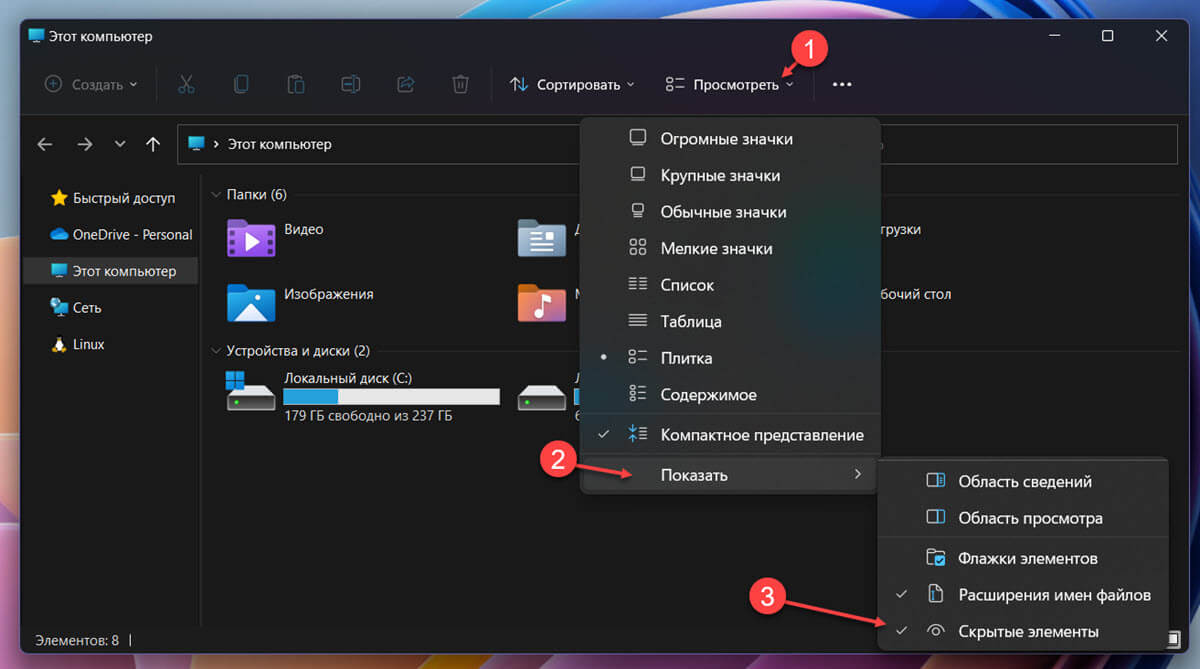
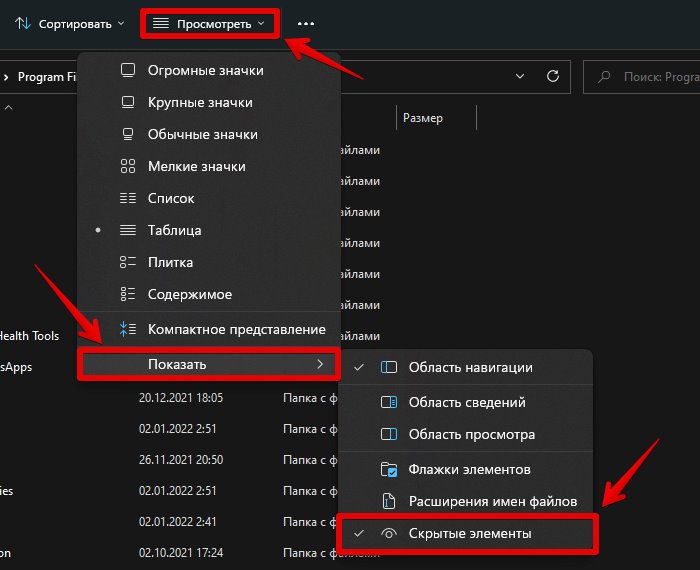
Примечание: В качестве альтернативы есть более простой способ показать скрытые папки. В меню проводника выберите опцию «Просмотреть». Затем наведите в контекстном меню указатель мыши на опцию «Показать» и нажмите на опцию «Скрытые элементы».
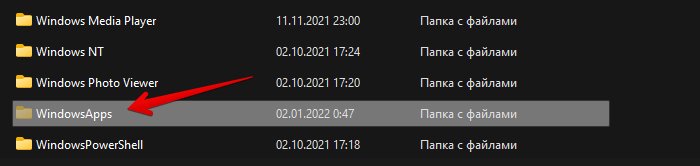
Шаг 7: После этого найдите папку «WindowsApps» и дважды кликните по ней, чтобы продолжить.
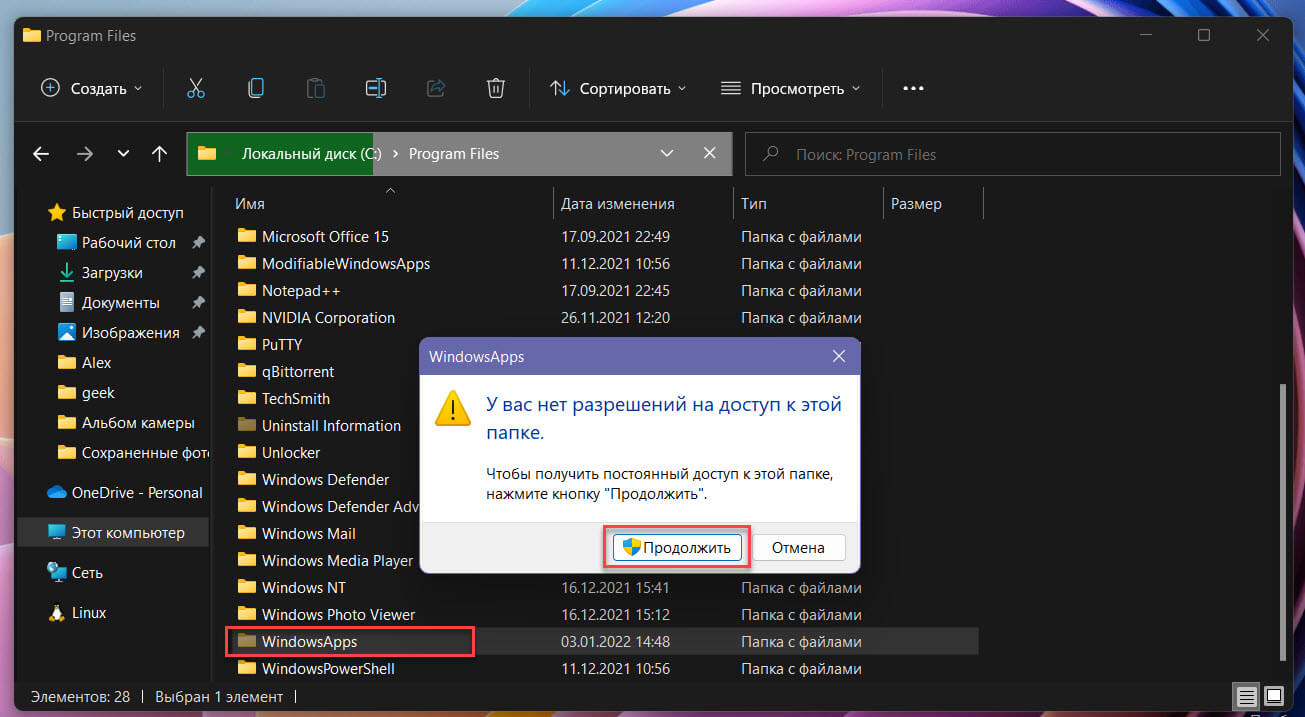
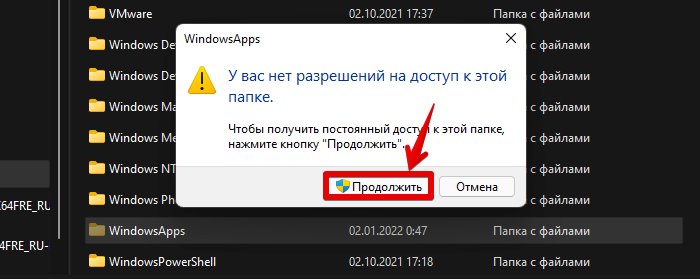
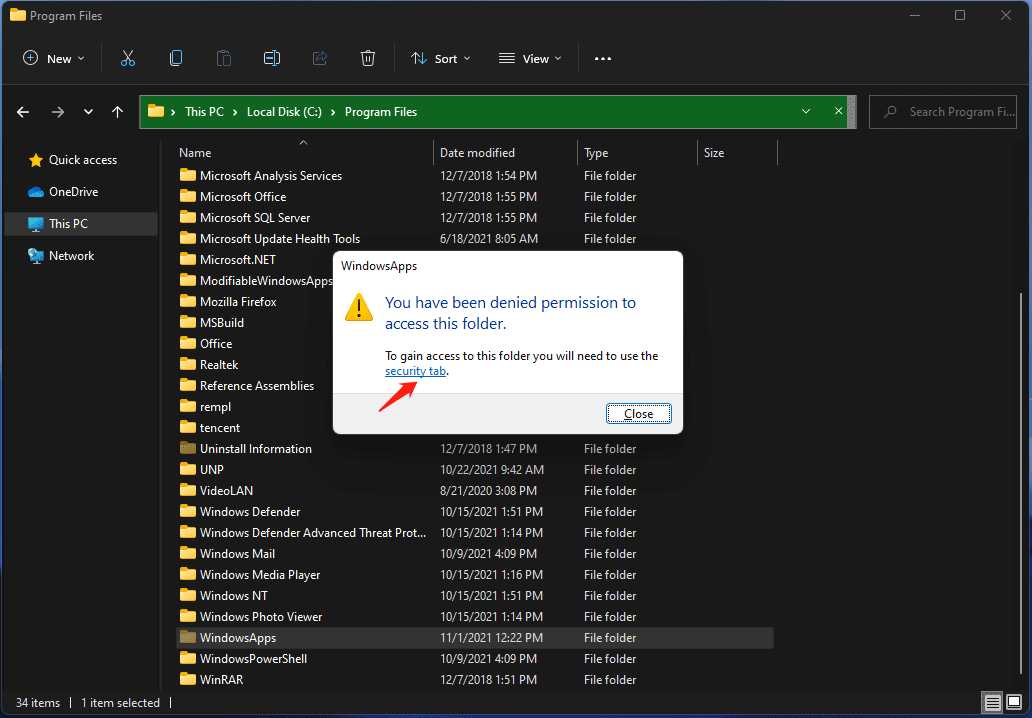
Шаг 8: На вашем экране появится сообщение о том, что у вас нет разрешения на доступ к папке. Нажмите в приглашении кнопку «Продолжить».
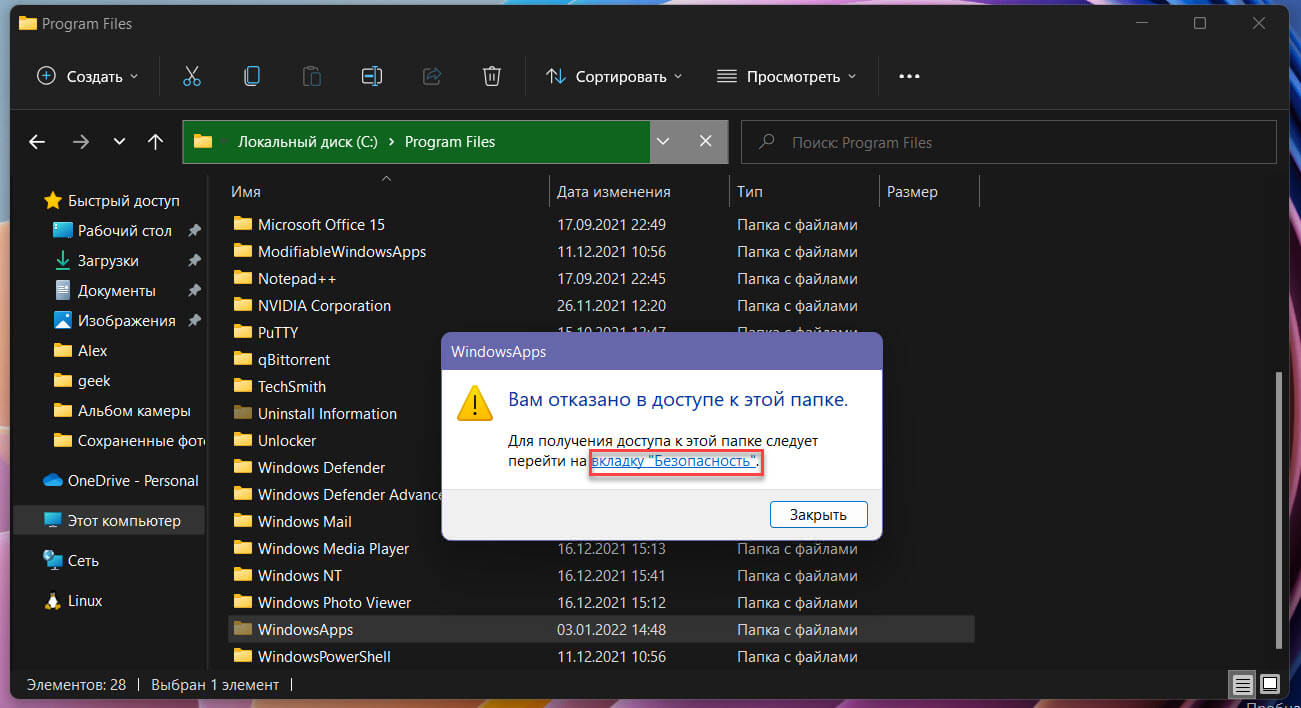
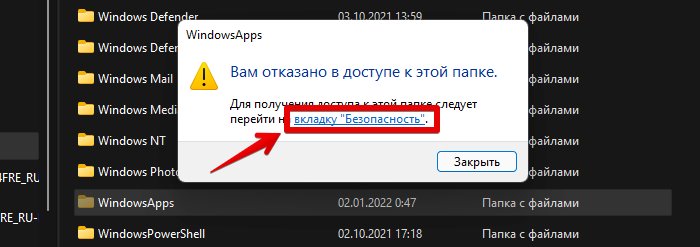
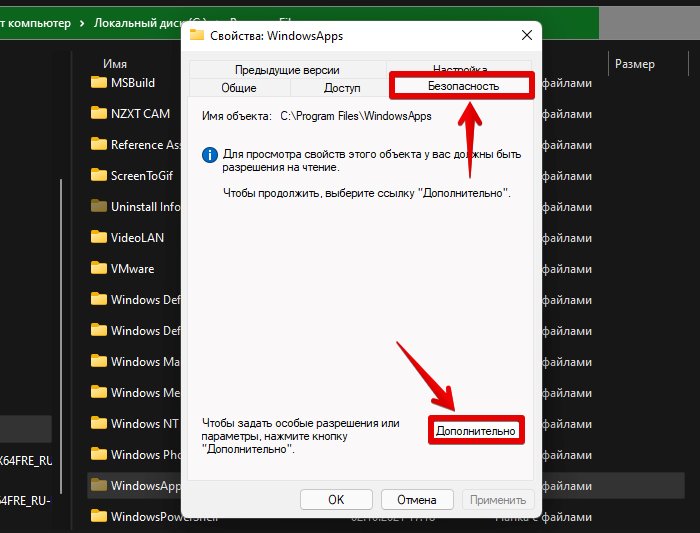
Шаг 9: Снова появляется уведомление о том, что вам отказано в доступе; нажмите ссылку (вкладку «Безопасность»), чтобы продолжить. На вашем экране откроется отдельное окно.
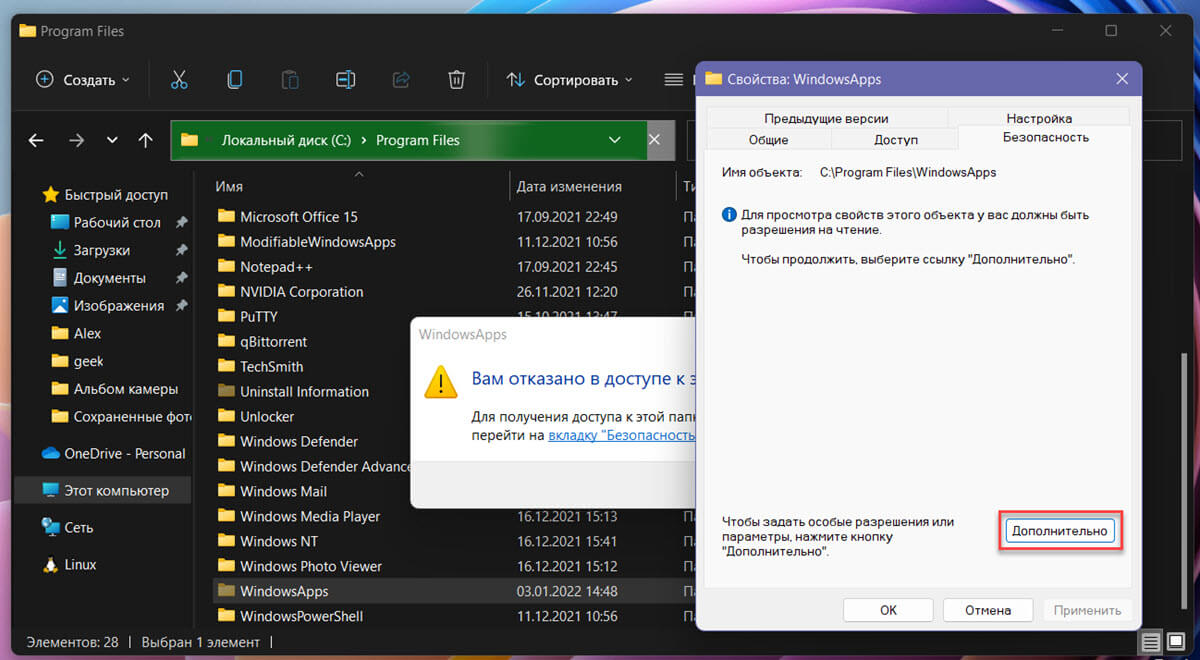
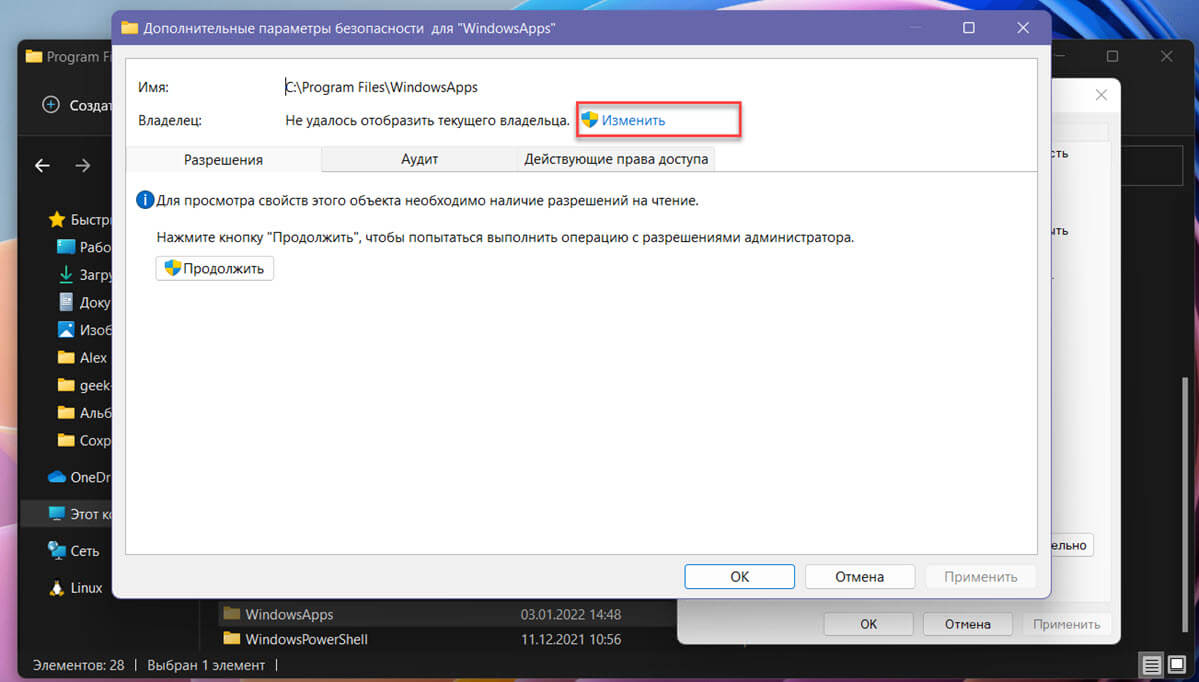
Шаг 10: После этого в окне «Свойства WindowsApps» нажмите кнопку «Дополнительно», чтобы настроить разрешения для доступа к папке. Это снова откроет отдельное окно на вашем экране.
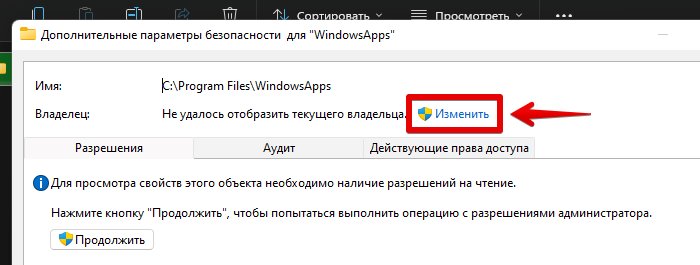
Шаг 11: Затем в «Расширенных настройках безопасности» нажмите кнопку «Изменить» рядом с меткой «Владелец». Откроется окно «Выбор пользователь или группа».
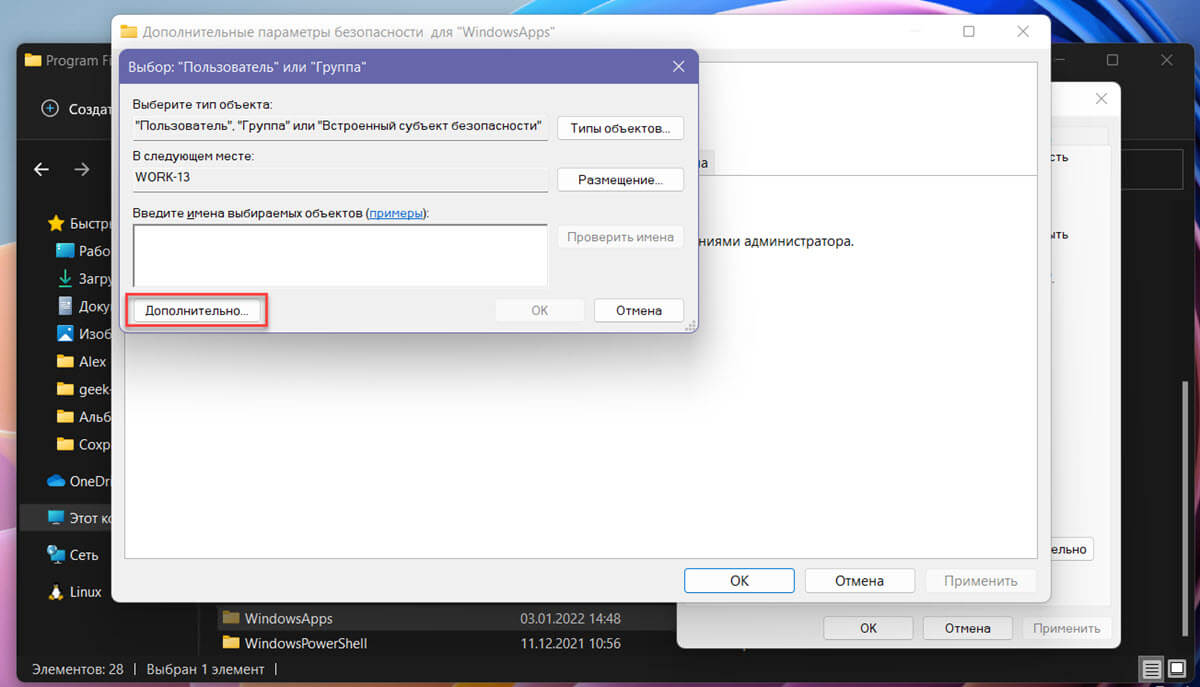
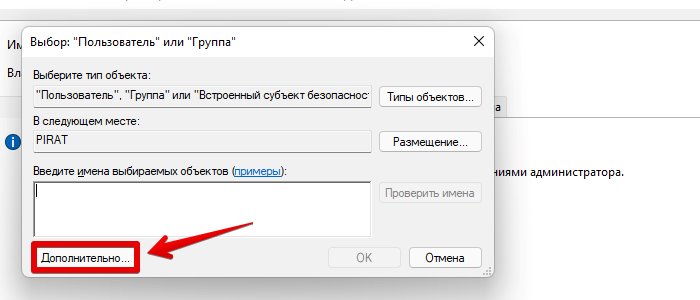
Шаг 12: В окне «Выбор пользователь или группа» нажмите кнопку «Дополнительно…» в нижнем левом углу окна. Это действие снова вызовет отдельное окно.
Шаг 13: Теперь в отдельно открытом окне нажмите кнопку «Поиск», чтобы продолжить. Это заполнит список в разделе «Результаты поиска» ниже.
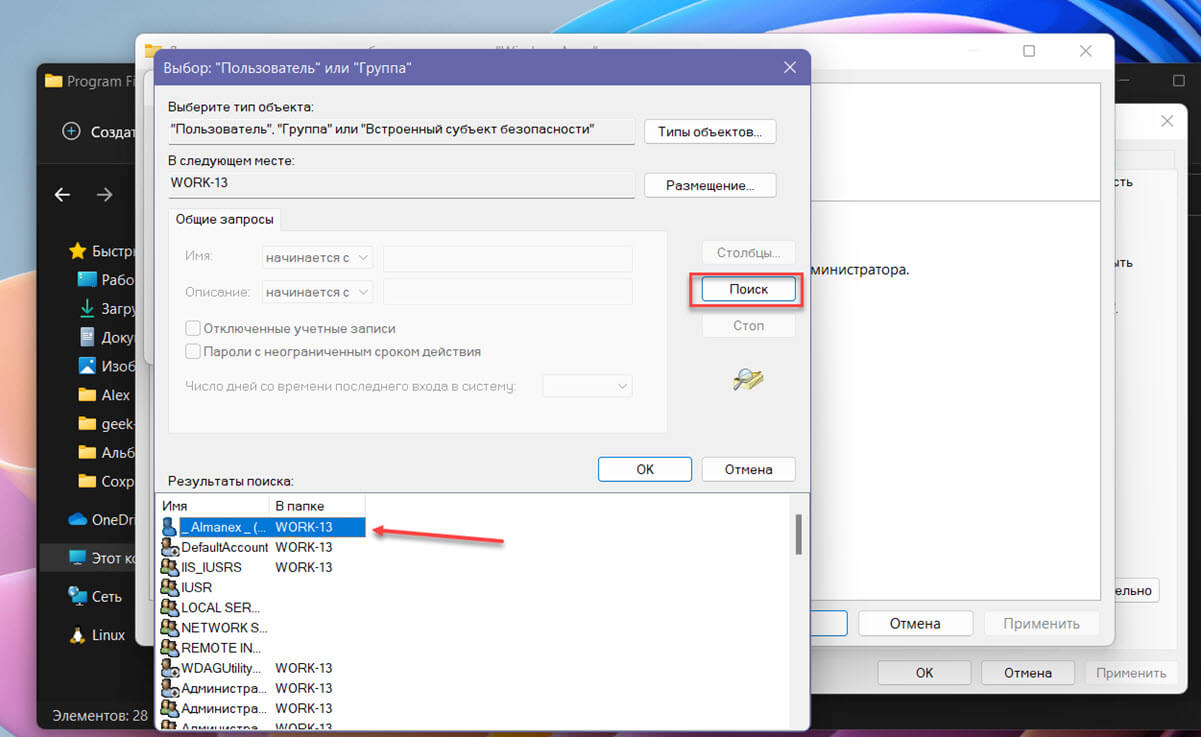
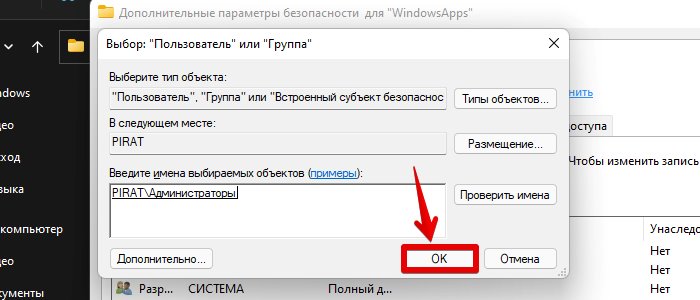
Шаг 14: После этого выберите свое имя пользователя / имя учетной записи из списка и нажмите кнопку «ОК», чтобы выбрать пользователя и закрыть окно.
Шаг 15: Затем в разделе «Выбор пользователь или группа» еще раз нажмите кнопку «ОК», чтобы сменить владельца папки «WindowsApps» и закрыть окно.

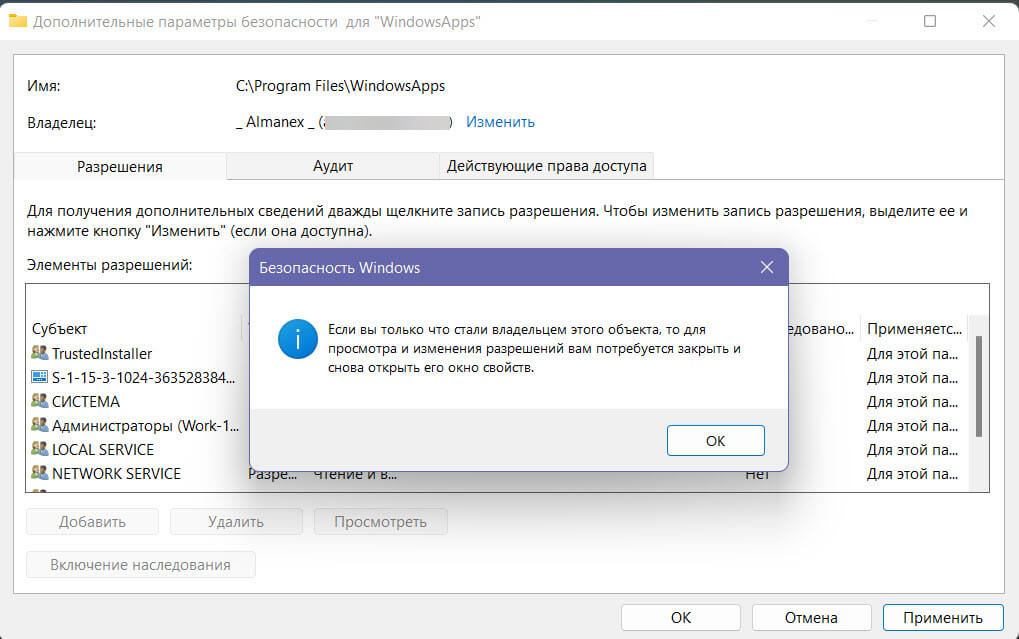
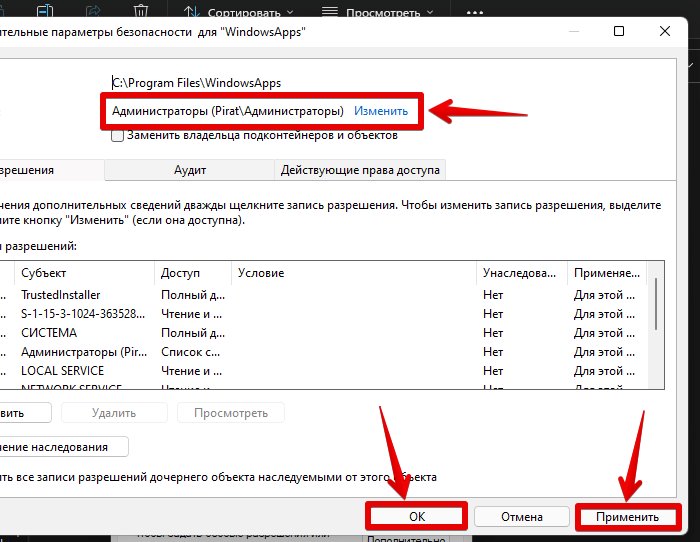
Шаг 16: Теперь в окне «Дополнительные параметры безопасности» для WindowsApps вы сможете подтвердить смену владельца папки. При необходимости установите флажок для опции «Заменить владельца подконтейнеров и объектов». Нажмите кнопку «Применить», чтобы сохранить изменения, и нажмите кнопку «ОК», чтобы закрыть окно.
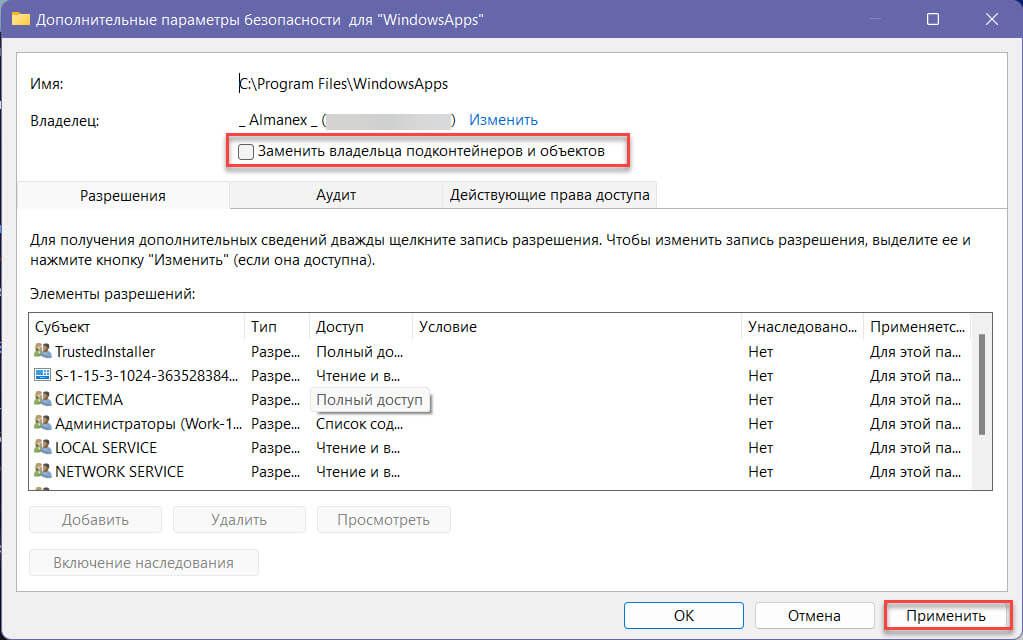
Вы увидите уведомление о том что вы стали владельцем этого объекта.
Шаг 17: Все, Вы справились, дважды кликните папку «WindowsApps», и она откроется как обычная папка.
Рекомендуем:
- Как восстановить владельца TrustedInstaller в Windows 11 \ 10
- Как получить полный доступ к конкретной записи реестра для редактирования или удаления
Нужен доступ к установочным файлам приложений, скаченных из Microsoft Store? Вот краткая инструкция, которая поможет найти приложения
Приложения из Microsoft Store работают как любые другие приложения в нашей системе. Однако место установки приложений из Microsoft Store по умолчанию изменено и скрыто.
Загруженные из Microsoft Store приложения хранятся в папке «WindowsApps» внутри каталога «Program Files» на системном диске Windows. Эта папка скрыта в каждой системе Windows и чтобы её отобразить необходимо проделать следующее:
Открываем «Этот компьютер», дважды щелкнув по ярлыку на рабочем столе. Либо нажимаем горячие клавиши «Win+E» на клавиатуре, чтобы вызвать проводник и в левой части проводника находим «Этот компьютер».

В разделе «Устройства и диски» находим и переходим в системный диск, обычно это «Локальный диск (C:)».

Отобразится список папок, нам нужна папка «Program Files», переходим в неё.
Оказавшись в папке
«Program Files»
, убедимся, что папка «WindowsApps» скрыта (ну мало ли?). Теперь, нажимаем на кнопку «Меню» (троеточие на панели инструментов в верхней части окна) и во всплывающем контекстном меню кликаем по пункту «Параметры».
Откроется окно «Параметры папок», сразу переходим во вкладку «Вид» и в разделе «Дополнительные параметры» находим настройку «Скрытые файлы и папки». Устанавливаем значение «Показывать скрытые файлы, папки и диски», затем нажимаем кнопки «Применить» и «ОК».
Так же существует более простой способ для отображения скрытых файлов и папок — в том же меню щелкаем по раскрывающемуся списку «Просмотреть», затем кликаем на пункт «Показать» и ставим галочку «Скрытые элементы».
Все! Папка «WindowsApps» отображается, скорей заходим в нее.
Но тут нас ждет сюрприз. По умолчанию для доступа к папке необходимы права, о чем нас предупреждает появившееся окно «У вас нет разрешений на доступ к этой папке». Нажимаем кнопку «Продолжить».
Следом появится новое окно «Вам отказано в доступе к этой папке». Давайте открывать доступ! Щелкаем на ссылку «Вкладка Безопасность».
В свойствах папки «WindowsApps» переходим во вкладку «Безопасность» и нажимаем на кнопку «Дополнительно».
В окне дополнительных параметров безопасности находим ссылку «Изменить» напротив пункта «Владелец» и щелкаем по ней.
В окне выбора пользователя или группы нажимаем на кнопку «Дополнительно…».
В нижней части окна отобразятся дополнительные параметры, щелкаем на кнопку «Поиск».

В результатах поиска выбираем пользователя или группу, обладающих правами администратора и щелкаем два раза левой кнопкой мыши, чтобы сделать выбор объекта.

В разделе «Введите имена выбираемых объектов» будет отображаться выбранный объект, после этого нажимаем кнопку «ОК«.
Теперь напротив пункта «Владелец» отображается объект с правами администратора. Для сохранения и подтверждения выбора, щелкаем кнопки «Применить» и «ОК«.
Вауля! Мы можем теперь заходить в папку «WindowsApps» без проблем!
-
Home
-
News
- Where Are Windows Store Apps Installed on Windows 11/10?
By Stella | Follow |
Last Updated
You can directly download many commonly-used apps from Microsoft Store. However, apps from Windows Store are stored in a specified location. Where are Windows Store apps installed? How to access the Windows 11/10 Store apps location? MiniTool Software will show you the answers in this post. Besides, you can want to recover data on Windows 11/10, you can try MiniTool Power Data Recovery.
Where Are Windows Store Apps Installed on Windows 11/10?
Microsoft has updated the Microsoft Store app (you can also call it Windows Store) on Windows 11/10. More and more apps have been added to Windows Store. It is safe to download and install your needed apps from Microsoft Store. At times, you may want to know the Windows 11/10 Store apps location to perform some operations. Well then, where are Microsoft Store apps installed or where does Windows 11/10 install apps?
The apps installed from Microsoft Store are saved to a folder in drive C. The specified location is C:\Program Files\WindowsApps. However, this folder is a hidden folder on your computer. That is, you need to show hidden folders on your Windows 11/10 computer and then you can see the WindowsApps folder in drive C. Besides, you can’t directly open this folder. You must have Read permissions to view this folder.
Where are Windows Store apps installed? Quick Answer: C:\Program Files\WindowsApps.
How to Access the WindowsApps Folder in Drive C?
In this part, we will show you how to open the WindowsApps folder in drive C to view the apps installed from Microsoft Store.
Step 1: Show Hidden Files and Folders on Windows 11/10
Show hidden files and folders on Windows 11
1. Open File Explorer.
2. Click the 3-dot menu on the top toolbar and select Options.

3. The Folder Options interface pops up. Then, you need to switch to the View tab.
4. Under Hidden files and folders, you need to make sure that the Show hidden files, folders, and drives option is selected.
5. Click Apply.
6. Click OK.
Show hidden files and folders on Windows 10
- Open File Explorer.
- From the top toolbar, go to View > Options > Change folder and search options.
- Switch to the View tab.
- Select Show hidden files, folders, and drives under Hidden files and folders in the Advanced settings
- Click Apply.
- Click OK.
Step 2: Gain the Read Permissions to Open the WindowsApps Folder
After showing hidden files and folders in File Explorer, you can go to the Windows 11/10 Store apps location (that is C:\Program Files\WindowsApps). You can see that you can only access the Program Files folder. When you click the WindowsApp folder, you will see an interface pops up, saying You don’t currently have permission to access this folder. Click Continue to permanently get access to this folder.
Now, we will show you how to obtain the permissions to open this folder.
1. Click the Continue button.

2. On the next interface, click the security tab link to continue.
3. WindowsApps Properties interface pops up. Switch to the Security tab and click the Advanced button to continue.

4. Click the Change link to continue.

5. Click Advanced on the next interface.

6. Click Find Now.
7. Select the user name you want to permit to open the WindowsApp folder.

8. Click OK.
9. Click Apply.
10. Click OK.
11. Click OK.
12. Close File Explorer. Then, go to C:\Program Files\WindowsApps. This time, you should open the WindowsApps folder successfully.

Tip: Recover Your Data on Windows 11/10
If your files or folders get lost by mistake on Windows 11/10, you use the free file recovery tool, MiniTool Power Data Recovery, to get them back. This software is specially designed to rescue your lost and deleted files from different kinds of data storage devices.
MiniTool Power Data Recovery TrialClick to Download100%Clean & Safe
Bottom Line
Where are Windows Store apps installed? After reading this post, you should know the answer. You can also use the method mentioned in this post to access that folder to see the details in it. Should you have other related issues, you can let us know in the comments.
About The Author

Position: Columnist
Stella has been working in MiniTool Software as an English Editor for more than 7 years. Her articles mainly cover the fields of data recovery including storage media data recovery and phone data recovery, YouTube videos download, partition management, and video conversions.
Когда вы устанавливаете приложения из Microsoft Store на компьютере под управлением операционной системы Windows 10, они автоматически сохраняются в специальную папку. Это делается для обеспечения удобства использования и управления приложениями.
Папка установки по умолчанию
По умолчанию все приложения, установленные из Microsoft Store, сохраняются в специальной папке «WindowsApps». Эта папка защищена от записи и доступа обычных пользователей, чтобы обеспечить целостность приложений и безопасность операционной системы. Поэтому в обычном режиме в одиночку нельзя безопасно просматривать или изменять файлы в папке «WindowsApps».
Как найти папку «WindowsApps»
По умолчанию папка «WindowsApps» скрыта с целью защиты операционной системы от случайного удаления или изменения файлов важных для работы приложений. Однако, существует несколько способов найти эту папку:
Вариант 1: Использование проводника
- Откройте проводник Windows, щелкнув на иконку папки в панели задач или используя сочетание клавиш Win + E.
- В адресной строке проводника введите %ProgramFiles% и нажмите Enter.
- В появившемся списке найдите папку «WindowsApps».
Вариант 2: Использование командной строки
- Откройте командную строку, нажав Win + X и выбрав «командная строка (администратор)».
- В командной строке введите следующую команду и нажмите Enter:
cd %ProgramFiles%\WindowsApps
Важно отметить
Папка «WindowsApps» предназначена только для хранения установленных приложений, и изменение файлов в этой папке может привести к неправильной работе программ или даже к повреждению операционной системы. Поэтому не рекомендуется изменять файлы или папки внутри «WindowsApps» без необходимости.
Если вам нужно удалить или изменить установленное приложение, рекомендуется использовать стандартные методы удаления приложений Windows 10 через «Настройки» или «Панель управления».
Советы по управлению приложениями
- Если вам нужно создать ярлык для приложения на рабочем столе или в панели задач, щелкните правой кнопкой мыши на приложении в меню «Пуск» или на экране «Все приложения» и выберите «Закрепить на панели задач» или «Отправить на рабочий стол».
- Приложения из Microsoft Store также можно перемещать или переустанавливать на другие диски через настройки «Настройки» > «Система» > «Хранение», выбрав нужный диск для установки новых приложений.
Теперь, когда вы знаете, куда сохраняются приложения из Microsoft Store и как управлять ими, вы можете легко устанавливать, удалять и настроить свои приложения на компьютере под управлением Windows 10.
- Как исправить ошибку в C++ (23): error C3861: size_bits: идентификатор не найден
- Куда сохраняются (в какую папку) программы из Microsoft Store
- Как кончить, если у меня маленький?
- Я так понял, что Анджелина Джоли любила в детстве губу раскатывать?
- Что умеют делать мои мозги?
- Что можно покушать с вареньем?
- Вылезет ли муравей из пылесоса?
- Мой человек — когда приходит это понимание?)))
In this guide, we will be sharing three different methods to open the WindowsApps folder in Windows 11. Generally, if you are having an administrator account on your PC, then you should be able to access all the system directories and files present inside the C Drive. However, in some instances, even being the administrator wouldn’t be sufficient enough to checkmark the required prerequisites.
The perfect example of the same is the inability of an admin to access the WindowsApps folder. Double-click on this folder and it will prompt you of insufficient privileges or in some cases, wouldn’t give out any notification as such. But why is the admin not able to access the contents of this folder? Well, this is because the WindowsApps folder is under the ownership of the built-in Microsoft user account called TrustedInstaller.
So if you are planning to access this folder, you will first have to transfer the ownership from the TrustedInstaller’s account over to your administrator account. And in this guide, we will show you three different methods to do the same. So follow along for the detailed instructions to open the WindowsApps folder in Windows 11.
- UWP Apps in Windows 11: Location, URI, Shortcut, Uninstall
- Where are the Windows 11 Default Icon Files Located
- How to Disable Online Search in Start Menu [Windows 11]
- How to Remove Ads in Windows 11
Open the WindowsApps Folder in Windows 11 via Task Manager
This first method is the least technical of the three but calls for maximum effort. In this method, we will be manually opening the desired UWP app so that its processes get up and running in the background.
Then we will use the Task Manager to access that process’ file location. Doing so shall then directly take us to the WindowsApps directory, inside that Windows app’s folder. So without further ado, let’s put this trick to the test.
Instruction Steps
- To begin with, head over to the Start Menu and launch the desired Windows Store/UWP app (say, Groovy Music).
- Then launch the Task Manager via Ctrl+Shift+Esc shortcut key combinations.
- Then go to the Processes tab and expand the Background Processes section.
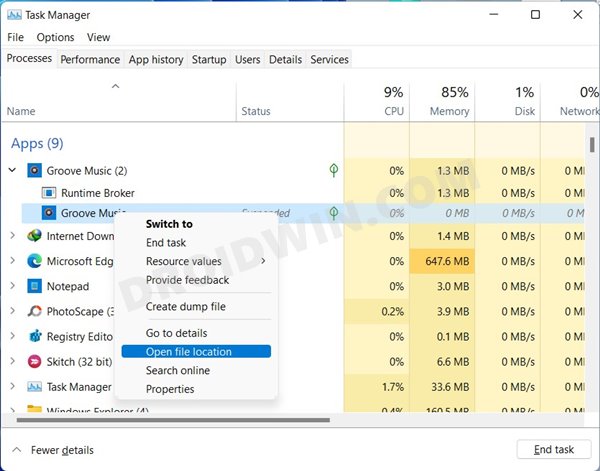
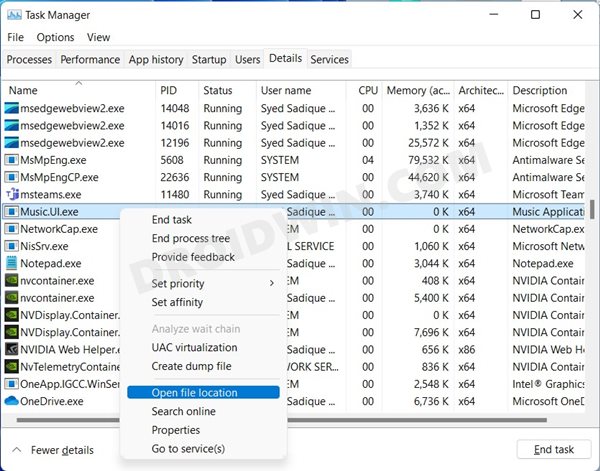
- Now expand the app that you had just opened, right-click on any of its processes and select Open File Location.

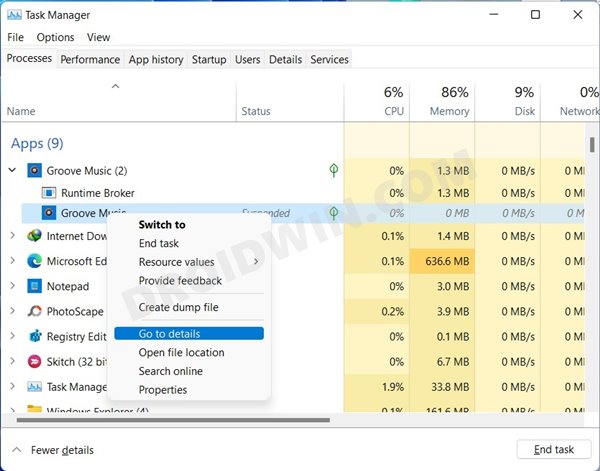
- However, if the Open File Location option is greyed out, then select the “Go to Details” option from the right-click menu.
- This shall take you to the Details tab of Task Manager, with the process selected. Just right-click on it and select Open File Location.
- You shall now be taken to that concerned app’s folder inside WindowsApps. And that’s it, you have successfully accessed the desired folder.

Benefits
You don’t need to carry out any registry editor hacks or make use of a reg file. Likewise, the entire process was fairly simple.
Drawback
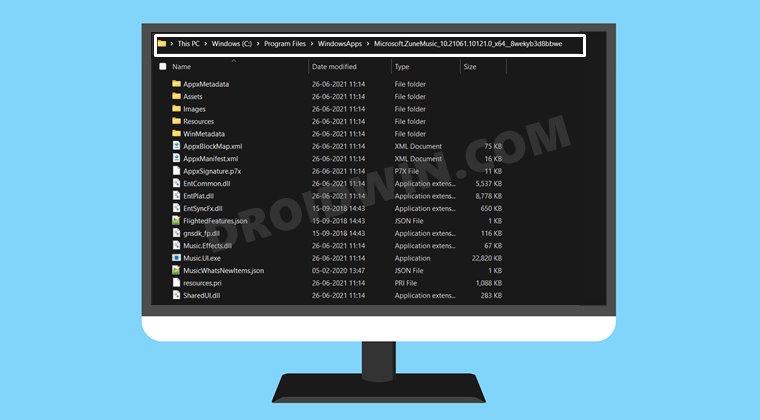
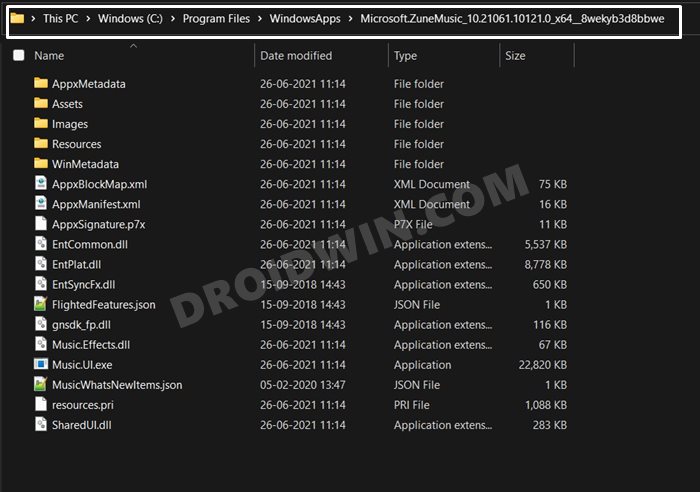
While this method was quite easy to execute, it does have a few drawbacks. First off, you will always have to open the app whose directory you need to access. And secondly, you will only be able to access that app’s directory only, you cannot hit the Back key and access any other app’s folder. As an example, I carried out this task using the Groove Music App and was hence taken to the following directory:
C:\Program Files\WindowsApps\Microsoft.ZuneMusic
Now I cannot hit the Back button and access the parent folder, which is the WindowsApps folder. So this method, at the very most, you could access the individual app’s directory only. To overcome this drawback, you should check out the below two methods to open the WindowsApps folder in Windows 11.
Open the WindowsApps Folder in Windows 11 via Registry Editor
This is the shortest and quickest method to carry out the aforementioned task. In this, you will just have to run a Registry Editor file which will help you to take ownership of the WindowsApps folder from the TrustedInstaller account.
Likewise, it also provides you the option to revert the changes. So once you are done using the WindowsApps folder, you could easily give the ownership back to TrustedInstaller. With that in mind, let’s get started.
Instruction Steps
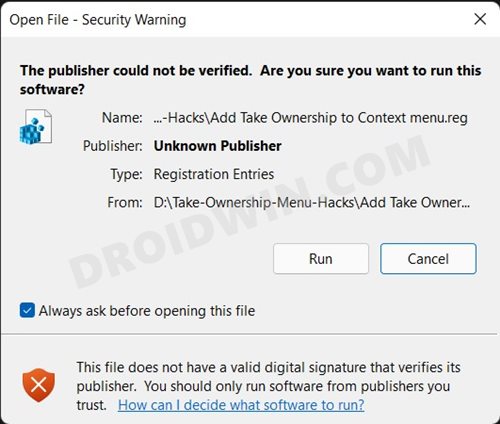
- To begin with, download the Take Ownership Registry File [Credits: HowToGeek] and extract it to any convenient location on your PC.

- Then double click on the Add Take Ownership to Context Menu.reg file and click Run in the dialog box that appears.

- After that, click Yes in the Windows confirmation dialog box. The process will hardly take a few seconds.
- Once done you shall get the “Add Take Ownership to Context Menu.reg has been successfully added to the registry” message.
- Now launch File Explorer via Windows+E shortcut keys and head over to the below location
C:\Program Files
- Right-click on the WindowsApp folder and select Take Ownership. A CMD window will now open confirming the transfer of ownership.
- Once that is done, restart the PC. You shall now be able to able to open and access all the contents of the WindowsApps folder on your Windows 11 PC.

Benefits
First off, it only takes a minute or two to carry out the entire process. Moreover, you could easily revert the changes to the default state and give back the permission to the TrustedInstaller account as and when required. To do so, head over to the extracted Take Ownership Registry File and just run the Remove Take Ownership from Context Menu (Default).reg file.
Risks
Dealing with registry hacks could sometimes prove to be risky, even more so when the publishers aren’t verified. So you will have to exert caution when trying out this tweak.
Open WindowsApps Folder in Windows 11 by Manually Taking Ownership
As is evident from the heading, in this section we will be manually doing the same work that the Registry Editor file did for us in the second method. Follow along.
Instructions Steps
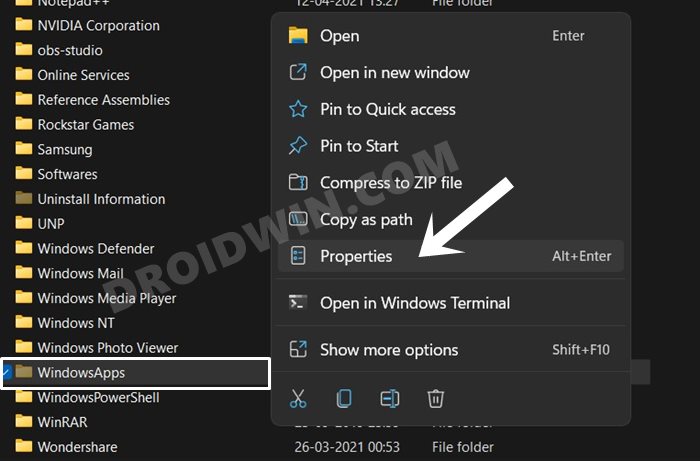
- To begin with, launch File Explorer via Windows+E and go to the below location:
C:\Program Files
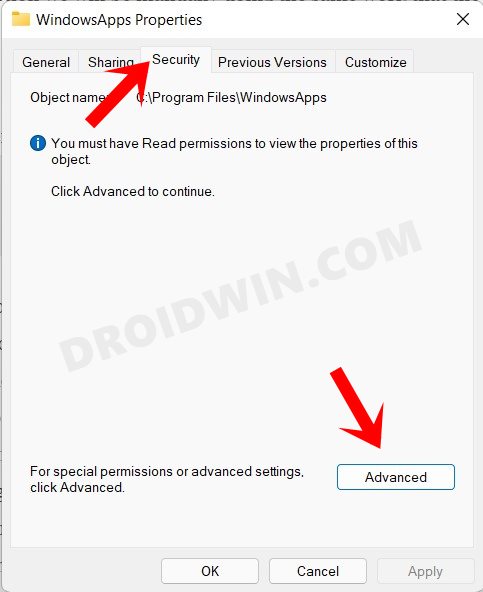
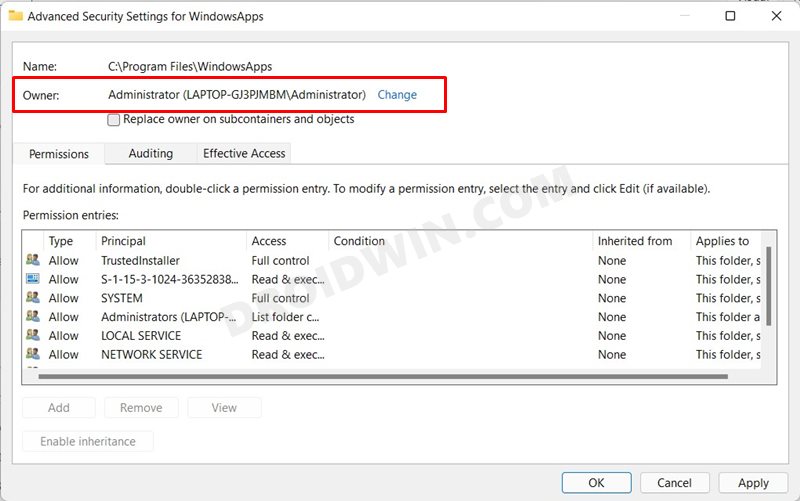
- Now right click on the WindowsApps folder and select Properties.

- Go to the Security tab and then click on the Advanced button situated at the bottom.

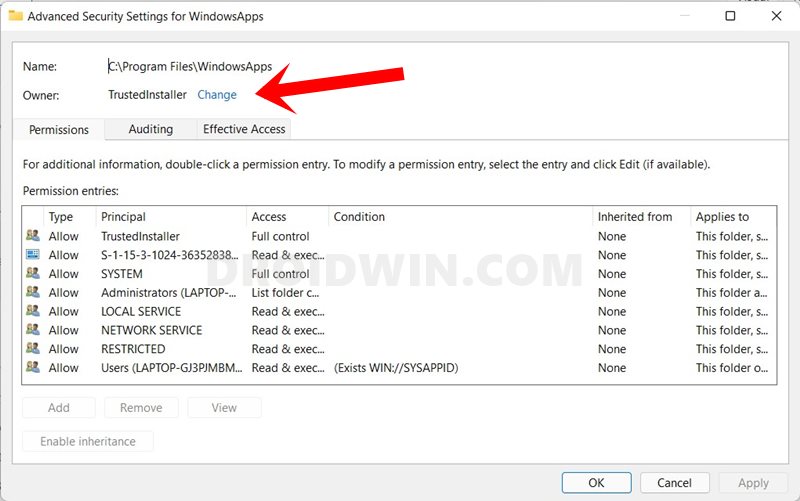
- Then click on the Change button next to Owner: TrustedInstaller.

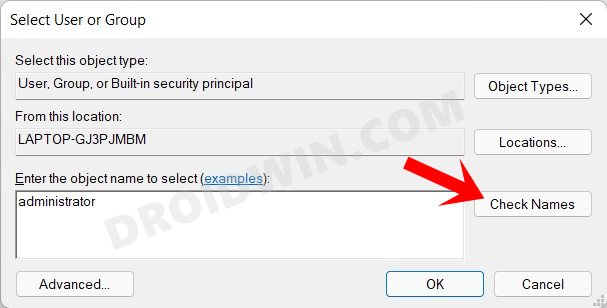
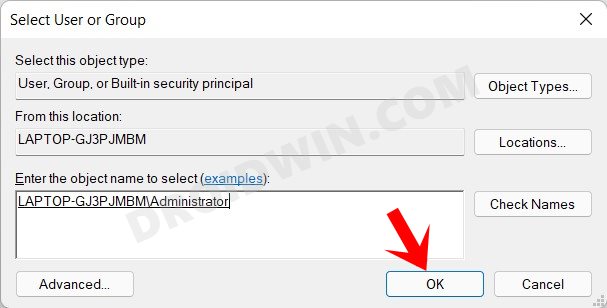
- Under the “Enter Object Names to select” field, type in administrator and click on the Check Names button.

- It shall now bring up your PC’s Administrator name, click OK to continue ahead.
- You shall now see the Owner being changed from TrustedInstaller to your administrator account.
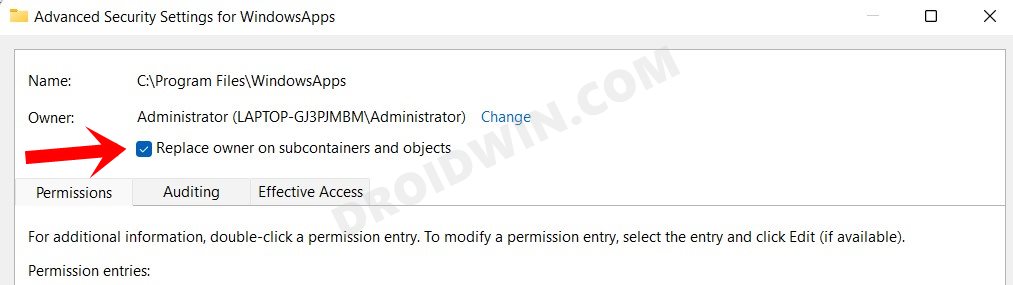
- Now, check-mark the “Replace owner on sub containers and objects” option situated just beneath the Owner field.

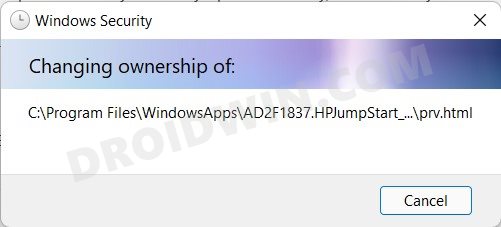
- Finally, click Apply > OK to save the changes. Windows will now begin the process of transferring the ownership.

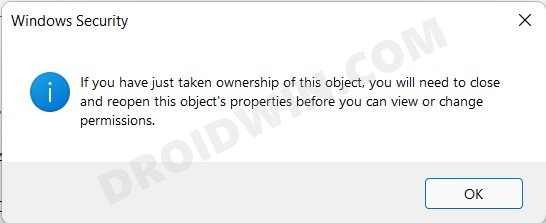
- Once done, you shall get a notification something along the lines of “If you have just taken ownership of this object…..”. Hit OK to close it.

- That’s it. You will now be able to open and access the WindowsApps folder on your Windows 11 PC.
Benefit
Unlike the first method, you will be able to access the entire directory and not just be limited to a particular app. Moreover, this method doesn’t require you to tweak any registry editor setting.
Drawback
This is quite a lengthy method and calls for maximum effort out of the three approaches that we have shared here.
Conclusion: Easily Access the WindowsApps Folder!
So with this, we round off the guide on how you could open the WindowsApps folder on your Windows 11 PC. We have shared three different methods for the same. Likewise, we have also listed the perks and caveats of each of these three methods. Do let us know in the comments section which method you ultimately decided to settle for. Likewise, all queries are welcomed in the comments below.
- How to Remove Evaluation Copy Watermark from Windows 11
- [5 Methods] How to Disable or Uninstall OneDrive in Windows 11
- Uninstall Apps using Command Prompt (CMD) or Powershell in Windows 11
- How to Change Refresh Rate in Windows 11
About Chief Editor

Sadique Hassan
administrator
A technical geek by birth, he always has a keen interest in the Android platform right since the birth of the HTC Dream. The open-source environment always seems to intrigue him with the plethora of options available at his fingertips. “MBA by profession, blogger by choice!”