Время на прочтение
9 мин
Количество просмотров 91K

У опытного программиста, сталкивающегося с новой технологией для решения конкретной прикладной задачи, сразу возникает множество практических вопросов. Как правильно установить платформу? Где и что будет лежать после установки? Как создать каркас проекта, как он будет структурирован? Как разбивать код на модули? Как добавить библиотеку в проект? Где вообще взять готовую библиотеку, которая делает то, что нужно? Как и в чём отлаживать код? Как написать модульный тест?
Ответы на эти вопросы можно при желании легко найти в сети, но придётся перечитать дюжину статей, и на каждый вопрос ответов будет, скорее всего, несколько. Некоторое время назад мне понадобилось написать небольшой туториал по node.js, который бы позволил быстро запустить разработку и познакомить новых программистов в проекте с этой технологией. Рассчитан он на опытных Java-разработчиков, которые и язык JavaScript хорошо знают, но node.js как платформа для бэкэнда для них в новинку.
Думаю, что данная статья будет полезна не только разработчикам из мира Java, но и всем, кто начинает работу с платформой node.js.

Установка и настройка
Установка node и npm
Windows
Установка node.js под Windows производится с помощью msi-инсталлятора. Для его загрузки нужно перейти на сайт https://nodejs.org и щёлкнуть «Install». После скачивания инсталлятора (файл с именем вида node-v0.12.4-install.msi) необходимо запустить его и следовать инструкциям по установке.

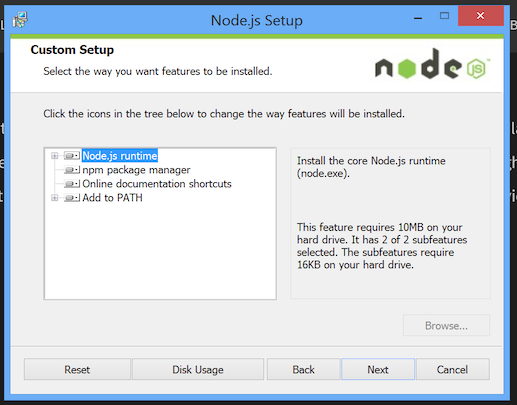
По умолчанию под Windows node.js устанавливается в папку c:\Program Files\nodejs. Также по умолчанию устанавливаются все компоненты (собственно node.js, пакетный менеджер npm, ссылка на документацию; кроме того, путь к node и npm прописывается в переменную среды PATH). Желательно убедиться, что все компоненты установки выбраны.
OS X
В OS X проще всего установить node через менеджер пакетов brew. Для этого необходимо выполнить команду:
> brew install node
Node установится в папку /usr/local/Cellar/<версия>/node с постоянным симлинком /usr/local/opt/node/.
Ubuntu (x64)
Для установки последней ветки (0.12) лучше скачать дистрибутив с сайта:
wget http://nodejs.org/dist/v0.12.4/node-v0.12.4-linux-x64.tar.gz
sudo tar -C /usr/local --strip-components 1 -xzf node-v0.12.4-linux-x64.tar.gz
Дистрибутив распакуется в папку /usr/local в подпапки bin, include, lib и share.
Проверка установки
Для проверки корректности установки можно запустить в командной строке node и npm с параметром —version:
> node --version
v0.12.4
> npm --version
2.10.1
Установка плагина в IntelliJ IDEA
Запустим IntelliJ IDEA, зайдём в настройки.
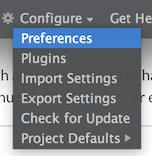
Найдём раздел Plugins и щёлкнем «Install JetBrains Plugin…»
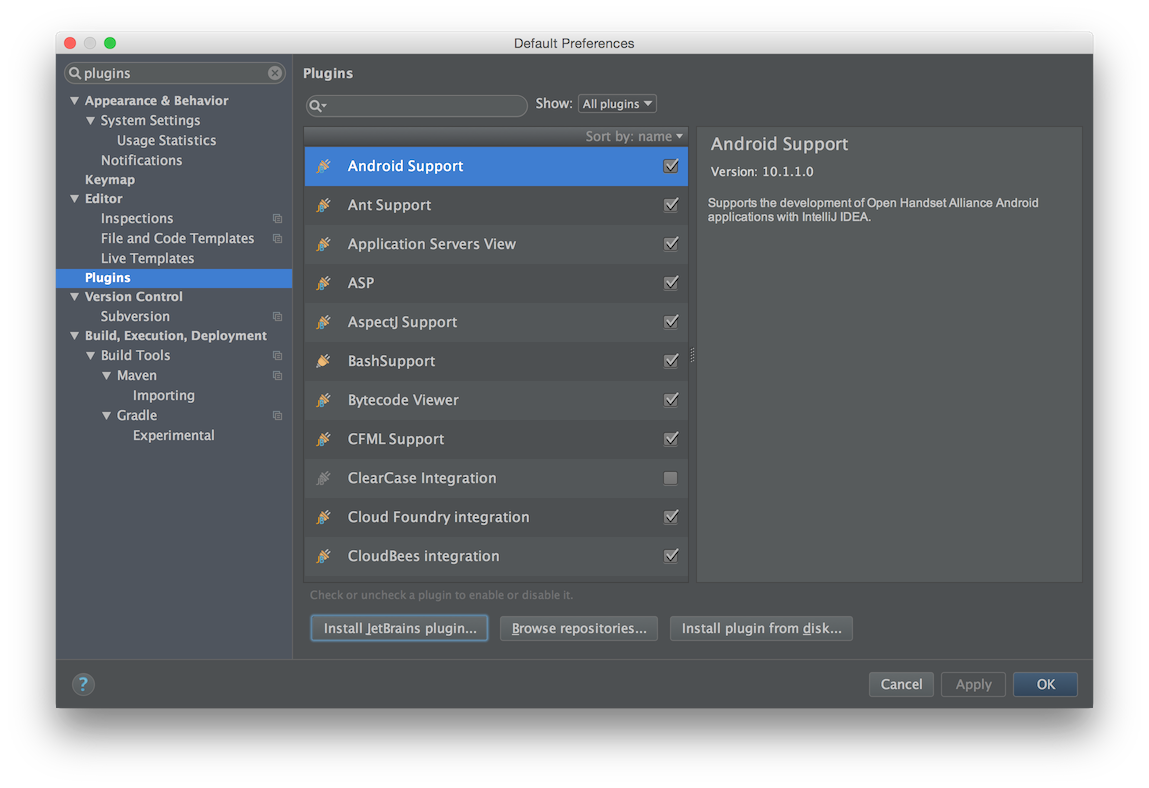
Найдём в списке плагин NodeJS, щёлкнем по кнопке «Install Plugin». По окончании загрузки кнопка превратится в «Restart IntelliJ IDEA» — щёлкнем её для перезагрузки среды.

После перезагрузки зайдём в настройки и найдём раздел Languages & Frameworks -> Node.js and NPM. Убедимся, что в разделе «Node interpreter» указана ссылка на установленный исполняемый файл node.
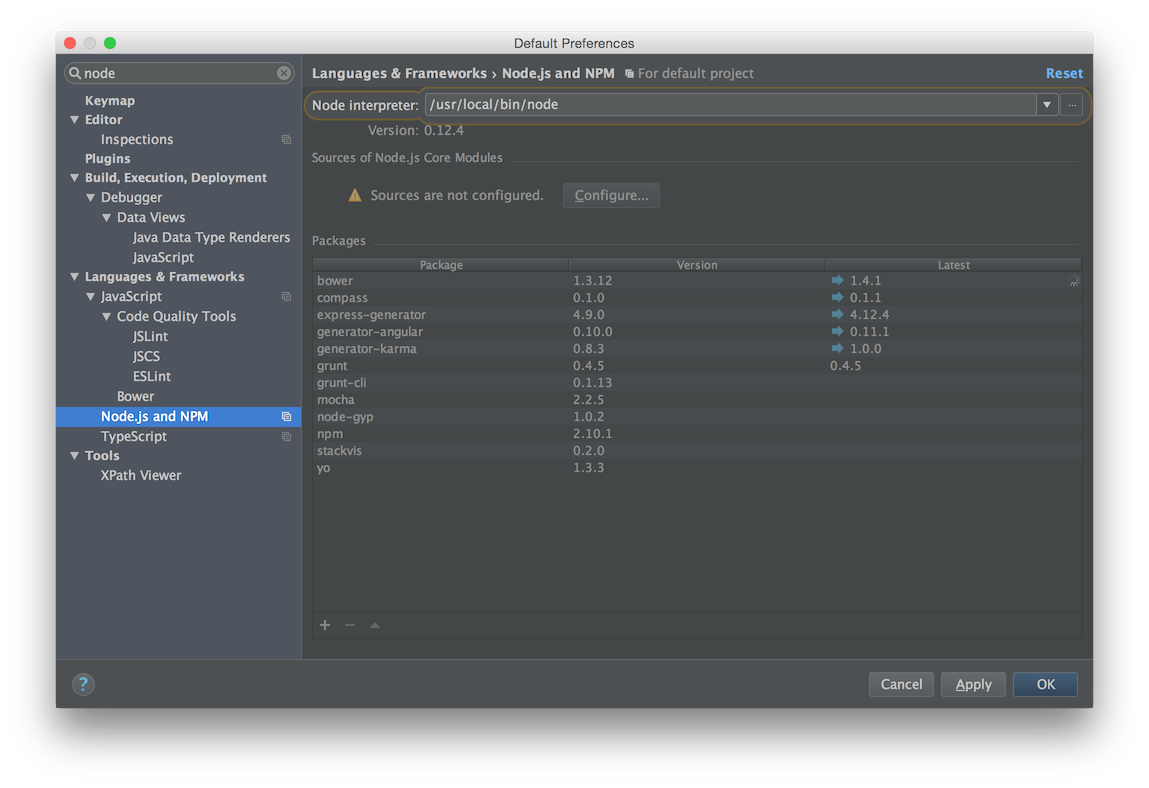
В разделе «Sources of node.js Core Modules» щёлкнем кнопку «Configure». В появившемся окне выберем «Download from the Internet» и щёлкнем «Configure», при этом скачаются и проиндексируются исходники node.js. Это позволит просматривать исходники при разработке.

В разделе packages отображаются глобально установленные пакеты (см. раздел «Глобальные пакеты»). В этом окне можно добавлять, удалять и обновлять эти пакеты. Если рядом с именем пакета отображается синяя стрелочка, значит, доступно обновление. Глобально лучше устанавливать только пакеты-утилиты.
Первые шаги
Пишем «Hello World»
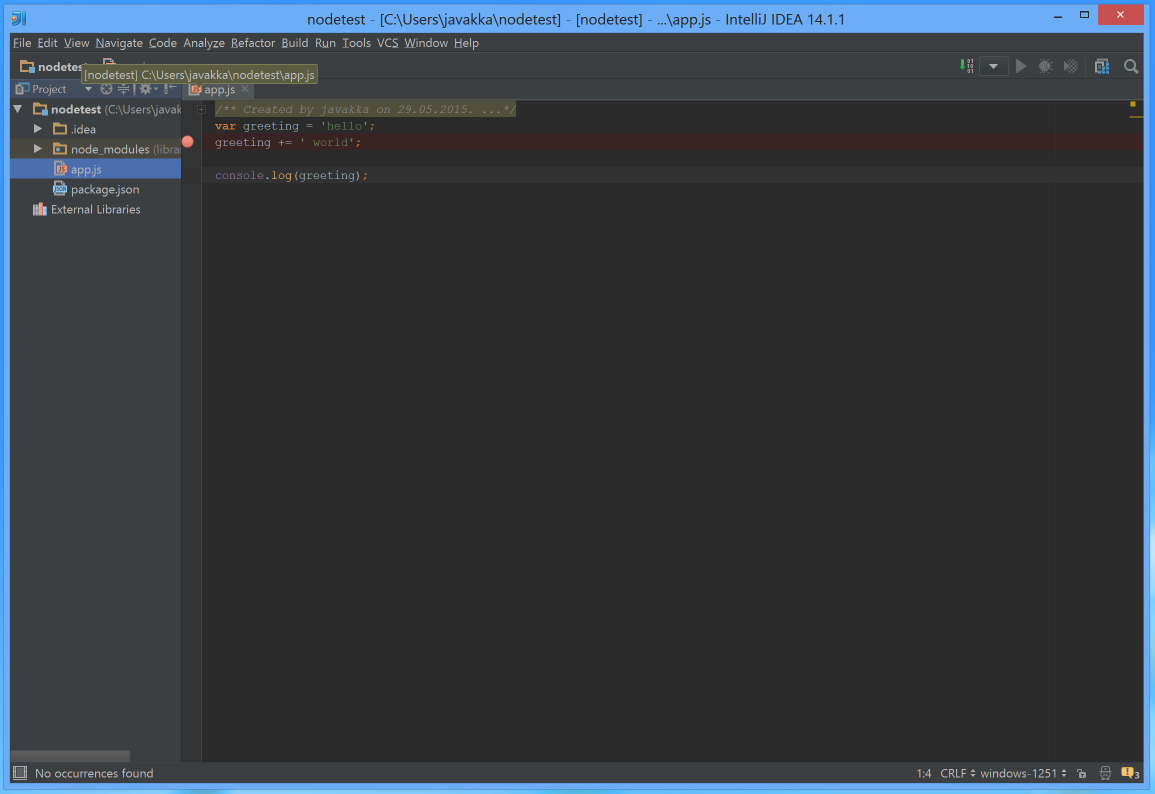
Создадим файл app.js, который формирует и выводит соответствующую строчку в консоль:
// файл app.js
var greeting = 'hello';
greeting += ' world!';
console.log(greeting);
Запустим его командой:
> node app.js
hello world!
Используем REPL
Запустив команду node без аргументов, можно попасть в REPL-цикл, аналогичный браузерной JS-консоли. В нём можно выполнять и проверять фрагменты кода:
> node
> console.log('hello world!')
hello world!
undefined

> [1, 2, 3].reduce(function(sum, item){return sum + item}, 0)
6
Каждая выполненная строчка имеет возвращаемый результат, который также выводится в консоль. Функция console.log() не возвращает результата, поэтому после её вызова в консоли вывелось «undefined».
В REPL-консоли работает автодополнение по нажатию клавиши Tab. Например, если написать «console.» и нажать Tab, то отобразится список атрибутов и функций объекта console.
> console.

console.__defineGetter__      console.__defineSetter__
console.__lookupGetter__      console.__lookupSetter__
console.__proto__             console.constructor
console.hasOwnProperty        console.isPrototypeOf
console.propertyIsEnumerable  console.toLocaleString
console.toString              console.valueOf

console.assert                console.dir
console.error                 console.info
console.log                   console.time
console.timeEnd               console.trace
console.warn
console.Console               console._stderr
console._stdout               console._times


> console.
Для выхода из консоли можно нажать Ctrl+D.
Работа с npm
Инициализация проекта
Для инициализации проекта выполним в каталоге будущего проекта команду npm init и введём необходимые данные в интерактивном режиме (можно просто нажимать Enter, так как предлагаются внятные настройки по умолчанию):
> npm init
This utility will walk you through creating a package.json file.
It only covers the most common items, and tries to guess sensible defaults.

See `npm help json` for definitive documentation on these fields and exactly what they do.

Use `npm install <pkg> --save` afterwards to install a package and
save it as a dependency in the package.json file.

Press ^C at any time to quit.
name: (nodetest)
version: (1.0.0)
description: my first node application
entry point: (index.js) app.js
test command:
git repository:
keywords:
author:
license: (ISC)
About to write to ***\package.json:

{
  "name": "nodetest",
  "version": "1.0.0",
  "description": "my first node application",
  "main": "app.js",
  "scripts": {
    "test": "echo \"Error: no test specified\" && exit 1"
  },
  "author": "",
  "license": "ISC"
}

Is this ok? (yes)
По окончании выполнения утилиты в текущем каталоге будет создан файл package.json, описывающий конфигурацию проекта. В нём же будет храниться информация о зависимостях проекта.
Добавление пакетов-зависимостей в проект
Чтобы установить зависимость в проект, используется команда npm install. При этом в текущем каталоге будет создана папка node_modules, в которую будет помещён загруженный пакет. Ключ —save означает, что информация об этой зависимости будет добавлена также в package.json. Например, установим пакет log4js для протоколирования:
> npm install --save log4js
log4js@0.6.25 node_modules/log4js
├── async@0.2.10
├── underscore@1.8.2
├── semver@4.3.4
└── readable-stream@1.0.33 (isarray@0.0.1, inherits@2.0.1, string_decoder@0.10.31, core-util-is@1.0.1)
После выполнения этой команды обнаружим, что в текущем каталоге появилась папка node_modules\open, а в файле package.json добавилась запись:
  "dependencies": {
    "log4js": "0.6.25"
  }
Запись о зависимости можно добавить в файл package.json и вручную, но после этого необходимо выполнить npm install, чтобы загрузить указанную зависимость в каталог node_modules.
Глобальные пакеты
Пакеты можно устанавливать как в каталог проекта, так и глобально, тогда они будут видны для всех проектов. Как правило, глобально устанавливаются только пакеты, являющиеся утилитами, например, утилита управления зависимостями bower, сборщики gulp и grunt, генератор проектов на Express express-generator, и т.д.
Глобальные пакеты устанавливаются:
- В Windows 8 — в %USERPROFILE%\AppData\Roaming\npm\node_modules,
- В OS X — в /usr/local/lib/node_modules,
- В Ubuntu — в /usr/local/lib/node_modules.
Чтобы установить пакет глобально, команда npm выполняется с ключом -g:
npm install -g grunt
Работа в IntelliJ IDEA
Открытие проекта
Чтобы открыть проект на node.js, достаточно открыть папку, содержащую package.json.
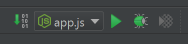
Настройка конфигурации запуска
Для запуска и отладки в IntelliJ IDEA необходимо создать конфигурацию запуска. Для этого зайдём в Run -> Run Configurations, щёлкнем плюсик в левом верхнем углу и выберем node.js:

Заполним поля Name и JavaScript File:

Теперь можно запускать скрипт в обычном режиме и в режиме отладки с помощью соответствующих кнопок на панели инструментов:
Отладка
Для отладки необходимо запустить созданную конфигурацию в режиме Debug. При этом можно ставить брейкпойнты на строки, «шагать» по строкам, смотреть содержимое стека вызовов, значения переменных в текущем контексте и делать всё прочее, что ожидается от отладочного режима.

Модульность в node.js
В Java единицами модульности являются пакеты и классы. Единицей модульности в node.js является файл. Чтобы сделать импорт одного модуля в другой, используется модуль-локальная (т.е. неявно определённая в каждом модуле) функция require(). Стандартные модули или пакеты, установленные в node_modules, можно импортировать по простому имени:
var http = require('http');
В переменную http будет помещён объект, который был экспортирован модулем http.
Если требуется импортировать не стандартный модуль, а один из модулей проекта в другой, то аргумент для функции require() должен содержать размещение модуля относительно текущего модуля (не считая расширения .js), например:
// файл myproject/somedir/mymodule1.js
mymodule2 = require('../anotherdir/mymodule2');
mymodule2.fun();
// файл myproject/anotherdir/mymodule2.js
module.exports.fun = function() {
    console.log('hello world!');
}
Всё, что объявлено в файле модуля, видно только внутри него — за исключением того, что мы явно экспортируем. Например, в отличие от JavaScript в браузере, область видимости переменной, объявленной на верхнем уровне, ограничена тем модулем, в котором она объявлена:
// файл mymodule.js
var enterprise = 'bloody';
Переменная enterprise будет видна только внутри модуля mymodule.js.
Чтобы экспортировать что-либо из модуля, можно использовать доступный в любом модуле атрибут module.exports, который по умолчанию содержит в себе пустой объект. Можно также использовать сокращённую ссылку на него — модуль-локальную переменную exports. Функция require(), которой передано имя нашего модуля, будет возвращать то, что мы поместили в module.exports. Соответственно, если мы поместим туда такой объект:
// файл mymodule.js
module.exports =  {
    fun: function() {
        console.log('hello world!');
    }
}
То именно его вернёт функция require, будучи вызванной в другом модуле:
// файл mymodule-client.js
mymodule = require('./mymodule');
mymodule.fun();
Полученный объект mymodule — это тот же самый объект с функцией fun, который был присвоен атрибуту module.exports в нашем модуле.
Однако подобным способом сделать экспорт не получится:
// файл mymodule.js
exports =  {
    fun: function() {
        console.log('hello world!');
    }
}
Это связано с тем, что из модуля всегда экспортируется атрибут module.exports. Заменив сокращённую ссылку exports на другой объект, мы не изменили этот атрибут. Сокращённая ссылка exports может быть использована только для экспорта каких-то отдельных функций или атрибутов:
// файл mymodule.js
exports.fun = function() {
    console.log('hello world!');
}
// файл mymodule-client.js
require('./mymodule').fun();
Тестирование
Mocha
Для добавления модульного тестирования в проект лучше всего начать с фреймворка Mocha. Устанавливается он как глобальный npm-модуль:
npm install -g mocha
Протестируем модуль с простейшей функцией:
// файл mymodule.js
exports.fun = function(name) {
    return 'Привет, ' + name + '!';
}
Тесты mocha по умолчанию размещаются в подпапке test:
// файл test/mymodule-test.js
var assert = require('assert');
var mymodule = require('../mymodule');

describe('mymodule', function() {
    describe('#fun()', function() {
        it('должна приветствовать пользователя, имя которого передано как аргумент', function() {
            assert.equal(mymodule.fun('Сергей'), 'Привет, Сергей!');
        });
    });
});
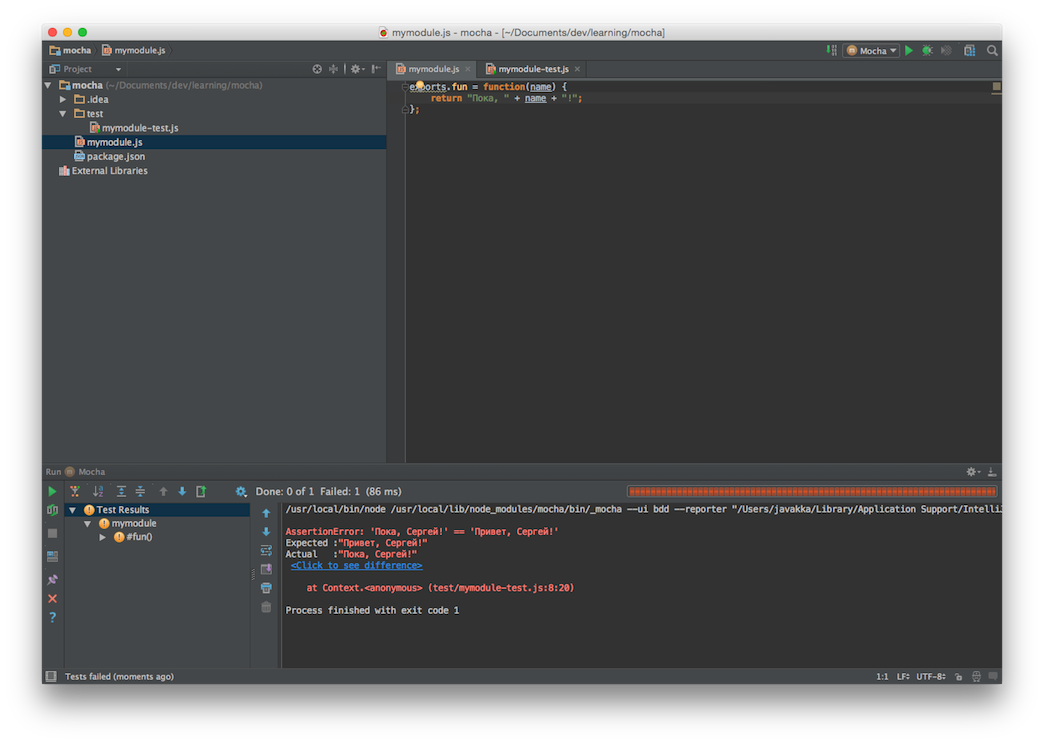
Первый аргумент функции describe — это человекочитаемое описание поведения тестируемой функции или модуля, которое будет выводиться в консоль при прогоне тестов. Здесь желательно придерживаться некоторых структурных соглашений — например, в первом describe указывается имя модуля, во вложенном — имя тестируемой функции. Запустим mocha и убедимся, что тест нашей функции проходит:
> mocha

  mymodule
    #fun()
      ✓ должна приветствовать пользователя, имя которого передано как аргумент

  1 passing (7ms)
Использование Mocha в IntelliJ IDEA
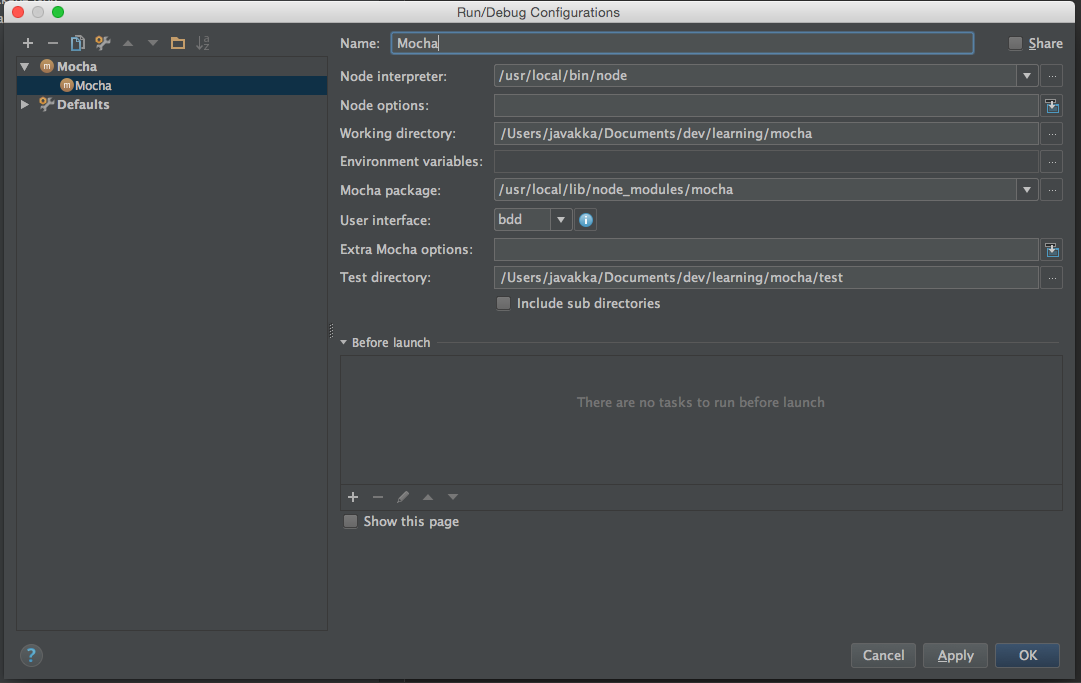
Mocha также умеет мониторить исходники и автоматически прогонять тесты при изменении кода. Запустить её в таком режиме можно и из командной строки с помощью параметра запуска —watch, но раз уж мы строим наш рабочий процесс в IntelliJ IDEA, то используем для этого специальную конфигурацию запуска:
В окне настройки конфигурации запуска укажем название этой конфигурации (Name), а также путь к папке с тестами (Test directory). Сохраним конфигурацию.
Изменим код функции так, чтобы он не проходил, и выполним (Run) конфигурацию запуска Mocha.
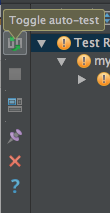
Теперь щёлкнем кнопку Toggle auto-test в появившейся панели. Эта кнопка включает режим автоматического прогона тестов при изменении исходников.
Исправим код функции, при этом Mocha автоматически прогонит тест и покажет, что теперь всё хорошо:

Ресурсы
- Документация по node.js — основной источник информации, хотя местами довольно лаконичный, и структурированный вокруг стандартных модулей.
- Веб-репозиторий npm — поиск библиотек, информация о них.
- Awesome List для node.js — незаменимый источник информации о проверенных библиотеках и решениях для разработки на node.js.
- Практики использования node.js в продакшне — информационный портал компании Joyent, занимающейся поддержкой node.js.
28.04.2019
1 комментарий
9 495
Привет! В этой статье расскажу, как установить Node.js. Причем не важно, какая у вас система — Windows или macOS.
Node.js — это технология, программная платформа, позволяющая писать серверный код на языке JаvaScript. Она представляет из себя компилятор, построенный на движке V8, зашитый в Google Chrome.
V8 — это высокопроизводительный движок JavaScript и WebAssembly от Google с открытым исходным кодом, написанный на C ++.
Он используется в Chrome и Node.js и других; реализует ECMAScript и WebAssembly, работает в системах от Windows 7 и более новых, macOS 10.12+ и Linux, использующих процессоры x64, IA-32, ARM или MIPS.
V8 может работать автономно или может быть встроен в любое приложение C ++.
Установка Node.js
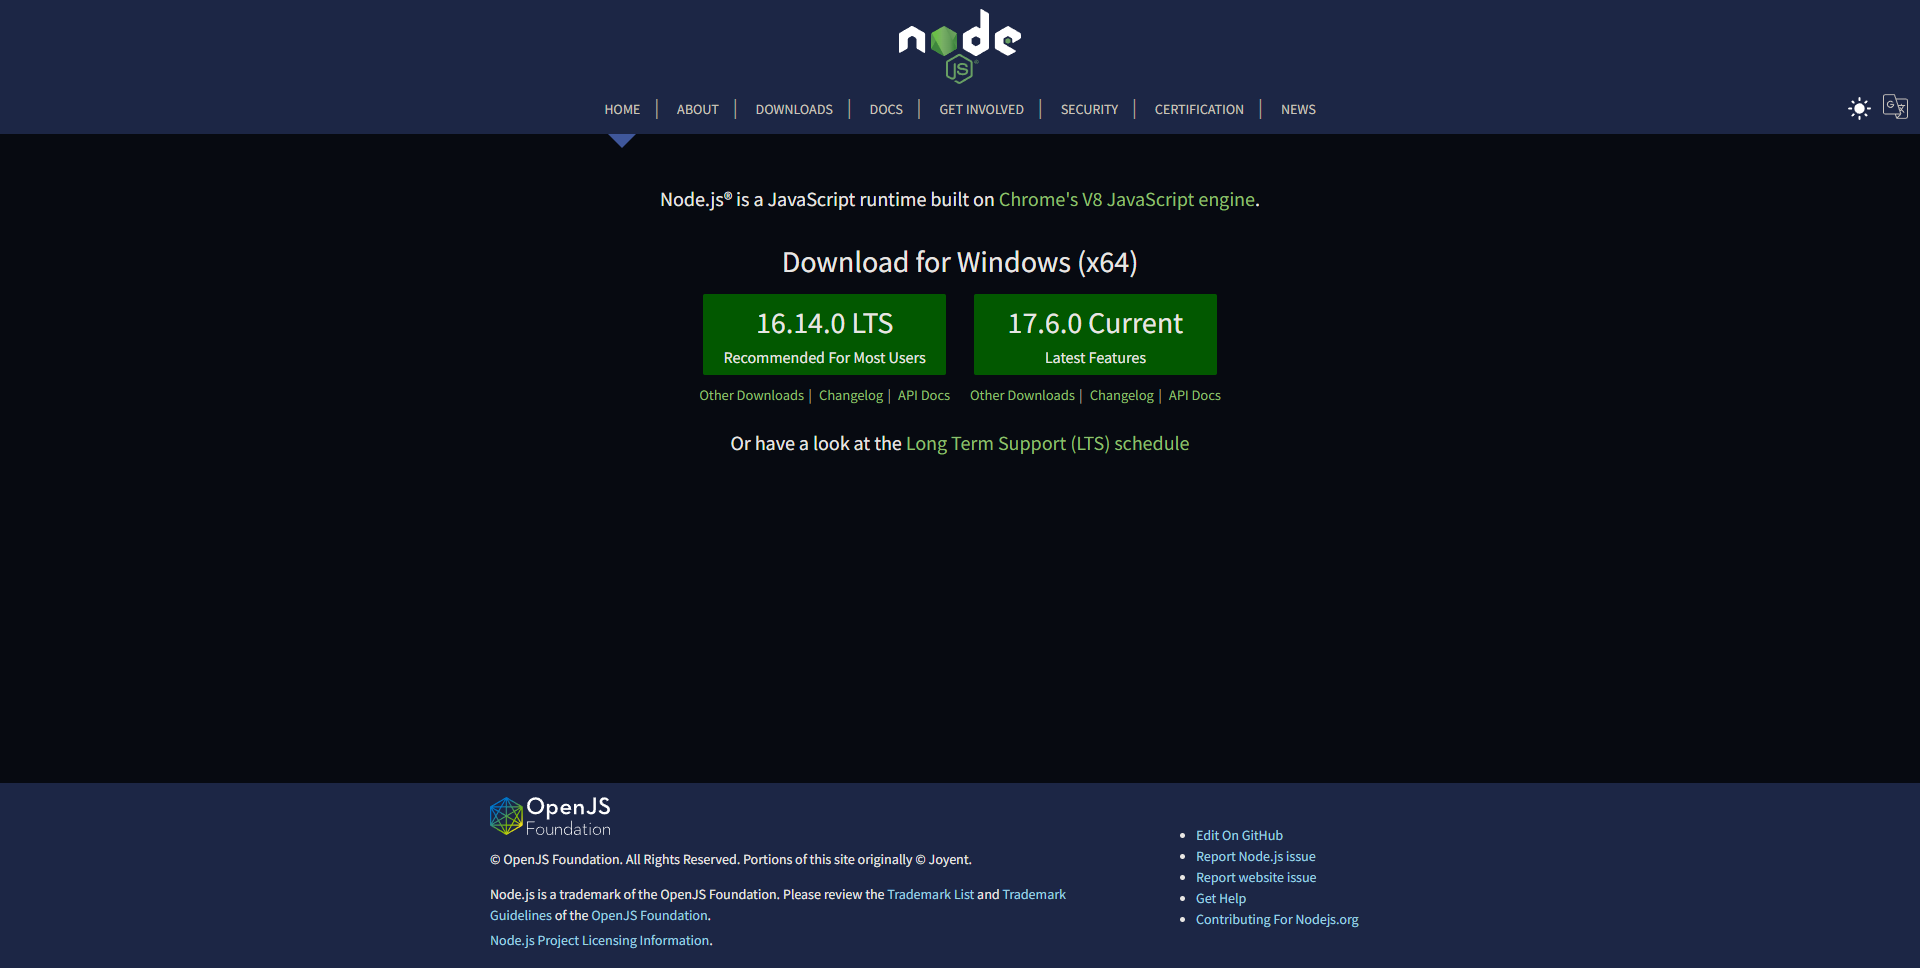
1. Заходим на сайт https://nodejs.org
Ваша система определяется автоматически. Выбираем Current (текущую версию). Это обычный exe файл, который устанавливается как и любая другая программа.
2. Следуйте всем настройкам по умолчанию, нажимая Next для продолжения:
Принимаем условия использования, ставим галочку:

Папка назначения, куда будет установлен Node.js. По умолчанию, это Program Files на диске C:

Настройки по умолчанию. Модули, которые установятся, здесь важно наличие npm modules:
Предлагают установить дополнительные инструменты — здесь галочку не ставим:
Install — нажимаем для запуска инсталляции или Back, чтобы вернуться и изменить настройки:
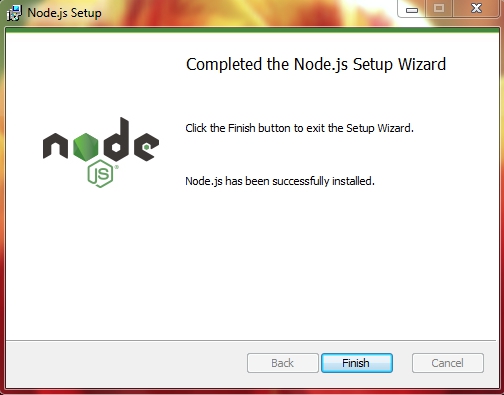
После успешной установки нажимаем Finish:
Проверяем работу Node.js
1. На вашем виртуальном сервере, у меня это OpenServer/domains:
- Создаем папку node
- В папке node создаем файл index.js с содержимым:
var text = 'Hello, world!';
console.log(text);
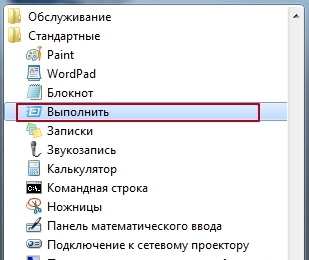
2. Запускаем командную строку. Если не знаете, как её запустить, то перейдите Пуск -> Стандартные программы -> Выполнить
2.1. Напишите в этой строке: npm -v
-v — version — версия
Если видим версию (на скрине у меня 6.7.0), значит всё ОК!
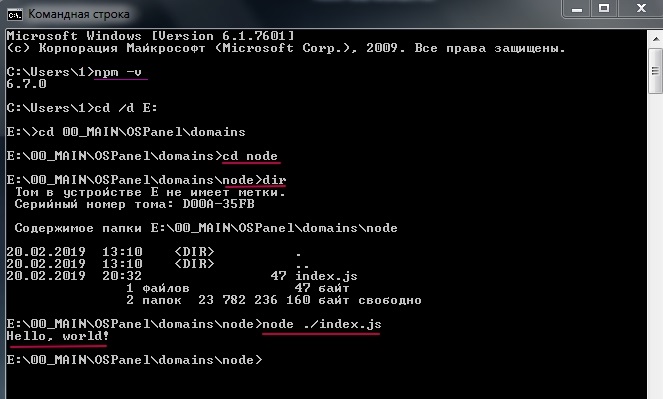
2.2. Здесь же, в консоли, переходим к папке node: cd node и командой dir проверяем содержимое папки. Наблюдаем наличие нашего index.js
2.3. Делаем компиляцию командой: node index
node index это сокращенная команда — аналог записи node ./index.js (выше на скрине). Т.е. можно не указывать путь к файлу, Node.js по умолчанию сам ищет в корне индексный файл index.js.
2.4. И вот он, долгожданный результат: Hello, World!
Всё работает! Поздравляю! 🙂 Или нет? Пишите.
Эту статью написала специально к серии уроков по Gulp, поскольку там ссылаюсь на необходимость установленного Node.js. Теперь будет понятно, как это сделать.
Документация по Nodejs https://nodejs.org/api/
Голосов: 6, Средняя оценка: 5
-
Главная
-
Инструкции
-
Node.js
-
Как установить Node.js на Windows: пошаговая инструкция
На JavaScript выполняется большая часть интерактивных элементов на сайтах и в мобильных приложениях. JavaScript отлично работает с HTML/CSS и интегрирован основные браузеры на рынке. Чистый JavaScript используется в вебе, а для общего применения JavaScript разработчики используют различные среды выполнения, например, Node.js.
Node.js — это среда выполнения кода JavaScript. Она позволяет использовать JavaScript как язык программирования общего назначения: создавать на нем серверную часть и писать полноценные десктопные приложения.
Основа Node.js — движок V8. Этот движок был разработан Google и используется в браузере Google Chrome. Он компилирует код JavaScript в машинный код, который понимает процессор. Однако, чтобы сделать из JavaScript язык общего назначения, одного движка недостаточно. Так, например, для создания серверной части нужно, чтобы язык умел работать с файлами, сетью и т.п. Для решения этой проблемы разработчики добавили к V8 дополнительные возможности, с помощью своего кода и сторонних библиотек. В итоге у них получился инструмент, который превращает JavaScript в язык общего назначения.
Node.js стала популярна среди разработчиков благодаря возможности создавать серверную и клиентскую часть на одном языке, скорости работы и NPM. В этом материале мы расскажем, как правильно установить Node.js на Windows 10.
Удаление старых версий
Перед установкой необходимо удалить старые версии среды выполнения, если они были ранее установлены. Наличие предыдущих версий может привести к возникновению конфликтов.
Проверим систему на наличие версий Node.js. Для этого в cmd (чтобы ее запустить, нажмите Win+R, введите cmd и нажмите Enter) выполняем команду nvm list:
C:\Users\Timeweb>nvm list
    18.9.0
    18.8.0
    16.17.0
Как видим, у нас установлено несколько версий. Удалим их:
- Выполняем команду
npm cache clean --force. - В «Установка и удаление программ» удаляем Node.js.
- Перезагружаем компьютер.
- Удаляем следующие каталоги. Некоторые из них могут существовать, а некоторые, наоборот, отсутствовать:
- C:\Program Files (x86)\Nodejs
- C:\Program Files\Nodejs
- C:\Users\{User}\AppData\Roaming\npm
- C:\Users\{User}\AppData\Roaming\npm-cache
- C:\Users\{User}\.npmrc
- C:\Users\{User}\AppData\Local\Temp\npm-*
- Возвращаемся в командную строку и выполняем
nvm uninstallк каждой версии, полученной с помощьюnvm list:
C:\Users\Timeweb>nvm uninstall 18.9.0
Uninstalling node v18.9.0... doneC:\Users\Timeweb>nvm uninstall 18.8.0
Uninstalling node v18.9.0... done
C:\Users\Timeweb>nvm uninstall 16.17.0
Uninstalling node v18.9.0... done
Дополнительно проверим, что версии удалены:
C:\Users\Timeweb>nvm list
No installations recognized.C:\Users\Timeweb>where node
ИНФОРМАЦИЯ: не удается найти файлы по заданным шаблонам.
C:\Users\Timeweb>where npm
ИНФОРМАЦИЯ: не удается найти файлы по заданным шаблонам.
С помощью nvm-windows
Node Version Manager или сокращенно NVM — это диспетчер версий Node.js. Возможно, во время работы вам придется использовать различные версии Node и переключаться между ними. Версии часто меняются, поэтому при работе рекомендуется использовать диспетчер версий.
NVM — самый распространенный диспетчер версий, но, к сожалению, в Windows он не доступен, и вместо него используется адаптированный вариант nvm-windows.
- Зайдите в репозиторий nvm-windows на github.
- Загрузите установщик
nvm-setup.exeпоследней версии диспетчера. - После загрузки осуществите установку.
- По окончании работы установщика откройте PowerShell от имени администратора и проверьте работоспособность NVM:
PS C:\Windows\system32 > nvm list
No installations recognized.
Теперь нужно выбрать версию Node.js, которую вы будете устанавливать на свой компьютер. Команда nvm list available покажет частичный список доступных для загрузки версий:

Если для вашего проекта не требуется определенная версия, то рекомендуется выбрать последний LTS-выпуск. Риск возникновения проблем при работе с такой версией минимален. Если же вы хотите протестировать нововведения и улучшенные возможности, то вы можете загрузить последнюю версию. При этом не стоит забывать, что риск возникновения проблем с новейшей версией выше.
Установим последний LTS. Возьмем номер версии из результата nvm list available и установим его с помощью nvm install:
PS C:\Windows\system32> nvm install 16.17.0
Downloading node.js version 16.17.0 (64-bit)...
Extracting...
Complete
Creating C:\Users\Timeweb\AppData\Roaming\nvm\tempDownloading npm version 8.15.0… Complete
Installing npm v8.15.0…
Installation complete. If you want to use this version, type
nvm use 16.17.0
Установка завершена. В ряде случаев при установке nvm-windows может возникнуть проблема: nvm не загрузит диспетчер пакетов NPM. В этом случае рекомендуем воспользоваться следующим способом установки.
Как установить node.js с помощью официального установщика
- Зайдите на официальный сайт nodejs.org в раздел «Загрузка».
- Выберите и загрузите нужную версию.
- По завершению загрузки откройте файл, после чего начнется установка.
- Следуйте инструкциям установщика.
Установка node.js в WSL2
Если вы хотите использовать Node.js вместе с Docker, планируете работать с командной строке Bash или просто любите Linux, то имеет смысл задуматься об установке среды выполнения в WSL2.
WSL (Windows Subsystem for Linux) — это программная прослойка для запуска приложений, созданных под Linux-системы, на ОС Windows. Возможно, вам уже приходилось работать в WSL с приложениями, у которых нет Windows-версий. Ранее мы уже рассматривали установку Node.js на Ubuntu 20.04. Поэтому в этом разделе будет размещена инструкция по установке WSL 2 — об установке Node.js на Ubuntu читайте в статье «Как установить Node.js в Ubuntu 20.04».
Алгоритм установки WSL2 в Windows 10 зависит от версии операционной системы. Чтобы её узнать, нажмите Win+R и введите winver. После этого откроется такое окно:
Алгоритм для версий старше 2004
В PowerShell от имени администратора выполняем следующие команды:
wsl --install
wsl --set-version Ubuntu 2
Для проверки результата воспользуемся командой wsl.exe -l -v:
PS C:\WINDOWS\system32> wsl.exe -l -v
  NAME      STATE           VERSION
* Ubuntu    Stopped         2
Алгоритм для версий младше 2004 (как минимум потребуется ОС версии 1903)
В PowerShell (от имени администратора) активируем подсистему Windows для Linux.
dism.exe /online /enable-feature /featurename:Microsoft-Windows-Subsystem-Linux /all /norestartЗатем активируем функцию виртуальной машины:
dism.exe /online /enable-feature /featurename: VirtualMachinePlatform /all /norestart После выполнения этих действий нужно перезагрузить компьютер.
Когда компьютера запустится, скачиваем и устанавливаем пакет обновлений ядра Linux. Загрузить его можно по здесь.
В PowerShell выберем 2 версию WSL в качестве основной:
wsl --set-default-version 2Теперь скачаем какую-нибудь операционную систему на Linux. Сделать это можно прямо магазине приложений Microsoft Store:
По окончании установки вы сможете зайти в консоль установленной системы через меню поиска:
Заключение
Node.js — это популярная среда разработки, которая используется множеством крупных компаний: PayPal, Yahoo, Ebay, General Electric, Microsoft и Uber. В рамках этого материала мы рассмотрели способы как установить Node.js на Windows 10.

In this article, you’ll learn how to work with JavaScript in the backend using Node on Windows.
When you start working with JavaScript and discover that you can not only work with it in the frontend but also in the backend, a new world of possibilities seems to open up before you.
To begin with, you realize that you don’t need to learn another language to have the backend of your applications up and running. Second, Node.js is simple to install and works in all development platforms we are used to: Mac, Linux, and Windows.
In this article, I’ll show you how to install Node on Windows with a step-by-step guide so you’re ready to use it.
You will also be happy to know that package management is made even easier, as npm (the Node Package Manager) comes with the installation of Node.
With it, you will be able to have access to an almost unending number of community-made dependencies. You can simply install these in your app so you don’t have to reinvent the wheel time and again.
So let’s install Node on Windows and start playing with it a bit.
The first thing to do is to access Node’s official site.
The website is intelligent enough to detect the system you are using, so if you are on Windows, you will most likely get a page like the one above. Right in the middle of it, two buttons show you the most common possibilities of download – also the latest ones.
If you are curious about all the most recent features Node has to offer, go with the button on the right. For most people, however, the site itself recommends using the Long-Term Support version, which leads you to the button on the left.
At the moment of writing this article, the LTS version is version 16.14.0.
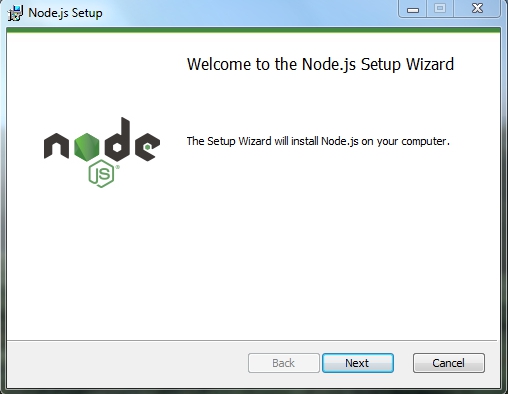
When you click on any of them, an .msi file gets downloaded to your computer. The next step is to click on it and the installation will begin. The wizard opens and the following window appears:
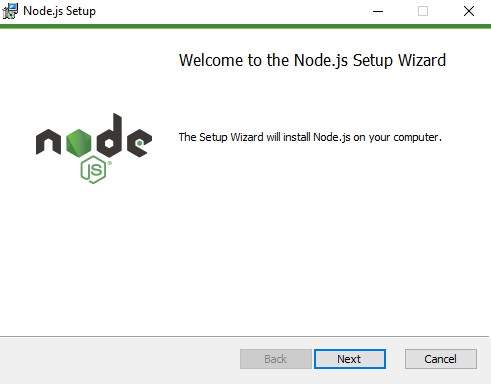
Click Next. On the following window, you’ll read (you do read it, right?) Node’s EULA, accept its terms, and click Next again. The next window is the one where you select the destination folder for Node.
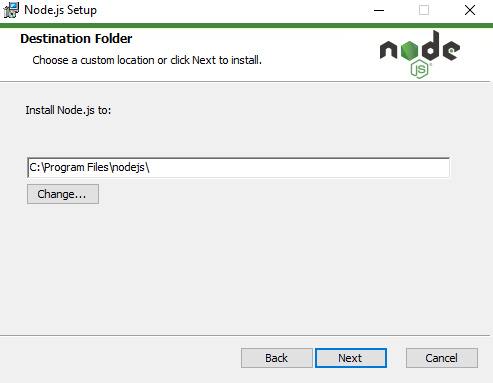
Windows normally recommends that the programs be installed in the Program Files folder, in a folder of their own (in our case, we are installing Node.js, so the nodejs folder is our go-to place).
For the sake of simplicity, let’s follow the wizard’s suggestions and use C:\Program Files\nodejs\ as the destination folder.
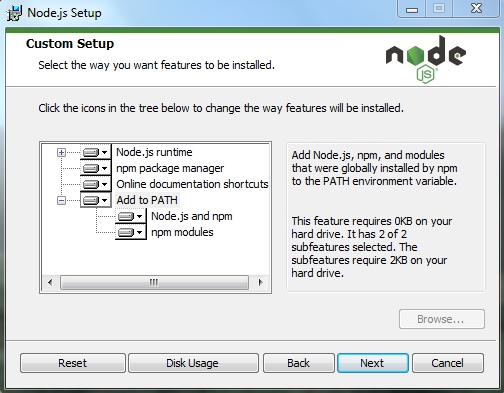
The following window is the one where you can customize your installation. Unless you have disk space problems or have a clear idea as to what you are doing, I recommend keeping the options as they are and just pressing Next again.
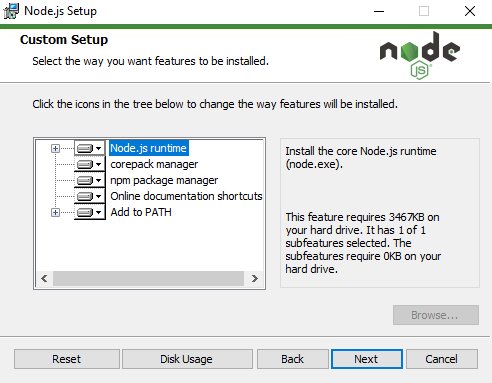
One thing I would like to point out on this window is the third option you see. That’s the option that allows you to have npm installed along with Node on your computer. This way, if you still intend to change the setup in this page somehow, keep that option as is and npm will be installed for you at the end of the process.
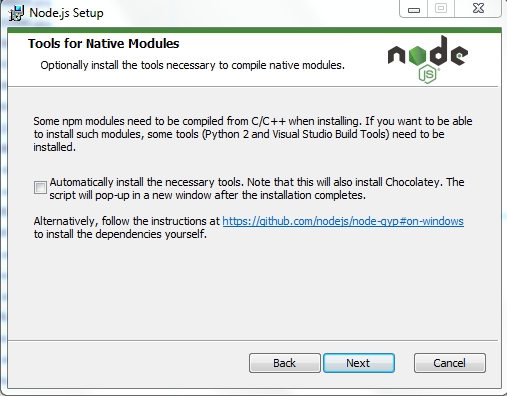
The next window deals with the automatic installation of “Tools for Native Modules”. Again, unless you are sure you need them, I recommend keeping this checkbox unmarked and just pressing Next once more.
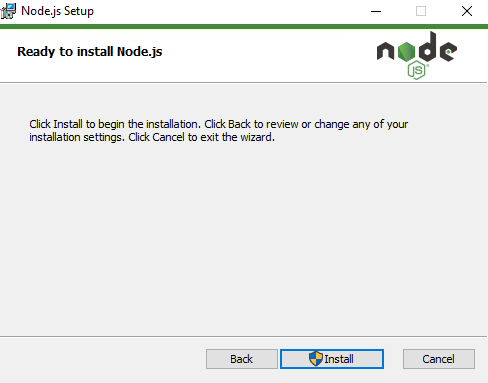
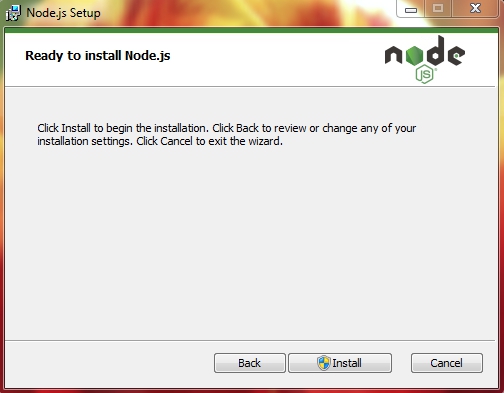
We’ve reached the final pre-install window. As it says, from here, you just have to click Install to begin the installation, so let’s do it.
Notice the shield beside the word Install? That means Windows will ask you to confirm if you really want to go through the installation process as soon as you click that button. Assuming this is the reason why you are reading this article, just click Yes and let the installer do its thing.
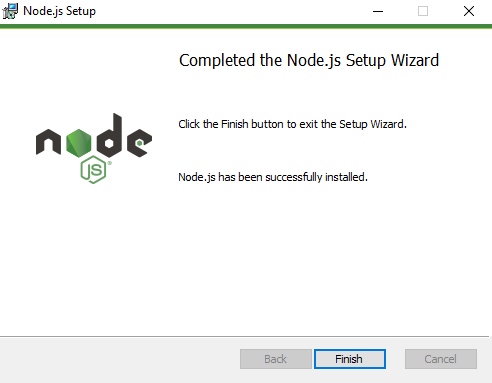
We finally got to the window we were hoping for, telling us that Node has successfully been installed on our Windows computer. Click Finish and let’s check if everything is ok.
How to Check Your Node Installation
In order to check if Node (and npm) were properly installed on your computer, you can choose to open either Windows Powershell or the Command Prompt.
We’ll go with the first. Click on the search bar beside the Start Menu button and type powershell. Click Enter and Windows Powershell will open up in a window for you.
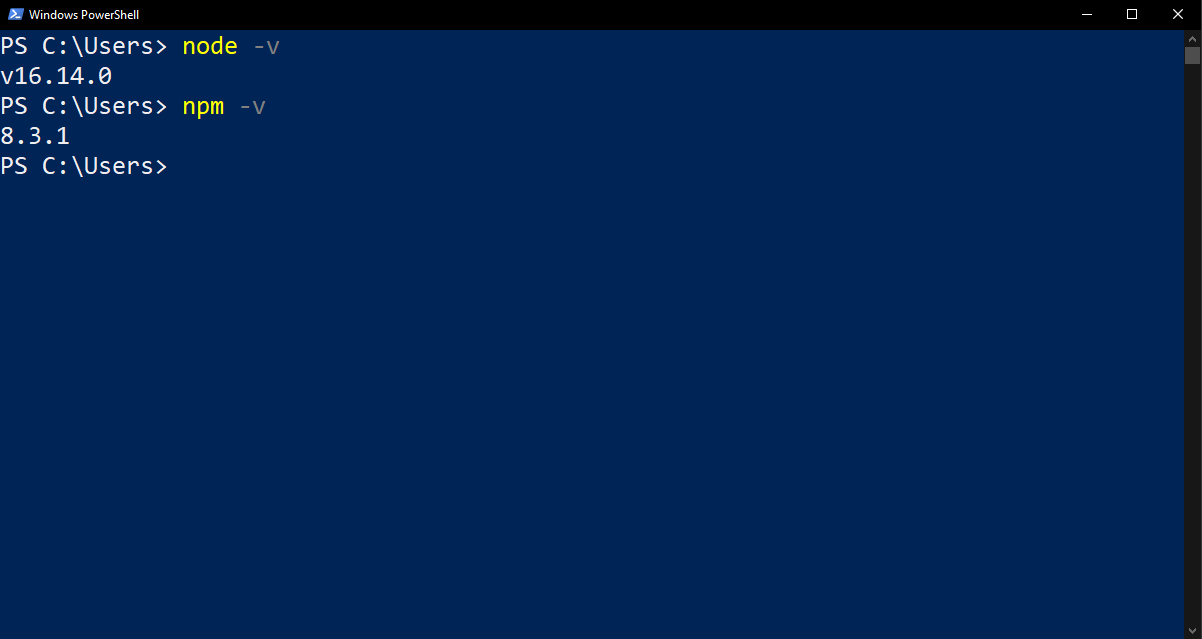
In any folder (like C:\Users, for instance), you can type node -v to check for the version of Node you are using. As I mentioned above, the latest version as I write this article is version 16.14.0 and that’s exactly what we see on Powershell above.
As a side note, you may be asking yourself why we can check this in any folder. One of the options in the custom setup (that we left as is) was to add Node to PATH. By doing so, we are able to access it from anywhere while navigating through the folders.
It is also possible to check for the npm version. To do so, type npm -v and press Enter. In our case, latest version is version 8.3.1, so we can pretty much say we are up to date.
How to Use npm
Ok, but you did not go all this way reading just to finish here after installing Node and npm, right? You want to see both in action. Let’s do it, then.
To learn how to start a project with Node and install packages with npm, we’ll use Visual Studio Code.
We’ll create a folder named Node_Test, where we’ll put both Node and npm to work a little.
Let’s start simple. Inside the Node_Test folder, right click inside the folder and click Open with Visual Studio Code. This will make VS Code open in this empty folder automatically.
Inside VS Code, if you haven’t yet, open a new terminal by pressing Ctrl+Shift+' (single quote).
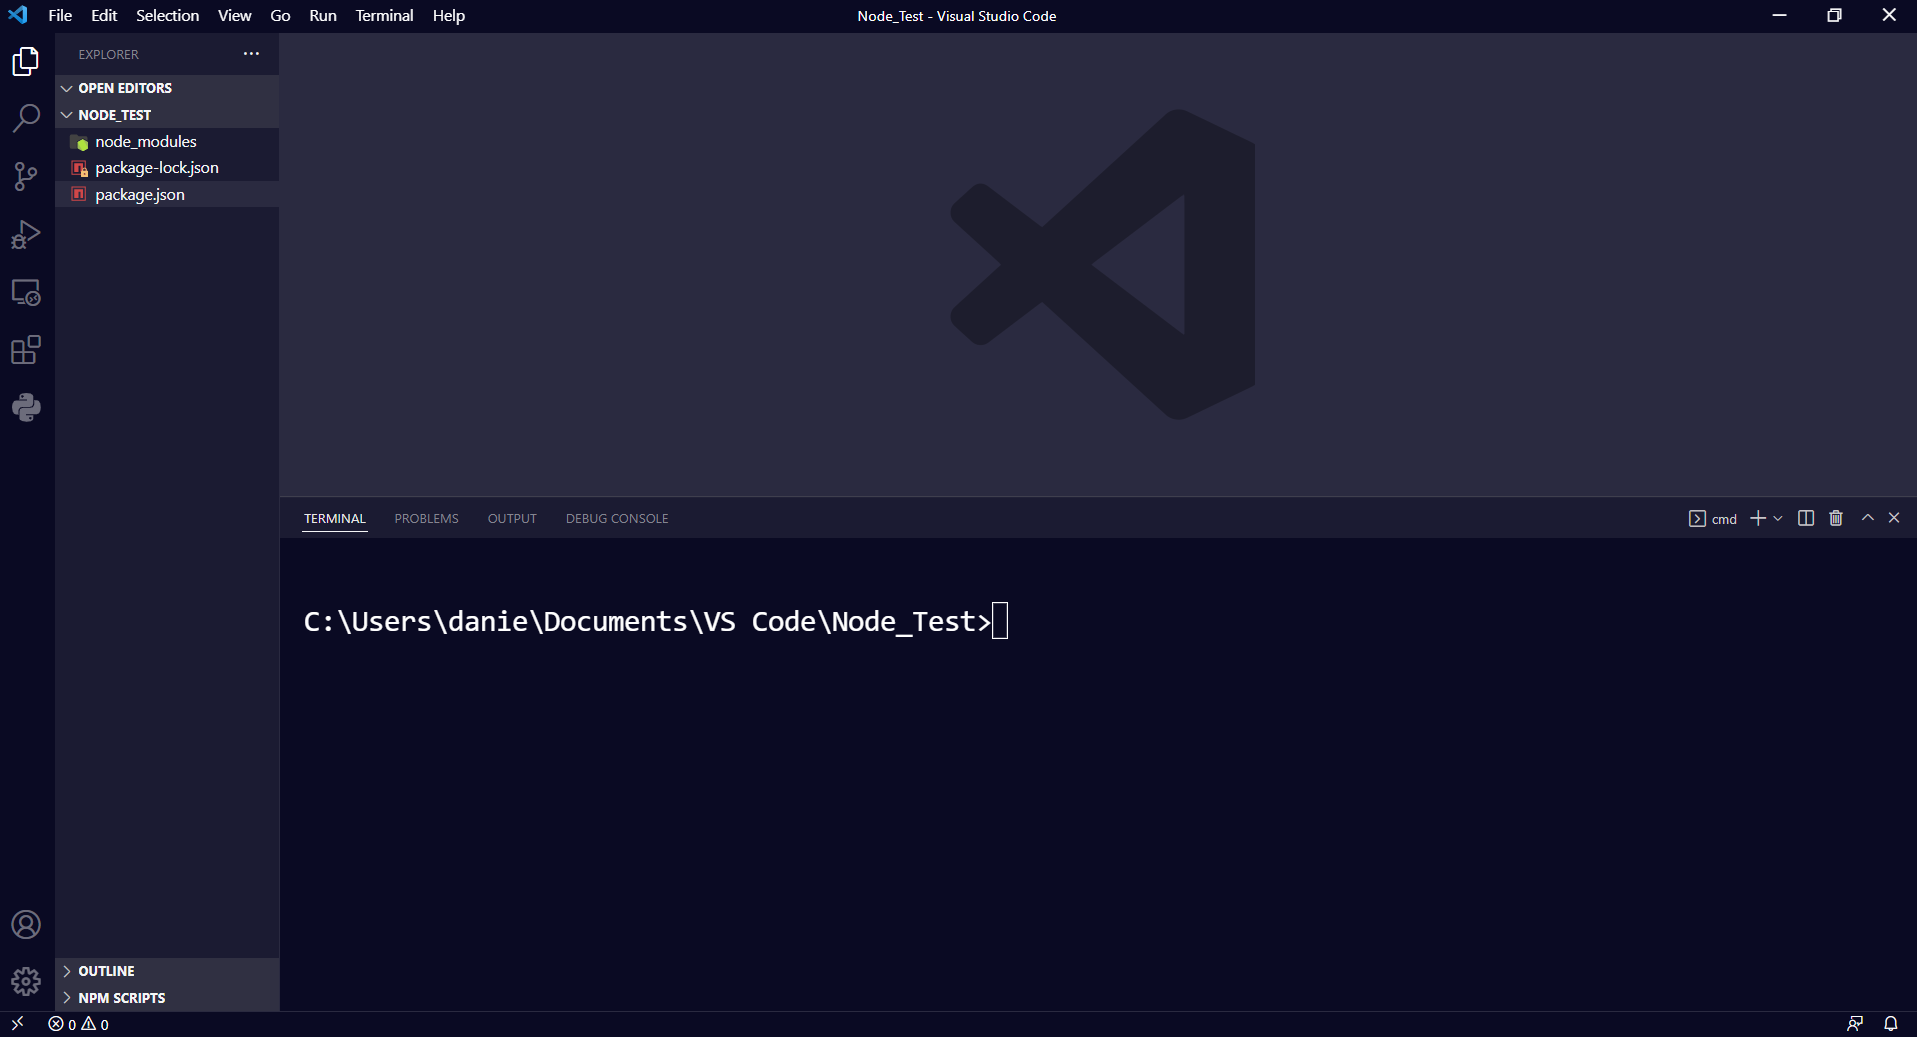
Click on the terminal and, on the command line, type npm init -y. This will start a Node project automatically for us without us needing to worry about the initial configuration (the -y flag will do that on its own). This creates a package.json file within the Node_Test folder.
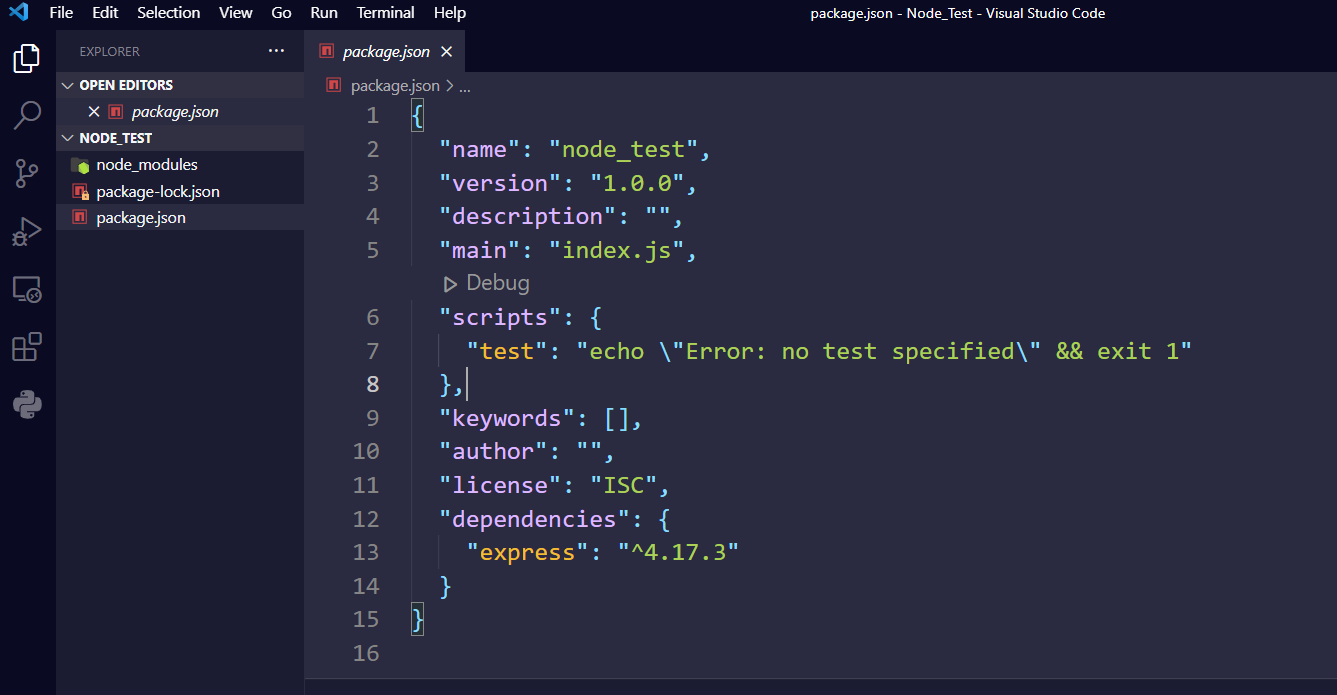
Next, let’s install Express as a dependency. You can find it and a list of other possible dependencies of npm on https://www.npmjs.com/.
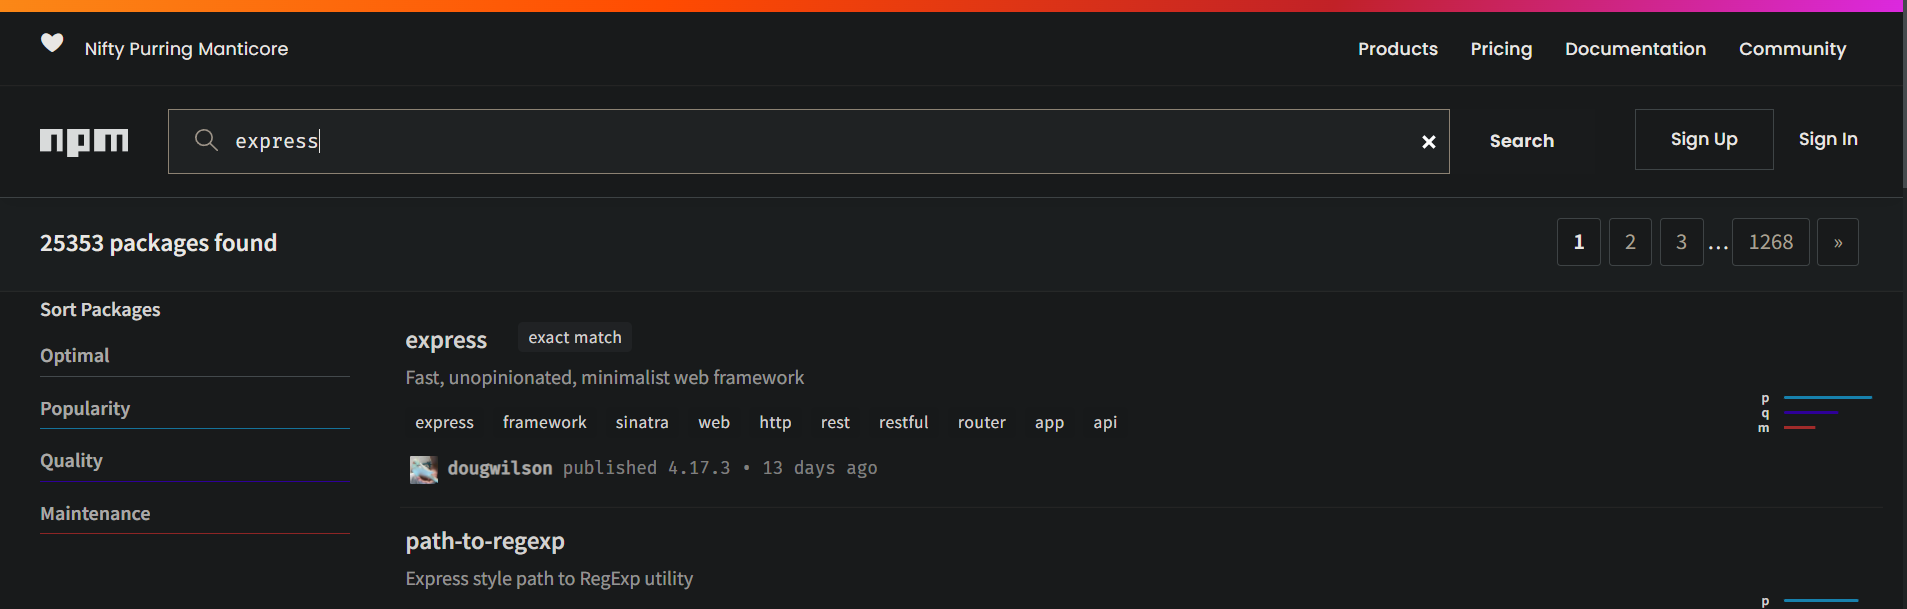
Another side note: every time you open npm’s web site, on the top left, you will see what appears to be a meaningless combination of three words. If you look at the initials, though, you will see that it is a brand-new sequence with the acronym npm.
Right, now let’s install Express with this Nifty Purring Manticore. Back on VS Code and the terminal, type npm i express and press Enter. Express will be installed. You can do the same with any other dependency you can think about.
To make sure that Express is installed, open package.json. Scroll up to the list of dependencies and you will see Express there.
Wrapping Up
That’s pretty much it. In this article, you saw how to install Node and npm on Windows.
I hope this has been useful to you. For more tutorials like this, check out freecodecamp.org/news and browse for the topic you would like to learn about.
Happy coding! 😊
Learn to code for free. freeCodeCamp’s open source curriculum has helped more than 40,000 people get jobs as developers. Get started
Node.js came as a blessing for JavaScript developers worldwide struggling with swapping among multiple languages and frameworks to amplify their code into a sustainable development environment.
With Node.js, you can finally build web applications with two-way connections where both the server-side and client-side can thoroughly communicate in real-time and exchange data. Indeed, Node.js has been revolutionary for developers who wanted to push real-time web applications over WebSocket.
If you’re aiming forward to enhancing your web development skills to the next level and becoming a full-stack JavaScript developer, Node.js indeed prepares the path towards that enthusiastic buzzword!
In this article, we’ll demonstrate a step-by-step guideline for installing Node.js on your computer and commencing with your web development journey.
What Is Node.js?
![]()
The first thing you should know is that Node.js is not a programming language!
You may already be aware of this fact, but it bears repeating for new developers in the field who may mistake Node.js for a unique programming language. It’s not!
Node.js is an open-source runtime environment for the JavaScript language that reshapes JavaScript’s characteristics and upgrades its functionality. As a result, you can use JavaScript for frontend and backend development, enabling full-stack development solely using JavaScript.
Initially, Node.js was designed to serve real-time performance, pushed-back architectures. But since then, Node.js has grown into a vital element for server-side programming for event-driven, non-blocking servers. Most conventional websites and API services today depend on Node.js.
Before Node.js, if you wanted to store any data on the database or connect your program to the database, you needed support from a server-side language. That’s because JavaScript couldn’t regulate the backend process. Consequently, you had to learn server-side languages like PHP, Python, Ruby, or C# — or seek a backend developer’s help.
The Node.js environment empowers JavaScript to directly employ the database and function properly as a backend language. As a result, you can ultimately build and run a program using only JavaScript with Node.js.
Node.js uses the V8 JavaScript runtime engine as its root power, and it employs a non-blocking I/O architecture that’s event-driven. All these together construct Node.js and help drive products towards robust performance.
Who Uses Node.js?
According to W3Techs, to date, 1.4% of all websites use Node.js — that’s more than 22 million websites. These numbers give you a general idea of the amount of Node.js users. On top of that, Node.js has been downloaded more than 1.3 billion times! As you can see, the stats speak strongly to Node.js’ market scale.
From your friends in IT to the industry tycoons, all are enjoying leveraging Node.js. That’s because Node.js amplifies the performance of developers and increases the speed of the development process. One of the most intelligent trends nowadays is using JavaScript everywhere, which has brought Node.js into the arena.
Top companies that use Node.js include:
- NASA
- Netflix
- PayPal
- Trello
- eBay
- Walmart
- Mozilla
- Medium
If you study these companies, you may notice that they run their businesses on different services or products. But they all have a critical factor in common: they rely on Node.js. Indeed, using Node.js can solve most of your development issues, never mind what industry you’re in.
Advantages of Using Node.js
Choosing the right programming platform for your tech stack is as important as the labor you want to invest in. Multiple factors should be considered when you look for the advantages of using a particular platform. Things like the learning curve, development speed, community, and scale can alter the overall balance of benefits.
Here are the main advantages of using Node.js:
- Simple syntax
- Easy learning curve
- Ability to scale quickly
- Open source and flexible
- Cross-platform development
- Single-language full-stack development
- Real-time communication
- Vast and active community
Node.js Prerequisites
Before installing Node.js, you need to ensure that you’ve gathered all the necessary bits of knowledge and downloaded all required installation files and elements.
Firstly, it would help if you had a basic understanding of JavaScript and its syntax — this will make picking up Node.js easier for you.
Secondly, a basic understanding of an object-oriented programming (OOP) language will help you work on server-side coding.
Lastly, rather than rushing into deep learning, take it one step at a time. Always remember that you’re not a day late or a dollar short as long as you’re progressing.
System Requirements
Node.js doesn’t require a fancy hardware setup to run; most computers of this era should handle Node.js efficiently. Even the most miniature computers like BeagleBone or Arduino YÚN can run Node.js.
Nevertheless, much still depends on what other memory hog software you’ve got running on the same system. But in most cases, you shouldn’t be worried unless your computer is from the Mesozoic Era!
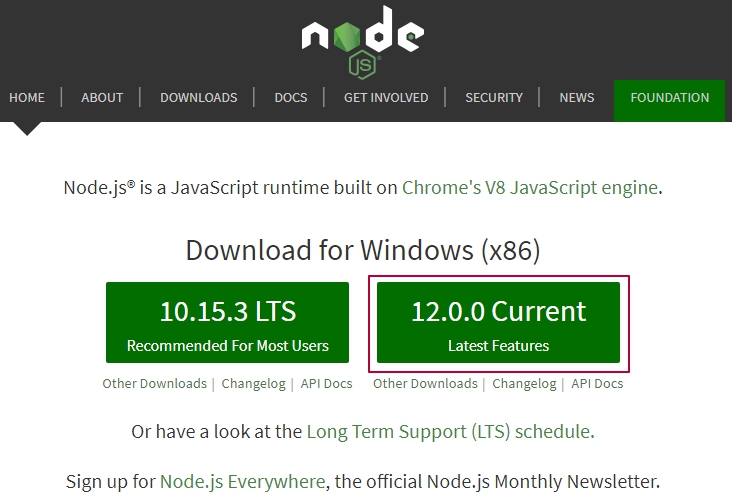
LTS Version vs Current Version
Node.js offers two different versions for you to download: the LTS version and the Current version.
The first one is Long-Term Support (LTS), which indicates the version that has been in the market for a while and comes with all mandatory support. Consequently, you can access a bunch of information and community for additional help with this version.
This LTS version is recommended to most users because of its sustainability and 18-month-long support cycle. As it’s a stable version, using it to produce backends can help you achieve a robust outcome.
The Current version indicates the latest released version of Node with the most recently added and updated features. But this version has less support behind it (around eight months) and possible bug exposure. Therefore, experts suggest using this version only for frontend development.
Considering all these factors, if you’re a regular user who loves to live hassle-free, go for the LTS version. On the other hand, if you’re an advanced user who loves the adventure of experiencing new technology, you can choose to install the Current version.
How to Install Node.js and npm
Every operating system has a distinct method of installing Node.js. The core setup file differs for each OS to OS. However, the Node.js creators have taken care to provide you with the files needed for each system.
In the next portion of the article, we’ll discuss installing Node.js on Windows, macOS, and Linux operating systems.
How to Install Node.js on Windows?
Follow this step-by-step guide to install Node.js on Windows.
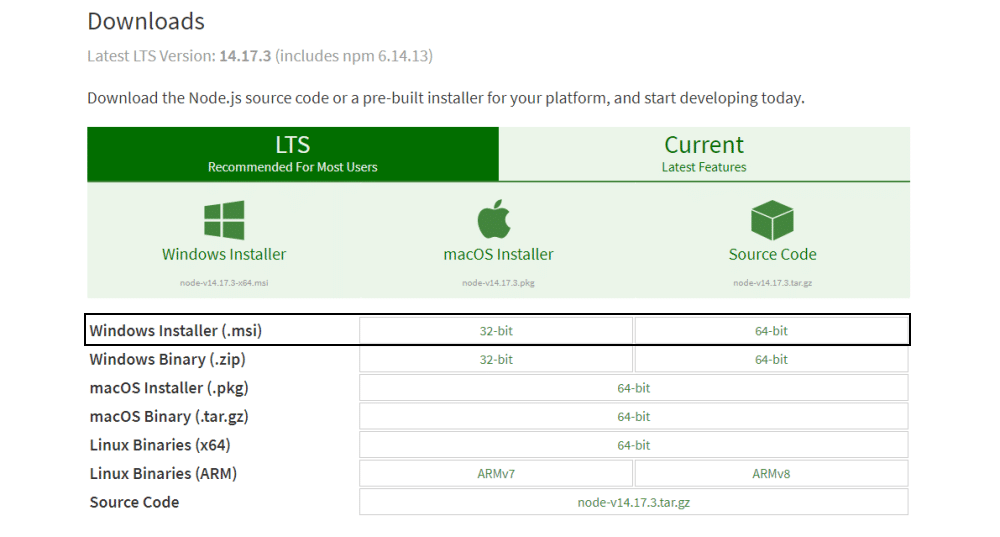
1. Download Windows Installer
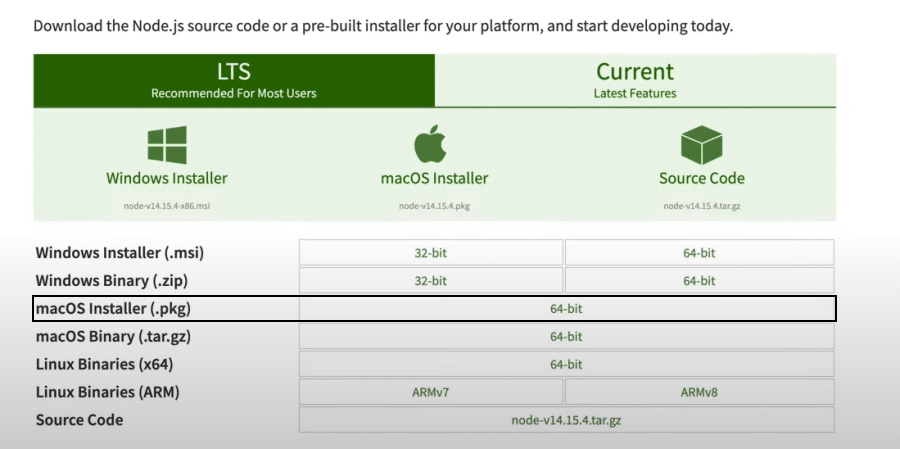
First, you need to download the Windows Installer (.msi) file from the official Node.js website. This MSI installer database carries a collection of installer files essential to install, update, or modify the existing Node.js version.
Notably, the installer also carries the Node.js package manager (npm) within it. It means you don’t need to install the npm separately.
When downloading, select the correct version as per your operating system. For example, if you’re using a 64-bit operating system, download the 64-bit version, and if you’re using the 32-bit version, download the 32-bit version:
2. Begin the Installation Process
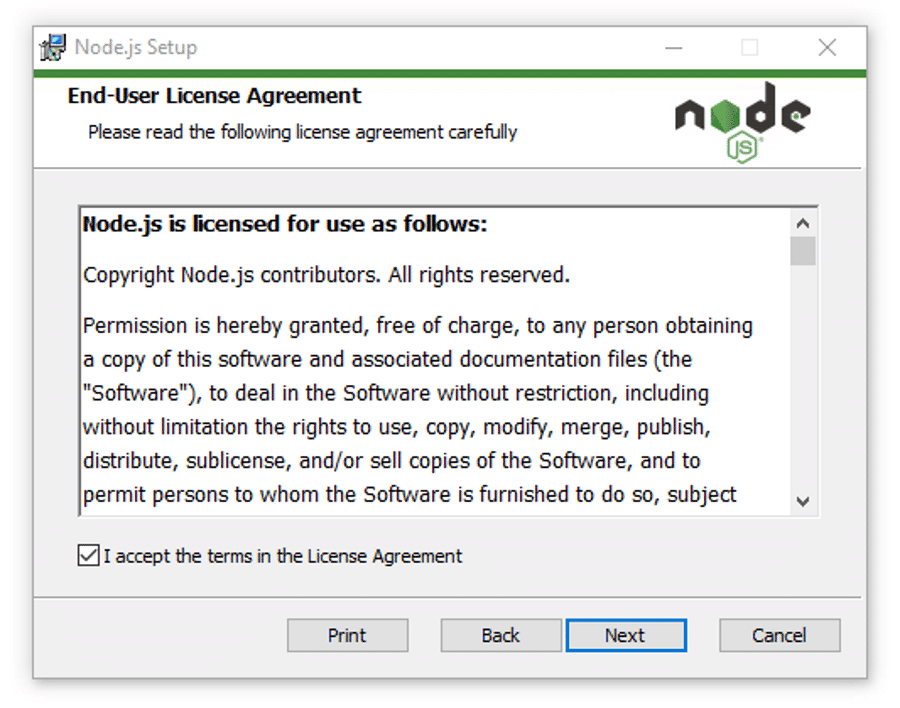
Once you open and run the .msi file, the installation process begins. But you have to set a few parameters before running the installation process.
Double-click on the installer file and run it. The installer will ask you to accept the Node.js license agreement. To move forward, check the “I accept” box and click Next:
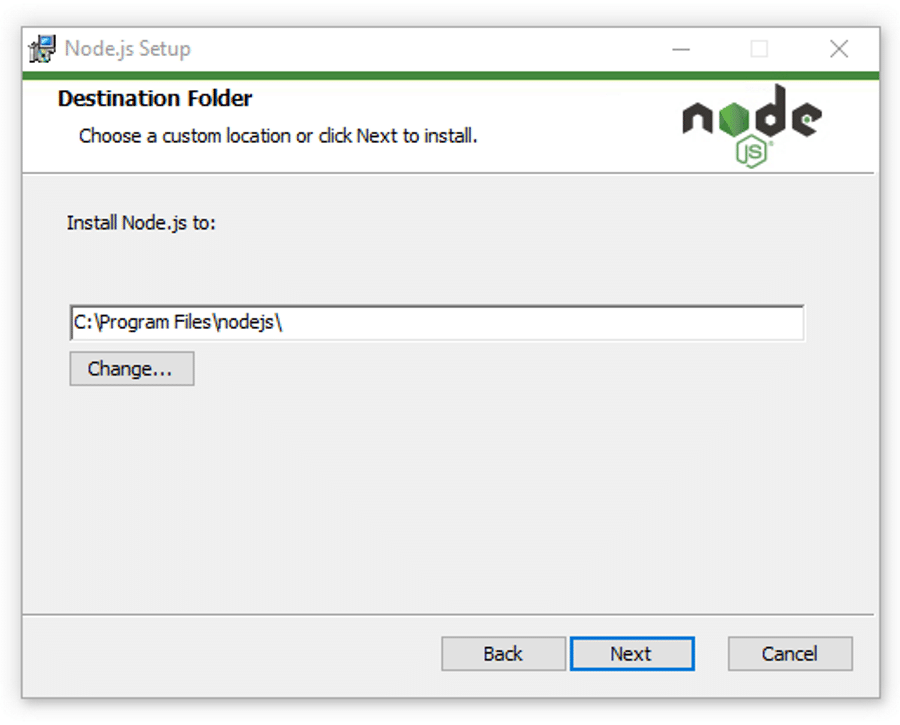
Then, select the destination where you want to install Node.js. If you don’t want to change the directory, go with the Windows default location and click the Next button again.
The next screen will show you custom setup options. If you want a standard installation with the Node.js default features, click the Next button. Otherwise, you can select your specific elements from the icons in the tree before clicking Next:
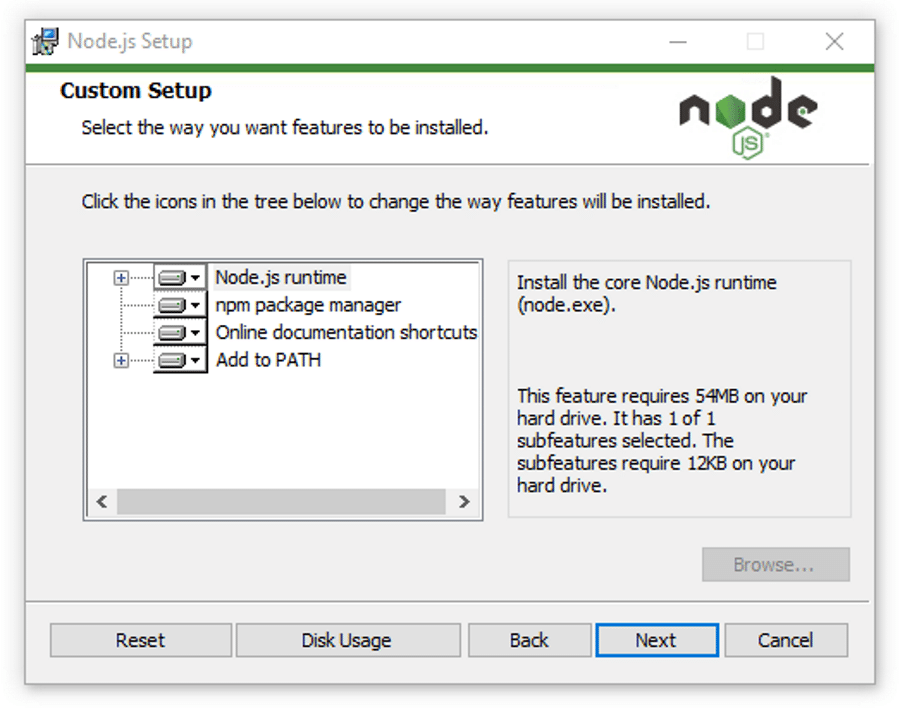
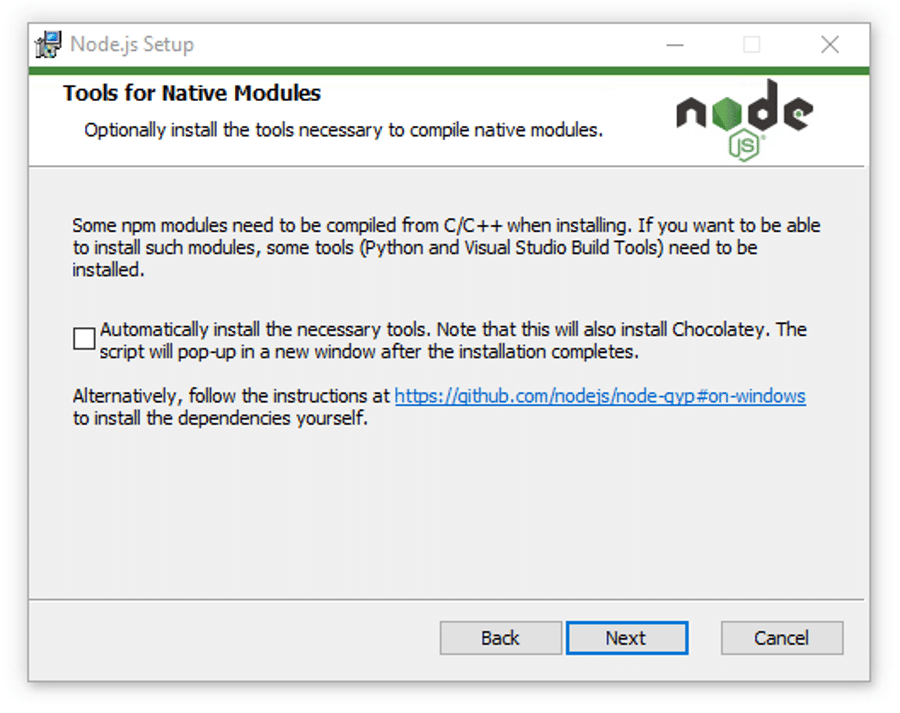
Node.js offers you options to install tools for native modules. If you’re interested in these, click the checkbox to mark your preferences, or click Next to move forward with the default:
3. Run Node.js Installation on Windows
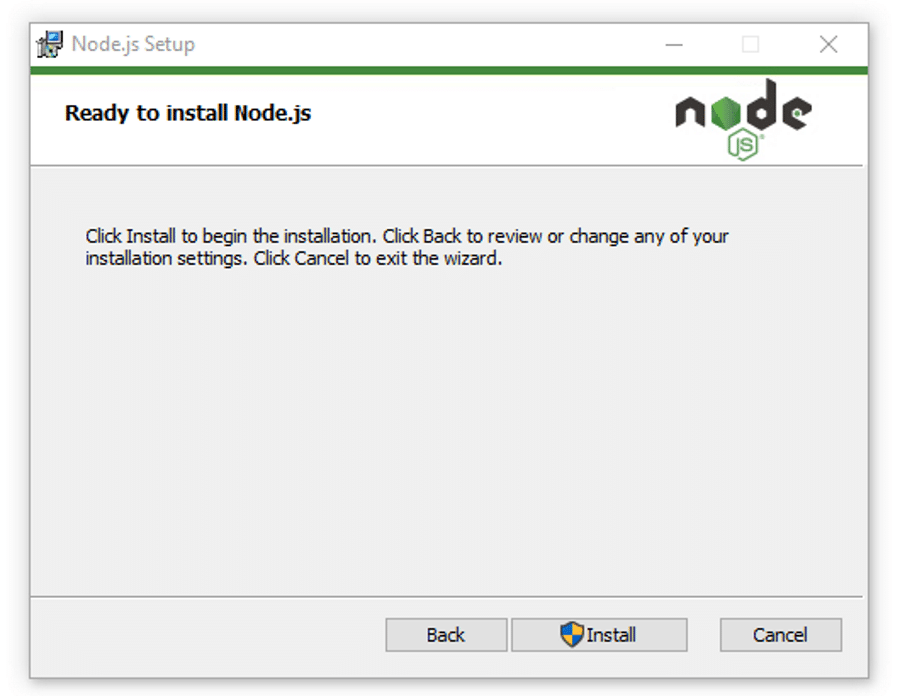
Lastly — and this is the easiest part of all — click the Install button to begin the installation process:
The system will complete the installation within a few seconds or minutes and show you a success message. Click on the Finish button to close the Node.js installer.

4. Verify Node.js Installation
So the installation process is completed. Now, you have to check whether Node.js is successfully installed or not.
To verify the installation and confirm whether the correct version was installed, open your PC’s command prompt and enter the following command:
Node --versionAnd to check the npm version, run this command:
npm --version
If the Node.js version and npm are correctly installed, you’ll see the version name in the CMD prompt.
How To Install Node.js on macOS?
Follow these step-by-step guidelines to install Node.js on macOS.
1. Download macOS Installer
Installing Node.js on macOS follows almost the same procedure as Windows. All you have to do is to download the installation file for Mac. Then, as soon as you start it up, the installer will walk you through the rest.
Firstly, download the macOS installer (.pkg) file from the Node.js website. There’s only a 64-bit version, so you don’t have to worry about which to download.
2. Begin Node.js Installation on macOS
Check your Download folder for the installer file and click on it to start the installation process.
The Node.js installer carries the Node.js core file, and, consequently, the installation process installs both Node.js and npm from the installer file. Therefore, you don’t need to install npm separately.
Then, click Continue to move forward with the installation.

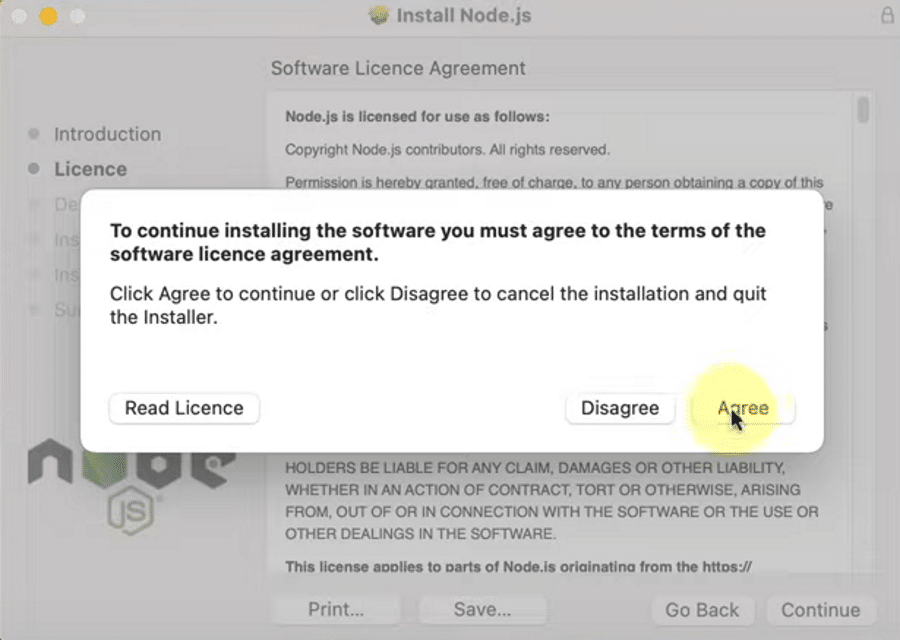
You must agree to the terms of usage to install Node.js. Read through it before clicking the Agree button to continue if you’d like to explore the license agreement.
At this screen, you need to select the installation location. Usually, the OS determines a default installation location. If you have other requirements, you can change the location. Otherwise, keep the default location.
3. Run Node.js Installation on macOS
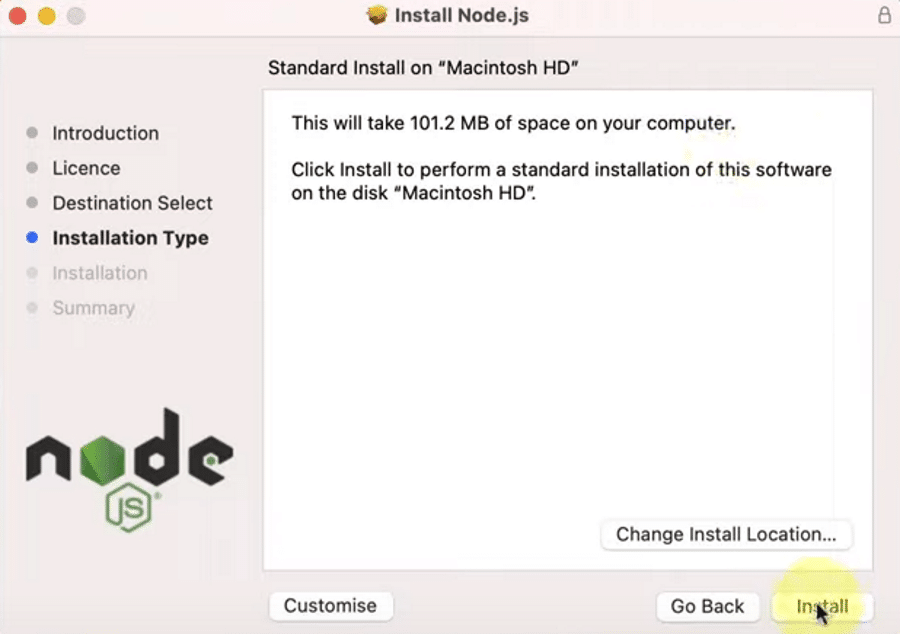
Until now, you’ve set all the preferences that are needed to install Node.js on macOS fully. Now click on the Install button to finish things up.
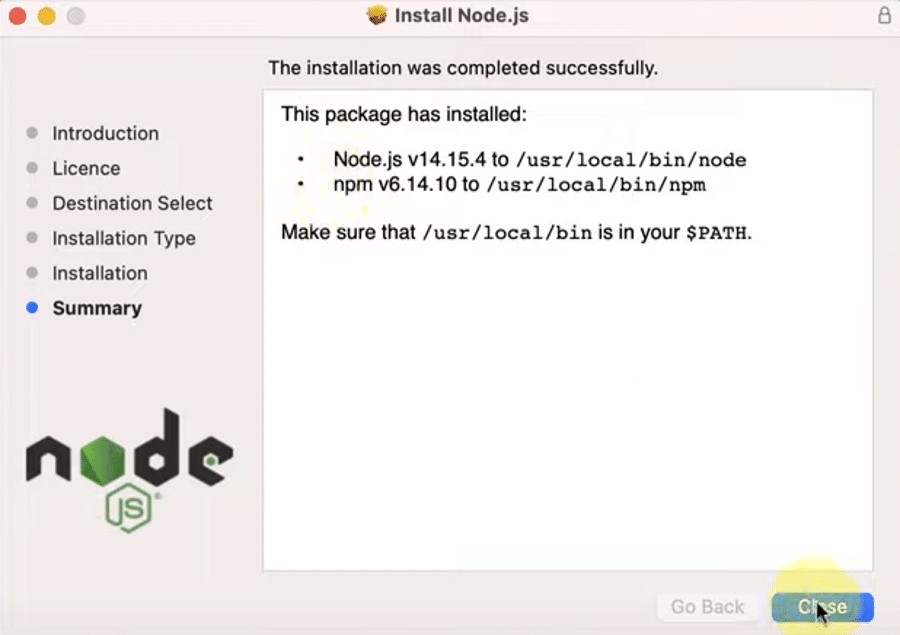
After a successful installation process, the system will show you a confirmation message. As npm is integrated within the Node.js installer, the notification should indicate proof of npm installation too.
Finally, click on the Close button to close the dialogue box.
4. Verify Node.js Installation on macOS
You’ve now successfully installed Node.js on your macOS. However, you should check to confirm that the installation process was successful and whether the Node.js and npm versions are working properly on your macOS.
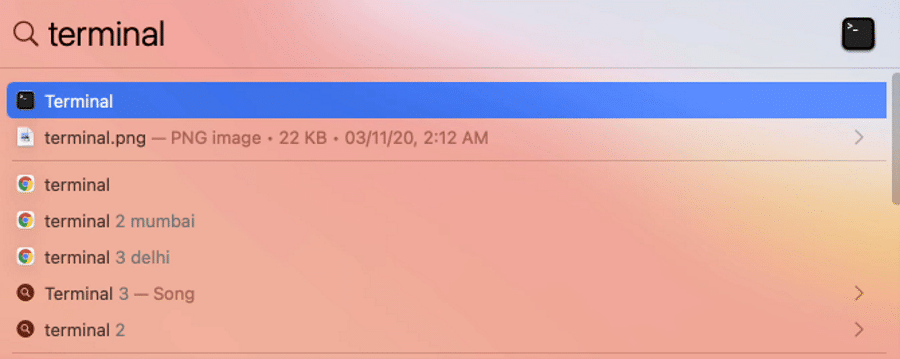
To check the Node.js version, you need to open your macOS terminal, click the Command + Space keys, or search the terminal from the search bar.
To check the Node.js version, type:
Node --versionAnd to check the npm version, run this command:
npm --version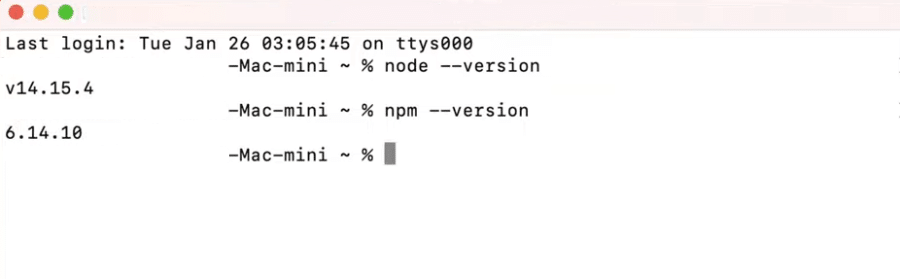
If the Node.js and npm versions are visible, both of them are correctly installed and working fine. If not, you may need to recheck to find the error or try the installation process again.
How To Install Node.js on Linux?
The Linux operating system works a bit differently than the other traditional operating systems. That’s because Linux is open-source, offering you more freedom, customization, and advanced functionalities.
If you’re casual with commands, you should feel comfortable with Linux. Here, we are about to discuss the easiest method of installing Node.js on the Linux operating system.
1. Choose the Node.js Version for Your Linux Distribution
The Linux operating system has hundreds of different distributions because of the diversity it provides. And users love to customize and harness different versions’ specific functionalities using distinct distributions.
Firstly, find the installation instruction for your specific distribution from Node.js’s Binary Distributions page. For this guide, we’ll be using Ubuntu for illustration purposes.
2. Install the Curl Command-Line Tool
Before going for Node.js installation, ensure that you have the curl command-line utility installed on your system. If not, then paste this command on your terminal to install curl:
sudo apt install curlIt may ask for your system password to verify the permission of the installation. Once you input the password, the system should begin the curl installation.

3. Start Node.js Installation
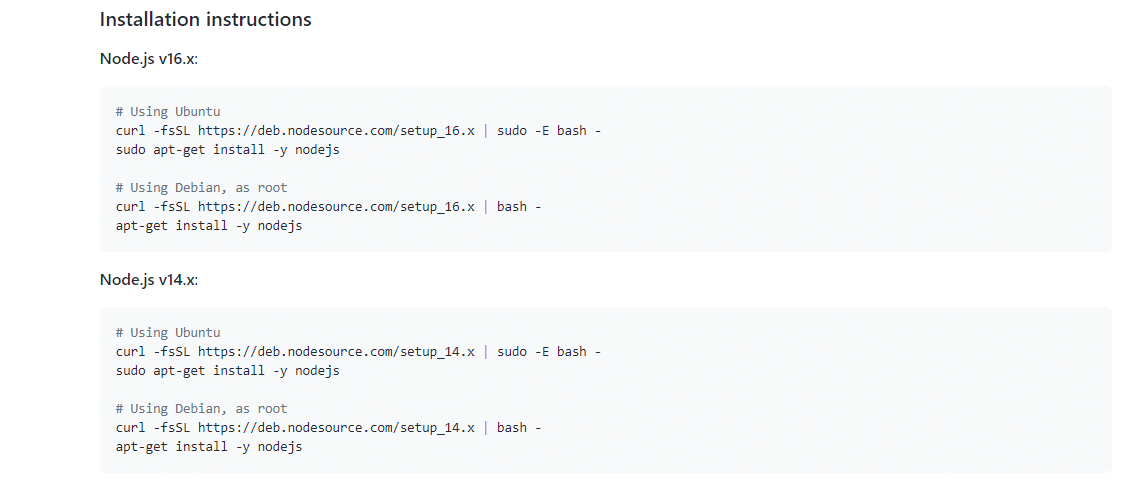
You need to copy and paste the Node.js installation command into your terminal (in our case, we can grab it from the Ubuntu distribution page) so that the system can begin the Node.js installation.
For instance, here, we’ll be installing Node.js v14.x. These are the installation commands for Ubuntu:
curl -fsSL https://deb.nodesource.com/setup_14.x | sudo -E bash -sudo apt-get install -y nodejsAs you already have the curl command line installed on your terminal, you’ll need to copy and paste the first command (the curl command) on your terminal and run it.

The curl command begins the Node.js installation process, updates your system, and downloads all Node.js libraries required to install Node.js on your Linux OS.
Now, all the libraries and resources of Node.js have been downloaded to your PC. With one final command, we can finish installing Node.js and npm on your computer.
Copy and paste the second line of command from the installation instructions above into your Linux terminal:
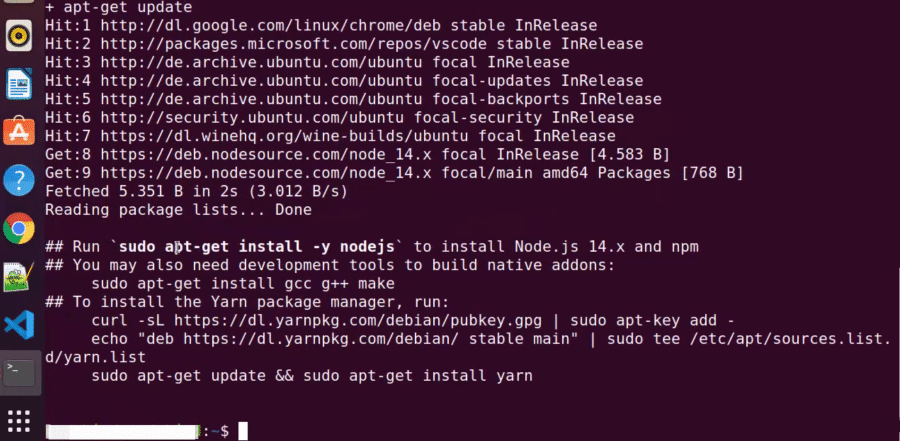
sudo apt-get install -y nodejs
If you’ve done everything correctly, Node.js will install correctly on your Linux distribution. Now input the Clear command to clear the terminal.
4. Verify Node.js Installation on Linux Ubuntu distribution
As you’ve installed Node.js, you can verify to check whether the installation is successful or not. To confirm the installation, you need to run two simple Linux commands on your Linux terminal.
To check the Node.js version, type:
Node --versionAnd to check the npm version, type:
npm --version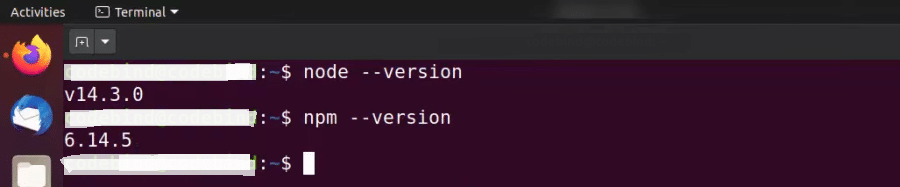
If the Node.js version and npm are installed correctly, you’ll see the Node.js and npm version names visible on the Linux terminal. It indicates that you have successfully installed Node.js and npm on your Linux distribution.
Check and Update npm Version
As we’ve mentioned, npm is the Node.js package manager. It manages the dependencies for packages. Without npm, you would have to unpack all your Node.js packages manually every time you want to upload a framework. But npm relieves you of this responsibility and takes care of it automatically.
Regularly updating npm also updates your local packages and improves the code used in your projects. However, as npm automatically installs with the Node.js version you choose, it often misses the latest npm release. In such cases, you can check your npm version and update it manually in a simple process.
The processes to check and update your npm version are very similar between Windows, macOS, and Linux — you’ll be running the same command on each.
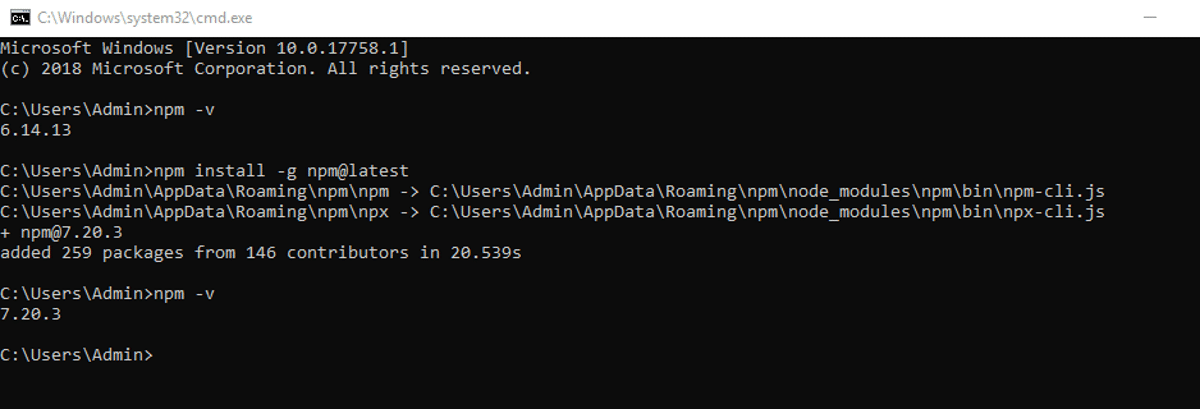
Update npm in Windows
To check the npm version, run the following command:
npm -v…or:
npm --versionAnd to update the npm version, run this command:
npm install -g npm@latestAfter running this command on your CMD prompt on Windows, the system will update your npm version and install the additional packages in a few seconds. In the end, you can recheck the version to confirm the update of the npm version.
Update npm on macOS
To check the npm version on macOS, open your terminal and run the following command:
npm -v…or:
npm --version
To update the npm version, run this command in your macOS terminal:
npm install -g npm@latest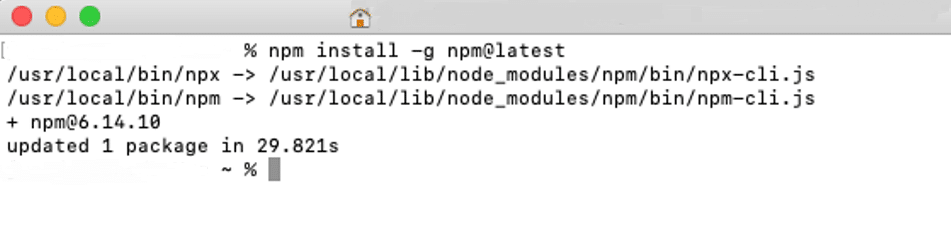
Update npm in Linux
To update your npm version on Linux, type these commands into your terminal:
sudo npm install -g n…and then:
sudo n latest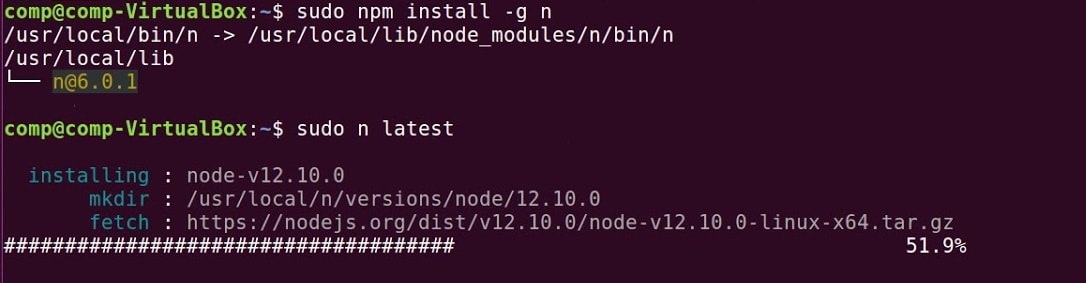
With Node.js, you can take your web dev skills to the next level 📈… so what are you waiting for? Get started with this guide 👇Click to Tweet
Summary
Node.js has become a popular programming environment quickly because of its usefulness in both frontend and backend. Thousands of active users have created a vast community that helps keep new developers and their questions from slipping through the cracks.
In essence, it’s easy to start with Node.js because of its simplicity, and its capabilities for creating advanced applications are extraordinary. It can also help turn you into a full-stack developer in a short time. These features make Node.js an inevitable choice for next-generation programming.
Have we missed any helpful tips about installing Node.js on Windows, macOS, or Linux? Let us know in the comments section!
Zadhid Powell
Zadhid Powell is a Computer Engineer who gave up coding to start writing! Alongside, he is a Digital Marketer, technology enthusiast, SaaS expert, reader, and keen follower of software trends. Often you may find him rocking downtown clubs with his guitar or inspecting ocean floor diving.
-
LinkedIn
-
Twitter