Службы Active Directory – решение от компании Microsoft позволяющее объединить различные объекты сети (компьютеры, сервера, принтеры и различные сервисы) в единую систему. Благодаря Active Directory администратор сети получает очень удобное централизованное средство управления учетными записями пользователей, групповыми политиками и объектами в сети.
Шаг 1. Подготовка сервера и развертывание Active Directory
Для начала нам необходимо подготовить главный контроллер домена, для этого нам понадобится сервер с установленной на нем Windows Server, в данной статье все манипуляции будем производить на Windows Server 2022, но это будет так же актуально и для Windows Server 2016 и 2019.
Забегая вперед скажу, что для безотказной работы Active Directory нам желательно иметь минимум два контроллера, чтобы в случае отказа одного из них (или на время его выключения для профилактики или установки обновлений) наша сеть AD продолжала функционировать.
Первым делом обязательно переименуйте ваш сервер, дав ему какое ни будь логичное для контроллера имя, например DC-1. Вторым делом, установите на сервер статический IP-адрес.
Теперь установим необходимые роли на наш будущий контроллер, выберем роль “DNS-сервер” и “Доменные службы Active Directory”.
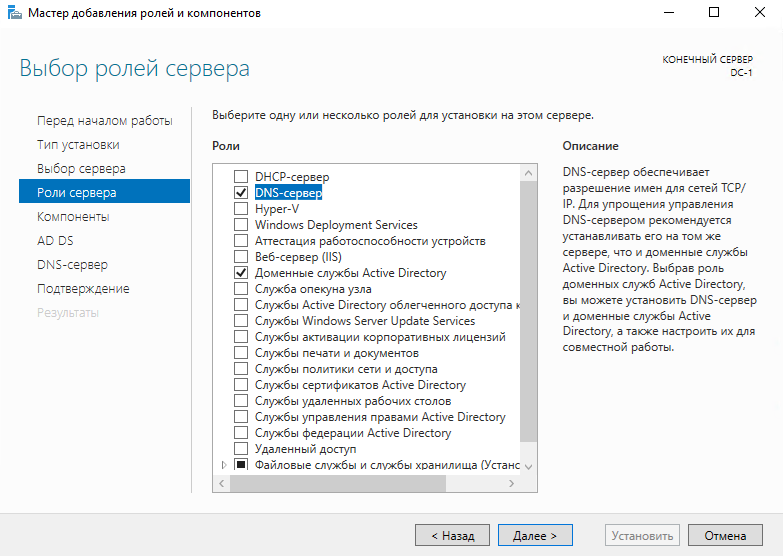
Нажимаем несколько раз “Далее” и в конце нажимаем “Установить”, ждем завершения установки новых ролей.
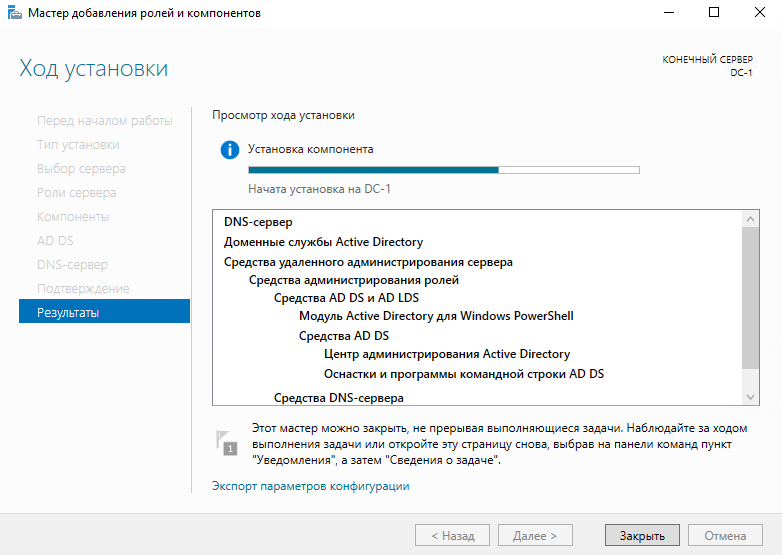
После завершения установки ролей можно нажать кнопку “Закрыть”. Далее в диспетчере серверов необходимо щелкнуть по флажку сверху и выбрать “Повысить роль этого сервера до уровня контроллера домена”.

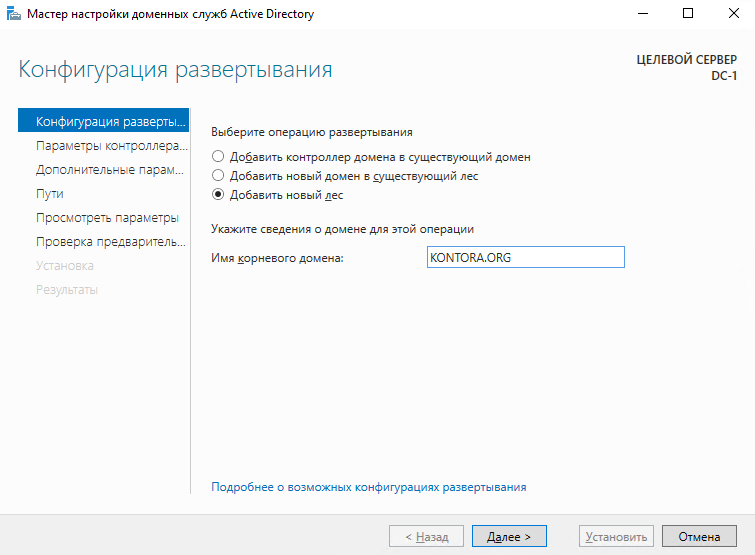
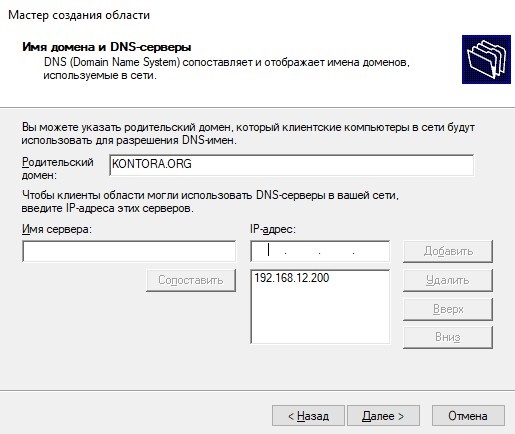
Запустится конфигуратор развертывания Active Directory. Выберем параметр “Добавить новый лес” и укажем имя нашего создаваемого домена, например KONTORA.ORG.
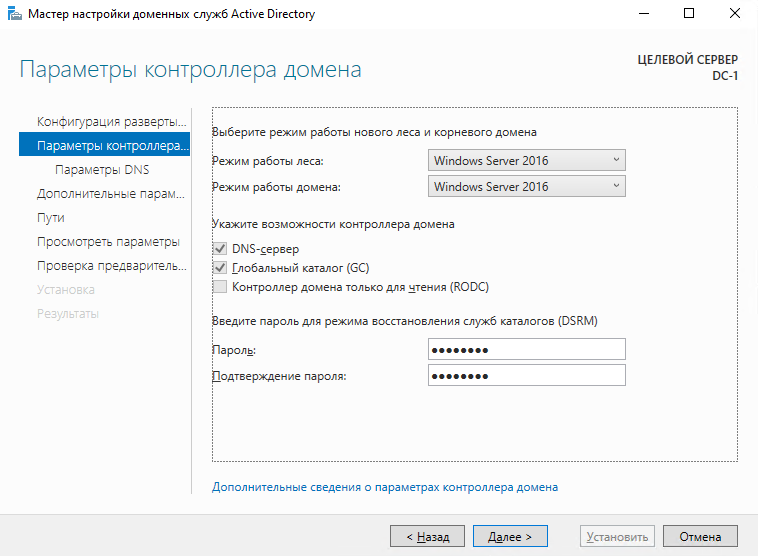
На следующей странице выбираем режим работы леса (рекомендую оставить Windows Server 2016), а так же укажите пароль для режима восстановления служб каталогов. Главное, не забудьте потом этот пароль.
Дальше нам предлагается указать параметры делегирования DNS, но сделать этого сейчас не получится, так как у нас еще не настроен DNS сервер, пропускаем этот шаг – жмем “Далее”.
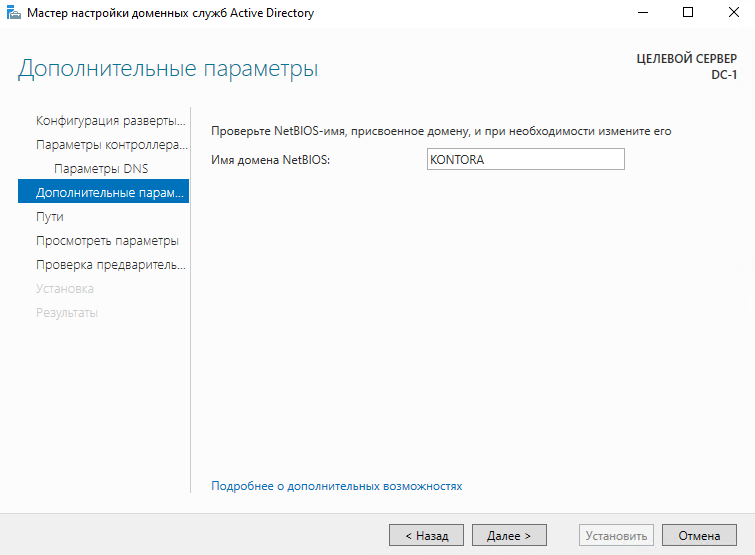
Дальше нас просят проверить NetBIOS имя вашего домена, ничего не трогаем, нажимаем “Далее”.
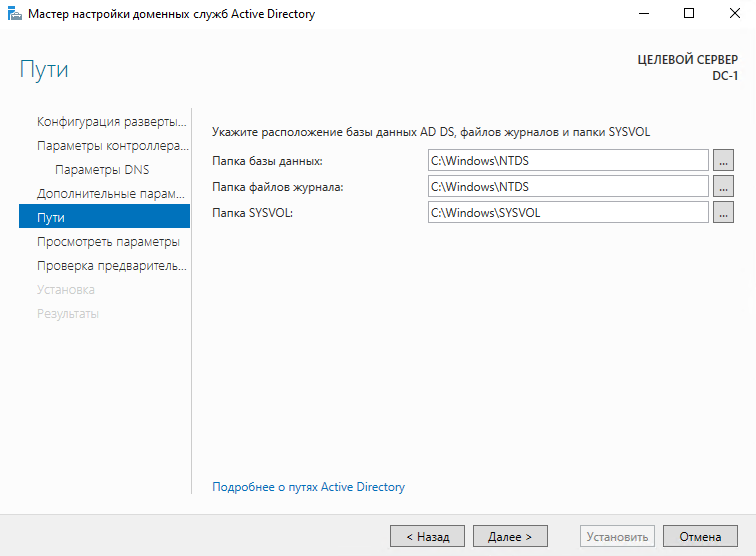
Далее нас попросят указать расположение базы данных Active Directory, файлов журналов и папки SYSVOL. Оставляем все по умолчанию и нажимаем “Далее”.
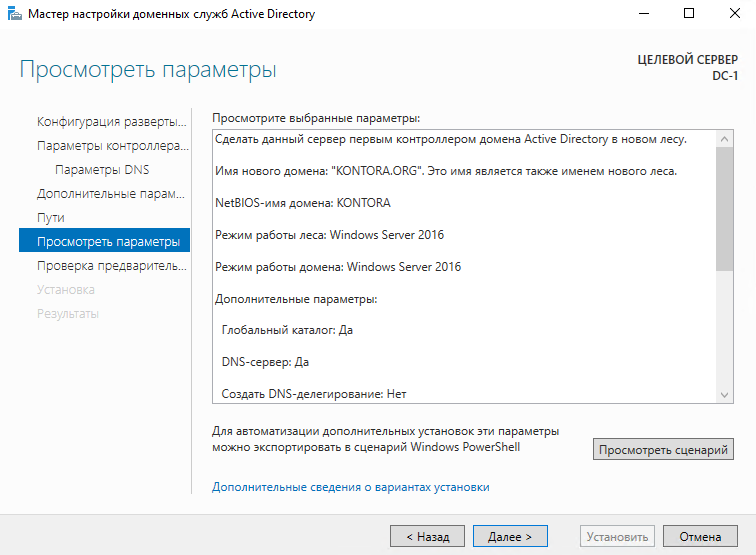
Затем нам предлагается посмотреть параметры, которые мы указали на этапах мастера развертывания AD, если хотите можете полистать. Нажимаем “Далее”.
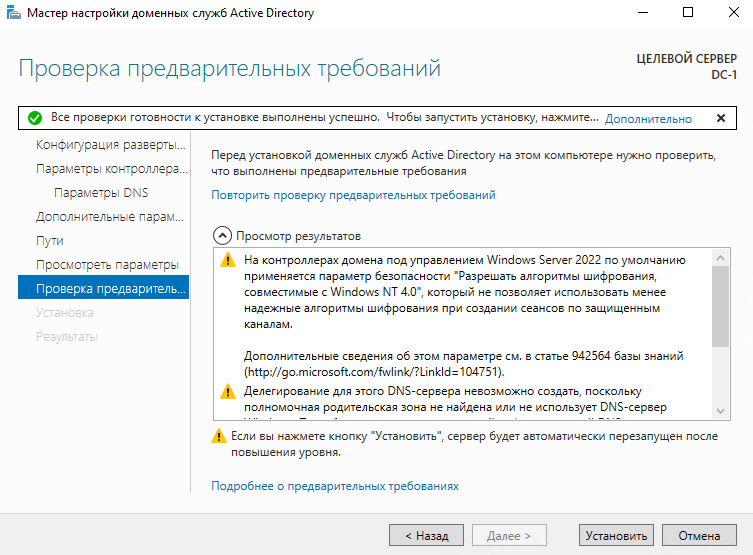
На этом этапе мастер говорит нам, что все готово к начале развертывания AD. Нажимаем кнопку “Установить” и ждем, в конце сервер сам уйдет в перезагрузку.
Теперь нам надо авторизоваться на сервере уже под доменной учетной записью. Так как ранее у нас на сервере был один пользователь, он же администратор, с именем “Администратор”, используем то же самое имя и тот же пароль, только при этом заходим в домен KONTORA.ORG.
Если вы подключаетесь к серверу через RDP, то указывать имя пользователя надо так: Администратор@KONTORA (.ORG можно не писать). Если авторизация под доменной учеткой прошла успешно, значит контроллер работает.
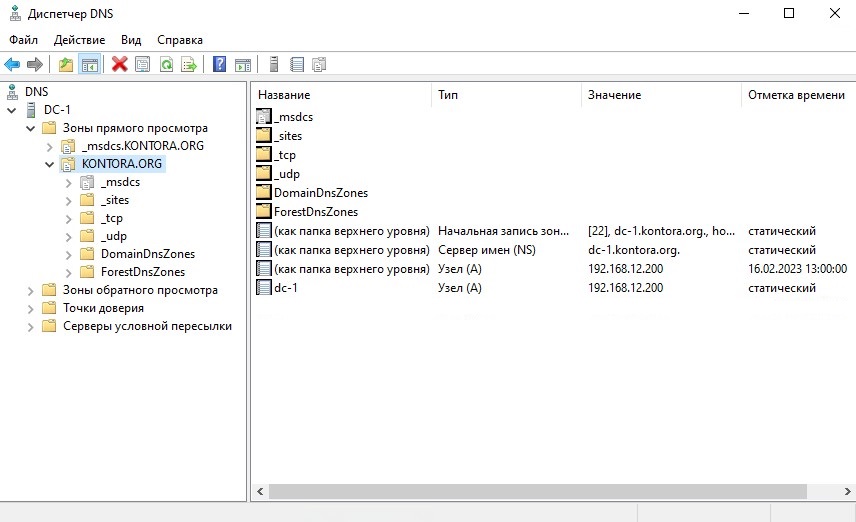
Откроем оснастку диспетчера DNS на контроллере домена командой dnsmgmt.msc или через ярлык в меню “Пуск” – “Средства администрирования Windows” – “DNS”. Как видим, мастер развертывания AD за нас уже подготовил и создал зону прямого просмотра, назвав ее именем нашего домена. Данная зона содержит в себе всю информацию о доменных именах компьютерах и прочих устройствах, добавленных в домен.
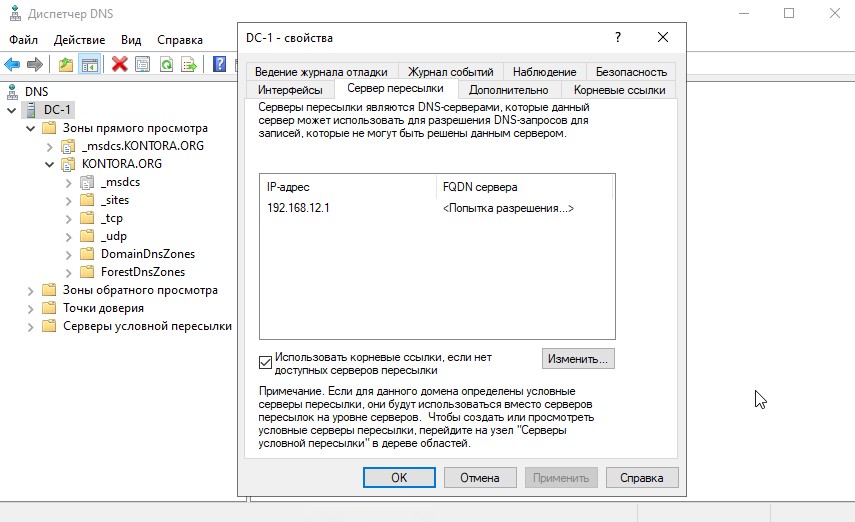
Откроем свойства нашего DNS-сервера и перейдем на вкладку “Сервер пересылки”. Сервер пересылки нужен для того, чтобы пересылать DNS-запросы внешних DNS-имен на DNS-серверы за пределами локальной сети. Сюда мастер по умолчанию добавит IP-адрес DNS-сервера, который был указан в статичных настройках IPv4 перед началом развертывания AD, у меня здесь указан IP-адрес моего маршрутизатора на котором работает DNS. По идее сюда можно прописать IP-адреса различных публичных DNS-серверов, например Google, Cloudflare и т.д.
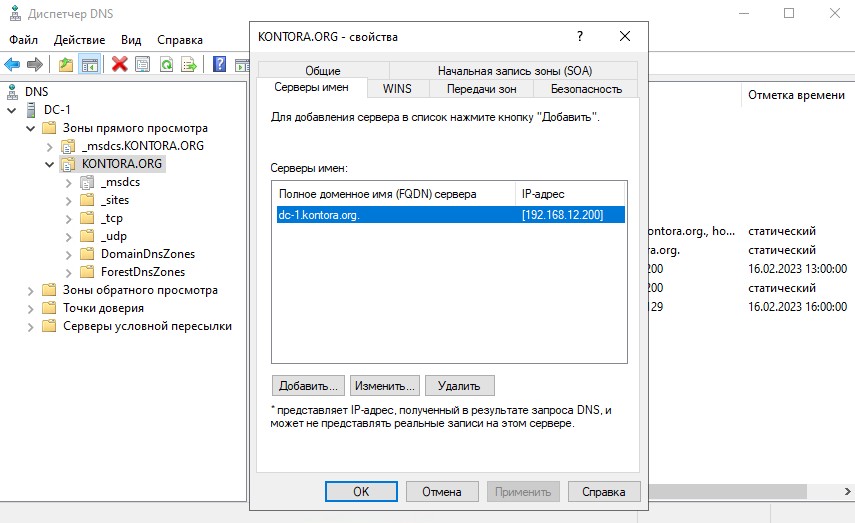
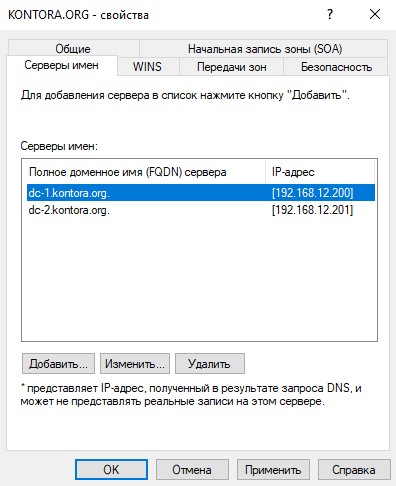
Откроем свойства зоны прямого просмотра, перейдем на вкладку “Серверы имен”. Здесь отображаются все DNS-серверы в нашем домене, в настоящее время у нас один контроллер и один сервер DNS, так как дополнительных серверов мы не поднимали. В случае если если мы добавим в наш домен еще один контроллер домена для репликации, на нем тоже будет поднята роль DNS-сервера и он отобразится на этой вкладке.
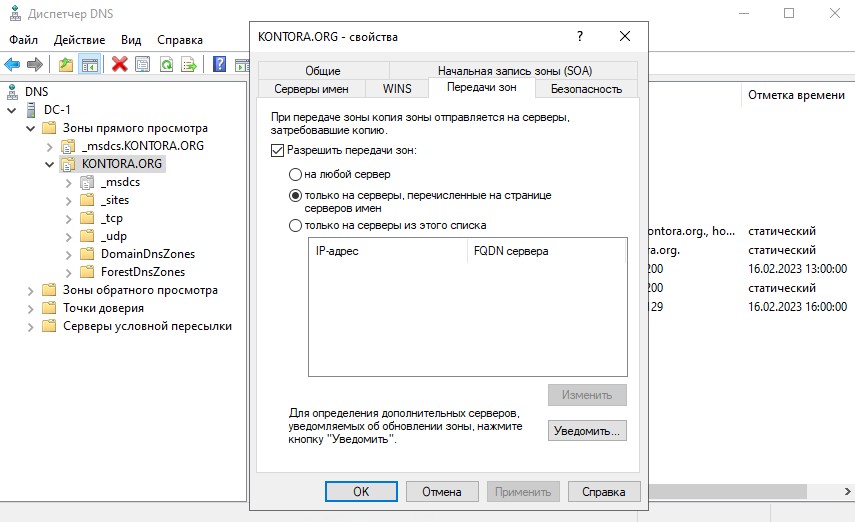
Перейдем на вкладку “Передачи зон” и заранее поставим галочку “Разрешить передачи зон” и выберем “только на серверы, перечисленные на странице серверов имен”. Данной настройкой мы заранее разрешим репликацию зоны на другие DNS-серверы в домене, если они будут добавлены. Если вы добавите в домен новый контроллер домена, не забудьте в свойствах этой же зоны на его DNS-сервере сделать такие же настройки, чтобы репликация была двухсторонняя.
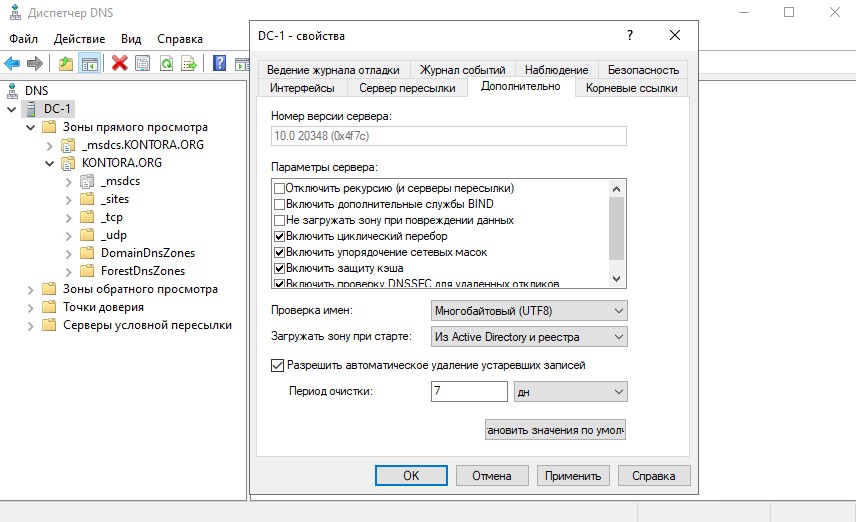
Так же рекомендую открыть вкладку “Дополнительно” и поставить галочку “Разрешить автоматическое удаление устаревших записей”, это поможет избавиться от старых, неактуальных DNS записей.
При желании можно создать зону обратного просмотра. Зона обратного просмотра нужна для определения имен хостов имен по их IP -адресу. Нажимаем правой кнопкой мыши по зоне обратного просмотра и выбираем “Создать новую зону”, откроется мастер. Нажимаем “Далее”, выбираем “Основная зона”, далее указываем репликацию для всех DNS-серверов работающих на контроллерах домена в этом домене, выбираем зону обратного просмотра IPv4, указываем идентификатор сети (первые три октета вашей подсети), выбираем “Разрешить только безопасные динамические обновления” и “Готово”. Зона обратного просмотра создана. Зайдем в свойства зоны и тоже включим передачу имен на вкладке “Передачи зон”, как мы делали с зоной прямого просмотра.
Проверить работоспособность DNS-сервера можно командой:
dcdiag /test:dns
В случае ошибок при работе DNS инициируйте регистрацию или удаление записей DNS, выполнив команду:
nltest.exe /dsregdns
Выполнять обе команды необходимо в командной строке контроллера домена от имени администратора.
Шаг 2. Поднятие роли DHCP-сервера на контроллере домена и его настройка
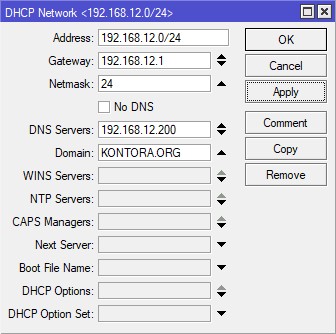
У вас уже наверняка имеется в сети свой DHCP-сервер, скорее всего это классическая его реализация на вашем маршрутизаторе. Если вы используете маршрутизатор MikroTik, вы вполне можете продолжать использовать и его. Главное, необходимо указать в его параметрах, чтобы он выдавал клиентам сетевые настройки используя в качестве DNS-сервера IP-адрес вашего контроллера домена, поскольку именно контроллер будет нашим главным DNS-сервером в сети, иначе клиентские компьютеры просто не увидят наш домен. Еще в параметрах DHCP-сервера необходимо будет указать имя вашего домена.
У MikroTik это выглядит так:
Но лучше все таки будет отдать роль DHCP-сервера самому контроллеру. Дело в том, что штатная роль DHCP на Windows Server умеет сама править зону прямого просмотра DNS, когда выдает тому или иному хосту новый IP-адрес. Плюс, можно будет настроить любое время аренды и не бояться, что в вашей прямой зоне DNS будут устаревшие сведения. В случае использования стороннего DHCP, того же MikroTik, необходимо будет выставлять время аренды вдвое больше, чем указано в параметрах автоматического удаления устаревших записей на вашем DNS-сервере. В нашем случае необходимо будет выставлять 14 дней.
Если вы не планируете разворачивать DHCP на Windows Server и планируете использовать DHCP на вашем маршрутизаторе, можете пропустить этот шаг.
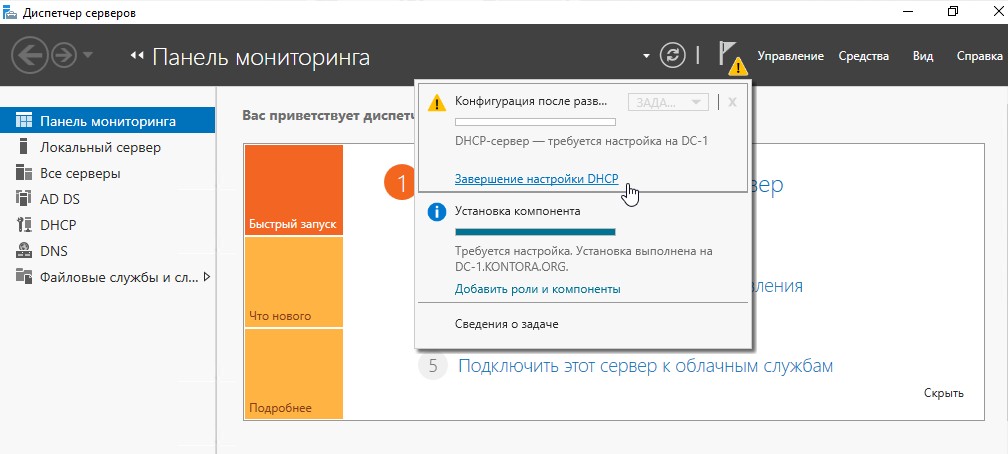
Для развертывания DHCP-сервера на контроллере домена, необходимо добавить новую роль.

Нажимаем несколько раз “Далее” и в конце “Установить”. Ждем завершения установки новой роли. Затем щелкнем на флажок в правой верхней части диспетчера серверов и выберем “Завершение настройки DHCP”.
Запустится мастер настройки конфигурации DHCP, нажимаем “Далее”.
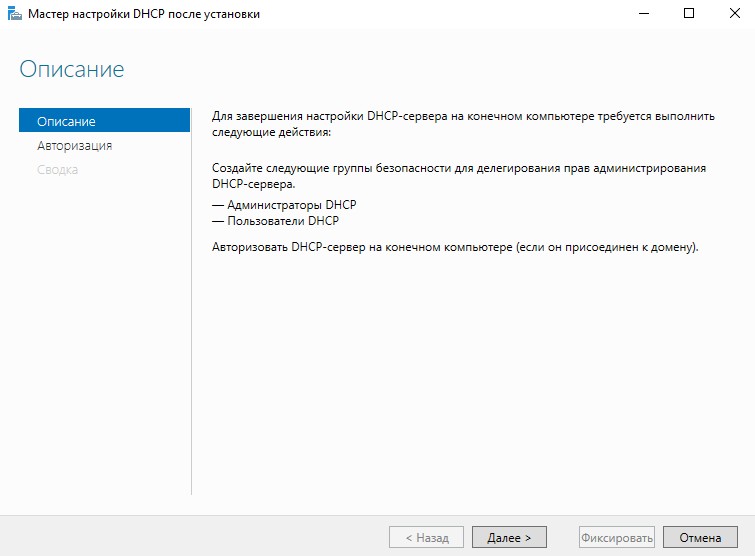
Указываем учетные записи для авторизации DHCP-сервера. Можно оставить администратора домена, а можно создать отдельную учетную запись и внести ее в группу “Администраторы DHCP”. Я оставлю администратора домена.
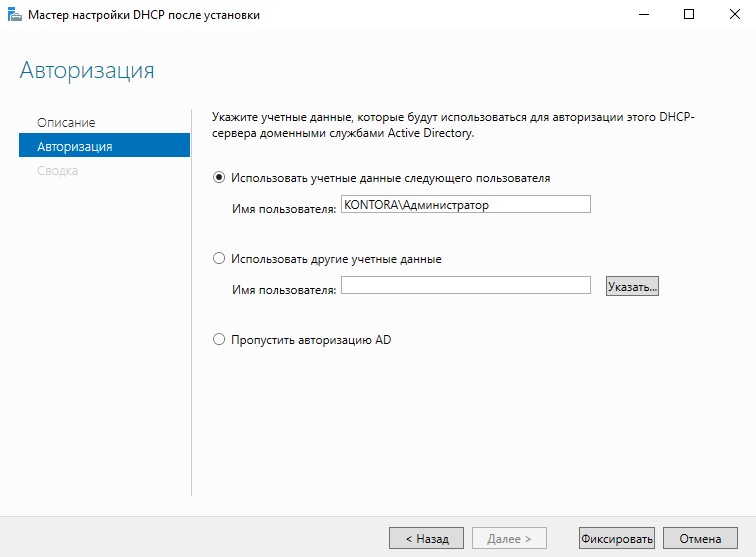
Нажимаем кнопку “Фиксировать” и “Закрыть”.
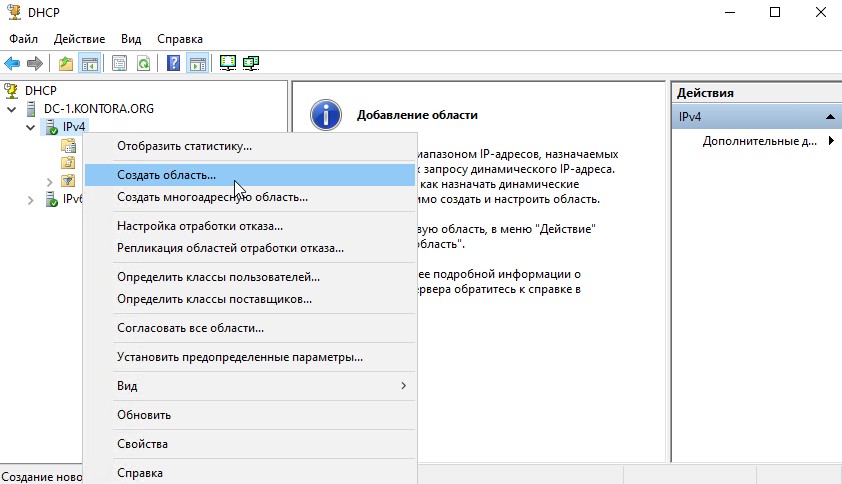
Теперь откроем диспетчер DHCP командой dhcpmgmt.msc или вызовем его из меню “Пуск” – “Средства администрирования Windows” – “DHCP”, откроется оснастка.
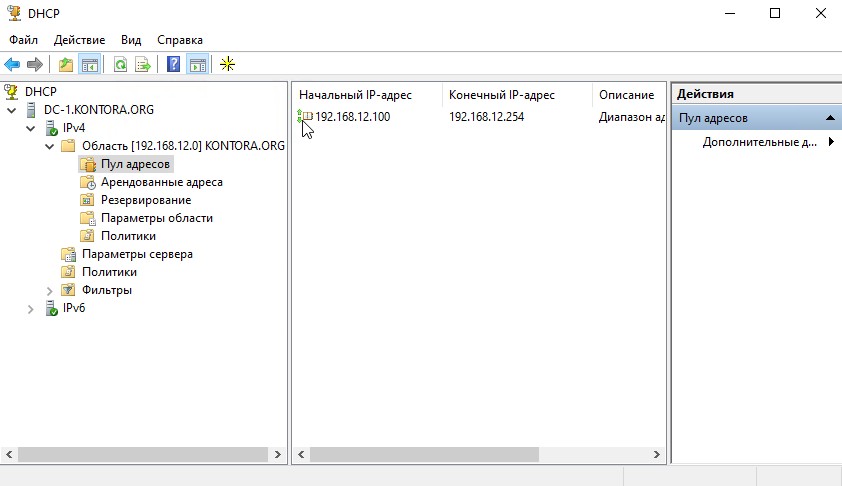
Развернем дерево нашего DHCP-сервера, щелкнем правой кнопкой мыши на “IPv4” и выберем “Создать область”, откроется мастер создания области.
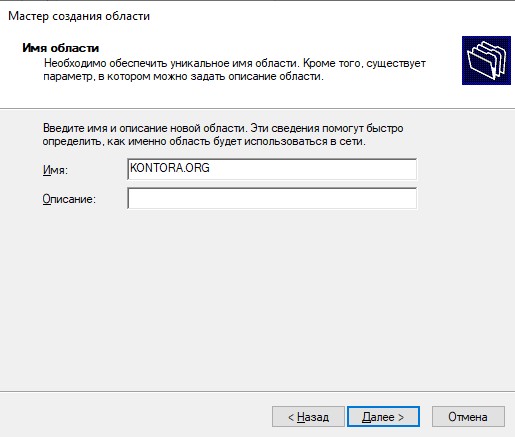
Нажимаем “Далее”, задаем имя области, можно указать имя нашего домена.
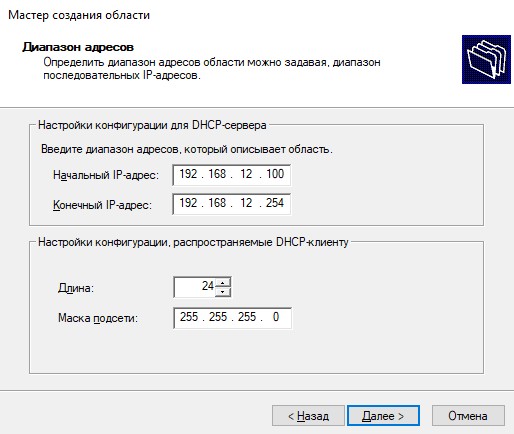
Нажимаем далее и указываем диапазон выдаваемых адресов, а так же маску подсети.
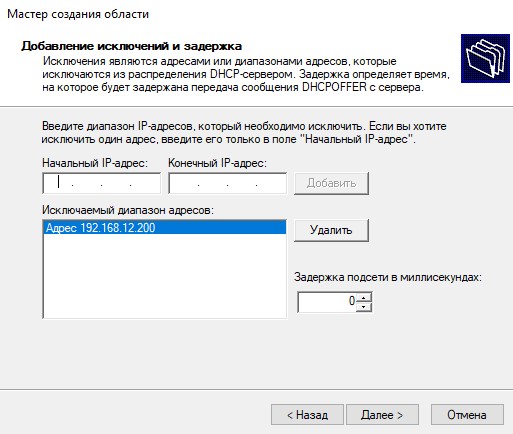
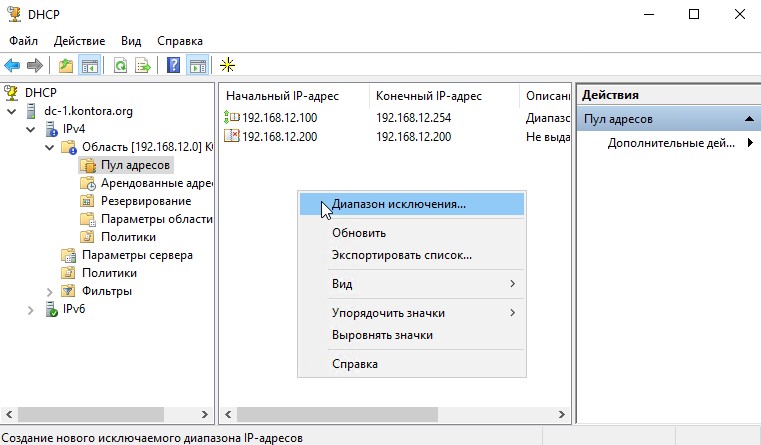
Нажимаем “Далее”. Здесь нам предлагается указать диапазон IP-адресов, которые DHCP-сервер не будет выдавать. Если таковых у вас нет, просто нажимаем “Далее”. Я же внесу сюда адрес, который сейчас предоставлен нашему контроллеру – 192.168.12.200. Вообще, правильнее было бы назначить контроллеру домена IP-адрес вне диапазона адресов, выдаваемых DHCP, например 192.168.12.2. Просто в моем случае я развернул стенд в своей действующей сети, где часть IP-адресов была уже занята и поэтому я назначил контроллеру IP-адрес из доступного участка адресов.
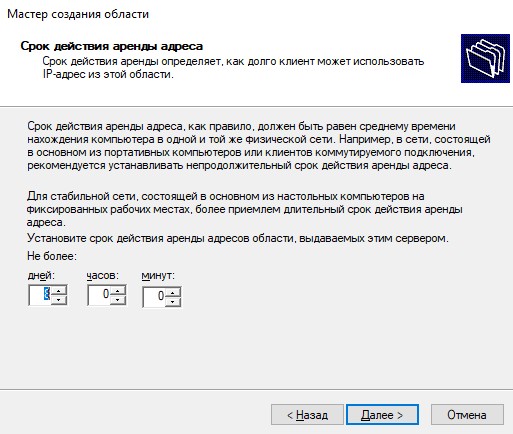
Теперь нас просят указать имя аренды IP-адресов, по умолчанию 8 дней. Можете оставить как есть, или указать свое значение. Я оставляю по умолчанию.
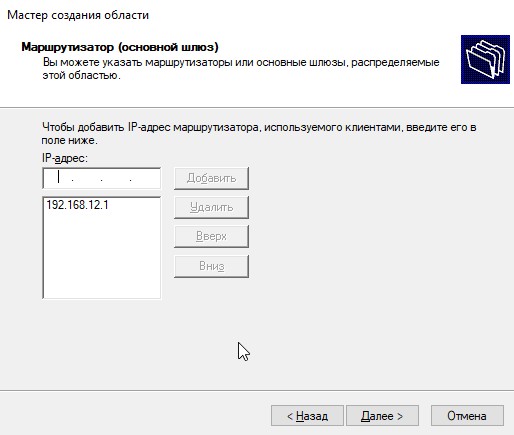
Идем дальше, нам предлагают настроить другие параметры, которые DHCP-сервер будет назначать клиентам, такие как IP-адрес маршрутизатора, DNS-сервера и т.д. Можем настроить позже, можем сейчас. Давайте сделаем.
Указываем IP-адрес вашего маршрутизатора (шлюза).
Далее нас просят указать имя домена и адрес DNS-сервера, мастер автоматически пропишет имя нашего домена и предложит в качестве DNS использовать IP-адрес контроллера домена, который у нас и будет основным DNS в сети.
Далее нас просят указать адрес WINS сервера. Он у нас не используется, поэтому пропускаем данный шаг. В конце нас спросят, хотим ли мы активировать данную область? Выбираем “Да”, нажимаем “Далее” и “Готово”.
Как видим у нас создалась новая область IPv4 с заданным пулом адресов и необходимыми параметрами. На вкладке “Арендованные адреса” можно посмотреть список клиентов.

DHCP-сервер настроен и готов к работе. Для проверки работоспособности запросите новые настройки DHCP на клиентской машине, в Windows это можно сделать командой:
ipconfig /renew
Обязательно отключите DHCP-сервер на вашем маршрутизаторе, он нам больше не пригодится.
Шаг 3. Создание пользователей в домене
И так, у нас теперь есть домен и собственно первый его контроллер, он же основной. Но у нас пока нет пользователей, приступим к их созданию.
Для создания пользователей в AD используется оснастка “Active Directory – пользователи и компьютеры”, запустить ее можно командой dsa.msc или открыть с помощью ярлыка из меню “Пуск”, во вкладке “Средства администрирования”.
В данной оснастке можно создавать и удалять пользователей, группы, подразделения, компьютеры. Если у вас в организации много пользователей и отделов, удобнее всего для каждого отдела создать свое подразделение и всех его сотрудников помещать туда. Так же для отдельных подразделений будет удобно создавать персональные групповые политики.
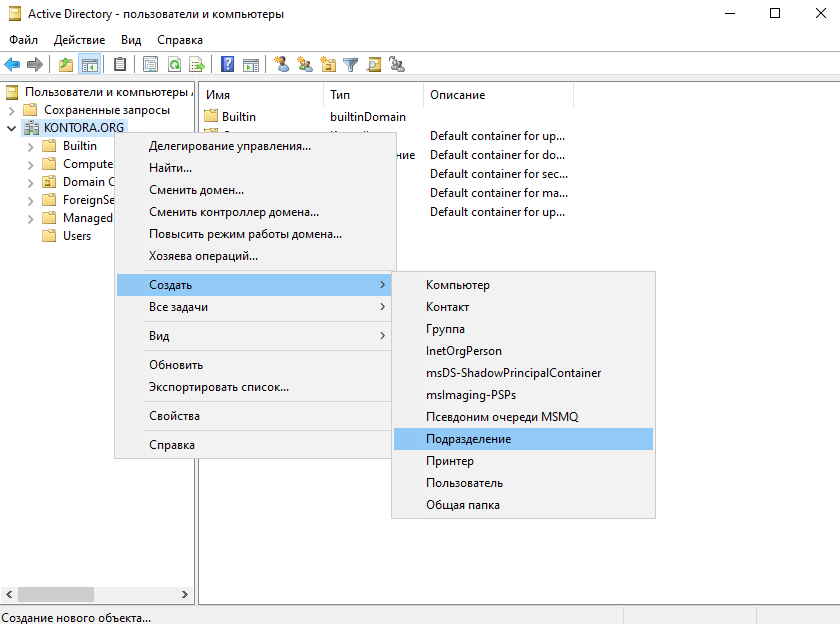
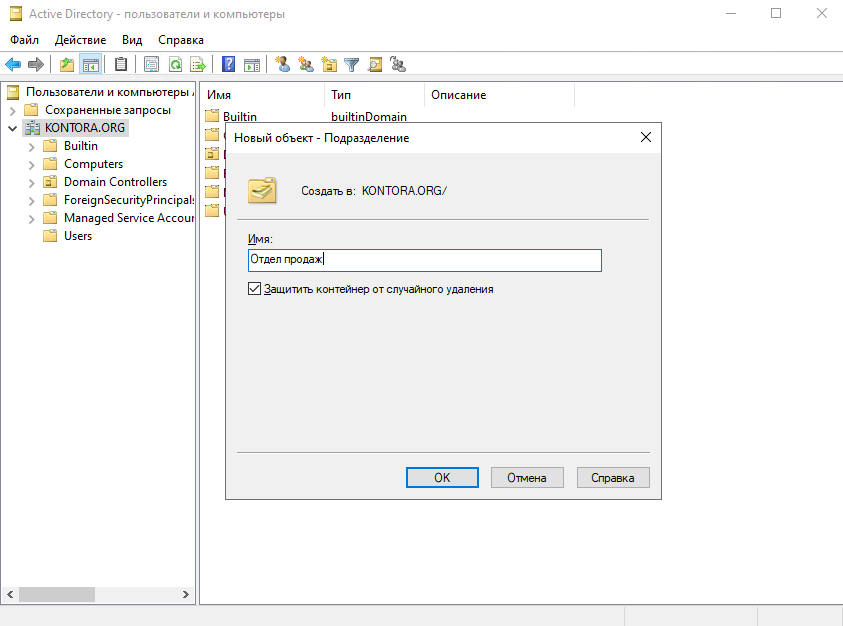
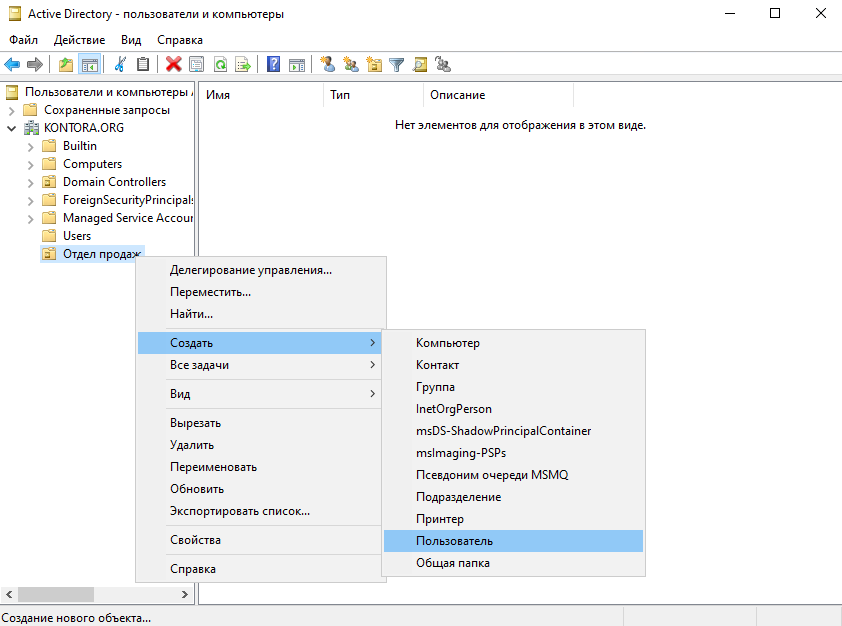
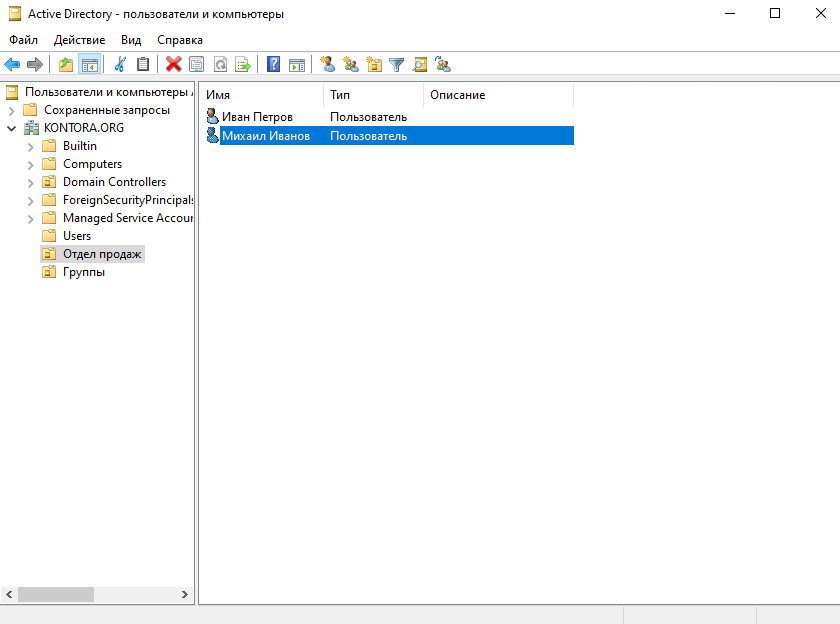
Для примера создадим подразделение “Отдел продаж” и создадим в нем учетные записи сотрудников – Петрова Ивана и Иванова Михаила.
Для создания подразделения щелкните правой кнопкой мыши по имени домена в оснастке “Пользователи и компьютеры” и выбирите “Создать” – “Подразделение”, затем введите имя подразделения и нажмите “ОК”.
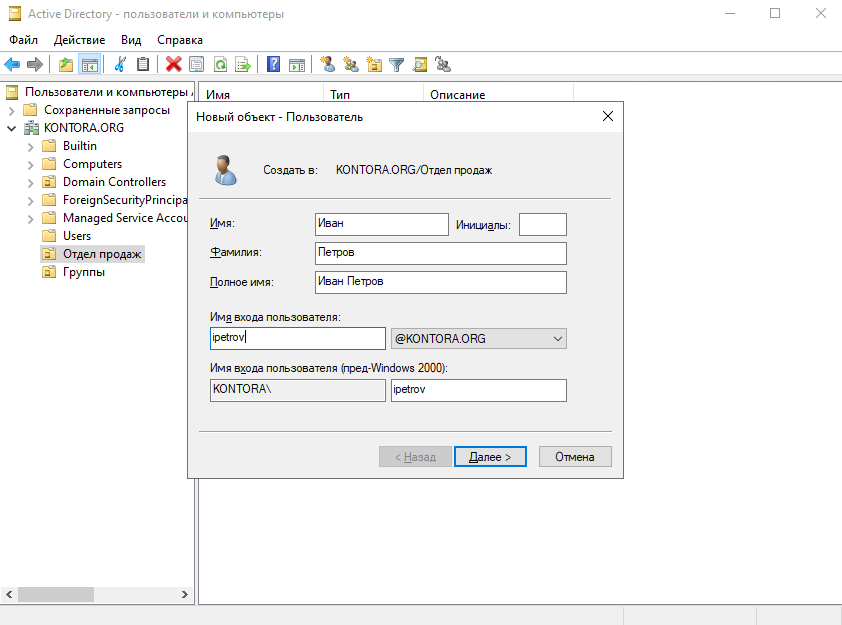
Теперь щелкаем правой кнопкой мыши по значку нашего подразделения, выбираем “Создать” – “Пользователь”. Пишем имя и фамилию – Иван Петров, создадим ему логин ipetrov.
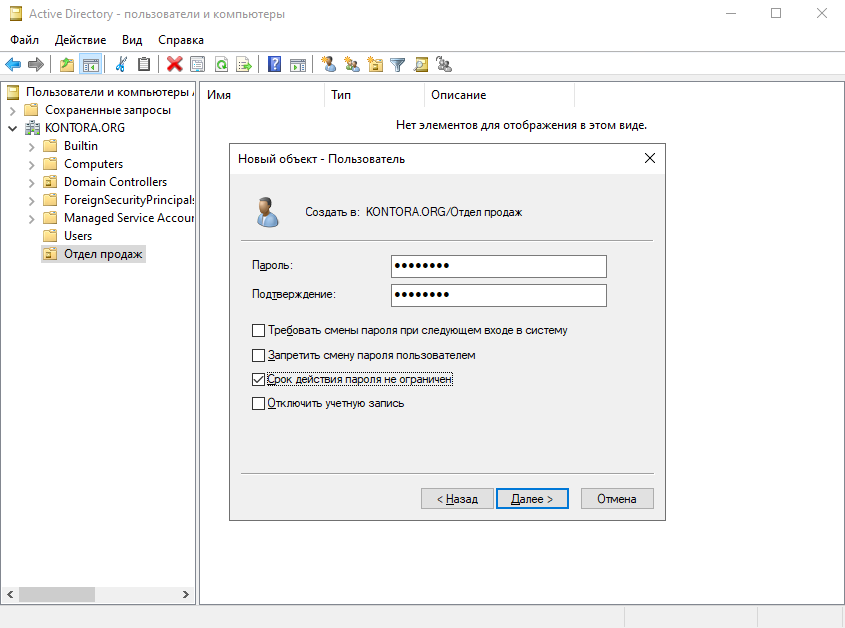
Нажимаем “Далее” и придумываем ему пароль. По стандартной политике использования паролей, он должен иметь минимум 8 символов, содержать буквы, цифры и хотя бы одна буква должна быть другого регистра, например – Pass1234. Ставим галочку “Срок действия пароля не ограничен”, если хотим создать постоянный пароль, и убираем галочку “Требовать смены пароля при следующем входе в систему”, если не хотим обременять пользователя лишними действиями при первом входе в систему. Нажимаем “Далее” и “Готово”, один пользователь в домене у нас есть.
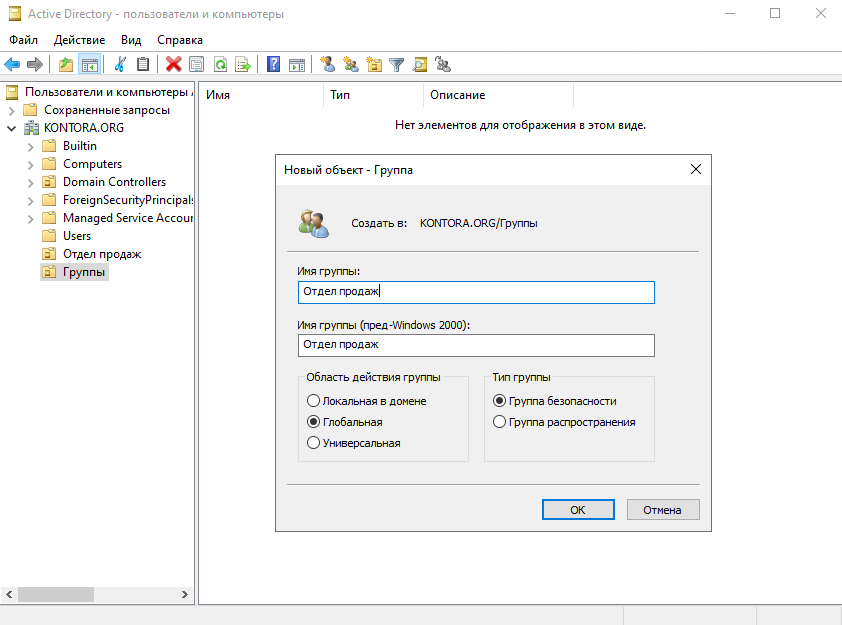
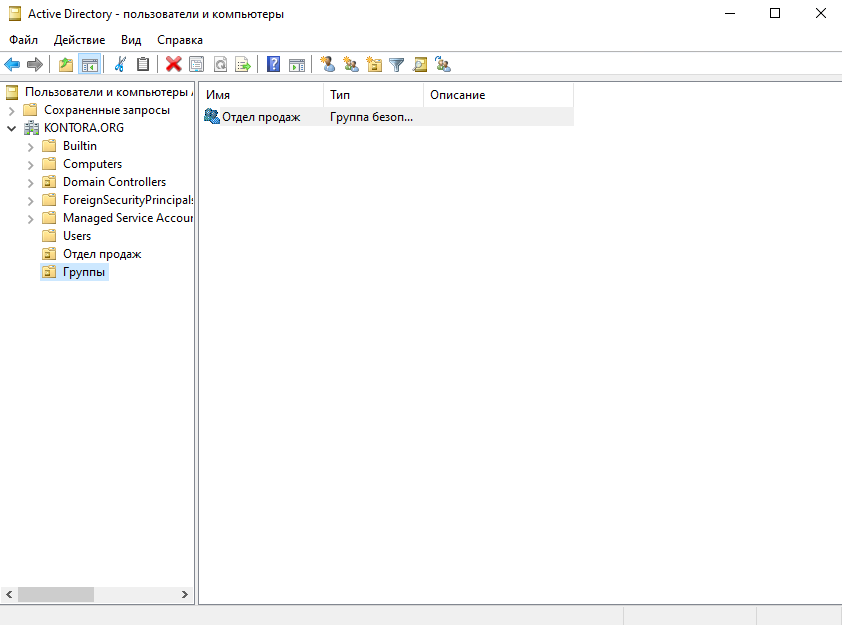
Далее, опять же для нашего удобства, создадим еще одно подразделение и назовем его “Группы”, в нем мы будем создавать наши группы пользователей и компьютеров, чтобы они все были в одном месте. В новом подразделении создадим первую группу “Отдел продаж”, в эту группу мы внесем пользователей из этого отдела.

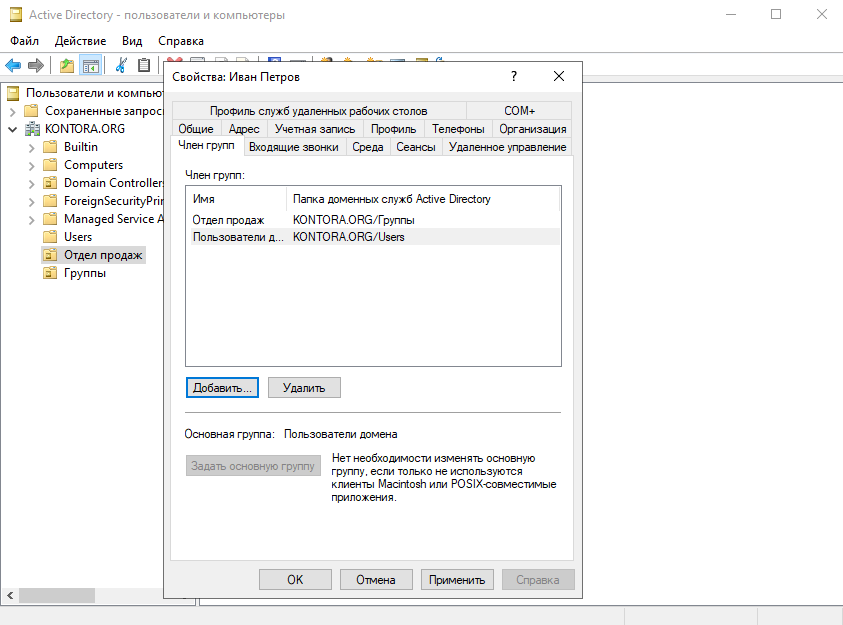
Переходим обратно в наше подразделение “Отдел продаж”, щелкаем дважды по пользователю Иван Петров, переходим на вкладку “Член групп” и добавляем группу “Отдел продаж”. Первый пользователь в группе у нас уже есть.

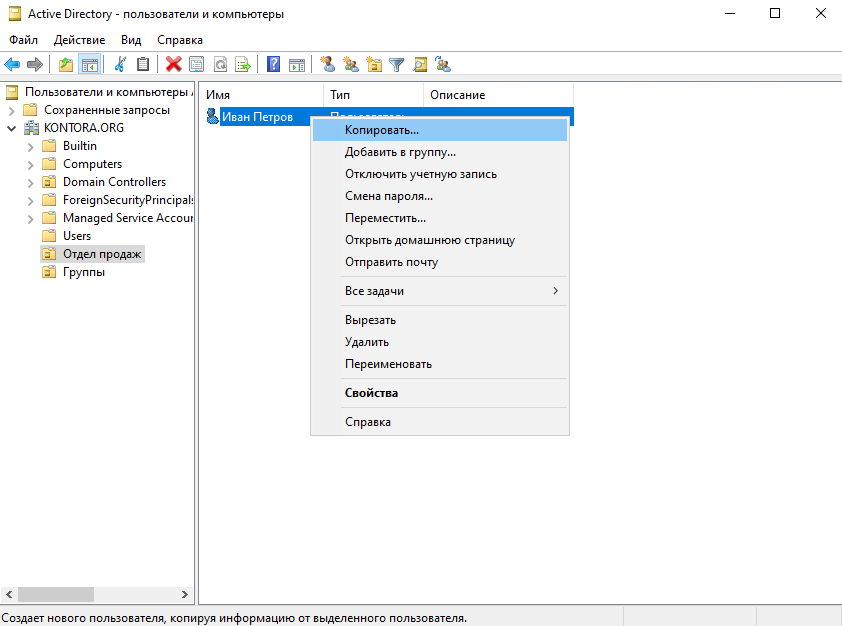
Теперь создадим в подразделении “Отдел продаж” второго пользователя – Михаил Иванов. Чтобы нам не указывать все параметры заново и не добавлять этого сотрудника в нужную группу, мы просто скопируем параметры из пользователя Иван Петров. Щелкаем по пользователю правой кнопкой мыши и выбираем “Копировать”.
 Отроется уже знакомая нам форма которую нужно заполнить. Вводим имя и фамилию пользователя, придумываем логин, нажимем “Далее”, задаем пароль и “Готово”. Обратите внимание, что на этапе установки пароля все галочки уже были проставлены в том порядке, как мы это делали у прошлого пользователя. Так же новый пользователь уже будет включен в группу “Отдел продаж”.
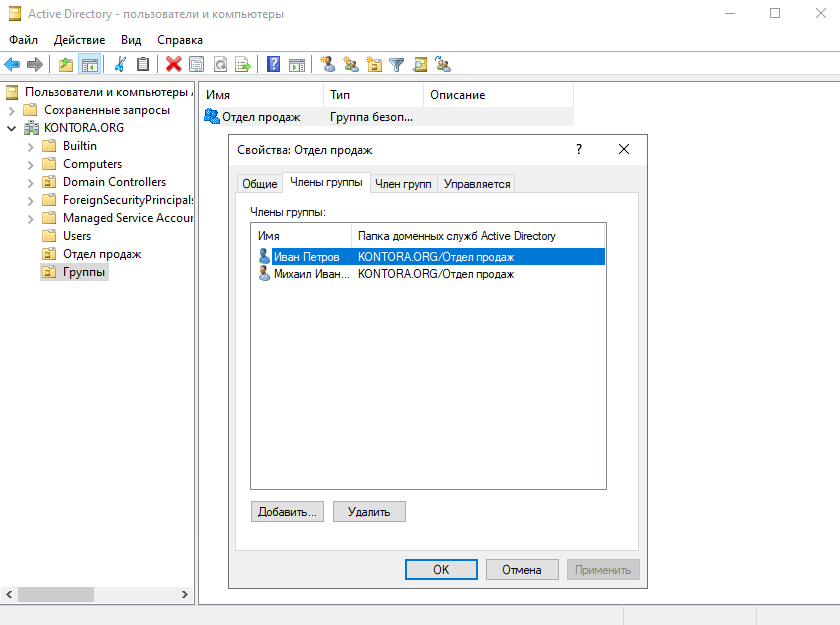
Теперь у нас есть два пользователя в подразделении.
Действуя по аналогии можно создавать другие подразделения, группы и пользователей.
Шаг 4. Присоединение компьютеров в домен
После того как пользователи созданы, необходимо завести компьютеры в домен. Подключить к домену получится только те компьютеры, на которых Windows имеет редакцию “Профессиональная”, “Корпоративная”, “Embedded” и т.д. Домашнюю версию завести в домен не получится.
Переходим к компьютеру, который мы будем заводить в домен. Открываем дополнительные параметры системы, нажимаем “Изменить”.
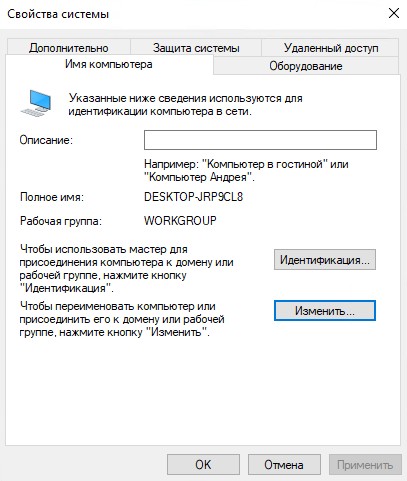
Выбираем, что компьютер является членом домена, вводим домен KONTORA.ORG, при желании можем указать новое имя компьютеру.
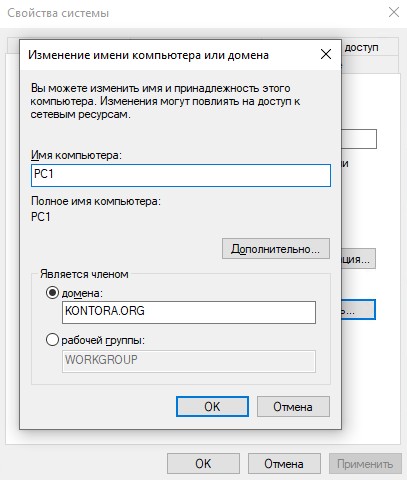
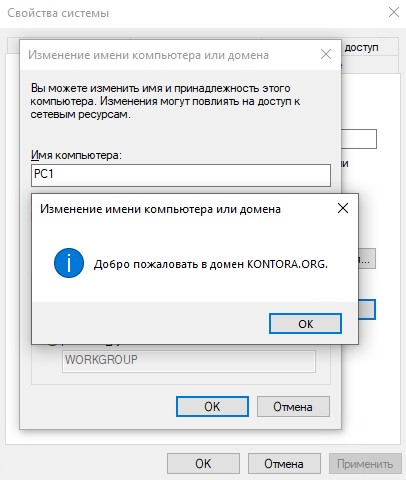
Нажимаем “ОК”, далее нас попросят ввести данные администратора домена, вводим и ждем появления уведомления о том, что компьютер добавлен в домен.
Если во время присоединения к домену вышла ошибка, что указанный домен не найден, проверяйте, правильные ли настройки DNS указаны на клиентском компьютере. В качестве предпочитаемого DNS-сервера должен быть указан IP-адрес контроллера домена. Если вы вносили изменения в настройки DHCP-сервера, проверьте, что клиентский компьютер получил новые настройки.
Теперь необходимо перезагрузить компьютер. После перезагрузки на компьютере можно будет авторизоваться под доменной учетной записью администратора, либо пользователя из числа тех, что мы создали. Попробуем авторизоваться под именем Ивана Петрова, вводим его логин ipetrov и пароль Pass1234.
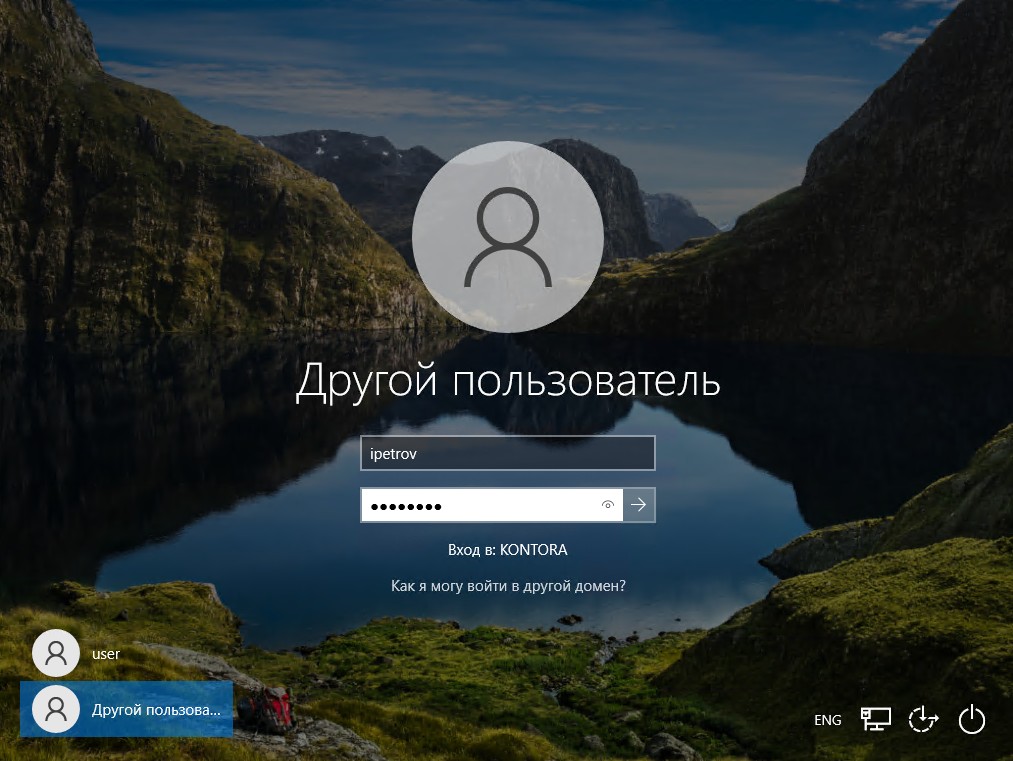
Как видим у нас прекрасно получилось авторизоваться под данным пользователем и даже имя и фамилия отображается во время входа в профиль.
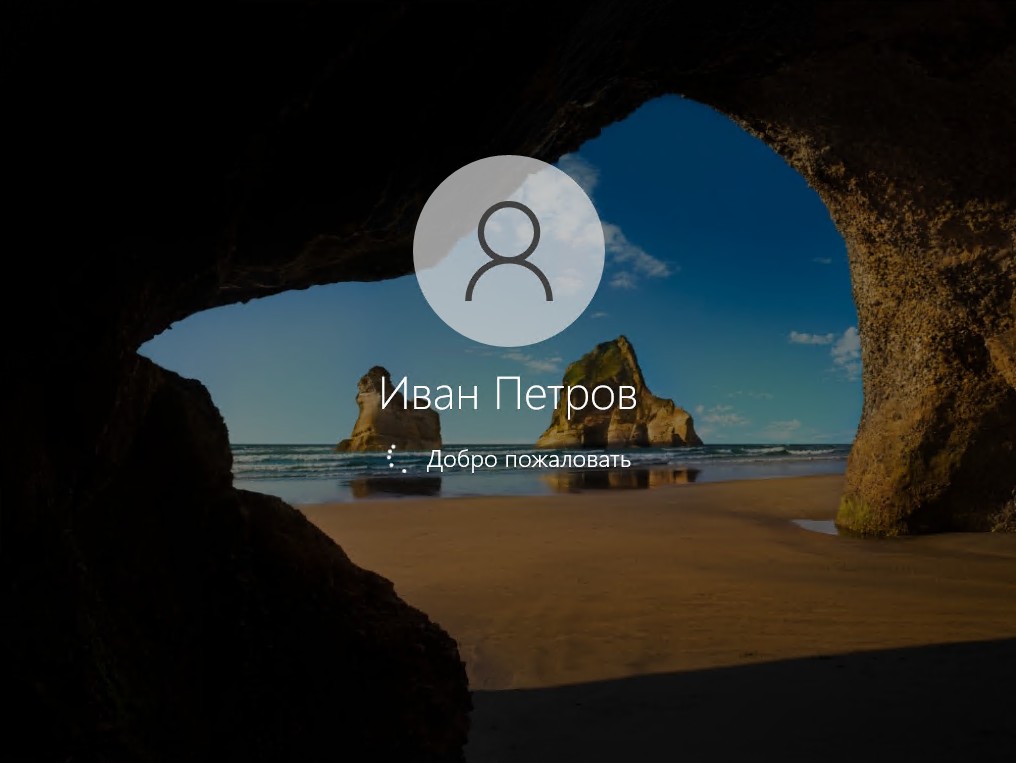
В системе так же видно, что мы работаем под данным пользователем.

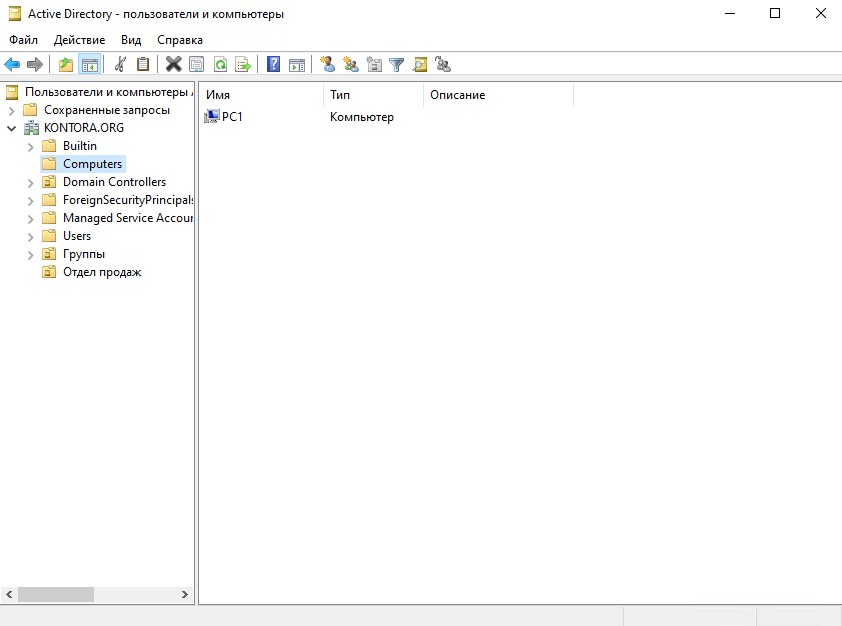
Перейдем в оснастку “Пользователи и компьютеры” на контроллере домена и откроем раздел Computers. Видим, что наш новый компьютер отображается в списке.
Кстати, если вы планируете завести в домен новый компьютер на котором ранее пользователь уже долгое время работал в своей локальной учетной записи и у него там наверняка все было настроено привычным ему образом – документы лежат в определенных местах, сохранена история браузера, сделаны удобные настройки Windows, стоят свои обои и т.д., вам наверняка потом придется переносить все в новый, доменный профиль, так как при первой авторизации после ввода компьютера в домен у пользователя создастся новый, пустой рабочий стол.
Чтобы этим не заморачиваться, нам нужно конвертировать локальную учетную запись пользователя в доменную, или другими словами – сделать миграцию профиля. Как делать миграцию профиля в Active Directory я описывал в этой статье.
Шаг 5. Примеры использования групповых политик в домене
Теперь, когда у вас есть свой домен, самое время заняться подготовкой групповых политик. Это очень удобно, достаточно создать одну политику и она будет применяться к тем пользователям и компьютерам, которые вы укажете в параметрах делегирования.
Запустить оснастку для работы с групповыми политиками можно командой gpms.msc или вызвать ее через ярлык в меню “Пуск” – “Средства администрирования Windows” – “Управление групповой политикой”.
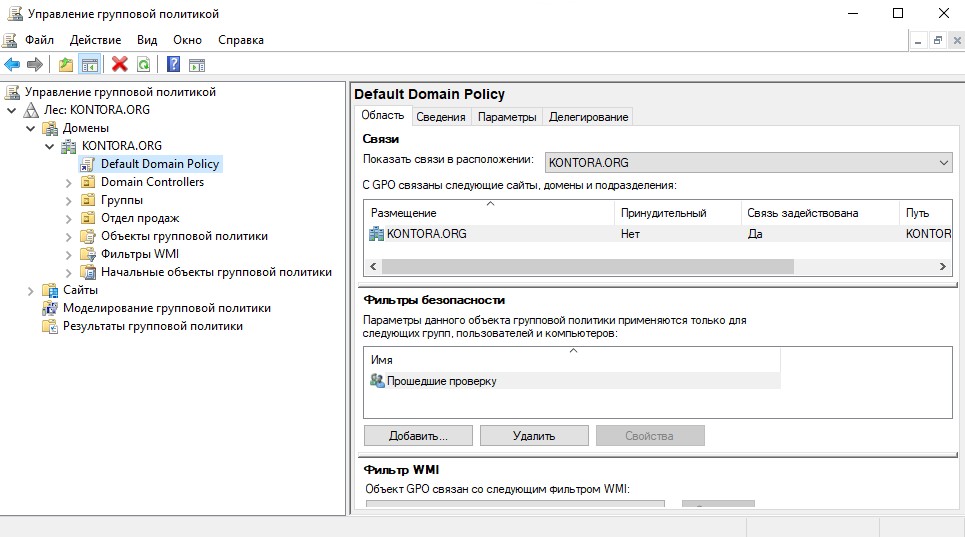
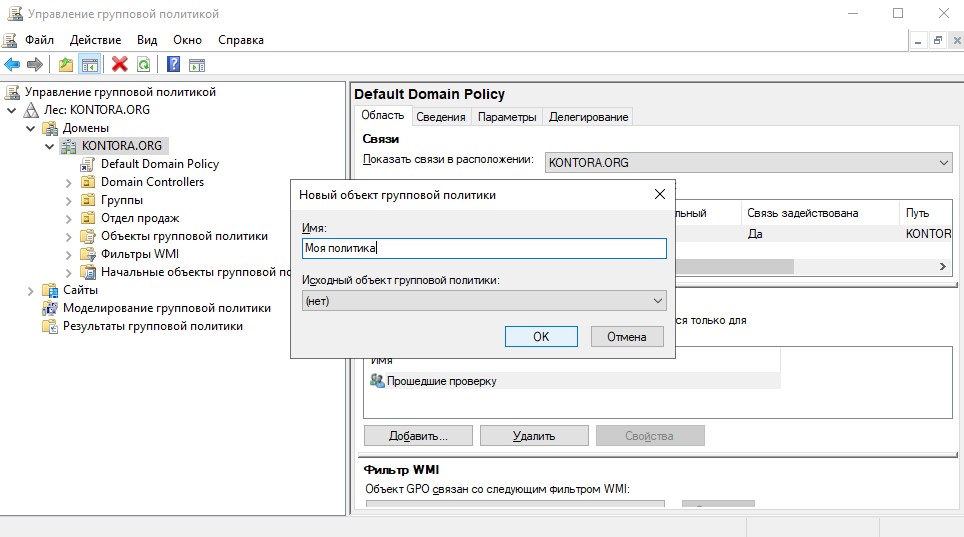
По умолчанию используется политика “Default Domain Policy”, рекомендую не трогать ее и создать свою политику, которую в случае чего можно будет потом удалить.
Щелкаем правой кнопкой мыши по имени нашего домена в оснастке и выбираем “Создать объект групповой политики в этом домене и связать его”, вводим имя нашей политики.
Щелкаем на нашу созданную политику и смотрим на “Фильтр безопасности”. Видим, что политика применяется к группе “Прошедшие проверку”, это означает, что политика будет применять ко всем пользователям и компьютерам домена. В случае чего эту группу можно убрать из фильтра и добавить туда какую ни будь другую, например “Отдел продаж”, которую мы создавали ранее. В таком случае параметры этой политики будут распространяться только на пользователей, которые были добавлены в группу “Отдел продаж”. Но есть один нюанс. Если мы убираем из фильтра безопасности группу “Прошедшие проверку” и добавляем туда любую другую группу, политика не будет применяться пока на вкладке “Делегирование” мы не добавим группу “Компьютеры домена.
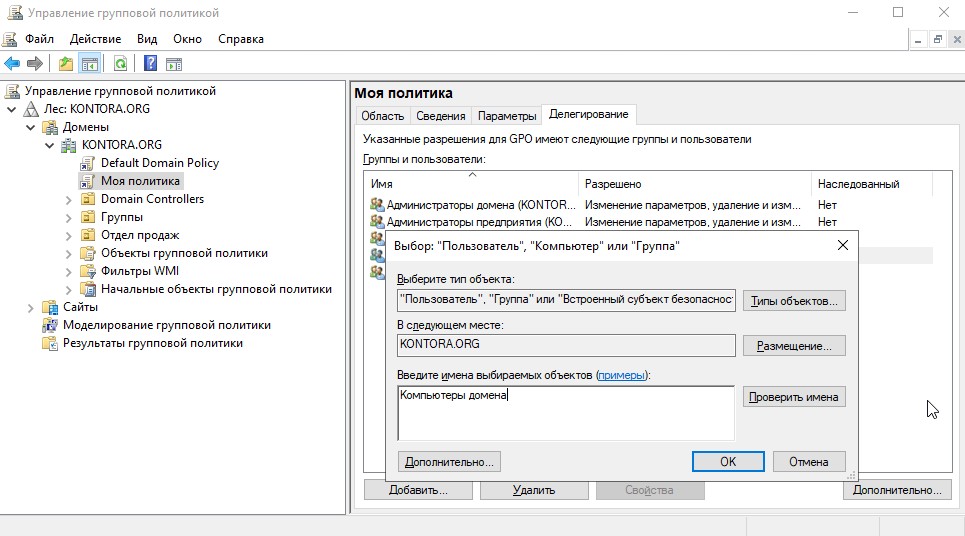
В нашем примере мы не будем менять настройки делегирования и оставим все по стандарту, чтобы созданная нами политика применялась ко всем пользователям и компьютерам в домене.
Для редактирования групповой политики, щелкнем по нашей политике правой кнопкой мыши и выберем “Изменить”, откроется редактор групповой политики.
Давайте для примера сделаем следующие настройки:
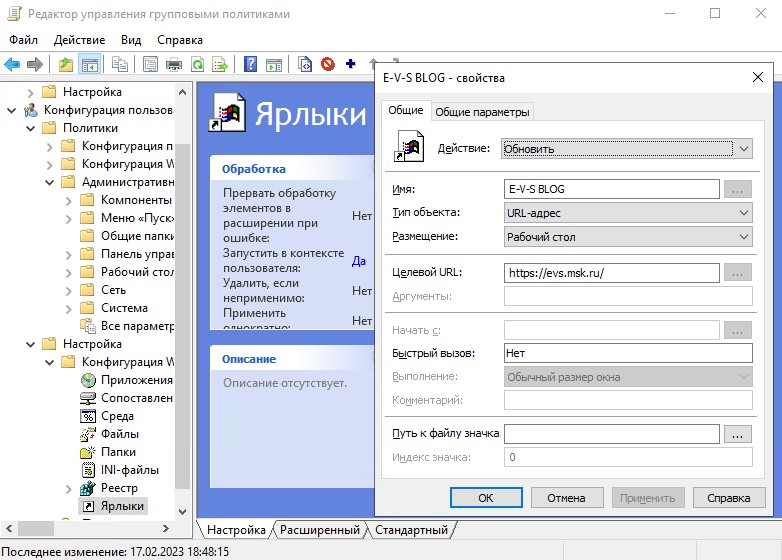
- Создадим на рабочих столах всех пользователей ярлык на сайт https://evs.msk.ru/
- Запретим запуск командной строки и редактора реестра.
- Отключим на компьютерах автоматические обновления.
Первые две настройки делаются в конфигурации пользователя.
Для создания ярлыков перейдем в “Настройка” – “Конфигурация Windows” – “Ярлыки” и создадим новый ярлык. В качестве действия выбираем “Обновить”, это создаст ярлык заново при следующем входе в профиль, если пользователь решит удалить его. В качестве места размещения ярлыка выбираем “Рабочий стол”.
Для запрета использования командной строки и редактора реестра, перейдем в “Политики” – “Административные шаблоны” – “Система” и включим параметры “Запретить использование командной строки” и “Запретить доступ к средствам редактирования реестра”.

Теперь авторизуемся под одним из наших пользователей на клиентской машине.
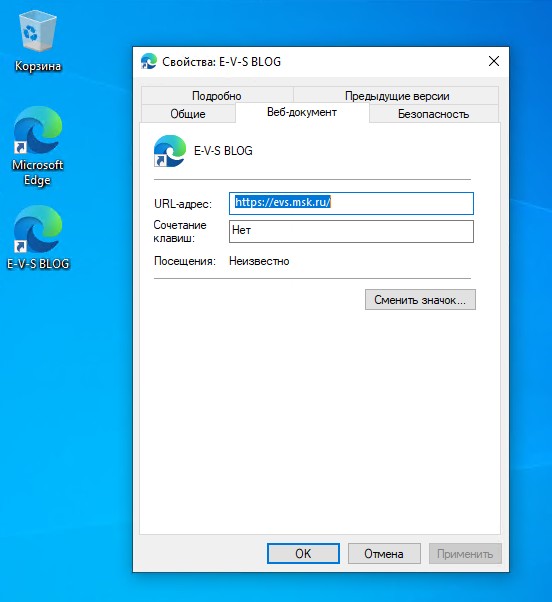
Как видим у пользователя создался на рабочем столе наш ярлык.
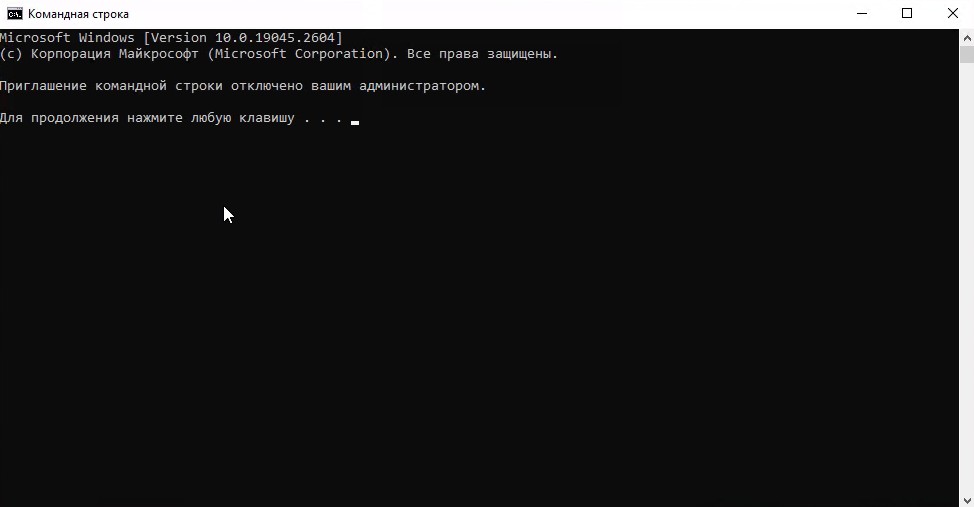
А при попытке открыть командную строку у него она откроется с сообщением “Приглашение командной строки отключено вашим администратором”.
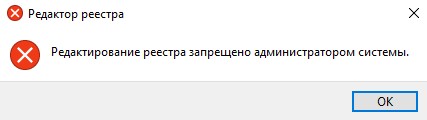
При попытке открыть редактор реестра тоже выйдет предупреждение.
Теперь отключим обновления Windows. Для этого мы перейдем в конфигурацию компьютера в нашей политике. Откроем “Политики” – “Административные шаблоны” – “Компоненты Windows” – “Центр обновления Windows”. Далее выберем параметр “Настройка автоматического обновления”.
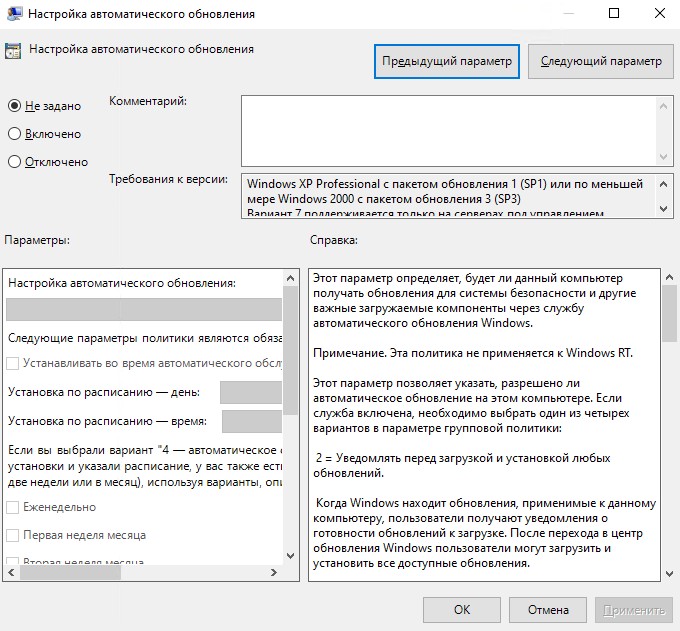
Выберем “Отключено” и нажмем “ОК”.
Проверим на нашей клиентской машине. Для этого перезагрузим клиентский компьютер, а затем откроем центр обновления Windows.
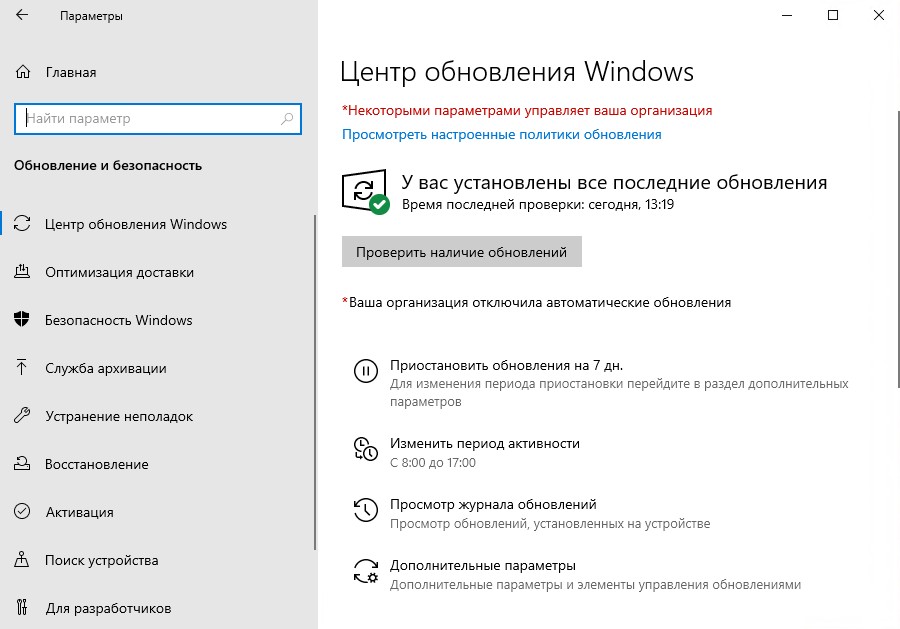
Как видим, система сообщаем нам, что “Ваша организация отключила автоматические обновления”.
Кстати, большинство новых групповых политик можно применить не прибегая к перезагрузке или завершению сеанса пользователя. Достаточно выполнить команду:
gpupdate /force
Таким образом можно создавать разные групповые политики, причем можно на каждую задачу создавать отдельную политику и в случае необходимости временно выключать ее. Для этого надо щелкнуть правой кнопкой мыши по нужно политике и снять галочку “Связь включена”. Для включения политики необходимо вернуть галочку.
Так как в нашем примере мы создали политику, которая делегируется всем пользователям в домене, она так же будет действовать и для администраторов и для них так же будут действовать ограничения, которые мы установили. Поэтому, если вы создаете политики с различными запретами и ограничениями, обязательно делегируйте их только для тех пользователей и групп, для которых данные ограничения должны действовать.
Шаг 6. Добавление в действующий домен второго контроллера
Теперь, когда вы создали домен, научились подключать к домену новые компьютеры, создавать пользователей, группы и научились работать с групповыми политиками, стоит побеспокоиться об отказоустойчивости построенной системы. В Active Directory это достигается созданием дополнительных контроллеров домена, которые реплицируются с главным контроллером и имеют в себе всегда актуальную базу Active Directory. Так, если один из контроллеров выйдет из строя, ваша инфраструктура продолжит функционировать в штатном режиме, а в случае восстановления вышедшего из строя контроллера, или добавления нового, он быстро обновит в себе актуальность вашей базы Active Directory.
Добавлять дополнительные контроллеры можно в двух режимах:
- Полноценный дополнительный контроллер домена, на котором как и на главном контроллере можно изменять настройки AD, создавать/удалять пользователей, группы, работать с редактором групповых политик и т.д. Все действия будут синхронизироваться со всеми контроллерами в домене.
- Режим “Только для чтения (RODC)”. Актуально, если вы планируете использовать такой контроллер на удаленном филиале, где у вас не будет к нему постоянного физического доступа. В таком режиме контроллер будет всегда поддерживать актуальную базу AD, синхронизируя ее с вашим основным контроллером, например, через VPN, и с помощью него смогут авторизовываться пользователи данного филиала не прибегая к необходимости обращаться каждый раз к вашему основном контроллеру. И при всем этом никто не сможет на таком контроллере внести какие либо изменения в вашу структуру AD.
Мы будем использовать первый режим.
Если первый контроллер домена вы разворачивали на “железном” сервере, а не на виртуальной машине, второй вполне можно развернуть на виртуалке. Главное, чтобы в сети был хотя бы один “железный” контроллер. Поэтому, если первый контроллер вы развернули на виртуальной машине, второй рекомендуется развернуть на “железном” сервере. Дело в том, что при использовании “железного” сервера, при развертывании AD по умолчанию отключается кэш диска, чтобы избежать потери информации при внезапных отключениях, а на виртуальной машине такая возможность отсутствует. Так, если на виртуальном сервере произойдет внештатная ситуация и часть данных будет потеряна, контроллер благополучно восстановит ее, загрузив с “железного” контроллера.
Для начала подготовим сервер для второго контроллера. Поменяем ему имя на DC-2 и введем его в наш домен. Далее установим, как в случае с первым нашим контроллером, роли “DNS-сервер” и “Доменные службы Active Directory”, а так же роль DHCP-сервера. Таким образом у нас будет второй, резервный контроллер домена со своим DNS-сервером и резервный DHCP-сервер.
Если вы используете свой отдельный DHCP-сервер, то роль DHCP-сервера разворачивать не нужно.
После установки ролей так же повышаем наш сервер до уровня контроллера домена и в мастере развертывания AD выбираем “Добавить контроллер домена в существующий домен”.
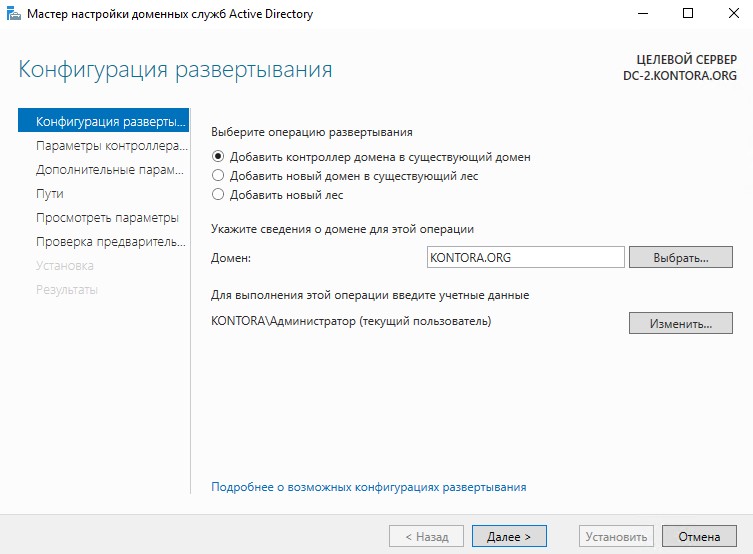
Далее, как и в случае с первым контроллером, указываем пароль для режима восстановления служб каталогов, на этом же этапе можно поставить галочку “Контроллер домена только для чтения (RODC)”. Мы будем делать полноценный контроллер, поэтому галочку ставить не будем. Здесь же предлагается выбрать сайт в который мы будем добавлять данный контроллер домена, что такое сайты в Active Directory я расскажу чуть ниже. Пока сайт у нас один, созданный по умолчанию, оставляем его и идем дальше.
Далее пропускаем страницу “Делегирование DNS” и на странице параметров репликации нам необходимо выбрать источник репликации. Можно выбрать наш основной контроллер домена, однако я рекомендую оставить параметр “Любой контроллер домена”, на случай если у нас их в сети будет несколько. В таком случае наш подготавливаемый контроллер сможет реплицировать базу со всех контроллеров в домене, а не только с одного.
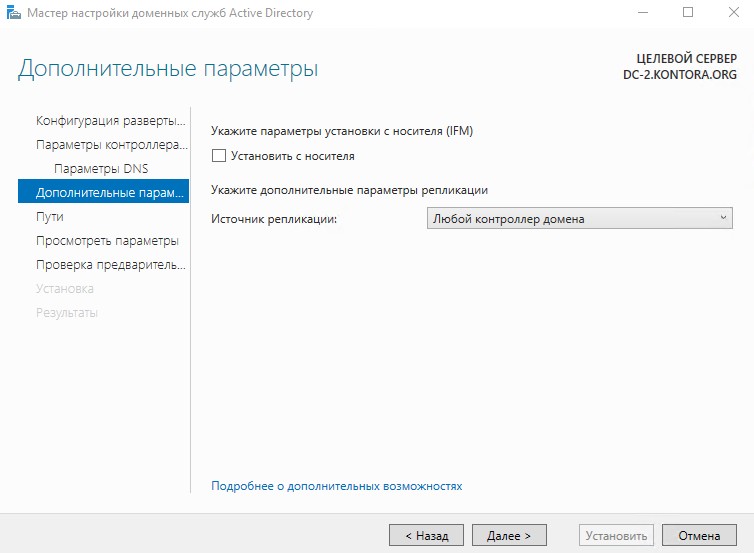
Дальше нас, как и в случае с настройкой первого контроллера, попросят указать пути к базе данных, файлам журналов и папке SYSVOL, оставляем все по умолчанию, нажимаем несколько раз “Далее” и “Установить”. Дожидаемся завершения работы мастера, по окончании ваш сервер уйдет в перезагрузку.
Зайдем на наш главный контроллер домена DC-1 и откроем оснастку “Active Directory – сайты и службы” по команда dssite.msc или через ярлык в меню “Пуск” – “Средства администрирования Windows” – “Active Directory – сайты и службы”. Развернем “Default-First-Site-Name”, затем “Servers” и увидим, что у нас в домене теперь два контроллера, DC-1 и DC-2.
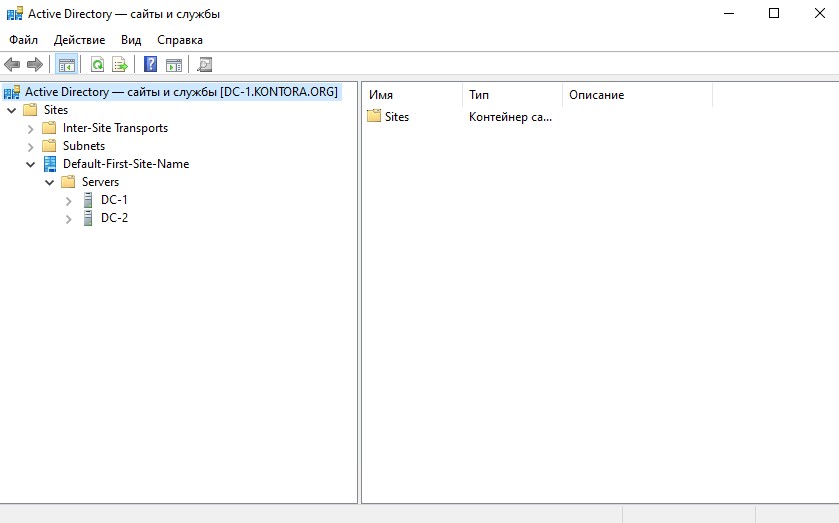
Название сайта “Default-First-Site-Name” можно переименовать без каких либо опасений, можно ему дать имя вашей организации. Так же можно создавать другие сайты, если у вас, например, несколько филиалов и в каждом филиале используется своя подсеть. В настройках каждого сайта указываются параметры подсети, для которой он создается и это поможет мастеру развертывания AD добавлять новые контроллеры сразу в нужные сайты. С помощью сайтов можно оптимизировать трафик между филиалами в разных городах. Так, компьютеры филиала, подсеть которого ссылается на определенный сайт в котором есть свой контроллер домена, будет взаимодействовать в первую очередь с этим контроллером домена, а потом уже с остальными.
Для сопоставления подсетей с сайтами в Active Directory, в оснастке “Active Directory – сайты и службы” щелкните правой кнопкой по “Subnets” и выберете “Создать подсеть”. Укажите адрес подсети с маской и выберите мышкой сайт для которого создается данная подсеть.

После данной операции подсеть появится в разделе Subnets.

Переходим на наш второй контроллер DC-2 и открываем оснастку DNS. Видим, что зона основного просмотра реплицировалась с нашим DNS-сервером на первом контроллере. Так же видим в записях DNS наш новый контроллер.
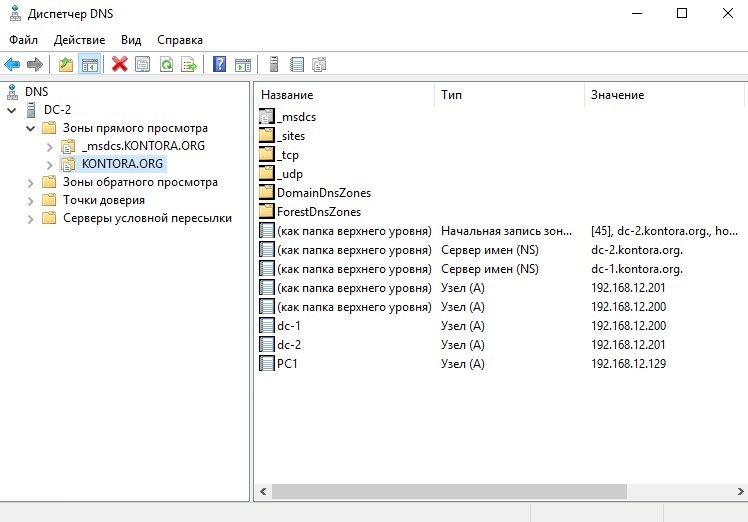
Зайдем в свойства этой зоны и включим передачу зон на серверы, перечисленные на странице серверов имен. Далее перейдем на вкладку “Серверы имен” и убедимся, что у нас теперь там отображаются два наших DNS-сервера: DC-1 и DC-2.
Можно еще перейти в оснастку DNS на первом контроллере и проверить, что там так же отображаются оба сервера.
И так, репликация DNS у нас работает. Проверим работает ли репликация между самими контроллерами, для этого существует команда:
repadmin /replsummary
Выполняем ее в командной строке от имени администратора, должны получить такой результат:
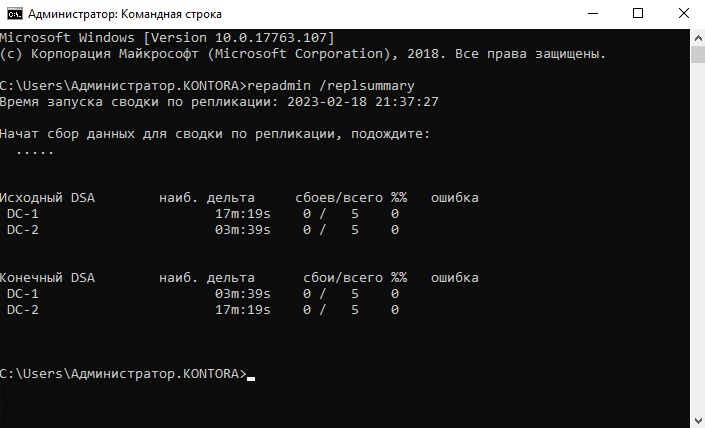
Как видим, репликация работает. Если значение наиб. дельты не боле часа – с репликацией всё в порядке. Количество сбоев должно быть равно 0.
Если же в работе репликации возникли ошибки то можно использовать следующую команду чтобы посмотреть какой контекст наименования не реплицируется:
repadmin /showreps
Теперь настроим DHCP-сервер на втором контроллере и изменим настройки на DHCP-сервере нашего главного контроллера.
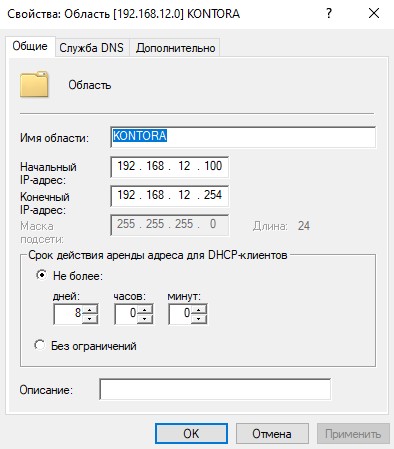
Для начала на DHCP-сервере нашего главного контроллера надо изменить диапазон выдаваемых адресов. Нужно сделать так, чтобы диапазоны выдаваемых адресов не пересекались между первым и вторым DHCP серверами. Например, чтобы первый DHCP выдавал IP-адреса в диапазоне 192.168.12.50-192.168.12.150, а второй DHCP в диапазоне 192.168.12.151-192.168.12.254. Таким образом диапазоны DHCP серверов не будут пересекаться между собой в тот момент, когда в сети они будут работать одновременно. Если вам не будет хватать адресов в пуле, можно расширить вашу сеть, сделав ее, например, с 22 маской (255.255.252.000). В таком случае у вас будут доступны подсети 192.168.12.0, 192.168.13.0, 192.168.14.0 и 192.168.15.0, разгуляться будет где.
Чтобы поменять диапазон выдаваемых адресов, нужно перейти в свойства вашей области IPv4 и поменять там значения:
Так же, если IP-адрес вашего второго контроллера пересекается с диапазоном выдаваемых адресов, добавьте его в исключения, однако я уже говорил, что лучше назначать контроллерам IP-адреса не из области выдаваемых DHCP.
Последним немаловажным изменением в настройках DHCP-сервера является добавление в параметрах области второго DNS-сервера – IP-адреса второго контроллера.
Теперь, используя инструкцию по настройке DHCP-сервера из этой статьи, завершите его настройку на втором контроллере домена.
Заключение
И так, мы сделали основные шаги в развертывании отказоустойчивой системы Active Directory в вашей сети. Теперь у вас в руках имеется мощный инструмент, благодаря которому администрирование огромных сетей теперь можно выполнять буквально в несколько кликов вышкой. Сломать отказоустойчивую систему AD очень сложно, но тем не менее не забывайте проверять техническое состояние ваших контроллеров, вовремя производите обслуживание серверов и конечно не забывайте про резервное копирование.
In this first tutorial dedicated to Windows Server 2022, I will show you how to install an Active Directory domain controller.
Si vous débutez avec les services Active Directory, je vous invite à suivre le cours j’ai créé avant :
In this tutorial, here is what we will see:
- Installing the Active Directory Domain Services (AD DS) role
- Promotion of a domain controller to create a new Active Directory domain
- Adding a Windows Server 2022 domain controller to an existing domain.
Before starting, you should know that Windows Server 2022 does not provide a new level of forest and domain functionality, so we remain on a Windows Server 2016 level.
Windows Server 2022 also does not bring a schema update, which is a first, the highest schema version is 88 which arrived with Windows Server 2019.
- Prerequisites before installing the AD DS role
- Installing the AD DS role on Windows Server 2022
- Create a new Active Directory domain by promoting the first domain controller
- Add a Windows Server 2022 Active Directory domain controller to an existing domain
Si vous êtes habitué à l’installation de contrôleur de domaine, il n’y a pas réellement d’évolution par rapport à Windows Serveur 2019 ou 2016.
Prerequisites before installing the AD DS role
Before launching the role installation wizard you must:
- Having correctly named the server, even if it is possible to rename a domain controller, it is better to name it correctly beforehand.
- Configure a fixed IP address to the server.
- The server must be dedicated to this role.
If you add a Windows Server domain controller to an existing environment, you must also:
- Have an existing domain controller as DNS
- Check the Active Directory domain name is resolved by the server
- Ensure the compatibility of the existing environment with Windows Server 2022
- Add the account that you are going to use in the Enterprise Admins and Schema Administrator groups if the schema is not in version 88, that is, you do not have a domain controller with Windows Server 2019.


Installing the AD DS role on Windows Server 2022
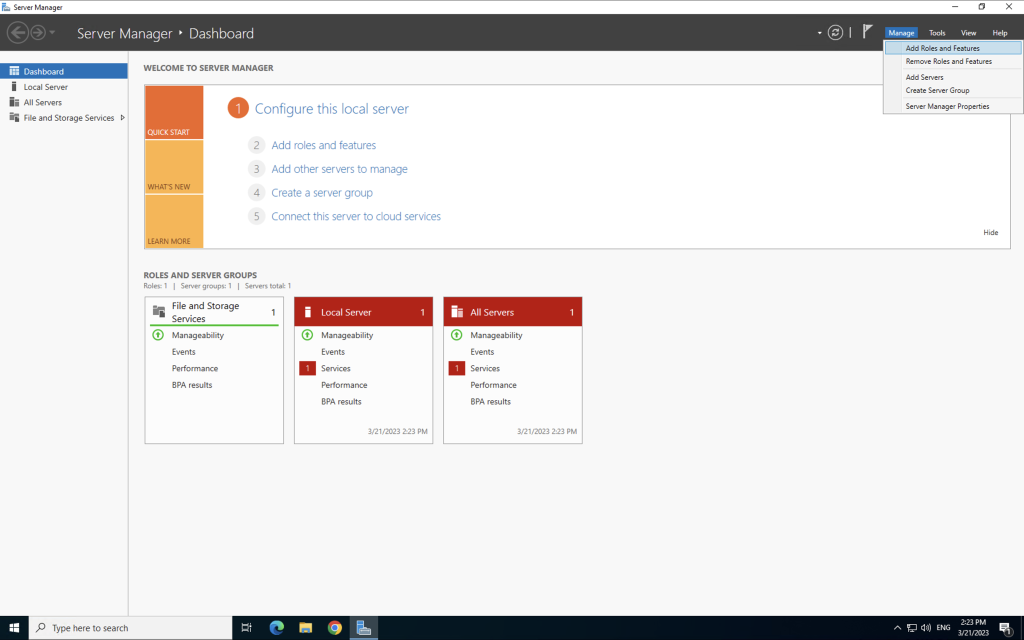
From the server manager, click on Add roles and features 1.

When the wizard starts, click on the Next 1 button.

Type of installation choose Installation based on a role or a feature 1 then click on Next 2.

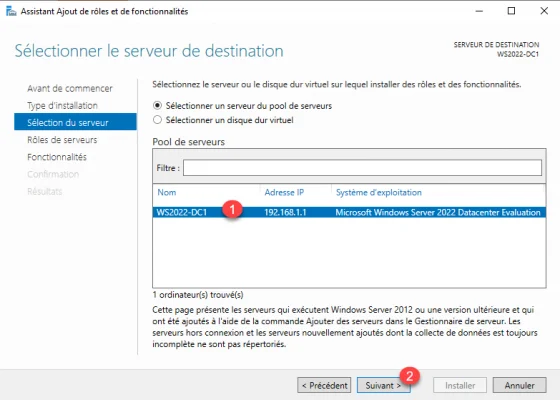
Select the server 1 where the AD DS role will be installed and click the Next button 2.
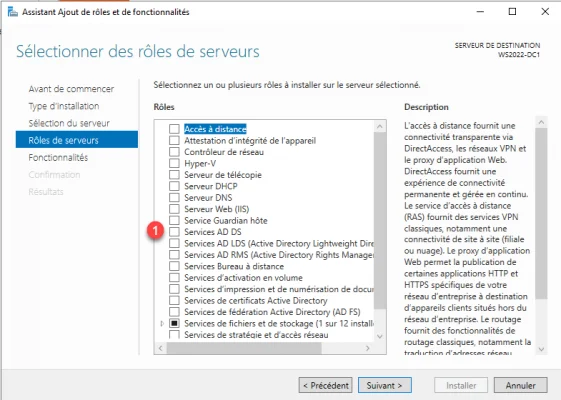
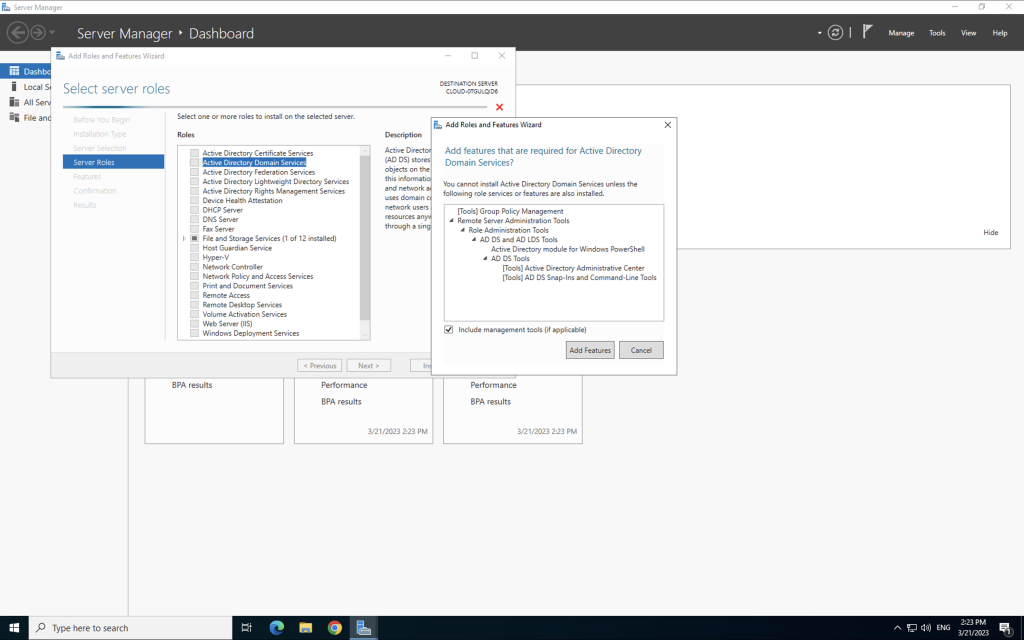
In the list of roles, check the box for AD DS 1.
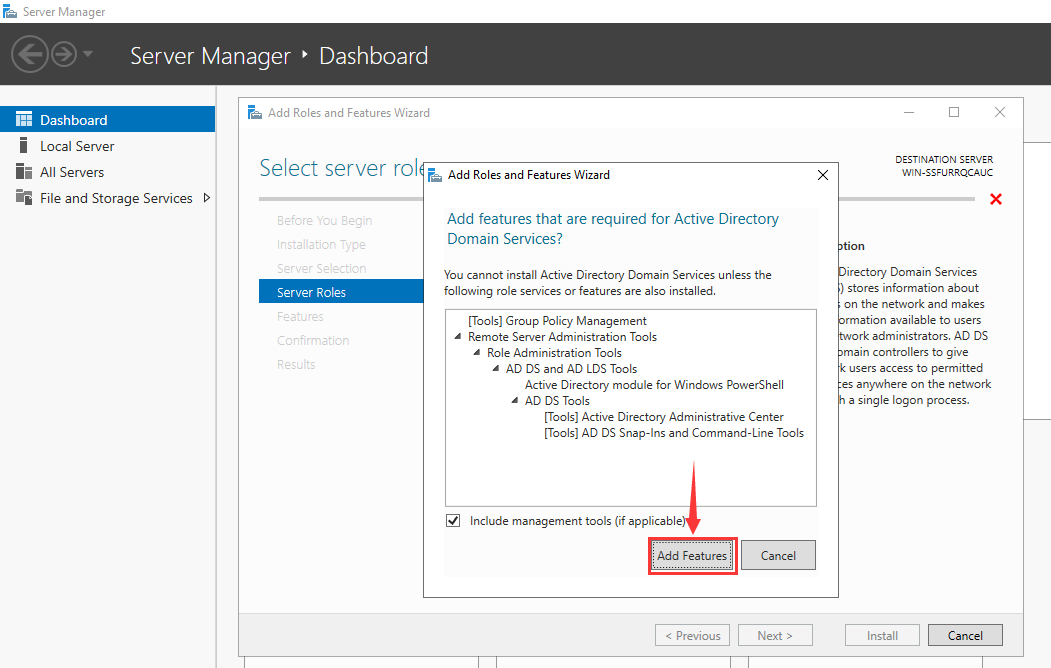
Confirm the addition of the administration consoles by clicking on Add features 1.

Now that the AD DS role is selected, click Next 1.

Skip the functionalities by clicking on the Next 1 button.

A summary of Active Directory Domain Services is displayed, click Next 1.

Confirm the installation of the AD DS role by clicking Install 1.

Wait during the installation …
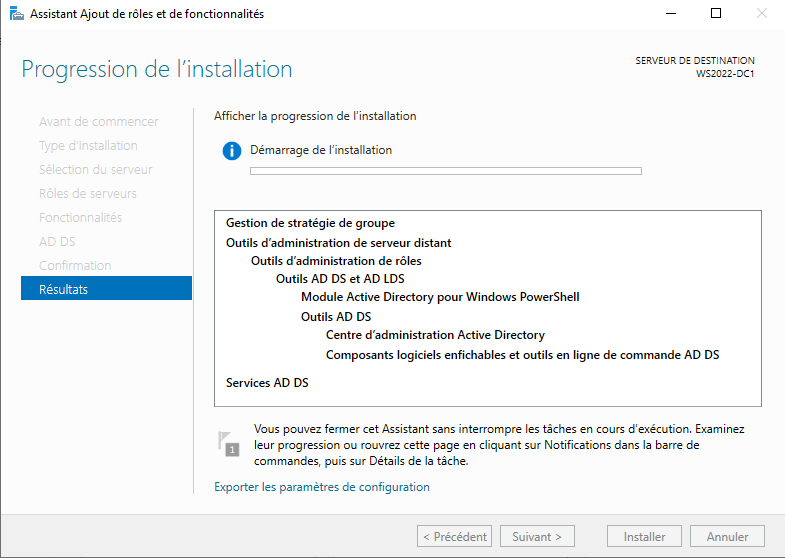

Once the installation, exit the wizard by clicking on Close 1.

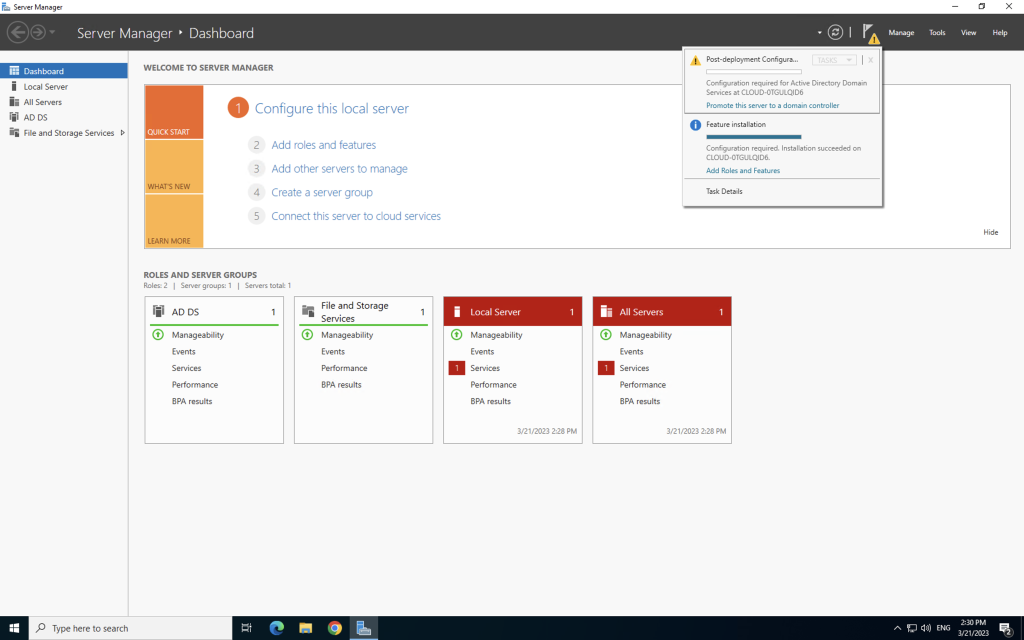
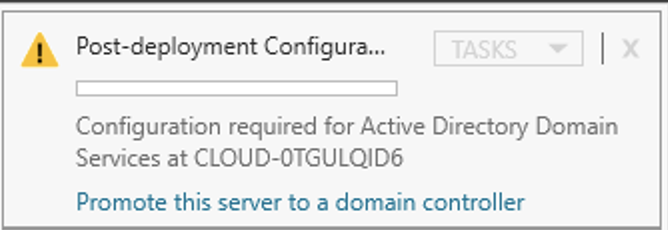
From Server Manager, we can see that AD DS role 1 is installed and action is required 2 to promote the server as a Domain Controller.

Install-windowsfeature -name AD-Domain-Services –IncludeManagementToolsCreate a new Active Directory domain by promoting the first domain controller
In this part, we will see how to create an Active Directory environment with the promotion of the first domain controller.
In production, it is recommended to have at least 2 domain controllers.
From the server manager, click on the notification icon then on Promote this server to a domain controller 2 to start the wizard.

The promotion wizard starts, before Windows Server 2012, we used the dcpromo.exe command

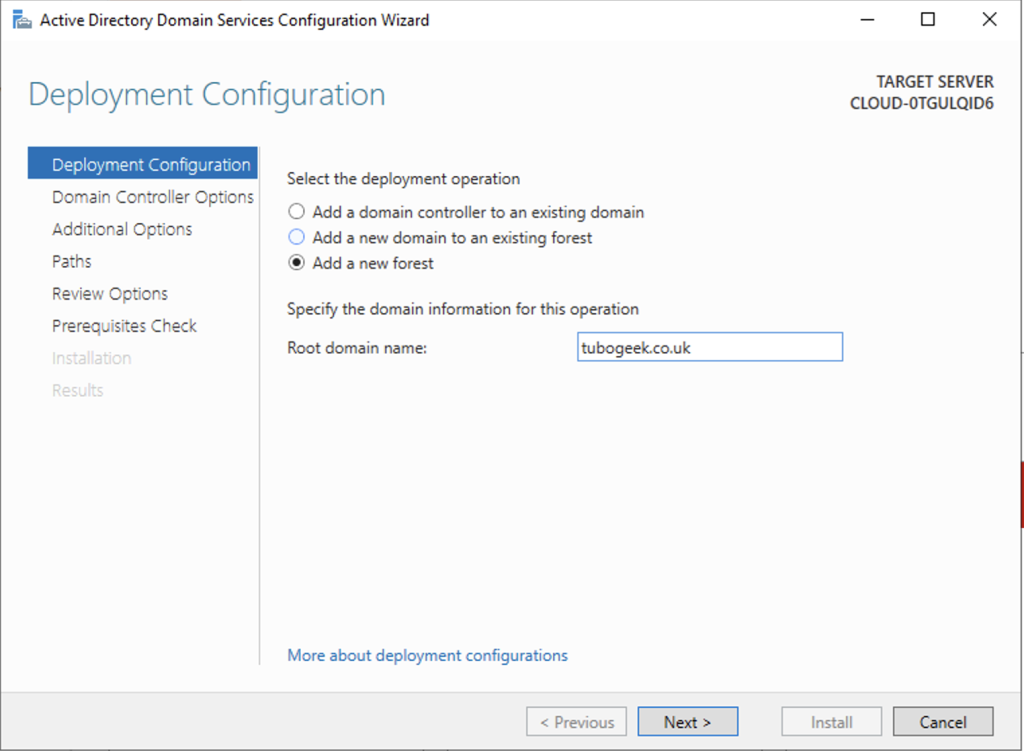
Select the operation: Add a new forest 1 then enter the domain root name 2 and click on Next 3.

The root name must be composed of a tld (Top Level Domain) public or not (.lan, .corp, .com …) and a name which can be that of your company for example.
The domain does not have to be registered.
For practical reasons, we avoid using a public domain that we use, such as that of the company’s Internet site.
Also take into account, that this name will be used for user logon in the form [email protected]
If you want users to open their session with their email address, it is possible to add a UPN suffix later, which allows you to have [email protected]
Enter a password for Directory Services Restore Mode 1 and click Next 2.

The DSRM password must imperatively be noted somewhere, it allows you to connect to the server if the AD DS services no longer work and to allow a repair.
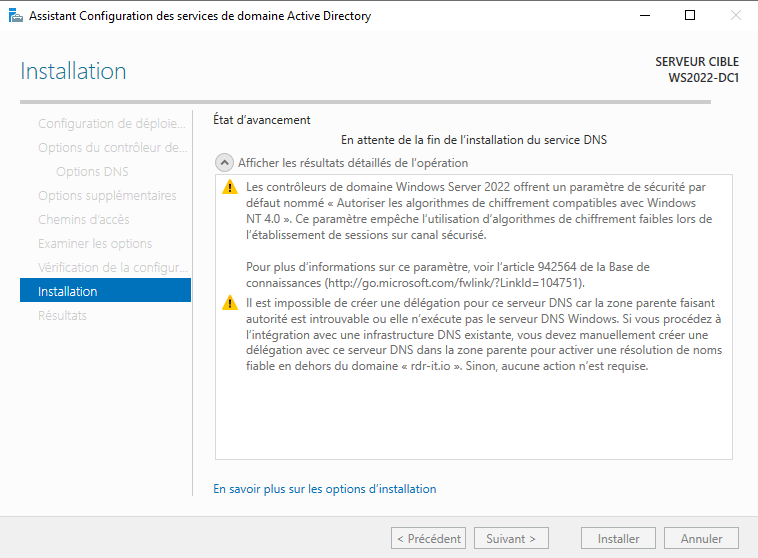
The DNS server role is installed on the domain controller, which is normal, a lot of Active Directory services rely on DNS records, which allows the client to find domain controllers.
On the screenshot, we can see that the functional level is Windows Server 2016.
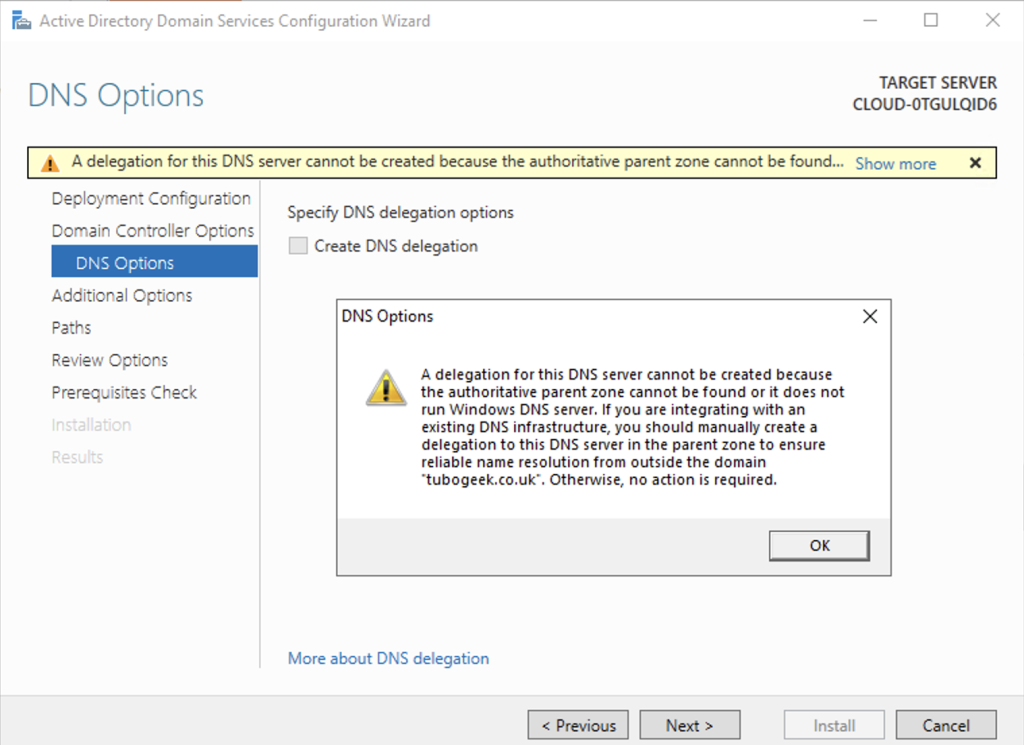
Skip the DNS options by clicking Next 1.

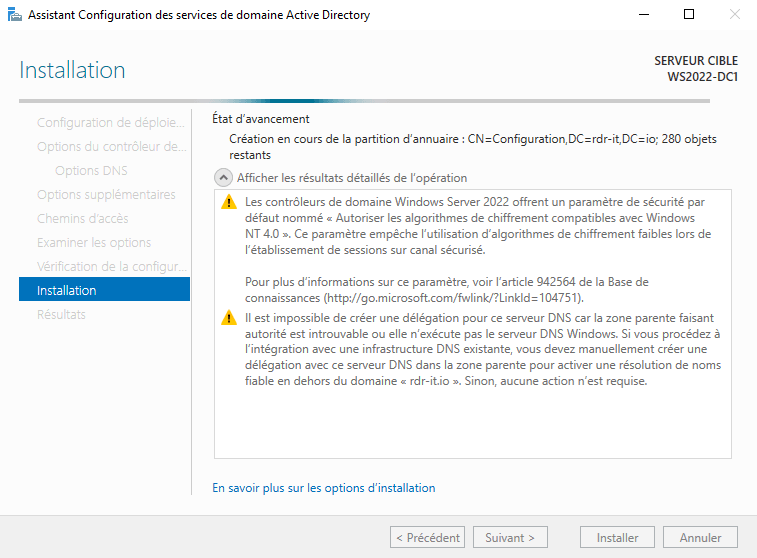
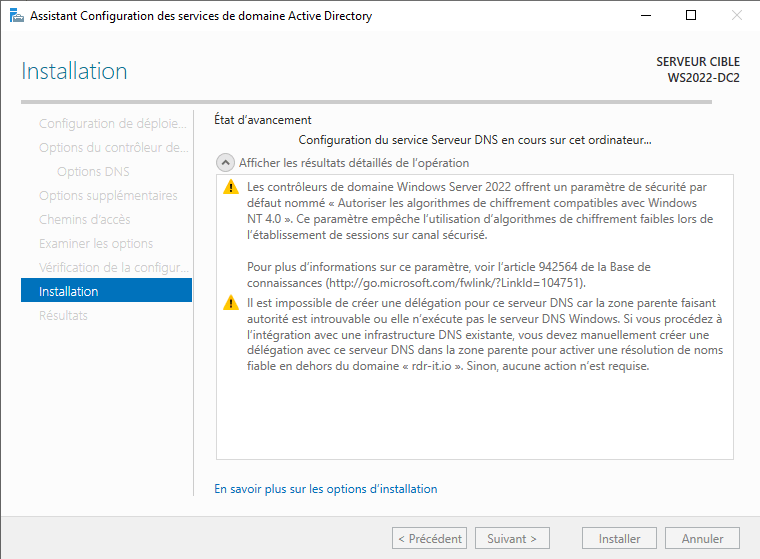
The DNS delegation warning message can be ignored because we are not going to publish the Active Directory environment to the Internet.
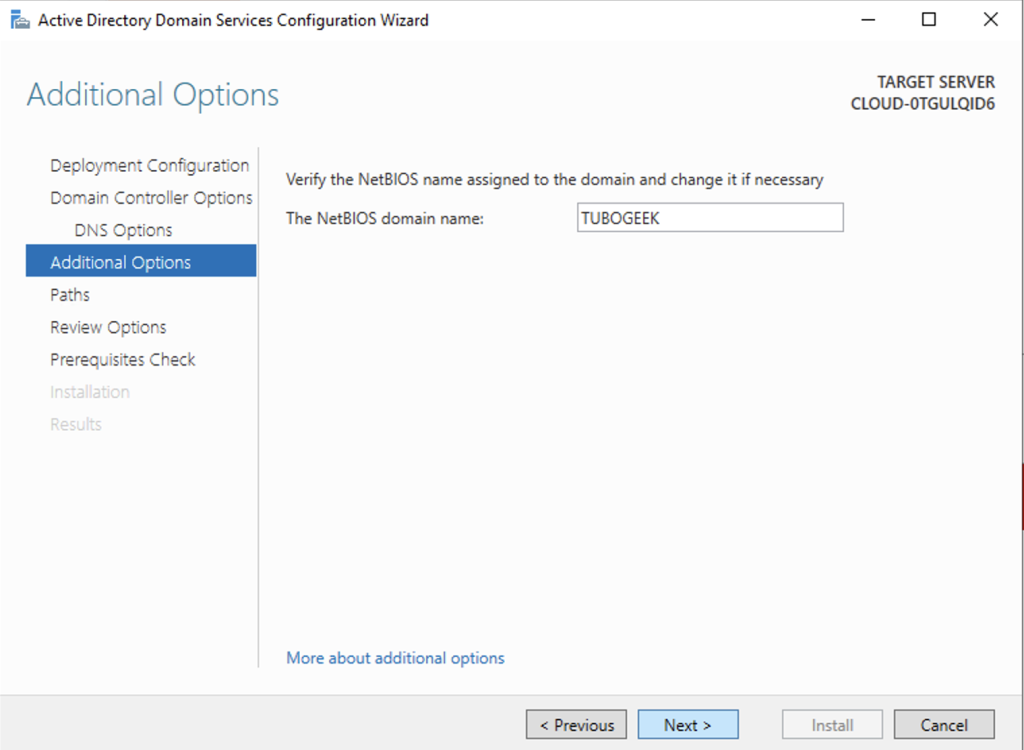
Once the NETBIOS name is generated 1, click Next 2.

The NETBIOS name is still used primarily for compatibility reasons.
To learn more about NETBIOS : NetBIOS – Wikipedia
The wizard suggests changing the NTDS and SYSVOL directories, generally, the default directories are used. Click on Next 1.

An option summary is displayed, verify the information then click Next 1.

The wizard will check the configuration, if no blocking error is detected, start the creation of the domain (forest) by clicking on Install 1.

Wait during the installation … at the end of the installation, the server restarts and will be a domain controller.

Once the server has restarted, connect with the password of the Administrator account of the server, on the capture, we can that the login is now NOM_NETBIOS \ administrator.

The server is now a domain controller, it can be seen through the server manager.


If you also look at the IP configuration, you can see the DNS server is configured on itself DNS server.
A domain controller no longer has its local user database (SAM), to add users, you must now go through the Active Directory Users and Computers console.
For security reasons, it is recommended not to use the Administrator account, you must now create a dedicated user who will be a member of the Domain Admins group.
To join computers to the domain, they must have the domain controller as their DNS server, and so that the computers can go to the Internet, it is advisable to configure a DNS forwarder.
In addition to the course on Active Directory that I advised you at the beginning of this tutorial, if you are new to AD DS, I invite you to read this tutorial: Active Directory: installation and configuration of a domain controller
Now that you are ready, we will see how to add a controller to ensure the redundancy of Active Directory services.
For the installation of the AD DS role, I let you reread the beginning of the tutorial.
Before launching the Active Directory services configuration wizard, we will make sure that the server resolves the domain.
From a command prompt, ping the domain.

From the notification area, start the wizard by clicking on Promote this server to a domain controller 1.

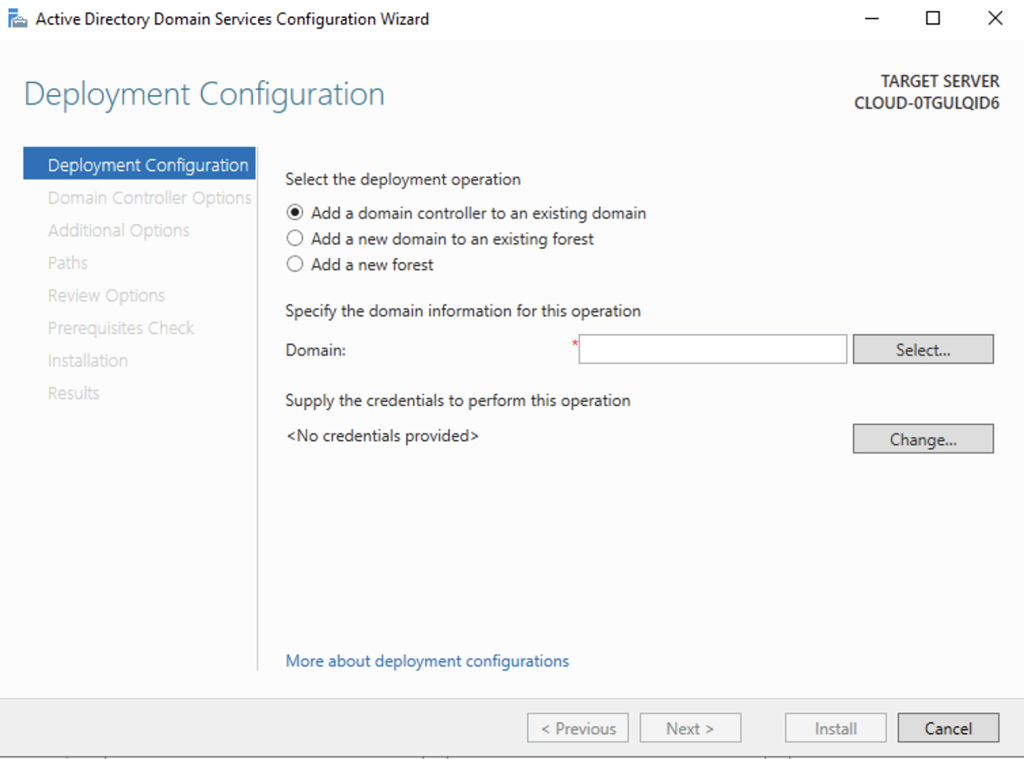
When the wizard is launched, let select: Add a domain controller to an existing domain 1 and click on the Modify button 2 to indicate an account that is a member of the Domain Admins group.

Enter the username (DOMAIN \ login or [email protected]) 1 then the password 2 and click OK 3.
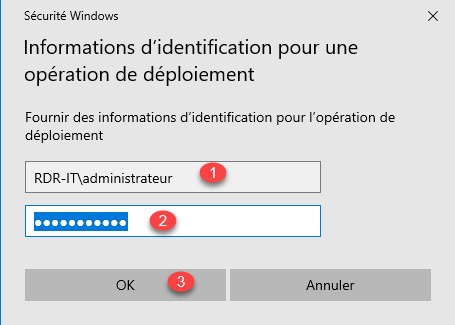
Reminder: in the event of a schema version upgrade (existing domain controller prior to Windows Server 2019), the account indicated must be a member of the Company Administrators and Schema Administrators group. Once the operation is complete, the account will need to be removed from the groups.
If the information is correct, the domain is automatically added 1, click on Next 2.

If the domain is not added, click on the Select button to choose it.
In the Domain controller options part, check the box DNS server (Domain Name System) 1 then enter the DSRM password 2 and click Next 3.

Check that the Global Catalog (GC) box is checked. In a single-domain environment, the recommendation is to leave all domain controllers with the Global Catalog option.
More information here: What is a Global Catalog (GC)? – Definition from Techopedia
In the DNS options, uncheck the Update DNS delegation 1 box and click Next 2.

Skip the installation options by clicking Next 1.

If necessary, change the default folders, otherwise click on Next 1.

A summary of the options is displayed, click Next 1 after viewing them.

Once the checks have been validated, click on the Install button 1.
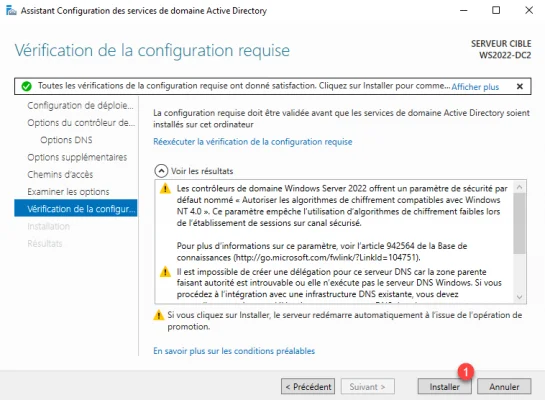
Wait during the promotion, after restarting the server will be domain controller.


After the restart, log on with an account that is a member of the Domain Admins group.

The server is a domain controller and a member of it:

From the Active Directory Users and Computer console, the server is located in the Domain Controllers organizational unit.

At the configuration level, if the DNS role has been added, the DNS server points to the address 127.0.0.1.

You now know how to install the AD DS role, configure an Active Directory domain and add a domain controller with Windows Server 2022.
If you are familiar with the AD DS role on earlier versions of Windows Server, Windows Server 2022 does not add anything new to configuring and administering an On-premise Active Directory environment.
Active Directory is essential for managing users, computers, and resources in a network environment. Administrators can easily manage and secure user accounts, group policies, and resources. This guide will teach you how to install Active Directory on Windows Server 2022 using the GUI. I will also go through some basic configurations to get you started. All these steps can be completed using PowerShell; look out for the PowerShell tips.
180-Day Windows Server Trial
Did you know you can get a 180-day free trial of Windows Server 2022 – Simply download direct from Microsoft.
Pre-Reqs
Minimum Requirements
- Processor: 1.4 GHz 64-bit processor
- RAM: 2 GB or higher
- Hard Disk Space: At least 40 GB of free space on the system drive
- Network Adapter: A network adapter that supports Ethernet, Fast Ethernet, or Gigabit Ethernet
- DNS Server: A DNS server should be configured or available on the network
- Domain Name: A unique and valid domain name should be selected
Static IP Address
Before installing AD, ensuring the server has a static IP address is important. This will prevent the IP address from changing, which can cause issues with the AD installation. To set a static IP address:
Note: Set the IPAddress and Default Gateway to your local values
- First, open the Network and Sharing Center.
- Select the Ethernet connection.
- Click on Properties
- Select Internet Protocol Version 4 (TCP/IPv4) from the list.
- Click on Properties
- Enter the IP address, subnet mask, default gateway, and DNS server address.
PowerShell
New-NetIPAddress -InterfaceAlias "Ethernet" -IPAddress "10.1.1.10" -PrefixLength 24 -DefaultGateway "10.1.1.1"It is important to note that the DNS server address should be set to the server’s IP address (127.0.0.1). This will ensure the server can resolve its hostname and prevent issues with the Active Directory installation.
Once the static IP address has been set, you can proceed with the AD installation.
Step 1 – Add the Active Directory Domain Services Role
The first step in installing AD is to use Server Manager to add the Active Directory Domain Services role. To do this:
- Open Server Manager and Select Add Roles and Features from the Manage menu.
- Press the Windows key + R on your keyboard to open the Run dialogue box.
- Type “servermanager” in the Run box.
- Click on the “OK” button or press Enter.
- Click Next until you reach the Server Roles screen. Select Active Directory Domain Services and click Next.
- Review the features and click Next again. Finally, click Install to begin the installation process.
PowerShell
Install-WindowsFeature -Name AD-Domain-Services, RSAT-AD-Tools -IncludeManagementToolsStep 2 – Install Active Directory
After installing the Active Directory Domain Services role, you must promote the server to a domain controller.
To do this,
- Open Server Manager
- Select the Active Directory Domain Services role from the Dashboard.
- Click on the Configuration Required link to open the configuration wizard. Follow the prompts to configure the necessary settings, such as the domain name, domain functional, and forest functional levels.
PowerShell
Install-ADDSForest -DomainName "turbogeek.co.uk" -DomainNetbiosName "TURBOGEEK" -DomainMode "WinThreshold" -ForestMode "WinThreshold" -InstallDns -NoRebootOnCompletionStep 3 – Setup the Domain
After selecting Promote this server to a domain controller, you will see the screen below. Fill in the information that’s relevant to you.
- Complete the Deployment configuration.
- Add the domain controller to an existing domain, add to an existing forest, or create a new one. In this example, I am creating a new forest called turbogeek.co.uk
- Set the Domain Functional Level and set a domain administrator password. I have also selected my domain controller as the DNS server and Global Catalog.
To find out more about Domain Functional Levels, click here.

If required, you can configure your DNS settings on the next page. In my example, I am skipping this warning because my domain controller will be the DNS server too. It may be different in your domain.
- The installer should automatically populate the NetBIOS name on the next screen.
- Next, set the location to save the AD database, log files, and SYSVOL. In this example, I will leave these values as the default.
- You may want to move NTDS and SYSVOL to separate disks in a production environment. This can improve performance on very large AD deployments.
- Click next on the Review Options and Prerequisites Check pages.
- Once the installer is running, give it a few minutes to complete the installation.
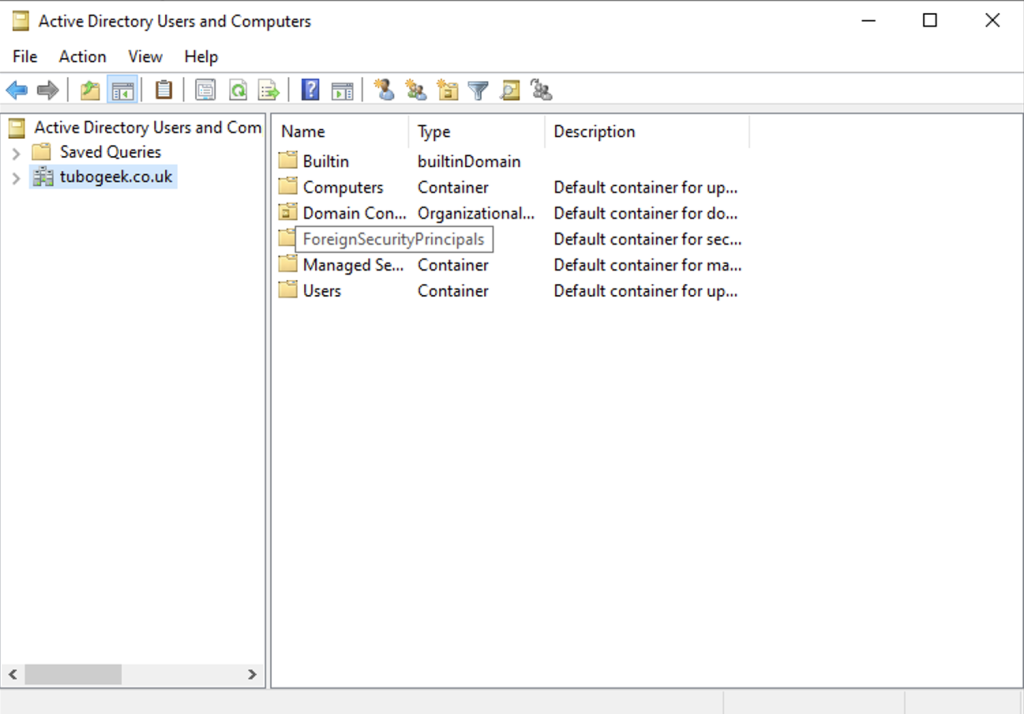
Step 4 – View Active Directory Users and Computers
- Then, from Server Manager, Open “Active Directory Users and Computers
- Equally, you can type dsa.msc from the command prompt or Powershell CLI

Installing AD on Windows Server 2022 is crucial in managing users, computers, and resources in a network environment. By following the steps outlined in this guide, you can ensure that the installation is successful and that your network environment is secure and easy to manage. Remember to verify the successful installation and access AD tools to ensure everything works correctly.
Windows Server Hints and Tips
Here are some hints and tips for Windows Server 2022:
Use Server Core installation:
Server Core installation provides a minimalistic interface with less disk space usage and fewer vulnerabilities, making it more secure and easier to manage.
Enable Windows Admin Center:
Windows Admin Center is a web-based tool with a graphical interface for server management tasks. It’s free and easy to install, making it a valuable addition to any Windows Server 2022 environment.
Use the latest security features:
Windows Server 2022 has many built-in security features, such as Credential Guard, Device Guard, and Just Enough Administration (JEA). It’s recommended to enable these features to enhance the server’s security posture.
Consider using Azure Hybrid Benefits:
If you have an Azure subscription, you can use the Azure Hybrid Benefits to save money on your Windows Server 2022 licensing costs. This benefit allows you to use your existing Windows Server licenses to run virtual machines in Azure, reducing the need to purchase new licenses.
Use Storage Spaces Direct:
Storage Spaces Direct is a software-defined storage solution that allows you to use commodity hardware to create highly available and scalable storage solutions. It’s easy to set up and manage and can be a cost-effective alternative to traditional storage arrays.
Use the Windows Server Update Services (WSUS):
WSUS is a built-in feature allowing you to manage and deploy Windows Servers and other Microsoft product updates. Therefore, using WSUS can help you maintain the server’s security and stability by keeping it up-to-date with the latest patches and updates.
Enable Remote Desktop Protocol (RDP) with caution:
RDP is a convenient way to access the server remotely but can also be a security risk if not configured correctly. It’s recommended to use Network Level Authentication (NLA) and limit the number of users accessing RDP.
These are just a few hints and tips for Windows Server 2022, and there are many other features and best practices to explore. It’s important to stay informed and up-to-date with the latest developments and security updates to ensure the server’s optimal performance and security.
FAQ on Installing Active Directory on Windows Server 2022
What is Active Directory?
Active Directory is a Microsoft service that manages identities and authentication for resources, including users, computers, and applications. It simplifies the management of user accounts and enables centralized management of security policies.
What are the system requirements for installing Active Directory on Windows Server 2022?
To install Active Directory on Windows Server 2022, your server must meet the minimum hardware and software requirements. These include a 64-bit processor with a minimum of 4 GB of RAM and 64 GB of available disk space.
Can I install Active Directory on a Windows Server 2022 Core installation?
You can install Active Directory on a Windows Server 2022 Core installation. However, the process is command-line based, and you will need to use PowerShell or the Sconfig tool to install and configure Active Directory.
How do I install Active Directory on Windows Server 2022 using the Server Manager?
To install Active Directory using the Server Manager, launch the Server Manager and click on “Add roles and features”. Then select the “Active Directory Domain Services” role and follow the wizard to complete the installation.
How do I configure Active Directory after installation?
After installing Active Directory, you must configure it by running the Active Directory Domain Services Configuration Wizard. This wizard will guide you through the process of configuring your domain, including setting up DNS, creating a domain controller, and configuring forest and domain functional levels.
Can I install Active Directory on Windows 2022 Nano Server?
You cannot install Active Directory on a Windows 2022 Nano Server. Nano Server is a lightweight installation option that does not include the Active Directory Domain Services role.
What is the difference between a domain and a forest in Active Directory?
A domain is a logical group of computers, users, and devices with a common security database. A forest is a collection of domains with a common schema and trust relationship. A forest can contain one or more domains.
Can I add a Windows Server 2019 domain controller to a Windows Server 2022 domain?
You can add a Windows Server 2019 domain controller to a Windows Server 2022 domain. However, you must ensure that the forest and domain functional levels are compatible with Windows Server 2019.
Can I install Active Directory on a virtual machine running on Windows Server 2022?
Yes, you can install Active Directory on a virtual machine running on Windows Server 2022. However, you must ensure that the virtual machine meets the minimum hardware and software requirements for installing Active Directory.
What are some best practices for securing Active Directory on Windows Server 2022?
Some best practices for securing Active Directory include enforcing strong passwords, limiting administrative access, enabling auditing, and monitoring logs for suspicious activity regularly. You should also keep your server up-to-date with the latest security patches and updates.
Post Views: 2,784
Active Directory is a powerful tool that allows administrators to manage user accounts, computers, and security policies across an organization’s network. It is a key component of Windows Server, and with the release of Windows Server 2022, how to install Active Directory has become even easier. In this article, we’ll guide you through the process of installing Active Directory on Windows Server 2022.
Process of Installing Active Directory on Windows Server 2022
To ensure a successful installation, please log in to your Windows Server 2022 environment as an administrator. Then follow the steps below to install Active Directory.
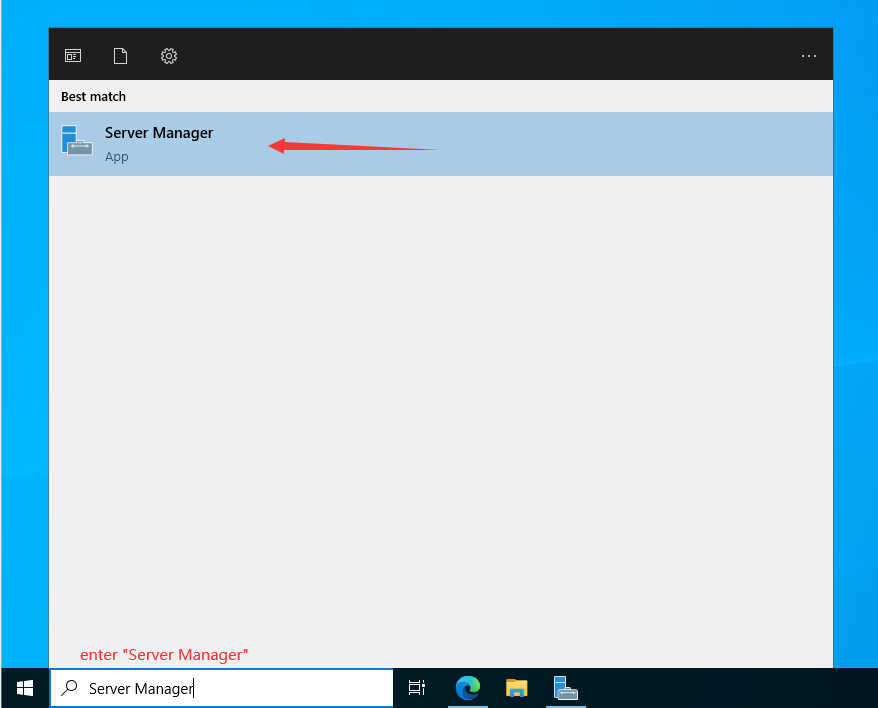
Step 1. Log in to Server Manager
To initiate the installation process for Active Directory Domain Services, please enter «Server Manager» in the Windows search box. After opening it, refer to the image below and follow the outlined steps.
Step 2. Select “Add Roles and Features”
Here are two ways to access to the «Add Roles and Features”. You can either click on the option on the home page or right-click “Manage” to choose the function from the context menu.
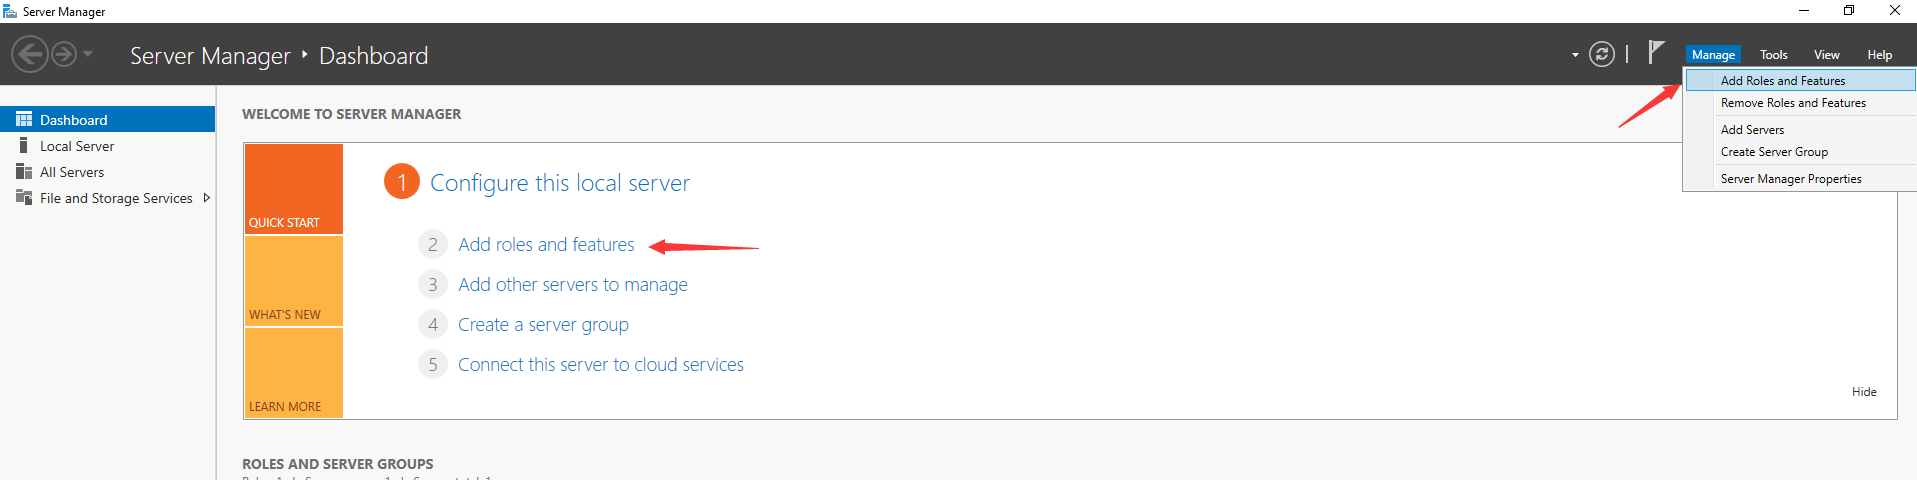
The process will open the “Add Roles and Features Wizard” page, which proceeds with the Active Directory installation. Please click on “Next”.
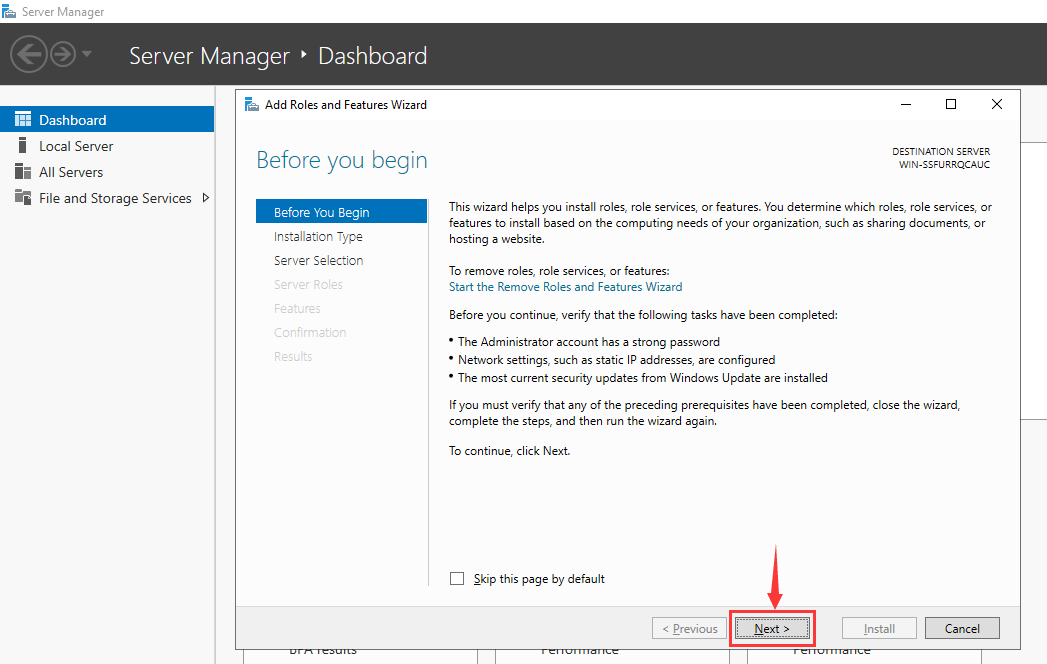
Step 3. Select Installation Type
On the «Installation Type» screen, select «Role-based or feature-based installation» and click «Next.»

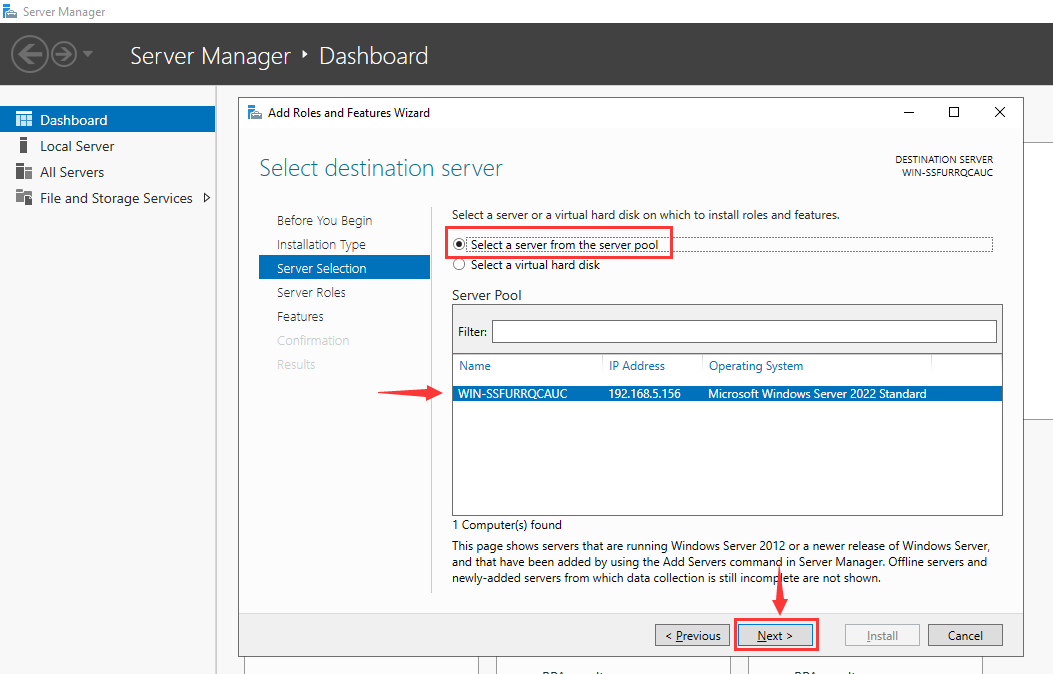
Step 4. Server Selection
In the «Server Selection» screen, select the server on which you want to install Active Directory and click «Next«. Taking the picture as an example, we chose the local Windows Server 2022 Standard as the reference.
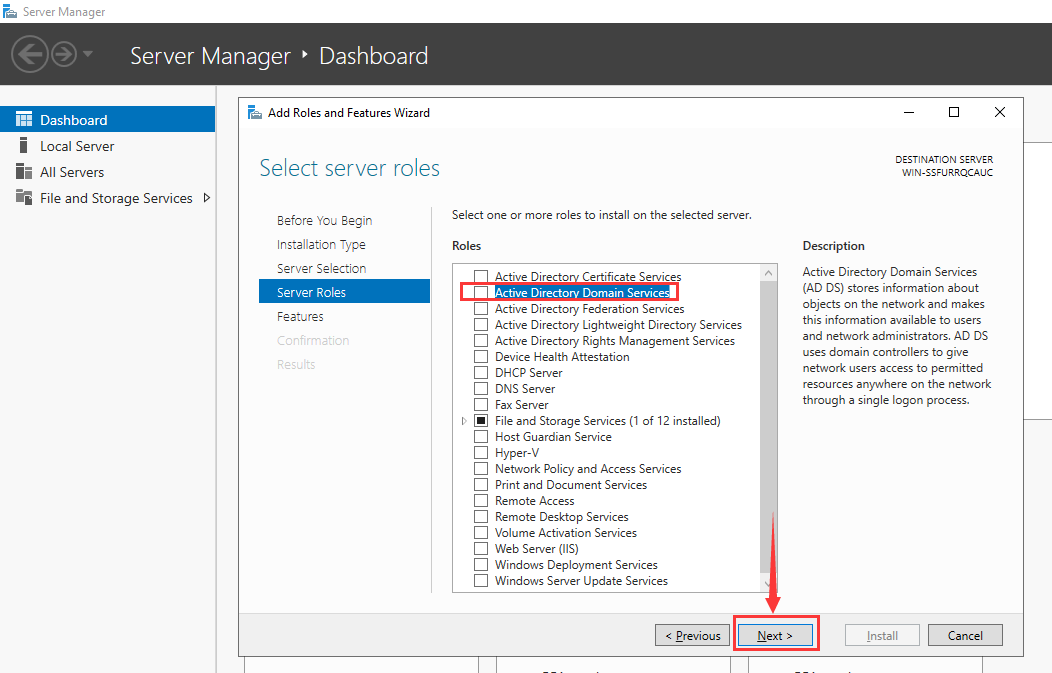
Step 5. Select Server Roles
All the previous settings will guide you to the «Server Roles» page where you will see multiple options with square checkbox beside them. To proceed, select «Active Directory Domain Services».
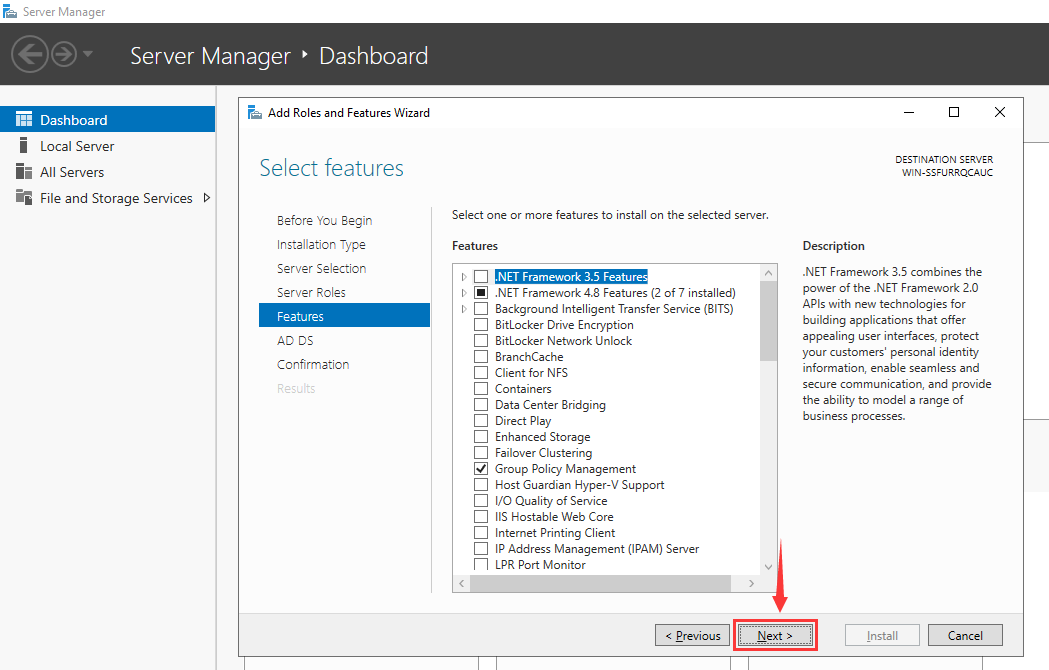
Step 6. Select and Add Features
The precondition to installing the Active Directory Domain Services is to add the necessary features. So please click “Add Features” first to select features and then proceed with the installation process.
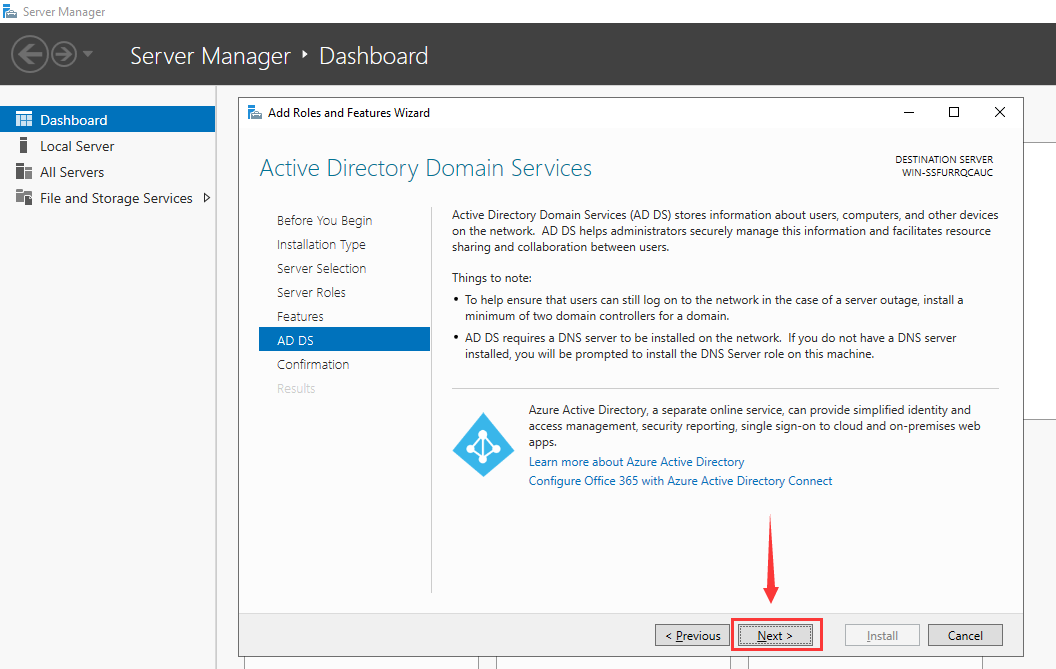
Step 7. Active Directory Domain Service
After step 6, you will be directed to the “Activate Directory Domain Services” page.
In the «AD DS» screen, review the information and click «Next».
Step 8. Confirm Installation Selections
Review your installation selections for confirmation before proceeding with the actual installation. You have the option to automatically restart the server if required. After checking, please click “Next” to move forward.

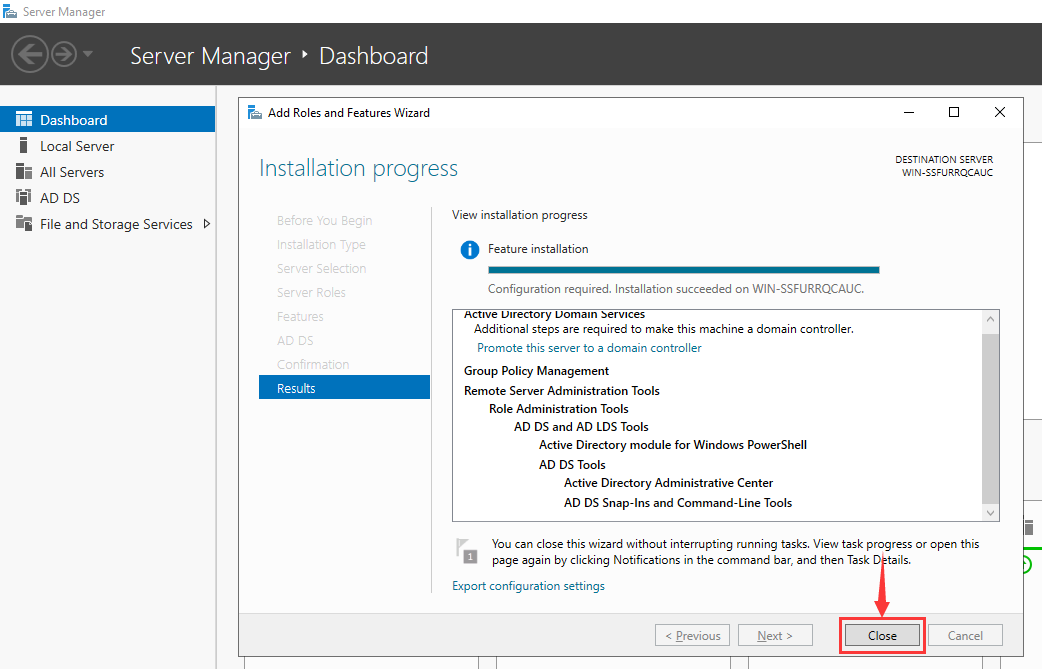
Once the previous settings are done, the installation will proceed.
After it finishes, please click “Close”.
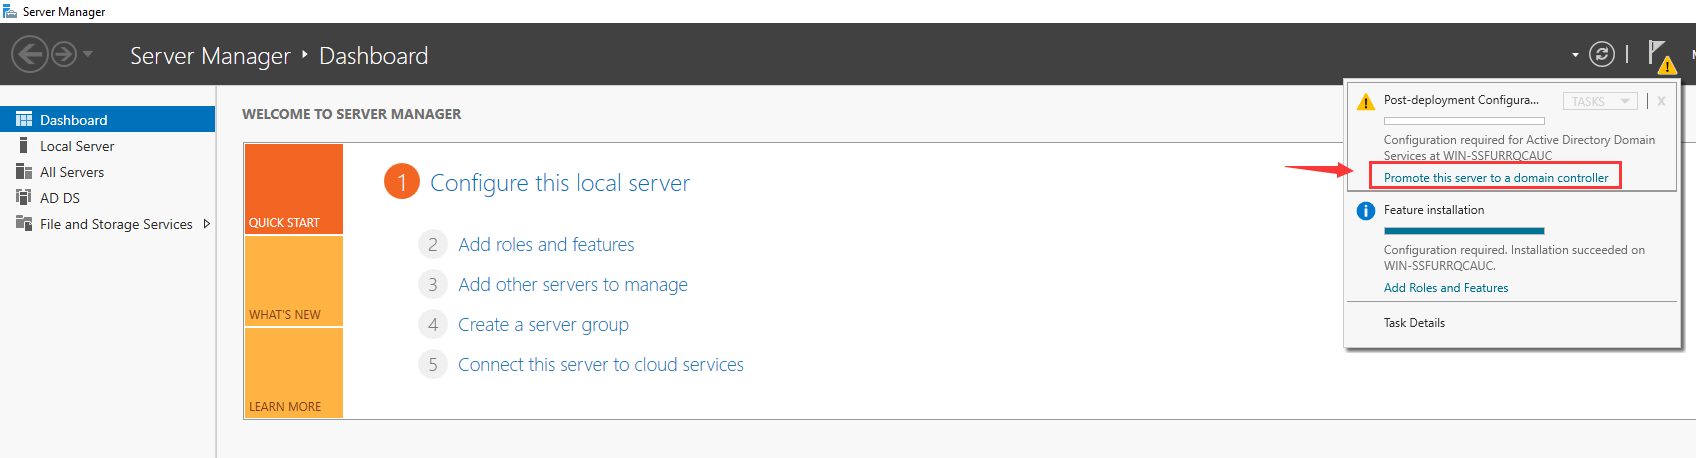
Step 9. Configure Active Directory Domain Services
After Active Directory Domain Services installation is complete, promote it to a Domain Controller. Please open Server Manager and locate the «Manage» tab, which will have a yellow exclamation notification next to it. Click on it and select «Promote this server to a domain controller».
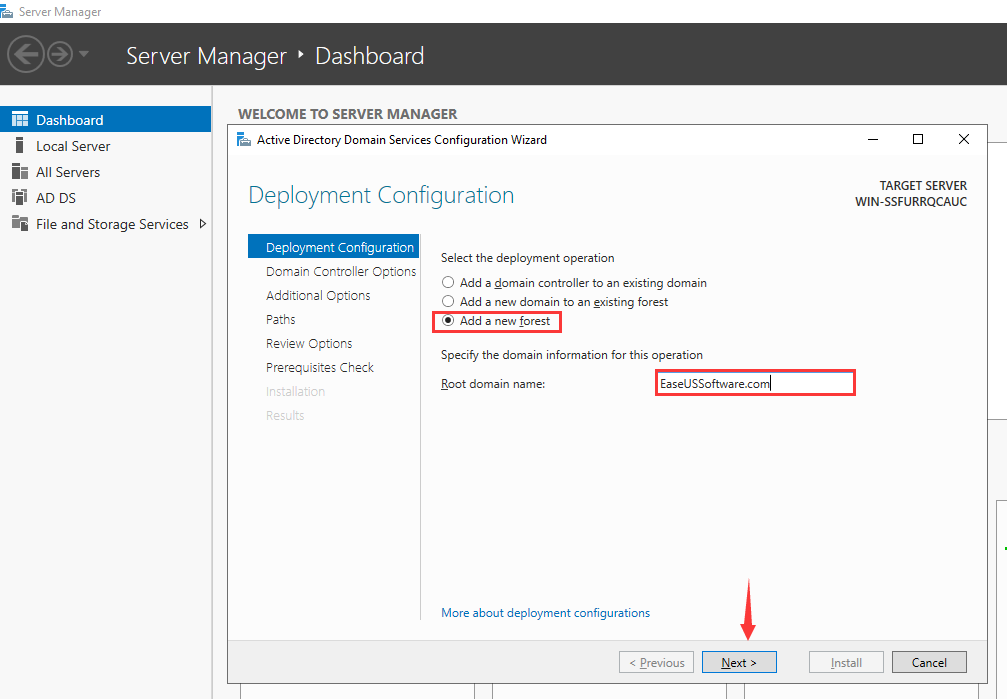
Step 10. Add a Forest
Click on «Promote this server to a domain controller», and a new window titled «Active Directory Domain Services Configuration Wizard» will appear. In this step, we will add a new Forest and customize your root domain name. However, if you have a different preference, you are free to choose the other options. Please enter your root domain name and click on «Next».
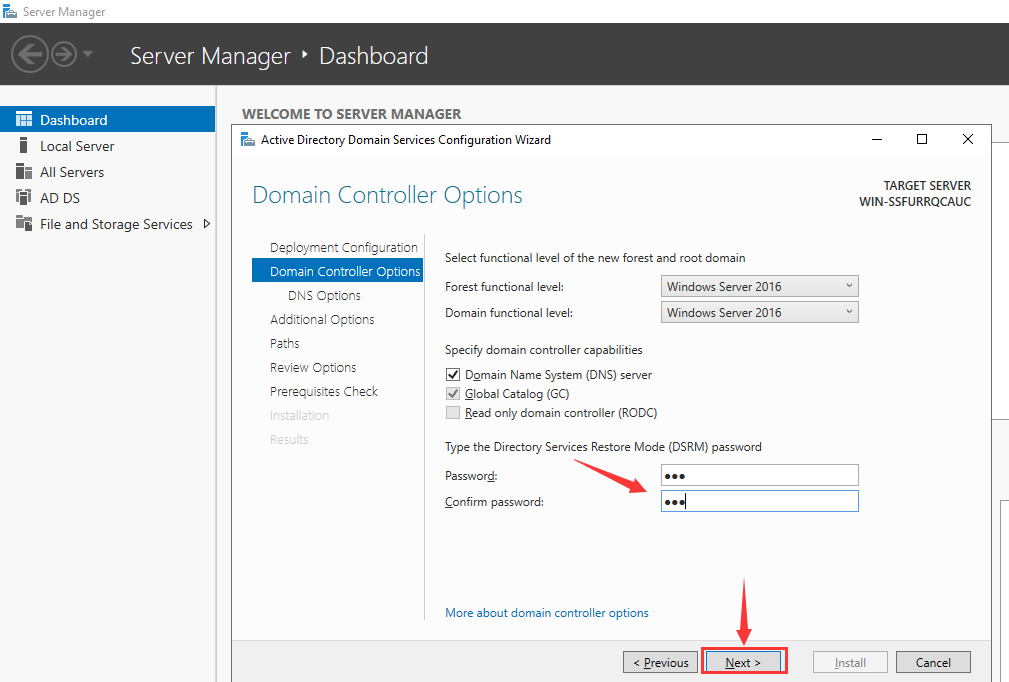
Step 11. Domain Controller Options
In the Domain Controller options, keep the default settings checked and set your password. After that, click on «Next».
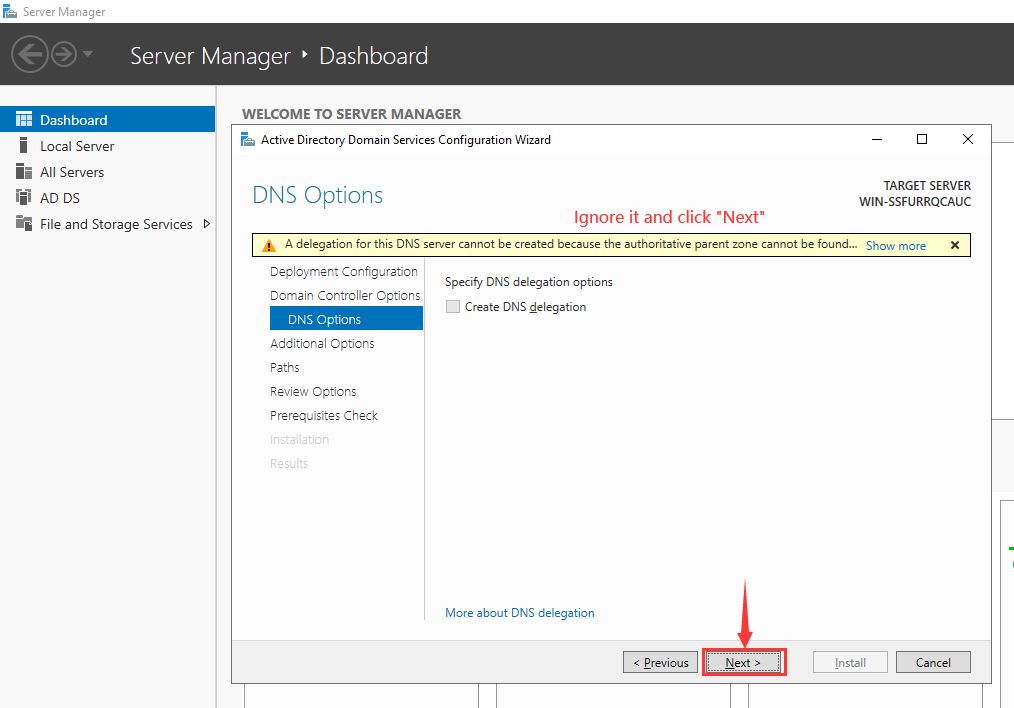
Step 12. DNS Options
On the “DNS Options” page, there will be a notification at the top stating «A delegation for this DNS server cannot be created because the authoritative parent zone cannot be found». Please disregard this message and proceed by clicking on «Next».
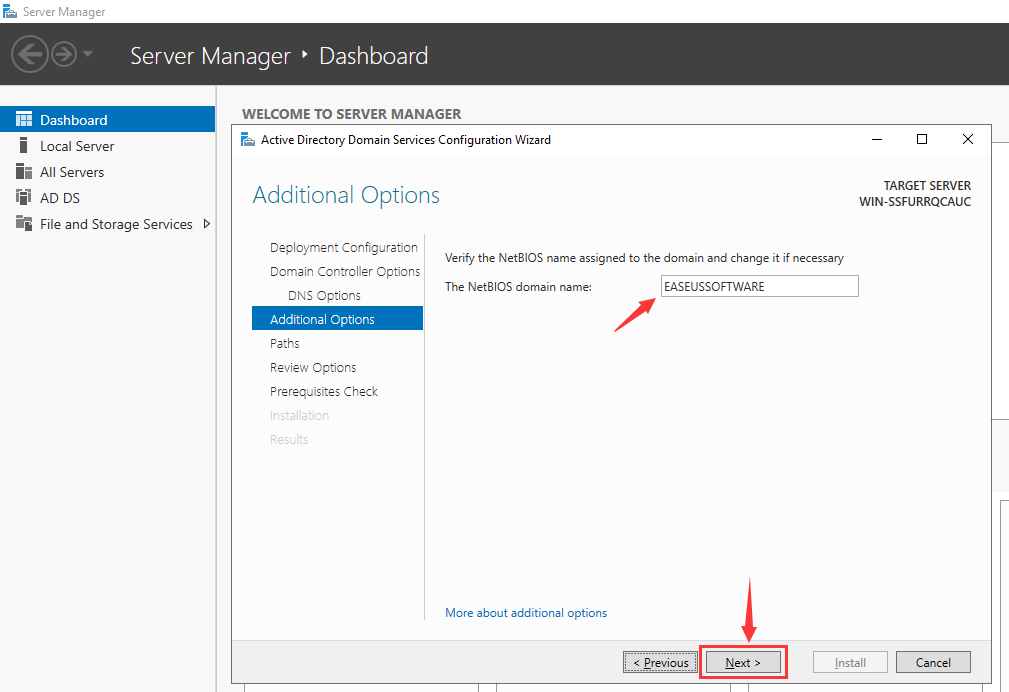
Step 13. Additional Options
On the page, you can modify the NetBios domain name as long as it doesn’t exceed 15 characters. You are also able to keep the NetBIOS domain name as default. Once you have made your selection, click on «Next».
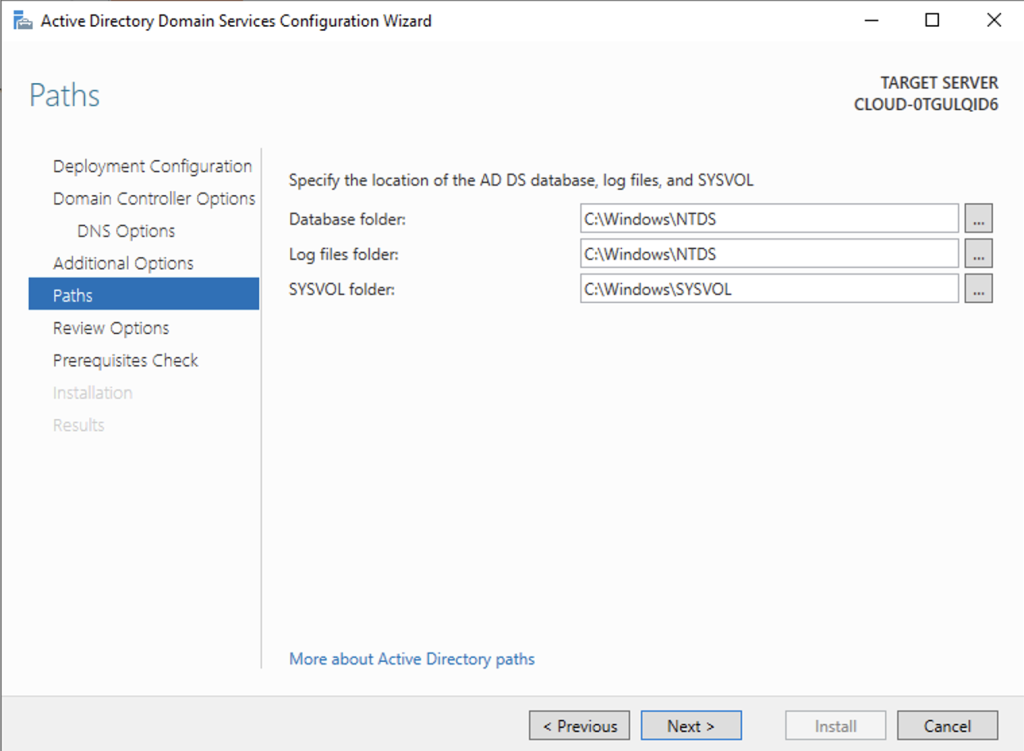
Step 14. Set Path
Please leave paths as default and click “Next” as shown below.
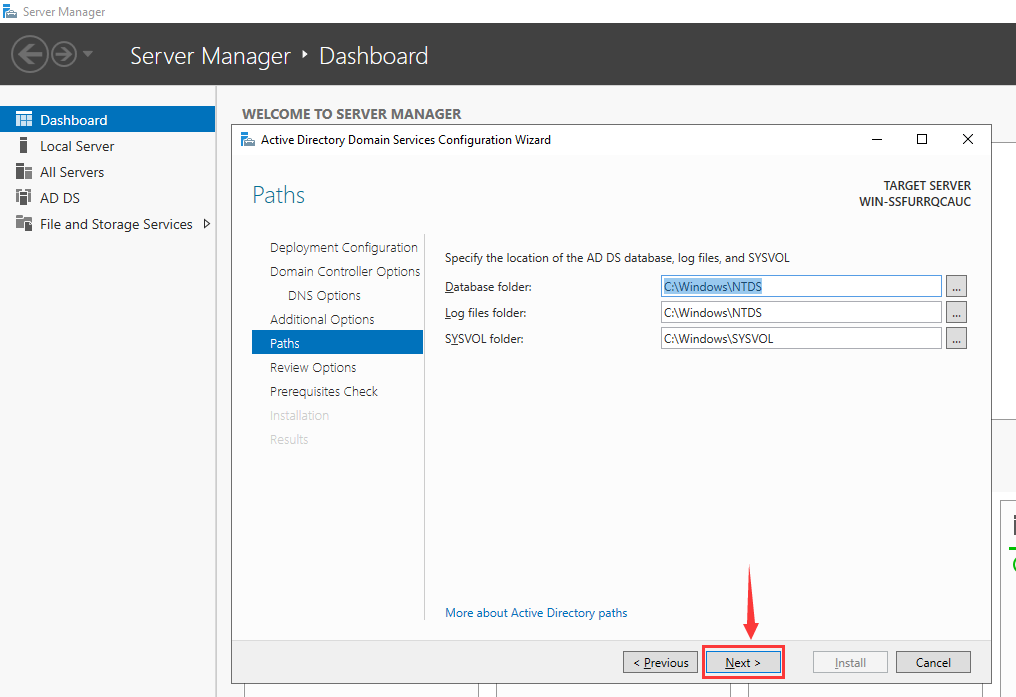
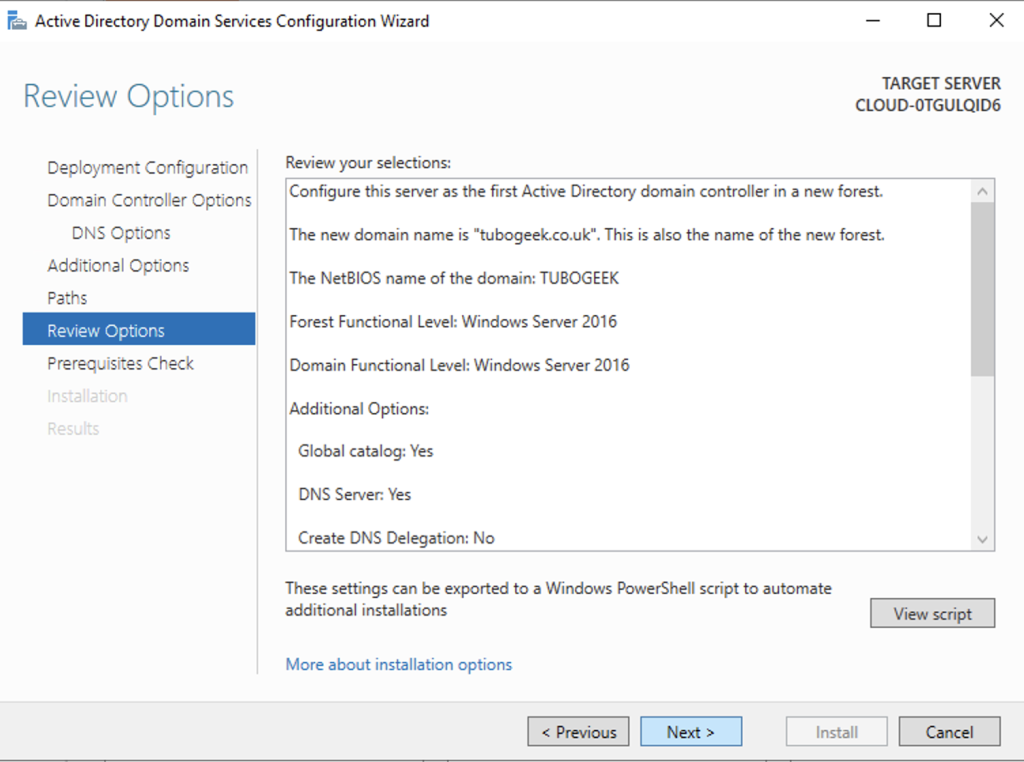
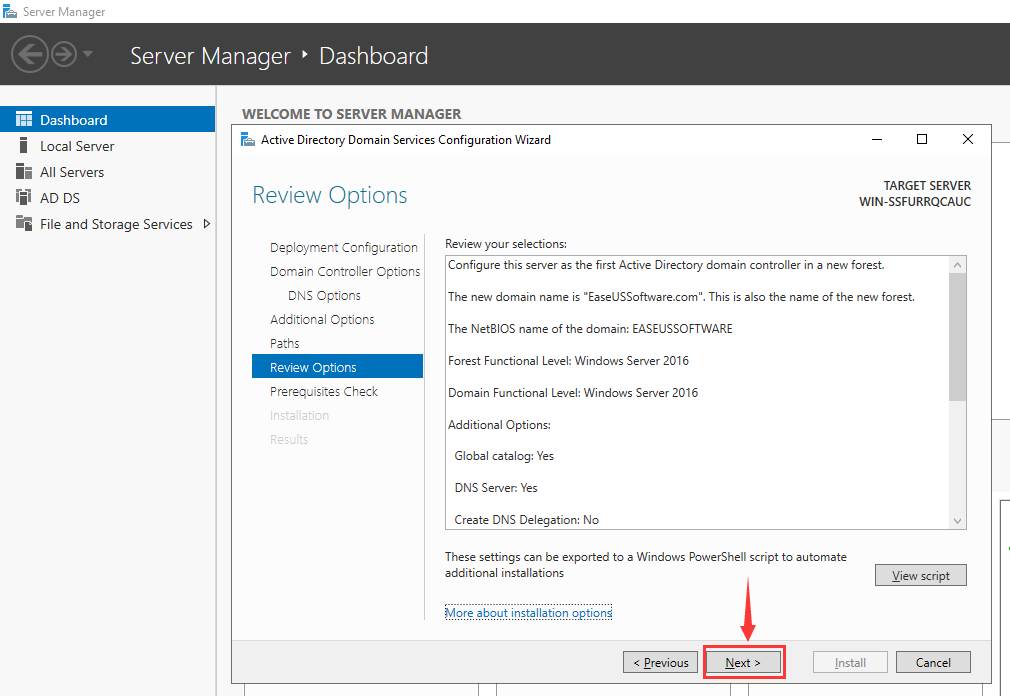
Step 15. Review Options
At this stage, the server will display a summary of the selections you have made. If you don’t want to change your choices, click on «Next» to proceed.
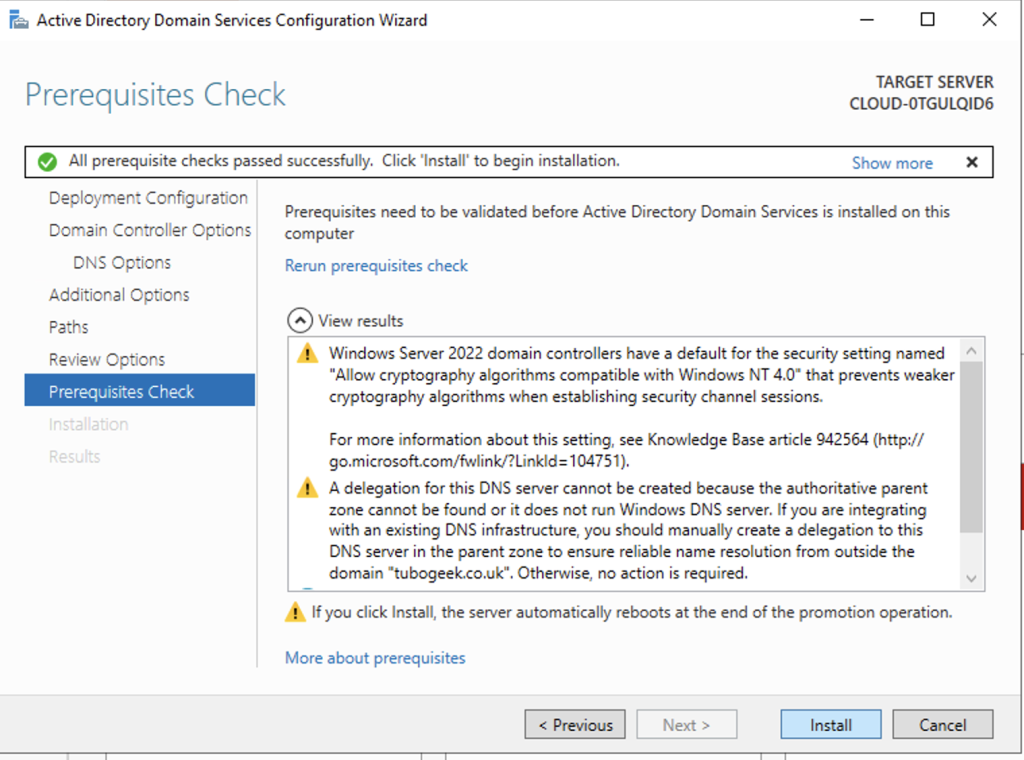
Step 16. Check Prerequisites
At this point, the server will provide a summary of the selections you have made. If you are content with your choices, proceed by clicking on «Install».
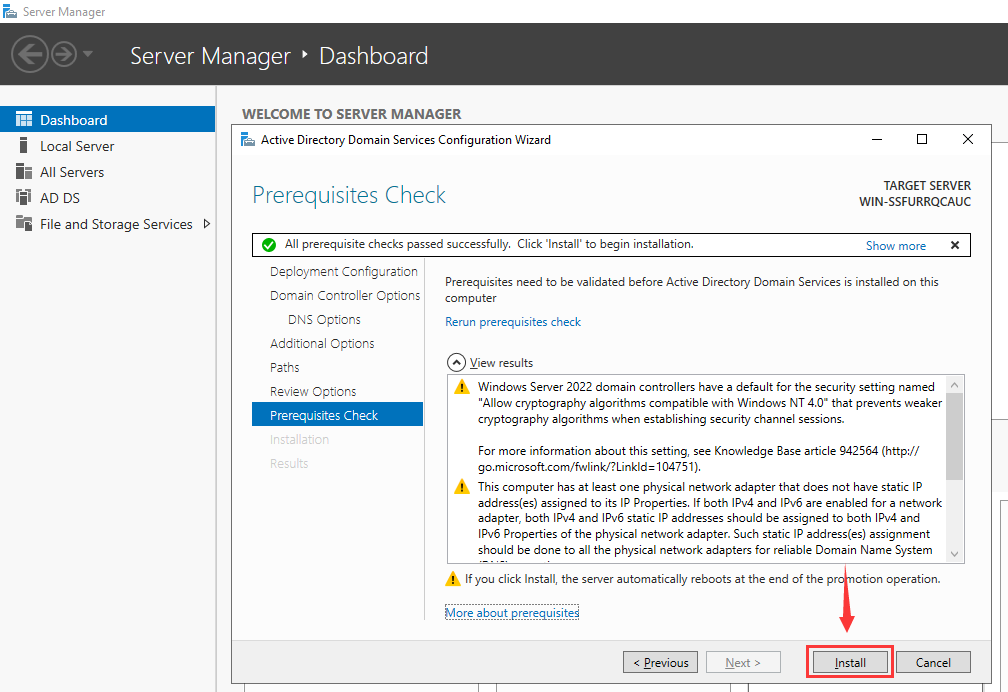
Then your server will reboot. After that, you can log into the Domain with your password.
Tools to Back Up Active Directory
After completing the aforementioned process, you will be able to effectively manage user accounts. To prevent potential data loss resulting from inadvertent actions, we recommend all domain administrators use using a reliable backup tool to back up activate directory regularly.
EaseUS Todo Backup Enterprise provides various solutions for all types of data backup, which is an excellent tool for backing up data on your Active Directory to avoid any accidental data loss. You can easily find and select your account there and then set up your backup plans to initiate the backup process.
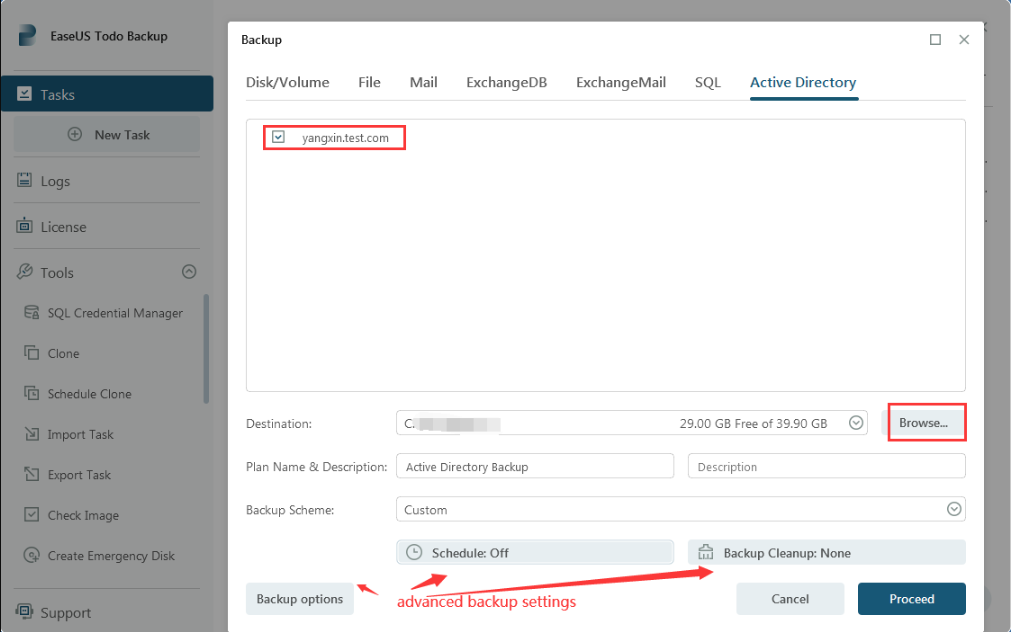
You can also refer to the guide on how to back up an active directory in EaseUS Todo Backup Enterprise.
Conclusion
Installing Active Directory on Windows Server 2022 is a straightforward process that allows administrators to manage user accounts, computers, and security policies across an organization’s network. By following the steps outlined in this article, you’ll be able to install and configure Active Directory on your Windows Server 2022 environment quickly and easily. And please do not forget to use a backup tool to protect your important data.
1. What is Active Directory in Windows Server 2022?
Active Directory in Windows Server 2022 is a directory service that provides a centralized database for managing and organizing user accounts, computers, and other resources on a network. It allows administrators to easily manage and control access to network resources, enforce security policies, and streamline user authentication and authorization processes.
2. How do I know if Active Directory is installed?
- Open the Server Manager
- In the Server Manager, click on «Local Server» in the left-hand pane.
- Look for the «Roles and Features» section in the right-hand pane and click on «Add roles and features.»
- In the «Add Roles and Features Wizard,» click «Next» until you reach the «Server Roles» page.
- Look for the «Active Directory Domain Services» role in the list. If it is checked, then Active Directory is installed on the server. If it is not checked, then Active Directory is not installed.
3. How to find your Active Directory Search Base?
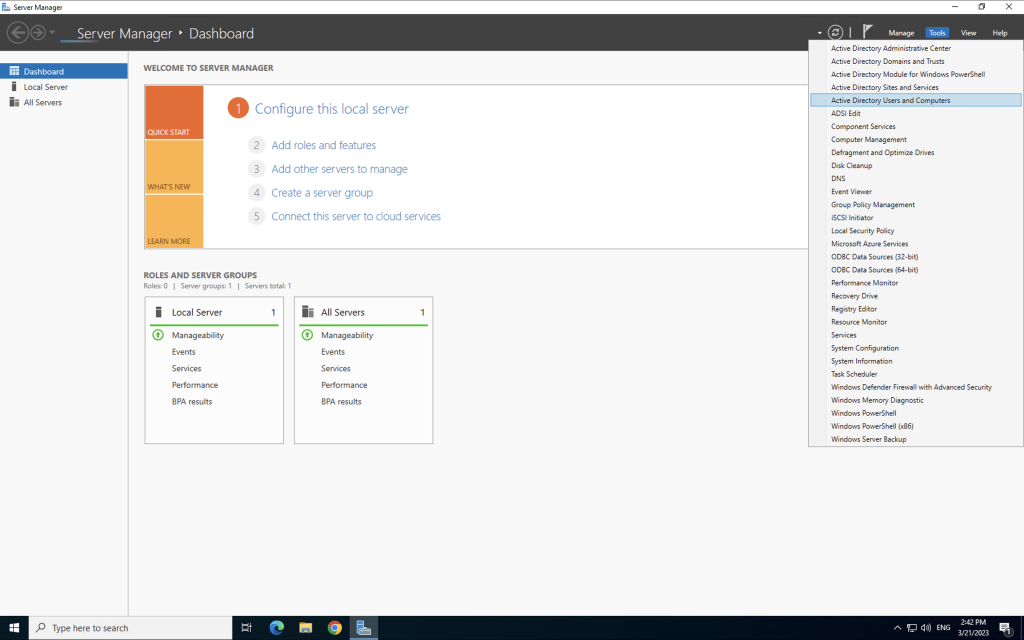
- Select Start > Administrative Tools > Active Directory Users and Computers.
- In the Active Directory Users and Computers tree, find and select your domain name.
- Expand the tree to find the path through your Active Directory hierarchy.
4. Can Windows Server 2022 Essentials be a domain controller?
No, Windows Server 2022 Essentials cannot be a domain controller. Microsoft has discontinued the Essentials edition of Windows Server starting with the 2022 release. Instead, Microsoft recommends using the Standard or Datacenter editions of Windows Server 2022 for domain controller roles.
How to Setup Active Directory Domain on Windows Server 2022. Active Directory (AD) is Microsoft’s directory service that validates and allows users to connect and access network resources. AD runs on Windows Server by the Domain Controller and stores all the files and information as objects (users, groups, applications, and devices). Each object has its individual name and attributes. The Domain Controller also enforces security policies, installs and updates software. For example, as a user logs into a device to access a specific resource, the Active Directory administrator will cross-check and verify the added details. After validation, he decides what information to share and authorizes access to certain resources. The platform also comprises in-built features like replication and redundancy. Under this feature, if a Domain Controller fails, then the other DC available will take up the load and responsibility.
Active Directory on Windows Server 2022 is a database and includes multiple directory services. Domain Services, Lightweight Directory Services, Certificate Services, Active Directory Federation Services, and Rights Management Services are a few of them that help connect users and control access to network resources. Active Directory is highly beneficial for enterprises as it helps improve security by controlling access to network resources, managing user identities, reducing operations expenses, delivering a seamless user experience, and maintaining business continuity.
How Does Active Directory work?
There are Domain Controllers (DCs) assigned in the Active Directory to run Active Directory Domain Services (AD DS), an essential part of the Windows Server operating system. These Domain Controllers have copies of the entire domain’s directory. An organization comprises multiple domain controllers. Thus, as and when a change (updating password or deleting user account) is made to anyone directory or a single domain controller, it immediately creates an automatic replication to the other DCs to stay updated. Administrators do not need to perform manual edits to each Domain controller or directory in the Active Directory service. A Global Catalog server is a type of DC that maintains a copy of all objects present in the domain directory and a partial copy of the domain forest. The server makes it easier for users and applications to locate objects in any domain.
An Active Directory environment includes Desktops, laptops, and any other device running Windows desktop 8/10/11 instead of Windows Server 2022. However, it is not a similar case with Active Directory Domain Services (AD DS). Active Directory Domain Services perform only with established protocols and standards, such as Kerberos, DNS (Domain Name System), and LDAP (Lightweight Directory Access Protocol).
In this post, we will show you how to set up an Active Directory Domain on Windows Server 2022.
Install Active Directory Domain Services On Windows Server 2022
An Active Directory domain is a collection of User, Group types, Computer, or Printers within a Microsoft Active Directory network. It can be identified using a DNS name, organization’s public domain name, a sub-domain, or an alternate version.
Follow the below steps to install an active directory domain service on Windows Server 2022.
Step 1 – Login to Windows Server 2022 as an administrator user and launch a Server manager:

Step 2 – Click on the Add Roles and Features button. You should see the Add Roles and Features Wizard:

Step 3 – Click on the Next button. You should see the Select installation type screen:

Step 4 – Select Role-based or feature-based installation and click on the Next button. You should see the Select destination server screen:

Step 5 – Select “Select a server from the server pool” and click on the Next button. You should see the Select server roles screen:

Step 6 – Select Active Directory Domain Services and click on the Next button. You should see the Select features screen:

Step 7 – Leave all default selections and click on the Next button. You should see the AD DS screen:

Step 8 – Click on the Next button. You should see the Confirm installation screen:

Step 9 – Click on the Install button to start the installation. Once the installation has been finished. You should see the following page.

Step 10 – Click on the Close button to close the installation wizard.
Setup Active Directory Domain 2022
At this point, the Active Directory Domain service has been installed on your server. Now, you will need to set up it on the server.
Follow the below steps to set up the Active Directory Domain:
Step 1 – After the Active Directory Domain service installation, you should see the yellow notification icon on the Server Manager:

Step 2 – Click on that icon and click on the Promote this server to a domain controller. You should see the Deployment Configuration screen:

Step 3 – Select Add a new forest, provide your domain name and click on the Next button. You should see the Domain Controller Options screen:

Step 4 – Provide your directory service restore mode password and click on the Next button. You should see the DNS configuration screen:

Step 5 – Leave the default configuration and click on the Next button. You should see the Additional Options screen:

Step 6 – Provide the NetBIOS name and click on the Next button. You should see the AD DS screen:

Step 7 – Leave all default configurations and click on the Next button. You should see the Review Options screen:

Step 8 – Review all the configurations and click on the Next button. You should see the Prerequisites Check screen:

Step 9 – Finally, click on the Install button to start the installation. Once the installation has been finished, your system will be restarted automatically.
How Secure is Your Active Directory ?
78% of companies have an insecure Active Directory and are vulnerable to a potential attack!!
Download our FREE Active Directory Security Best Practices Compliance Checker
Verify Active Directory Installation
After installing and setting up Active Directory Domain, you will need to verify whether the Domain Controller is set up or not.
To verify, open the Windows PowerShell and run the following command:
Get-Service adws,kdc,netlogon,dns
You should see the status of all services in the following output:
					Status Name DisplayName
------ ---- -----------
Running adws Active Directory Web Services
Running dns DNS Server
Running kdc Kerberos Key Distribution Center
Running Netlogon netlogon
To display the information of your domain controller, run the following command:
You should see the following output:
					ComputerObjectDN : CN=CLOUD-0PMID0K86,OU=Domain Controllers,DC=exampledomain,DC=com
DefaultPartition : DC=exampledomain,DC=com
Domain : exampledomain.com
Enabled : True
Forest : exampledomain.com
HostName : CLOUD-0PMID0K86.exampledomain.com
InvocationId : fbf797ca-0647-45a6-acb7-e510d174e5ef
IPv4Address : 104.219.54.195
IPv6Address :
IsGlobalCatalog : True
IsReadOnly : False
LdapPort : 389
Name : CLOUD-0PMID0K86
NTDSSettingsObjectDN : CN=NTDS Settings,CN=CLOUD-0PMID0K86,CN=Servers,CN=Default-First-Site-Name,CN=Sites,CN=Conf
iguration,DC=exampledomain,DC=com
OperatingSystem : Windows Server 2022 Datacenter
OperatingSystemHotfix :
OperatingSystemServicePack :
OperatingSystemVersion : 10.0 (20348)
OperationMasterRoles : {SchemaMaster, DomainNamingMaster, PDCEmulator, RIDMaster...}
Partitions : {DC=ForestDnsZones,DC=exampledomain,DC=com, DC=DomainDnsZones,DC=exampledomain,DC=com,
CN=Schema,CN=Configuration,DC=exampledomain,DC=com,
CN=Configuration,DC=exampledomain,DC=com...}
ServerObjectDN : CN=CLOUD-0PMID0K86,CN=Servers,CN=Default-First-Site-Name,CN=Sites,CN=Configuration,DC=exam
pledomain,DC=com
ServerObjectGuid : 12ff11b2-6827-480d-8f55-c2239a790e13
Site : Default-First-Site-Name
SslPort : 636
If you want to see detailed information of your domain, run the following command:
Get-ADDomain exampledomain.com
You will get the following information:
					AllowedDNSSuffixes : {}
ChildDomains : {}
ComputersContainer : CN=Computers,DC=exampledomain,DC=com
DeletedObjectsContainer : CN=Deleted Objects,DC=exampledomain,DC=com
DistinguishedName : DC=exampledomain,DC=com
DNSRoot : exampledomain.com
DomainControllersContainer : OU=Domain Controllers,DC=exampledomain,DC=com
DomainMode : Windows2016Domain
DomainSID : S-1-5-21-2931533566-3810835548-1451992128
ForeignSecurityPrincipalsContainer : CN=ForeignSecurityPrincipals,DC=exampledomain,DC=com
Forest : exampledomain.com
InfrastructureMaster : CLOUD-0PMID0K86.exampledomain.com
LastLogonReplicationInterval :
LinkedGroupPolicyObjects : {CN={31B2F340-016D-11D2-945F-00C04FB984F9},CN=Policies,CN=System,DC=exampledomain,
DC=com}
LostAndFoundContainer : CN=LostAndFound,DC=exampledomain,DC=com
ManagedBy :
Name : exampledomain
NetBIOSName : EXAMPLEDOMAIN
ObjectClass : domainDNS
ObjectGUID : a9509988-a945-442d-ad03-6346c40c105f
ParentDomain :
PDCEmulator : CLOUD-0PMID0K86.exampledomain.com
PublicKeyRequiredPasswordRolling : True
QuotasContainer : CN=NTDS Quotas,DC=exampledomain,DC=com
ReadOnlyReplicaDirectoryServers : {}
ReplicaDirectoryServers : {CLOUD-0PMID0K86.exampledomain.com}
RIDMaster : CLOUD-0PMID0K86.exampledomain.com
SubordinateReferences : {DC=ForestDnsZones,DC=exampledomain,DC=com,
DC=DomainDnsZones,DC=exampledomain,DC=com,
CN=Configuration,DC=exampledomain,DC=com}
SystemsContainer : CN=System,DC=exampledomain,DC=com
UsersContainer : CN=Users,DC=exampledomain,DC=com
Setup Active Directory Domain on Windows Server 2022 Complete
Congratulations! you have successfully set up the Active Directory Domain on Windows server 2022. You can now explore the Active Directory Domain and start creating user, group, and computer accounts.