All you need to know about PC Fan control
by Kazim Ali Alvi
Kazim has always been fond of technology, be it scrolling through the settings on his iPhone, Android device, or Windows. And at times, unscrewing the device to take… read more
Updated on
- A lot of users have wanted to control the computer fan in Windows 11, however, they can’t seem to find the right way for it.
- You can either control the fan using a tool provided by the OEM via the BIOS settings or use a third-party tool.
- Also, find out about the fan speed and how it affects the system.
XINSTALL BY CLICKING THE DOWNLOAD
FILE
You may have had to shut down the system at least once due to overheating, or it may have turned off itself. We have all been there. But what if you can manually control the fan in Windows 11 for optimal results?
Most of you would be thrilled to control the fan speed manually, but it’s not that simple. Instead, you will have to find the correct application to control the speed and reduce overheating, like cooling software.
In the following sections, we will list the various methods to get the right tool to monitor and control your PC fan as you wish.
How do I reduce the fan noise on Windows 11?
There are various ways to control the fan noise on a Windows 11 laptop. Below are some of the easy methods:
- Via power settings: Your power settings can significantly add to your Windows 11 fan speed problem. To get this under control, switch to either the Best power efficiency or the Balanced plan instead of high performance.
- Clearing of air vents: When the Windows 11 air vents are blocked by dust and debris, it can increase fan noise. The solution here is to clear the dirt using a vacuum or other suitable methods.
- Using a fan control tool: You can still experience high fan noise in some cases despite using the best power plan and cleaning the vents. In this case, you need to use a control tool to keep the noise in check. There is the option of using the tool released by OEM for your PC or fan control software for Windows 11.
How can I control the fan speed on a PC?
1. Use the software released by the OEM to control fan speed
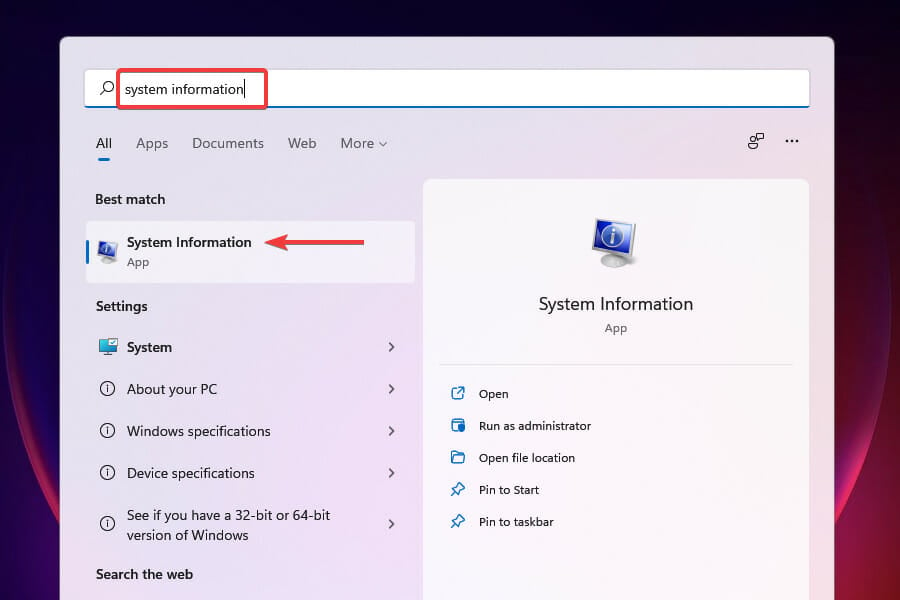
- Press Windows + S to launch the Search menu.
- Enter System Information in the text field at the top and click on the relevant search result that appears.

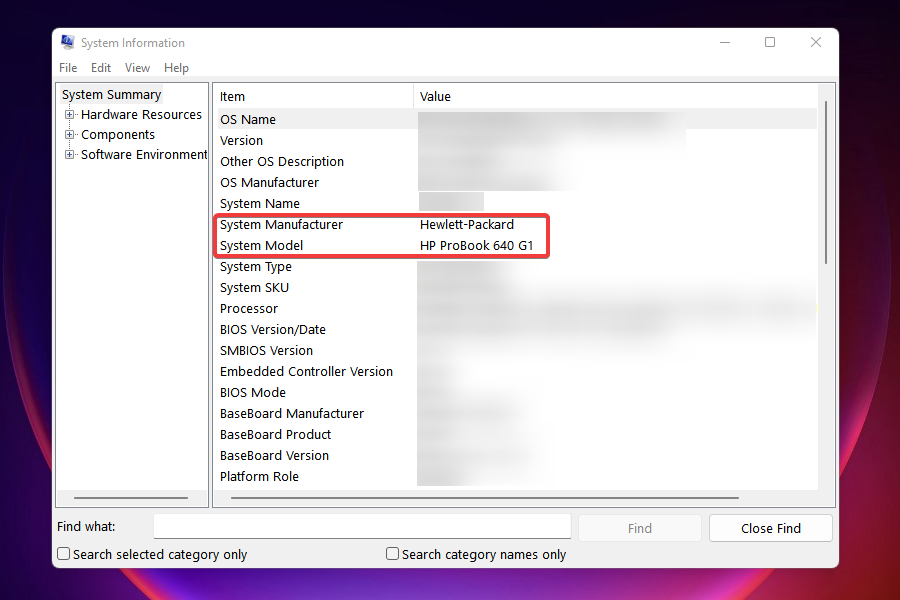
- Locate the System Manufacturer and System Model the in the System Summary tab.
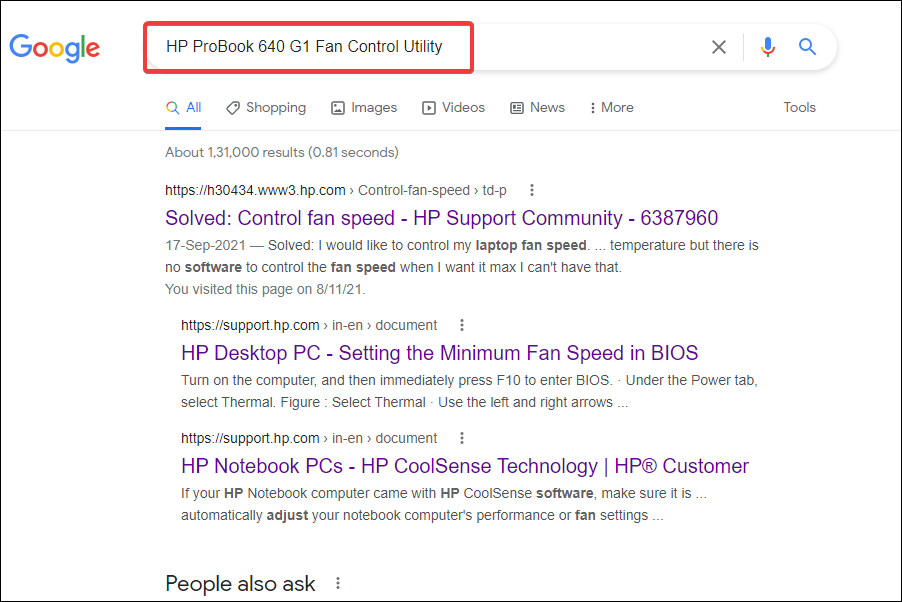
- Next, go to Google or any other effective search engine, and search for the fan control software in Windows 11 using the Manufacturer’s name and model followed by Fan Control Utility as the keywords.

- Next, open the OEM’s website, locate the relevant utility and download it.
- Locate the downloaded file and double-click on it to launch the installer.
- Follow the on-screen instructions to complete the installation process.
After installing the software, you can start controlling the computer fan and set it to run at the desired speed.
How we test, review and rate?
We have worked for the past 6 months on building a new review system on how we produce content. Using it, we have subsequently redone most of our articles to provide actual hands-on expertise on the guides we made.
For more details you can read how we test, review, and rate at WindowsReport.
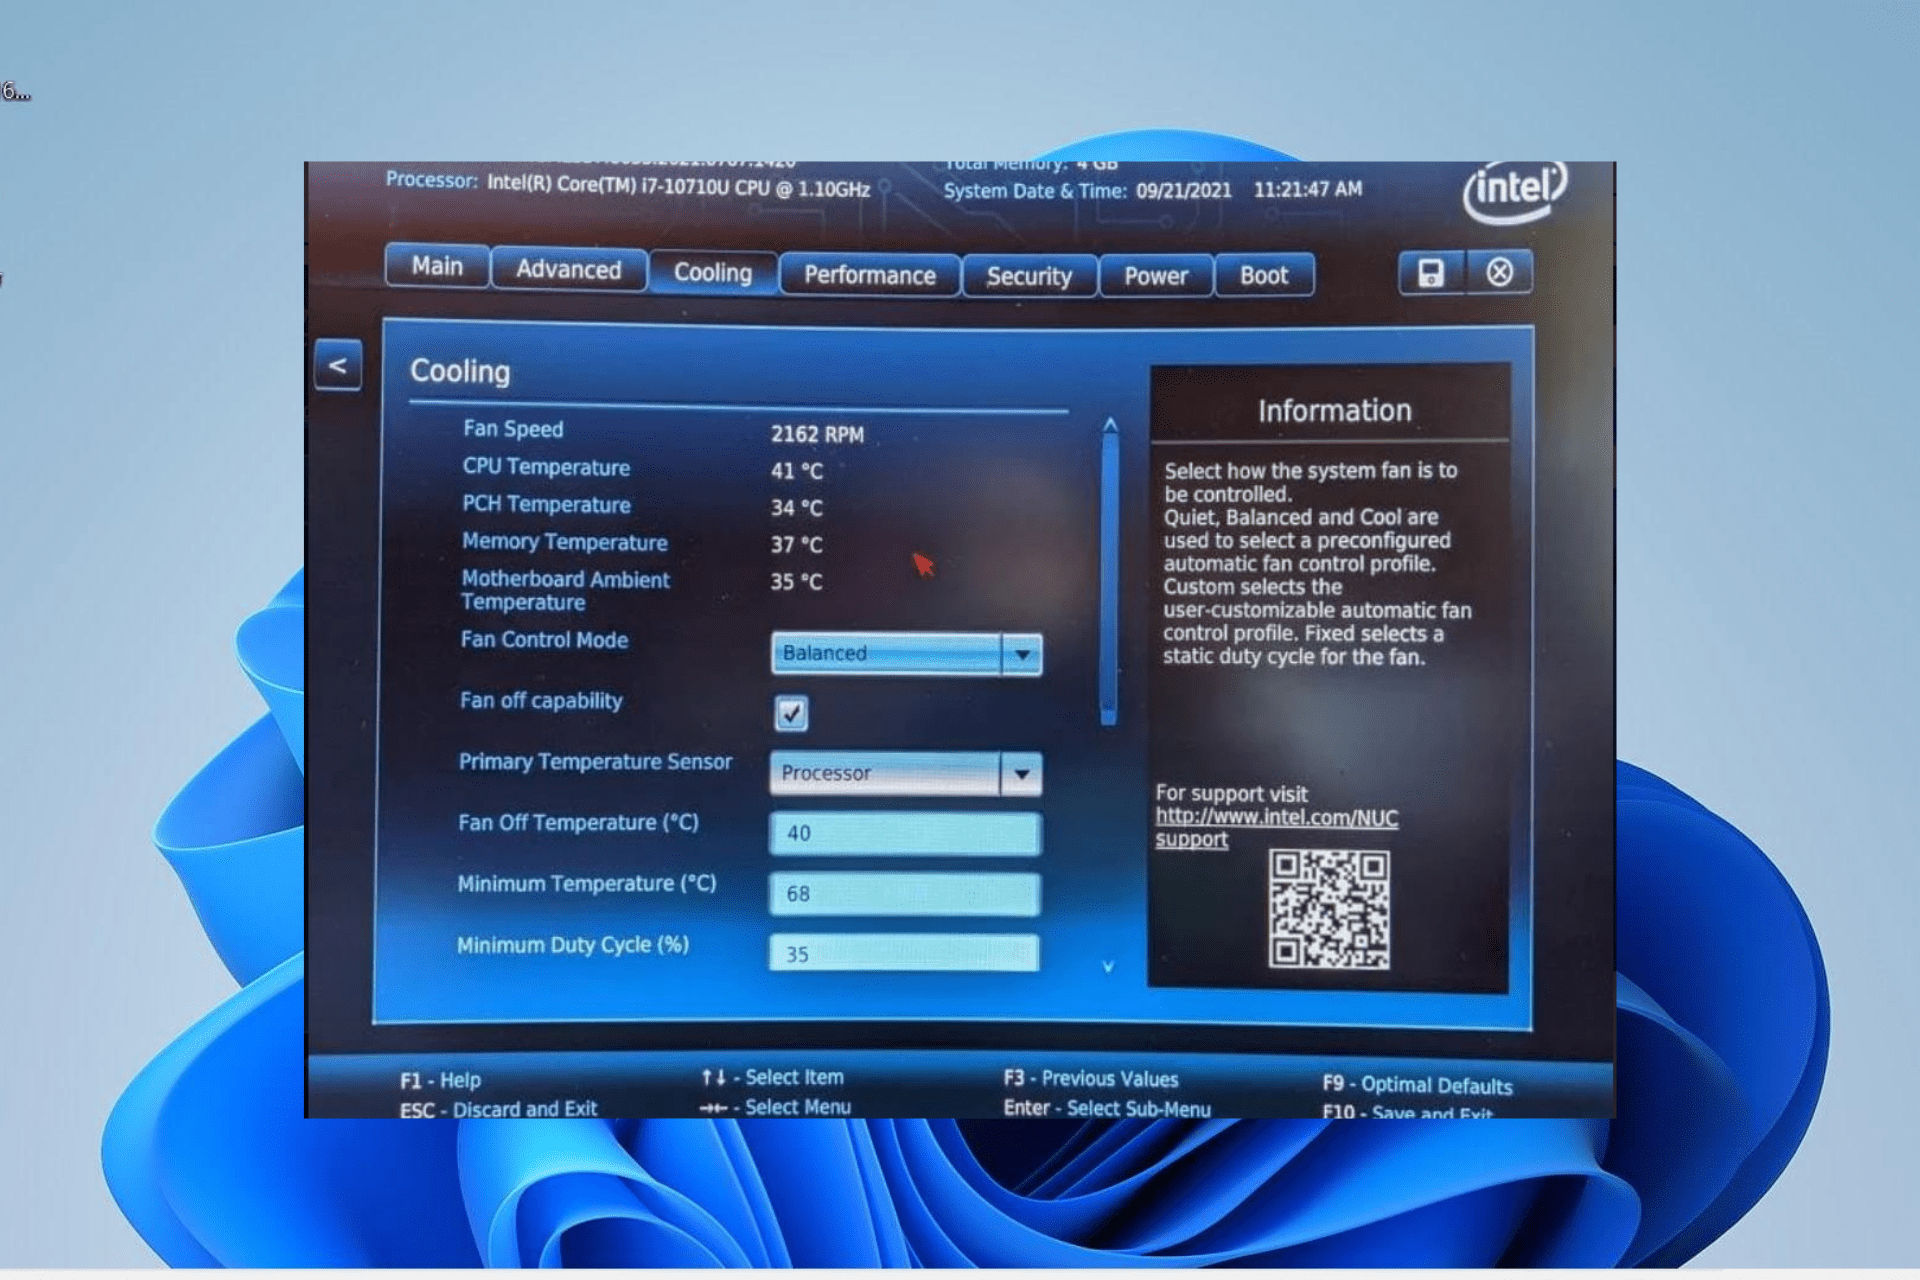
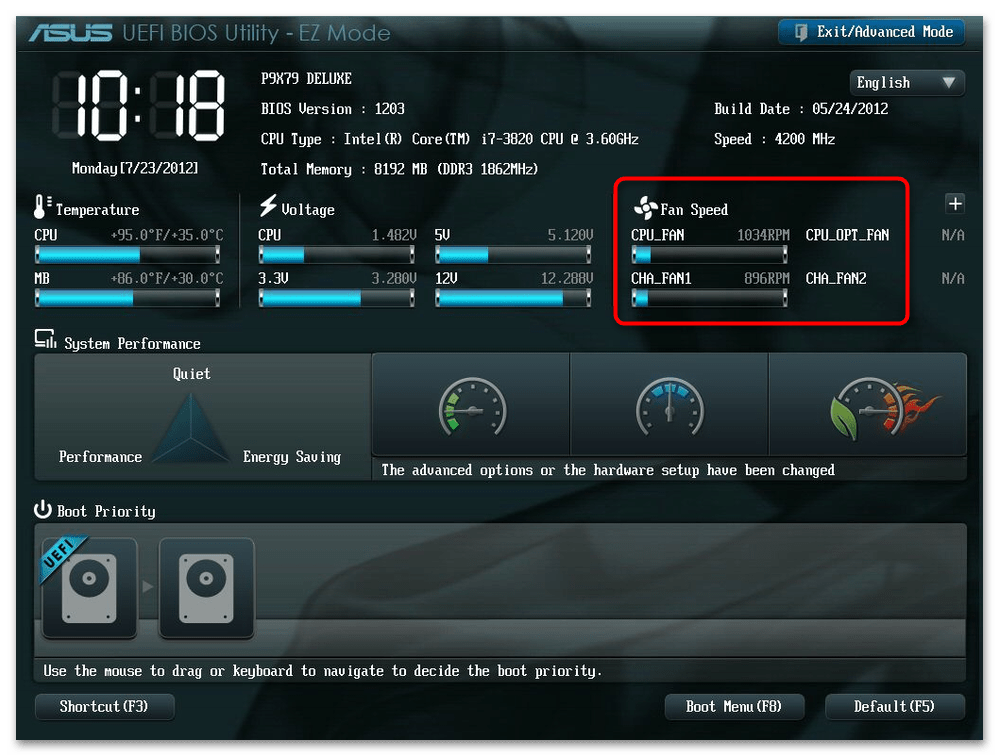
2. Control fan speed on Windows 11 in BIOS
You can easily control fan speed on PC through BIOS. Controlling the PC fan from the BIOS is both time-consuming as well as an intricate affair. You have to be careful while making the changes since a minor lapse can prove fatal for the computer.
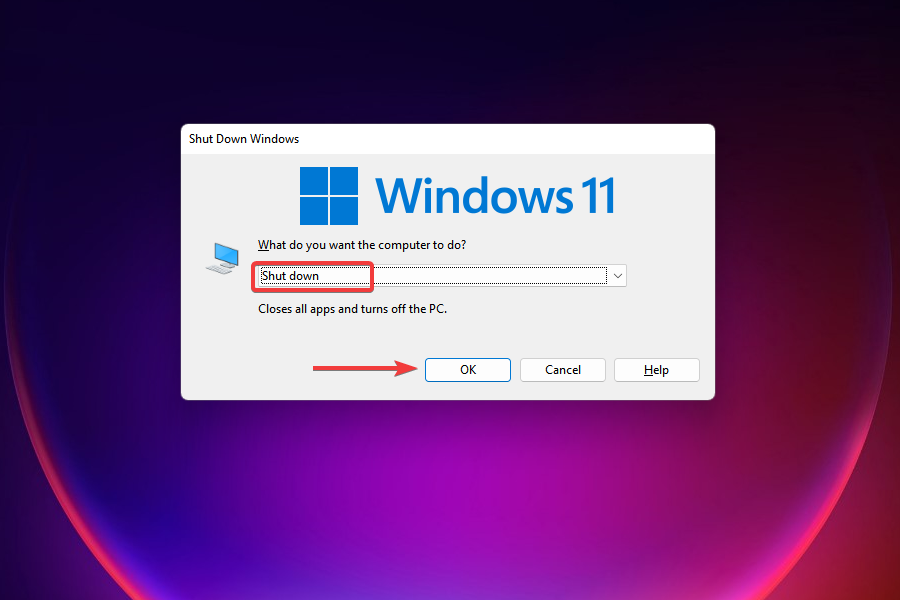
1. Navigate to the desktop and press Alt + F4 to launch the Shut Down Windows box.
2. Select Shut down from the dropdown menu and click on OK at the bottom.
3. Next, press the Power button to turn on the computer.
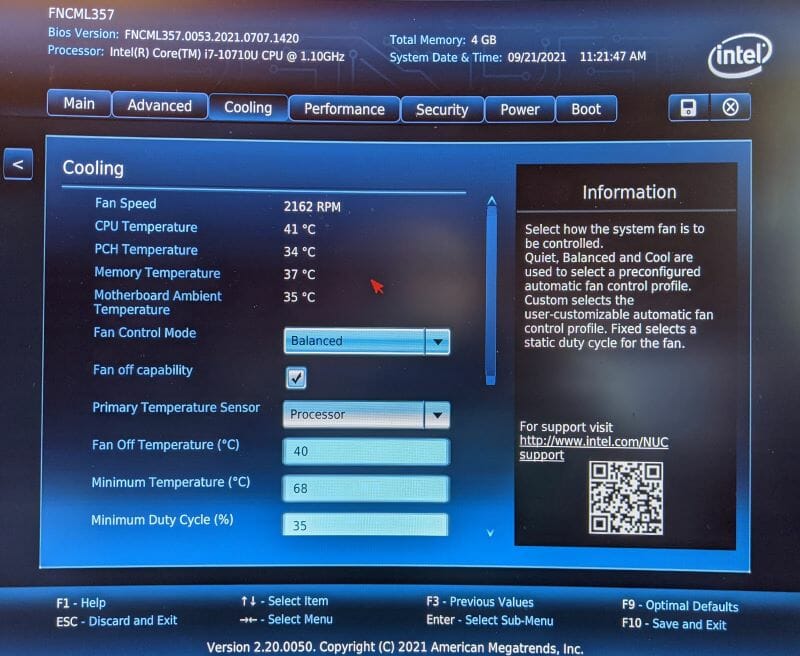
4. As soon the screen lights up, press Esc or F12 key (depending on the computer settings) to enter the BIOS.
5. Navigate through the different options (Advanced, Overclocking, or something similar) and look for settings related to the computer fan.
6. After finding the relevant options, you can now control the computer fan and run it at the desired speed for optimal results.

NOTE
The previous steps will be different for various computer manufacturers. However, with a basic concept idea, you can navigate to the relevant section and make the changes.
Note: do not change any other settings unless you know the results.
- My CPU fan is not spinning: 4 quick ways to fix it
- How to Type Accents on Windows 11
- How to Disable the Insert Your Security Key Into the USB Port popup
3. Download a third-party utility to control the fan speed on Windows 11
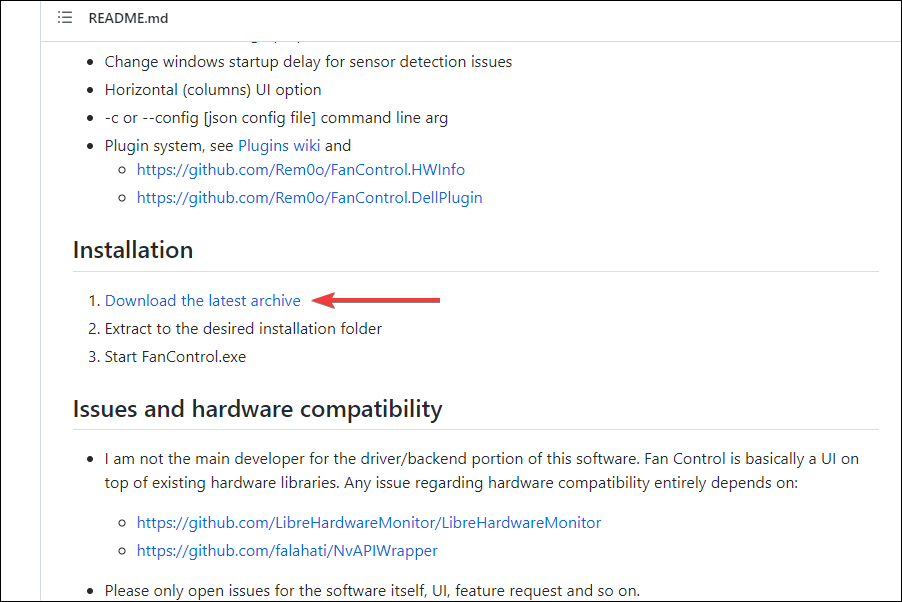
- Go to the GitHub page of Fan Control, scroll down, and click on Download the latest archive under Installation.
- Navigate to the folder where the downloaded file (.zip format) is stored, right-click on it, and select Extract all from the context menu.
- Choose a destination to store the files and click on Extract in the window that appears.
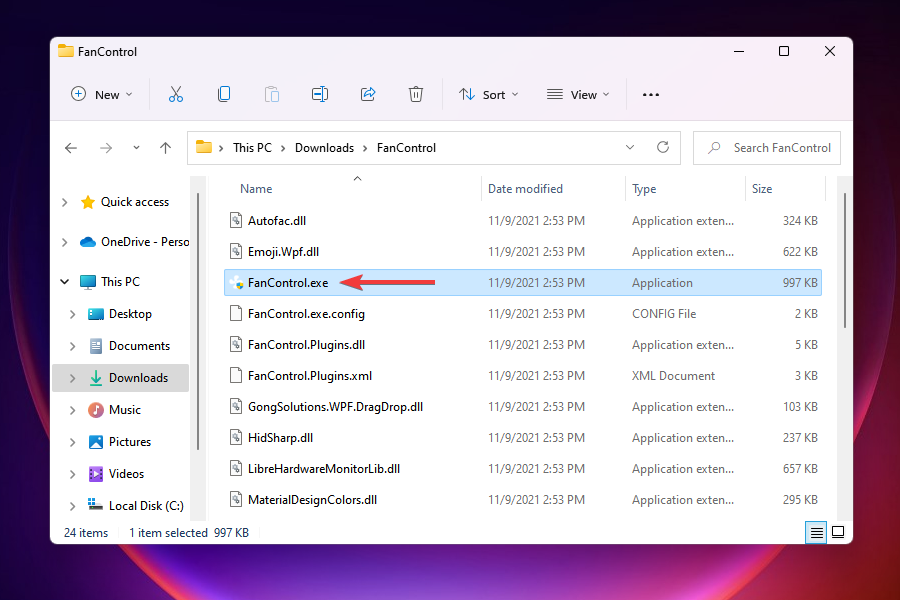
- Open the folder where the extracted files are stored, and double-click on the FanControl.exe file to launch the app.
- Choose the appropriate response in case a warning pops up, and then click on Yes in the UAC (User Account Control) prompt that appears.
- Let the Fan Control app scan the system and choose the relevant response when prompted.
- After scanning, it will list all the fans connected to the system under Controls and their subsequent running speed under Speeds.

- You can now make the relevant changes to the fan speed and set it to the desired value.

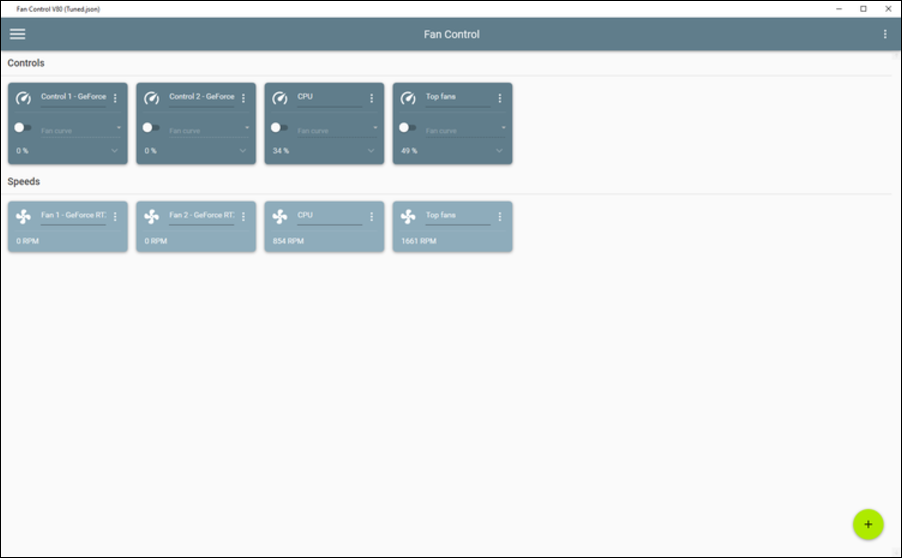
Fan Control is one of the best open-source third-party utilities available in the market and is free to use. It offers a simple interface and allows users to quickly change the settings and control the fans in Windows 11.
That’s all there is to know about PC fan control in Windows 11. Before controlling and modifying the fan speed, do thorough research to understand the required settings.
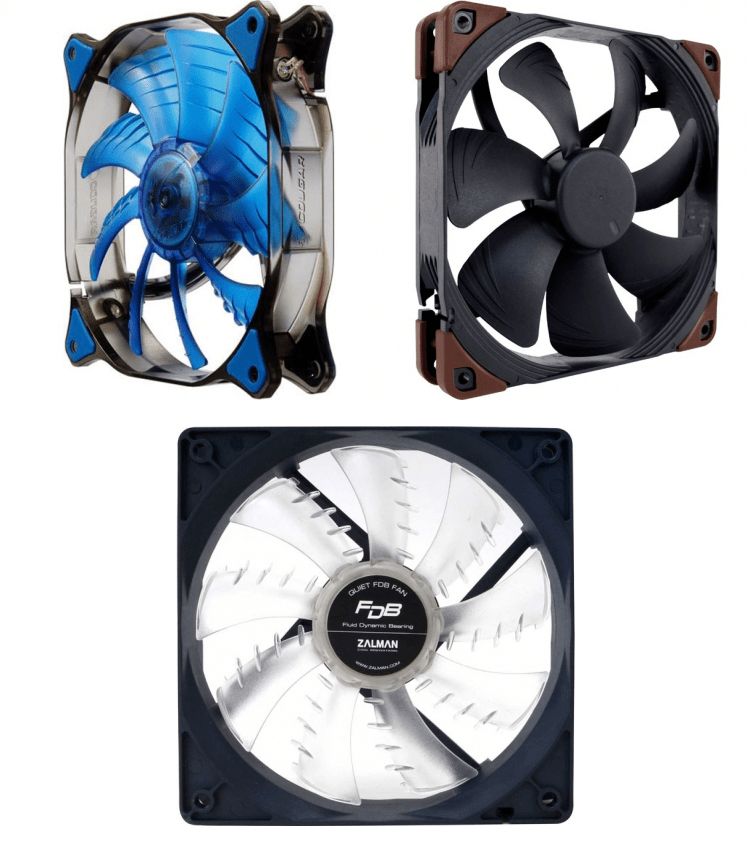
You can also check the best available fans in the market if you are facing trouble with the installed one.
Tell us which of the above methods worked for you or whether you want to choose a utility not listed here in the comments section below.
![]()
Содержание
- Регулировка скорости процессорного кулера
- Управление вентиляторами видеокарты
- Вариант 1: NVIDIA
- Вариант 2: AMD
- Настройка корпусных кулеров
- Вопросы и ответы

Регулировка скорости процессорного кулера
На каждом компьютере обязательно установлен процессорный кулер, который является основным охлаждением системы. Водяное охлаждение пока что монтируется только в крайне редких случаях, да и настроек у него программных никаких нет, поэтому будем разбирать именно управление вентиляторами. Подключение процессорного кулера производится при помощи специально отведенного разъема на материнской плате, что и открывает доступ к настройкам его оборотов. Проще всего их поменять через BIOS или UEFI, но есть и другие методы. Обо всех них читайте в тематической статье по ссылке ниже, выбирайте оптимальный для себя и изменяйте настройки в соответствии с потребностями.
Подробнее: Как отрегулировать скорость вращения процессорного кулера
В некоторых случаях общего материала по управлению кулерами процессора пользователю недостаточно в силу неопытности или запутанности самого процесса. Если вам тоже показалось, что ничего из описанного выше непонятно, советуем к ознакомлению отдельные материалы, перейти к которым можно, нажав по следующим заголовкам. В них вы найдете ответы на вопросы по теме увеличения и уменьшения скорости, в зависимости от выбранной статьи. Далее останется только следовать инструкциям, чтобы добиться нужного результата.
Читайте также:
Увеличиваем скорость кулера на процессоре
Уменьшаем скорость вращения вентилятора на процессорном кулере
Управление вентиляторами видеокарты
Видеокарта сделана таким образом, что кулеры для охлаждения уже вмонтированы в ее корпус. Вентиляторов может быть как несколько, так и всего один, что зависит от модели и мощности самого графического адаптера. В этом случае уже не получится обратиться к BIOS или программам для управления кулерами, поскольку они не имеют связи с видеокартой. Нужно использовать официальные или специализированные решения для регулировки оборотов.
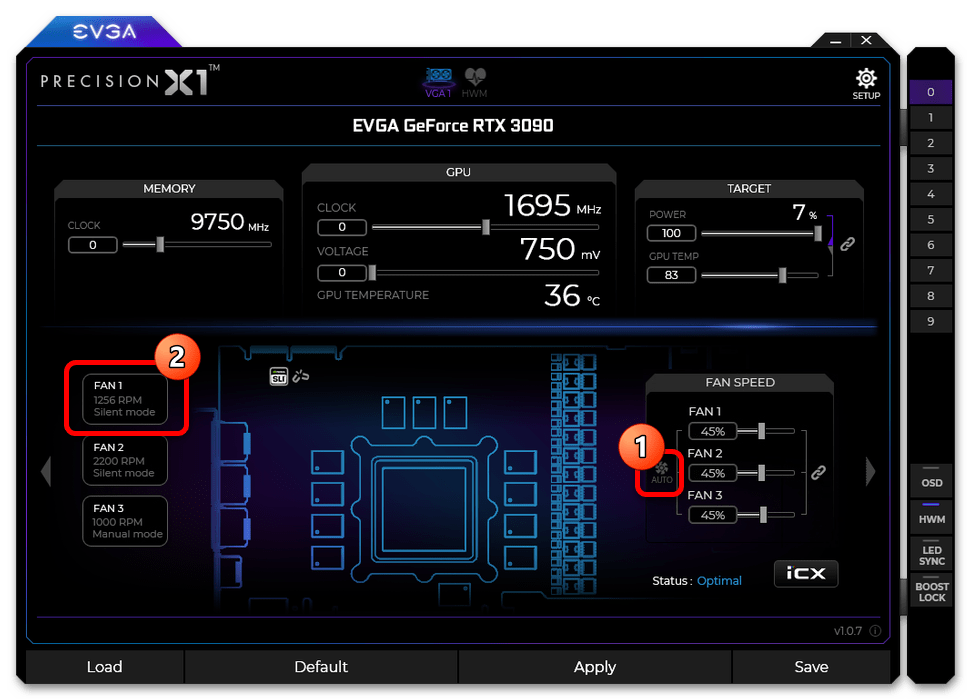
Вариант 1: NVIDIA
Для начала разберемся с видеокартами от NVIDIA. К сожалению, стандартное программное обеспечение, устанавливаемое вместе с драйвером, не оснащено специальной функцией, которая бы позволяла вручную менять скорость оборотов. Поэтому придется обратиться к одной из двух специализированных программ. Каждая из них предназначена как для разгона производительности, так и для регулировки вентиляторов. Как раз разгоном мы не рекомендуем заниматься, если вы не разбираетесь в данной теме, а вот об управлении кулерами более детально читайте далее.
Подробнее: Настройка кулеров видеокарты NVIDIA
Вариант 2: AMD
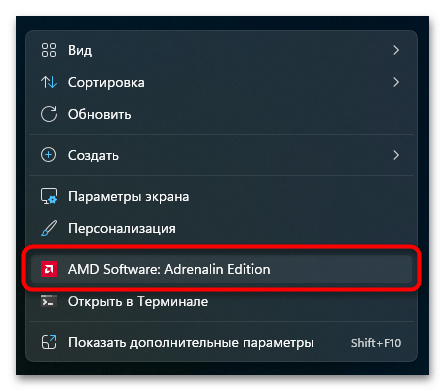
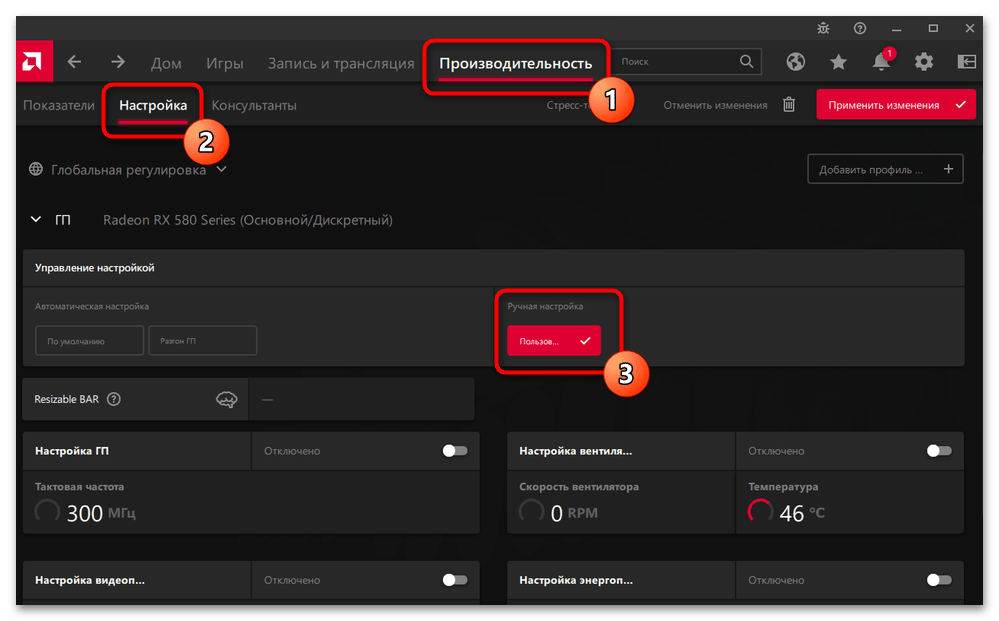
С моделями графических адаптеров от AMD все намного проще, поскольку пользователь получает полный доступ к настройкам видеокарты вместе с регулировкой оборотов вентилятора непосредственно в стандартном ПО под названием AMD Software: Adrenalin Edition. Давайте с вами в следующей инструкции более наглядно разберемся с этим процессом.
- По ссылке выше вы можете перейти к скачиванию AMD Software: Adrenalin Edition, если по каким-то причинам данное ПО не установлено вместе с драйвером вашей видеокарты. Для его вызова нужно нажать правой кнопкой мыши по пустому месту на рабочем столе и из появившегося контекстного меню выбрать соответствующий пункт.
- В новом окне выберите раздел «Производительность», перейдите на вкладку «Настройка» и активируйте режим пользовательской настройки.
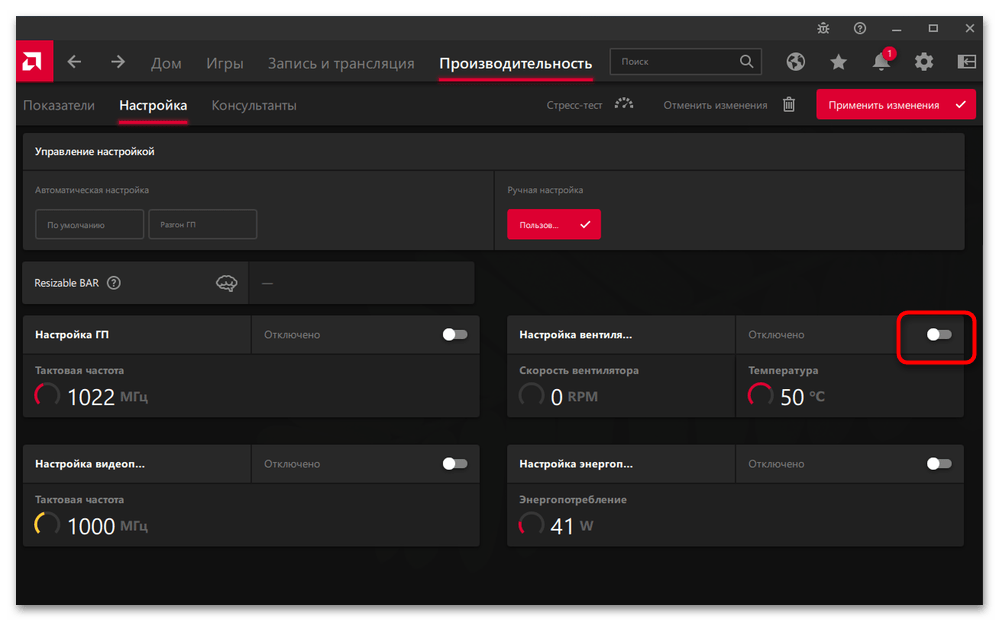
- Среди всех существующих блоков вас интересует «Настройка вентиляторов», где вам нужно перетащить переключатель в активное положение.
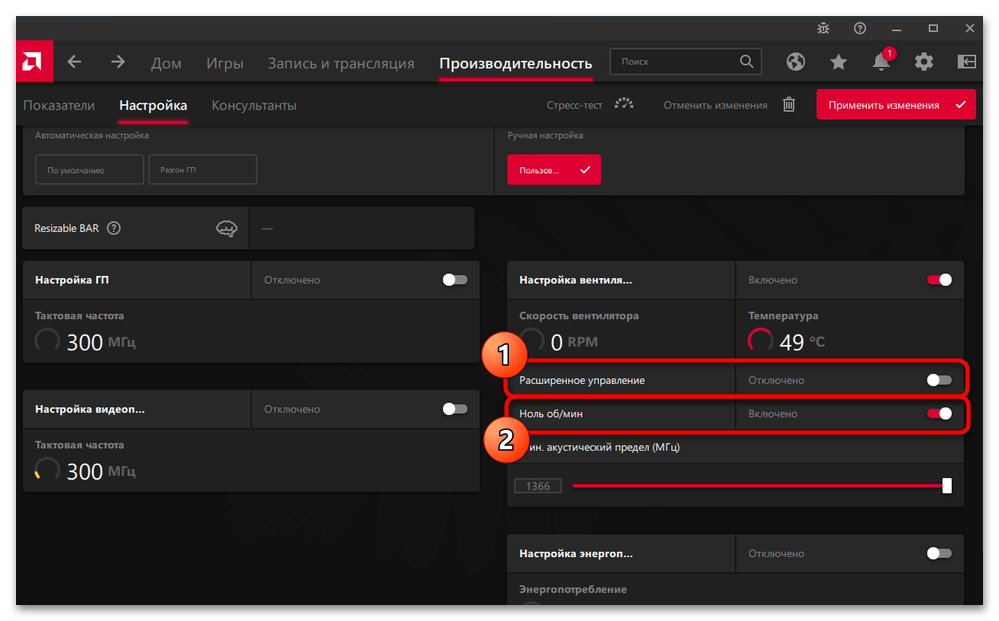
- Вам обязательно понадобится активировать «Расширенное управление», чтобы получить доступ к регулировке оборотов. Функцию «Ноль об/мин» используйте в тех случаях, когда хотите, чтобы при отсутствии нагрузки на видеокарту ее кулеры полностью останавливались.
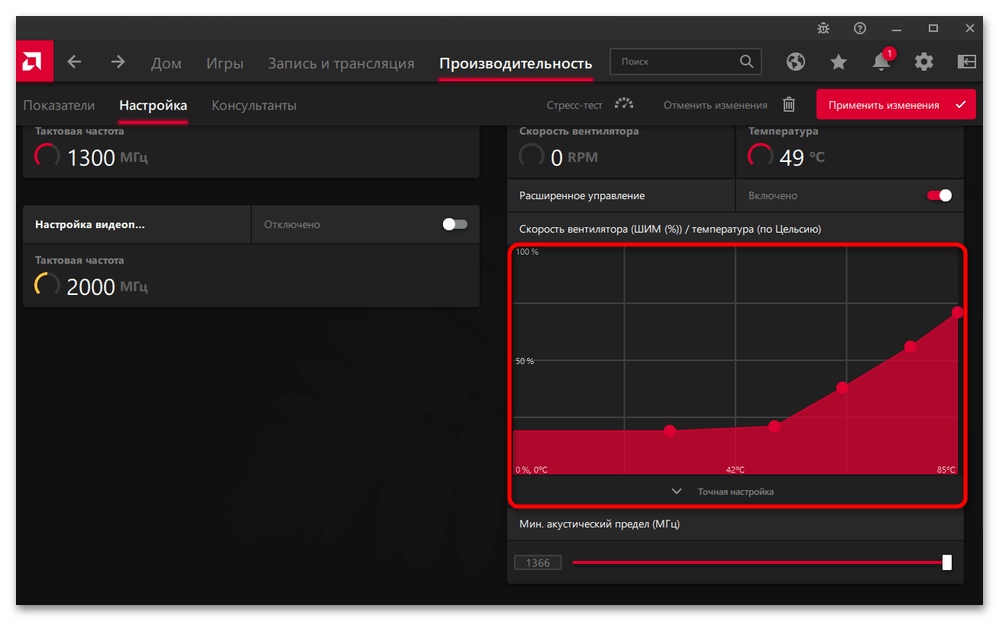
- В расширенной настройке используйте регуляторы и график для выбора соотношения температуры и скорости вращения кулеров. Оптимальная настройка заключается в плавном повышении скорости вращения при наборе температуры, но вы можете даже сразу включить максимальный оборот или понизить его до приемлемого значения, чтобы убрать лишний шум.
- После экспериментов с настройками вы точно найдете какое-то подходящее значение для себя. Перед выходом из окна с параметрами обязательно нажмите «Применить изменения», чтобы они были сохранены.

Настройка корпусных кулеров
В завершение давайте поговорим о том, как осуществляется настройка скорости оборотов корпусных кулеров. Сразу отметим, что изменение каких-либо параметров для данного оборудования будет доступно только в том случае, если оно подключено непосредственно к материнской плате. При связи через блок питания никакая программа не сможет получить доступ к настройкам поведения вентилятора.
Читайте также:
Подключение кулера или вентилятора к материнской плате
Подключение кулера к блоку питания
Как только вы разобрались с типом подключения и выяснили, что ваш вентилятор можно настроить, пора переходить к выполнению этой операции. Для настройки лучше всего подходит программа SpeedFan. В ней есть разные разделы с регуляторами и графиками для всех подключенных кулеров, в том числе и для процессорного. Общую информацию по работе с данным ПО вы найдете в материале далее.
Скачать SpeedFan
Подробнее: Увеличение скорости кулера через SpeedFan
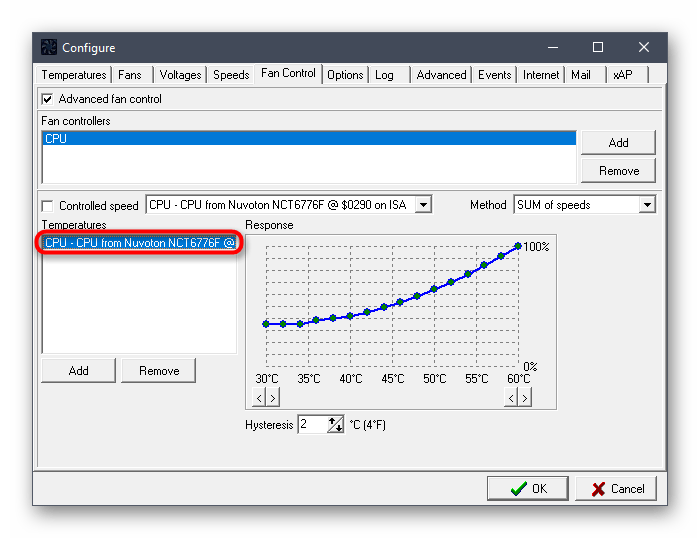
Если вас заинтересовала тема работы со SpeedFan и вы желаете получить больше информации о такой продвинутой программе, в этом вам поможет другая инструкция на нашем сайте. В ней рассмотрены как все присутствующие параметры, так и средство мониторинга температурного режима, что позволит вам всегда быть в курсе того, не перегревается ли компьютер.
Подробнее: Правильное использование программы SpeedFan
Помимо программы SpeedFan, есть и другие возможные варианты управления вентиляторами на корпусе системного блока. Однако они требуют покупки дополнительного оборудования или завязаны исключительно на переподключении кулера для подачи большего напряжения.
Читайте также: Регулировка оборотов корпусного кулера
- Что нужно знать до экспериментов с кулерами?
- SpeedFan
- Open Hardware Monitor
- Argus Monitor
- NoteBook FanControl
- MSI Afterburner
- Фирменные утилиты для управления вентиляторами
Вентиляторы охлаждения (они же — кулеры) играют важную роль в работе компьютера, предотвращая перегрев тех его компонентов, что подвергнуты сильному нагреву. Многие пользователи и не догадываются, что кулерами можно управлять, точнее — скоростью их вращения. Но это не всегда возможно.
Если речь о вентиляторах, подключенных непосредственно к материнской плате (например, кулер центрального процессора, корпусные вентиляторы или кулеры жестких дисков), то регулировка скорости их вращения должна поддерживаться на уровне материнской платы. Если же это кулер, охлаждающий видеокарту, тогда изменение скорости вращения должно поддерживаться самим графическим адаптером.
Управление вентиляторами, подключенными к материнской плате, стандартным способом предполагает изменение соответствующих параметров в BIOS. В случае с видеокартами это осуществляется путем внесения изменений в настройки драйвера. Нестандартные же способы предполагают использование специальных утилит. Некоторые из них разработаны самими производителями системной платы, видеокарты, ноутбука и т.д., другие — сторонними разработчиками. Рассмотрим популярные программы для управления вентиляторами компьютера.

Что нужно знать до экспериментов с кулерами?
Мы не зря назвали процесс контроля скорости вращения кулеров экспериментом, ведь последствия этой процедуры нельзя предсказать точно заранее. По умолчанию все вентиляторы компьютера настроены на работу в автоматическом режиме. Когда необходимо, скорость их вращения увеличивается или, наоборот, снижается. Все зависит от текущей температуры охлаждаемого компонента. Когда требуется отрегулировать скорость вращения кулеров вручную, то автоматику придется отключить. А это всегда риск.
Никогда точно неизвестно, как поведет себя вентилятор после манипуляций с его настройками — он может просто перестать вращаться или замедлиться настолько, что создаваемого им уровня охлаждения окажется недостаточным. И это не говоря еще о возможном выходе кулеров из строя, что обычно наблюдается при ручном увеличении скорости их вращения свыше значения по умолчанию (чем выше скорость, тем больше напряжения нужно подать на вентилятор, и если оно окажется слишком высоким, то устройство может и перегореть).
Но как показывает практика, негативные последствия экспериментов с управлением кулерами — довольно редкое явление, а выход из строя самих охлаждаемых компонентов компьютера — и подавно (спасибо функциям защиты устройств от перегрева, если они, конечно, не были каким-либо образом отключены).
SpeedFan
Бесплатная программа
SpeedFan (скачать по ссылке) — одна из самых известных утилит для мониторинга в режиме реального времени скорости вращения и контроля охлаждающих вентиляторов и не только. Программа рассчитана на опытных пользователей, имеющих опыт в разгоне процессора и видеокарт, однако для управления кулерами особых навыков не требуется.
1
Регулировка скорости вращения вентиляторов осуществляется путем изменения процентного значения напротив выделенных на изображении выше опций:
- «Sys». Корпусный кулер (вытяжка, обдув), подключаемый в специальное отведенное гнездо материнской платы и обеспечивающий контроль общей температуры внутри системного блока (кейса). Текущая скорость вращения вентилятора отображается напротив строки «Sys Fan», а температура — напротив «System».
- «AUX» (Auxiliary). Примерно то же, что и в предыдущем случае. Это также вспомогательные вентиляторы, подключаемые к специальным гнездам материнской платы. Также может относиться к небольшим кулерам охлаждения северного и южного мостов, которые бывают встроены в некоторые модели системных плат. Их можно использовать и для охлаждения жестких дисков. Т.е. точно нельзя сказать, что именно охлаждают AUX-кулеры, не взглянув внутрь системного блока.
- «CPU». Это самый главный вентилятор любого компьютера, отвечающий за охлаждение центрального процессора. Текущая скорость его вращения отображена напротив параметра «CPU Fan», а температура процессора — напротив «CPU», «Core 0», «Core 1» и т.д. (показания для отдельных ядер процессора).
- «GPU Fan». Кулер графического процессора или по-простому — видеокарты. Скорость вращения указана напротив одноименного параметра, а текущая температура — напртив «GPU».
Обращаем внимание, что наличие и названия тех или иных параметров в программе SpeedFan зависит от модели материнской платы и/или иных критериев. Отрицательные температуры напротив «AUX» обычно означают, что к соответствующему гнезду платы кулер не подключен.
Скачать SpeedFan
Open Hardware Monitor
Бесплатная программа
Программа Open Hardware Monitor (скачать можно здесь) первоначально создана для мониторинга работы всех важных компонентов компьютера, включая скорость вращения как основных, так и дополнительных кулеров. Но у данной утилиты также присутствует функция, позволяющая вручную управлять вентиляторами.
Функция регулировки скорости кулеров (Controls) находится в том разделе главного окна, в котором приведены данные мониторинга за конкретным устройством. Т.е. если это вентилятор центрального процессора, то опция контроля его скорости будет расположена в разделе с названием модели ЦП, если видеокарта — то в разделе с названием видеоадаптера. Если же в том или ином разделе функция «Controls» отсутствует, это значит, что у устройства отсутствует поддержка управления кулером либо сама программа не поддерживает конкретную модель материнской платы, видеокарты и т.д.
Для управления вентиляторами из программы Open Hardware Monitor:
- Находим строку «Controls» в разделе с названием устройства.
- Если это, например, видеокарта, кликаем по опции «GPU Fan» правой кнопкой мыши, открываем подменю «Control», затем «Manual» и уже в нем выбираем желаемую скорость вращения в процентах.
Скачать Open Hardware Monitor
Argus Monitor
Условно-бесплатная программа
Argus Monitor — еще одна программа для мониторинга с мощным функционалом контроля скорости вращения любых вентиляторов. Утилита имеет удобный и к тому же русскоязычный интерфейс, но она платная (30 дней можно использовать бесплатно).
Для каждого из поддерживаемых программой компонентов компьютера предусмотрена отдельная вкладка. Если нужно отрегулировать скорость вращение кулера видеокарты, заходим во вкладку «GPU», справа от графика есть выпадающий список — выставляем в нем значение «Ручное управление» (отобразится предупреждающее окно, где нужно согласиться с рисками последующих действий), задаем нужную скорость вращения кулера в процентах и нажимаем кнопку «Применить»:
Управление вентиляторами, подключенными к материнской плате (включая кулер центрального процессора), осуществляется во вкладке «Мат. плата» в подразделе «Управ. вент.». Для каждого отдельного кулера здесь предусмотрены свои профили настроек. Например, нам требуется отрегулировать вентилятор процессора: в выпадающем списке напротив строки «CPU Вент. 1» (в нашем случае) также выставляем значение «Ручное управление», задаем скорость при помощи ползунка и нажимаем кнопку «Применить». То же самое можно проделать с любым дополнительным кулером.
Приведенные выше инструкции — это простейшие способы контроля скорости вентиляторов из Argus Monitor. Но программа также способна взять контроль на себя, автоматически изменяя скорость того или иного кулера в зависимости от температуры компонента, который тем охлаждается. Для начала напротив названия устройства (вентилятора) нужно выставить значение «Упр. программой» и нажать кнопку «Кривая».
Откроется дополнительное окно с подвижным графиком (кривой). Путем перемещения точек кривой по вертикали настраивается скорость вращения кулера, а по горизонтали — задается температура, при которой программа автоматически установит заданную скорость. Всего таких точек — 7.
Подобным образом можно автоматизировать и работу вентилятора видеокарты или любого другого.
Скачать Argus Monitor
NoteBook FanControl
Бесплатная программа
Программа NoteBook FanControl предназначена для контроля вентиляторов у ноутбуков. Она бесплатна и предельно проста в использовании. Утилита способна контролировать скорость вращения всех кулеров, присутствующих в конструкции мобильного компьютера. Единственное условие — тот должен поддерживаться программой.
Последняя на момент написания обзора версия NoteBook FanControl имела поддержку более 200 различных моделей лэптопов производства Acer, Asus, Dell, Fujitsu, Gigabyte, HP, Lenovo, Medion, Sony, Toshiba и некоторых других компаний. Управление вентиляторами ноутбуков осуществляется в несколько простых действий:
- Сначала нужно выбрать конфигурацию: жмем кнопку «…» напротив надписи «Select Config», выбираем модель ноутбука в списке «Config» во вновь отобразившемся окне и там же нажимаем кнопку «Apply» (если в списке отсутствует нужная модель ноутбука, программу можно закрывать).
- Переводим переключатель «Fan control service status» в положение «Enabled» (можно сначала выставить «Read-only», чтобы просто ознакомиться с доступными функциями). Останется настроить скорость вращения кулеров, используя отобразившиеся ниже ползунки (т.к. в нашем случае утилита запускалась на стационарном компьютере, она показывает неверные данные и вообще не работает).
Более опытные и очень заинтересованные (сложноватая задача) пользователи могут самостоятельно создать конфигурацию управления кулерами для своей модели ноутбука, для чего в программе NoteBook FanControl предусмотрены соответствующие функции. Их можно найти в окне выбора модели лэптопа, кликнув по кнопке «Edit» (в новом открывшемся окне обязательно жмем кнопку «New», иначе будет отредактирована конфигурация выбранной модели).
Скачать NoteBook FanControl
MSI Afterburner
Бесплатная программа
Программа MSI Afterburner предназначена, в первую очередь, для разгона (увеличения производительности) видеокарт от любых производителей (но только тех моделей графических адаптеров, что поддерживают данную возможность). Однако у нее также присутствует функция, позволяющая регулировать скорость вращения кулеров у поддерживаемых утилитой моделей видеокарт.
Пользоваться программой MSI Afterburner довольно просто:
- Нажимаем угловатую кнопку с надписью «Auto» напротив ползунка «Fan Speed» (это разблокирует сам ползунок, который по умолчанию неактивный).
- Устанавливаем нужную скорость в процентах при помощи разблокированного ползунка.
- Нажимаем кнопку «Применить» с изображением галочки. Готово.
Полного списка поддерживаемых программой MSI Afterburner видеокарт, по всей видимости, не существует, но точно известно, что в него включены графические адаптеры AMD (ATI) и NVIDIA, начиная с Radeon HD 3000 и GeForce 8X00, соответственно.
Скачать MSI Afterburner
Фирменные утилиты для управления вентиляторами
Все рассмотренные выше программы являются универсальными, т.е. они могут функционировать на разных компьютерах, независимо от производителя материнской платы, видеокарты или иных комплектующих. Но существуют и узкоспециализированные фирменные утилиты, способные управлять вентиляторами у устройств только определенного производителя. Мы не будем рассматривать их функционал, а только приведем их названия, поддерживаемое ими оборудование и ссылки для скачивания:
- ZOTAC FireStorm. Программа служит для разгона, мониторинга и управления (в т.ч. кулерами) видеокартами производства ZOTAC. Впрочем, эта компания производит адаптеры на графических ядрах от NVIDIA. В список поддерживаемых моделей входят видеокарты серии GEFORCE GTX/GT, GEFORCE GTX 16, RTX 20 и RTX 30. По приведенной выше ссылке можно скачать программу ZOTAC FireStorm для конкретной серии видеокарт.
- Aorus Engine. То же, что и в предыдущем случае, но для видеокарт производства Gigabyte. Последняя на момент написания обзора версия Aorus Engine поддерживала видеокарты на базе графических процессоров GeForce RTX 2070/2080/2080 Ti (но по ссылке выше также можно скачать более раннюю версию Aorus Engine для более ранних видеокарт от NVIDIA).
- Easy Tune. Еще одна программа от Gigabyte, но для управления материнскими платами от этого производителя. Помимо прочего, в ней присутствует функционал по контролю скорости вращения кулеров охлаждения центрального процессора и дополнительных вентиляторов системной платы. Указанная выше ссылка ведет на страницу скачивания нескольких утилит от Gigabyte, в числе которых есть программа «APP Center», которую нужно установить для возможности запуска Easy Tune.
Это, конечно, не весь перечень фирменных утилит для управления вентиляторами. Рекомендуем зайти на официальный сайт производителя установленной в компьютере материнской платы или видеокарты — возможно, там можно будет скачать программу для контроля кулеров этих устройств.
The Windows 11 operating system offers numerous ways to modify your computer’s performance, including using fan control software. By leveraging the tools within these programs, users can maintain optimal temperatures in their system.
With fan control software, users can customize the fan speeds in their PC to accurately adjust the balance between cooling and noise. This article will discuss the best ten fan control software for Windows 11 and how to utilize each of their features in the best way. Check out our articles on other important software.
Reasons to Trust Fuzo Tech: Our product and service testing is conducted in real-world conditions with real people to ensure we provide real benefits. For more information on our testing procedures, reviews, and ratings, please explore our testing process.
In a hurry? Here is a summary of the review
- SpeedFan – SpeedFan allows users to monitor temperature, customize fan speeds, monitor system health, work with various sensors, and easily overclock their systems.
- Corsair Link – With Corsair Link, you can precisely control fan speed and lighting, monitor temperature, regulate voltage, and track performance.
- Argus Monitor – The Argus Monitor is a powerful software with temperature monitoring, fan speed control, automatic overclocking, alert notifications, and customizable profiles.
- EasyTune 5 – This software provides precise fan speed control, comprehensive system information, system health checkup, customizable interfaces, and multiple system settings optimization.
- ASUS AI Suite 3 – ASUS AI Suite 3 is a monitoring system that optimizes system information, overclocking, power management, fan speed, and system tuning.
- Zotac Firestorm – Zotac Firestorm offers user control over fan speed, noise cancellation, preset configurations, and customizable alerts in manual mode.
- MSI AfterBurner – temperature monitoring, fan speed control, overclocking, real-time system monitoring, power limit control
- Fan Control – MSI AfterBurner can help users monitor their systems in real-time, control the fan speed, and overclock their systems while limiting power usage.
- HWMonitor – HWMonitor is a software solution that offers temperature monitoring, hardware monitoring, stress testing, a customizable dashboard, and voltage control.
- MSI Dragon Center – With MSI Dragon Center, users can customize their fan speed, use an on-screen display, monitor their system resources, optimize the system status, and access reliable system tuning tools.
How do I control my fan in Windows 11?
To control your fan in Windows 11, you can follow these steps:
- Power down your PC.
- Then, turn your computer on again and quickly tap the BIOS shortcut key. It differs from one computer to another. It may be the F2, F12, or Delete key.
- After that, locate the fan settings portion in the menu that pops up, usually under PC Health, Advanced, or Overclocking.
- Set the percentage between 0 to 100%, 100 being the highest and 0 being the lowest.
- Once you set the speed, click Save.
- Then, press Exit to close the BIOS.
What app controls fan speed in Windows 11?
1. SpeedFan – Robust Temperatire monitoring
![]()
SpeedFan is an app designed to control fan speed in Windows 11. It is used to monitor computer temperatures, voltages, and fan speeds. It allows users to adjust their fan settings automatically or manually.
This is especially helpful in cases where the computer is exposed to higher temperatures and needs to cool off more quickly. This app requires no extra hardware as it can adjust its settings using Windows services.
Using SpeedFan, users can set their fan speeds to a certain preset value or adjust the settings manually. It can also be used to set thresholds for the temperatures that it should act upon. This allows it to react immediately when temperatures rise above set levels.
The app also features an automatic fan speed control option that adjusts the fan speed based on the current temperatures of distinct areas of the computer. Moreover, this app provides real-time information about vital statistics like temperature, fan speed, and voltages, which helps users monitor their computers more effectively.
It is important to note that this app should be used in combination with common sense and caution, as it can be dangerous to operate a computer under extreme temperatures. Using SpeedFan, users can easily control and customize their fan speeds according to their needs.
It is a simple yet powerful app that allows users to keep their computers running smoothly and efficiently.
Other essential features of SpeedFan include:
- Temperature monitoring
- Customizable fan speeds
- System health monitoring
- Compatibility with various sensors
- Overclocking support
2. Corsair Link – Easy fan speed control
![fan control windows 11]()
Corsair Link is an app for Windows 11 that can control fan speed. It allows users to set fan speeds, monitor various system parameters, and design custom cooling profiles.
With Corsair Link, users can easily adjust CPU and GPU fan speed depending on their desired temperature or performance. The app also boasts compatibility with various Corsair products, such as liquid coolers, fans, and power supplies.
Corsair Link also provides a comprehensive dashboard that allows users to monitor their system in real-time. It shows detailed information about CPU and GPU load, temperatures, and fan speeds.
Additionally, users can view a graph of their system’s overall performance over time and any alerts the system may have triggered. This data allows users to take appropriate action to improve their system’s performance.
Moreover, Corsair Link also offers advanced functionality. Users can create custom cooling profiles using a user-friendly interface. They can also customize the monitoring functions, adding additional sensors to the dashboard if desired.
This feature is handy for anyone wanting to fully customize their overall system performance. In conclusion, Corsair Link is a powerful app for Windows 11 that can be useful to control fan speed and monitor system performance.
The app is highly user-friendly and provides a comprehensive dashboard and customizable features for users to customize their system performance. It also boasts compatibility with various Corsair products, making it the perfect choice for any PC enthusiast.
Other essential features of Corsair Link include:
- Precise fan speed control
- Lighting control
- Temperature monitoring
- Voltage regulation
- Performance tracking
3. Argus Monitor – Excellent fan control and system monitoring
![fan control windows 11]()
The Argus Monitor app is a sophisticated performance monitoring tool for Windows 11, designed to achieve maximum system performance and minimize fan noise. It lets users monitor hardware sensors such as temperatures, load, and voltages and accurately control the fan speed accordingly.
It can adjust the fan speed manually or automatically based on user preferences. Furthermore, the app instantly displays fan speed information and monitors each fan’s performance to ensure optimal speeds.
In addition to controlling fan speed, Argus Monitor provides detailed information about processor usage, memory, disk stresses, sound level, clock speed, and power consumption. This data can be useful to analyze the system’s health and diagnose any potential issues.
The app also features advanced alert settings. Examples are warning system that notifies users of any irregularities or critical values. If it’s beyond preset parameters, users can take appropriate actions accordingly.
Furthermore, it provides a comprehensive hardware documentation tool for each system component, including hardware used and versions.
Other essential features of Argus Monitor include:
- Temperature monitoring
- Fan speed control
- Automatic overclocking
- Alert notifications
- Customizable profiles
4. EasyTune 5 – PC health monitoring software
![fan control windows 11]()
EasyTune 5 is an app that allows users to control the fan speed of computer components in Windows 11. Its controls are simple to use. By monitoring system information, including system fan speeds, voltages, and temperatures, EasyTune 5 can adjust the fan speed automatically or manually.
It also equips customized features such as fan profiles and silent mode, ensuring the system runs cool and quiet. Moreover, users can get immediate assistance from EasyTune 5’s real-time system monitoring and verification.
Users can manually adjust different fan performance settings and understand which works best for their system. Once a fan speed threshold is set, the fan will automatically adjust its speed when the pre-set temperature is reached.
EasyTune 5 can help manage and maximize system performance, temperature, and fan speed for greater power savings. In conclusion, EasyTune 5 is the perfect tool to monitor and control fan speeds which is ideal for computer enthusiasts looking to increase the performance of their systems.
Other essential features of EasyTune 5 include:
- Precise fan speed control
- Comprehensive system information
- System health checkup
- Customizable interfaces
- Multiple system settings optimization
5. ASUS AI Suite 3 – Enhance ASUS motherboard performance instantly
![fan control windows 11]()
ASUS AI Suite 3 is a powerful application that lets Windows 11 users control and monitor their fan speed. It enables users to configure and fine-tune their cooling system with ease.
AI Suite 3 offers an intuitive user interface and various performance-tuning features, such as an intelligent fan speed control mechanism that adjusts the fan speed according to system needs. This helps in maintaining the optimal operating temperature.
Additionally, users can customize the fan speeds according to their preferences. AI Suite 3 provides diagnostics information regarding the system status and temperature, which helps understand the temperature levels and further simplifies the system optimization process.
Furthermore, it has an auto-tuning feature that adjusts settings according to the user’s system configuration and optimizes performance. AI Suite 3 also helps users to get the perfect balance between performance and cooling capabilities.
It also provides real-time notifications and information regarding fan speed adjustments. To sum up, ASUS AI Suite 3 is an excellent application that helps users to keep their systems cool and optimize the performance of their PC.
Other essential features of ASUS AI Suite 3 include:
- Monitoring system information
- Overclocking
- Power management
- Fan speed optimization
- System tuning
6. Zotac Firestorm – Easy and immersive control
![fan control windows 11]()
Zotac Firestorm is an app that allows users to control fan speeds in Windows 11. It utilizes a user-friendly interface to modify system fan profiles and create customized curves. Users can select one of their system’s multiple pre-set fan speed profiles, depending on their choice.
With Zotac Firestorm, users can also manually set fan speeds according to their preferences to achieve their desired performance levels. Additionally, the app allows users to assign fan speeds depending on temperatures for different system parts.
The app also provides various customized options for users to sync their fan speeds with system temperatures or create a custom fan speed curve.
Furthermore, Zotac Firestorm delivers improved control and accuracy of temperatures during gaming or when performing intensive operations. It helps prevent system failures or damage from overheating by automatically increasing the fan speed as the temperature rises.
It also features a one-click override, allowing the fan to run at its maximum speed for cooling.
Other essential features of Zotac Firestorm include:
- Manual mode
- Fan speed control
- Noise cancellation
- Preset configurations
- Customizable alerts
7. MSI AfterBurner – Gold Standard
![]()
MSI AfterBurner is a popular tool for monitoring and controlling GPU temperature, fan speed, and clock speeds. It helps Windows 11 users change fan behavior to optimize their system performance.
With MSI AfterBurner, users can set up the fan’s speed according to their requirements, which can be adjusted from auto to manual. It also allows users to configure their fan profiles and set custom fan speeds, allowing users to determine the exact temperature rating for each fan.
MSI AfterBurner can also be used for monitoring the temperature of the GPU with the help of built-in hardware monitoring technology. Its user-friendly interface allows users to easily monitor information like clock speed, frame rate, temperature, memory usage, and more.
In addition, MSI AfterBurner includes various other helpful features, such as fan speed recording, GPU overvolting, fan customization, and troubleshooting functionalities. With MSI AfterBurner, users can also customize their fan setup and control the fan’s speed for better cooling effects.
Thus, MSI AfterBurner is an effective tool for Windows 11 users to monitor and control their GPU performance and fan speed all in one app.
Other essential features of MSI AfterBurner include:
- Temperature monitoring
- Fan speed control
- Overclocking
- Real-time system monitoring
- Power limit control
8. Fan Control – Highly focused fan-controlling software
![]()
Fan Control is an app that allows users to adjust the fan speed in Windows 11. It allows them to customize their system to manage better cooling and noise levels based on the instantaneous demands of their system. Users can easily set the minimum and maximum fan speed levels and monitor the fan speed in real-time.
It offers several options, including manual control, temperature-based regulation, and CPU/GPU fan control. With manual control, users can adjust the fan speed by themselves, while with temperature-based regulation, the fan speed is automatically adjusted based on the CPU and GPU temperatures.
Lastly, users can adjust fan speed for both CPU and GPU separately. The app makes monitoring and adjusting fan speed easy, ensuring a comfortable user experience. It ensures that the fan speed matches the system’s temperature and reduces noise levels by not running fans at higher speeds than necessary.
Additionally, it optimizes system performance by allocating resources when the fan speed is adjusted to run the fans optimally. Fan Control provides an easy way to monitor and adjust the fan speed to improve system performance and ensure a comfortable user experience.
Other essential features of Fan Control include:
- Speed control
- Temperature monitoring
- Multi-speed settings
- Fan monitoring
- Configurable profiles
9. HWMonitor – Voltages, temperatures, and fans speed monitoring
![]()
Firstly, HWMonitor is an app that allows users to control fan speed in Windows 11 accurately. It uses hardware monitoring functions to provide user-friendly, real-time monitoring of system temperature, voltage, and fan speed.
Secondly, it creates a safe and efficient environment by enabling users to adjust fan speed according to specific voltage and temperature thresholds. Furthermore, it can display readings from various sensors, including GPU and CPU temperatures.
Additionally, the app provides a detailed log of fan usage, which can be used to detect irregularities and optimize system performance. The application also supports remote monitoring and logging, helping users to keep tabs on their systems even when they are away.
With HWMonitor, users can maximize the ventilation and cooling in their system while keeping its components secure and efficient.
Other essential features of HWMonitor include:
- Temperature monitoring
- Hardware monitoring
- Stress testing
- Customizable dashboard
- Voltage control
10. MSI Dragon Center – Convenient and efficient fan control fan
![]()
MSI Dragon Center is an app designed to control fan speed in Windows 11. It includes System Monitor, System Tuner, and LED Wizard features. System Monitor allows users to view the current status of components such as CPU, GPU, RAM, storage, and network with real-time monitoring.
System Tuner allows users to customize how Windows runs by creating specific profiles based on fan speed levels. LED Wizard lets users customize LED settings according to preferences, turning LED lights on/off or setting specific color patterns.
Furthermore, Dragon Center features an AI Tuning function, which dynamically adjusts fan speed and system performance based on usage scenarios. This helps balance performance and fan noise for a pleasant user experience.
With a simple and intuitive interface, Dragon Center allows users to easily switch between different profiles, optimizing the settings for a specific scenario. Overall, MSI Dragon Center offers users a convenient and efficient way to control fan speed and customize their Windows experience.
Other essential features of MSI Dragon Center include:
- Fan speed customization
- On-screen display
- Resource monitoring
- Systems status optimization
- System tuning tools
How do I reduce the fan noise on Windows 11?
The ways for you to reduce fan noise on Windows 11 may include the following:
- Check to compute air inlets and outlets: Ensure at least 3-4 inches of clearance between the fan and any walls, ceiling, or furniture. Clean away any dust or debris that might be interfering with airflow.
- Change the fan speed: You can adjust the speed of your fan with fan controllers or by entering your computer’s BIOS settings.
- Change the fan type: Consider replacing your stock fan with a quieter product, such as a liquid- or sleeve-bearing fan.
- Invest in soundproofing materials: Consider soundproofing materials such as acoustic foam or dampening pads to reduce fan noise.
- Look for other sources of noise: Make sure there aren’t other sources from the hard drive or power supply that could add to the noise. Consider replacing these components with quieter models if needed.
In conclusion, this review of the best ten fan control software options for Windows 11 provides comprehensive control of system hardware and temperature, enabling you to keep your computer cool and running optimally.
With these tools, you can customize your environment and ensure the best performance of all your system components.
Most of you would be thrilled to control the fan speed manually, but it’s not that simple. Instead, you will have to find the correct application to control the speed and reduce overheating, like cooling software.
In the following sections, we will list the various methods to get the right tool to monitor and control your PC fan as you wish.
How do I reduce the fan noise on Windows 11?
There are various ways to control the fan noise on a Windows 11 laptop. Below are some of the easy methods:
Via power settings: Your power settings can significantly add to your Windows 11 fan speed problem. To get this under control, switch to either the Best power efficiency or the Balanced plan instead of high performance. Clearing of air vents: When the Windows 11 air vents are blocked by dust and debris, it can increase fan noise. The solution here is to clear the dirt using a vacuum or other suitable methods. Using a fan control tool: You can still experience high fan noise in some cases despite using the best power plan and cleaning the vents. In this case, you need to use a control tool to keep the noise in check. There is the option of using the tool released by OEM for your PC or fan control software for Windows 11.
How can I control the fan speed on a PC?
1. Use the software released by the OEM to control fan speed
After installing the software, you can start controlling the computer fan and set it to run at the desired speed.
2. Control fan speed on Windows 11 in BIOS
You can easily control fan speed on PC through BIOS. Controlling the PC fan from the BIOS is both time-consuming as well as an intricate affair. You have to be careful while making the changes since a minor lapse can prove fatal for the computer.
-
Navigate to the desktop and press Alt + F4 to launch the Shut Down Windows box.
-
Select Shut down from the dropdown menu and click on OK at the bottom.
-
Next, press the Power button to turn on the computer.
SPONSORED -
As soon the screen lights up, press Esc or F12 key (depending on the computer settings) to enter the BIOS.
-
Navigate through the different options (Advanced, Overclocking, or something similar) and look for settings related to the computer fan.
-
After finding the relevant options, you can now control the computer fan and run it at the desired speed for optimal results.
Note: do not change any other settings unless you know the results.
3. Download a third-party utility to control the fan speed on Windows 11
Fan Control is one of the best open-source third-party utilities available in the market and is free to use. It offers a simple interface and allows users to quickly change the settings and control the fans in Windows 11.
That’s all there is to know about PC fan control in Windows 11. Before controlling and modifying the fan speed, do thorough research to understand the required settings.
You can also check the best available fans in the market if you are facing trouble with the installed one.
Tell us which of the above methods worked for you or whether you want to choose a utility not listed here in the comments section below.
Name *
Email *
Commenting as . Not you?
Save information for future comments
Comment
Δ