Возникла необходимость удаленного управления сервером с запущенной ролью Hyper-V с компьютера под управлением Window 10 (личный ноутбук), который не состоит в домене. Чтобы такая схема заработала, нужно выполнить следующие настройки на стороне сервер-гипервизора и клиента.
- Настройка сервера Hyper-V
- Настройка клиента Windows 10 для подключения к серверу Hyper-V
- Удаленное подключение из Windows 10 к Hyper-V
Содержание:
Настройка сервера Hyper-V
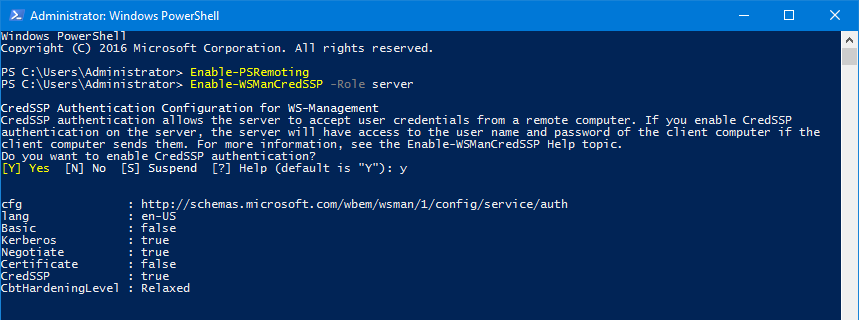
На сервере Hyper-V (Windows Server 2016) нужно включить удаленное управление PowerShell Remoting и открыть соответствующие порты на файерволе. Включаем службу WinRM командой
Enable-PSRemoting
Теперь нужно разрешить подключение со всех клиентов (из публичных сетей в той же самой локальной подсети) и разрешить передавать и получать CredSSP:
Enable-PSRemoting -SkipNetworkProfileCheck -Force
Enable-WSManCredSSP -Role Server
Включим правило межсетевого экрана WinRM-HTTP-In-TCP-Public.
Set-NetFirewallRule -Name "WinRM-HTTP-In-TCP-Public" -RemoteAddress Any
Проверьте удаленную доступность порта WinRM (TCP 5985) на сервере
Test-NetConnection -ComputerName target_name -Port 5985
Настройка клиента Windows 10 для подключения к серверу Hyper-V
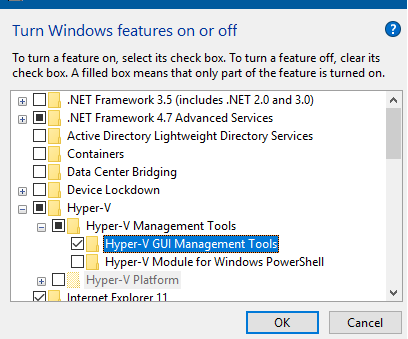
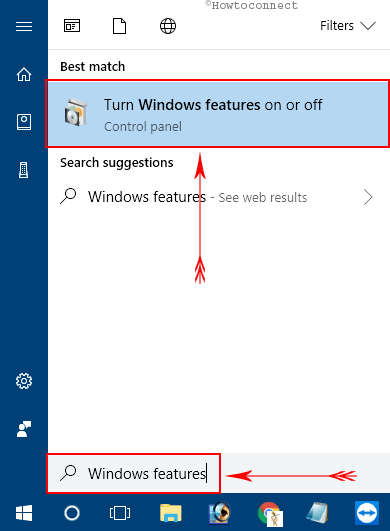
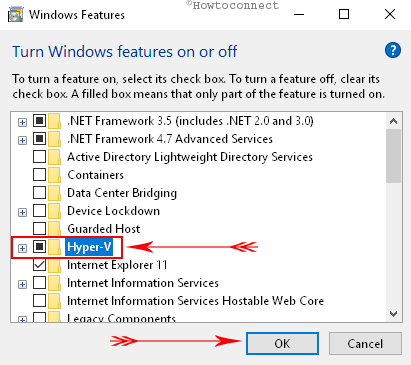
В первую очередь на компьютере с Windows 10 нужно установить консоль управления Hyper-V. Для этого в панели управления в разделе программ нужно нажать кнопку Turn windows features on or off и в разделе Hyper-V-> Hyper-V Management Tools -> выбрать Hyper-V GUI Management Tools.
Проверьте, что тип сетевого подключения у вас установлен на Private.
Откройте консоль PowerShell с правами администратора и выполните следующие команды:
Enable-PSRemoting
Set-Item WSMan:\localhost\Client\TrustedHosts -Value "Hyper-V-FQDN"
Enable-WSManCredSSP -Role client -DelegateComputer "Hyper-V-FQDN"

Тем самым мы добавили наш сервер в список доверенных и разрешили аутентификацию CredSSP.
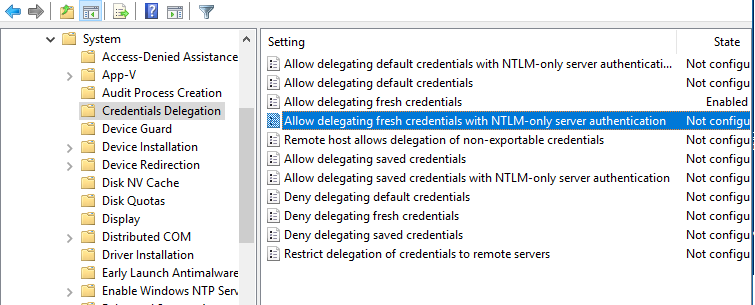
Теперь в редакторе локальной групповой политики (gpedit) нужно включить NTLM аутентификацию на недоменных компьютерах. Перейдите в раздел Computer Configuration > Administrative Template > System > Credentials Delegation и включите политику Allow delegating fresh credentials with NTLM-only server authentication, добавьте в нее строку wsman/Hyper-V-FQDN.
Удаленное подключение из Windows 10 к Hyper-V
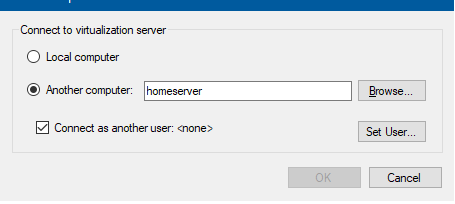
На компьютере Windows 10 откройте консоль Hyper-V Manager, щелкните ПКМ по “Hyper-V Manager” и выберите Connect to Server… Введите имя сервера и отметьте галку Connect as another user и укажите имя пользователя с правами на сервере Hyper-V.
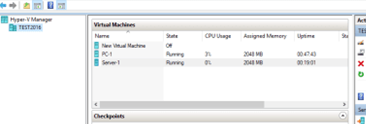
После этого, консоль должна отобразить список ВМ, запущенных на хосте Hyper-V.
Если вы развернули роль Hyper-V на редакции Windows, в которой отсутствует графический интерфейс (Windows Server Core или Microsoft Hyper-V Server) вы можете использовать для управления серверов и виртуальными машинами команды PowerShell из модуля Hyper-V. Для более комфортного управления виртуальными машинами предпочтительно использовать графически интерфейс консоли Hyper-V Manager или веб интерфейс Windows Admin Center (WAC). В этой статье мы покажем, как установит и настроить удаленное управление гипервизором Microsoft с помощью консоли диспетчера Hyper-V в не-доменном окружение (рабочей группе).
В данном примере мы покажем, как удаленно подключиться к серверу Hyper-V (на Windows Server 2022/2019/2016/2012 R2 или Win 11/10/8.1) с рабочей станции с Windows 10 Pro x64 с помощью консоли Hyper-V Manager. Проверьте, что хост с ролью Hyper-V и ваша рабочая станция находятся в одной рабочей группе (WORKGROUP).
Сначала нужно разрешить удаленное управление на хосте Hyper-V. Если роль Hyper-V развернута на Server Core или Microsoft Hyper-V Server, запустите утилиту
sconfig.cmd
, перейдите в раздел 4 — Remote Management и разрешите удаленное управление.
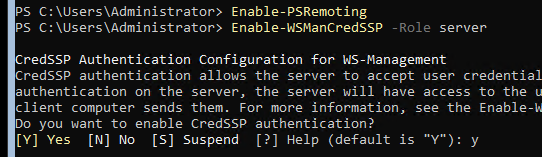
Затем в консоли PowerShell настройте службу WinRM и разрешите аутентификацию CredSSP:
Enable-PSRemoting
Enable-WSManCredSSP -Role server
Если вы включили WinRM с помощью команды Enable-PSRemoting, это автоматически создаст необходимые правила в Microsoft Defender Firewall.
Можете проверить доступность порта WinRM (TCP 5985) на сервере с клиента с помощью команды:
Test-NetConnection -ComputerName 192.168.21.30 -Port 5985
Теперь нужно выполнить ряд настроек на клиентского компьютера с Windows 10, с которого вы планируете управлять вашим сервером Hyper-V.
Установите консоль Диспетчер Hyper-V. Для этого откройте консоль Turn Windows Features on or off (выполните команду optionalfeatures). В открывшемся окне разверните раздел Hyper-V и отметьте для установки Hyper-V GUI Management Tools.

Также установить клиент Hyper-V Manager с помощью PowerShell:
Enable-WindowsOptionalFeature -Online –FeatureName Microsoft-Hyper-V-Management-Clients
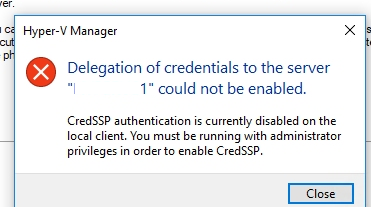
Если прямо сейчас попытаться подключиться к хосту Hyper-V, появится ошибка:
CredSSP authentication is currently disabled on the local client. You must be running with administrator privileges in order to enable CredSSP.
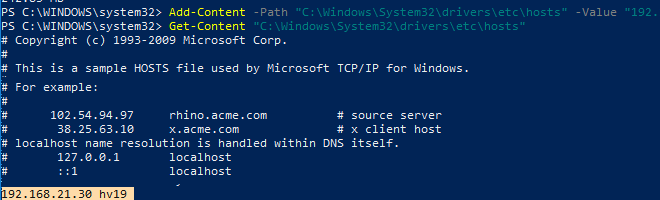
Чтобы хост Hyper-V был доступен с клиента по имени, нужно добавить соответствующую запись в файл hosts (C:\Windows\System32\drivers\etc\hosts) на клиентском компьютере.
Можно добавить запись в файл hosts с помощью PowerShell:
Add-Content -Path "C:\Windows\System32\drivers\etc\hosts" -Value "192.168.21.30 hv19"
В файле hosts должна появится такая строка:
192.168.21.30 hv19
Теперь нужно добавить имя Hyper-V сервера в доверенные узлы:
Set-Item WSMan:\localhost\Client\TrustedHosts -Value "hv19"
Теперь сохраните пароль учетной записи администратора Hyper-V, которую вы будете использовать для подключения в диспетчер учетных записей Windows:
cmdkey /add:hv19 /user:Administrator /pass:HVpa66w0ddr
Если вы не хотите использовать сохраненный пароль, можно подключаться к Hyper-V с интерактивным запросом учетных данных:
runas /user:hv19\Administrator /netonly "mmc virtmgmt.msc"
Проверьте, что для вашего сетевого подклюений в Windows 10 назначен Public профиль сети:
Get-NetConnectionProfile|select InterfaceAlias,NetworkCategory
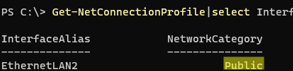
Если команда вернет, что для подключения назначен тип сети Public, его нужно сменить на Private:
Set-NetConnectionProfile -InterfaceAlias "EthernetLAN2" -NetworkCategory Private
Теперь включите аутентификацию CredSSP на клиенте и укажите адрес сервера, которому вы доверите делегировать ваши учетные данные:
Enable-WSManCredSSP -Role client -DelegateComputer "hv19"
Подтвердите добавление
y
->
Enter
.
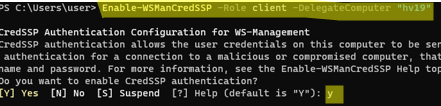
Это также изменит настройки локальной политики Allow delegating fresh credentials.
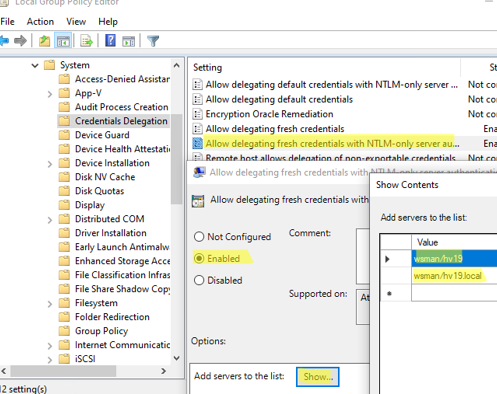
Теперь нужно разрешить NTLM аутентификацию на недоменном компьютере. Для этого:
- Запустите редактор локальной групповой политики
gpedit.msc
; - Перейдите в раздел Local Computer Policy -> Computer Configuration -> Administrative Templates -> System -> Credentials Delegation;
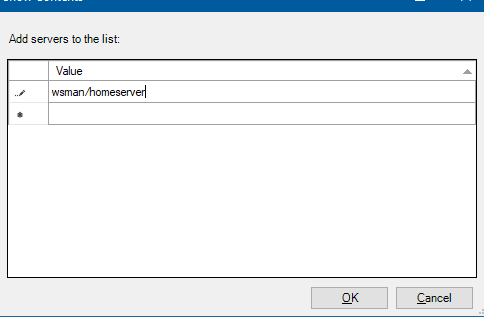
- Включите параметр политики Allow Delegating Fresh Credentials with NTLM-only Server Authentication;
- Потом нажмите кнопку Show и добавьте два значения для имени вашего сервера Hyper-V (в нашем примере это hv19):
wsman/hv19
и
wsman/hv19.local

- Закройте консоль редактора и обновите настройки групповых политик компьютера:
gpupdate /force
Теперь можно подключиться к удаленному хосту с ролью Hyper-V. Откройте консоль Hyper-V Manager (
virtmgmt.msc
) и выберите Connect to Server. Введите имя вашего сервера Hyper-V. 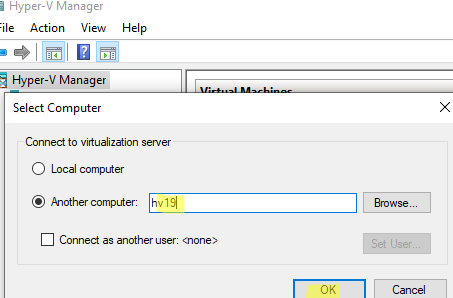
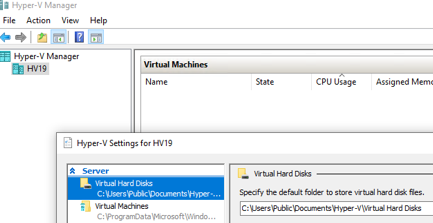
Если вы все сделали правильно, консоль должна подключится к серверу Hyper-V и отобразить список зарегистрированных виртуальных машин.
Теперь вы можете управлять настройками Hyper-V Server, создавать/включать/выключать, импортировать/экспортировать виртуальные машины Hyper-V из графической консоли.
Here, in this article, we will present you 5 ways to Open Hyper V Manager in Windows 10 or 11. Accessing this Administrative Tool could be tricky, especially when you are using a new system.
Following a few simple steps can help you find Hyper-V Manager in times of emergency or just in case some VM needs extra attention easily. Different versions of Windows have different methodology and techniques for accessing VM, here we will focus only on Windows 10 version. List of ways to Open Hyper V Manager in Windows 11 or 10 –
1: Using Cortana
2: Access via Control Panel
3: Through Run Command
4: From Command Prompt
5: Via Windows PowerShell
Before exploring the ways to open Hyper V Manager in Windows 11 or 10, the first thing is to ensure that its feature is successfully installed on your PC.
Step-1: Press Windows logo key and when the Start Menu shows up, type Windows features. Once the result displays the option ”Turn Windows features on or off”, hit Enter.
Step-2: In the Windows Features box, locate Hyper-V.
Step-3: Select Hyper-V checkbox and click OK to install its feature. Now, proceed towards various ways to open Hyper V Manager in Windows 10.
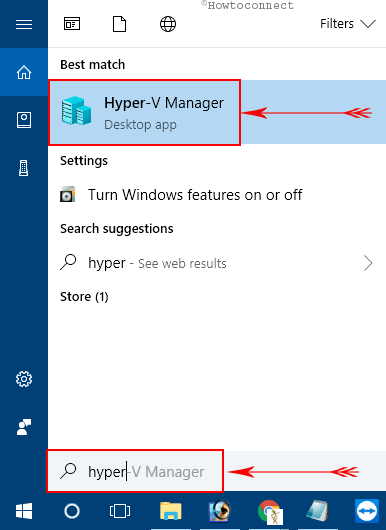
Way-1: Using Cortana
I. Open Start Menu and type hyper.
II. Cortana will immediately display Hyper V Manager as the Best match, click on it.
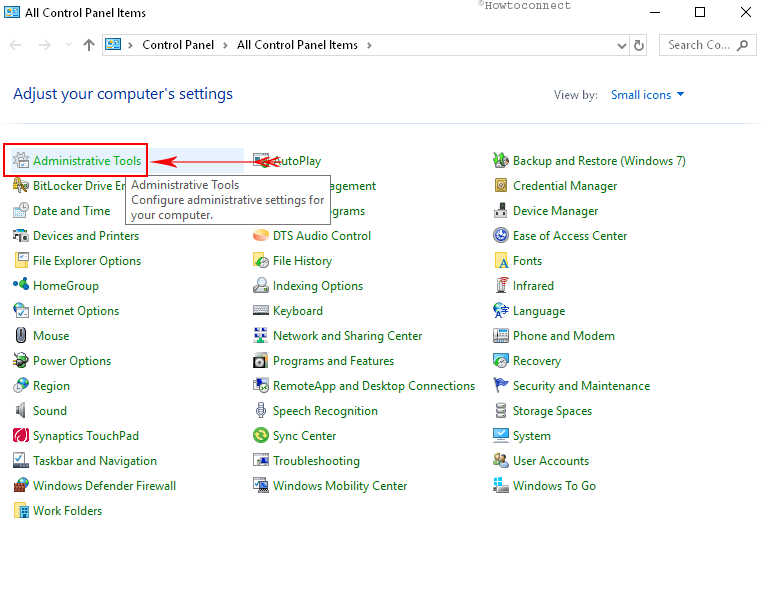
Way-2: Accessing via Control Panel
i. First of all, Open Control Panel using any of your preferred procedures.
Tip: Read Display Control Panel on Power User Menu Instead Settings Windows 10.
ii. Once inside Control Panel, make the icons into small view. Navigate to Administrative Tools and click on it.
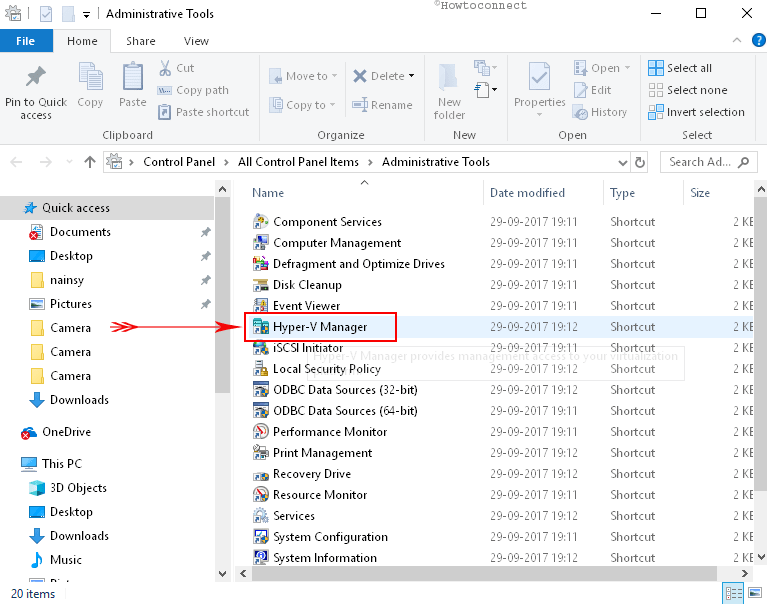
iii. In the Administrative Tools window within the right side pane, locate Hyper-V Manager and double click on it.
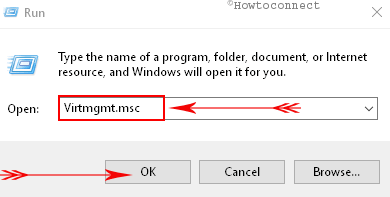
Way-3: Through Run Command
A. Get access to Run Dialog Box by together hitting ‘Windows + R’ hotkeys or right-click Start icon and select Run.
B. Now, type or copy-paste Virtmgmt.msc and click OK.
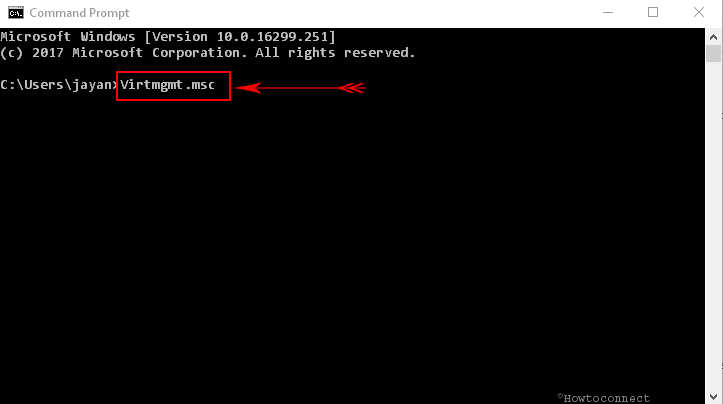
Way-4: From Command Prompt
# Go to Cortana text box, type cmd, and press Enter.
# Once the black window appears on the PC screen, type virtmgmt.msc and hit Enter.
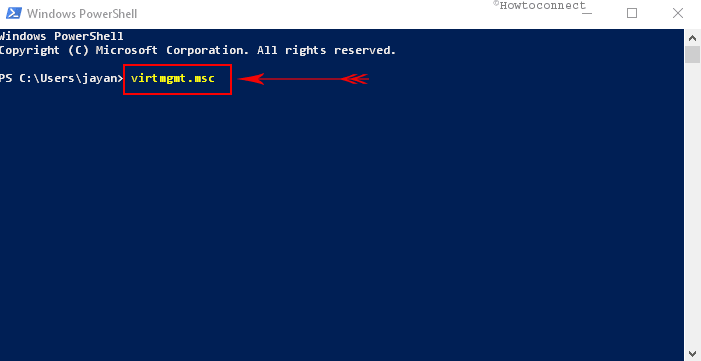
Way-5: Via Windows PowerShell
• Perform a right-click on Start icon to launch Power user menu. In addition, you can also access the menu by pressing Windows + X.
• From the list, find Windows PowerShell and click on it.
• Now, on the blue window, simply copy-paste or type the command virtmgmt.msc. Finally, to open Hyper V Manager, press Enter.
These are the few basic and simple methods to Open Hyper V Manager in Windows 11 or 10. Hopefully, with these techniques, you will not face any more difficulties in accessing the tool.
Search code, repositories, users, issues, pull requests…
Provide feedback
Saved searches
Use saved searches to filter your results more quickly
Sign up
Hyper-V is Microsoft’s virtualization platform. It is available on Windows Server operating systems and Microsoft has also added the Hyper-V functionality to Windows 8.1, Windows 10, and Windows 11.
Unfortunately, the Hyper-V feature is only available in Windows 10 Professional, Enterprise, and Education editions. You can’t install it on Windows 10 Home edition by default.
However, using the steps in this article, we’ll show you how to enable Hyper-V in the Windows 10 Home edition.
Table of contents
- Does Your System Support Virtualization?
- Enable Virtualization in Firmware/BIOS
- Install Hyper-V in Windows 10 Home
- How to Enable Hyper-V on Windows 10 (Pro, Enterprise, Education)
- Enable Hyper-V from Optional Features
- Enable Hyper-V from Command Prompt
- Enable Hyper-V from Windows PowerShell
- How to Disable Hyper-V in Windows 10 (Home, Pro, Enterprise, Education)
- Closing Thoughts
Does Your System Support Virtualization?
Before moving forward, we need to check if our system supports virtualization. Hardware virtualization is required for Hyper-V to function correctly. Otherwise, you can use other virtualization platforms like Virtualbox and VMWare.
There are four basic requirements for Hyper-V to be installed on a Windows 10 computer:
- VM Monitor Mode Extensions
- Virtualization enabled in firmware
- Second Level Address Translation (SLAT)
- Data Execution Prevention
All four of these requirements can be easily checked through a Command Prompt cmdlet. Run the following cmdlet in an elevated Command Prompt and obtain the results on the four requirements:
systeminfoThis will generate a list, and you will find the section “Hyper-V Requirements” at the end of the list containing the details of the 4 requirements, as in the image below:
 1")
If these requirements are met, the results will display “Yes.” However, if you find that “Virtualization Enabled In Firmware” states “No,” you need to enable it using the guide below.
Enable Virtualization in Firmware/BIOS
Most modern computers support all the requirements of Hyper-V. But some systems have virtualization disabled from BIOS. You can go to the BIOS setup computer at the startup and enable Virtualization using the following steps:
-
Restart your computer and enter the BIOS setup using the hotkey.
-
Here, look for the “Virtualization” tab and click on it, or use the arrow keys on the keyboard to highlight it and press Enter.
-
Now enable Virtualization.
 2")
Enable virtualization from BIOS -
Now save the new settings and exit BIOS. The system will now reboot normally.
 2")
When it reboots, continue with the following steps to install and enable Hyper-V.
Install Hyper-V in Windows 10 Home
Note: Since Windows Home edition comes without Hyper-V, you must first install it. If you have the Pro, Education, or Enterprise editions, then you may skip this step and proceed to the next section of this article. To check which edition you have, type in winver in the Run Command box and obtain your operating system’s details.
Follow the steps below to install and enable Hyper-V in Windows 10 Home:
-
Download Hyper-V Installer by clicking on the following link:
Hyper-V installer and enabler for Windows 10 Home (317 bytes, 35,759 hits)
-
Once downloaded, right-click on the file and select Run as Administrator from the context menu. This will trigger the installation script.
 4")
Run as admin -
If prompted with a UAC, click Yes.
Click Yes on User Access Control It may take some time to complete the installation. Please let it complete without interruption.
-
Once complete, press Y to continue.
Press Y to continue The computer will now reboot and update.
 4")
 5")
 6")
Once rebooted, Hyper-V will have installed and automatically enabled on your Windows Home.
How to Enable Hyper-V on Windows 10 (Pro, Enterprise, Education)
The method given above automatically enables Hyper-V as well as installing it on a Windows Home. However, if you are running Windows Pro, Education, or Enterprise edition, then you can enable Hyper-V using any one of the following methods.
Enable Hyper-V from Optional Features
Since Hyper-V is an optional feature that one can enable when needed, you can enable it from the Optional Features applet. Here is how:
-
Open the Optional Features applet by typing in optionalfeatures in the Run Command box.
 7")
Open the Optional Features applet -
Now look for the “Hyper-V” option from the list and check the box next to it. Then click Ok.
 8")
Enable Hyper V from Optional Features -
You will now see a window applying the changes. Click Close when it is done.
 9")
Close installation window
 7")
 8")
 9")
Hyper-V will now be installed and enabled. You can now access the Hyper-V manager by searching for it in the search box in the taskbar or through the Start menu.
 10")
Alternatively, you can also use the other 2 command-line methods to enable Hyper-V on Windows 10.
Enable Hyper-V from Command Prompt
Follow these steps to enable Hyper-V using the DISM command tool in the Command Prompt:
-
Run the following cmdlet in an elevated Command Prompt:
DISM /Online /Enable-Feature /All /FeatureName:Microsoft-Hyper-VEnable Hyper V from Command Prompt -
When asked, enter Y to restart the computer:
Enter Y
 11")
 12")
The computer will now restart, When it does, Hyper-V should be enabled successfully.
Enable Hyper-V from Windows PowerShell
If you’d rather prefer to use Windows PowerShell, here is how to enable Hyper-V:
-
Run the following cmdlet in an elevated PowerShell:
Enable-WindowsOptionalFeature -Online -FeatureName Microsoft-Hyper-V-AllEnable Hyper V using PowerShell -
When asked, enter Y and hit Enter to restart the computer:
Enter Y When the computer reboots, Hyper-V will have installed successfully.
 13")
 14")
These are the 3 methods to enable Hyper-V in Windows 10, provided that the hardware is supported and Hyper-V is installed.
How to Disable Hyper-V in Windows 10 (Home, Pro, Enterprise, Education)
If you don’t want this functionality on your computer, you can always disable it. There are three ways to disable it:
-
From Optional Features
-
Open the Optional Features applet by typing in optionalfeatures in the Run Command box.
Open Optional Features applet -
Uncheck the box next to Hyper-V and click Ok.
 16")
Disable Hyper-V from Optional Features -
When done, click Restart now to finalize the changes.
Restart PC
-
-
From Command Prompt
Run the following cmdlet in an elevated Command Prompt to disable Hyper-V:
DISM /Online /Disable-Feature /FeatureName:Microsoft-Hyper-V-allIf asked for a reboot, enter Y for Yes.
Disable Hyper V from Command Prompt -
From PowerShell
Run the following cmdlet in an elevated PowerShell to disable Hyper-V:
Disable-WindowsOptionalFeature -Online -FeatureName Microsoft-Hyper-V-AllIf asked for a reboot, enter Y for Yes.
Disable Hyper V from Windows PowerShell
 16")
 17")
 18")
 19")
Closing Thoughts
Sometimes Hyper-V is very useful even for home users. It can be used to test and evaluate new software without hurting the host system. But there are times when enabling virtualization support or installing Hyper-V is not recommended.
Hyper-V requires some system resources to run its virtual machines. For example, if you have 4 GB RAM, you won’t be able to give any resources to the virtual machine. So it would not be wise to enable Hyper-V functionality.
For what purpose do you want to enable Hyper-V functionality on your Windows 10 Home computer? Please share your thoughts in the comments below.