В этой простой инструкции подробно о способах открыть окно «Конфигурация системы» во всех актуальных версиях Windows, а также кратко о содержимом этого окна.
Способы открыть окно «Конфигурация системы»
Один из самых быстрых и простых способов запустить конфигурацию системы — использовать соответствующую команду:
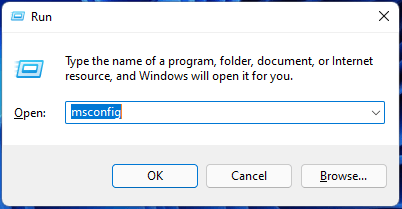
- Нажмите клавиши Win+R на клавиатуре (где Win — клавиша с эмблемой Windows), либо нажмите правой кнопкой мыши по кнопке «Пуск» и выберите пункт «Выполнить».
- Введите команду msconfig и нажмите Ok или клавишу Enter.
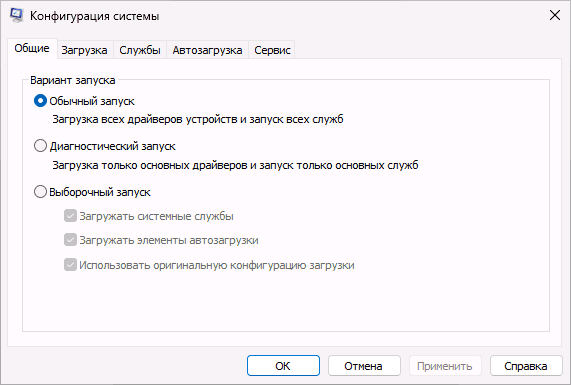
- В результате откроется окно конфигурации системы.
Возможно, вас заинтересуют и другие полезные команды диалогового окна «Выполнить».
Это не единственный способ, помимо него можно использовать один из следующих вариантов:
Надеюсь, одного из этих способов будет достаточно для выполнения задачи.
Вкладки в окне «Конфигурация системы»
Окно «Конфигурация системы» содержит 5 вкладок, на каждой из которых можно задать те или иные параметры:
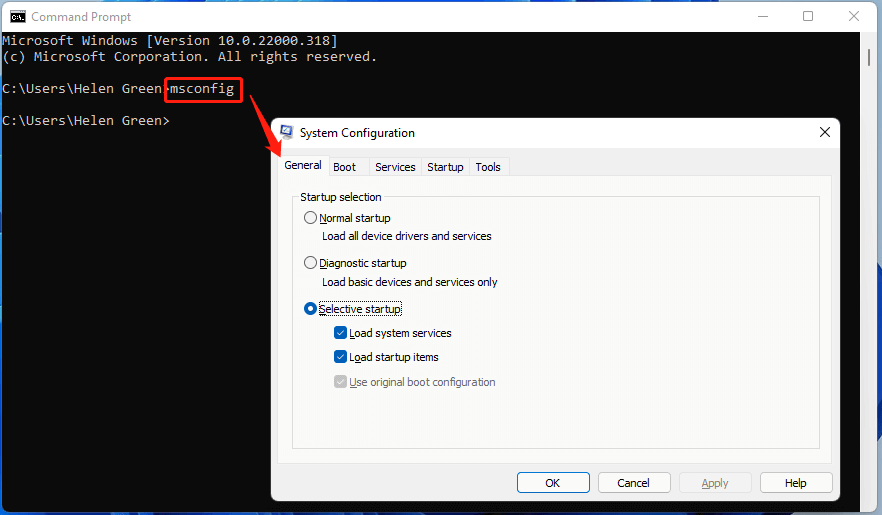
- Общие — здесь можно выбрать вариант запуска, например, включить запуск только основных служб или отключить запуск элементов автозагрузки. Это может помочь в диагностике ошибок и иных проблем в случае, если есть предположение, что они вызваны сторонним ПО на компьютере.
- Загрузка — вкладка для настроек параметров загрузки Windows, позволяет включить или отключить безопасный режим, а в случае наличия нескольких ОС на компьютере (или остатков предыдущих установленных Windows) — сделать их загружаемыми по умолчанию или удалить из меню загрузки.
- Службы — список служб с возможностью их отключения, однако для этого лучше использовать другой интерфейс управления службами: как открыть службы Windows.
- Автозагрузка — в последних версиях Windows вкладка не актуальна, так как управление автозагрузкой теперь находится в другом расположении. Подробнее: Как добавить или удалить программы из автозагрузки Windows 11, Автозагрузка программ Windows 10.
- Сервис — вкладка для запуска различных встроенных системных утилит и интерфейсов настроек Windows.
Возможности конфигурации системы могут быть полезны во многих ситуациях и использование этого окна настроек часто затрагивается в инструкциях на сайте, как один из быстрых способов достичь нужного результата.
Получаем подробные характеристики ПК в Windows 11 при помощи встроенных инструментов
Большинство пользователей ПК имеют стандартное представление о технических характеристиках своего компьютера — память, процессор, ОС и тд.
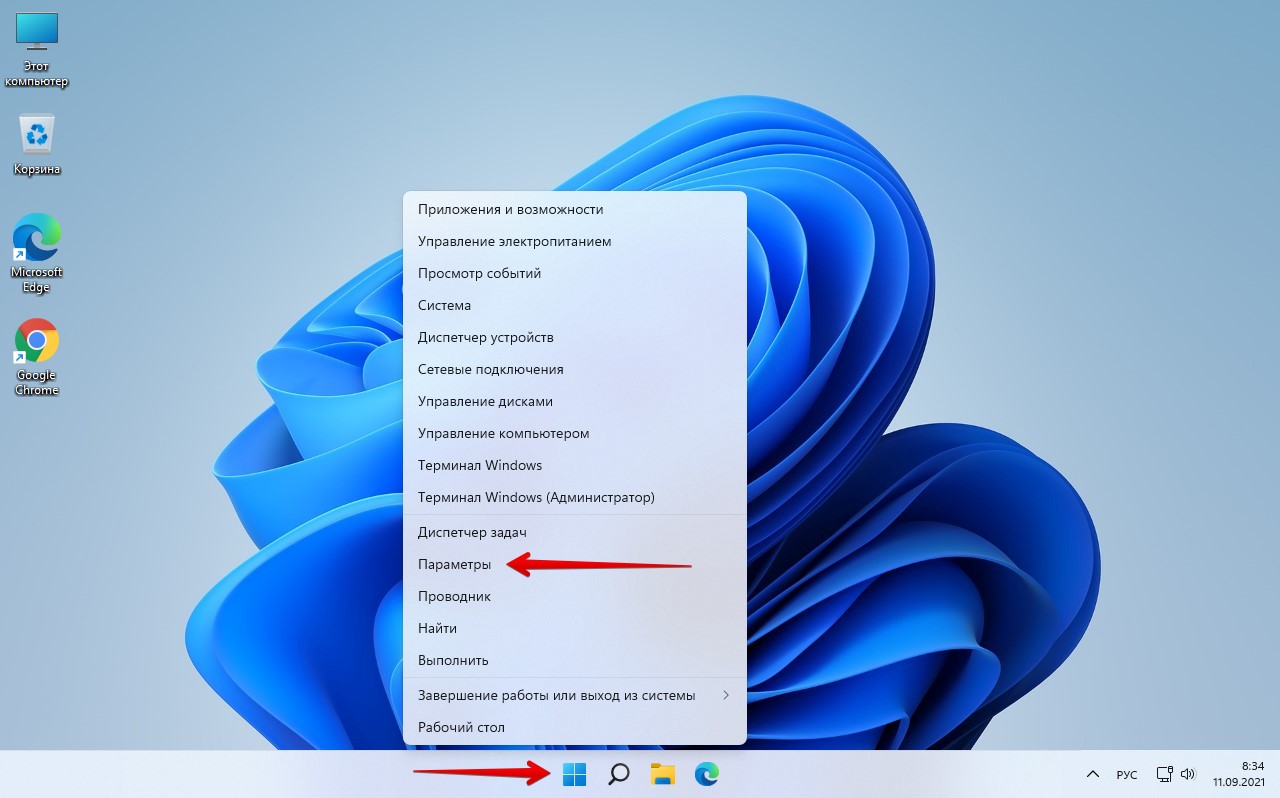
Чтобы найти сведения о компьютере через «Параметры», щелкаем правой кнопкой мыши по меню «Пуск» на панели задач или нажимаем «Win+X», чтобы открыть меню быстрого доступа, далее выбираем «Параметры» из списка. Кроме этого, можно нажать «Win+I», чтобы напрямую попасть в «Параметры» Windows 11.
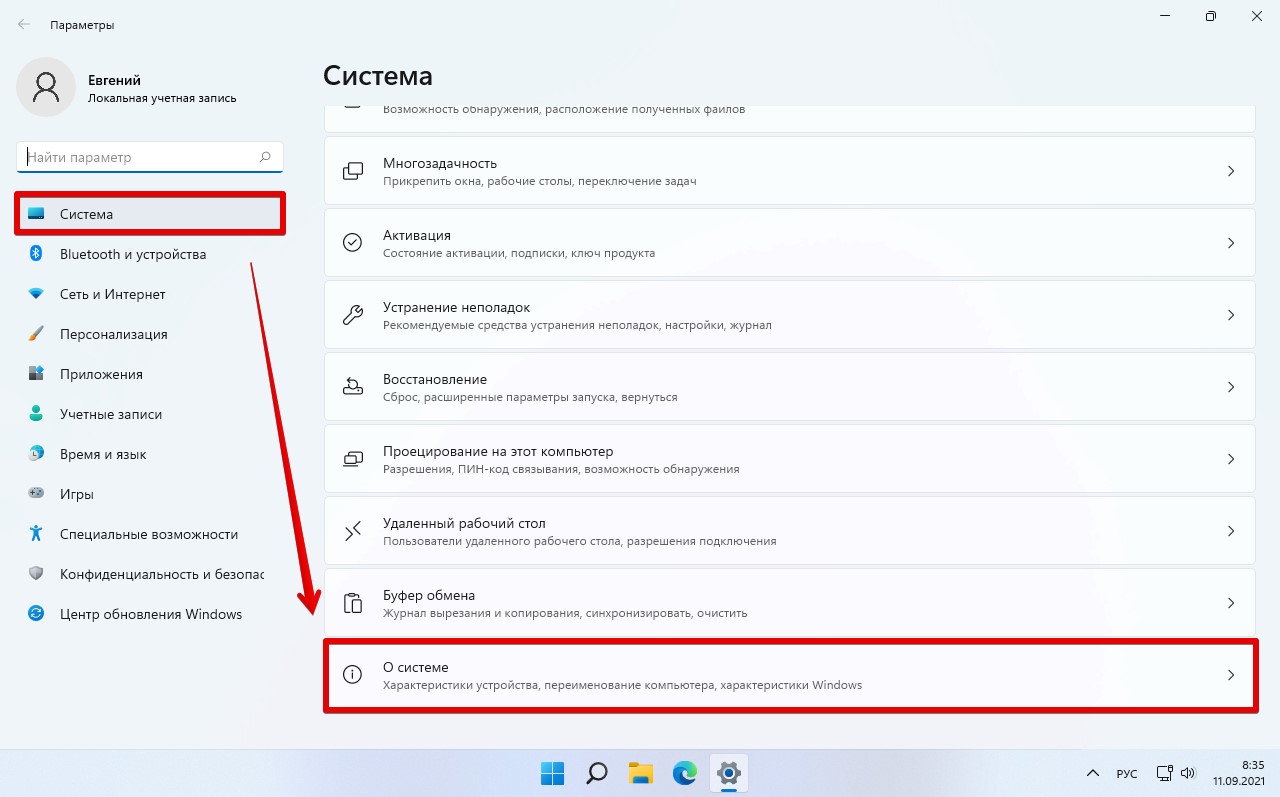
В открывшемся окне «Параметры» мы по умолчанию оказываемся в разделе «Система», прокручиваем колесом мыши окно вниз пока не увидим пункт «О системе», кликаем мышью по нему.
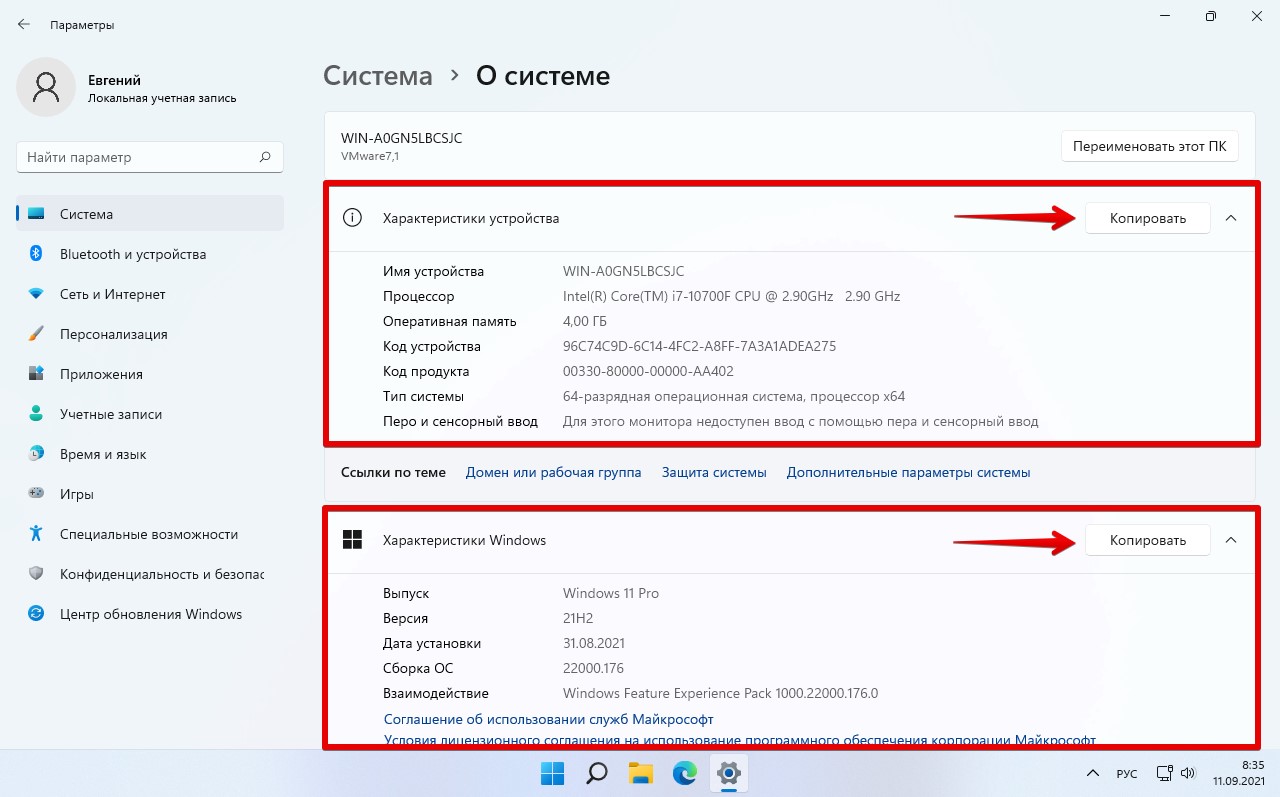
В этом разделе мы увидим «Характеристики устройства» и «Характеристики Windows». Ими можно поделиться, предварительно скопировав через кнопку «Копировать».
Поиск характеристик ПК через «Сведения о системе» в Windows 11
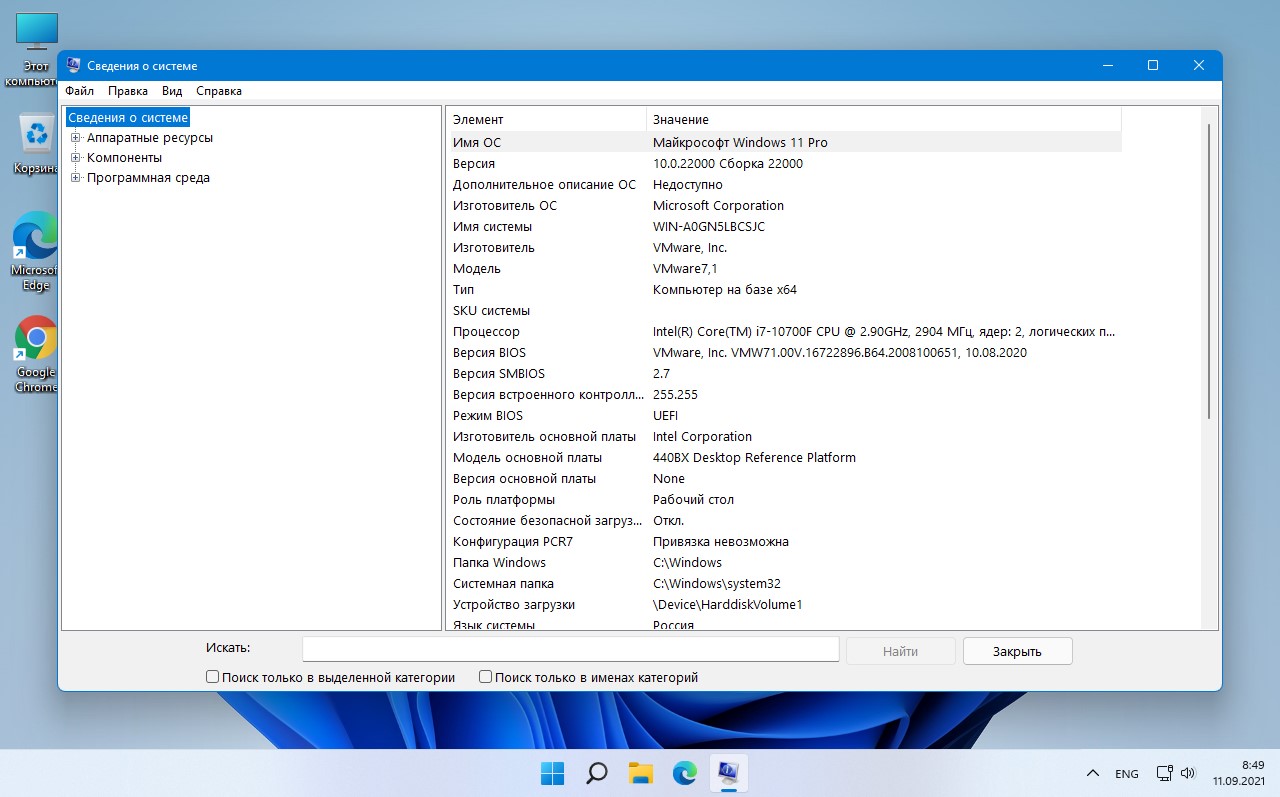
В приложении «Сведения о системе» подробно описаны аппаратные и программные характеристики компьютера. Информация, распределена по разным разделам на панели навигации слева, что значительно упрощает поиск нужных характеристик.
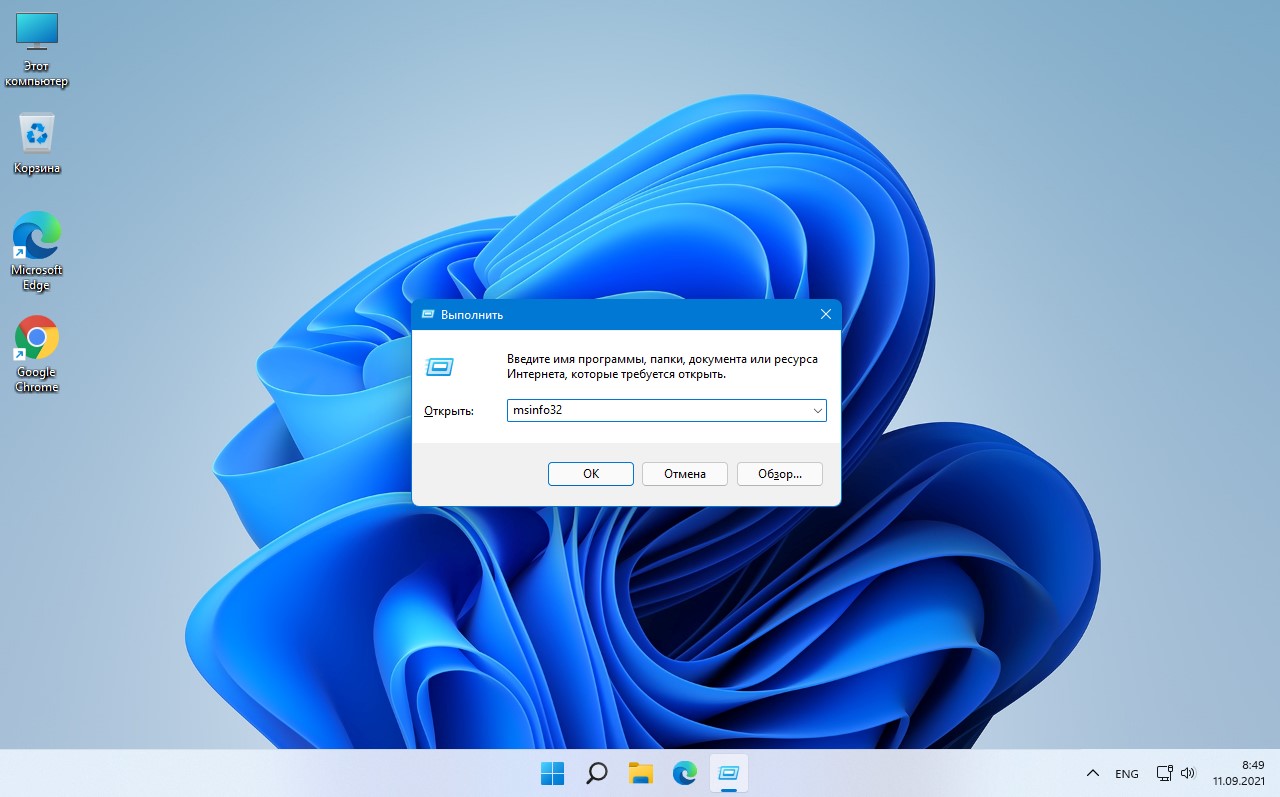
Нажимаем «Win+R», чтобы запустить окно «Выполнить», и вводим «msinfo32» в текстовое поле, затем нажмем «OK», либо «Enter» на клавиатуре, чтобы запустить приложение «Сведения о системе».
Приложение «Сведения о системе» также позволяет экспортировать характеристики в текстовый файл, для этого необходимо нажать «Файл» — «Экспорт».
Смотрим характеристики ПК через командную строку в Windows 11
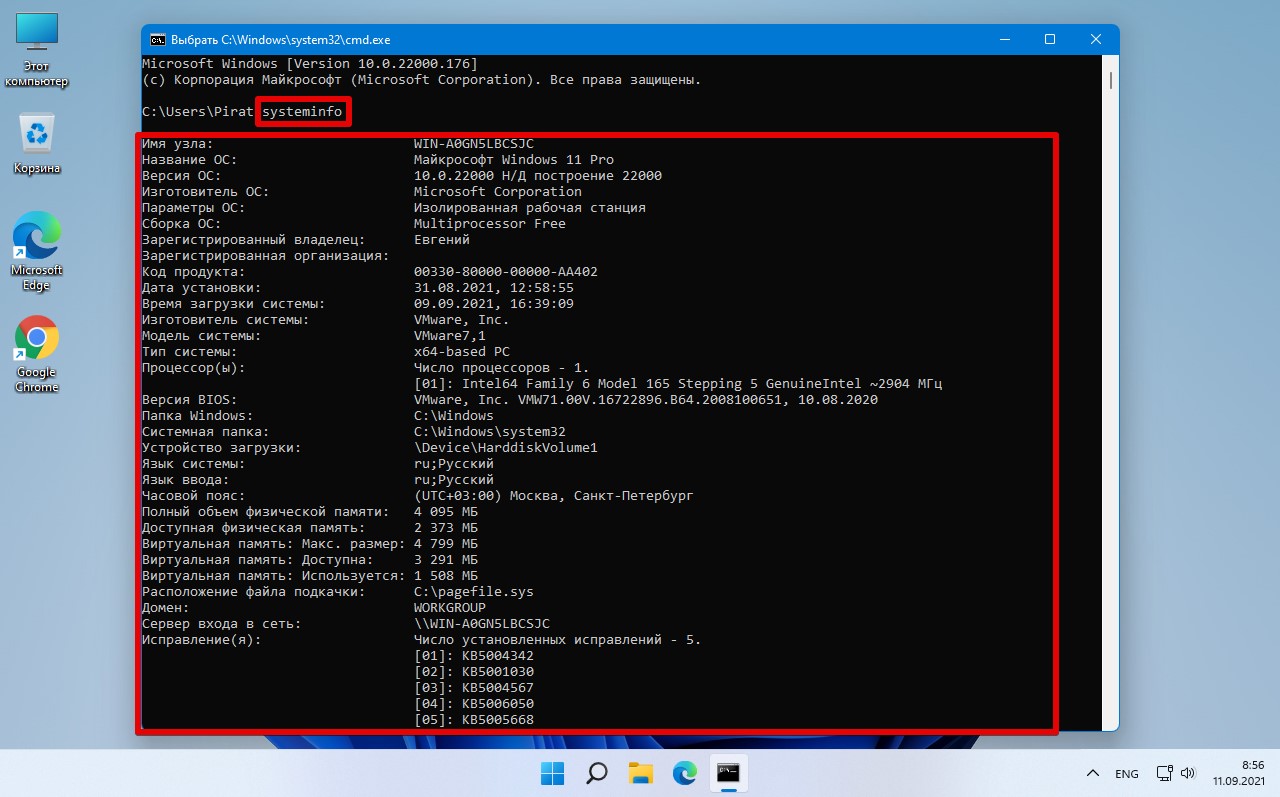
Нажимаем «Win+R» для запуска окна «Выполнить», вводим «cmd» для запуска командной строки. В открывшейся командной строке вводим «systeminfo» для отображения сведений о ПК.
Автор: , 31.07.2021
Рубрики: Windows 10, Windows 11

При изменении ряда параметров в Windows (например, имени ПК, настроек удаленного доступа, параметров быстродействия, и др.) — приходится прибегать к окну свойств системы. Однако, в современных Windows 11/10 его (почему-то…) «прячут»…
Именно поэтому решил набросать небольшую заметку, в которой приведу несколько способов, как можно будет найти это заветное окно со свойствами ОС (заранее предупрежу: т.к. эти ОС постоянно обновляются, то не факт, что у вас на момент прочтения статьи будут работать все способы — проверяйте самостоятельно / экспериментально 👌).
Примечание: дополнительные справочные материалы можно найти в следующих рубриках: по Windows 10 / по Windows 11.
*
Содержание статьи📎
- 1 —> Свойства системы <—
- 1.1 Способ 1
- 1.2 Способ 2
- 1.3 Способ 3
- 1.4 Способ 4
- 1.5 Способ 5
→ Задать вопрос | дополнить
—> Свойства системы <—
Способ 1
Актуален для всех современных ОС Windows 7/8/10/11.
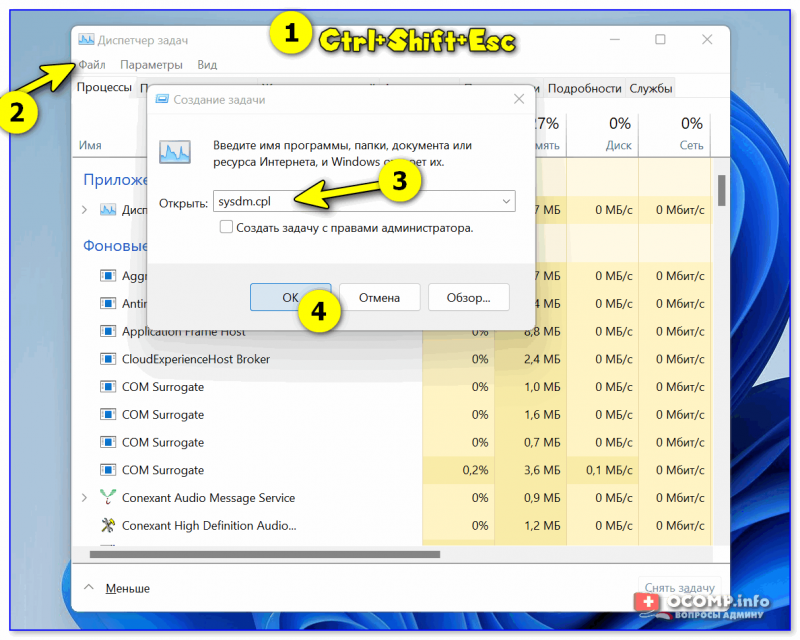
- нажать сочетание Ctrl+Shift+Esc (или Ctrl+Alt+Del) для вызова диспетчера задач;
- в диспетчере задач нажать по меню: «Файл / новая задача»;
- в строку «Открыть» ввести команду sysdm.cpl и нажать Enter. См. пример ниже. 👇
*
Примечание: вместо sysdm.cpl можно использовать команду: shell:::{bb06c0e4-d293-4f75-8a90-cb05b6477eee}
sysdm.cpl — диспетчер задач
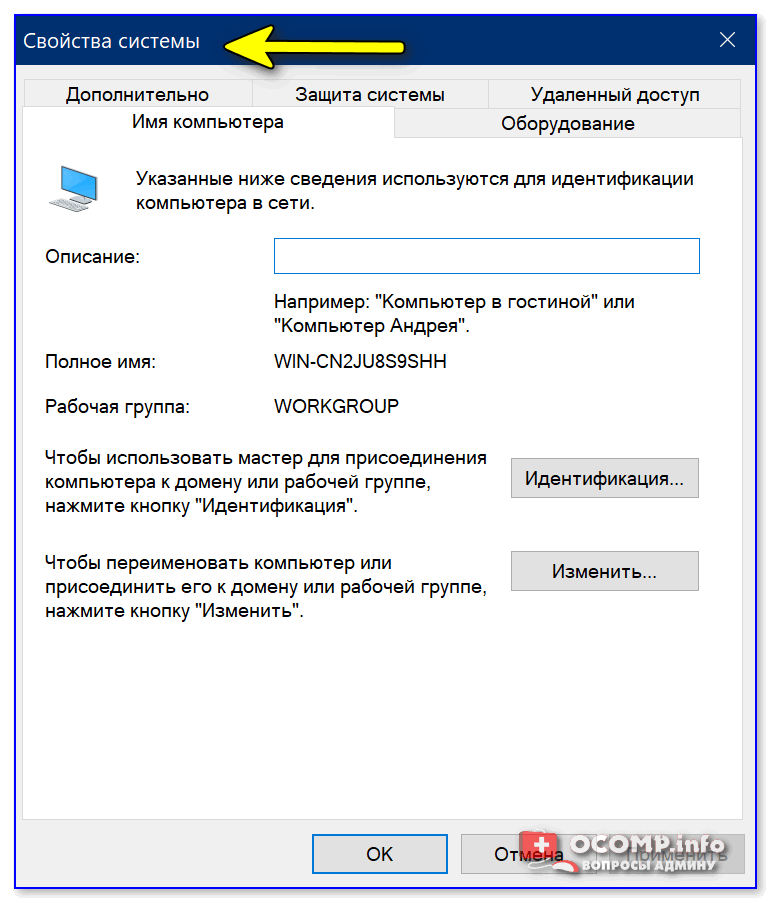
Сразу после этого должно открыться окно «Свойства системы» (окно, кстати, «старого» образца! Прим.: просто в Windows 11 при использовании других способов — это окно со свойствами заменили на вкладку из параметров системы — что далеко не всегда удобно…).
Свойства открыты
*
👉 В этом окне свойств можно:
- изменить имя компьютера и рабочую группу (необходимо при настройке лок. сети);
- вызвать диспетчер устройств;
- настроить создание точек восстановления;
- изменить параметры загрузки системы, ее быстродействия и пр.
*
Способ 2
Актуально для Windows 10/11.
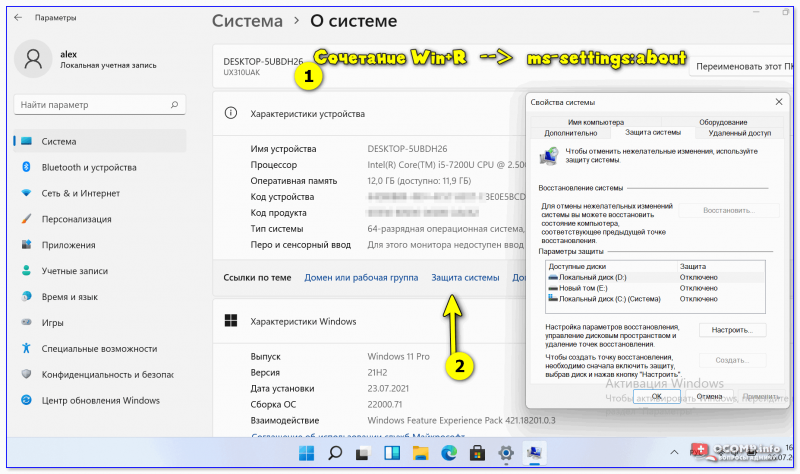
- нажать сочетание Win+R (можно запустить диспетчер задач по Ctrl+Alt+Del и создать новую задачу);
- в строку «Открыть» ввести команду ms-settings:about и нажать Enter;
- должны открыться параметры ОС — здесь можно будет узнать не только тех. характеристики компьютера, но и вызвать диспетчер устройств, окно «Свойства системы» и т.д. См. пример ниже. 👇
*
👉 Доп. в помощь!
Как открыть параметры в Windows 11/10. Что делать, если параметры не открываются (+ таблицы ms-settings для доступа к основным настройкам системы).
О системе Windows 11
*
Способ 3
Универсальный способ!
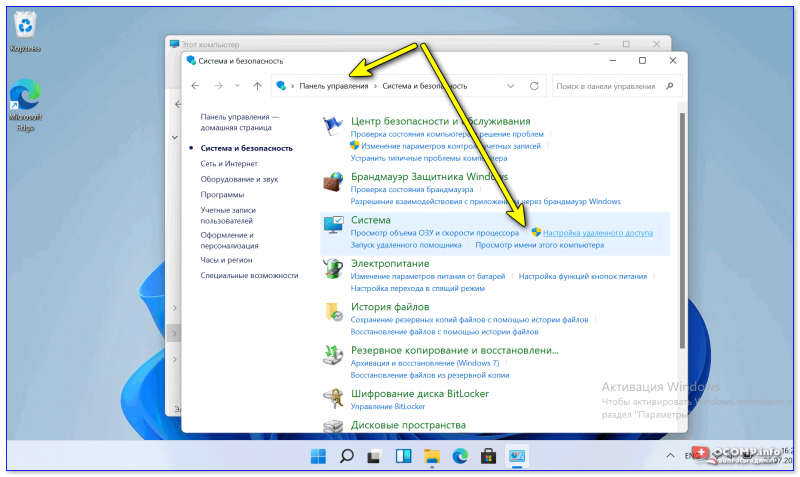
- необходимо сначала открыть 👉 контрольную панель / Control Panel;
- перейти раздел «Система и безопасность» и кликнуть по ссылке «Система» (либо по любой другой из ее подраздела);
- в зависимости от вашей версии Windows — откроется либо «старое» окно со свойствами системы, либо «новая» вкладка из параметров…
Контрольная панель управления — система
*
Способ 4
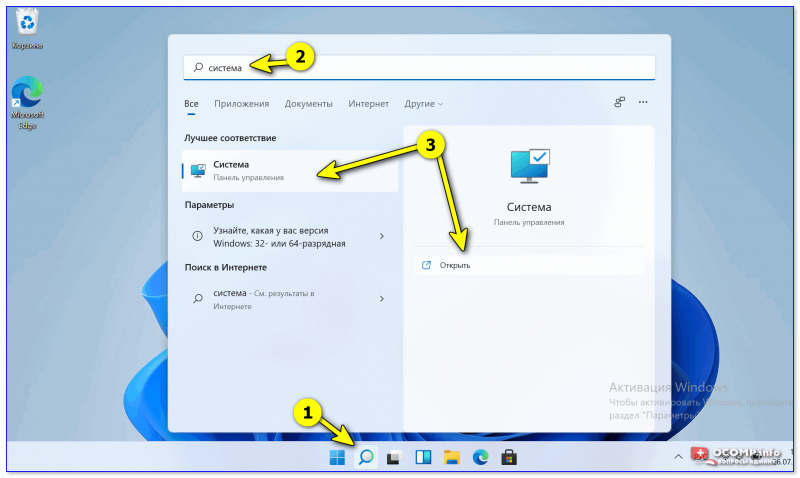
- нажать по значку «Лупы» рядом с поиском;
- ввести «Система» (без кавычек) в поисковую строку;
- из найденных результатов выбрать «Система // панель управления» и открыть ссылку… Пример на скриншоте ниже. Актуально для разных версий Windows… 👌
Поиск — система
*
Способ 5
Один из самых «древних» и распространенных способов.
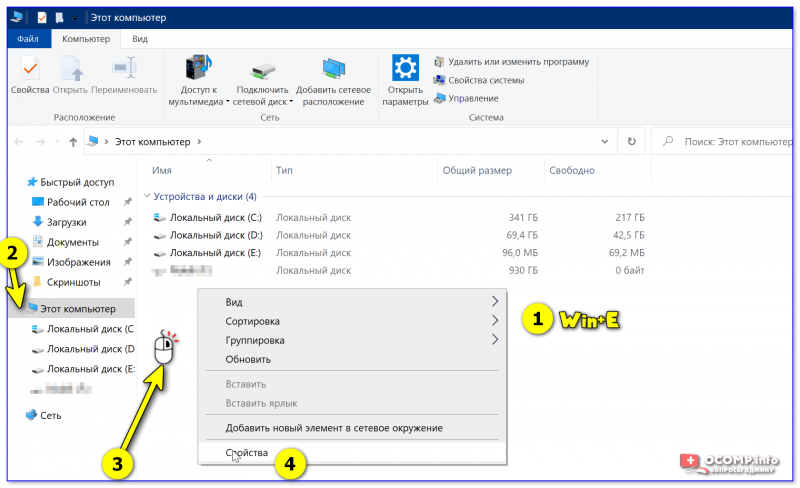
- сначала необходимо открыть проводник // любую папку (Win+E);
- в меню слева перейти во вкладку «Мой компьютер // Этот компьютер»;
- кликнуть правой кнопкой мышки в любом свободном месте окна;
- в появившемся меню кликнуть по пункту «Свойства». Пример ниже. 👇👌
Свойства — мой компьютер
*
👉 Доп. в помощь!
1) Список команд «Выполнить» — WIN+R / строка «Открыть».
2) Таблицы сочетаний клавиш на клавиатуре: для работы с текстом, ввода спец-символов, горячие клавиши Windows.
*
Дополнения и иные решения — приветствуются!
Удачи!
👋


This post discussed by MiniTool includes two parts. On the one hand, it teaches you solutions for how to open Windows 11 System Configuration app ordered by easiness. On the other hand, this essay offers you several ways to check your system information/specs.
How to Get to Msconfig in Windows 11?
The following will provide multiple methods for getting access to MSConfig (system configuration) in Windows 11.
#1 Open Windows 11 System Configuration Through Search
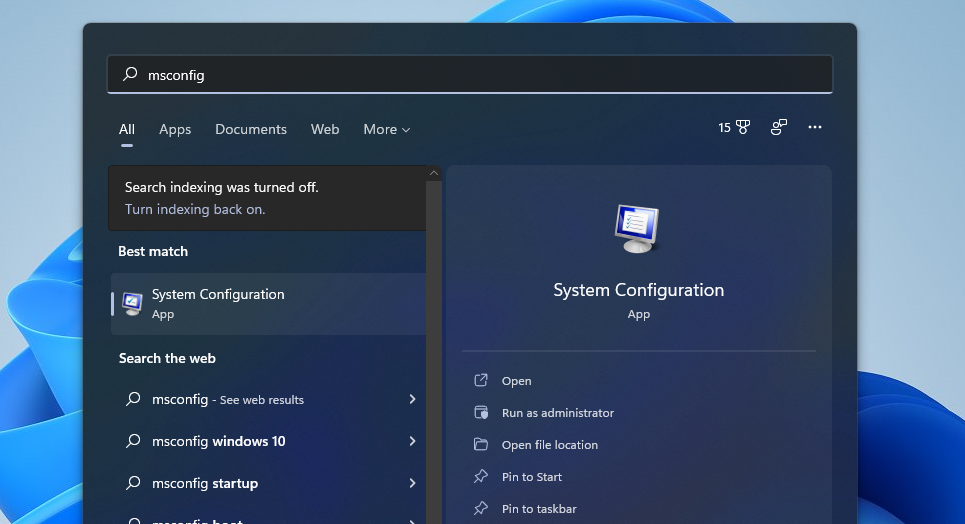
First of all, you can launch the System Configuration application in Windows 11 by searching. Generally, type “system configuration” or “msconfig” in Windows Search and click the result (or click the Open option) to start the app. If you want to open an elevated version, just select Run as administrator.
#2 Launch System Configuration Windows 11 with Windows Run
Secondly, you can start System Configuration relying on the Run box. Open Windows 11 Run dialog, input “msconfig” and press Enter key or click OK.
#3 Start Windows 11 System Configuration Within CMD
Thirdly, you are able to trigger the System Configuration program with the help of a command prompt (CMD). Launch CMD in Win11, key in “msconfig” or “start msconfig”, and press Enter.
#4 Trigger System Configuration Win11 via PowerShell
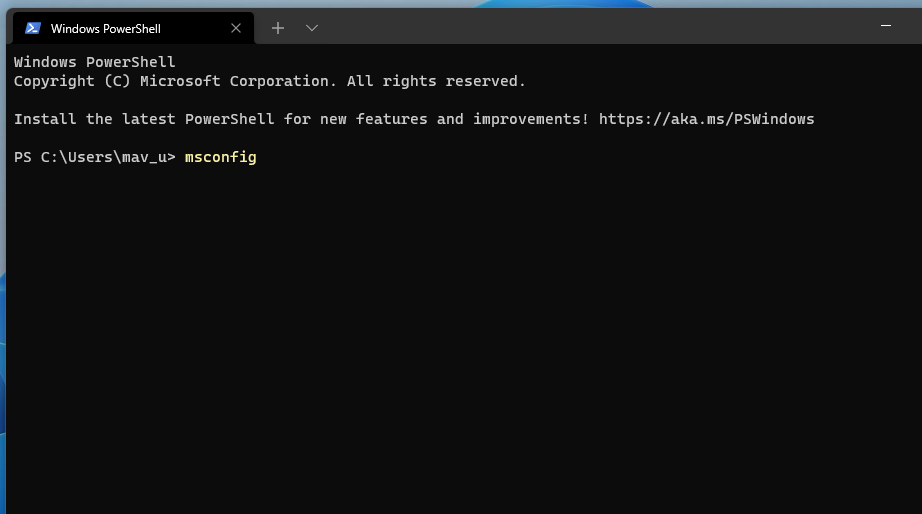
Also, you can open Windows 11 System Configuration using a specific command in PowerShell. Start Win 11 PowerShell, type “msconfig” or “start msconfig”, and press Enter key.
#5 Open System Configuration Windows 11 in File Explorer
Besides, you can initiate System Configuration in Windows eleven under Windows Explorer. Open any Windows File Explorer, input “msconfig” into the address bar, and press Enter.
#6 Launch Windows 11 System Configuration by Windows Tools
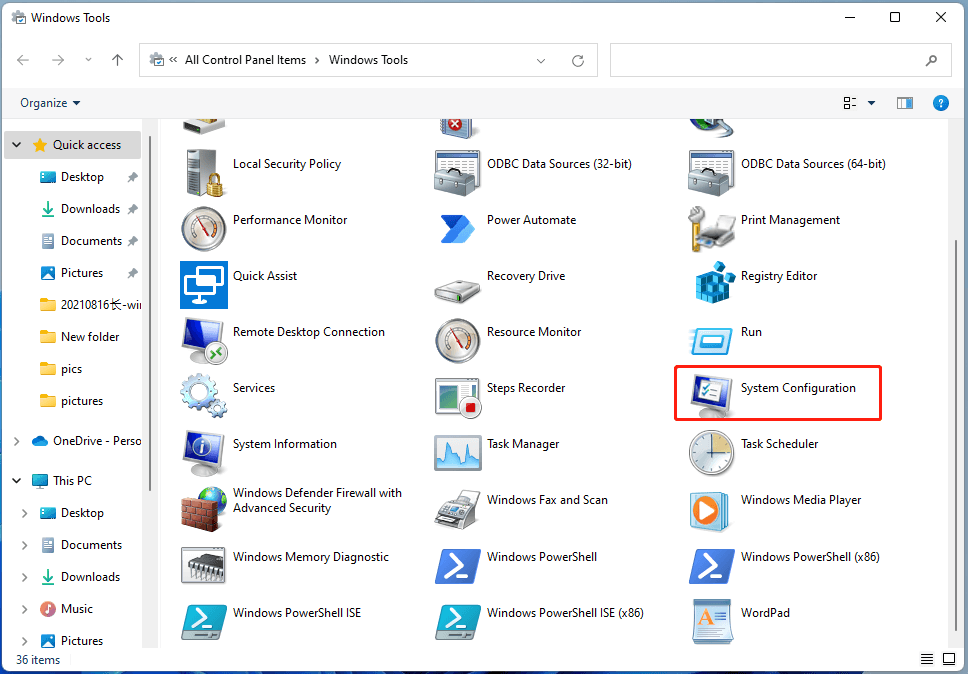
Next, you can get access to System Configuration from Windows Tools. Open Windows 11 Tools, find and double-click System Configuration there.
#7 Open Windows 11 System Configuration by Creating Shortcut
Finally, you can launch Win11 System Configuration with its desktop shortcut. Right-click on your desktop and choose New > Shortcut. In the popup, input “msconfig” and click OK > Finish.
How to Check System Configuration in Windows 11?
Usually, the purpose that we open System Configuration software is for checking for the current computer’s system information or properties. Yet, you can directly view system information with the below solutions.
#1 Check System Information in Windows Settings
To view system info, just go to Windows 11 Start > Settings > System > About.
You can also access the above page by right-clicking on This PC and choosing Properties.
#2 View System Information with Its App
Or, you can take advantage of the System Information app to look at the details.
#3 Find Windows 11 System Information by Command
Also, you can rely on a command platform, CMD or PowerShell, to check your OS information. Just make use of systeminfo command.
Tip: You can also use the Windows Run box to perform systeminfo command.
Or, input get-computerinfo command in PowerShell.
#4 Check System Info by DirectX Diagnostic Tool
Besides, you are able to view your system information with the DirectX Diagnostic Tool.
#5 View System Information Within Task Manager
Moreover, you can view your hardware information including CPU, memory, disk, Ethernet, and GPU specifics in the Performance tab in Task Manager.
#6 View System Information with Third-Party Apps
Finally, you can make use of third-party tools to check Windows 11 information like CPU-Z, Speccy, HWiNFO, etc.
Windows 11 Assistant Software Recommended
The new and powerful Windows 11 will bring you many benefits. At the same time, it will also bring you some unexpected damages such as data loss. Thus, it is strongly recommended that you back up your crucial files before or after upgrading to Win11 with a robust and reliable program like MiniTool ShadowMaker, which will assist you to protect your increasing data automatically on schedules!
MiniTool ShadowMaker TrialClick to Download100%Clean & Safe
MSConfig is a great way to tweak your system, and there are many ways to open this useful app in Windows 11.
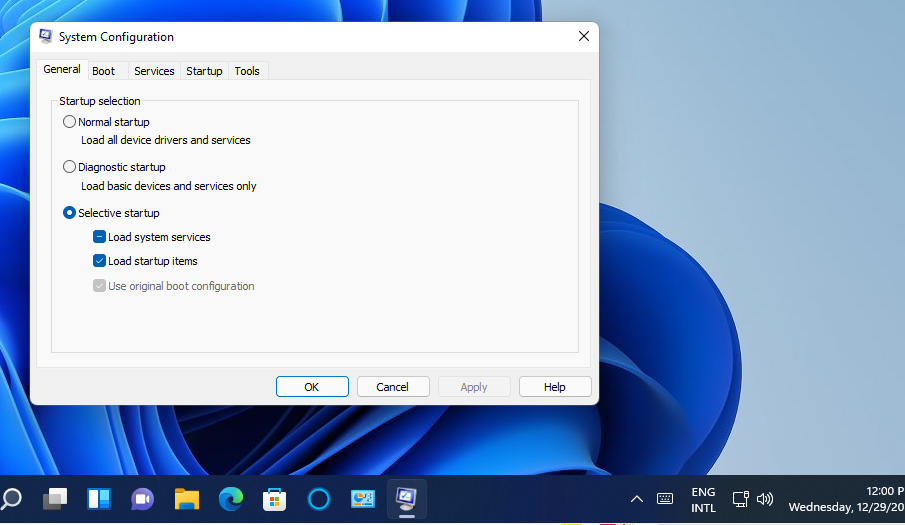
MSConfig (otherwise known as System Configuration) is a handy troubleshooting utility that’s been a part of Windows since 1998. You can use this handy tool to reconfigure your operating system’s startup by changing boot settings and disabling (or enabling) services. By doing so, you can stop conflicting programs or services starting with Windows.You can resolve numerous issues that arise in Windows 11 with System Configuration. When a game doesn’t start, for example, opening and changing the MSConfig settings might fix it. As such, here are eight different ways you can open MSConfig in Windows 11.
1. Open MSConfig With Run
Run is a built-in accessory you can launch many Windows tools with. You can open MSConfig with that accessory by entering a quick command for it. Here is how to open MSConfig with Run.
- First, open the WinX menu by pressing the Win + X key combination.
- Select Run on the menu to open its window.
- Type msconfig in the text box.
- Click OK to bring up the System Configuration window.
The Windows search utility provides a quick and easy way to find and launch most built-in tools and accessories. You can find and launch MSConfig in no time at all with the search box. To do so, just follow these quick steps.
- Click the magnifying glass taskbar icon to bring up a search box.
- Type the keyword MSConfig in the search box to find System Configuration.
- Click System Configuration in the search results to open MSConfig.
- Or click Run as administrator for System Configuration on the right side of the search box.
3. Open MSConfig With Windows Terminal
Windows Terminal is an app that incorporates both Command Prompt and PowerShell. You can open MSConfig with both those command-line tools in much the same way as with Run. If you prefer to utilize command-line utilities, this is how you can open MSConfig via Windows Terminal.
- Right-click Start and select Windows Terminal (Admin) on the menu.
- If a UAC prompt pops up, select the Yes option on it.
- Click the Open a new tab button, and select the Windows PowerShell or Command Prompt utility you prefer.
- Then type in msconfig within a PowerShell or Command Prompt tab, and press the Enter key to open.
4. Open MSConfig With File Explorer
Explorer is the built-in file manager utility within Windows from which you can launch software and tools. You can open MSConfig from its System32 folder or by entering some text within Explorer’s path box. Either way, this is how to bring up MSConfig via File Explorer.
- Press Explorer’s convenient Win + E keyboard shortcut to open that file manager.
- Click inside Explorer’s folder path bar, and erase whatever text is there.
- Then tap in msconfig in the folder path bar, and press the Return key.
- Alternatively, open MSConfig’s folder at its C: > Windows > System32 path. Then you can click msconfig in that folder to open System Configuration.
5. Open MSConfig With Task Manager
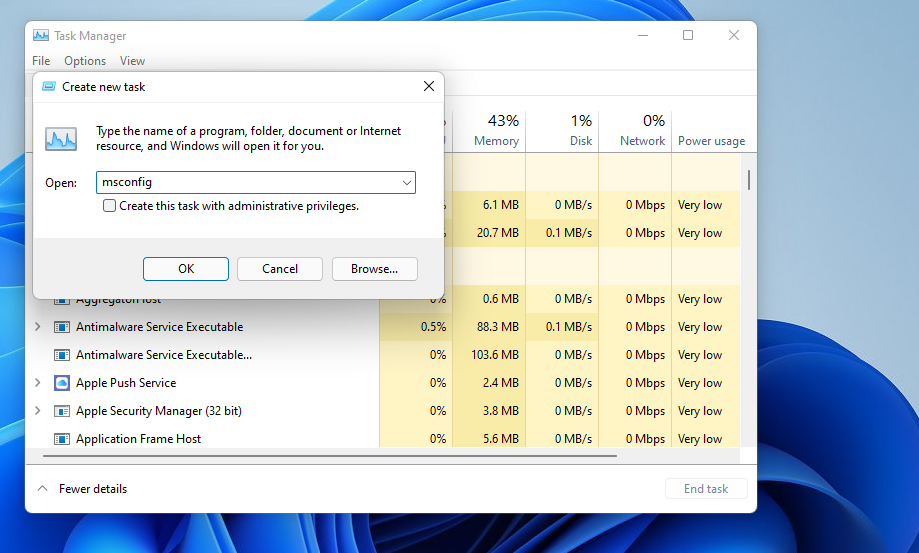
Task Manager is Windows 11’s system resource manager, which provides an overview of processes. You can also open MSConfig via that utility by selecting its Run new task option. That option opens a Create new task window, which is very similar to the Run accessory. Follow these steps to open MSConfig from Task Manager.
- Bring up Task Manager by right-clicking Start and selecting it on the WinX menu.
- Click the File menu in Task Manager.
- Select the Run new task option.
- Type msconfig within the Open box there.
- You can also select a Create this task with administrative privileges option there.
- Select the OK option to bring up MSConfig.
6. Open MSConfig With Cortana
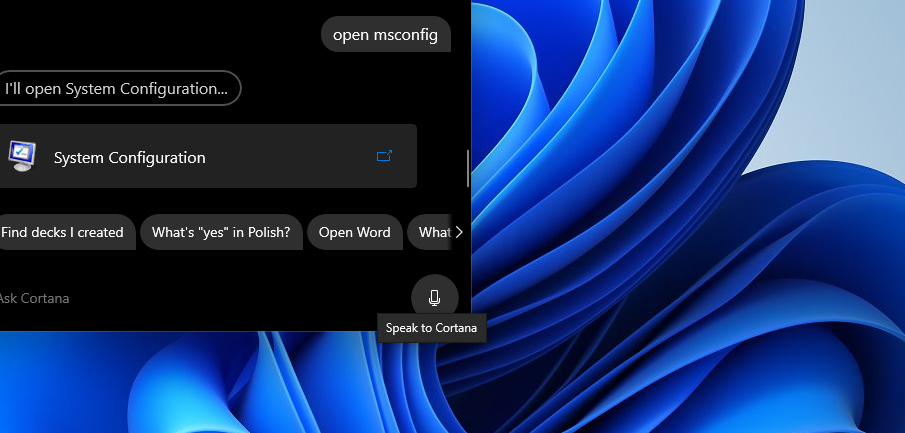
Cortana is your digital assistant in Windows 11 with which you can launch both third-party software and system tools. It’s a pretty cool app that accepts both text and voice (vocal) commands for launching software and tools. You can open MSConfig with Cortana like this.
- Click the round Cortana circle icon on your taskbar.
- Type open MSConfig within the Ask Cortana box.
- Then press the Enter key to launch System Configuration.
- If your PC’s microphone is enabled, you can also give a voice command by clicking the Speak to Cortana button. Then say “open MSConfig” to ask Cortana to launch System Configuration.
Setting up a desktop, taskbar, or Start menu shortcut for MSConfig will give you a more direct way to launch System Configuration. When you’ve established a desktop shortcut for MSConfig, you can move it to the taskbar or pin it to the Start menu. This is how you can set up an MSConfig desktop shortcut within Windows 11.
- Right-click an area of your desktop wallpaper and select New > Shortcut on the context menu.
- Type msconfig within the location box.
- Select Next to proceed.
- Enter MSConfig in the shortcut title text box.
- Click Finish to add the new MSConfig shortcut.
Now you can click the MSConfig desktop shortcut whenever you need to open System Configuration. If you would prefer it on the taskbar, right-click the shortcut and select Show more options > Pin to taskbar. Alternatively, select the Pin to Start option to add an MSConfig shortcut to the Start menu.
8. Set Up an MSConfig Keyboard Shortcut
Keyboard shortcuts for Windows system tools are even more convenient than desktop ones. When you’ve set up an MSConfig desktop shortcut, you can give it a hotkey as well. Then you can press a System Configuration hotkey whenever you need that tool. You can establish an MSConfig keyboard shortcut as follows.
- First, add an MSConfig shortcut to the desktop as covered in the seventh method.
- Right-click the MSConfig shortcut on your desktop and select Properties to view the Shortcuts tab.
- Click inside the Shortcut key box.
- Press M to establish a Ctrl + Alt + M key combo for the System Configuration tool.
- Select Apply to save the new hotkey.
- Click OK to exit the shortcut’s properties window.
Now press the Ctrl + Alt + M keys at the same time to launch MSConfig. Remember that the hotkey depends on the desktop shortcut you applied it to. So, you’ll need to keep the MSConfig shortcut on the desktop to utilize the hotkey.
Troubleshoot Windows 11 With MSConfig
So, there are various ways you can open MSConfig in Windows 11. If you want the most direct access to System Configuration, set up a desktop, taskbar, Start menu, or keyboard shortcut for it. Whatever method you choose to open it with, you’ll find MSConfig to be a handy troubleshooting utility with which to disable superfluous third-party startup items and modify boot options. System Configuration’s Tools tab also includes a list of handy shortcuts for opening numerous other built-in utilities.

