Enables an administrator to create, delete, query, change, run and end scheduled tasks on a local or remote system.
Runs a scheduled task immediately.
Stops a running scheduled task.
If omitted the system parameter defaults to the local system.
Prompts for input if omitted.
For the system account, valid values are «», «NT AUTHORITY\SYSTEM» or «SYSTEM».
For v2 tasks, «NT AUTHORITY\LOCALSERVICE» and «NT AUTHORITY\NETWORKSERVICE» are also available as well as the well known SIDs for all three.
To prompt for the password, the value must be either «*» or none.
This password is ignored for the system account.
Must be combined with either
/RU or /XML switch.Valid schedule types: MINUTE, HOURLY, DAILY, WEEKLY, MONTHLY, ONCE, ONSTART, ONLOGON, ONIDLE, ONEVENT.
Valid values are listed in the «Modifiers» section below.
Valid values: MON, TUE, WED, THU, FRI, SAT, SUN and for MONTHLY schedules 1 — 31 (days of the month).
Wildcard «*» specifies all days.
Defaults to the first day of the month.
Valid values: JAN, FEB, MAR, APR, MAY, JUN, JUL, AUG, SEP, OCT, NOV, DEC.
Wildcard «*» specifies all months.
Valid range: 1 — 999 minutes.
Example: C:\windows\system32\calc.exe
The time format is HH:MM:SS (24 hour time) for example, 14:30:00 for 2:30 PM.
Defaults to current time if
/ST is not specified.This option is required with
/SC ONCE.The format is «dd/mm/yyyy».
This is not applicable for schedule types: MINUTE, HOURLY, ONSTART, ONLOGON, ONIDLE, ONEVENT.
Valid range: 1 — 599940 minutes.
If either /ET or /DU is specified, then it defaults to 10 minutes.
The time format is HH:mm (24 hour time) for example, 14:50 for 2:50 PM.
This is not applicable for schedule types: ONSTART, ONLOGON, ONIDLE, ONEVENT.
The time format is HH:mm.
This is not applicable with /ET and for schedule types: ONSTART, ONLOGON, ONIDLE, ONEVENT.
For /V1 tasks, if /RI is specified, duration defaults to 1 hour.
This is not applicable for schedule types: ONSTART, ONLOGON, ONIDLE, ONEVENT.
Either /ET or /DU must be specified.
The format is dd/mm/yyyy.
Defaults to the current date.
This is not applicable for schedule types: ONCE, ONSTART, ONLOGON, ONIDLE, ONEVENT.
The format is «dd/mm/yyyy».
This task runs only if the user is logged in.
The task runs non-interactively as the given user.
Only local resources are available.
Can be combined with /RU and /RP switches, or with /RP alone, when task XML already contains the principal.
Not compatible with /XML.
Valid values are LIMITED and HIGHEST.
The default is LIMITED.
The time format is mmmm:ss.
This option is only valid for schedule types ONSTART, ONLOGON, ONEVENT.
The /RP password will be prompted for.
The outer quotes for CMD need to be double quotes; the inner quotes can be single quotes or escaped double quotes:
Deletes one or more scheduled tasks.
Enables an administrator to display the scheduled tasks on the local or remote system.
Changes the program to run, or user account and password used by a scheduled task.
Prompts for input if omitted.
For the system account, valid values are «», «NT AUTHORITY\SYSTEM» or «SYSTEM».
Password will not effect for the system account.
Type the path and file name of the program.
The time format is HH:mm (24 hour time) for example, 14:30 for 2:30 PM.
Valid range: 1 — 599940 minutes.
The time format is HH:mm (24 hour time) for example, 14:50 for 2:50 PM.
The time format is HH:mm. This is not applicable with /ET.
The format is dd/mm/yyyy.
The format is dd/mm/yyyy.
This task runs only if the user is logged in.
Valid values are LIMITED and HIGHEST.
The default is to not change it.
The time format is mmmm:ss.
This option is only valid for schedule types ONSTART, ONLOGON, ONEVENT.
Shows the SID for the task’s dedicated user.
‘Schedule tasks‘ is a GUI application using which we can schedule tasks, There is an equivalent utility which provides the same functionality but with the advantage that it can be used from windows command line. This command is Schtasks. This is an in-built windows command supported by XP, Vista and Windows 7. Let’s see the syntax of this command with the help of few examples.
How to schedule a task ?
If you are logged into the same computer where you want to run the scheduled task, then you can use the below command to create the task.
Schtasks create /RU username /RP password /SC schedule_frequency /MO Schedule_modifier /D days /M months /TN taskname /TR Task_command /ST start_time /SD start_day /ED end_date
Now let’s see few examples.
Example 1: Schedule disk defragmentation on every Saturday at 10AM. User credentials are administrator/password.
Schtasks /create /RU administrator /RP adminpassword /SC weekly /D SAT /TN defrag /TR c:\windows\system32\defrag.exe /ST 10:00:00
If the specified username and password are correct, then you would get the below message when you run the above command.
SUCCESS: The scheduled task "defrag" has successfully been created.
If the credentials are not correct, you may get a warning like below.
WARNING: The Scheduled task "defrag5" has been created, but may not run because the account information could not be set.
If there exists a scheduled task with the same name then the error would be:
specified task name already exists in the system.
If you need to use a domain user account to run the task you can specify domainname\username with /RU option.
How to get the list of scheduled tasks?
Just run Schtasks command and you can see the list of scheduled commands.
C:\>schtasks

TaskName                             Next Run Time            Status
==================================== ======================== ===============
defrag                               10:00:00, 3/12/2011
GoogleUpdateTaskUserS-1-5-21-3567637 11:14:00, 3/6/2011
GoogleUpdateTaskUserS-1-5-21-3567637 13:14:00, 3/5/2011
If you want complete details about each of the tasks you can run the command ‘Schtasks /query /v
Delete a scheduled task
We can delete a schedule task using ‘schtasks /delete /TN task_name‘ command. For example, to delete the task we created in the example 1 we can run the below command.
Schtasks /delete /TN defrag
Delete all the scheduled tasks
You can run the below command to delete all the scheduled tasks.
schtasks /delete /TN *
Disable a scheduled task
There does not seem to be a way to disable a scheduled task from command line. We can delete the tasks as mentioned above.
Modify a scheduled task:
We can change a scheduled task using ‘schtasks /change’ command. Run ‘schtasks /change /?’ for the syntax.
Давайте посмотрим, как запустить Планировщик заданий Windows на компьютере разными способами. Оснастка Планировщик заданий — компонент операционной системы Windows для выполнения различных заданий, запланированных в определенное время.
С помощью Планировщика заданий выполняются работы по автоматическому обслуживанию операционной системы, выполняется отложенный запуск приложений и т. п. Часть заданий запланирована в Планировщике самой Windows, другие задания автоматически добавляются программами или планируются пользователем, после добавления задания вручную в средство системы.
Содержание:
- Как открыть Планировщик заданий в окне «Выполнить»
- Как открыть Планировщик заданий при помощи поиска Windows
- Запуск Планировщика заданий в командной строке
- Как открыть Планировщик заданий в Windows PowerShell
- Открытие Планировщика заданий в Управление компьютером
- Открываем Планировщик заданий из меню «Пуск»
- Как открыть планировщик заданий Windows из Панели управления
- Выводы статьи
Планировщик заданий позволяет запланировать и автоматически выполнить конкретные действия на компьютере в определенное время, без участия пользователя. Среди выполняемых операций могут быть совсем нежелательные задания.
Например, на вашем компьютере при старте системы вдруг стал автоматически открываться браузер на какой-нибудь странице, обычно, с рекламой. Велика вероятность, что вирус или вредоносное программное обеспечение, при установке на компьютер, добавило свое задание в Планировщик заданий (хотя могут быть и другие способы для автоматического открытия нежелательных страниц) для автоматического запуска приложения. Для решения проблемы, потребуется войти в Планировщик заданий, а затем найти и отключить ненужное задание.
Как открыть Планировщик заданий Windows? Есть несколько способов для запуска оснастки в операционной системе. В статье мы разберем варианты, которые подходят для Windows 10, Windows 8.1, Windows 8, Windows 7.
Как открыть Планировщик заданий в окне «Выполнить»
Универсальный способ для запуска Планировщика заданий во всех версиях операционной системы Windows: запуск команды с помощью диалогового окна «Выполнить».
Проделайте следующие действия:
- Нажмите одновременно на клавиши клавиатуры «Win» + «R».
- В окне «Выполнить», в поле «Открыть:» введите команду: «taskschd.msc» (без кавычек), а затем нажмите на кнопку «ОК».

На Рабочем столе компьютера откроется оснастка Планировщик заданий. Теперь вы можете посмотреть запланированные задания, при необходимости, изменить или удалить ненужные задания.
При работе с планировщиком или другими средствами системы, пользователь должен понимать к чему могут привести те или иные изменения. Если вы не уверены, что совершаете правильные действия, ничего не меняйте.

Как открыть Планировщик заданий при помощи поиска Windows
Следующий способ: использование штатной функции поиска в операционной системе Windows. Выполняемое действие подобно во всех версиях системы, отличается только интерфейс Виндовс.
В Windows 7 войдите в меню «Пуск», введите выражение «планировщик заданий» (без кавычек) в поле «Найти программы и файлы», запустите приложение.
В Windows 8.1 и Windows 8 проведите курсором мыши сверху вниз в правой части экрана, в боковой панели, в поле «Поиск» введите выражение «планировщик заданий» (без кавычек), запустите системное средство.
В Windows 10 кликните по значку поиска на Панели задач, введите выражение «планировщик заданий» (без кавычек), запустите классическое приложение.
Запуск Планировщика заданий в командной строке
Далее рассмотрим еще один инструмент для того, чтоб открыть Планировщик заданий — командная строка. О том, как найти командную строку в Windows 10 читайте здесь.
Выполните следующее:
- Запустите командную строку от имени администратора.
- В окне интерпретатора командной строки введите команду: «taskschd.msc» (без кавычек), а затем нажмите на клавишу «Enter».

После этого, на компьютере откроется окно «Планировщик заданий».
Как открыть Планировщик заданий в Windows PowerShell
Еще один из способов для запуска планировщика на компьютере: с помощью средства Windows PowerShell.
В Windows 10 сделайте следующее:
- Щелкните правой кнопкой мыши по меню «Пуск», выберите «Windows PowerShell (администратор)».
- В окне «Администратор: Windows PowerShell» введите команду: «taskschd.msc» (без кавычек), а после этого нажмите на клавишу клавиатуры «Enter».

В результате, на ПК будет открыт Планировщик заданий.
Открытие Планировщика заданий в Управление компьютером
Планировщик заданий встроен в консоль Управление компьютером, оттуда его можно открыть.
Для запуска консоли Управление компьютером можно воспользоваться диалоговым окном «Выполнить», введя команду: «compmgmt.msc» (без кавычек).
Другой способ войти в консоль Управление компьютером:
- Кликните по значку «Мой компьютер» («Этот компьютер») на Рабочем столе. Прочитайте тут, как вернуть значок «Мой компьютер» на Рабочий стол.
- В контекстном меню выберите пункт «Управление».
В окне «Управление компьютером» в разделе «Управление компьютером (локальный)» в списке служебных программ отобразится Планировщик заданий.

Открываем Планировщик заданий из меню «Пуск»
Планировщик заданий присутствует в списке приложений меню «Пуск». Для запуска приложения необходимо войти в меню «Пуск», среди списка программ найти папку «Средства администрирования», а затем запустить Планировщик заданий.
Как открыть планировщик заданий Windows из Панели управления
В завершении, мы запустим системное средство из Панели управления. Сначала необходимо открыть Панель управления операционной системы.
Мы запустим Панель Управления способом, который работает во всех версиях Windows:
- Нажмите на клавиши «Win» + «R».
- В диалоговом окне «Выполнить» введите команду «control» (без кавычек), а затем нажмите на кнопку «ОК».
- После запуска Панели управления, в настройках просмотра необходимо выбрать «Мелкие значки».
- В окне «Все элементы панели управление» нажмите на «Администрирование».
- В окне «Администрирование» выберите «Планировщик заданий».

Выводы статьи
В случае необходимости, пользователь может открыть Планировщик заданий в Windows разными способами: вводом команды из диалогового окна «Выполнить», из командной строки, из Windows PowerShell, осуществить запуск приложения из меню «Пуск», из оснастки Управление компьютером, из Панели управления, с помощью поиска.
Похожие публикации:
- Как открыть реестр Windows: все способы
- Как скрыть раздел диска в Windows — 4 способа
- Как установить пароль на флешку в BitLocker
- Быстрая помощь Windows 10 — приложение Quick Assist
- Как убрать защиту от записи с флешки — 5 способов
Время на прочтение
7 мин
Количество просмотров 16K
Автоматическая установка операционных систем семейства Windows требует от системного администратора тщательной проработки всех этапов выполнения. Давно интересуюсь данной темой, однако, в ходе многолетнего опыта по созданию собственных настроенных и обновлённых сборок Windows мной был упущен аспект работы с Планировщиком заданий. Разработчики Windows закладывают задачи, выполняемые в будущем по-расписанию, но ненужные и порой вредные «рядовому» пользователю. Список этих задач предлагаю к рассмотрению и обсуждению в данной статье.
Я уже писал здесь статьи про быструю и тонкую настройку операционной системы путём применения собранных мной твиков реестра, также была серия статей посвященных работе с образом Windows посредством DISM, где выкладывались мои скрипты: добавления пакетов обновлений, отключения компонентов, удаления «магазинных» приложений, получения информации из образа Windows. Скрипт приведённый в этой статье элементарный, основной интерес направлен на сам список задач, которые я предлагаю убрать из Планировщика заданий.
Скрипт
@echo off

schtasks /Delete /tn "\Microsoft\Windows\AppID\SmartScreenSpecific" /f                                        &rem - 9 B
schtasks /Delete /tn "\Microsoft\Windows\Application Experience\AitAgent" /f                                  &rem 7 9 -
schtasks /Delete /tn "\Microsoft\Windows\Application Experience\Microsoft Compatibility Appraiser" /f         &rem 7 9 B
schtasks /Delete /tn "\Microsoft\Windows\Application Experience\ProgramDataUpdater" /f                        &rem 7 9 B
schtasks /Delete /tn "\Microsoft\Windows\Application Experience\StartupAppTask" /f                            &rem - 9 B
schtasks /Delete /tn "\Microsoft\Windows\ApplicationData\appuriverifierdaily" /f                              &rem - - B
schtasks /Delete /tn "\Microsoft\Windows\ApplicationData\appuriverifierinstall" /f                            &rem - - B
schtasks /Delete /tn "\Microsoft\Windows\Autochk\Proxy" /f                                                    &rem 7 9 B

schtasks /Delete /tn "\Microsoft\Windows\Customer Experience Improvement Program\BthSQM" /f                   &rem - 9 -
schtasks /Delete /tn "\Microsoft\Windows\Customer Experience Improvement Program\Consolidator" /f             &rem 7 9 B
schtasks /Delete /tn "\Microsoft\Windows\Customer Experience Improvement Program\KernelCeipTask" /f           &rem 7 9 B
schtasks /Delete /tn "\Microsoft\Windows\Customer Experience Improvement Program\UsbCeip" /f                  &rem 7 9 B

schtasks /Delete /tn "\Microsoft\Windows\Defrag\ScheduledDefrag" /f                                           &rem 7 9 B
schtasks /Delete /tn "\Microsoft\Windows\Device Information\Device" /f                                        &rem - - B
schtasks /Delete /tn "\Microsoft\Windows\Diagnosis\Scheduled" /f                                              &rem 7 9 B
schtasks /Delete /tn "\Microsoft\Windows\DiskDiagnostic\Microsoft-Windows-DiskDiagnosticDataCollector" /f     &rem 7 9 B

schtasks /Delete /tn "\Microsoft\Windows\LanguageComponentsInstaller\Installation" /f                         &rem - - B
schtasks /Delete /tn "\Microsoft\Windows\LanguageComponentsInstaller\Uninstallation" /f                       &rem - - B

schtasks /Delete /tn "\Microsoft\Windows\Maintenance\WinSAT" /f                                               &rem 7 9 B
schtasks /Delete /tn "\Microsoft\Windows\Maps\MapsToastTask" /f                                               &rem - - B
schtasks /Delete /tn "\Microsoft\Windows\Maps\MapsUpdateTask" /f                                              &rem - - B
schtasks /Delete /tn "\Microsoft\Windows\Mobile Broadband Accounts\MNO Metadata Parser" /f                    &rem - 9 B
schtasks /Delete /tn "\Microsoft\Windows\MobilePC\HotStart" /f                                                &rem 7 - -
schtasks /Delete /tn "\Microsoft\Windows\MUI\LPRemove" /f                                                     &rem 7 9 B

schtasks /Delete /tn "\Microsoft\Windows\NetTrace\GatherNetworkInfo" /f                                       &rem 7 9 B

schtasks /Delete /tn "\Microsoft\Windows\Power Efficiency Diagnostics\AnalyzeSystem" /f                       &rem 7 9 B

schtasks /Delete /tn "\Microsoft\Windows\RAC\RacTask" /f                                                      &rem 7 9 -
schtasks /Delete /tn "\Microsoft\Windows\RemoteAssistance\RemoteAssistanceTask" /f                            &rem 7 9 B
schtasks /Delete /tn "\Microsoft\Windows\RetailDemo\CleanupOfflineContent" /f                                 &rem - - B

schtasks /Delete /tn "\Microsoft\Windows\SettingSync\BackgroundUploadTask" /f                                 &rem - 9 B
schtasks /Delete /tn "\Microsoft\Windows\SettingSync\BackupTask" /f                                           &rem - 9 B
schtasks /Delete /tn "\Microsoft\Windows\SettingSync\NetworkStateChangeTask" /f                               &rem - 9 B
schtasks /Delete /tn "\Microsoft\Windows\Setup\EOSNotify" /f                                                  &rem 7 9 -
schtasks /Delete /tn "\Microsoft\Windows\Setup\EOSNotify2" /f                                                 &rem 7 9 -
schtasks /Delete /tn "\Microsoft\Windows\Setup\SetupCleanupTask" /f                                           &rem - 9 B
schtasks /Delete /tn "\Microsoft\Windows\Speech\SpeechModelDownloadTask" /f                                   &rem - - B
schtasks /Delete /tn "\Microsoft\Windows\SystemRestore\SR" /f                                                 &rem 7 9 B

schtasks /Delete /tn "\Microsoft\Windows\Time Synchronization\SynchronizeTime" /f                             &rem 7 9 B

schtasks /Delete /tn "\Microsoft\Windows\Windows Error Reporting\QueueReporting" /f                           &rem 7 9 B
schtasks /Delete /tn "\Microsoft\Windows\WindowsBackup\ConfigNotification" /f                                 &rem 7 - -
schtasks /Delete /tn "\Microsoft\Windows\WS\License Validation" /f                                            &rem - 9 -
schtasks /Delete /tn "\Microsoft\Windows\WS\WSRefreshBannedAppsListTask" /f                                   &rem - 9 -

schtasks /Delete /tn "\Microsoft\XblGameSave\XblGameSaveTask" /f                                              &rem - - B
schtasks /Delete /tn "\Microsoft\XblGameSave\XblGameSaveTaskLogon" /f                                         &rem - - B

timeout 3 > nul
Использование
Запуск под учётной записью администратора приводит к выполнению последовательности команд schtasks с аргументом /Delete (удалить) последующее имя задачи за аргументом /tn. Ключ /f подавляет вывод уведомлений о подтверждении. Достаточно одного выполнения скрипта, а повторные запуски лишь отобразят список ошибок из-за невозможности удалить то, чего уже нет. Скрипт не наделён «интерактивностью», так как используется в процессе автоматической установки Windows.
Применимость
Список задач, подлежащих удалению данным скриптом, составлен для следующих версий ОС: Windows 7 Professional VL SP1 (updated Jan 2020 — End of Support), Windows 8.1 Professional VL Update3 (updated Jan 2023 — End of Support), Windows 10 v1607 Enterprise LTSB (updated Jan 2023). Изначально хотел написать отдельные скрипты для каждой версии Windows, но увидел, что список задач значительно повторяется и поэтому объединил в один. В планах добавить в список ненужные задачи из следующих версий ОС: Windows 10 v1809 Enterprise LTSC, Windows 10 v21H2 Professional BE (business editions) — на базе которых также делаю свои сборки.
Комментирование
Чтобы не запутаться в списке задач — откуда каждая из них взялась и стоит ли её удалять — в комментарии, в конце строки каждой команды можно видеть подсказку в каких версиях Windows удаляемая задача встречается. Это удобно для анализа и редактирования списка. Также присутствует алфавитная сортировка задач, с группировкой разделов по первой букве. Взгляните, в Windows 7 ненужных задач было не много — всего 22, в Windows 8.1 их уже стало 30, в Windows 10 LTSB уже 41! Страшно представить сколько «мусора» в Планировщике заданий я обнаружу в версии Windows 10 Enterprise LTSC и особенно в Windows 10 21H2.
Откуда список
Я составлял данный список путём вдумчивого чтения описания каждой задачи и анализа параметров её запуска. За дополнительной информацией обращался к источникам в Интернете, в том числе англоязычным, в том числе официальным. Не всегда мне удавалось найти однозначный ответ на вопрос: «стоит удалять данную задачу или нет?». Бывало так, что описание у задачи отсутствовало, параметры запуска скрыты, триггеры срабатывания отсутствуют, но при этом задача почему-то выполнялась. В сети Интернет не нашел аналогичного списка с развёрнутой дискуссией обсуждения целесообразности включения в него тех или иных задач.
Удаление или отключение?
Консольная команда schtasks имеет полный набор аргументов для управления Планировщиком заданий Windows. В ходе поиска информации по отдельным задачам в сети Интернет мне попадались скрипты других авторов, где ненужные задачи отключались (подаргумент /disable аргумента /Change). Я использую более радикальный подход — просто удаляю (аргумент /Delete) ненужные мне задачи. Ведь вариант «отключение» подразумевает что мне когда-нибудь понадобится включить некоторую задачу. Не представляю себе ситуацию, когда мне понадобится снова включить, например, уведомление об окончании срока поддержки или телеметрию. Что скажете?
Вердикт на удаление
Какие задачи в Планировщике заданий принимать к рассмотрению? Рассмотрим какие задачи бывают, в каком состоянии и насколько открыты. На начальном этапе были мысли написать простой скрипт, который бы удалял вообще все задачи (без разбора), но данный подход опасен тем, что может привести к снижению производительности и надёжности системы, так что пришлось разбираться. Итак:
- Состояние — Отключено
Я не включал в список на удаление задачи в состоянии «Отключено». Как правило это либо «артефакты» прошлых версий Windows, либо уже отключенные самими разработчиками посредством пакетов обновлений, либо ещё что… - Бесполезное обслуживание
Это пример задач которые запускают ежедневное/еженедельное выполнение различных служб в назначенное время, как правило ночью. Как итог, эти задачи не выполняются так как ночью мой компьютер («рядового» пользователя) отключён. Также мне не надо чтобы днём отвлекались ресурсы моего компьютера. - Телеметрия
Это страшное слово знакомо многим системным администраторам и не только. Значительная часть удаляемых по моему списку задач относится к средствам телеметрии и слежения за пользователем со стороны компании Майкрософт. Мой компьютер — это МОЙ КОМПЬЮТЕР! - «Тёмные лошадки»
Самая сложная категория задач. Как правило, много их появилось в версии Windows 10. Отличительные особенности: описание размыто или отсутствует, параметры запуска скрыты, триггеры срабатывания отсутствуют, но при этом задача каким-то чудом регулярно запускается, о чём указано в поле «Время прошлого запуска».
Обсуждение
Конечно, представленный мной список может быть не полным или наоборот избыточным. Есть вероятность, что я не распознал в какой-то задаче «скрытого пожирателя ресурсов» или наоборот включил в список задачу удаление которой скорее навредит работоспособности ОС. Прошу аргументированно высказывать своё мнение, делится опытом. В данном ключе обсуждение может начинаться по двум сценариям:
- Вы включили в список задачу «X», удаление которой приведёт к следующим негативным последствиям…
- Вы не включили в список задачу «Y», которая является вредной, так как выполняет следующие действия…
Список составлен для компьютера предназначенного для домашнего использования. Прошу к рассмотрению и обсуждению!
Windows 10 ships with Task Scheduler, which is an advanced tool that allows you to create and run routines automatically. Using this tool, you can automate tasks to perform all sorts of things, including launching an app, running a specific command, or executing a script at a specified day and time, or when a particular condition is met using triggers.
Although there’s a graphical experience to use Task Scheduler, you can also use Command Prompt to create, edit, and delete tasks, which can come in handy in many situations. For instance, when you need to speed up the process to create the same task on multiple computers, and when building an application or script that needs to connect with the tool — just to name a few.
In this Windows 10 guide, we’ll walk you through the steps to get started managing scheduled tasks using the schtasks.exe tool on Command Prompt.
- How to create a scheduled task using Command Prompt
- How to change a scheduled task using Command Prompt
- How to delete a scheduled task using Command Prompt
How to create a scheduled task using Command Prompt
To create a scheduled task with Command Prompt on Windows 10, use these steps:
- Open Start.
- Search for Command Prompt, right-click the top result, and select the Run as administrator option.
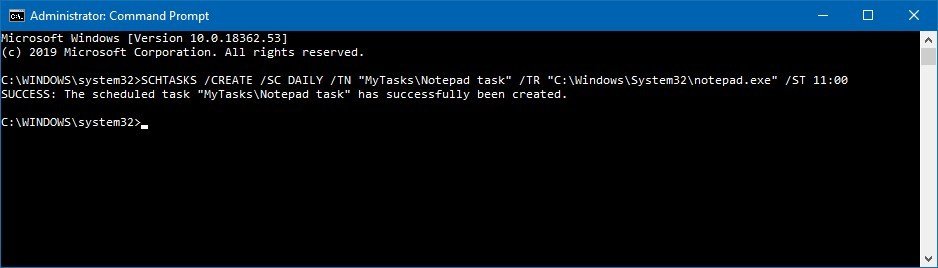
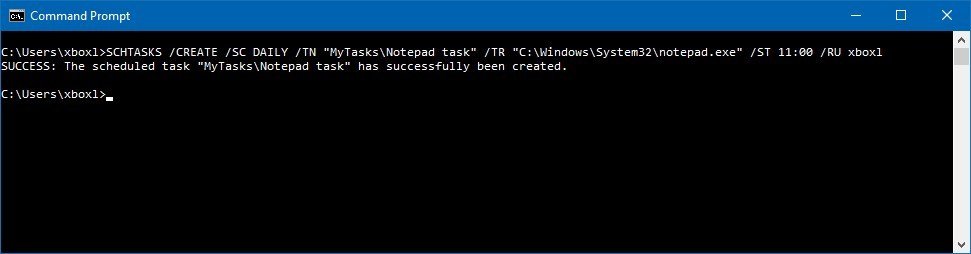
- Type the following command to create a daily task to run an app at 11:00am and press Enter:Syntax
SCHTASKS /CREATE /SC DAILY /TN "FOLDERPATH\TASKNAME" /TR "C:\SOURCE\FOLDER\APP-OR-SCRIPT" /ST HH:MMExampleSCHTASKS /CREATE /SC DAILY /TN "MyTasks\Notepad task" /TR "C:\Windows\System32\notepad.exe" /ST 11:00Quick tip: The folder path before the task name, under the /TN option, is not a requirement, but it’ll help you to keep your tasks separate. If you don’t specify a path, the task will be created inside the Task Scheduler Library folder.
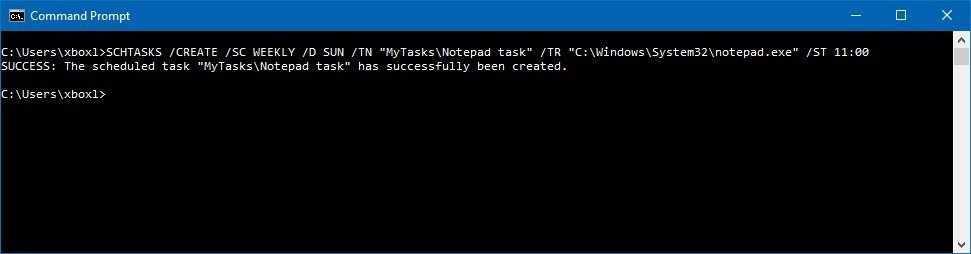
- Type the following command to create a weekly task to run an app at 11:00am and press Enter:Syntax
SCHTASKS /CREATE /SC WEEKLY /D SUN /TN "FOLDERPATH\TASKNAME" /TR "C:\SOURCE\FOLDER\APP-OR-SCRIPT" /ST HH:MMExampleSCHTASKS /CREATE /SC WEEKLY /D SUN /TN "MyTasks\Notepad task" /TR "C:\Windows\System32\notepad.exe" /ST 11:00
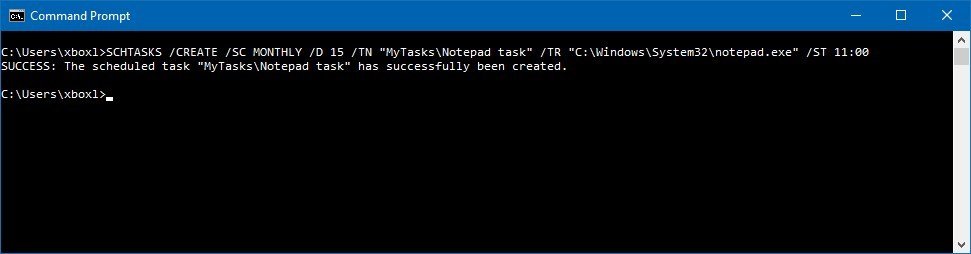
- Type the following command to create a monthly task to run an app at 11:00am and press Enter:Syntax
SCHTASKS /CREATE /SC MONTHLY /D 15 /TN "FOLDERPATH\TASKNAME" /TR "C:\SOURCE\FOLDER\APP-OR-SCRIPT" /ST HH:MMExampleSCHTASKS /CREATE /SC MONTHLY /D 15 /TN "MyTasks\Notepad task" /TR "C:\Windows\System32\notepad.exe" /ST 11:00
- Type the following command to create a scheduled task that runs daily as a specific user and press Enter:Syntax
SCHTASKS /CREATE /SC DAILY /TN "FOLDERPATH\TASKNAME" /TR "C:\SOURCE\FOLDER\APP-OR-SCRIPT" /ST HH:MM /RU USER-ACCOUNTExampleSCHTASKS /CREATE /SC DAILY /TN "MyTasks\Notepad task" /TR "C:\Windows\System32\notepad.exe" /ST 11:00 /RU admin
Once you complete the steps, the task will run during the intervals you specified.
Task Scheduler create options
The command line version of Task Scheduler ships with many options allowing to customize many aspects of a task, and in this guide, we are using the following options to change a scheduled task:
- /CREATE — specifies that you want to create a new an automated routine.
- /SC — defines the schedule for the task. Options available, include MINUTE, HOURLY, DAILY, WEEKLY, MONTHLY, ONCE, ONSTART, ONLOGON, ONIDLE, and ONEVENT.
- /D — specifies the day of the week to execute the task. Options available, include MON, TUE, WED, THU, FRI, SAT, and SUN. If you’re using the MONTHLY option, then you can use 1 — 31 for the days of the month. Also, there’s the wildcard «*» that specifies all days.
- /TN — specifies the task name and location. The «MyTasks\Notepad task» uses the «Notepad task» as the name and stores the task in the «MyTasks» folder. If the folder isn’t available, it’ll be created automatically.
- /TR — specifies the location and the name of the task that you want to run. You can select an app or custom script.
- /ST — defines the time to run the task (in 24 hours format).
- /QUERY — displays all the system tasks.
- /RU — specifies the task to run under a specific user account.
These are just some of the available options. You can learn more about the options to create a scheduled task running the
SCHTASKS /CREATE /?command.
How to change a scheduled task using Command Prompt
To modify a scheduled task on Windows 10 with Command Prompt, use these steps:
- Open Start.
- Search for Command Prompt, right-click the top result, and select the Run as administrator option.
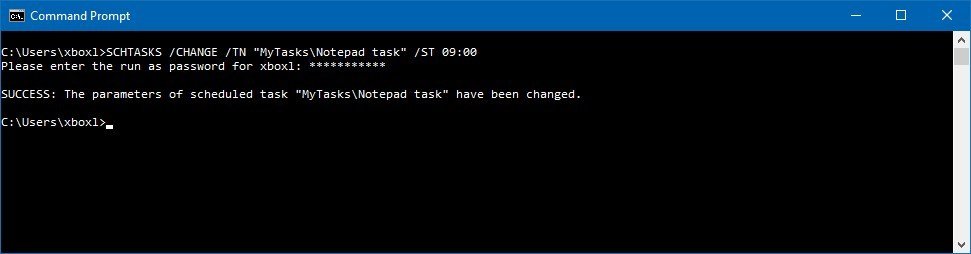
- Type the following command to change the time to run the task 9:00am and press Enter:Syntax
SCHTASKS /CHANGE /TN "FOLDERPATH\TASKNAME" /ST HH:MMExampleSCHTASKS /CHANGE /TN "MyTasks\Notepad task" /ST 09:00
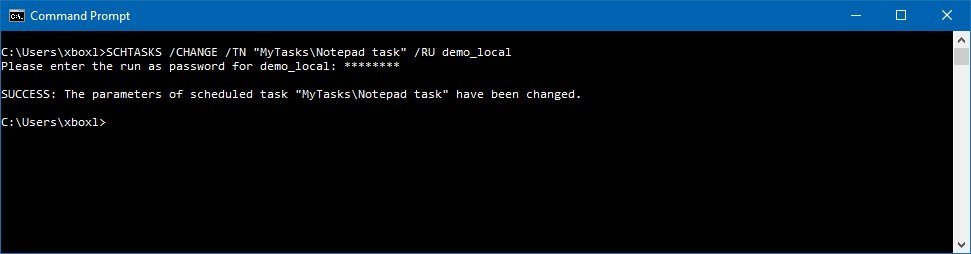
- Type the following command to change the task user information and press Enter:Syntax
SCHTASKS /CHANGE /TN "FOLDERPATH\TASKNAME" /RU NEW-USERNAMEExampleSCHTASKS /CHANGE /TN "MyTasks\Notepad task" /RU admin2
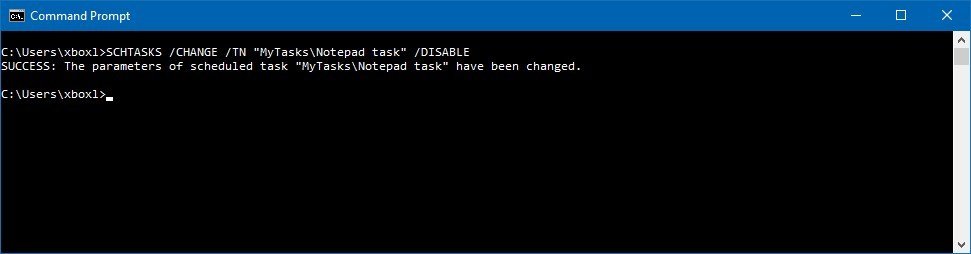
- Type the following command to disable a scheduled task and press Enter:Syntax
SCHTASKS /CHANGE /TN "FOLDERPATH\TASKNAME" /DISABLEExampleSCHTASKS /CHANGE /TN "MyTasks\Notepad task" /DISABLEQuick tip: If you want to re-enable the task, you can use the same command, but make sure to use the/ENABLEoption instead.
After completing the steps, the task will be modified with the information that you’ve specified.
Task Scheduler change options
In this guide, we are using the following options to create a scheduled task:
- /CHANGE — specifies that you want to edit an existing task.
- /TN — specifies the name and location of the task that you want to modify.
- /ST — defines the new time to run the automated routine.
- /DISABLE — disables the task.
These are just some of the available options. You can learn more about the options to change a scheduled task running the
SCHTASKS /CHANGE /?command.
How to delete a scheduled task using Command Prompt
If you no longer need a particular task, you can delete it using these steps:
- Open Start.
- Search for Command Prompt, right-click the top result, and select the Run as administrator option.
- Type the following command to delete a scheduled task and press Enter:Syntax
SchTask /DELETE /TX "FOLDERPATH\TASKNAME"ExampleSCHTASKS /DELETE /TN "MyTasks\Notepad task"
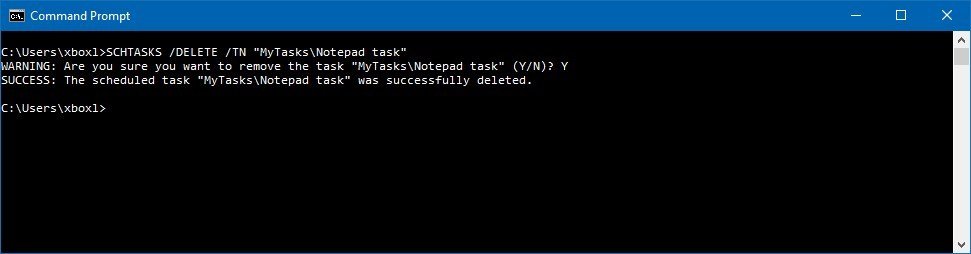
- Press the Y key to confirm.
Once you complete the steps, the task will be removed, and it’ll no longer be available on your device.
Task Scheduler delete options
In this guide, we are using the following options to delete a scheduled task:
- /DELETE — specifies that you want to delete an existing task.
- /TN — specifies the name and location of the task that you want to delete.
We’re focusing this guide on Windows 10, but the ability to use Task Scheduler with Command Prompt has been around for a long time, which means that you can also use these steps on Windows 8.1 and Windows 7.
All the latest news, reviews, and guides for Windows and Xbox diehards.
Mauro Huculak is technical writer for WindowsCentral.com. His primary focus is to write comprehensive how-tos to help users get the most out of Windows 10 and its many related technologies. He has an IT background with professional certifications from Microsoft, Cisco, and CompTIA, and he’s a recognized member of the Microsoft MVP community.