Windows 8.1 Windows 8.1 Enterprise Windows 8.1 Pro Windows 8 Windows 8 Enterprise Windows 8 Pro Windows 7 Enterprise Windows 7 Home Basic Windows 7 Home Premium Windows 7 Professional Windows 7 Starter Windows 7 Ultimate Windows Vista Enterprise 64-bit Edition Windows Vista Ultimate 64-bit Edition Windows Vista Business Windows Vista Business 64-bit Edition Windows Vista Enterprise Windows Vista Ultimate Windows 10 More…Less
If some Windows functions aren’t working or Windows crashes, use the System File Checker to scan Windows and restore your files.
Though the steps below might look complicated at first glance, just follow them in order, step-by-step, and we’ll try to get you back on track.
Run the System File Checker tool (SFC.exe)
To do this, follow these steps:
-
Open an elevated command prompt. To do this, do the following as your appropriate:
-
If you are running Windows 10, Windows 8.1 or Windows 8, first run the inbox Deployment Image Servicing and Management (DISM) tool prior to running the System File Checker. (If you are running Windows 7 or Windows Vista, skip to Step 3.)
Type the following command, and then press Enter. It may take several minutes for the command operation to be completed.
DISM.exe /Online /Cleanup-image /Restorehealth
Important: When you run this command, DISM uses Windows Update to provide the files that are required to fix corruptions. However, if your Windows Update client is already broken, use a running Windows installation as the repair source, or use a Windows side-by-side folder from a network share or from a removable media, such as the Windows DVD, as the source of the files. To do this, run the following command instead:
DISM.exe /Online /Cleanup-Image /RestoreHealth /Source:C:\RepairSource\Windows /LimitAccess
Note: Replace the C:\RepairSource\Windows placeholder with the location of your repair source. For more information about using the DISM tool to repair Windows, reference Repair a Windows Image.
-
At the command prompt, type the following command, and then press ENTER:
sfc /scannow
The sfc /scannow command will scan all protected system files, and replace corrupted files with a cached copy that is located in a compressed folder at %WinDir%\System32\dllcache.
The %WinDir% placeholder represents the Windows operating system folder. For example, C:\Windows.
Note Do not close this Command Prompt window until the verification is 100% complete. The scan results will be shown after this process is finished.
-
After the process is finished, you may receive one of the following messages:
-
Windows Resource Protection did not find any integrity violations.
This means that you do not have any missing or corrupted system files. -
Windows Resource Protection could not perform the requested operation.
To resolve this problem, perform the System File Checker scan in safe mode, and make sure that the PendingDeletes and PendingRenames folders exist under %WinDir%\WinSxS\Temp. -
Windows Resource Protection found corrupt files and successfully repaired them. Details are included in the CBS.Log %WinDir%\Logs\CBS\CBS.log.
To view the detail information about the system file scan and restoration, go to How to view details of the System File Checker process. -
Windows Resource Protection found corrupt files but was unable to fix some of them. Details are included in the CBS.Log %WinDir%\Logs\CBS\CBS.log.
To repair the corrupted files manually, view details of the System File Checker process to find the corrupted file, and then manually replace the corrupted file with a known good copy of the file.
-
Swipe in from the right edge of the screen, and then tap Search. Or, if you are using a mouse, point to the lower-right corner of the screen, and then click Search. Type Command Prompt in the Search box, right-click Command Prompt, and then click Run as administrator. If you are prompted for an administrator password or for a confirmation, type the password, or click Allow.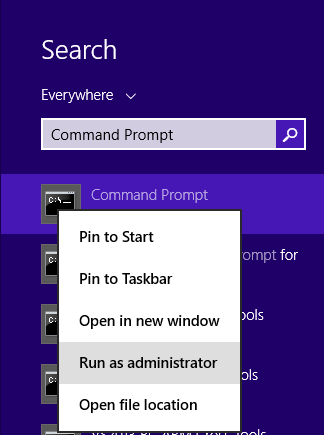
To do this, click Start, type Command Prompt or cmd in the Search box, right-click Command Prompt, and then click Run as administrator. If you are prompted for an administrator password or for a confirmation, type the password, or click Allow.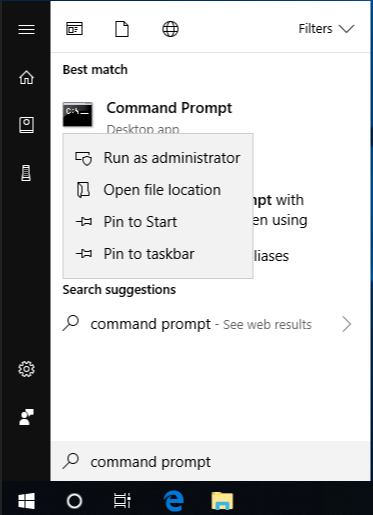
More Information
How to view details of the System File Checker process
To view the details that included in the CBS.Log file, you can copy the information to the Sfcdetails.txt file by using the Findstr command, and then view the details in the Sfcdetails.txt. To do this, follow these steps:
-
Open an elevated command prompt as described in the previous step 1.
-
At the command prompt, type the following command, and then press ENTER:
findstr /c:"[SR]" %windir%\Logs\CBS\CBS.log >"%userprofile%\Desktop\sfcdetails.txt"
Note The Sfcdetails.txt file contains details from every time that the System File Checker tool has been run on the computer. The file includes information about files that were not repaired by the System File Checker tool. Verify the date and time entries to determine the problem files that were found the last time that you ran the System File Checker tool.
-
Open the Sfcdetails.txt file from your desktop.
-
The Sfcdetails.txt file uses the following format:
Date/Time SFC detail
The following sample log file contains an entry for a file that could not be repaired:2007-01-12 12:10:42, Info CSI 00000008 [SR] Cannot
repair member file [l:34{17}]»Accessibility.dll» of Accessibility, Version =
6.0.6000.16386, pA = PROCESSOR_ARCHITECTURE_MSIL (8), Culture neutral,
VersionScope neutral, PublicKeyToken = {l:8 b:b03f5f7f11d50a3a}, Type
neutral, TypeName neutral, PublicKey neutral in the store, file is missing
How to manually replace a corrupted system file with a known good copy of the file
After you determine which system file was corrupted and could not be repaired through the detail information in the Sfcdetails.txt file, find where the corrupted file located, and then manually replace the corrupted file with a known good copy of the file. To do this, follow these steps:
Note You may be able to get a known good copy of the system file from another computer that is running the same version of Windows with your computer. You may perform a System File Checker process on that computer to make sure the system file that you intend to copy is a good copy.
-
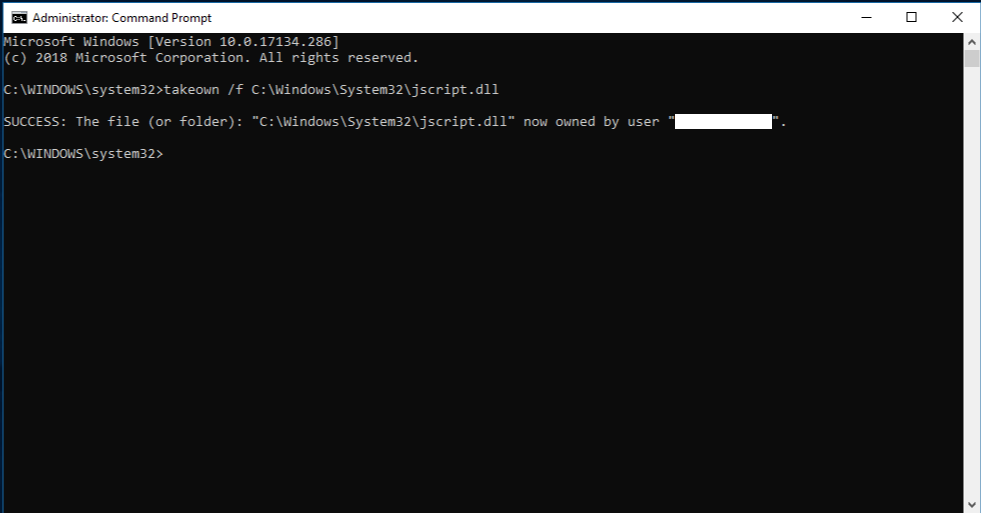
Take administrative ownership of the corrupted system file. To do this, at an elevated command prompt, copy and then paste (or type) the following command, and then press ENTER:
takeown /f Path_And_File_Name
Note The Path_And_File_Name placeholder represents the path and the file name of the corrupted file. For example, type takeown /f C:\windows\system32\jscript.dll.

-
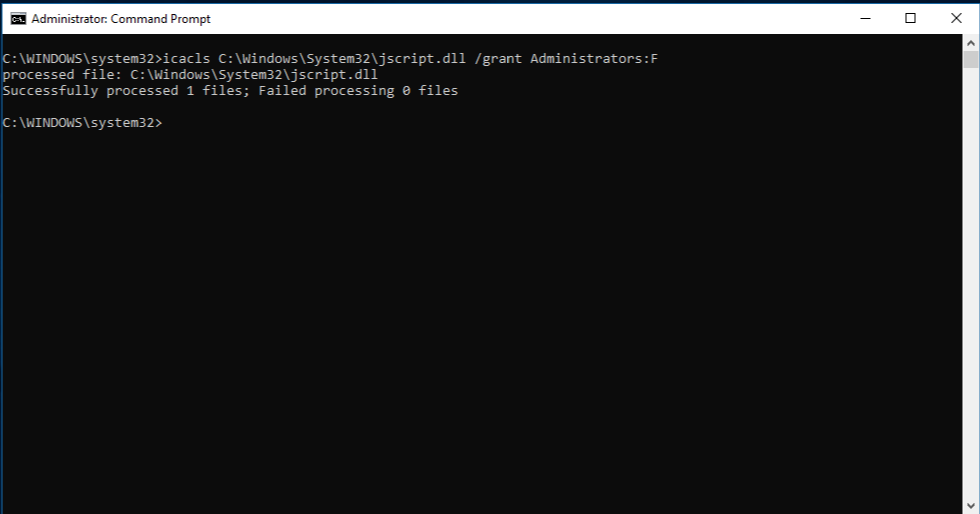
Grant administrators full access to the corrupted system file. To do this, copy and paste (or type) the following command, and then press ENTER:
icacls Path_And_File_Name /GRANT ADMINISTRATORS:F
Note The Path_And_File_Name placeholder represents the path and the file name of the corrupted file. For example, type icacls C:\windows\system32\jscript.dll /grant administrators:F. -
Replace the corrupted system file with a known good copy of the file. To do this, copy and paste (or type) the following command, and then press ENTER:
Copy Source_File Destination
Note The Source_File placeholder represents the path and file name of the known good copy of the file on your computer, and the Destination placeholder represents the path and file name of the corrupted file. For example, type copy E:\temp\jscript.dll C:\windows\system32\jscript.dll.
If the steps above don’t work, you may need to reinstall Windows. For more info, see Windows 10 recovery options.
Need more help?
Want more options?
Explore subscription benefits, browse training courses, learn how to secure your device, and more.
Communities help you ask and answer questions, give feedback, and hear from experts with rich knowledge.
Windows 8.1 Windows 8.1 Enterprise Windows 8.1 Pro Windows 8 Windows 8 Enterprise Windows 8 Pro Windows 7 Enterprise Windows 7 Home Basic Windows 7 Home Premium Windows 7 Professional Windows 7 Starter Windows 7 Ultimate Windows Vista Enterprise 64-bit Edition Windows Vista Ultimate 64-bit Edition Windows Vista Business Windows Vista Business 64-bit Edition Windows Vista Enterprise Windows Vista Ultimate Windows 10 Еще…Меньше
Если некоторые функции Windows не работают или Windows завершает работу, используйте средство проверки системных файлов для сканирования Windows и восстановления файлов.
Несмотря на то, что приведенные ниже шаги могут показаться сложными на первом этапе, просто выполните их по порядку, и мы попробуем помочь вам.
Запуск средства проверки системных файлов (SFC.exe)
выполнив указанные ниже действия.
-
Откройте командную строку с повышенными привилегиями. Для этого выполните указанные ниже действия, в зависимости от версии операционной системы:
-
Пользователям Windows 10, Windows 8.1 или Windows 8 перед запуском средства проверки системных файлов нужно запустить систему обслуживания образов развертывания и управления ими (DISM). (Если на вашем компьютере установлена система Windows 7 или Windows Vista, перейдите сразу к шагу 3.)
Введите следующую команду и нажмите клавишу ВВОД. Выполнение команды может занять несколько минут.
DISM.exe /Online /Cleanup-image /Restorehealth
Важно! При запуске этой команды DISM обращается к Центру обновления Windows, чтобы получить файлы для устранения повреждений. Но если поврежден клиент Центра обновления Windows, используйте работающий экземпляр Windows в качестве источника восстановления либо параллельную папку Windows из сетевого расположения или со съемного носителя, например DVD-диска Windows, в качестве источника файлов. Для этого введите в командной строке такую команду:
DISM.exe /Online /Cleanup-Image /RestoreHealth /Source:C:\RepairSource\Windows /LimitAccess
Примечание. Вместо заполнителя C:\RepairSource\Windows укажите расположение вашего источника восстановления. Дополнительные сведения об использовании средства DISM для восстановления Windows см. в статье Восстановление образа Windows.
-
Введите в командной строке приведенную ниже команду и нажмите клавишу ВВОД:
sfc /scannow

Команда sfc /scannow проверит все защищенные системные файлы и заменит поврежденные файлы их кэшированной копией, расположенной в сжатой папке по адресу %WinDir%\System32\dllcache.
Заполнитель %WinDir% представляет собой папку операционной системы Windows. Например, C:\Windows.
Примечание. Не закрывайте это окно командной строки, пока проверка не завершится на 100 %. Результаты проверки будут показаны после завершения данного процесса.
-
После завершения процесса проверки на экране может появиться одно из приведенных ниже сообщений:
-
Защита ресурсов Windows не обнаружила нарушений целостности.
Это значит, что отсутствующие и поврежденные системные файлы не обнаружены. -
Защита ресурсов Windows не может выполнить запрошенную операцию.
Для устранения этой проблемы выполните сканирование с помощью средства проверки системных файлов в безопасном режиме, убедитесь, что папки PendingDeletes и PendingRenames находятся в папке %WinDir%\WinSxS\Temp. -
Защита ресурсов Windows обнаружила поврежденные файлы и успешно их восстановила. Сведения см. в журнале CBS.Log %WinDir%\Logs\CBS\CBS.log.
Для просмотра подробных сведений о сканировании и восстановлении системных файлов перейдите к разделу Как просмотреть подробные сведения процесса работы средства проверки системных файлов. -
Защита ресурсов Windows обнаружила поврежденные файлы, но не может восстановить некоторые из них. Сведения см. в журнале CBS.Log %WinDir%\Logs\CBS\CBS.log.
Для восстановления поврежденных файлов вручную просмотрите подробные сведения процесса работы средства проверки системных файлов, чтобы найти поврежденный файл, а затем вручную заменить поврежденный файл гарантировано работоспособной копией.
-
Проведите пальцем от правого края экрана к центру и коснитесь кнопки Поиск. Либо, если вы используете мышь, переместите указатель в правый нижний угол экрана и щелкните кнопку Поиск. Введите запрос Командная строка в поле Поиск, щелкните правой кнопкой мыши элемент Командная строка, затем выберите команду Запуск от имени администратора. Если система запросит пароль администратора или подтверждение, введите пароль или нажмите кнопку Разрешить.
Для этого нажмите кнопку Пуск, введите запрос Командная строка или cmd в поле Поиск, щелкните правой кнопкой мыши элемент Командная строка, а затем выберите команду Запуск от имени администратора. При получении запроса на ввод пароля администратора или подтверждения введите пароль или нажмите кнопку Разрешить.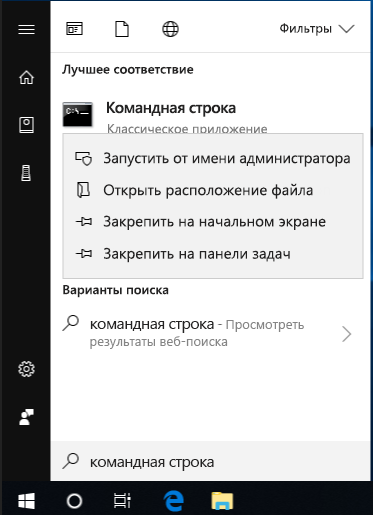
Дополнительная информация
Просмотр подробных сведений о процессе работы средства проверки системных файлов.
Чтобы ознакомиться с подробными сведениями, включенными в файл CBS.Log, вы можете скопировать сведения в файл Sfcdetails.txt с помощью команды Findstr, а затем просмотреть их в этом файле. Для этого выполните указанные ниже действия.
-
Откройте командную строку с повышенными привилегиями, как это описано на шаге 1.
-
Введите в командной строке приведенную ниже команду и нажмите клавишу ВВОД:
findstr /c:"[SR]" %windir%\Logs\CBS\CBS.log >"%userprofile%\Desktop\sfcdetails.txt"
Примечание. В файле Sfcdetails.txt содержатся сведения о каждом запуске средства проверки системных файлов на компьютере. Он также содержит информацию о файлах, которые не были исправлены средством проверки системных файлов. Проверьте дату и время записей, чтобы определить проблемные файлы, обнаруженные при последнем запуске средства проверки системных файлов.
-
Откройте файл Sfcdetails.txt на рабочем столе.
-
В файле Sfcdetails.txt используется следующий формат:
Сведения о дате и времени SFC
В следующем примере файла журнала содержится запись для одного файла, который не удалось исправить:2007-01-12 12:10:42, Info CSI 00000008 [SR] Cannot
repair member file [l:34{17}]»Accessibility.dll» of Accessibility, Version =
6.0.6000.16386, pA = PROCESSOR_ARCHITECTURE_MSIL (8), Culture neutral,
VersionScope neutral, PublicKeyToken = {l:8 b:b03f5f7f11d50a3a}, Type
neutral, TypeName neutral, PublicKey neutral in the store, file is missing
Как вручную заменить поврежденный системный файл гарантированно работоспособной копией файла.
После определения, какой системный файл поврежден и не может быть восстановлен, с помощью подробных сведений в файле Sfcdetails.txt, выясните расположение поврежденного файла, затем вручную замените поврежденный файл его гарантировано работоспособной копией. Для этого выполните указанные ниже действия.
Примечание. Гарантировано работоспособную копию системного файла можно взять с другого компьютера, на котором установлена такая же, как на вашем компьютере версия Windows. Чтобы убедиться в работоспособности системного файла, который вы планируете скопировать на другом компьютере, можно провести процесс проверки средством проверки системных файлов.
-
Распространите на поврежденный системный файл права собственности администратора. Для этого скопируйте, а затем вставьте (или введите) в командную строку с повышенными привилегиями приведенную ниже команду, затем нажмите клавишу ВВОД:
takeown /f Путь_и_имя_файла
Примечание. Заполнитель Путь_и_имя_файла представляет собой путь и имя файла для поврежденного файла. Например, введите takeown /f C:\windows\system32\jscript.dll.
-
Предоставьте администраторам полный доступ к поврежденному системному файлу. Для этого скопируйте и вставьте (или введите) приведенную ниже команду и нажмите клавишу ВВОД:
icacls Путь_и_имя_файла /GRANT ADMINISTRATORS:F
Примечание. Заполнитель Путь_и_имя_файла представляет собой путь и имя файла для поврежденного файла. Например, введите icacls C:\windows\system32\jscript.dll /grant administrators:F. -
Замените поврежденный системный файл гарантировано работоспособной копией файла. Для этого скопируйте и вставьте (или введите) приведенную ниже команду и нажмите клавишу ВВОД:
Copy Исходный_файл Расположение
Примечание. Заполнитель Исходный_файл представляет собой путь и имя гарантировано работоспособной копии файла на вашем компьютере, а заполнитель Расположение представляет собой путь и имя поврежденного файла. Например, введите copy E:\temp\jscript.dll C:\windows\system32\jscript.dll.


Если описанные выше действия не помогли, возможно, потребуется переустановить Windows. Дополнительные сведения см . в разделе Варианты восстановления Windows10.
Нужна дополнительная помощь?
Нужны дополнительные параметры?
Изучите преимущества подписки, просмотрите учебные курсы, узнайте, как защитить свое устройство и т. д.
В сообществах можно задавать вопросы и отвечать на них, отправлять отзывы и консультироваться с экспертами разных профилей.
Содержание
- Способы проверки
- Способ 1: Windows Repair
- Способ 2: Glary Utilities
- Способ 3: «Командная строка»
- Проблема с запуском «SFC»
- Вопросы и ответы

При неполадках в работе компьютера не лишним решением будет произвести проверку ОС на предмет целостности файлов системы. Именно повреждение или удаление данных объектов часто служит причиной некорректной работы ПК. Посмотрим, как можно выполнить указанную операцию в Виндовс 7.
Читайте также: Как проверить Виндовс 10 на ошибки
Способы проверки
Если вы замечаете какие-то ошибки при работе компьютера или его некорректное поведение, например, периодическое появление синего экрана смерти, то, прежде всего, необходимо проверить диск на наличие ошибок. Если данная проверка никаких неисправностей не обнаружила, то в этом случае следует прибегнуть к сканированию системы на предмет целостности файлов системы, о котором мы подробно поговорим ниже. Данную операцию можно выполнить как воспользовавшись возможностями стороннего ПО, так и применив запуск внедренной утилиты Виндовс 7 «SFC» через «Командную строку». Следует, заметить, что даже сторонние программы используются только для того, чтобы активировать «SFC».
Способ 1: Windows Repair
Одной из самых популярных сторонних программ для сканирования компьютера на предмет повреждения файлов системы и их восстановления в случае обнаружения неполадок является Windows Repair.
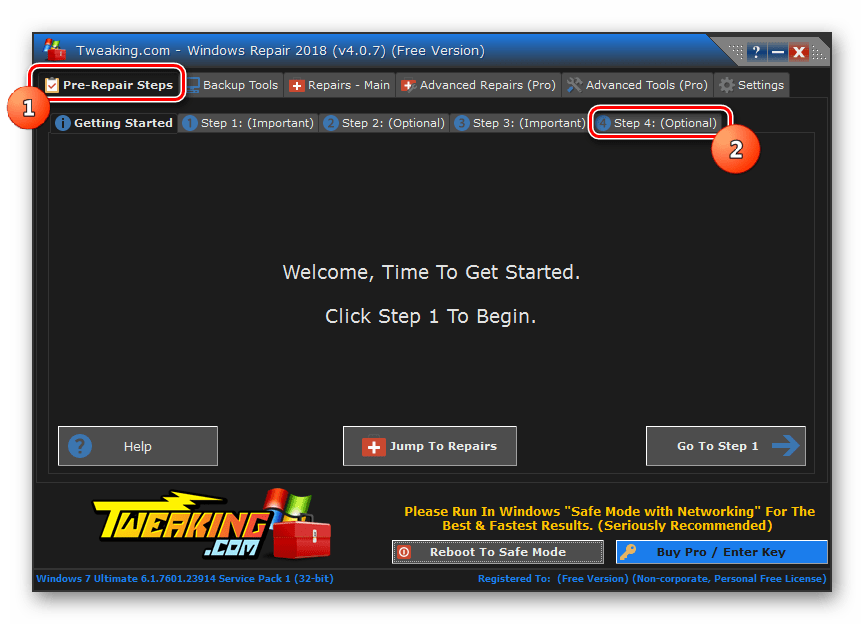
- Откройте Windows Repair. Чтобы запустить проверку на предмет повреждения файлов системы, сразу в разделе «Pre-Repair Steps» кликайте по вкладке «Step 4 (Optional)».
- В открывшемся окне щелкайте по кнопке «Check».
- Запускается стандартная утилита Виндовс «SFC», которая и производит сканирование, а затем выдает его результаты.

Подробнее о работе данной утилиты мы поговорим при рассмотрении Способа 3, так как её можно запустить также методом использования внедренных Microsoft инструментов операционной системы.
Способ 2: Glary Utilities
Следующей комплексной программой для оптимизации работы компьютера, с помощью которой можно проверить целостность файлов системы, является Glary Utilities. Использование данного приложения имеет одно важное преимущество перед предыдущим способом. Оно заключается в том, что Глори Утилитес, в отличие от Windows Repair, имеет русскоязычный интерфейс, что значительно облегчает выполнение задачи отечественным пользователям.
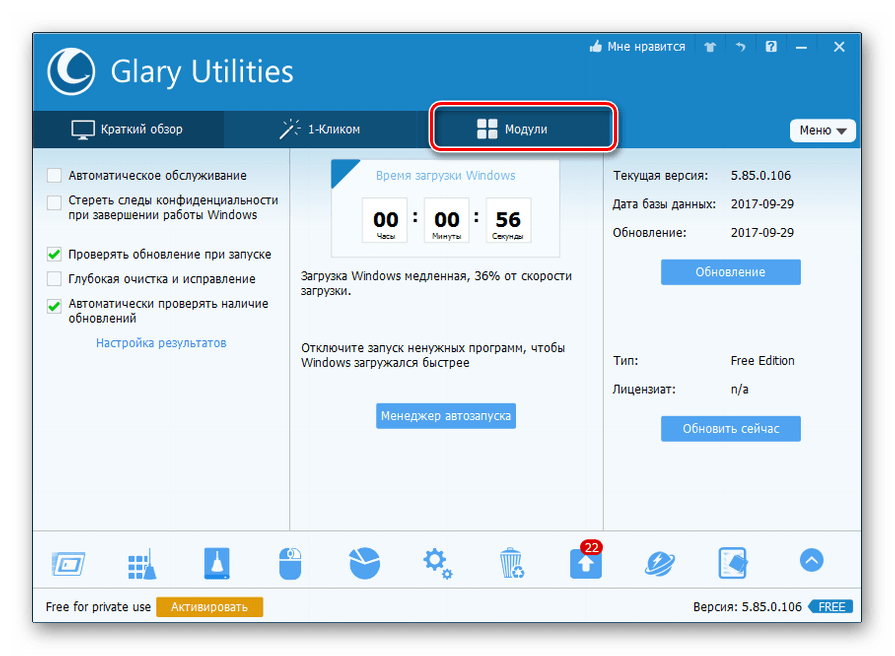
- Запустите Glary Utilities. Затем переходите в раздел «Модули», переключившись на соответствующую вкладку.
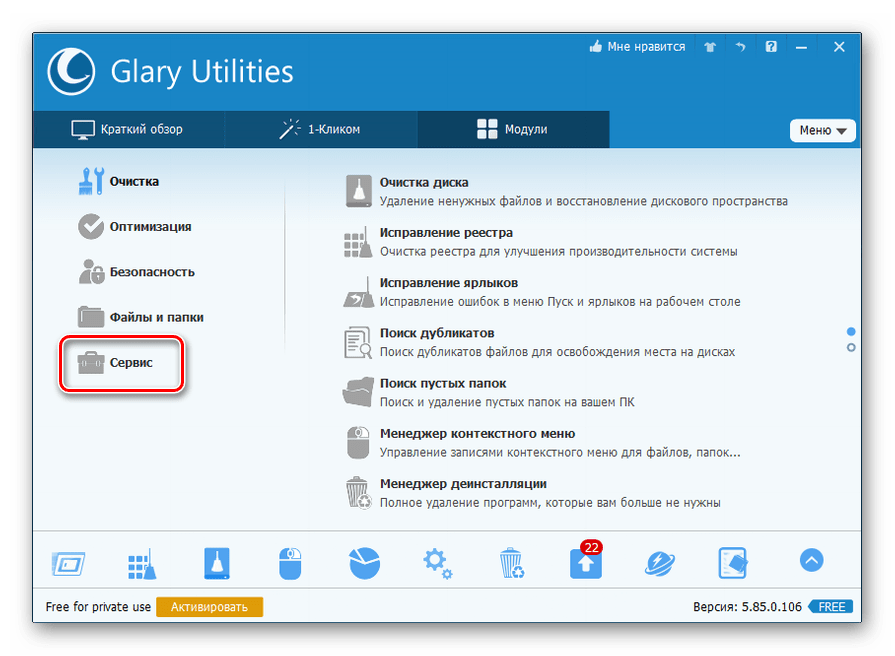
- Затем с помощью бокового меню переместитесь в раздел «Сервис».
- Чтобы активировать проверку на предмет целостности элементов ОС, щелкайте по пункту «Восстановление системных файлов».
- После этого запускается тот же системный инструмент «SFC» в «Командной строке», о котором мы уже говорили при описании действий в программе Windows Repair. Именно он проводит сканирование компьютера на предмет повреждения файлов системы.

Более подробная информация о работе «SFC» представлена при рассмотрении следующего метода.
Способ 3: «Командная строка»
Активировать «SFC» для сканирования на предмет повреждения файлов системы Виндовс, можно используя исключительно средства ОС, а конкретно «Командную строку».
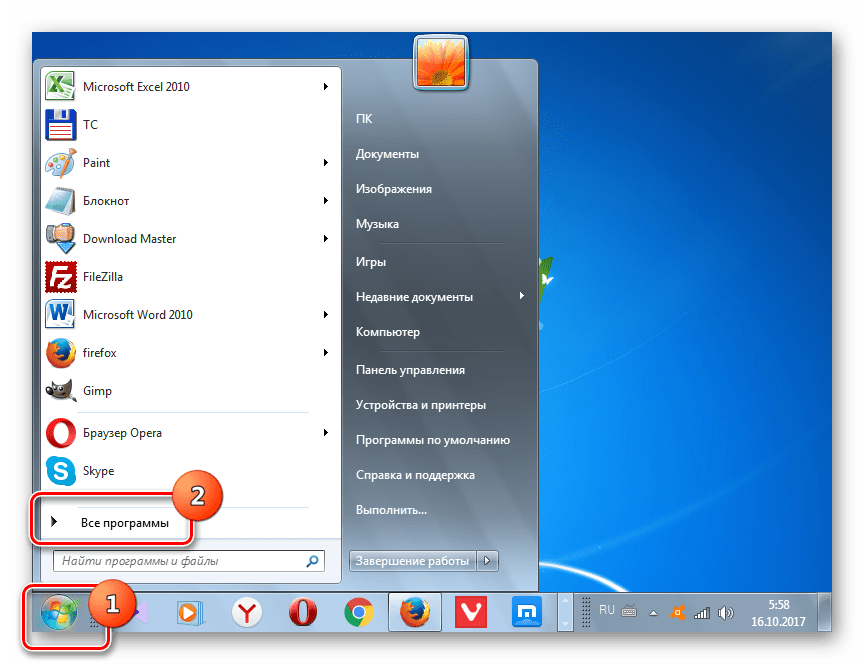
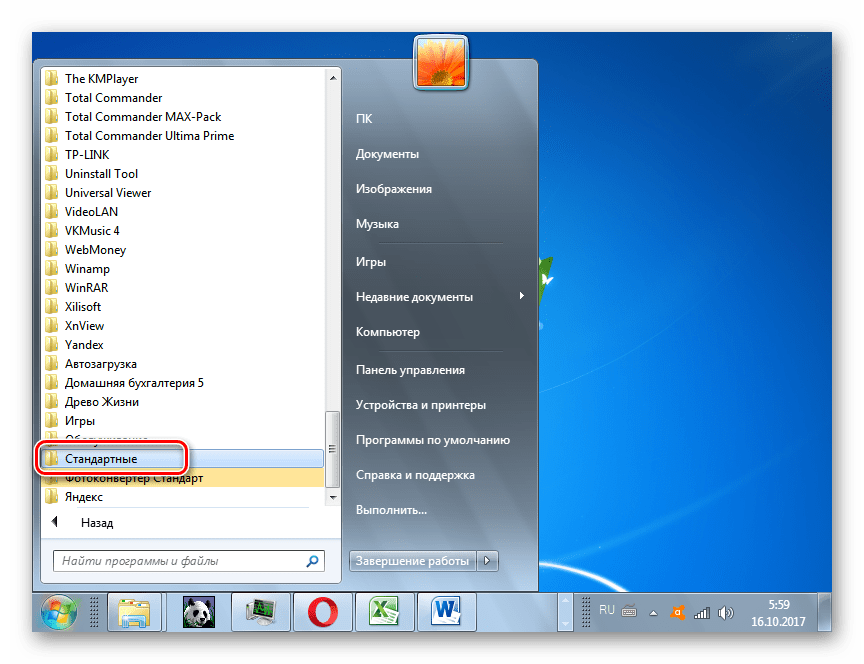
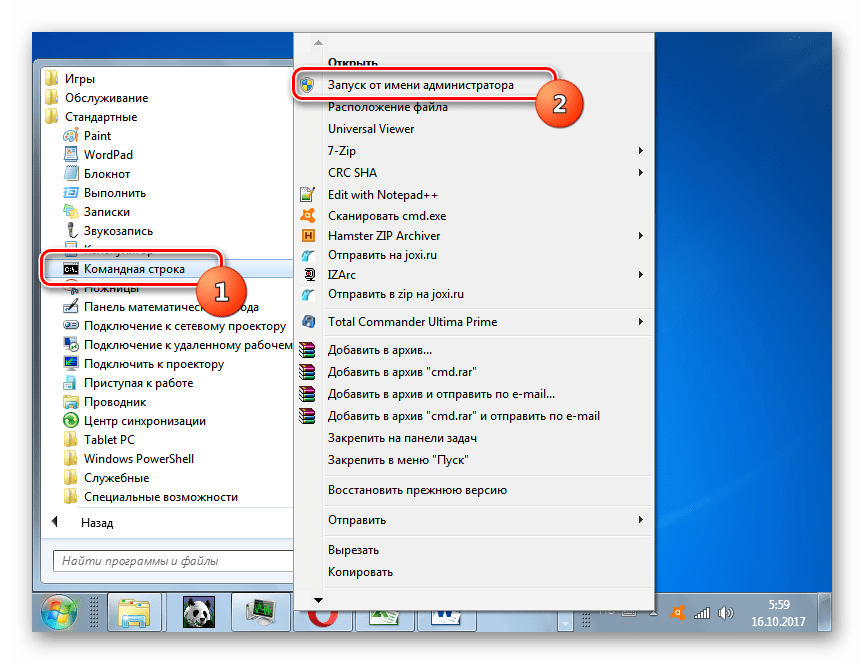
- Чтобы вызвать «SFC» при помощи встроенных инструментов системы, нужно сразу активировать «Командную строку» с полномочиями администратора. Щелкайте «Пуск». Кликните «Все программы».
- Ищите папку «Стандартные» и заходите в неё.
- Открывается перечень, в котором необходимо отыскать название «Командная строка». Щелкните по нему правой кнопкой мышки (ПКМ) и выбирайте «Запуск от имени администратора».
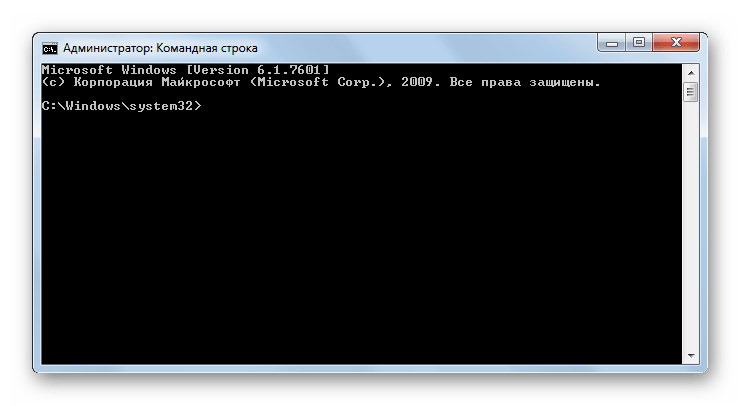
- Оболочка «Командной строки» запущена.
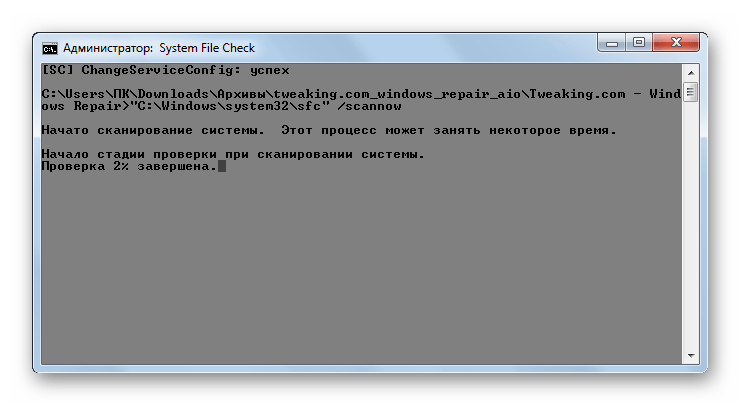
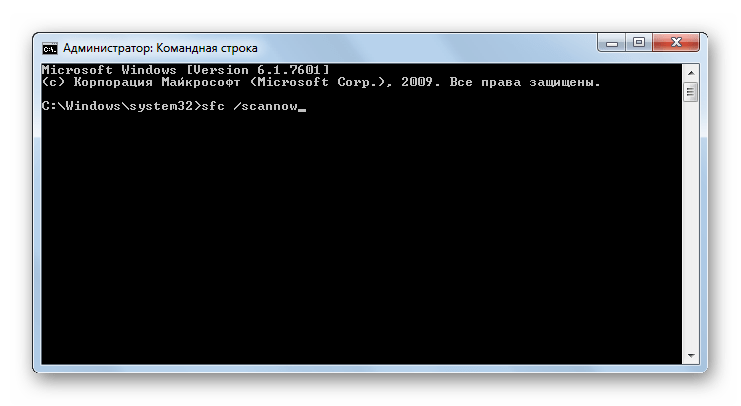
- Тут следует вбить команду, которая запустит инструмент «SFC» с атрибутом «scannow». Введите:
sfc /scannowЖмите Enter.
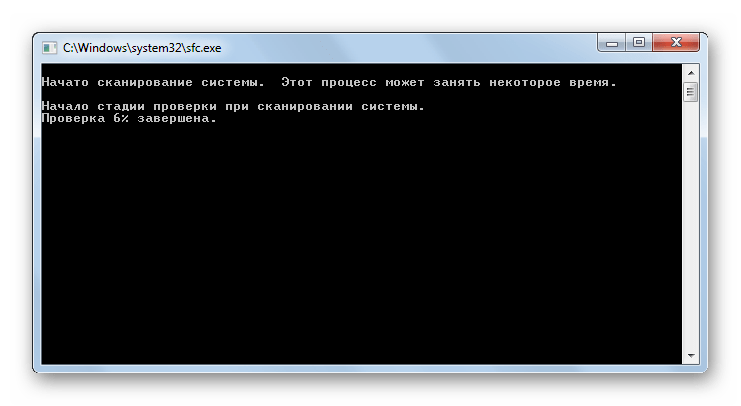
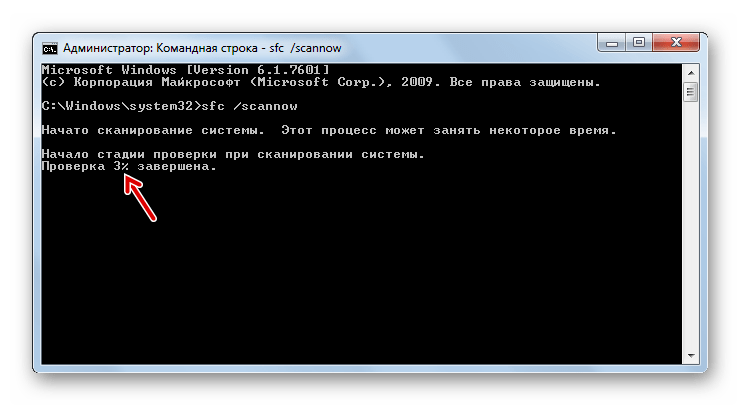
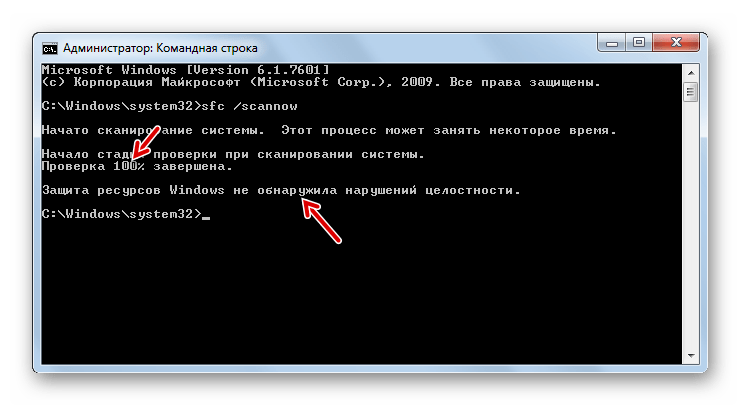
- В «Командной строке» активируется проверка на предмет неполадок в файлах системы инструментом «SFC». Прогресс операции можете наблюдать при помощи отображаемых информации в процентах. Нельзя закрывать «Командную строку» до тех пор, пока процедура не будет завершена, иначе вы не узнаете о её результатах.
- После завершения сканирования в «Командной строке» отобразится надпись, говорящая о её окончании. Если инструмент не выявил неполадок в файлах ОС, то ниже данной надписи будет отображена информация о том, что утилита не обнаружила нарушений целостности. Если же проблемы все-таки найдены, то будут отображены данные их расшифровки.
Внимание! Для того чтобы «SFC» смог не только проверить целостность файлов системы, но и произвести их восстановление в случае обнаружения ошибок, перед запуском инструмент рекомендуется вставить установочный диск операционной системы. Это обязательно должен быть именно тот диск, с которого Виндовс устанавливалась на данный компьютер.
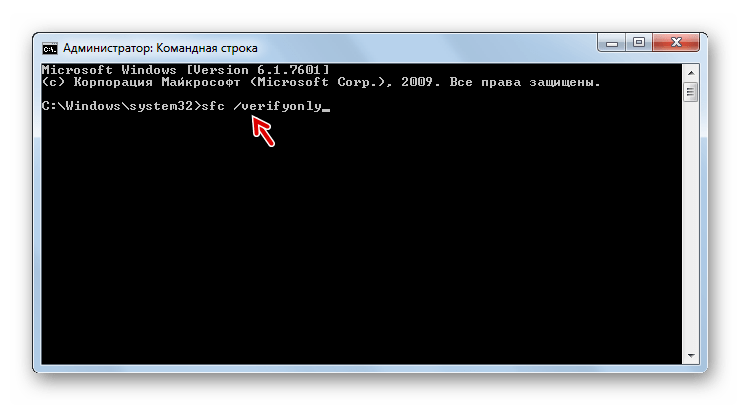
Есть несколько вариаций использования средства «SFC» для проверки целостности файлов системы. Если вам нужно выполнить сканирование без восстановления по умолчанию недостающих или поврежденных объектов ОС, то в «Командной строке» нужно ввести команду:
sfc /verifyonly
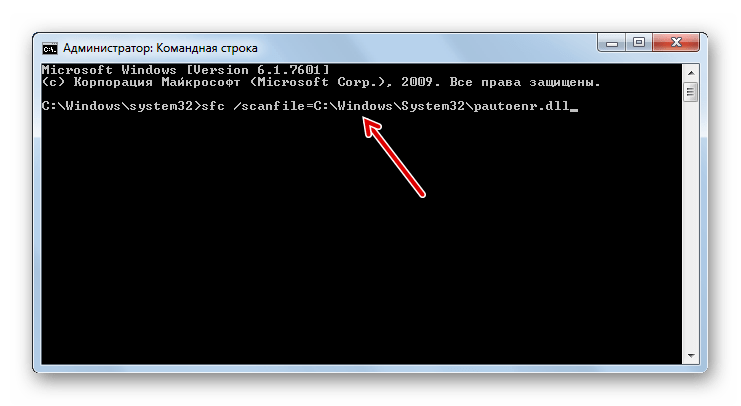
Если вам необходимо проверить конкретный файл на предмет повреждения, то следует ввести команду, соответствующую следующему шаблону:
sfc /scanfile=адрес_файла
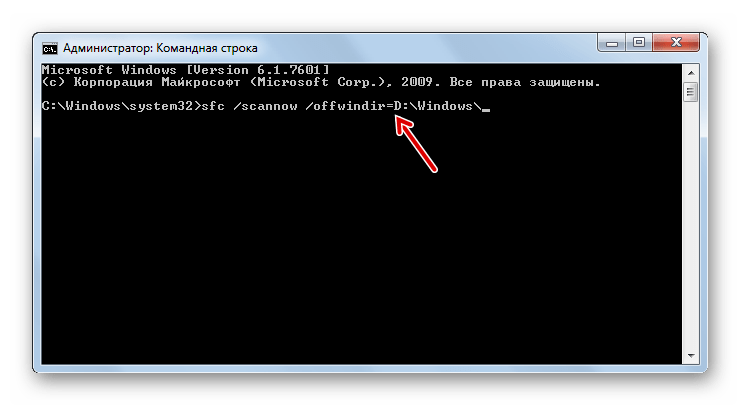
Также особая команда существует для проверки операционной системы, расположенной на другом жестком диске, то есть, не той ОС, в которой вы работаете в данный момент. Её шаблон выглядит следующим образом:
sfc /scannow /offwindir=адрес_каталога_с_Виндовс
Урок: Включение «Командной строки» в Виндовс 7
Проблема с запуском «SFC»
При попытке активировать «SFC» может произойти такая проблема, что в «Командной строке» отобразится сообщение, говорящее о неудачной активации службы восстановления.
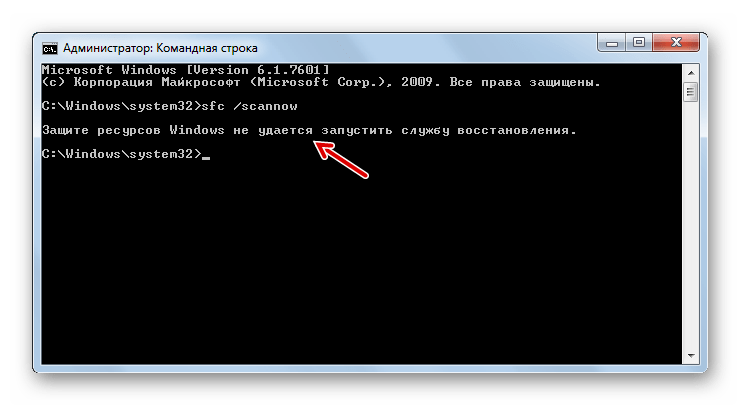
Самой частой причиной данной проблемы является отключение системной службы «Установщик модулей Windows». Чтобы иметь возможность просканировать компьютер инструментом «SFC», её следует обязательно включить.
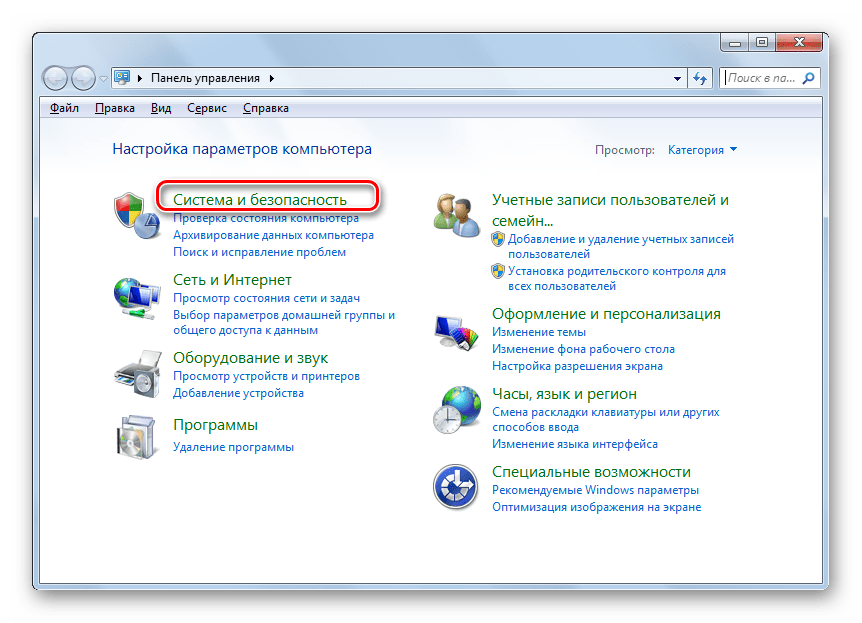
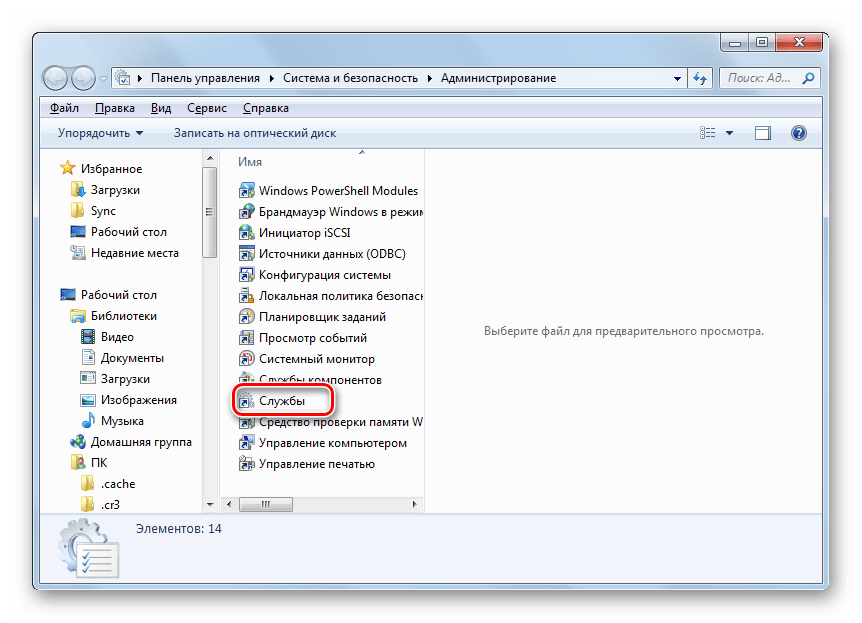
- Щелкайте «Пуск», переходите в «Панель управления».
- Заходите в «Система и безопасность».
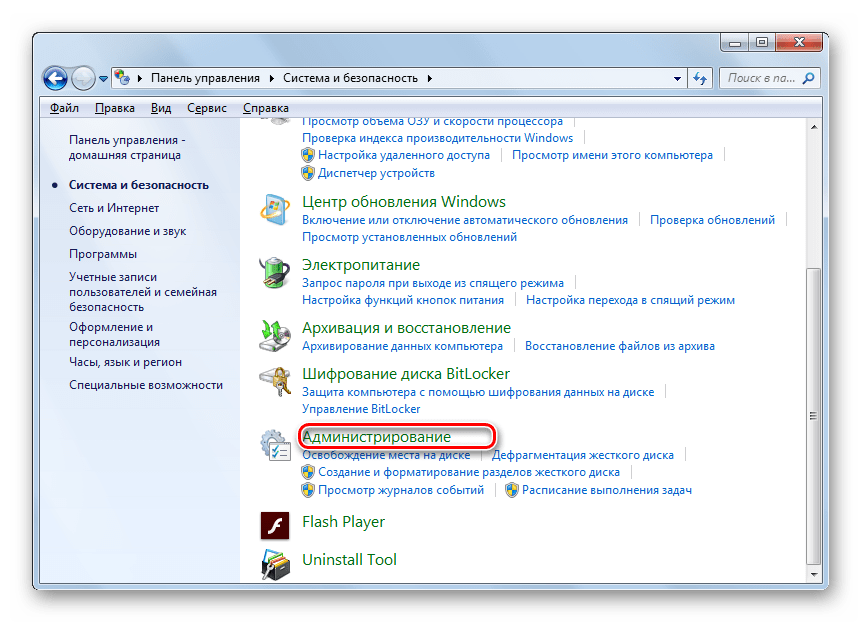
- Теперь жмите «Администрирование».
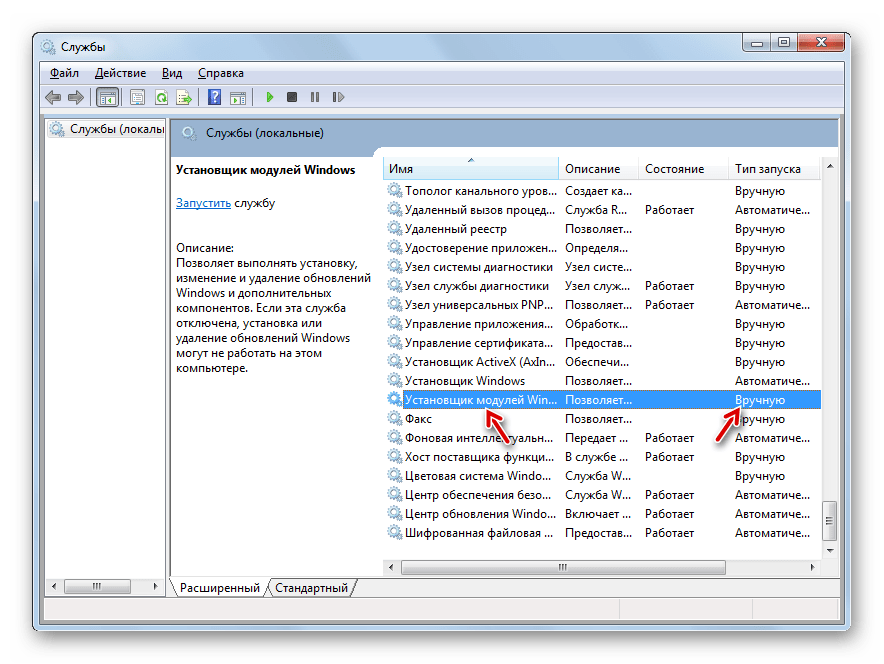
- Появится окошко со списком различных системных средств. Жмите «Службы», чтобы произвести переход в «Диспетчер служб».
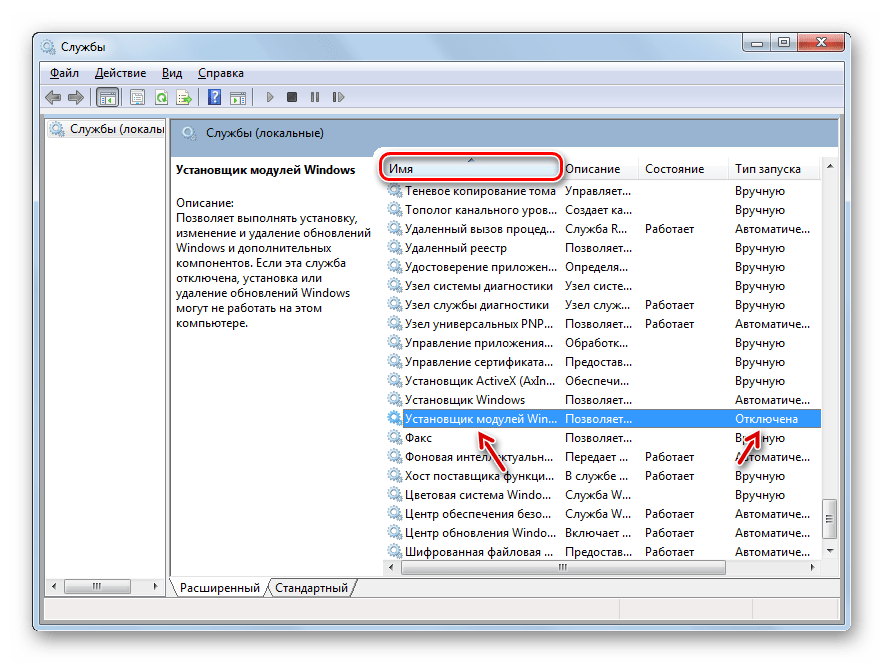
- Запускается окошко с перечнем системных служб. Тут нужно отыскать наименование «Установщик модулей Windows». Для облегчения поиска жмите по названию колонки «Имя». Элементы построятся согласно алфавиту. Обнаружив нужный объект, проверьте, какое значение стоит у него в поле «Тип запуска». Если там надпись «Отключена», то следует произвести включение службы.
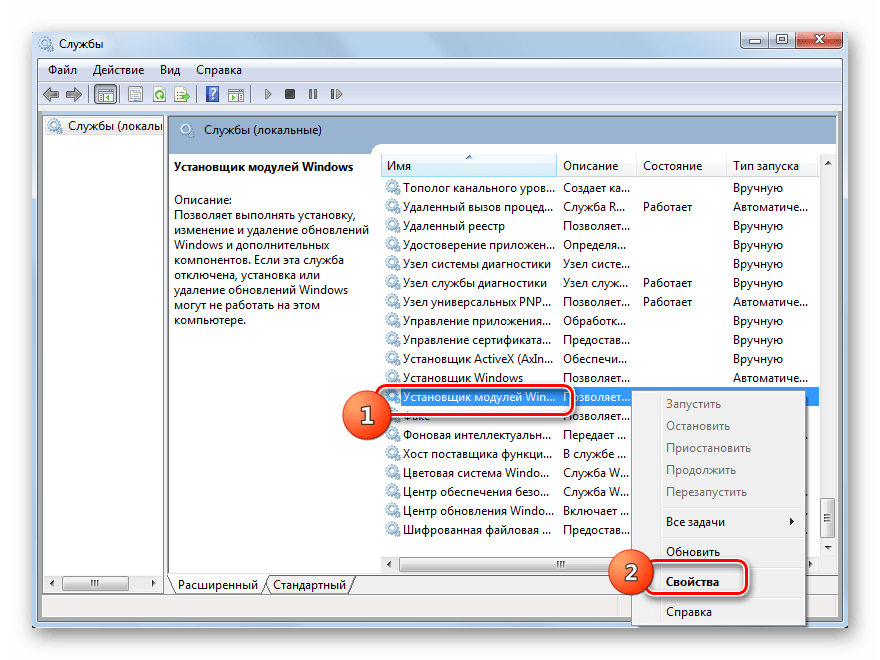
- Кликните ПКМ по наименованию указанной службы и в списке выберите «Свойства».
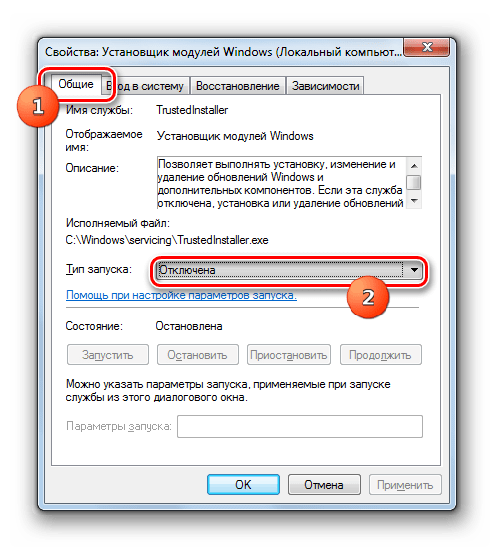
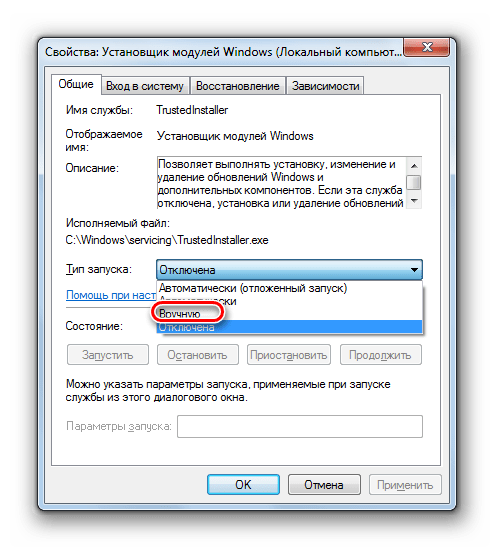
- Открывается оболочка свойств службы. В разделе «Общие» щелкните по области «Тип запуска», где в данный момент установлено значение «Отключена».
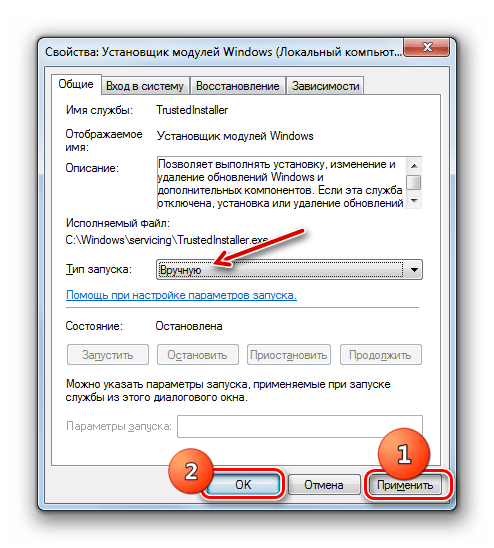
- Открывается список. Тут следует выбрать значение «Вручную».
- После того, как необходимое значение установлено, щелкайте «Применить» и «OK».
- В «Диспетчере служб» в колонке «Тип запуска» в строке нужного нам элемента установлено значение «Вручную». Это означает, что теперь можно запускать «SFC» через командную строку.

Как видим, запустить проверку компьютера на целостность файлов системы можно как при помощи сторонних программ, так и воспользовавшись «Командной строкой» Виндовс. Впрочем, как бы вы не запускали проверку, все равно её выполняет системный инструмент «SFC». То есть, сторонние приложения могут только облегчить и сделать интуитивно понятным запуск встроенного инструмента для сканирования. Поэтому специально для того, чтобы произвести данный вид проверки, нет смысла скачивать и устанавливать ПО сторонних производителей. Правда, если оно уже для общих целей оптимизации системы установлено на вашем компьютере, то, конечно, можете использовать для активации «SFC» данные программные продукты, так как это все-таки удобнее, чем действовать традиционно через «Командную строку».
This guide shows you how to use the sfc utility for the following Windows versions: Windows XP, Vista, 7, 8, 8.1 and 10.
About sfc
Sfc or sfc.exe stands for System File Checker. It’s a utility in Microsoft Windows operating systems, starting from Windows 98, that allows you to scan and restore corruptions in system files.
The sfc utility is available for Windows XP, Windows Vista, Windows 7, Windows 8, Windows 8.1 and Windows 10.
To run this utility you need to be logged in as an Administrator.
Parameters
The most command parameter for this utility is:
sfc /scannow
The /scannow command will scan for issues and, if it finds one, it will attempt to replace the files that have issues from the DLL Cache.
In Windows Vista or later (7, 8, 8.1), the sfc utility can be used to scan individual files.
Other parameters for the sfc utility are:
sfc /scanonce will scan the system files only once.
sfc /scanboot will scan the system files at every boot of your computer
sfc /revert will return the scan to its default operating
sfc /purgecache will remove the Windows File Protection cache and begin a scan over the system files
sfc /cachesize=x, where x is the size in MB, will set the cache size of the Windows File Protection
sfc /? will display the help list
Run sfc in Easy Recovery Essentials
You can download and burn Easy Recovery Essentials on any CD, DVD or USBs and run the sfc.exe commands you need.
To do so, follow these steps:
- Download Easy Recovery Essentials
- Burn the ISO image. Follow our instructions on how to burn a bootable ISO image to a CD or DVD. If you’d like to have a recovery USB instead, follow these instructions.
- Boot into Easy Recovery Essentials
- Select Launch Command Line

Run sfc in Windows XP
To run the sfc utility in Windows XP, follow these steps.
If you run the utility while you’re logged into Windows XP:
- Open Command Prompt. To do so, go to Start > Run and type
cmdand click OK. - Type the
/scannowcommand and press Enter:sfc /scannow
If you run sfc outside Windows XP, e.g. when you’re at Recovery Console or via Easy Recovery Essentials if you can’t boot into Windows XP, you need to set the path where your Windows XP is installed:
- Open Command Prompt
- Type this command, but replace
c:\with the letter of the drive where your Windows XP is installed:sfc /scannow /offbootdir=c:\ /offwindir=c:\windows
- Press Enter
If System File Checker founds any errors and repairs the issues found, restart your computer before you boot into Windows XP.
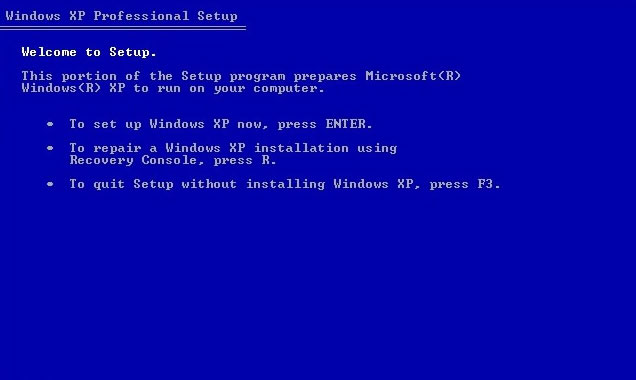
To run the commands using your Windows XP installation disc, follow these steps:
- Insert the installation CD in the disc tray
- Restart the computer
- At the Press any key message, press any key on your keyboard to boot from the CD
- At the Welcome to Setup screen, press R to open Recovery Console
- Enter the Administrator password
- When Command Prompt appears, type the sfc command and press Enter:
sfc /scannow /offbootdir=c:\ /offwindir=c:\windows
Replace
c:\with the letter of the drive where your Windows XP is installed.
Run sfc in Windows Vista
To run the sfc in Windows Vista, follow these steps:
- Click Start
- Click All Programs
- Click Accessories
- Right-click on Command Prompt
- Click Run as Administrator
- If UAC (User Account Control) appears, click Yes or Continue to continue to open Command Prompt as Administrator
- When the Command Prompt appears, type:
sfc /scannow - Press Enter
If you can’t boot into Windows Vista, use your original installation disc. To do so, follow these steps below.
If you don’t have the installation disc, go to Run sfc in Easy Recovery Essentials. You can burn EasyRE on any CD, DVD or USBs.
- Insert the original Windows Vista DVD in the disc tray
- Boot from the DVD
- Choose a language and keyboard layout
- At the Welcome screen, click on Repair your computer
- Choose your operating system from the list
- Click Next
- At the System Recovery Options window, click Command Prompt
- Type the command and press Enter:
sfc /scannow /offbootdir=c:\ /offwindir=c:\windows
Replace
c:with the letter of the drive where Windows Vista is installed.


Run sfc in Windows 7
To run the sfc in Windows Vista, follow these steps:
If you can’t boot into Windows 7, go to Run sfc in Easy Recovery Essentials.
- Click Start
- Type
command promptin search box - Right-click on the first item in search results list: Command Prompt
- Click Run as administrator
- Click Continue or Yes on the UAC warning window to allow this action
- When Command Prompt appears, type the command:
sfc /scannow
- Press Enter

You can also run the sfc command via the installation disc or the System Recovery Options panel installed on your computer.
Method #1
- Insert the original Windows 7 installation DVD in the disc tray and reboot your computer
- Press any key when it says “Press any key to boot from CD or DVD..”
- Select a language and keyboard option
- Click Repair your computer
- Select your operating system
- Choose Command Prompt
- Type the command and press Enter:
sfc /scannow /offbootdir=c:\ /offwindir=c:\windows
Replace
c:with the letter of the drive where Windows 7 is installed.


Method #2
- Restart your computer
- Press the F8 key several times during booting before the Windows 7 logo appears
- At the Advanced Options screen, select Repair your computer
If Repair your computer option isn’t available, follow Method #1 above.
- Select a keyboard and language
- Select Command Prompt
- Type the command and press Enter:
sfc /scannow /offbootdir=c:\ /offwindir=c:\windows
Replace
c:with the letter of the drive where Windows 7 is installed.

Run sfc in Windows 8 or 8.1
To run the sfc in Windows 8 or Windows 8.1, follow these steps:
- Boot into your system
- Press the and C key to open the Charm Bar
- Type
command promptorcmdin the search field - From the search results list, right-click on Command Prompt
- Select Run as Administrator
- Enter the password
- When Command Prompt loads, type the sfc command and press Enter:
sfc /scannow


You can also run the utility from the Windows installation disc. To do so, follow these steps below.
If you don’t have the installation disc, go to Run sfc in Easy Recovery Essentials. You can burn EasyRE on any CD, DVD or USBs.
- Insert the disc and restart the computer
- Press any key to boot from the DVD
- Choose your keyboard layout, time and language
- Click Next
- Click Repair your computer
- Click Troubleshoot
- Click Advanced options
- Click Command Prompt
- Type the command and press Enter:
sfc /scannow /offbootdir=c:\ /offwindir=c:\windows


Run sfc in Windows 10
To run the sfc in Windows 10, follow these steps:
- Boot into your system
- Press the key to open the Start Menu
- Type
command promptorcmdin the search field - From the search results list, right-click on Command Prompt

- Select Run as Administrator
- Enter the password
- When Command Prompt loads, type the sfc command and press Enter:
sfc /scannow

You can also run the utility from the Windows installation disc. To do so, follow these steps below.
If you don’t have the installation disc, go to Run sfc in Easy Recovery Essentials. You can burn EasyRE on any CD, DVD or USBs.
- Insert the disc and restart the computer
- Press any key to boot from the DVD
- Choose your keyboard layout, time and language
- Click Next
- Click Repair your computer

- Click Troubleshoot
- Click Advanced options
- Click Command Prompt
- Type the command and press Enter:
sfc /scannow /offbootdir=c:\ /offwindir=c:\windows

Troubleshooting
sfc isn’t recognized
If the sfc commands you’re typing in Command Prompt aren’t being recognized, make sure that:
- You’re logged in as an Administrator
- Or you’re logged in as a user of an Administrator group
Windows Resource Protection could not perform
You may receive this error while trying to perform a /sfc scannow:
Windows Resource Protection could not perform the requested operation
This error usually appears if the hard disk has corruptions or bad sectors. To fix this error, you can try any of the following tips:
Tip #1: Boot into Safe Mode
Try to run the sfc /scannow command while in Safe Mode. To boot into Safe Mode, follow these steps:
- Boot your computer
- Press the F8 key before the Windows logo appears
- At the Windows Options screen, use the arrows keys and select Safe Mode
- Press Enter
To get the full instructions on how to boot into Safe Mode, read our guide on Safe Mode with instructions for each Windows version:
- Windows XP
- Windows Vista
- Windows 7
- Windows 8 or 8.1
Tip #2: Run chkdsk
If Tip #1 doesn’t work, also try to run chkdsk commands to check if your hard disk has bad sector or corruption issues.
To run chkdsk (related guide: chkdsk), follow these steps:
- Insert the original Windows installation CD or DVD
- Go to Command Prompt. Depending on your Windows version, Command Prompt is:
- Windows XP: Go to Recovery Console
- Windows Vista or 7: Go to System Recovery Options
- Windows 8 or 8.1: Go to Troubleshoot > Advanced Options
- When Command Prompt appears, type this command:
chkdsk c: /r
Where
c:is where your Windows is installed.
Press Enter
Windows Resource Protection could not start the repair service
The sfc utility may return the following error when you try to run it:
Windows Resource Protection could not start the repair service
If it returns this error, run the following commands:
-
ren c:\windows\winsxs\pending.xml pending.old
Replace
Cwith the drive’s letter where Windows is installed on. -
sfc /scannow /offbootdir=[c]:\ /offwindir=[c]:\windows
Replace
Cwith the drive’s letter where Windows is installed on.
More Information
Support Links
- Easy Recovery Essentials for Windows – our repair and recovery disk.
It’s an easy-to-use and automated diagnostics disk. It’s available for Windows 8, Windows 7 and Windows Vista. It’s also available for Windows XP and Windows Server.
Read more at Windows Recovery Disks.
- The NeoSmart Support Forums, member-to-member technical support and troubleshooting.
- Get a discounted price on replacement setup and installation discs: Windows XP, Windows Vista, Windows 7, Windows 8, Windows 10.
Applicable Systems
This Windows-related knowledgebase article applies to the following operating systems:
- Windows XP (all editions)
- Windows Vista (all editions)
- Windows 7 (all editions)
- Windows 8 (all editions)
- Windows 8.1 (all editions)
- Windows 10 (all editions)
Propose an edit
System or application crashes are common when using a Windows computer. While there are many causes for it, some of the most common are system damage, corrupt system file, missing system file and alterations due to new software installation etc.
System File Checker (SFC) is a vital tool in Windows that checks the system for corruptions and if any, restores them. Using this tool might seem complicated at first, but is actually a simple process that you can use anytime after doing it once. Using this command you can scan, check and repair all corrupted or damaged files on Windows 7. When a corrupt file is found, this command prompts the system to remove and replace that file with a newer version. In this article, we will discuss a few methods to repair Windows 7 with Sfc /Scannow.
How To Use Sfc /Scannow to Repair Windows 7
- The first step is to open an elevated command prompt window.For Windows 7, click on Start and type cmd in Search box. Right click on cmd to get a drop down list. In the list, click on Run as administrator.

Image Source: TrishTech.com
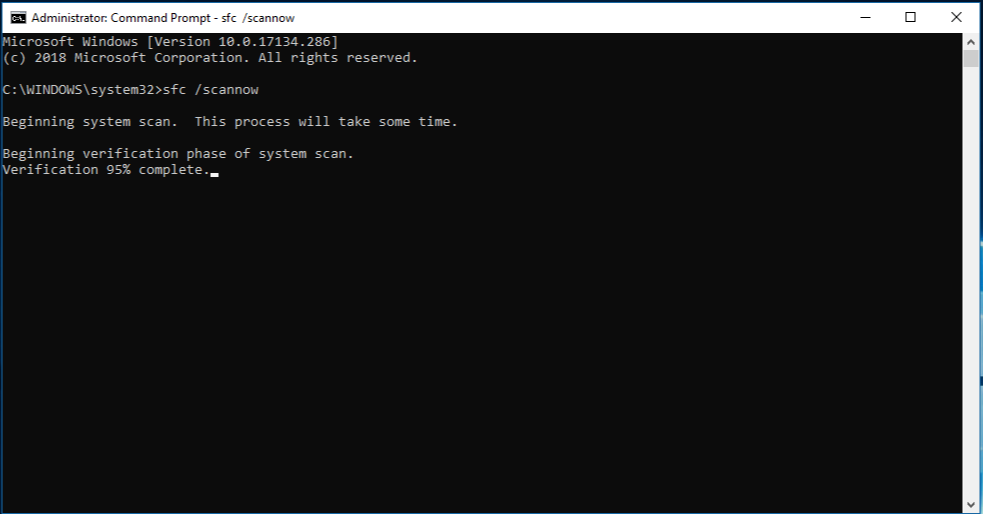
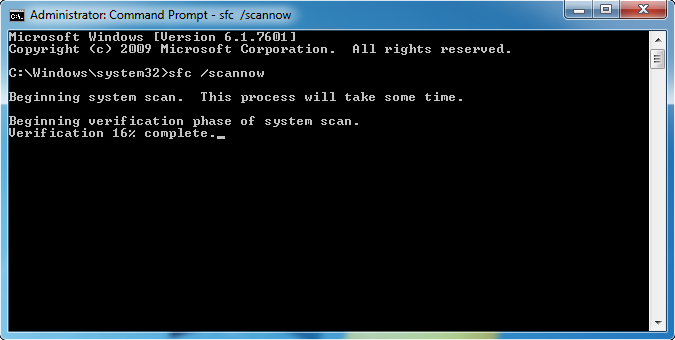
- Once the Command Prompt Window opens, type sfc /scannow and press enter.

Image Source: Dowser.org
The process of scanning the files for corrupted files takes about 10- 15 minutes. Do not close the command prompt window during this time.
- After the system performs 100% scan, there could be two outcomes. In case, no errors found, a message will flash “Windows Resource Protection did not find any integrity violations.”

Image Source: intowindows.com
In case of an error found, the system will find the errors and repair them.

Image Source: winhelp.us
There is also a possibility that the window shows a message that Windows Resource Protection found corrupt files but was unable to fix some of them.

Image Source: drivethelife.com
In such cases, sfc /scannow command requires added information about the location of the drive where Windows 7 is installed.
Method 1 : Restart Your Computer In Safe mode and Enter Command Again
- Restart your computer
- While the system boots, press F8 key several times, until the Windows 7 logo appears on screen. Click on Repair Your Computer.

Image Source: informit.com
- Select keyboard and language


Image Source: lifewire.com
- In System Recovery Options click on Startup Repair


Image Source: techrepublic.com
- When the command prompt window opens, type the following command:
Format :Sfc /scannow /offbootdir=”letter of the drive where Windows 7 is installed” /offwindir=”letter of the drive where your Windows 7 is installed”windows.
For example, for Windows 7 installed in D:, type:
sfc /scannow /offbootdir=d:\ /offwindir=d: \windows 
Image Source: winhelponline.com
Method 2 : Use Recovery Disc
If the above method does not work, you can use the recovery disc and followed by the sfc command.
- Install the original Windows 7 DVD in the disc tray.
- The system will prompt to press any key to boot from the CD or DVD. Select the language and keyboard option.


Image Source: lifewire.com
3. Click on Repair your computer

Image Source: winhelp.us
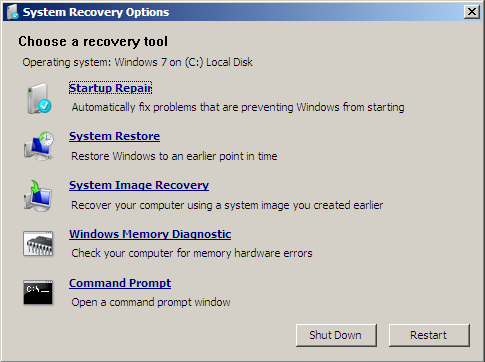
4. A window named System Recovery Options will open. Choose the first option and click on Next

Image Source: howtogeek.com
5. You will be asked to Choose a recovery tool. Click on Command Prompt at the end of the list

Image Source: fixwindowserrors.biz
6. Once the Command prompt window opens type
Format: Sfc /scannow /offbootdir=”letter of the drive where Windows 7 is installed” /offwindir=”letter of the drive where your Windows 7 is installed”windows.
Example: Assuming the Windows 7 is installed in D: you will type,
sfc /scannow /offbootdir=d:\ /offwindir=d: \windows

Image Source: winhelponline.com
Next Read: How to Fix Blue Screen of Death Error in Windows 7
Try any of these methods, next time you come across errors in your Windows 7 computer. Do let us know it this article was helpful.