
(Image credit: Windows Central)
Although Windows 10 can automatically mount a drive, the ability to mount and unmount a drive manually can come in handy in many scenarios. For example, when the system does not automatically assign a drive letter upon connecting a new storage device. You formatted a drive using commands, and you did not specify a mount point. Or you need to unmount a device’s storage to make it permanently inaccessible to users.
Whatever the reason it might be, Windows 10 allows you to quickly mount or unmount a drive using a graphical interface with Disk Management or with command-line using the mountvol and DiskPart tools in Command Prompt.
In this Windows 10 guide, we will walk through the steps to mount and unmount a drive (or volume) using the Disk Management graphical console and mountvol and DiskPart command-line tools available with Command Prompt.
- How to mount drive on Windows 10
- How to unmount drive on Windows 10
How to mount drive on Windows 10
On Windows 10, when you mount a drive manually, you will create a mount point with a drive letter that will make the storage available to users and allow the system to automatically mount the drive with the same drive letter.
You can complete this process in at least three ways with the Disk Management console and the mountvol and DiskPart command-line tools.
Mount drive with Disk Management
To use Disk Management to mount a drive on Windows 10, use these steps:
- Open Start.
- Search for Create and format hard disks partitions and click the top result to open Disk Management.
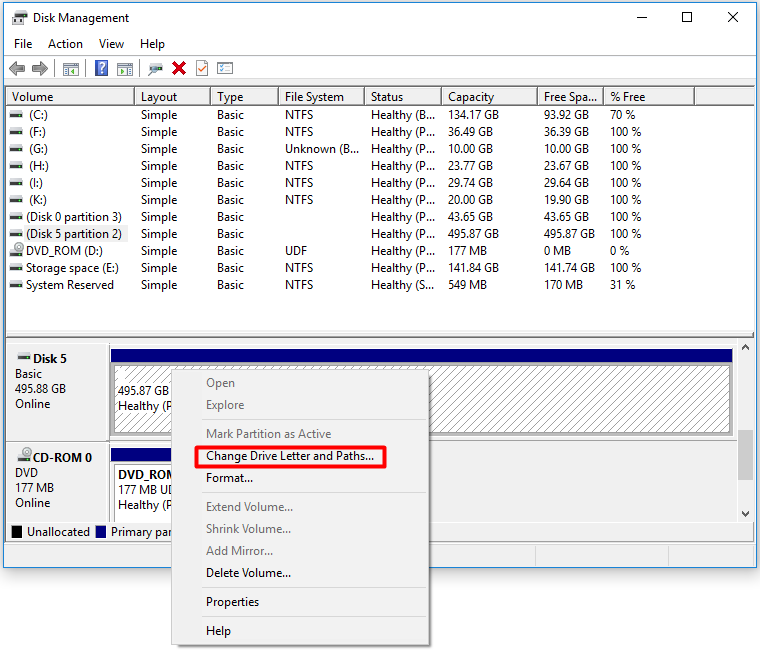
- Right-click the drive and select the Change Drive Letter and Path option.
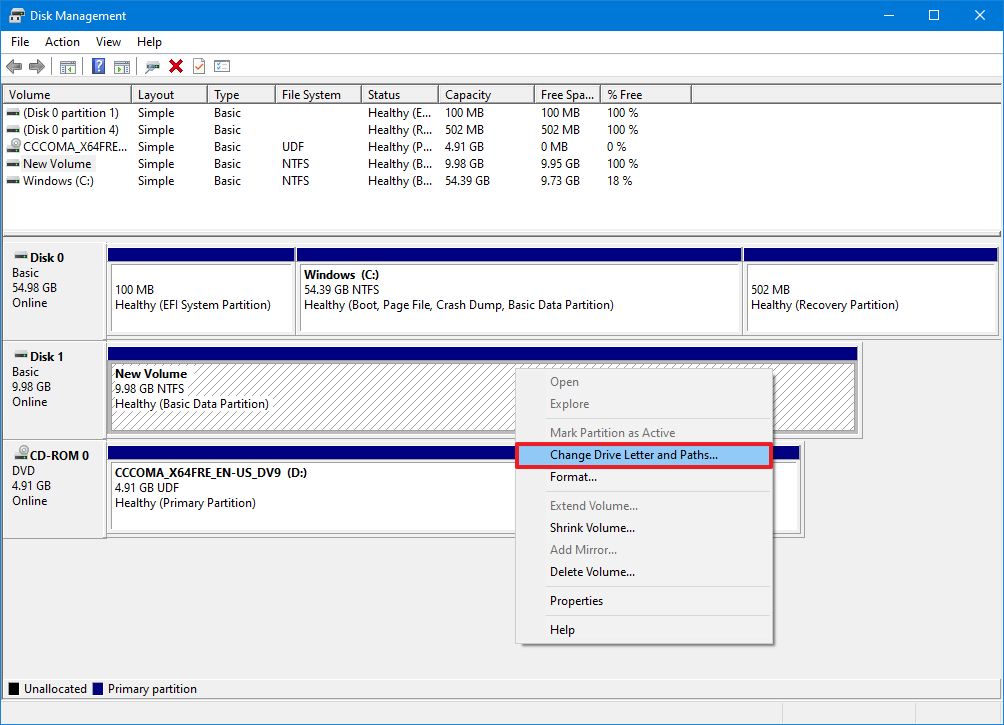
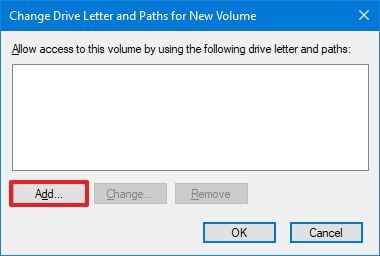
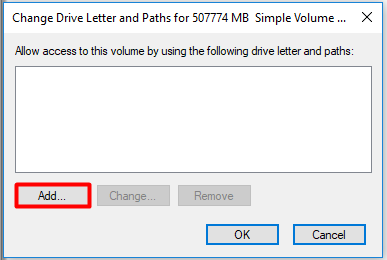
- Click the Add button.
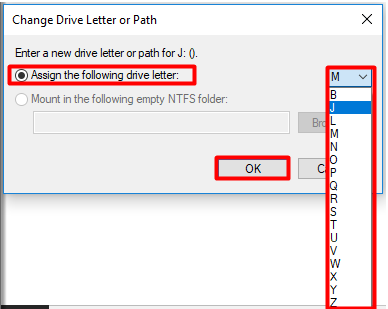
- Select the Assign the following drive letter option.
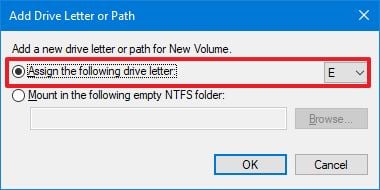
- Use the drop-down menu and select one of the available letters.Quick tip: When assigning a letter manually, it’s best to start with the last available letter to have a point of reference to determine if the volume was mounted manually or automatically.
Once you complete the steps, the drive will mount and appear in the system to store data.
Mount drive with mountvol
To use mountvol to mount a drive, use these steps:
- Open Start.
- Search for Command Prompt, right-click the top result, and select the Run as administrator option.
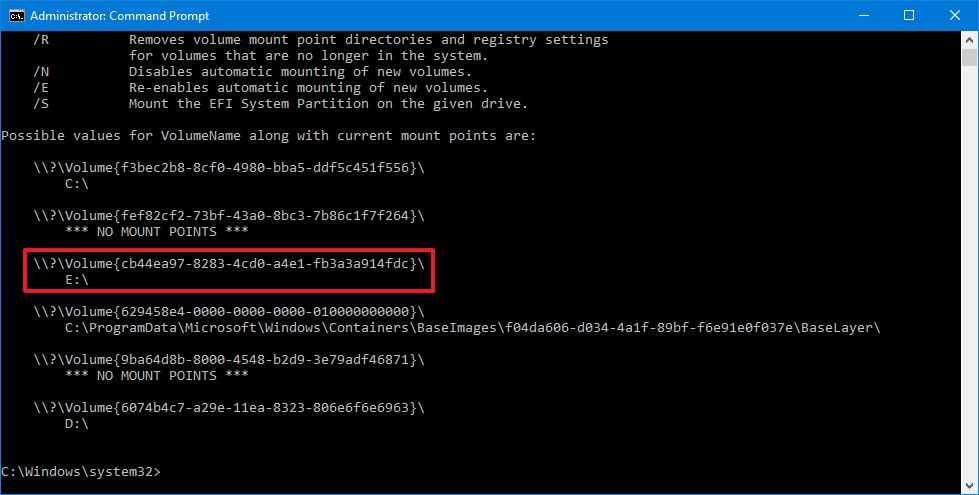
- Type the following command to list all the available mount points and press Enter:
mountvol
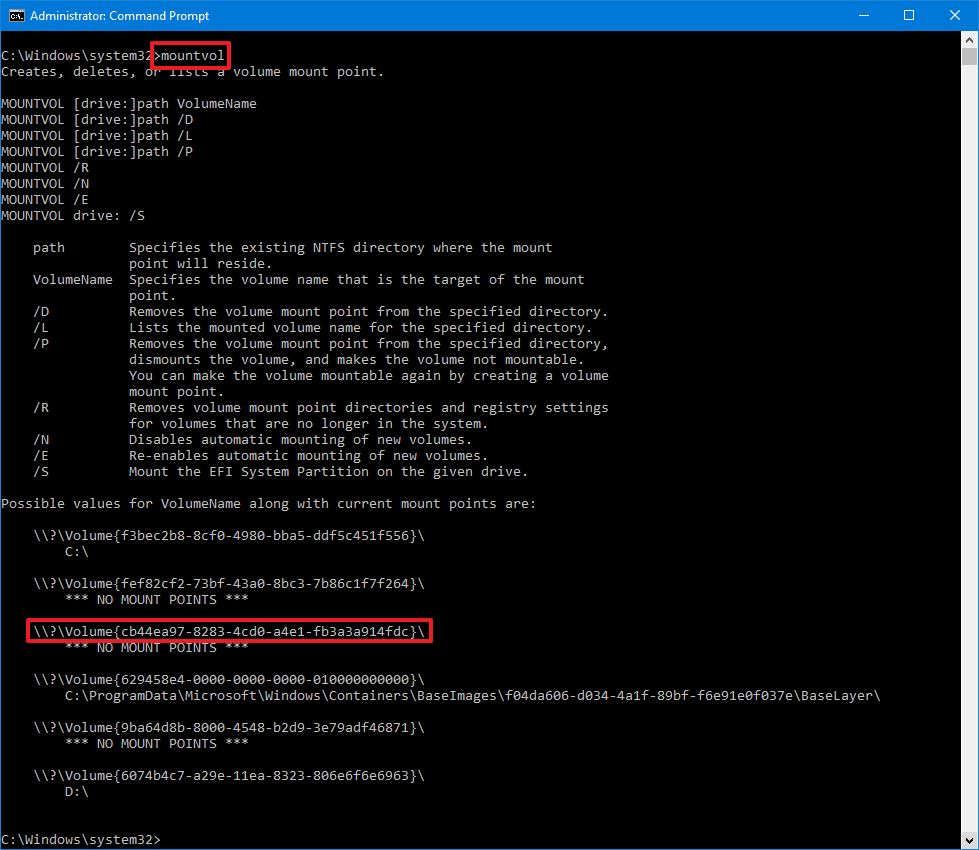
- Select the mount point path to copy the information to the clipboard.Quick note: Usually, the volume may or may not be listed with the «Not mountable until a volume mount point is created» label. If you cannot identify the volume, then use the Disk Management console instead.
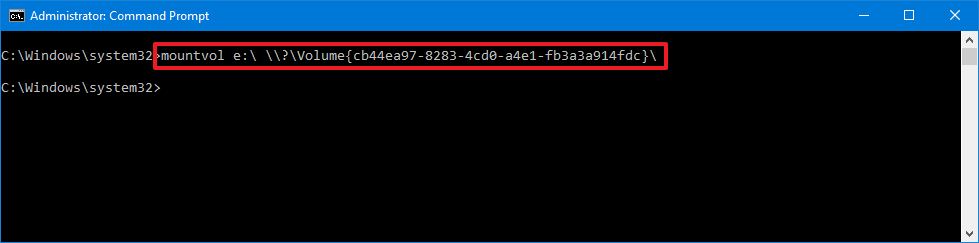
- Type the following command to mount the volume and press Enter:
mountvol DRIVE-LETTER:\ VOLUME-NAMEIn the command, make sure to replace DRIVE-LETTER and VOLUME-NAME with the appropriate information.For example, this command mounts the\\?\Volume{cb44ea97-8283-4cd0-a4e1-fb3a3a914fdc}\with theedrive letter:mountvol e:\ \\?\Volume{cb44ea97-8283-4cd0-a4e1-fb3a3a914fdc}\
After you complete the steps, the volume will be accessible through File Explorer and across the experience.
Mount drive with DiskPart
Alternatively, you can also accomplish the task using DiskPart with these steps:
- Open Start.
- Search for Command Prompt, right-click the top result, and select the** Run as administrator** option.
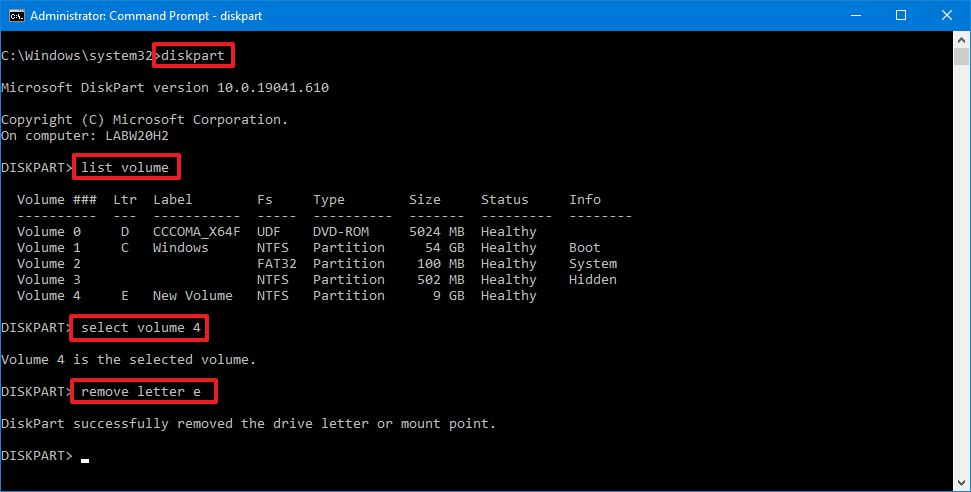
- Type the following command to start the tool and press Enter:
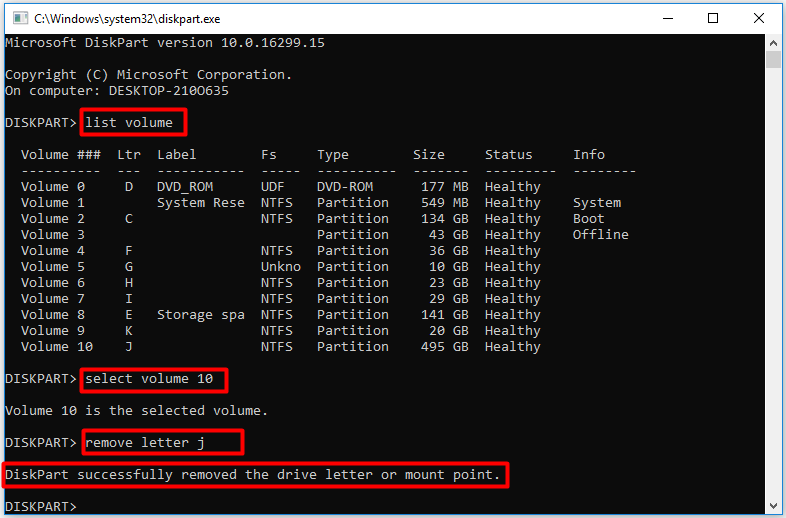
diskpart - Type the following command to list all the available volumes and press Enter:
list volume - Confirm the volume you want to mount.
- Type the following command to select the drive and press Enter:
select volume VOLUME-NUMBERIn the command, replace VOLUME-NUMBER with the number of the drive (volume) you want to mount.For example, this command selects volume number four:select volume 4

- Type the following command to mount the drive on Windows 10 and press Enter:
assign letter DRIVE-LETTERIn the command, replace DRIVE-LETTER with the letter you want to mount and access the storage.For example, this command mounts the drive and assigns theedrive letter:assign letter e
How to unmount drive on Windows 10
When you unmount a drive manually, you will remove the mount point making the storage inaccessible. Also, the system will no longer try to mount it automatically. If you want to make the drive mountable again, you will need to revert the changes (see above steps).
If you want to unmount a drive, you can also use the same Disk Management, mountvol, and DiskPart tools.
Unmount drive with Disk Management
To unmount a drive with Disk Management, use these steps:
- Open Start.
- Search for Create and format hard disks partitions and click the top result to open Disk Management.
- Right-click the drive and select the Change Drive Letter and Path option.
- Click the Remove button.
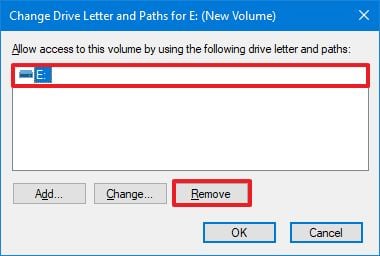
- Click the Yes button.
Once you complete the steps, the drive will no longer be accessible on Windows 10.
Unmount drive with mountvol
To dismount a drive (or volume) with mountvol, use these steps:
- Open Start.
- Search for Command Prompt, right-click the top result, and select the Run as administrator option.
- Type the following command to list all the available mount points and press Enter:
mountvol
- Type the following command to dismount a drive and press Enter:
mountvol DRIVE-LETTER:\ /pIn the command, make sure to change DRIVE-LETTER with the correct drive letter of the mount point you are trying to dismount.For example, this command unmounts thee:\mount point:mountvol e:\ /pQuick note: The/poption will unmount the drive and remove the drive letter. The tool also offers the/doption, but it is only meant to remove mount points individually.

After you complete the steps, the mount points will be removed, making the storage inaccessible to users.
Unmount drive with DiskPart
You can also dismount a drive with DiskPart using these steps:
- Open Start.
- Search for Command Prompt, right-click the top result, and select the** Run as administrator** option.
- Type the following command to start the tool and press Enter:
diskpart - Type the following command to list all the available volumes and press Enter:
list volume - Confirm the volume you want to unmount.
- Type the following command to select the drive and press Enter:
select volume VOLUME-NUMBERIn the command, replace VOLUME-NUMBER with the number of the drive (volume) you want to mount.For example, this command selects volume number four:select volume 4
- Type the following command to unmount the drive on Windows 10 and press Enter:
remove letter DRIVE-LETTERIn the command, replace DRIVE-LETTER with the letter of the storage you want to unmount.For example, this command dismounts theedrive:remove letter e
Also, do not confuse mounting a drive with mounting a drive as a folder, which is something different. You can use these instructions to mount a drive as a folder.
All the latest news, reviews, and guides for Windows and Xbox diehards.
Mauro Huculak is technical writer for WindowsCentral.com. His primary focus is to write comprehensive how-tos to help users get the most out of Windows 10 and its many related technologies. He has an IT background with professional certifications from Microsoft, Cisco, and CompTIA, and he’s a recognized member of the Microsoft MVP community.
-
Home
-
Partition Manager
- How to Mount and Unmount Drive in Windows 10
By Amy | Follow |
Last Updated
How to mount a drive in Windows 10? You may also look for the answer like many other users. In this guide, MiniTool illustrates the detailed steps for the drive mounting process. Besides, it also tells you how to unmount drive. Mount drive with the given steps now!
Why Do You Need to Mount/Unmount Drives
In most time, Windows 10 can automatically mount and unmount a drive after you connect or disconnect a new drive. By dosing so, Windows can uniquely identify a volume even its drive letter is changed.
However, you need to mount or unmount the drive when Windows 10 fails to do that. This post will show you how to mount and unmount a drive in Windows 10 respectively.
How to Mount a Drive in Windows 10
As for drive mounting, here are 2 available methods for you. You can check them by reading the following content.
Mount Drive via Disk Management
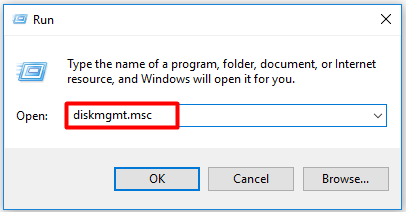
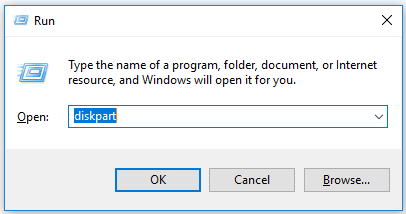
Step 1: Press Windows and R keys to open the Run window, and then input diskmgmt.msc and click OK to open Disk Management.
Step 2: Right-click on the newly added drive and choose Change Drive Letter and Paths in the pop-up menu.
Step 3: Click on the Add button to continue.
Step 4: In the prompted window, check the Assign the following drive letter option and then choose a drive letter from the drop-down menu. Finally, click OK to save the changes.
After you finish these steps, the drive will mount and show up in the system. Then you can store data in it.
Also read: How to Mount a USB Drive in Linux Manually [2 Ways]
Mount Drive via Diskpart
You can also mount drive via another Windows built-in program – Diskpart. This program enables you to finish the computer mounting operation within a few command lines.
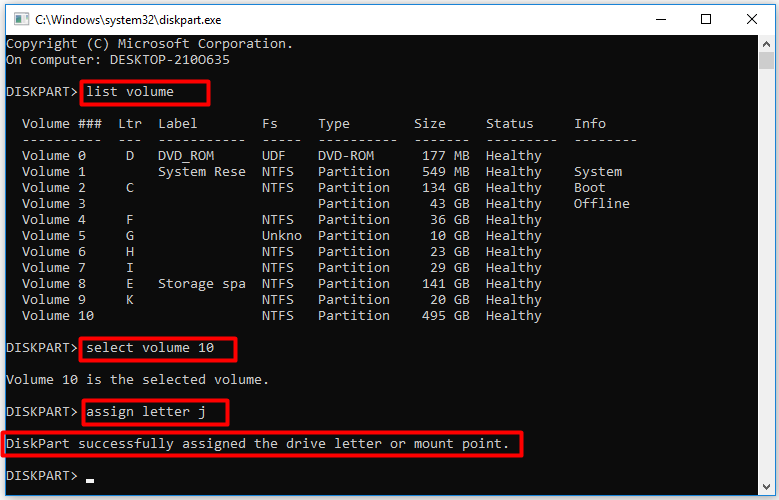
Step 1: Open the Run window by pressing Windows and R keys, and then input diskpart and hit Enter.
Step 2: In the elevated window, type the following commands and hit Enter after each.
- list volume
- select volume N (N stands for the number of volume that you want to mount.)
- assign letter j (You can replace the letter j with the letter you would like to assign to the volume.)
How to Unmount a Drive in Windows 10
After you unmount the drive, Windows will remove the volume mount point from the specified directory, dismount the volume, and make the volume not mountable. How to unmount drives in Windows 10? Here are 2 tutorials.
Unmount Drive via Disk Management
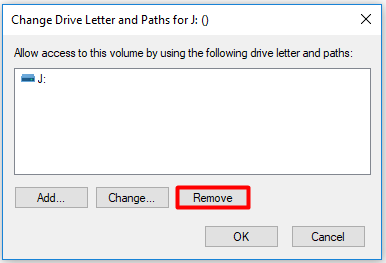
Step 1: Open Disk Management, and then right-click on the drive to unmount and click Change Drive Letter and Paths.
Step 2: In the pop-up window, click on the Remove button.
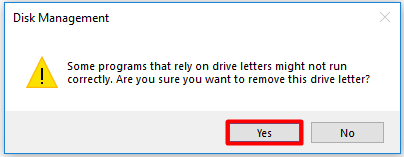
Step 3: Then you will receive a warning window stating that some programs relying on drive letters might not run correctly after removing the drive letter. If you still want to remove it, click Yes to confirm the operation.
Step 4: After the process ends, the drive will not be accessible on Windows 10 anymore.
Also read: Chromebook Recovery Utility: How to Create and Use It
Unmount Drive via Diskaprt
Step 1: Likewise, open Diskpart from the Run window.
Step 2: Type the following commands in the prompted window and press the Enter key after each.
- list volume
- select volume N (N represents the number of the volume to be unmounted.)
- remove letter j (Replace the j with your actual drive letter.)
About The Author

Position: Columnist
Having writing articles about computer tech for a long time, I am rather experienced especially on the aspect of computer optimization, PC enhancement, as well as tech terms explanation. The habit of looking through tech forums makes me a great computer issues collector. And then, many articles related to these issues are released, which benefit plenty of users. Professional, effective, and innovative are always the pursuit of an editing worker.
просмотров: 3403724 октября 2011 года
Понятно, что Виндоуз как бы умный и все делает сам, но иногда бывают глюки и необходимо узнать почему внешний диск/флешка не монтируется…
Для монтирования разделов из под Windows, собственно нужно загрузить саму консоль, Пуск — Выполнить — cmd
Список подключенных устройств можно увидеть коммандой mountvol:
Создание, удаление и просмотр точек подключения.

MOUNTVOL [<диск>:]<путь> <имя тома>
MOUNTVOL [<диск>:]<путь> /D
MOUNTVOL [<диск>:]<путь> /L

<путь> Существующая папка NTFS, в которой будет
располагаться точка подключения.
<имя тома> Имя подключаемого тома.

/D Удаление точки подключения тома из заданной папки.
/L Вывод списка имен подключенных томов для заданной папки.

Возможные значения имени тома вместе с текущими точками подключения:

\\?\Volume{c05a2f30-d8b6-11df-a7fc-806d6172696f}\
C:\

\\?\Volume{479c450f-ee89-11e0-86ec-806d6172696f}\
D:\

\\?\Volume{232e1d8b-d4e6-11e0-8f1c-806d6172696f}\
E:\

\\?\Volume{32ece9ab-e1d8-11e0-8f29-001bfc863028}\
G:\
Тут как бы выводятся все физические адреса устройств и их назначенные точки монтирования.
Например, для демонтирования раздела G:\, выполним комманду:
mountvol G:\ /Dа для его монтирования:
mountvol G:\ \\?\Volume{32ece9ab-e1d8-11e0-8f29-001bfc863028}\Исходя из документации — можно монтировать раздел и в подпапку промонтированных устройств (like UNIX), например в D:\Disk_G\
Что скажем?
Windows автоматически монтирует любой подключенный диск. При необходимости вы можете подключить или отключить диск в Windows вручную. Вот как.
Если вы включите компьютер и откроете проводник, вы увидите все доступные диски, готовые к использованию. Это связано с тем, что Windows автоматически монтирует все диски или тома, подключенные к системе. Разумеется, файловая система диска должна быть совместима. Таким образом, вы можете получить доступ ко всем файлам и программам на этих дисках с самого начала — вам не нужно вручную монтировать диски при каждой перезагрузке.
Хотя это хорошо, может быть время, когда вам нужно размонтировать диск в Windows. Например, возможно, диск вызывает ошибки, вам больше не нужно, чтобы диск отображался в проводнике и т. д. С другой стороны, вы можете захотеть вручную смонтировать диск в Windows, если он не монтируется автоматически.
Независимо от причины, если вам это когда-либо понадобится, Windows позволяет легко монтировать и отключать диск. Все, что требуется, — это несколько кликов или пара команд, в зависимости от вашего варианта использования.
В этом простом практическом руководстве для Windows показаны шаги по монтированию и отключению диска в Windows без лишних слов.
Оглавление:
Если определенный диск не монтируется автоматически, для его монтирования можно использовать средство управления дисками или командную строку. Это довольно легко сделать. Я покажу оба метода, и они достигают одного и того же. Следуйте за тем, который вы считаете легким. Как правило, если вам нужен метод «укажи и щелкни», следуй методу «Управление дисками». Следуйте методу командной строки, если вы хотите побаловаться с командами или создать сценарий.
Использование инструмента управления дисками
Приложение «Управление дисками» — это встроенный инструмент для управления дисками или томами в Windows. Выполните следующие шаги, чтобы смонтировать диск Windows с помощью инструмента управления дисками.
- Откройте меню «Пуск».
- Найдите и откройте «Создание и форматирование разделов жесткого диска».
- Определите несмонтированный том.
- Щелкните правой кнопкой мыши размонтированный диск.
- Выберите опцию «Изменить букву диска и путь».
- Нажмите кнопку «Добавить».
- Выберите радио опцию «Назначить следующую букву диска».
- Выберите букву диска из выпадающего меню.
- Нажмите кнопку «ОК».
- При этом диск/раздел монтируется.
- Вы можете закрыть инструмент управления дисками.
- Откройте проводник, чтобы увидеть только что смонтированный диск.

Использование командной строки
Вы также можете смонтировать диск с помощью командной строки, выполнив всего несколько команд. Вот как.
Откройте окно командной строки с правами администратора. Для этого найдите «Командная строка» в меню «Пуск» и выберите «Запуск от имени администратора».
Затем выполните приведенную ниже команду, чтобы вывести список всех дисков или томов.
маунтвол
Приведенная выше команда выводит список всех подключенных и отключенных томов с соответствующими идентификаторами GUID. Определите размонтированный том и скопируйте соответствующий GUID тома.
GUID тома выглядит примерно так: «\\?\Volume{cf8ec040-28a9-43c6-bc10-3152b85b34cd}\». Вы должны скопировать все это.
Затем выполните приведенную ниже команду, заменив «DriveLetter» на букву диска, которую вы хотите назначить, и «VolumeGUID» на фактическую строку, которую вы скопировали ранее.
Важное примечание. Убедитесь, что между буквой диска «:» и GUID тома есть пробел. В противном случае команда не будет выполнена. Буква диска, которую вы используете в команде, не должна уже использоваться.
Буква диска mountvol: VolumeGUID
Фактическая команда выглядит примерно так:
mountvol E: \\?\Volume{cf8ec040-28a9-43c6-bc10-3152b85b34cd}\
Как только вы выполните команду, Windows монтирует целевой том с буквой диска.
Как размонтировать диск в Windows
Вы можете размонтировать диск в Windows с помощью инструмента «Управление дисками» или командной строки. Оба метода просты. Следуйте за тем, который вы считаете легким. Для начинающих я рекомендую использовать инструмент управления дисками. Если вы не боитесь команд или хотите создавать собственные сценарии, следуйте методу командной строки.
Использование инструмента управления дисками
Выполните следующие действия, чтобы размонтировать диск в Windows с помощью инструмента «Управление дисками».
- Откройте меню «Пуск».
- Найдите и откройте «Создание и форматирование разделов жесткого диска».
- Определите диск, который вы хотите размонтировать.
- Щелкните правой кнопкой мыши диск.
- Выберите опцию «Изменить букву диска и путь».
- Нажмите кнопку «Удалить».
- Нажмите «Да» в окне предупреждения.
- При этом диск/раздел размонтируется.
- Вы можете закрыть инструмент управления дисками.
- Откройте проводник, и вы больше не увидите размонтированный диск.

Использование командной строки
Вы можете размонтировать диск в Windows с помощью командной строки с помощью одной команды. Он довольно аккуратный и простой в использовании. Позвольте мне показать вам, как это сделать.
Нажмите клавишу «Пуск», найдите «Командная строка» и выберите параметр «Запуск от имени администратора», чтобы открыть окно CMD с правами администратора.
Выполните приведенную ниже команду, заменив «DriveLetter» фактической буквой диска, который вы хотите размонтировать. Например, если я хочу размонтировать диск E:, я заменю «DriveLetter» на «E».
Буква диска mountvol: /P
Закройте окно командной строки после выполнения команды. Вы больше не увидите размонтированный диск в проводнике.
–
Это все. Так просто подключить или отключить диск в Windows.
Я надеюсь, что это простое руководство по Windows помогло вам.
Если вы застряли или вам нужна помощь, оставьте комментарий ниже, и я постараюсь помочь как можно больше.
Как известно, одно из отличий файловых систем WinDOS и *nix в том, что в Windows каждый том обычно имеет буквенное обозначение — C:. D: и т.д., а в *nix — подключается к каталогу внутри файловой системы.
Но начиная с Windows 2000 есть возможность не только назначить тому букву или несколько, но и подключить его к пустой папке на разделе с NTFS:
Это открывает новые полезные возможности. Например, у меня на NTFS-разделе создан каталог (сюрприз!) \mnt, внутри которого куча подкаталогов — по одному на каждый сменный накопитель, когда либо подключавшийся к моему рабочему компу.
Всё бы ничего, но Windows предлагает преимущественно графические средства для подобных настроек, тогда как в *nix существует команда mount, которая умеет как показать подключенные тома, так и подключать новые.
Однако, в Windows есть команда diskpart, которая в чем-то сходна с mount. О ней и поговорим немного.
Diskpart может работать в интерактивном режиме: запускаем ее, она выводит свою подсказку и ждет ввода своей команды. А можно собрать нужные команды в файл сценария и с ключом /s запустить этот сценарий на выполнение.
Таблица взята из технета по ссылке выше. Перевод мой.
| Команда | Описание |
|---|---|
|
list volume |
Выводит список обычных и динамических томов на всех дисках. |
|
select volume |
Выбирает указанный том, volumenumber — номер тома, и «фокусируется» на нём, то есть, следующие команды будут применяться к этому тому. Если номер тома не задан, то команда select показывает, какой том выбран на данный момент. Том можно задать номером, буквой диска или путём к точке монтирования. На простых дисках (basic disk) выбор тома одновременно выбирает и соответствующий раздел на этом диске. |
|
assign |
Назначает текущему тому букву диска или каталог-точку монтирования. Если ни то ни другое не указано, то тому присваивается следующая свободная буква. Если выбранная буква или точка монтирование уже занята, то выводится сообщение об ошибке.
С помощью команды assign можно изменить букву, назначенную съемному носителю. Нельзя присваивать буквы загрузочным томам или томам, содержащим файл подкачки. Кроме того, нельзя назначать буквы специальным разделам вроде ОЕМ-разделов, системным разделам EFI или любым разделам в GPT кроме основных разделов с данными. |
|
mount= путь |
Указывает пустой существующий каталог на разделе NTFS, куда будет подключен указанный том. |
Кроме того, начиная с srv2003 есть команда mountvol, гораздо более близкая к mount. Она занимается именно тем, что подключает том к указанному каталогу.