Download Windows Speedup Tool to fix errors and make PC run faster
Some users of Windows have been coming face to face with a strange DistributedCOM error 1001 when they open the Event Viewer. Usually, this error pops up when folks attempt to run scripts or tweak certain functionality in the Windows operating system. This error also appears when users try to run apps from the Microsoft Store.
Event ID 10001, DistributedCOM, Unable to start a DCOM Server

DCOM or Distributed Component Object Model is a proprietary Microsoft technology that allows Component Object Model (COM) software to communicate across a network. Component Services needs the DCOM wire protocol to communicate with the Component Object Model (COM) components on other computers. In a Windows-based system, by default, network computers are initially configured to enable DCOM. What’s COM? It’s a tool used for advanced configuration and troubleshooting.
To fix DCOM error 10001 on your Windows 11/10 computer, follow these suggestions:
- Fix Problems with Apps From Microsoft Store
- Repair corrupted files with System File Checker
- Registry Editor Permission
- Change the permission of the Application ID
Event ID 10001, DistributedCOM, Unable to start a DCOM Server
1] Fix Problems with Apps From Microsoft Store
To begin, we must look at how to fix problems relating to apps found in the Microsoft Store. There are several ways to do this, so let us take a look at a few of them that we know for certain can work.
- Make sure Windows is updated: Press the Windows key + I to open the Settings app. From there, go to Windows Update > Check for updates. If any updates are available, select Install Now, then wait.

- Ensure the app works with Windows 11: In some cases, an app might not work due to incompatibility with Windows 11. We suggest checking for new app updates to get the latest version that works for the operating system.
- Update the Microsoft Store: The next thing you should do if the above fails is to update the Microsoft Store. You see, the Store is an app to itself, so if you want to update it, you must click on the Store icon to open it. After that, click on Library > Get Updates.

- Repair or Reset Microsoft Store apps: Chances are you may have to repair or reset the apps that are being affected.
2] Repair corrupted files with System File Checker

If the above fails, then we suggest using the System File Checker as well as the DISM Tool tool to fix corrupted system files or image.
- Open the Command Prompt.
- Run sfc /scannow.
- Restart your computer
- Thow run DISM.exe /Online /Cleanup-image /Restorehealth in CMD
- Restart your computer.
Go ahead and check to see if the error message is still showing up.
3] Copy the App ID from Component Services

- First, you must click on the search icon located on the Taskbar.
- After that, type Component Services.
- Once it has appeared in the search results, click on it to open.
- A window should now appear.
- Expand Component Services > Computers > My Computer > DCOM Config.
- You are now required to right-click on the services you want to change.
- Select the Properties option.
After that, be sure to copy the Application ID because it will be needed later.
4] Change the permission of the Application ID
We must now modify the permission of the particular service. This is a simple task, so let us discuss how to get it done.
- Press the Windows key + R to open the Run dialog box.
- Type Regedit into the box and hit Enter.
- Got to Computer via the ‘HKEY_CLASSES_ROOT folder.
- Paste the App ID right after ROOT and hit Enter.
- Right-click on the folder with the App ID numbers
- Click on Permissions from the dropdown menu.
- Navigate to Advanced >TrustedInstaller.
- You now want to change the ownership to Local Administrator Group.
- Hit Apply to Save changes.
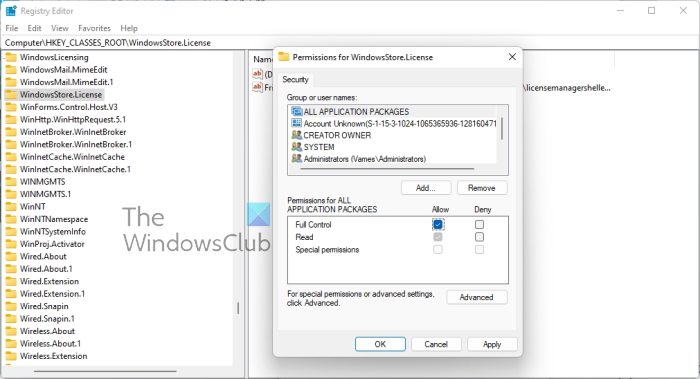
- Next, you must choose Local Administrators group located under the Security tab.
- Check the Allow box right away to gain Full Control in the section that reads, Permissions for Administrators.
- Hit Apply > OK to save all changes.
That should get the job done, at least, we hope.
Related: Fix DistributedCOM error 10005
How do you solve the DCOM Event ID 10001 error?
It is possible to resolve this problem by reinstalling the affected application in a bid to restore missing files. This is just a basic method, but it works more often than not so give it a try.
Related errors: DCOM Event ID 10016 | DCOM Error 1084 | DCOM Error 1084 | Unable to start a DCOM Server, Event ID 10000.
What is DistributedCOM error Windows 11/10
In most cases, the DCOM error shows its ugly head whenever a service or application attempts to use DCOM, but lacks the proper permission. This shouldn’t be a major issue because, in most situations, DCOM errors will not affect your computer system, but they cannot clog up your Event Viewer.
What is DCOM used for?
OK, so for those who might be wondering, Distributed Component Object Model (DCOM) is an extension of Component Object Mode, or COM for short. It enables software components to speak with each other across multiple computers all located on a local area network (LAN), a wide area network (WAN), or the internet.
- How to clear the Event Viewer logs
- If DCOM errors are clogging up the Event Viewer logs, then we need to clean things up.
- Open the Command Prompt by pressing the Windows key + X.
- From there, select Command Prompt (Admin), or Windows Terminal (Admin).
- Next, you need to copy and paste: for /F “tokens=*” %1 in (‘wevtutil.exe el’) DO wevtutil.exe cl “%1”.
- Hit the Enter key on your keyboard.
The Event Viewer logs should now be cleared without problems.
Vamien has studied Computer Information Services and Web Design. He has over 10 years of experience in building desktop computers, fixing problems relating to Windows, and Python coding.
Некоторые пользователи Windows столкнулись лицом к лицу со страннойОшибка распределенного COM 1001когда они открывают средство просмотра событий. Обычно эта ошибка появляется, когда люди пытаются запустить сценарии или настроить определенные функции операционной системы Windows. Эта ошибка также появляется, когда пользователи пытаются запустить приложения из Microsoft Store.
Идентификатор события 10001, DistributedCOM, невозможно запустить сервер DCOM.
ДКОМили Объектная модель распределенных компонентов — это собственная технология Microsoft, которая позволяет программному обеспечению модели компонентных объектов (COM) обмениваться данными по сети. Службам компонентов необходим проводной протокол DCOM для связи с компонентами объектной модели компонентов (COM) на других компьютерах. В системе под управлением Windows по умолчанию сетевые компьютеры изначально настроены на включение DCOM.Что такое COM? Это инструмент, используемый для расширенной настройки и устранения неполадок.
Чтобы исправить ошибку DCOM 10001 на вашем компьютере с Windows 11/10, выполните следующие действия:
- Устранение проблем с приложениями из Microsoft Store
- Восстановите поврежденные файлы с помощью средства проверки системных файлов.
- Разрешение редактора реестра
- Изменение разрешения идентификатора приложения
Идентификатор события 10001, DistributedCOM, невозможно запустить сервер DCOM.
1] Исправить проблемы с приложениями из Microsoft Store.
Для начала мы должны посмотреть, как исправить проблемы, связанные с приложениями, найденными в Microsoft Store. Есть несколько способов сделать это, поэтому давайте взглянем на некоторые из них, которые, как мы точно знаем, могут работать.
- Убедитесь, что Windows обновлена: нажмите клавиши Windows + I, чтобы открыть приложение «Настройки». Оттуда перейдите в Центр обновления Windows > Проверить наличие обновлений. Если доступны какие-либо обновления, выберите «Установить сейчас» и подождите.
- Убедитесь, что приложение работает с Windows 11.: в некоторых случаях приложение может не работать из-за несовместимости с Windows 11. Мы рекомендуем проверять наличие новых обновлений приложения, чтобы получить последнюю версию, подходящую для данной операционной системы.
- Обновите Магазин Microsoft: Следующее, что вам следует сделать, если вышеуказанное не помогло, — это обновить Microsoft Store. Видите ли, Магазин — это отдельное приложение, поэтому, если вы хотите его обновить, вам нужно щелкнуть значок «Магазин», чтобы открыть его. После этого нажмите «Библиотека» > «Получить обновления».

- Восстановить или сбросить приложения Microsoft Store: Скорее всего, вам придется восстановить или сбросить настройки затронутых приложений.
2] Восстановите поврежденные файлы с помощью средства проверки системных файлов.

Если вышеуказанное не помогло, мы предлагаем использовать средство проверки системных файлов, а также инструмент DISM Tool для исправления поврежденных системных файлов или изображений.
- Откройте командную строку.
- БегатьСФЦ /сканноу.
- Перезагрузите компьютер
- Как бежатьDISM.exe/Онлайн/Очистка образа/Восстановление здоровьяв ЦМД
- Перезагрузите компьютер.
Продолжайте и проверьте, появляется ли сообщение об ошибке по-прежнему.
3] Скопируйте идентификатор приложения из служб компонентов.

- Сначала необходимо нажать на значок поиска, расположенный на панели задач.
- После этого введите Службы компонентов.
- Как только он появится в результатах поиска, нажмите на него, чтобы открыть.
- Теперь должно появиться окно.
- Разверните Службы компонентов > Компьютеры > Мой компьютер > Конфигурация DCOM.
- Теперь вам необходимо щелкнуть правой кнопкой мыши службы, которые вы хотите изменить.
- Выберите опцию «Свойства».
После этого обязательно скопируйте идентификатор приложения, поскольку он понадобится позже.
4] Измените разрешение идентификатора приложения.

Теперь мы должны изменить разрешение конкретной службы. Это простая задача, поэтому давайте обсудим, как ее выполнить.
- Нажмите клавиши Windows + R, чтобы открыть диалоговое окно «Выполнить».
- Введите Regedit в поле и нажмите Enter.
- Попал на компьютер через папку HKEY_CLASSES_ROOT.
- Вставьте идентификатор приложения сразу после ROOT и нажмите Enter.
- Щелкните правой кнопкой мыши папку с номерами идентификаторов приложений.
- Нажмите «Разрешения» в раскрывающемся меню.
- Перейдите в раздел «Дополнительно» > «TrustedInstaller».
- Теперь вы хотите изменить владельца на группу локальных администраторов.
- Нажмите «Применить», чтобы сохранить изменения.
- Далее вы должны выбрать группу «Локальные администраторы», расположенную на вкладке «Безопасность».
- Сразу установите флажок «Разрешить», чтобы получить полный доступ в разделе «Разрешения для администраторов».
- Нажмите «Применить» > «ОК», чтобы сохранить все изменения.
По крайней мере, мы надеемся, что это должно завершить работу.
Связанный: Исправить ошибку DistributedCOM 10005.
Как устранить ошибку DCOM Event ID 10001?
Эту проблему можно решить, переустановив уязвимое приложение, чтобы восстановить недостающие файлы. Это всего лишь базовый метод, но чаще всего он работает, поэтому попробуйте.
Связанные ошибки:Идентификатор события DCOM 10016 | Ошибка DCOM 1084 | Ошибка DCOM 1084 | Невозможно запустить сервер DCOM, идентификатор события 10000.
Что такое ошибка DistributedCOM в Windows 11/10
В большинстве случаев ошибка DCOM проявляется всякий раз, когда служба или приложение пытается использовать DCOM, но не имеет надлежащего разрешения. Это не должно быть серьезной проблемой, поскольку в большинстве ситуаций ошибки DCOM не влияют на вашу компьютерную систему, но не могут засорить вашу программу просмотра событий.
Для чего используется DCOM?
Итак, для тех, кому может быть интересно: объектная модель распределенных компонентов (DCOM) — это расширение объектного режима компонентов, или сокращенно COM. Он позволяет компонентам программного обеспечения взаимодействовать друг с другом на нескольких компьютерах, расположенных в локальной сети (LAN), глобальной сети (WAN) или в Интернете.
- Как очистить журналы просмотра событий
- Если ошибки DCOM засоряют журналы просмотра событий, нам необходимо их очистить.
- Откройте командную строку, нажав клавиши Windows + X.
- Оттуда выберите «Командная строка (Администратор)» или «Терминал Windows» (Администратор).
- Далее вам нужно скопировать и вставить: для /F «tokens=*» %1 в (‘wevtutil.exe el’) DO wevtutil.exe cl «%1».
- Нажмите клавишу Enter на клавиатуре.
Журналы просмотра событий теперь должны очищаться без проблем.
Sometimes when you run some scripts to tweak the default functionalities of Windows, you might face the DCOM errors with error code 10001.
This error code has several variations like:
Unable to start a DCOM server 2147942402

Unable to start a DCOM server event ID 10001

What is DCOM?
DCOM (Distributed Component Object Model) is a service that allows computers to run programs on the network as if they’re running locally. As you can see, this is a sensitive service because it is closely related to the proper working of the Windows operating system. Hence, we don’t recommend tweaking the permissions and settings of DCOM in any condition.
Still, if you want to tweak the permissions of DCOM to resolve a particular or 10001 error code, then you should understand the reason for that error code first.
When Does the DCOM Error 10001 Occur?
This error code mostly occurs:
- When you execute some scripts to disable Cortana or the software keyboard in Windows 10. That is why people also call it the 10001 windows 10 error.
- After installing a fresh copy of Windows in some cases.
- When updating Windows applications like the Windows store.
Pre-requisite
Before we move on to tweaking your registries, you should first check whether your local Antivirus isn’t conflicting or quarantining the application files through which you are encountering the error message.
According to a user, his Microsoft Store files were quarantined by Zemana Antilogger and he wasn’t notified. This occurred after he initiated the process to update the Store application. No matter which Antivirus you are using, make sure to check the directories or files it is black-listing.
You can check our guide on How to Disable your Antivirus.
How to Solve DCOM Error 10001?
In this series of steps, we will demonstrate how to resolve the error message w.r.t the InputService. This is one of the use-cases and you can freely replace it with the other application you are having the error with.
- First, disable the startup of ‘InputService‘ (or any other app if you’re solving some other error code with DCOM).
- Now, open the ‘Component Services’ console from the Start menu.

Opening ‘Component Services’ from the ‘Start menu’

Copying the ‘App ID’ from ‘Component Services’
- In the new window, expand the ‘Component Services,’ then ‘Computers.’
- Now, expand the ‘My Computer’ and then, ‘DCOM Config.’

Expanding ‘Component Services’ < ‘Computers’ < ‘My Computer’ < ‘DCOM Config’ in the ‘Component Services’ console - Right-click on the service you need to change inside DCOM Config and choose the ‘Properties’ option.
- Now, jot down the ‘Application Name’ and ‘Application ID’ in the properties window of that particular service.

Jotting down the ‘Application Name’ and ‘Application ID’ of a particular service in the ‘Properties’ of that service


Note: Copy the ‘Application ID’ here because we will need it later on
Changing the Permissions of that Particular ‘App ID’ in ‘Registry Editor’
Note: Modifying the permissions of a particular service can break some functionalities in Windows so make sure you follow the steps correctly.
- After that, minimize the opened windows and go to the ‘Registry Editor.’

Typing the ‘regedit’ to open the ‘Registry Editor’ 
Confirming ‘Yes’ to open the ‘Registry Editor’ - Click on the ‘HKEY_CLASSES_ROOT’ folder inside the ‘Computer’ section and paste the copied (jotted down) ‘App ID’ after ‘Computer\HKEY_CLASSES_ROOT\.’
- Hitting the ‘Enter’ key will take you to that particular key in the registry editor.

Selecting the ‘App ID’ of that particular service in ‘Registry Editor’ - Now, right-click on the folder that has the same ‘App ID’ and choose the ‘Permissions’ option.

Choosing the ‘Permissions…’ option to edit the permissions of that particular service - Then, click on the ‘Advanced’ button in the ‘Permissions…’ window.

Clicking on the ‘Advanced’ button in the ‘Permissions’ window of that particular service - Now, you will notice that the Owner/account type is ‘TrustedInstaller.’ So, click on the ‘Change’ option to change the ownership.

Clicking on the ‘Change’ option in front of the ‘Owner’ - Then, change the ownership to the ‘Local Administrator group’ or some applicable owner and click on ‘Apply’ to save the new changes.
- After that, click on the ‘OK’ button to close this window.
- Now, choose the ‘Local Administrators group’ under the ‘Security’ tab of the ‘Permissions…’ window.
- Then, check the ‘Allow’ box for ‘Full Control’ in the ‘Permissions for Administrators’ section in the same window.
- After that, click ‘Apply’ to save the changes.

Selecting the ‘Local Administrators group’ and changing its permission type to ‘Full Control’ - Now, close the ‘Component Services’ console and everything else.
- After that, reopen the ‘Component Services’ console and try to change the ‘Launch and Activation Permissions’ from the ‘Security’ tab of the applications’ properties.


Note: You need to deny all the permissions for ‘InputService’ to resolve the DCOM error 10001
Conclusion
This procedure is dangerous for your operating system because it can break your Windows and you may need to reinstall the Windows. So, we don’t recommend trying this solution at all because it is better to play safe. Still, if you want to tweak the permissions of ‘DCOM Config,‘ this procedure is the only one that has worked for others.

I am a BSCS graduate and a technology nerd who now loves working and writing about computers and other tech-related stuff. In my free time, I like watching Netflix and playing Cricket 22 and The Witcher 3 (Wild Hunt).
The Event Viewer logs events that lead to errors. The event logs can help you understand what triggered or where exactly the issue is coming from so you can be apply the relevant troubleshooting steps. In this post, we provide the most applicable solutions to Windows Error Reporting Event ID 1001 on Windows 11/10.

Windows Error Reporting Event ID 1001 is generic, which means it can occur on your Windows 11/10 computer due to several reasons; and to successfully resolve the issue, we have to identify the event name referenced in Event Viewer. This event indicates that an application has crashed the system. The instance of this error will differ to a large extent depending on several factors, including information contained in the log file. The solutions provided in this post apply to the instance of the Windows Error Reporting Event ID 1001 with the following Event Name:
- AEAPPINVW8
- RADAR_PRE_LEAK_64
- MemDiagV1
The symbolic name for this Event ID is WER_EL_BUCKET_LOG. Code 1001 is like a universal code in case of a Windows error. It represents almost all the main errors like application crashes, lagging systems, generic reports, etc.
Read: Windows Errors, System Error Messages and Codes: Complete List and Meaning
There is no known adverse effect of this error on the system in terms of performance, security compromise, or general health of the system other than the event log getting flooded with the error. However, if you are looking to stop the Windows Error Reporting Event ID 1001 from occurring and getting logged, you can try our recommended suggestions below in no particular order and see if that helps you accomplish this task. Remember that almost all errors in the Event Viewer log are unimportant – the errors issued are just informative and a report has been sent to Microsoft. We suggest the following course of action:
- Run Memory Test
- Change Virtual Memory/Page File
- Delete/Disable all tasks in the Customer Experience Improvement Program folder in Task Scheduler
- Disable Automatic Updates
- Perform System Restore or Uninstall update
Let’s take a look at the description of the process involved concerning each of the listed solutions.
1] Run Memory Test

The Event Name RADAR_PRE_LEAK_64 or MemDiagV1 are memory issues. RADAR is Microsoft’s Memory Leak Detector that indicates an app or program is not properly handling memory. Some games, such as BlackOps are known to frequently cause the report to be written, and it’s nothing to worry about. However, in this case of Windows Error Reporting Event ID 1001, you can use Task Manager and/or use Process Explorer from SysInternals to identify the app or game that’s having Memory leak issues – it’s imperative to note that some errant memory “tweaking” could cause some memory to become unusable.
Related: The computer has rebooted from a bugcheck
In addition, you can also test for defective physical memory on your PC with the inbuilt Windows Memory Diagnostic Tool or the advanced MemTest86+. Although this is a software issue, where an app or program is not properly managing its memory, rather than a hardware issue, you can run Hardware and Devices Troubleshooter to rule out faulty hardware, which could be due to either physical damage or corrupt driver/software linked to the hardware.
Read: Memory leak issue in Remote Registry Service causes Windows to hang
2] Change Virtual Memory/ Page File

What these errors are is memory errors. The Windows operating system ships with factory default virtual memory. If you have more RAM than factory settings, you need to change your virtual memory to match the physical RAM installed on your computer.
To change the Page File size or Virtual Memory on your Windows 11/10 PC, do the following:
- In the Taskbar Search, type Advanced System.
- In the search result, click on View Advanced System Settings. Alternatively, press Windows key + R, then type sysdm. cpl in the Run dialog box and hit Enter to open System Properties.
- In System Properties, click the Advanced tab.
- In the Performance section, click the Settings button.
- In the Performance Options sheet, click the Advanced tab.
- In the Advanced tab, under Virtual memory, select Change.
- Now, uncheck Automatically manage paging file size for all drives option.
- Next, highlight or select your Windows system drive.
- Select the radio button for the Custom size option.
- Change the Initial size value and the Maximum size value to a higher value.
- Click Set.
- Click Apply to save changes.
- Click OK all the way to exit.
Read: How to reset Virtual Memory or Page File in Windows
3] Delete/Disable all tasks in the Customer Experience Improvement Program folder in Task Scheduler

As reported by some affected users, the Event Name AEAPPINVW8 is triggered by Windows Automatic Maintenance because they notice the error appears at the time task is scheduled to run. Also, this issue was confirmed or reproduced by manually triggering Windows Automatic Maintenance as the error message promptly appeared in the event log. The scheduled task that triggers the error is called Program Data Update, which is part of the Customer Experience Improvement Program – a task that collects information about software installations, uninstalls, and such.
In this case, you can run System Maintenance Troubleshooter to automatically detect and fix common maintenance problems on your Windows 11/10 computer. Also, in Task Scheduler, delete/disable all scheduled tasks in the Customer Experience Improvement Program folder that runs or is triggered at the specified time the error appears and is logged in Event Viewer. – here’s how:
- Press the Windows key + R keys to invoke the Run dialog.
- In the Run dialog box, type taskschd.msc and hit Enter to open Task Scheduler.
- Navigate to the directory path below:
Task Scheduler Library > Microsoft > Windows > Customer Experience Program Improvement Program
- At the location, in the middle pane of the opened folder, select one or more task(s) you want to delete.
Note: If you want to delete or disable more than one task, you can press and hold the Ctrl key while clicking on the tasks one after the other to highlight all.
- Once you have selected all the tasks you want to delete/disable, do either of the following:
- Click on Delete or Disable under Selected Items in the right Actions pane.
- Click on Action (Alt+A) on the toolbar and click Delete or Disable (Alt+D).
- Right-click on the selected task(s) and click Delete or Disable on the context menu.
- Click Yes on the prompt that pops up to confirm.
- Exit Task Scheduler when done.
Read: How to Import or Export Tasks from Task Scheduler in Windows
4] Disable Automatic Updates
These errors as logged in Event Viewer might also report WindowsUpdateFailure2 or StoreAgentScanForUpdatesFailure0. In this case, what worked is to disable Automatic Updates for Windows and Microsoft Store apps. In addition, you can run the Windows Update Troubleshooter and the Windows Store Apps Troubleshooter to resolve any underlying issues causing both the Windows update and Microsoft Store apps update failures.
Read: Recommended Windows Update policies Admins should be using
5] Perform System Restore or Uninstall update
Some PC users reported they started seeing this error entry in event logs after successfully installing a new Windows update on their system. If you’re in a similar situation, then the applicable solution here is to either perform System Restore or uninstall the ‘problematic’ update. If the update installed is a Windows optional update for the driver of particular hardware on your computer, like the graphics card, you can roll back the driver updates in Device Manager.
Read: Bad GPU Driver Update causing problems in Windows
I hope you find this post informative and helpful!
These Event IDs-related error posts might interest you:
- DistributedCOM error 10001, Unable to start a DCOM Server
- How to fix DCOM Event ID 10016 error on Windows
- Event ID 10010, Server did not register with DCOM within timeout
- How to fix Event ID 642 ESENT error on Windows
What is a Fault Bucket error in Windows 10?
On a Windows 11/10 computer, a Fault Bucket identification number is a number assigned by the system to identify specific types of errors. This number is used by Microsoft to identify a particular program error when you send an error report.
Read: How to read Windows Defender Event Log using WinDefLogView
What is CbsPackageServicingFailure2?
One of those is the Windows Event Error CbsPackageServicingFailure2. The only way users find out about this error is by going to their Windows logs. It is thought to be a system problem potentially caused by the Windows update cache that initiates repeated downloads and installations. Affected users reported that the error did not affect the regular use of Windows on their devices.
How do I view Windows log files?
To view the Windows Setup event logs on your device, follow these steps:
- Start the Event Viewer.
- Expand the Windows Logs node.
- Click System.
- In the Actions pane, click Open Saved Log.
- Locate the Setup.etl file. By default, this file is available in the %WINDIR%\Panther directory. The log file contents appear in the Event Viewer.
Read: What or Where is CBS.log? How to read CBS.log file in Windows
Does Windows have a crash log?
When your hardware or software of the system crashes, hangs, or freezes then the operating system generates and maintains a crash log record to identify the causes of the crashes. Windows operating system maintains this log in Event Viewer. At any time, you can review and as well clear the Event Log in Windows 11/10.
- Remove From My Forums
-
Вопрос
-
В журнале событий на сервере Windows Server 2019 вижу сообщение об ошибке.
Источник: DistributedCOM
ID: 10001
Не удалось запустить DCOM-сервер: {995C996E-D918-4A8C-A302-45719A6F4EA7} как Недоступно/Недоступно.Ошибка:
«0»
Произошла при запуске команды:
C:\Windows\System32\rundll32.exe C:\Windows\System32\shell32.dll,SHCreateLocalServerRunDll {995C996E-D918-4a8c-A302-45719A6F4EA7} -EmbeddingЧто это за проблема?
Ответы
-
Привет,
Такая ошибка появляется из-за нехватки прав. Вам нужно проверить какие NTFS права (DCOM) у Вас настроены .
Мнения, высказанные здесь, являются отражением моих личных взглядов, а не позиции корпорации Microsoft. Вся информация предоставляется «как есть» без каких-либо гарантий. Не забывайте помечать сообщения как ответы и полезные,
если они Вам помогли.-
Изменено
10 ноября 2020 г. 8:37
-
Помечено в качестве ответа
msandrosov
27 ноября 2020 г. 7:38
-
Изменено
-
Из обсуждения, смотрите объяснение процесса:
That GUID maps to the «Shell Hardware Mixed Content Handler», which is a COM handler that needs to run as «Interactive User», meaning run in a logged-on user’s session (that’s you ). The reason it needs to run in the context of a logged-on
user is that it’s actually the Autorun handler (enabling Autorun on my own Win7 box causes the same process to be spawned).If you don’t want to see it, go into the control panel and disable Autorun. Otherwise, it needs to run for Autorun to work properly.
Если на работоспособность ошибка не влияет, то мой совет не трогать конфигурацию.
Если все-таки захотите менять конфигурацию, смотрите информацию по правам DCOM:
What do the different DCOM / COM security settings mean?
Setting Minimum DCOM Permissions
Setting DCOM Remote Access Permissions
Мнения, высказанные здесь, являются отражением моих личных взглядов, а не позиции корпорации Microsoft. Вся информация предоставляется «как есть» без каких-либо гарантий. Не забывайте помечать сообщения как ответы и полезные,
если они Вам помогли.-
Помечено в качестве ответа
Petko KrushevMicrosoft contingent staff, Owner
26 ноября 2020 г. 7:59
-
Помечено в качестве ответа