Fixing the Cache Manger error couldn’t be any simpler
by Milan Stanojevic
Milan has been enthusiastic about technology ever since his childhood days, and this led him to take interest in all PC-related technologies. He’s a PC enthusiast and he… read more
Updated on
- The CACHE_MANAGER error in Windows can occur from various causes, like outdated drivers.
- Check for any Windows updates if your Windows 11 crashes with the stop code CACHE_MANAGER.
- To eliminate the CACHE_MANAGER error, you can use a third-party tool that addresses BSoD issues.
XINSTALL BY CLICKING THE DOWNLOAD
FILE
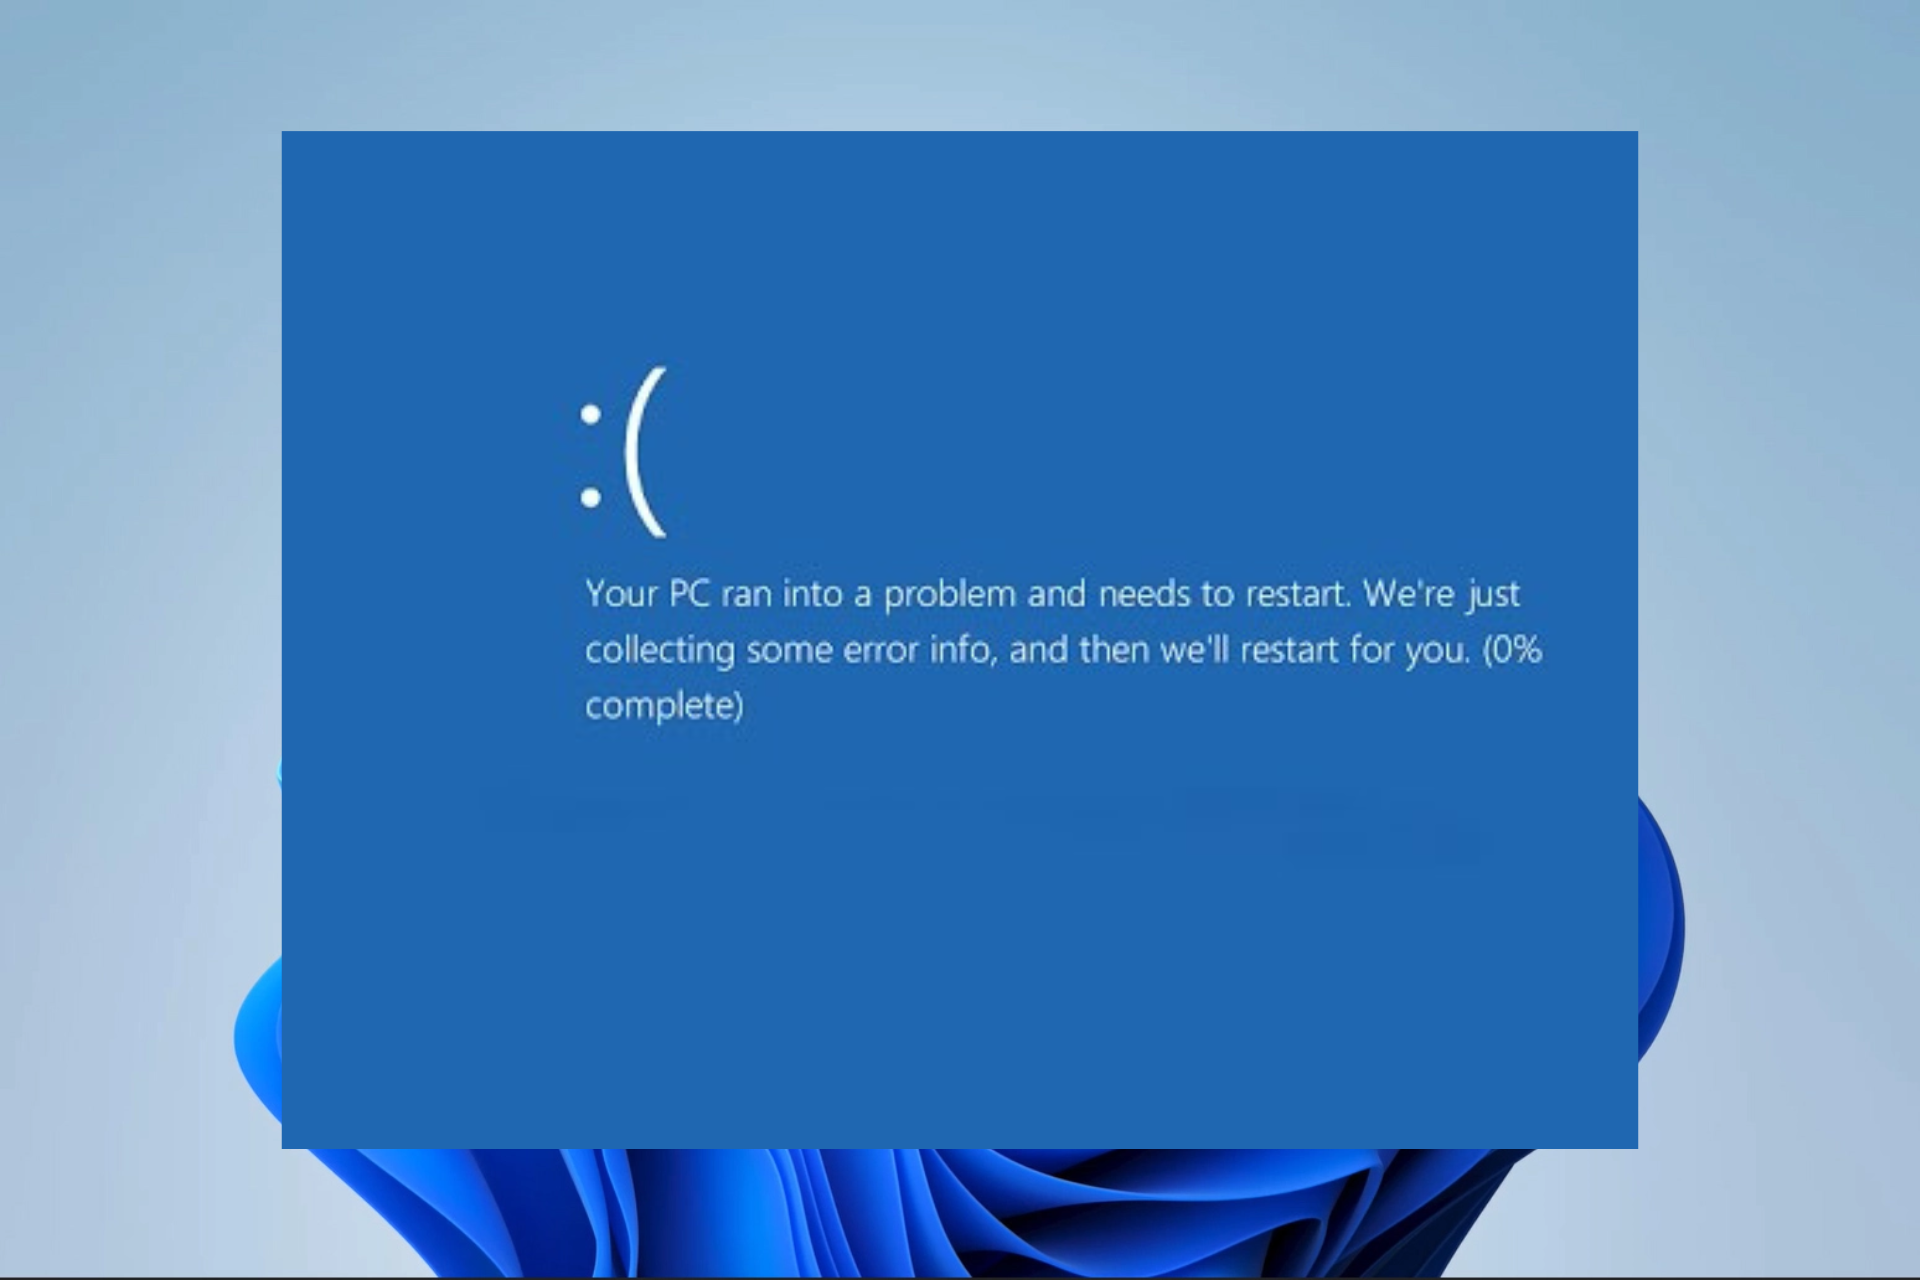
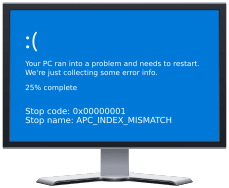
Since BSoD errors can be problematic, today we’ll show you how to fix the stop code cache manager BSoD error.
Blue Screen of Death errors can cause your PC to restart frequently. These errors can affect any operating system, and Windows 11 is no exception. Let us take you through all you should know about this error in Windows 11.
What is Cache Manager?
The memory manager and the cache manager work together, providing data caching for the Windows file system drivers. It is a collection of kernel-mode operations and system threads (network and local).
Cache managers act as a container for organizing a collection of caches into a single management unit that may be started and stopped simultaneously.
How we test, review and rate?
We have worked for the past 6 months on building a new review system on how we produce content. Using it, we have subsequently redone most of our articles to provide actual hands-on expertise on the guides we made.
For more details you can read how we test, review, and rate at WindowsReport.
What causes the Cache Manager blue screen?
- Hardware devices – If there are defects or faults with hardware components like your hard drive, you may experience this error. You should only use the best hard drives for your Windows PC.
- Bad or outdated drivers – Windows users can expect varying errors, including the cache management blue screen error when drivers have not been updated.
- Corrupt system and OS files – Maintaining proper system and app files will reduce the chances of experiencing this error on a Windows device.
- Software or anti-virus compatibility issues – When an app has compatibility flaws, it triggers errors in the OS. We always recommend only the most compatible software and antivirus programs on your Windows devices.
How do I fix the Cache Manager blue screen error?
Before jumping into these solutions, apply the following:
- Make sure that you keep a regularly updated OS, this way, you can avoid little bugs or defects that may trigger this error.
- You should also ensure your hardware works fine and change faulty drives if there are any. To check your RAM, you’ll need to use tools such as MemTest86+. Simply put the tool onto a USB flash drive and boot your computer from it. Let MemTest86+ run for a couple of hours.
1. Use a third-party BSoD fixer
2. Run the BSOD Troubleshooter
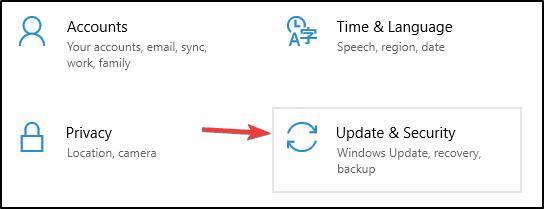
- Open the Settings app and go to Update & Security section.

- Select Troubleshoot from the menu on the left, then select BSOD from the right pane and click Run the troubleshooter.

- Follow the instructions on the screen to complete the troubleshooter.

3. Update your drivers
Many BSoD errors are caused by outdated drivers that aren’t fully compatible with Windows. Searching for drivers on your own can be time-consuming.
An automatic driver updater will save you the effort of manually looking for drivers and will ensure that your system has the most recent drivers available.
Driver updaters such as Outbyte Driver Updater can also repair damaged or missing drivers. You can schedule regular updates and driver scans to ensure your device is always fully optimized.
The software is very lightweight, so it can silently run on your machine without interfering with other apps or using too many resources.
⇒ Get Outbyte Driver Updater
4. Run the SFC scan
- Right-click on the Windows search and type cmd, then click Run as administrator.

- Enter the following line and press Enter:
sfc/scannow
- Wait until the process is done (it may take a while); if the solution is found, it will automatically be applied.
- Now, close the Command Prompt and restart your computer.
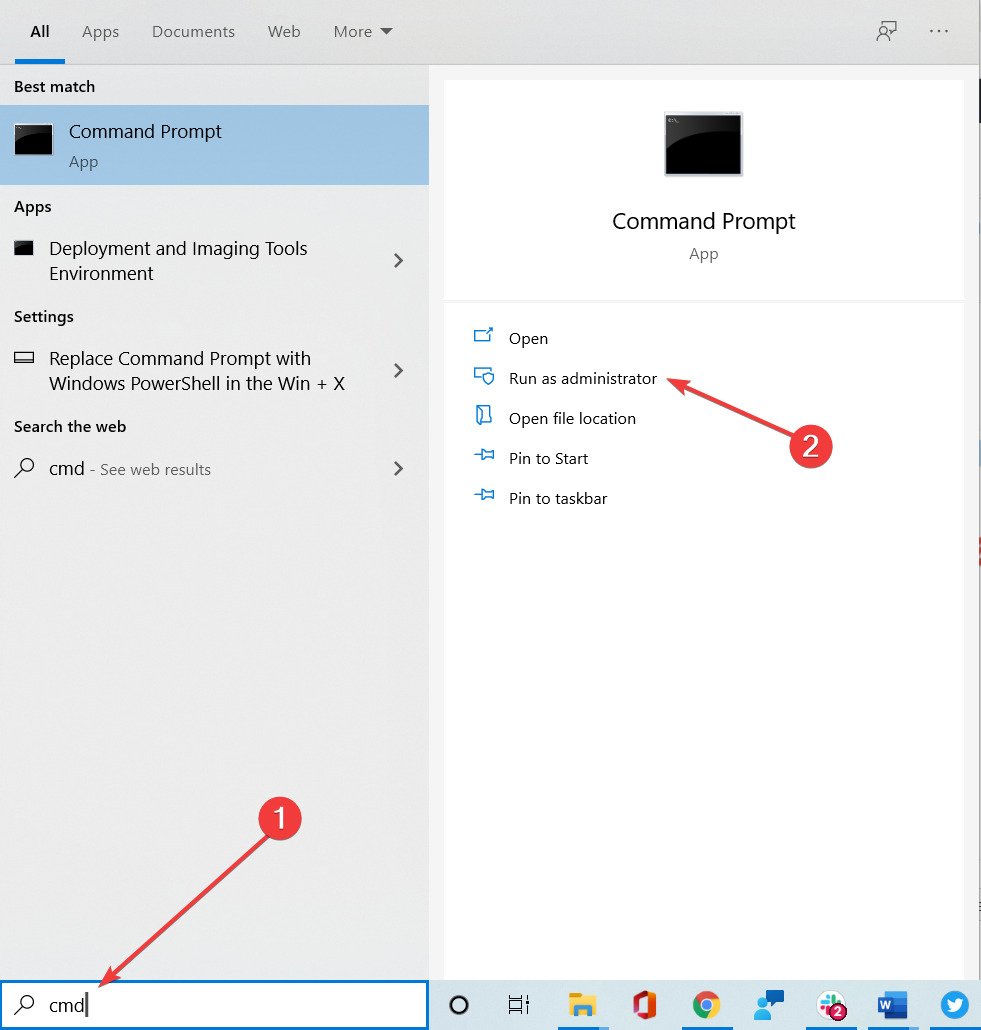

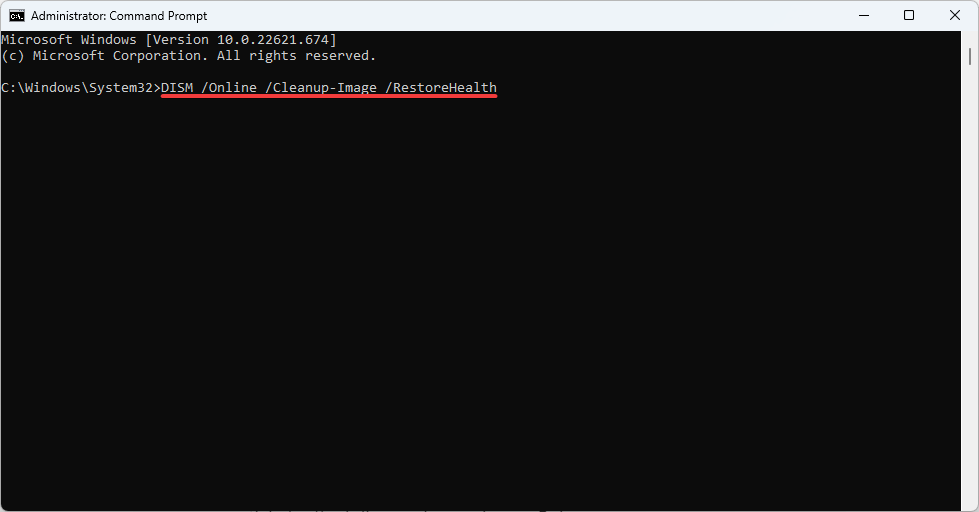
5. Run DISM
- Right-click on the Windows search and type cmd, then click Run as administrator.
- Enter the following line and press Enter:
DISM /Online /Cleanup-Image /RestoreHealth - Wait until the scan is finished, then restart your computer and try updating again.
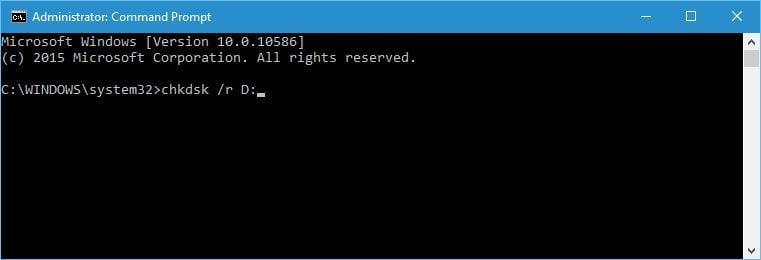
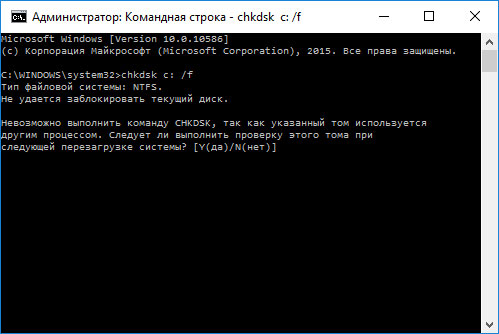
6. Run chkdsk
- Right-click on the Windows search and type cmd, then click Run as administrator.
- When Command Prompt starts, enter the script below and press Enter to run it.
chkdsk /f /r C: - You’ll have to perform this scan for every hard drive partition, so be sure to replace C with a matching hard drive letter.

Blue Screen of Death errors, such as the stop code cache manager error, can be troublesome, but you can easily fix them using some of our solutions.
In the worst-case scenario, you might have to replace your hard drive or try if your hard drive works on a different computer. Let us know what solutions worked best for you.
![]()
Skip to content
Как убрать CACHE_MANAGER (0x00000034)?
Как убрать « CACHE_MANAGER» ( 0x00000034)?
На компьютере или ноутбуке под управлением Windows появился «синий экран смерти»? После появления сообщения «
CACHE_MANAGER» (
0x00000034) система перезагружается? Ищите как исправить
0x00000034: «
CACHE_MANAGER»?
Как просмотреть информацию об ошибках, исправить ошибки в Windows 10, 8 или 7
Причины появления ошибки
- На жестком диске компьютера или ноутбука не достаточно места. Для правильной работы ОС Windows 10 на системном диске должно быть свободно 2 — 10 ГБ.
- На компьютер был установлен не совместимый BIOS или прошивка была повреждена.
- Установлены не совместимые с ОС драйвера устройств.
- Реестр Windows был поврежден или удален. Возможно в результате очистки были удалены системные ключи реестра.
- Ативирусное программное обеспечение или компьютерные вирусы могут заблокировать системные файлы или удалить важные ключи реестра.
- В результате ошибок в работе программы для резервного копирования.
- В результате обновления ОС Windows.
Актуально для ОС: Windows 10, Windows 8.1, Windows Server 2012, Windows 8, Windows Home Server 2011, Windows 7 (Seven), Windows Small Business Server, Windows Server 2008, Windows Home Server, Windows Vista, Windows XP, Windows 2000, Windows NT.
Вот несколько способов исправления ошибки «
CACHE_MANAGER»:
Восстановите удаленные файлы
Часто появление BSoD ошибок приводит к утери важных файлов. Блокировка файлов компьютерными вирусами, ошибки в работе программ для резервного копирования, повреждение или перезапись системных файлов, ошибки файловой системы или наличие битых секторов диска – это не далеко полный список причин удаления данных.
Исправление соответствующих ошибок восстановит работоспособность устройства, но не всегда восстановит повреждённые или утерянные файлы. Не всегда имеется возможность устранить ту или иную ошибку без форматирования диска или чистой установки операционной системы, что также может повлечь за собой утерю файлов.
Загрузите бесплатно и просканируйте ваше устройство с помощью Hetman Partition Recovery. Ознакомьтесь с возможностями программы и пошаговой инструкцией.
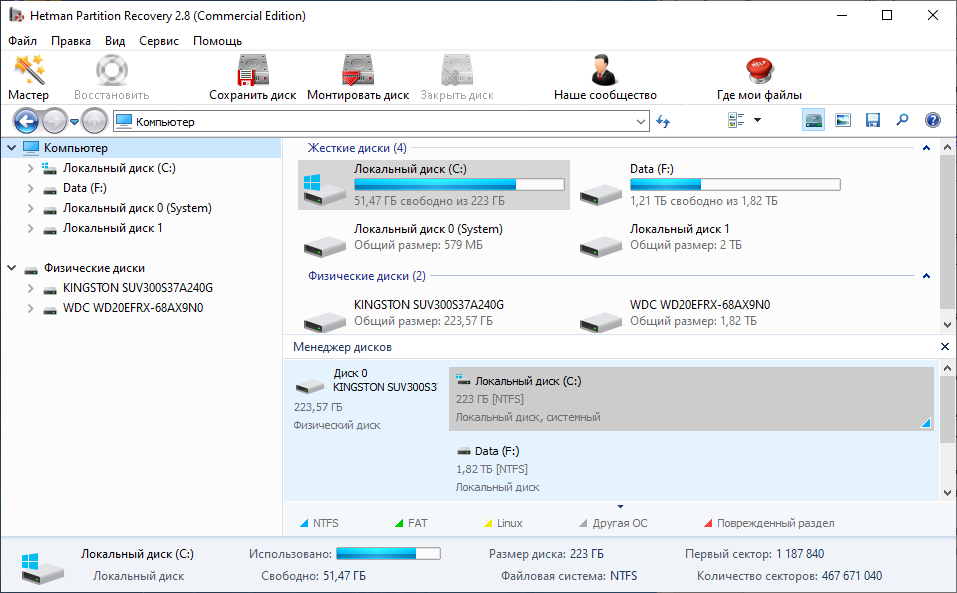
Программа для восстановления данных
Запустите компьютер в «безопасном режиме»
Если ошибка «CACHE_MANAGER» (0x00000034) возникает в момент загрузки Windows и блокирует любую возможность работы с системой, попробуйте включить компьютер в «безопасном режиме». Этот режим предназначен для диагностики операционной системы (далее ОС), но функционал Windows при этом сильно ограничен. «Безопасный режим» следует использовать только если работа с системой заблокирована.
Чтобы запустить безопасный режим сделайте следующее:
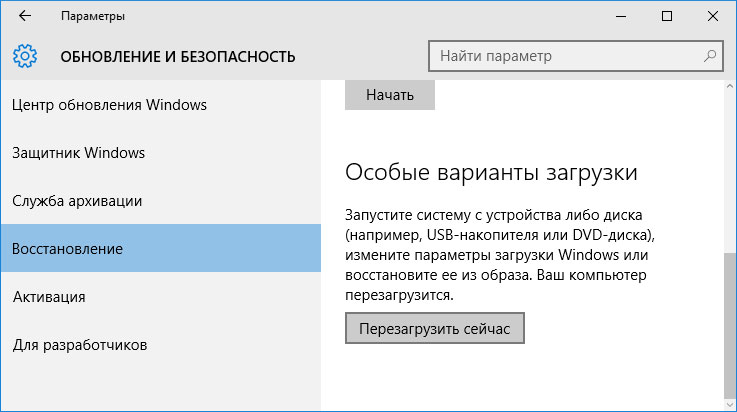
- Перейдите в меню Пуск и выберите Параметры.
- В открывшемся окне параметров перейдите в меню Обновление и Безопасность и выберите раздел Восстановление.
- В разделе Восстановление найдите Особые варианты загрузки и нажмите кнопку Перезагрузить сейчас.
- После этого Windows перезагрузится и предложит выбрать следующее действие. Выберите Поиск и устранение неисправностей.
- В меню Поиск и устранение неисправностей кликните на Дополнительные параметры, далее — Параметры загрузки.
- Далее Windows уведомит вас о том, что компьютер можно перезагрузить с использованием дополнительных параметров загрузки. Укажите — Включить безопасный режим. Нажмите Перезагрузить.
- После перезагрузки выберите Включить безопасный режим нажав клавишу F4.
Как загрузить Windows в безопасном режиме
Обновите драйвер через Диспетчер устройств
Вы установили новое аппаратное обеспечение на компьютере? Возможно вы начали использовать новое USB-устройство с вашим компьютером. Это могло привести к ошибке «CACHE_MANAGER». Если вы установили драйвер устройства используя диск, который поставляется вместе с ним, или использовали драйвер не c официального сайта Microsoft, то причина в нем. Вам придется обновить драйвер устройства, чтобы устранить эту проблему.
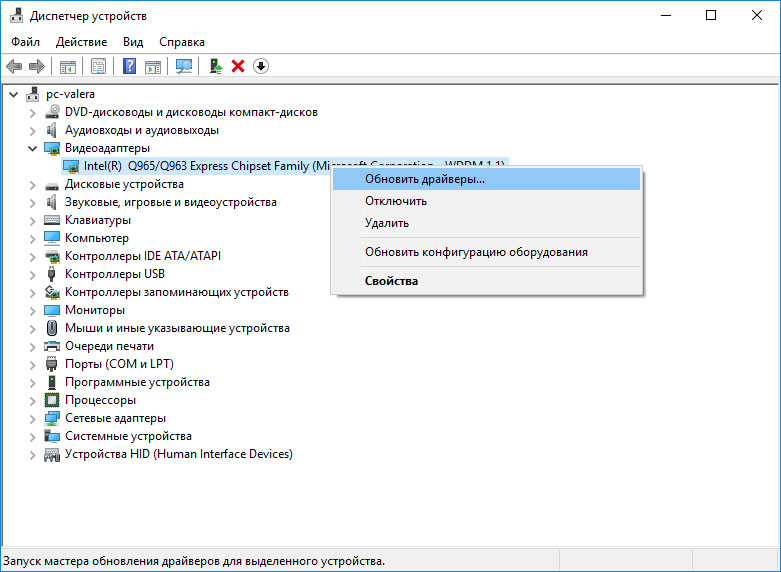
Вы можете сделать это вручную в диспетчере устройств Windows, для того выполните следующие инструкции:
- Нажмите кнопку Windows, затем введите диспетчер устройств с клавиатуры.
- Выберите Диспетчер устройств из списка.
- Просмотрите список категорий устройств, нажмите на стрелочку рядом с категорией вашего нового устройства. Драйвер может быть отмечен желтым треугольником.
- Кликните правой кнопкой мыши на имя устройства и нажмите Обновить драйвер.
- Далее откроется окно Мастера обновления драйверов с двумя опциями:
- Автоматический поиск обновленных драйверов. Windows проверит наличие наиболее подходящего драйвера для этого устройства в автоматическом режиме.
- Выполнить поиск драйверов на этом компьютере. Используйте эту опцию, что бы самостоятельно указать ОС файлы драйвера.
Перезагрузите компьютер после установки драйвера.
Используйте sfc /scannow для проверки всех файлов системы
Повреждение или перезапись системных файлов может привести к ошибке «CACHE_MANAGER». Команда sfc находит поврежденные системные файлы Windows и заменяет их.
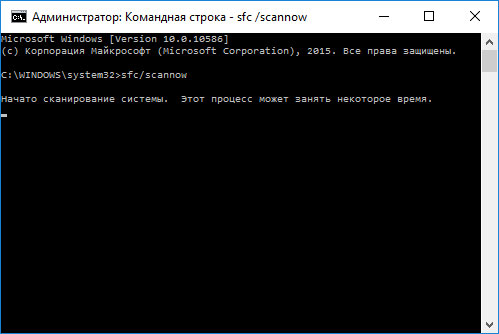
- Нажмите кнопку Windows, затем введите cmd с клавиатуры.
- Правой кнопкой мышки кликните на CMD и запустите от имени администратора.
- В окне командной строки введите sfc /scannow и нажмите Enter.
Этот процесс может занять несколько минут.
Как восстановить системные файлы Windows 10

Проверьте диск с Windows на наличие ошибок командой chkdsk c: /f
Возможно к синему экрану с «CACHE_MANAGER» привела ошибка файловой системы или наличие битых секторов диска. Команда CHKDSK проверяет диск на наличие ошибок файловой системы и битых секторов. Использование параметра /f заставит программу автоматически исправлять найденные на диске ошибки, а параметр /r позволяет найти и «исправить» проблемные сектора диска. Для запуска следуйте инструкциям:
- Нажмите кнопку Windows, затем введите CMD с клавиатуры.
- Правой кнопкой мышки кликните на CMD и запустите от имени администратора.
- В окне командной строки введите chkdsk c: /f и нажмите Enter (используйте ту букву диска, на котором установлена ОС).
Дождитесь окончания процесса и перезагрузите компьютер.
Используйте режим совместимости со старой версией Windows
Отключите лишние программы из автозагрузки Windows
Программное обеспечение, вызывающее «CACHE_MANAGER» (0x00000034), может быть прописано в автозагрузку Windows и ошибка будет появляться сразу после запуска системы без вашего участия. Удалить программы из автозагрузки можно с помощью Диспетчера задач.

- Загрузитесь в Безопасном режиме.
- Кликните правой кнопкой мышки на Панели задач, затем на пункте Диспетчер задач.
- Перейдите на вкладку Автозагрузка.
- Чтобы убрать ту или иную программу из автозагрузки выберите её из списка и отключите, нажав кнопку Отключить в правом нижнем углу окна.
Обратитесь в поддержку Microsoft
Microsoft предлагает несколько решений удаления ошибки «голубого экрана». «CACHE_MANAGER» (0x00000034) можно убрать с помощью Центра обновления или обратившись в поддержку Windows.
- Перейдите на сайт технической поддержки Microsoft.
- Введите код и сообщение об ошибке в поисковую строку и следуйте найденным рекомендациям.
- Если вы не найдете готового решения, то задайте вопрос в сообществе — возможно вам ответит сертифицированный системный администратор.
Установите последние обновления системы
С обновлениями Windows дополняет базу драйверов, исправляет ошибки и уязвимости в системе безопасности. Загрузите последние обновления, что бы избавиться от ошибки «CACHE_MANAGER» (0x00000034).
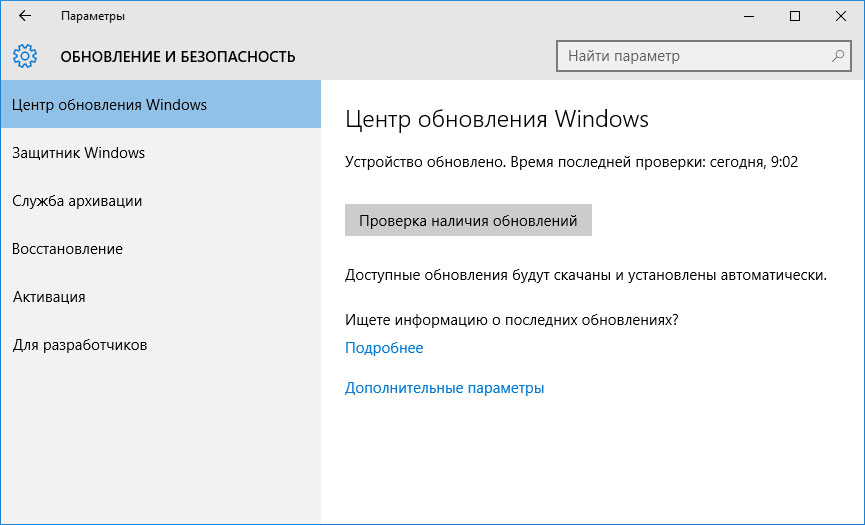
Запустить Центр обновления Windows можно следующим образом:
- Перейдите в меню Пуск и выберите Параметры.
- В окне Параметров перейдите в меню Обновление и Безопасность.
- Для установки последних обновлений Windows нажмите кнопку Проверка наличия обновлений и дождитесь окончания процесса их поиска и установки.
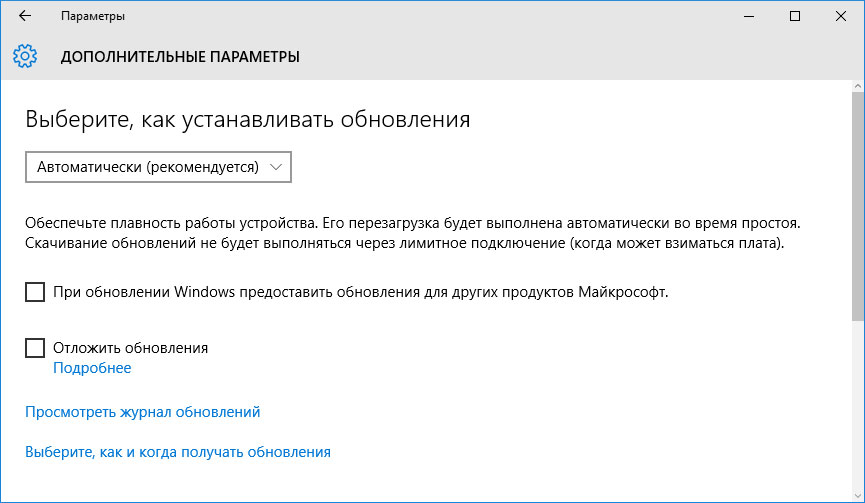
Рекомендуется настроить автоматическую загрузку и установку обновлений операционной системы с помощью меню Дополнительные параметры.
Чтобы включить автоматическое обновление системы необходимо запустить Центр обновления Windows:
- Перейдите в меню Пуск и выберите Параметры.
- В окне Параметров перейдите в меню Обновление и Безопасность и выберите подменю Центр обновления Windows. Для установки последних обновлений Windows нажмите кнопку Проверка наличия обновлений и дождитесь окончания процесса их поиска и установки.
- Перейдите в Дополнительные параметры и выберите, как устанавливать обновления — Автоматически.
Запустите проверку системы на вирусы
«Синий экран смерти» с ошибкой «CACHE_MANAGER» 0x00000034 может вызывать компьютерный вирус, заразивший систему Windows.
Для проверки системы на наличие вирусов запустите установленную на компьютере антивирусную программу.
Современные антивирусы позволяют проверить как жесткие диски, так и оперативную память. Выполните полную проверку системы.
Выполните проверку оперативной памяти
Неполадки с памятью могут привести к ошибкам, потере информации или прекращению работы компьютера.
Прежде чем проверять оперативную память, отключите её из разъёма на материнской плате компьютера и повторно вставьте в него. Иногда ошибка CACHE_MANAGER» вызвана неправильно или не плотно вставленной в разъём планкой оперативной памяти, или засорением контактов разъёма.
Если предложенные действия не привели к положительному результату, исправность оперативной памяти можно проверить средствами операционной системы, с помощью средства проверки памяти Windows.
Запустить средство проверки памяти Windows можно двумя способами:
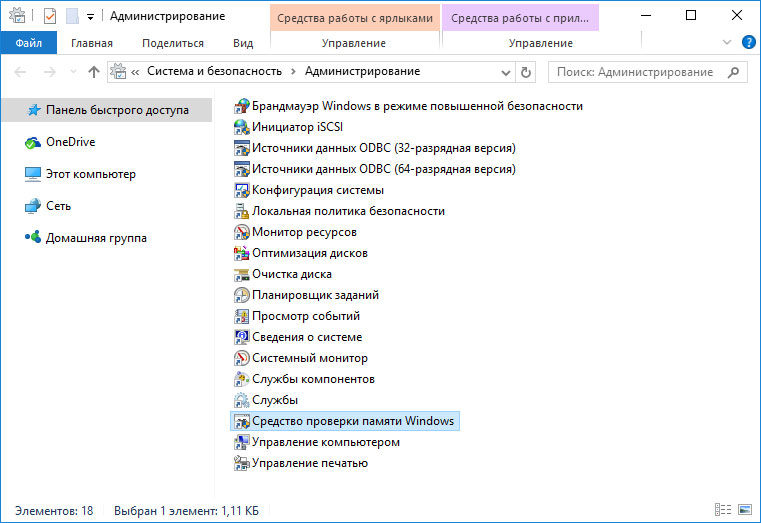
- С помощью Панели управления:

Перейдите в Панель управления / Система и безопасность / Администрирование. Запустите приложение Средство проверки памяти Windows.
- С помощью средства Выполнить:

Запустите средство Выполнить с помощью комбинации клавиш Windows + R. Наберите mdsched и нажмите Enter. После чего откроется средство проверки Windows.
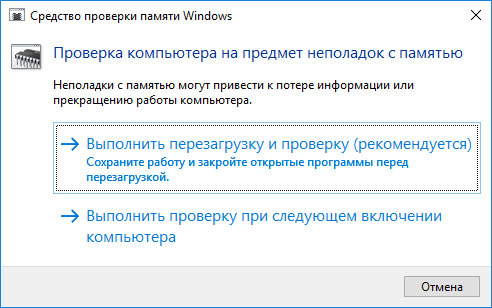
Для начала проверки выберите один из предлагаемых вариантов, проверка оперативной памяти в соответствии с которым будет запущена после перезагрузки компьютера.
Если в результате проверки будут определены ошибки, исправить которые не представляется возможным, то такую память необходимо заменить (замене подлежит модуль памяти с неполадками).
Выполните «чистую» установку Windows
Если не один из перечисленных методов не помог избавиться от CACHE_MANAGER», попробуйте переустановить Windows. Для того чтобы выполнить чистую установку Windows необходимо создать установочный диск или другой носитель с которого планируется осуществление установки операционной системы.
Загрузите компьютер из установочного диска. Для этого может понадобиться изменить устройство загрузки в BIOS или UEFI для более современных компьютеров.
Следуя пунктам меню установщика укажите диск, на который вы хотите установить Windows. Для этого понадобится отформатировать его. Если вас не устраивает количество или размер локальных дисков, их можно полностью удалить и заново перераспределить.
Помните, что форматирование, удаление или перераспределения дисков удалит все файлы с жесткого диска.
После указания диска для установки Windows запуститься процесс копирования системных файлов и установки операционной системы. Во время установки от вас не потребуется дополнительных действий. В течении установки экран компьютера будет несколько раз гаснуть на непродолжительное время, и для завершения некоторых этапов установки компьютер будет самостоятельно перезагружаться.
В зависимости от версии Windows на одном из этапов от вас может понадобиться выбрать или внести базовые параметры персонализации, режим работы компьютера в сети, а также параметры учётной записи или создать новую.
После загрузки рабочего стола чистую установку Windows можно считать законченной.
Примечание. Прежде чем приступить к выполнению чистой установки Windows заранее побеспокойтесь о наличии драйверов ко всем установленным устройствам и сохранности ваших файлов. Загрузите и сохраните драйвера на отдельный носитель информации, а для важных данных создайте резервную копию.
Как сбросить Windows 10 к исходному состоянию
Как сбросить Windows 10, 8, 7 если компьютер не загружается
Many Windows users encounter the cache manager BSOD crashing error. What is cache manager? How to fix the error? If you are also trying to figure them out, this post of MiniTool is what you need.
BSOD, also known as Blue Screen of Death and Stop code, is one of the most common system crashing errors on Windows. This problem can cause a computer to restart frequently and even data loss. Moreover, the BSOD screen is often accompanied by different error codes such as Critical Process Died, Win32k power watchdog timeout, and the one discussed in this post.
Here’s a true example from the answersmicrosoft.com forum. He encountered the cache manager BSOD error on Windows 10. What is cache manager? How to fix the error? Let’s start exploring the answers.
Dear, since I installed Windows 10, I got the Blue Screen Crash CACHE_MANAGER problem, it turns into a blue screen, and then my PC restart! I think it`s caused by a driver issue but I can`t fix it!!! Can someone help me???
https://answers.microsoft.com/en-us/windows/forum/all/blue-screen-crash-cachemanager/e5591cdf-eb6f-47e8-8483-976d2cacaf47

What Is Cache Manager
What is cache manager? It is a set of kernel-mode data structures and system threads that work with the memory manager. It’s mainly used to interact with other elements of the operating system and provide data caching for all Windows file system drivers.
However, many users reported that their computer restarts suddenly and throws the cache manager BSOD error. Don’t worry. We will analyze the possible causes of the error and provides corresponding fixes.
What Causes the Cache Manager BSOD Error
As the error message suggests, the stop code cache manager BSOD can be caused by issues with your hardware components like hard disk and memory. In addition, outdated device drivers, corrupted system files, outdated OS, and even virus infection are also responsible for the BSOD error.
Important Thing! Back Up Your Computer As Soon As Possible
According to user reports, the cache manager blue screen error often occurs with frequent shutdowns, causing data loss. So, we highly recommend that you back up all important data as soon as possible before you fix the error.
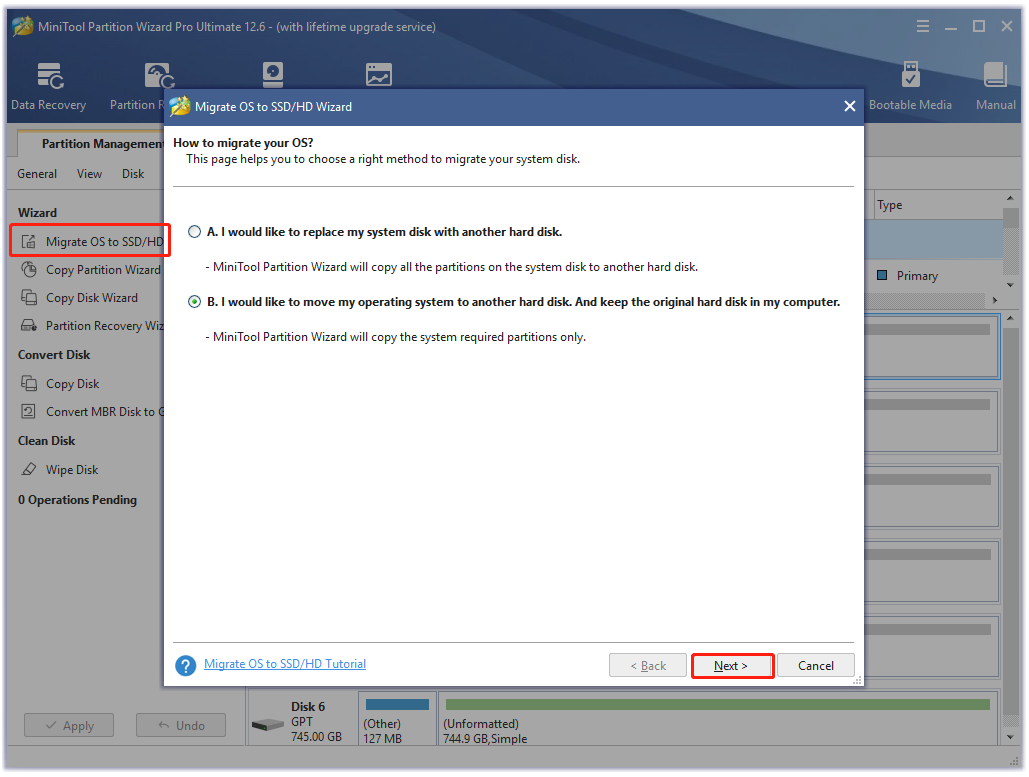
How to back up your computer safely and quickly? MiniTool Partition Wizard is a good choice that can migrate OS and even copy the whole hard disk without reinstalling. Here you can use the tool to make a backup first and fix the error via the following solutions.
MiniTool Partition Wizard DemoClick to Download100%Clean & Safe
How to Fix the Cache Manager BSOD Error on Windows
There are 9 feasible ways to fix the blue screen crash cache manager on Windows 10/11 PCs. We recommend you try them in order until the problem gets solved.
# 1. Run the Blue Screen Troubleshooter
The Blue Screen troubleshooter is a Windows built-in diagnostic tool that can be used to scan and repair BSOD errors. Here you can use the troubleshooter to fix the blue screen crash cache manager error.
Step 1. Press the Win + I keys to open the Settings app and select Update & Security.
Step 2. Click on Troubleshoot from the left pane, and then scroll down to find the Blue Screen and click on the Run the troubleshooter button.
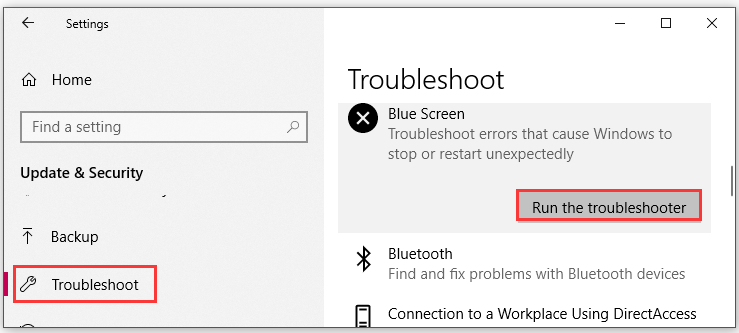
Step 3. Wait for the troubleshooter to detect the BSOD error. If any issues related to the BSOD error are detected, click on Apply this fix and follow the on-screen prompts to complete the repair.
# 2. Install the Latest Windows Updates for Your Computer
If you have never updated your operating system, your computer may interfere with some bugs or viruses, which can trigger the stop code cache manager. So, it’s highly recommended that you keep the Windows system up to date.
Step 1. Open the Settings app again and select Update & Security.
Step 2. With the Windows Update option selected from the left panel, click on the Check for updates button from the right panel if available. If the option is not here, you can Download and install it under the latest updates.

After you installed the latest Windows updates, reboot your computer and check if the blue screen cache_manager error disappears.
# 3. Update Your Device Drivers
Some users from the answers.microsoft.com forum reported that the BSOD cache manager error can be fixed by updating the chipset driver. Here you may have a try.
Step 1. Right-click the Start menu and select Device Manager from the context menu.
Step 2. In the pop-up window, expand the Processors category, right-click the chipset driver that you want to update, and select Update driver.
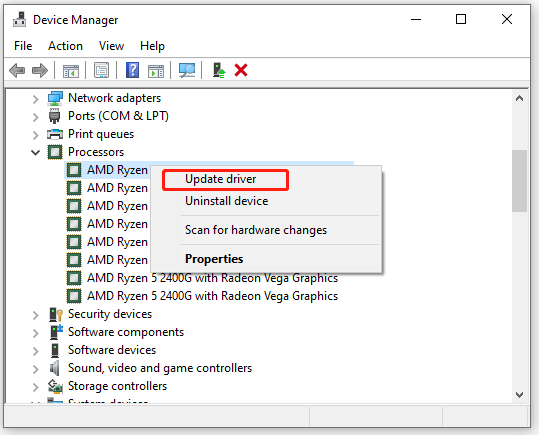
Step 3. Select the Search automatically for drivers option and follow the on-screen instructions to complete the update. Then you can refer to the same process to update other device drivers like GPU driver, storage driver, etc.

# 4. Scan Your Computer for Virus
In addition, the BSOD cache manager crashing error can be caused by a virus or malware infection. So, you’d better perform a full virus scan of your computer using Windows Security or third-party antivirus software.
Step 1. Type virus in the search box and click the Virus & threat protection app from the top result.
Step 2. Inside the Windows Defender Security Centre, click the Scan options option on the right panel.
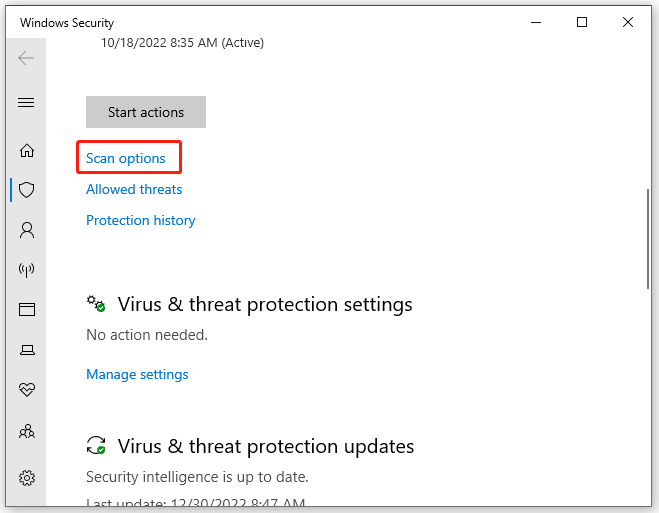
Step 3. Select Full scan and tap on Scan now to start the full virus scan. Then you need to wait a while until the scan completes.

Wait for the scan to complete and reboot your computer to see if the blue screen cache_manager error disappears.
# 5. Check Your Hard Disk for Errors
The Windows 10 cache_manager BSOD error usually indicates there is an issue with your hardware components like hard disk. To rule out this factor, you’d better check your hard drive for errors.
How to check hard drive errors on Windows 10/11? The CHKDSK command is often used to check hard drive errors, but sometimes this tool may run into various issues like CHKDSK write-protected and CHKDSK not working. In this case, MiniTool Partition Wizard is a better choice. It can help you check bad sectors on the hard drive easily.
MiniTool Partition Wizard FreeClick to Download100%Clean & Safe
Step 1. Launch the MiniTool software to get its main interface, and then select the problematic hard disk and click on Surface Test from the left pane.
Step 2. Click on the Start Now button in the pop-up window. After that, this tool will scan the whole disk immediately and show you the test result.
Tips:
You can also select Check File System from the left action panel and elect Check & fix detected errors and click on the Start button to repair the file system errors on the hard disk.

Step 3. If any blocks are marked with red color, it indicates that your hard drive is getting failing. In this case, you can use this bad sector repair guide or consider replacing the hard disk with a new one.
Once repaired, you can restart your computer and check if the BSOD cache manager error is gone.
# 6. Check the System File Corruption
If some system files get corrupted or broken, you may encounter the Windows 10 cache_manager BSOD error. In this case, you can scan and repair the system files using the System File Checker or DISM tool.
Step 1. Type cmd in the Search box, and then right-click the Command Prompt app and select Run as administrator. Then click on Yes to confirm this operation.
Step 2. Type the sfc /scannow command in the elevated command prompt and hit Enter. This process may take some time to complete. Don’t interrupt this process until it is complete.

Step 3. If the SFC tool fails to work, you can try using the DISM tool. Type the following commands in the elevated Command Prompt window in order and hit Enter after each one.
- DISM.exe /Online /Cleanup-image /Scanhealth
- DISM.exe /Online /Cleanup-image /Restorehealth
- DISM.exe /online /cleanup-image /startcomponentcleanup
# 7. Disable BIOS Memory
Some users from the Microsoft forum reported that the cache manager blue screen is gone after disabling the BIOS memory option. It may seem strange but worth trying. To do this work, you just need to enter BIOS, navigate to the Advanced tab, and set the Cache Memory option to Disabled. Also, you can refer to this guide to know more details.
# 8. Check Your System Memory
Some users reported that the stop code cache manager BSOD error can be caused by broken system memory or insufficient memory. To rule out this factor, we recommend you perform a memory test or add more memory to the computer.
Step 1. Type Windows Memory Diagnostic in the search box and double-click this program under Best match.
Step 2. You will receive a message saying Check your computer for memory problems. Here are 2 options for you to perform a RAM test. It is recommended that you click Restart now and check for problems.

Step 3. Then wait for this diagnostic process to finish. If the RAM gets broken, you may consider replacing it with a new one. You can refer to this post “How to Get More RAM on Laptop—Free up RAM or Upgrade RAM” to know more details.
# 9. Wipe Your Hard Drive and Reinstall Windows
If none of the above methods get rids of the cache manager blue screen error, you may consider wiping the hard drive and reinstalling Windows. This process will delete all data on your hard drive and revert your system to its original status, so make sure you have backed up all important data in advance. This method has been proven by many people to be useful. You may have a try.
Are you troubled by the cache manager BSOD crashing error? Now, you come to the right place. Here are several effective troubleshooting methods.Click to Tweet
Bottom Line
This post focuses on how to fix the cache manager BSOD error on Windows. You can try the given 9 methods to fix the error. If you have better solutions, please share them with us in the following comment zone. In addition, you can contact us via [email protected] if you have any questions about MiniTool Partition Wizard.
Summary: If you’re getting a CACHE_MANAGER error code with a blue screen on booting your system, learn how to fix this bug code in this blog. We’ve covered all the possible causes behind this error with the best solutions. Moreover, we’ve provided powerful data recovery software to retrieve data from crashed PCs.

Contents
- What causes CACHE MANAGER error in Windows 10/11?
- How can I fix the CACHE MANAGER error in Windows 10/11?
When a hectic day begins, you may want to check your emails on the computer first, but sometimes instead of the normal desktop, you see a cache manager BSOD. Well, it’s not uncommon for PCs to show these crash screens.
Your device may experience Blue Screen of Death (BSOD) difficulties for several causes, including bad memory, damaged hardware, corrupt system drivers, overheated components, and many more.
Thankfully, you may quickly fix this problem by using a few workarounds. There are a few tools in Windows that may be used to resolve the problem. In this article, we’ll show you where to find these repair tools so you may utilize them to solve the problem.
What causes CACHE MANAGER error in Windows 10/11?
The memory manager and the Cache Manager work together to enable data caching for all Windows file system drivers. The Cache Manager is a collection of kernel-mode operations and system threads.
Common issues like outdated drivers, antivirus issues, or complex memory malfunctions may be the root of this problem. Another thing that may be the reason for this bug check, according to Microsoft, is a memory shortage.
How can I fix the CACHE MANAGER error in Windows 10/11?
1. Run chkdsk
As previously stated, mainly bad memory causes the stop code Cache Manager to occur. Therefore, the first step on your how-to list should be to run memory-related troubleshooters. A tool called CHKDSK (check disk) checks your hard drive for file system issues on Windows operating systems. Utilizing the CHKDSK application keeps your system data organized while checking for and fixing hard disk issues.
- In the Start menu, search the Command Prompt, right-click the best result, and choose Run as Administrator.

- Type in chkdsk /f /r C: and press Enter.

- You must carry out this Scan for each hard drive partition, so be sure to replace C with a hard drive letter that corresponds.
2. Use memory diagnostics
It is time to test your RAM. You should make use of a program called Memory Diagnostics to do this. This tool works by writing data to each RAM sector of your computer and reading it back one sector at a time. The tool will read a different value if it detects a problem with your RAM. This will let you know if there is anything wrong with your RAM.
- Press Windows Key + R, type mdsched.exe, and hit Enter.

- Click Restart now and check for problems (recommended).

Note: To run the test, you must restart your computer. You can’t use your computer while the test takes place. Make sure first to save your work. When you select “Restart now and check for problems (recommended),” your computer will restart immediately.
3. Run SFC
Running SFC scan is also necessary as this tool checks all the system files and ensures everything is in place. You should also run DISM after this utility to repair any damaged file in your system file folder.
- Use the Windows search by opening the start menu and typing Command Prompt. Right-click on the best result and Run as an administrator.
- Press Enter after entering the line sfc/scannow in the Command Prompt.

- Restart your computer after the procedure.
4. Run DISM
- Once again, launch the Command Prompt as an administrator.
- This time type DISM /Online /Cleanup-Image /restorehealth.

- Restart your computer.
5. Uninstall third-party antivirus
Another method to fix BSOD issues like CACHE MANAGER is to identify the troublesome program and uninstall it. Note that the issue can also be related to a newly installed hardware, which we will discuss in the next method.
Moreover, if the problem starts occurring after installing an application, it is recommended to uninstall it. In some cases, the antivirus is to blame. Thus, you should temporarily uninstall it to resolve this issue.
It is worth noting that outdated antivirus or firewall can also cause various BSOD errors. So, make sure you remove any antivirus software you have installed besides Windows Defender.
It’s been reported by a few users that the CACHE MANAGER problem persisted even after deleting certain antivirus software. It’s mainly because leftover antivirus files and registry entries likely cause this and using specialized uninstaller programs is the only way to remove antivirus software entirely.
You may download and utilize the uninstaller tools hosted by most antivirus firms for free on their websites.
6. Check your hardware
As we mentioned earlier, the newly installed hardware could also be the cause of the error. For example, your motherboard may not be completely compatible with the recently added components.
We advise you to check your RAM if you haven’t installed any new hardware recently. Additionally, check that your hard drive is correctly connected to your computer because it can also result in the CACHE MANAGER BSOD error.
What would the technician do if you sought professional help?
The technician will most likely use special tools and software to pinpoint the source of the problem, but if none of the above fixes worked for you, the technician will reinstall Windows or replace the damaged component in your PC. In either case, you risk losing all of your data. To avoid this, we recommend using Stellar Data Recovery Professional to recover your files before seeking professional assistance.
The software can recover your data even if your PC cannot boot due to a BSOD error.
- Connect the USB drive to another operational PC. It would help if you had a USB of at least 1GB size.
- Launch Stellar Data Recovery Professional after downloading and installing it from the official website.
- In the main window of the Select What to Recover screen, select Waffle Menu.

- Choose Create Recovery Drive.

- In the Create Recovery Drive dialog box, go to the drop-down menu to select the USB drive you want to use as bootable media.
- Now select Create Recovery Drive and click OK.
- A new Activation window appears where you need to enter an activation key. After purchasing the product, enter the Key you received via email into the box and press the Activate button.
- Attach the mentioned USB media to your Windows computer that won’t boot.
- Turn on your computer, then rapidly press the F12 or Bios Key to view any connected bootable USB media.
- Select the bootable data recovery media using the arrow keys, then press Enter to boot the computer.
- You will see the Stellar Data Recovery Professional software interface once the computer has booted from USB media.
- From the Select What to Recover screen, select the files you wish to recover and press Next.
- Click Scan after selecting the desired drive.

- Click Recover to save the files that you have selected from the preview menu.

No cache issues anymore!
CACHE MANAGER BSOD errors can be frustrating, but you can easily resolve them using some solutions. If the problem is software-related and you are dealing with system file corruption, the above solutions will work.
In the worst-case scenario, you may have to replace your hard drive or see if it works on another computer. But don’t worry; even if your hard drive is damaged, you can use Stellar Data Recovery Professional to recover your data and clone your hard drive and then attempt to replace your faulty storage.
FAQ
- What is the cause of the Blue Screen of Death error?
Blue Screen of Death usually indicates something is wrong with the system, and Windows can’t solve the issue by itself or operate while the problem is active. The reason behind BSoD can be as simple as an incompatible gadget recently attached to the PC or as complicated as corrupted Windows files.
- Can I access BIOS if my PC won’t boot?
BIOS can be accessed as soon as you turn the computer on. Before the PC boots into Windows, you should be able to enter BIOS by pressing the BIOS key (often F12). So, you can access BIOS even if your PC can’t boot.
- Do I need to boot my computer up to use Stellar Data Recovery Professional?
No, you can create a bootable media on a USB stick and use it to access the software on your unbootable PC without running Windows or booting it up.
About The Author
Farhad Pashaei
As a technophile, Farhad has spent the last decade getting hands-on experience with a variety of electronic devices, including smartphones, accessories, laptops, wearables, printers, and so on. When he isn’t writing, you can bet he’s devouring information on products making their market foray, demonstrating his unquenchable thirst for technology.
Stuck with the Blue Screen error up on Startup? Well, it’s quite common. Blue screen of Death (BSOD) errors can occur on your device due to a variety of reasons that include corrupt system drivers, hardware malfunction, faulty memory, overheated components, and many other issues. The Cache Manager error also appears on the Blue Screen at the time of Startup. Fortunately, you can easily get past this issue by following a few workarounds:

In this post, we have several listed solutions to fix the Cache Manager error on Windows 10 by making a few tweaks in Windows settings.
Let’s get started.
Also read: BSOD Kernel Security Check Failure on Windows 10
What Causes Cache Manager Error on Windows 10?
Here are a couple of reasons why you may get stuck with the Cache Manager error on your Windows device.
- Outdated/corrupt system drivers.
- Lack of Storage space.
- Hardware Incompatibility.
- Outdated Windows version.
- BSOD issues.
- Presence of virus or malware.
How to Fix the Cache Manager Error on Windows
Let’s quickly learn how to resolve the Cache Manager Blue Screen error and get your Windows device up and running again within no time.
#1 Run the BSOD Troubleshooter
Windows 10 comes with a myriad of built-in security features that allow you to fix common errors and bugs. To run the BSOD Troubleshooter on Windows 10, follow these quick steps:
Press the Windows icon, tap the gear-shaped icon to open Settings.
In the Windows Settings, select “Update and Security”.

Switch to the “Troubleshoot” option from the left menu pane. Scroll down and look for the “Find and Fix problems” section.
Tap the “Run the Troubleshooter” button placed beneath “Blue Screen”.

Follow the on-screen instructions on the wizard to run the BSOD Troubleshooter.
Once the Troubleshooter is done with its job, reboot your device to check if the issue persists.
Also read: Critical Process Died on Windows 10 – How to Fix This BSOD Error
#2 Update System Drivers
Is your device running on outdated/corrupt system drivers? If yes, then it may trigger the Cache Manager error on the Windows device. There are two simple ways to update system drivers, one is the manual method where you update drivers in Windows Device Manager. An alternative method for updating system drivers is via a third-party tool that automatically fetches the latest update of drivers and saves you a lot of time and effort.
Update System Drivers Manually:
Press the Windows + R key combination to open the Run dialog box. Type “Devmgmt.msc” in the textbox, hit Enter.

In the Device Manager window, right-click on the outdated driver, select the “Update Driver” option.

Follow the on-screen instructions to complete the process.
Reboot your machine and check if the issue persists.
Download Smart Driver Care


Manually updating every system driver is a tedious job. Isn’t it? Download Smart Driver Care utility tool that automatically scans your entire device for outdated/corrupt system drivers and software and fetches their latest update. It allows you to automatically update all outdated drivers in just one click.
Also read: 9 Best Driver Updater Software For Windows 10, 8, 7 PC
#3 Run the SFC Scan
System File Checker is another Windows utility tool that allows you to scan and fix hardware errors, replace corrupt system files, and removes discrepancies. The SFC Scan is executed on the Command Prompt shell, here’s what you need to do:
Launch the Start menu search, type “Command Prompt”, right-click on its icon, and select “Run as Administrator”.

In the Command Prompt shell, type the following command and hit Enter.

sfc/scannow
Wait for a few minutes until a complete scan is performed on your device. Once the scan is completed, reboot your device if you’re still experiencing the Cache Manager error on Windows 10 PC.
Also read: SFC Scan Stops Working on Windows 10? Here’s the Fix!
#4 Use the DISM Command
The DISM (Deployment Image Servicing and Management) command can be used to fix common BSOD errors on Windows 10 devices. DISM is typically a command-line tool that loads Windows in a Recovery environment. To run the DISM command on Windows, follow these steps:
Open Command Prompt shell.
Type the following command and hit Enter to execute it:

DISM /Online /Cleanup-Image /RestoreHealth
Once the scan is completed, reboot your machine if you’re still facing any technical difficulties at the time of Startup.
Also read: 5 Ways to Resolve the Dism.exe 1392 Error on Windows 10
#5 Scan your Device for Viruses and Malware
Tried the above-mentioned workarounds and still no luck? Well, there’s a slight possibility that your device may be infected with a virus or malware. Is your device installed with a strong antivirus suite? If not, then we recommend you install Systweak Antivirus for Windows PC that offers real-time protection against viruses, malware, spyware, trojans, adware, and Ransomware attacks.
Download Systweak Antivirus
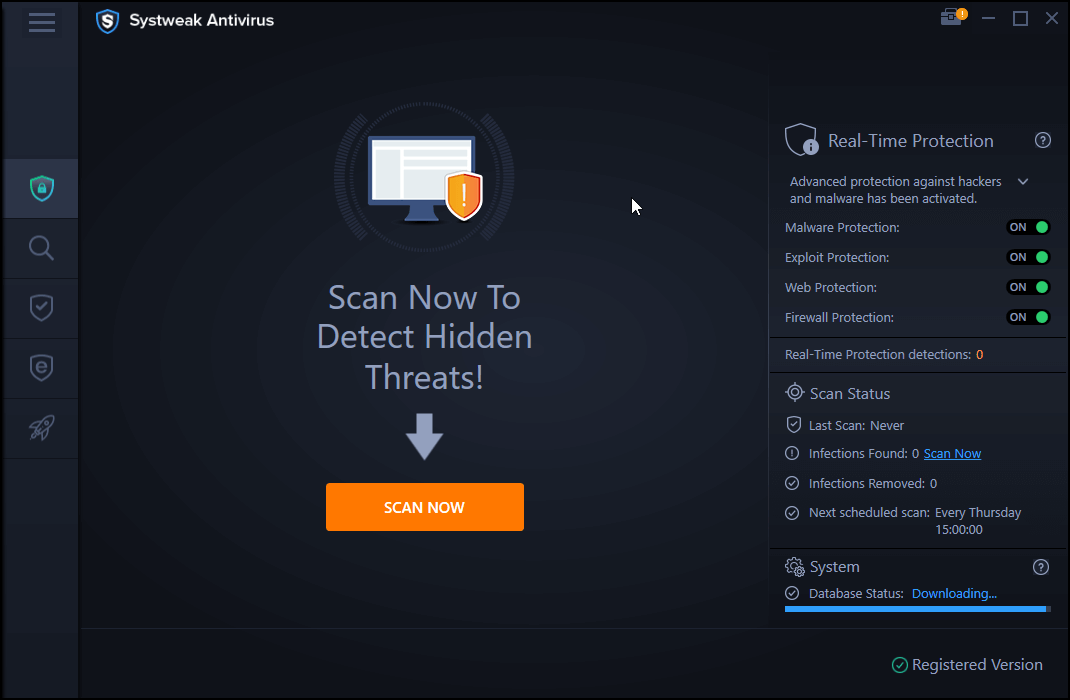
Systweak Antivirus protects your device from malicious threats, zero-day vulnerabilities, and exploits. Apart from offering complete secure protection from cyber threats, Systweak Antivirus also enhances the speed and performance of your PC by cleaning unwanted/malicious startup items.
Also read: 8 Best Free Startup Manager Tools For Windows PC
Conclusion
Here are a few solutions that will allow you to fix the Cache Manager error on Windows 10 devices. Do let us know which solution worked out the best for resolving the Blue Screen error. For any other assistance, feel free to drop your queries in the comments space!