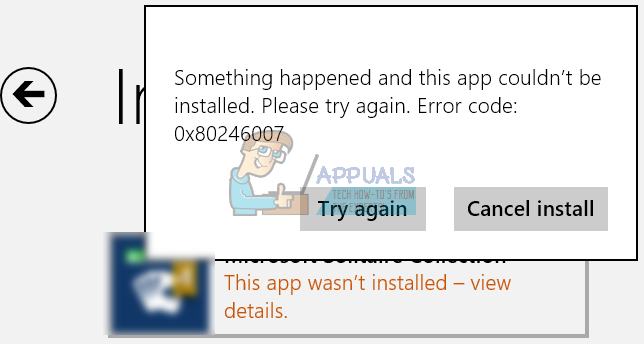
Ошибка 0x80246007 проявляет себя, как правило, при проверке наличия доступных обновлений с помощью Центра обновления Windows. В обычном случае, данная ошибка блокирует возможность для обновления уже установленных приложений и компонентов операционной системы, но с недавнего времени пользователи обнаружили, что она также появляется при попытках установки билдов Windows 10.
Существует несколько причин для появления ошибки 0x80246007, но в большинстве случаев главной причиной этой проблемы оказывается поврежденная база данных Центра обновления Windows. Также порой случается так, что какой-то запущенный процесс Windows может войти в конфликт со службами Центра обновления Windows, из-за чего и невозможно установить или скачать обновление.
Ознакомившись с причинами появления ошибки 0x80246007, давайте попробуем избавиться от нее.
Исправляем ошибку 0x80246007 при обновлении Windows
Метод №1 Сброс службы BITS(Фоновая интеллектуальная служба передачи)
- Нажмите комбинацию клавиш Win+R и впишите в появившиеся окно services.msc.
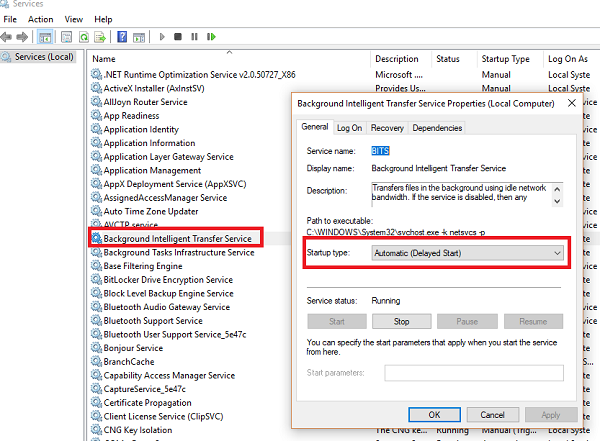
- Перед вами появится окошко со всеми службами, которые работают на вашем компьютере. Найдите службу под названием «Фоновая интеллектуальная служба передачи(BITS)».
- Нажмите на эту службу правой кнопкой мыши и выберите из контекстного меню пункт «Свойства».
- Перейдите во вкладку «Общие».
- Выставьте опцию «Тип запуска — Автоматически».
- Нажмите «Ок», а затем на «Применить» для сохранения изменений.
Проверьте, смогли ли вы исправить проблему с ошибкой 0x80246007.
Метод №2 Проведение чистого запуска
- Нажмите комбинацию клавиш Win+R и впишите в поисковую строку msconfig для открытия окна Конфигурации системы.
- Перейдите во вкладку «Службы».
- Поставьте галочку напротив параметра «Не отображать службы Майкрософт», а затем нажмите кнопку «Отключить все».
- Потом откройте Диспетчер задач с помощью комбинации клавиш Ctrl+Alt+Delete.
- Перейдите во вкладку «Автозагрузка» и отключите все утилиты, которые выставлены на автоматическую загрузку при запуске Windows.
- После выполненных шагов, перезагрузите свой компьютер.
Затем попытайтесь снова обновить свой Windows. При повторном появлении ошибки 0x80246007 переходите к следующему пункту в этой статье. Если же ошибка пропала, что это означает, что какой-то ранее запущенный процесс, до чистой загрузки, мешал обновляться операционной системе.
Вам нужно поочередно запускать каждый отключенный элемент, чтобы найти какой именно из них мешает обновлению, что может занять, к сожалению, довольно приличное количество времени.
Метод №3 Исправление проблем с почтой и датой
Довольно часто именно из-за проблем с почтой и датой в системе и не получается выполнить нормальное обновление. Для решения этой проблемы выполните следующие шаги:
- Откройте Диспетчер задач. Сделать это можно с помощью команды Ctrl+Alt+Delete или же с помощью такой команды Ctrl+Shift+ESC, про которую мало кто знает или забывают.
- Выберите «Файл — Запустить новую задачу».
- Пропишите в появившемся окошке Get-appxprovisionedpackage –online | where-object {$_.packagename –like “*windowscommunicationsapps*”} | remove-appxprovisionedpackage –online
После этого проверьте наличие ошибки 0x80246007 в системе. Попытайтесь скачать какое-то обновление для приложения или запустить Центр обновления Windows.
Метод №4 Использовать Восстановление системы
Данный метод является одним из самых полезных и решает множества проблем, в которые входит и ошибка 0x80246007. Однако, это не будет работать без заранее созданной точки восстановления. Но, обычно, должно быть включено автоматическое создание точки восстановления. Выполните следующие шаги:
- Перезагрузите свой компьютер.
- Перед загрузкой операционной системы, нажмите на F8 для входа в Безопасный режим.
- Введите свои данные для входа в систему.
- Как только вы войдете в систему, отключите ваш антивирус.
- Нажмите на клавишу Win и пропишите в поисковой строке «Восстановление системы».
- Выберите удобную вам точку Восстановления и проведите ее.
Таким образом, вы обратите внесенные недавно изменения на своем компьютере, которые смогли повлиять на появление ошибки 0x80246007. В этот раз проблема с обновлениями должны будут исчезнуть.
Когда служба Центра обновления Windows сканирует обновление и начинает загрузку, может появиться сообщение об ошибке: Некоторые обновления не завершили загрузку, мы будем продолжать пытаться, код ошибки 0x80246007. Это может произойти с любым Центром обновления Windows, в факт с приложениями Windows, такими как OneNote, а также. Эта ошибка происходит по многим причинам, в том числе
- База данных Центра обновления Windows повреждена.
- Когда другой процесс конфликтует с компонентом Центра обновления Windows.
- Даже когда есть проблема с услугами BITS.
В этом посте мы расскажем, как можно исправить ошибку 0x80246007 при загрузке обновлений Windows 10.

Некоторые обновления не закончили загрузку, ошибка 0x80246007
Прежде чем начать, вы можете запустить это встроенное средство устранения неполадок Центра обновления Windows и посмотреть, поможет ли это вам.
1] Удалите содержимое временной папки
Вы можете удалить все загруженные, сбойные и ожидающие обновления Windows 10 с помощью команды «Выполнить».
Откройте диалоговое окно «Выполнить», нажав комбинацию Win + R, и в открывшемся диалоговом окне введите % temp% и нажмите Enter. В папке, которая открывается перед тем, как выбрать все файлы и папки в папке Temp, а затем удалить их.
% temp% – это одна из многих переменных среды в Windows, которая может открывать папку, обозначенную Windows как временную папку, обычно расположенную в C: \ Users \ [имя пользователя] \ AppData \ Local \ Temp .
2] Перезапустите службу BITS
BITS или Background Intelligent Transfer Service является частью службы Центра обновления Windows, которая управляет фоновой загрузкой Центра обновления Windows, сканирует новые обновления и так далее. Если ваш Windows Update несколько раз выходит из строя, вы можете перезапустить службу BITS. Для этого вам потребуются права администратора.

Запустите консоль служб, введя services.msc в командной строке, после чего нажмите клавишу ввода.
Найдите Фоновую интеллектуальную службу передачи. Дважды нажмите, чтобы открыть окно свойств.
На панели свойств выберите тип запуска Вручную и нажмите кнопку Пуск . Если это не помогает, установите для него значение «Автоматически» (с задержкой) и затем перезагрузите компьютер.
3] Удалить файлы из папки распространения программного обеспечения

Когда Windows загружает обновления, они хранятся в специальной папке, называемой распространением программного обеспечения. Файлы, загруженные здесь, автоматически удаляются после завершения установки. Однако, если он не очищается или установка еще не завершена, у вас есть два варианта. Сначала удалите все файлы в папке SoftwareDistribution после приостановки службы Windows Update. Во-вторых, попробуйте перезагрузить компьютер несколько раз, чтобы убедиться, что процесс обновления запускается автоматически.
4] Сброс папки catroot2
Сброс папки catroot2, как было известно, решает несколько проблем Центра обновления Windows.
Catroot и catroot2 – это папки операционной системы Windows, необходимые для процесса обновления Windows. Когда вы запускаете Центр обновления Windows, папка catroot2 хранит подписи пакета Центра обновления Windows и помогает в его установке. Служба криптографии использует файл % windir% \ System32 \ catroot2 \ edb.log для процесса обновления. Обновления хранятся в папке SoftwareDistribution, которая затем используется автоматическим обновлением для выполнения процесса обновления.
Пожалуйста, не удаляйте и не переименовывайте папку Catroot. Папка Catroot2 автоматически воссоздается Windows, но папка Catroot не воссоздается, если папка Catroot переименована.
5] Удалить файл pending.xml

Перейдите в папку C: \ Windows \ WinSxS \ , найдите файл pending.xml и переименуйте его. Вы можете даже удалить его. Это позволит Центру обновления Windows удалять отложенные задачи и создавать новую новую проверку обновлений. Посмотрите, поможет ли это.
Надеюсь, что-то поможет! Дайте нам знать, что сработало для вас.
Download Windows Speedup Tool to fix errors and make PC run faster
When Windows Update service scans for an update and starts downloading, you may receive an error saying Some updates did not finish downloading, We will keep trying, Error code 0x80246007. This may happen with any Windows Update, in fact with Windows applications like OneNote as well. This error happens for many reasons including-
- Windows Update database is corrupt.
- When another process is conflicting with the Windows Update component.
- Even when there is an issue with the BITS services.
In this post, we are sharing how you can fix error 0x80246007 when downloading Windows 10 Updates.

Some updates did not finish downloading, Error 0x80246007
Before you begin, you might want to Run this inbuilt Windows Update troubleshooter and see if that helps you.
1] Delete the contents of the Temporary folder
You can delete all the downloaded, failed and pending Windows 10 updates by using the ‘Run’ command.
Open the ‘Run’ dialog box by pressing Win+R in combination and in the dialog box that opens, type %temp% and hit Enter. In the folder that opens before you select all the files and folders within the Temp folder and then delete them.
%temp% is one of many environment variables in Windows that can open the folder designated by Windows as your Temporary folder, typically located at C:\Users\[username]\AppData\Local\Temp.
2] Restart BITS Service
BITS or Background Intelligent Transfer Service is a part of Windows Update service which manages background download of Windows Update, scan for new updates and so on. If your Windows Update is failing multiple times, you may want to restart the BITS service. You will need admin privileges to complete this.
Launch Services console by typing services.msc in the run prompt followed by the enter key.
Search for Background Intelligent Transfer Service. Double click to open Properties.
In the Properties pane, set the Startup type to Manual and then click on the Start button. If that doesn not help, set it to Automatic (Delayed) and then restart your computer.
3] Delete Files from Software Distribution Folder

When Windows downloads the updates, they are kept in a dedicated folder called as Software Distribution. Files download here are automatically deleted once the installation is complete. However, if it doesn’t clean up or if an installation is still pending, you have two choices. First, delete all the files in the SoftwareDistribution folder after pausing Windows Update Service. Second, try restarting the computer multiple times to see if the update process automatically starts.
4] Reset the catroot2 folder
Resetting the catroot2 folder has been known to fix several Windows Update problems.
Catroot and catroot2 are Windows operating system folders that are required for the Windows Update process. When you run Windows Update, the catroot2 folder stores the signatures of the Windows Update package and helps in its installation. The Cryptographic service makes use of the %windir%\System32\catroot2\edb.log file for the updating process. The updates are stored in the SoftwareDistribution folder which are then used by Automatic Updates to carry out the updating process.
Please do not delete or rename the Catroot folder. The Catroot2 folder is automatically recreated by Windows, but the Catroot folder is not recreated if the Catroot folder is renamed.
5] Remove pending.xml file

Navigate to C:\Windows\WinSxS\ folder, search for a pending.xml file and rename it. You may even delete it. This will allow Windows Update to delete pending tasks and build a fresh new update check. See if this helps.
Related: Windows Upgrade errors 8007002C, 80246007, 80070004, 80240020.
Hope something helps! Let us know which worked for you.
Anand Khanse is the Admin of TheWindowsClub.com, a 10-year Microsoft MVP (2006-16) & a Windows Insider MVP (2016-2022). Please read the entire post & the comments first, create a System Restore Point before making any changes to your system & be careful about any 3rd-party offers while installing freeware.
Error Code 80246007 simply means that the update has not been downloaded. This issue occurs when Windows has an update that needs to be installed – but it could not download it from Windows repositories.
This can be really frustrating for users trying to figure out why the update failed to download as it could be due to numerous reasons such as the server from where the update is pushed is down, or your antivirus raised a false flag on the download or it could also be the internet connection failing to establish a link with Windows.
Error Code 0x80246007 – How to Solve
This particular error code can occur either while trying to download Windows updates or while updating or downloading apps from Windows Store. The explanation provided by Microsoft on their post regarding all error messages is simply that “The update has not been downloaded”.
This can be quite annoying, especially if an app you want to update is quite important. Information regarding this error message in particular is quite rare and obscure but there are a lot of great fixes which are guaranteed to fix any error code you might receive.
1. Disable Your Antivirus and Firewall
Antivirus software is something every user should have installed on their PCs because threats you can infect your computer with are numerous and you can easily catch a virus online or by an infected DVD or USB flash drive.
However, these tools sometimes prevent services such as Windows Update from accessing the Internet normally and that is often why you receive these annoying error messages.
- Disable your antivirus.
- The process for each antivirus is different. However, if you are a Windows 10 user, you also need to disable Windows Defender.
- Right-click on the shield icon on your taskbar and click on Open.
- When Windows Defender Security Center opens, click on the shield icon below the home button, open Virus & threat protection settings, and turn off Real-time protection and Cloud-based protection.
- Navigate to the browser icon (second from the end) and turn off the Check apps and files option.
- Also, turn off the SmartScreen for Windows Store apps option below.
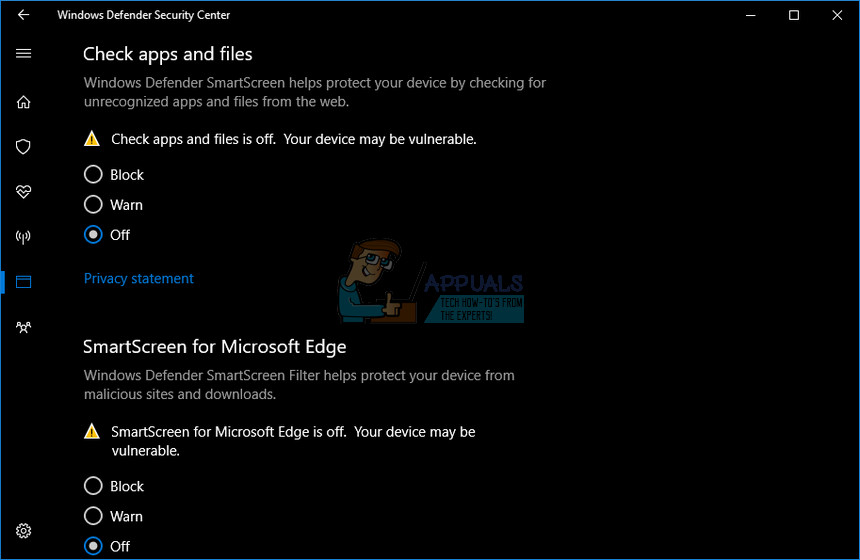
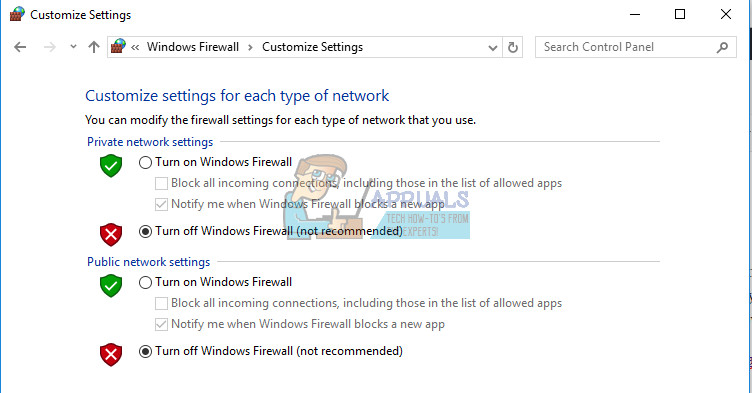
Windows Firewall may also cause some connectivity issues because it automatically blocks unrecognized connections towards you computer and it’s quite possible it’s currently blocking some of the connections related to Windows or application updates.
- Open Control Panel by searching for it after pressing the Start button located at the bottom left part of your desktop.
- Change the View by option to Small icons and locate the Windows Firewall option.
- Click on it and select the Turn Windows Firewall on or off option located at the menu on the left side of the window.
- Click the radio button next to the “Turn off Windows Firewall (not recommended)” option next to both the Private and Public network settings.
- Click on the OK button and try updating your computer now.
Note: Even though you struggled with updating one of your apps or your operating system because of your antivirus or firewall, you shouldn’t leave your computer unprotected so please make sure you turn on your antivirus, Windows Defender, and your Windows Firewall as soon as you successfully update Windows or the app you wanted to update.
2. Troubleshoot Windows Update and Your Internet Connection
Windows 10 comes preinstalled with several troubleshooters which can automatically recognize the problem you are having and fix it for you in no time. These troubleshooters have helped a lot of people who are not so experienced in dealing with these issues themselves and the process takes almost no time at all.
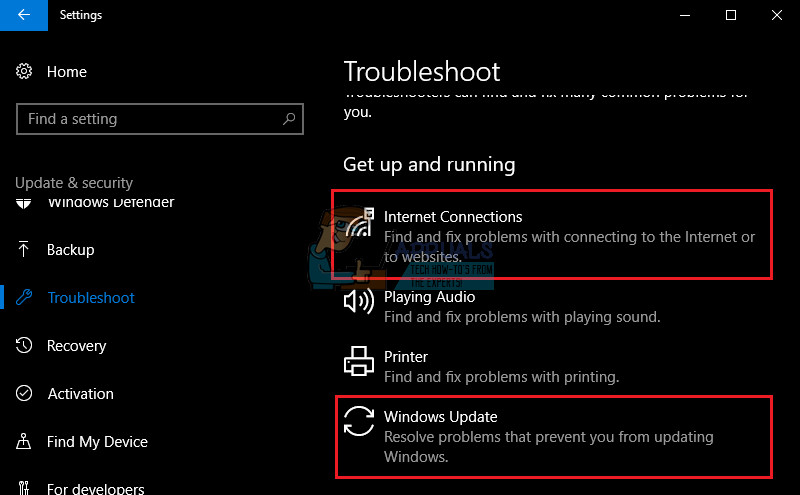
- Press and hold the Windows key then press the I key to open the Settings app.
- Head over to the Update & Security section and navigate to the Troubleshoot menu.
- First of all, click on the Windows Update option and follow the instructions on the screen to see whether there is something wrong with Windows Update services and processes.
- After the troubleshooter finishes, navigate to the Troubleshoot section again and open the Internet Connections troubleshooter.
- Check to see if the problem is solved.
3. Check Your Image and Your System Files
Windows updates failing usually have to do something with your Windows image or your system files. Luckily, Windows comes with several tools built-in which can fix these issues easily and automatically.
DISM (Deployment Image Servicing and Management) is a command which can be used to check your Windows image for errors and fix these errors.
SFC (System File Checker) is another command which can be used to locate faulty and missing Windows system files and the tool also fixes or replaced them.
- You can use these tools with Command Prompt. Type Command Prompt in the search bar, right-click on it, and select Run as administrator.
- Type in the following command in order for DISM to scan your Windows image and perform a repair automatically. Please be patient for this tool to finish as the process can take up to 20 minutes.
DISM /Online /Cleanup-Image /RestoreHealth
- After the previous process finishes, use the following command to have SFC scan your system files for malfunctions:
sfc /scannow
- Try updating or downloading your app now if that was the problem or try running Windows update to see if the problem is fixed.
4. Resetting Windows Update Components Manually
This is probably the most complex solution but it efficiently eliminates all types of Windows update problems and error codes because of the fact that you have to reset everything on your computer regarding Windows update.
- Type Command Prompt in the search bar and run it with administrator privileges.
- Kill the following services: MSI Installer, Windows Update Services, BITS, and Cryptographic by copying and pasting the commands below. Make sure you click Enter after each one.
net stop msiserver
net stop wuauserv
net stop bits
net stop cryptSvc
- Rename the Catroot2 and Software Distribution folders. You can do this more easily by copying the following commands in the Command Prompt:
ren C:\Windows\SoftwareDistribution SoftwareDistribution.old
ren C:\Windows\System32\catroot2 Catroot2.old
- Start the MSI Installer, Windows Update Services, BITS, and Cryptographic services again by copying and pasting the commands below one after another.
net start wuauserv
net start cryptSvc
net start bits
net start msiserver
- Restart your computer after this and check to see if your problem is solved.
Note: You won’t be able to rename the folders listed in Step 3 unless you end the services we listed before. Follow these steps exactly as they are listed, make sure you are logged in with an administrator account, and run Command Prompt as administrator.

Kevin Arrows
Kevin Arrows is a highly experienced and knowledgeable technology specialist with over a decade of industry experience. He holds a Microsoft Certified Technology Specialist (MCTS) certification and has a deep passion for staying up-to-date on the latest tech developments. Kevin has written extensively on a wide range of tech-related topics, showcasing his expertise and knowledge in areas such as software development, cybersecurity, and cloud computing. His contributions to the tech field have been widely recognized and respected by his peers, and he is highly regarded for his ability to explain complex technical concepts in a clear and concise manner.
Если при загрузке или проверке наличия обновлений появилась ошибка 80246007 Центра обновления Windows, необходимо изменить фоновую интеллектуальную службу передачи (BITS) или перезапустить ее. Данная служба позволяет Центру обновления Windows загружать обновления на компьютер. Сначала рекомендуется запустить средство устранения неполадок Центра обновления Windows. «http://go.microsoft.com/?linkid=9830262»
Если устранить проблему не удалось, выполните следующие действия.
Изменение или перезапуск фоновой интеллектуальной службы передачи (BITS)
Для выполнения этих действий необходимо войти в систему с правами администратора.
Откройте раздел «Администрирование». Для этого нажмите кнопку ПускИзображение кнопки «Пуск» и выберите компонент Панель управления. В поле поиска введите администрирование и затем выберите компонент Администрирование.
Дважды щелкните элемент Службы.
Правой кнопкой мыши щелкните службу Фоновая интеллектуальная служба передачи (BITS), а затем выберите пункт Свойства.
На вкладке Общие в группе Тип запуска должен быть выбран параметр Автоматически (отложенный запуск). Если он не выбран, выберите его, а затем нажмите кнопку Применить.
В разделе Состояние службы убедитесь, что служба запущена. Если служба не запущена, нажмите кнопку Запустить.