When you launch Windows Update, it makes an effort to connect to the internet to update your PC, and this problem can show up: 0x8024402c. How to fix the error? Here is the quick navigation.
| Workable Solutions | Step-by-step Troubleshooting |
|---|---|
| Fix 1. Enable Automatic Network | In the first method, we shall enable automatic network detection settings via Windows Settings…Full steps |
| Fix 2. Disable Windows Firewall | By temporarily disabling Windows Defender Firewall, check whether the error code 0x8024402c…Full steps |
| Fix 3. Delete Distribution | In this method, you should delete software distribution to eliminate the error…Full steps |
| Fix 4. Restart to Clean the Boot | We will perform a Clean Boot via System Configuration to eliminate the error…Full steps |
| More Fixes | The other 2 fixes are available here for you to fix Windows update error 0x8024402c…Full steps |
What Is Windows Error Code 0x8024402c
This occurs when the PC cannot correctly connect to the Windows Update Server, which then confuses the system and ultimately causes it to crash and display the blue screen of death. An incorrect network setting, LAN setting, or update setting that does not comply with the update requirements could cause this issue. By approving the Automatically detected connection settings, it can be stopped.
The connection between the PC and the Windows Updates servers may break down if the firewall or proxy settings are misconfigured, another possible reason for this issue. Given below are more causes on why the Windows update error 0x8024402c occurs:
- ⏳Pending updates
- ⚙️Incorrect time setting on your PC
- 📃Damaged files
- 🚮Junk files that contain active threats
- 🧱Incorrect firewall configuration preventing critical computer updates
So, these are the possible causes of the error 0x8024402c Windows 10 or 11 error. Now, let us move on to the solutions to solve the error.
There are several methods to fix the Windows 11/10 error 0x8024402c. Check out the solutions below for the error code and a detailed video.
- 00: 22 — Disable Proxy Settings
- 00: 57 — Reset Proxy
- 01: 46 — Install Windows Updates
- 02: 18 — Automatically detect LAN Settings
So, I hope this video helped you understand more about Windows 11/10 error 0x8024402c. Now, let us move on to the detailed solutions for this error.
- Fix 1. Enabling Automatic Network Detection Settings
- Fix 2. Temporarily Disable Windows Defender Firewall
- Fix 3. Delete Software Distribution
- Fix 4. Restart to Access Clean Boot
- Fix 5. Removing the Invalid Characters in the Proxy Exception List
- Fix 6. Changing the DNS Servers
Fix 1. Enabling Automatic Network Detection Settings
In the first method, we shall allow automatic network detection settings via Windows Settings. Here is how to go about it:
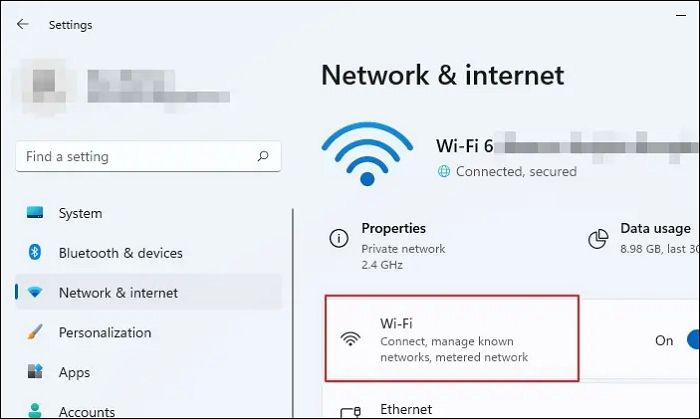
Step 1. Press the Windows key + I to open Settings.
Step 2. Choose Network & Internet from the left pane.
Step 3. Click on Wi-Fi. Next, click on the Wi-Fi properties you are connected to.
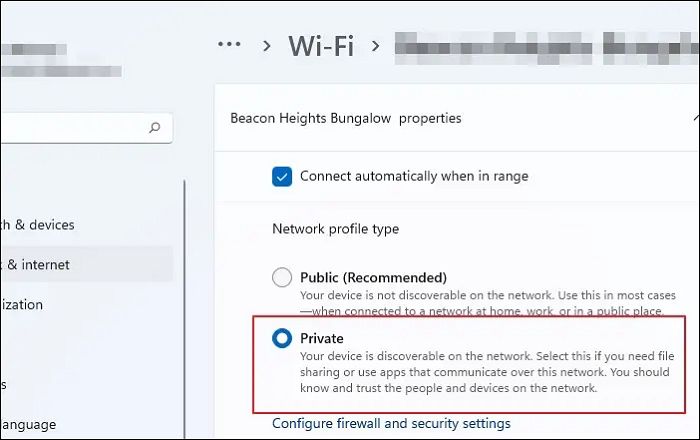
Step 4. Under the Network profile type, click the «radio» button next to the Private option to enable automatic network detection. This will make your PC discoverable and may help eliminate the Windows error code 0x8024402c.
Fix 2. Temporarily Disable Windows Defender Firewall
By temporarily disabling Windows Defender Firewall, check whether the error code 0x8024402c gets eliminated. This is how you go about it:
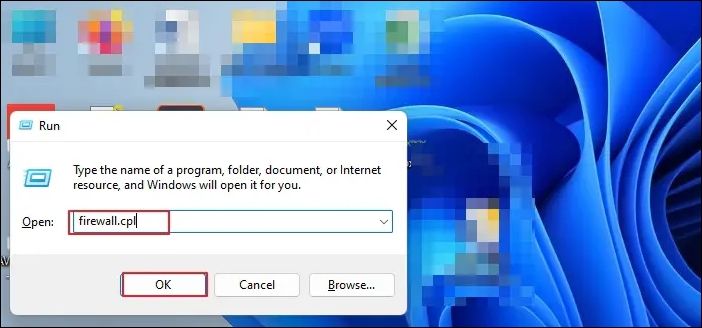
Step 1. Type firewall.cpl into the Windows search bar and press Enter.
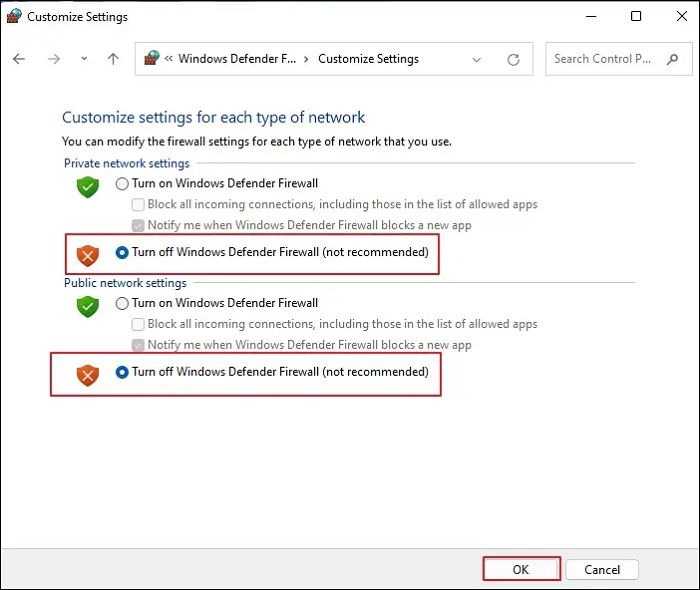
Step 2. On the left side of the windows, click the «Turn Windows Defender Firewall» on or off option.
Step 3. Under Private Network Settings, click the «radio» button next to Turn off «Windows Defender Firewall». Do the same for Public Network Settings and click «OK» to save the changes.
You should now check the Windows updates and see whether the issue is fixed.
Fix 3. Delete Software Distribution
In this method, you should delete software distribution to eliminate the error. This is how you go about it:
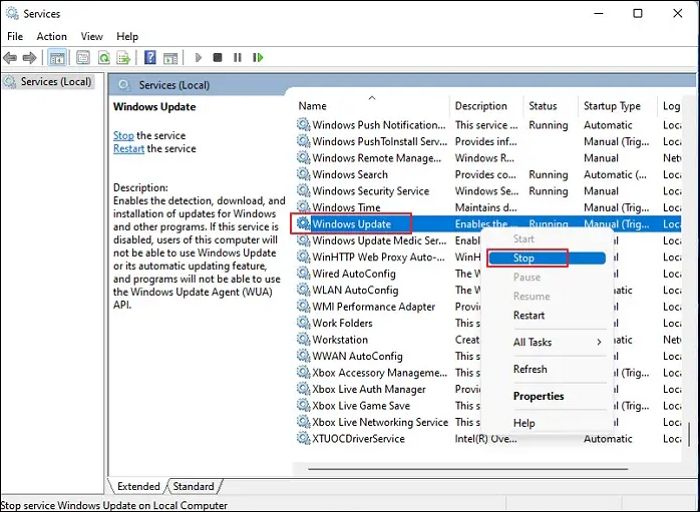
Step 1. Type Services into the Windows search bar, right-click on the result and choose the Run as administrator option.
Step 2. In the Services window, please scroll down and locate the Windows Update option, right-click on it, and choose the «Stop» option from the context menu.
Step 3. After it stops, click on File Explorer and choose Local Disk (C:).
Step 4. Click on the «Windows folder». Next, please scroll down and locate the SoftwareDistribution folder, right-click on it, and choose the Delete option from the context menu.
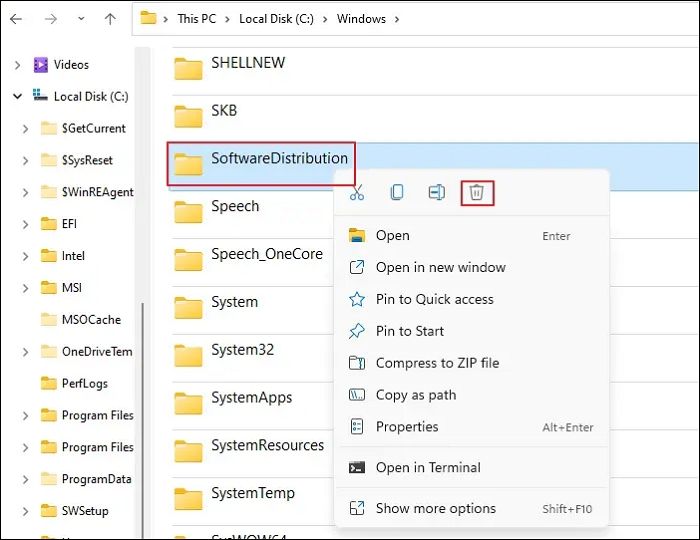
After removing the contents from the SoftwareDistribution folder, check whether the Windows 11/10 error 0x8024402c disappears.
Fix 4. Restart to Access Clean Boot
We will perform a Clean Boot via System Configuration to eliminate the error. Let us see how to go about it:
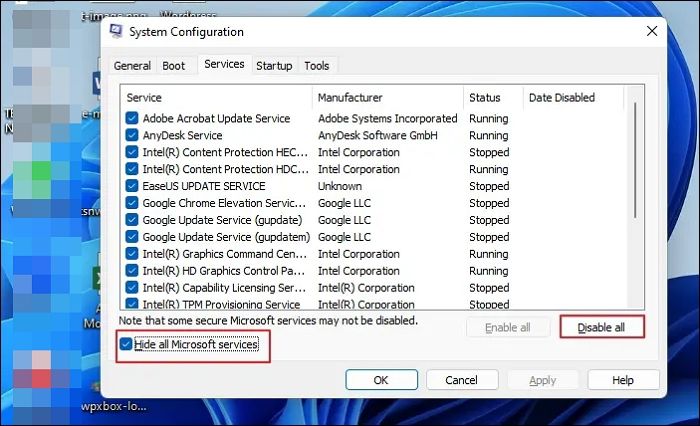
Step 1. Press Windows key + R to open the Run dialogue box. Type msconfig into the text box and press OK. This will open the System Configuration window.
Step 2. Click the «Services» tab and the check box next to «Hide all Microsoft services» to enable it. Next, click the «Disable al»l button and «Apply».
Step 3. Click on the Startup tab and click on «Open Task Manager». Next, please find all the application that has the Enabled status, right-click on them, and choose the Disabled option.
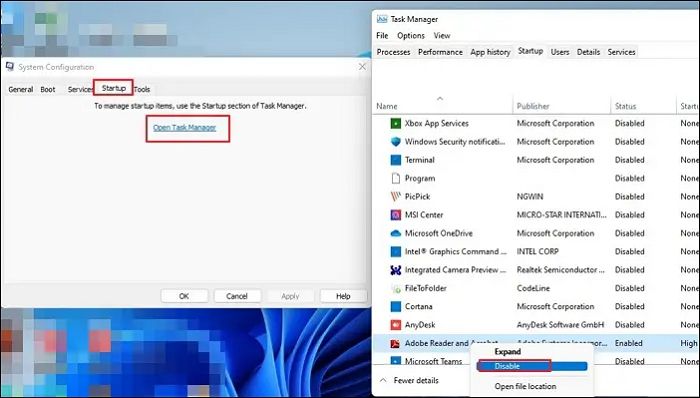
Step 4. Close the window and click OK. Click the Restart button to apply the changes in the System Configuration prompt.
Fix 5. Removing the Invalid Characters in the Proxy Exception List
In the proxy exception list, remove all the invalid characters. This is how you go about it:
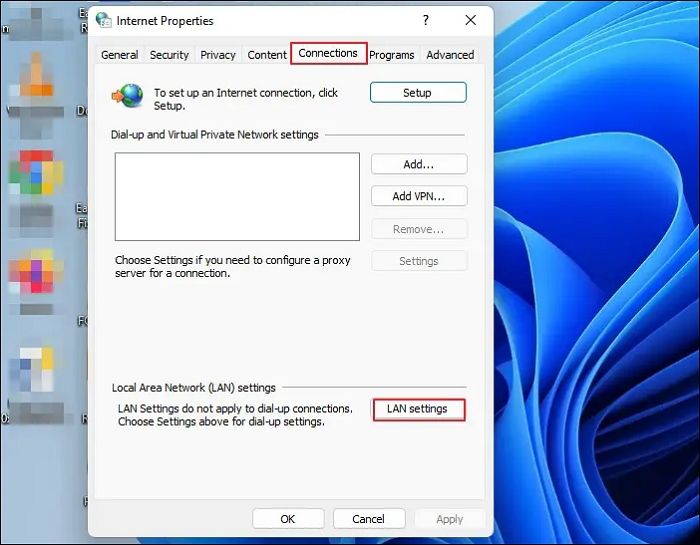
Step 1. Type internet options into the Windows search bar and click on the result to open the Internet Properties window.
Step 2. Click on the «Connections» tab and the LAN settings button.
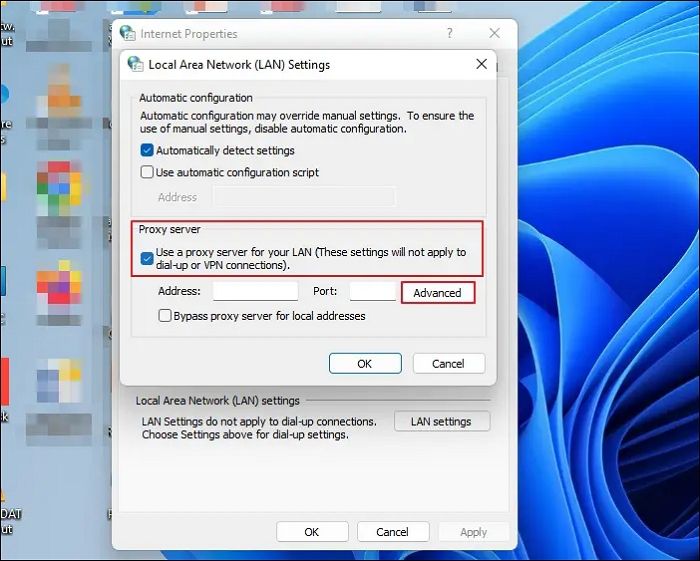
Step 3. In the next window, click on the radio button next to Use a proxy server for your LAN and click on the Advanced button to open Proxy Settings.
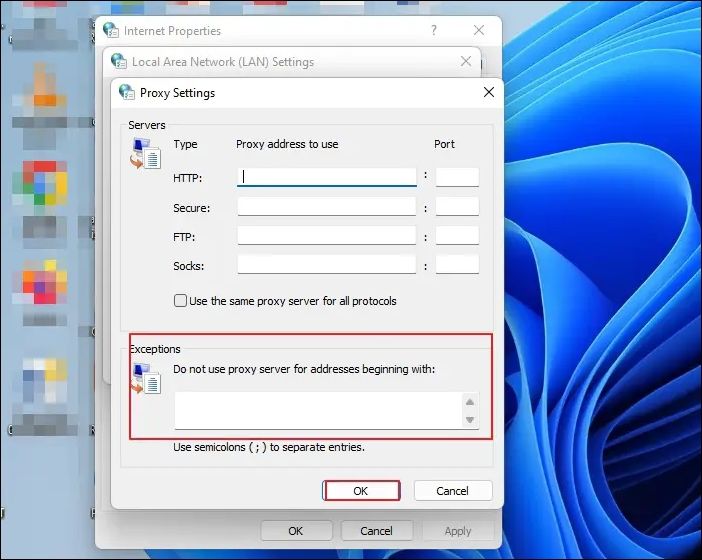
Step 4. Delete everything in the Do not use a proxy server for addresses beginning with the field, press OK in the prompt window, and OK again to close the LAN settings window.
The next step is to clear the proxy cache. Here is how to go about it:
Step 1. Right-click on the Windows logo and click on Windows Terminal (Admin).
Step 2. Press Enter after typing each command line one by one:
netsh winhttp reset proxy net stop wuauserv net start wuauserv
The error code 0x8024402c should be resolved after it is finished.
Fix 6. Changing the DNS Servers
In this method, change DNS servers to fix the 0x8024402c error. Let us see how to go about it:
Step 1. Press the Windows key + R to open the Run command box and type ncpa.cpl into the text box and press Enter to open the Wi-Fi-Status window.
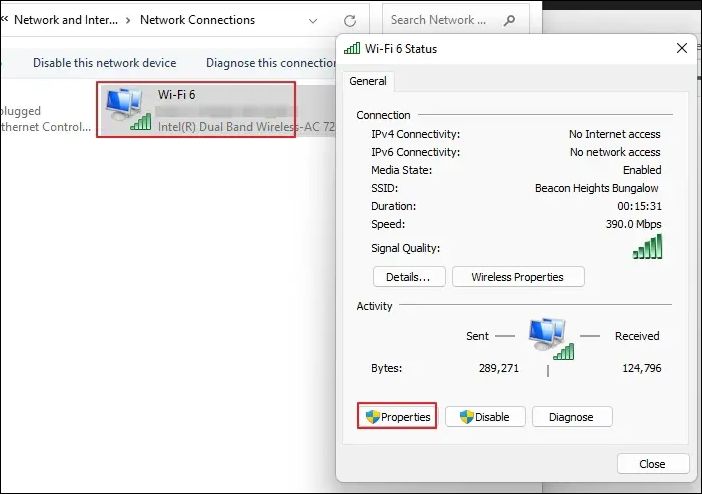
Step 2. Click on the Properties button. Next, locate the Internet Protocol Version 4 option and double-click on t to open its properties.
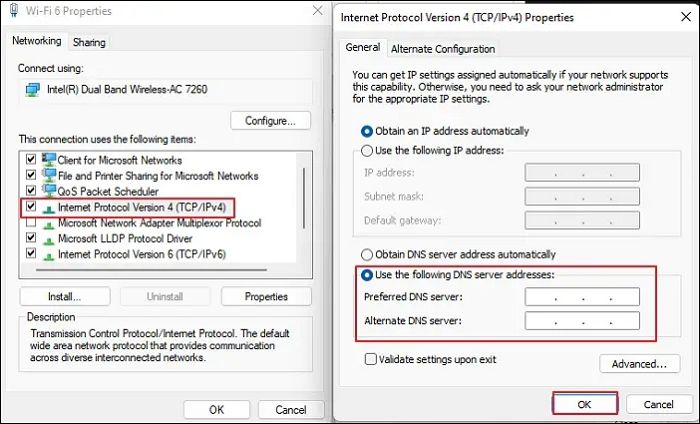
Step 3. Click on the radio button next to Use the following DNS server addresses and type in the following addresses:
- Preferred DNS server: 8.8.8.8
- Alternate DNS server: 8.8.4.4
Step 4. Click OK to update the changes and check whether the Windows error code 0x8024402c has disappeared.
Windows users have proved the efficacy of these fixes. If one of the methods helps fix the Windows update error 0x8024402c, share it on Facebook, Twitter, Instagram, and other social media platforms!
How to Recover Data When Fixing Error 0x8024402c
Windows users may lose data after fixing error code 0x8024402c. So, to recover deleted files from Windows 11/10/8/7, I recommend using EaseUS Data Recovery Wizard. It was created to aid in the recovery of data lost as a result of a file system malfunction, system crashes, and unintended file deletion. Even novice users can recover files quickly because of the software’s user-friendly interface.
EaseUS Data Recovery Wizard
- It can recover lost photos, videos, music files, documents, and other files with simple clicks.
- This software recovers data from external hard drives, SSD, USB flash drive, and pen drive.
- It makes restoring a partition’s data simple, even if it has been completely lost or the system cannot recognize it.
Download it now and follow the guide below to restore data from your PC quickly.
Note: To guarantee a high data recovery chance, install EaseUS data recovery software on another disk instead of the original disk where you lost files.
Step 1. Launch EaseUS Data Recovery Wizard on your Windows 11, Windows 10, Windows 8, or Windows 7 computer. Select the disk partition or storage location where you lost data and click «Scan».

Step 2. This recovery software will start scanning the disk to find all lost and deleted files. When the scan process completes, click «Filter» > «Type» to specify lost file types.

Step 3. Preview and restore lost Windows files. You can double-click to preview the scanned files. Then, select the target data and click the «Recover» button to save them to another safe spot in the PC or an external storage device.

Conclusion
The abovementioned techniques can resolve the Windows Update error code 0x8024402c.
You can also consider setting up a time sync between your PC and the internet, then restarting Windows Updates. When updates stop working due to malware, you can run security software. You should also be aware that Windows Updates is a compassionate application; if it has problems, the system will be adversely affected and may start to run slowly or improperly. So, follow the solutions given in this article carefully for a smooth and successful completion of the Windows update without any errors.
Also, note that after fixing the error code 0x8024402c, you may lose some data on your PC. So, download and use the data recovery tool EaseUS Data Recovery Wizard to save all your lost files. So that is it! I hope this article helped you resolve the error code issue!
Windows Update Error Code 0x8024402c FAQs
Do you have more questions on the Windows update error code 0x8024402c? Check out the frequently asked questions and their answers given below:
1. What does 0x8024401c mean?
You might encounter various issues when connecting to Microsoft’s Windows Update servers. It usually happens when you attempt to install updates, but the proxy, firewall, or other network settings are incorrect. 0x8024402C is one of these error codes. The error code is displayed on the screen when a user checks for updates.
2. How do I get rid of the error-checking drive?
On your Windows PC. Right-click on the Windows logo and choose Windows Terminal (Admin). Click Yes on User Account Control prompt and type chkdsk into the Windows Terminal window. Press Enter. CHKDSK will scan for drive errors and let you know if it finds any issues that need repair. Remember that it will not fix the errors without a command.
3. What does the Windows Update client fail to detect with error 0x8024402c?
An incorrect network setting, LAN setting, or update setting that does not comply with the update requirements could cause this issue. By approving the Automatically detected connection settings, it can be stopped.
4. What is error 0x8024402c for feature installation?
Not sure what this is feature installation. Kindly send me a message about it.
Перейти к содержанию
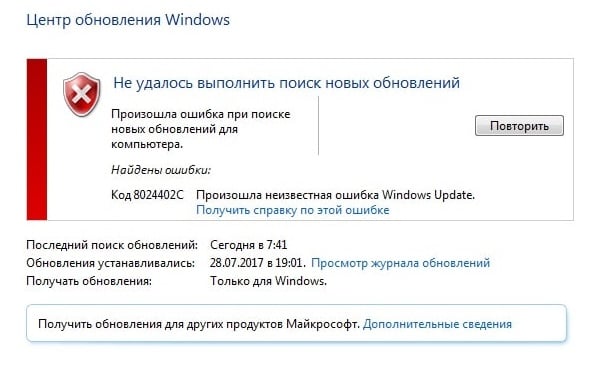
Центр обновления Windows необходим для нормальной работы вашего ПК. Вот почему ошибка при обновлении может быть настолько большой проблемой, насколько это возможно. Ошибка Центра обновления Windows 8024402c – это один из наиболее распространенных способов возникновения проблемы с обновлением Windows. Это вызвано тем, что ваш компьютер не может подключиться к серверам обновлений Microsoft.
Содержание
- Причины ошибки Центра обновления Windows 8024402c
- Убедитесь, что ваш брандмауэр / антивирус не блокирует обновление
- Проверьте VPN / прокси-серверы – они могут быть заблокированы или мешать загрузке обновлений
- Попробуйте запустить функцию “Устранение неполадок Центра обновления Windows”
- Измените DNS-сервера
Причины ошибки Центра обновления Windows 8024402c
Эта ошибка будет появляться всякий раз, когда Центр обновления Windows не может подключиться к серверам обновлений Microsoft. Если вы запускаете Центр обновления Windows, запускается ваше запланированное обновление, и нет соединения с Интернетом, или это соединение где-то заблокировано, есть большая вероятность, что вы увидите ошибку 8024402c.
Эту ошибку особенно сложно решить, поскольку существует множество причин, которые могут помешать компьютеру подключиться. Ваше WiFi соединение слабое? Вы не связаны вообще? Ошибка может случиться. Затем, есть более технические и трудные, чтобы определить причины.
Хитрость в том, чтобы выяснить, какой это на самом деле, потому что эта ошибка довольно расплывчата и не сообщает точную причину. Вот четыре наиболее распространенных технических причины ошибки 8024402c:
Убедитесь, что ваш брандмауэр / антивирус не блокирует обновление
Сначала проверьте свою собственную антивирусную программу. Попробуйте отключить любой брандмауэр и остановите его, если сможете. Если это не облегчает проблему, продолжайте.
Откройте меню Пуск и в строке поиска наберите «Безопасность и обслуживание»

Выберите раздел Безопасность. Если вы видите, что брандмауэр и антивирус включены, вам нужно их отключить.

Выберите Изменить параметры безопасности и обслуживания в левом верхнем углу экрана.
Выберите Сетевой брандмауэр и Защита от вирусов, чтобы отключить их.

Проверьте VPN / прокси-серверы – они могут быть заблокированы или мешать загрузке обновлений
Если вы в настоящее время используете VPN или прокси для подключения к Интернету, лучше временно отключить его, чтобы исключить его в качестве причины. Если у вас есть приложение VPN от вашего провайдера, сначала используйте его для отключения VPN. В противном случае выполните следующие действия, чтобы отключить VPN.
Выберите меню «Пуск» > «Настройки».

Выберите Сеть и Интернет.

Выберите VPN.
Найдите ваше VPN-соединение и отключите его.
Попробуйте запустить функцию “Устранение неполадок Центра обновления Windows”
Microsoft предлагает собственное автоматизированное решение для устранения неполадок Центра обновления Windows. Перейдите на страницу загрузки Microsoft и загрузите правильную версию средства устранения неполадок для вашей версии Windows.
Запустите средство устранения неполадок, и, если повезет, он обнаружит и решит проблему
Измените DNS-сервера
Серверы системы доменных имен (DNS) направляют ваш компьютер к нужным серверам для поиска веб-сайтов, которые вы ищете. Они являются важной частью вашего компьютера для установления соединения с серверами Центра обновления Windows. Если вы не можете подключиться к Центру обновления Windows, причиной может быть плохой DNS-сервер. К счастью, вы можете изменить их в любое время.
Введите новый предпочтительный и альтернативный DNS-сервер. Вот два хороших варианта:
- Cloudflare: 1.1.1.1 и 1.0.0.1
- Google: 8.8.8.8 и 8.8.4.4
Нажмите OK в нижней части окна, чтобы сохранить изменения. Попробуйте запустить Центр обновления Windows еще раз, чтобы увидеть, можно ли подключиться. Если у вас остались вопросы – пишите их в комментариях.
Просмотров 3.6к.
Обновлено
Windows Update error 8024402C (Windows could not search for new updates – Errors found 8024402C) while checking for updates is commonly caused by invalid network settings or invalid update settings. The problem also occurs if your computer was connected to a local network (LAN) and managed by a Windows Server Update Services (WSUS).

This tutorial contains detailed instructions on how to resolve In order to fix the Windows Update error 0x8024402C in Windows 8, 7 or Vista.
How to fix Error code 0x8024402C in Windows Update.
Solution 1. Run the Windows Update Troubleshooter.
1. Navigate to Windows Control Panel, set the ‘View By’ to Small icons and open Troubleshooting.

2. In Troubleshooting options, click View all.

3. Open the Windows Update.

4. Click Next to troubleshoot Windows update problems.

5. When the troubleshooting process is complete, close the troubleshooter.
6. Restart your computer and see if the Error code 8024402C is resolved.
Solution 2. Change the DNS servers.
Some IPS causes errors with Windows Update. So try to manually add a public DNS server (e.g. Google DNS) on your network connection.
1. Press Windows ![]() + R keys to open the run command box.
+ R keys to open the run command box.
2. Type ncpa.cpl and press Enter.

3. Double click at your active Network Adapter.
4. Click Properties.

5. Open ‘Internet Protocol Version 4 (TCP/IPv4)’ Properties.

6. Select «Use the following DNS server addresses:» and type the following Google’s public DNS server addresses:
- 8.8.8.8
- 8.8.4.4

7. Press OK twice to exit Network settings.
8. Restart your computer and check for updates again.
Solution 3. Configure Automatic Updates client to connect directly to the Windows Update site on the Internet.
1. Press Windows ![]() + R keys to open the run command box.
+ R keys to open the run command box.
2. Type regedit and press Enter.

3. In Windows registry editor locate the following key:
HKEY_LOCAL_MACHINE\SOFTWARE\Policies\Microsoft\Windows\WindowsUpdate\AU

Note: If you don’t find the WindowsUpdate key you have to create it: Right click on Windows key (on the left pane) and select New > Key. Give the name: WindowsUpdate. Then right click at «WindowsUpdate’ & perform the same operation to create the AU key.

4. At the right double click to open the UseWUServer value and change the Value data from 1 to 0.

Note: If you don’t find the UseWUServer value you have to create it: Right click on the right pane and select New > DWORD (32-bit) Value. Give the name: UseWUServer.

5. Press OK to apply changes and exit from Registry Editor.

That’s all folks! Did it work for you?
Please leave a comment in the comment section below or even better: like and share this blog post in the social networks to help spread the word about this solution.
If this article was useful for you, please consider supporting us by making a donation. Even $1 can a make a huge difference for us.

Ошибка 0x8024402c делает неисполнимым установку апдейтов ОС. Это вызвано следующими факторами:
- задействование прокси сервера;
- блокирование соединения антивирусом или файрволом.
Способы решения ошибки 0x8024402c
Решается проблема следующими способами:
- Отключение приложений, которые блокирую сетевые подключения. Предпочтительней всего сделать неактивными или удалить на время обновления антивирус и файрвол (брандмауэр).
- Отключение прокси. Запустите Internet Explorer и следуйте по пути: «Свойства браузера» => «Подключения» => «Настройка сети». Убедитесь, что стоит галочка в строке «Использовать прокси…». Переходьте в раздел «Дополнительно» и проверьте, что во всех строках там нет каких-либо значений. Подтверждаем действием нажатием Ок в двух открытых окнах. Перегружаем ПК и ошибка 0x8024402c исчезнет.
Table of Contents
- Scenario
- Symptom
- Troubleshooting
- Solution
Scenario
Consider a client workstation that it is using a WSUS Server that is located in the DMZ behind Forefront TMG. This WSUS Server is not a domain member. There is a group policy specifying the WSUS Server name as shown below:

Symptom
When the client workstation is running Windows Update it receives an error 0x8024402c, which appears in the Windows Update log (check KB902093 for default location) as shown below:

Troubleshooting
During the course of troubleshooting of this issue the following items were validated:
- The DNS Server correctly had an entry for the WSUS Server
- The DC was able to resolve the WSUS Server name.
- The client was able to resolve the WSUS Server name using nslookup command, but it was not able to resolve when using ping command.
To better understand what it was happening the following steps were done on the client workstation:
- Ran ipconfig /flushdns
- Started Netmon capture.
- Ran the command ping srvwus.crop.contoso.com.
- Stopped the capture.
On the netmon capture it was possible to see that the answer from the DNS Server came incorrectly as shown below:
![]()
At this point, we know that name resolution works fine and that the client is able to talk to the DNS Server. To isolate potential name resolution issue we tried to ping to SRVWSUS using the IP address and got the result below:

This indicates that the local machine didn’t know what to do with that request.
Solution
The client workstation was missing the IP address of the default gateway. Once we added the default gateway the client workstation was able to obtain updates.