by Aleksandar Ognjanovic
Aleksandar’s main passion is technology. With a solid writing background, he is determined to bring the bleeding edge to the common user. With a keen eye, he always… read more
Updated on
- If the upgrade procedure suddenly crashes every time you give it a go, you may need to change how the upgrade is distributed and the installation source.
- Windows Update is pretty plagued with issues, so your optional way out of this is to use an external source.
- You can always use the Windows above 10 installation media and perform a clean reinstallation.
XINSTALL BY CLICKING THE DOWNLOAD
FILE
By the latest reports, three-quarters of Windows 10 users have obtained Windows 10 Fall Creators Update.
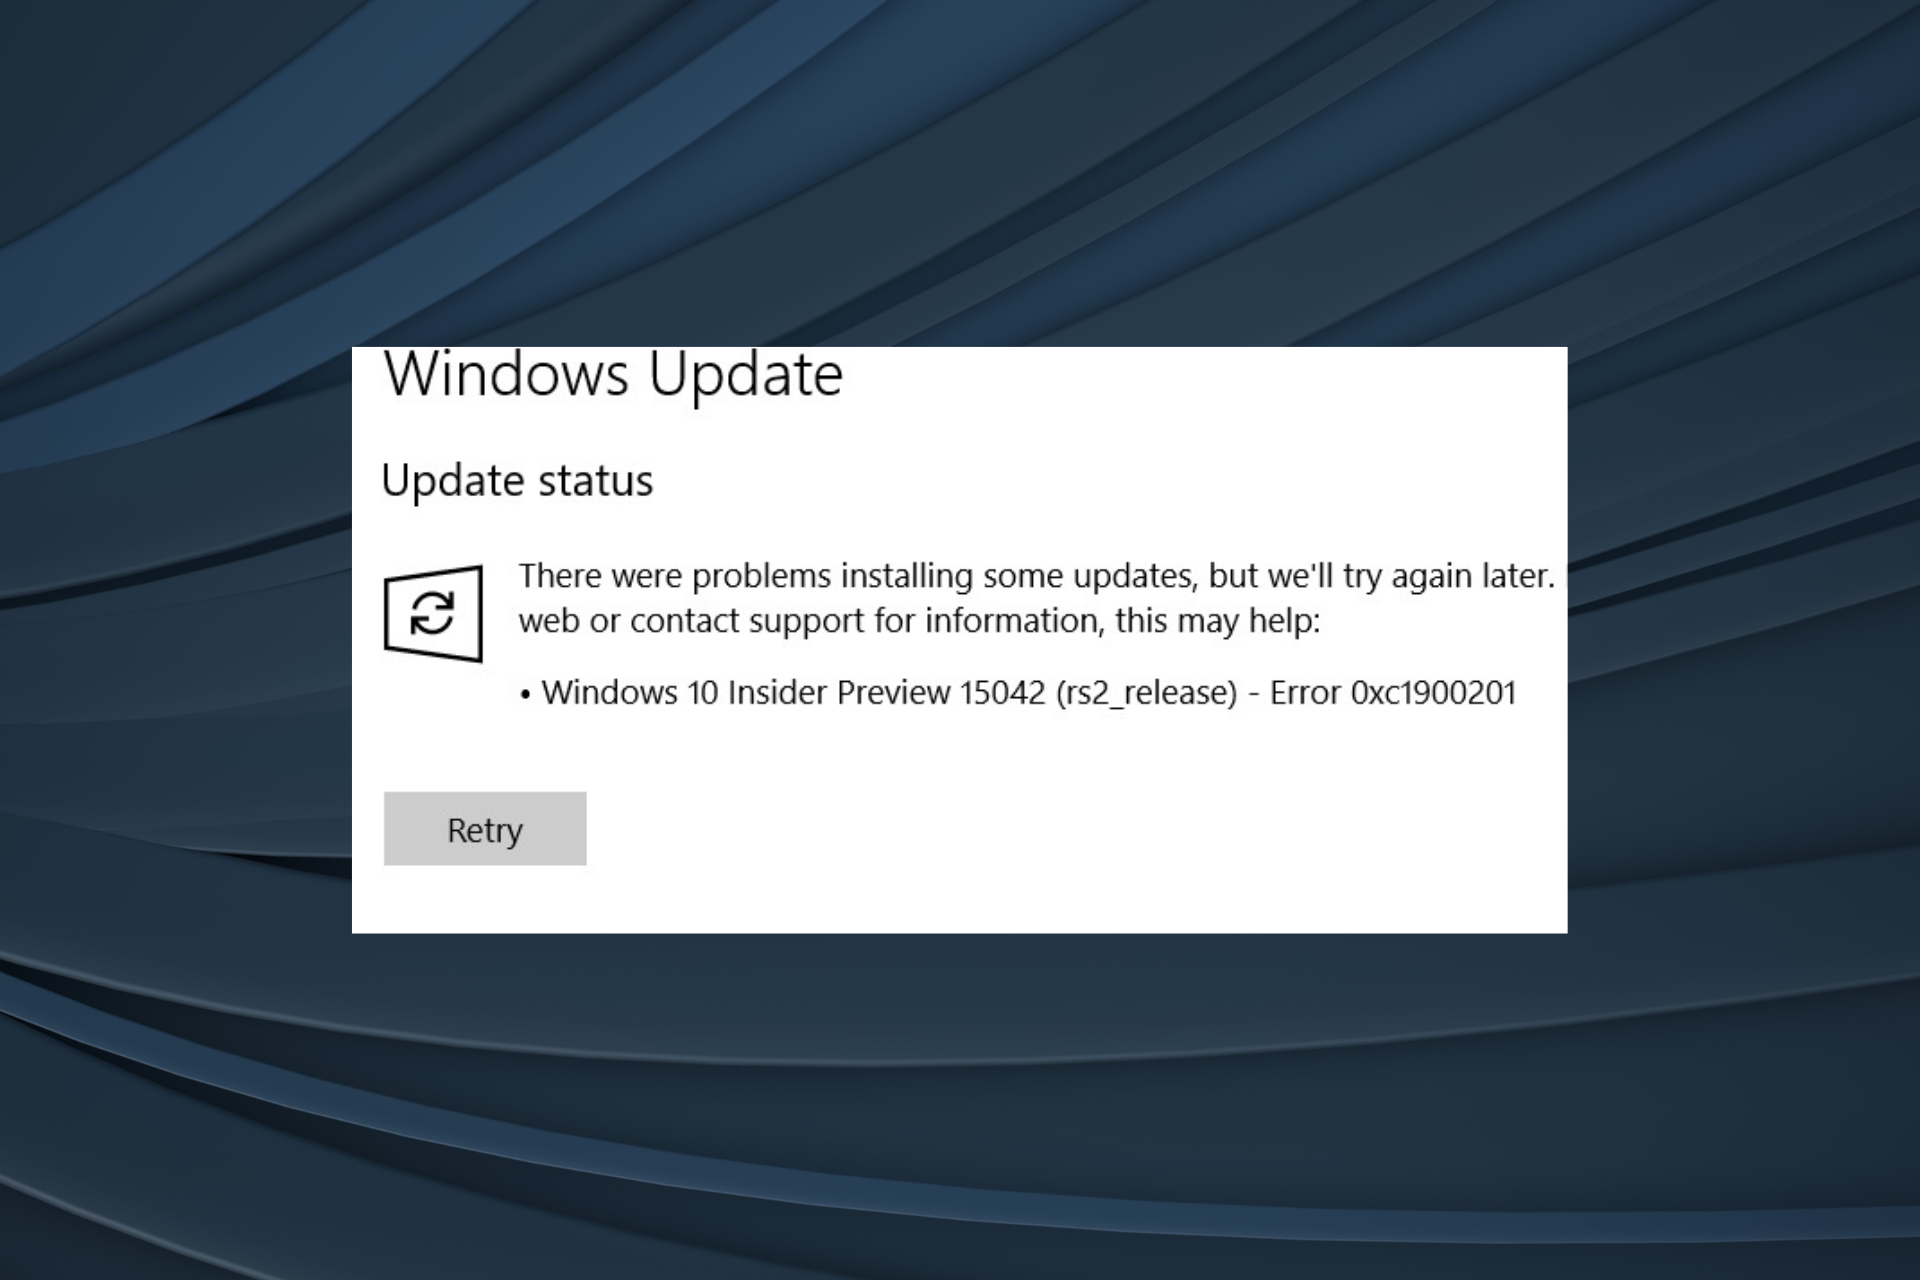
However, some users recently prompted to upgrade to version 1709 bump into an upgrade error baring the code 0xc1900201.
Seemingly, they cannot overcome this error after a few tries and can confirm that the connection or update services are responsible for the error at hand.
We prepared a list of the most common solutions that should fix the issue or provide a viable alternative. So, if you’re stuck with the 0xc1900201 Windows Update error on Windows 10 or Windows 11, make sure to check the list below.
How can I fix the error code 0xc1900201?
- How can I fix the error code 0xc1900201?
- 1. Expand System Reserved Partition
- 2. Use Media Creation Tool
- 3. Perform a clean reinstallation
1. Expand System Reserved Partition
This shouldn’t be something with what end-users should meet, but that’s Windows 10 for you. When it works – it works fine; when it doesn’t – you’ll need to turn to complex workarounds to make it work.
How we test, review and rate?
We have worked for the past 6 months on building a new review system on how we produce content. Using it, we have subsequently redone most of our articles to provide actual hands-on expertise on the guides we made.
For more details you can read how we test, review, and rate at WindowsReport.
In this scenario, you’ll need to resize your System Reserved Partition to obtain the latest upgrade, Falls Creator Update.
All chances are that its nominal values vary around 100 MB, while you’ll need 200 to 600 to upgrade to the latest Windows 10 iteration.
This is a rather complex operation, and many tech-savvy users advise using some partition-managing third-party tool. The best one and the most simple to use is EaseUS Partition Manager.
Also, it won’t cost you a thing to back up your system before we move through the steps.
- Firstly, create a system repair disk in case something goes awry.
- Download EaseUs Partition Manager.
- Install this nifty tool and run it.
- Select your system partition. The one where Windows 10 is installed initially (most of the time, is C:)
- Click Resize/Move.
- Under the Decide size and position, reduce the available space to approximately 600 MB.
- After that, you should be able to see free and unreserved Unallocated space to restart your PC.
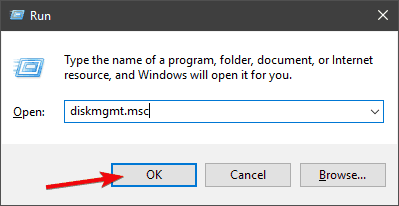
- Once it boots again, press the Windows key + R to open the Run elevated command line.
- In the command line, type diskmgmt.msc and press Enter.

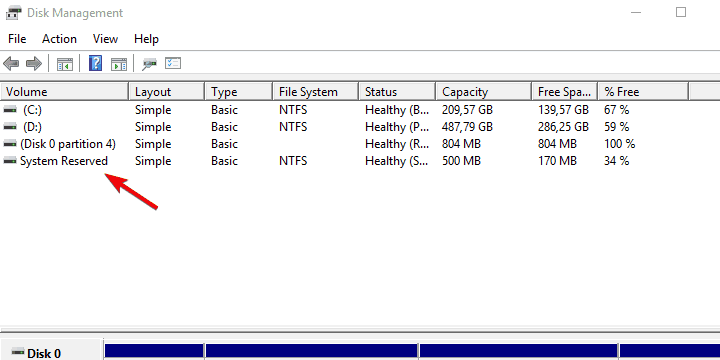
- Right-click on the System Reserved Partition and click Extend Volume.

- Add the unallocated space you previously created to System Reserved Partition and confirm changes.
- Restart your PC and try upgrading again.
After that, you should be able to install all significant updates without any issues whatsoever.
2. Use Media Creation Tool
If the upgrade procedure suddenly crashes every time you give it a go, you may need to change how the upgrade is distributed and the installation source.
Windows Update is pretty plagued with issues, so your optional way out of this is to use an external source: USB or DVD with the installation files. You can create such media with Media Creation Tool.
If the problem is in connection or upgrades file distribution, this should resolve it accordingly. Make sure to follow the steps below to create an installation media and upgrade to Windows 10 with it:
- First, download Media Creation Tool by following this link.
- Next, run the tool and accept the Licence Terms.
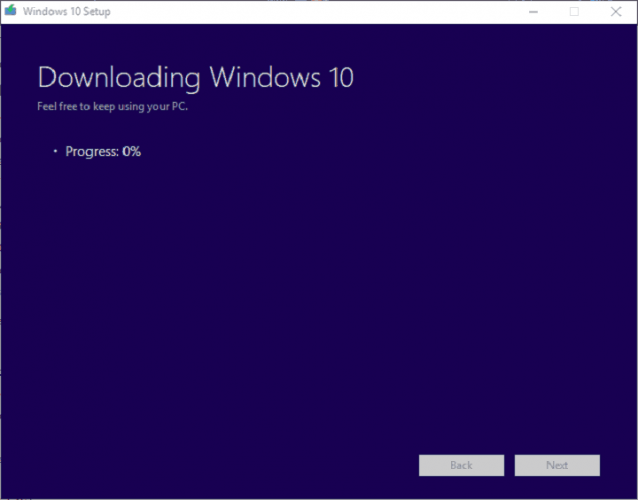
- Choose Upgrade this PC, and the downloading process should commence.
- Once it downloads files, Media Creation Tool will start applying upgrades.

- This procedure should take up to 2 hours, depending on your Windows 10 version and bandwidth.
- Windows 11 adds new icons for low-battery Bluetooth devices
- Windows 11 will now notify users when apps request location
- Microsoft added a scrollable view option to Quick Settings
3. Perform a clean reinstallation
Finally, if none of the previous steps fell short, you can always use the aforementioned Windows 10 installation media and perform a clean reinstallation.
Once your system is completely renewed, it should pack the Fall Creators Update, a.k.a version 1709.
If you’re not sure how to perform a clean reinstallation of Windows 10, check this article for in-depth insight and a step-by-step explanation of the complete procedure.
With that, we can conclude this article. However, if you’re still unable to make it work and the same error code 0xc1900201 reappears, don’t forget to send your ticket to Microsoft.
On the other hand, if you managed to resolve the issue alternatively, we’ll be grateful if you share it with us in the comments section below.
- Why does Windows 10 version 1903 take so long to install?
The reason for a slow installation might be the free space on the drive. Another reason might be a slow Internet connection.
![]()
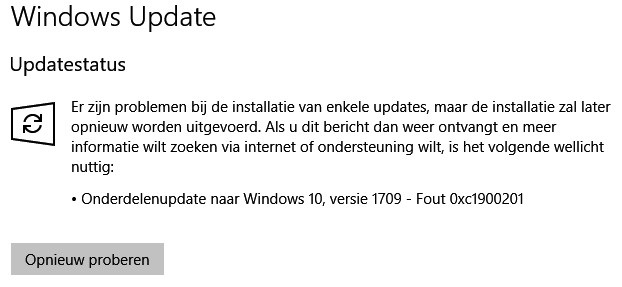
Некоторые пользователи в сети утверждают, что сталкиваются с ошибкой 0xc1900201, когда пытаются установить то или иное обновление для операционной системы Windows 10. В сообщении ошибки можно увидеть следующий текст:
С установкой некоторых обновлений возникли проблемы, но позднее будет предпринята еще одна попытка. Если вы продолжаете видеть это сообщение и хотите поискать дополнительные сведения в Интернете или обратиться в службу поддержки, вам может помочь следующая информация:
Обновление функций до Windows 10, версия 1709 — 0xc1900201
По всей видимости, подобная ошибка появляется только на Windows 10 и ни на какой другой версии ОС Майкрософт.
Причины появления ошибки 0xc1900201
На сегодняшний день известно, что ошибка 0xc1900201 может появляться по следующему ряду причин:
- Центр обновления Windows застрял между обновлениями.
- Один из компонентов Центра обновления начал работать некорректно.
- Проблемы с верификацией аппаратного обеспечения на клонированной операционной системе.
- Серьезные повреждение системных файлов.
Сразу стоит отметить, что ошибка 0xc1900201 — это, как правило, легко решаемая проблема. Придерживайтесь приведенных ниже методов и все будет хорошо.
Методы решения ошибки 0xc1900201
Метод №1 Запуск средства устранения неполадок
Не спешите копаться в операционной системе! Первым делом вы должны пустить в дело автоматизированное средство устранения неполадок. Стоит заметить, что данное средство — не палочка-выручалочка. Проще говоря, либо оно вам поможет, либо оно не сделает ничего. Так или иначе попробовать определенно стоит. Чтобы запустить средство устранения неполадок Windows 10, вам нужно сделать следующее:
- нажмите Win+I на клавиатуре для открытия Параметров системы;
- откройте раздел Обновление и безопасность;
- перейдите во вкладку Устранение неполадок;
- найдите в списке Центр обновления Windows и выберите его ЛКМ;
- нажмите на кнопку Запустить средство устранения неполадок;
- следуйте за инструкциями средства на вашем экране;
- закончив работать со средством, перезагрузите компьютер.
Попробуйте обновить Windows 10 еще раз. На сей раз ошибка 0xc1900201 могла исчезнуть.
Метод №2 Сброс всех компонентов с помощью «битника»
Появление подобных ошибок может возникать в результате некорректной работы одного или нескольких компонентов Центра обновления Windows 10. Восстановить поврежденные компоненты очень легко с помощью самодельного «батника» (файла с расширением .bat), в котором заложен особый скрипт. Сейчас мы покажем вам, как создать такой батник и как им пользоваться.
Итак, создайте на своем рабочем столе самый обычный текстовый файл. Далее откройте этот текстовик и вставьте в него следующий скрипт:
:: Run the reset Windows Update components.
:: void components();
:: /*************************************************************************************/
:components
:: —— Stopping the Windows Update services ——
call :print Stopping the Windows Update services.
net stop bitscall :print Stopping the Windows Update services.
net stop wuauservcall :print Stopping the Windows Update services.
net stop appidsvccall :print Stopping the Windows Update services.
net stop cryptsvccall :print Canceling the Windows Update process.
taskkill /im wuauclt.exe /f
:: —— Checking the services status ——
call :print Checking the services status.sc query bits | findstr /I /C:»STOPPED»
if %errorlevel% NEQ 0 (
echo. Failed to stop the BITS service.
echo.
echo.Press any key to continue . . .
pause>nul
goto :eof
)call :print Checking the services status.
sc query wuauserv | findstr /I /C:»STOPPED»
if %errorlevel% NEQ 0 (
echo. Failed to stop the Windows Update service.
echo.
echo.Press any key to continue . . .
pause>nul
goto :eof
)call :print Checking the services status.
sc query appidsvc | findstr /I /C:»STOPPED»
if %errorlevel% NEQ 0 (
sc query appidsvc | findstr /I /C:»OpenService FAILED 1060″
if %errorlevel% NEQ 0 (
echo. Failed to stop the Application Identity service.
echo.
echo.Press any key to continue . . .
pause>nul
if %family% NEQ 6 goto :eof
)
)call :print Checking the services status.
sc query cryptsvc | findstr /I /C:»STOPPED»
if %errorlevel% NEQ 0 (
echo. Failed to stop the Cryptographic Services service.
echo.
echo.Press any key to continue . . .
pause>nul
goto :eof
):: —— Delete the qmgr*.dat files ——
call :print Deleting the qmgr*.dat files.del /s /q /f «%ALLUSERSPROFILE%\Application Data\Microsoft\Network\Downloader\qmgr*.dat»
del /s /q /f «%ALLUSERSPROFILE%\Microsoft\Network\Downloader\qmgr*.dat»:: —— Renaming the softare distribution folders backup copies ——
call :print Deleting the old software distribution backup copies.cd /d %SYSTEMROOT%
if exist «%SYSTEMROOT%\winsxs\pending.xml.bak» (
del /s /q /f «%SYSTEMROOT%\winsxs\pending.xml.bak»
)
if exist «%SYSTEMROOT%\SoftwareDistribution.bak» (
rmdir /s /q «%SYSTEMROOT%\SoftwareDistribution.bak»
)
if exist «%SYSTEMROOT%\system32\Catroot2.bak» (
rmdir /s /q «%SYSTEMROOT%\system32\Catroot2.bak»
)
if exist «%SYSTEMROOT%\WindowsUpdate.log.bak» (
del /s /q /f «%SYSTEMROOT%\WindowsUpdate.log.bak»
)call :print Renaming the software distribution folders.
if exist «%SYSTEMROOT%\winsxs\pending.xml» (
takeown /f «%SYSTEMROOT%\winsxs\pending.xml»
attrib -r -s -h /s /d «%SYSTEMROOT%\winsxs\pending.xml»
ren «%SYSTEMROOT%\winsxs\pending.xml» pending.xml.bak
)
if exist «%SYSTEMROOT%\SoftwareDistribution» (
attrib -r -s -h /s /d «%SYSTEMROOT%\SoftwareDistribution»
ren «%SYSTEMROOT%\SoftwareDistribution» SoftwareDistribution.bak
if exist «%SYSTEMROOT%\SoftwareDistribution» (
echo.
echo. Failed to rename the SoftwareDistribution folder.
echo.
echo.Press any key to continue . . .
pause>nul
goto :eof
)
)
if exist «%SYSTEMROOT%\system32\Catroot2» (
attrib -r -s -h /s /d «%SYSTEMROOT%\system32\Catroot2»
ren «%SYSTEMROOT%\system32\Catroot2» Catroot2.bak
)
if exist «%SYSTEMROOT%\WindowsUpdate.log» (
attrib -r -s -h /s /d «%SYSTEMROOT%\WindowsUpdate.log»
ren «%SYSTEMROOT%\WindowsUpdate.log» WindowsUpdate.log.bak
):: —— Reset the BITS service and the Windows Update service to the default security descriptor ——
call :print Reset the BITS service and the Windows Update service to the default security descriptor.sc.exe sdset wuauserv D:(A;;CCLCSWLOCRRC;;;AU)(A;;CCDCLCSWRPWPDTLOCRSDRCWDWO;;;BA)(A;;CCDCLCSWRPWPDTLCRSDRCWDWO;;;SO)(A;;CCLCSWRPWPDTLOCRRC;;;SY)S:(AU;FA;CCDCLCSWRPWPDTLOCRSDRCWDWO;;WD)
sc.exe sdset bits D:(A;;CCLCSWLOCRRC;;;AU)(A;;CCDCLCSWRPWPDTLOCRSDRCWDWO;;;BA)(A;;CCDCLCSWRPWPDTLCRSDRCWDWO;;;SO)(A;;CCLCSWRPWPDTLOCRRC;;;SY)S:(AU;FA;CCDCLCSWRPWPDTLOCRSDRCWDWO;;WD)
sc.exe sdset cryptsvc D:(A;;CCLCSWLOCRRC;;;AU)(A;;CCDCLCSWRPWPDTLOCRSDRCWDWO;;;BA)(A;;CCDCLCSWRPWPDTLCRSDRCWDWO;;;SO)(A;;CCLCSWRPWPDTLOCRRC;;;SY)S:(AU;FA;CCDCLCSWRPWPDTLOCRSDRCWDWO;;WD)
sc.exe sdset trustedinstaller D:(A;;CCLCSWLOCRRC;;;AU)(A;;CCDCLCSWRPWPDTLOCRSDRCWDWO;;;BA)(A;;CCDCLCSWRPWPDTLCRSDRCWDWO;;;SO)(A;;CCLCSWRPWPDTLOCRRC;;;SY)S:(AU;FA;CCDCLCSWRPWPDTLOCRSDRCWDWO;;WD):: —— Reregister the BITS files and the Windows Update files ——
call :print Reregister the BITS files and the Windows Update files.cd /d %SYSTEMROOT%\system32
regsvr32.exe /s atl.dll
regsvr32.exe /s urlmon.dll
regsvr32.exe /s mshtml.dll
regsvr32.exe /s shdocvw.dll
regsvr32.exe /s browseui.dll
regsvr32.exe /s jscript.dll
regsvr32.exe /s vbscript.dll
regsvr32.exe /s scrrun.dll
regsvr32.exe /s msxml.dll
regsvr32.exe /s msxml3.dll
regsvr32.exe /s msxml6.dll
regsvr32.exe /s actxprxy.dll
regsvr32.exe /s softpub.dll
regsvr32.exe /s wintrust.dll
regsvr32.exe /s dssenh.dll
regsvr32.exe /s rsaenh.dll
regsvr32.exe /s gpkcsp.dll
regsvr32.exe /s sccbase.dll
regsvr32.exe /s slbcsp.dll
regsvr32.exe /s cryptdlg.dll
regsvr32.exe /s oleaut32.dll
regsvr32.exe /s ole32.dll
regsvr32.exe /s shell32.dll
regsvr32.exe /s initpki.dll
regsvr32.exe /s wuapi.dll
regsvr32.exe /s wuaueng.dll
regsvr32.exe /s wuaueng1.dll
regsvr32.exe /s wucltui.dll
regsvr32.exe /s wups.dll
regsvr32.exe /s wups2.dll
regsvr32.exe /s wuweb.dll
regsvr32.exe /s qmgr.dll
regsvr32.exe /s qmgrprxy.dll
regsvr32.exe /s wucltux.dll
regsvr32.exe /s muweb.dll
regsvr32.exe /s wuwebv.dll:: —— Resetting Winsock ——
call :print Resetting Winsock.
netsh winsock reset:: —— Resetting WinHTTP Proxy ——
call :print Resetting WinHTTP Proxy.if %family% EQU 5 (
proxycfg.exe -d
) else (
netsh winhttp reset proxy
):: —— Set the startup type as automatic ——
call :print Resetting the services as automatics.
sc.exe config wuauserv start= auto
sc.exe config bits start= delayed-auto
sc.exe config cryptsvc start= auto
sc.exe config TrustedInstaller start= demand
sc.exe config DcomLaunch start= auto:: —— Starting the Windows Update services ——
call :print Starting the Windows Update services.
net start bitscall :print Starting the Windows Update services.
net start wuauservcall :print Starting the Windows Update services.
net start appidsvccall :print Starting the Windows Update services.
net start cryptsvccall :print Starting the Windows Update services.
net start DcomLaunch:: —— End process ——
call :print The operation completed successfully.echo.Press any key to continue . . .
pause>nul
goto :eof
:: /*************************************************************************************/
Ни в коем случае ничего не меняйте в скрипте! Если вы поставите хотя один лишний пробел, точку или другой символ, то скрипт попросту потеряет свою полезность. Скопировали и вставили в текстовик — готово. Ок, теперь сохраните внесенные изменения в текстовый файл, нажмите на него ПКМ и выберите переименовать. Измените расширение файла с .txt на .bat.
Заметка: если в вашей ОС деактивирована функция показа расширений файлов, то вам нужно включить ее самостоятельно. Для этого откройте Проводник системы, перейдите во вкладку Вид и поставьте галочку возле опции Расширения имен файлов.
Нажмите ПКМ на созданный файл и выберите Запуск от имени администратора. И… на этом все. Созданный вами «батник» в автоматическом режиме сбросит все компоненты Центра обновления Windows 10. Перезагрузите компьютер и попробуйте обновить свою систему еще раз. Ошибка 0xc1900201 наверняка исчезла, если проблема действительно заключалась в поврежденных компонентах ЦО.
Метод №3 Завершение переноса ОС с HDD на SSD
Многие пользователи клонируют уже обжитую ОС, чтобы перенести ее со старенького жесткого диска на современный, быстрый твердотельный накопитель. Тем не менее во время процесса клонирования и переноса ОС может пойти что-то не так, вследствие чего система работает не совсем корректно. Возможно, ошибка 0xc1900201 как раз и стала результатом не самого удачного клонирования ОС.
Как утверждают некоторые пользователи в сети, данную проблему можно устранить, изменив параметр PortableOperatingSystem в реестре клонированной системе на 0. Сейчас мы покажем вам, как поменять значение для этого параметра.
- нажмите Win+R;
- пропишите в пустой строке regedit.msc и нажмите Enter;
- перейдите через навигационную строку по ветке Computer\HKEY_LOCAL_MACHINE\SYSTEM\CurrentControlSet\Control;
- нажмите ПКМ на параметр PortableOperatingSystem и выберите Изменить;
- выберите шестнадцатеричную систему исчисления и измените значение параметра на 0;
- сохраните изменения в реестре системы и перезагрузите компьютер.
Метод №4 Запуск утилиты DISM
Если никакие из вышеуказанных методов не работают и ошибка 0xc1900201 все еще донимает вас, то мы советуем воспользоваться утилитой Deployment Image Servicing and Management (DISM). Ваша задача — восстановить прежний образ системы, починить ее поврежденные компоненты. Вот что вам нужно сделать:
- нажмите Win+R;
- впишите в пустую строку cmd и нажмите Ctrl+Shift+Enter;
- вставьте команду DISM /Online /Cleanup-Image /RestoreHealth и нажмите Enter;
- дождитесь окончания работы команды и перезагрузите компьютер.
По входу в систему запустите обновление Windows 10 через ЦО и посмотрите, исчезла ли ошибка 0xc1900201 или нет. Ну а если и это не помогло, то остается попробовать удалить последние обновление, вернуть компьютер в исходное состояние либо полностью переустановить операционную систему. Удачи!
При установке Windows 11 многие пользователи сталкиваются с кодом ошибки 0x1900201, который может помешать успешному завершению процесса установки. Эта ошибка может возникать по разным причинам и требует немедленного решения, чтобы пользователь мог получить доступ к новой операционной системе.
Одной из основных причин появления ошибки 0x1900201 при установке Windows 11 является несовместимость оборудования компьютера с требованиями новой операционной системы. Windows 11 имеет определенные требования к процессору, объему оперативной памяти, видеокарте и т. д. Если компьютер не соответствует этим требованиям, то установка Windows 11 может столкнуться с проблемами.
Другой возможной причиной ошибки 0x1900201 является наличие установленного на компьютере антивирусного программного обеспечения, которое блокирует установку новой операционной системы. Некоторые антивирусные программы могут считать процесс установки подозрительным и препятствовать его завершению, чтобы защитить компьютер от возможных угроз.
Существуют различные способы решения проблемы с кодом ошибки 0x1900201 при установке Windows 11. Один из таких способов — обновление драйверов для оборудования компьютера. Иногда устаревшие драйверы могут вызывать конфликты и препятствовать установке операционной системы. Поэтому важно проверить наличие последних версий драйверов и установить их перед повторной попыткой установки Windows 11.
Также рекомендуется временно отключить антивирусное программное обеспечение перед установкой Windows 11. Для этого можно воспользоваться инструкцией по отключению антивируса на сайте разработчика. После завершения установки операционной системы можно снова включить антивирусное ПО или установить альтернативную программу, совместимую с Windows 11.
Причины возникновения ошибки 0x1900201 при установке Windows 11
Ошибка 0x1900201, которая может возникнуть при установке операционной системы Windows 11, может быть вызвана несколькими причинами.
1. Неподдерживаемое оборудование. Одной из основных причин возникновения ошибки 0x1900201 является неподдержка установки Windows 11 на вашем компьютере. Новая операционная система имеет определенные требования к оборудованию, и если ваш компьютер не соответствует им, то установка может быть невозможна. Например, для установки Windows 11 требуется 64-битный процессор с поддержкой набора инструкций x86-64 или ARM64, 4 ГБ оперативной памяти, 64 ГБ свободного места на жестком диске и поддержка TPM версии 2.0.
2. Отсутствие обновлений. Если у вас установлена предыдущая версия Windows и вы не обновляли ее до последней доступной версии, то это может привести к возникновению ошибки 0x1900201. Перед установкой Windows 11 рекомендуется установить все доступные обновления для текущей операционной системы.
3. Проблемы с драйверами. Несовместимость или устаревшие драйверы устройств могут вызвать ошибку 0x1900201 при установке Windows 11. Рекомендуется обновить все драйверы до последних версий перед установкой новой операционной системы. Это можно сделать, посетив официальные веб-сайты производителей оборудования и загрузив самые новые драйверы для вашего оборудования.
4. Программное обеспечение сторонних производителей. Некоторые программы сторонних производителей могут быть несовместимы с Windows 11 и вызывать ошибку 0x1900201 при установке. Рекомендуется отключить или удалить такие программы перед установкой новой операционной системы.
5. Низкая скорость интернета. Если у вас низкая скорость интернета, то загрузка файлов для установки Windows 11 может занимать слишком много времени и вызвать ошибку 0x1900201. Рекомендуется проверить скорость вашего интернет-соединения и убедиться, что она достаточно высока для загрузки больших файлов.
В случае возникновения ошибки 0x1900201 при установке Windows 11 можно попробовать решить проблему, следуя указанным рекомендациям. Однако, если ничего не помогает, возможно, ваш компьютер не удовлетворяет требованиям новой операционной системы, и вам придется обновить или заменить свое оборудование.
Способы решения ошибки 0x1900201 при установке Windows 11
Ошибка 0x1900201 при установке Windows 11 может возникать по разным причинам и может привести к тому, что операционная система не устанавливается или процесс установки прерывается. В данной статье рассмотрим несколько способов решения данной ошибки.
-
Проверьте системные требования.
Перед установкой Windows 11 убедитесь, что ваш компьютер соответствует всем системным требованиям новой операционной системы. Проверьте, что у вас установлен процессор с поддержкой TPM 2.0, имеется достаточный объем оперативной памяти и свободное место на жестком диске.
-
Обновите BIOS и драйверы.
Попробуйте обновить BIOS вашего компьютера и установить последние версии драйверов для всех устройств. Некорректно работающее оборудование может вызывать ошибку 0x1900201 при установке операционной системы. Обновление BIOS и драйверов может решить эту проблему.
-
Отключите антивирусное программное обеспечение и другое защитное ПО.
Антивирусное программное обеспечение и другие защитные программы могут мешать процессу установки Windows 11 и вызывать ошибку 0x1900201. Попробуйте временно отключить антивирусное ПО или другие защитные программы перед установкой операционной системы.
-
Проверьте подключенные устройства.
Отключите все лишние устройства, подключенные к компьютеру, кроме основной клавиатуры и мыши. Некоторые несовместимые или неисправные устройства могут вызывать ошибку 0x1900201 при установке Windows 11. Попробуйте установить операционную систему с минимальным набором подключенных устройств.
-
Воспользуйтесь утилитой Media Creation Tool.
Если приведенные выше способы не помогли решить проблему, попробуйте воспользоваться утилитой Media Creation Tool от Microsoft. С помощью этой утилиты вы сможете создать загрузочный USB-накопитель (флешку), с помощью которого можно установить операционную систему Windows 11. Запустите утилиту, выберите опцию «Создание установочных носителей (USB флеш-накопитель, DVD или ISO-файл) для другого компьютера», следуйте инструкциям и попробуйте установить Windows 11 с использованием созданного установочного носителя.
The Windows update error 0xc1900201 pops up when the users try to install the latest upgrade, especially the Windows 11 22H2 upgrade. The error is accompanied by the statement, ‘We couldn’t update the system reserved partition.’
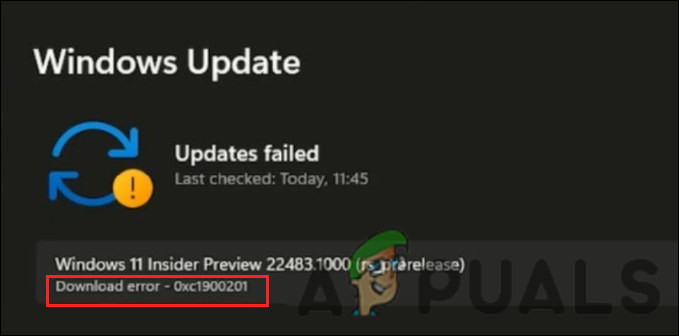
In most cases, the error is caused when the System Reserved Partition (SRP) becomes full. System Reserve Partitions (SRPs) are hard drive partitions that store boot information for Windows. This guide will walk you through the troubleshooting methods that fixed the issue for other users.
1. Resize the Partition
This error is caused when the System Reserve Partition (SRP) becomes full and does not have space for the update. This is why the most appropriate troubleshooting method to start is by resizing the partition.
We will remove the folders not often used to create the required space.
Here is all that you need to do:
- Open the Run program, and Press the Win + R keys together.
- Type diskmgmt.msc in Run and click Enter.
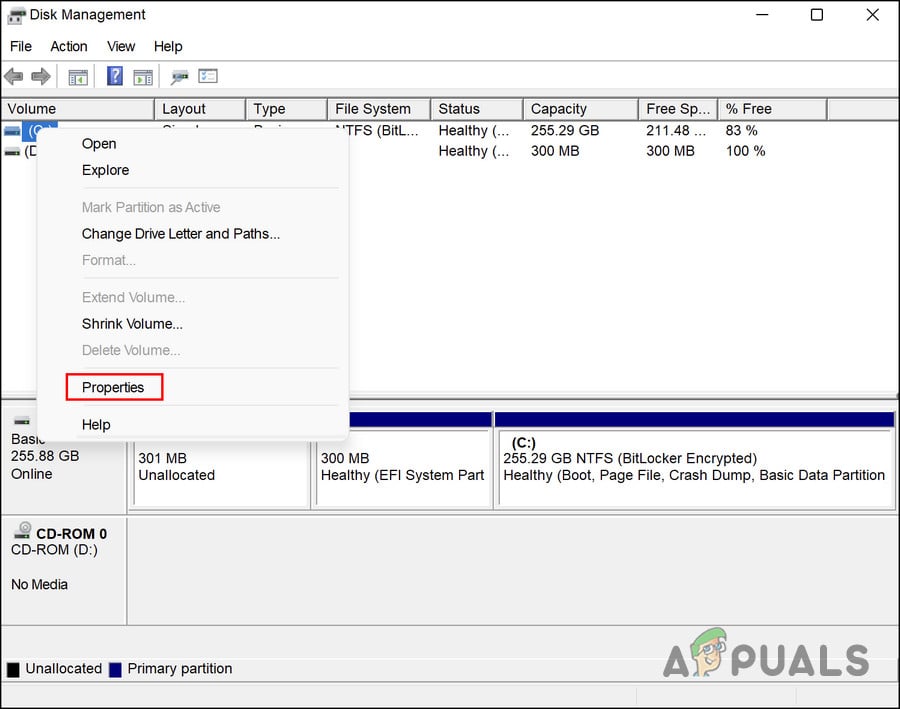
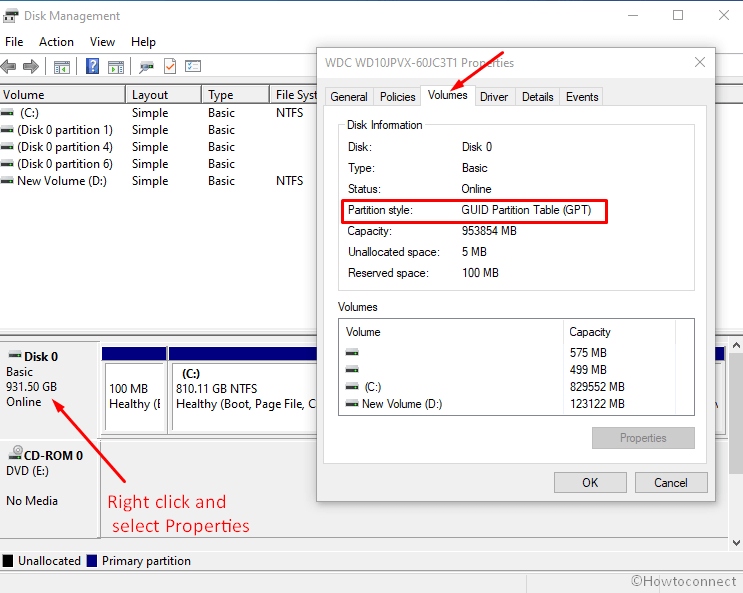
- In the following window, right-click on the disk that contains SRP and choose Properties from the context menu.

Access the properties of the drive - Head over to the Volume tab and check your partition style. It will either be GUID Partition Table (GPT) or Master Boot Record (MBR).
1st Scenario: GPT Partition
If you have a GPT partition, proceed with the following methods:
- Press Win + R to open Run.
- Type cmd in Run and press Ctrl + Shift + Enter to open Command Prompt as an administrator.
- Alternatively, you can type cmd in the search area of the taskbar and choose Run as administrator.
- Click Yes in the User Account Control prompt.
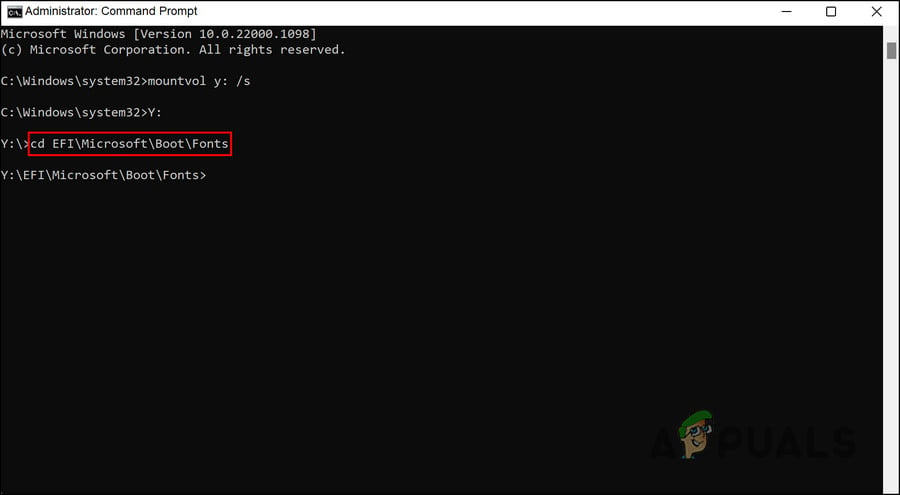
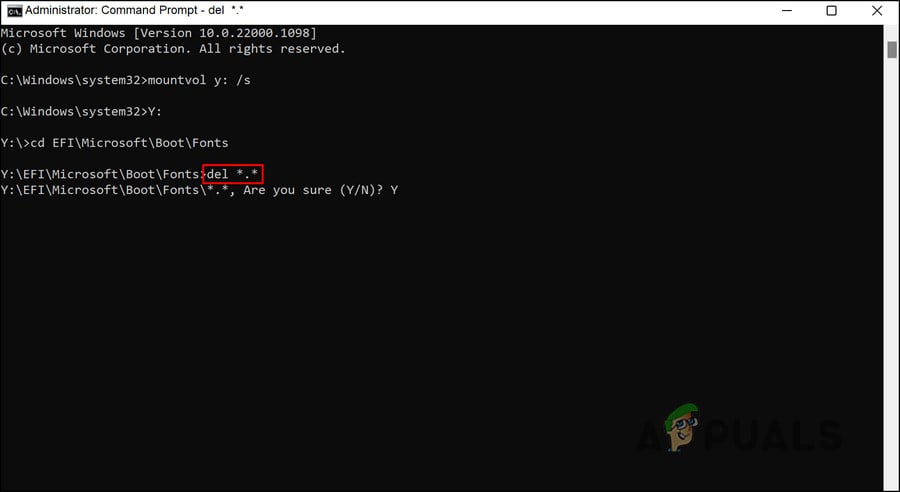
- Now, type the following command in Command Prompt and hit Enter to execute it. By doing so, you will add the Y: driver letter to access the System Partition.
mountvol y: /s
- Now, type Y: and hit Enter.
- Once done, type the following to open the Fonts folder. This is the folder that we will be removing.
cd EFI\Microsoft\Boot\Fonts

Execute the entered command - Now, type del *.* to delete font files.

Delete the fonts folder - If asked to confirm the action, type Y and hit Enter.
You can now try installing the targeted update without any problems.
2nd Scenario: MBR Partition
If you have an MBR partition, the process will be slightly different and longer. Follow these steps to proceed:
- Press Win + R to open Run.
- Type diskmgmt.msc in Run and click Enter.
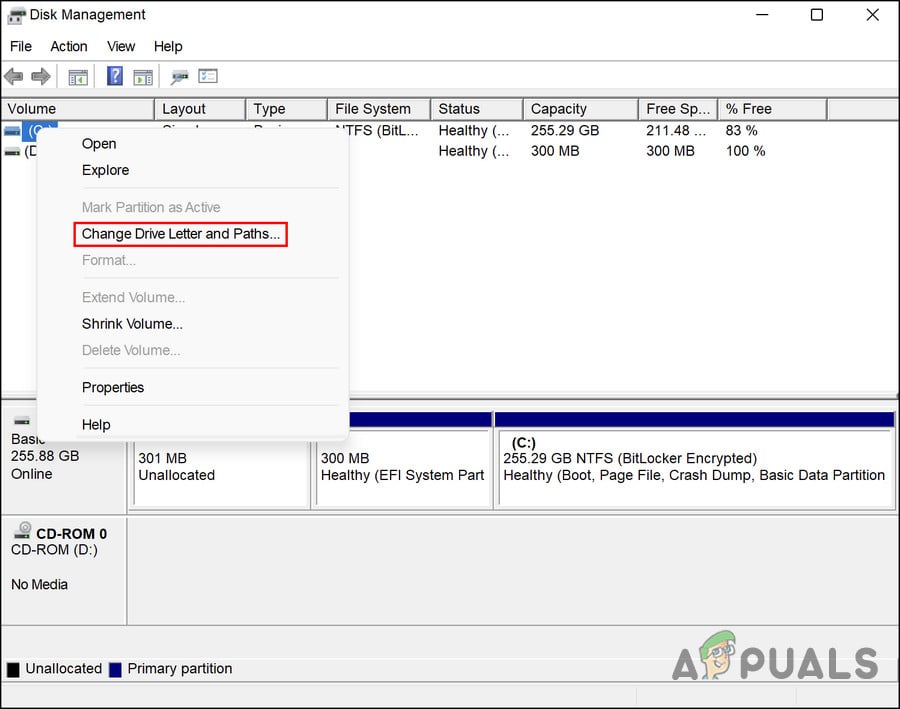
- Right-click on the partition marked as System Reservice.
- Choose Change Drive Letter and Paths and then click on Add.
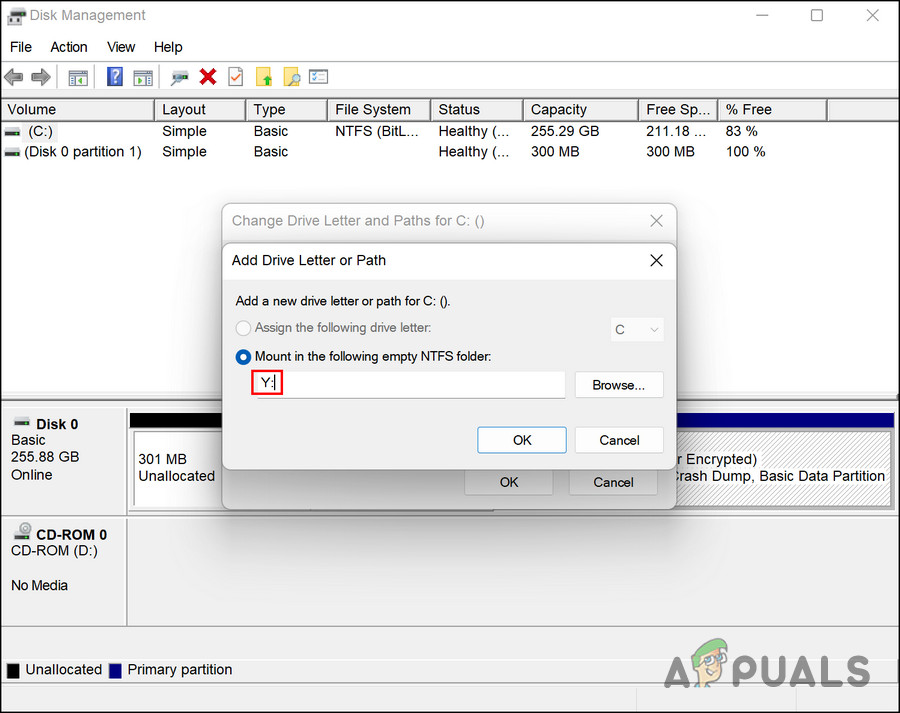
Change the drive letter and its path - Enter Y: as the driver letter and click OK.

Enter a drive letter - Now, type cmd in the search area of the taskbar and click on Run as administrator.
- Click Yes in the User Account Prompt.
- Once you are inside the Command Prompt window, type Y: and click Enter. This will make you switch to that drive.
- Now, execute the following command to head over to the Fonts folder:
cd Boot\Fonts
- Next, execute this command:
takeown /d y /r /f .
- To backup the permission to the drive, execute the following command:
icacls Y:\* /save %systemdrive%\NTFSp.txt /c /t
- Type whoami and hit Enter. Note down the username.
- Then, execute this command:
icacls . /grant <username you got from whoami>:F /t
- Type del *.* to delete font files.
- To confirm the action, type Y and hit Enter.
Once this is done, you can restore the permissions of the drive by following these steps:
- In Command Prompt, execute the following command. If there are no successful files, then the command was executed incorrectly; you need to process some files before continuing.
icacls Y:\ /restore %systemdrive%\NTFSp.txt /c /t
- Execute the following code to adjust the ACL back to the System:
icacls . /grant system:f /t
- Using the following command, revert the drive’s ownership to System:
icacls Y: /setowner “SYSTEM” /t /c

Revert drive’s ownership - Now, head back to Disk Management and refresh the data. This will confirm if the SRP finally has enough free space.
- If it does, right-click on the System Reserved Partition and choose Change Drive Letter and Paths.
- Click on the Y: drive and choose Remove.
- Finally, hit OK and close the Disk Management window.

Once this is done, you can try to install the update again. Hopefully, you will be able to do it without any issues this time.
2. Perform a Reset or a Repair Install
By this point, you have not found a viable solution, which suggests that the problem cannot be fixed using conventional troubleshooting methods. Moving forward, you have two options.
You can restore Windows to its default state if you want to give your system a fresh start. With this method, you will remove all the applications you installed yourself. It will restore your Windows to its state when you purchase it.
The second option is a repair installation, which replaces all Windows files with fresh copies. However, this will not affect your files or programs.
Generally, both methods are believed to solve the problem, so you can choose whichever method you prefer.

Zainab Falak
Zainab Falak is a highly educated professional with a background in actuarial science and a strong passion for technology. Her expertise lies in the field of data analytics and she is a proficient programmer in languages such as Python and R. At Appuals, Zainab shares her extensive knowledge of Windows 8, 10, and 11, covering a broad range of topics related to these operating systems. Zainab’s ability to effectively communicate technical concepts in a clear and concise manner has earned her recognition and respect in the tech community. She is committed to staying up-to-date with the latest developments in the field and providing readers with insightful and informative content.
Sometimes, you might find error 0xc1900201 with a message “We couldn’t update system reserved partition”. This issue commonly occurs when trying to upgrade the Windows 11 or 10 and System Reserved Partition is either full or written by a 3rd party antimalware app.
The error code might appear with update or upgrade failure in Windows 10 20H2, 2004, 21H1, and some of the Windows 11 versions. However, you can repair this System reserve aka SRP problem very easily.
Here is how to fix error code 0xc1900201 We couldn’t update system reserved partition in Windows 11/10 –
The main factor for this problem is the filled System partition, therefore, freeing the space will help you resolve it. You need to delete at least 15 MB from the partition so that the upgradation might end up successfully. Fonts folder existing in the Boot folder is greater than 15 MB and removing this will work in this case. This method includes 3 steps – 1. Determine the SRP partition type (MBR or GPT), 2. Delete in MBR and 3. Delete in GPT. make sure that you are aware of executing the command
a) Determine whether the system reserve partition is MBR OR GPT –
- Press – Winkey.
- Type – diskmgmt.msc.
- Press – Enter.
- Right click on – Disk 0.
- Select – Properties.
- Click the tab saying – Volumes.
- Now, you can see – The Partition Style: GUID Partition Table (GPT) or Master Boot Record (MBR).
If the partition is GPT
- Click the – Start.
- Type in – cmd.
- From the right of the result flyout, select – Run as administrator.
- Choose – Yes on the User account control prompt.
- Copy mountvol y: /s from here, paste into the command prompt (you can use right-click).
- Press – Enter.
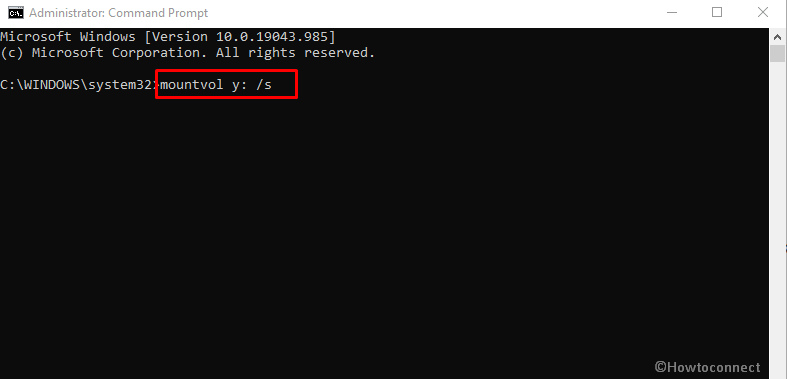
- As a result, this command-line will add the “Y: drive letter” to access the Partition.
- Type Y: and hit Enter in order to switch to the Y drive.
- Paste cd EFI\Microsoft\Boot\Fonts and press “Enter”.
- Type del *.* to delete font files. The system may ask if you are sure to continue, press Y and then Enter. This will fix error code 0xc1900201 We couldn’t update system reserved partition in Windows 11 and 10.
To fix error 0xc1900201 If the partition is MBR
- Open run dialog box by hitting Windows key and R together.
- Write – diskmgmt.msc.
- Press the – Enter.
- Right-click on the partition showing a System Reserve.
- Choose – Change Drive Letter and Paths.
- Click – Add.
- Type Y for the drive letter.
- Click the – OK.
- Open Command Prompt as Administrator as said in the above method.
- Type – Y:
- Hit the – enter.
- Next, type – cd Boot\Fonts and hit – ‘enter’.
- Now, Type takeown /d y /r /f and press Enter. Important – For the command to work correctly put space and period after the “f”.
- In order to back up the permission to the drive run the following command –
icacls Y:\* /save %systemdrive%\NTFSp.txt /c /t
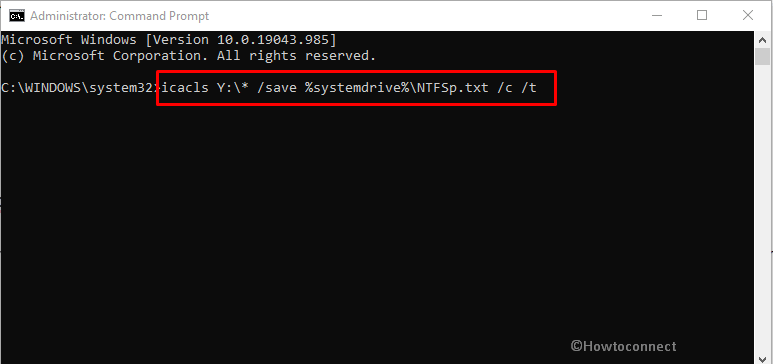
Important: Make sure that you can see ‘successful’ for all files and none is showing failed.
- Copy whoami paste in the prompt and press Enter.
- Note down the user name.
- Run the following command –
icacls . /grant <username you got from whoami>:F /t
Important: This time, don’t put a space between the username and “:F”, or the command won’t work.
- Ensure that you are still in Fonts location (Y:\Boot\Fonts).
- Type del *.*.
- You may be asked – Are you sure to continue, press Y, and then enter.
- To bring back the permissions type the following command and hit Enter –
icacls Y:\ /restore %systemdrive%\NTFSp.txt /c /t
- You may notice a message hinting that some files failed while processing. This is normal as these files have been deleted subsequent to backing them up.
- If the amount of successful files is none, then the command was executed incorrectly; you must have some files successfully processed before continuing.
- Adjust the ACL back to System by copying-pasting the following and pressing Enter:
icacls . /grant system:f /t
- Set the owner of the drive back to System by typing the underneath command and hitting Enter:
icacls Y: /setowner “SYSTEM” /t /c
- Go back to Disk Management and select Action -> Refresh
- Ensure that the percentage of free space in the System reserved partition (SRP) is more.
- Now, Right-click the System Reserved Partition.
- Click the – Change Drive Letter and Paths.
- Select the – Y: drive.
- Click – Remove.
- Choose – OK to solve error code 0xc1900201.
That’s all!!
Repair any Windows problems such as Blue/Black Screen, DLL, Exe, application, Regisrty error and quickly recover system from issues using Reimage.