Ошибка 80246008 возникает во время обновления операционных систем Windows 7 и Windows 10. Впрочем, на последней ОС код ошибки приобретает несколько иной вид: 0x80246008. Так в чем же проблема? А проблема, как правило, заключается в некорректной работе служб «Background Intelligent Transfer Service (BITS)» и «Системы событий COM+ (COM+ Event System)».
В сегодняшней статье мы покажем вам, как поднять на ноги вышеуказанные службы, чтобы ваша ОС могла нормально обновиться.
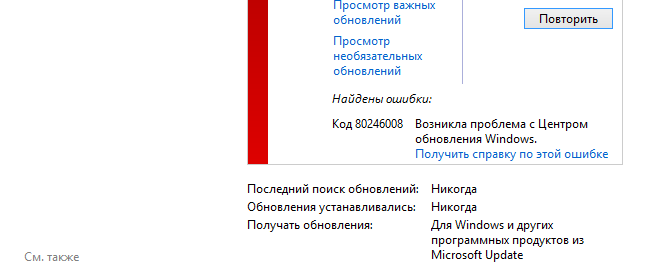
Как избавиться от ошибки 80246008 при обновлении Windows
- Нажмите на клавиатуре WIN+R для вызова окна «Выполнить».
- Пропишите в пустой строке значение «services.msc» и нажмите ENTER.
- Найдите в предоставленном списке «Фоновую интеллектуальную службу передачи (BITS)» и дважды кликните на нее ЛКМ.
- Оказавшись в свойствах службы, выберите в ниспадающем меню типа запуска значение «Автоматически».
- Если в строке состояние службы будет указано, что она остановлена, нажмите «Запустить».
- Теперь найдите в списке службу «Система событий COM+» и нажмите на нее ЛКМ, чтобы перейти в ее свойства.
- Выберите в ниспадающем меню типа запуска значение «Автоматически (отложенный запуск)».
- Перезагрузите свой ПК и проверьте, исчезла ли ошибка во время апдейта Windows. Если ничего не изменилось, переходите к 9 шагу.
- Нажмите на клавиатуре WIN+R для вызова окна «Выполнить».
- Вставьте в пустую строку окна значение «cmd» и нажмите комбинацию CTRL+SHIFT+ENTER.
- Чтобы сбросить компоненты Центра обновления Windows, выполните в консоли следующий набор команд:
- net stop bits
- net stop wuauserv
- net stop appidsvc
- net stop cryptsvc
- Del «%ALLUSERSPROFILE%\Application Data\Microsoft\Network\Downloader\qmgr*.dat»
- Ren %systemroot%\SoftwareDistribution SoftwareDistribution.bak
- Ren %systemroot%\system32\catroot2 catroot2.bak
- net start bits
- net start wuauserv
- net start appidsvc
- net start cryptsvc
- Снова вызовите перед собой окошко «Выполнить», после чего вставьте в пустую строку значение «C:\ProgramData\Microsoft\Network\Downloader» (без кавычек) и нажмите ENTER.
- Удалите абсолютно (!) все файлы из папки «Downloader» (вы только что в нее перешли).
- Скачайте из какого-то проверенного источника в сети Microsoft FixIt 50202 (к сожалению, Майкрософт прекратила официальную поддержку этого средства).
- Загрузив средство FixIt 50202, запустите его от имени администратора и выберите «Aggressive Mode» (агрессивный режим).
- Как только средство закончит свою работу, удалите со своего компьютера все сторонние программы для защиты ОС, мониторинга сетевого трафика и ускорения загрузки файлов из Интернета. Вы сможете установить их снова, но только тогда, когда избавитесь от ошибки 80246008.
- Загрузите следующие два REG-файла и сохраните их у себя на Рабочем столе:
- https://download.bleepingcomputer.com/win-services/7/BITS.reg
- https://cdn.discordapp.com/attachments/736655722967990293/861235181582549003/eventsystemwin7.reg
- Теперь загрузите PSTools по следующей ссылке.
- Еще раз вызовите окошко «Выполнить», пропишите в пустой строке «c:\windows\system32» и нажмите ENTER.
- Поместите скачанный в пункте 18 файл psexec.exe и переместите его в открытую папку «system32».
- Вызовите перед собой Командную строку, как это было продемонстрировано выше, и выполните в ней команду «psexec -s -i -d regedit».
- Далее нажмите WIN+R, чтобы открыть «Выполнить», пропишите в пустой строке «regedit» и нажмите ENTER для открытия редактора реестра.
- Кликните на пункт «Файл» в строке меню окна редактора реестра и выберите «Импорт…».
- Выберите файлы «BITS.reg» и «eventsystemwin7.reg», сохраненные на вашем Рабочем столе, и нажмите «Открыть».
- Перезагрузите свой ПК в последний раз.
Если вы сделали все по инструкции, ошибка 80246008 должна исчезнуть из Центра обновления вашей Windows.
Если вы столкнулись с ошибкой Центра обновления Windows 80246008, это означает, что есть проблемы с фоновой интеллектуальной службой передачи или с системой событий COM +. Ни одна из этих служб не может запуститься, что важно для работы Центра обновления Windows и, следовательно, ошибки. Хотя иногда ошибка конфигурации с BITS может вызвать вышеуказанную проблему, как вы видите, есть разные причины, но все они связаны с BITS. Поэтому, не теряя времени, давайте посмотрим, как на самом деле исправить ошибку Центра обновления Windows 80246008 с помощью приведенного ниже руководства по устранению неполадок.
СОДЕРЖАНИЕ
- Исправить ошибку Центра обновления Windows 80246008
- Метод 1. Убедитесь, что службы системы событий BITS и COM + работают
- Метод 2: исправление реестра
- Метод 3. Запустите средство устранения неполадок Центра обновления Windows.
- Метод 4: сбросить компоненты Центра обновления Windows
Обязательно создайте точку восстановления на случай, если что-то пойдет не так.
Метод 1. Убедитесь, что службы системы событий BITS и COM + работают
1. Нажмите клавиши Windows + R, введите services.msc и нажмите Enter.

2. Теперь найдите BITS и COM + Event System Services, затем дважды щелкните по каждой из них.
3. Убедитесь, что для параметра Тип запуска установлено значение « Автоматически» и все вышеперечисленные службы запущены. Если нет, нажмите кнопку « Пуск» .

4. Щелкните Применить, а затем ОК.
5. Перезагрузите компьютер и снова попробуйте обновить Windows.
Метод 2: исправление реестра
1. Откройте Блокнот и скопируйте содержимое ниже как есть:
Редактор реестра Windows версии 5.00
[HKEY_LOCAL_MACHINE \ SYSTEM \ CurrentControlSet \ services \ BITS] «DisplayName» = »@% SystemRoot% \\ system32 \\ qmgr.dll, -1000»
«ImagePath» = шестнадцатеричный (2): 25,00, 53,00,79,00,73,00,74,00,65,00,6d, 00,52,00,6f, 00,6f, 00, \
74,00,25,00,5c, 00,53 , 00,79,00,73,00,74,00,65,00,6d, 00,33,00,32,00,5c, 00,73, \
00,76,00,63,00,68, 00,6f, 00,73,00,74,00,2e, 00,65,00,78,00,65,00,20,00,2d, 00, \
6b, 00,20,00,6e, 00 , 65,00,74,00,73,00,76,00,63,00,73,00,00,00
«Описание» = »@% SystemRoot% \\ system32 \\ qmgr.dll, -1001»
« ObjectName »=« LocalSystem »
« ErrorControl »= dword: 00000001
« Start »= dword: 00000002
« DelayedAutoStart »= dword: 00000001
« Type »= dword: 00000020
«DependOnService» = hex (7): 52,00,70,00,63,00,53,00,73,00,00,00,45,00,76,00,65,00, \
6e, 00, 74,00,53,00,79,00,73,00,74,00,65,00,6d, 00,00,00,00,00
« ServiceSidType » = dword: 00000001
«RequiredPrivileges» = hex (7) : 53,00,65,00,43,00,72,00,65,00,61,00,74,00,65,00,47, \
00,6c, 00,6f, 00,62,00, 61,00,6c, 00,50,00,72,00,69,00,76,00,69,00,6c, 00,65,00, \
67,00,65,00,00,00,53 , 00,65,00,49,00,6d, 00,70,00,65,00,72,00,73,00,6f, 00,6e, \
00,61,00,74,00,65, 00,50,00,72,00,69,00,76,00,69,00,6c, 00,65,00,67,00,65,00, \
00,00,53,00,65,00 , 54,00,63,00,62,00,50,00,72,00,69,00,76,00,69,00,6c, 00,65, \
00,67,00,65,00, 00,00,53,00,65,00,41,00,73,00,73,00,69,00,67,00,6e, 00,50,00, \
72,00,69,00,6d , 00,61,00,72,00,79,00,54,00,6f, 00,6b, 00,65,00,6e, 00,50,00,72, \
00,69,00,76,00,69,00,6c, 00,65,00,67,00,65,00,00,00,53,00,65,00,49,00,6e, 00, \
63,00,72,00,65,00,61,00,73,00,65,00,51,00,75,00,6f, 00,74,00,61,00,50,00,72 , \
00,69,00,76,00,69,00,6c, 00,65,00,67,00,65,00,00,00,00,00
«FailureActions» = шестнадцатеричный: 80,51,01 , 00,00,00,00,00,00,00,00,00,03,00,00,00,14,00,00, \
00,01,00,00,00,60, шт., 00, 00,01,00,00,00, c0, d4,01,00,00,00,00,00,00,00,00,00
[HKEY_LOCAL_MACHINE \ SYSTEM \ CurrentControlSet \ services \ BITS \ Parameters] «ServiceDll» = шестнадцатеричный (2): 25,00,53,00,79,00,73,00,74,00,65,00,6d, 00,52,00,6f, 00,6f, \
00,74,00, 25,00,5c, 00,53,00,79,00,73,00,74,00,65,00,6d, 00,33,00,32,00,5c, 00, \
71,00,6d , 00,67,00,72,00,2e, 00,64,00,6c, 00,6c, 00,00,00
[HKEY_LOCAL_MACHINE \ SYSTEM \ CurrentControlSet \ services \ BITS \ Performance] «Библиотека» = «bitsperf.dll»
«Открыть» = «PerfMon_Open»
«Собрать» = «PerfMon_Collect»
«Закрыть» = «PerfMon_Close»
«InstallType» = dword: 00000001
«PerfIniFile» = »bitsctrs.ini»
«Первый счетчик» = dword: 0000086c
«Последний счетчик» = dword: 0000087c
«Первая помощь» = dword: 0000086d
«Последняя помощь» = dword: 0000087d
«Список объектов» = «2156»
« PerfMMFileName »=« Global \\ MMF_BITS_s »
[HKEY_LOCAL_MACHINE \ SYSTEM \ CurrentControlSet \ services \ BITS \ Security]« Безопасность »= шестнадцатеричное: 01,00,14,80,94,00,00,00, a4,00,00, 00,14,00,00,00,34,00,00,00,02, \
00,20,00,01,00,00,00,02, c0,18,00,00,00,0c, 00 , 01,02,00,00,00,00,00,05,20,00, \
00,00,20,02,00,00,02,00,60,00,04,00,00,00,00,00,14,00, fd, 01,02,00,01,01,00, \
00,00,00,00,05,12,00,00,00,00,00,18,00, ff, 01,0f, 00,01,02,00,00,00,00,00,05 , \
20,00,00,00,20,02,00,00,00,00,14,00,8d, 01,02,00,01,01,00,00,00,00,00,05, 0b, \
00,00,00,00,00,18,00, fd, 01,02,00,01,02,00,00,00,00,00,05,20,00,00,00,23 , 02, \
00,00,01,02,00,00,00,00,00,05,20,00,00,00,20,02,00,00,01,02,00,00,00, 00,00, \
05,20,00,00,00,20,02,00,00
2. Теперь в меню « Блокнот» нажмите « Файл», затем нажмите « Сохранить как».

3. Выберите желаемое расположение (лучше всего на рабочем столе) и назовите файл BITS.reg (важно расширение .reg).
4. В раскрывающемся списке Тип файла выберите Все файлы и нажмите Сохранить.

5. Щелкните правой кнопкой мыши файл (BITS.reg) и выберите « Запуск от имени администратора».
6. Если появится предупреждение, выберите « Да», чтобы продолжить.
7. Перезагрузите компьютер, чтобы сохранить изменения.
8. Откройте командную строку . Пользователь может выполнить этот шаг, выполнив поиск «cmd» и нажав Enter.

9. Введите следующую команду в cmd и нажимайте Enter после каждой:
NET START BITS
NET START COM + EVENT SYSTEM
SC QC BITS
SC QUERYEX BITS
SC QC EVENTSYSTEM

10. Снова попробуйте обновить Windows и посмотрите, сможете ли вы исправить ошибку Windows Update 80246008.
Метод 3. Запустите средство устранения неполадок Центра обновления Windows.
1. В панели управления найдите Устранение неполадок в строке поиска в правом верхнем углу, а затем нажмите Устранение неполадок .

2. Затем в левом окне на панели выберите Просмотреть все.
3. Затем в списке Устранение неполадок компьютера выберите Центр обновления Windows.

4. Следуйте инструкциям на экране и запустите средство устранения неполадок Центра обновления Windows.

5. Перезагрузите компьютер и посмотрите, сможете ли вы исправить ошибку Центра обновления Windows 80246008.
Метод 4: сбросить компоненты Центра обновления Windows
1. Откройте командную строку . Пользователь может выполнить этот шаг, выполнив поиск «cmd» и нажав Enter.
2. Введите следующую команду в cmd и нажимайте Enter после каждой:
чистые стоповые биты
net stop wuauserv
net stop appidsvc
net stop cryptsvc

3. Удалите файлы qmgr * .dat, для этого снова откройте cmd и введите:
Del «% ALLUSERSPROFILE% \ Application Data \ Microsoft \ Network \ Downloader \ qmgr * .dat»
4. Введите в cmd следующее и нажмите Enter:
cd / d% windir% \ system32

5. Повторно зарегистрируйте файлы BITS и файлы Центра обновления Windows . Введите каждую из следующих команд по отдельности в cmd и нажимайте Enter после каждой:
regsvr32.exe atl.dll
regsvr32.exe urlmon.dll
regsvr32.exe mshtml.dll
regsvr32.exe shdocvw.dll
regsvr32.exe browseui.dll
regsvr32.exe jscript.dll
regsvr32.exe vbscript.dll
regsvr32.exe scrrun.dll
regsvr32.exe msxml.dll
regsvr32.exe msxml3.dll
regsvr32.exe msxml6.dll
regsvr32.exe actxprxy.dll
regsvr32.exe softpub.dll
regsvr32.exe wintrust.dll
regsvr32.exe dssenh.dll
regsvr32.exe rsaenh.dll
regsvr32.exe gpkcsp.dll
regsvr32.exe sccbase.dll
regsvr32.exe slbcsp.dll
regsvr32.exe cryptdlg.dll
regsvr32.exe oleaut32.dll
regsvr32.exe ole32.dll
regsvr32.exe shell32.dll
regsvr32.exe initpki.dll
regsvr32.exe wuapi.dll
regsvr32.exe wuaueng.dll
regsvr32.exe wuaueng1.dll
regsvr32.exe wucltui.dll
regsvr32.exe wups.dll
regsvr32.exe wups2.dll
regsvr32.exe wuweb.dll
regsvr32.exe qmgr.dll
regsvr32.exe qmgrprxy.dll
regsvr32.exe wucltux.dll
regsvr32.exe muweb.dll
regsvr32.exe wuwebv.dll
6. Чтобы сбросить Winsock:
сброс WinSock Netsh

7. Сбросьте для службы BITS и службы Windows Update дескриптор безопасности по умолчанию:
sc.exe sdset биты D: (A ;; CCLCSWRPWPDTLOCRRC ;;; SY) (A ;; CCDCLCSWRPWPDTLOCRSDRCWDWO ;;; BA) (A ;; CCLCSWLOCRRC ;;; AU) (A ;; CCLCSWRPWP;
sc.exe sdset wuauserv D: (A ;; CCLCSWRPWPDTLOCRRC ;;; SY) (A ;; CCDCLCSWRPWPDTLOCRSDRCWDWO ;;; BA) (A ;; CCLCSWLOCRRC ;;; AU) ;;
8. Снова запускаем службы обновления Windows:
чистые стартовые биты
net start wuauserv
net start appidsvc
net start cryptsvc

9. Установите последний агент обновления Windows.
10. Перезагрузите компьютер и посмотрите, сможете ли вы решить проблему.
Рекомендуемые:
- Исправить Не удается настроить яркость экрана в Windows 10
- Как исправить ошибку BackgroundContainer.dll при запуске
- Исправить код ошибки сетевого адаптера 31 в диспетчере устройств
- Исправьте ERR_CONNECTION_ABORTED в Chrome
Вот и все, что вы успешно исправили ошибку Центра обновления Windows 80246008, но если у вас все еще есть какие-либо вопросы относительно этого руководства, не стесняйтесь спрашивать их в разделе комментариев.
Tweaking your registry and restarting BITS should fix this issue
by Sonia Martin
Sonia is a tech enthusiast that fell in love with Windows after having experienced working on a different OS. Being above all, a down-to-earth kind of person, she… read more
Updated on
Reviewed by
Alex Serban

After moving away from the corporate work-style, Alex has found rewards in a lifestyle of constant analysis, team coordination and pestering his colleagues. Holding an MCSA Windows Server… read more
- If you are facing the Windows update error 0x80246008, it might be because of a missing registry key.
- A quick and effective fix is to repair broken system files using built-in file fixers or dedicated software.
- Another excellent solution is to create a new registry and restart the BITS service.
XINSTALL BY CLICKING THE DOWNLOAD
FILE
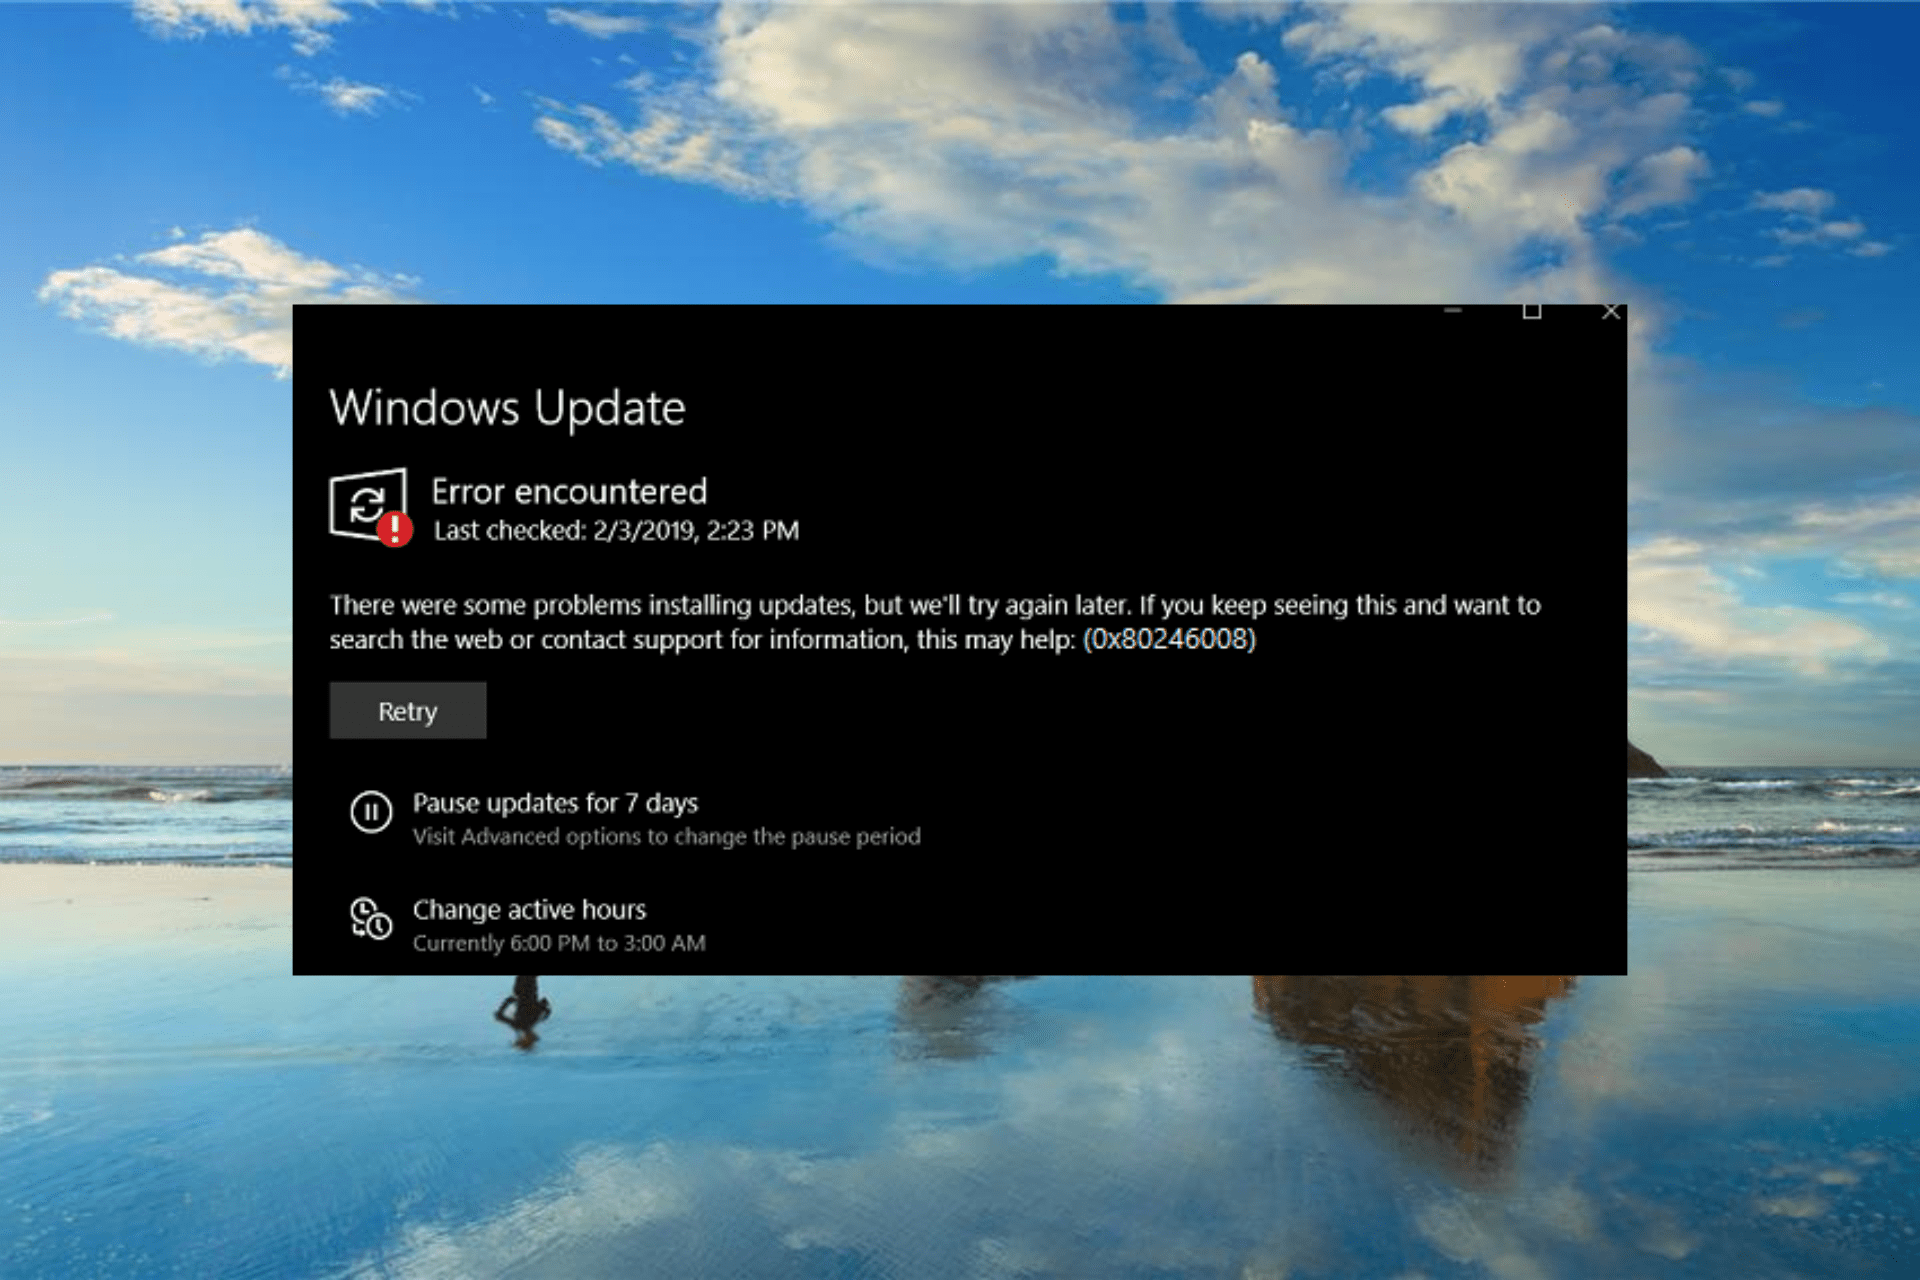
Update errors are pretty common on Windows PC. One of the most popular and troublesome is the Windows update error 0x80246008.
Like others, it prevents users from installing the latest update, leaving their PCs prone to attacks. While the issue can be frustrating, it can be easily fixed by following the detailed steps in this guide.
What causes the 0x80246008 error?
Just as there are different variations of the 0x80246008 error, several potential factors can cause it too. Below are some of the prevalent causes:
- Faulty system files: If your PC is displaying, we couldn’t install this update, but you can try again with error code 0x80246008; it might be because of broken system files and components. You must repair and restore these files using dedicated software or built-in repair tools.
- Missing registry key: Some users noticed that a missing registry key can cause this issue. The solution here is to create the key and restart the BITS service.
- Issues with security software: If you have third-party security software on your PC, it might prevent the update process. Disabling or removing the software and probably replacing it with one of the best antiviruses for Windows PC.
What are the variations of error 0x80246008?
- Windows Store error 0x80246008: This problem can also appear in the Windows Store, but you should be able to fix it using one of our solutions.
- Windows update not working Windows 10: If you cannot download updates due to this error, disable your antivirus and check if that helps.
- Error 0x80246008 occurred while downloading the update: This error can prevent you from downloading updates, and from fixing it, you need to reset Windows Update components.
- Windows update error: Sometimes, update errors can occur due to file corruption issues, but you can fix that by performing DISM and SFC scans.
How can I fix error 0x80246008?
Listed below are the troubleshooting steps you need to try before exploring the sophisticated fixes in this section:
- Disable or remove third-party antivirus
- Restart your PC
1. Tweak the registry
- Press the Windows key + R, type regedit, and click OK.

- Follow the path below in the left pane:
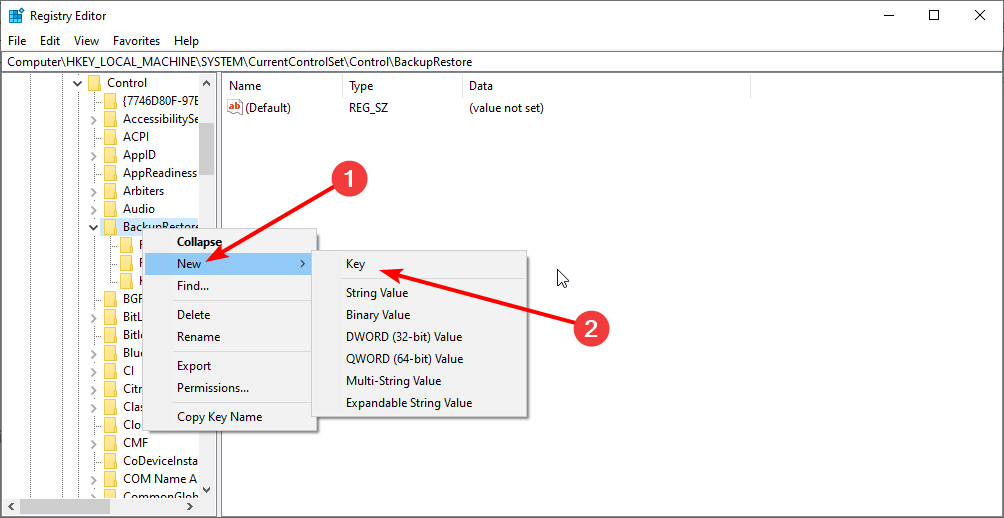
HKEY_LOCAL_MACHINE\SYSTEM\CurrentControlSet\Control\BackupRestore\FilesNotToBackup
- If the FilesNotToBackup key is there, proceed to Step 4. If it is not there, you need to create it by following the steps below:
- Right-click the BackupRestore folder.
- Select New > Key.
- Now, type FilesNotToBackup and hit Enter, and proceed to Step 4.
- Next, close the Registry Editor.
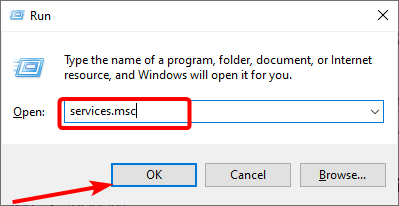
- Now, press the Windows key + R, type services.msc, and click OK.
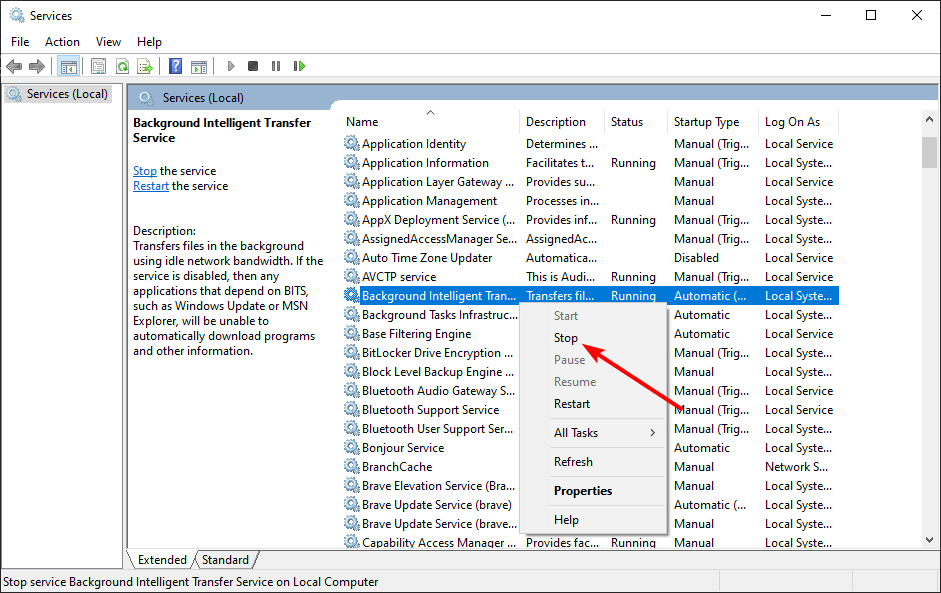
- Right-click the Background Intelligent Transfer Service and select Stop.

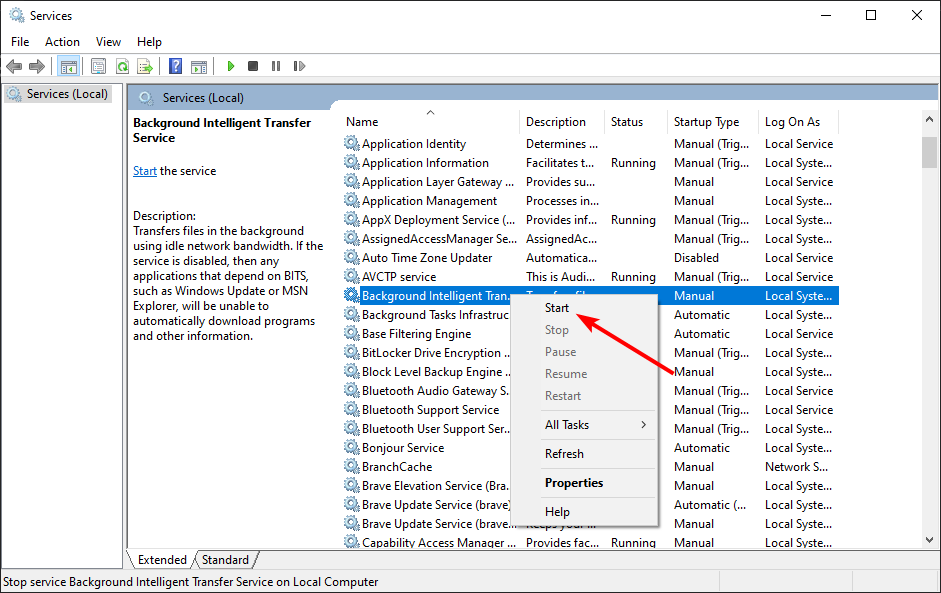
- Finally, right-click it again and choose Start.
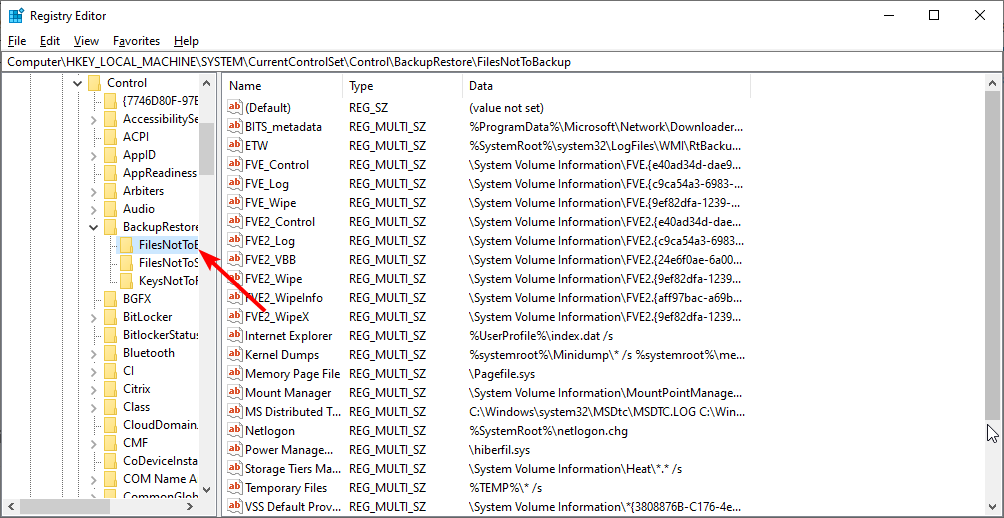
The FilesNotToBackup key is vital for the smooth update of your PC. If it is missing, you can experience the 0x80246008 error.
How we test, review and rate?
We have worked for the past 6 months on building a new review system on how we produce content. Using it, we have subsequently redone most of our articles to provide actual hands-on expertise on the guides we made.
For more details you can read how we test, review, and rate at WindowsReport.
Following the steps above show fix this and restore normalcy.
2. Repair system files
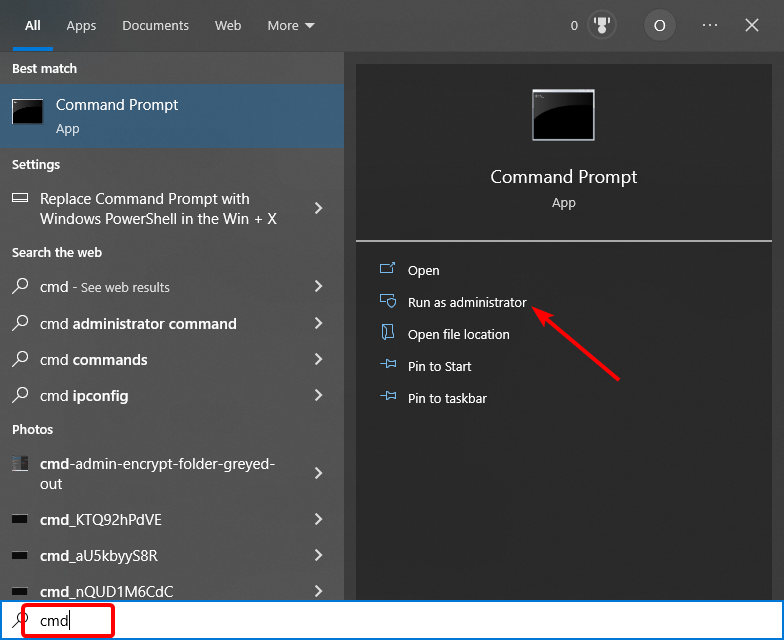
- Press the Windows key, type cmd, and select Run as administrator under Command Prompt.

- Type the command below and hit Enter to run it:
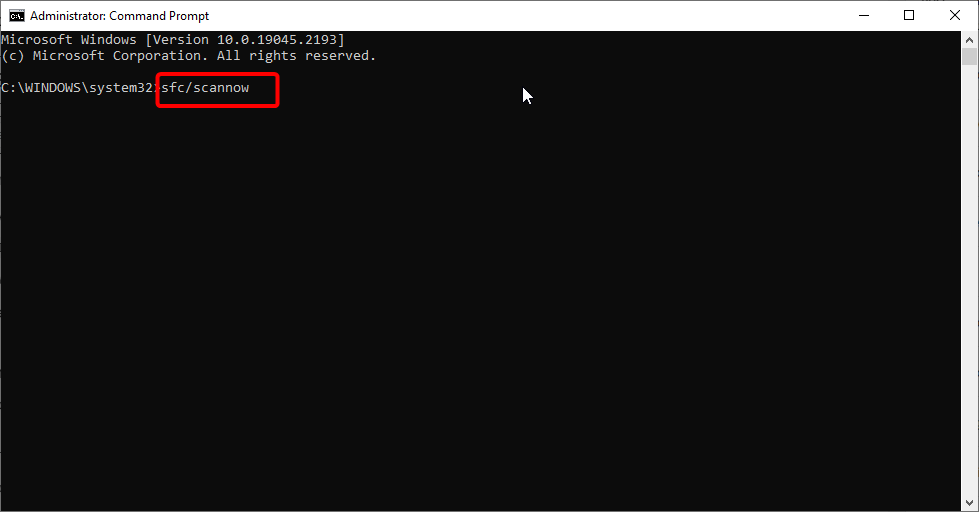
sfc /scannow
- Wait for the SFC scan to finish running. Then, if it fails or does not solve the issue, copy and paste the command below and hit Enter:
DISM /Online /Cleanup-Image /RestoreHealth - Finally, wait for the command to finish running and rerun the SFC scan.
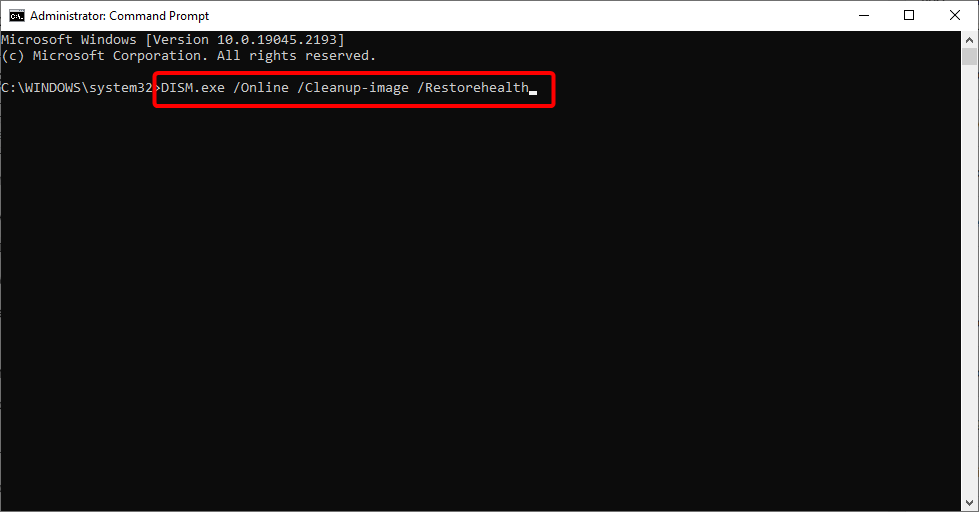
Sometimes, file corruption can cause update error 0x80246008 to appear. Your installation can get corrupted for various reasons, but you might be able to fix the problem simply by performing both SFC and DISM scans.
Alternatively, you can use a dedicated tool in Fortect to repair and fix these files. This tool requires no code but can repair any broken file on your PC in minutes.
It replaces any missing system file on your PC with the original copy. Also, Fortect fixes other system issues and ensures your PC is running optimally.
⇒ Get Fortect
3. Run Windows Update troubleshooter
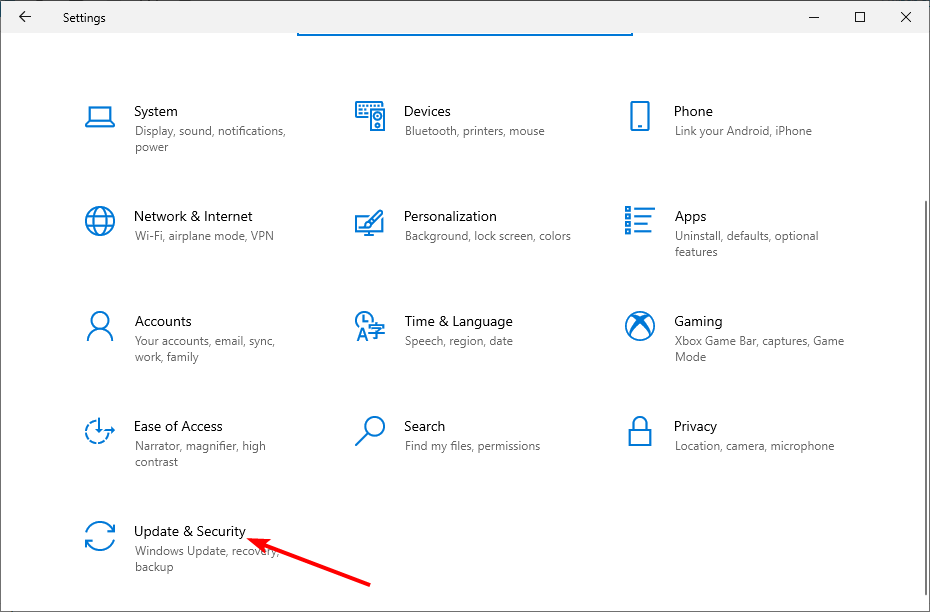
- Press the Windows key + I to open the Settings app and select the Update & Security option.

- Navigate to Troubleshoot in the left pane and select Additional troubleshooters.
- Finally, select Windows Update from the list and click the Run the troubleshooter button.
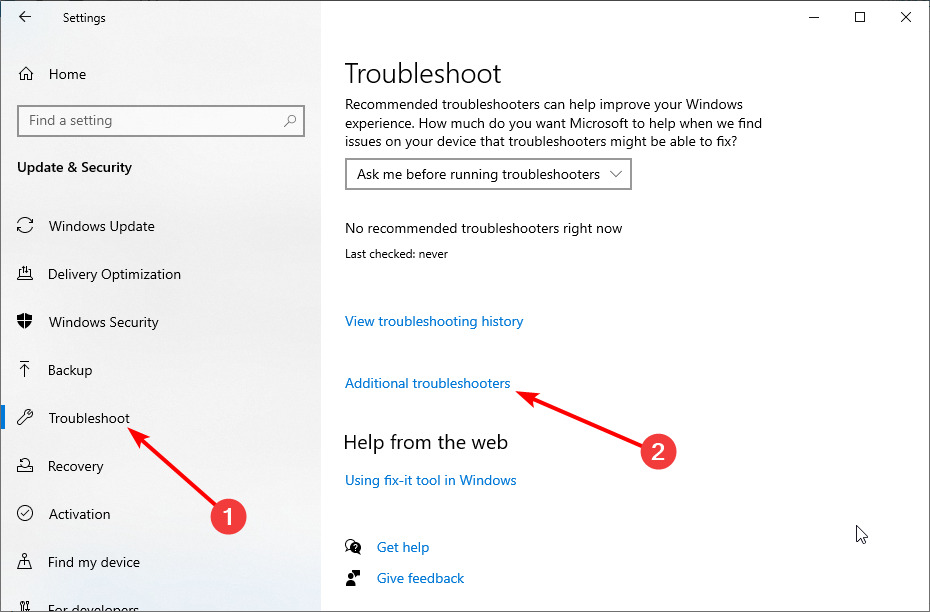
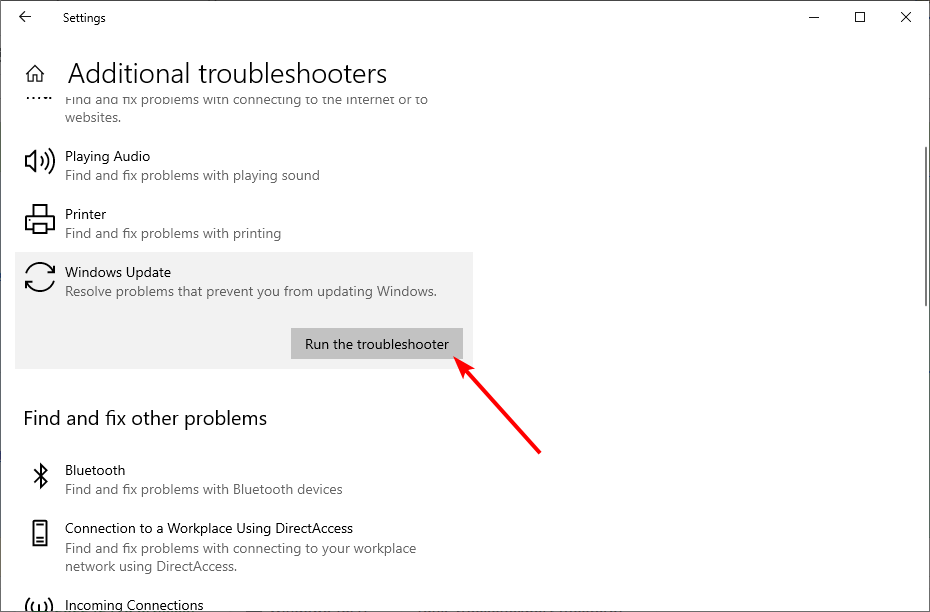
Users say update error 0x80246008 can sometimes occur due to minor Windows update glitches. However, you can quickly fix those glitches by running Windows Update troubleshooter.
4. Reset Windows Update components
- Launch Command Prompt as administrator.
- Now, type the following commands and click Enter after each:
net stop wuauservnet stop cryptSvcnet stop bitsnet stop msiserverRen C:WindowsSoftwareDistribution SoftwareDistribution.oldRen C:WindowsSystem32catroot2 Catroot2.oldnet start wuauservnet start cryptSvcnet start bitsnet start msiserver
Another problem that can cause update error 0x80246008 can be your Windows Update components.
Sometimes certain services might not be running correctly, and the only way to fix the problem is to reset them manually. After running the above commands, check if the Windows update issue is resolved.
- Microsoft might introduce AI-based light-controlling features to Windows
- Windows 11 23H2: How to Download the Official ISO
- A 64-bit Windows 12 ISO is out, theoretically. Here’s all you need to know
- Dev Build 23550 comes with a huge undocumented improvement
- How to enable automatic optional updates in Windows 11
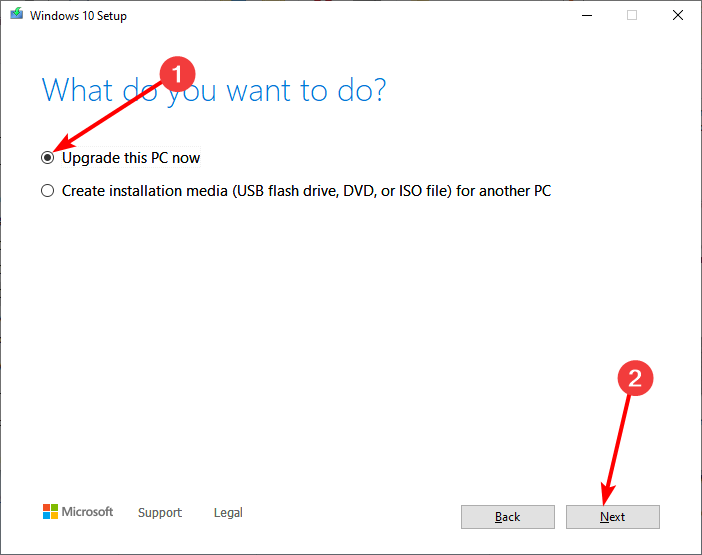
5. Use the Windows 10 Media Assistant tool
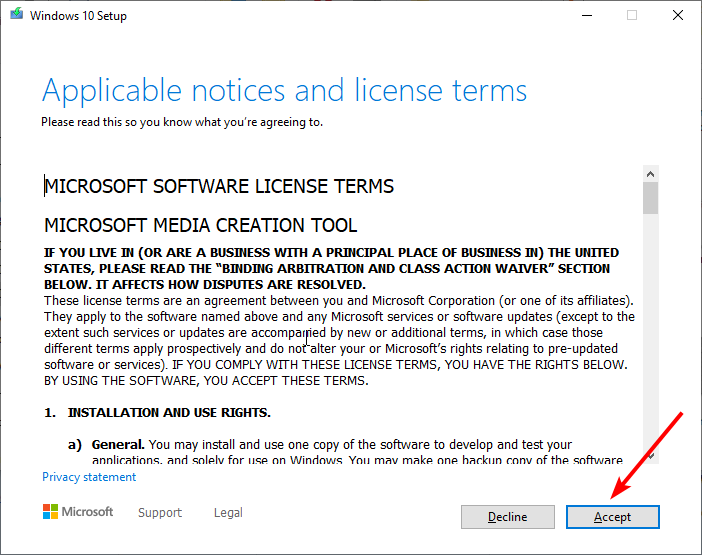
- Go to Windows 10 download page to download the Assistant tool.

- When the download is complete, run the tool and click the Accept button on the license page.

- Tick the radio button for the Upgrade this PC now and click the Next button.
- Finally, follow the onscreen instructions to complete the upgrade.
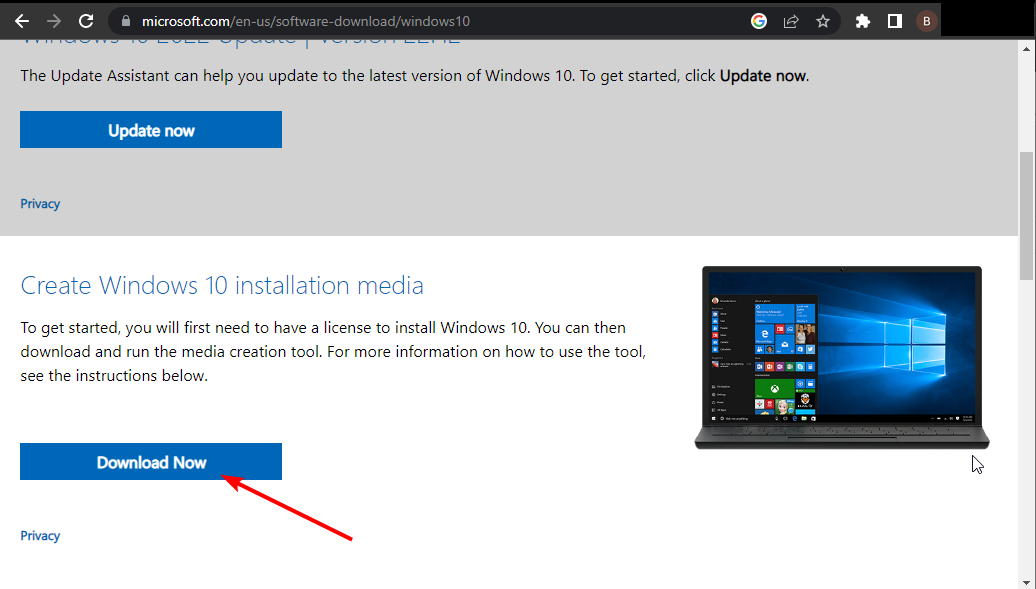
If the solutions above prove abortive in fixing the update error 0x80246008, you might need to perform an in-place upgrade instead.
Once the upgrade process is finished, you’ll have the latest version of Windows installed with all your files and applications preserved, and the problem will be permanently resolved.
That’s about it. We hope this article helped you resolve the problem with update error 0x80246008 in Windows 10 and that you can now install your updates normally.
If you are facing other issues like the 0x800f0988 Windows update error or the 0x80190001 error, check our detailed guide to fix it quickly.
Please let us know in the comments below if you have any questions, suggestions, or more solutions.
![]()
If you are facing Windows Update Error 80246008, then this means that there are issues with Background Intelligent Transfer Service or with COM+ Event System. Either of these services cannot start which are important for Windows Update to work and hence the error. While sometimes configuration error with BITS can cause the above issue, as you see, there are different reasons, but they are all associated with BITS. So without wasting any time let’s see how to actually Fix Windows Update Error 80246008 with the below-listed troubleshooting guide.
Table of Contents
Make sure to create a restore point just in case something goes wrong.
Method 1: Make Sure BITS and COM+ Event System Services are running
1. Press Windows Keys + R then type services.msc and hit Enter.

2. Now find BITS and COM+ Event System Services, then double click on each of them.
3. Make sure the Startup type is set to Automatic, and each of the above services is running, if not then click on the Start button.

4. Click Apply, followed by OK.
5. Reboot your PC and again try to update Windows.
Method 2: Registry Fix
1. Open Notepad and copy the below content as it is:
Windows Registry Editor Version 5.00
[HKEY_LOCAL_MACHINE\SYSTEM\CurrentControlSet\services\BITS]
“DisplayName”=”@%SystemRoot%\\system32\\qmgr.dll,-1000”
“ImagePath”=hex(2):25,00,53,00,79,00,73,00,74,00,65,00,6d,00,52,00,6f,00,6f,00,\
74,00,25,00,5c,00,53,00,79,00,73,00,74,00,65,00,6d,00,33,00,32,00,5c,00,73,\
00,76,00,63,00,68,00,6f,00,73,00,74,00,2e,00,65,00,78,00,65,00,20,00,2d,00,\
6b,00,20,00,6e,00,65,00,74,00,73,00,76,00,63,00,73,00,00,00
“Description”=”@%SystemRoot%\\system32\\qmgr.dll,-1001”
“ObjectName”=”LocalSystem”
“ErrorControl”=dword:00000001
“Start”=dword:00000002
“DelayedAutoStart”=dword:00000001
“Type”=dword:00000020
“DependOnService”=hex(7):52,00,70,00,63,00,53,00,73,00,00,00,45,00,76,00,65,00,\
6e,00,74,00,53,00,79,00,73,00,74,00,65,00,6d,00,00,00,00,00
“ServiceSidType”=dword:00000001
“RequiredPrivileges”=hex(7):53,00,65,00,43,00,72,00,65,00,61,00,74,00,65,00,47,\
00,6c,00,6f,00,62,00,61,00,6c,00,50,00,72,00,69,00,76,00,69,00,6c,00,65,00,\
67,00,65,00,00,00,53,00,65,00,49,00,6d,00,70,00,65,00,72,00,73,00,6f,00,6e,\
00,61,00,74,00,65,00,50,00,72,00,69,00,76,00,69,00,6c,00,65,00,67,00,65,00,\
00,00,53,00,65,00,54,00,63,00,62,00,50,00,72,00,69,00,76,00,69,00,6c,00,65,\
00,67,00,65,00,00,00,53,00,65,00,41,00,73,00,73,00,69,00,67,00,6e,00,50,00,\
72,00,69,00,6d,00,61,00,72,00,79,00,54,00,6f,00,6b,00,65,00,6e,00,50,00,72,\
00,69,00,76,00,69,00,6c,00,65,00,67,00,65,00,00,00,53,00,65,00,49,00,6e,00,\
63,00,72,00,65,00,61,00,73,00,65,00,51,00,75,00,6f,00,74,00,61,00,50,00,72,\
00,69,00,76,00,69,00,6c,00,65,00,67,00,65,00,00,00,00,00
“FailureActions”=hex:80,51,01,00,00,00,00,00,00,00,00,00,03,00,00,00,14,00,00,\
00,01,00,00,00,60,ea,00,00,01,00,00,00,c0,d4,01,00,00,00,00,00,00,00,00,00
[HKEY_LOCAL_MACHINE\SYSTEM\CurrentControlSet\services\BITS\Parameters]
“ServiceDll”=hex(2):25,00,53,00,79,00,73,00,74,00,65,00,6d,00,52,00,6f,00,6f,\
00,74,00,25,00,5c,00,53,00,79,00,73,00,74,00,65,00,6d,00,33,00,32,00,5c,00,\
71,00,6d,00,67,00,72,00,2e,00,64,00,6c,00,6c,00,00,00
[HKEY_LOCAL_MACHINE\SYSTEM\CurrentControlSet\services\BITS\Performance]
“Library”=”bitsperf.dll”
“Open”=”PerfMon_Open”
“Collect”=”PerfMon_Collect”
“Close”=”PerfMon_Close”
“InstallType”=dword:00000001
“PerfIniFile”=”bitsctrs.ini”
“First Counter”=dword:0000086c
“Last Counter”=dword:0000087c
“First Help”=dword:0000086d
“Last Help”=dword:0000087d
“Object List”=”2156”
“PerfMMFileName”=”Global\\MMF_BITS_s”
[HKEY_LOCAL_MACHINE\SYSTEM\CurrentControlSet\services\BITS\Security]
“Security”=hex:01,00,14,80,94,00,00,00,a4,00,00,00,14,00,00,00,34,00,00,00,02,\
00,20,00,01,00,00,00,02,c0,18,00,00,00,0c,00,01,02,00,00,00,00,00,05,20,00,\
00,00,20,02,00,00,02,00,60,00,04,00,00,00,00,00,14,00,fd,01,02,00,01,01,00,\
00,00,00,00,05,12,00,00,00,00,00,18,00,ff,01,0f,00,01,02,00,00,00,00,00,05,\
20,00,00,00,20,02,00,00,00,00,14,00,8d,01,02,00,01,01,00,00,00,00,00,05,0b,\
00,00,00,00,00,18,00,fd,01,02,00,01,02,00,00,00,00,00,05,20,00,00,00,23,02,\
00,00,01,02,00,00,00,00,00,05,20,00,00,00,20,02,00,00,01,02,00,00,00,00,00,\
05,20,00,00,00,20,02,00,00
2. Now from Notepad menu, click on File then click Save As.

3. Select your desired location (most preferably Desktop) and then name the file as BITS.reg (the .reg extension is important).
4. From the Save as type drop-down select All file and then click Save.

5. Right-click on the file (BITS.reg) and select Run as Administrator.
6. If will give warning, select Yes to continue.
7. Reboot your PC to save changes.
8. Open Command Prompt. The user can perform this step by searching for ‘cmd’ and then press Enter.

9. Type the following command into cmd and hit Enter after each one:
NET START BITS
NET START COM+ EVENT SYSTEM
SC QC BITS
SC QUERYEX BITS
SC QC EVENTSYSTEM

10. Again try to Update Windows and see if you’re able to Fix Windows Update Error 80246008.
Method 3: Run Windows Update Troubleshooter
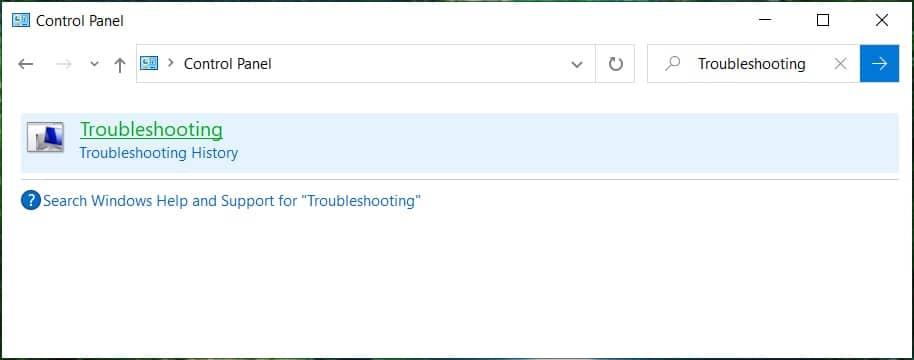
1. In control panel search Troubleshooting in the Search Bar on the top right side and then click on Troubleshooting.
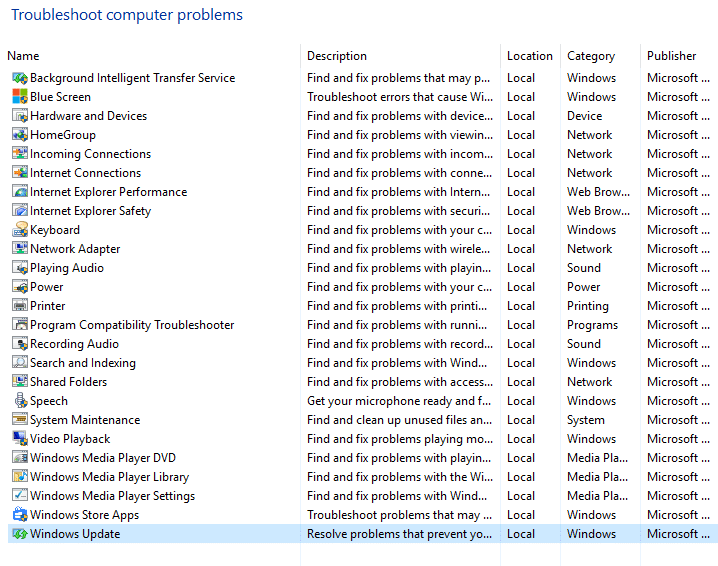
2. Next, from the left window, pane select View all.
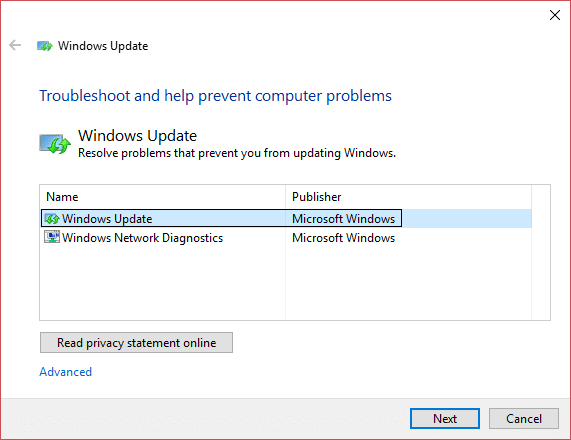
3. Then from the Troubleshoot computer problems list select Windows Update.
4. Follow on-screen instructions and let the Windows Update Troubleshoot run.
5. Restart your PC and see if you can fix Windows Update Error 80246008.
Method 4: Reset Windows Update Components
1. Open Command Prompt. The user can perform this step by searching for ‘cmd’ and then press Enter.
2. Type the following command into cmd and hit Enter after each one:
net stop bits
net stop wuauserv
net stop appidsvc
net stop cryptsvc

3. Delete the qmgr*.dat files, to do this again open cmd and type:
Del “%ALLUSERSPROFILE%\Application Data\Microsoft\Network\Downloader\qmgr*.dat”
4. Type the following into cmd and hit Enter:
cd /d %windir%\system32

5. Reregister the BITS files and the Windows Update files. Type each of the following commands individually in cmd and hit Enter after each one:
regsvr32.exe atl.dll
regsvr32.exe urlmon.dll
regsvr32.exe mshtml.dll
regsvr32.exe shdocvw.dll
regsvr32.exe browseui.dll
regsvr32.exe jscript.dll
regsvr32.exe vbscript.dll
regsvr32.exe scrrun.dll
regsvr32.exe msxml.dll
regsvr32.exe msxml3.dll
regsvr32.exe msxml6.dll
regsvr32.exe actxprxy.dll
regsvr32.exe softpub.dll
regsvr32.exe wintrust.dll
regsvr32.exe dssenh.dll
regsvr32.exe rsaenh.dll
regsvr32.exe gpkcsp.dll
regsvr32.exe sccbase.dll
regsvr32.exe slbcsp.dll
regsvr32.exe cryptdlg.dll
regsvr32.exe oleaut32.dll
regsvr32.exe ole32.dll
regsvr32.exe shell32.dll
regsvr32.exe initpki.dll
regsvr32.exe wuapi.dll
regsvr32.exe wuaueng.dll
regsvr32.exe wuaueng1.dll
regsvr32.exe wucltui.dll
regsvr32.exe wups.dll
regsvr32.exe wups2.dll
regsvr32.exe wuweb.dll
regsvr32.exe qmgr.dll
regsvr32.exe qmgrprxy.dll
regsvr32.exe wucltux.dll
regsvr32.exe muweb.dll
regsvr32.exe wuwebv.dll
6. To reset Winsock:
netsh winsock reset

7. Reset the BITS service and the Windows Update service to the default security descriptor:
sc.exe sdset bits D:(A;;CCLCSWRPWPDTLOCRRC;;;SY)(A;;CCDCLCSWRPWPDTLOCRSDRCWDWO;;;BA)(A;;CCLCSWLOCRRC;;;AU)(A;;CCLCSWRPWPDTLOCRRC;;;PU)
sc.exe sdset wuauserv D:(A;;CCLCSWRPWPDTLOCRRC;;;SY)(A;;CCDCLCSWRPWPDTLOCRSDRCWDWO;;;BA)(A;;CCLCSWLOCRRC;;;AU)(A;;CCLCSWRPWPDTLOCRRC;;;PU)
8. Again start the Windows update services:
net start bits
net start wuauserv
net start appidsvc
net start cryptsvc

9. Install the latest Windows Update Agent.
10. Reboot your PC and see if you’re able to fix the issue.
Recommended:
- Fix Can’t adjust screen brightness in Windows 10
- How To Fix BackgroundContainer.dll error on Startup
- Fix Network Adapter Error Code 31 in Device Manager
- Fix ERR_CONNECTION_ABORTED in Chrome
That’s it you have successfully Fix Windows Update Error 80246008 but if you still have any queries regarding this guide then feel free to ask them in the comment’s section.
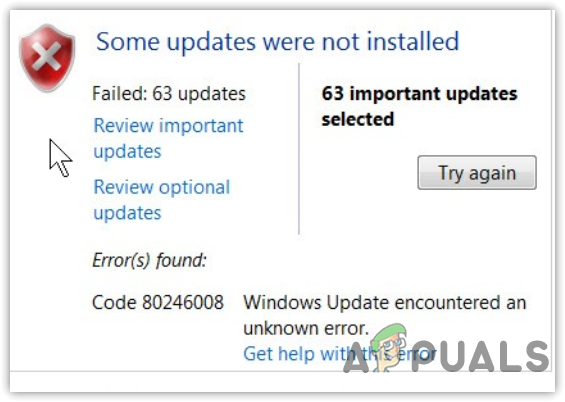
The Windows update error 80246008 often occurs while updating Windows via Windows update. It has been seen that when the error appears, the Background Intelligent Transfer Service has been stopped. However, it might not be the leading cause as other reasons such as corrupted system files, interference of a third party application, corrupted software distribution folder, and disabled Windows update service can also be the reason for this error.
Below we have described the causes in more detail:
- Stopped Background Intelligent Transfer Service- Mainly, the error happens due to the stopped Background Intelligent Transfer Service. It is an essential service to download or transfer files between computers using idle network bandwidth. Thus, if this service is not working, you will encounter this error message. Hence, it is recommended to ensure that the service is running properly.
- Corrupt System Files- If your system files are damaged or corrupted, you might face this error. Try running the SFC or DISM commands to restore the corrupted files to fix this issue.
- Corrupt Software Distribution Folder- The software distribution folder is responsible for storing Windows update files. If the data under this folder is corrupted, you will encounter errors like this. Hence, try clearing the software distribution folder and downloading the updates.
- Interference of Third-party Application- It is also possible that some third-party applications or services are preventing you from installing the Windows update. Hence, either uninstall or disable the applications at the startup or perform a clean boot.
- Unstable Internet Connection- Another possible factor that can lead you to this error is an unstable internet connection. If other applications are using the network bandwidth and windows do not have much idle network bandwidth left to download Windows updates, you might encounter this error message.
- Stopped Windows Update Service- Windows update service is responsible for detecting, downloading and installing Windows updates. If this service is not running properly, you might have a problem while trying to update Windows.
1. Restart Background Intelligent Transfer Service
Background Intelligent Transfer Service transfers files between computers using idle network bandwidth. If BITS service is disabled, you will not be able to update your Windows as Windows update depends on BITS service.
Windows update uses the BITS service to download updates with the help of unused network bandwidth. It is an essential component as it ensures that the updates will download when no other downloads are in progress. So if the applications use your network bandwidth, the downloading of Windows updates will pause until the task that is using the network gets completed. Follow the below steps to restart the service:
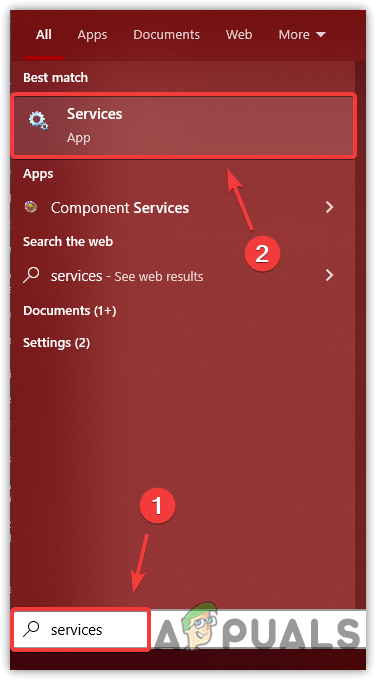
- Press the Windows key and type Services

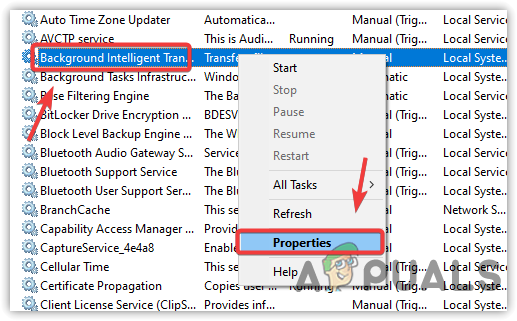
Opening Services Page - Open the Services Window and find the Background Intelligent Transfer Service
Note: You can easily find the service by typing B on the keyboard - Once you find the service, right-click the service and click Properties

Opening BITS Service Properties - Change the startup type from Manual to Automatic
- Click Apply and click the Start button to restart the service

Restarting BITS Service - Once done, click OK and check if the issue is resolved.

2. Run System File Checker
SFC or System File Checker is an inbuilt utility that repairs corrupted system files. Hence, executing the sfc command might help resolve your issue if the error occurs due to the corrupted system files. Here are the steps:
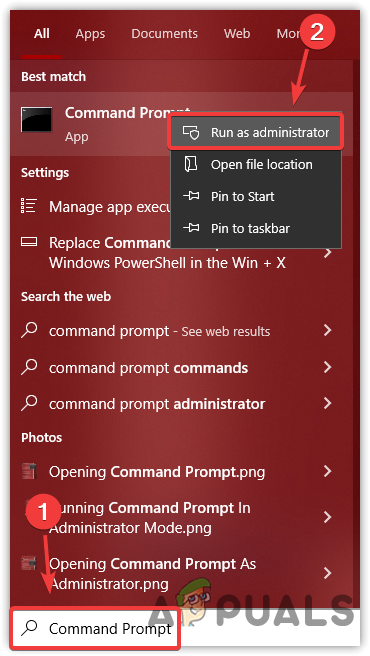
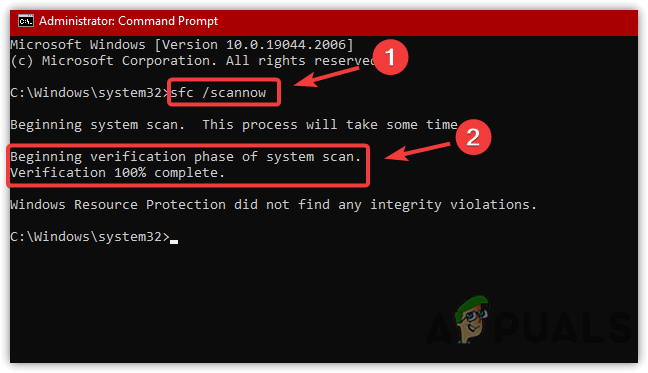
- Click the Start Menu and type Command Prompt
- Right-click the command prompt and click Run As Administrator

Opening Command Prompt In Administrator Mode - Once the terminal is opened, type the following command and wait for the verification to be completed.
sfc /scannow

Using System File Checker - Once done, check if the issue is resolved.
3. Perform a Clean Boot
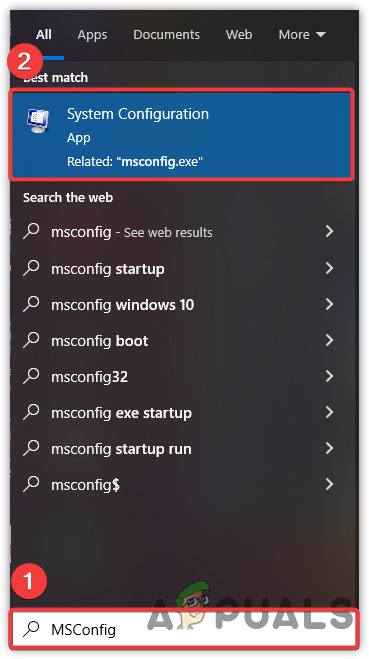
Another way to fix this error is to perform a clean boot. It is a process that helps determine the source of a problem by preventing irrelevant services and third-party applications at the startup. Therefore if there is a program or service preventing you from updating the Windows by displaying the error message, performing a clean boot might help. Below we have given the instructions to perform a clean boot:
- Press the Windows key and type msconfig

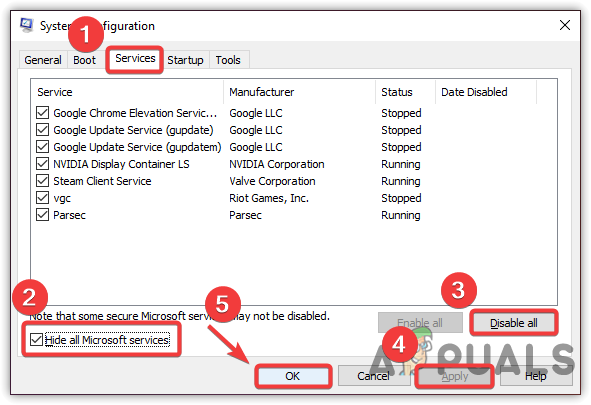
Opening System Configuration Settings - Open the system configuration and choose the Selective Startup

Switching to Selective Startup - Go to Services from the top and tick the Hide All Microsoft Services
- Then, click Disable All
- Once done, click Apply and then click OK
Performing a Clean Boot in Windows - Restart your computer for the changes to take effect
- Once done, go to the Windows update settings and check if the error is fixed.

4. Run Windows Update Troubleshooter
Microsoft provides troubleshooters for their components to fix common issues by restoring corrupted files, restarting the service for a particular component, and others. You can find the Windows update troubleshooter in the troubleshooting settings and it is worth it to run the Windows update troubleshooter by following the steps below:
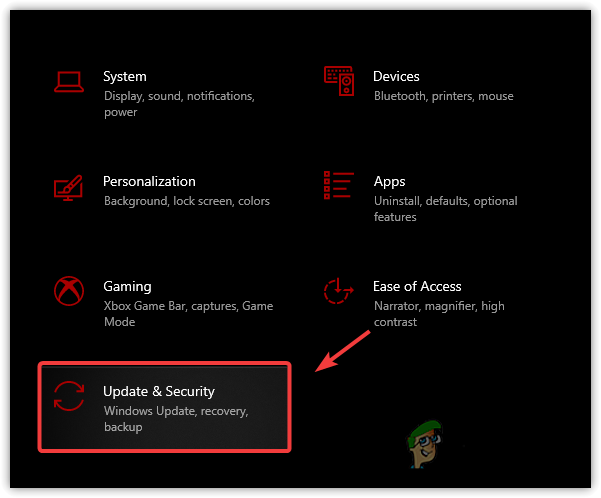
- Open the Settings by pressing Win + I on the keyboard
- Once the setting is opened, navigate to Update & Security

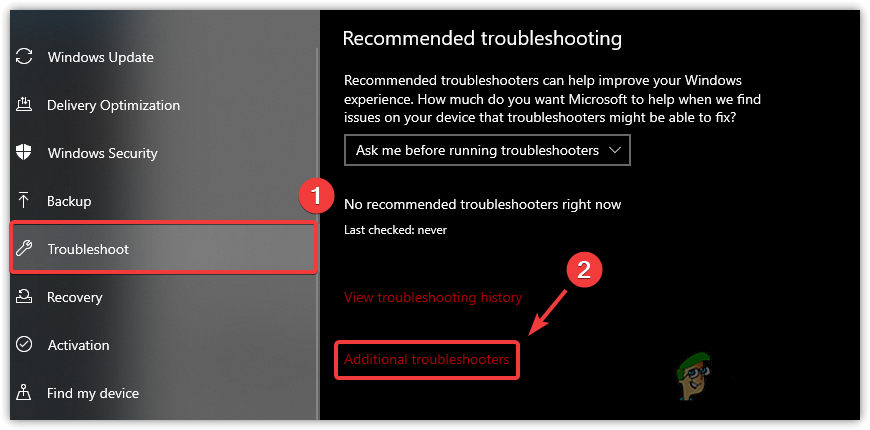
Navigating to Update And Security - Then, click the Troubleshoot from the left pane
- Click Additional Troubleshooters

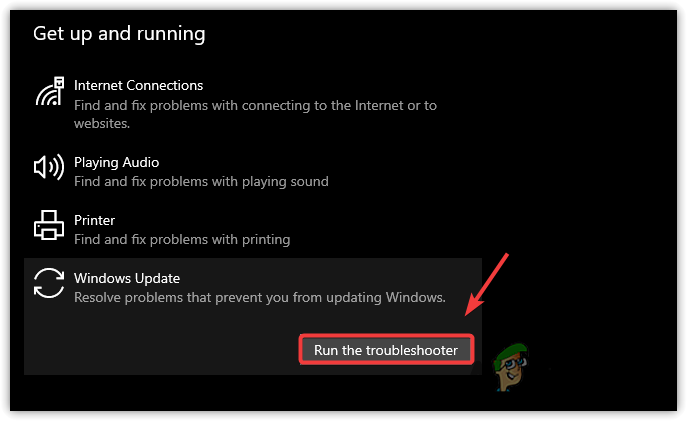
Navigating to Additional Troubleshooters - Select Windows Update and then click Run The Troubleshooter

Running Windows Update Troubleshooter - Once done, try to update your Windows and check if it fixed this error.
5. Clear Software Distribution Folder
If the error is not fixed yet, another solution you can try is to clear the software distribution folder. There is a chance that your software distribution files are corrupted, which is why you are receiving this error message. If you don’t know about software distribution, it is a folder that stores the files downloaded from the Windows update utility. If the files under this folder are corrupted for some reason, you will encounter issues while updating Windows.
Therefore, If there is a corrupted file that is leading to this error message will be deleted when you clear the software distribution folder. Below we have outlined the steps:
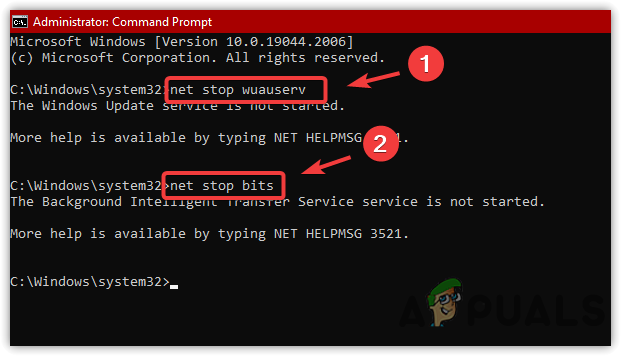
- Press the Win key and type Command Prompt
- Right-click on the terminal and choose Run As Administrator
- Now type the following command to stop the Windows Update Service
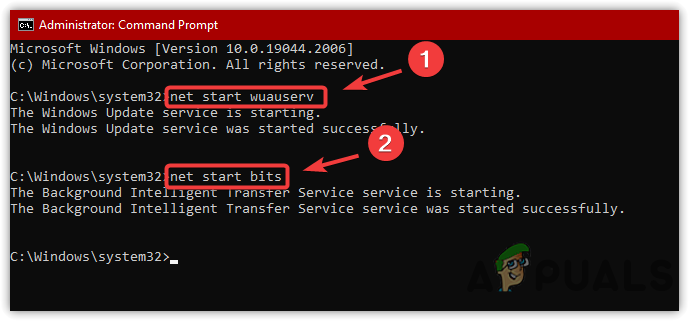
net stop wuauserv
- Again enter the following command the Background Intelligent Transfer Service
net stop bits

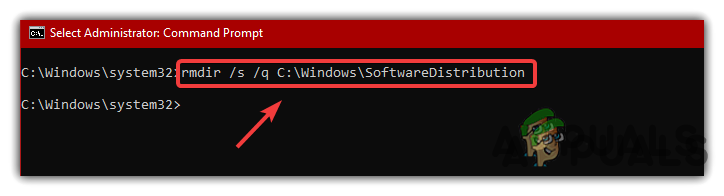
Stopping Running Windows Update Service - Once done, type the following command to delete the software distribution folder
rmdir /s /q C:\Windows\SoftwareDistribution

Removing the Software Distribution Folder - Once done, restart the services again by putting the commands below
net start wuauserv
net start bits

Starting the Windows Update And BITS Service - Once done, try updating Windows to check if the error is resolved.
6. Restart Windows Update Service
Another reason for this error can be a stopped Windows update service. If this service is not running, you will face issues as it detects, downloads and installs Windows updates. Therefore, it is recommended to check the service status by following the steps below:
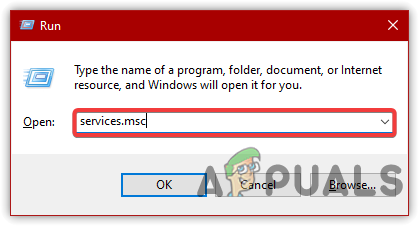
- Press the Win + R keys together to launch the Run Window
- Type services.msc and click OK to navigate

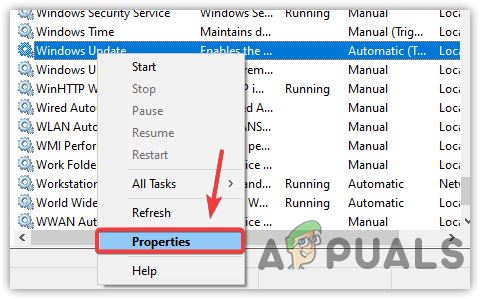
Opening Services Window - Find and right-click the Windows Update service
- Then, select Properties from the listed options

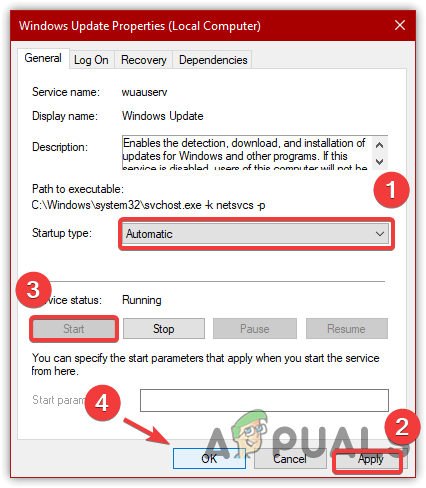
Opening Windows Update Service Properties - Now, if the startup type is not set to automatic, change it to Automatic and click Apply
- Then, click the Start button to start the service again
- Once done, click OK to close the Window
Restarting Windows Update Service - Restart the downloading of the Windows updates and check if the error persists.

Kevin Arrows
Kevin Arrows is a highly experienced and knowledgeable technology specialist with over a decade of industry experience. He holds a Microsoft Certified Technology Specialist (MCTS) certification and has a deep passion for staying up-to-date on the latest tech developments. Kevin has written extensively on a wide range of tech-related topics, showcasing his expertise and knowledge in areas such as software development, cybersecurity, and cloud computing. His contributions to the tech field have been widely recognized and respected by his peers, and he is highly regarded for his ability to explain complex technical concepts in a clear and concise manner.