Microsoft releases a wide range of cumulative updates, preview builds now and then such as Tuesday patches, and more to keep the operating system away from bugs and issues. But sometimes users find with 0x80070424 Update Error in Windows 10 or 11 that blocks the update process halfway. It is so annoying that this error message appears in both the cases – Windows Update page in the Settings app and also in the Windows Standalone Installer. This leaves the user with no choice of upgrading their systems neither automatically nor manually.
In addition to these aspects, when trying to download or update apps from Microsoft Store, users experience the same issue. Hence, it is pretty clear that the problem is within the system files and as everything is inter-connected, the trouble occurs across all platforms. So, in this article, we will discuss all the applicable solutions to mitigate this issue and have an error-free update process.
Here is how to fix 0x80070424 Update Error in Windows 11 or 10 –
1] Re-register Background Intelligent Transfer Service (BITS) DLL Files
Certain Windows system files are always required to download and install the Windows update flawlessly. These files are in the .dll file formats and when they go missing from the system, you tend to meet 0x80070424 Update Error in Windows 11 or 10. So, as a first solution, just register the missing system files by the following steps –
- Press ‘Win+R’ keys together to open Run dialog box.
- Insert the below-given commands one by one and hit Enter.
regsvr32 Qmgr.dll /s
regsvr32 Qmgrprxy.dll /s
- After running the commands successfully, reboot the device.
2] Modify Registry Entries to Fix 0x80070424 Update Error in Windows 11 and 10
Sometimes, Windows Registry accidentally imposes certain restrictions on the Windows Update service. Hence, a simple modification in the Registry Editor would help you to mitigate 0x80070424 Update Error in Windows 10 and 11. Let us see how to deploy this workaround –
- Insert the command regedit in the taskbar search box and hit Enter. To give consent, click Yes on the prompt of the User Account Control.
- Once you access Registry Editor, navigate to the below-given path on its left sidebar.
HKEY_LOCAL_MACHINE\SOFTWARE\Policies\Microsoft\Windows\WindowsUpdate
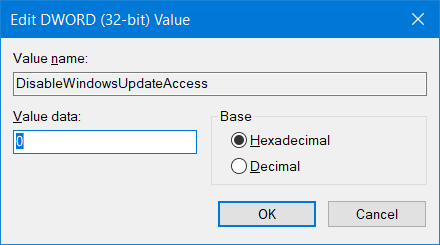
- Switch to the right pane and locate the DWORD namely DisableWindowsUpdateAccess.
- Do a right-click on it and choose Modify. Set its Value data as 0 and click OK to implement the changes.
- This small tweak would let you enable Windows Update from Registry after you reboot the device. Upon startup, all the updates would take place without any further error codes.
3] Use Windows Update and Microsoft Store Troubleshooter
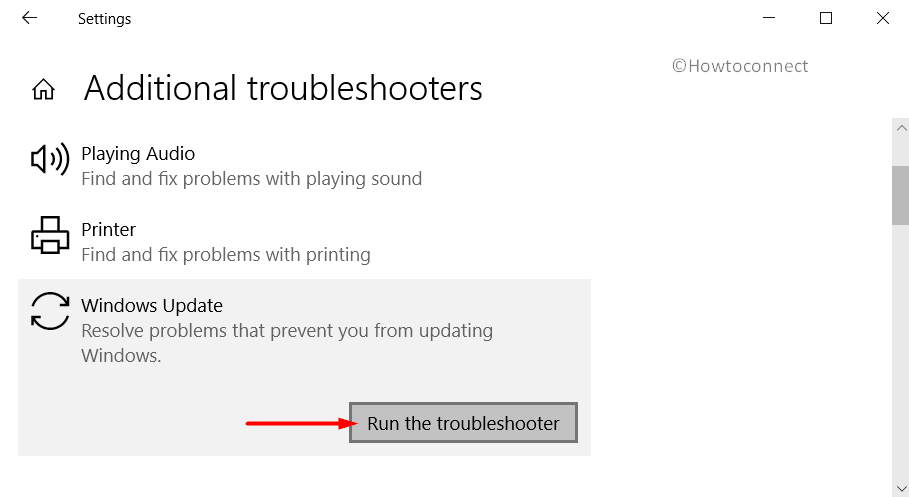
Microsoft provides multiple troubleshooters to every aspect of the operating system. Hence, it also includes the troubleshooting tools for both Windows Update and Windows Store Apps. Running this built-in utility would scan, detect, and attempts to fix all the possible causes. This is how you will execute the troubleshooter –
For Windows 10 –
- Open Windows Settings and to do so hit on Win+I keys.
- Click Update & security.
- Go to the Troubleshoot subsection that appears on the left pane.
- In the right, locate and select Windows Update and Windows Store Apps one after another.
- Hit Run the troubleshooter for both. Wait for the scan to complete and display the result.
For Windows 11 –
- Hit – Winkey + I.
- Select – Windows update.
- Click on – ‘Check for updates.’
4] Check Services related to Windows Update
The entire procedure of Windows Update depends on certain services. Those services have to be running in order to update the patches or applications in Microsoft Store. This is how you will make it sure that the concerned services are in the working state –
- Right-click on Start and choose Run. Type services.msc in the text space and click OK.
- In the Services console, find and double-click on the services Windows Update, Background Intelligent Transfer Service and Workstation respectively.
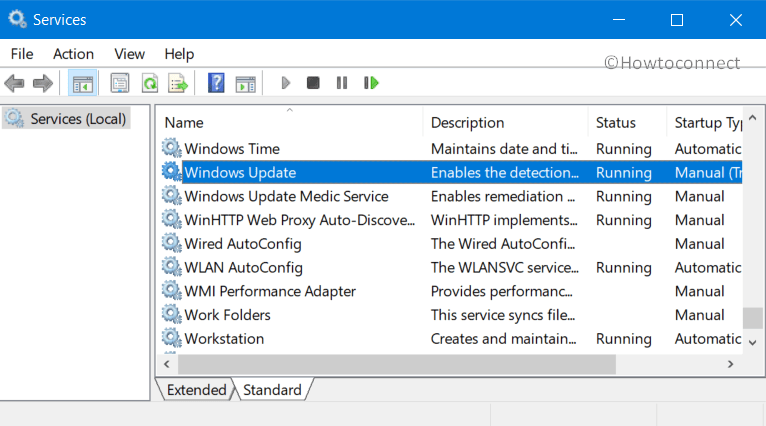
- Make sure that all three of them are set to Automatic and are in Running status.
- If not, then set them to Automatic and click the Start button. Restart the PC and then continue with the updates.
5] Reset Windows Update Components
Another relevant workaround to bypass 0x80070424 Update Error in Windows 11 or 10 is to reset all the components of Windows Update.
- Type the command cmd.exe on the taskbar search box. Right-click on Command Prompt and choose ‘Run as administrator’.
- Hit Yes on the prompt of UAC.
- Once the black window appears, insert the below-mentioned commands and hit Enter after each.
net stop wuauserv
net stop cryptSvc
net stop bits
net stop msiserver
Ren C:\Windows\SoftwareDistribution SoftwareDistribution.old
Ren C:\Windows\System32\catroot2 Catroot2.old
net start wuauserv
net start cryptSvc
net start bits
net start msiserver
- After successfully running the commands, check for the error code.
6] Fix 0x80070424 Update Error by using DISM tool
For several reasons, the Windows Update files may get corrupt or broken and in such cases, it is very common to receive issues with the update procedure. Therefore, one more applicable solution to resolve this error is to run the DISM tool. Specially designed to repair system images on your device, this tool is very handy to use and does not need any further installation.
- Get access to Run and type cmd into it. Press Ctrl + Shift + Enter keys in one go in order to Open Command Prompt as Admin from Run.
- On the UAC prompt, click Yes.
- Type or copy-paste the below command and hit Enter to execute the tool.
DISM /Online /Cleanup-Image /RestoreHealth
- After the scan, restart Windows 10 or 11 PC and check for the 0x80070424 Update Error.
7] Reset Microsoft Store to Fix 0x80070424 Update Error in Windows 11 or 10
The 0x80070424 Update Error in Windows 10 or 11 also occurs while downloading or updating the Store apps. In such conditions, the most applicable workaround would be to reset Microsoft Store.
- Open Command Prompt as administrator and insert
wsreset. Hit Enter. - Wait for the procedure to finish and then attempt to install the app or Windows Update again.
Hopefully, with the above-mentioned workarounds, you would be able to resolve the 0x80070424 Update Error in Windows 11 or 10 pretty effortlessly.
Methods:
1] Re-register Background Intelligent Transfer Service (BITS)
2] Modify Registry Entries
3] Use Windows Update and Microsoft Store Troubleshooter
4] Check Services related to Windows Update
5] Reset Windows Update Components
6] Fix 0x80070424 Update Error by using DISM tool
7] Reset Microsoft Store
That’s all!!
Repair any Windows problems such as Blue/Black Screen, DLL, Exe, application, Regisrty error and quickly recover system from issues using Reimage.
- Почему появляется ошибка Центра обновлений
- 5 решений ошибки 0x80070424
Во время поиска и установки обновлений в Windows часто возникают сбои. Один из них — ошибка с кодом 0x80070424. Она существует в системе давно и встречается как на старых версиях Windows, так и на последних изданиях. При возникновении этой неисправности загрузка и установка новых компонентов невозможна. Рассмотрим, почему возникает ошибка и как ее исправить.
Почему появляется ошибка Центра обновлений
Основные причины возникновения сбоя — проблемы со службами системы и ошибки файлов ОС. Если сервис Центра обновления не запущен или отключен в Windows совсем, выполнить обновление невозможно. В таком случае появляется ошибка. Другая распространенная причина — повреждение некоторых системных файлов.
5 решений ошибки 0x80070424
Устранение неполадки будет заключаться в проверке служб ОС и восстановлении поврежденных файлов. Разберем 5 различных решений ошибки, которые помогут избавиться от ее причин и восстановить исправную работу Центра обновления.
Проверка целостности файлов ОС
Для начала следует проверить целостность системных файлов. В Windows это можно сделать просто, используя только одну команду в консоли. Служба автоматически найдет и исправит ошибки компонентов ОС, если это возможно. Чтобы запустить проверку, выполните следующее:
1. Найдите Командную строку в поиске на панели задач, кликните по ней ПКМ и запустите с правами администратора.

2. В появившемся окне консоли введите команду sfc /scannow и нажмите Enter на клавиатуре, чтобы запустить ее.
3. Когда служба завершит работу, она выведет на экран результат проверки. Скорее всего, для полного восстановления файлов потребуется перезагрузка. Закройте окно и перезапустите компьютер.
После этого следует проверить работу обновлений. Возможно, они смогут установиться исправно.
Запуск средства устранения ошибок
В Windows есть набор встроенных утилит для устранения неполадок разных системных программ и служб. Такое приложение доступно и для Центра обновления. В некоторых случаях оно помогает избавиться от ошибки с кодом 0x80070424. Чтобы запустить эту утилиту, откройте Параметры, зайдите в раздел Обновление и безопасность, откройте меню Устранение неполадок, выберите пункт Центр обновления в левой панели и щелкните на кнопку Запустить средство. После этого проследуйте всем инструкциям программы, перезагрузите ПК и повторно проверьте работу обновлений.
Настройка служб Windows
Частой причиной ошибки 0x80070424 являются отключенные службы, необходимые для функционирования Центра обновления. Их проверка и активация может помочь решить ее. Чтобы настроить службы, проследуйте инструкции:
1. Найдите стандартную утилиту Службы через поиск на панели задач, кликните по ней ПКМ и откройте с правами администратора.
2. В списке компонентов найдите пункт Центр обновления и щелкните по нему дважды.
3. Если служба находится в состоянии Остановлена, нажмите на кнопку Запустить.
4. В графе Тип запуска установите значение Автоматически, если было выбрано другое.
5. Щелкните Применить и ОК.
6. В окне Службы найдите пункт Фоновая интеллектуальная служба передачи и проделайте с ней то же самое (проверьте состояние и тип запуска, изменив параметры при необходимости).
7. Закройте утилиту и перезагрузите ПК.
Скорее всего, после этого обновления заработают корректно и сбой перестанет возникать при их установке.
Регистрация системных файлов
Иногда неисправность вызвана проблемами с некоторыми библиотеками DLL. Чтобы устранить их, можно попробовать вручную изменить параметры для компонентов ОС. Для этого запустите утилиту Выполнить сочетанием клавиш Win+R, скопируйте в нее команду regsvr32 Qmgr.dll /s и щелкните на кнопку ОК.
Затем снова откройте программу и таким же образом выполните в ней regsvr32 Qmgrprxy.dll /s без кавычек. После этого перезапустите компьютер и попробуйте снова инсталлировать обновления.
Восстановление ОС до точки отката
Если ни один из предыдущих способов решения не помог, можно попробовать выполнить откат ОС до точки восстановления. Он возможен только в случае, если эта функция активирована в настройках. Помните, что восстановление может существенно изменить вид системы. На файлы пользователя оно не влияет.
Чтобы запустить откат, перейдите в старую Панель управления и найдите пункт Восстановление через поиск. Затем щелкните на ссылку Запустить восстановление и проследуйте дальнейшим инструкциям службы.
При работе с Microsoft Store пользователь может столкнуться с ошибкой 0x80070424, которая не позволяет ему устанавливать или обновлять приложения из этого магазина. В этой статье мы разберем, как исправить данную ошибку.
Причины возникновения ошибки
Ошибки 0x80070424 может возникнуть по нескольким причинам:
- Наличие вирусов или вредоносных программ на компьютере
- Некорректная установка обновлений Windows
- Проблемы с брандмауэром Windows
- Неправильные настройки служб Windows
Шаги по исправлению ошибки
Шаг 1. Проверить наличие вирусов
Первым шагом необходимо проверить наличие вирусов на компьютере, так как они могут привести к возникновению данной ошибки. Для этого необходимо запустить антивирусную программу и проверить весь компьютер на наличие вредоносного ПО. Если антивирус обнаружит вирусы, необходимо их удалить.
Шаг 2. Обновить Windows
Если ошибку 0x80070424 вызывают проблемы с обновлениями Windows, необходимо обновить операционную систему. Для этого необходимо:
- Нажмите на клавишу «Пуск» и выберите пункт «Настройки»
- Выберите «Обновление и безопасность»
- Нажмите на кнопку «Проверить наличие обновлений»
- Если обновления есть, установите их
Затем перезагрузите компьютер и проверьте, устранена ли ошибка.
Шаг 3. Проверить настройки брандмауэра Windows
Если настройки брандмауэра Windows неправильно сконфигурированы, это может привести к появлению ошибки 0x80070424. Для проверки настроек необходимо:
- Нажмите на клавишу «Пуск» и выберите пункт «Настройки»
- Выберите «Обновление и безопасность»
- Выберите «Брандмауэр и защита»
- Нажмите на кнопку «Разрешить приложения через брандмауэр»
- Убедитесь, что настройки разрешают доступ к интернету для приложений из Microsoft Store.
Шаг 4. Перезапустить службы Windows
Некоторые настройки служб Windows могут вызвать ошибку 0x80070424. Для исправления данной ошибки необходимо перезапустить следующие службы Windows:
- Нажмите на клавишу «Win + R»
- Введите «services.msc» и нажмите «OK»
- Найдите службы «Windows Update», «Продукты Windows Store», «Фоновая передача данных в Windows Store», «Windows Defender» и «Защита Windows от программ-шпионов»
- Дважды кликните на каждой службе и остановите их
- Затем запустите службы снова, используя соответствующие кнопки на панели инструментов
Шаг 5. Переустановить Microsoft Store
Если все вышеперечисленные шаги не помогли, необходимо переустановить Microsoft Store. Для этого:
- Нажмите на клавишу «Win + X» и выберите пункт «Windows PowerShell (администратор)»
- Введите следующую команду и нажмите Enter:
Get-AppxPackage -allusers Microsoft.WindowsStore | Foreach {Add-AppxPackage -DisableDevelopmentMode -Register "$($_.InstallLocation)\AppXManifest.xml"}
- Дождитесь завершения процесса и перезагрузите компьютер.
Если после этого ошибка 0x80070424 по-прежнему не устранена, необходимо обратиться в службу поддержки Windows.
Заключение
Ошибки 0x80070424 могут вызывать некоторые неудобства при работе с Microsoft Store. Однако, следуя описанным выше шагам, вы сможете исправить данную ошибку и наслаждаться загрузкой приложений из магазина безболезненно.
Title: How to Fix Error Code 0x80070424 in Microsoft Store on Windows 11/10
Introduction:
If you’re encountering Error Code 0x80070424 in the Microsoft Store on your Windows 11 or Windows 10 computer, don’t worry; you’re not alone. This error can be frustrating, but in this article, we’ll guide you through a series of steps to resolve it. These solutions range from simple settings adjustments to more advanced troubleshooting methods. Follow the steps carefully to get your Microsoft Store working smoothly again.
Note: Some of these methods involve modifying system settings and reinstalling Windows components, so proceed with caution and make sure to back up your important data.
Method 1: Start Update Orchestrator Service
- Type «Services» in the Windows search box and click on «Services.»
- In the Services window, scroll down and find «Update Orchestrator Service.»
- Double-click on it to open its properties.
- Set the «Startup type» to «Automatic.»
- If the «Service status» is not already «Running,» click the «Start» button.
- Click «Apply» and then «OK.»
- Try opening the Microsoft Store again.
Method 2: Reset Windows Update Components
- Open Notepad on your computer.
- Copy and paste the commands provided in the video description into Notepad.
- Save the file with a .bat extension, such as «wu-fix.bat,» on your desktop.
- Right-click on the saved .bat file and select «Run as administrator.» This will run the script to reset Windows Update components.
- After the script completes, restart your computer.
- Open Windows Update and check for updates. Install any available updates.
- Restart your computer again.
- Try opening the Microsoft Store to see if the issue is resolved.
Method 3: Clear Store Cache using WSReset
- Type «WSReset» in the Windows search box.
- Click on «WSReset» to run it. This will clear the Microsoft Store cache.
- Wait for the process to complete, and then try opening the Microsoft Store.
Method 4: Repair or Reset Microsoft Store
- Open Windows Settings.
- Go to «Apps» or «Apps & Features.»
- Search for «Microsoft Store» in the list of installed apps.
- Click on «Microsoft Store» and select «Advanced options» (Windows 11) or «App settings» (Windows 10).
- Click «Repair» to attempt to repair the Microsoft Store.
- If the repair doesn’t resolve the issue, you can choose «Reset» to reset the Microsoft Store app to its default settings.
- After the reset, try opening the Microsoft Store again.
Method 5: Restart Windows Update, Microsoft Store Install Service, and Background Intelligent Transfer Service
- Type «Services» in the Windows search box and click on «Services.»
- Find and open «Windows Update.»
- Set the «Startup type» to «Automatic.»
- If the «Service status» is not already «Running,» click the «Start» button.
- Click «Apply» and then «OK.»
- Restart the «Windows Update» service by right-clicking on it and selecting «Restart.»
- Find and open «Microsoft Store Install Service.»
- Set the «Startup type» to «Automatic.»
- If the «Service status» is not already «Running,» click the «Start» button.
- Click «Apply» and then «OK.»
- Restart the «Microsoft Store Install Service» by right-clicking on it and selecting «Restart.»
- Find and open «Background Intelligent Transfer Service.»
- Set the «Startup type» to «Automatic.»
- If the «Service status» is not already «Running,» click the «Start» button.
- Click «Apply» and then «OK.»
- Restart the «Background Intelligent Transfer Service» by right-clicking on it and selecting «Restart.»
- After restarting these services, try opening the Microsoft Store.
Method 6: Run PowerShell Commands
- Type «PowerShell» in the Windows search box.
- Right-click on «Windows PowerShell» and select «Run as administrator.»
- Run the provided PowerShell commands one by one. These commands may take some time to complete.
- After running the commands, restart your computer.
- Try opening the Microsoft Store again.
Method 7: Ensure Proper TLS Settings
- Type «Internet Options» in the Windows search box and open it.
- Go to the «Advanced» tab.
-
Scroll down and ensure that the following TLS settings are checked:
- Use TLS 1.0
- Use TLS 1.1
- Use TLS 1.2
- Use TLS 1.3
- Click «Apply» and then «OK.»
- Restart your computer and try opening the Microsoft Store.
Method 8: Update Windows Using Media Creation Tool
- Download the Media Creation Tool specific to your version of Windows (Windows 10 or Windows 11).
- Run the tool and select the option to upgrade your PC.
- Follow the on-screen instructions to upgrade Windows.
- Restart your computer after the upgrade is complete.
- Check if the Microsoft Store is working correctly.
Method 9: Reset Windows 11/10
- Before attempting this method, create a backup of your important files because resetting Windows will result in data loss.
- Open Windows Settings.
- In Windows 11, go to «Windows Update» > «Advanced options» > «Recovery.» In Windows 10, go to «Update & Security» > «Recovery.»
-
Under the «Reset this PC» section, choose the option that suits your needs:
- «Keep my files»: Removes apps and settings but keeps personal files.
- «Remove everything»: Removes all personal files, apps, and settings.
- Follow the on-screen instructions to reset Windows.
- After the reset, set up your computer again and check if the Microsoft Store works properly.
Conclusion:
Error Code 0x80070424 in the Microsoft Store can be resolved using the methods outlined above. Start with the simpler solutions and progress to the more advanced ones if necessary. Remember to back up your data before attempting any major changes to your system. If one of these methods doesn’t resolve the issue, you can be confident that another one will help you get your Microsoft Store back up and running smoothly.
Thank you for reading, and if you found this guide helpful, please comment then we create more useful content.
Windows Update and Windows Store are inter-dependable services on Windows 11/10. So, many times when an error like 0x80070424, ERROR SERVICE DOES NOT EXIST occurs for one, the other service is prone or affected by it too. However, this error can occur to both Windows Update Standalone Installer as well as to the Windows Update section in the Windows Settings App too.

The Windows Update Standalone Installer states:
Installer encountered an error: 0x80070424, The specified service does not exist as an installed service.
The Windows Store error states:
The were some problems installing updates, but we’ll try again later. If you keep seeing this and want to search the web or contact support for information, this may help: (0x80070424).
This error code has been known to appear while updating Windows Defender too.
We will be discussing how to fix this error for Windows Update and Microsoft Store on Windows 11 or Windows 10:
- Re-register Background Intelligent Transfer Service DLL file
- Run Windows Update & Store apps Troubleshooters.
- Reset Windows Update related folders.
- Use the Registry Editor.
- Check Windows Services.
- Reset the Microsoft Store.
- Fix Windows Update files using DISM
- Restore via Registry.
See which of these suggestions apply in your case.
1] Re-register Background Intelligent Transfer Service DLL file
Open Command Prompt with Administrator level privileges.
Type in the following commands and hit the Enter key to re-register the dll files–
regsvr32 Qmgr.dll /s regsvr32 Qmgrprxy.dll /s
Reboot and check if your issues are fixed.
2] Run Windows Update & Windows Store Apps Troubleshooters
You can run the Windows Update Troubleshooter and also Microsoft’s Online Windows Update Troubleshooter and check if that is any help in fixing any of your issues. You may want to also run the Windows Store Apps Troubleshooter.
3] Reset Windows Update related folders
You need to delete the contents of the SoftwareDistribution folder & reset the Catroot2 folder.
4] Check the WU setting in Registry
Type regedit in Windows Search box and hit Enter to open the Registry Editor. Locate the registry key:
Computer\HKEY_LOCAL_MACHINE\SOFTWARE\Policies\Microsoft\Windows\WindowsUpdate
Select and Double-click on the DWORD named as DisableWindowsUpdateAccess set its Value Data as 0.
Restart your computer and check if this has fixed your issues.
5] Check on some Windows Services
Open the Windows Services Manager and locate the following services:
- Windows Update Service – Manual (Triggered)
- Background Intelligent Transfer Service – Manual.
- Workstation Service – Automatic.
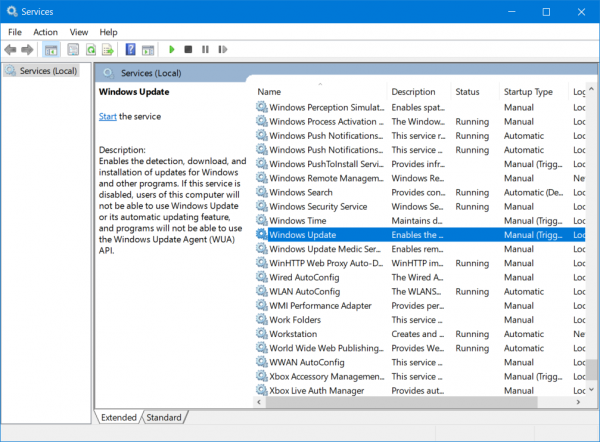
Open their Properties and ensure that their Startup type is as mentioned above against their name and that the Services are running. If not click on the Start button.
6] Reset the Microsoft Store
To Reset the Microsoft Store Run CMD as Administrator and execute the following command:
wsreset
Wait for the process to complete and then try to install your App or Windows Update again.
7] Fix Windows Update files using DISM
You may need to fix Windows Update files using DISM.
8] Restore via Registry
If you have managed to delete Windows Update Service (sc delete wuauserv), then it must have also removed registry entries under HKLM\SYSTEM\CurrentControlSet\Services\wuauserv. Some Windows Home users have reportedly deleted the service to stop Windows Update from downloading any future updates.
So you need to follow two steps here to fix the error:
Restore Windows Update Service
Sadly, there is no simple way to do this. While you can use the DISM and SFC command, but they cannot fix which is not there. Especially DISM, which uses Windows Update to provide the files that are required to fix corruption.
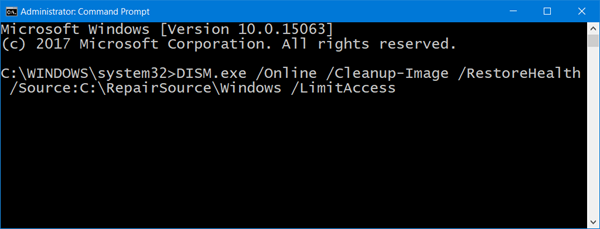
The alternate way is to use DISM with Windows installation as the repair source. It can be Windows side-by-side folder from a network share or a removable media. To do this, run the following command:
DISM.exe /Online /Cleanup-Image /RestoreHealth /Source:C:\RepairSource\Windows /LimitAccess
In the command, replace the C:\RepairSource\Windows placeholder with the location of your repair source. Read more about Repair Source here. If you cannot get this done, you need to Refresh your Windows 10 PC, but you will need Windows 10 Bootable media as it will copy the service file from the image, and reregister it.
Once you fix the Windows Update Service issue, make sure to run it. If there is no error, and you can download the update, then you are done. If not, follow the next step.
Import Registry Entries from a different computer
Since Windows Update service will need its registry entries to work as expected, you need to place them manually. The best way is to find a laptop which is running the same version as yours, and then export all entries related to the Windows Update service.
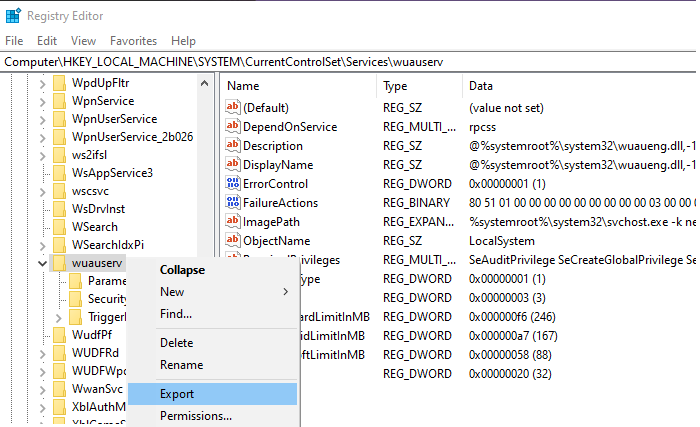
Open Registry Editor and navigate to:
Computer\HKEY_LOCAL_MACHINE\SYSTEM\CurrentControlSet\Services\wuauserv
- Right-click on wuauserv key, and select export
- Save as a REG file on the computer.
- Copy the file to the computer where you need to fix the issue.
- Double click on the file, and agree to import.
We have also linked to the exported version of the file in this post. Download the 0x80070424 Fix, extract the contents and double-click on the reg file. Now when you run the Windows Update service, you will not receive error 0x80070424.
I hope something helps!