This guide will help you fix the Igdkmd64.sys BSOD, which continues to plague Windows 10 users. The instructions provided mostly work with older versions of Windows as well.
The article you will read below deals with the error message connected with Igdkmd64.sys BSOD – the driver for the Intel Graphics Kernel Mode, also known as igfx. It contains some solutions in the form of guides that are supposed to get that unpleasant issue solved for you.
Where, when and why could Igdkmd64.sys error appear?
Igdkmd64.sys is by no means a new error in the Windows scene and it appears to occur just as frequently on Windows 10.
This specific driver has been developed by Intel and only systems with a processor made by Intel could experience such an issue. The problem itself represents a Blue Screen of Death together with an error notification stating this driver is not working properly. In fact, such an issue might result from nothing – there could be no reason for it. Some Mac users might also become victims of such a problem. Fortunately, we have provided a few useful guides below that could be just the right thing for your case. Hopefully, by following the steps inside them, you will be able to get rid of this problem.
Igdkmd64.sys – a Windows 10 Fix
The Guide
Guide #1: Steps to disable Intel’s integrated GPU
The instructions in the following guide will only work for users, who have discrete graphic cards. Examples of discrete cards are AMD or nVidia. Actually, the instructions below represent something more of a workaround than of a fix. However, in case you don’t really use Intel’s GPU, you are not going to spot any differences.
- Turn off your PC.
- Unplug the graphics card.
- Boot your device again.
- Load the Device Manager. Just push the Windows Key on your keyboard, and then enter Device Manager. Open the generated result.
- As soon as you open the generated result, enlarge the Display Adapters.
- Find Intel’s integrated GPU there.
- Click with the right button of the mouse on it. Once you see the dropdown menu, choose Disable.

- The last step from this guide is to shut down your machine once more. Then simply plug your graphics card back in.
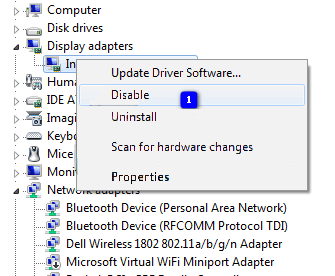
When you start your computer again, you should not be experiencing the igdkmd64.sys issue anymore.
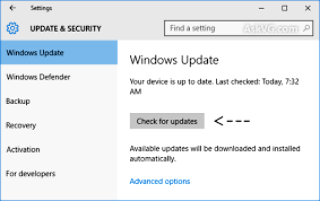
Guide #2: How to solve the issue by updating the drivers via Windows’ Force Update
In some cases, using the Force Update could fix the error by getting you the newest drivers. However, what you are supposed to do first is to download everything Windows Update has available for you.
- Hit the Windows key.
- Enter Check for Updates. When there is a result of this search request, load it.
- Push the Check for Updates from there.

- This should be done as many times as it is necessary. The final message you should see in order to stop doing that is “Your device is up to date“.
- When you have finished with the steps above, load This PC.
- From there go to C:\Windows\SoftwareDistribution\Download. Once there, remove everything from the inside.
- Next you have to enter an Elevated Command Prompt. For that purpose, press both Windows and X at the same time. From the menu that comes up, choose Command Prompt.
Wuauclt.exe /updatenow should be entered in the Command Prompt, followed by pushing Enter. In the end, only a reboot of the system is recommended.
A special tip: In case you are overclocking, stop that!
This solution doesn’t work for everyone. In case you are not aware of the fact that you are overclocking, this will not be the tip for you. Still, if you know that you ARE, proceed with the next paragraph.
Overclocking could result in a serious strain on your CPU, as well as your GPU. This depends on which one exactly you are overclocking. Such issues might result in BSOD with the aforementioned error alert. Our advice is that you attempt to bring everything back to the stock frequencies and voltages. In some particular cases, this might fix the problem.
Guide #3: Maybe setting a new name to “igdkmd64.sys” will help
The instructions below are only compatible with issues of Mac users who use Windows via Bootcamp.
- First of all, look for the .sys file {It is normally found in the Windows folder of the partition where your OS has been installed – within System32 and inside the drivers folder}.
- Choose that file. Right-click on it then. Select the Rename option, after which alter its name to another one like igdkmd64Backup.sys. Save the new name.
The problem should not be present anymore.
A blue screen error is the worst affliction for all users and it always occurs out of nowhere all of a sudden. Igdkmd64.sys BSOD is a similar issue in Windows 10 that appears as a prefix of several stop errors. These may be SYSTEM_SERVICE_EXCEPTION, IRQL_NOT_LESS_OR_EQUAL, KMODE_EXCEPTION_NOT_HANDLED, PAGE_FAULT_IN_NONPAGED_AREA, or other. This problem takes place mainly due to unexpected issues in the Windows driver for Intel Graphics Kernel Mode.
Igdkmd64.sys is an important driver for Intel Graphics Kernel Mode and widely understood as igfx. It is developed by Intel hence, every machine having a processor from the company that will have this integrated graphics card. IGDKMd64 represents Intel Graphics Driver Kernel Mode 64-bit on an OEM basis computer. Blue screen error happens unexpectedly and the system prepares to restart showing the name of error with significant code. Nevertheless, the issue is a bit complicated while resolving, you can apply some of the potentially helpful methods after coming across this trouble. You are just a click away from deploying the solution from below section and thereby fixing igdkmd64.sys BSOD error.
Here is how to fix igdkmd64.sys BSOD / Blue Screen Error in Windows 10 –
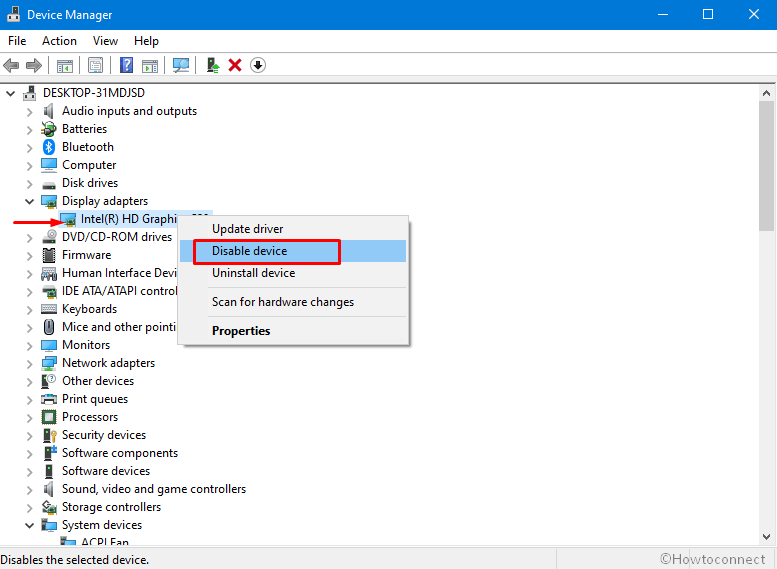
1] Uninstall the Display adapter driver
Graphics components are essential parts for the machine because they control as well as enhance the way pictures, videos, 3D, animation, and programs will be displayed on the screen. These components are available in a separate card plugged in the motherboard slot. Being known as Graphics card, oftentimes they are built-in together in the motherboard directly. The application that controls the graphics card is known as Graphics card driver. Furthermore, it also works with the rest of the computer in the machine like display monitor, SketchUp, etc.
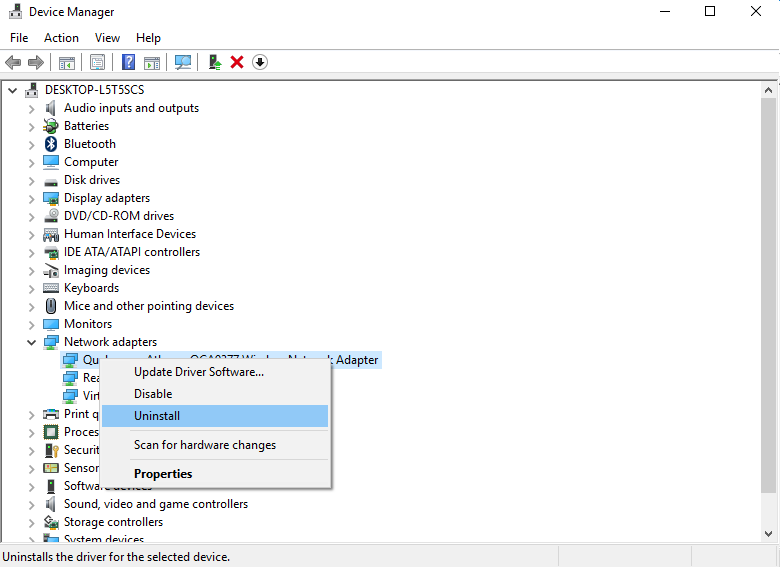
Once the Graphics card driver has some issues or bugs, the Windows may encounter igdkmd64.sys Blue Screen Error. Oftentimes this Windows 10 problem is somewhat irrecoverable and doesn’t settle easily. The only thing you can do is uninstall the Graphics card driver using Device Manager. To do that, follow the below guidelines –
- Press the – Win+X.
- Select the – Device Manager.
- Reach the – Display adapters.
- Double click the device to reveal the drivers’ list.
- Right-click the – Intel(R) HD Graphics.
- Select the – Uninstall device.

- Follow the guidelines to complete uninstalling.
- Restart the computer once this process ends.
2] Roll back the Display adapter driver
A defective update for the graphics card driver causes severe damage to the machine sometimes instead of fixing the igdkmd64.sys BSOD / Blue Screen Error. Software vendors release regular updates for the drivers for making them updated, providing the latest modifications. However, some bugs can always come with a new update making the machine immobile once installed.
If the Blue screen error initiates after receiving a buggy update for graphics card driver, then rolling back will work the wonder to finish it out. Windows Device Manager has the option to carry out this task without making any negative changes. To accomplish the method, follow the below steps –
- Open Device Manager as given in the 1st method.
- Move to – Display adapters.
- Double click the device.
- Right-click the – Intel(R) HD Graphics.
- Select the – Properties.
- Click the – Driver tab.
- Select the – Roll Back Driver.
- Hit – Ok.
- After the task is finished, reboot Windows 10.
3] Tweak Intel Graphics settings to solve igdkmd64.sys BSOD
Some unexpected changes in the Intel’s integrated Graphics card is another cause of igdkmd64.sys BSOD / Blue Screen Error in Windows 10.
To get rid of the Stop error code, change the graphics settings as shown in the below instructions –
- Right click on desktop and select the – Intel(R) Graphics Settings.
- Select the – 3D from the Control Panel.
- Click the – Global Settings.
- Ensure that Application Optimal Mode is Enabled.
- Next, click the Application Settings and changes them as directed –
Multi-Sample Anti-Aliasing – Use Application Settings.
Conservative Morphological Anti-Aliasing – Turn Off.
- Go back to the main menu and modify the below settings as shown –
Standard Color Correction – Application Settings.
Input Range – Application Settings.
- Click the – Apply and close the application.
- Restart the computer and check if there is igdkmd64.sys BSOD error still persists in Windows.
4] Disable Intel’s integrated GPU
After reinstalling the display driver and changing the configuration, the igdkmd64.sys BSOD may continue. In that case, you have to disable this integrated GPU from Intel.
Windows Device Manager holds all probable ways to fix a driver related incompatibilities including one to Disable problematic driver as well. To carry out this task, follow the below steps –
- Again launch the – Device Manager.
- Locate the – Display adapters.
- Double click this and unfold the drivers’ list.
- Right click the – Intel(R) HD Graphics.
- Choose the – Disable device.
- Restart your PC to save changes.
- Once the computer will be back in operation, the system will automatically switch to your discrete graphics card for display.
- Check if the error is resolved by now, it should not appear.
5] Use the SFC /Scannow tool
Corrupted system components sometimes have adverse effects on the graphics components and cause igdkmd64.sys BSOD Error. System files are major components in the machine helping the Windows to run accurately. Unfortunately, the malware can sneak through the defense of the system and damage it. Even faulty Windows update files may corrupt them and they appear as unreadable.
You can fix these corrupted system components easily by running SFC in the Elevated Command Prompt. To Execute this tool, follow the below guidelines –
- Click the Start and type in – cmd.
- Select the – Run as Administrator.
- Click the – Yes on User account control prompt.
- Copy Sfc /scannow and paste on the cmd command prompt.
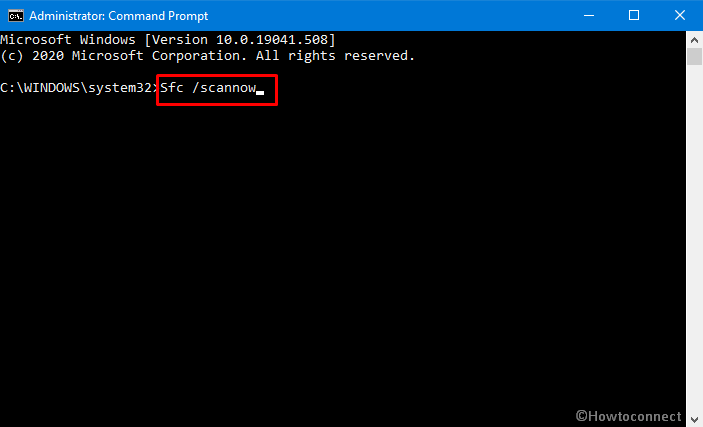
- Hit the – Enter.
- Restart the computer and check if igdkmd64.sys error still occurs.
6] Check the disk for error
Hard disk is the most important part of a machine often considered as the powerhouse of a system. However, this is also a large source of various errors and issues in Windows 10 if not maintained in good health.
System drive i.e. OS (C:) can have bad areas formed due to forcibly pulling out a cable connection or whenever the device is exposed to external damage. These poor sectors are more likely to cause igdkmd64.sys BSOD / Blue Screen Error than any other probable causes. However, you can correct these areas easily by running the disk error checking tool following underneath guidelines –
- Press the – Win+E.
- Click – This PC.
- Right click the – Local Disk (C:).
- Select the – Properties.
- Enter the – Tools tab.
- Go to the – Error checking field.
- Click the – Check.
- Choose the – Scan drive.
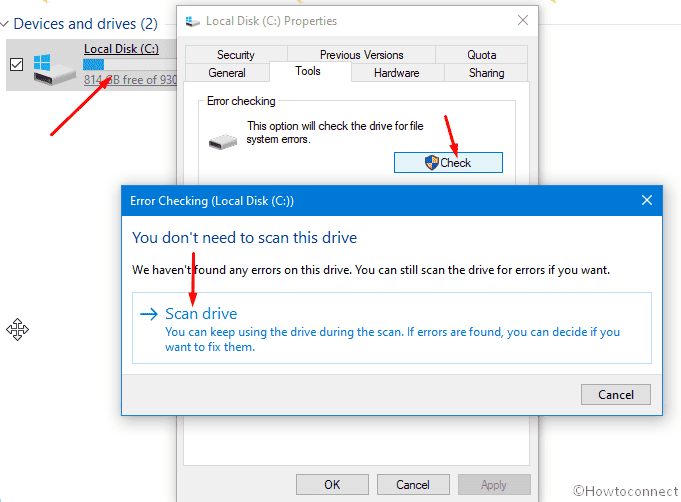
- Wait until the scanning ends.
- Restart the computer after the completion of checking.
7] Update Windows 10 to latest build to fix igdkmd64.sys BSOD
An updated version of Windows 10 is more stable and rich in advanced features to block potentially harmful bugs. Oppositely, an older version is prone to generate igdkmd64.sys BSOD than an updated one. Since Microsoft pushes cumulative updates regularly, you have to install them in time to avoid unexpected issues.
However, the Windows Updating process is independent in the machine, Microsoft delays to release patches for some devices. To avoid this, you can check from time to time for the updates manually through the Windows Settings. If available any patch, install that going through the below steps –
- Click the search on Taskbar, type update and hit the Enter.
- Select the – Check for updates.
- Scanning will start automatically followed by downloading if there is a pending update patch.
- Choose Restart now when asked.
See – 4 Ways to Update Windows 10.
8] Change the name of igdkmd64.sys file
If you are a Mac user running Windows via Bootcamp and encountering the igdkmd64.sys BSOD Error, changing the name of igdkmd64.sys file might resolve it easily.
To do that, follow the below steps –
- Go to C\Windows\System32\Drivers and look for igdkmd64.sys.
- Once found, right-click on the file.
- Select the – Rename.
- Rename it to igdkmd64Backup.sys.
- Check if the error is resolved.
Methods:
1] Uninstall the Display adapter driver
2] Roll back the Display adapter driver
3] Tweak Intel Graphics settings
4] Disable Intel’s integrated GPU
5] Use the SFC /Scannow tool
6] Check the disk for error
7] Update Windows 10 to latest build
8] Change the name of igdkmd64.sys file
That’s all!!
Repair any Windows problems such as Blue/Black Screen, DLL, Exe, application, Regisrty error and quickly recover system from issues using Reimage.
 Синий экран (BSoD) с кодом KMODE EXCEPTION NOT HANDLED — один из самых сложных в диагностике, особенно в случае, если на экране не сообщается о каких-либо сбойных модулях (.sys), его вызвавших. Однако, попробовать разобраться и решить проблему можно.
В этой инструкции подробно о возможных способах исправить ошибку на синем экране KMODE EXCEPTION NOT HANDLED в Windows 10 в зависимости от ситуации и сопутствующих появлению проблемы нюансов.
- Причины ошибки KMODE EXCEPTION NOT HANDLED
- Исправление в случае, когда возможен вход в Windows 10 или доступен экран входа в систему
- Что делать, если синий экран появляется до появления входа в систему
- Ошибка появляется через некоторое время после чистой установки системы
Причины ошибки KMODE EXCEPTION NOT HANDLED

Самая частая причина появления синего экрана KMODE EXCEPTION NOT HANDLED в Windows 10 — сбои драйверов. Но, здесь есть очень важный нюанс: часто речь идёт не о драйвере какого-то физического устройства, а о драйверах, устанавливаемых сторонними программами для своей работы. Среди таких программ можно выделить:
- Антивирусы, средства автоматической очистки системы, файрволлы, средства VPN и прокси.
- Некоторое ПО, модифицирующее систему.
- Программы, устанавливающие драйверы виртуальных устройств (приводов, сетевых адаптеров для раздачи Wi-Fi и подобные).
- Средства криптографии.
Не обязательно дело в них: причина вполне может крыться и в драйвере реального физического устройства, но стоит помнить и о такой возможности.
Ещё одна возможность — какие-либо проблемы с оборудованием, не обязательно его неисправность. К примеру, плохо подключив жесткий диск или SSD (или подключив его неисправным кабелем), также можно получить рассматриваемую ошибку. Поэтому, если вы что-то делали с оборудованием компьютера (или перевозили его с место на место, что тоже иногда ведет к проблемам из-за тряски), учитывайте этот момент.
И ещё одна важная деталь: если синий экран KMODE EXCEPTION NOT HANDLED указывает на какой-либо файл .sys (в скобках после кода ошибки), обязательно попробуйте найти в Интернете, что это за файл и к какому драйверу или программе он относится (поиск на английском обычно более результативен), возможно это даст необходимую информацию о том, что именно вызывает проблему.
Исправление ошибки в случае, когда Windows 10 запускается или отображается экран входа в систему
Внимание: если ошибка появляется после завершения работы Windows 10 и последующего включения компьютера или ноутбука, но не появляется после перезагрузки, попробуйте отключить быстрый запуск Windows 10.
Относительно простой случай — появление ошибки уже после входа в Windows 10 или хотя бы доступность экрана входа в систему, с которого мы тоже можем выполнить некоторые действия. В этой ситуации рекомендую использовать следующие шаги:
- До очередного появления синего экрана перезагрузите компьютер или ноутбук в безопасном режиме. Если система загружается, для этого вы можете нажать клавиши Win+R, ввести msconfig и нажать Enter, после этого на вкладке «Загрузка» включить безопасный режим, сохранить параметры и выполнить перезагрузку. Если вам доступен только экран блокировки, нажмите по изображенной справа внизу кнопке питания, затем, удерживая Shift, нажмите «Перезагрузка». На синем экране перейдите в «Поиск и устранение неисправностей» — «Параметры загрузки», а в параметрах загрузки нажмите клавишу 4 для входа в безопасный режим. Подробнее: Как зайти в безопасный режим Windows 10.
- Если непосредственно перед появлением проблемы вы обновляли какие-то драйверы, откатите их в диспетчере устройств, удалите, или установите другой драйвер в безопасном режиме.
- Если вам известно, какая программа вызвала сбой, удалите её в безопасном режиме (лучше всего через Панель управления — Программы и компоненты).
- Если вам неизвестно, что вызывает сбой, но синий экран появляется через некоторое время после появления рабочего стола: попробуйте убрать все программы (особенно установленные в последнее время) из автозагрузки. Как это сделать: Автозагрузка в Windows 10 — как убрать программы или добавить их.
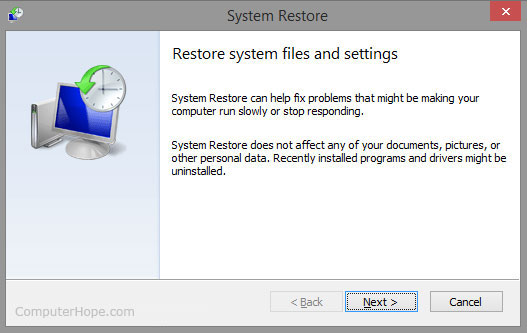
- Если недавно проблема не появлялась, а что-либо на компьютере не устанавливалось, попробуйте использовать точки восстановления (Панель управления — Восстановление). Подробнее: Точки восстановления Windows 10.
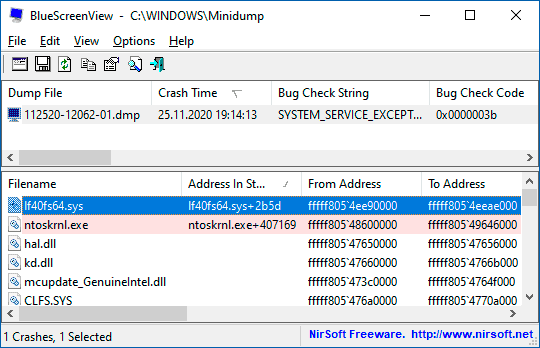
- Если имя сбойного файла .sys не отображается на экране с ошибкой, попробуйте использовать программу BlueScreenView, доступную на сайте https://www.nirsoft.net/utils/blue_screen_view.html. Она может показать подробную информацию о том, что вызвало (какой файл) ошибку. Например, для написания этой статьи я использовал старую программу Lock Folder, так как точно знал, что драйвер из неё может вызвать указанный синий экран в Windows Синий экран я получил (но с другим кодом) и в BlueScreenView видно, что виноват файл lf40fs64.sys — как раз от этой программы.

Если синий экран KMODE EXCEPTION NOT HANDLED появляется до входа в систему
Случай, когда сбой происходит до входа в систему сложнее, но проблему иногда можно решить, не прибегая к переустановке системы:
- Вам потребуется загрузочная флешка Windows 10 в той же разрядности, которая установлена на вашем компьютере или ноутбуке. Сделать её можно и на другом устройстве. Флешку UEFI можно записать даже на телефоне Android.
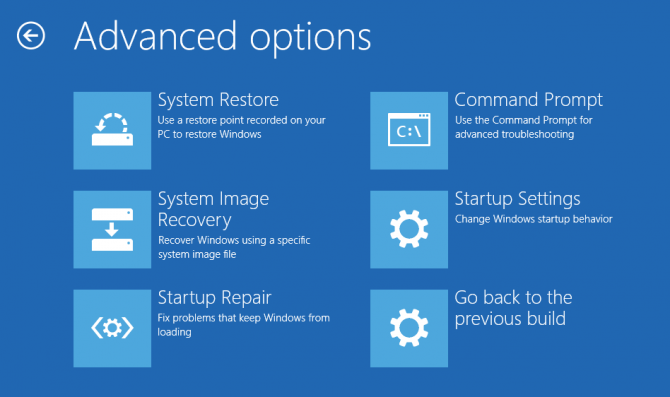
- Загрузите проблемный компьютер с этой флешки, выберите язык на первом экране, а затем нажмите «Восстановление системы» слева внизу на следующем экране и выберите «Поиск и устранение неисправностей».

- Далее вы можете попробовать использовать точки восстановления системы или удалить последние обновления Windows 10.

- Запустив командную строку в средствах восстановления, вы можете включить безопасный режим для системы, уже установленной на компьютере, используя команду
bcdedit /set {default} safeboot minimalс последующей перезагрузкой компьютера уже с основного HDD или SSD.


Ошибка появляется через некоторое время после чистой установки системы
Если ошибка KMODE EXCEPTION NOT HANDLED появляется всегда через какое-то время после установки/переустановки Windows 10, возможно, причина в том, что система сама загружает драйверы для оборудования и какие-то из них работают неправильно в вашей системе.
Возможное решение для такой ситуации: заранее разместить скачанные вручную драйверы оборудования с официальных сайтов производителя материнской платы ПК или ноутбука, произвести установку без подключения к Интернету, а затем вручную установить заранее подготовленные драйверы. При желании также можно отключить автоматическое обновление драйверов в Windows 10.
В случае, если всё ещё нужна помощь, постарайтесь подробно описать в комментариях все детали, которые вам известны о появлении ошибки на вашем компьютере: после чего стал появляться синий экран, в какие именно моменты он появляется и любые дополнительные детали. Возможно, решение найдётся.
Windows operating system is one of the most used operating system for both PC and laptop throughout the world. There are several versions in windows OS such like windows7, windows8, windows 10 etc. Nowadays many users use updated version windows 10. Whatever it is “system thread exception not handled” (igdkmd64.sys) error is very common problem for windows users. It can occur anytime during starting or doing any random work. But it generally occurs at boot time. During error showing time a blue screen appears before users and SYSTEM_THREAD_EXCEPTION_NOT_HANDLED is showed in the error message. Then you will see that keyboard or mouse won’t work. You may think that your computer gets damaged or maybe you get tensed about your favorite device seeing such kind of error. But It’s not a big deal to get free from this error.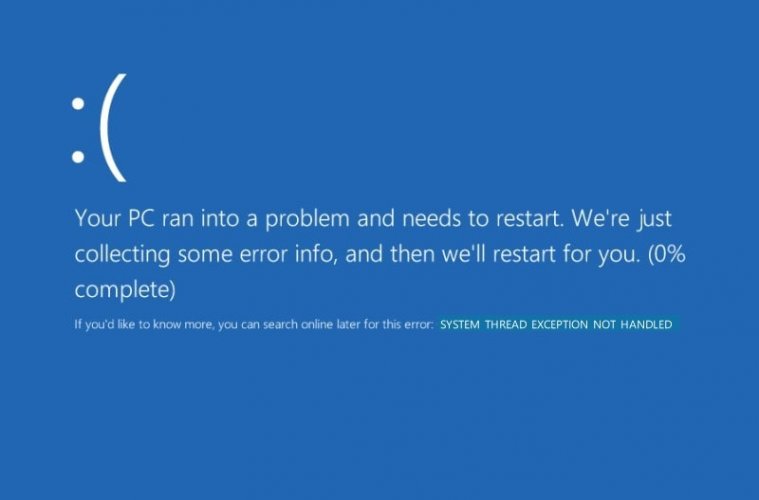
There are some easy, flexible and effective solution to solve the problem. We are here going to show you that kind of fruitful solution to make you tension free. When you get the error, you have to close your device using power button. You should press the button again and again until it gets switched off. Then power it on and try to solve the issue through a recovery option.
Contents
- 1 Fix Unbootable Windows PC using SFC Command
- 2 Update Drivers
- 3 Restore your Computer to an Earlier Time
- 4 Rename the driver which is responsible for the error
- 5 Disable hardware acceleration
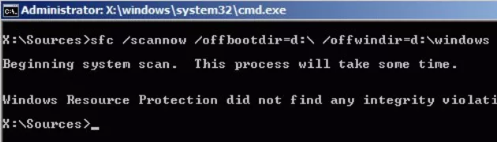
Fix Unbootable Windows PC using SFC Command
We assume that you got a recovery option (Continuously Press F8 at Boot Time). Then follow the following steps to get recovered:
- Go into Troubleshoot, then Advanced options, and then Command Prompt
- Type sfc /scannow/offbootedir=C:\ /offwindir=C;\windows and press Enter

- Then type bcdedit /set {default} bootmenupolicy legacy and run it pressing Enter
- Last of all restart the computer.
Now you may see that you could fix the error. For some reason, you may not get the recovery options and then you have to take an installation media which can be a DVD or a USB. Here are the steps of booting through a DVD or a USB:
- Enter the DVD or the USB into your computer.
- Power ON the computer and tap F2 key from keyboard to access Boot menu. To access Boot menu tapping key may vary.
- After entering Boot menu select CD/DVD or USB that you have inserted.
- If you are asked to press any key, you should press the key.
- Now click on Repair your computer that may be stayed in the lower left corner in your PC.

- Then follow the above command described in the previous section and get into safe mode. After getting into safe mode follow step-2.
Update Drivers
The faulty driver especially the graphics card driver can create the BSOD error. If you see SYSTEM THREAD EXCEPTION NOT HANDLED followed by igdkmd64.sys, you have to understand that the error can be for the Graphics card or the Intel Graphics which supply power for the Windows Operating system. Then you should uninstall the existing version and update the driver. Many BSoD like PFN List Corrupt and Kernel Security Check Failure are easily fixed by updating drivers of the system. First, you need to check for the Faulty Drivers, then Uninstall them and then Update them all at once.
Checking driver whether it is faulty or not:
- From Keyboard, Press Windows+R.
- A “Run” dialog box will be opened and there you have to type cmd. Then Press Enter
- A dialog box will be opened and then you have to type “eventvwr” next to “User name you use to log in into windows”> and then press Enter
- A dialog box will be opened and there from other options select Windows Logs option.
- Then click on system
- After clicking system, you can see whether your driver is faulty or not through checking source from source tab.
- If you see that your driver is responsible for the problem, then you must update it.
Uninstalling the problematic Drivers:
- Open RUN Command Prompt and type devmgmt.msc and then press Enter to open Device Manager dialog box.

- Click on Display adapters to open it.
- Right click on the driver and Click on Uninstall option.
- After uninstalling, restart your computer. Then you have to update the right version of the driver.
Do you know how to update it? Here are the steps of updating the driver:
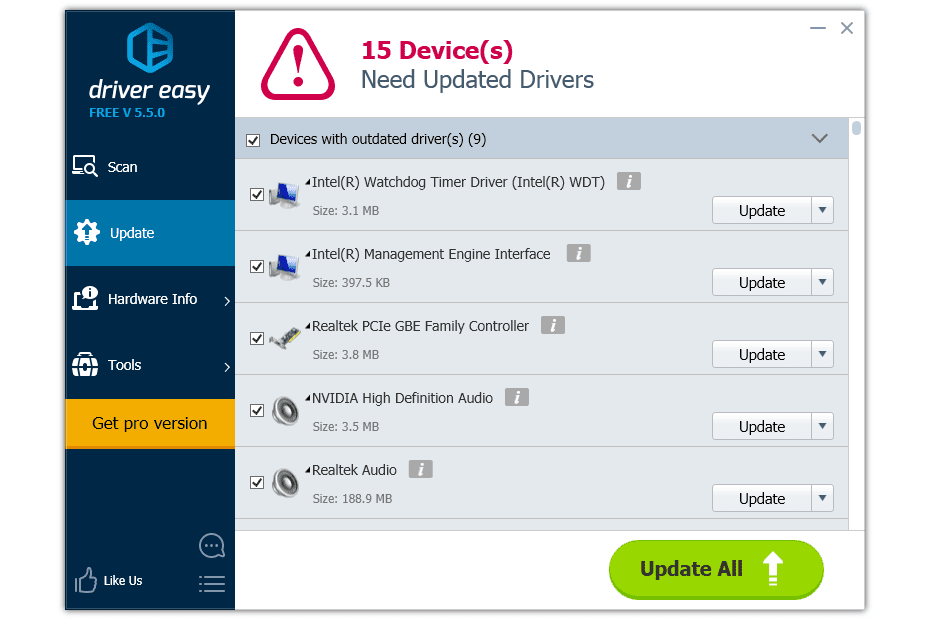
- Download and install Driver Easy
- Run the installed application and click on Scan Now. If there exists any problem, Driver Easy will detect that.
- Then in the next dialog box, you should have clicked on the Update button. A correct version of the driver will be installed automatically. Or click on Update All to download and install the correct version of all the drivers automatically into your computer.

Restore your Computer to an Earlier Time
- Insert windows installation media or recovery disc into your PC
- Select your language and tap on next
- Click on Repair option which may stay at the bottom
- Go to Troubleshoot and then Advanced options
- Here click on System Restore and follow the given instructions to complete the action

- Restart your device and see what will happen?
Rename the driver which is responsible for the error
- Go into Troubleshoot, then Advanced options, and then Command Prompt
- Type C: and press Enter
- Then type cd windows\system32\drivers and press Enter
- Then type ren Filename.sys Filename.old (In the place of filename type as yours. It may be nvlddmkm.sys nvlddmkm.old) and press Enter
- Exit from there and restart your computer
- Now check it out that system thread exception not handled blue screen error removes or not
If this doesn’t work try with solution 4.
Disable hardware acceleration
Disable hardware acceleration in Google Chrome:
- Double click on google chrome software to open it
- Type chrome://flags in the address bar and press Enter
- Scroll down to find GPU compositing on all pages
- Select disabled option from the drop-down menu and then click on relaunch to restart chrome

Disable hardware acceleration in Mozilla Firefox:
- Double click on Mozilla Firefox software to open it
- Type about:preferences#advanced in the address bar and press Enter
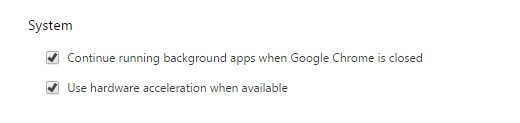
- Erase checkmark from “use hardware acceleration when available”
- Then restart Firefox
Disable hardware acceleration in Internet Explorer:
- Double click on Internet Explorer software to open it
- Click on Tools> Internet Options
- Select the Advanced tab and there give checkmark in “use software rendering instead of GPU rendering” from Accelerated graphics option
- Then click OK and restart Internet Explorer
Read Also, How to fix following Blue Screen Error of Death:
- Memory Management BSoD
- VIDEO TDR FAILURE
- Clock Watchdog Timeout
- DPC WATCHDOG VIOLATION
Here we gave you four effective solution procedures for you to solve system thread exception not handled BSOD error. We are hoping that you can fix the issue through following any of first three processes. We recommend to follow Solution 1 firstly, then Solution 2 and then Solution 3. But if it is not possible to recover error using those ways, you have to use the last solution steps. So, follow our path to recover your valuable operating system and enjoy a happy life.
-
#1
I’ve been experiencing random crashes during the past few days where my computer shuts down and displays the above message, I believe it has something to do with my on-board graphics card (Intel HD Graphics 530)
I also have a second card which is a NVIDIA GeForce GTX 960M.
I’ve attempted doing driver updates, rollbacks, re-installations, BIOS update, etc and none of these things have worked, could anyone please have a look at the zip file I’ve provided to try and make sense of the DMP files? I would greatly appreciate any help you guys could give me!
-
DESKTOP-04GFSGR-Fri_18_11_2016_183805_20.zip
940.9 KB · Views: 755
Advertisements

-
#2
It looks like, sometime after November 2nd you switched from McAfee AV (which looks like it was complicit in an earlier BSOD) to AVG.
Why not try uninstalling AVG using the Programs and Features applet in the Control Panel and follow that up by using the vendor specific, proprietary removal tool…..
http://www.avg.com/us-en/utilities
You might also want to run the same for McAfee just in case in left some remnants, it’s called MCPR (McAfee Consumer Product Removal) and a link to it can be found here
https://service.mcafee.com/webcente…&showHeader=false&_adf.ctrl-state=ddzeqkudb_4
Make sure Defender and windows Firewall are re-enabled afterwards and see if that provides any stability to your system.
-
#3
Thanks for the quick response, I’ll try doing the suggestions you’ve made and I’ll let you know if another crash happens after doing so.
-
#4
Since removing AVG/McAfee I’ve had no crashes occur, I believe my problem has been resolved.
Thank you.
Advertisements
-
#5
You’re welcome, but…..
It’s only been a few days. I’d give it a week maybe two before pronouncing the problem solved.
Continue using the computer with the native Defender and Firewall product and stay away from third party solutions for now.
After a couple weeks you can start breathing easier and perhaps re-visit the AV problem.
Personally, I just use Defender and MalwareBytes Premium and of course the native Windows Firewall.