It doesn’t matter whether you are a gamer, coder, or editor, as everybody wants their computer to run as fast as possible. SSDs proved to be a major step forward in this dream due to their absurd speed compared to HDDs. NVMe SSDs are immensely popular because they are the fastest SSDs available to consumers.
If you are able to get one for your system, you should move the Windows OS there for increased computer performance. This article will teach you how to clone Windows from SSD to NVMe.
Is It Worth Cloning Windows from SSD to NVMe?
Yes, you should always upgrade to NVMe from SSD if you can afford one and your computer is compatible. An NVMe SSD is about 20 times faster than a standard SSD. It has an average read/write speed of 4000 MB/s compared to 400 MB/s of a standard SSD. The reason is that a standard SSD uses SATA and SAS interface, while an NVMe SSD uses the latest PCIe interface.
That’s why, if your computer has an NVME SSD, you should clone Windows from SSD to NVMe. It will increase your system performance significantly and provide many other benefits.
Benefits of Moving from SSD to NVMe
| ⏱Quicker Boot: | Once the Windows is cloned to the NVMe drive, the boot time for your system will be reduced significantly. Since an NVMe drive is much faster than an SSD, the computer will be able to load up the Windows operating system files in no time. |
| ?Better Gaming: | Upgrading from SSD to NVMe will also boost the gaming performance of your system. A faster hard drive means fewer lags and glitches during your gameplay. It will also reduce the game load time by a lot. |
| ?Improve Computer Performance: | An NVMe drive is much faster and has low latency, so your computer performance will become top-notch. You will be able to perform all the actions at a much higher speed due to its high read and write speed. |
| ?Longer Battery Life: | If you are using a laptop, upgrading to NVMe SSD can increase your device’s battery life. That’s because NVMe drives are more power efficient than standard SSDs. These drives are also sturdier than their competitors. |
Best Tool to Clone Windows from SSD to NVMe Recommend
You are going to need a Windows cloning tool to clone Windows from SSD to NVMe. There is no in-built tool in Windows to help you in this process. The best tool to clone Windows without any complex processes or issues is EaseUS Partition Master. It is a complete toolbox for hard drives and can easily clone one drive to another, including a system drive.
The process required to clone Windows from SSD to NVMe is easy to follow and fast in this tool. You can download and use EaseUS Partition Master to clone Windows for free.
Key Features
- 4K Alignment: Even the fastest NVMe SSDs are also prone to the accumulation of junk data in the drive. It results in degraded computer performance. With EaseUS Partition Master, you can run 4K Alignment on NVMe SSD to restore their speed by allowing it to adopt the smallest 4K sector to store data.
- Cluster Size Adjustment: When using EaseUS Partition Master, you no longer need to format your NVMe drive to change cluster size. It allows you to adopt the cluster size of your choice without affecting the data in the drive.
- Wipe Partition: After you have moved to the new NVMe SSD, you can wipe clean the old SSD using EaseUS Partition Master. It will permanently clean the data off the drive to ensure no one can access your data.
- Clone Partitions: Want to transfer data from one partition to another? EaseUS Partition Master allows you to clone one partition to another in a few simple clicks. The process will be extremely fast, and no data will be lost during the process. You can even clone system drives without any issues.
Guide to Clone Windows from SSD to NVMe SSD in Simple Clicks
As mentioned above, the process to clone Windows from SSD to NVMe SSD is simple and quick when using EaseUS Partition Master. Once you have installed this tool and attached the new NVMe SSD to your system, you are ready to clone Windows. Follow the guides given below to flawlessly clone Windows from SSD to NVMe SSD in simple clicks.
1. Clone Windows from SSD to NVMe SSD
If the NVMe drive is for another computer and you want to clone Windows OS and other programs from your old computer, follow this guide. By cloning Windows from your older computer, you can easily move all your settings, programs, and the same OS to the new computer. Follow these steps to clone Windows from SSD to NVMe SSD:
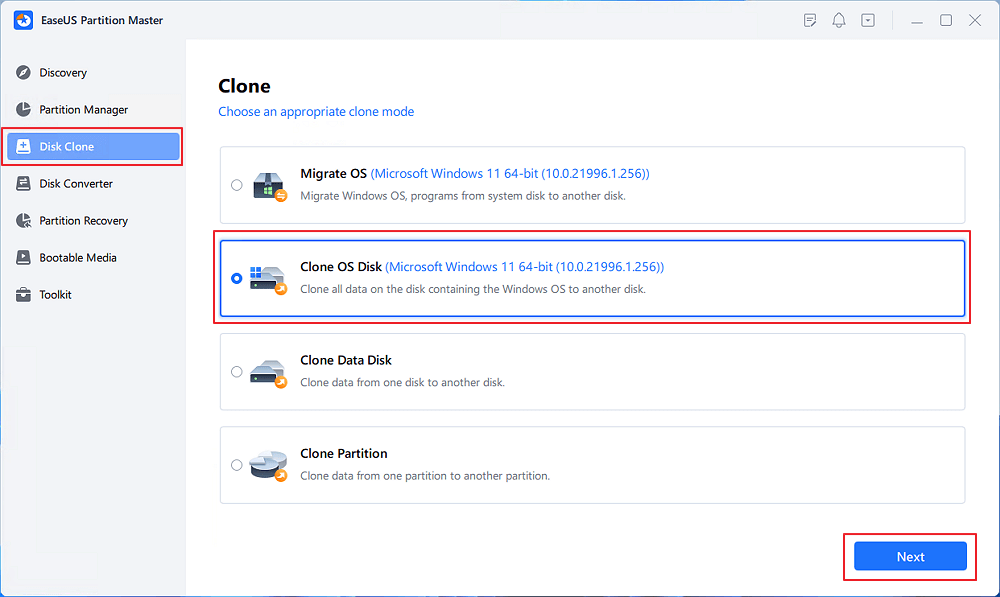
Step 1. Launch EaseUS Partition Master, go to the Disk Clone tab, select «Clone OS Disk» and click «Next».
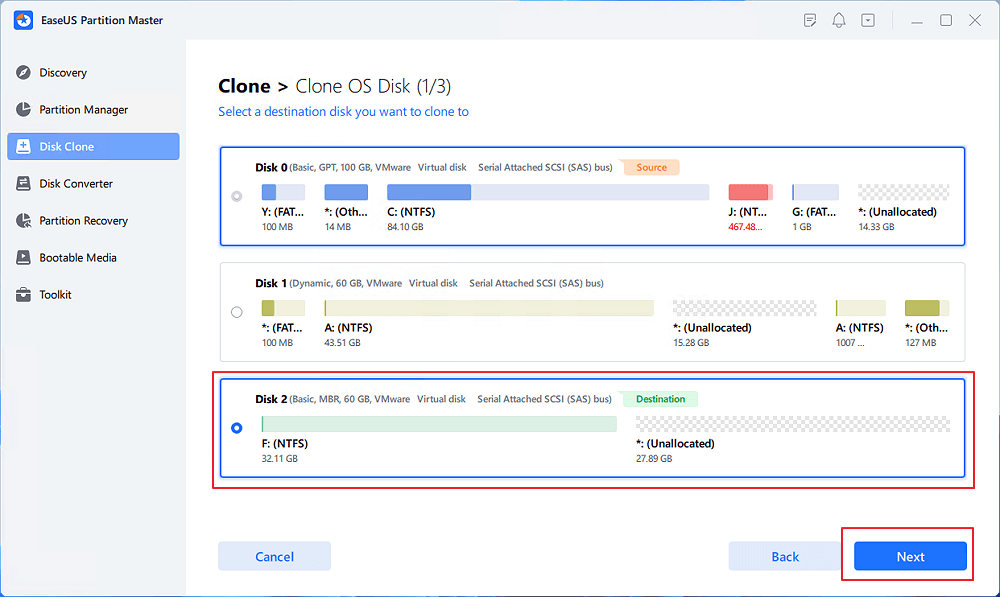
Step 2. Select the target new drive where you want to clone the OS to, and click «Next».
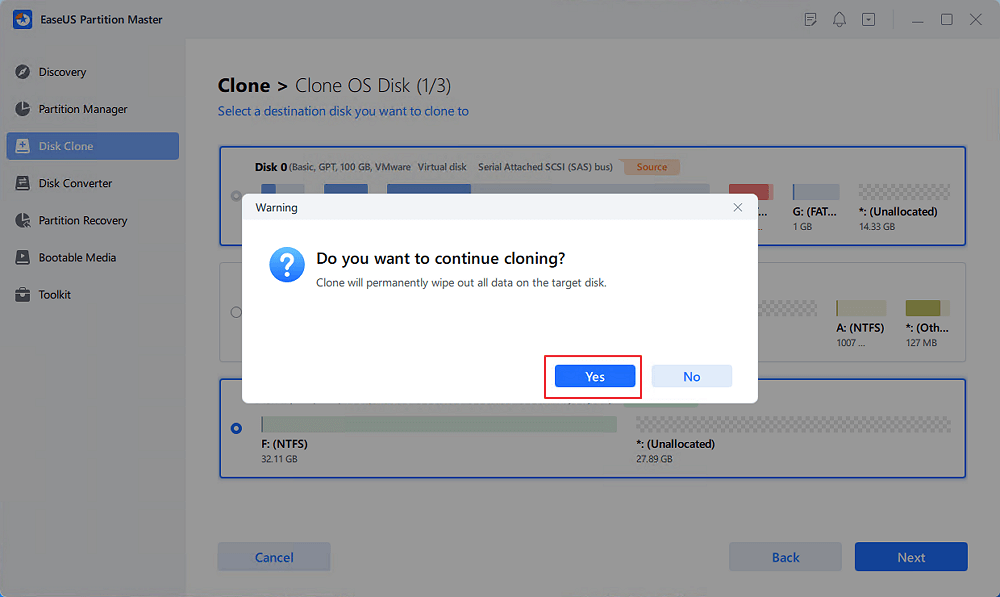
Click «Yes» to confirm that you want to continue the OS disk cloning process.
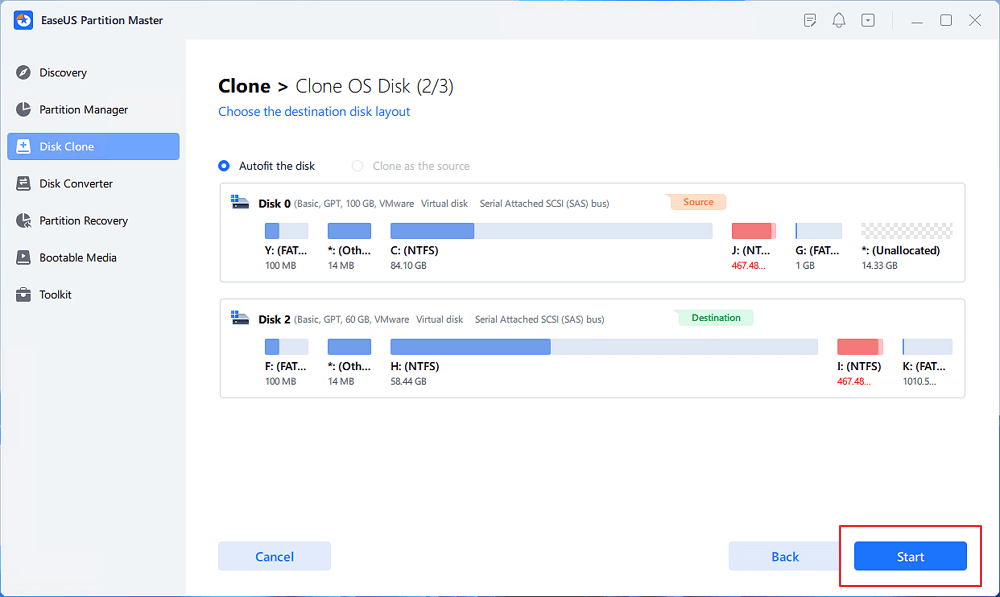
Step 3. View the disk layout, and click «Start» to begin the OS cloning process.
Step 4. When the process completes, you’ll see a confirming message, asking «if you want to start up computer from the clone target disk».
- Reboot Now means to reboot your PC and configure the computer to boot OS from the new disk immediately.
- Done means you want to make the changes later.

2. Migrate OS from SSD to NVMe
In the case of copying the Windows OS from an SSD to an NVMe SSD on the same computer, follow the steps mentioned in this section.
Moving your Windows OS to a faster drive will mean a faster boot time and increased computer responsiveness and performance. Use these steps to migrate OS from SSD to NVMe:
Steps to migrate OS to HDD/SSD:
- Run EaseUS Partition Master, and select «Clone» from the left menu.
- Check «Migrate OS» and click «Next».
- Select the SSD or HDD as the destination disk and click «Next».
- Check Warning: the data and partitions on the target disk will be deleted. Make sure that you’ve backed up important data in advance. If not, do it now.
- Then click «Yes».
- Preview the layout of your target disk. Then click «Start» to start migrating your OS to a new disk.
- After this, click «Reboot Now» or «Done» to determine if you want to reboot the computer from the new disk immediately.
«Reboot Now» means to keep the changes instantly, while «Done» means you need to restart the computer later manually.
Note: The operation of migrating OS to SSD or HDD will delete and remove existing partitions and data on your target disk when there is not enough unallocated space on the target disk. If you saved important data there, back up them to an external hard drive in advance.
3. Make NVMe Bootable
Once you have completed the process to clone Windows from SSD to NVMe SSD, you need to set the new drive as the boot drive. Only then will your computer reboot using the Windows OS located in the new NVMe SSD. You will need to access your computer’s BIOS settings using the following steps to make NVMe bootable:
Step 1: Reboot your computer after cloning Windows OS and press the BIOS key to access the BIOS settings of your computer. The BIOS key differs for different computer models and can be F10, F12, F1, F2, DEL, or Esc.
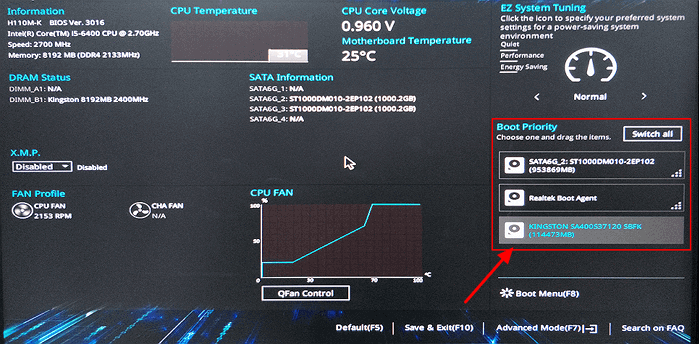
Step 2: Use the arrow keys on your keyboard to find the «Boot» option in BIOS settings. Here find the «Boot Device Priority» option or a similar one.
Step 3: Now, use the «+» or «-» keys to give your new NVMe drive the highest boot priority. When done, press “F10” to save and exit the BIOS interface and restart your system.
Final Verdict
In a nutshell, moving your Windows OS to the new NVMe drive is the recommended choice. However, it isn’t a simple process, and you need a trusted and reliable cloning tool. EaseUS Partition Master is an excellent tool that allows you to clone Windows from SSD to NVMe in no time. With it, you can clone Windows to a new computer or migrate OS within the same computer.
FAQs about Clone Windows from SSD to NVMe
The process of cloning Windows from SSD to NVMe SSD can be confusing. That’s why below are answers to some FAQs regarding this topic from the internet:
1. Why Clone SSD to NVMe Won’t Boot?
The most likely reason for the newly cloned Windows OS in NVMe SSD not booting is its low booting priority. You need to change the booting order in the BIOS settings of your computer to assign NVMe Drive the highest booting priority. It can be done through the «Boot» settings in BIOS.
2. How to transfer OS from SSD to M.2?
You can easily transfer OS from SSD to M2 with the help of EaseUS Partition Master. It is an incredible OS cloning tool that provides a simple way to clone a system from one drive to another. During the cloning process, your destination device must be equal to or larger than the source drive.
3. Can you transfer OS from SSD to NVMe?
Yes, you can transfer OS from SSD to NVMe. You will need a third-party tool like EaseUS Partition Master to transfer OS from SSD to NVMe. It is a reliable and secure tool with a quick and straightforward cloning process. You can also download and use this tool for free.
Привет, друзья. В этой публикации рассмотрим, как перенести Windows 10 на SSD M.2. Казалось бы, тема клонирования Windows с одного накопителя на другой универсальная, и здесь просто нужно подобрать оптимальный для себя способ клонирования. Но когда лично я стал переносить Windows 10 на SSD M.2, не все использованные мной инструменты завершили операцию успешно, при том, что с переносом операционной системы на обычные диски HDD и SSD SATA эти инструменты справлялись отлично. Поэтому я решил написать отдельную статью о переносе Windows 10 именно на накопитель SSD M.2 с поддержкой NVMe. И я решил выбрать для переноса системы универсальный инструмент, который подойдёт для всех накопителей SSD M.2, а не только для накопителей отдельных производителей. Это и универсальный инструмент, и точно рабочий, но самое главное – он обеспечивает самый простой способ решения поставленной задачи. И это программа AOMEI Backupper Professional.
Как перенести Windows 10 на SSD M.2
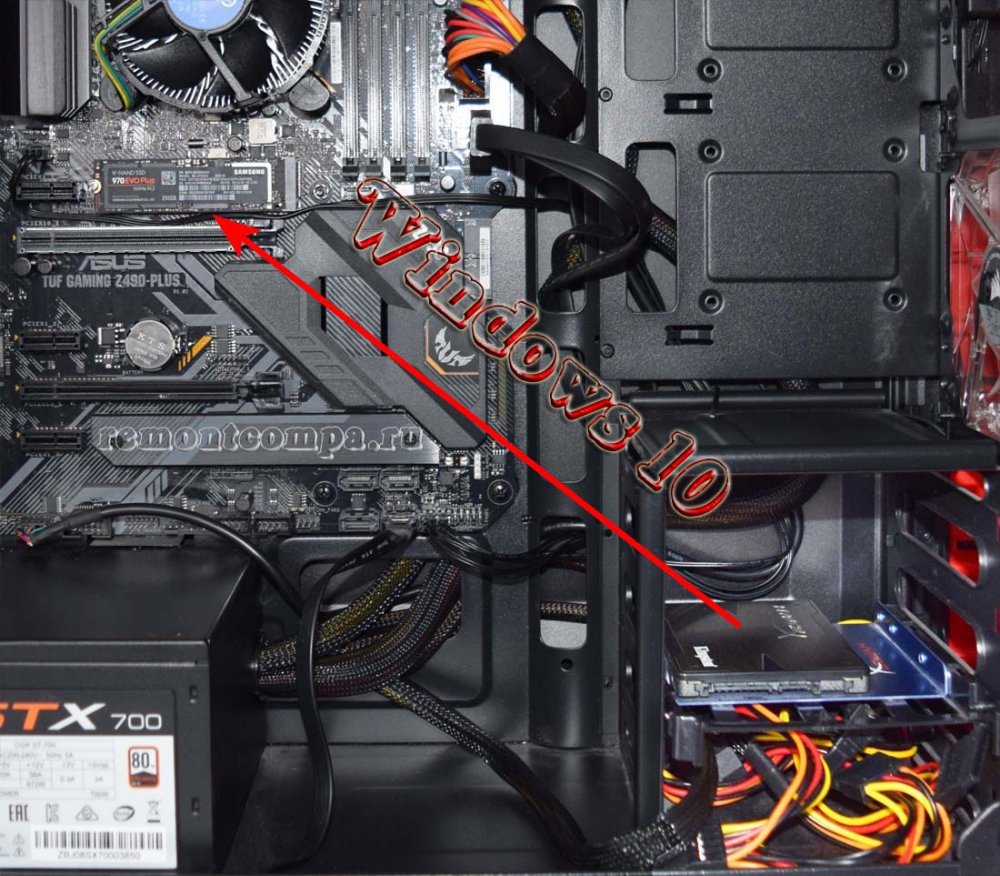
Как перенести Windows на SSD M.2 NVMe мы рассмотрим на примере Windows 10, но версия операционной системы здесь не принципиальна. Если вы используете Windows 8.1 или Windows 7, изложенное ниже подходит вам в равной степени. Чтобы на SSD M.2 можно было перенести Windows, он, соответственно, должен быть видим операционной системой, а для этого его необходимо правильно подключить к компьютеру. Кстати, насчёт подключения, гляньте статью сайта «Как подключить SSD M.2 к компьютеру» и проверьте, правильные ли вы настройки в BIOS сделали.
 Для переноса Windows будем использовать программу AOMEI Backupper в её платной редакции Professional. Только редакция Professional предусматривает интеллектуальное клонирование Windows на другие диски – клонирование с автоматической коррекцией системного загрузчика, дабы он загружал клонированную операционную систему, находящуюся уже на новом диске компьютера. AOMEI Backupper в редакции Professional – платная программа, но вы можете использовать её совершенно бесплатно, активировав бесплатным лицензионным ключом, привязанным к конкретной версии программы. Детали смотрим в статье «Бесплатный ключ для программы AOMEI Backupper Professional 6.4».
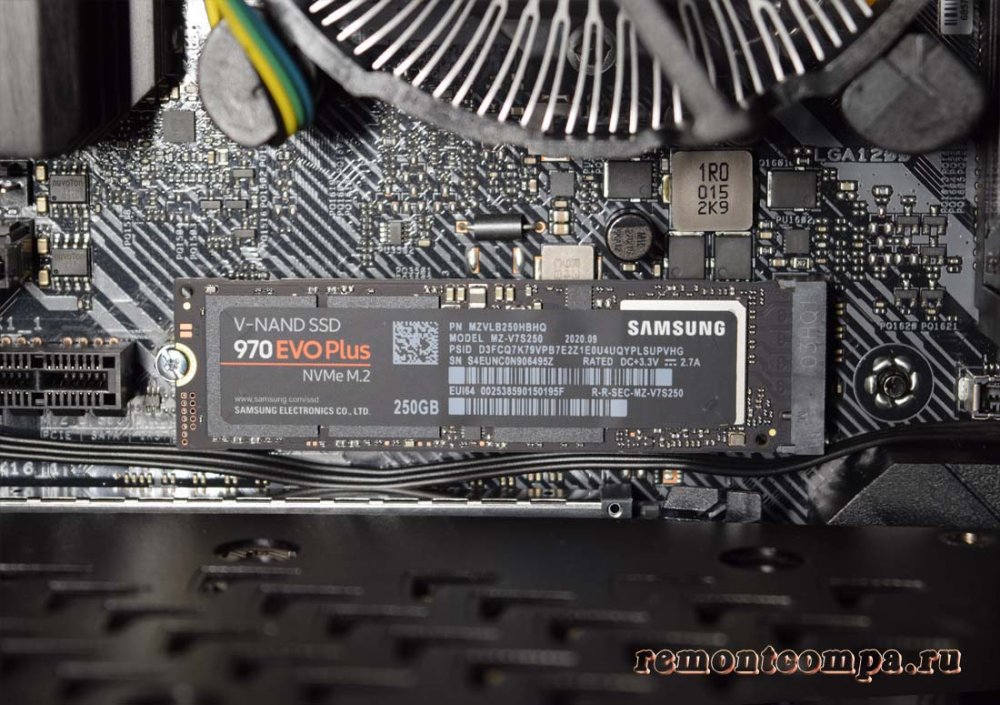
Клонирование Windows 10 на SSD M.2 в программе AOMEI Backupper Professional
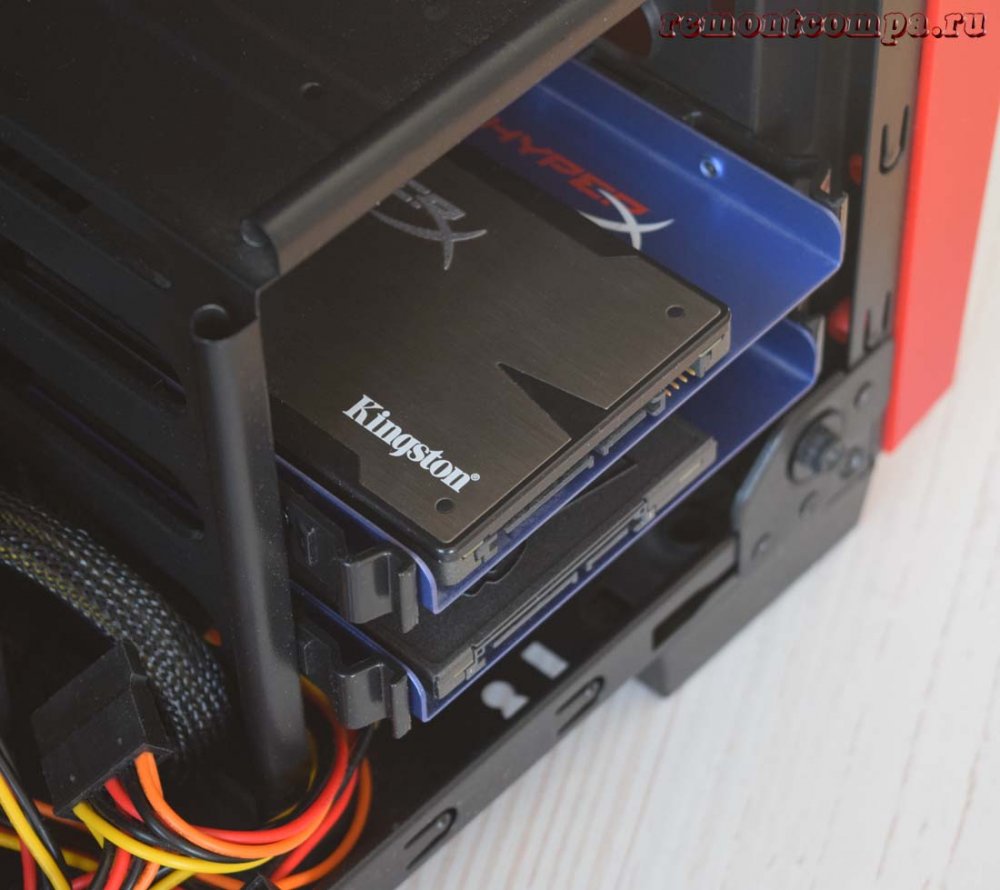
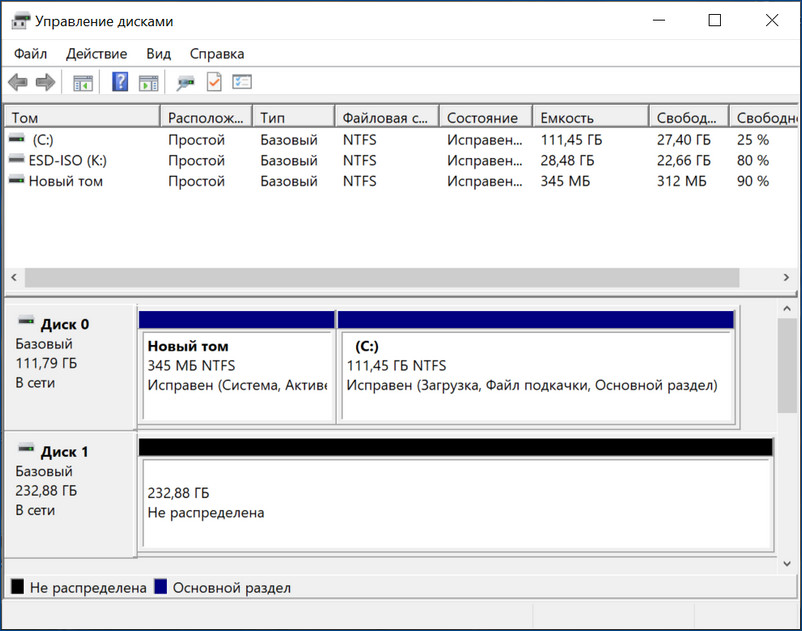
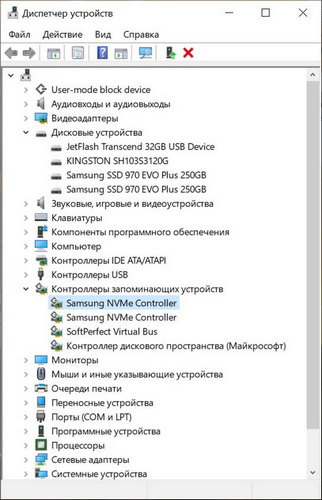
Условия переноса Windows 10 у нас элементарные: имеем наработанную систему на старом SSD SATA номинальным объёмом 120 Гб, и имеем новый SSD M.2 NVMe Samsung 970 EVO Plus с номинальным объёмом 250 Гб, чистый, без разметки. Вот как эта ситуация выглядит в управлении дисками.
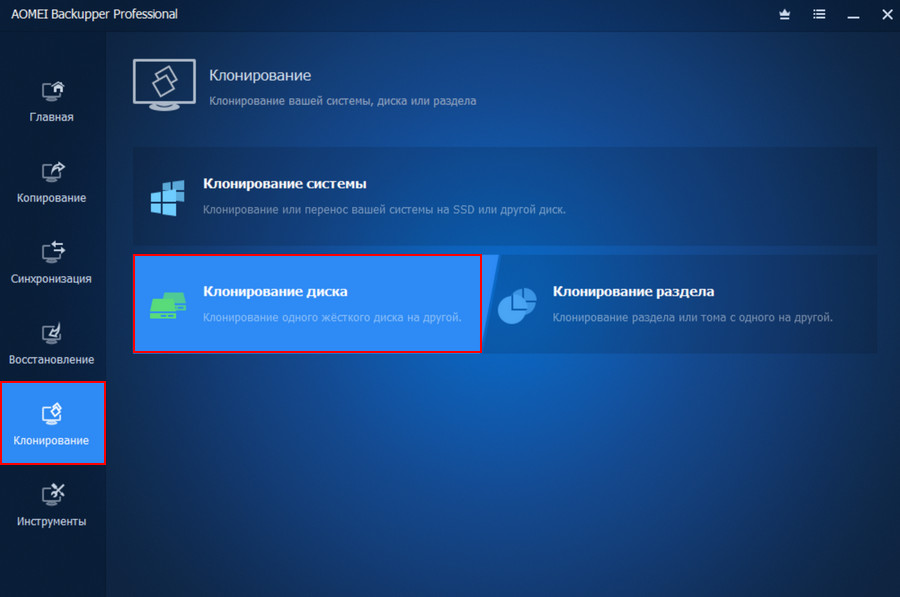
И давайте клонируем операционную систему с SSD SATA на SSD M.2. Запускаем AOMEI Backupper Professional. Идём в программный раздел «Клонирование», запускаем функцию «Клонирование диска».
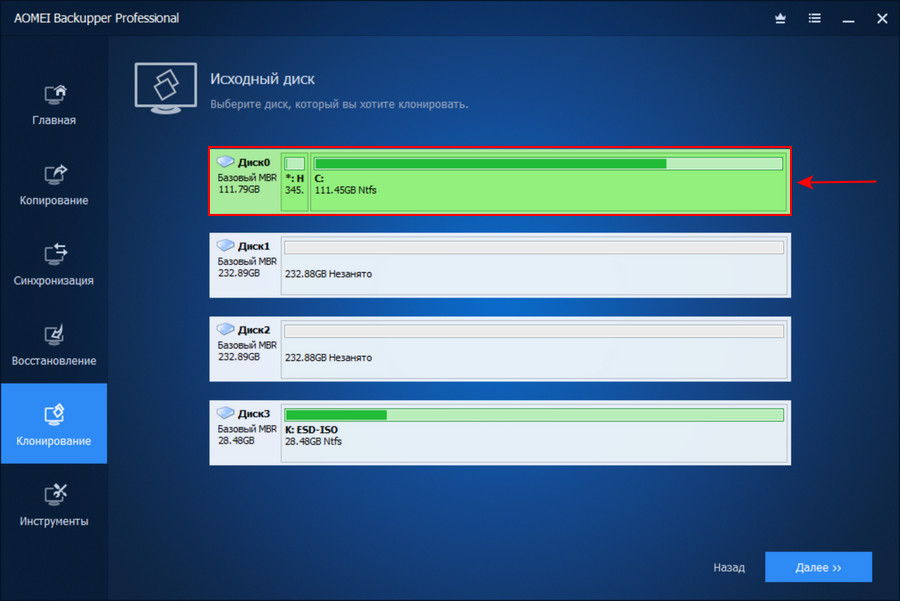
В качестве исходного диска указываем SSD SATA. Жмём «Далее».
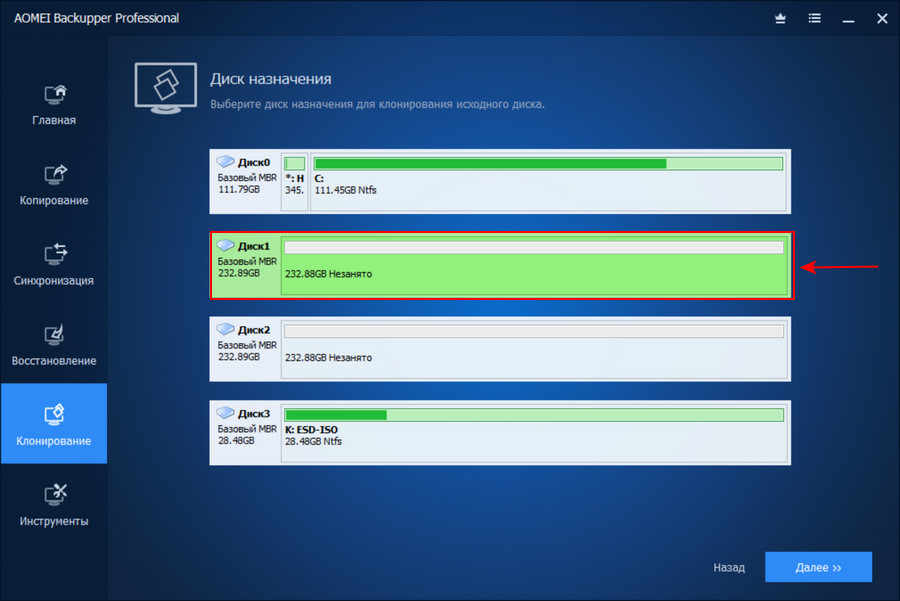
 В качестве диска назначения указываем всё чистое дисковое пространство нового SSD M.2.
На этапе сводки операции активируем опцию «Выравнивание SSD», это нужно для корректной разметки накопителя. Если интересно, подробнее о выравнивании разделов, зачем это нужно, и почему это важно, смотрим здесь. И жмём «Запуск».

Ожидаем завершения операции, наблюдаем её прогресс в окне программы.
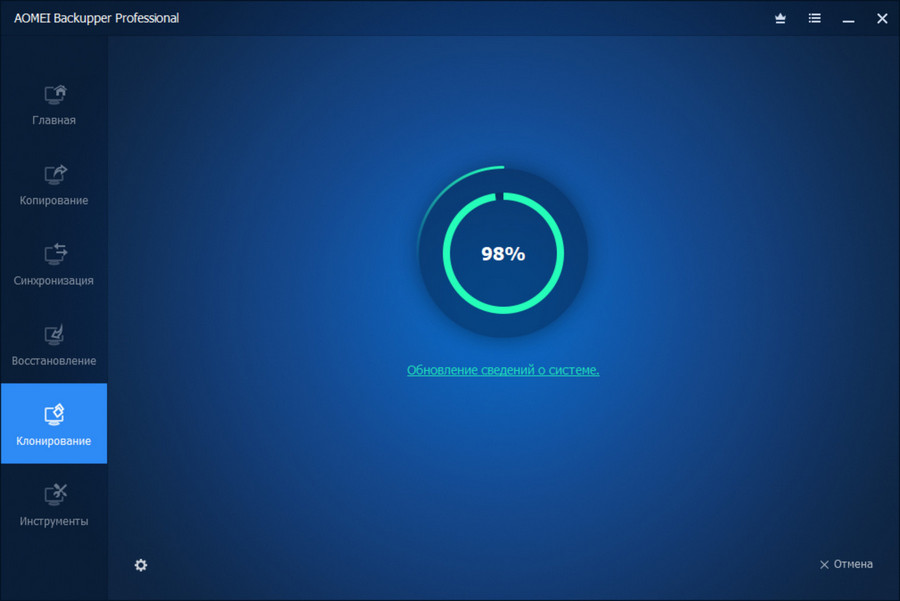

И всё – готово.
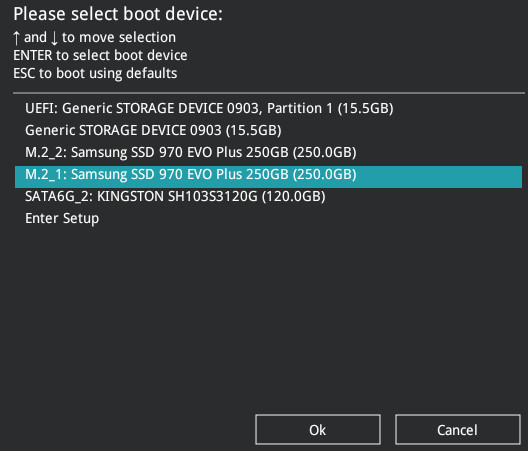
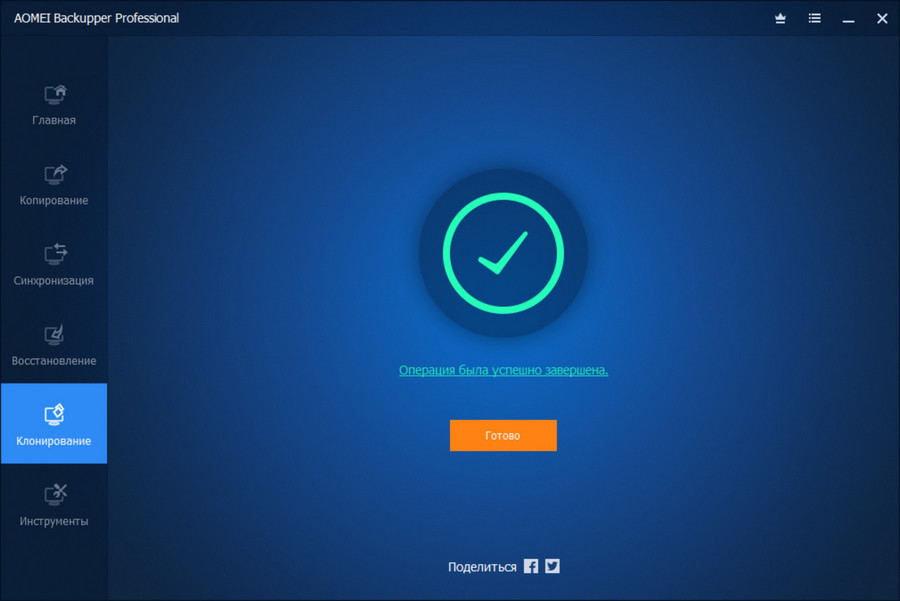 Вот так просто происходит перенос Windows 10 на другой диск, и более ничего не нужно. Просто перезагружаем компьютер и в приоритете загрузки BIOS выставляем новый накопитель SSD M.2.
 И уже внутри клонированной «Десятки» можем посмотреть на ситуацию в управлении дисками. AOMEI Backupper Professional скопировала все системные разделы Windows 10. Из-за разности размера накопителей в конце дискового пространства на SSD M.2 осталась часть пространства в размере 121 Гб, эту часть потом можно оформить в пользовательский раздел.
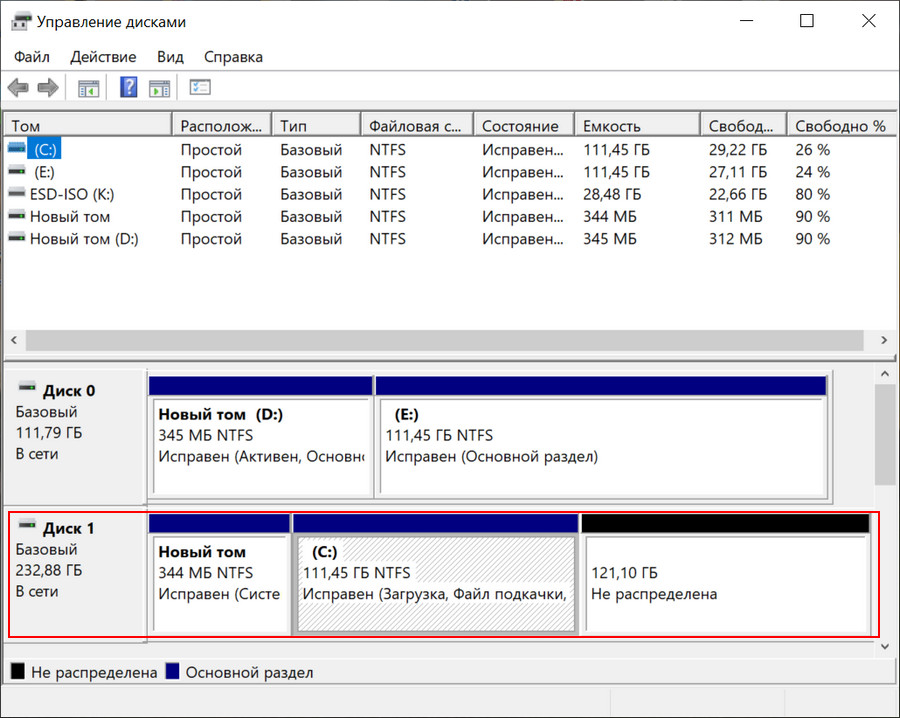
После клонирования обновите драйвера на чипсет материнской платы и драйвера накопителя SSD M.2 NVMe с сайта производителя.
Друзья, если у вас что-то не получается с программой AOMEI Backupper Professional, попробуйте другие способы переноса Windows на SSD. В статье «Как перенести Windows 10 на SSD» мы сделали подборку лучших программ, в том числе бесплатных, для этих целей: AOMEI Partition Assistant, Paragon Migrate OS to SSD, HDClone, R-Drive Image, Dism++. Годность способов переноса Windows с использованием этих программ могу гарантировать только для SSD SATA, но, возможно, эти способы подойдут конкретно в вашем случае с SSD M.2.
 A few weeks ago I received a 1TB Western Digital Black SN750 M.2 SSD, boasting an impressive 3470 MB/s read speed on the packaging. I already had a SATA SSD installed in my gaming/photo editing PC. Nevertheless, those specs got me to pick up a screwdriver and install the new M.2 SSD. The physical installation is dead simple: remove graphics card, install M.2 SSD, reinstall graphics card. I wasn’t really looking forward to a full reinstallation of Windows 10 though. There’s just too many applications, settings and licenses on that system that I didn’t want to recreate or re-enter. Instead, I wanted to clone Windows 10 from SATA SSD to M.2 SSD.
After a little bit of research, I ended up with Macrium Reflect, which is freeware disk cloning software. Long story short: I cloned the old SSD to the M.2 SSD, rebooted from the M.2 SSD, and… was greeted with a variety of errors. The main recurring error was Inaccessible Boot Device, however in my troubleshooting attempts I saw many more errors.
UEFI vs BIOS

While googling for solutions, many solutions mentioned the bootrec.exe, bcdedit.exe and diskpart commands to solve the boot issues. In the end however, my problem had more to do with the difference between BIOS and UEFI, and how storage devices are addressed. I’m still not 100% sure why, so feel free to comment below!
I was running a really old BIOS, and never properly set it up when I initially installed Windows 10 many years ago. In that old BIOS, my storage devices were set to Legacy mode instead of UEFI. This is probably because it ran Windows 7 or 8 a few years ago; or just because I never changed it from the default mode. What this in effect means is that my old SATA SSD was formatted with MBR instead of GPT (it’s a partitioning scheme). It also means that my Windows 10 installation had a “system partition” instead of an “EFI system partition”. There is a important distinction here.
All this meant I could clone and play around with bootrec and bcdedit all day long, but it wasn’t going to solve my problem. I kept getting Inaccessible Boot Device errors, the bootrec and bcdedit commands didn’t find my Windows installation, and changing drive letters with diskpart didn’t do anything either. So what did enable me to clone clone Windows 10 from SATA SSD to M.2 SSD? I had to upgrade to a UEFI Windows 10 installation, with a GPT partition style! Fortunately, that’s not as hard as it sounds.
Preparations: backup and unplug other drives
First of all, the mandatory disclaimer. Commands in this post have the potential to ruin your installation. If there’s anything important on your drives, make a backup. I’m not to blame if you lose data.
Next up, unplug other drives. I have a 6TB WD Red drive in there as well, so I unplugged that to make sure I wasn’t going to accidentally format it. Leave the PC cover off, because you might be unplugging and connecting drives a few times.
It also helps if you have another system/laptop and a few 4-8GB USB sticks nearby, so you can create a few tools that will help along the way. I created a Windows 10 Recovery Drive and (on advice of a dear friend), created a CloneZilla USB stick.
A quick check to see if this post applies to your situation is to open disk manager (right-click the Windows “start” button, choose disk management). Locate your old SATA SSD drive, right click the drive and choose properties. Navigate to the volumes tab. In the Partition style field, you should see Master Boot Record (MBR). If you already see GUID Partition Table (GPT), this fix might not apply to you. Do continue reading if your curious though… 😉
Convert from MBR to GPT
A UEFI system will only boot from a GPT drive. So I had to convert my existing SATA SSD that housed my Windows 10 installation from MBR to GPT. Fortunately, with Windows 10 Creators Edition, that’s fairly simple. Open up the Windows Settings, go to Updates & Settings, select Recovery. Find Advanced startup, and restart your system. This will cause your Windows 10 system to reboot into the advanced startup mode, which (among other options) gives you a command prompt.

Once rebooted, navigate through the options until you get a command prompt. In there, run diskpart to verify the correct drive number:

In this screenshot, you can see that Disk 0 is my old 500GB SATA SSD and Disk 1 is my new 1TB NVMe M.2 SSD. The old SSD is not GPT partitioned, the new SSD is indeed GPT style (because I played around with it during troubleshooting).
So we need to convert disk 0. Exit diskpart, and run the following command: mbr2gpt /validate

Check two things: that the command is pointing to the right drive, and that the validation completes successfully. If it doesn’t point to the right disk immediately, you can adjust the command to mbr2gpt /validate /disk:0 to force it to run on disk 0. Of course, substitute the disk number for your own configuration.
If this all works, convert the drive with mbr2gpt /convert (or mbr2gpt /convert /disk:0):

Check for errors (hopefully, none). What this mbr2gpt does (Microsoft KB article) is:
- Change the partitioning style to GPT
- Create a new EFI system partition
- Create new boot files in this new EFI system partition. This is the key thing that will ultimately allow you to boot from the M.2 drive and avoid the boot device inaccessible error!
Afterwards, run diskpart again to verify the partition style has indeed changed to GPT. Mine has, so we are ready to continue. Exit out of the command line interface and power down your system. Do not just reboot, because we need to switch to UEFI mode.
Change Legacy BIOS mode to UEFI
Power the system back on again and enter the BIOS. Each BIOS is different, so check your manual for your specific procedure. In my Gigabyte BIOS, it looks like this:

The left is MBR, the right is UEFI. I could have left CSM Support enabled and manually toggled the boot device to UEFI, but Windows 10 doesn’t require CSM Support so I disabled it entirely.
Save your settings and exit the BIOS. You should now cleanly boot into your old Windows 10 installation from your old SATA SSD. Verify all your files are still there, maybe even reboot a second time to verify everything is working as intended. Once you’re happy you haven’t broken anything, it’s time to FINALLY clone Windows 10 from SATA SSD to M.2 SSD!
Cloning your SATA SSD to the M.2 SSD
To clone the old SATA SSD to the M.2 SSD, you can use a multitude of tools. Macrium Reflex and Clonezilla are both freeware; Macrium has a nice GUI, Clonezilla is a little bit more oldskool. On my final clone I used clonezilla. Mostly because it’s a bit faster, but also because my Windows 10 install is completely shut down during the clone. Pick whichever you like.
Alright, here we go! pic.twitter.com/mRFUcvV60k
— Jon Klaus (@JonKlaus) March 22, 2019
Once the clone is completed, power down your system. You want to unplug your old SATA SSD, as having two boot disks with identical Windows installations could have pretty spectacular results. And not in a positive sense!
Once the SATA SSD is unplugged, power the system back on again. If needed, change the BIOS settings to boot from the NVMe M.2 SSD. If you are lucky, that installation might boot straight away. In my case, I was back to the dreaded Inaccessible Boot Device blue screen of death (BSOD). Let the PC loop through this blue screen routine for three times, after which it will automatically boot into the Advanced Startup settings to help you fix things. Navigate to the Command Line Prompt again; all the other troubleshooting options didn’t do much in my case.
Even though the MBR2GPT command already recreated the boot files, they will need to be changed again due to the disk clone. What we are going to do now is recreate the boot files manually with the bcdboot command. First, run the diskpart command again to verify drive letters:

In my case, C is the Windows 10 installation (check the 464GB size) and E is the EFI system partition (473MB in size). This is important for the next command.
Now, exit out of diskpart and run the following command: bcdboot c:\windows /s e: /f UEFI
![]()
This creates new boot files pointing to your C:\windows installation, deposits them on the E: drive (which is the EFI System partition), and ensures it’s in the UEFI format. Pretty much everything that I covered earlier in the post. Alright! Exit the command line interface again, and reboot. No need to power down now, since the BIOS is already in UEFI mode and the NVMe M.2 SSD is the only device attached. The system should now start your Windows 10 installation cleanly, although the first boot might take a second or two longer.
Actually, while typing this, E: might not be the right partition in this case, as it’s the OEM partition (see partition sizes in the pictures below). Most likely you will not have to use the /s and /f switches in the bcdboot command; try for yourself. Nevertheless, it worked!
Resize your partition
Wait, we’re not there yet! My SATA SSD was only 500GB, and the new M.2 one is 1TB. So this is wrong:

For this last step, it’s best to use AOMEI Partition Assistant. This is because, as you can see in the disk layout, the OEM partition is right next up to the C: drive. This blocks any expansions of said C: drive.

What we’re going to do is move the OEM partition to the far right, and extend the C: volume.

If you click proceed, AOMEI Partition Assistant will boot into a Windows PE environment, perform the necessary actions and return you to Windows 10. Check the new capacity…

Voila, you’re done! Clone Windows 10 from SATA SSD to M.2 SSD succeeded!
Update 02-2021: People commented on this post with various suggestions, alterations or other advice if this manual does not 100% fit your case. Have a look at them at the bottom of this page!
Now, for the WD_Black SN750 NVMe M.2 SSD speeds…
Well, see for yourself 😉

Again, a few disclaimers, before the entire benchmarking internet falls on top of me. For the first half of the benchmark, my system was still half loading and synchronizing files. Plus it’s still an old Windows 10 install, so far from optimized. For one, my NVMe drivers are still Windows default, which might affect speed. Also, not every motherboard is the same. I’ve got a 4-lane PCIe 3.0 bus, so that’s good, but some other boards might be quicker. Nevertheless, please take the numbers in this benchmark with not just a grain of salt, but a truck full of salt. They are mostly for “wow, this is much quicker than SATA-600!”-purposes.
I myself am pretty happy with the speeds. Over 3GB/s sequential read, with over 2.2GB/s sequential write. Random throughputs ranging from 100.000 to 300.000+ IOps. In real life: the system feels a fair bit more responsive compared to the ol’ SATA SSD. Job done!
[Disclaimer: Western Digital gave me the 1TB WD Black SN750 NVMe M.2 SSD at Storage Field Day 18. They did not request anything in return. The sole reason I wrote this post is because it took a frustrating amount of time to clone my OS to the new M.2 SSD, and I want to avoid other people from going through the same ordeal.]
Updated by
Daisy on Sep 19, 2023
NVMe refers to Non-Volatile Memory express. It is the host controller interface used to connect SSD. It has replaced the SATA interface in many instances due to its high read speeds, low latency, and low consumption. The speed of booting Windows from NVMe SSD will be optimized and enhanced. That’s why the NVMe interface is already built into many computers as a standard.

If you want higher computer read and write speeds, or want to upgrade your Windows 11/10 system, it is a good idea to clone Windows to NVMe. This article will provide a quick way to avoid installing Windows on NVMe and run Windows on an NVMe SSD. Let’s see how this works.
You can clone Windows to NVMe with professional disk cloning software, but there are some preparations you need to take care of before cloning. Let’s look at these additional actions and see a detailed step-by-step approach to help us clone Windows to NVMe successfully.
Preparations for Cloning Windows to NVMe
1. Prepare newer computer hardware. NVMe works better with Skylake chipsets or higher.
2. The motherboard needs to have an adapter for an M.2 slot that supports NVMe, such as an M.2 PCI-E x4 slot.
3. The computer supports UEFI boot mode and needs UEFI firmware.
4. If it is a new NVMe SSD, initialize it to GPT format.
5. Make sure that the space available on the NVMe SSD is larger than the space for the data on the source disk within Windows.
6. Backup all essential data on the target NVMe SSD. Because the cloned new data will overwrite the old data.
7. Download the professional cloning software: EaseUS Partition Master. This software can save time and effort and help you clone Windows to NVMe quickly.
Next, let’s see how this software works and follow the step-by-step guide to cloning Windows to NVMe.
Steps for Cloning Windows to NVMe
You can use EaseUS Partition Master to clone partitions and clone systems. It supports SSD 4K alignment, which can solve SSD cloning problems and maintain good SSD performance. And it has a good user interface and supports all Windows users.
Before using EaseUS Partition Master, please connect NVMe to the M.2 PCI-E x4 slot and make sure your computer can detect the NVMe SSD. Then, follow the steps below to clone Windows to NVMe.
Step 1. Launch EaseUS Partition Master, go to the Disk Clone tab, select «Clone OS Disk» and click «Next».
Step 2. Select the target new drive where you want to clone the OS to, and click «Next».
Click «Yes» to confirm that you want to continue the OS disk cloning process.
Step 3. View the disk layout, and click «Start» to begin the OS cloning process.
Step 4. When the process completes, you’ll see a confirming message, asking «if you want to start up computer from the clone target disk».
- Reboot Now means to reboot your PC and configure the computer to boot OS from the new disk immediately.
- Done means you want to make the changes later.
Once the cloning is complete, you can set the NVMe SSD as the boot disk and boot your computer from the NVMe. If you don’t know how to set up the boot disk, please refer to the following simple steps.
Step 1. Click F2/F8/Del to enter BIOS setup.
Step 2. Change the boot disk and set the NVMe SSD as the boot drive.
Step 3. Save the settings and exit.
- Tip
- If the cloned SSD won’t boot, you can check if you have cloned the system and set the target disk as a bootable drive.
The above describes how to clone Windows to NVMe with EaseUS Partition Master and how to set the target drive as a bootable drive. In addition to the cloning feature, EaseUS Partition Master has many more features:
- Format NVMe SSD
- Clone HDD to SSD
- Clone Windows to new SSD
- Clone Windows to another drive
If you are interested, click the link above to see the exact cloning method. If you have other problems related to disk partition, you can download EaseUS Partition Master for help.
Conclusion
If you want to clone Windows to NVMe for faster read/write speeds, you can use EaseUS Partition Master. This article provides detailed tutorials on preparing for cloning before using the tool and how to use the professional cloning tool. If you have any cloning related or partition related issues like formatting partitions, or resizing partitions. You can use this tool to solve your problems.
FAQs About How to Clone Windows to NVMe
This section lists other frequently asked questions about cloning Windows to NVMe. Please check out the questions and answers below if you have other questions.
1. Can you put Windows on NVMe?
You can put Windows on NVMe. And here are two ways to put Windows on NVMe. You can download and reinstall Windows on NVMe SSD. Or you can use EaseUS Partition Master to clone the system and partition to NVMe.
2. How do I convert Windows to NVMe?
Download EaseUS Partition Master and easily migrate Windows to NVMe SSD without reinstalling the system. And the software is very easy to use.
Step 1. Launch EaseUS Partition Master and select «Disk Clone» on the left side.
Step 2. Choose «Clone OS disk» and click «Next.»
Step 3. Select target drive and click «Next» to continue.
Step 4. Click «Yes» and choose «Start» to begin the cloning process.
3. Can you make NVMe bootable?
You can make NVMe bootable. You need to clone the OS to the NVMe SSD first. Then go to BIOS setup and change the boot order. And set the target drive to be bootable.
 Если вам потребовалось перенести установленную Windows 10 на SSD (или просто на другой жесткий диск) при покупке твердотельного накопителя или в другой ситуации, сделать это можно несколькими способами, все они подразумевают использование стороннего ПО и далее будут рассмотрены бесплатные программы, позволяющие перенести систему на твердотельный накопитель, а также пошагово показано, как именно это сделать.
В статье продемонстрированы бесплатные средства, которые позволяют без ошибок скопировать Windows 10 на SSD на современных компьютерах и ноутбуках с загрузкой UEFI или Legacy (BIOS) и системой, установленной на GPT или MBR диск. После переноса системы не забудьте установить загрузку компьютера или ноутбука с нового накопителя.
Примечание: если вам не требуется переносить все ваши программы и данные со старого жесткого диска, вы также можете просто выполнить чистую установку Windows 10, заранее создав дистрибутив, например, загрузочную флешку. Ключ при установке не потребуется — если вы устанавливаете ту же редакцию системы (Домашняя, Профессиональная), которая была на данном компьютере, нажмите при установке «У меня нет ключа» и уже после подключения к Интернету система активируется автоматически, несмотря на то, что теперь установлена на SSD. См. также: Настройка SSD в Windows 10.
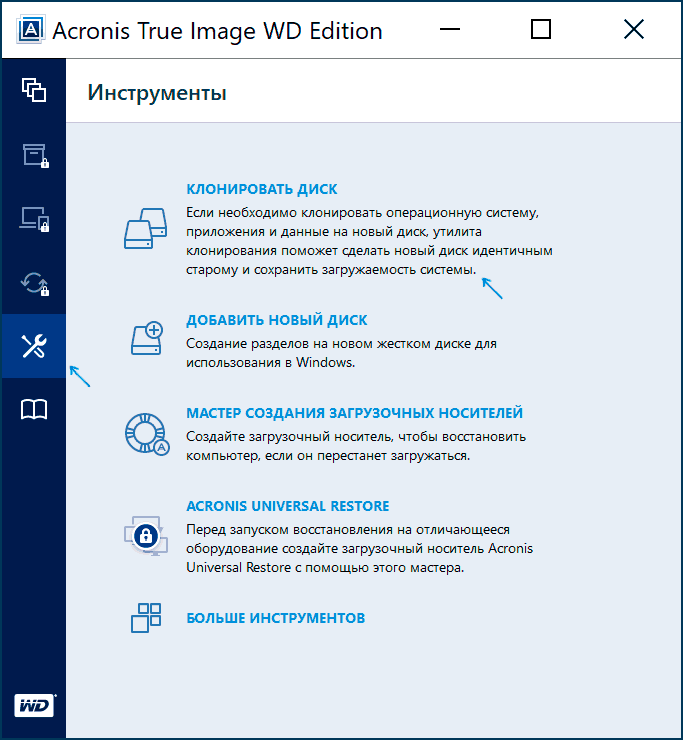
- Перенос на SSD в бесплатной Acronis True Image
- Samsung Data Migration
- Macrium Reflect
- Другие программы для переноса Windows 10 на SSD
Перенос Windows 10 на SSD в бесплатной версии Acronis True Image
Многие производители SSD в качестве программы для переноса установленной системы на свои твердотельные накопители предлагают использовать бесплатную упрощенную версию Acronis True Image, доступную на официальном сайте производителя. Такая бесплатная версия доступна для SSD следующих марок:
- WD (Western Digital)
- SanDisk
- Kingston
- Crucial
- A-Data
Программа полностью на русском языке, а сам процесс переноса не должен быть сложным даже для начинающего пользователя: весь процесс осуществляется с помощью мастера в простом или ручном режиме, позволяющем исключить отдельные папки из переноса или настроить переносимые разделы.
Подробная инструкция о программе, видео демонстрация процесса и ссылки на загрузку доступны в статье Как перенести Windows 10, 8.1 и Windows 7 с HDD на SSD с помощью Acronis True Image.
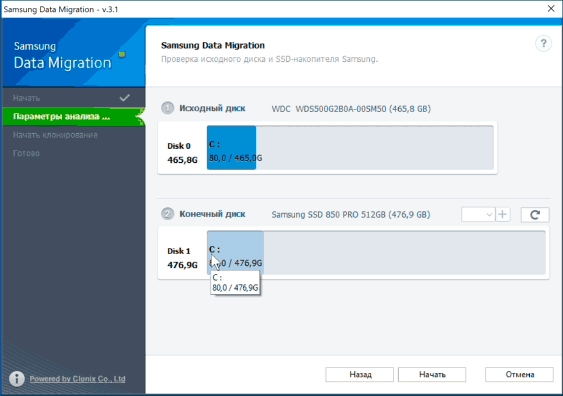
Samsung Data Migration
Диски SSD от Samsung — одни из самых популярных, а официальная программа Samsung Data Migration для переноса системы с жесткого диска или другого SSD на накопители Samsung — одна из самых простых в использовании. Обычно всё, что потребуется — указать исходный и целевой диски и начать перенос.
По завершении останется установить загрузку с нового SSD в системе и использовать старый диск для любых иных задач. Инструкция и загрузка программы доступны на официальном сайте Samsung — https://www.samsung.com/ru/support/mobile-devices/how-can-i-transfer-windows-to-my-new-ssd-samsung/
Клонирование дисков (перенос Windows 10 на другой диск) в бесплатной версии Macrium Reflect
Macrium Reflect — отличная программа для работы с резервными копиями системы, которая, помимо прочего, позволяет сравнительно легко перенести Windows 10 на диск SSD. Единственный возможный недостаток для начинающего пользователя — отсутствие русского языка интерфейса.
Однако, разобраться будет не сложно, на сайте доступна отдельная подробная пошаговая инструкция, информация об установке программы и видео, где весь процесс переноса показан наглядно и со всеми необходимыми пояснениями: Перенос Windows 10 на SSD или другой жесткий диск в Macrium Reflect Free.
Другие программы для переноса Windows 10 на SSD и особенности их использования
Есть масса других программ, позволяющих перенести Windows 10 на SSD. Но при их использовании есть существуют некоторые нюансы. Например, Intel Data Migration больше не поддерживается и не находится на официальном сайте: придется использовать другие источники программы для простого переноса системы на SSD от Intel (сам процесс переноса полностью тот же, что и при использовании Acronis True Image).
Что касается следующих программ, в них существовала возможность бесплатного переноса системы в ранних версиях, а в последних она стала доступной только после приобретения лицензии. Но: загрузив старую версию программы (нужные версии я укажу ниже, о том как это сделать в инструкции: Как скачать оригинальные старые версии программ), а иногда — слегка иную программу того же разработчика, вы можете выполнить перенос бесплатно.
MiniTool Partition Wizard Free
Функции переноса ОС на SSD в программе MiniTool Partition Wizard Free были бесплатными до определенной версии программы, в последних же обновлениях их заблокировали и перенос недоступен без приобретения лицензии. Однако, если вы найдете старую версию программы (например, 11.6), то в ней такая функция присутствует бесплатно и работает исправно.
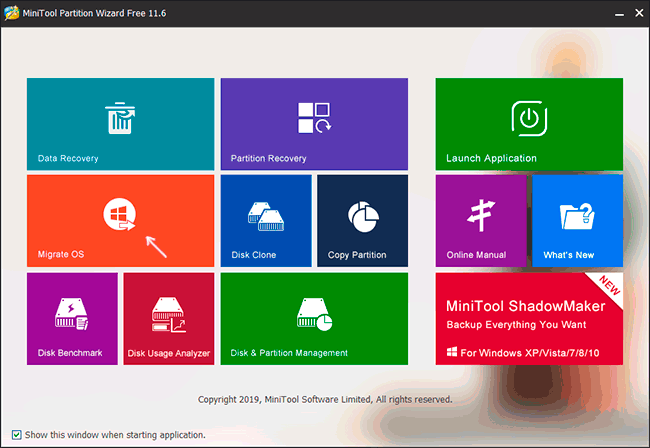
Подробно о шагах, необходимых для миграции Windows 10 на SSD в этой программе: Как перенести Windows 10 на SSD или другой диск в MiniTool Partition Wizard Free.
Aomei Partition Assistant Standard Edition
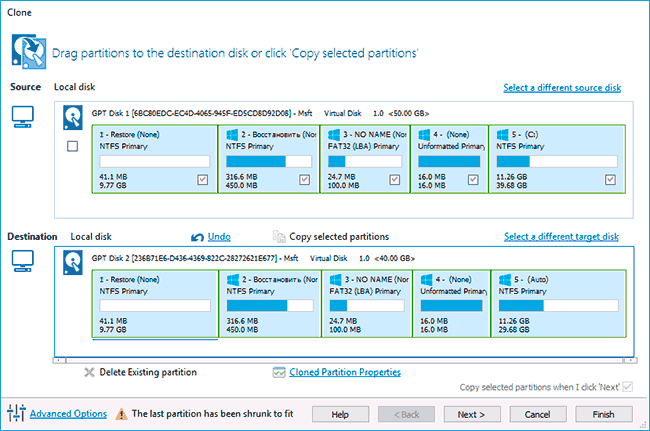
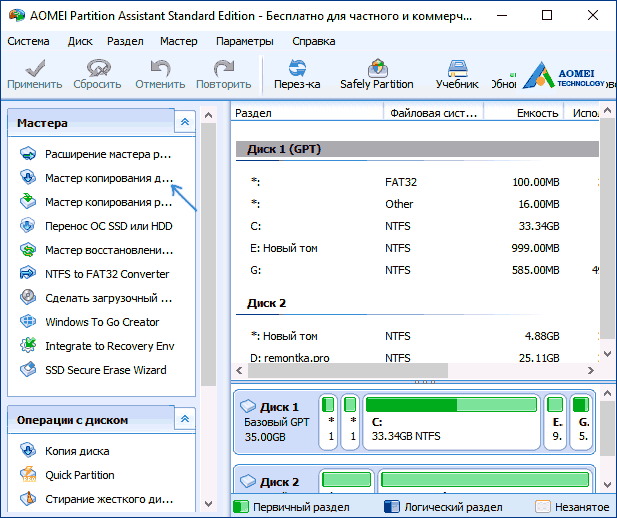
Aomei Partition Assistant Standard — удобная программа на русском языке для работы с дисками, в сегодняшней бесплатной версии которой функция «Перенос ОС на SSD или HDD» недоступна. Другая функция — «Копия диска» тоже отказывается работать. Однако, эта же функция (Копия диска) исправно работает в версии 6.6 программы (для дисков MBR будет работать и пункт «Перенос ОС на SSD или HDD).
- Перед выполнением указанных действ
- Запустите «Мастер копирования дисков» и выберите пункт «Быстро скопировать диск».

- Укажите исходный, а затем — целевой диск (диск назначения).
- Укажите, следует ли изменить размеры разделов или подогнать их под размеры целевого диска.
- Нажмите «Готово», а затем — кнопку «Применить» в главном окне программы.
- Будет выполнена перезагрузка компьютера и начнется процесс клонирования дисков (может занять продолжительное время).
- Компьютер автоматически перезагрузится, и вы получите два идентичных диска. Останется вручную перезагрузить компьютер еще раз и установить загрузку с нужного вам диска.
EaseUS ToDo Backup Free
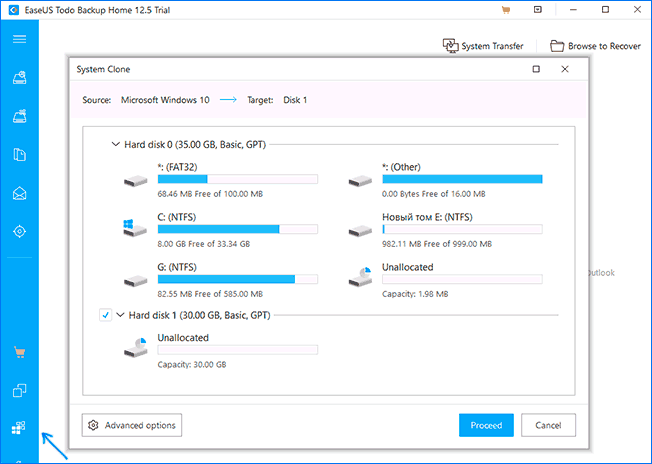
У разработчика EaseUS есть бесплатная версия программы для работы с разделами дисков — Partition Master, но в ней функции переноса системы на SSD недоступны без лицензии. Однако, если с официального сайта easeus.com загрузить другую программу, EaseUS ToDo Backup Free, то в процессе установки вы увидите предложение на один месяц включить полную версию Home.
А эта версия уже позволяет не только делать резервные копии системы, но и выполнить перенос системы:
- В главном окне программы выберите кнопку клонирования системы (два значка Windows справа внизу), а затем укажите целевой диск, отметив его галочкой.

- Нажмите кнопку «Proceed». Если вам сообщат о невозможности клонирования GPT диска или наоборот, конвертируйте целевой диск таким образом, чтобы он имел нужную таблицу разделов (Как конвертировать GPT в MBR или наоборот).
- Клонирование дисков автоматически будет запущено, а по завершении система будет перенесена на другой диск, останется настроить БИОС/UEFI таким образом, чтобы загрузка происходила с нужного диска.
Надеюсь, описанных методов окажется достаточно для ваших целей. Если вы можете предложить свои варианты, буду рад прочесть о них в комментариях.