Klif.sys or Kaspersky Lab Intruder Filter is an integral part of Kaspersky Antivirus developed by Kaspersky Lab. This file enables the Kaspersky Antivirus to filter out the intrusions in near real-time actively. The same file is used in Zone Alarm by CheckPoint Software Technologies. A few Windows users who are using Kaspersky Antivirus complained about the system’s slowness and the Klif.sys blue screen error soon after booting up. The worst part is that you won’t even get a chance to customize the settings from Kaspersky Control Panel; you shall be directed directly to the blue screen and followed by a restart.
If you have been facing the blue screen error with any of the below-mentioned error, then you are in the right spot. In this article, we shall be showing you many methods to fix the Klif.sys blue screen error in your Windows 10 device.
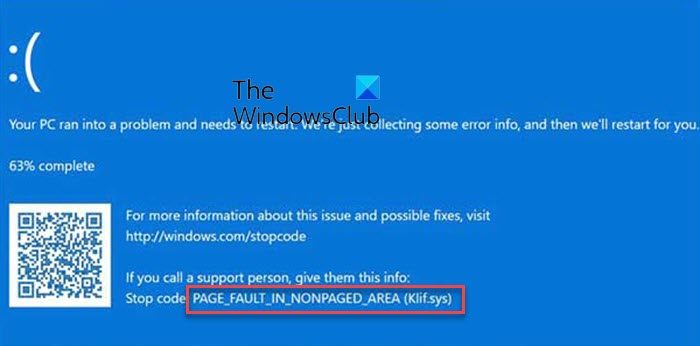
- PAGE_FAULT_IN_NONPAGED_AREA
- IRQL_NOT_LESS_OR_EQUAL
- KMODE_EXCEPTION_NOT_HANDLED
Location of Klif.sys file : C:\Windows\System32\drivers
Before we begin, please understand that there is no specified solution for this particular problem. We have collected a few practical fixes for this problem, and they are as mentioned below,
- Delete Klif.sys
- Uninstall the Kaspersky software
- Uninstall any other 3rd-party security software
- Switch from Beta to Stable Kaspersky software
- Perform System Restore
Before we hit the road, please take care of a few points,
- If you cannot access Windows normally, you need to boot up your device in safe mode. For this, you need to use the Advanced Startup options that you can access by pressing F8 on your keyboard while starting up. If this won’t work for you, please use the installation media to carry out the instructions.
- The methods mentioned below might lead to the uninstallation of the Kaspersky Antivirus. If organizational policies restrict you, we highly recommend you contact the IT administrator before moving ahead.
1. Delete Klif.sys
- Press the “Win + R” key on your keyboard to open the Run dialog.
- Then type the below-mentioned path and hit the enter button to open in the File Explorer,
C:\Windows\System32\drivers
- In File Explorer, scroll down and locate the “Klif.sys” file and delete it.
- In the address bar, copy & paste the below-mentioned path and hit the enter key to navigate,
C:\Windows\System32\DriverStore
- In File Explorer, scroll down and locate the “Klif.sys” file and delete it.
- Once you follow the above steps, reboot your device and check if the issue persists.
Most of the time, deleting the “Klif.sys” file should fix the blue screen issue. Please try out the below methods if the first one didn’t work for you.
2. Uninstall the Kaspersky software:
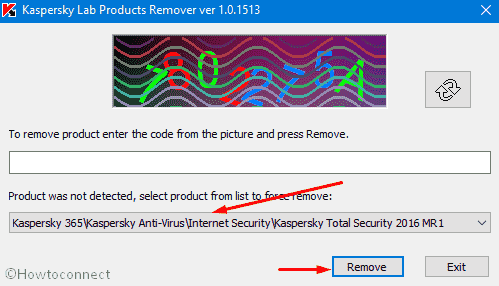
Removing the Kaspersky Antivirus is the simplest way to fix the blue screen error. For removing the Kaspersky lab application smoothly, the company offers a tool “Kavremover” for your Windows 10 device.
- Click this link to navigate to the download page.
- Double-click on the “karemover.exe” program to launch the tool.
- Allow access upon UAC prompt.
- Then, on the next windows, click on the “Remove” button to completely uninstall the Kaspersky Antivirus.
- Restart your device and verify the occurrence of the blue screen error.
3. Uninstall any other 3rd-party security software:
If you are not willing to remove the Kaspersky Antivirus from your system, this method may help you. We have noticed that the “Klif.sys” blue screen error might occur due to the presence of third-party security softwares. We highly recommend you to use only one Antivirus software at a time to avoid the unnecessary clashes and such blue screen freeze error on your Windows 10 device.
4. Switch from Beta to Stable Kaspersky software
The “Klif.sys” blue screen error might occur if you are using the beta version of the Kaspersky Antivirus. To fix this scenario, we recommend you to follow the below steps,
- Uninstall the beta version of the Kaspersky Antivirus and switch to the stable one.
- If you are using the Windows insider builds, we recommend using the stable Windows release or following the previous step.
5. Perform System Restore
Resetting your Windows device is a hectic process, and we advise you to use the System Restore tool instead. In this fix, please select a restore point before installing the Kaspersky Antivirus and follow the on-screen instructions to complete the restoration.
Conclusion:
In this article, we have explained the “Klif.sys” blue screen error and walked you through the possible fixes. If you are facing any issues while following the above fixes, leave a comment for us below.
About
Harsit Mohapatra is a full-time Software Engineer passionate and hungry for tech updates and knowledge. Besides being a crazy software developer, he is an avid traveller and loves capturing the things that give him a perception through his lenses
Download Windows Speedup Tool to fix errors and make PC run faster
When you boot or restart your Windows 11/10 device, you may encounter the Klif.sys Blue Screen error. If so, then this post is intended to help you. This post offers the most suitable solutions you can try to successfully resolve this issue.
The genuine klif.sys file or Kaspersky Lab Intruder Filter is a software component of Kaspersky Anti-Virus by Kaspersky Lab. Klif.sys usually resides in C:\Windows\System32\drivers. It is an important driver file component of the antivirus software from Kaspersky Lab. It is also used in Zone Alarm software from CheckPoint Software Technologies.
Many users report that Windows 10 becomes extremely slow before the error appears and even they couldn’t change settings of the Kaspersky normally.
The error may appear as a prefix of:
- PAGE_FAULT_IN_NONPAGED_AREA,
- IRQL_NOT_LESS_OR_EQUAL,
- KMODE_EXCEPTION_NOT_HANDLED.
If you’re faced with this issue, you can try our recommended solutions below in no particular order and see if that helps to resolve the issue.
- Delete Klif.sys
- Uninstall the Kaspersky software
- Uninstall any other 3rd-party security software
- Switch from Beta to Stable Kaspersky software
- Perform System Restore
Let’s take a look at the description of the process involved concerning each of the listed solutions.
If you can log in normally, good; else you will have to boot into Safe Mode, enter the Advanced Startup options screen, or use the Installation Media to boot to be able to carry out these instructions.
1] Delete Klif.sys
Do the following:
- Press Windows key + R to invoke the Run dialog.
- In the Run dialog box, type or copy and paste the path below and hit Enter.
C:\Windows\System32\drivers
- At the location, scroll and find Klif.sys and delete it.
- Next, in the Run dialog box again, type or copy and paste the path below and hit Enter.
C:\Windows\System32\DriverStore
- At the location, scroll and find Klif.sys file and delete it.
- Reboot your system.
If the Klif.sys Blue screen error appears again, try the next solution.
2] Uninstall the Kaspersky software
Uninstalling the Kaspersky antivirus program is a quick way to resolve this issue. The company offers a removal tool to help you when any issue occurs due to this software. Kavremover is the tool that allows you to completely uninstall Kaspersky Lab applications from your Windows 10 device.
Do the following:
- Download the Kavremover tool.
- Double click on kavremvr.exe to launch the application.
- Click Yes on UAC prompt.
- On the tool window, click on Remove.
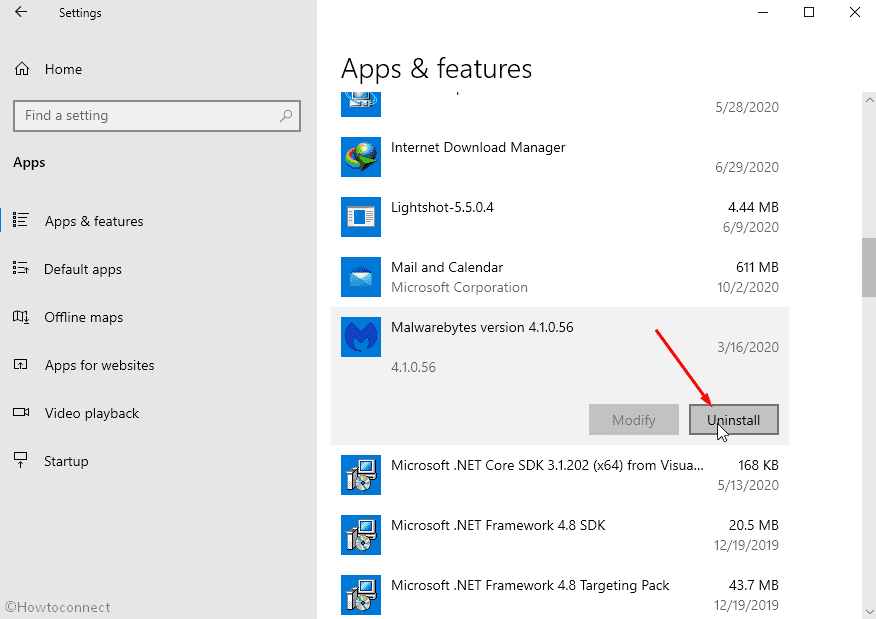
3] Uninstall any other 3rd-party security software
This solution requires you to remove any other third-party antivirus programs from your PC using the dedicated antivirus removal tool to remove all files associated with your antivirus program.
4] Switch from Beta to Stable Kaspersky software
If you are using a Beta version of any Kaspersky software, switch to its Stable version. If you using Stable Kaspersky on Windows Insider Builds, then too, this error can occur.
5] Perform System Restore
If you recently installed Kaspersky software or you have no idea what changed that might be triggering the error, you can perform System Restore and select a restore point prior to installing the software.
Hope this helps!
Obinna has completed B.Tech in Information & Communication Technology. He has worked as a System Support Engineer, primarily on User Endpoint Administration, as well as a Technical Analyst, primarily on Server/System Administration. He also has experience as a Network and Communications Officer. He has been a Windows Insider MVP (2020) and currently owns and runs a Computer Clinic.
Question
Issue: How to fix klif.sys BSOD in Windows?
Hello. I keep getting a klif.sys Blue Screen error every few days. What could it be and can I fix it?
Solved Answer
When the Klif.sys file, which is a software component of Kaspersky Anti-Virus, malfunctions, the klif.sys BSOD (Blue Screen of Death) error in Windows occurs. This file is an essential driver[1] component of antivirus software and is typically found in the C:WindowsSystem32drivers folder. The klif.sys file is also used by CheckPoint Software Technologies’ Zone Alarm software.
Blue Screen Errors are serious errors that occur in Windows when the system crashes. When the klif.sys file causes a Blue Screen Error, the system may crash unexpectedly, resulting in data loss or damage. Users may see a blue screen with an error message, or the system may automatically restart.
Users who have Kaspersky Anti-Virus or Zone Alarm installed on their computers may be affected by this issue. It can cause significant inconvenience and data loss, and restoring the system to its previous state may take some time. Uninstalling klif.sys with a removal tool is one option for resolving the BSOD error. To resolve the issue, you can also perform a system restore or repair installation of Windows.
In this guide, you will find 6 steps that should help you fix klif.sys BSOD in Windows. We also recommend trying a system repair tool like FortectMac Washing Machine X9. It can fix most system errors, BSODs,[2] corrupted files, and registry[3] issues automatically. Otherwise, follow the step-by-step instructions below.

Method 1. Fix Corrupted System Files
Fix it now!
Fix it now!
To repair damaged system, you have to purchase the licensed version of Fortect Mac Washing Machine X9.
Use Command Prompt commands to repair system file corruption:
- Open Command Prompt as administrator
- Use the following command and press Enter:
sfc /scannow

- Reboot your system
- If SFC returned an error, then use the following command lines, pressing Enter after each:
DISM /Online /Cleanup-Image /CheckHealth
DISM /Online /Cleanup-Image /ScanHealth
DISM /Online /Cleanup-Image /RestoreHealth
Method 2. Remove Klif.sys
Fix it now!
Fix it now!
To repair damaged system, you have to purchase the licensed version of Fortect Mac Washing Machine X9.
- Press the Windows key + R simultaneously to open the Run dialog.
- Type or copy and paste the path C:\Windows\System32\drivers in the Run dialog box.
- Hit the Enter key to go to the location.

- Look for the Klif.sys file and delete it.
- Open the Run dialog box again by pressing the Windows key + R.
- Type or copy and paste the path C:\Windows\System32\DriverStore in the Run dialog box.
- Hit the Enter key to go to the location.
- Look for the Klif.sys file and delete it.
- Reboot your system to ensure the changes take effect.
Method 3. Uninstall Kaspersky
Fix it now!
Fix it now!
To repair damaged system, you have to purchase the licensed version of Fortect Mac Washing Machine X9.
- Go to the official Kaspersky website and download the Kavremover tool.

- Once the download is complete, navigate to the downloaded file location.
- Double-click on kavremvr.exe to launch the application.
- If prompted by User Account Control (UAC), click on Yes to allow the application to make changes to your device.
- On the Kavremover tool window, click on the Remove button.
- Wait for the tool to complete the removal process.
- Once done, restart your computer to ensure that all Kaspersky products have been successfully removed.
Method 4. Uninstall Third-Party Security Software
Fix it now!
Fix it now!
To repair damaged system, you have to purchase the licensed version of Fortect Mac Washing Machine X9.
- Click on the Windows Start menu in the bottom left-hand corner of your screen.
- Type Control Panel into the search bar and click on the corresponding result.
- Click on Programs or Programs and Features depending on the version of Windows you’re using.
- Scroll through the list of installed programs until you find the antivirus software you want to remove.
- Click on the antivirus program to select it, and then click on the Uninstall button at the top of the list.

- Follow the prompts in the uninstall wizard to complete the removal process.
- If prompted, restart your computer to complete the uninstallation process.
Method 5. Use System Restore
Fix it now!
Fix it now!
To repair damaged system, you have to purchase the licensed version of Fortect Mac Washing Machine X9.
System Restore is a feature in Microsoft Windows that allows users to revert their computer’s state to a previous point in time. This can be helpful if you have made changes to your system that are causing problems.
- Press the Windows key + R on your keyboard to open the Run box.
- Type SystemPropertiesProtection and press Enter.
- Go to the System Protection tab.

- You will see the System Restore… button. Click it to run System Restore.
- Follow the prompts until you can select a restore point.
- Select the one you want (ideally before the issue started occurring) and go ahead with the process.
Method 6. Repair Install Windows
Fix it now!
Fix it now!
To repair damaged system, you have to purchase the licensed version of Fortect Mac Washing Machine X9.
- Visit the official Microsoft website to download Windows 11 or Windows 10 Installation Media
- Run the Media Creation Tool and select Create Installation Media for another PC.
- Select your USB drive.
- Let the Process complete of writing the Installation files to the USB drive.
- Click Finish.
- On the PC you wish to upgrade, Press Windows + E to open the File Explorer.

- Open the Removable drive and click Setup.exe.
- Accept the license terms on the next screen.
- Confirm the Upgrade options – Files, apps and Settings are kept.
- Click Install, and the upgrade should start.
Repair your Errors automatically
ugetfix.com team is trying to do its best to help users find the best solutions for eliminating their errors. If you don’t want to struggle with manual repair techniques, please use the automatic software. All recommended products have been tested and approved by our professionals. Tools that you can use to fix your error are listed bellow:
do it now!
Download Fix
Happiness
Guarantee
do it now!
Download Fix
Happiness
Guarantee
Compatible with Microsoft Windows
Compatible with OS X
Still having problems?
If you failed to fix your error using FortectMac Washing Machine X9, reach our support team for help. Please, let us know all details that you think we should know about your problem.
Fortect — a patented specialized Windows repair program. It will diagnose your damaged PC. It will scan all System Files, DLLs and Registry Keys that have been damaged by security threats.Mac Washing Machine X9 — a patented specialized Mac OS X repair program. It will diagnose your damaged computer. It will scan all System Files and Registry Keys that have been damaged by security threats.
This patented repair process uses a database of 25 million components that can replace any damaged or missing file on user’s computer.
To repair damaged system, you have to purchase the licensed version of Fortect malware removal tool.To repair damaged system, you have to purchase the licensed version of Mac Washing Machine X9 malware removal tool.
Private Internet Access is a VPN that can prevent your Internet Service Provider, the government, and third-parties from tracking your online and allow you to stay completely anonymous. The software provides dedicated servers for torrenting and streaming, ensuring optimal performance and not slowing you down. You can also bypass geo-restrictions and view such services as Netflix, BBC, Disney+, and other popular streaming services without limitations, regardless of where you are.
Malware attacks, particularly ransomware, are by far the biggest danger to your pictures, videos, work, or school files. Since cybercriminals use a robust encryption algorithm to lock data, it can no longer be used until a ransom in bitcoin is paid. Instead of paying hackers, you should first try to use alternative recovery methods that could help you to retrieve at least some portion of the lost data. Otherwise, you could also lose your money, along with the files. One of the best tools that could restore at least some of the encrypted files – Data Recovery Pro.
When the Klif.sys file, which is part of Kaspersky AntiVirus, doesn’t work right, Windows gives the klif.sys BSOD (Blue Screen of Death) error. This file is an important driver for antivirus software, and you can usually Fix Klif.sys Blue Screen Error in Windows.
The Zone Alarm software from CheckPoint Software Technologies also uses the klif.sys file. This problem could affect people who have Kaspersky Anti-Virus or Zone Alarm installed on their computers. It can cause a lot of trouble and loss of data, and putting the system back to how it was can take some time.
One way to fix the BSOD error is to use a removal tool to uninstall klif.sys. You could also do a system restore or a repair installation of Windows to fix the problem. Visit Microsoft Support center for more information.
Fix: Klif.sys Blue Screen Error in Windows 11/10
Uninstall the Kaspersky software
- Click this link to go to the page where you can download the file.
- If you double-click on the “karemover.exe” file, the tool will start up.
- Allow access when prompted by UAC.
- Then, on the next window, click “Remove” to remove the Kaspersky Antivirus completely.
- Start up your device and check to see if the blue screen error is still happening.
Restore the system to previous time
- Hit the Win key, type “restore,” and then press the Enter key.
- System Restore… button.
- Choose the – Pick a different restore point option.
- Then, click the – Next button.
- Before you install the antivirus, click on the date and time.
- Now, choose the – Finish button.
- Last, click the Yes button on the confirmation window.
- The process will take some time, so you should wait until the repair is done.
Delete Klif.sys
- Press the – Win+R.
- Type – C:\Windows\System32\drivers and select the – OK.
- Find Klif.sys and delete it.
- Similarly, go to c:\Windows\System32\DRUSTORE\ folder.
- Delete Klif.sys.
- Reboot your system and see if the BSOD error still persists.
Remove another antimalware program if exists
- Click the Taskbar search, type apps, and then hit Enter.
- Locate the antivirus from the list and select it.
- Hit Uninstall.
Run the SFC /Scannow
- Hit Windows key and type the – cmd.
- Click the – Run as administrator.
- Select the Yes agreeing with UAC prompt.
- Type in – “SFC /Scannow” without quotes and press the – Enter.
Update all your device drivers
- Press Windows + I to launch Settings.
- Go to Windows Update and click Check for updates.
- The system will search for any pending driver updates and display the same under Optional Updates.
- Click to expand this section, check all the boxes, and hit Download and Install.
Perform System Restore
- Instead of resetting your Windows device, you can use the System Restore tool.
- Before you install the Kaspersky Antivirus, you will need to choose a restore point.
- Follow the instructions on the screen to finish the restoration.
What Causes the Klif.sys Blue Screen Error on Windows?
- Do a scan of the system: Do a full scan of your system with your antivirus software to see if there are any malware infections that could be causing the Klif.sys error. Get rid of any threats found.
- Update your drivers: Make sure that your graphics card, network adapter, and all other hardware drivers have the most recent versions. You can manually download the drivers from the manufacturers’ websites, or you can use software that updates drivers automatically.
- Check the equipment: Run a hardware diagnostics test to see if the error could be caused by a problem with the hardware. Use the right diagnostic tools to check your RAM, hard drive, and other parts.
- Fix system files: Use the System File Checker (SFC) tool to find corrupted system files and fix them. Open a Command Prompt as the system administrator and type “sfc /scannow” into it.
What does KLIF sys mean?
KLIF sys is basically a device driver that helps your PC’s hardware and any external devices you connect to it talk to each other better. Both your operating system and the hardware can be accessed directly by this driver. So, if this gets messed up in some way, it could cause a blue screen error on your PC.
Kevin Hawk
Specializing in crafting captivating list-based articles, Kevin dives into the world of software, tools, and apps, offering readers expert insights and recommendations. His keen interest in technology is matched only by his love for travel, which fuels his creativity and adds a unique perspective to his writing. With a finger on the pulse of the tech landscape, Kevin Hawk continues to be a valuable asset to Bollyinside’s content team, providing a blend of expertise, passion, and wanderlust.
You might encounter a blue screen error where the stop code includes Klif.sys. Basically, the issue occurs because of a component existing in Kaspersky virus protection application. System crashes, freezes, shows BSOD furthermore stuck on the login screen occasionally at that time. Many users report that Windows 11 or 10 becomes extremely slow before the error appears and even they couldn’t change Settings of the Kaspersky normally. Therefore, Klif.sys Blue screen is a big headache for them as they can neither work on the computer nor apply a solution.
Klif.sys BSOD will be generated due to the file whose full name is Kaspersky Lab Intruder Filter. The error may appear as a prefix of Page Fault in Nonpaged Area, IRQL_NOT_LESS_OR_EQUAL, KMODE Exception Not Handled, or other. Commonly when the error occurs you need to remove the Kaspersky software. If you have installed the free version then there is no problem you can uninstall but if purchased a premium then fixing the issue is more complicated. However, a few solutions work perfectly to resolve the problem; let’s see them –
Here is how to fix Klif.sys Blue screen BSOD Error in Windows 11 or 10 –
1] Delete Klif.sys
Since the Blue screen of death will indicate the Kaspersky Lab Intruder Filter file as a reason better option will be to uninstall the Antivirus program. Even, users having paid edition may try this solution. Simply delete Klif.sys from the software installation and driver folders and the issue will be gone. Follow the instructions –
- Press the – Win+R.
- Type – C:\Windows\System32\drivers and select the – OK.
- Find Klif.sys and delete it.
- Similarly, go to c:\Windows\System32\DRUSTORE\ folder.
- Delete Klif.sys.
- Reboot your system and see if the BSOD error still persists.
2] Uninstall the Kaspersky Software
The easiest way to fix Klif.sys Blue screen error is uninstalling the Kaspersky antivirus program. The company offers a removal tool to help you when any issue occurs due to this software. Kavremover, in short, is the tool that allows to completely uninstall Kaspersky Lab applications resolving the issue. Therefore, use the app by following the steps –
- Go to the link and download the Kavremover tool.
- Double click on kavremvr.exe and open the application.
- Agree with the user account control by selecting Yes.
- It will automatically detect the product; click on Remove.
3] Remove another antimalware program if exists
Although Kaspersky will automatically remove another antivirus at the time of installation at times it may be skipped. Consequently, your Windows 11 or 10 computer will contain multiple antimalware programs that may end up clashing with each other. If the same situation is with you showing Klif.sys BSOD or Blue screen error then it would be solved simply with the removal of one software using the below instructions –
- Click the Taskbar search, type apps, and then hit Enter.
- Locate the antivirus from the list and select it.
- Hit Uninstall.
- Comply with the on-screen guidelines until the removal of the app.
4] Run the SFC /Scannow
Corrupted System resources might produce a hitch with the external program finishing with the blue screen of death. Fortunately, SFC tool works as a rescuer by detecting and mending the files and finally solving the problem. Hence, run this utility by following the steps –
- Hit Windows key and type the – cmd.
- Click the – Run as administrator.
- Select the Yes agreeing with UAC prompt.
- Type in – “SFC /Scannow” without quotes and press the – Enter.

- Wait for a few minutes and reboot your PC once the repair is completed.
5] Boot into the Safe mode
Occasionally, the error might prevent normal operation on the system and you couldn’t uninstall Kaspersky or delete Klif.sys. Booting into Safe mode will eradicate the issue by loading only basic services and device drivers. Removal of Klif.sys will become effortless in this condition so follow the instructions –
- Click the Search from Taskbar and type in the – MSConfig.
- Go to the – Boot tab.
- Next, click the checkbox for – Safe boot
- Choose the – Minimal.
- Select the – Apply and then – OK.
- Finally, click the – Restart.
- Delete Klif.sys or uninstall Kaspersky from this mode.
6] Restore the system to previous time
In case, you have recently installed the software you have another option to fix Klif.sys BSOD error in Windows 10 or 11. System restore, a tool in Windows 11 and 10, will withdraw the PC to the earlier date & time of your choice when there was no issue. Once using this, the recently made changes will revert back and you will experience absolutely errorless machine. Follow the guidelines –
- Press the Win key, type restore, and then hit Enter.
- Click the – System Restore….
- Select the – Choose a different restore point.
- After that, click the – Next.
- Click the date and time prior to the installation of the antivirus.
- Now, select the – Finish.
- Finally, click the – Yes on the confirmation dialog.
- The process will take time so wait until the restoration is completed.
Methods list:
1] Delete Klif.sys
2] Uninstall the Kaspersky Software
3] Remove another antimalware program if exists
4] Run the SFC /Scannow
5] Boot into the Safe mode
6] Restore the system to previous time
That’s all!!
Repair any Windows problems such as Blue/Black Screen, DLL, Exe, application, Regisrty error and quickly recover system from issues using Reimage.