Время на прочтение
3 мин
Количество просмотров 53K
- [Kinect for Windows SDK. Часть 1. Сенсор]
- Kinect for Windows SDK. Часть 2. Потоки данных
- Kinect for Windows SDK. Часть 3. Функциональные возможности
- Играем в кубики с Kinect
- Программа, апорт!
Три части обзорной статьи можно считать вводными к двум другим: «Играем в кубики с Kinect» и «Программа, апорт!». Хотя хронологически они идут последними. Более того, за время их написания Microsoft успел выпустить новую версию SDK – 1.5. Какой удар со стороны корпорации!
Как вам должно быть известно, Kinect – это бесконтактный контроллер, т.е. скажем в играх, вместо того, чтобы яростно стучать по клавиатуре или терзать gamepad, вы размахиваете руками и ногами и время от времени голосом даете какие-то команды. Самое время спрятать дорогие китайские вазы X века подальше!
Начинать знакомство с Kinect лучше со знакомства с самим сенсором. Это небольшая черная коробочка с тремя камерами, длиной чуть более 20 см и высотой около 5 см (не считая ножки). Один нюанс – в Kinect две камеры. И это изображение (взято из MSDN) тому подтверждение.
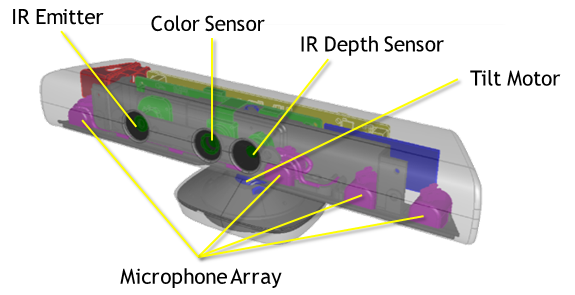
- IR Emitter – Инфракрасный излучатель. Да, это не камера. Его назначение испускать инфракрасные лучи, которые, отражаясь от предметов, попадают назад в сенсор, где их принимает:
- IR Depth Sensor – Инфракрасный приёмник. Собирает отраженные лучи, преобразуя их в расстояние от сенсора до объекта(ов). И таким образом строится, можно сказать, матрица расстояний — целый кадр. Максимальное разрешение 640×480 (30 fps). Если говорить о переводе мне кажется, «ИК приёмник» лучше отражает суть, чем дословный «ИК датчик глубины».
- Color Sensor – Цветная камера. Захват видео с максимальным разрешением 1280×960 (12fps). Угол обзора камеры: 43° по вертикали и 57° по горизонтали (угол обзора дальномера идентичный). Можно выбрать формат картинки: RGB или YUV.
- Microphone Array – набор микрофонов. 4 встроенных микрофона позволяют определить местоположение источника звука и направление звуковых волн. Встроенный обработчик звукового сигнала включает подавление эха и уменьшение шума.
- Tilt Motor – Коррекция наклона. Позволяет программно настраивать наклон сенсора в диапазоне ±27° по вертикали.
Сенсор подключается к компьютеру через USB, хотя, строго говоря, USB устройством не является, т.к. имеет несколько отличную прошивку, нежели стандартное USB устройство. Найти какие-либо комментарии по этому поводу не получилось, но можно предположить, что сделано это исключительно в целях повышения производительности. Вы можете подключить до четырех сенсоров одновременно.
Другой важный аспект аппаратной части – диапазон «рабочих» расстояний, т.е. на каком расстоянии сенсор способен видеть объекты (данные дальномера). И снова картинка помогает продемонстрировать возможности Kinect.
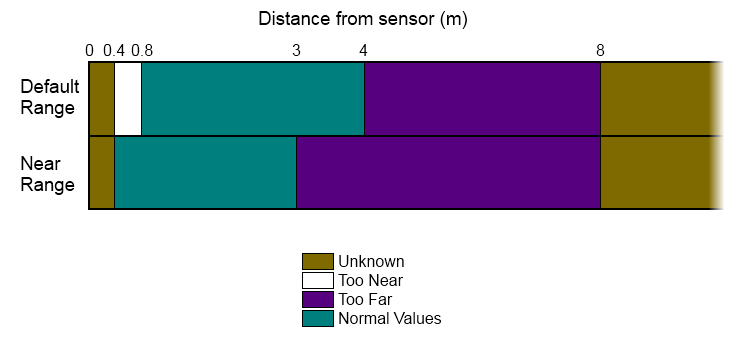
Режим Default Range доступен как для Kinect for Windows, так и для Kinect for XBox, но Near Range доступен только для сенсора Kinect for Windows. Простой пример: для всех объектов в кадре находящихся в пределах Normal Values сенсор вернёт измеренное расстояние, но для объектов, выходящих за этот диапазон, сенсор вернёт либо ноль, либо определенную для каждого диапазона константу (зависит от заданных вами настроек). Одно из существенных отличий SDK 1.5 от 1.0 в том, что теперь в режиме Near Range можно получить информацию о сидящем человеке, это так называемый трекинг сидящей фигуры (seated skeletal tracking). Kinect отслеживает 10 точек: голову, шею и руки. Но об этом чуть позже.
Хочется обратить внимание на различия двух Kinect (XBox и Windows). Первый разрабатывался и тестировался с одним устройством – XBox. Второй же, напротив, должен работать с широким диапазоном устройств (компьютеров), поэтому его кабель короче, а специальное устройство призвано не позволить Kinect подраться с остальной USB периферией. Лицензионное соглашение позволяет использовать Kinect for Windows в коммерческих целях, а Kinect for XBox нет.
Перейдем теперь к установке SDK. В версии 1.5 Microsoft разделил SDK на два пакета. Скачать их можно с официальной страницы:
- Kinect for Windows SDK. Включает APIs и драйверы сенсора.
- Kinect for Windows Developer Toolkit. Включает Kinect Studio (полезный для отладки инструмент), Face Tracking SDK, примеры кода и документация.
Не будем останавливаться на установке SDK, в этом нет ничего сложного или интересного. А вот что действительно интересно так это то, что же разработчик может получить от Kinect? Взглянем на следующие возможности:
- Skeletal Tracking (трекинг человеческой фигуры)
- Face Tracking (трекинг лица)
- Speech Recognition (распознавание речи)
Обзор этих функций вы найдете в следующих частях статьи.
Полезные ссылки:
- Kinect for Windows SDK
- Руководство разработчика. Можно найти примеры на C# (managed code) и на C/C++ (unmanaged code)
- Kinect for Windows Quickstart Series. Серия видео-уроков о возможностях Kinect (весьма полезная для знакомства с устройством).
- Near Mode: What it is (and isn’t). Статья о near mode, хотя написана в преддверии SDK 1.0, но полезна в плане разоблачения некоторых мифов.
- Форумы Kinect for Windows SDK. Здесь можно обратиться за советом к экспертам.

- Компьютеры
- Cancel

Сенсор Kinect, изначально разработанный в качестве бесконтактного контроллера для консоли Xbox 360, позже с помощью умельцев был таки подключен к компьютеру, что отрыло для него огромные возможности. Талантливые программисты писали для сенсора самопальные драйверы и приложения. Сначала Microsoft не одобрил эту идею, но наблюдая, какие доселе невиданные «фишки» творит их изобретение, поспешил выпустить бесплатный набор для разработчиков (SDK), а позже и специальную версию контроллера — Kinect for Windows, отличающуюся наличием полноценного USB-интерфейса и возможностью работы с объектами в меньшей дистанции.
В скором же времени ожидается выход второго поколения контроллера:
Итак, приступим непосредственно к теме сегодняшнего поста, а именно к подключению Кинекта к PC с помощью официального драйвера от Microsoft.
Как отмечалось выше, в отличие от специальной версии Kinect for Windows, обычный иксбоксовский Кинект не будет работать при подключении его напрямую к компьютеру, для этого Вам придется дополнительно приобрести вот такой переходник:
После подключения к компьютеру, необходимо установить ПО, для этого переходим по этой ссылке , где загружаем соответственно: Kinect for Windows SDK и Developer Toolkit.
После благополучной установки необходимых компонентов, можно сразу же попробовать некоторые возможности Вашего Кинект на PC, например: треккинг лица, распознавание скелета, речи, и т.д.
Для этого переходим в Пуск -> Все программы -> Kinect for WIndows SDK -> Developer Toolkit Browser
Откроется вот такое окно:
Выбираем нужный компонент (к примеру, Skeleton Basics-D2D) и жмём Run. Вот так выглядит мой «скелетик»:
Продолжение следует.
Hello everyone, my name is Gavin Gear, and I am going to be blogging regularly here on the Extreme Windows Blog. My background includes working on the Windows sensor team (see recent talks from BUILD HERE), and before Microsoft I graduated with a degree in Mechanical Engineering. Some of the things I enjoy include studio photography, video production, building PCs, writing apps, and inventing/fabricating/fixing. I look forward to bringing you stories where Windows powers extreme experiences, and to start I thought I’d do a quick Kinect for Windows project. Here we go!

Gavin at BUILD in, 2011
What is Kinect for Windows?
We’ve all seen Kinect: the amazing game input device for Xbox 360 that enables controller-less console game play and control of other Xbox experiences. It’s fascinating to discover how this device uses array microphones, a projected IR dot pattern, an IR camera, and a regular RGB camera to sense the surrounding environment. With these inputs, the Kinect sensor can isolate and record sounds, generate a room depth-map, and build 3D models of human faces and skeletons. It’s safe to say that Kinect is a game-changer.

Kinect IR dot pattern as seen by modified DSLR camera
Kinect for Windows is all about enabling Windows PCs to take advantage of Kinect. The Kinect for Windows 1.5 SDK and Toolkit was released in May 2012, and includes Windows drivers for the Kinect sensor, a full SDK (Software Development Kit) a toolkit (sample code, tools), and supporting documentation.
Here’s a list of what you need to start writing Kinect apps:
- Kinect sensor*
- Windows PC with Windows 7 or later Windows OS
- Visual Studio (Express or full)
- Kinect for Windows downloads (SDK and Toolkit)
*There are actually two Kinect sensors that work with the Kinect for Windows SDK and Toolkit:
Kinect for Xbox 360 sensor (says “XBOX 360” on the front) – these devices are licensed for development purposes only, and do not support “Near Mode”. This is what I used for this blog post.
Kinect for Windows sensor (says “KINECT” on the front) – these devices are optimized for Windows experiences, are licensed for use with Windows PCs, and also support “Near Mode”.
Developers can use either sensor to get started, but deployments need to be on a Kinect for Windows sensor which can be purchased online here. If you get serious about experimenting with and integrating Kinect experiences into your projects (and I hope you do), I recommend you pick up the Kinect for Windows sensor so you have access to all of the development possibilities enabled with this pc-optimized device. However, if all you’ve got is a Kinect for Xbox kicking around your living room, break it out and give it a go!
I’ve wanted to write a Windows Kinect app for a while now. The first idea that came to mind was to experiment with human presence sensing, something I had investigated while working on the Windows sensor platform. Part of that exploration included writing an application that would control Windows experiences by means of a long-distance reflective IR proximity sensor. These reflective IR sensors have their limitations, one being that they cannot distinguish between inanimate objects (like office chairs) and humans. I had wondered how a more powerful sensor like Kinect could improve human sensing accuracy for spaces like an office. Now it’s time to find out!
App Challenge: Kinect as Human Presence Sensor
I decided to give myself a challenge: In less than a day, I would attempt to write a functioning Kinect human presence detection app using some C# code that I had previously written. This existing code did not incorporate Kinect, and I had no experience with the Kinect SDK. This would be a good challenge because in addition to writing the app, I would also need to document the entire process on video using multiple cameras. Sounds like fun to me!
I started the day with the Kinect 1.5 SDK and Toolkit installed on my Windows 7 box, and a Kinect sensor that was still in its box. I had briefly talked to the Kinect for Windows team to get ideas for how to sense human presence with Kinect. To paraphrase, they told me to “take a look at face tracking, skeletal tracking, and depth”. I had no Kinect code at this point (other than SDK samples), and no links to docs or references.
Getting Setup
From my experience with Kinect for Xbox 360, I knew that I would need about 4-6 feet of distance between myself and the sensor (however this distance is only about 400mm with a Kinect for Windows device). The first thing I did was to “mount” the sensor above and behind my monitors in an orientation where it would “look down” about 10 degrees at me when I was seated. The goal was to maximize field of view and distance while minimizing monitor obstruction.

Kinect sensor placement at my workstation
I personally think I should get extra credit for using some of the Kinect sensor packing materials (cardboard column supporting the sensor) to improvise this setup. I’ll be looking into a more solid mount for permanent use.
Once the Kinect sensor was powered up and plugged into the PC, it was time to validate that everything was working properly. I ran some of the SDK samples from the toolkit, and in a few minutes was able to run through some of the key scenarios.

Kinect SDK Sample Screen grabs – Skeleton Basics (left, showing standing position), Face Tracking Basics (right, while seated at desk)
I spent about 10 minutes improvising the mount and running the cords, and about 5 minutes playing with the samples. So at 15 minutes into the project, I was ready to start reading docs and writing code.
Getting Into the Code
I’ll admit it- I didn’t follow the schoolbook approach of reading documentation and then writing code. Instead I started in Visual Studio, exploring the APIs with Intellisense (a code explorer tool) and reading documentation for specific items when needed. This turned out to be a time-effective way to develop such a prototype.
I ran into a problem early on when I was trying to control the elevation angle of the Kinect sensor (tilt). When I first ran my app, the following error message was displayed:
Invalid Operation Exception: “Kinect must be running to control the motor”
Wow- if only all error messages were this descriptive. This gave me the clue that I needed to “start” the sensor before using it. I added the necessary code, ran the app again, and the sensor tilted! I got a tingle of excitement from seeing my app control a piece of hardware in such a short period of time. The term “instant satisfaction” comes to mind.
Next, it was on to figuring out human presence detection with Kinect. Running the SDK samples proved to be a great way to “visualize” the kinds of data that Kinect exposes to developers. From what I saw, I decided to use skeletal tracking data since it appeared to offer good detection of human presence.
The logic I wrote to control Windows experiences is pretty simple, and is based on the number of tracked skeletons at any given point in time (humans in view of the Kinect sensor). When the number of detected humans changes, the code I wrote does the following:
Zero people: Pause media (if playing), lock workstation
One person: Play media (if not playing)
More than one person: Pause media (if playing)
The simple app UI shows a numeric display of the number of tracked skeletons (present humans), and has checkboxes to allow supported features to be toggled on/off.

It’s obvious that this app’s UI won’t win any design awards, but it’s enough to drive these simple demos. With the UI in place it was time to test out media play/pause. With my app running, I started an mp3 playing in Windows Media Player, enabled the play/pause feature, and then walked out of my office. The music stopped. When I entered and sat down, the music started playing again. This is just too fun. Following that, it was a simple matter to add the “Lock workstation” feature. Having spent about 90 minutes writing code, reading documentation, searching the internet, and doing basic testing, I was now at 1:45 for total project time. Later, when my friend stopped by I was able to test the “pause my media when another person enters my office” feature, cool.
Here’s a video that I put together during the project to show you how things unfolded:
Wrap-up
When I started this project, I was not sure exactly what to expect. What I discovered is that Kinect for Windows provides developers with a comprehensive set of tools, samples, and documentation and the APIs are also easy to use. The next thing I’m going to do with Kinect is to get one of the Kinect for Windows sensors so that I can test my app with “Near Mode”. I can’t wait to see more of what developers will do with Kinect for Windows, and I have my own ideas for additional projects.
Resources:
www.kinectforwindows.com
Kinect for Windows Downloads
Kinect for Windows Hardware
You can follow me on twitter here: @GavinGear
As I have been writing my series on using sensors with Windows and .NET, it occurred to me that I actually had a pretty amazing set of sensors sitting unused – the Kinect device from my XBox One.
I don’t have any games that really use the XBox One, and with some of the refinements to the console operating system, I’ve found it to be easier to use the gamepad than to use voice commands.
I knew that the Kinect for the XBox 360 wasn’t compatible with my PC, and that there’s actually a separate Kinect for Windows device – but after a little research, I found that the Kinect for the XBox One could work with a PC, as long as it was connected through an adapter.
I want to write about my experiences – as usual, things didn’t work quite as smoothly as I’d have liked! Hopefully my experiences will be useful to someone else out there.
Installing the Kinect Software SDK
As I mentioned above, my Kinect wouldn’t connect to a PC directly, it needed to go through an adapter. There were some other system requirements listed at this link.
If I were starting this process again, I would install the SDK (available here) before purchasing the Kinect Adapter. This ships is a tool which analyses your PC for compatibility, and would have told me if my PC wasn’t good enough. Fortunately it was good enough, but it could have been an expensive mistake if I bought the adapter and found my machine wasn’t up to the job.
Step 1: Download the Kinect for Windows SDK 2.0
The SDK is freely available for download from this link.
When the SDK has downloaded, you double click on the executable to start the installation process. The first thing you’ll be challenged to do is to accept the licence agreement and click Install.

The install is pretty straightforward, and if it successfully installs it will finish on the screen below:

At this point, it’s possible to load up the verification tool – there will be a new Windows app called “SDK Browser 2.0 (Kinect for Windows)”. You can search for this through the Windows Start menu. If you start this up, you’ll see a screen something like the one below.
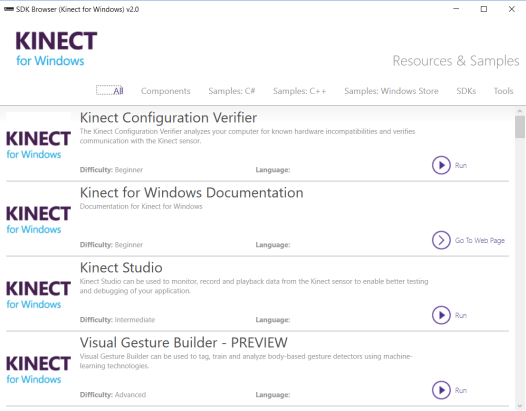
You can see at the top of the list, there’s a component named “Kinect Configuration Verifier”, which has a “Run” button on the right hand side. If you click on Run, you’ll see a screen like the one below.

After a few seconds, this should change to a screen like the one below:

Hopefully your machine will have green ticks against everything – in my system, I don’t have a Kinect connected yet – therefore the “Kinect Connected” test has failed, as has the “Verify Kinect Depth and Color Streams” test.
Step 2: Connecting the Kinect Device
I set up my Kinect device in the configuration shown in the Microsoft site, also displayed below. I plugged this into the electrical power, and also connected the USB cable into the USB 3.0 port on my PC.
Using USB 3.0 is really important – I also tried it with a USB 2 socket, and this didn’t work.

There were some alerts as Windows installed the drivers for the Kinect, but I was able to check that the Kinect had installed correctly by looking at the Device Manager. There is a new node for Kinect sensor devices, shown below:

Under the Sound, video and game controllers now there was a new item called Xbox NUI Sensor, shown below:

And finally, under Audio inputs and outputs, there is a new item called “Microphone Array (Xbox NUI Sensor)”.

After this point, I re-ran the verification tool, expecting different results as the Kinect sensor was connected to the machine. The results are shown below.

Unfortunately one of the tests failed – “Verify Kinect Depth and Color Streams”. This is very strange, as when I expanded the item to see more details, I was clearly able to see the output from the Kinect sensor, with a frame-rate varying between 20 – 30 FPS.
Other people have not been so lucky. I’ve included some links below which might be helpful.
Troubleshooting and Common Issues Guide
Error: Verify Kinect Depth and Color Streams
Red Mark on “Graphic Processor” and “Verify Kinect Depth and Color Streams”
Testing the Kinect out with some of the samples
Obviously I’d some concerns that my Kinect wasn’t going to work given that one of the verification tests had failed, but I pressed on with some experiments.
Face Basics-WPF
The first application I tested was “Face Basics-WPF”. This demonstrates how to use the FaceFrameReader to obtain information about the faces that the Kinect sees.
After running the application, I found that my face was detected if I stood back a couple of metres from the sensor – I’ve shown the output below. Basically everything detected in the image is correct – although it’s a shame it didn’t detect me as being happy! This value changed depending on whether I was smiling or not, which shows the level of detail that the Kinect and its software is able to pick up.

I found that this application was installed on my machine in the location:
C:\Program Files\Microsoft SDKs\Kinect\v2.0_1409\Samples\Managed\FaceBasics-WPF
Discrete Gesture Basics-WPF
The next application I tested was the “Discrete Gesture Basics-WPF” application. This uses the VisualGestureBuilderFrame object to detect people in front of the sensor, and also to track gestures from these people. In the screenshot below, I’m standing a couple of metres in front of the Kinect, and my left hand is open and my right hand is closed (and you can see the different way each hand is displayed, the open hand is green and the closed hand is red). It’s a pretty good recognition of a person standing.

When I moved closed to the Kinect, and sat down in front of it, the Kinect correctly saw that I was seated, but I was too close to the Kinect for it to display a useful representation.

Again, I found this application installed to my hard disk at the location below:
C:\Program Files\Microsoft SDKs\Kinect\v2.0_1409\Samples\Managed\DiscreteGestureBasics-WPF
Conclusion
I’ve successfully tested the Kinect sensor for the XBox One with a PC, and found the process to get it working was actually really straightforward. I had to purchase a Kinect Adapter which cost my about £33 (in UK pounds sterling) to get this to work. I’m looking forward to starting some more development projects involving computer vision and speech recognition.
Kinect for Windows SDK is a Windows program package that offers a set of components that help you to build sophisticated Kinect applications. It provides a considerable amount of tools, APIs, samples and thorough documentation. If you need to configure a VR device, you may use Oculus Runtime.
Purpose
Kinect has been a game changer in the world of motion games since release. The developer version of the working environment, Kinect for Windows SDK, offers users with tools to create various applications that run on Windows. For example, you may use the Kinect Studio to record and work with your project data during debugging.
Setup
The installation files are available on the official Microsoft website. After deploying the Developer Toolkit, you will get a standalone executable that you may use to launch the program. Next, you need to ensure that the Kinect sensor is connected to the power hub and plug it in your computer via the USB cable. The driver installation will begin automatically.
Advanced functionality
The software provides a library that enables you to directly interact with the camera sensors, the microphone array and the motor. It is also possible to extend an application for gesture recognition using body motion. What is more, you have the option to toggle speech recognition.
Features
- free to download and use;
- compatible with modern Windows versions;
- gives you the ability to develop Kinect apps;
- it is possible to configure the camera sensors;
- provides a wide range of design tools.