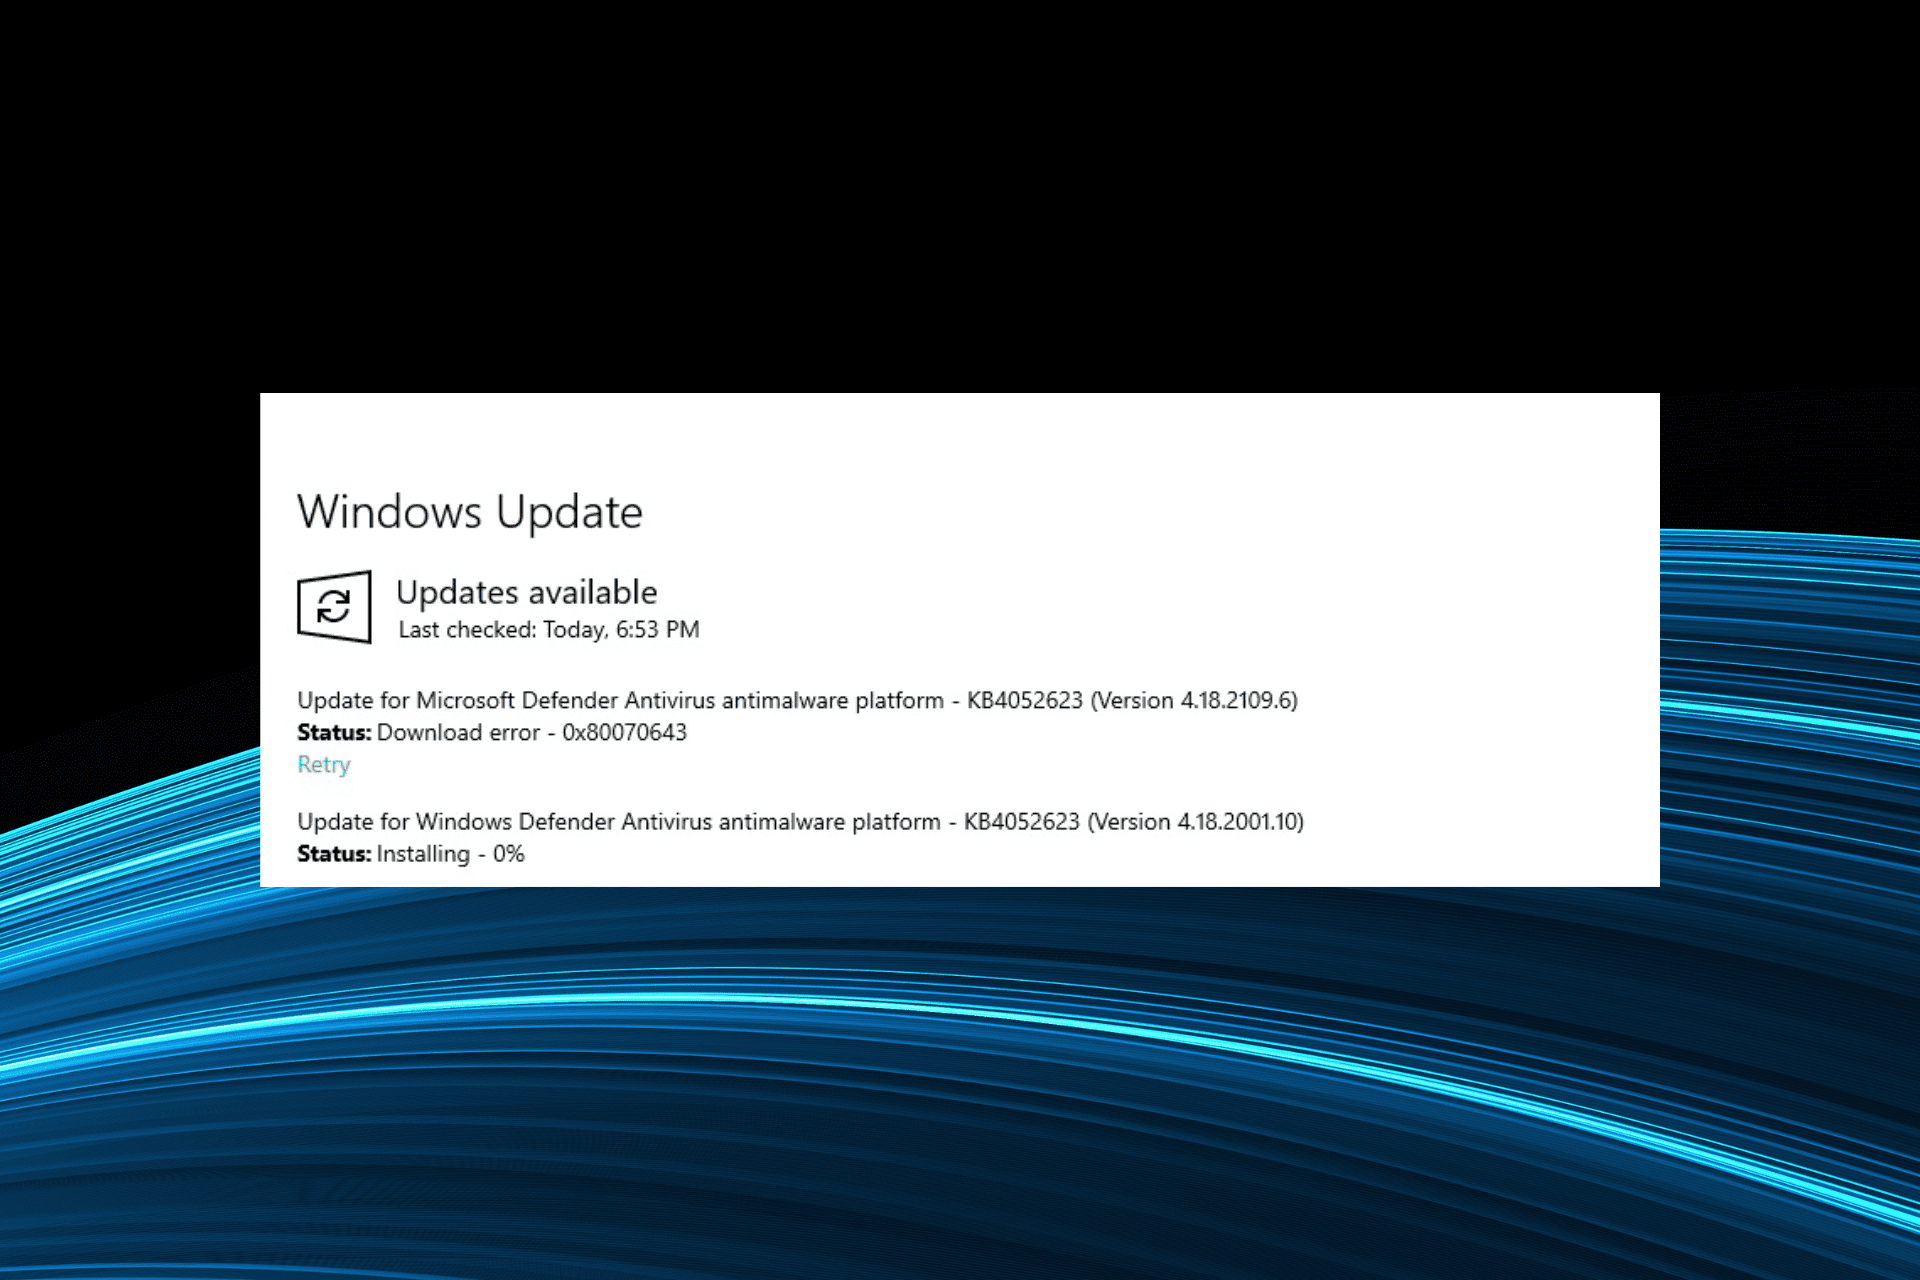
KB2267602 is a Protection or Definition Update for Windows Defender that is designed to fix vulnerabilities and threats in Windows. Several users report that they can not receive the protection update package because of some errors. When you try to install the Security Intelligence Update for Microsoft Defender Antivirus KB2267602, error codes such as 0x80070643, 80070005, 2147023293, 0x80240016, 0x8007005 or 0x80240017 appear. Sometimes, after installing when the PC restarts, a message shows up Undoing changes made to your computer on the screen. So here we are providing solutions to KB2267602 failed to install in Windows.
KB2267602 0x80070643 or other error codes appear because of corrupted Windows Update cache, presence of malware, and broken system files. Unfortunately, there are times when the Security Intelligence Update for Microsoft Defender Antivirus can not install in Windows, leaving your computer at risk.
Here is how to fix KB2267602 Failed to Install in Windows 11 or 10 –
Way-1: Manually install the Security Intelligence Update for Microsoft Defender Antivirus
If the automatic Windows update fails when installing KB2267602 then there is an option to manually install the same. Furthermore, there is an official batch file that would clean the previous definition updates and install the latest one as well. All you need is to follow the steps:
- Click on Start and type cmd.exe.
- Select – Run as administrator.
- When User account control opens up, click on – Yes.
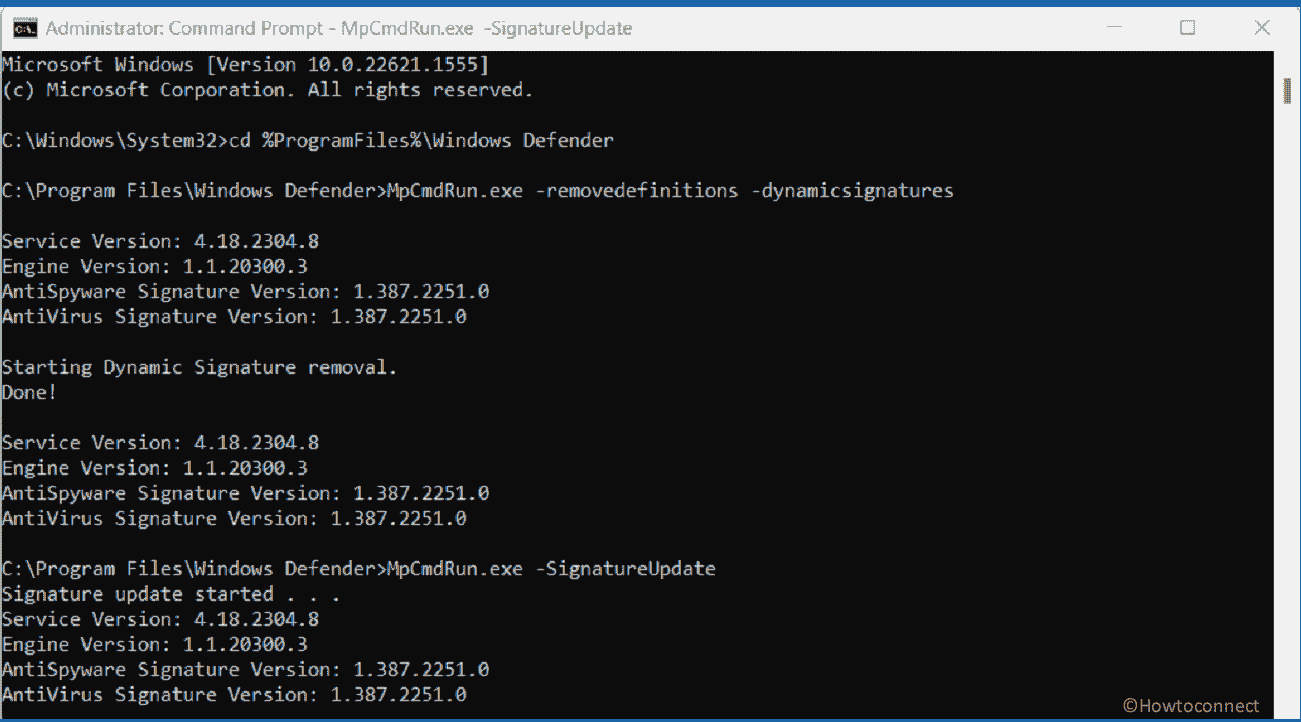
- Type the following command in the Command Prompt and press Enter –
cd %ProgramFiles%\Windows Defender
MpCmdRun.exe -removedefinitions -dynamicsignatures
MpCmdRun.exe -SignatureUpdate- To manually install the update, find KB2267602 download link on this page.
- Find the latest version under Antivirus solution and click on 32-bit | 64-bit | ARM according to your device’s architecture.
- Double click on mpam-fe.exe from Downloads folder and install the update.
See: How to Check Protection Updates for Threat Definitions in Windows 10.
Way-2: Uninstall third-party antivirus or programs
Most of the time it is seen that the Security Intelligence Update for Microsoft Defender Antivirus couldn’t be installed due to interference with third-party antivirus such as Mcafee, AVG, MalwareByte, Kaspersky, or other programs. Therefore, uninstall them on the first priority using the below steps:
- Press Windows and R keys.
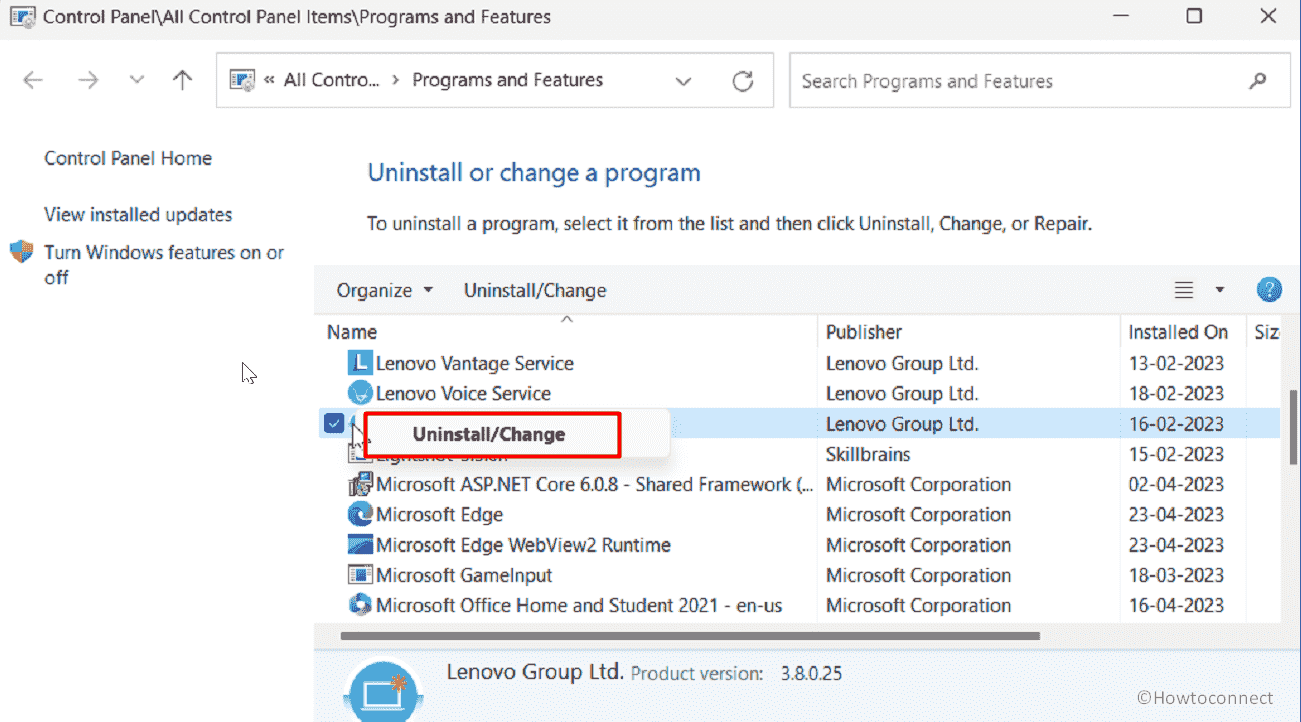
- Type – appwiz.cpl.
- Press Enter to open the Programs and Features window.
- Right-click on the Software and select Uninstall.
- If any uninstallation wizard appears, follow the instructions given on that until the removal is completed.
Way-3: Run the Windows Update Troubleshooter
This troubleshooter is a built-in tool that can help you identify and fix issues with Windows updates such as patches, definition update, driver update or other. The utility can solve KB2267602 download error or problem with installing this. Hence, follow the steps:
- Press the Windows key + I to open the Settings app.
- Click on “Troubleshoot” from the right pane.
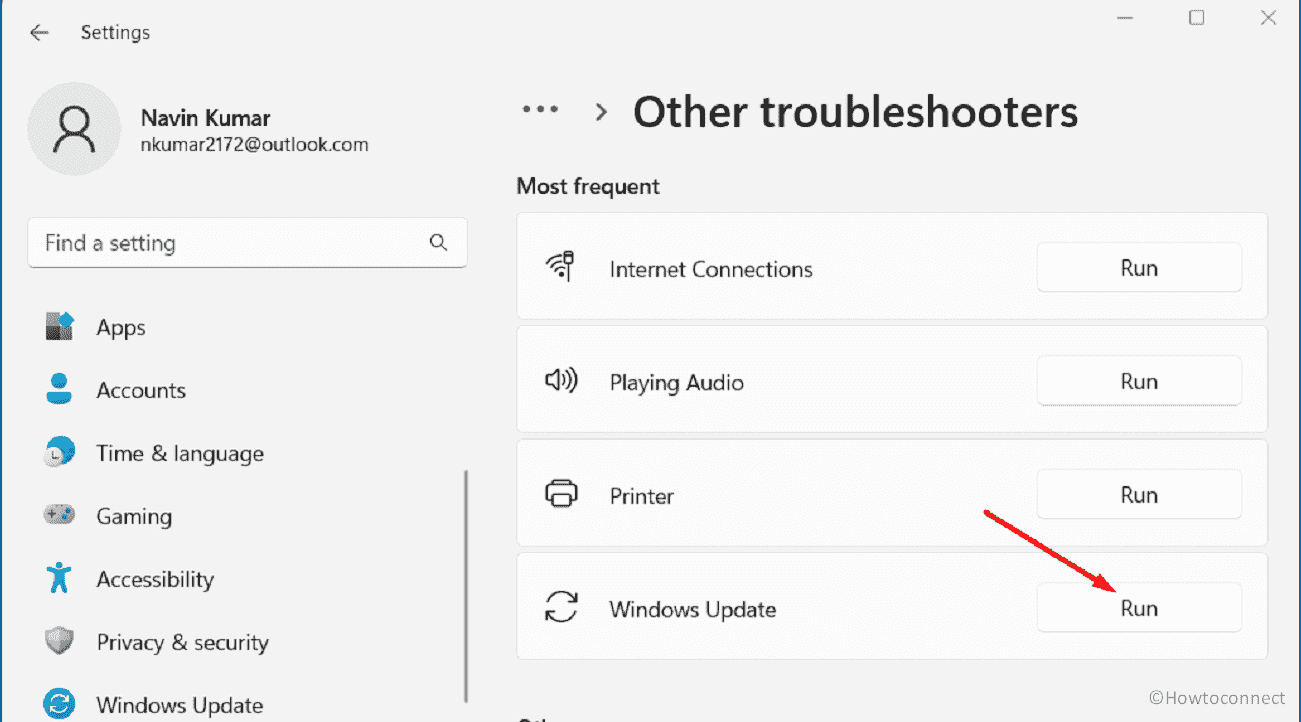
- Select – Other troubleshooters.
- Go to “Windows Update” and then click on “Run”.
- Follow the on-screen instructions.
- After the troubleshooting is finished, try installing KB2267602 again.
Read: Use Common Windows Update Troubleshooter on Windows 11, 10, 8.1, 7.
Way-4: Reset Windows Update database cache
Broken Windows update cache is another main reason why KB2267602 not installing issue occurs. The cache is where Windows update files are stored after being downloaded on computer.
When this is corrupted the codes such as 80070005, 0x80070643, 0x80240016, 0x8007005, and 2147023293 are likely to appear. But resetting the cache is pretty easy if you head to the instructions;
- Download the file – Reset_Windows_11_update.zip.
- Select the file zip file and click on Extract all from the ribbon of File Explorer.
- Click on “Extract” on the new window.
- Browse the unzipped folder.
- Right-click on WUReset.bat and choose “Run as administrator”.
- Select Yes on the UAC popup.
- Once Command prompt appears, press any key on your keyboard to continue.
- Wait for some time until the commands finish their work.
- In the end, once more press a key to exit the command prompt.
- Restart your PC and check if the issue still persists or if the Windows update is successfully installed.
Navigate to: How to Reset Windows Update to Default in Windows 10.
Way-5: Scan the System using Microsoft Safety Scanner
Malware or virus might prevent KB2267602 from installing. Since the Virus & threat protection is not updated, use Microsoft Safety Scanner instead to scan the full system. This is free for the first 8 days. Follow the steps:
- Navigate to the download link of Microsoft Safety Scanner and download the tool.
- Double click on MSERT.exe.
- Select – Accept all terms of preceding license agreement and click on Next.
- Once more click on “Next”.
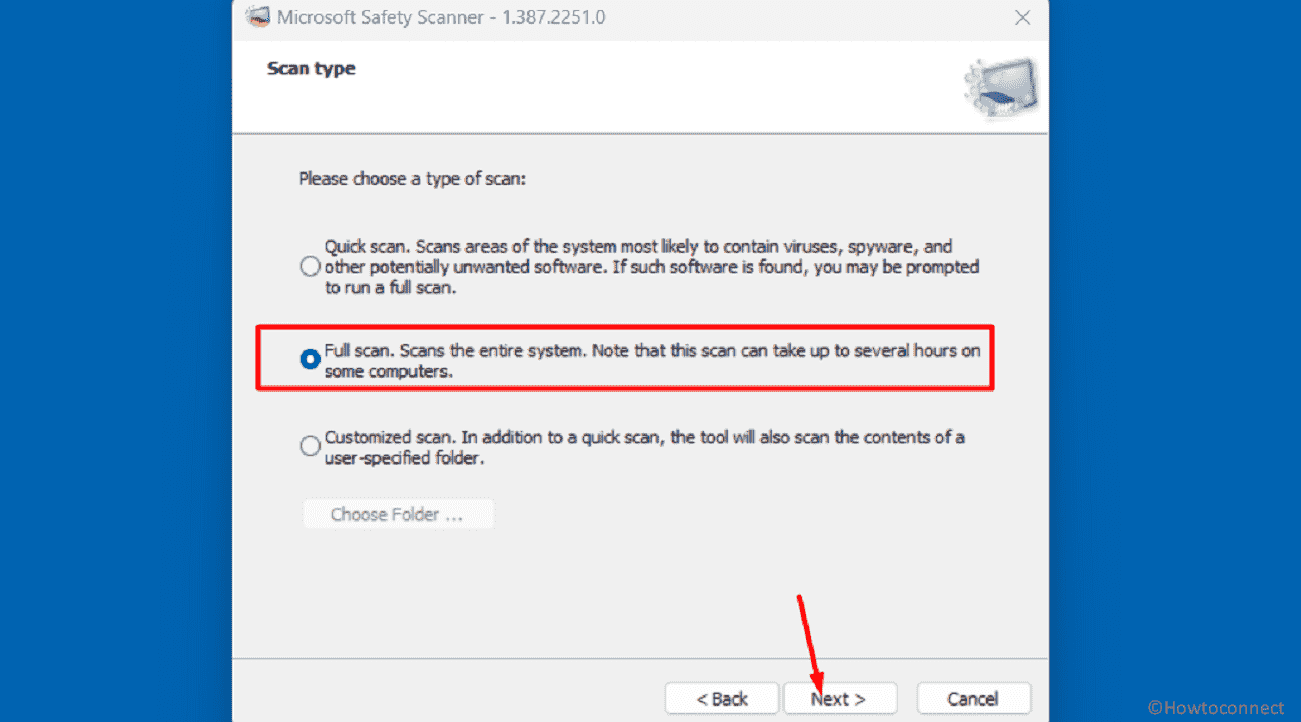
- Follow the instructions and choose Full Scan, Scan the entire system. Note that this can take several hours on some systems.
- Click Next, let the scanning complete, and remove the threats if found.
- Restart your computer then try installing KB2267602.
Way-6: Use DISM and System File Checker
DISM (Deployment Image Servicing and Management) and System File Checker (SFC) are two command-line tools in Windows that are used to repair system files and components.
- Open an elevated Command Prompt. To do this, click on the Start button and type cmd. select “Run as administrator”.
- Run System File Checker by typing the following command and pressing Enter:
sfc /scannow
- This command will scan your system files and repair any corrupted files it finds. It may take a while to complete.
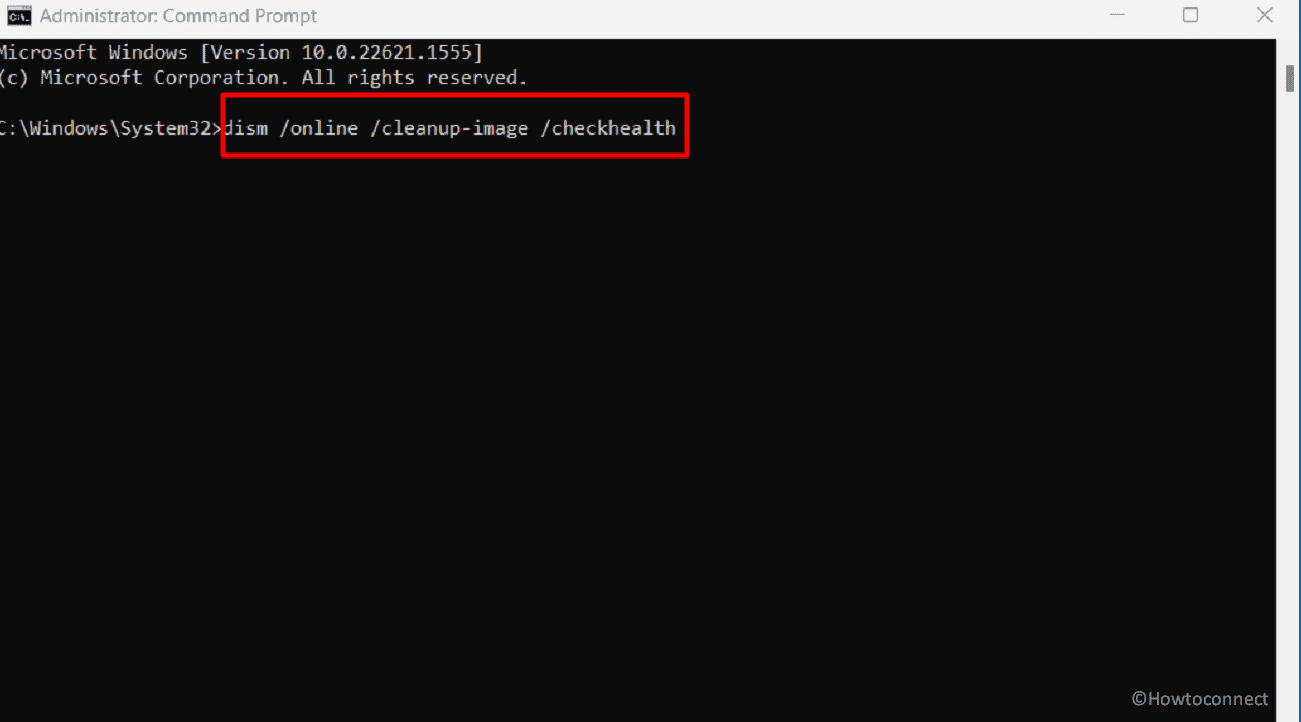
- If the System File Checker is unable to repair the corrupted files, you can try using DISM. Type the following command and press Enter after each one:
dism /online /cleanup-image /checkhealth
dism /online /cleanup-image /scanhealth
dism /online /cleanup-image /restorehealth- This should return a message indicating that no integrity violations were found.
- Using these two tools can help ensure that your Windows system files are working properly and prevent issues with your computer.
Way-7: Run Disk Cleanup
Lack of disk space also triggers error codes when downloading KB2267602 or installing the same. Using Disk Cleanup will delete unnecessary and even temporary files interfering with the Windows update process. So run this tool using the following guidelines:
- Press Winkey+R.
- Type cleanmgr.exe.
- Press Enter.
- A drive selection pop-up will appear; select (C:) drive in and click on OK.
- The tool will figure out what is removable on the disk and show a wizard; click on Cleanup system files.
- Again choose (C:) and press “Enter”.
- Click on “OK” and then when a confirmation dialog prompts click on Delete files.
- Restart the computer and try to install the update.
Way-8: Trust, In-Place Upgrade will help you
An in-place upgrade refers to the process of upgrading a computer system to a new version of an operating system while preserving user data, applications, and system settings.
Different users have mentioned that they have to ultimately use this method to solve KB2267602 failed to install problem as this process can replace corrupted system files and other reasons that may be causing the update installation problem. Below are the steps to execute in-place upgrade in Windows 11:
- Visit – https://www.microsoft.com/en-in/software-download/windows11, scroll down, and click on – Download Windows 11 Disk Image (ISO).
- Select the option – Windows 11 (multi-edition ISO).
- Then, click Download.
- Select a language as per your requirement.
- Click on – Confirm.
- Next, click on 64-bit Download and wait for the download to complete. This option may vary depending on your device.
- Navigate to the Downloads folder, right-click on Win11-22H2-Language-x64v1.iso, and select Mount.
- On the next folder, double-click on setup.exe.
- On the Install Windows 11 wizard that shows up, click Next.
- Choose – Accept.
- The setup will ensure there is enough free space in the drive and display the Ready to install window.
- Tick the box next to the choice Keep personal files and apps.
- Finally, click – Install and allow the system to complete the process.
Methods:
Way-1: Manually install the Security Intelligence Update for Microsoft Defender Antivirus
Way-2: Uninstall third-party antivirus or programs
Way-3: Run the Windows Update Troubleshooter
Way-4: Reset Windows Update database cache
Way-5: Scan the System using Microsoft Safety Scanner
Way-6: Use DISM and System File Checker
Way-7: Run Disk Cleanup
Way-8: Trust, In-Place Upgrade will help you
That’s all!!
Repair any Windows problems such as Blue/Black Screen, DLL, Exe, application, Regisrty error and quickly recover system from issues using Reimage.
Вы зашли в центр обновления Windows 10, а там написано:
С установкой некоторых обновлений возникли проблемы…
• Обновление определения для Windows Defender — КБ2267602 (Определение 1.215.422.0) — ошибка 0x80070643
Коды ошибок могут быть разными: 0x80200056, 0x80070002, 0x80070005 и другие
Если заново нажать «обновить», то уже ничего не пишет о Защитнике, а просто пишет «Устройство обновлено». Но если через пару дней зайти в центр обновлений, то там снова появится надпись про ошибку обновления определений.
Если зайти в сам Защитник, то в статусе обновления написано «Ошибка подключения». При попытке обновить появится окно «Не удалось обновить определения вирусов и
программ-шпионов
. Код ошибки: 0x80070002».
Я с такой проблемой столкнулся в Windows 10, но для предыдущих версий решение такое же.
Решение 1 (сперва попробуйте его)
Идея: Защитник во время обновления пытается удалить временную папку, но ему для этого не хватает прав. Решение: удалить содержимое временных папок.
Для этого:
- Откройте командную строку от имени администратора (как это сделать?)
- Скачайте скрипт fix.cmd и запустите его через командную строку. Или можете сами копировать по одной команде, вставлять в командную строку и запускать.
- После этого зайдите в Центр обновлений → Проверить наличие обновлений. Затем откройте Защитник Windows и обновите определения уже через него.
Решение 2 (если предыдущее не сработает)
Идея такая же: Защитник не может получить доступ к своей собственной папке. Значит нам нужно эту папку удалить, и при следующем запуске Защитник сам ее создаст заново, уже с нужными правами доступа.
Итак:
- Для удаления папки Защитника, нужно его полностью отключить:
- Отключаем Защитник в настройках (все переключатели на Выкл).
- Качаем NoDefender, запускаем, следуем инструкциям.
- Качаем и устанавливаем Winaero Tweaker (portable или обычная установка — без разницы). Запускаем, набираем в поиске defender или в левом меню ищем снизу раздел Windows Apps → Disable Windows Defender. Нажимаем «Disable Windows Defender».
- Удаляем папку
C:\ProgramData\Microsoft\Windows Defender. Кто боится удалять — можно просто переименовать ее. Возможно после этого шага стоит перезагрузить компьютер. - Включаем Защитник заново. Сперва в тех двух прогах, затем в настройках. Так же
через Winaero Tweaker можно вернуть иконку Защитника в трее (если она
пропала). - Вероятно стоит еще раз очистить все временные папки (как написано в Решении 1).
- Теперь обновите Защитника — все должно получиться.
Заключение
В Windows так же есть средство устранения неполадок с обновлениями. Проблему с Защитником оно, увы, не исправляет. Но на всякий случай запустите его:
- В Пуске наберите «Поиск и устранение неполадок Центра обновления Windows» → Запустите → Везде нажимайте Далее.
- Перезагрузка.
- Откройте Центр обновлений и нажмите Обновить.
Просьба
Этот пост я пишу через несколько недель после самого исправления. Некоторые детали у меня спутались. Например, не помню, что нужно сперва запускать: NoDefender или Winaero Tweaker. Так же не помню в какой момент нужно перезагружать комп — а может и вообще без перезагрузок можно обойтись?
Если вы пытались решить проблему и у вас получилось или нет, то напишите в комментариях об этом. Может быть в
каких-то
пунктах пришлось делать то, что у меня не указано?
Question
Issue: How to fix KB2267602 fails to install in Windows 10?
Hello. I tried to install the Security Intelligence Update for Microsoft Defender Antivirus – KB2267602 (Version 1.387.507.0) but I received the 0x80070643 error. What should I do?
Solved Answer
Microsoft released KB2267602[1] as a security update for its Defender Antivirus software, which helps protect Windows 10 computers from malware and other security threats. However, some users have reported having problems installing this update, specifically receiving error code 0x80070643.
Windows updates are critical for maintaining the operating system’s security and stability. These updates contain critical security patches, bug fixes, and performance improvements that can help protect users from known security vulnerabilities while also keeping their systems running smoothly.
If KB2267602 fails to install, users’ systems may be vulnerable to security threats because the update contains critical Defender Antivirus security fixes. Furthermore, some users may encounter performance issues or other issues with their systems as a result of not having the most recent updates installed.
Restarting the computer, running the Windows Update troubleshooter, and manually downloading and installing the update from the Microsoft Update Catalog are all options for resolving issues with KB2267602 failing to install.
In this guide, you will find 7 steps that should help you fix KB2267602 fails to install in Windows 10. If you want to avoid a lengthy troubleshooting process, you can use a maintenance tool like FortectMac Washing Machine X9 that can fix most system errors, BSODs,[2] corrupted files, and registry[3] issues. Otherwise, follow the step-by-step instructions below.
Method 1. Run the Windows Update Troubleshooter
Fix it now!
Fix it now!
To repair damaged system, you have to purchase the licensed version of Fortect Mac Washing Machine X9.
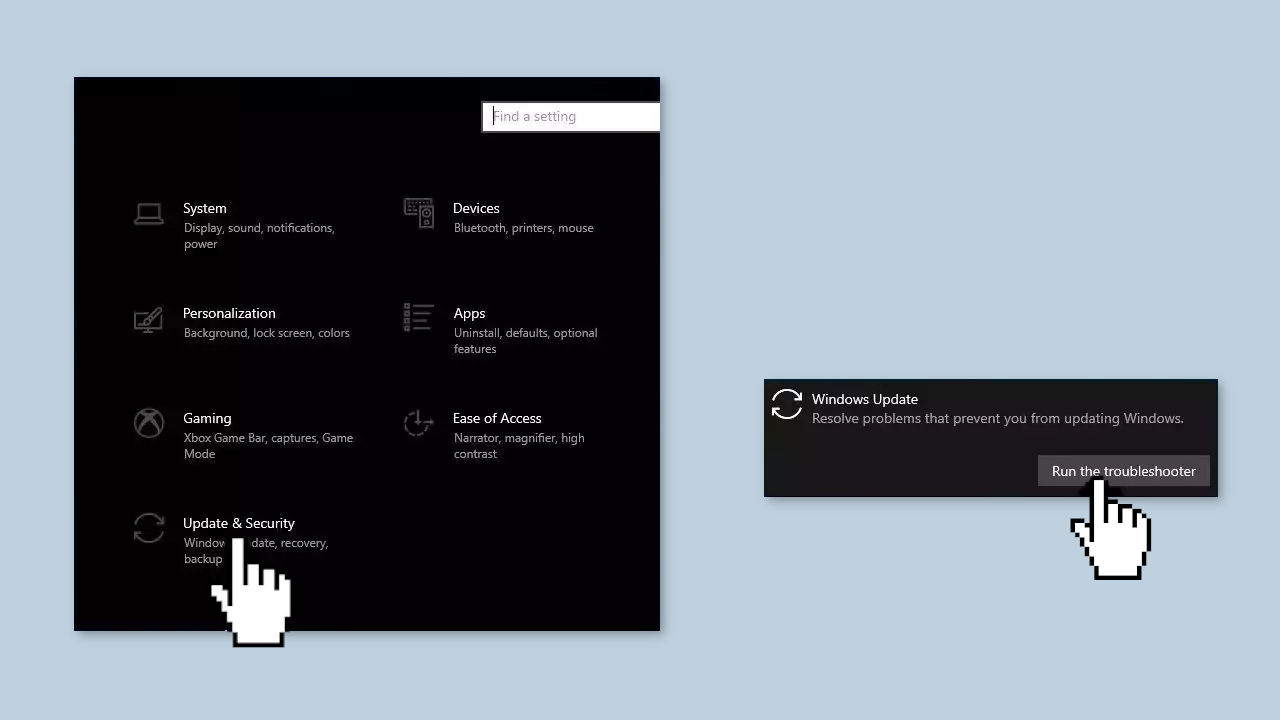
- Press the Windows + X keys and go to Settings
- Go to Update and Security
- Click Troubleshooter
- Select Additional troubleshooters
- Run the Update troubleshooter
- Restart
Method 2. Fix Corrupted System Files
Fix it now!
Fix it now!
To repair damaged system, you have to purchase the licensed version of Fortect Mac Washing Machine X9.
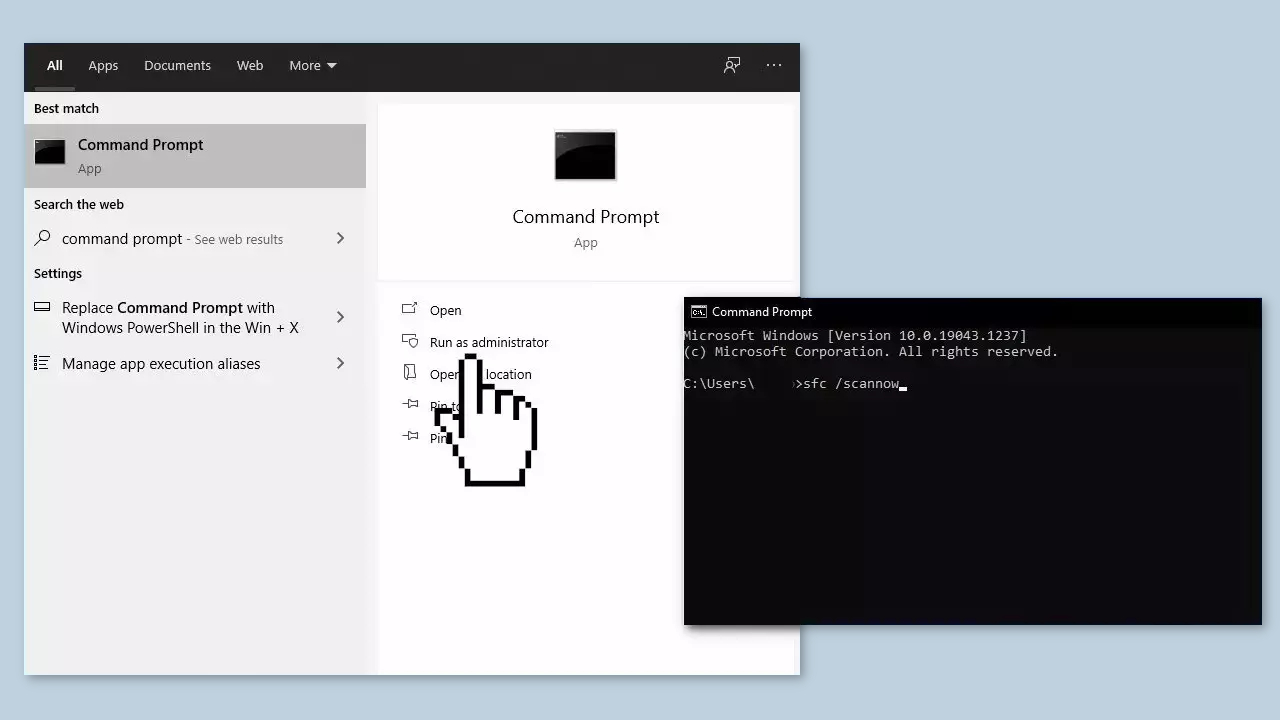
Use Command Prompt commands to repair system file corruption:
- Open Command Prompt as administrator
- Use the following command and press Enter:
sfc /scannow
- Reboot your system
- If SFC returned an error, then use the following command lines, pressing Enter after each:
DISM /Online /Cleanup-Image /CheckHealth
DISM /Online /Cleanup-Image /ScanHealth
DISM /Online /Cleanup-Image /RestoreHealth
Method 3. Update Drivers
Fix it now!
Fix it now!
To repair damaged system, you have to purchase the licensed version of Fortect Mac Washing Machine X9.
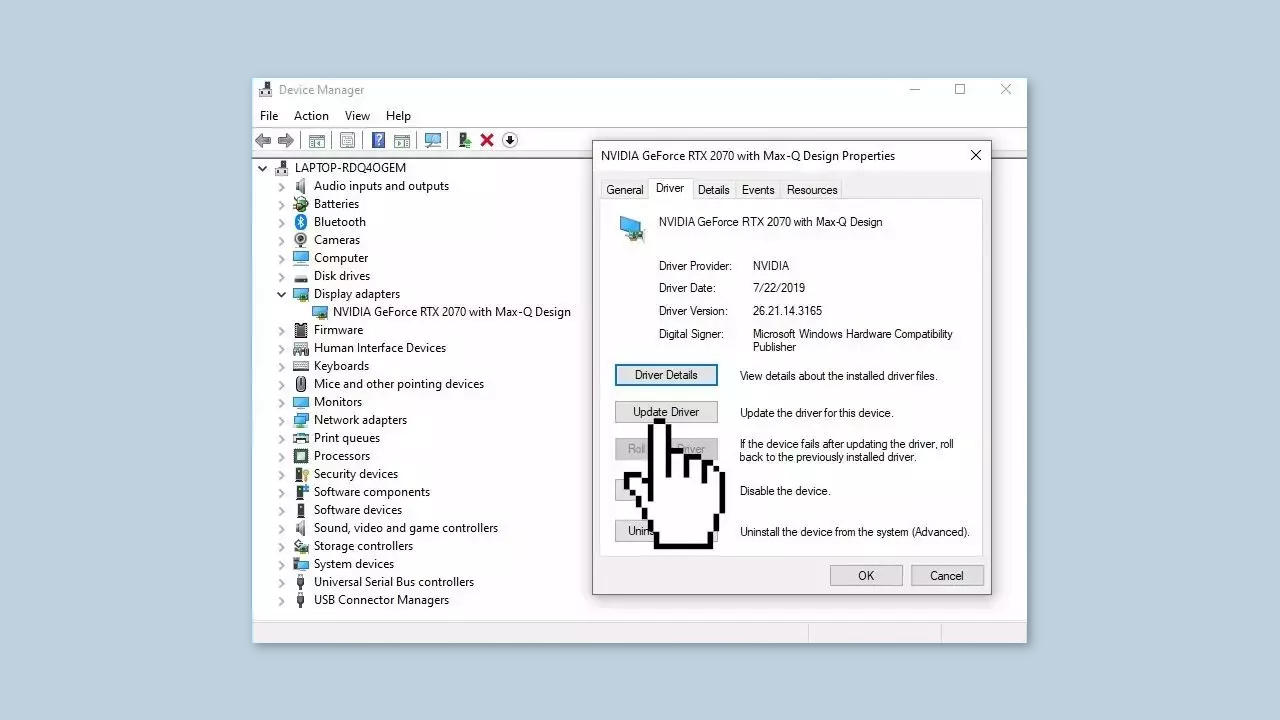
- In the search box on the taskbar, enter device manager, then select Device Manager
- Select a category to see the names of devices, then right-click the one you’d like to update
- Select Search automatically for updated driver software
- Select Update Driver
- If Windows doesn’t find a new driver, you can try using an automatic tool like DriverFix which can find the best drivers for your system
Method 4. Restart Windows Services
Fix it now!
Fix it now!
To repair damaged system, you have to purchase the licensed version of Fortect Mac Washing Machine X9.
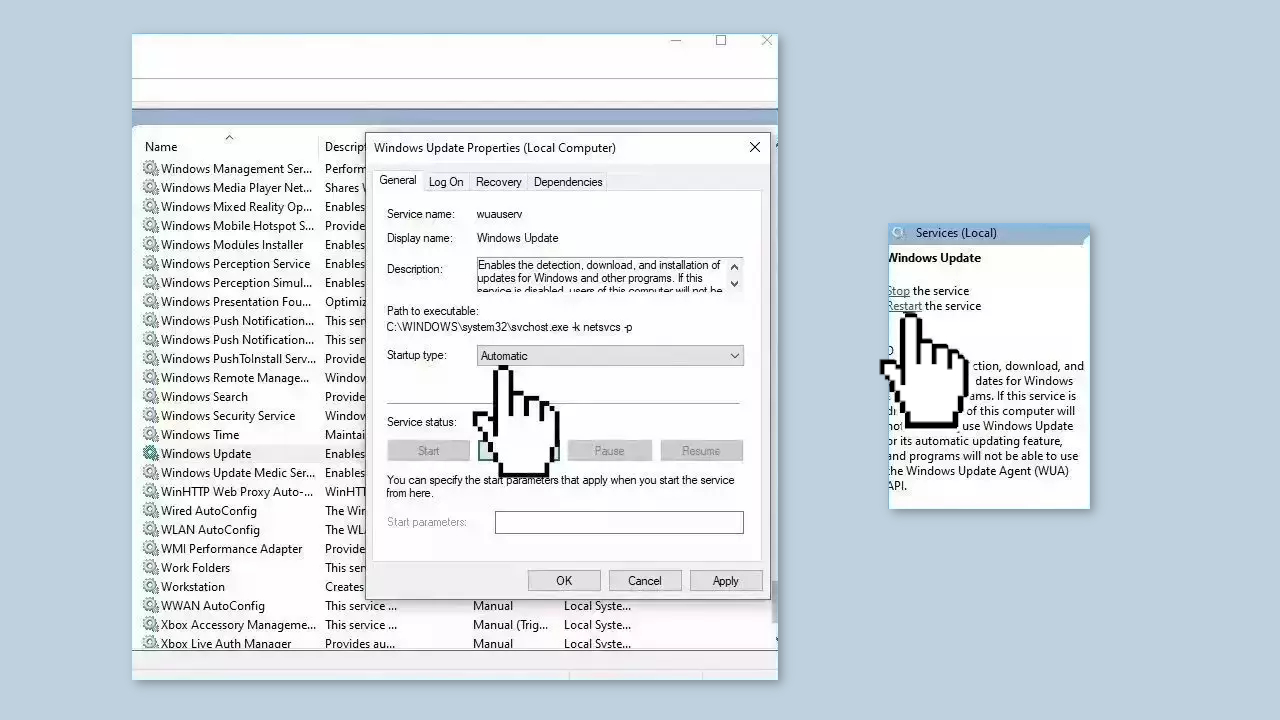
- Type services in the search bar and launch the Services utility
- Find Windows Update in the list
- Double-click on it, set the Startup type to Automatic, and click Apply
- Now click on Restart the Service
- Do the same with Background Intelligent Transfer Service
Method 5. Install the KB4577266 Update
Fix it now!
Fix it now!
To repair damaged system, you have to purchase the licensed version of Fortect Mac Washing Machine X9.
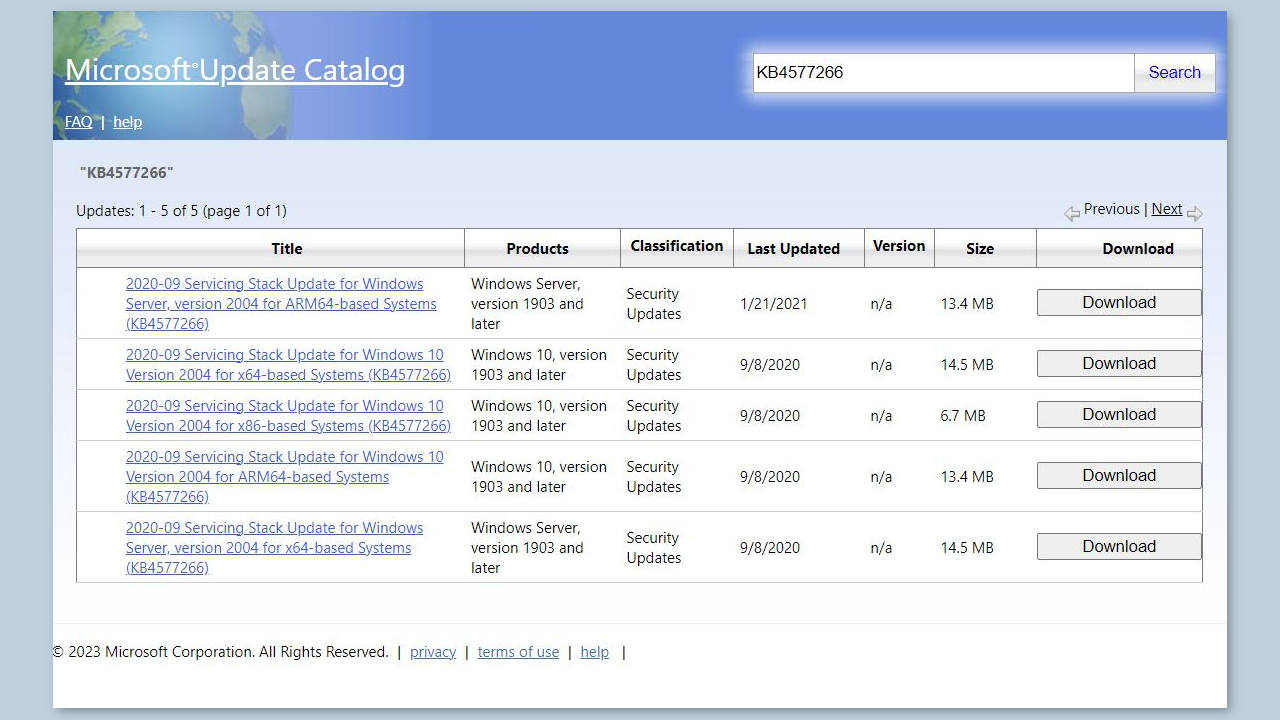
KB4577266 is a Servicing Stack Update for Windows 10. If for some reason your system does not have it, you should download and install it to see if it fixes the issue.
- Open your browser and go to the Microsoft Update Catalog.
- You will be presented with several versions of the KB4577266 update.
- Find the correct update for your OS version (you can check it by right-clicking Start and picking System > Windows specifications > Version is what you are looking for) and click Download.
- Follow the on-screen instructions and install the update.
- Reboot your system.
Method 6. Try Clean Boot
Fix it now!
Fix it now!
To repair damaged system, you have to purchase the licensed version of Fortect Mac Washing Machine X9.
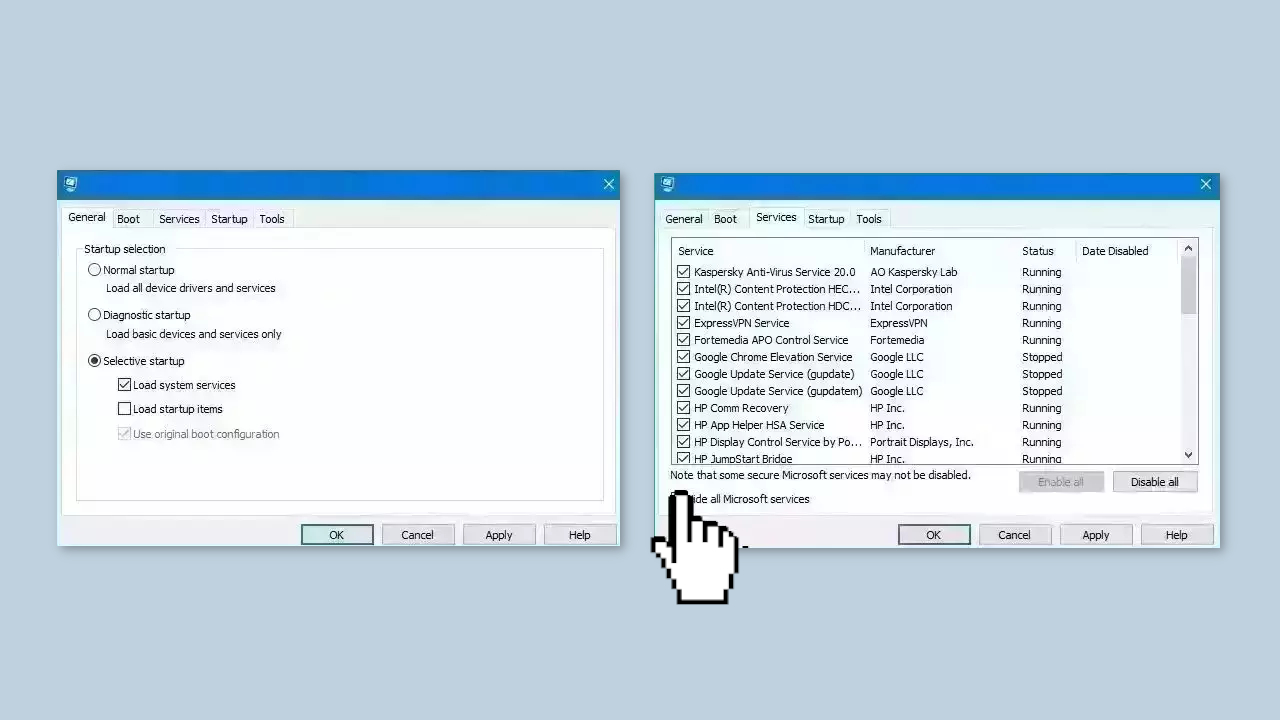
- Open the Search menu, type in system configuration, and press Enter
- Under the Services tab, tick the Hide all Microsoft services box
- Click on Disable all button
- Head over to the Startup tab and click on Open Task Manager
- Select a third-party program and click on Disable at the top
- Repeat this step to disable all third-party apps and programs
- Restart your PC to enter the clean boot state and see if the issue persists
- If the issue disappeared in the clean boot state, then you can be certain that a third-party app is causing it
- Go through all recently installed apps or programs and remove them one by one
Method 7. Use Media Creation Tool
Fix it now!
Fix it now!
To repair damaged system, you have to purchase the licensed version of Fortect Mac Washing Machine X9.
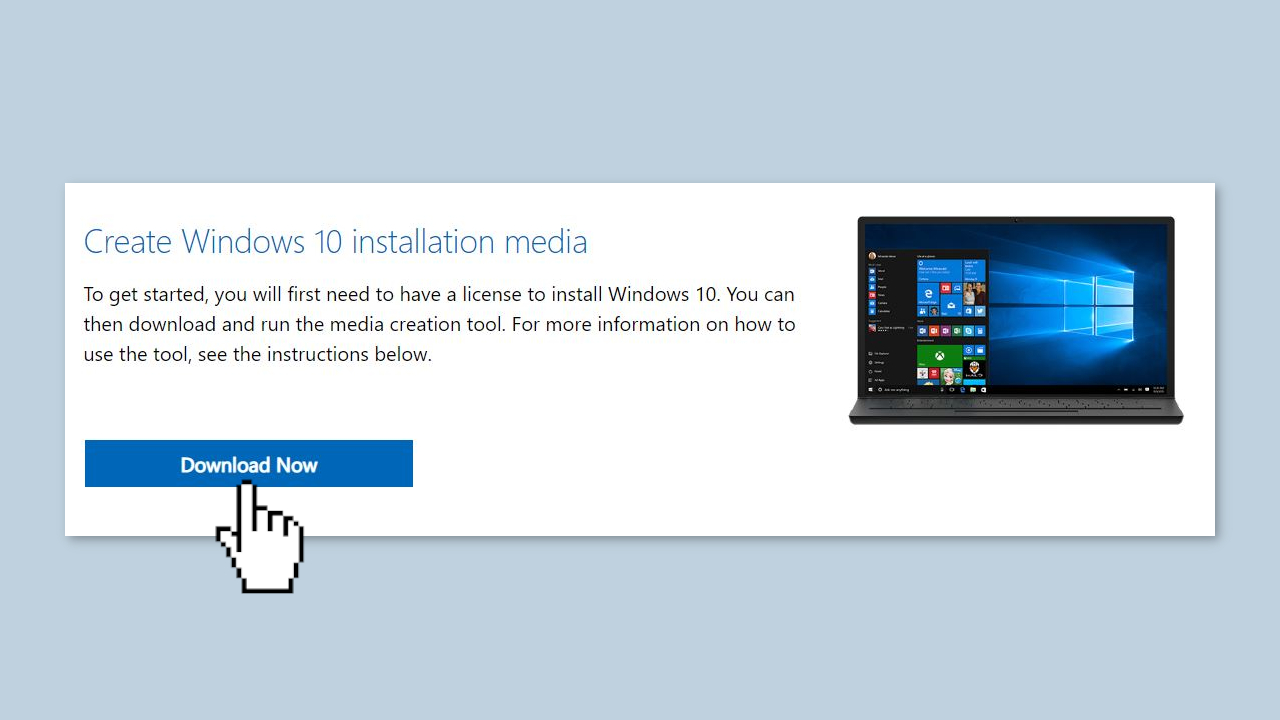
- Visit the official Microsoft website and download Windows 10 installation media.
- Double-click the installer and select Yes when UAC shows up.
- Agree to terms and click Next.
- Select Upgrade this PC now and select Next.
- Proceed with on-screen instructions.
- Your PC will restart.
Repair your Errors automatically
ugetfix.com team is trying to do its best to help users find the best solutions for eliminating their errors. If you don’t want to struggle with manual repair techniques, please use the automatic software. All recommended products have been tested and approved by our professionals. Tools that you can use to fix your error are listed bellow:
do it now!
Download Fix
Happiness
Guarantee
do it now!
Download Fix
Happiness
Guarantee
Compatible with Microsoft Windows
Compatible with OS X
Still having problems?
If you failed to fix your error using FortectMac Washing Machine X9, reach our support team for help. Please, let us know all details that you think we should know about your problem.
Fortect — a patented specialized Windows repair program. It will diagnose your damaged PC. It will scan all System Files, DLLs and Registry Keys that have been damaged by security threats.Mac Washing Machine X9 — a patented specialized Mac OS X repair program. It will diagnose your damaged computer. It will scan all System Files and Registry Keys that have been damaged by security threats.
This patented repair process uses a database of 25 million components that can replace any damaged or missing file on user’s computer.
To repair damaged system, you have to purchase the licensed version of Fortect malware removal tool.To repair damaged system, you have to purchase the licensed version of Mac Washing Machine X9 malware removal tool.
A VPN is crucial when it comes to user privacy. Online trackers such as cookies can not only be used by social media platforms and other websites but also your Internet Service Provider and the government. Even if you apply the most secure settings via your web browser, you can still be tracked via apps that are connected to the internet. Besides, privacy-focused browsers like Tor is are not an optimal choice due to diminished connection speeds. The best solution for your ultimate privacy is Private Internet Access – be anonymous and secure online.
Data recovery software is one of the options that could help you recover your files. Once you delete a file, it does not vanish into thin air – it remains on your system as long as no new data is written on top of it. Data Recovery Pro is recovery software that searchers for working copies of deleted files within your hard drive. By using the tool, you can prevent loss of valuable documents, school work, personal pictures, and other crucial files.
Explore some tested methods to resolve this problem quickly
by Madalina Dinita
Madalina has been a Windows fan ever since she got her hands on her first Windows XP computer. She is interested in all things technology, especially emerging technologies… read more
Updated on
- The error code 0x80070643 appears mostly when updating the Windows Defender.
- Make sure you uninstall previous antiviruses that might interfere with the update.
- You can also perform SFC, and DISM scans to allow the PC to get rid of the issue.
- Another solution would be turning off the Defender and switching to a better security tool.
Users complain that the Windows Defender update fails to install due to the 0x80070643 error code. Unfortunately, this error has been randomly plaguing Windows Defender users for a while now.
Judging by the number of views from the first Microsoft forum thread regarding the Windows Update error 0x80070643, it’s no exaggeration to state that tens of thousands of users have encountered this problem.
What does the Windows Update error 0x80070643 mean?
The error is likely caused by malware, file corruption, driver malfunction, or even improper system settings.
The full error message states: There were problems installing some updates, but we’ll try again later. If you keep seeing this, and want to search the web or contact support for information, this may help. Definition Update for Windows Defender – Error 0x80070643.
Read on to find out how to solve the install error – 0x80070643 issue in no time and get back to using your PC without any problems.
If you encountered the 0x80070643 error on Windows 11, check out our dedicated guide for more help.
How do I fix the Windows Defender 0x80070643 error?
- What does the Windows Update error 0x80070643 mean?
- How do I fix the Windows Defender 0x80070643 error?
- 1. Use antivirus removal tools
- 2. Check your system files
- 3. Perform a Clean boot
- 4. Use a third-party antivirus software
- 5. Restart the Security Center Service
- 6. Perform a final manual update
- 7. Disable .NET Framework
- 8. Check for updates from Windows Defender
- 9. Reset Windows Update components
- What are some common Windows Defender issues?
1. Use antivirus removal tools
When you uninstall a third-party antivirus using the Uninstall option from Control Panel, some files might remain undetected, preventing you from running and updating Windows Defender.
Even if you uninstalled your previous antivirus and have been using Windows Defender for quite some time without any problems, you’re not safe.
How we test, review and rate?
We have worked for the past 6 months on building a new review system on how we produce content. Using it, we have subsequently redone most of our articles to provide actual hands-on expertise on the guides we made.
For more details you can read how we test, review, and rate at WindowsReport.
The remnants of your previous antivirus may now be causing the 0x80070643 Windows Defender error, and since they are hard to remove manually, you need to deal with them some other way.
This is where uninstaller software comes in handy to remove your antivirus or any leftover files. It is specially designed to remove the selected application and all its files and registry entries, leaving a clean space.
Completely uninstall your old antivirus programs, restart your computer, and Windows Defender should be able to install the latest updates.
2. Check your system files
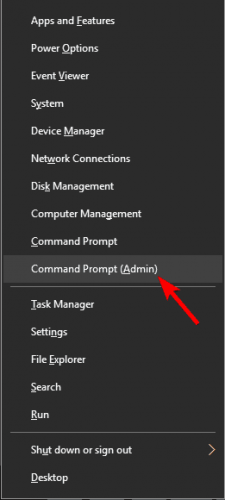
- Press Windows Key + X and choose Command Prompt (Admin) from the menu.
- You can also use PowerShell (Admin).
- Type the following command and hit Enter:
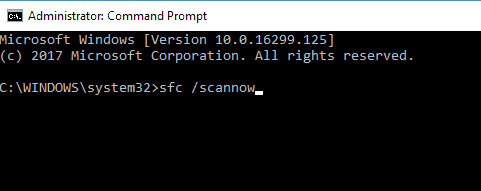
sfc /scannow
The System File Checker tool repairs corruption in system files. Use this tool to verify whether Windows Defender is corrupted, which could explain why you can’t install the updates.
To perform an SFC scan, you need to do the following:
If you can’t run the SFC scan or if SFC didn’t solve the problem, you might have to use a DISM scan instead. To do that, follow these steps:
- Start Command Prompt as administrator.
- Now run the following command and press Enter:
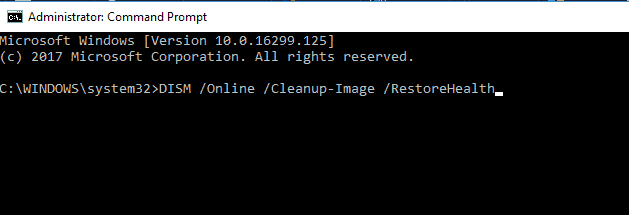
DISM /Online /Cleanup-Image /RestoreHealth - DISM scan will now start.
- Remember that this scan can take up to 20 minutes or more, so don’t interrupt it.
Once the DISM scan is finished, check if the problem is resolved. If the issue persists, or if you couldn’t run an SFC scan before, try rerunning the SFC scan and check if that solves the problem.
3. Perform a Clean boot
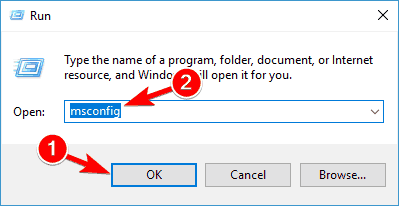
- Press the Windows Key + R and enter msconfig.
- Press Enter or click OK.
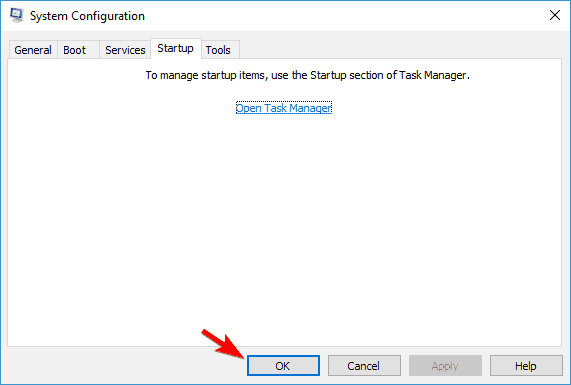
- The System Configuration window will now appear.
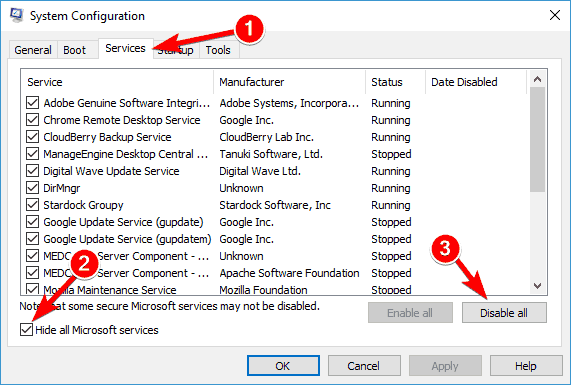
- Go to the Services tab and check to Hide all Microsoft services.
- Now click Disable all button.
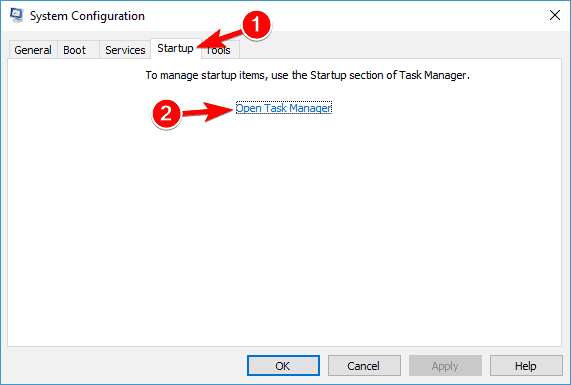
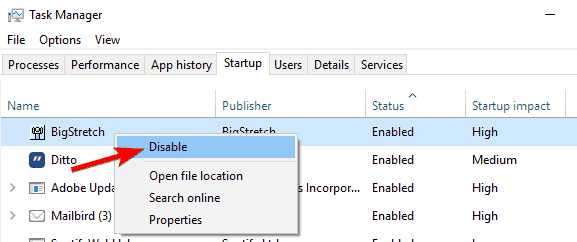
- Go to the Startup tab and click Open Task Manager.
- A list of startup applications will now appear.
- Please select the first item on the list, right-click it and choose Disable from the menu.
- Now repeat this step for all startup applications.
- Once you disable all startup applications, close Task Manager and return to the System Configuration window.
- Click Apply and OK to save changes and restart your PC.
- Once your PC restarts, check if the problem still appears.
- If not, go back and enable disabled apps and services one by one until you find the one causing the issue.
- When you find it, delete or disable it, and the problem will be permanently resolved.
Third-party applications can sometimes interfere with Windows and cause Windows Defender update to fail and the Windows Update error 0x80070643 to appear. You might be able to fix it by performing a Clean boot.
4. Use a third-party antivirus software
If you want to avoid all the problems related to Windows Defender, you can switch to a better security tool, such as third-party antivirus software.
Not only will this software do a better job at protecting your data from being stolen or stopping any virus from infecting your device. It should also have no errors or glitches.
You will also benefit from other useful features that protect your PC and allow you to browse the internet carelessly and without worry.

ESET Internet Security
The ultimate security tool uses AI and machine learning to provide excellent protection.
5. Restart the Security Center Service
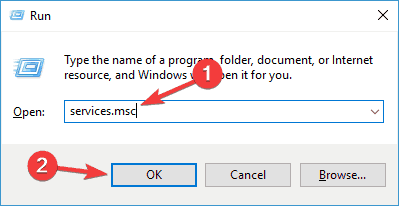
- Press Windows key + R and launch run.
- Type services.msc and hit Enter.
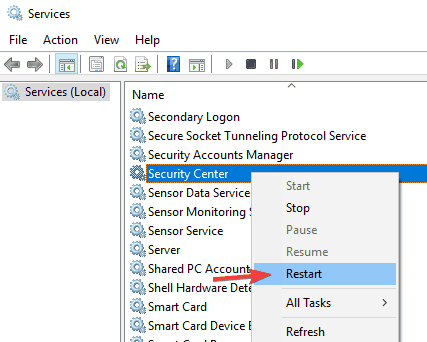
- In the Services tab, search for Security Center.
- Right-click on Security Center, then click on Restart.
6. Perform a final manual update
- Go to Microsoft’s Malware Protection Center portal.
- Follow the instructions to download and install the Antimalware, antispyware updates, and Network Inspection System updates available for your system.
NOTE
The manual ADL packageu00a0update installs silently. To ensure the manual update worked correctly, check with the Windows Defender Client UI to see if it reports the latest threat definition version.
7. Disable .NET Framework
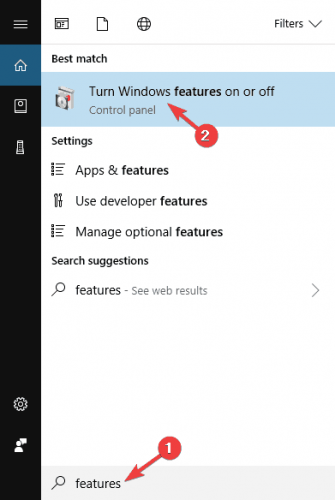
- Press the Windows Key + S and enter features.
- Select Turn Windows features on or off.
- When the Windows Features window opens, disable Windows Communication Foundation HTTP Activation and Windows Communication Foundation Non-HTTP Activation.
- Now click OK to save the changes.
- Restart your PC and check if the problem is solved.
According to people, sometimes .NET Framework can cause problems with Windows Defender updates. However, you might be able to fix this problem simply by disabling it.
Several users suggest repairing your .NET Framework installation as a potential solution, so you might want to try that as well.
8. Check for updates from Windows Defender
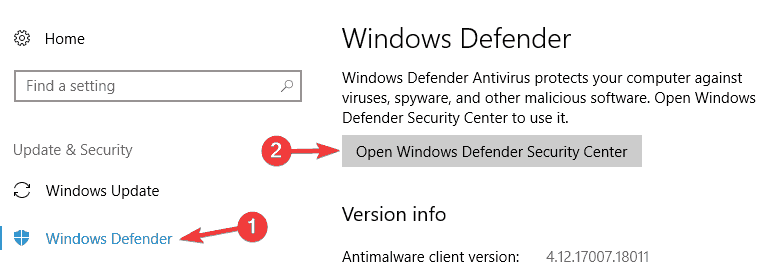
- Press Windows Key + I to quickly open the Settings app.
- Go to the Update & Security section.
- In the left pane, select Windows Defender and then click the Open Windows Defender Security Center button.
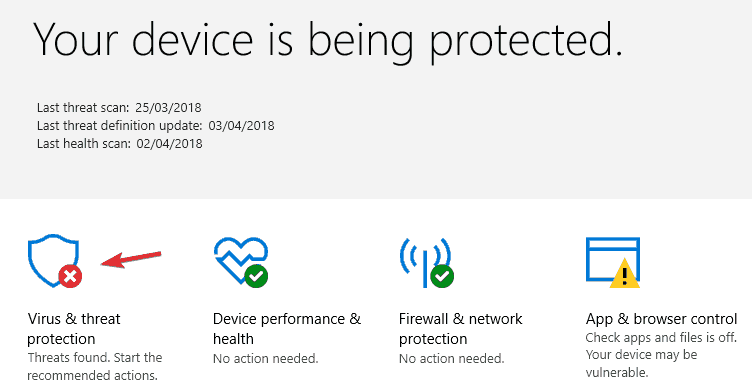
- Then, go to Virus & threat protection section.
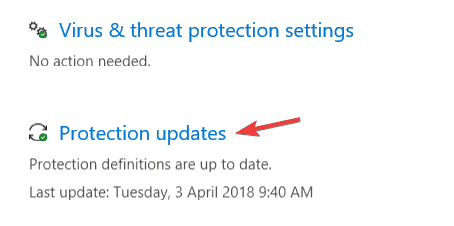
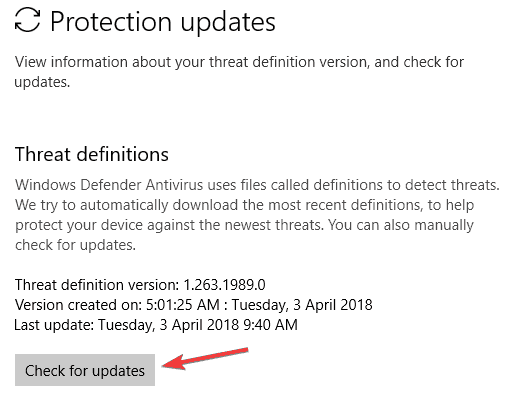
- Now go to Protection updates.
- Click the Check for updates button.
Windows Defender will now download the available updates. In addition, several users reported that this method fixes the kb2267602 error 0x80070643 for them, so feel free to try it out.
If you’re having problems with downloading updates, you might be able to fix the problem by trying to download updates directly from Windows Defender.
9. Reset Windows Update components
- Start Command Prompt as administrator.
- Now enter the following commands:
net stop wuauserv
net stop cryptSvc
net stop bits
net stop msiserver
ren C:WindowsSoftwareDistribution SoftwareDistribution.old ren C:WindowsSystem32catroot2 Catroot2.old
net start wuauserv
net start cryptSvc
net start bits
net start msiserver
Sometimes there might be a bug with Windows Update components, which can cause the Windows Update error 0x80070643 error to appear. You might be able to fix the problem by running several CMD commands.
By running these commands, you’ll stop all services associated with the Windows Update, rename the affected directories and then restart the services. This is a simple solution, so feel free to try it out.
- Fix: This Alias Cannot be Added to Your Account Error on Windows 11
- Windows 11 23H2: How to Download the Official ISO
- How to fix the Thinkpad if it Won’t Wake Up
- A 64-bit Windows 12 ISO is out, theoretically. Here’s all you need to know
What are some common Windows Defender issues?
Windows Defender offers solid protection, but if you want to keep your Windows 10 PC protected, it’s important to update Windows Defender regularly.
Unfortunately, update issues can occur, and speaking of cases, these are some of the common problems that users reported:
- Windows Defender update failed – If the Windows Defender update fails, the issue might be a third-party antivirus tool. If your previous antivirus isn’t completely removed, sometimes leftover files can interfere with Windows Defender and cause this issue to appear. To fix it, remove any leftover files.
- Windows Defender update stuck – Sometimes, your Windows Defender can get stuck during the update process. If this happens, be sure to repair your system files using both SFC and DISM scans.
- Windows Defender update connection failed – If you get this error message while trying to update Windows Defender, your third-party firewall might be an issue, so be sure to disable it or uninstall it.
- Windows Defender update won’t install – If the Windows Defender update doesn’t install, the issue might be a problematic application. However, you can fix the problem simply by performing a Clean boot.
- Windows Defender not getting updated / security intelligence update error – Several users claim that Windows Update components can cause this issue, so try resetting them and check if that solves the problem.
We’ve written extensively about Defender update problems before. So bookmark our article on what to do if Windows Defender won’t update in case you need it later.
We hope these fixes work for you in solving the Windows Update error 0x80070643, related to Windows Defender.
If you’ve found other workarounds for the Windows Defender 0x80070643 issue, tell us more about your experience in the comment section below.
При обновлении операционной системы Windows 10 пользователи иногда сталкиваются с проблемой, когда обновление с кодом Kb2267602 не устанавливается. Эта проблема может быть вызвана различными причинами, включая конфликты с другими установленными программами, неправильными настройками системы или проблемами с самим обновлением.
Одной из распространенных причин невозможности установки обновления Kb2267602 является конфликт с другими программами на компьютере. Возможно, у вас уже установлены некоторые программы, которые взаимодействуют с тем же компонентом системы, который обновляется этим обновлением. В таком случае, обновление Kb2267602 может оказаться заблокированным, и его установка не будет происходить.
Также стоит обратить внимание на настройки системы, которые могут влиять на возможность установки обновления. Некоторые настройки безопасности, настроенные пользователем, могут запрещать установку обновлений, если они не совпадают с определенными требованиями. В таком случае, необходимо проверить настройки системы и убедиться, что они позволяют установку обновлений.
Если проблема с установкой обновления Kb2267602 все еще не решена, можно попробовать ряд способов, которые помогли многим пользователям. Например, можно попытаться установить обновление в безопасном режиме, чтобы избежать возможных конфликтов с другими программами. Также может помочь временное отключение антивирусных программ, которые могут блокировать установку обновления. Некоторым пользователям помогло изменение параметров службы Windows Update или выполнение специальных команд в командной строке.
Причины невозможности установки Kb2267602 в Windows 10
1. Несовместимость с текущей версией операционной системы.
Одной из основных причин, по которой Kb2267602 не устанавливается в Windows 10, может быть несовместимость обновления с текущей версией операционной системы. Как правило, каждое обновление имеет определенные системные требования и может быть доступно только для определенных версий Windows 10. Проверьте, соответствует ли ваша операционная система требованиям обновления Kb2267602.
2. Наличие конфликтующих программ или драйверов.
Иногда Kb2267602 не удается установить из-за наличия конфликтующих программ или драйверов на вашем компьютере. Это могут быть программы антивирусной защиты или другие системные утилиты, которые не допускают установку обновлений. Попробуйте временно отключить или удалить подобные программы, чтобы установить обновление.
3. Неполадки с Windows Update.
Иногда Windows Update может работать некорректно, что может привести к неудачной установке обновлений. В этом случае, необходимо проверить состояние службы Windows Update, перезапустить компьютер и попробовать снова. Также можно воспользоваться инструментом «Утилита проверки системных файлов», чтобы исправить возможные неполадки.
4. Ограничения на установку обновлений.
В некоторых случаях, невозможность установки Kb2267602 в Windows 10 может быть связана с наличием ограничений на установку обновлений, заданных администратором компьютера или групповой политикой. Если ваш компьютер находится в корпоративной сети, обратитесь к администратору системы или службе поддержки, чтобы узнать о наличии ограничений или получить помощь в установке обновления.
Если ни одна из этих причин не помогла решить проблему с установкой Kb2267602 в Windows 10, рекомендуется обратиться в службу поддержки Microsoft для дополнительной помощи и инструкций по устранению ошибки.
Способы решения проблемы с установкой Kb2267602 в Windows 10
Установка обновлений является важной частью поддержания безопасности и стабильности операционной системы Windows 10. Однако иногда возникают проблемы при установке конкретных обновлений, например, Kb2267602. В этом случае можно попробовать следующие способы решения проблемы:
- Проверьте подключение к интернету. Установка обновлений может завершиться неудачно из-за проблем с соединением. Убедитесь, что вы подключены к интернету стабильно и проверьте скорость вашего соединения.
- Перезагрузите компьютер. Иногда проблемы с установкой обновлений могут быть вызваны неполадками в системе. Попробуйте перезагрузить компьютер и запустить установку обновления повторно.
- Выполните проверку ошибок системы. В Windows 10 есть встроенный инструмент, который позволяет выявить и исправить ошибки в системе. Нажмите клавиши Win + X и выберите «Командная строка (администратор)». В командной строке введите команду «sfc /scannow» и нажмите Enter. Инструмент начнет проверку системы и автоматически исправит обнаруженные ошибки.
- Отключите антивирусное программное обеспечение. В некоторых случаях антивирусные программы могут блокировать установку обновлений, считая их потенциально опасными. Попробуйте временно отключить антивирусное программное обеспечение и повторить установку обновления.
- Используйте инструменты устранения неполадок Windows Update. В Windows 10 есть встроенные инструменты для устранения проблем с обновлениями. Откройте Настройки (клавиши Win + I), выберите «Обновление и безопасность» и перейдите на вкладку «Отладка». Запустите инструменты устранения неполадок для Windows Update и следуйте инструкциям на экране.
Если ни один из этих способов не помог решить проблему с установкой Kb2267602 в Windows 10, рекомендуется обратиться за помощью в службу поддержки Microsoft или воспользоваться другими источниками информации, такими как форумы обсуждений или сообщества пользователей Windows.
