Привет, друзья. Тема этой публикации — как поменять экран блокировки на Windows 10. Создатель операционной системы — компания Microsoft – не особо щедра в реализации штатных пользовательских возможностей по настройке экрана блокировки, но кое-что немногое изменить в нём мы можем. Кстати, если он вам не нужен, вы можете его вообще отключить, а как это сделать, смотрите в статье сайта «Как отключить экран блокировки в Windows 10». Если же нужен, давайте разбираться с теми немногими настроечными возможностями, которые доступны для него. А это смена картинки, запуск слайд-шоу фотографий, настройка сведений приложений, настройка фона входа пользователя в Windows 10.
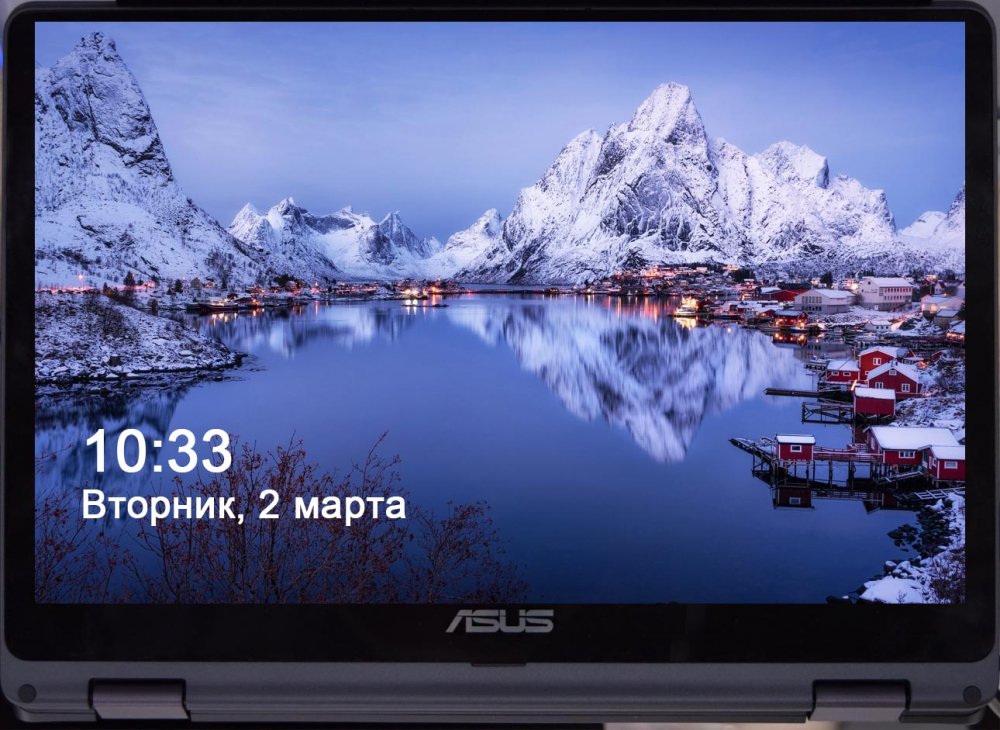
Итак, друзья, экран блокировки Windows 10. Это системная среда вне пользовательских учётных записей, среда, где пользователи операционной системы выполняют вход в свои учётные записи и имеют доступ к некоторым системным функциям. И сделана эта среда на фоне приятных картинок живописных пейзажей, показываемых нам в рамках по умолчанию активной функции «Windows: Интересное».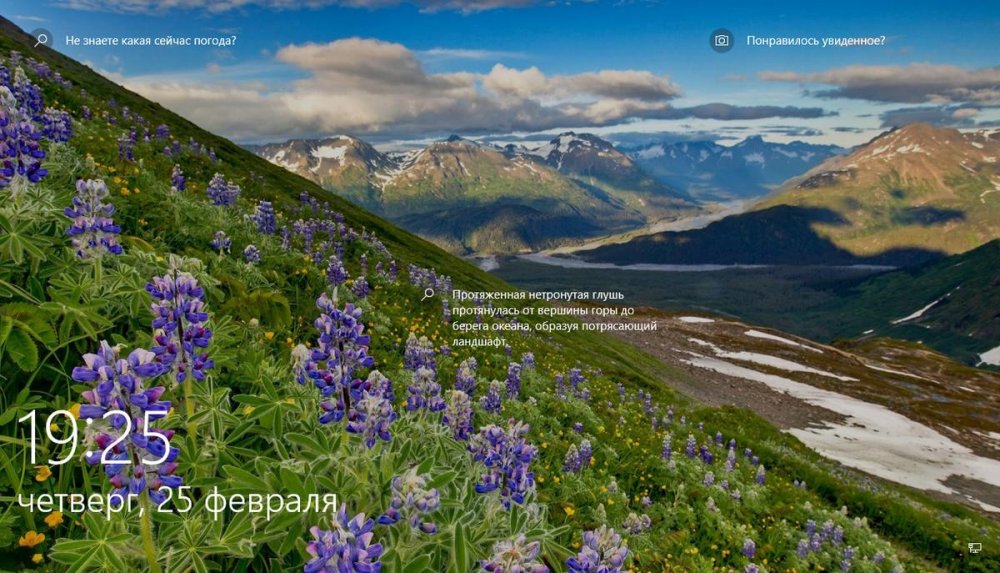
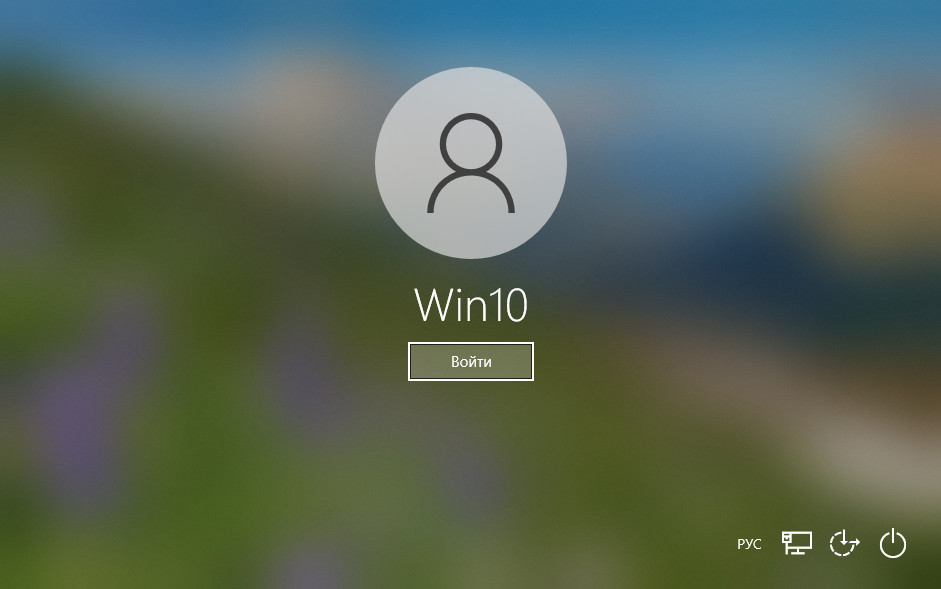
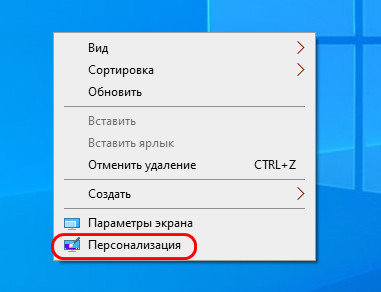
По умолчанию в качестве фона экрана блокировки Windows 10 показываются разные картинки в рамках активной функции «Windows: Интересное», она же Windows Spotlight. Эта функция подтягивает с ресурсов Microsoft эффектные пейзажи и меняет их каждый день. Кроме того, на самих картинках отображаются различные занимательные факты о местностях, изображённых на картинках. А иногда отображаются советы по работе с Windows 10 и продуктами Microsoft.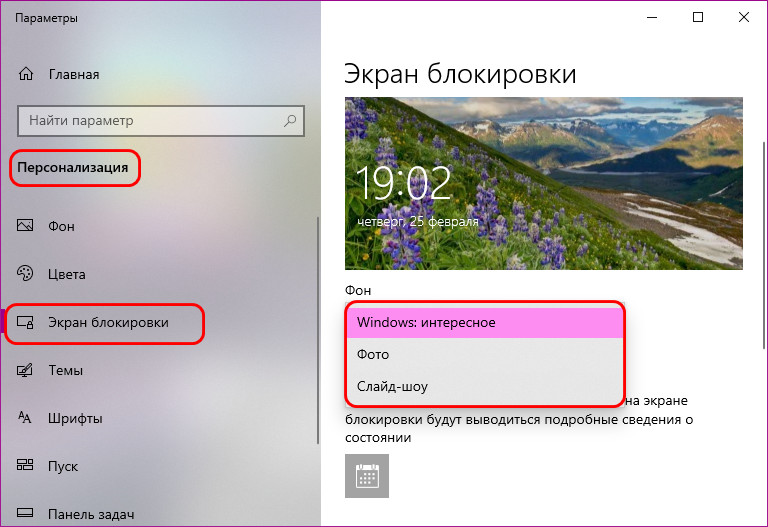
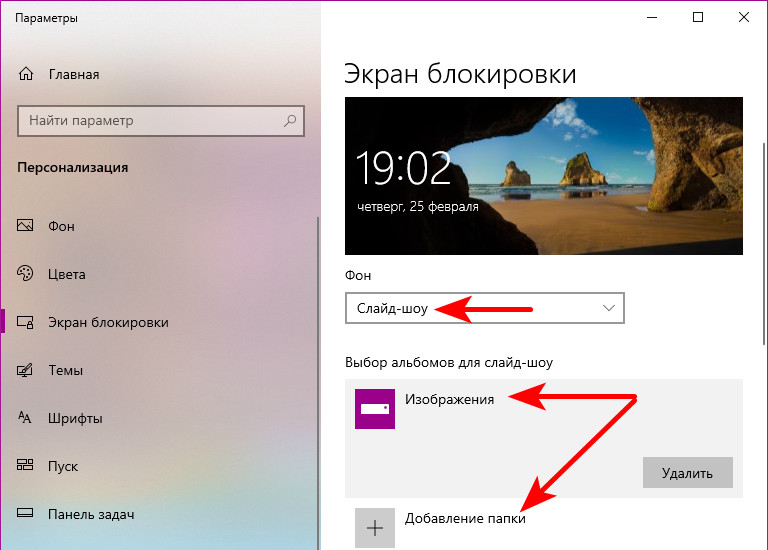
Третий вариант фона при настройке экрана блокировки Windows 10 – слайд-шоу. Этот вариант не меняет главное изображение экрана блокировки, но добавляет на экран воспроизведение слайд-шоу картинок из добавленных папок. Выбираем в качестве фона «Слайд-шоу» и добавляем папку с картинками на компьютере.
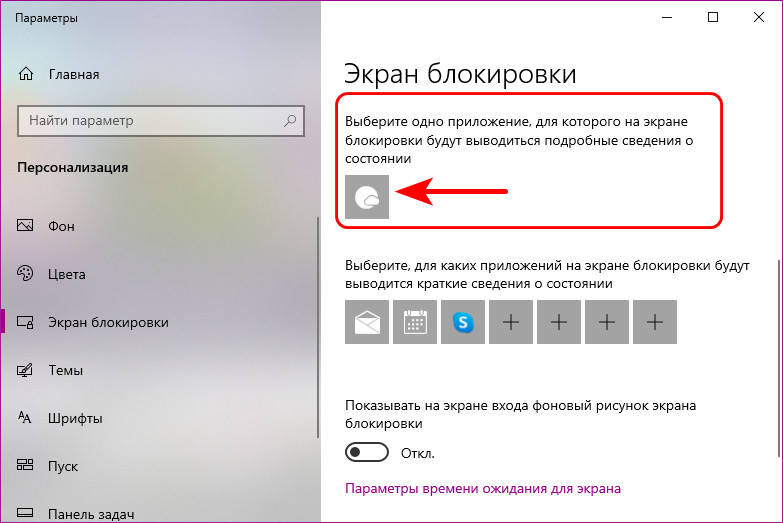
В настройках экрана блокировки Windows 10 можем выбрать современные универсальные приложения, которые будут выводить на экран какие-то сведенья – число новых писем или сообщений, пропущенные звонки по Скайпу, задачи планировщика и т.п. Одно приложение можно настроить для подробных сведений, а семь приложений — для кратких сведений. Конечно, у каждого свои приоритеты, но наверняка для многих актуальным будет отображение погоды на экране блокировки. Для этого нужно указать приложение «Погода» в качестве того одного, для которого будут отображаться подробные сведения.
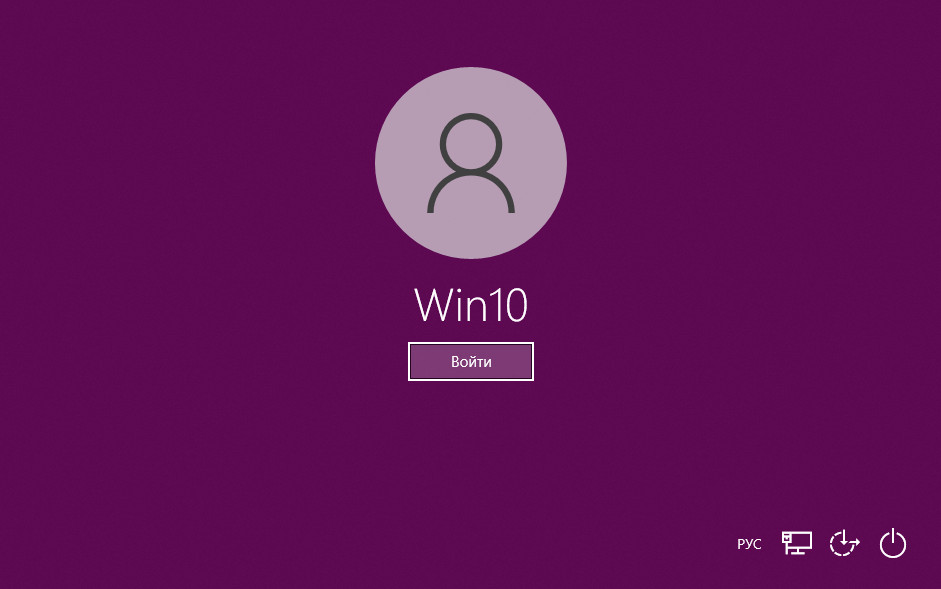
И последняя настройка экрана блокировки Windows 10 – настройка экрана входа в учётную запись. Для него при желании можно отключить фоновый рисунок, применяемый к экрану блокировки.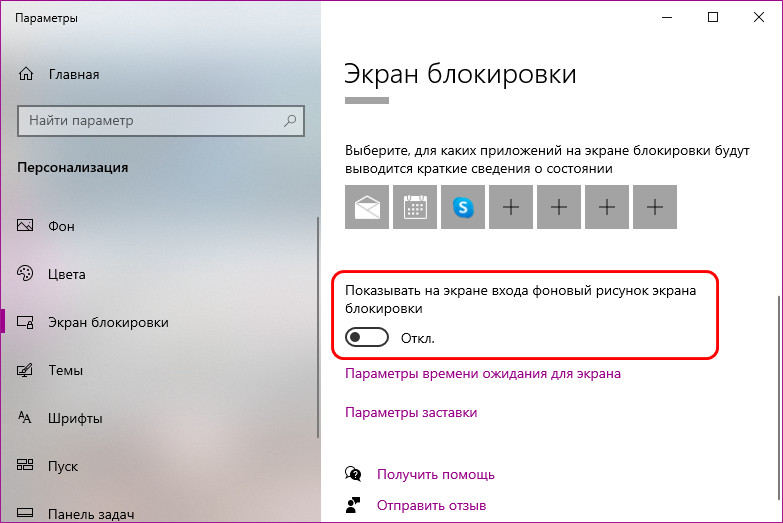
regedit
Раскрываем путь:
Компьютер\HKEY_LOCAL_MACHINE\SOFTWARE\Policies\Microsoft\Windows\System
Создаём 32-битный параметр DWORD.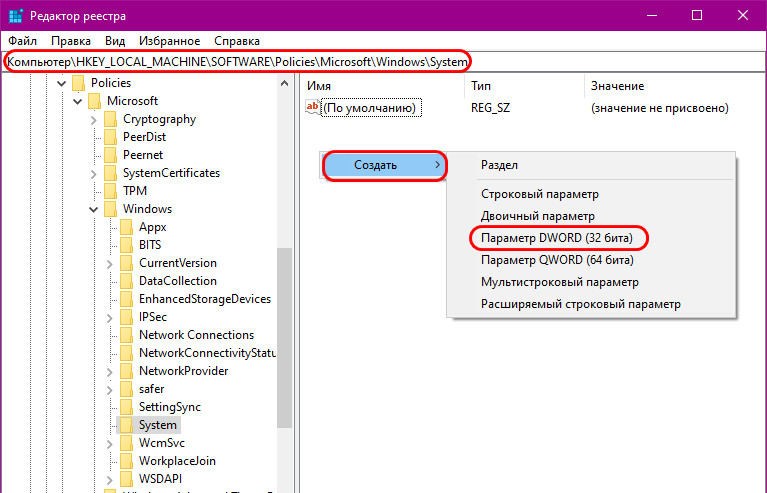
DisableAcrylicBackgroundOnLogon
Устанавливаем его значение 1.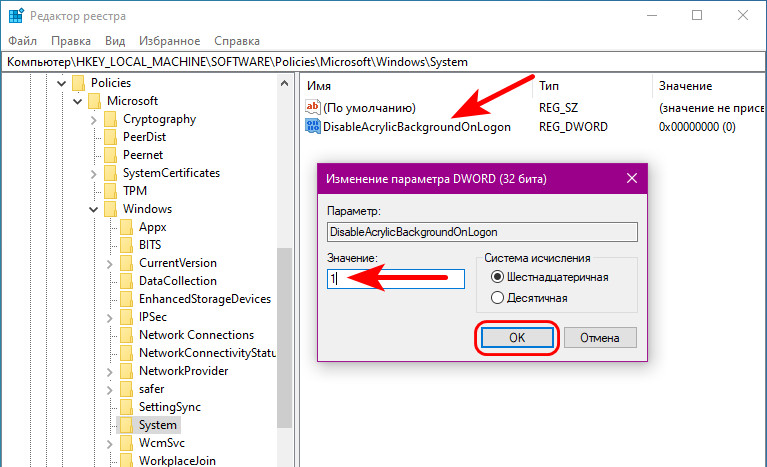
Вот это, друзья, как поменять экран блокировки на Windows 10: системные настроечные возможности в этом плане весьма скромны, но в общем-то более и не нужно. У Microsoft есть ещё много непаханых полей…
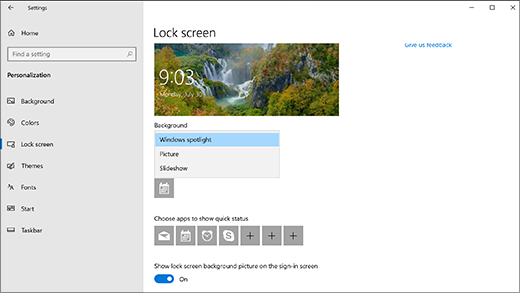
You can customize your lock screen. Try changing the background to a favorite photo or slide show. You can also choose quick status notifications to show you upcoming calendar events, social network updates, or other app and system notifications.
Customize your lock screen image
-
Select Start > Settings .
-
Select Personalization > Lock screen.
-
Select the list for Personalize your lock screen, then do one of the following:
-
Select Windows spotlight for beautiful photography that displays automatically. Windows Spotlight updates daily with images from around the globe, and it also shows tips and tricks for getting the most out of Windows.
Note: If you don’t see this option, it might be because it’s managed by your organization. Check with your system administrator for more info.
-
Select Picture, then select a recent image, or select Browse photos, select the photo you want to use, and select Choose picture.
-
Select Slideshow, then select Browse, select the folder you want to use, and select Choose this folder. If you see folders listed that you don’t want included in the slideshow, select Remove next to that folder.
-
If you chose Windows spotlight for your lock screen, you can test if it’s working correctly. Press Windows logo key + L to lock your device. The Windows spotlight image should appear on the lock screen.
If you don’t see the Windows spotlight image when you’re signing in, select Start > Settings > Personalization > Lock screen. Check that the toggle for Show lock screen background picture on the sign-in screen is turned on.
Customize a lock screen quick notification
-
Select Start > Settings .
-
Select Personalization > Lock screen.
-
Select the list for Lock screen status, and select an option such as Mail, Weather, or Calendar.
Note: If you choose Calendar, you can easily see your upcoming meetings.
You can customize your lock screen. Try changing the background to a favorite photo or slide show. You can also choose quick status notifications to show you upcoming calendar events, social network updates, or other app and system notifications.
Customize your lock screen image
-
Select Start > Settings .
-
Select Personalization > Lock screen .
-
Select the list for Background, then do one of the following:
-
Select Windows spotlight for beautiful photography that displays automatically. Windows Spotlight updates daily with images from around the globe and it also shows tips and tricks for getting the most out of Windows.
Note: If you don’t see this option, it might be because it’s managed by your organization. Check with your system administrator for more info.
-
Select Picture, then select a recent image, or select Browse photos, select the photo you want to use, and select Choose picture.
-
Select Slideshow, then select Add a folder, select the folder you want to use, and select Choose this folder. If you see folders listed that you don’t want included in the slideshow, select the folder, then select Remove.
-
If you chose Windows spotlight for your lock screen, you can test if it’s working correctly. Press Windows logo key + L to lock your device. The Windows spotlight image should appear on the lock screen.
If you don’t see the Windows spotlight image when you’re signing in, select Start > Settings > Personalization > Lock screen . Then make sure Show lock screen background picture on the sign-in screen is turned on.
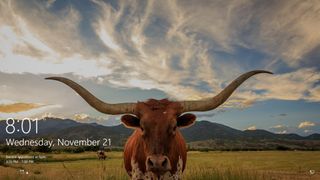
On Windows 10, the Lock screen is the experience that you always see before signing in to your account, and while it may seem like something unnecessary, it provides some useful functionalities, even before accessing the desktop.
For example, in the Lock screen, you can see the current date and time, show calendar events, and notifications from other apps. You can also interact with Cortana, showcase your favorite background images, personal pictures, and beautiful images from Bing using Windows Spotlight.
In this Windows 10 guide, we’ll walk you through the steps to customize and get the most out of the Lock screen experience.
- How to customize background in the Lock screen
- How to customize apps notifications in the Lock screen
- How to disable the Lock screen background in the sign-in screen
- How to allow Cortana above the Lock screen
- How to set screen timeout in the Lock screen
How to customize background in the Lock screen
Windows 10 allows you to customize the look of the Lock screen using the Windows Spotlight service, a single picture, or you can even showcase a collection of images from one or multiple folders.
Using Windows Spotlight
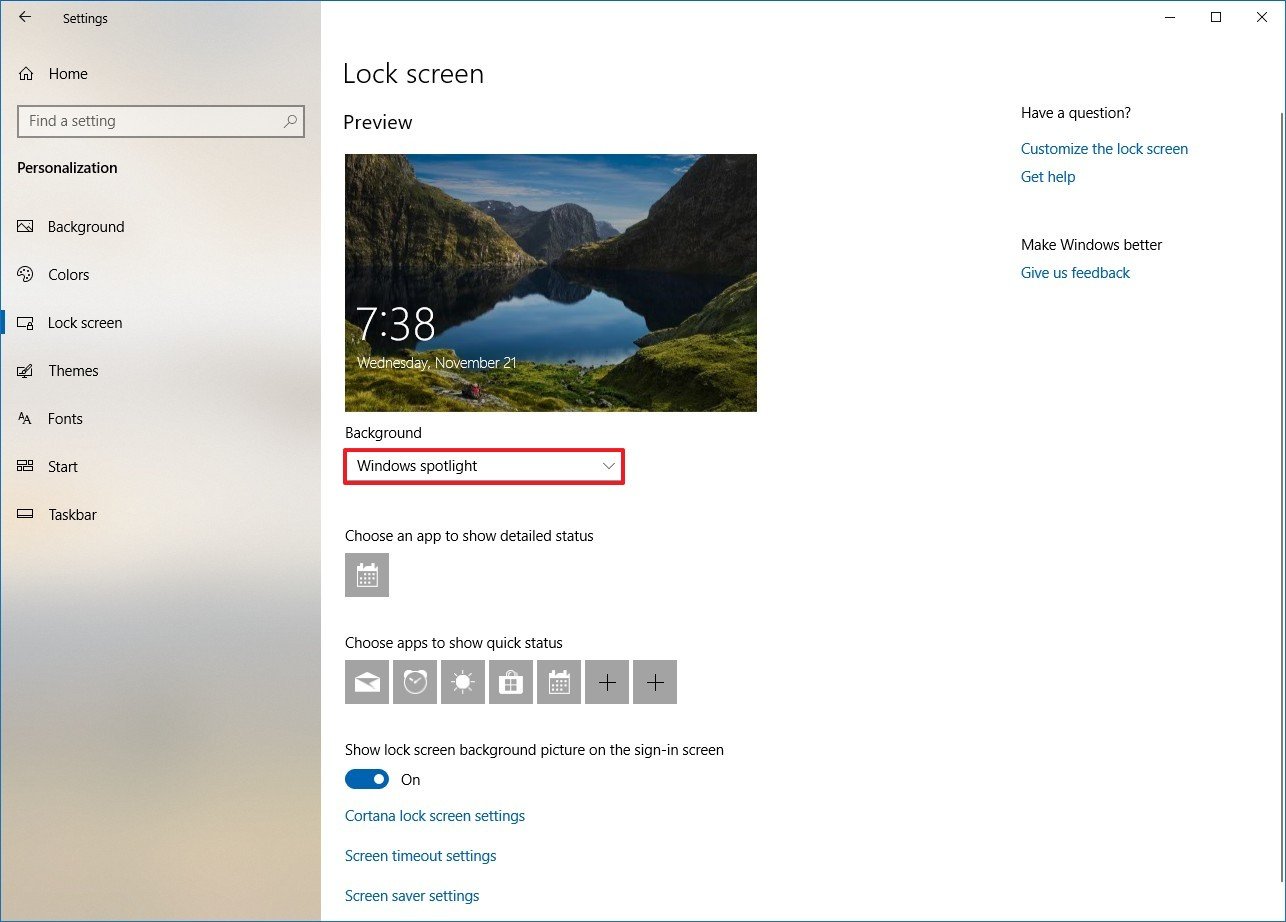
Spotlight is a feature that connects with Bing to download and set new background images automatically to keep the experience fresh every time you have to sign in to Windows 10. You can enable the feature using these steps:
- Open Settings.
- Click on Personalization.
- Click on Lock screen.
- Use the «Background» drop-down menu, and select the Windows Spotlight option.
Once you’ve completed the steps, the Lock screen will now include a new image every time that you sign in to your account.
If you’re having problems getting Spotlight to work, you can use this guide to troubleshoot and fix most common issues.
Using a single image
If you want to see always a particular image, you can customize the Lock screen to display a single image with these steps:
- Open Settings.
- Click on Personalization.
- Click on Lock screen.
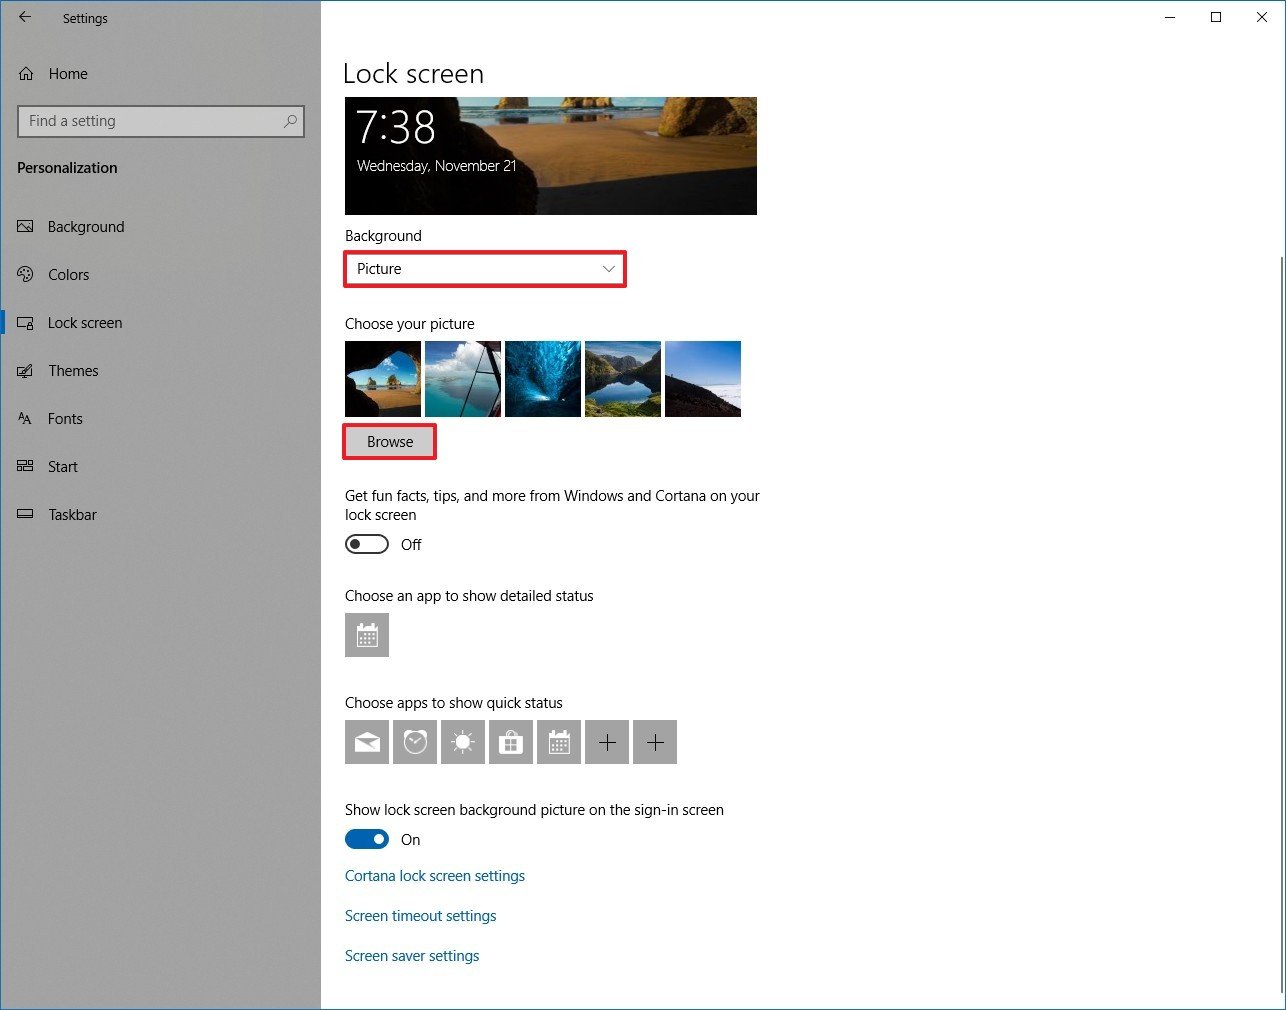
- Use the «Background» drop-down menu, and select the Picture option.
- Click the Browse button to locate the image you want to use.
In addition, you may want to turn off the Get fun facts, tips, and more from Windows and Cortana on your lock screen toggle switch to get a cleaner experience.
Using image collection
Alternatively, you can use the following steps to showcase a collection of images from one or multiple folders in the Lock screen:
- Open Settings.
- Click on Personalization.
- Click on Lock screen.
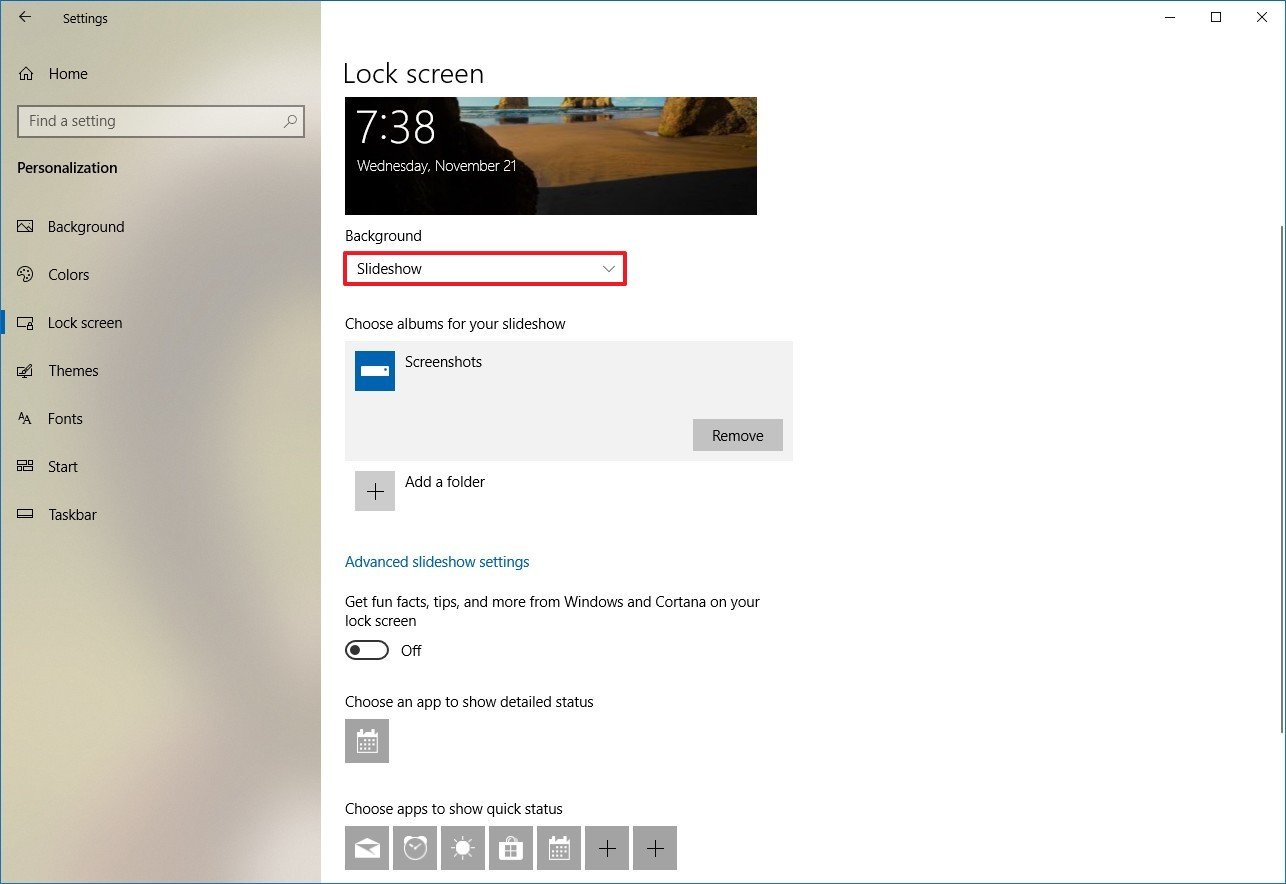
- Use the «Background» drop-down menu, and select the Slideshow option.
- Select the Pictures item.
- Click the Remove item.
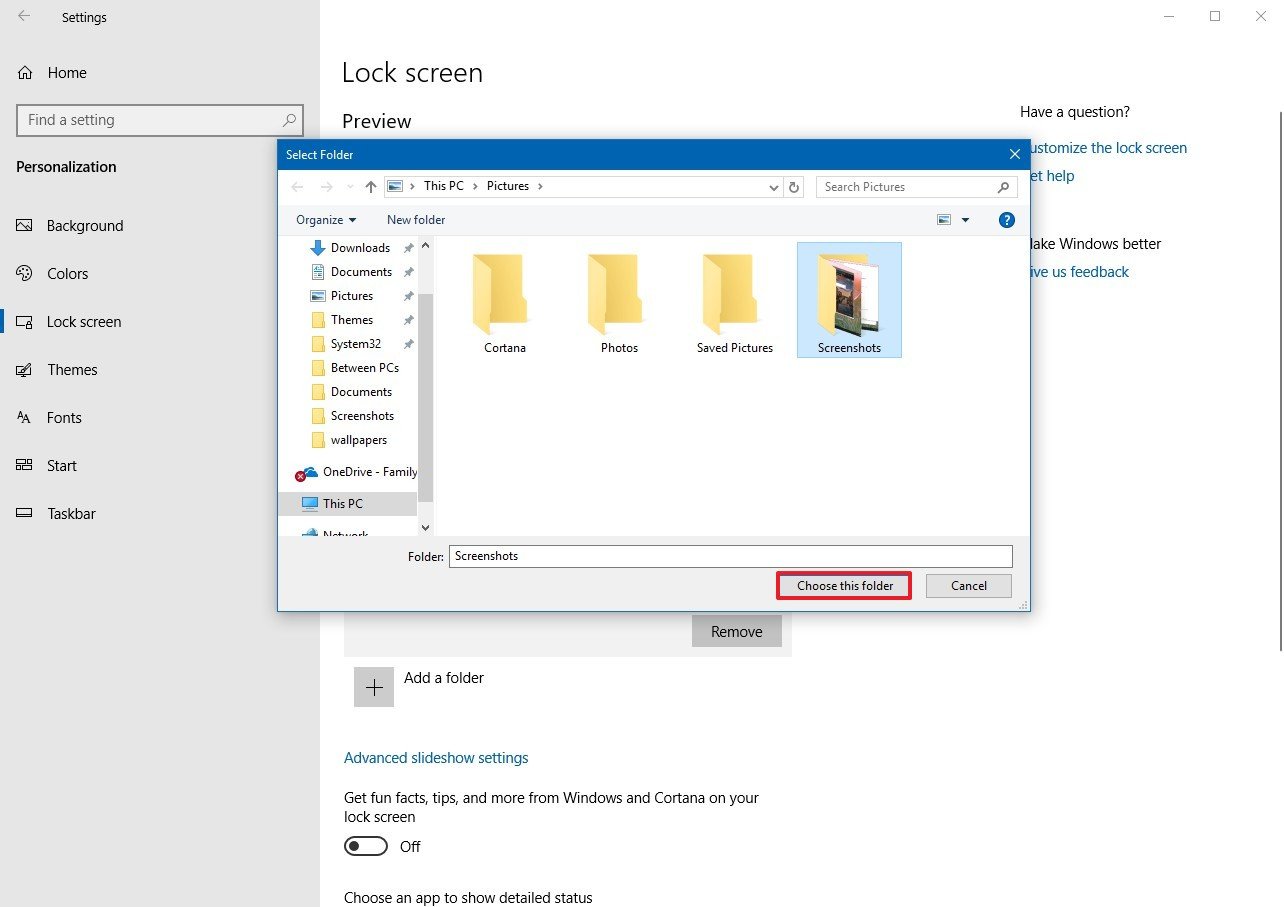
- Click the Add a folder button.Quick Tip: Using this option, you can add one or more folders with images.
- Browse the location of the folder with images that you want to showcase in the Lock screen.
- Select the folder.
- Click the Choose this folder button.
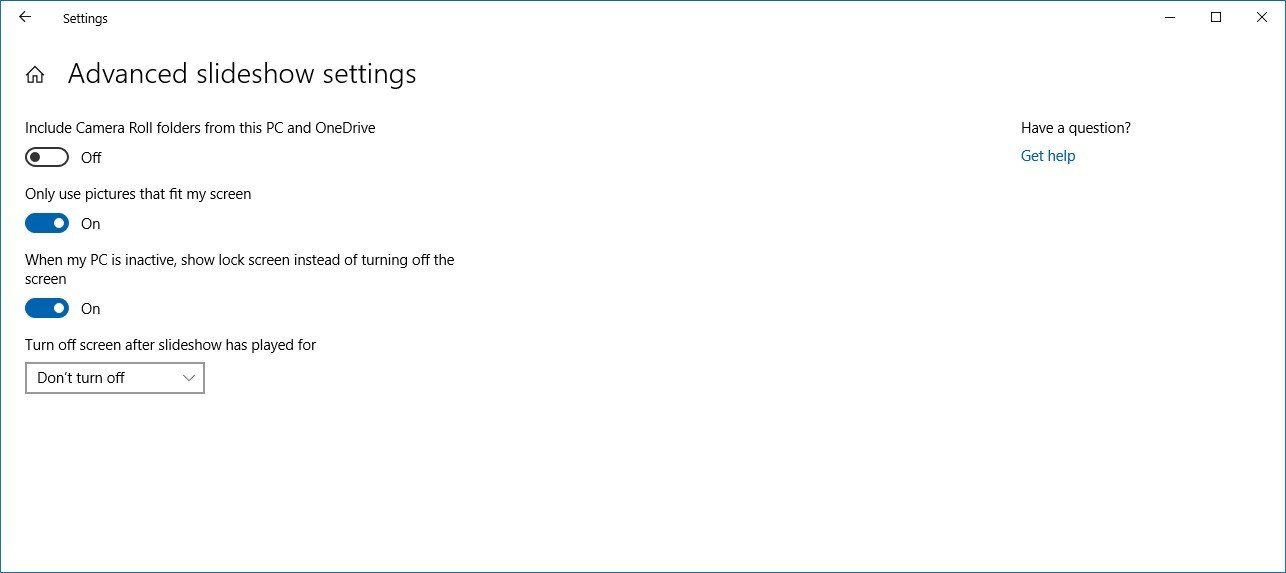
If you want to customize the experience further, click the Advanced slideshow settings option, and select enable or disable the options that you want to use while showing a collection of photos in the Lock screen, including:
- Include Camera Roll folders from this PC and OneDrive: In addition to the folders you selected, turning on this toggle switch, the Lock screen will also display images stored in your Camera Roll and OneDrive Camera Roll folders, which usually include the photos from your phone and other devices.
- Only use pictures that fit my screen: If you have multiple sizes of images in the folder, only those that will fit the screen will be displayed.
- When my PC is inactive, show lock screen instead of turning off the screen: This option is similar to setting up a screensaver on Windows 10. In addition, you can use the drop-down menu to specify when to turn off the screen after the slideshow played for a period of time.
Finally, you may also want to turn off the Get fun facts, tips, and more from Windows and Cortana on your lock screen toggle switch to get a cleaner experience.
How to customize apps notifications in the Lock screen
The Lock screen is also capable of showing notifications from apps. Using this feature, you can set a single app to display detailed notifications, and you can show quick notifications for multiple apps.
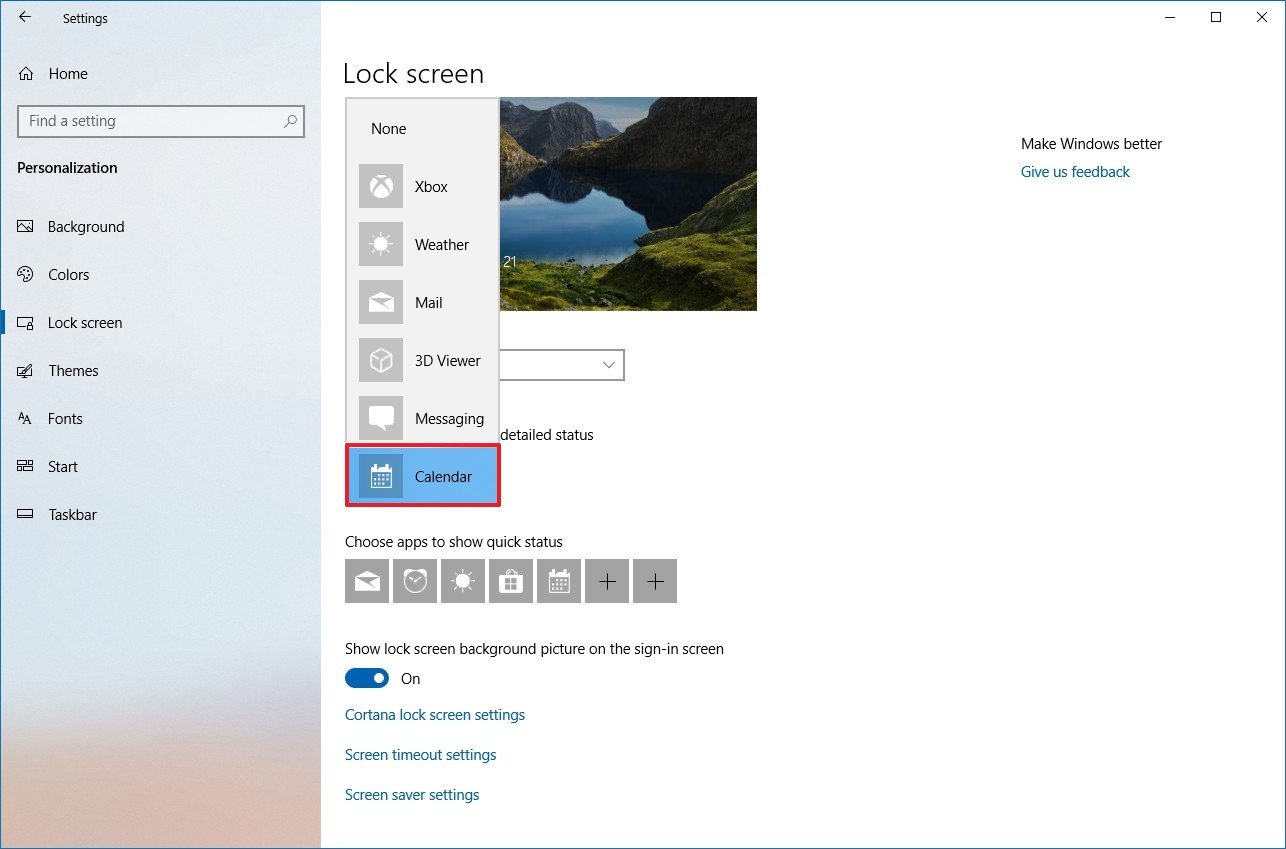
Setting app detailed status
To set an app to show detailed status, use these steps:
- Open Settings.
- Click on Personalization.
- Click on Lock screen.
- Under «Choose an app to show detailed status» section, click the Plus (+) button to select the app you want to see more details in the Lock screen. (Using the None option will disable this feature.)
Once you’ve completed the steps, notifications with detailed information from the app that you specified will appear in the bottom-left corner of the Lock screen.
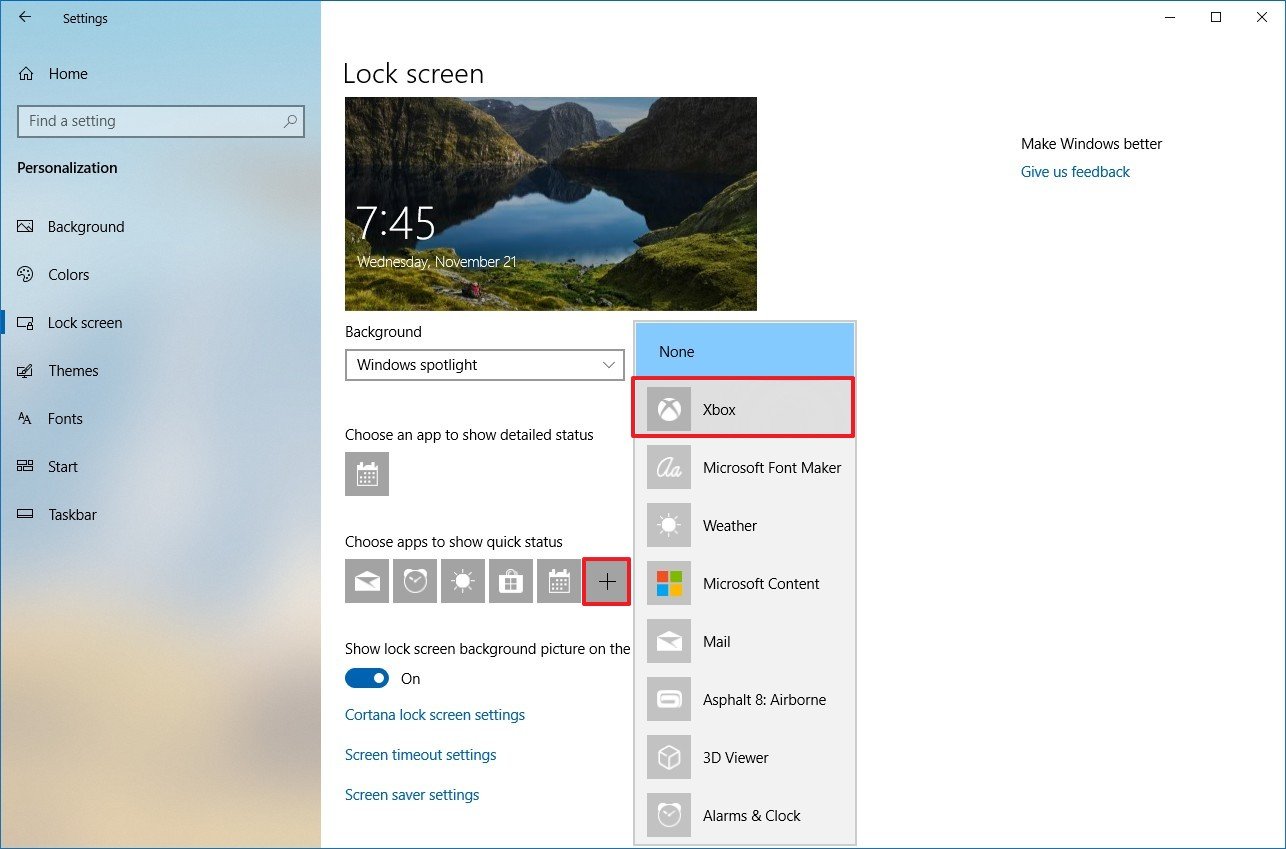
Setting apps quick status
To set one or more apps to show the number of unseen updates, use these steps:
- Open Settings.
- Click on Personalization.
- Click on Lock screen.
- Under «Choose an app to show quick status» section, click the Plus (+) button to select the app you want to see more details in the Lock screen. (Using the None option removes the item from the experience.)
- Repeat step No.4 to configure quick notifications for additional apps (up to 7).
After completing the steps, in the bottom-left corner of the screen, you’ll see icons with badges letting you know the number of unseen updates for each application that you configured to appear in the Lock screen.
How to disable the Lock screen background in the sign-in screen
Using the Lock screen settings, you can even decide if the Sign-in screen uses the same background image as the Lock screen:
- Open Settings.
- Click on Personalization.
- Click on Lock screen.
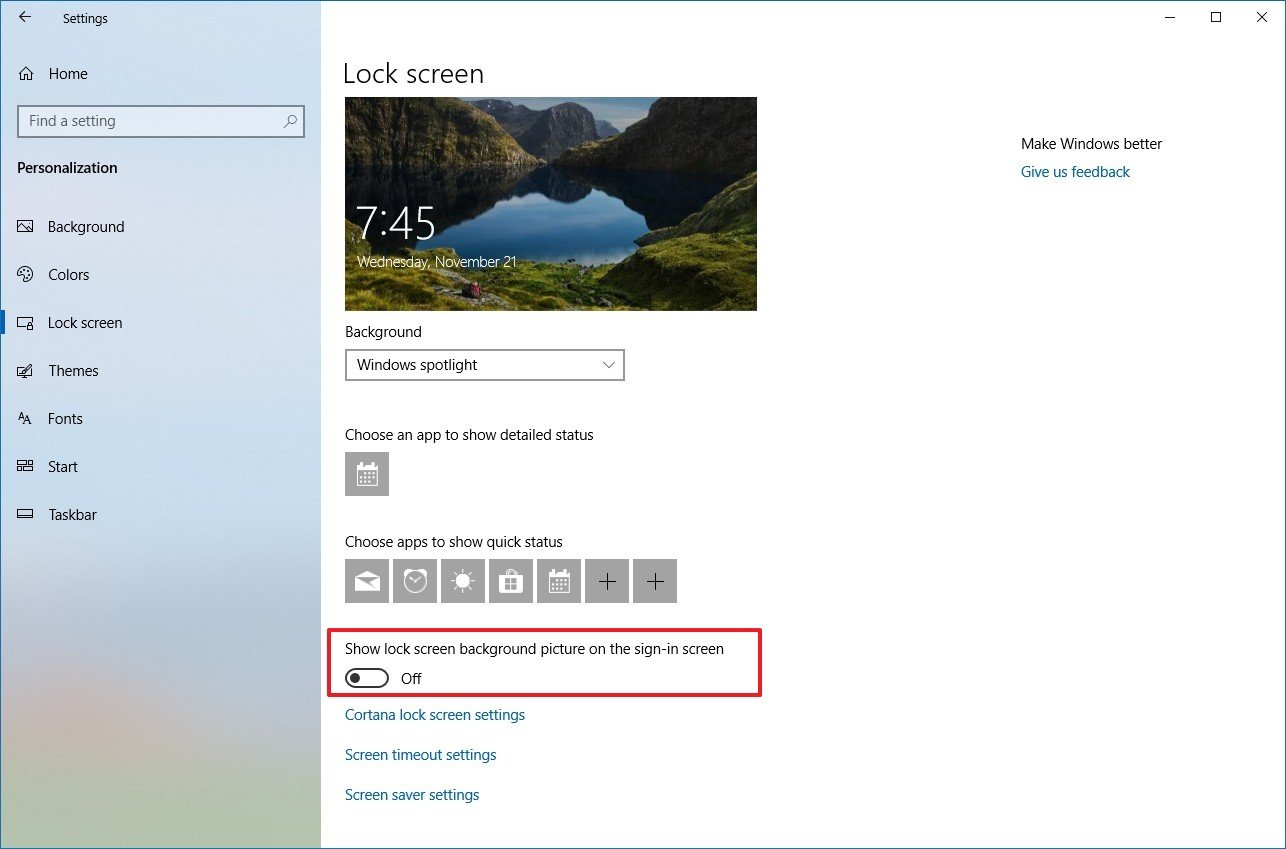
- Turn off the Show lock screen background picture on the sign-in screen toggle switch.
Once you’ve completed the steps, the sign-in screen will no longer include the same image as the Lock screen. Instead, it’ll show a solid color background from the current scheme configured in the Personalization settings.
How to allow Cortana above the Lock screen
If your device is equipped with a microphone, you can also use Cortana while in the Lock screen to query basic questions. Here’s how:
- Open Settings.
- Click on Personalization.
- Click on Lock screen.
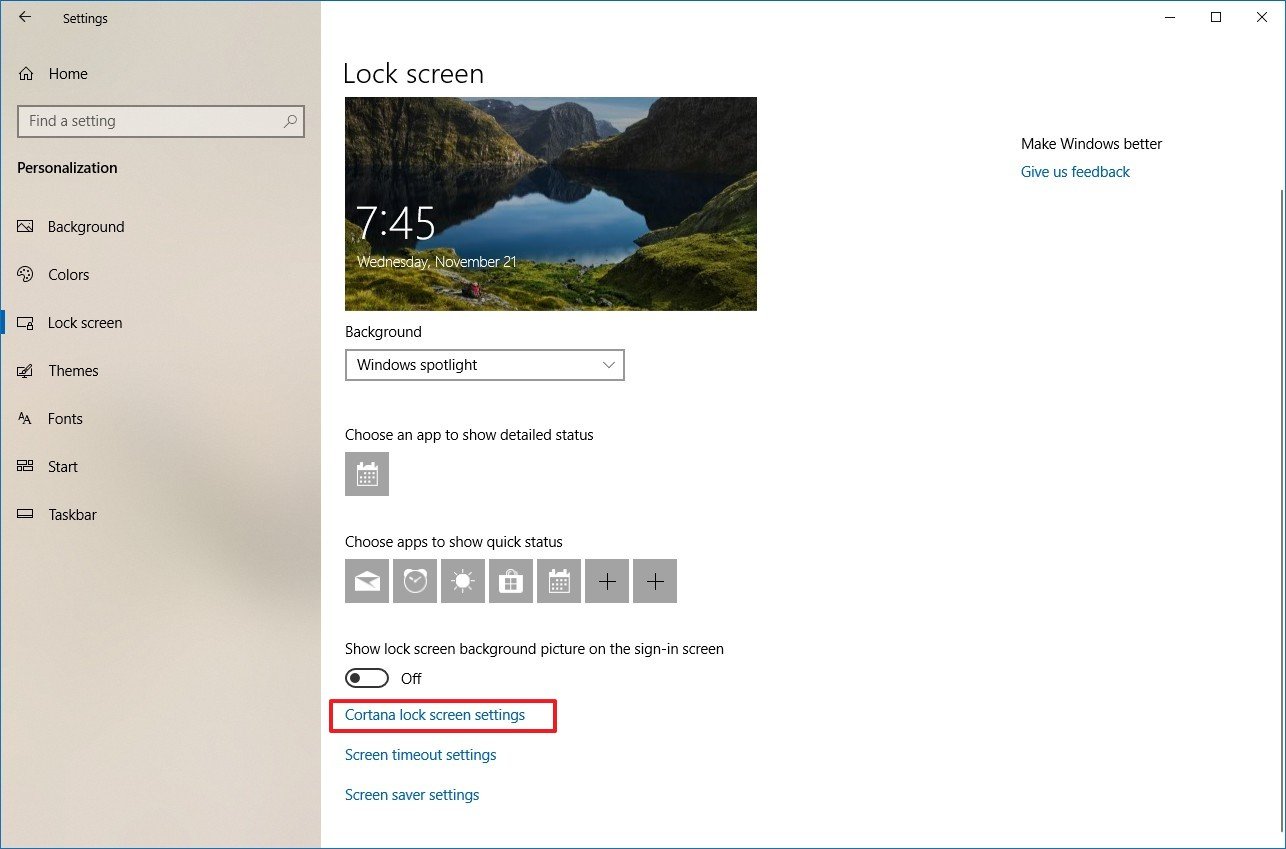
- Click the Cortana lock screen settings option.
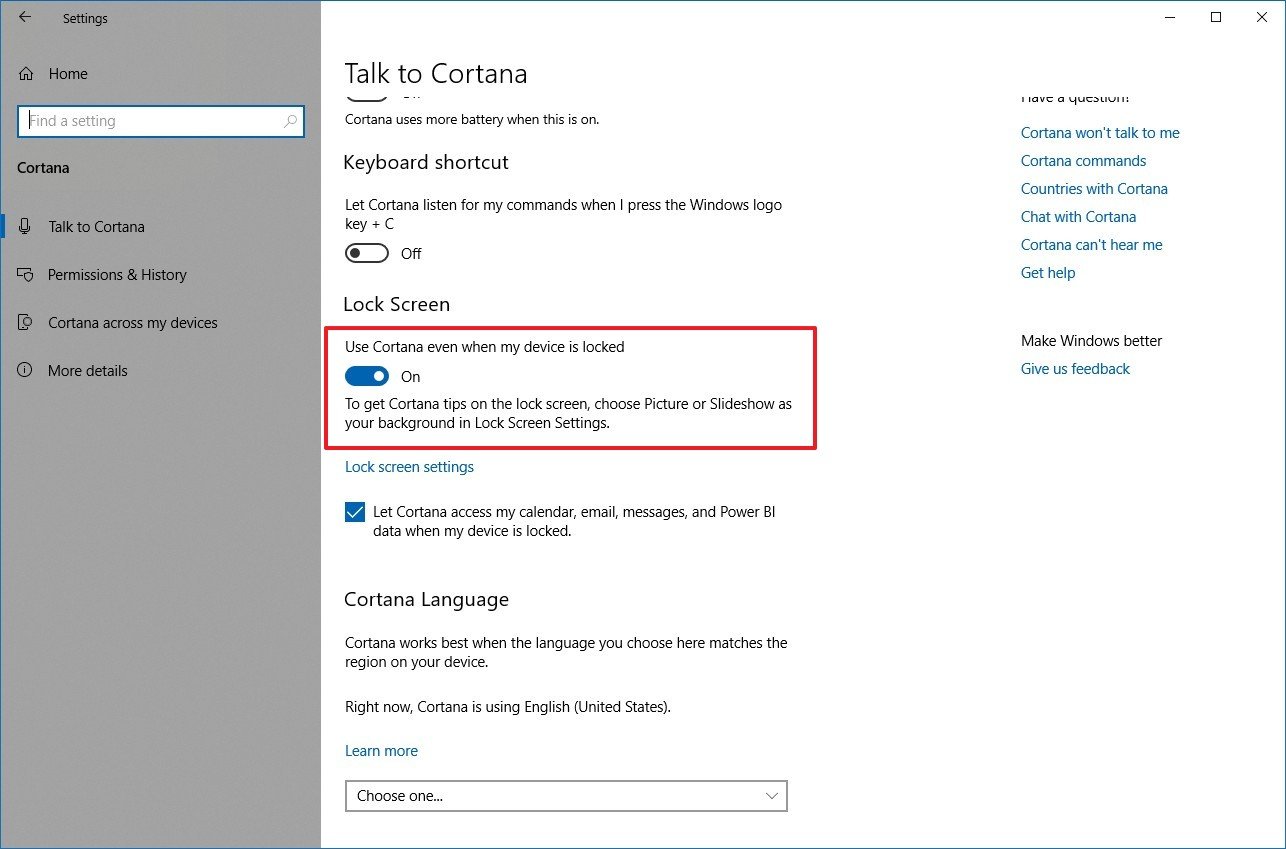
- Under the Lock screen section, turn on the Use Cortana even when my device is locked toggle switch.
- (Optional) Check the Let Cortana access my calendar, email, messages, and Power BI data when my device is locked option.
After completing the steps, you can say the command «Hey Cortana» followed by your question, such as «How’s the weather?» to interact with the assistant in the Lock screen.
How to set screen timeout in the Lock screen
Also, if you always lock your device as you step out of the office using Dynamic lock or manually (Windows key + L), it’s also possible to set the time before the screen turns off automatically. Here’s how:
- Open Settings.
- Click on Personalization.
- Click on Lock screen.
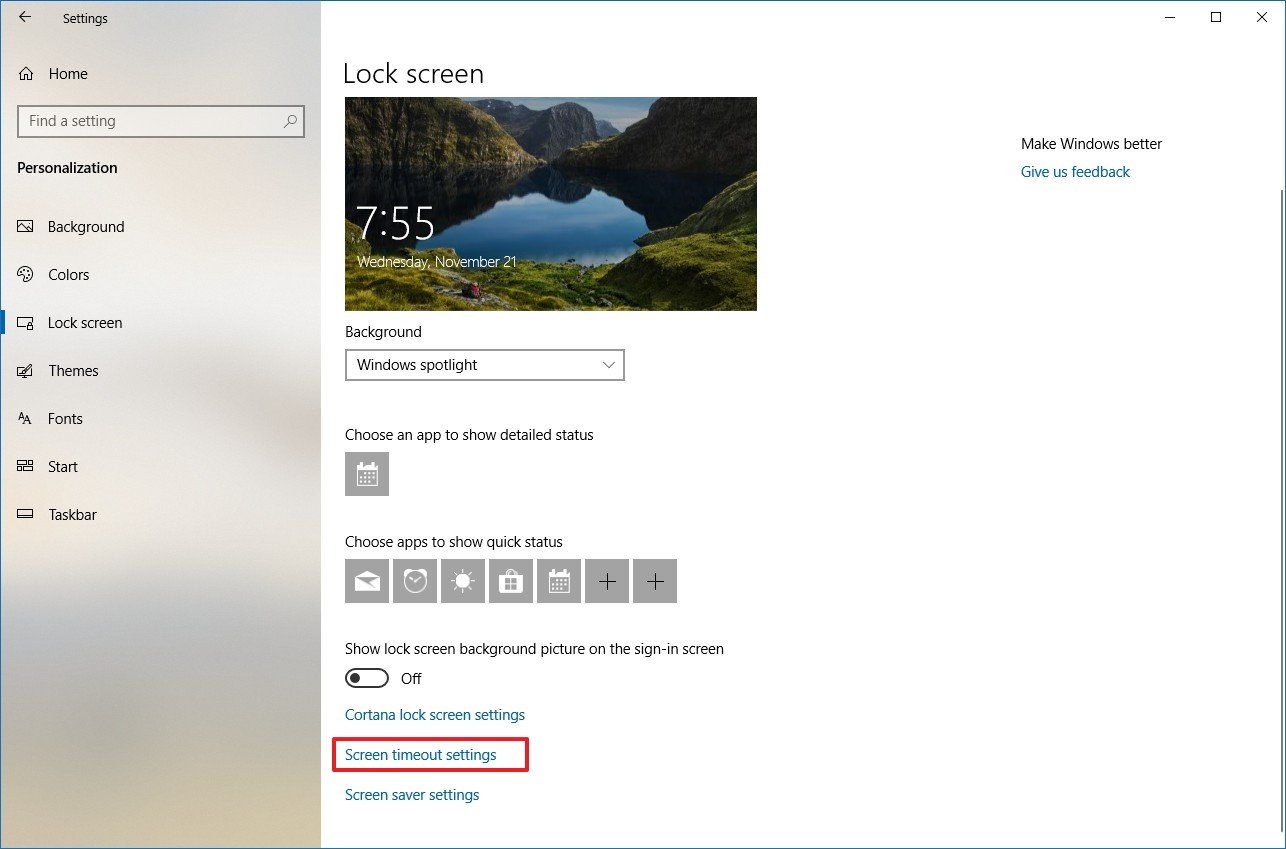
- Click the Screen timeout settings option.
- Use the «Screen» drop-down menu to specify when your display should turn off when the device is plugged in.Quick Tip: If you’re changing these settings on a laptop, you’ll also see the option to adjust the screen settings when your computer is running on battery.
Once you’ve completed the steps, the screen will turn off automatically after the device is not active for the amount of time you specified.
More Windows 10 resources
For more helpful articles, coverage, and answers to common questions about Windows 10, visit the following resources:
- Windows 10 on Windows Central – All you need to know
- Windows 10 help, tips, and tricks
- Windows 10 forums on Windows Central
All the latest news, reviews, and guides for Windows and Xbox diehards.
Mauro Huculak is technical writer for WindowsCentral.com. His primary focus is to write comprehensive how-tos to help users get the most out of Windows 10 and its many related technologies. He has an IT background with professional certifications from Microsoft, Cisco, and CompTIA, and he’s a recognized member of the Microsoft MVP community.
The lock screen isn’t only a background image or slideshow on Windows 10. It also has the capacity of displaying widgets, notifications, the detailed information of the applications and custom wallpapers.
You can also access Cortana directly from this screen. So, it is necessary for you to know it. Next, I’d like to tell you to learn how to adjust lock screen on Windows 10.
Contents:
How to Set a Custom Lock Screen on Windows 10?
How to Adjust Screen Timeout Settings on windows 10?
How to Setup Cortana Lock Screen?
How to Adjust Screen Saver Settings?
How to Set a Custom Lock Screen on Windows 10?
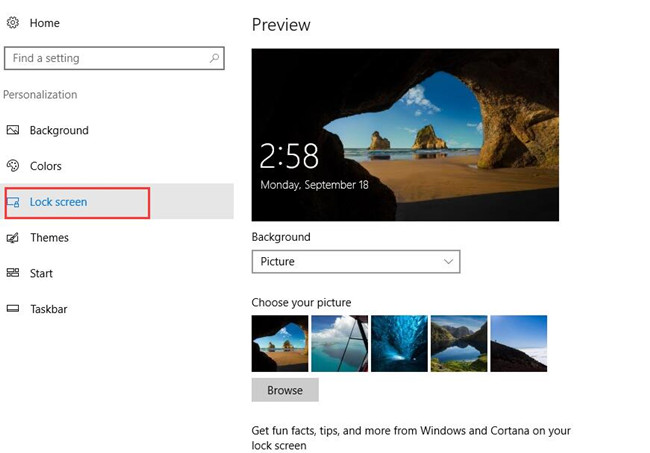
Step 1: Click the Windows key, head to Settings. Then you should select Personalization.
Step 2: On this window, click Lock screen. And you can also click Colors to customize Colors on Windows 10.
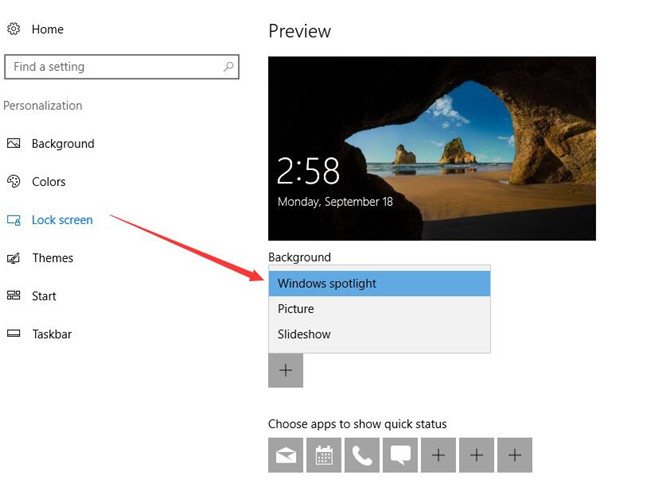
Step 3: Open the drop list of the Background.
The default setting of the background is Windows spotlight. It displays different background images and occasionally offers suggestions on the lock screen. If you prefer to various images on your lock screen, you can choose this option.
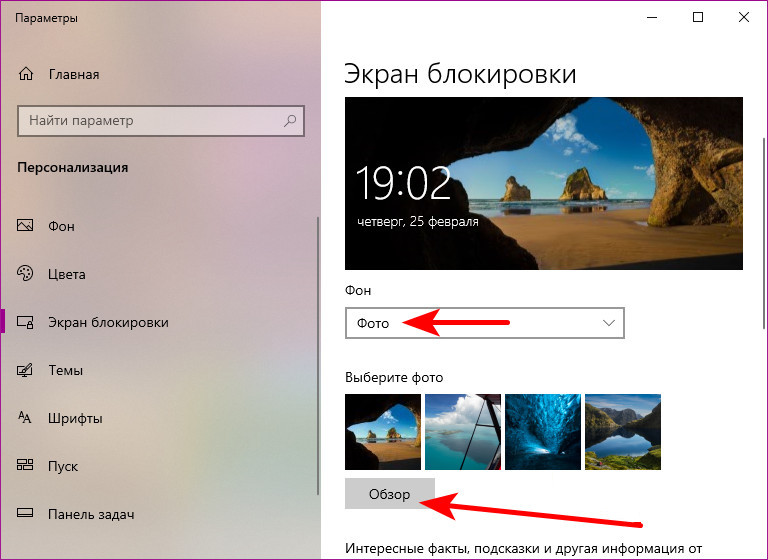
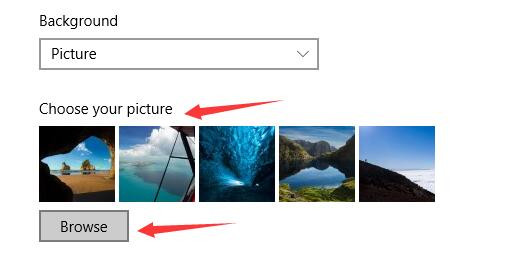
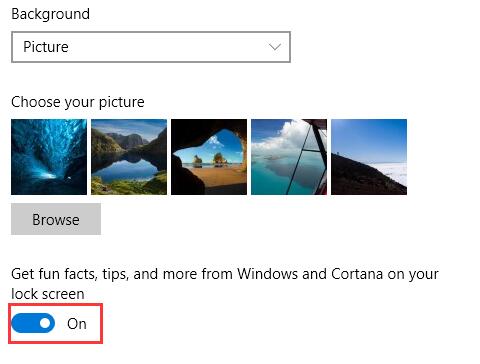
If you’d like to use a picture you want, you can choose the Picture. Then it will give some local pictures. And you can also browse your own picture from your folders. And you can have a personalized lock screen.
Get fun facts, tips, and more form Windows and Cortana on your lock screen
If you choose Picture under Background, you can set more things on your lock screen. If you turn on it, you can see some notifications on it. This will help you to get some information directly. And if you feel that it is too complex, you can turn off it.
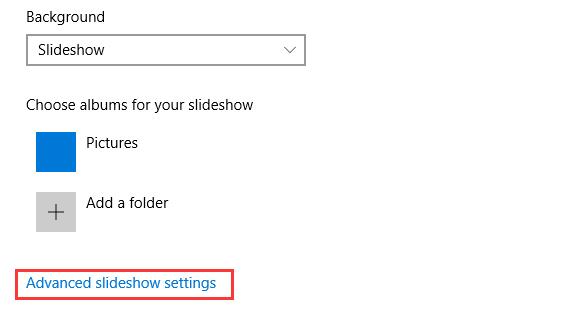
The way to set Slideshow is similar to Picture. And if you do this, it can be changeable on your lock screen. Sometimes, it will give you a good view. But all is up to you.
If your option is Slideshow, you can head to Advanced slideshow settings.
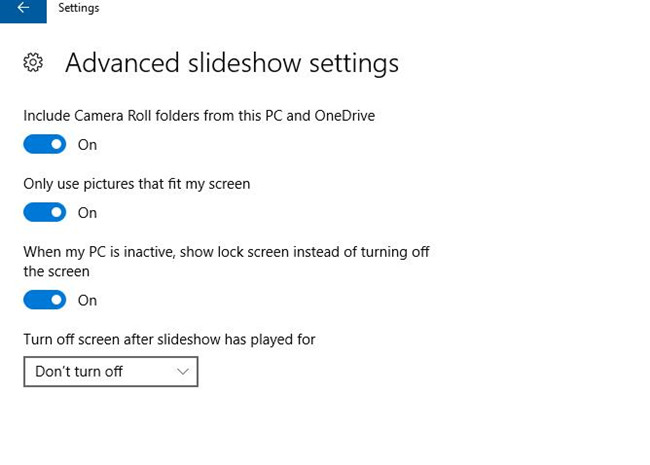
On this window, you can reset other options. You can use your picture that is only fit to your screen. And also you can turn off or open the screen after slideshow has played.
Tips: If you choose the Slideshow, you cannot change the screen timeout settings.
Read More: How to Setup Themes on Windows 10?
Step 4: Then you can customize more on this window.
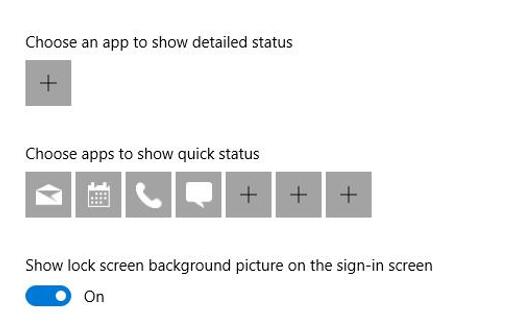
Choose an app to show detailed status
If you want to know the detailed information of one application on your lock screen, you can click the checkbox under choose an app to show detailed status. Then you can choose one, like weather, calendar, email, messaging, and more.
Choose apps to show quick status
If you want to get the status from the applications quickly, then you can add them to here.
Show lock screen background picture on the sign-in screen
This same lock screen background image is displayed on the sign-in screen that appears when you leave your lock screen by default.
How to Adjust Screen Timeout Settings on windows 10?
The lock screen timeout and switches off your monitor after one minute by default on Windows 10. For your convenience, we need to change the screen timeout settings. Such as, while the Lock screen provides useful information and beautiful pictures, you probably noticed that your computer’s display turns off quickly.
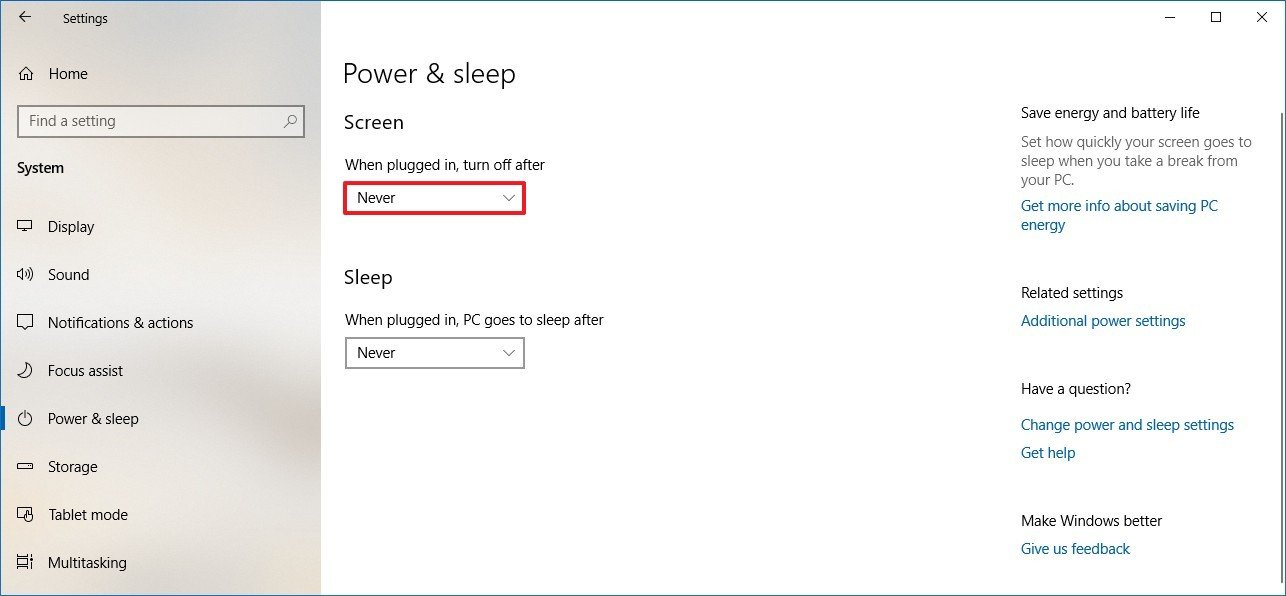
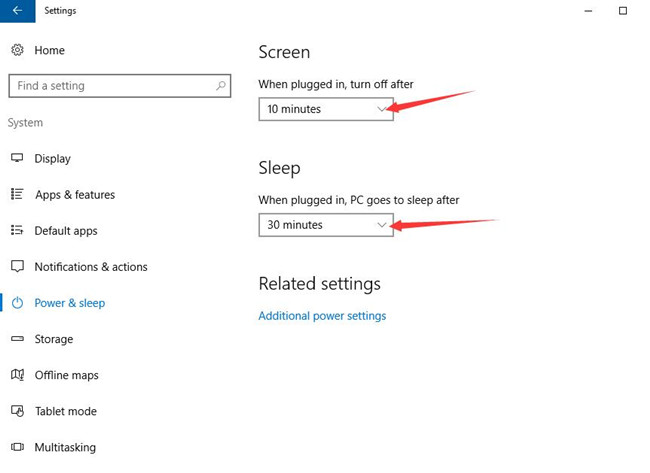
Step 1: Click the Screen timeout settings. It will jump to the Power & Sleep settings.
Step 2: Now, you can change the timeout settings for your screen and sleep.
Screen: You can reset the screen timeout after power supply plugged and the computer does not work for a specific time.
Sleep: You can change the sleep timeout after power supply plugged and the computer does not work for a specific time.
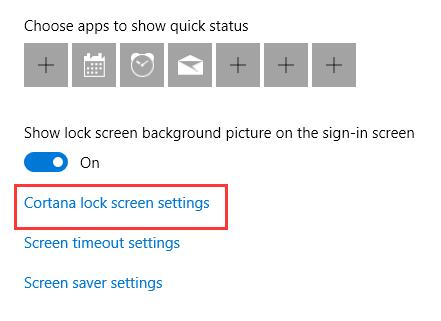
How to Setup Cortana Lock Screen?
If you want to change the settings of Cortana on the lock screen, you can click Cortana lock screen settings.
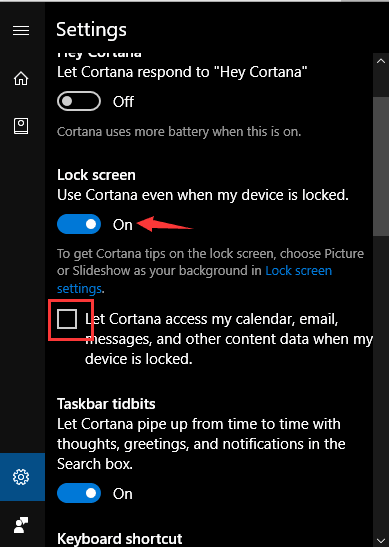
You can turn on the option: use Cortana even when my device is locked. And if you need to walk into your calendar, email, messages, and other content data by Cortana under your device is locked, you should select the checkbox here. And here you can also customize basic settings for Cortana.
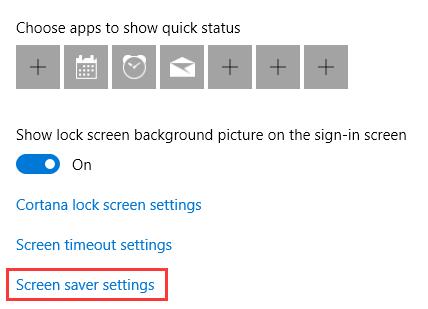
How to Adjust Screen Saver Settings?
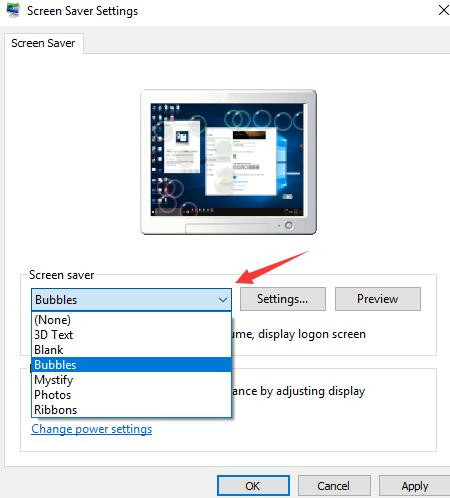
If you want to make your screensaver special, you can click Screen saver settings. Then you can go to this window. Here you can choose the mode of the screen saver.
Open the drop list of the Screen saver, you can select the one you like. If you are not sure, you can click Preview to view the effect. After that, you can make a decision. And you can also set the time of its working.
I think that it is fun to change lock screen on your desktop. And this tutorial will make it possible for you to have an optimized experience on customizing lock screen on Windows 10.
More Articles:
How to Disable Lock Screen on Windows 10?
Solved: Windows 10 Spotlight Lock Screen Not Working
[Solved] Cannot Change Lock Screen Picture on Windows 10
FAQ
[Windows 11/10] Изменить экран блокировки
Пожалуйста, перейдите к соответствующей инструкции, исходя из текущей операционной системы Windows на вашем компьютере:
- Windows 11
- Windows 10
Windows 11
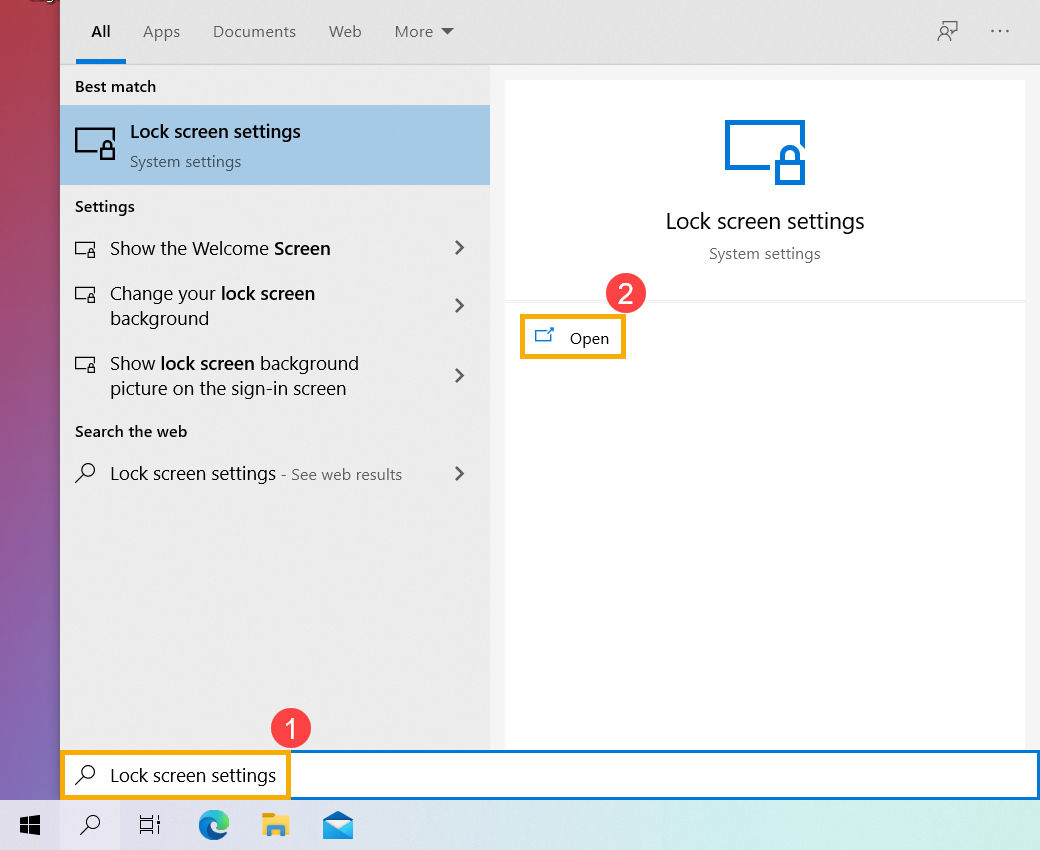
- Введите и найдите [Настройки экрана блокировки] в строке поиска Windows ①, а затем нажмите [Открыть] ②.
- На экране блокировки вы можете выбрать фон в качестве прожектора Windows, изображения или создать слайд-шоу из изображений ③.
Если вы выберете прожектор Windows, он будет ежедневно обновляться изображениями и автоматически отображаться на экране блокировки.
- В поле «Статус экрана блокировки» вы можете выбрать, какое приложение будет отображать подробный статус или какие приложения отображать быстрый статус на экране блокировки④.
Если вы хотите, чтобы экран входа был таким же, как и экран блокировки, установите для параметра [Показывать фоновое изображение экрана блокировки на экране входа] значение Вкл.⑤. В противном случае экран входа будет отображать простой фон.
Windows 10
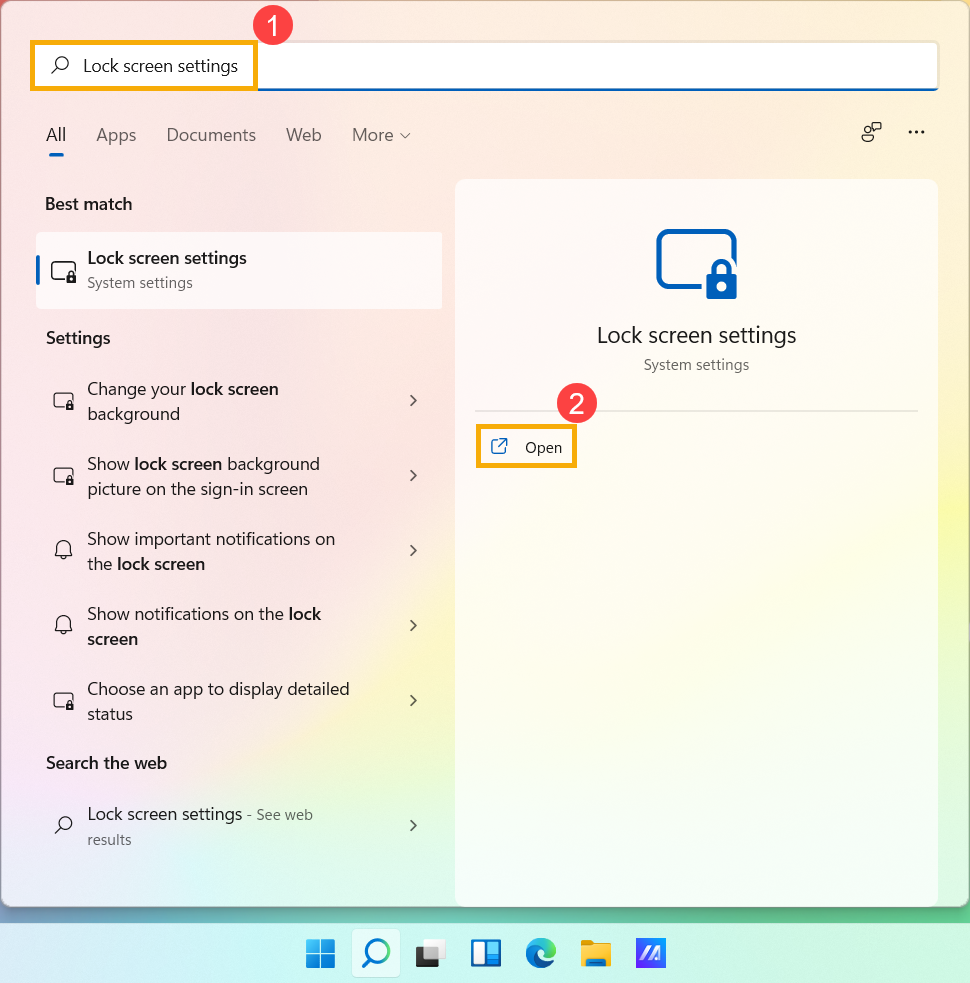
- Укажите в поисковой строке Windows [Параметры экрана блокировки] ①, и выберите [Открыть]②.
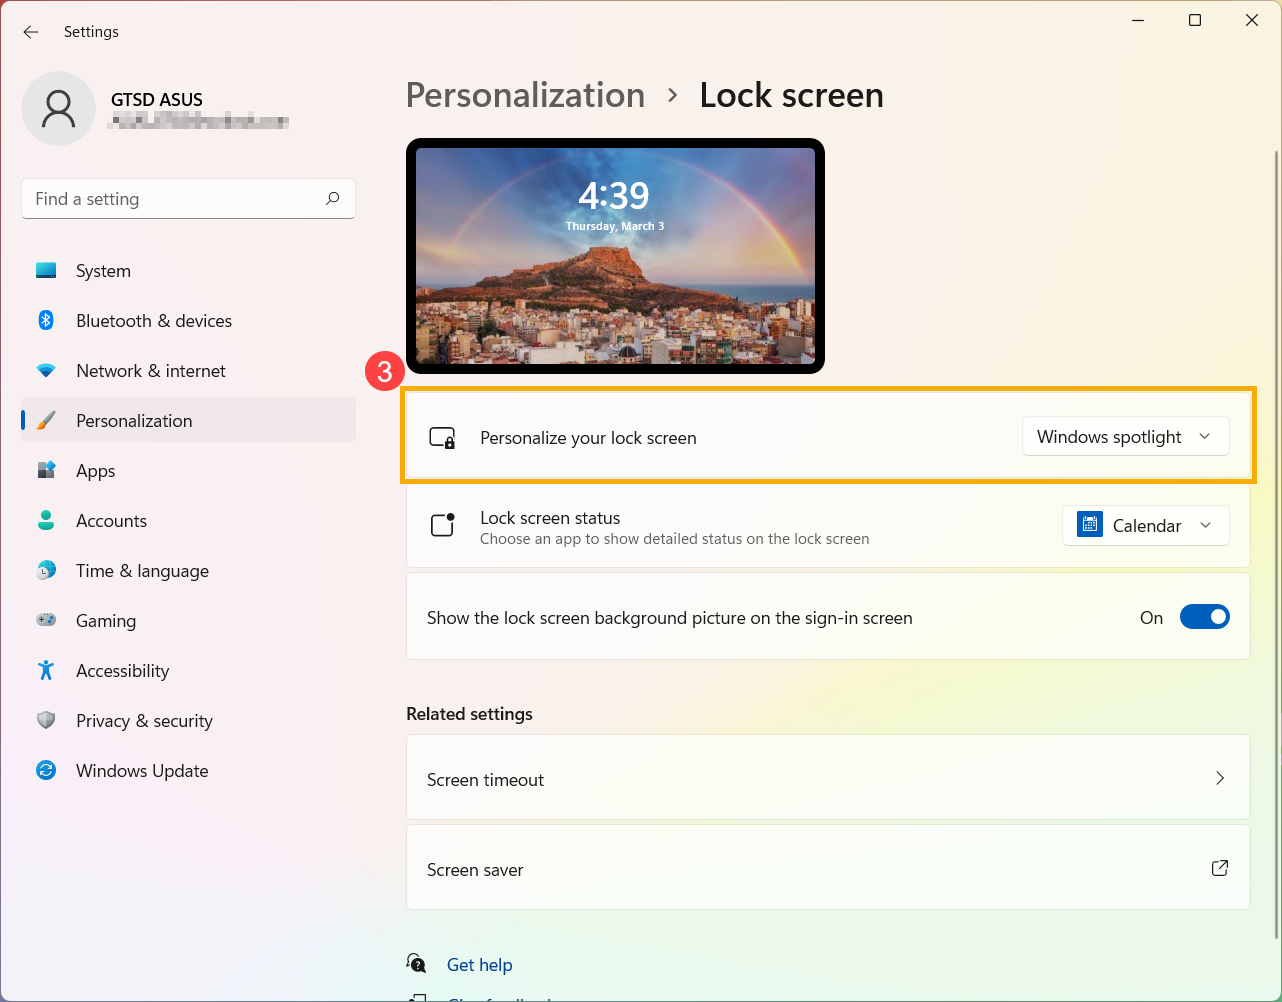
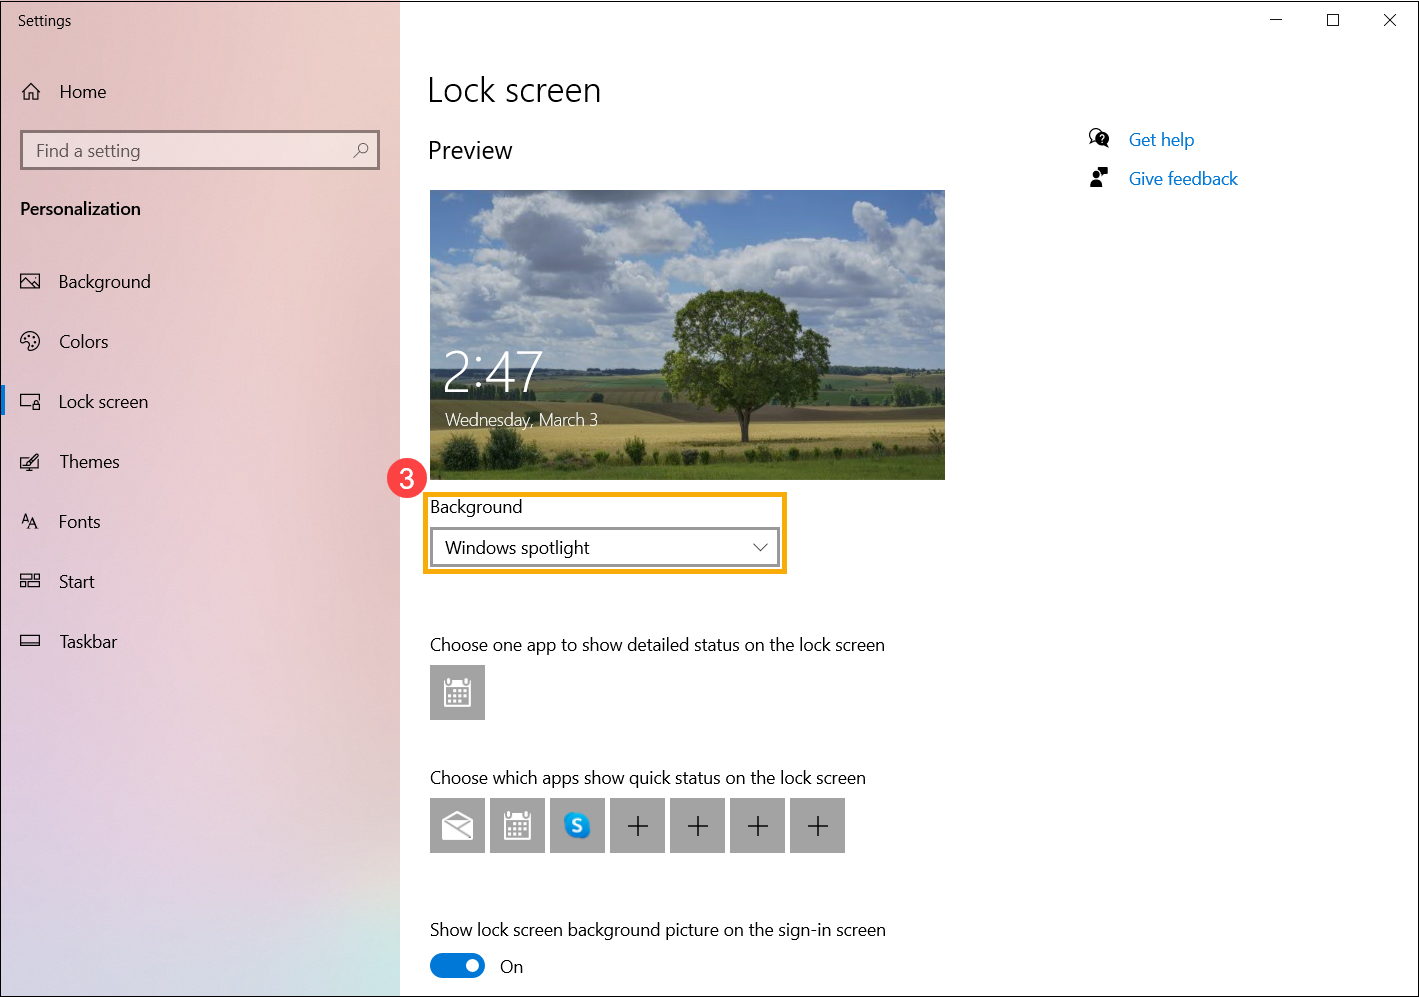
- На экране блокировки вы можете выбрать фон в качестве фона Windows, фото или создать слайд-шоу из изображений③.
Если вы выберете Windows Spotlight, он будет ежедневно обновляться изображениями со всего мира и автоматически отображаться на вашем экране блокировки.
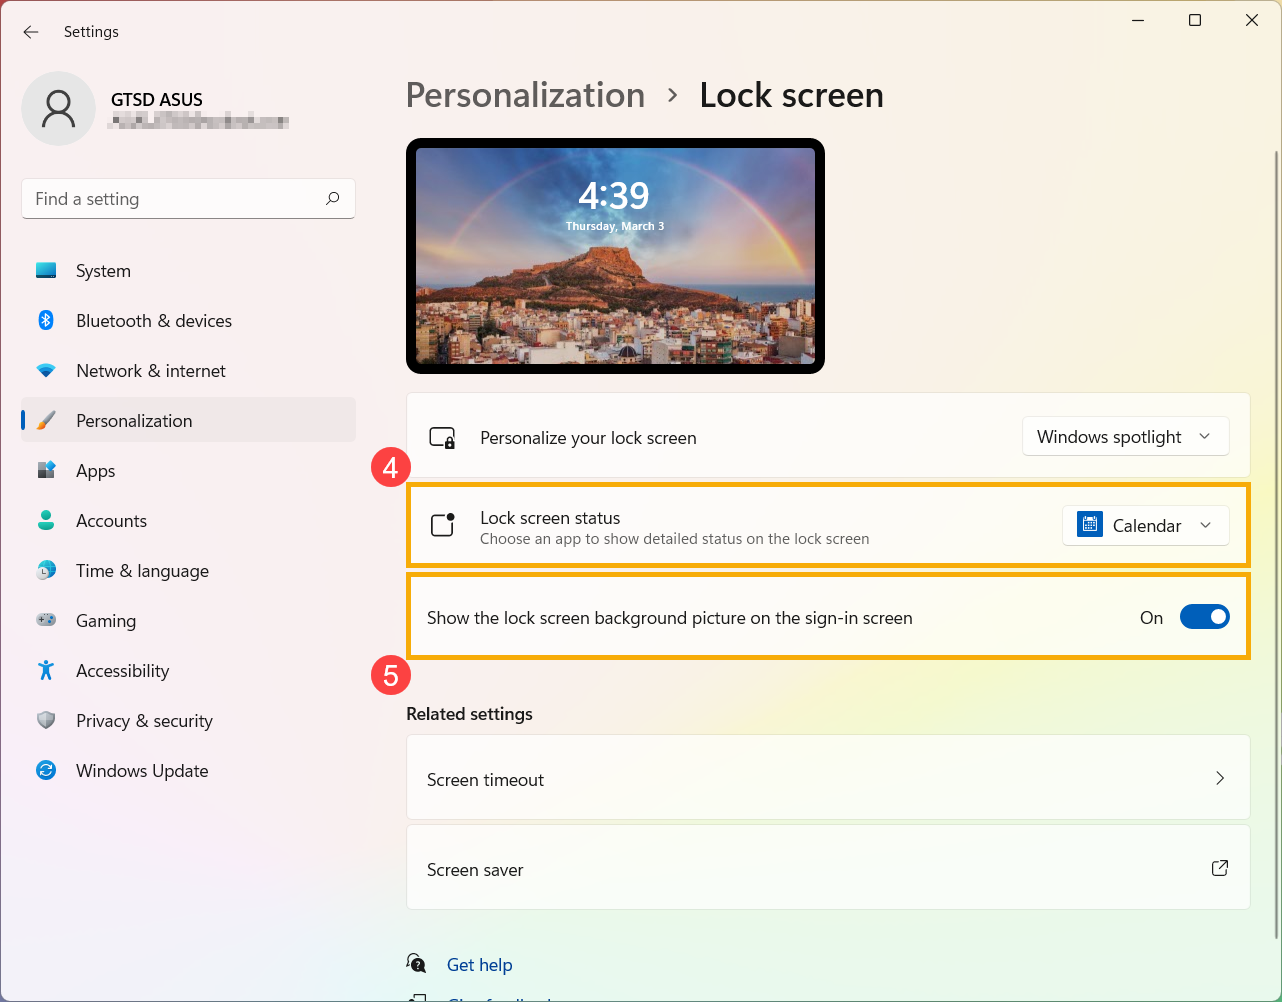
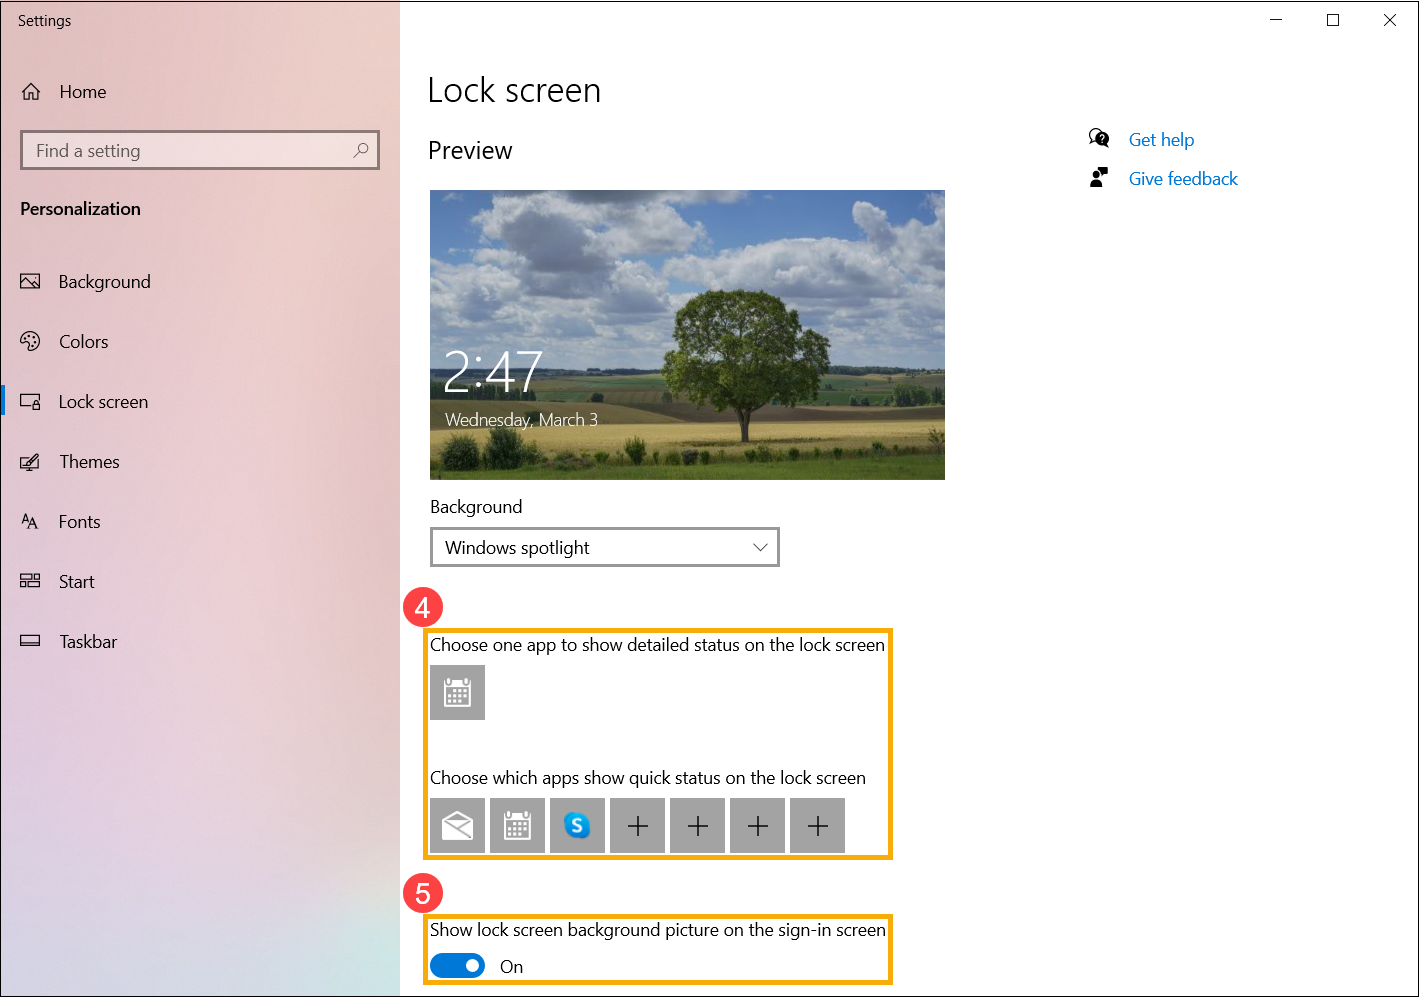
- В области приложений экрана блокировки вы можете выбрать, какое из приложений будет отображать подробный статус или какие приложения будут отображать быстрый статус на экране блокировки ④.
Если вы хотите, чтобы экран входа совпадал с экраном блокировки, установите [Показывать фоновое изображение экрана блокировки на экране входа] в положение Вкл⑤. В противном случае на экране входа будет отображаться простой фон.
Эта информация была полезной?
Yes
No
- Приведенная выше информация может быть частично или полностью процитирована с внешних веб-сайтов или источников. Пожалуйста, обратитесь к информации на основе источника, который мы отметили. Пожалуйста, свяжитесь напрямую или спросите у источников, если есть какие-либо дополнительные вопросы, и обратите внимание, что ASUS не имеет отношения к данному контенту / услуге и не несет ответственности за него.
- Эта информация может не подходить для всех продуктов из той же категории / серии. Некоторые снимки экрана и операции могут отличаться от версий программного обеспечения.
- ASUS предоставляет вышеуказанную информацию только для справки. Если у вас есть какие-либо вопросы о содержании, пожалуйста, свяжитесь напрямую с поставщиком вышеуказанного продукта. Обратите внимание, что ASUS не несет ответственности за контент или услуги, предоставляемые вышеуказанным поставщиком продукта.
