Панель задач Windows 11. Делаем красивее и удобнее
Привет, сегодня мы рассмотрим как в Windows 11 сделать панель задач максимально компактной и похожей на панель из MacOS, которая будет показывать закрепленные значки без лишних полос справа и слева, при этом, если открыть какое-нибудь приложение, то панель автоматически растянется, а если закрыть, то наоборот сузиться.
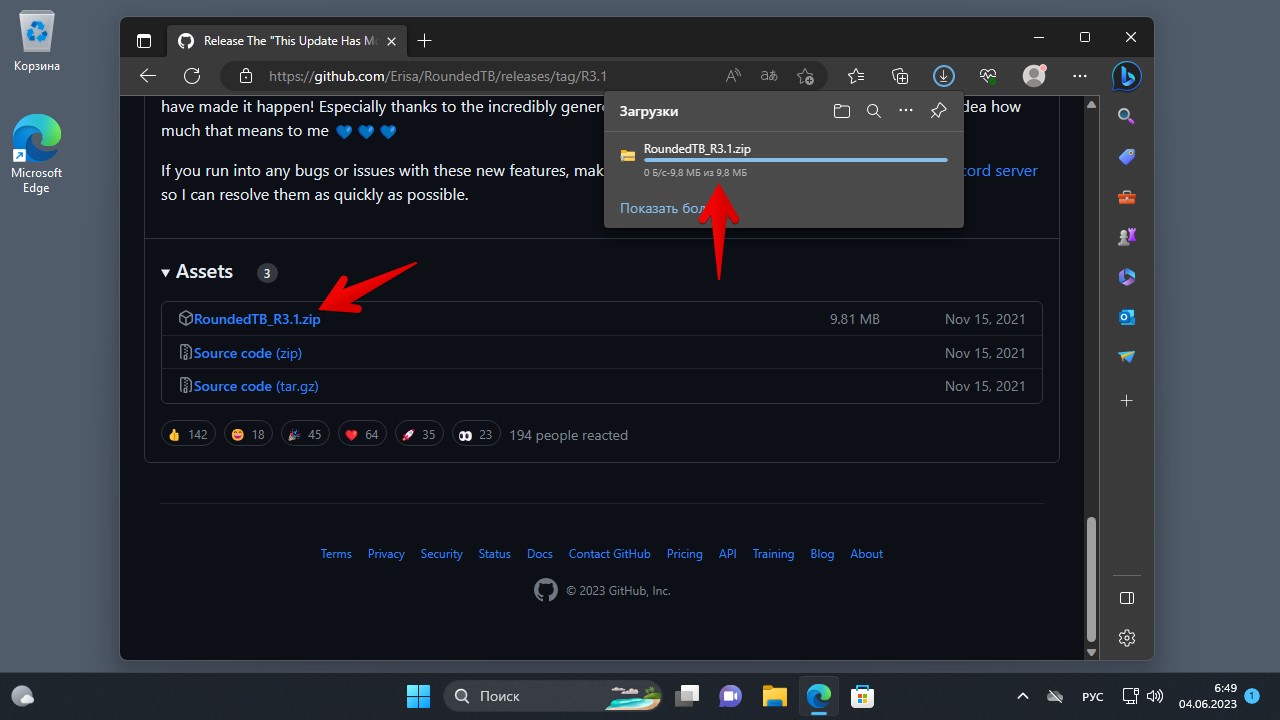
Итак, чтобы преобразить панель задач, необходимо зайти на сайт github и скачать небольшую утилиту — RoundedTB.
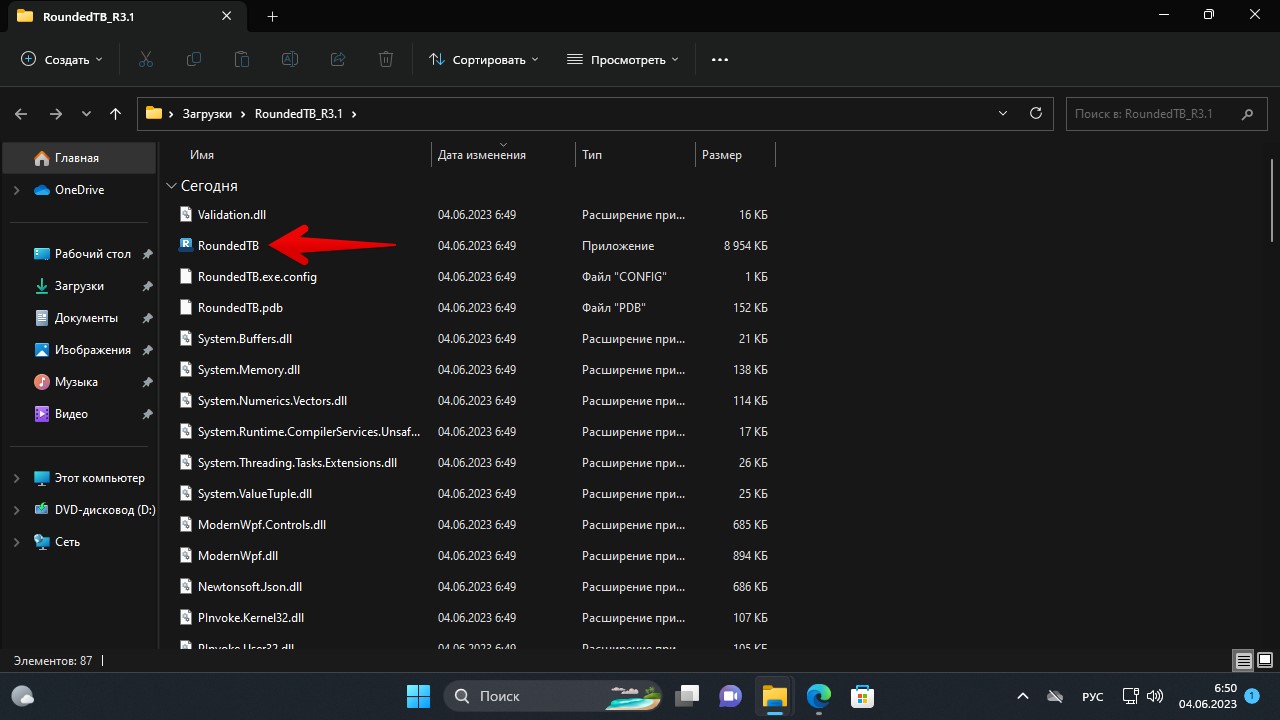
После скачивания извлекаем и запускаем утилиту.
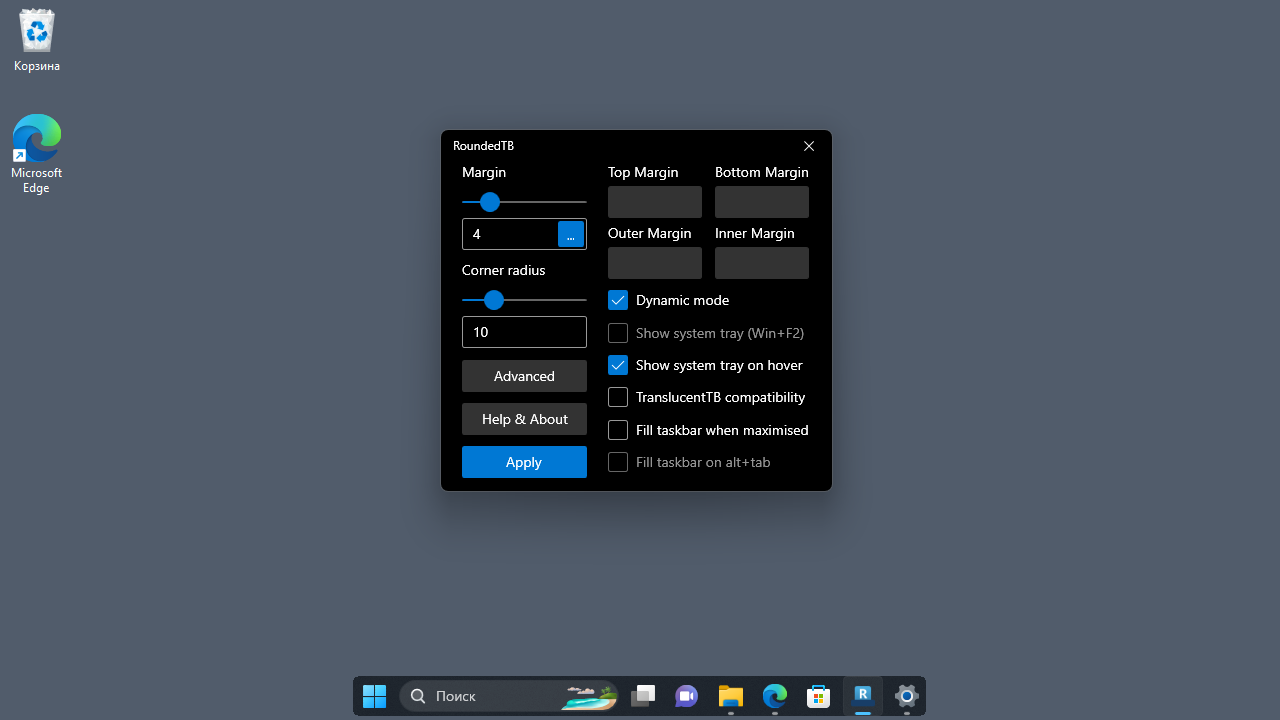
После запуска, нажимаем на кнопку «Advanced» (расширенные), чтобы отобразить дополнительные настройки.
Ползунок «Margin» — отвечает за обрезку панели задач со всех сторон, делая его, как бы парящим, либо можно настроить отдельно обрезку для четырех сторон, «Top Margin» отвечает за обрезку сверху, «Bottom Margin» — за обрезку снизу, «Left Margin» и «Right Margin» за стороны слева и справа соответственно.
Ползунок «Corner radius» отвечает за округление краев панели задач.
Для того, чтобы убрать полосы слева и справа, т.е. сделать панель задач компактной, отмечаем галочку на пункте «Dynamic mode».
Чтобы отображать системный трей справа, выбираем пункт «Show system tray», а чтобы показывать трей только при наведении мыши на правый нижний угол, отмечаем галочку «Show system tray on hover».
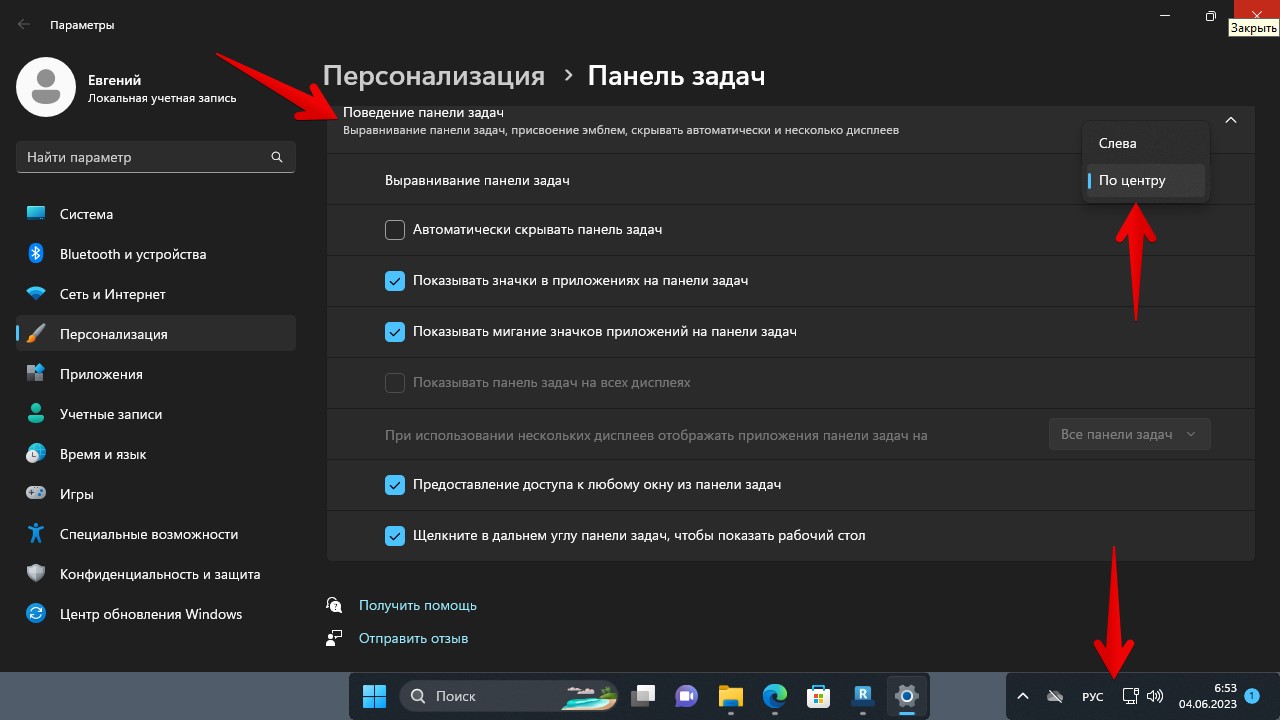
В программе RoundedTB имеется баг при первом запуске, который, возможно, исправят в следующих версиях — при выборе настройки «Show system tray», системный трей может не появится справа, для исправления этого бага переходим в «Параметры» Windows 11 в раздел «Персонализация», а затем в раздел «Панель задач», в пункте «Поведение панели задач» и в параметре «Выравнивание панели задач» меняем положение на «Слева», а затем обратно «По центру», после этого все лишние полосы пропадут и панель задач будет работать как надо.
И последнее, чтобы запускать утилиту при старте Windows 11, щелкаем правой кнопкой мыши на значок «RoundedTB» в трее панели задач, чтобы отобразить всплывающее окно, в котором устанавливаем галочку «Run at sturtup».

Windows 11 taskbar behaves differently from the previous versions. Its right-click menu is different, its settings have been completely overhauled, and even pinning icons to the taskbar works differently.
After installing Windows 11, the first thing you will probably notice is the changes to the taskbar. There are a bunch of new icons all moved to the middle while Cortana seems to be demoted from the front desk job. These upfront changes are just the tip of the iceberg.
If you are having trouble customizing the new Windows 11 taskbar, then we’ve got you covered. We will show you how to adjust the Window 11 taskbar to your liking and also share some hacks to access features that are no longer officially available in Windows 11.
Remove the default icons.
There are a few icons on the taskbar by default that can’t be removed using the unpin function. Other than the Start menu, you can remove the other icons using the taskbar settings. Right-click on the taskbar and then click on the Taskbar settings option.
Here at the top, you’ll see all the taskbar default items with a toggle button next to them. Just toggle off the items you don’t want to see on the taskbar, and they will be removed.
Move taskbar icons to the left.
I don’t mind taskbar icons in the middle, but I still moved them to the left due to the Start menu. In the middle, I have to aim the mouse to click on the Start menu. However, on the far left corner, I can just blindly move the mouse in the bottom-left direction, and it works, which saves me some focus.
If you also want to move the taskbar icons to the left, just go to the taskbar settings as we did above. Here scroll down and open the Taskbar behaviors section. Afterward, select Left in the Taskbar alignment option.
Pin icons to the taskbar
If you like the convenience of using the drag-and-drop function to pin icons to the taskbar, unfortunately, it won’t work in Windows 11. For now, you’ll have to use the other methods of pinning the app to the taskbar. The easiest would be to search for the app using Windows Search and then right-click on it and select Pin to taskbar.
To do it from Windows Explorer, you have to first right-click the app icon and select the Show more option, and then you’ll see the Pin to taskbar option.
Enable taskbar auto-hide
Windows 11 retains the auto-hide function like in the previous versions, and it can be found in the taskbar settings. Scroll down in the taskbar settings and open the Taskbar behaviors section. Here check the checkbox next to the Automatically hide the taskbar option. Now, unless you hover the mouse cursor over the taskbar area, the taskbar will stay hidden.
Make Windows 11 taskbar transparent.
You can also make the taskbar change its color according to the background and make it look transparent. You have to do it from the Windows 11 settings, here’s how:
Click on the Start menu and select Settings from it.
Here select Personalization in the left panel and then click on Colors.
Now enable the Transparency effects option, and it will make the taskbar transparent.
Hide/show system tray icons.
In previous versions of Windows, you could easily hide/show icons in the system tray right from the taskbar. However, in Windows 11, the name of the system tray is changed to Taskbar corner overflow, and you have to manage it from the taskbar settings.
In the taskbar settings, there is a dedicated section for Taskbar corner overflow. You can click on it to open all the apps that can show its icon on the Taskbar corner overflow. You will have to individually toggle on/off apps here to hide/show their icons in the right corner of the taskbar.
Disable the Show Desktop button on the taskbar
The Show Desktop button on the taskbar is much smaller in Windows 11 and doesn’t show the desktop when you hover the mouse pointer on it. However, if you are still not interested in using this feature and feel like it’s taking unrequired space on the taskbar, you can disable it.
Go to the taskbar settings and open up the Taskbar behaviors section. Here uncheck the option Select the far corner of the taskbar to show the desktop, and the button will be removed.
Change the taskbar color.
You can also use custom colors for the taskbar that won’t be influenced by the color of your theme. Here’s how to do it:
In Windows 11 settings, click on Personalization in the left panel and then select the Colors option.
Here select Custom in the Choose your mode section and Dark in the Choose your default Windows mode section.
Now scroll down and enable the option Show accent color on Start and taskbar.
Afterward, set the Accent color option to Manual and choose any color you like below to select as your taskbar color. You can also open up the color wheel by clicking on the Custom colors option to set a custom color.
Move the taskbar to the top.
The previous versions of Windows allowed you to move the taskbar to the top, left, or right side, but Windows 11 has forced it to stay at the bottom. If you still want to move the taskbar in Windows 11, you’ll have to edit the Windows Registry.
Even then, there is no guarantee that the taskbar will work as intended as it’s not an official workaround. From my experiences and what other users have reported, moving the taskbar to the left or right completely breaks it. So your only option is to move it to the top. Even at the top, the Start menu is aligned slightly to the left compared to the button.
So before following the below instructions, keep in mind that the taskbar may not work as intended after the changes.
Open up Windows Registry using the search bar or pressing Windows+R keys and using the Run command regedit.
Here move to the below-mentioned path. You can either copy it and paste it in the Registry search bar at the top or manually open mentioned folders in sequence.
\HKEY_CURRENT_USER\Software\Microsoft\Windows\CurrentVersion\Explorer\StuckRect3
In StuckRect3, open the Settings key by double-clicking on it, and you will see a bunch of values.
In the 2nd row under the FE column, change the value from “03” to “01” and click on OK.
You need to restart Windows Explorer to see the changes. Just press Ctrl+Shift+Esc keys to open the Task Manager, and here, right-click on the Windows Explorer process and select Restart. If you prefer, you can also restart the PC, and the changes will take effect.
Change the taskbar size.
If you want a better view of the taskbar icons or want to fit in more icons on the taskbar, you can do so by increasing or decreasing the size of the taskbar. However, you will have to edit the registry to make this happen. But don’t worry, this little hack won’t break the taskbar. Here’s what you need to do:
Open up the registry again and access the following location as I showed above.
\HKEY_CURRENT_USER\Software\Microsoft\Windows\CurrentVersion\Explorer\Advanced
While the Advanced folder is selected, right-click on an empty space in the right panel and select New > DWORD (32-bit) Value.
Name this new key TaskbarSi and double-click on it to open it.
Under Value data, change the value to 0, 1, or 2 to change the size to small, medium, or large, respectively. Here the medium is the default Windows 11 taskbar size.
Once done, click on OK and restart the Windows Explorer as shown above to let the changes take effect.
Final thoughts 👨💻
Along with these customization options, I will also recommend you try out third-party tools to further customize the taskbar and even get features removed in Windows 11. ExplorerPatcher is a good taskbar replacement tool for this purpose. You can even try some Windows 10 Start menu alternatives. Many of them work fine in Windows 11.
Возможности персональной настройки панели задач Windows 11 остаются пока что ограниченными, по большому счету пользователю доступно включение/отключение определенных значков, если не считать смены темы оформления. Тем, кто хочет настроить панель задач по своему вкусу, приходится прибегать к помощи сторонних приложений, с одним из которых мы сегодня предлагаем познакомиться.
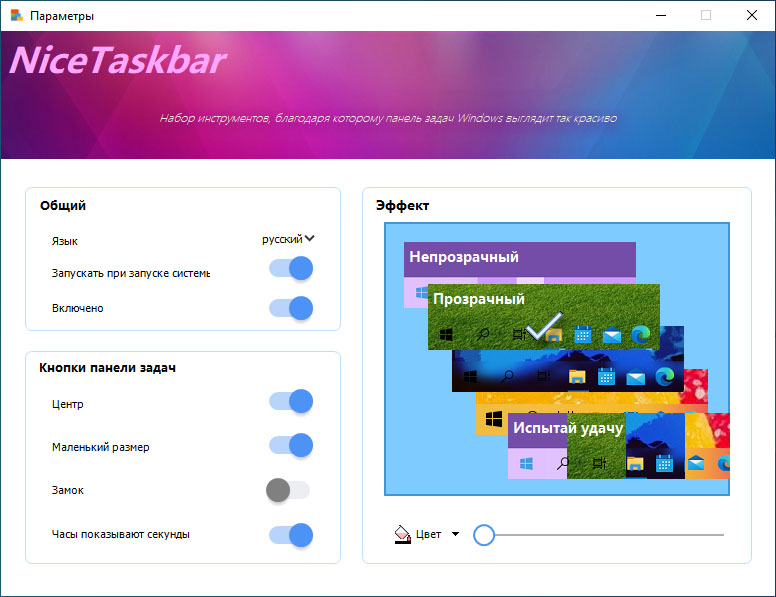
Это NiceTaskbar — универсальное приложение, предназначенное для кастомизации панели задач Windows 10 и 11.
NiceTaskbar может сделать панель задач прозрачной или полупрозрачной, применить к ней эффект размытия, поменять цвет и так далее.
Сразу после установки к панели задач будут применены настройки по умолчанию. Таковыми в NiceTaskbar являются эффект прозрачности и центрирование значков, если речь идет о Windows 10, так как в Windows 11 значки панели задач и так располагаются по центру.
Открыть настройки программы можно из системного трея, кликнув левой кнопкой мыши по иконке NiceTaskbar и выбрав опцию «Параметры».
Окно настроек включает три блока: Общий, Кнопки панели задач и Эффект. Интерес представляют второй и третий блок настроек: во втором вы можете изменить размер значков панели задач, разместить их по центру, закрепить или открепить саму панель задач, включить показ секунд для системных часов; блок «Эффект» представляет собой набор пяти шаблонов «Непрозрачный», «Прозрачный», «Размытие», «Беглый» (в смысле исходный) и предлагающий случайный выбор «Испытай удачу».
А еще в NiceTaskbar имеется простенькая палитра, дублирующая системный функционал и позволяющая выбрать произвольный цвет.
Установить программу можно из Магазина Windows, перейдя по ссылке:
www.microsoft.com/en-us/p/nicetaskbar/9pkl2s93xwb5
Кастомизатор бесплатен, в настройках есть русский язык, выбираемый по умолчанию.
Загрузка…
Как мы все знаем, в Windows 11 значительно улучшен дизайн пользовательского интерфейса, включая панель задач. Он расположен по центру на нижней панели. Но у нас все еще есть некоторые методы, которые помогут вам настроить панель задач в Windows 11.
Персонализировать элементы панели задач
По умолчанию на панели задач расположены следующие элементы: меню «Пуск», «Поиск», «Просмотр задач», «Виджеты», «Чат», «Edge» и «папка». Если вам нужно настроить, какие элементы будут отображаться на панели задач, выполните следующие действия:

- Поиск Панель задач в поле поиска и нажмите Настройки панели задач;
- Под Персонализация, Вы можете переключить кнопку на право решать, какой элемент отображать на панели задач;
Персонализировать поведение панели задач
За исключением персонализации элементов панели задач по умолчанию, у нас также есть возможность настроить поведение панели задач для управления выравниванием панели задач, значками и отображением.
Измените выравнивание панели задач влево.

- Поиск Настройки панели задач и щелкните по нему;
- Прокрутите вниз до Поведение панели задач и левый в выпадающем меню справа;
- Панель задач будет слева.

Изменить цвета панели задач
Если мы хотим заменить синий цвет Microsoft по умолчанию для панели задач, мы можем изменить цвета на ваш любимый, выполнив следующие действия:

- Нажмите Цвета под Персонализация;
- Переключитесь на вкладку Темный режим для Windows 11;
- Выберите цвет под Цвет акцента;
- включать Показывать акцентный цвет на Пуске и на панели задач;
- Выбранный цвет вступит в силу.
Конечно, мы продолжим изучать больше настроек и персонализации для панели задач Windows 11, чтобы помочь нам повысить эффективность нашей работы и сделать нашу повседневную работу более интересной.
