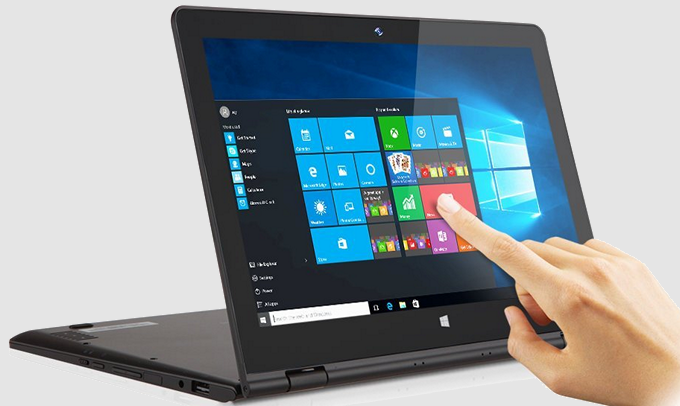
Вас не устраивает точность с которой сенсорный экран вашего планшета или ноутбука с операционной системой Microsoft Windows на борту реагирует на ваши нажатия? Это дело поправимое.
Для того, чтобы вернуть вашему устройству «былую меткость» при распознавании места касания к экрану, вам нужно будет всего лишь откалибровать сенсор дисплея. Как это делается?
А делается это очень и очень просто. Вот вам нехитрая инструкция по калибровке сенсора на дисплее Windows 10 устройств:
Как откалибровать сенсор дисплея Windows 10 планшета или ноутбука
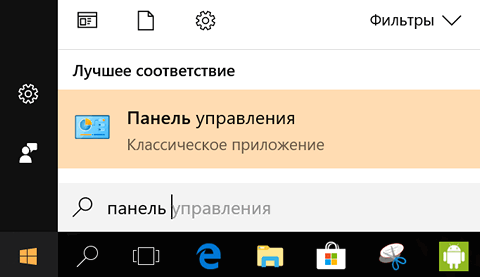
1. Откройте Панель управления системы:
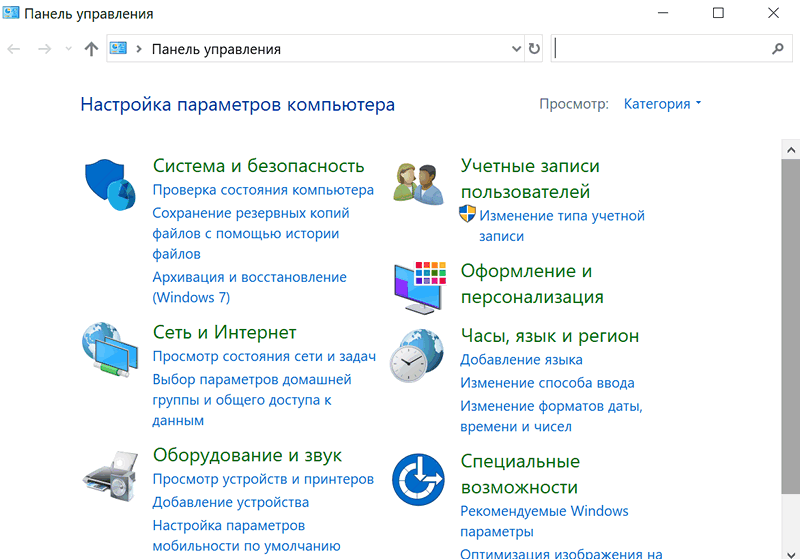
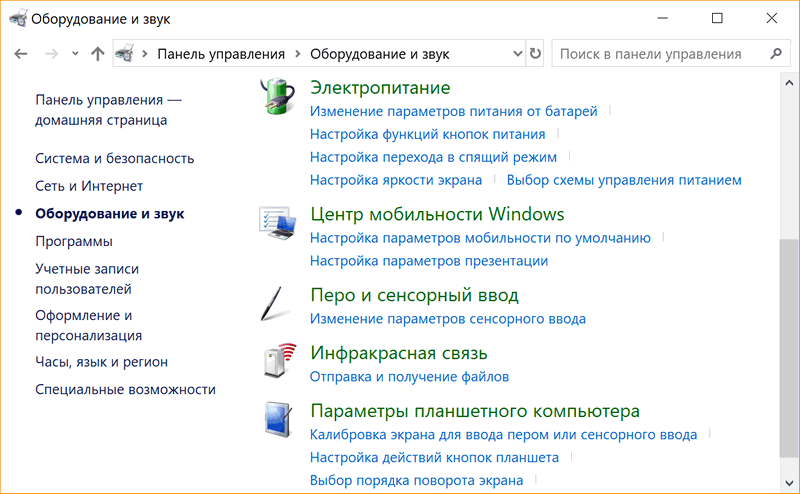
и переключите при необходимости режим просмотра на «Категории». Затем откройте: Оборудование и Звук -> Параметры планшетного компьютера.
2. Здесь вы увидите пункт «Калибровка экрана для ввода пером или сенсорного ввода»
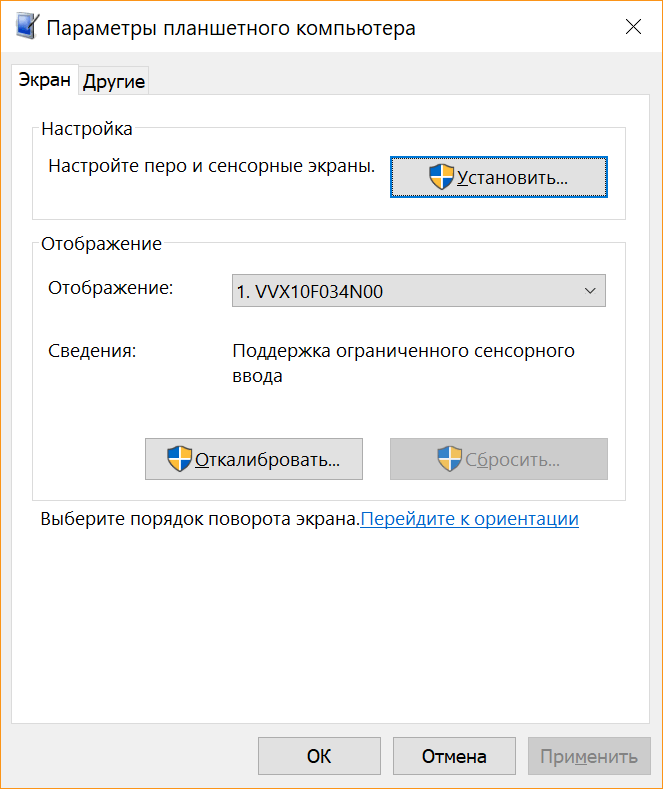
3. Кликните по нему, после чего откроется окно следующего вида:
4. Нажмите на кнопку «Откалибровать»
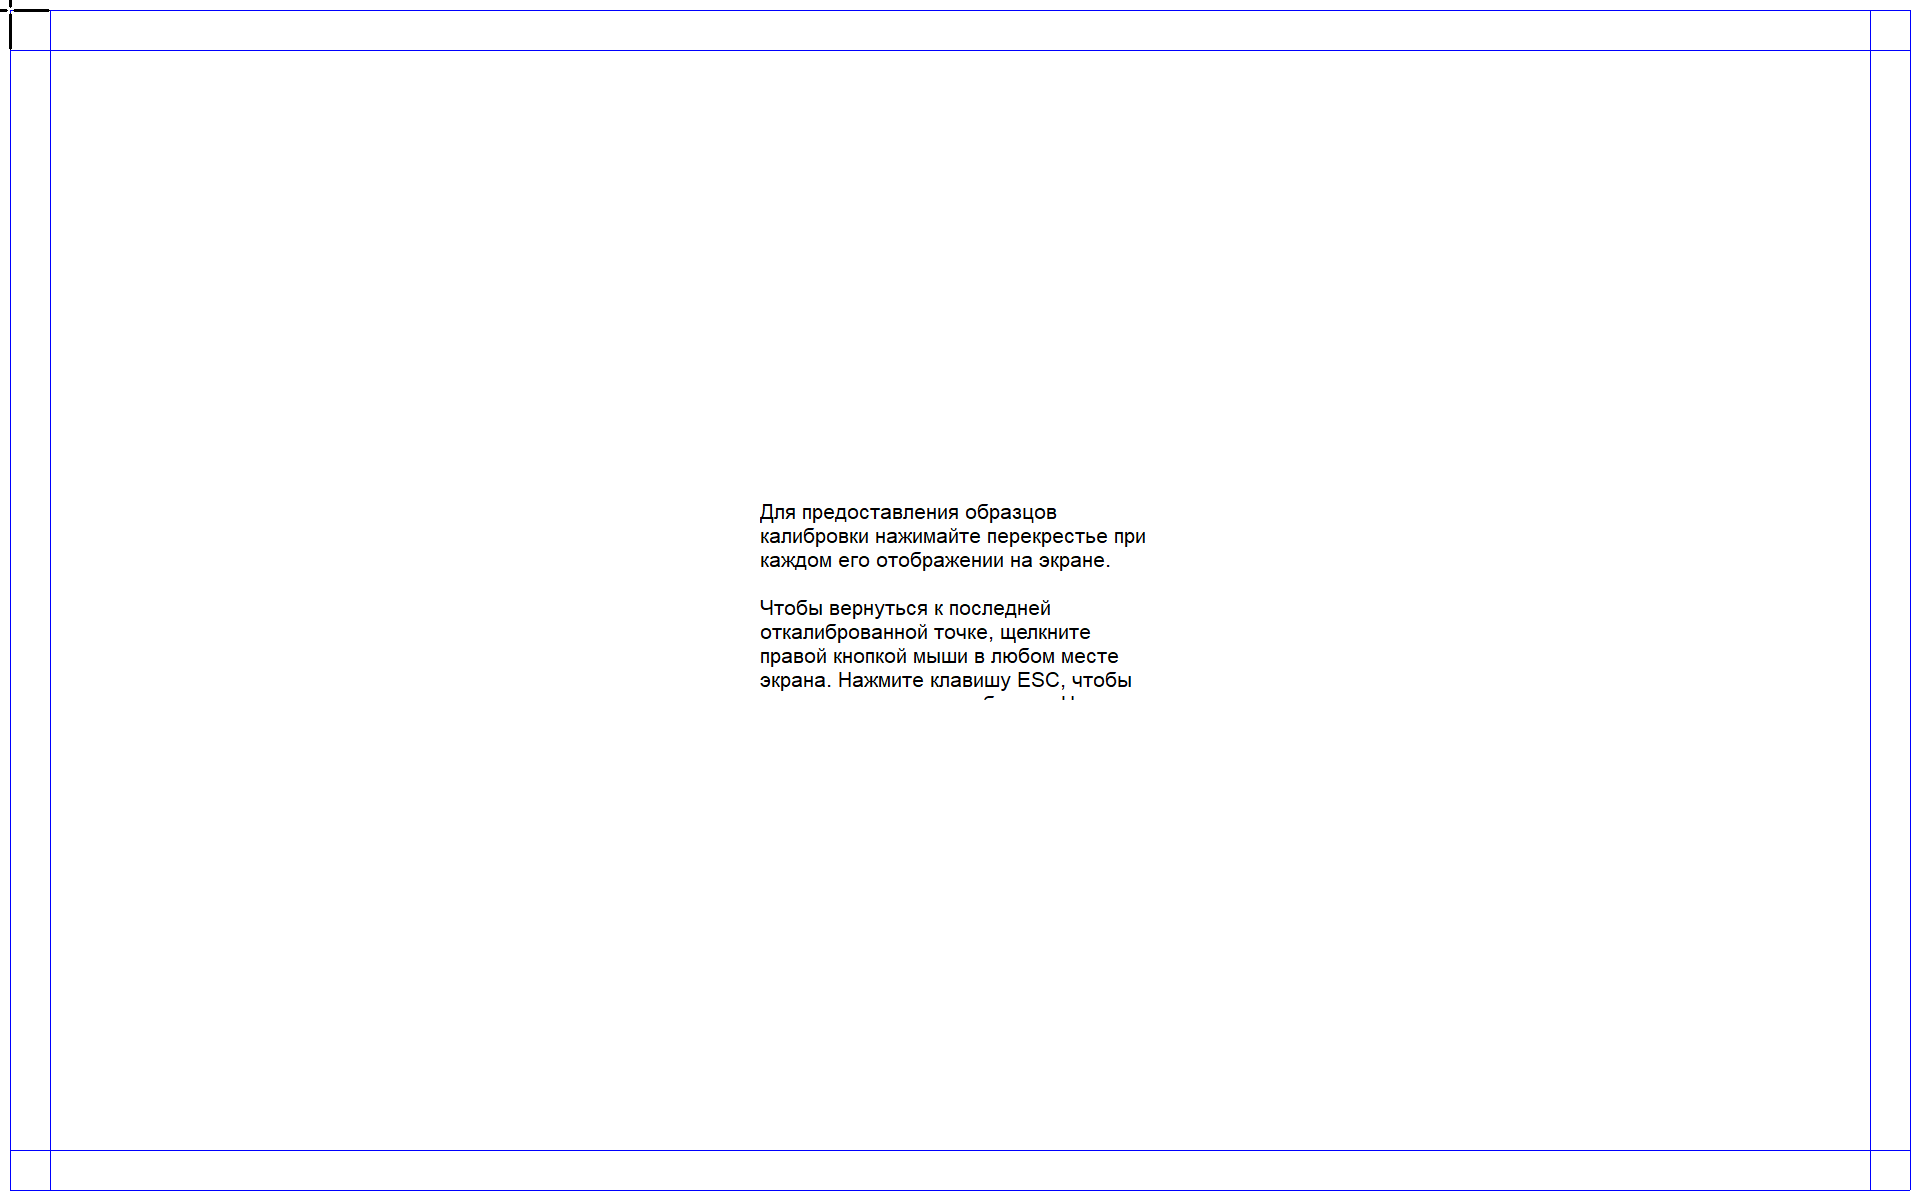
5. Разрешите запуск приложения «Средство калибровки дигитайзера», после чего на экране вашего устройства отобразится такое окно:
6. Здесь вам нужно будет касаться перекрестья, появляющегося в разных местах экрана, а по завершении процесса калибровки сохранить данные собранные средством для дальнейшего использования.
Всё. Теперь ваш Windows планшет или ноутбук с сенсорным экраном должен заметно точнее распознавать ваши прикосновения к дисплею.
Похожие материалы:
Как включить виртуальный тачпад в Windows 10 Creators Update
Windows 10 — советы и подсказки. Как отключить экран блокировки (локскрин)
Как включить доступ к расширенному набору эмодзи по сочетанию клавиш «Win + .» в Windows 10 Fall Creators Update
Windows 10 – советы и подсказки. Как включить или отключить отображение ярлыков «Компьютер», «Панель управления», «Сеть», «Корзина» и пр. на рабочем столе Windows 10
Теги:
- microsoft
- windows 10
- windows 10 советы и подсказки
- советы windows
- советы и подсказки
Some users have reported that their touch screens stopped working. When they opened Settings to calibrate their touch screen, they found the calibrate touch screen option missing from their Windows 11/10 computers. Yet others have found the Calibrate button greyed out. Windows 11/10 has a touch screen calibration option for the touch-capable displays. When you use this option, a crosshair appears on your screen. You have to tap on these crosshairs to calibrate your touch screen. If the Calibrate Touch Screen is missing in your Windows 11/10 PC, the solutions provided in this post may help you.
If you find the Calibrate Touch Screen option missing in Windows 11/10, the following solutions may help you resolve the issue.
- Run Hardware and Devices Troubleshooter
- Calibrate your touch screen via the Control Panel
- Disable and re-enable the HID-compliant touch screen driver
- Uninstall and reinstall the HID-compliant touch screen driver
- Check the status of the Touch Keyboard and Handwriting Panel Service
- Boot to UEFI and test your touch screen
- Perform a System Restore
Let’s see all these solutions in detail.
1] Run Hardware and Devices Troubleshooter
Hardware and Devices Troubleshooter helps users resolve the issues occurring on hardware devices that can be part of their system or connected externally, provided the hardware is not faulty. Running the troubleshooter has fixed the issue for many users. It should also help you.
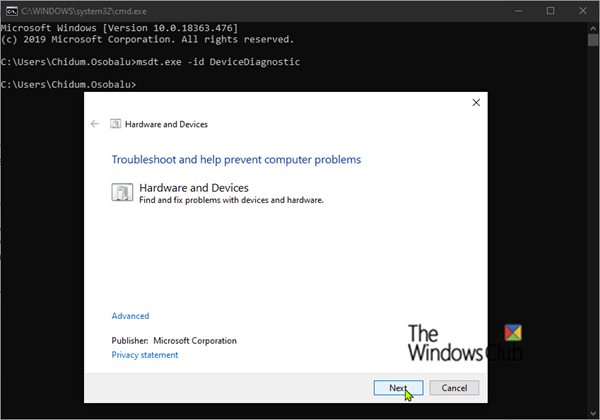
To run Hardware and Devices Troubleshooter, you have to execute the following command in the Command Prompt:
msdt.exe -id DeviceDiagnostic
After running the Hardware and Devices Troubleshooter. check if the problem persists.
2] Calibrate your touch screen via the Control Panel
You can also calibrate the touch screen from the Control Panel. If the option to calibrate your touch screen is missing in Windows 11/10 Settings app, open the Control Panel and see if the option is available there.
The steps are as follows:
- Open the Control Panel.
- Change the View by mode to Large icons.
- See if the Tablet PC Settings option is available. If yes, click on that and you will be able to calibrate your touch screen.
3] Disable and re-enable the HID-compliant touch screen driver
Open the Device Manager and disable and re-enable your HID-compliant touch screen driver. See if it helps. The steps are as follows:
- Open the Device Manager.
- Expand the Human Interface Devices node.
- You will see your touch screen driver there. Right-click on the HID-compliant touch screen driver and select Disable device.
- Wait for a few minutes, then right-click on the HID-compliant touch screen driver and select Enable device.
Now, check if the issue is fixed.
4] Uninstall and reinstall the HID-compliant touch screen driver
We also suggest you uninstall and reinstall the HID-compliant touch screen driver. If the Device Manager does not show the HID-compliant touch screen driver, you can download its latest version from the official website of the manufacturer and install it manually.
The following instructions will help you:
- Open the Device Manager.
- Expand the Human Interface Devices node.
- If you see the HID-compliant touch screen driver, right-click on it and select Uninstall device.
- Now, download the latest version of your touch screen driver from the manufacturer’s website.
- Install the driver manually.
5] Check the status of the Touch Keyboard and Handwriting Panel Service
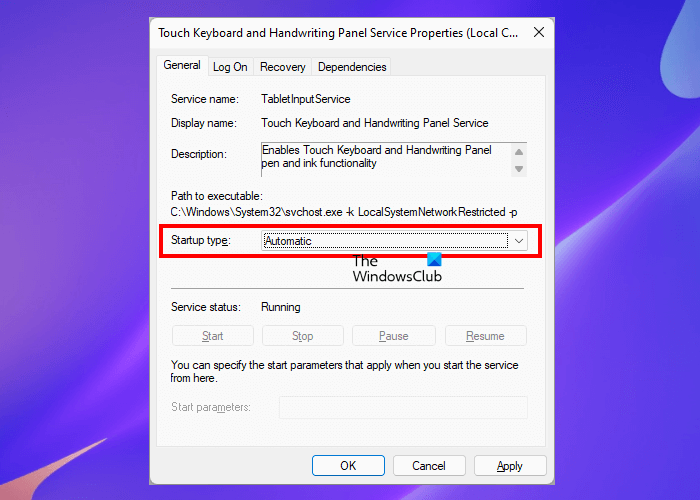
The Touch Keyboard and Handwriting Service is responsible for the proper functioning of the touch keyboard and handwriting panel pen and ink on Windows 11/10. If this service is stopped, you will not be able to use your touch keyboard and pen. If the calibrate touch screen option is missing in Windows 11/10, check the status of the Touch Keyboard and Handwriting Panel Service. The following instructions will help you with that:
- Click on Windows Search and type services.
- Select the Services app from the search results.
- Locate the Touch Keyboard and Handwriting Panel Service.
- If it is not running, right-click on it and select Properties.
- Under the General tab, select Automatic in the Startup type drop-down.
- Click Start.
- Click Apply and then click OK.
This should bring the missing calibrate option.
6] Boot to UEFI and test your touch screen (solution for Surface devices users)
This solution is for Surface device users. Boot your system to UEFI and check if the touch screen works. Because UEFI operates independently of Windows, booting your system to UEFI will let you know whether the issue is associated with hardware or software. If the touch screen works in UEFI, the issue is with your drivers. In this case, uninstalling and reinstalling the touch screen driver can bring the calibrate option back. We have already explained how to uninstall and reinstall the touch screen driver earlier in this article.
To boot your Surface device to UEFI, shut down your Surface laptop. When it is turned off, press and hold the Volume up key and turn on your laptop. You have to press and hold the Volume up key until you see the Microsoft or Surface logo on your screen.
If your touch screen does not respond in UEFI, there might be a hardware issue. You can contact Microsoft support if your Surface laptop is under warranty.
7] Perform a System Restore
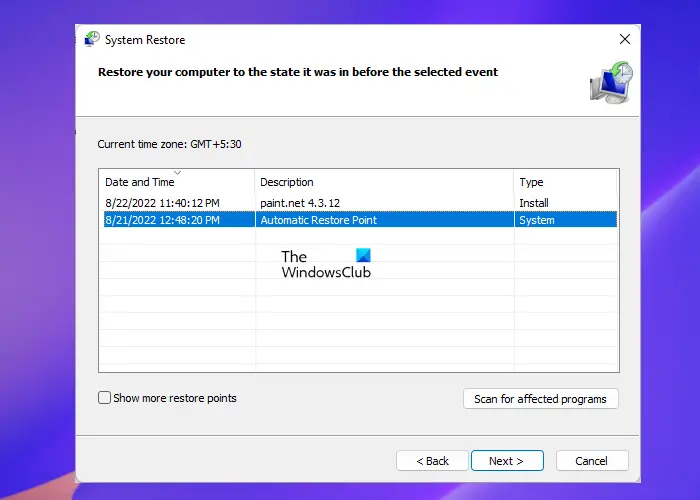
System Restore is a tool from Microsoft that helps users protect and repair their computer software. It takes snapshots of your system files and Windows Registry and saves them as Restore Points. You can restore your system using the System Restore points and take your system to the state before the issue started occurring on your system.
Restore your system using the System Restore tool and see if it helps. When you open the System Restore tool, you will see the date on which Windows created the restore points. If you select the Choose a different restore point on the System Restore window, Windows will show you all the Restore Points along with the date and time they were created. Select that Restore Point which was created before the problem started occurring on your computer. This should work.
Do note that System Restore will not delete your personal data. But from the safety point of view, we recommend you backup your data on an external hard disk.
Read: HID-Compliant Touch Screen Driver is missing.
How do I calibrate a touch-enabled display in Windows 11?
You can easily calibrate the Microsoft Surface touch display and other touch-capable displays in Windows 11 via the Windows 11 Settings. Click on Windows Search and type calibrate the screen for pen or touch and select the desired option. Alternatively, open the Control Panel and type Tablet PC Settings in the Control Panel search, and select the desired option.
Does Windows 11 support a touch screen?
Yes, Windows 11 supports a touch screen. If you have a touch screen capable display and it is not working, you can update or reinstall the HID-compliant touch screen driver. Or you can download the latest version of the touch screen driver from the manufacturer’s website and install it manually.
I hope this helps.
Read next: Fix Razer Blade touch screen not working.
Touch function stops working suddenly when you use the touch monitor or laptop? Have troubles such as touchscreen is unresponsive, touch screen input is offset or writing is intermittent? Let’s troubleshoot these common touch issues and fix them pronto!
1. Check the Hardware ─ Connector and Wiring
If the external monitor can not work touch function properly, the common hardware issues are as follows:
When encountering touch problems, please check whether the hardware connection is correct first.(The screen of touchscreen laptop is integrated all-in-one, and the wiring is inside the case. Usually, it is not necessary to check hardware connection problems. You can move forward to next part for software settings.)

● Poor Contact of the USB Connection
External touch monitors usually adopt the USB interface to transmit touch signals. If the USB ports on either side of the computer or touch monitor is faulty, the solder pins are tin stripped, the pin tongue is loose, etc., the touch may be intermittent, unusable, or the screen may not light up at all.

● Disconnected, Mis-Plugged or Faulty Cables
This happens more likely if you plug and unplug the cables frequently. Please re-insert the cables again to ensure the cables are inserted into the right ports and the plugs are not shaky or loose. If the touch screen still does not work, try to buy a new cable from the original manufacturer!
● Clean the Screen from Dirt and Dust
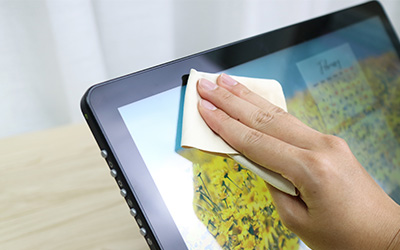
Grease and dust can potentially cause poor electrical sensing on touch surfaces. Use a lens cloth to gently wipe the touch screen and wipe with a little water for the tough stains. Do not spray too much water or detergent.
2. Check the Software Settings ─ Unresponsive Touch
When touch function stops working, check whether Windows Update and BIOS are updated to the latest version. If it still does not work, follow the following settings step by step to resolve possible problems!
● Update the USB Driver
If the USB driver on Windows 10 is not successfully updated, not only the external touch screen cannot be activated, but other USB devices may encounter problems.
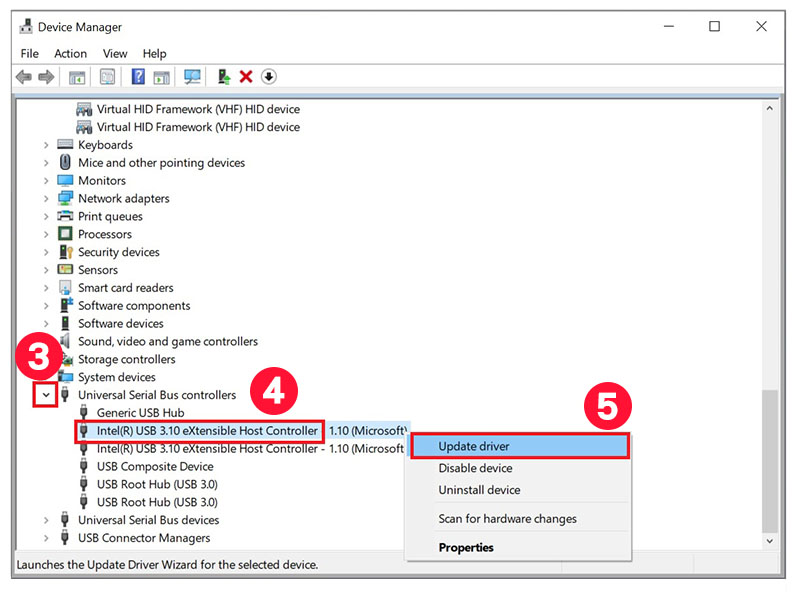
Right click [Start] → [Device Manager] → [Universal Serial Bus controllers], you can select [Update driver] directly or select [Uninstall device] and then restart the computer. Windows will automatically install the driver after rebooting.

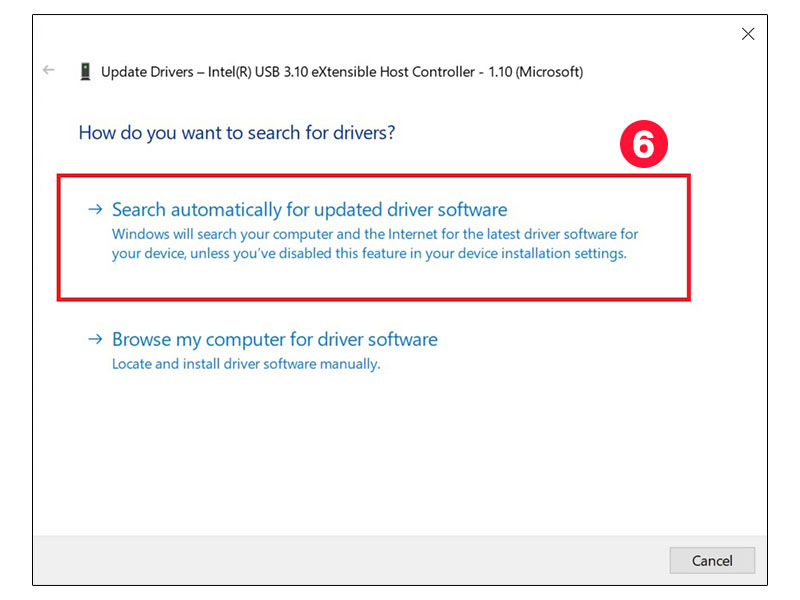
● Update the «Human Interface Devices» Driver
Connect the monitor to the computer and go to [Device Manager] → [Human Interface Device]. If the touch monitor connection is successful, the touch screen will appear in the list of Human Interface Devices. Right click the touch screen and follow the steps to update the driver.


◆ If you can’t find the touch screen device in the Human Interface Devices, please try to enable «Show hidden devices» in the view setting.
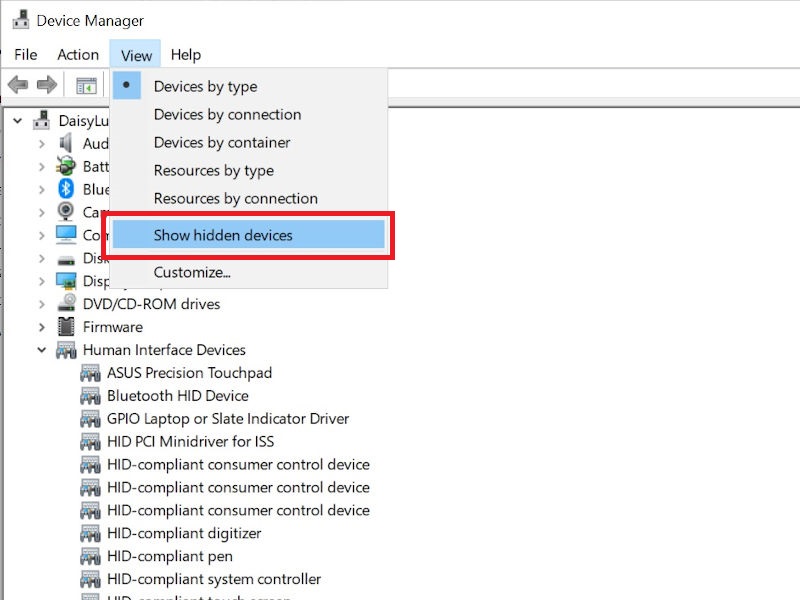
● Make the Computer Identify the Touch Screen
Click [Start] → [Control Panel] → [Tablet PC Settings], and then click [Setup] under the display tab. When «Tap this screen with a single finger to identify it as the touchscreen» appears on the screen, just touch the screen.


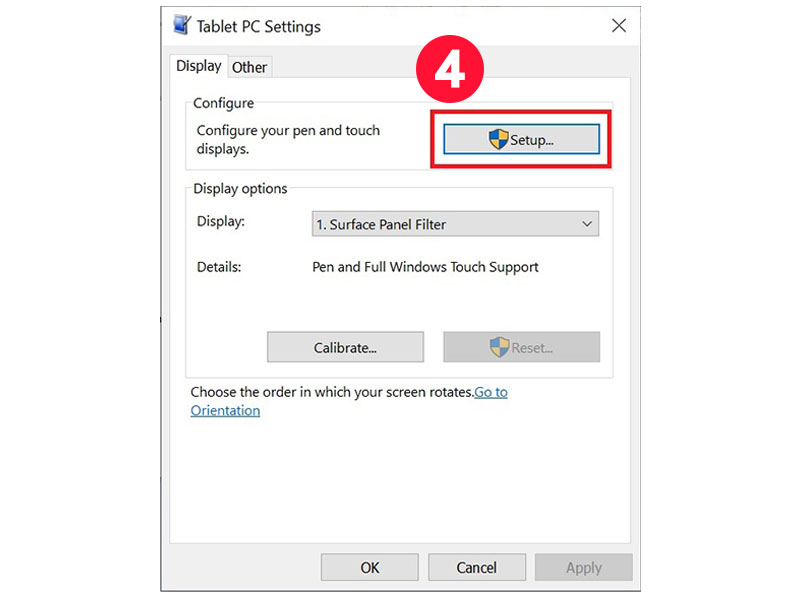
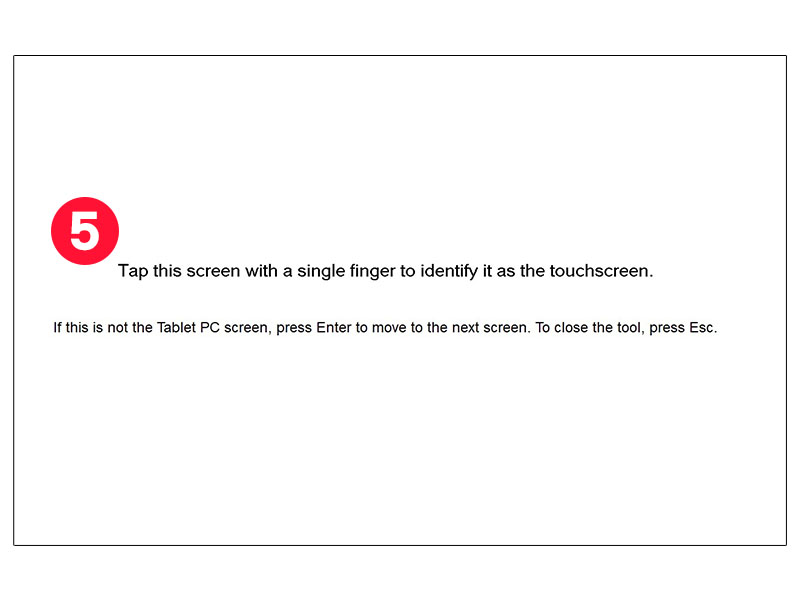
3. Software Setting ─ Calibrate Touch Input When the Touch Screen Input is Offset
● Step 1. Check the Resolution Setting
If the resolution setting does not match the screen, the touch position will also be affected. For example, when you touch certain positions on the screen, it responds on correct points, but clicks on other positions may activate other areas next to them instead.
When the cursor is on the desktop, right click for the setting menu → click [Display settings ] → choose the touch screen (number 2 screen) and select the corresponding resolution(for example, On-Lap M505T resolution is 1920×1080), and then click «Apply».
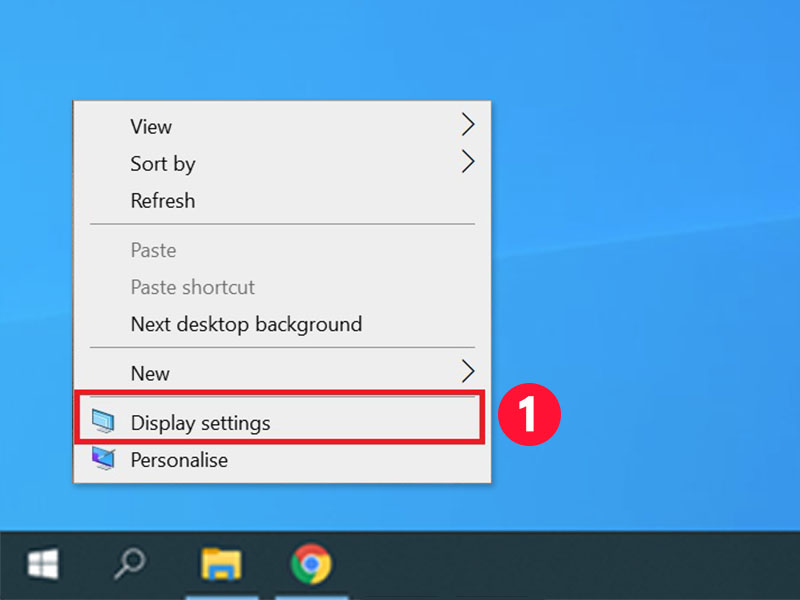

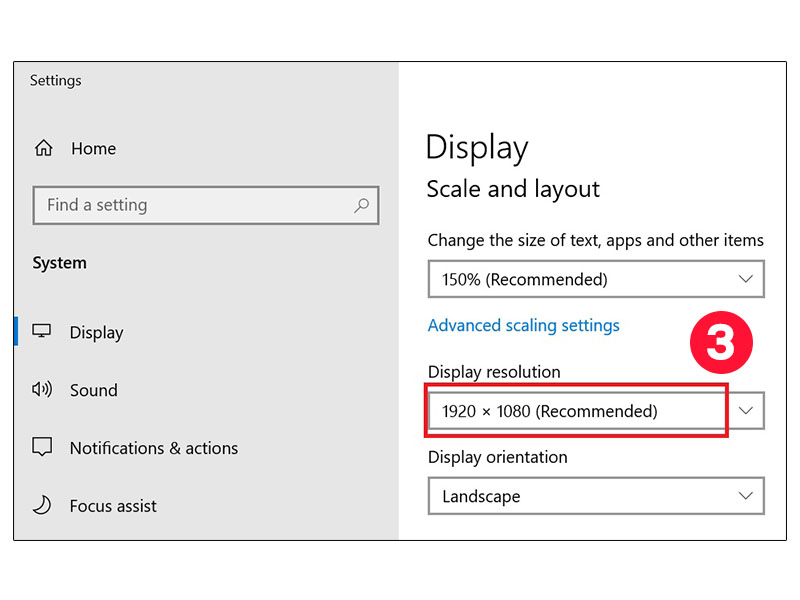
● Step 2. Calibrate Touch Input
Click [Start] → [Control Panel] → [Tablet PC Settings], or search for [Calibrate the screen for pen or touch input]. Open [Tablet PC Settings] and select your external monitor from the drop-down menu of Display → Click [Calibrate] → Tap the crosshair each time that it appears on the screen. → click «Yes» to save the calibration data .


4. When the Stylus does Not Work or is Not Sensitive
Touchscreen laptops and smartphones usually need to be paired with a dedicated stylus. For On-Lap series touch monitors, you can choose a passive stylus with a conductive rubber or plastic disc greater than 6mm diameter. The induction of active styluses differs from brand to brand. If your writing or drawing is intermittent, it is recommended to use a stylus with stronger induction (e.g., Adonit Dash3)

5. Confirm the Main Device Supports External Touch Screen
● iMac or MacBook
The Mac OS system does not support external touch signals, and the touch monitor can only display images when connected to the computer. This is a limitation of OS compatibility. If you need an external touch monitor for Mac, you can use BootCamp, a multi boot utility that comes with Mac OS. It assists you in installing Windows 10 on Intel-based Mac computers . When you switch your MacBook to Windows 10, you can operate the external touch monitor!


● Android Smartphone
When you connect 15.6-inch On-Lap M505T touch monitor to an Android phone supporting USB Type-C DP Alt, M505T can receive touch, video and audio signals at the same time. However, in case the Android phone OS is not updated to Android 8.0 or latest, you cannot use the touchscreen function on M505T touch monitor.
Note! Not every smartphone with a USB-C connector can be connected to a touch screen. You must inquire your smartphone manufacturer about whether the model supports DisplayPort Alt mode for outputting video signals.
6. Eliminate Environmental Interference ─ Flicker or Touch Ghost Clicks
As the projected capacitive touch technology is sensitive to electricity difference, the electromagnetic interference or unstable power current input may cause touch ghost clicks—the screen responds to touches you’re not making. In this case, please eliminate the following interference from your environment :

Unstable electric current
Sockets in public spaces usually have complicated wiring and power adoption. you may experience current fluctuations occasionally. When the power input to the touch monitor comes from these sockets or extension cords, you may encounter problems of not being able to operate touch screen normally.

High-Power-Consumption Appliances
Please try to stay away from kitchen appliances in use, such as electric cookers, microwave ovens, etc. Even table lamps may emit a lot of low-frequency electromagnetic waves. These electrical appliances that emit electromagnetic interference during operation may affect the use of your touch screen.
We hope the article has helped you to solve the problems of using touch monitors. If you have any other questions about touch screens, please write to GeChic Customer Service or contact us via FB.
На чтение 3 мин. Просмотров 2k. Опубликовано
Как и Windows 8, Windows 10 оптимизирована для сенсорных мониторов, но, как и в случае любой новой операционной системы, могут возникнуть некоторые несовместимости.
Например, пользователи сообщили, что они не могут откалибровать свой сенсорный экран в Windows 10.

Содержание
- Что делать, если у вас проблемы с сенсорным экраном в Windows 10?
- Если сенсорный экран не калибруется, попробуйте некоторые из этих решений:
- Решение 1. Очистите дисплей
- Решение 2. Обновите драйверы
- Решение 3. Вместо этого используйте драйверы по умолчанию
- Решение 4 – Проверьте другие устройства ввода
- Решение 5 – Выполнить Устранение неполадок
- Решение 6. Установите драйвер в режиме совместимости
Что делать, если у вас проблемы с сенсорным экраном в Windows 10?
Если сенсорный экран не калибруется, попробуйте некоторые из этих решений:
- Очистите ваш дисплей
- Обновите ваши драйверы
- Вместо этого используйте драйверы по умолчанию
- Проверьте другие устройства ввода
- Выполнить Устранение неполадок
- Установите драйвер в режиме совместимости
Решение 1. Очистите дисплей
Сенсорные экраны являются довольно чувствительными устройствами, и иногда жир и грязь могут привести к их неправильной работе.
Чтобы предотвратить это, вы должны регулярно чистить сенсорный дисплей.
Решение 2. Обновите драйверы
- Откройте диспетчер устройств и раскройте раздел «Устройства интерфейса пользователя».
- Найдите свой сенсорный экран. Вероятно, он называется HID-совместимым сенсорным экраном или чем-то подобным.
- Щелкните по нему правой кнопкой мыши, если есть опция «Включить», в противном случае нажмите «Обновить драйвер».
- Выберите «Просмотреть мой компьютер для программного обеспечения драйвера», выберите диск C: и установите флажок «Включить подпапки».
- Если это не работает, повторите процедуру и выберите Поиск автоматически для обновления программного обеспечения драйвера.
- Мы также рекомендуем Инструмент обновления драйверов TweakBit (одобрен Microsoft и Norton) для автоматической загрузки всех устаревших драйверов на ваш компьютер.
CHECK OUT : исправлено: ноутбук с Windows 8, 10 не калибровал экран
Кроме того, вы можете посетить веб-сайт производителя вашего монитора и проверить, есть ли драйверы для Windows 10.
Решение 3. Вместо этого используйте драйверы по умолчанию
Если обновление драйверов не помогает, попробуйте вместо этого использовать драйверы по умолчанию.
- Перейдите в раздел «Диспетчер устройств»> «Устройства интерфейса пользователя».
- Найдите устройство с сенсорным экраном, щелкните его правой кнопкой мыши и выберите «Удалить».
- Установите флажок «Удалить программное обеспечение драйвера для этого устройства» и нажмите «ОК».
- Перезагрузите компьютер, и драйвер по умолчанию должен быть установлен.
Решение 4 – Проверьте другие устройства ввода
- Откройте диспетчер устройств и перейдите в раздел «Устройство интерфейса пользователя».
- Найти USB-устройство ввода. Если их больше, вам, возможно, придется повторить их для всех.
- Выберите «Свойства» и перейдите на вкладку «Управление питанием».
- Снимите флажок Разрешить этому компьютеру выключать это устройство для экономии энергии.
Это будет постоянно поддерживать ваше устройство включенным, но в результате ваш компьютер будет потреблять больше энергии. Тем не менее, это может решить
Если у вас есть какие-либо другие проблемы, связанные с Windows 10, вы можете найти решение в разделе исправлений Windows 10.
Читать также: исправлено: невозможно обновить Магазин Windows ‘Ошибка 80246007 ′
Решение 5 – Выполнить Устранение неполадок
- Нажмите Пуск, введите и выберите Устранение неполадок.
- Выберите «Оборудование и устройства».
- Нажмите Run.
- Следуй инструкциям
Решение 6. Установите драйвер в режиме совместимости
- Загрузите установочный файл для драйвера с веб-сайта производителя.
- Щелкните правой кнопкой мыши файл и выберите «Свойства».
- На вкладке «Совместимость» установите флажок «Запустить эту программу в режиме совместимости».
- Установите драйвер.
Сенсорные экраны стали популярным элементом современных ноутбуков, планшетов и мониторов. Однако, иногда может возникнуть проблема с точностью определения касания на экране. В таких случаях необходимо провести калибровку экрана touch screen, чтобы улучшить его работу и повысить точность отклика.
Калибровка экрана touch screen в Windows 10 является простым и быстрым процессом. В этой статье мы расскажем, как выполнить калибровку шаг за шагом, чтобы получить наилучшие результаты.
Шаг 1: Откройте панель управления Windows 10.
Нажмите правой кнопкой мыши на кнопку «Пуск» в левом нижнем углу экрана и выберите «Панель управления».
Шаг 2: Найдите и запустите инструмент калибровки экрана.
В поисковой строке вверху справа панели управления введите «калибровка экрана» и выберите соответствующий результат.
Шаг 3: Запустите процесс калибровки.
В открывшемся окне Настройка таблицы калибровки экрана нажмите «Далее» и следуйте инструкциям на экране. Вам будет предложено точно нажать на несколько точек, чтобы система определила особенности вашего сенсорного экрана.
После завершения процесса калибровки экрана touch screen в Windows 10, ваше устройство будет готово к работе с высокой точностью и отзывчивостью. Не забудьте сохранить изменения и перезапустить систему, чтобы применить новые настройки полностью.
Содержание
- Зачем калибровать экран touch screen в Windows 10?
- Как калибровать экран touch screen в Windows 10 с помощью встроенных инструментов
- Как калибровать экран touch screen в Windows 10 с помощью сторонних программ
Зачем калибровать экран touch screen в Windows 10?
Калибровка экрана особенно важна для устройств touch screen, таких как планшеты, ноутбуки с сенсорным экраном и гибридные устройства. Если экран не калиброван, могут возникнуть проблемы с точностью и смещением указателя при касании.
К примеру, если приложение или игра требует точного нажатия на определенную область экрана, некорректная калибровка может привести к неправильным действиям или невозможности выполнить необходимые задачи.
Также, некорректно откалиброванный экран может вызвать дискомфорт и раздражение при использовании устройства. Картина на экране может быть расположена смещенно относительно указателя, что затрудняет его точное касание и может приводить к ошибкам.
Поэтому регулярная калибровка экрана touch screen в Windows 10 помогает обеспечить более комфортное и точное использование устройства.
Как калибровать экран touch screen в Windows 10 с помощью встроенных инструментов
Калибровка экрана touch screen в Windows 10 может быть необходима, чтобы обеспечить точность и чувствительность сенсорного экрана. Встроенные инструменты операционной системы позволяют произвести калибровку без необходимости использования дополнительного программного обеспечения.
Вот пошаговая инструкция по калибровке экрана touch screen в Windows 10 с помощью встроенных инструментов:
- Откройте меню «Пуск» и выберите «Параметры».
- В окне «Параметры» выберите раздел «Система».
- На странице «Система» выберите «Дисплей» в левом меню.
- Справа откройте список «Сенсорный экран» и выберите «Дополнительные параметры сенсорного экрана».
- В открывшемся диалоговом окне выберите вкладку «Цвета» и нажмите кнопку «Калибровка».
- Следуйте инструкциям помощника калибровки, чтобы выполнить процесс.
- В процессе калибровки вам может быть предложено нажимать на определенные точки на экране, чтобы система определила его параметры и настроила чувствительность сенсорного экрана.
- По завершении процесса калибровки, пройдите проверку на точность касаний, чтобы убедиться в правильности настройки.
- При необходимости можно повторить процесс калибровки, чтобы достичь максимальной точности.
Следуя этой простой инструкции, вы сможете калибровать экран touch screen в Windows 10 с помощью встроенных инструментов и настроить его под свои потребности и предпочтения.
Как калибровать экран touch screen в Windows 10 с помощью сторонних программ
Помимо встроенного инструмента калибровки в операционной системе Windows 10, существуют сторонние программы, которые предлагают более расширенные возможности для калибровки экрана touch screen. В данной статье мы рассмотрим несколько таких программ.
1. Touch Calibration Tool — это бесплатная программа, специально разработанная для калибровки экранов touch screen. Она позволяет настроить точность и чувствительность сенсорного экрана. Чтобы воспользоваться данной программой, следуйте инструкциям на ее официальном сайте.
2. TouchMe Gesture Studio — это платная программа, которая помимо калибровки экрана touch screen также предлагает настройку жестов и мульти-тачей на сенсорном экране вашего устройства. Она обладает интуитивным интерфейсом и проста в использовании. Чтобы воспользоваться данной программой, загрузите ее с официального сайта и следуйте инструкциям на экране.
3. DisplayCAL — это бесплатная программа калибровки цвета и контрастности экрана, которая также поддерживает калибровку сенсорных экранов touch screen. Она предлагает широкий набор инструментов для настройки параметров экрана и создания пользовательских профилей калибровки. Чтобы воспользоваться данной программой, загрузите ее с официального сайта и следуйте инструкциям на экране.
4. i1Profiler — это платная программа, разработанная специально для профессиональной калибровки и профилирования экранов. Она обладает расширенными функциями и инструментами для точной настройки сенсорных экранов touch screen. Чтобы воспользоваться данной программой, загрузите ее с официального сайта и следуйте инструкциям на экране.
Выбрав одну из указанных программ, вы сможете более точно и удобно калибровать экран touch screen своего устройства под ваши индивидуальные предпочтения.
