Windows Build Number
Microsoft Windows [Version 10.0.19043.1165]
WSL Version
- WSL 2
- WSL 1
Kernel Version
Kernel version: 5.4.72
Distro Version
Release: 2021.2
Other Software
No response
Repro Steps
- First i run this command «iwconfig» it will show :
└─# iwconfig
sit0 no wireless extensions.
bond0 no wireless extensions.
lo no wireless extensions.
eth0 no wireless extensions.
dummy0 no wireless extensions.
- when I run
└─# wifite
. .
.´ · . . ·. wifite2 2.5.8 : : : (¯) : : : a wireless auditor by derv82. ·/¯\ ´ · .´ maintained by kimocoder/¯¯¯\ ´ https://github.com/kimocoder/wifite2
[!] Warning: Recommended app pyrit was not found. install @ https://github.com/JPaulMora/Pyrit/wiki
[!] Warning: Recommended app hcxdumptool was not found. install @ apt install hcxdumptool
[!] Warning: Recommended app hcxpcapngtool was not found. install @ apt install hcxtools
[+] Checking airmon-ng…
[!] airmon-ng did not find any wireless interfaces
[!] Make sure your wireless device is connected
[!] See http://www.aircrack-ng.org/doku.php?id=airmon-ng for more info
[!] Error: airmon-ng did not find any wireless interfaces
[!] Full stack trace below
[!] Traceback (most recent call last):
[!] File «/usr/lib/python3/dist-packages/wifite/main.py», line 97, in entry_point
[!] wifite.start()
[!] File «/usr/lib/python3/dist-packages/wifite/main.py», line 51, in start
[!] Configuration.get_monitor_mode_interface()
[!] File «/usr/lib/python3/dist-packages/wifite/config.py», line 167, in get_monitor_mode_interface
[!] cls.interface = Airmon.ask()
[!] File «/usr/lib/python3/dist-packages/wifite/tools/airmon.py», line 313, in ask
[!] raise Exception(‘airmon-ng did not find any wireless interfaces’)
[!] Exception: airmon-ng did not find any wireless interfaces
[!] Exiting
so I cant able to use wifi of my windows in my wsl so that I can practice wifi hacking.
Expected Behavior
evert wsl must and should have a feature of running the wifi of windows.
so that security researcher can perform wifi hacking with authorization
Actual Behavior
cant able to use wifi of windows 10
Diagnostic Logs
No response
Microsoft has introduced Windows Subsystem for Linux, or WSL, which lets users run their favorite Linux distributions directly from Windows 10 without dual-booting or using a virtual machine. Thanks to the efforts of Offensive Security and the WSL team at Microsoft, Kali Linux is now the most recent addition to the Microsoft Store.
Those familiar with running Kali virtual machines understand the frustration of attempting to use Wi-Fi and Wi-Fi adapters, which is what makes the Windows subsystem so nice — you have no such problems. Additionally, you have the full performance capability of your PC without having to partition it as you would with a virtual system. And, unlike a dual-boot setup, you don’t have to restart the system and boot into a new OS anytime you want to use it. It’s as simple as opening a shell.

![]()
Limitations of Kali as a Windows Subsystem for Linux
While this is definitely a step in the right direction for Microsoft, it’s not quite there yet in terms of full functionality. Specifically, WSL does not support AF_PACKET, and that’s because Windows itself does not support it because of security restrictions. This means that you won’t be able to put a Wi-Fi adapter in promiscuous mode (or monitor mode), and tools that require raw sockets to function properly won’t work, such as Nmap. To make this possible, head over to the reported issue on GitHub to let them know how many people want this.
Enough talk, let’s install the Kali Linux subsystem and see what it can do!
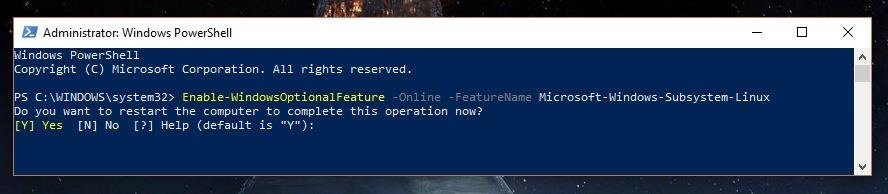
Step 1. Install the Windows Subsystem for Linux
First, run PowerShell as the administrator by pressing Windows + X and clicking on “Windows PowerShell (Admin).” Then enable this optional Windows feature by running the following command.
Enable-WindowsOptionalFeature -Online -FeatureName Microsoft-Windows-Subsystem-Linux
Once you press Enter, a loading bar will appear for a few seconds, then you will be prompted to restart the computer. Press Y and Enter to reboot. The system will immediately begin to restart.
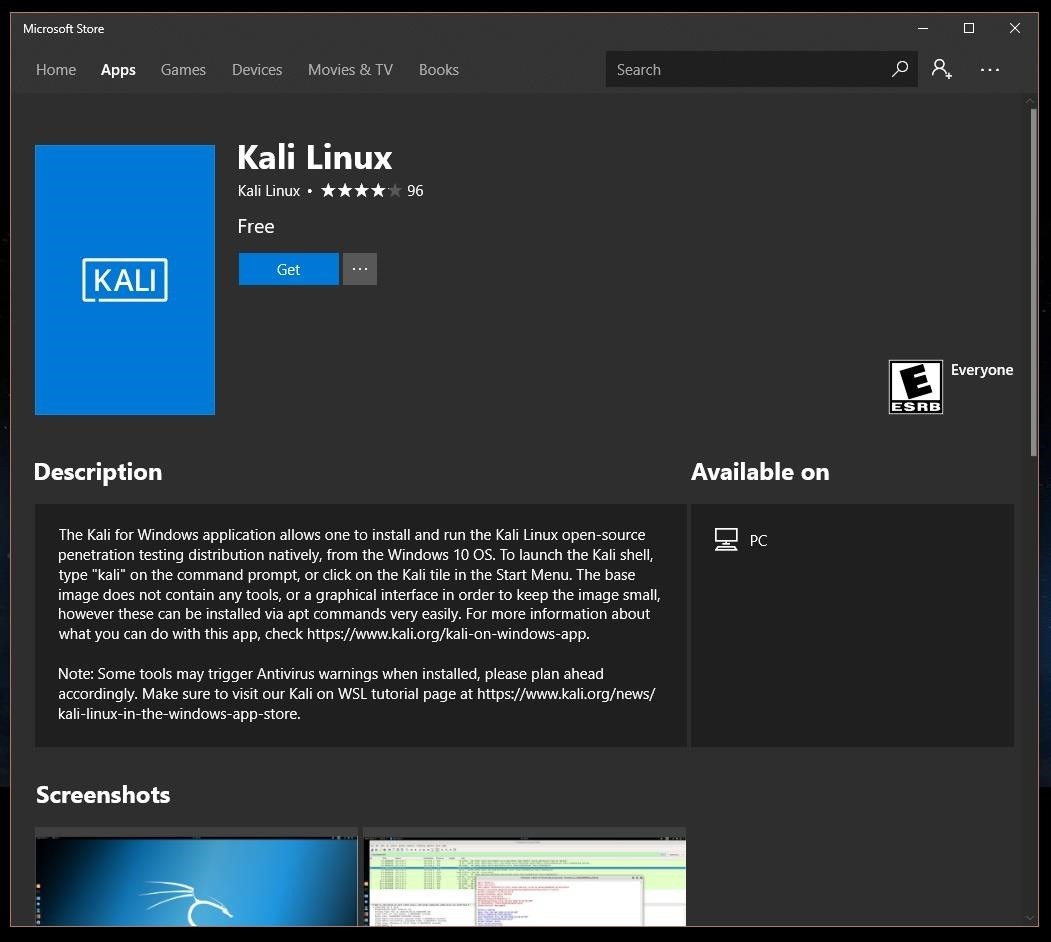
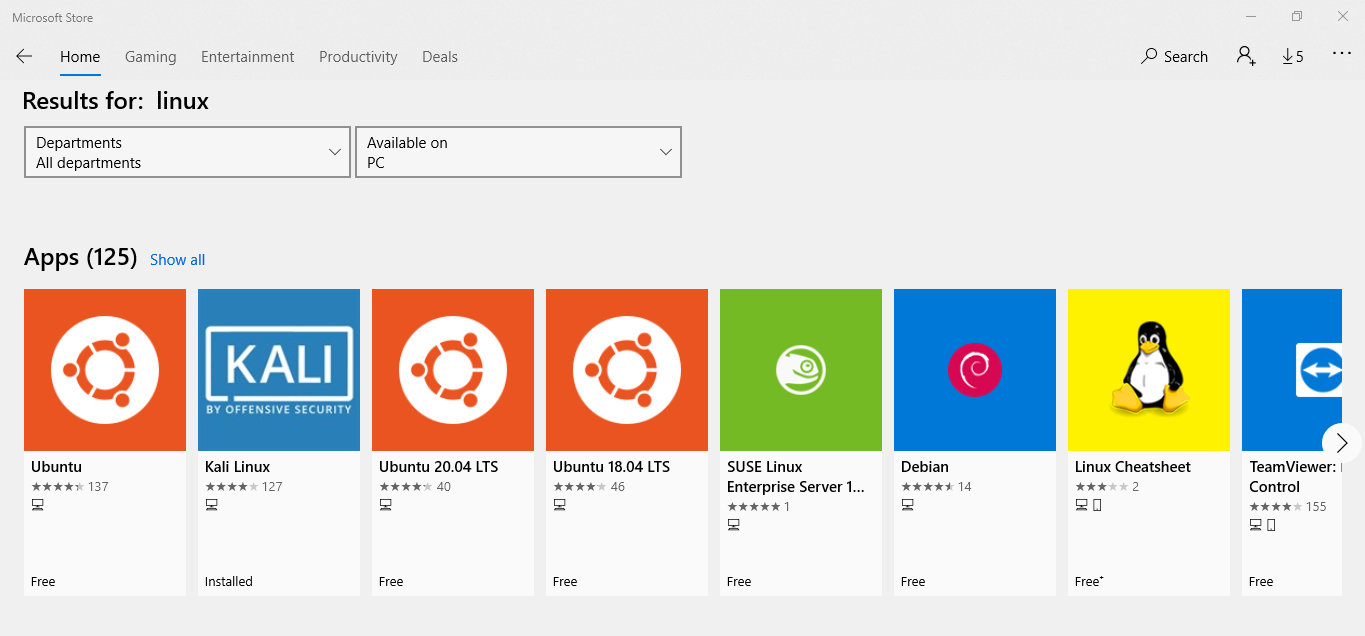
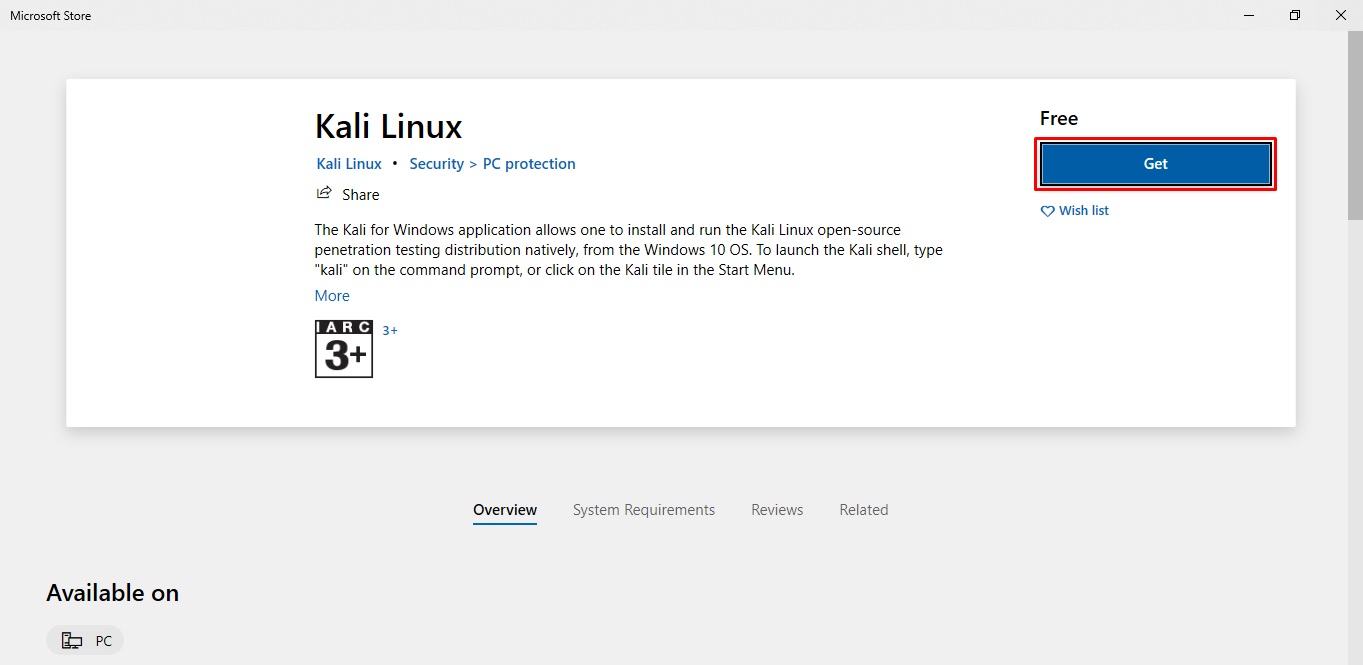
Step 2. Download the ‘Kali Linux’ Application
Once your system has rebooted and you’ve logged back into your account, navigate to the Microsoft Store by searching for it in the Cortana search bar in the bottom-left corner of your screen. Once there, search for “Kali Linux” or simply follow the link below to open the Kali page in the Microsoft Store. From there, click “Get” to begin installing.
- Install Kali Linux from the Microsoft Store for Windows 10
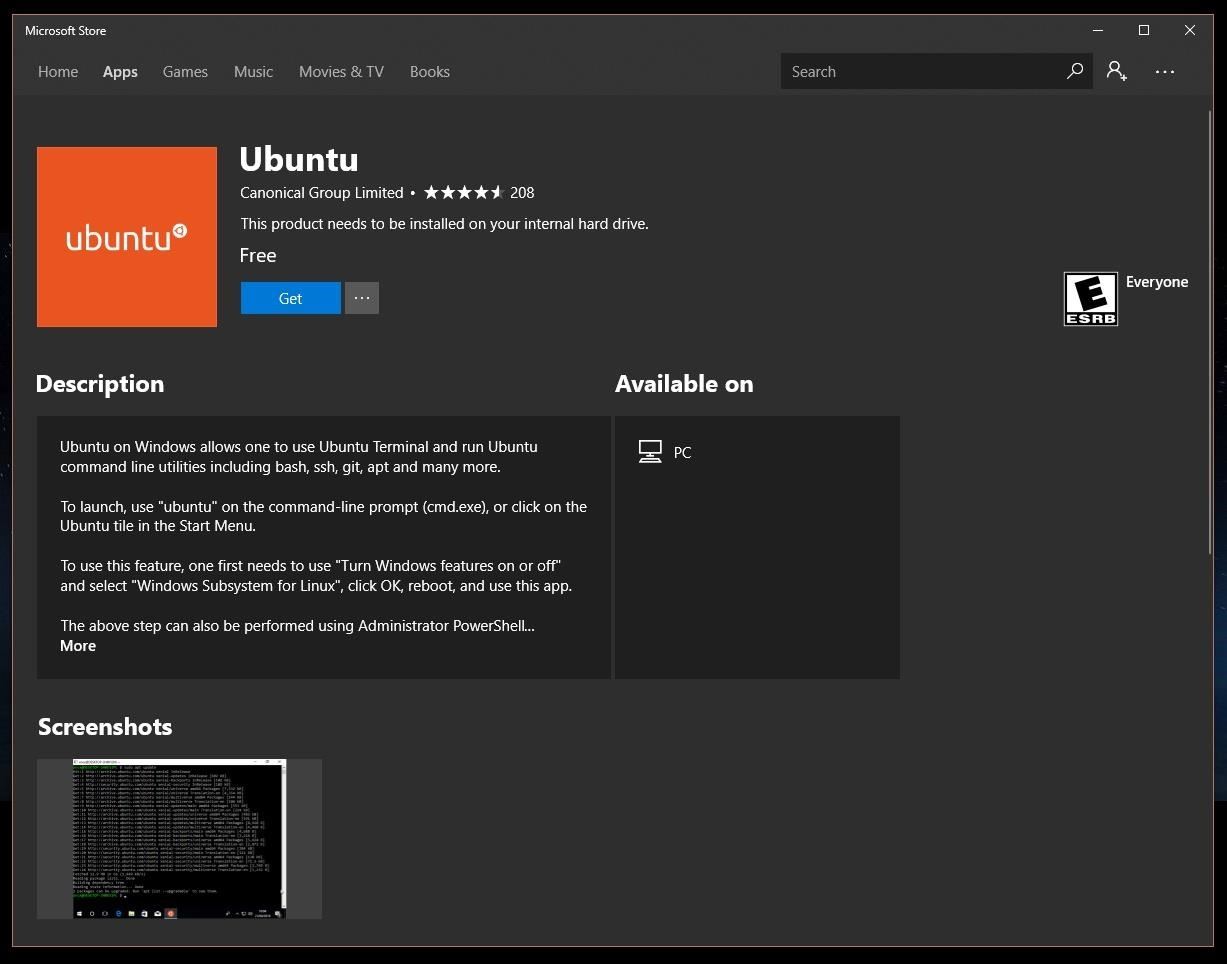
Other ubiquitous Linux distributions, such as Ubuntu, are also available so you may want to spend a few minutes looking around the Microsoft Store before you leave.
Step 3. Launch Kali for the First Time
Before you launch the “Kali Linux” app for the first time, I recommend clicking “Pin to Start” or, better yet, click the ellipsis (…) just to the right of it and then “Pin to Taskbar” to make it quick and simple to launch Kali in the future.

Once you’ve done that, click “Launch,” and a shell will open and begin the final installation which can take a few minutes.
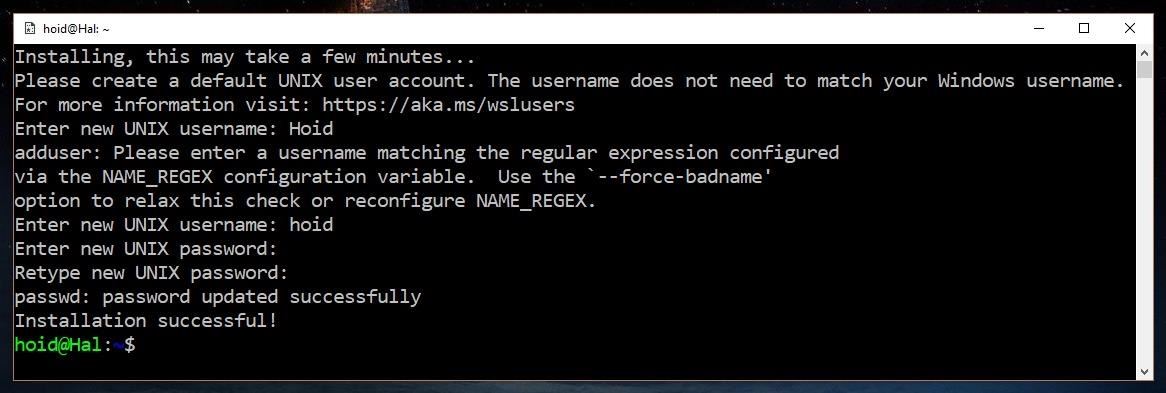
With that done, you’ll be prompted to create a Unix username and password. Congratulations, you’re all set up and running a Kali Linux subsystem on your Windows machine! Don’t forget to update it regularly just like any Linux system:
sudo apt-get update
sudo apt-get dist-upgrade
If hard drive space is a concern, then don’t forget to clean up the apt directory.
sudo apt-get clean
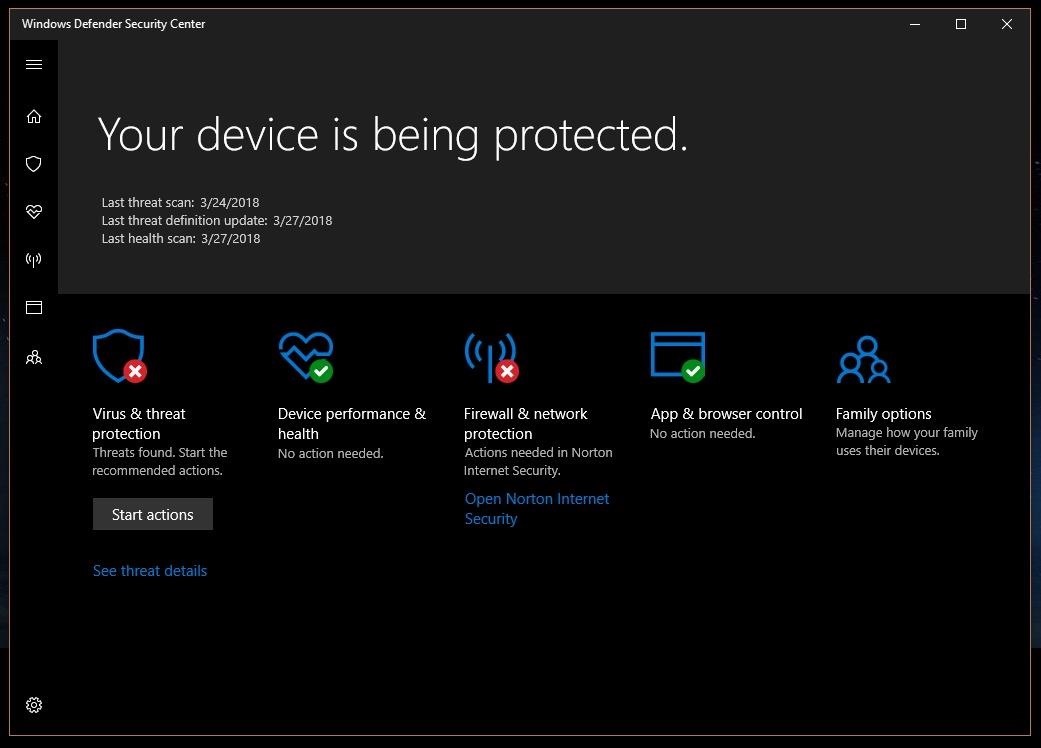
Step 4. Add Windows Defender Exclusion
Unfortunately, Windows Defender doesn’t always like to play nice with the tools in the Kali repository. Sometimes, it detects them as viruses and/or malware and blocks some portion of the program. To prevent these errors, it’s a good idea to go ahead and add a Windows Defender exclusion for the Kali Linux folder.
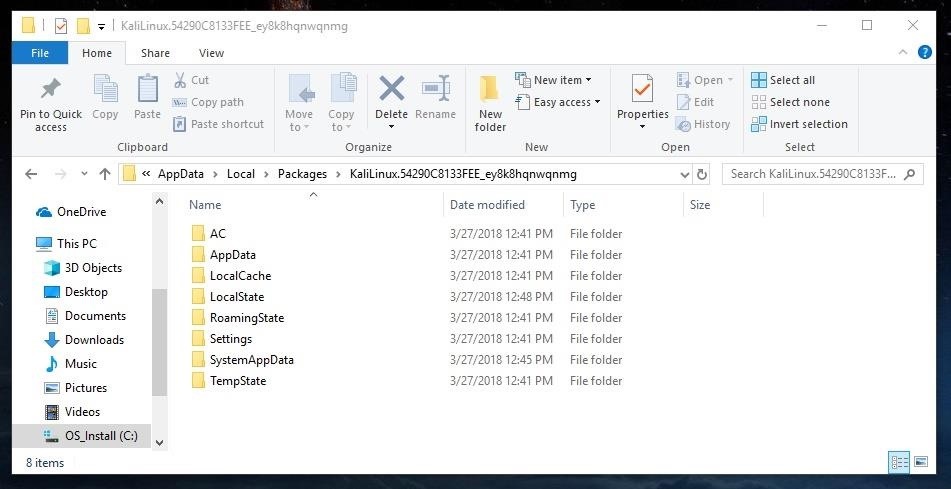
First, find that folder by opening File Explorer and entering the following location in the address bar. Don’t forget to replace “yourusername” with your actual username.
C:\Users\yourusername\AppData\Local\Packages\
Now, open the Kali Linux folder which should look something like “KaliLinux.54290C8133FEE_,” and copy the folder location.
With that in hand, search for “Windows Defender Security Center” in the Cortana search bar the bottom left of the screen. Within the Security Center, click on “Virus & threat protection” represented by a shield on the menu to the left side of the screen.
Next, click on the cog in the bottom, then “Virus & threat protection settings,” then scroll down to the bottom under Exclusions and click “Add or remove exclusions.” Then press the plus icon beside “Add an exclusion,” select “Folder,” and then paste the Kali folder address in the top bar. Click “Select folder,” and a popup will appear — click “Yes” to add the exclusion.
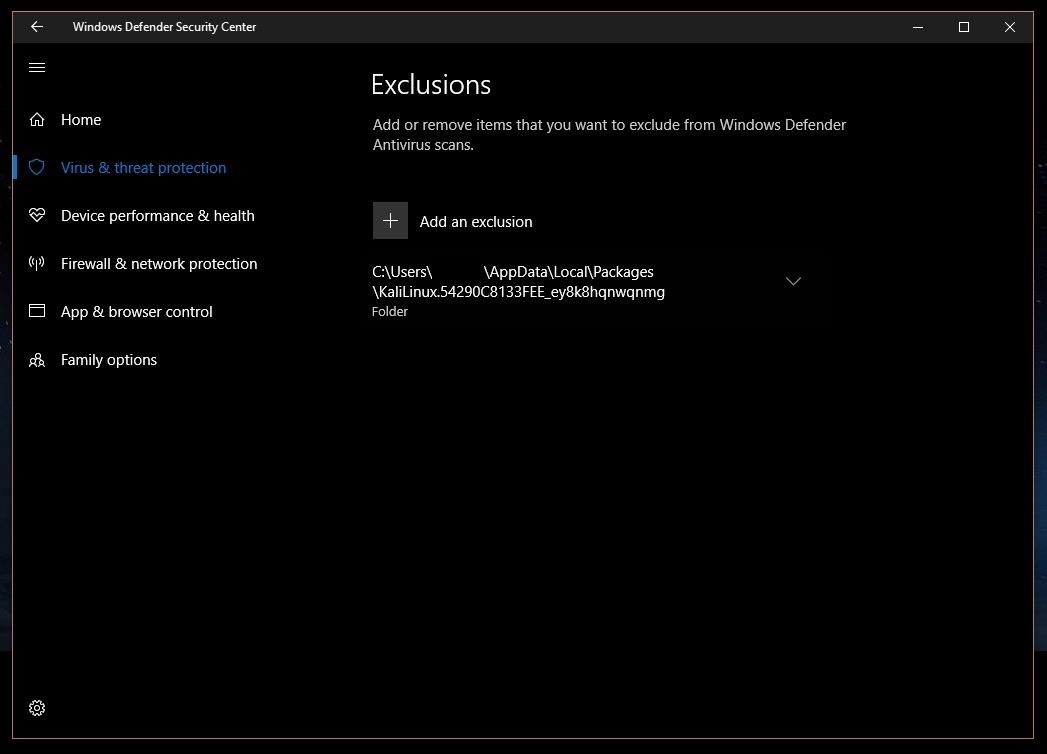
If you ever want to remove this exclusion, simply click on the down arrow beside the folder location, and click “Remove.”
Step 5. Install Penetration Testing Tools
With the Windows Defender exclusion in place, you’re ready to get started with your ethical hacking. Not much comes preinstalled in this version, so install tools you wish to use from the Kali repository as you normally would with the apt-get command. For example, to install Metasploit:
sudo apt-get update
sudo apt-get install metasploit-framework
Step 6. To Run Kali Linux GUI version
1. INSTALL WSL 2
RUN POWERSHELL as administrator
Type>> Enable-WindowsOptionalFeature -Online -FeatureName Microsoft-Windows-Subsystem-Linux
RESTART
Type>> dism.exe /online /enable-feature /featurename:VirtualMachinePlatform /all /norestart
Type>> dism.exe /online /enable-feature /featurename:Microsoft-Windows-Subsystem-Linux /all /norestart
RESTART
Download Linux Kernel: https://aka.ms/wsl2kernel
SET DEFAULT TO WSL 2
Type>> wsl –set-default-version 2
CHECK VERSION
Type>> wsl –list –verbose
GUI commands
sudo apt update && sudo apt -y upgrade
sudo apt-get purge xrdp
sudo apt install -y xrdp
sudo apt install -y xfce4
sudo apt install -y xfce4-goodies
sudo cp /etc/xrdp/xrdp.ini /etc/xrdp/xrdp.ini.bak
sudo sed -i ‘s/3389/3390/g’ /etc/xrdp/xrdp.ini
sudo sed -i ‘s/max_bpp=32/#max_bpp=32\nmax_bpp=128/g’ /etc/xrdp/xrdp.ini
sudo sed -i ‘s/xserverbpp=24/#xserverbpp=24\nxserverbpp=128/g’ /etc/xrdp/xrdp.ini
echo xfce4-session > ~/.xsession
sudo nano /etc/xrdp/startwm.sh
edit these lines to:
# test -x /etc/X11/Xsession && exec /etc/X11/Xsession
# exec /bin/sh /etc/X11/Xsession
add these lines:
# xfce
startxfce4
sudo /etc/init.d/xrdp start
> now open Remote desktop and type : localhost:3390 and press enter.
if there’s dbus issue
Install dbus
sudo apt-get install dbus
& then now open Remote desktop and type : localhost:3390 and press enter.
Feel free to leave a comment below or reach me on Instagram @iamshubhamkumar__.
![]()
Go to Kalilinux
r/Kalilinux
r/Kalilinux
Dedicated to Kali Linux, a complete re-build of BackTrack Linux, adhering completely to Debian development standards with an all-new infrastructure that has been put in place.
Members
Online
•
by
purjak
kali Linux Windows 10 app no wifi networks
Hi i have a question: what is needed to be done to have the wifi networks shown in the this version of kali linux that you can download at Microsoft store
Setup Kali Linux in Windows 10 WSL2
Table of Contents
This article will explain how you can install Kali Linux directly inside your Windows 10 without having to run the Kali setup. This will save you a lot of time that is required to setup a Kali VM in Windows and you won’t have to go through fixing the errors which can encounter during Kali installation.
Install WSL2 in Windows 10
This article assumes you have already installed WSL2 in your Windows 10. The more information about WSL2 and its installation steps are covered in following article:
If you have not installed WSL2, please check this article first and then come back here to start setting up your Kali Linux environment.
Install Kali Linux
- To install Kali Linux (or any other GNU/Linux distribution), open Run dialog (Windows key + R), then type “
ms-windows-store:” without quotes and hit enter. This will launch Microsoft Store app. - Click on the search, type “Linux” and hit enter. You will see all the popular Linux apps.
-
- Select Kali Linux and click on Install (or Get) button. If it asks you to login with Microsoft account, just click on No, thanks. This will start downloading and installing the Kali Linux which could take a while.
- To launch the Kali linux, click on start and type “Kali” to search.
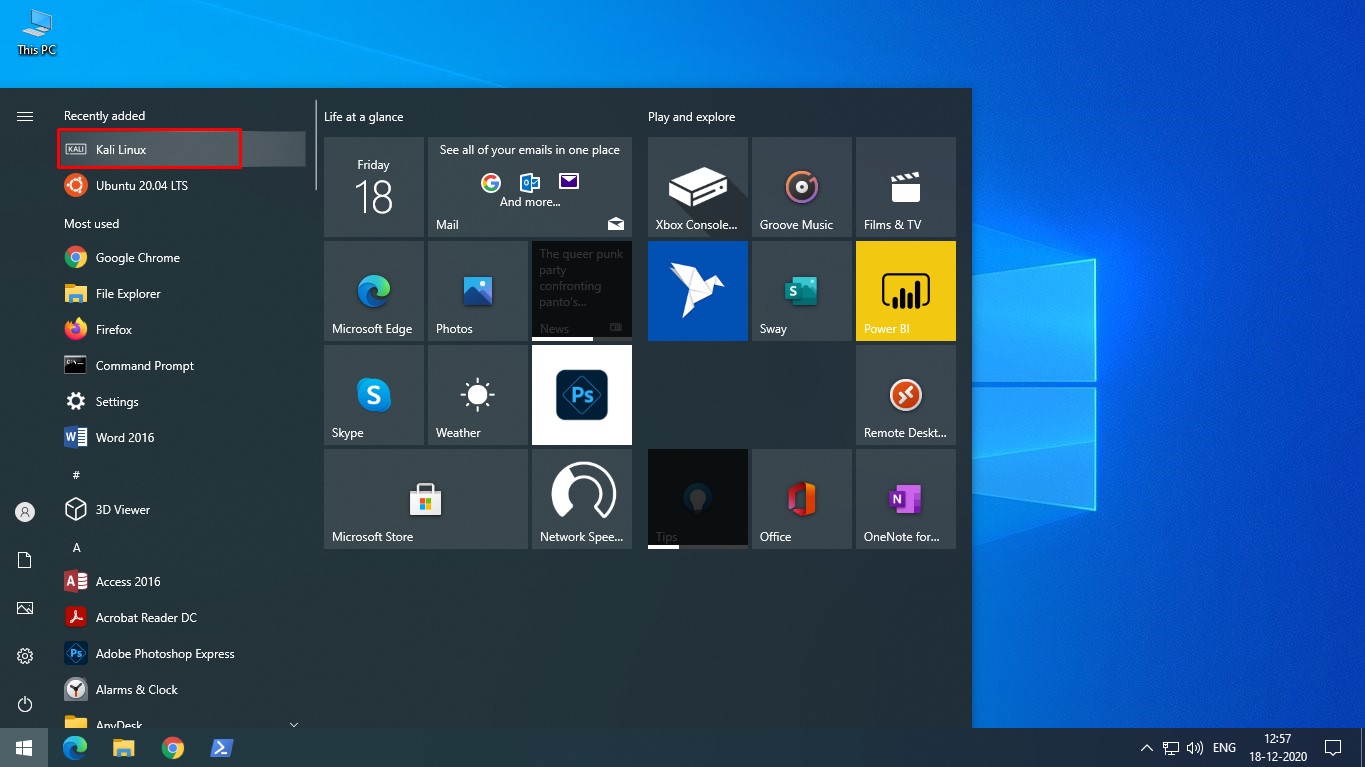
Tip: The most recently installed app “Kali Linux” will probably be displayed on top of start menu.
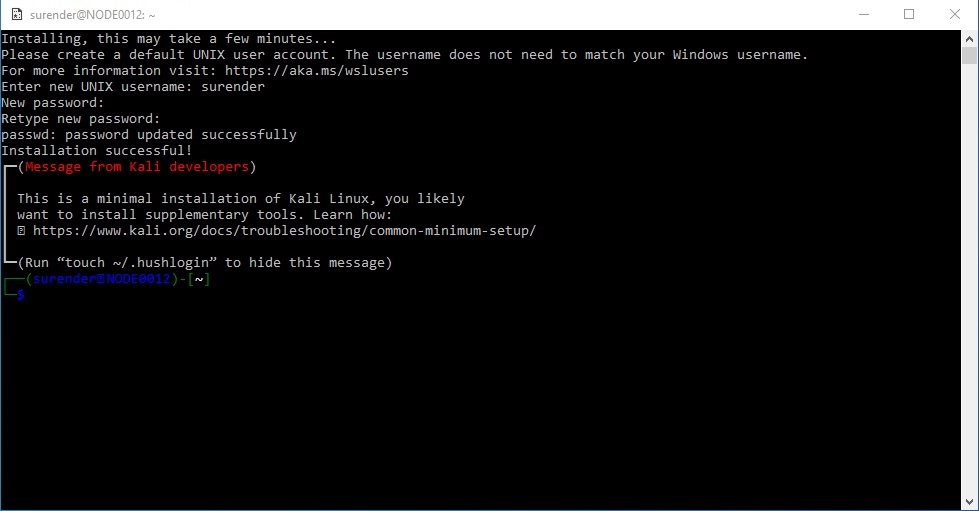
- Click on “Kali Linux” and it will display a terminal window with a text “
Installing, this may take a few minutes”. This will happen only for the first time.
-
- Once done, you will be asked to type a user name and then set a password. After typing password twice, you will be logged in to your Kali Linux environment. This is just a minimal installation of Kali linux. In the next step, we will convert the minimal installation to full including GUI and tools.
-
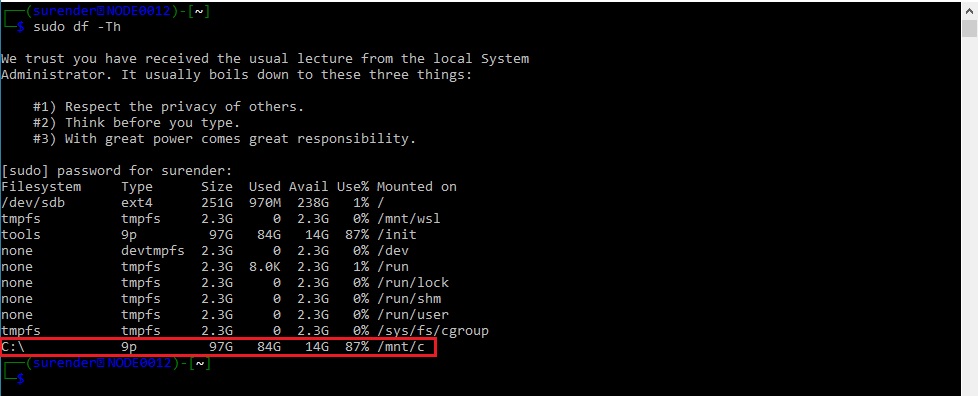
- The good thing is that your Windows C: drive is automatically mounted to /mnt/c directory in Kali linux. So you can browse and seamlessly transfer the files across Windows and Kali. Take a look at the following image:
- Now that we have a mimimal Kali install running in a terminal. We can run commands in terminal to convert it into full GUI. The
sudo apt update && sudo apt install kali-desktop-xfce -ycommand will do that. But instead of installing XFCE desktop environment, we will install Kali Desktop Experience for Windows (aka Win-KeX).
- Now why would we install Win-KeX instead of XFCE which is default desktop environment for Kali Linux? Because “Win-KeX” offers a Kali Desktop Experience for WSL2 which is tightly integrated with Windows. It provides following features:
- Window Mode: Starts a Kali Linux desktop in a dedicated window
- Seamless Mode: Share the Windows desktop between Windows and Kali apps
- Shared clipboard: Allows copy/paste between Windows and Kali Linux apps
- Multi-session support: Supports Root and regular user sessions
- Sound support
Leave the terminal window open and proceed to the next step in order to install Win-KeX.

Install Win-KeX in Kali Linux
- Type the following commands in terminal and hit enter. When prompted, enter the password you set in Step 5.
sudo apt update -y && sudo apt install kali-win-kex -y
It could take a while depending upon the speed of your computer and internet connection. Wait for installation to finish.
Run Win-KeX in Kali Linux
WSL2 allows you to run Win-KeX in three modes.
- Window Mode: Window mode helps keeping the Windows and Kali environments visually apart. Kali linux will run in a dedicated window. To start Win-KeX in Window mode with sound support, type the following command in terminal and hit enter:
win-kex --win -s
- Enhanced Session Mode (ARM only): Enhanced Session Mode runs the Kali Linux desktop session in a separate window using protocols and clients native to Windows. This is supported on ARM devices only. To start Win-KeX in Enhanced Session Mode with sound support, type the following command and hit enter:
win-kex --esm --ip -s
- Seamless mode: Seamless Mode runs a Kali Linux panel on the screen top of the Windows desktop. It removes the visual segregation between linux and window apps which provides a great platform to run a penetration tests in Kali Linux and copy the results straight into a Windows app. To start Win-KeX in Seamless mode with sound support, type the following command and hit enter:
win-kex --sl -s
Now you know How to run Kali Linux in WSL2 without having to install and maintain a VM in VirtualBox or Hyerp-V. But wait a minute; When you want to start Kali Linux, you will have to repeat following two steps every time:
- Open cmd.exe (or PowerShell console) in Windows and then type
wsl -d kali-linuxcommand - And then type
win-kex --sl -scommand to run WinKex in seamless mode
If you don’t want to repeat these steps every time, proceed to the next step of this article.
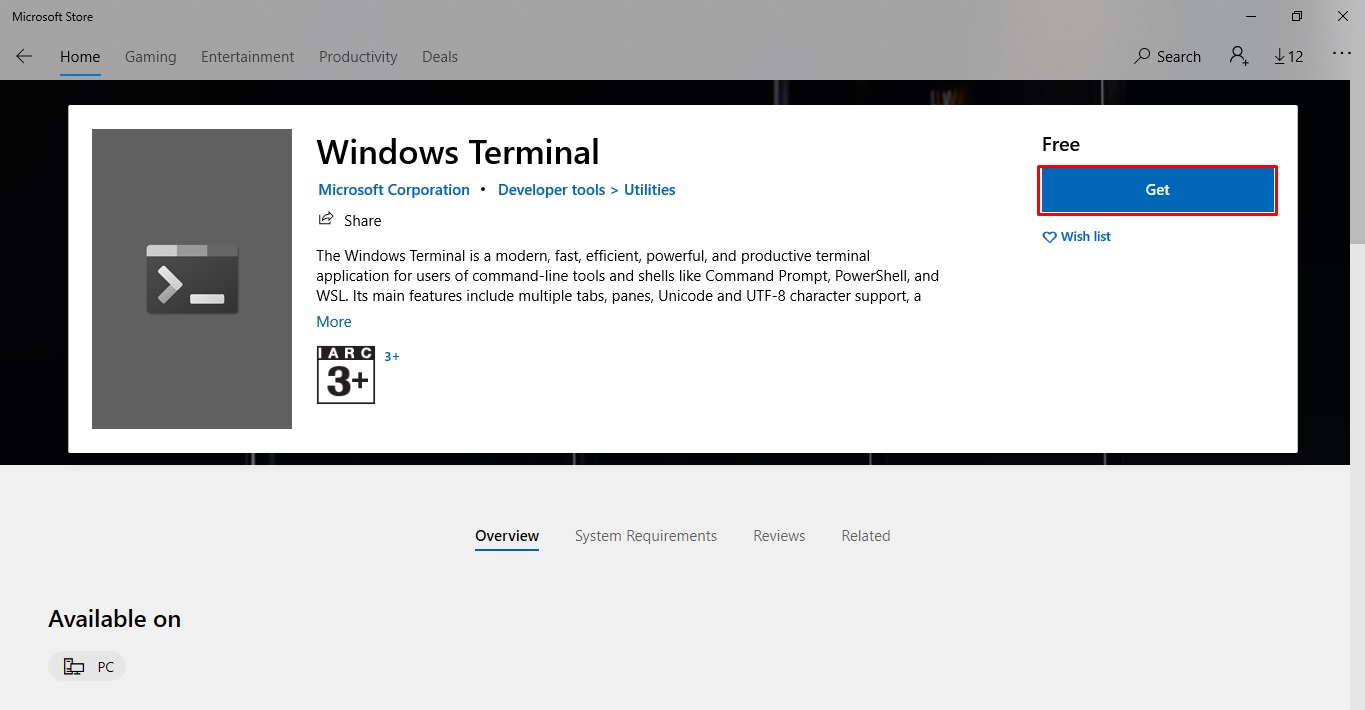
Install Windows Terminal
- Open Run dialog (Windows key + R), then type “
ms-windows-store:” without quotes and hit enter. This will launch Microsoft Store app. - Click on the search, type “Windows Terminal” and hit enter.
-
- Click on Windows Terminal app from search results and click on Install (or Get) button. If it asks you to login with Microsoft account, just click on No, thanks. This will start downloading and installing the Windows Terminal app.
- We will now create a shortcut in Windows Terminal which will help us start the Kali Linux automatically in just a single click.
Now launch Windows Terminal app and press “Ctrl + ,” keys simultaneously to open terminal settings. It will open “settings.json” file in “Code Writer” app so don’t freak out.
-
- In settings.json file, look for the lines marked with Red box in image, copy the marked section and then paste it right below (as marked by the Green box)
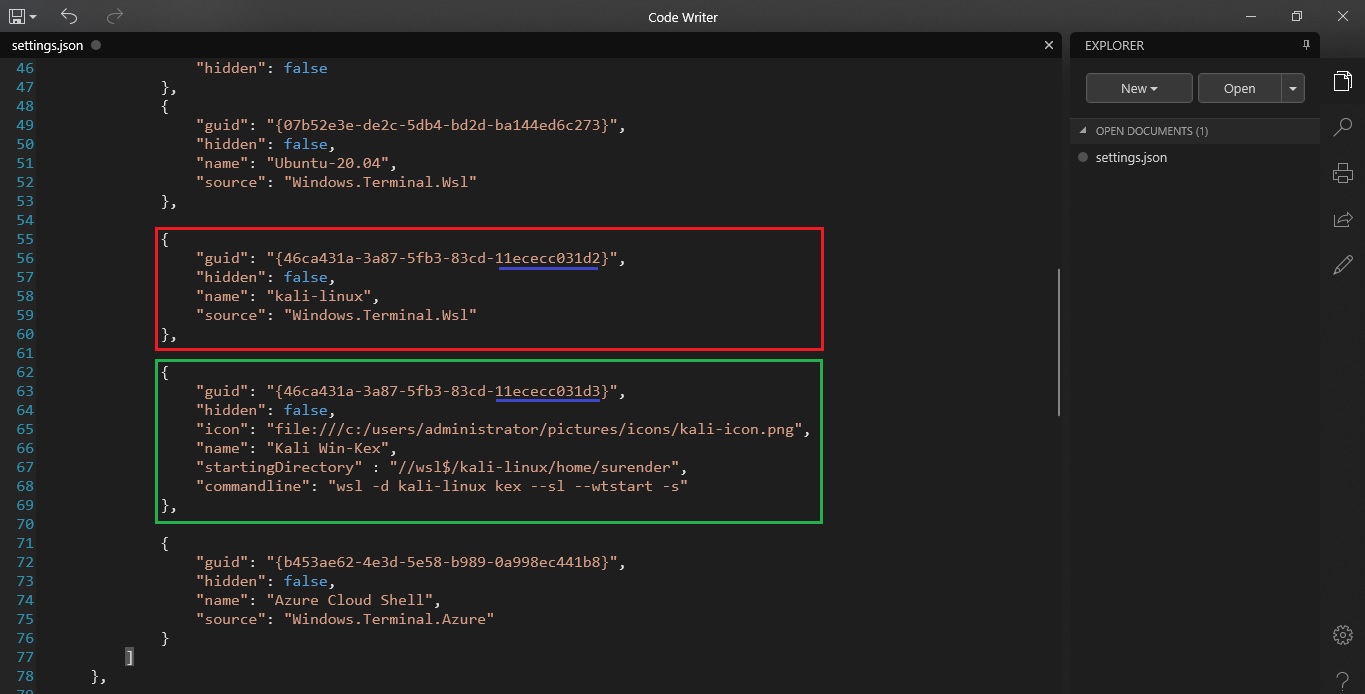
Look at the “commandline” argument’s value. This is the actual command which will run Kali Linux in seamless mode when you click on Windows Terminal shortcut. You can download the kali icon from here.
If you want to run Kali in Window mode, set the “commandline” value to wsl -d kali-linux kex --wtstart -s . You must slightly change the “guid” value marked with Blue underline otherwise you won’t see the new shortcut in Windows Terminal. You can also change other values if you like and then save the file.
-
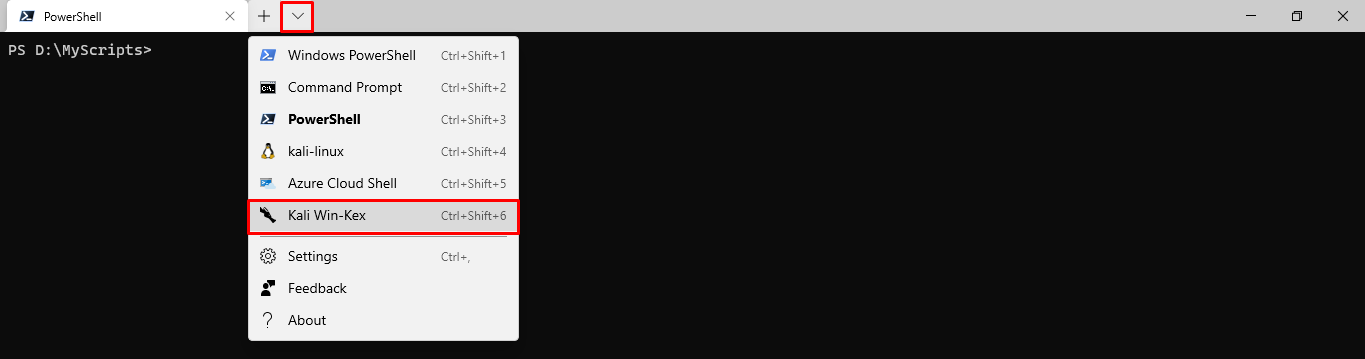
- Now close the Windows Terminal and launch it again. Then click on the dropdown icon and choose the Kali Win-KeX option to launch it.
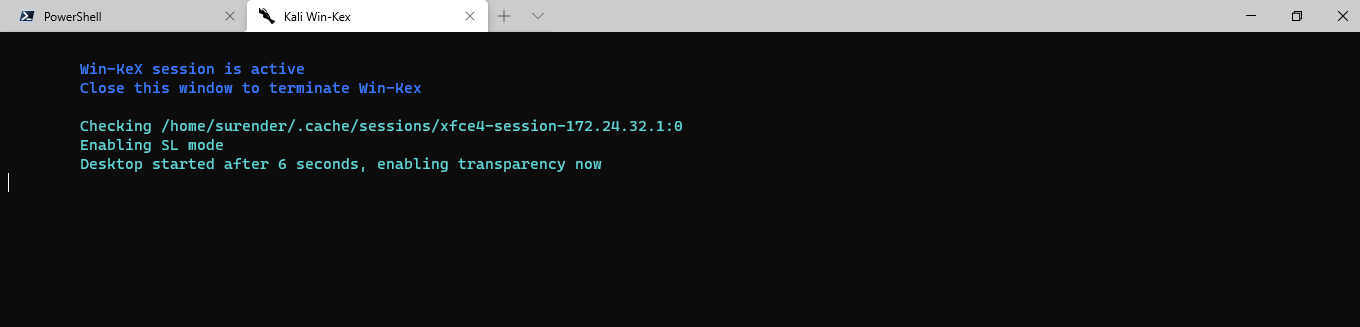
-
- This will launch Kali Win-KeX in seamless mode and you will see a new window running Kali desktop.
That’s it. Now you’re running Kali Linux in Windows 10 in seamless mode where you can change through apps opened in Windows as well as Kali Linux by pressing “Alt + Tab ” or “ Windows logo + Tab ” keys.
If you want to close the Kali window, just close the Kali Win-KeX tab in Windows Terminal.
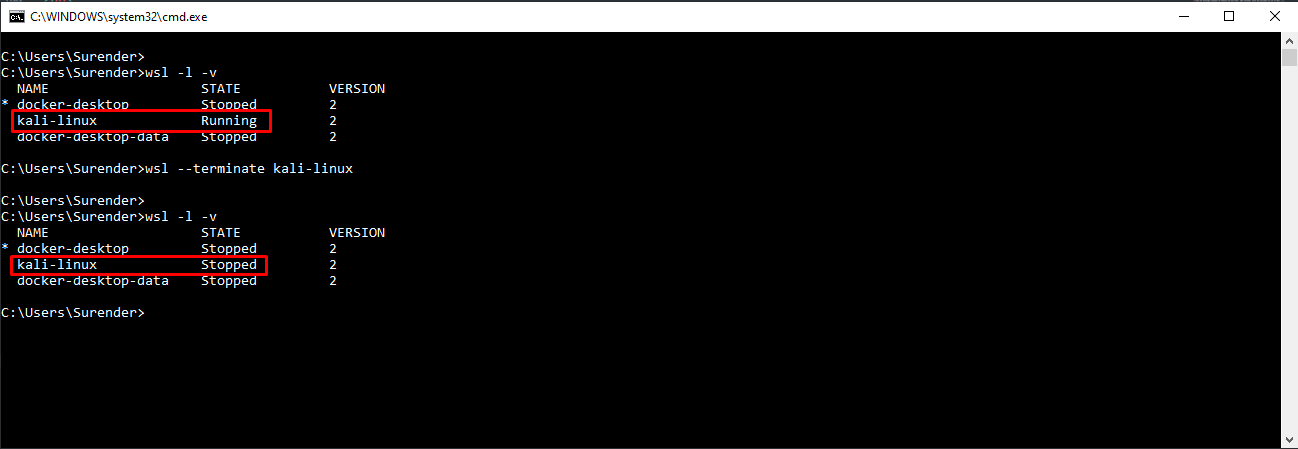
Tip: Closing the Kali Win-KeX tab in Windows Terminal doesn’t actually terminate the “kali-linux” WSL distribution. You can run wsl -l -v command in cmd.exe or PowerShell console and you will still see it Running.
To terminate the WSL instance, you need to run wsl -t kali-linux command manually as shown in image below.
Fixing Errors in Kali Linux
- If you see a message saying Started Win-KeX SL on Windows Terminal but don’t see any Window for Kali Linux, it is most likely that your Windows Firewall or Antivirus Firewall is blocking the application. You need to add the following application to trusted apps list in your Firewall.
\\wsl$\kali-linux\usr\lib\win-kex\VcXsrv\vcxsrv.exe
- If you see an error like Failed to execute child process “dbus-launch” (No such file or directory). You need to connect to Kali linux by running “
wsl -d kali-linux” command in cmd.exe (or PowerShell console) and then execute the following commands:sudo service xrdp stop sudo apt-get install dbus-x11 sudo service xrdp start

Hey, are you looking to Enable Wi-Fi in VMware in Kali Linux? If yes then this is the right place to find out the easiest way to Enable WiFi in VMware.
Sometimes people face the same problem while installing Kali Linux on VMware, they are not able to use their Wifi on the system.
So read this article completely on know How you can Enable WiFi on Kali Linux in VMware Workstation.
So let’s get started !!
Kali Linux is a popular Linux distribution for penetration testing and security auditing. It is often run within a virtual machine using software such as VMware.
However, by default, the WiFi may not be enabled in a Kali Linux virtual machine running on VMware. This guide will show you how to enable WiFi in VMware Kali Linux.
Step 1: Install VMware Tools
The first step is to install VMware Tools, which is a suite of utilities that enhances the performance of a virtual machine’s guest operating system and improves the management of the virtual machine.
To install VMware Tools, go to the “Virtual Machine” menu, select “Install VMware Tools” and follow the prompts to complete the installation.
Step 2: Configure Network Settings
Once VMware Tools are installed, go to the “Edit” menu, select “Virtual Network Editor” and configure the network settings.
By default, VMware creates a network adapter that is set to “NAT” (Network Address Translation) mode, this mode allows the virtual machine to access the internet, but it does not allow the virtual machine to be accessible from the host or from other machines on the same network.
To enable WiFi, you need to change the adapter to “Bridged” mode, this allows the virtual machine to use the host’s wireless adapter and access the wireless network.
Step 3: Enable Wireless Interface
After the network adapter is configured, open a terminal and type:
ifconfig
This will show a list of available network interfaces, look for the wireless interface, it should be labeled as “wlan0” or “wlp3s0” (the label may vary depending on your setup).
To enable the wireless interface, type the following command:
Step 4: Connect to a wireless network
Now that the wireless interface is enabled, you can use the command line tool “iwconfig” to scan for available wireless networks and connect to one of them. To scan for available networks, type the following command:
This will show a list of available wireless networks, take note of the “ESSID” (network name) of the network you want to connect to. To connect to a wireless network, type the following command:
iwconfig wlan0 essid “ESSID”
replace “ESSID” with the name of the network you want to connect to.
Step 5: Configure DHCP
Once you are connected to a wireless network, you need to configure DHCP to get an IP address, type the following command:
dhclient wlan0
This will request an IP address from the DHCP server on the wireless network, once the IP address is obtained you should be able to access the internet from the virtual machine.
Conclusion
By following these steps, you should now be able to enable WiFi in VMware Kali Linux. This can greatly improve the user experience and make it easier to use the virtual machine for penetration testing and security auditing tasks, as well as for general internet access. Remember to always use a secure wireless network when connecting to the internet from a virtual machine.
- How to Crack PDF Password in Kali Linux
- How to Install Kali Linux on VMWare Workstation
If you have liked this article and liked it, then you can share it with friends and family so that they do not ever get such a problem.
If you have any problem with any part of this article, or you want any more information related to the computer, then tell me in the comment box, and I will surely reply to you.
Thank You !!