Умная женщина — та, в обществе которой можно держать себя как угодно глупо (П. Валери).
Сегодня беспроводные сети более распространены на открытых площадках и в крупных корпорациях, где требуется усиление безопасности для управления аутентичностью и конфиденциальностью. Беспроводная сеть позволяет участникам оставаться на связи в роуминге без проводов. Поскольку точки доступа усиливают сигналы Wi-Fi, машина может находиться далеко от маршрутизатора и при этом оставаться подключенной к сети. Вы подключаетесь к беспроводной сети этого учреждения, когда подключаетесь к точке доступа Wi-Fi в кафе или другом общественном месте. Радиочастотная (RF) технология управляет беспроводными сетями, частота, связанная с передачей радиоволн в электромагнитном спектре. Всякий раз, когда RF-ток направляется в антенну, он создает электромагнитное поле, которое может перемещаться по космосу. Большинству людей знаком значок беспроводной связи на ноутбуке или телефоне, обозначающий исправное беспроводное подключение к локальной сети, но немногие знакомы с древностью технологии Wi-Fi. Удивительно, но Wi-Fi был создан как маркетинговый термин для продвижения и облегчения взаимодействия между различными системами беспроводных локальных сетей, а не самой технологии. Wi-Fi никогда не задумывался как более короткая версия беспроводной связи; это была просто игра на фразе hi-fi (высокое качество воспроизведения), дань уважения большим аудиотехнологиям. Поскольку беспроводные сети передают данные по воздуху, утечка данных всегда возможна. По сравнению с медным кабелем беспроводные сети имеют больший риск утечки и взлома данных. В результате в беспроводных сетях повышенная концентрация шифрования данных является обязательной. Емкость устройства беспроводной сети может быть увеличена без необходимости прокладки дополнительных кабелей. В кабельных сетях LAN необходима дополнительная медная проводка для увеличения числа рабочих. Мы можем запустить Kali Linux по беспроводной сети после настройки нашей беспроводной сети. Мы можем получить все свободы типичного ПК в законном этическом тесте на проникновение, потому что нам не нужен провод Ethernet.
Способ подключения Kali Linux к беспроводной сети
Цель этой статьи — показать, как разрешить и остановить Wi-Fi в Kali Linux. Это можно сделать через графический интерфейс или командную строку, и в этом руководстве мы научим вас, как это сделать.
Это пригодится, если у вас возникли проблемы с доступом к беспроводному маршрутизатору или вы собираетесь использовать Aircrack-ng для мониторинга и взлома WiFi.
Способ 1
Первый способ связан с реализацией терминала Kali Linux. Запустите терминал и введите IP-адрес, чтобы увидеть метку вашего WiFi-адаптера и сведения о подключении, а также предположим, что вы уже подключены к сети Wi-Fi.
Идентификатор нашего WiFi-соединения в этом примере — eth0. Введите следующую прикрепленную команду, чтобы отключить соединение WiFi.
$ sudo ifconfig eth0 down
Введите следующую команду, чтобы перезагрузить устройство и активировать Wi-Fi. Затем мы также запускаем команду «IP a», чтобы увидеть, работает ли ссылка.
$ sudo ifconfig eth0 up
Способ 2
Программа Network Manager Text User Interface (nmtui) предоставляет вам текстовый интерфейс для работы с Network Manager и настройки вашей сети Kali Linux. Поскольку инструмент nmtui управляет Network Manager, мы должны сначала убедиться, что служба NetworkManager присутствует в нашей системе Kali Linux.
Выполните указанную ниже инструкцию на терминале Kali Linux.
Как только выполнение вышеперечисленной команды завершится, в вашем окне kali Linux появится графический пользовательский интерфейс, который покажет эти три параметра:
- Редактировать соединение
- Активировать соединение
- Установить имя хоста системы
Нажмите «ОК» после выбора «Активировать соединение».
Как только вы выберете опцию «Активировать соединение», вы увидите другой экран. Отсюда вы можете построить беспроводную сеть.
Заключение
Эта статья научила нас, как разрешать и ограничивать Wi-Fi в Kali Linux с помощью графического интерфейса и командной строки. Если ваш компьютер не подключается к сети Wi-Fi или не имеет доступа к Интернету, используйте это как средство устранения неполадок. Я надеюсь, что вам будет легко следовать этой статье в вашей системе Kali Linux.
Если вы нашли ошибку, пожалуйста, выделите фрагмент текста и нажмите Ctrl+Enter.
4 285 просмотров
Кали Линукс (Kali Linux) — это известный дистрибутив операционной системы Linux, специально разработанный для тестирования безопасности и взлома. Он предлагает широкий набор инструментов для анализа и проникновения в сети. Однако, несмотря на мощные возможности этой операционной системы, некоторые пользователи сталкиваются с проблемами при подключении Kali Linux к Wi-Fi.
Одной из наиболее распространенных проблем является отсутствие видимости Wi-Fi сетей в списке доступных соединений. Это может быть вызвано несколькими причинами, включая неправильную настройку сетевых адаптеров или отсутствие драйверов для Wi-Fi чипсета. Для решения этой проблемы необходимо правильно настроить сетевые настройки и убедиться, что установлены необходимые драйверы.
Еще одной распространенной проблемой является невозможность установить соединение с Wi-Fi сетью, несмотря на то, что сеть отображается в списке доступных соединений. Это может быть связано с неправильными настройками безопасности сети, такими как неправильно введенный пароль или использование неподдерживаемой шифровки. Для решения этой проблемы необходимо проверить правильность ввода пароля и убедиться, что все настройки безопасности сети соответствуют требованиям Wi-Fi адаптера.
Важно заметить, что большинство проблем с подключением Kali Linux к Wi-Fi связаны с некорректными настройками или отсутствием необходимых драйверов. Пользуясь этими решениями, вы сможете насладиться всеми возможностями Kali Linux в вашей беспроводной сети.
Итак, в этой статье мы рассмотрим некоторые из наиболее распространенных проблем с подключением Kali Linux к Wi-Fi и предложим возможные решения. Если вы столкнулись с проблемами при настройке или использовании своего Wi-Fi соединения в Kali Linux, наши советы помогут вам в нахождении решения и продолжении работы со всеми инструментами этой мощной операционной системы.
Содержание
- Причины неработающего Wi-Fi на Kali Linux
- Как решить проблемы с подключением Wi-Fi в Kali Linux
- Дополнительные советы по настройке Wi-Fi в Kali Linux
Несколько причин, почему у вас может возникнуть проблема с подключением Wi-Fi на Kali Linux:
- Отсутствие драйверов: одной из основных причин проблем с Wi-Fi на Kali Linux является отсутствие подходящего драйвера для вашего Wi-Fi адаптера. Важно установить драйвер, совместимый с вашим адаптером, чтобы обеспечить правильную работу Wi-Fi.
- Неправильные настройки адаптера: некоторые разделы конфигурации адаптера могут быть неправильно настроены, что может привести к проблемам с подключением Wi-Fi. Убедитесь, что настройки вашего адаптера соответствуют правильным значениям.
- Конфликты с другими программами: некоторые программы или сервисы на вашей системе могут приводить к конфликтам с Wi-Fi на Kali Linux. Проверьте, нет ли конфликтующих программ, и при необходимости временно отключите их.
- Проблемы с сетью: проблемы с Wi-Fi могут также быть связаны с сетью, с которой вы пытаетесь подключиться. Убедитесь, что Wi-Fi сеть функционирует правильно и отсутствуют проблемы с маршрутизатором или другими устройствами сети.
Если вы столкнулись с неработающим Wi-Fi на Kali Linux, близкое изучение этих причин может помочь вам устранить проблему и восстановить подключение к Wi-Fi. Важно учесть, что каждая ситуация может быть уникальной, поэтому необходимо провести дополнительные исследования в соответствии с вашей конкретной проблемой.
Как решить проблемы с подключением Wi-Fi в Kali Linux
Вот несколько шагов, которые могут помочь в решении проблемы:
1. Проверить наличие драйверов: Убедитесь, что ваша сетевая карта поддерживается Kali Linux и имеет соответствующие драйверы. Вы можете проверить список совместимого оборудования и драйверов на официальном сайте Kali Linux.
2. Обновить систему: Убедитесь, что ваша система Kali Linux обновлена до последней версии. Для этого можно использовать команды «apt update» и «apt upgrade». Это поможет устранить возможные ошибки и проблемы в системе.
3. Проверить настройки сети: Убедитесь, что настройки сети и протоколы Wi-Fi настроены правильно. Вы можете воспользоваться командой «iwconfig» для просмотра информации о вашем беспроводном устройстве и текущих настройках сети. Также можно проверить файл настроек сети «/etc/network/interfaces» на наличие ошибок.
4. Перезагрузить сетевой интерфейс: Иногда проблемы с Wi-Fi могут решиться простым перезагрузкой сетевого интерфейса. Для этого можно использовать команду «ifdown» для отключения интерфейса и «ifup» для его включения снова.
5. Проверить пароль Wi-Fi: Если вы используете защищенную Wi-Fi сеть, убедитесь, что вы правильно вводите пароль. Проверьте, что ни одна клавиша не залипает, и что пароль содержит правильные символы и регистр.
6. Проверить DNS-настройки: Проблемы с подключением Wi-Fi могут возникать из-за неправильных настроек DNS. Вы можете проверить файл «/etc/resolv.conf» на наличие правильных DNS-серверов. Если они неправильные или отсутствуют, вы можете вручную добавить соответствующие DNS-серверы.
Если ни один из этих шагов не помог в решении проблемы, вам может потребоваться провести дополнительные исследования или обратиться за помощью к специалисту.
Дополнительные советы по настройке Wi-Fi в Kali Linux
Если у вас возникли проблемы с подключением Kali Linux к Wi-Fi, вот несколько дополнительных советов, которые могут помочь решить проблему.
1. Проверьте наличие драйверов: убедитесь, что у вас установлены правильные драйверы для вашего Wi-Fi адаптера. Вы можете проверить это с помощью команды lspci или lsusb, чтобы узнать, какой адаптер у вас установлен, и затем найти соответствующие драйверы для этого адаптера.
2. Установите необходимые пакеты: убедитесь, что у вас установлены все необходимые пакеты для работы с Wi-Fi в Kali Linux. Вы можете установить их с помощью менеджера пакетов apt или apt-get. Некоторые из основных пакетов, которые вам могут понадобиться, включают iw, wpa_supplicant и net-tools.
3. Проверьте настройки Wi-Fi: убедитесь, что настройки Wi-Fi соответствуют вашей сети. Вы можете проверить это с помощью команды ifconfig, чтобы убедиться, что ваш адаптер имеет правильный IP-адрес, и команды iwgetid, чтобы узнать, подключен ли ваш адаптер к правильной сети.
4. Проверьте наличие конфликтующих программ: иногда другие программы могут вызывать проблемы с Wi-Fi в Kali Linux. Убедитесь, что у вас нет других сетевых утилит, которые могут конфликтовать с вашим подключением Wi-Fi.
5. Приоритет сетей: проверьте приоритет сетей в Kali Linux. Если у вас подключено несколько сетей Wi-Fi, убедитесь, что ваша сеть имеет более высокий приоритет, чем другие сети. Это можно сделать с помощью инструмента nm-connection-editor.
С помощью этих советов вы можете решить большинство проблем с подключением Wi-Fi в Kali Linux и настроить свое подключение для лучшей производительности и безопасности.
To connect to the Internet and access the public network, one of the most common methods is to connect to WiFi, in different environments installed on popular Linux distributions, the way to activate WiFi is different. WiFi can be enabled and disabled both through the desktop environment and through the command line in popular Linux distributions. Most famous Linux distributions have GNOME and KDE desktop environments by default, also applying specific settings in graphical environments is naturally easier than making changes in the terminal environment, and you can easily enable and disable WiFi in graphical environments.
Activating WiFi using the command line is not too difficult, and by the way, in some Linux distributions, it is very simple to apply settings in the graphical user interface. Especially since today scripts are programmed to enable and disable WiFi to make it easier for Linux users to change their settings.
In this article, for your guidance, we will teach you how to enable and disable WiFi in Kali Linux, one of the modern and attractive Linux distributions, you have already familiarized yourself with Kali Linux, through the desktop environment and the command line. So you can freely use the method that is easier for you to apply your changes. If you want to enable or disable WiFi on Kali Linux, follow the instructions below.
prerequisite
Kali Linux is an excellent distribution in that we have presented how to install Kali Linux in previous tutorials. In this article, we are going to teach how to “turn on WiFi” in Kali Linux and how to disable it. If you plan to use Kali Linux on the server and access the Internet via WiFi, buy Linux VPS with btc will provide you with this possibility.
Therefore, one of the prerequisites for executing the instructions that we will teach later is a system or server with the Kali Linux operating system. Additionally, you must have root user privileges and log into the Linux system using the Sudo command.
Enable and disable WiFi in Kali Linux via GUI
How to connect to WiFi in KDE, GNOME, and Xfce desktop environments are almost similar to each other. Follow the steps below to enable or disable WiFi in the Kali Linux desktop environment.
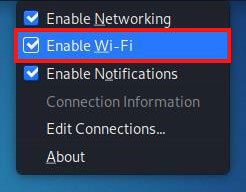
First, find the network icon in the Taskbar, which is located on the right side and at the top of the screen next to the clock icon.
![]()
Then, by right-clicking on the Network icon, if you want to connect to WiFi, select “Enable Wi-Fi” among the options.
If you want to disable the WiFi connection, check the Disable WiFi option.
After the WiFi adapter is activated, single-click on the Network icon and select the WiFi you want to connect from among the available WiFi networks.
By selecting the desired WiFi network, a window will open asking for the password to connect to the WiFi network. After entering the password, click on the “connect” button to complete the process. Then, by clicking on the Network icon, you will have access to the WiFi network and the Internet.
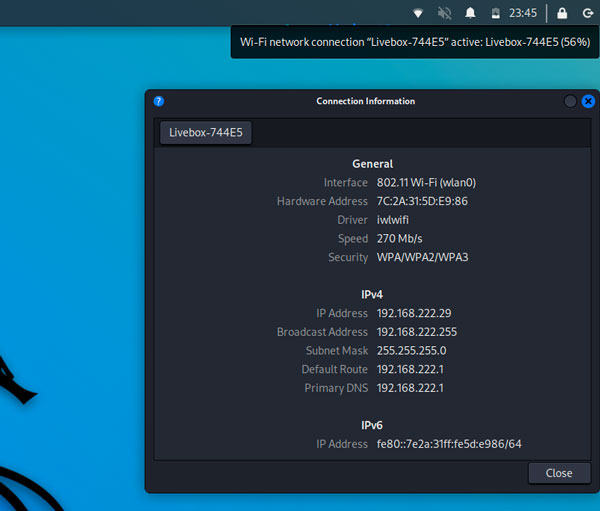
To view connection details, after connecting to WiFi, right-click on the Network icon from the menu of the Network icon, select “Connection Information” and view information about the WiFi network and your connections.
Enable and disable WiFi Networking in Kali Linux through the terminal
You can use different commands to connect to the desired WiFi in Kali Linux. We will teach different methods about connect to wifi in kali using command line.
-
Connect to WiFi network through iwlist
The first step to connect to a network in the terminal environment is to scan and identify available networks. Running the iwlist command can help you in this regard:
iwlist wlan0 scan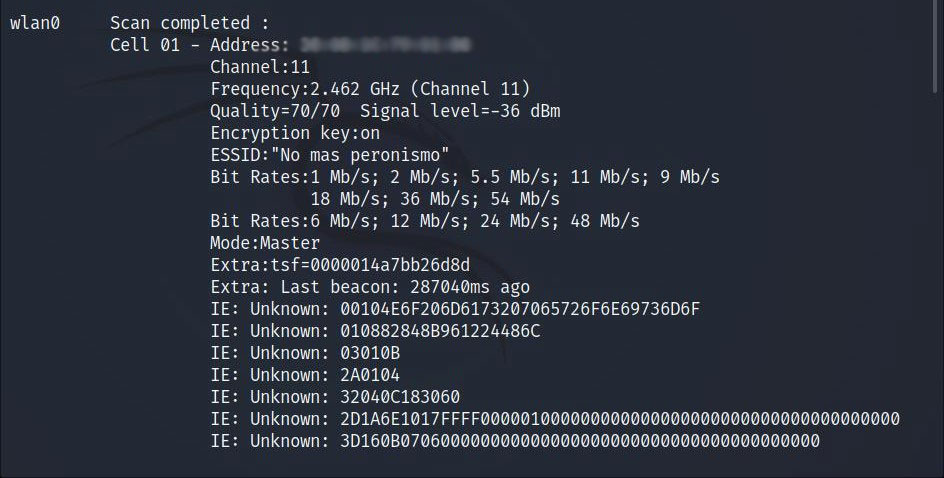
Available networks are displayed in the output, to connect to the desired network, you can use the grep command to get a more useful output and connect to the desired network more easily. In this tutorial, we are going to access the ESSID (Extended Service Set Identifier) network, for this reason, use the following command to provide the output of ESSID networks:
iwlist wlan0 scan | grep ESSID
After you identify the networks and access the network you want to connect to, you can connect to it using various commands.
1. Connect Kali Linux to WiFi via nmcli command
To control NetworkManager and connect to the network, using the nmcli command is a simple and practical method. To run the nmcli command, you need to enter the network name and password in the following format:
nmcli d wifi connect [The desired network name ] password [The desired network password]By executing the above command, you will be connected to the desired network. If you need help about the nmcli command, you can refer to its man page .
2. Connect to WiFi in Kali Linux via nmtui command
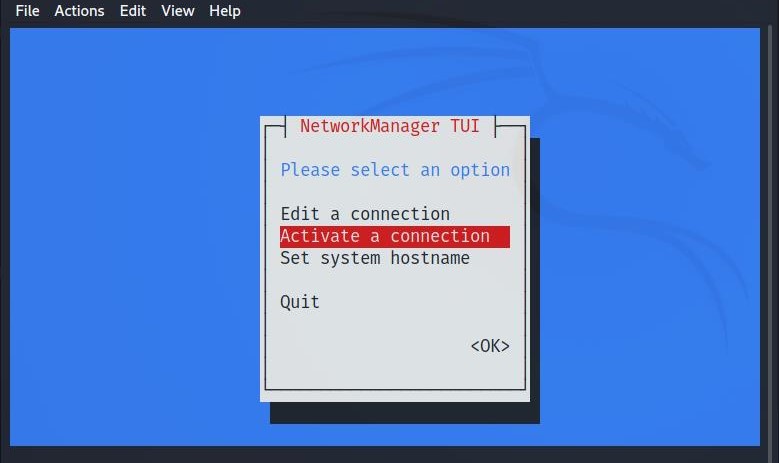
The nmtui command, like the nmcli command, provides the ability to control NetworkManager. To connect to the desired WiFi network, type the following command:
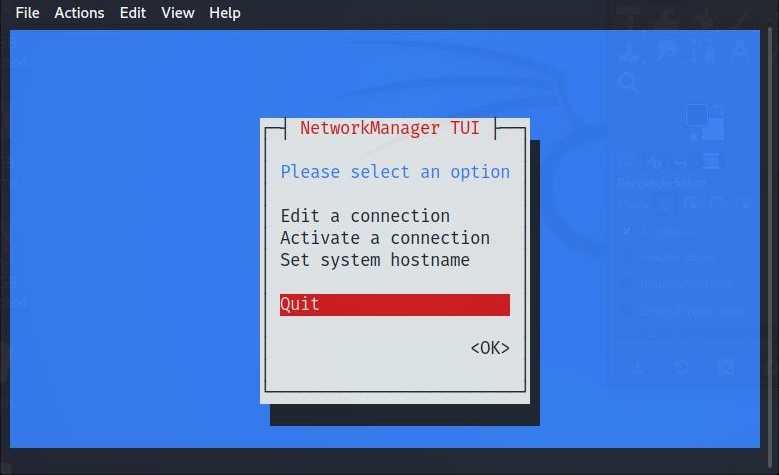
nmtuiAfter running the above command, the menu you see in the image below will be displayed for you, you must select the “Activate a connection” option using the keyboard and then press the Enter button.
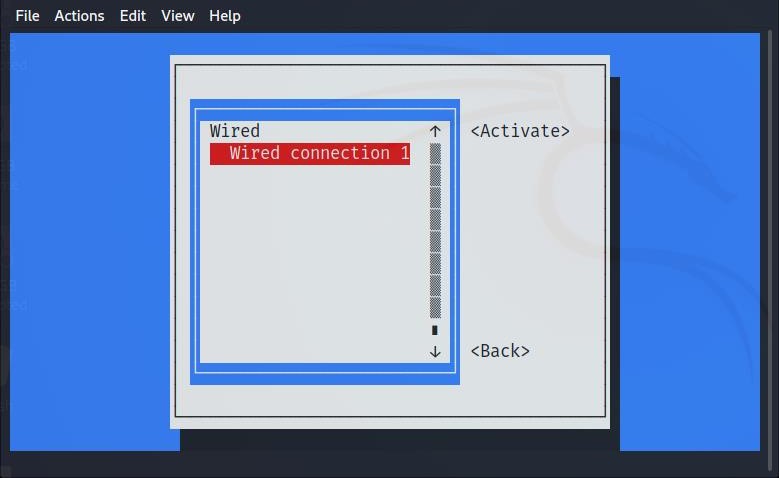
In the menu that will be displayed again, you will see the available networks, select the desired option using the keyboard and then press Enter.
To connect, it is enough to have access to the Internet in advance, and finally, you must now have access to the WiFi network you want.
After connecting to the desired network, select the Back option and then press Enter.
To exit the nmtui command prompt, select Quit and press Enter.
-
Connect to the WiFi network through the ip command
Another way to connect to a WiFi network is to use the ip command. To access the desired WiFi adapter name and connection details (if you were already connected to a network), enter the following command in the terminal environment:
$ ip aIf you want to disable your WiFi connection, run the following command:
$ sudo ip link set dev [name of desired WiFi ] downAlso, to enable WiFi by Backupping your desired adapter run the following command:
$ sudo ip link set dev [name of desired WiFi ] upYou can run theip a command again to check the WiFi connection.
Troubleshooting command for when Wifi device drivers are not detected
In Kali Linux, this problem is not common, but if you encounter this issue, you can use the following command to troubleshoot:
sudo apt install kali-linux-wirelessOf course, this problem may be related to the failure of your wireless card, so it is better to identify your network device name first so that you can make the necessary settings:
iwconfigAfter identifying the name of your network device, run the following command:
ifconfig [wireless card name ] upDisabling Wifi Adapter may be one of the reasons why you cannot see the wireless device and available networks in the list. To enable the Wifi Adapter in Kali Linux, enter the Kali Linux terminal environment and execute the following command:
sudo ifconfig wlan0 upBy running the previous command, you should access a list of available networks, otherwise, it is better to restart the Kali Linux operating system.
The WiFi adapter is used when connecting to the WiFi network, so in the same way, we explained earlier, you must enable the Kali Linux Wifi and enter the password of the Wifi network and connect to the desired network. It should be noted that usually when Kali Linux is used in virtual environments, not recognizing the wireless adapter is one of the common concerns that using an external adapter can solve your problem.
Of course, if executing the command we provided and restarting the Kali Linux system does not affect activating your WiFi adapter, consider using an external adapter as one of the solutions. Although the use of Kali Linux in virtual environments does not require a wireless adapter, if you are using a physical system, enabling the wireless adapter can be an important factor in improving WiFi performance.
Why is Kali Linux Enable WiFi not showing
One of the problems that Kali Linux users may face is the failure to show Enable WiFi in Kali Linux. This problem arises based on different software and hardware configuration of users’ systems, but some solutions can solve this problem.
To solve this problem, while the Kali Linux system uses the internal WiFi adapter, you need to identify the driver that the adapter uses. For this purpose, enter the following command:
lspci -nnk | grep -iA2 netBy running the previous command, you will get complete information about the network adapters on your Kali Linux system. After knowing the desired adapter, you must run themodprobecommand to load the desired driver.
For example, if the ath9k_htc drive is used for the adapter, the command you must run to load the desired drive will be as follows:
modprobe ath9k_htcAfter executing the previous command, your problem should be solved and you can access a list of enabled WiFi networks. If your problem is not solved, you can solve your problem by installing the firmware-Atheros package, which provides firmware for Atheros-based wireless adapters.
FAQ
The most common reason for not connecting is related to the incorrect configuration of network drives or not installing them, but if your hardware is working properly, the reason can be that the network drives are not updated. You must click on the shell button on the bottom right side of the screen and find and update the desired software by typing «software and updates» in the search bar.
Nmcli is a command that allows you to control NetworkManager and provides information about the network status, so run the following command to scan WiFi networks:
nmcli dev wifiConclusion
In this article, you learned how to connect to a WiFi wireless network through the graphical environment and the command line of your Kali Linux operating system. The advantage of Linux is that it offers users different methods to apply settings, you can use both the graphical method, which is a simple method for the desired settings and the command line method to connect to WiFi.
Learning the command line method can be useful for you in different situations, especially in this tutorial, this method for connecting to WiFi is similar in most Linux distributions. Also, by connecting to WiFi using the terminal environment, you can easily troubleshoot and solve problems such as lack of connection. Usually, the command line method can work better on servers.
Thank you for choosing our article to read.
Kubuntovod, я ввёл команду
вот что показало:
Кликните здесь для просмотра всего текста
Код
[ 1187.932932] usb 7-4: new high-speed USB device number 5 using ehci-pci
[ 1188.089811] usb 7-4: New USB device found, idVendor=2357, idProduct=010c, bcdDevice= 0.00
[ 1188.089817] usb 7-4: New USB device strings: Mfr=1, Product=2, SerialNumber=3
[ 1188.089820] usb 7-4: Product: 802.11n NIC
[ 1188.089823] usb 7-4: Manufacturer: Realtek
[ 1188.089826] usb 7-4: SerialNumber: 00E04C0001
[ 1188.090430] Chip Version Info: CHIP_8188E_Normal_Chip_TSMC_D_CUT_1T1R_RomVer(0)
[ 1188.182221] r8188eu 7-4:1.0: firmware: direct-loading firmware rtlwifi/rtl8188eufw.bin
[ 1188.943817] R8188EU: indicate disassoc
через 2 секунды:
Кликните здесь для просмотра всего текста
Код
[ 1188.089817] usb 7-4: New USB device strings: Mfr=1, Product=2, SerialNumber=3
[ 1188.089820] usb 7-4: Product: 802.11n NIC
[ 1188.089823] usb 7-4: Manufacturer: Realtek
[ 1188.089826] usb 7-4: SerialNumber: 00E04C0001
[ 1188.090430] Chip Version Info: CHIP_8188E_Normal_Chip_TSMC_D_CUT_1T1R_RomVer(0)
[ 1188.182221] r8188eu 7-4:1.0: firmware: direct-loading firmware rtlwifi/rtl8188eufw.bin
[ 1188.943817] R8188EU: indicate disassoc
[ 1190.904962] R8188EU: assoc success
[ 1190.905529] IPv6: ADDRCONF(NETDEV_CHANGE): wlan0: link becomes ready
Добавлено через 5 минут
Kubuntovod, кстати забыл написать когда создавал тему. До установки кали у меня был линукс минт, так вот в минте всё норм работало. И ещё, я заметил что когда я пытаюсь подключится к wifi на котором стоит пароль, кали не подключается, хотя пароль верный, но если пароля нет, то подключается.
Добавлено через 24 минуты
Kubuntovod, странно, только что я ввёл команды
1) sudo airmon-ng check kill
2) sudo rmmod r8188eu.ko
3) sudo NetworkManager start
Вынул и вставил адаптер, теперь он подключается к wifi с паролем. 
Connecting to a Wi-Fi network on Kali Linux is often an important step, especially if you keep the Ethernet connection free for other purposes (or don’t have other choice). Anyway, whether you try to connect to the Wi-Fi during the installation, via the GUI or in command line, this guide will help you to get connected quickly.
Kali Linux can be connected to a Wi-Fi network by using the SSID and password from one of these interfaces: during the installation, from the desktop interface or by using command lines in a terminal.
Let’s see how to do this in each situation.
Note: I’m explaining here how to connect to your own wireless network, not how to hack another Wi-Fi network. You need the SSID and password before going further, whatever the option you choose.
Kali Linux: Wi-Fi connection during the system installation
Hide your IP address and location with a free VPN:
Try it for free now, companies are paying for you.
1500 servers in 120 countries. It’s free. Forever. No email required.
A network connection is mandatory to install Kali Linux on a computer. If you don’t use a network cable, a Wi-Fi network needs to be configured during the installation.
Wireless card not detected?
Kali Linux is based on Debian, so most wireless adapters should work with it. If you are not using something too new or exotic, your wireless card will be detected and can be used directly.
If you aren’t lucky, you may need to install an additional driver to make it work. In this case, I would recommend completing the installation with a RJ45 cable plugged to your network, and fix the wireless connection later. It will be easier from the full interface rather than doing it during the installation.
Wi-Fi configuration during Kali Linux installation
If you don’t have any network cable connected, a Wi-Fi connection will be asked during the installation of Kali Linux. As most packages are downloaded from the Internet servers, a connection is mandatory.
Here is how to connect to a Wi-Fi network during the installation:
- Start the installation by configure your locales (localization, language, keyboard layout, etc.).
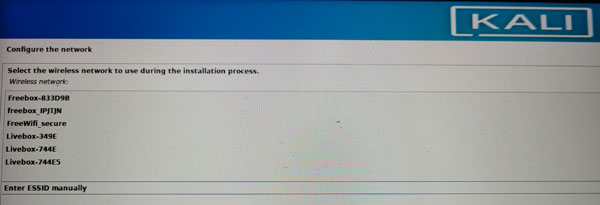
- The wizard will then detect your network configuration, and ask for a Wi-Fi network:

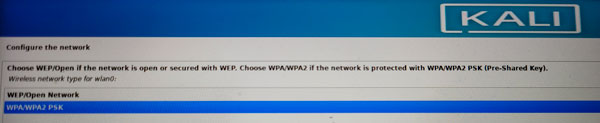
You can pick one in the list, or choose “Enter ESSID manually” if your Wi-Fi network is hidden or not displayed there. - You’ll then have the options to configure it, mostly choose the security options and type the password:

- If everything goes as expected, you’ll be connected to your Wi-Fi network, and the installer will use it to download packages and updates from the Kali Linux servers.
- Once the system installed, you’ll be automatically connected to the same network, nothing more to do after that:

Connect to Wi-Fi via the desktop interface on Kali Linux
The easiest way to connect to a Wi-Fi network on Kali Linux is to use the desktop interface after the installation. XFCE includes various tools and shortcuts to do it quickly and easily.
Quick connection from the top bar
If your wireless adapter is detected, you can quickly connect to your Wi-Fi network by clicking on the network icon in the top panel:

Kali Linux For Beginners
Learn how the good and the bad guys hack!
Learn from the pros how to use Kali Linux easily and quickly.
Learn more
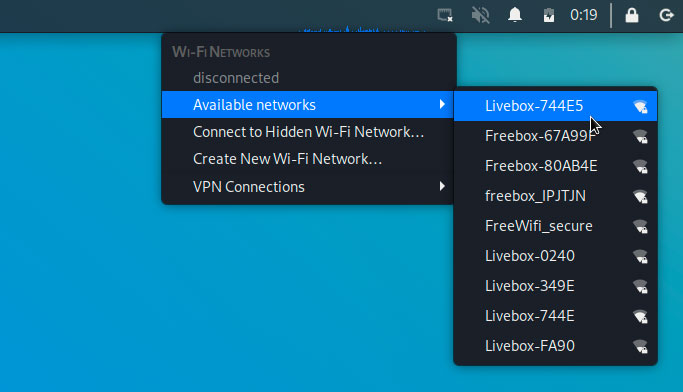
- Click on the network icon in the top-right corner.
It should be a “disconnected” network icon if you don’t have any network configured, or the “connected” alternative if you only have the RJ45 configuration done. - When you click on it, you’ll get the option to choose a network, or connect to a hidden network manually:

- Type your password, and you’ll be connected to it a few seconds later.
That’s it, in most cases it shouldn’t be that complicated.
I understand it might be new for you if you have no experience with Linux, but it’s not different from configuring it on other Linux distributions, the interface is really intuitive.
Advanced settings
If your Wi-Fi setup requires more advanced options, you can open the system settings from the main menu and go to the “Advanced Network Configuration” tool to get more options.
It looks like that:
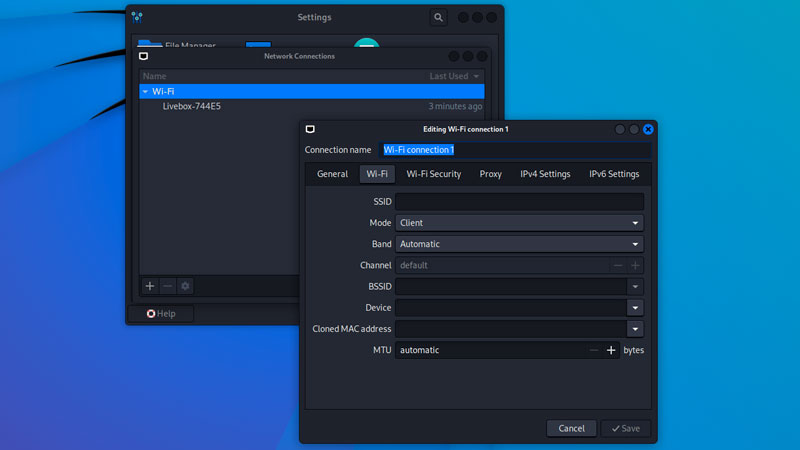
From there, you can either edit an existing configuration, or create a new one, with all the advanced options you might need (channel, MAC address, security, proxy, IP configuration, etc.).
For example, if there is no DHCP on your network, you will need this tool to set your IP address, gateway and DNS server.
Install a wireless driver
As explained earlier, even if Kali Linux comes with the most common wireless drivers, you may have a situation where your hardware is not detected, and you can’t connect directly to a Wi-Fi network. In this case, you’ll need to download and install the driver manually before you can use the Wi-Fi.
A few steps are involved, so I recommend watching this video to understand the idea:
Obviously, it will be slightly different depending on your Wi-Fi adapter manufacturer, but I hope it will help you to understand the procedure, so you can then do your research for your specific needs.
Using the command line to connect to a Wi-Fi network on Kali Linux
If you don’t have other options, it’s still possible to connect to a Wi-Fi network from a terminal on Kali Linux. Just expect to be a little more challenging, but it’s doable by following these steps:
Whatever the option you chose from this tutorial, you should now be connected to your Wi-Fi network, and can now check my other tutorials about Kali Linux on this website :-).
Here are a few suggestions:
- How To Remote Access Kali Linux
- Getting Started With John The Ripper On Kali Linux
- How To Easily Change Hostname On Kali Linux