 Если для работы той или иной программы требуется установка .NET Framework определенной версии, вы легко можете скачать необходимые компоненты с официального сайта Майкрософт, впрочем, и это часто не требуется. Также при установке следует учитывать некоторые нюансы, о которых некоторые начинающие пользователи не знают.
В этой простой инструкции для начинающих о том, как скачать .NET Framework 4.5, 4.6, 4.7, 4.8, 4.0 или 3.5 для x64 и 32-бит версий Windows 11 и 10, Windows 7 и 8.1, а также о некоторых особенностях, о которых полезно знать. На близкую тему: Как скачать распространяемые компоненты Microsoft Visual C++ Redistributable всех версий.
- Загрузка .NET Framework с официального сайта
- Особенности установки
- Видео инструкция
Загрузка установщика .NET Framework с официального сайта Майкрософт
Ранее как веб-установщики, так и оффлайн-установщики .NET Framework были распределены по разным страницам загрузки официального сайта. Теперь все они доступны в рамках одной единственной страницы, загрузка с которой максимально проста:
- Зайдите на официальный сайт https://dotnet.microsoft.com/download/dotnet-framework
- Выберите версию, которую нужно скачать (в разделе Supported versions — поддерживаемые в настоящее время версии .NET Framework, в разделе Out of support versions — старые версии).

- На следующей странице вы увидите две кнопки для быстрой загрузки, а ниже — таблицу, на которой будут представлены веб-установщик, оффлайн установщик и языковые пакеты. А также два варианта .NET Framework — Dev Pack для разработчиков и Runtime для запуска программ пользователями. Я рекомендую скачивать оффлайн-установщик Runtime, если ваша задача — простой запуск программы.

- После скачивания и установки, при необходимости вы также можете скачать и установить русский языковой пакет для установленной версии .NET Framework — ссылки для загрузки будут на той же странице, где производилось скачивание установщика.


При появлении ошибок во время установки, в первую очередь обратите внимание, чтобы в свойствах файла-установщика не была включена блокировка (внизу вкладки «Общие»), а также учитывайте, что, если ранее вы отключали службы обновления Windows, это также может вызывать ошибки.
Особенности установки .NET Framework
А теперь некоторые моменты, которые может быть полезным знать в контексте скачивания и установки .NET Framework:
- Компоненты .NET Framework 4-й версии (4.8) включены в поставку Windows 11 и Windows 10 и задействованы по умолчанию.
- .NET Framework 3.5 и 2.0 можно не скачивать в Windows 11 и 10, достаточно просто включить соответствующий компонент, подробнее: Как включить дополнительные компоненты Windows 11 и Windows 10.

- В части совместимости разных версий .NET Framework ситуация выглядит следующим образом: если программе для запуска требуется .NET Framework 4.5, то она будет работать и с версией 4.8. Если программе для запуска требуется .NET Framework 3.5, то наличия 4-х версий в системе недостаточно: потребуется отдельно установить именно .NET Framework 3.5 (удалять имеющуюся версию 4.8 или иную при этом не требуется).

Видео инструкция
Search code, repositories, users, issues, pull requests…
Provide feedback
Saved searches
Use saved searches to filter your results more quickly
Sign up
To ensure compatibility with older applications, it’s essential to enable DotNet Framework in Windows 11, particularly version 3.5. While these framework versions, 2.0 and 3.5, may be considered outdated, they remain necessary for running programs developed with them. It’s crucial to enable these frameworks to handle potential compatibility issues that might arise on Windows 11.

These outdated programs may require previous versions of the .NET Framework, a set of software libraries developers use to construct Windows apps and services. In many circumstances, your program will install but not run. You may receive a notice informing you that the .NET Framework 2.0 is required (for example). Other times, the app will not launch at all, and you will have no idea why. Kindly refer to this guide for how to enable or disable DotNet Framework (NetFx3) via PowerShell, Control Panel, and DISM in Windows.
Even if you run the program in Compatibility Mode, you may still require the latest version of the .NET Framework. Microsoft has added .NET Framework installation as an optional Windows feature in Windows 11. Here’s how to activate the .NET Framework 3.5, 3.0, and 2.0 on Windows 11.
In addition, there are other related articles you can read about How to install and Update Azure PowerShell on your Windows PC, Enable Secure boot and TPM on HyperV: How to fix “This PC Can’t Run Windows 11” on Hyper V, and how to install Windows Subsystem for Linux on Windows 11 via the Command line, and Microsoft Store.
Using Framework 2.0 and 3.5 on Windows 11
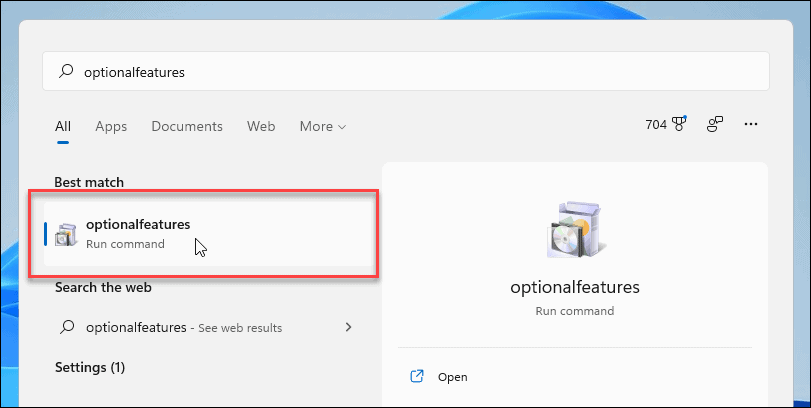
There are several methods for enabling the .NET Framework on your Windows 11 PC, but we’ll start with the simplest. To begin, click the Start button in the Taskbar or use the Windows key on your keyboard to bring up the Start menu. Enter optionalfeatures in the Start menu and choose the first result to open Windows Features dialog box.

Make sure you type optionalfeatures as a single word with no spaces. Don’t select Optional Features (with spaces), as this is something entirely different.
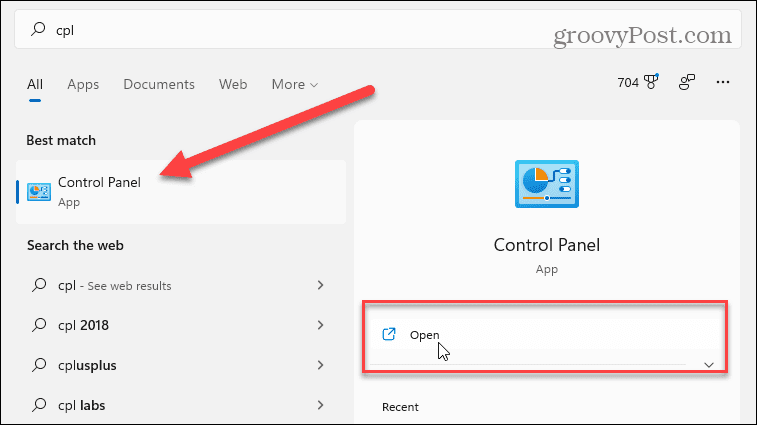
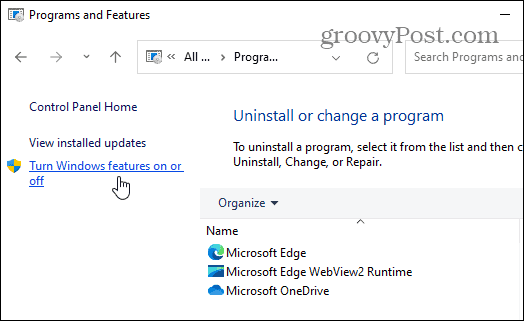
Alternatively, you can open the Windows Features by going to the control panel. Click the Start button in the Taskbar or use the Windows key on your keyboard to bring up the Start menu. Enter ‘cpl’ which opens the control panel. In the Control Panel window, click Programs, then click the ‘Turn Windows features on or off’ under the Programs and Features.

Click Programs, then click the ‘Turn Windows features on or off’ under the Programs and Features.

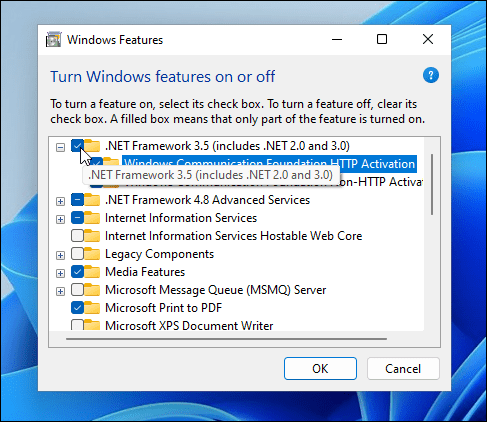
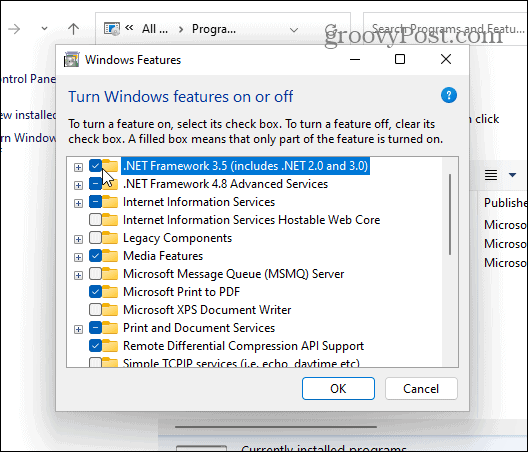
These two processes open up the Windows Features dialog box as shown below. On the Windows Features dialog box click ‘.NET Framework 3.5 (includes .NET 2.0 and 3.0)‘ from the list, and then click OK.

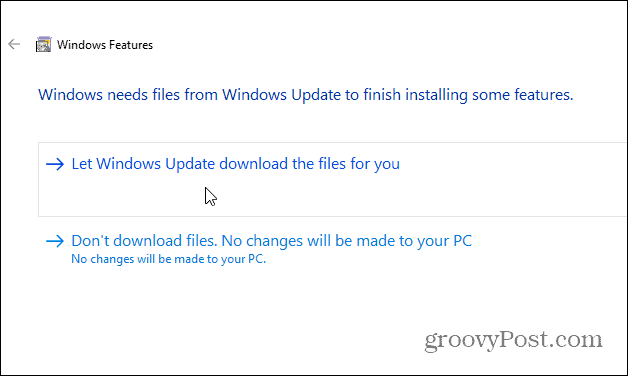
Following that, a box will appear informing you that Windows needs to download files from Windows Update in order to finish the operation. Click ‘Let Windows Update download the files for you’.

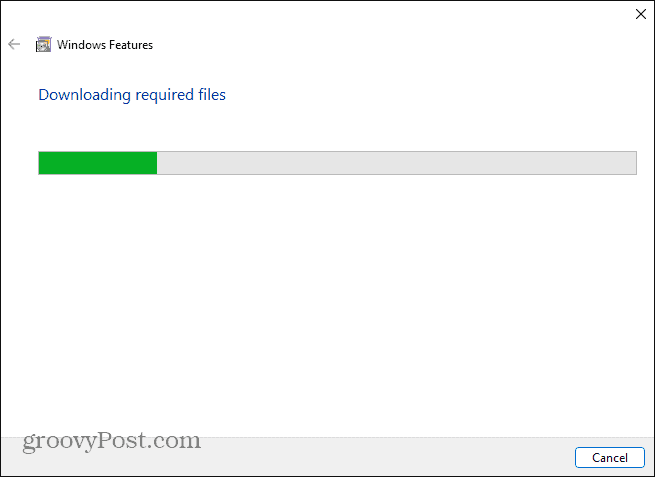
While the essential components are being downloaded and installed, a progress bar will show. Allow time for this to be completed.

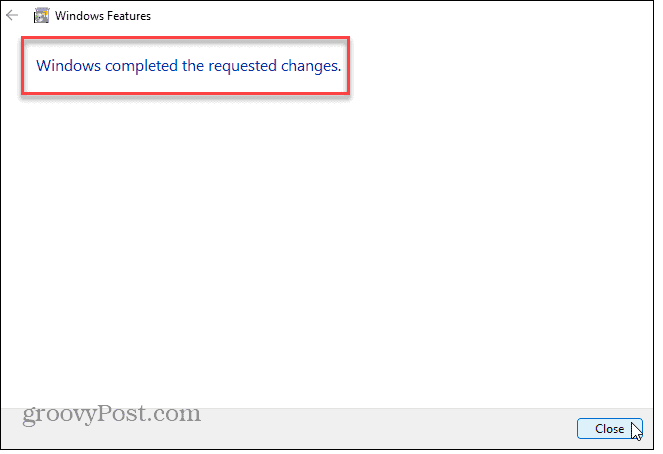
When Windows has finished installing the.NET Framework, you will get a confirmation message (as seen in the screenshot below). To conclude, click the Close button. You should not have to restart your computer, but you may want to do so just in case.

Using Command Prompt
- Click the Windows key to open the start menu and enter ‘cmd‘ to run the Command Prompt as an administrator.

Execute the following command, substituting DriveLetter with the letter for the Windows 11 installation disk (usually drive letter C).
Dism /online /enable-feature /featurename:NetFx3 /All /Source:DriveLetter:\sources\sxs

The .NET Framework 3.5 will now be enabled.
How to Install .NET Framework 3.5 using PowerShell
PowerShell may also be used to install .NET Framework 3.5. It functions similarly to Command Prompt. However, the installation commands are different.
- Search for ‘Windows PowerShell‘ in the start menu and run as administrator.

Enter the following command below.
Enable-WindowsOptionalFeature -Online -FeatureName "NetFx3"
This will download, install, and activate the.NET Framework 3.5 on your computer.
How to Download and install .NET Framework (using web installer)
You may also use an online installer to install.NET Framework 3.5. As a result, an internet connection will still be necessary. Download the web installer by clicking the link below.
When the web installer has been downloaded, right-click it and select Run as administrator. The installation wizard will now launch. Click ‘Download and install this feature.‘

The process will then download and install .NET 3.5 for you. When the wizard is finished, click the close button.
How to install 3.5 Offline
To enable DotNet Framework in Windows, you can also install .NET Framework 3.5 on devices without internet using Command Prompt, sourcing files directly from a Windows 11 ISO image, as described above.
Note: The ISO file must be for the same Windows version on which you are installing .NET; otherwise, mismatched source files might cause the installation to fail or install an incorrect .NET version.
- First, you must mount the Windows 11 ISO file on your PC. If you don’t already have an ISO file, you can get one here. To mount an image, right-click it and select Mount from the menu bar.

To enable DotNet Framework in Windows, once the ISO image is mounted, utilize this command to install .NET Framework 3.5 from the source files, even without an internet connection. Replace “DriverLetter” with the corresponding drive letter of the mounted ISO file.
Dism /online /enable-feature /featurename:NetFx3 /All /Source:DriveLetter:\sources\sxs
If you’re looking to enable DotNet Framework in Windows, I trust you found this blog post useful. If you have any questions, feel free to ask in the comment session below.
Если вы пытаетесь установить Windows Subsystem for Android (WSA) или файлы .apk на Windows 11 и все еще получаете ошибки Framework. В этой статье вы узнаете, как загрузить, установить и включить версии Microsoft Framework на Windows 11. Примечание: это руководство исправит все ошибки отсутствия .NET Framework 2.0, 3.5, 4.5, с которыми вы столкнулись на Windows 11.
.jpg")
Ошибки .NET Framework — это обычные ошибки Windows, которые время от времени встречаются в большинстве версий Windows, включая последнюю версию Windows 11. Эти ошибки бывают разных форм и видов, но наиболее распространенными являются: ошибки отсутствия .NET Framework, за которыми следует код ошибки и отсутствие Framework версий 2.0, 3.5, 4.5 и т.д. На данный момент они чаще всего возникают при попытке установить Windows Subsystem for Android (WSA).
К счастью, исправить любую отсутствующую ошибку .NET Framework очень просто, независимо от версии. Все, что вам нужно сделать, это загрузить недостающую версию, установить ее, а затем включить ее в Windows, чтобы все заработало. Ниже вы найдете все необходимые ссылки на скачивание и шаги для всех этих процессов, поэтому следуйте инструкциям, пока мы ведем вас через весь процесс.
Как исправить ошибки об отсутствии .NET Framework в Windows 11? Установите Microsoft .NET Framework вручную.
Первое и самое важное, что вам нужно сделать, это загрузить и установить отсутствующую платформу .NET Framework на свой компьютер. Вы можете найти отсутствующую версию Framework в сообщении об ошибке. Как только вы узнаете, какая именно версия вам нужна, загрузите ее по одной из официальных ссылок Microsoft ниже. Если вашей версии нет в списке, вы сможете легко найти ее с помощью поиска Google.
Скачать Microsoft .NET Framework 4.5
Скачать Microsoft .NET Framework 4.0
Скачать Microsoft .NET Framework 3.5
Загрузить Microsoft .NET Framework 3.0
Как только необходимая версия .NET Framework будет загружена на ваш компьютере, дважды щелкните по ней и установите ее так же, как и любую другую программу. После установки выполните перезагрузку системы, а затем перейдите к следующему шагу. Убедитесь, что .NET Framework включен в Windows 11.
Как включить .NET Framework в Windows 11? Включение .NET Framework в Windows 11.
Теперь, когда вы установили необходимые компоненты .NET Framework на свой компьютер, вы можете убедиться, что они включены, выполнив следующие действия.
Откройте меню «Пуск» и найдите пункт Панель управления\Все элементы панели управления\Программы и компоненты\Включение или отключение компонентов Windows
Теперь, когда у вас открыто меню Включение или отключение компонентов Windows, найдите записи .NET Framework, которые нужно включить, и убедитесь, что флажок отмечен синим цветом (включен).
Наконец, нажмите OK, и ваша система будет автоматически обновлена. Чаще всего необходимо включить только последнюю версию.

Теперь вы можете закрыть все открытые окна, выполнить перезагрузку, и все сообщения об ошибках, которые вы получали ранее, должны исчезнуть.
If you are running an older app on Windows 11, it might ask for .NET Framework 2.0 or 3.5. Here’s how to install the older .NET Framework on your Windows 11 PC.
On Windows 11, there might be times where older programs and apps won’t run. These older apps might require older versions of the .NET Framework to work, a set of software libraries that developers use to create Windows apps and services.
In many cases, your app might install, but it won’t launch. You may see a message letting you know that .NET Framework 2.0 is required (for example). Other times, the app won’t open at all, and you won’t know why.
Even if you run the app in Compatibility Mode, you might still need the correct version of the .NET Framework installed. Here’s how to enable .NET Framework 3.5, 3.0, and 2.0 on Windows 11.
Here’s an example of a program that needs .NET Framework 3.5 to run on Windows.
There are a couple of different ways you can enable the .NET Framework on your Windows 11 PC, but we’ll look at the easiest first.
To start, press the Start button from the Taskbar or hit the Windows key on your keyboard to open the Start menu. In the Start menu, type: optionalfeatures and click the top result.
Note: Make sure you’re typing optionalfeatures as one word with no spaces. Don’t click Optional Features (with spaces), as this is something entirely different.
After clicking optionalfeatures, the Windows Features settings window will open up. This is where you can turn various features on or off on your Windows 11 PC.
From the list, click to enable “.NET Framework (includes .NET 2.0 and 3.0)” and then click OK.
Next, a screen will pop up showing you that Windows needs to download files from Windows Update to complete the process. Click Let Windows Update download the files for you to begin.
You’ll see a progress bar appear while the necessary components are downloaded and installed. Allow time for this to complete.
Once Windows has installed the .NET Framework, you’ll see a confirmation message (as seen in the screenshot below).
Click the Close button to finish. You shouldn’t need to restart your PC, but you may want to, just in case.
Use Control Panel to Install .NET Framework
If the steps above don’t work, you can use the classic Control Panel to activate the .NET Framework on your PC.
To do this, press the Windows key on your keyboard or press the Start button on the taskbar. In the Start menu, type: cpl before clicking the top Control Panel result.
In the Control Panel window, scroll down and click Programs and Features.

Next, click Turn Windows features on or off on the left.
This opens the same Windows Features dialog box, where you can turn Windows features on or off.
Click on the “.NET Framework 3.5 (includes .NET 2.0 and 3.0)” check box, then click OK and follow the onscreen instructions.
Using Older Apps on Windows 11
Enabling older versions of the .NET Framework on Windows 11 is a straightforward process—as long as you know where to look. Once you’ve followed the steps above, you can then start using older apps on your PC without switching to an older version of Windows.
For more on Windows 11, check out our article on uninstalling apps or how to hide ‘Most Used’ apps on the Start menu. And if you’re on Windows 10, take a look at enabling .NET Framework on Windows 10 or 8.1.
![]()