 |
Категория: | Виртуальные машины |
| Поддерживаемые ОС: | Windows 7 | |
| Разрядность: | 32 bit, 64 bit, x32, x64 | |
| Для устройств: | Компьютер | |
| Язык интерфейса: | на Русском | |
| Версия: | Последняя | |
| Разработчик: | Oracle |
Достаточно просто скачать VirtualBox для Windows 7 хоть операционная система больше не поддерживается производителем, тем не менее, дистрибутивы все еще можно достать, многие этим пользуются, ведь программа была одной из лучших в свое время. Применение достаточно широко — от тестирования каких-либо программ до включения устаревших на данный момент приложений. В том числе применяется виртуальная машина Virtual Box для «семерки».
Virtualbox для Windows 7 на компьютер
Виртуал Бокс — это инструмент администратора или программиста, которому необходимо протестировать новую конфигурацию системы либо написанный код, но не хочется подвергать риску работающую и функциональную сеть либо собственный компьютер. Virtual Box позволяет создать «виртуальную машину», то есть компьютер с полным набором возможностей, начиная от операционной системы, заканчивая мощностью, объемом жесткого диска, настройками памяти и графики. В операционной системе Виндовс 7 была полностью реализована эта возможность, также можно создать «семерку» под современным компьютером с «десяткой».
Virtual Box существует во всех версиях Виндовс и поставляется в комплекте с основной операционной системой. Обычно она не «показывает» себя, поскольку инструмент достаточно специфический, но его возможности всегда можно активировать, если найти по поиску. Для поиска лучше всего воспользоваться запросом Oracle — именно эта компания поставляет соответствующий продукт для пользователей. После вызова программы она предложит назвать систему каким-либо именем, а дальше выделить ресурсы имеющейся системы под виртуальный компьютер.
VirtualBox для версий windows:
|
|
Возможности и преимущества VirtualBox
Виртуальные машины

Снимки состояния

Простые настройки

Легкий обмен файлами

Скачать Virtualbox для Windows 7 бесплатно
| Приложение | OS | Распаковщик | Формат | Версия | Загрузка |
|---|---|---|---|---|---|
| VirtualBox | Windows 7 | OpenBox | x32 | Бесплатно (на русском) |
Скачать ↓ |
| VirtualBox | Windows 7 | OpenBox | x64 | Бесплатно (на русском) |
Скачать ↓ |
| VirtualBox | Windows 7 | OpenBox | x32 — x64 | Бесплатно (на русском) |
Скачать ↓ |
Как установить Virtualbox для windows 7:
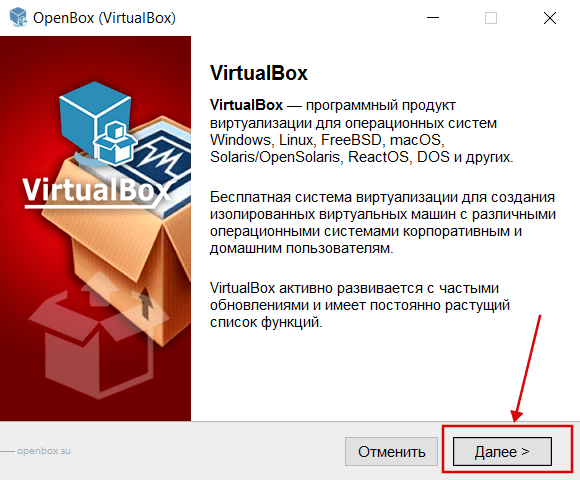
Запустите файл.

Ознакомьтесь с информацией и нажмите «Далее».
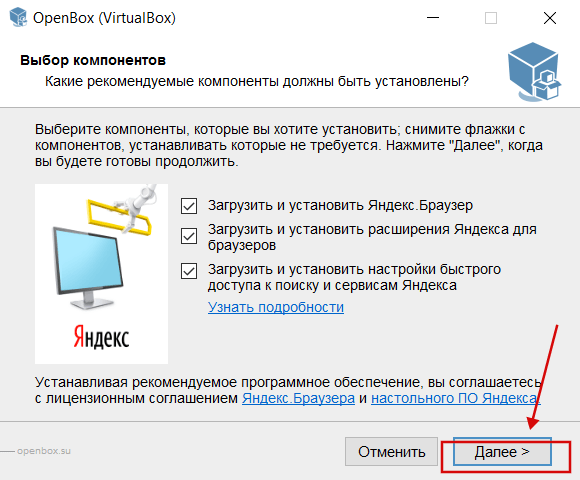
Нажмите «Далее», или снимите галочки с рекомендуемого ПО и нажмите «Далее». Если снять все галочки, рекомендуемое ПО не установится!
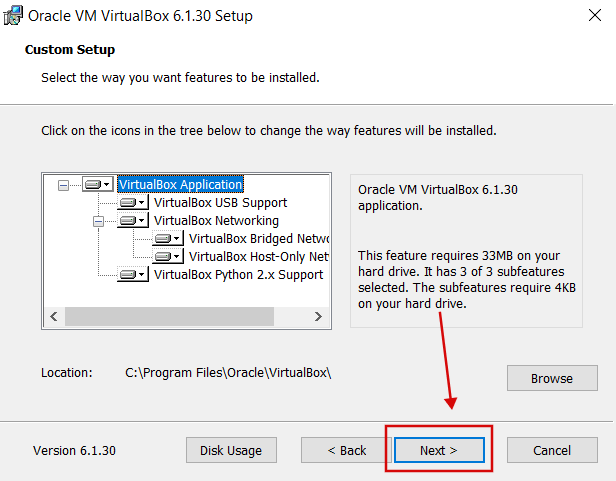
Не смотря на то что установка на английском сама программа будет на русском.
Разумеется, используются ресурсы физической машины, поэтому на виртуальную нельзя «поставить» больше, чем есть у основного компьютера. Здесь как раз и может пригодиться «семерка», ведь она гораздо менее требовательная к ресурсам, чем любая из более новых операционных систем от компании Microsoft. Большинство программ и настроек, совместимых с Виндовс 7, будет успешно работать и на «старших» версиях. В дальнейшем «физическая» и «виртуальная» машины будут общаться между собой посредством сетевого подключения, поэтому такое решение идеально для того, чтобы тестировать и программы, и функции сети.
Search “Windows 7 ISO file” and you will find tons of results. Visit any of them and download Windows 7. Soon you will find either Windows 7 setup files are either broken, corrupted, or infected.
To avoid any of those, you can use the given link below to download Windows 7 ISO for PC and laptop. You can also use Windows 7 ISO for VirtualBox and VMware too. From using Windows 7 for upgrading your system from earlier versions of Windows such as Windows XP to perform a clean installation on a PC, all of them can be done using the setup file of Windows 7.

Windows 7 is a great option for businesses and corporations. While Windows 7 is a great option to perform from basic to advanced work on the other hand the extended support for Windows 7 has been ended too.
Microsoft Windows 7 reached its end of life on January 14, 2020. Only reason now users are using Windows 7 is cause they are installing it on older hardware or want to perform virtualization.
While both of them require product keys for installation. Product keys can be accessed from retail stores or from sites online. Whereas downloading ISO files is quite a challenge, as you might get infected files with the system files of Windows 7.
Why should you download from us?
A few years ago, users who had Windows 7 product keys had the option to download the setup of Windows 7 in an ISO file from Microsoft’s official page.
However; now you can’t even download the ISO file from the official Microsoft page. The only way to get Windows 7 is to get it from third-party sites. While they provide the ISO files for free, you might also get:
- Corrupt Windows 7 system files.
- There is the possibility that the system files of Windows 7 can be missing.
- The setup file of Windows 7 can be infected by viruses, malware, or spyware.
So, use the links to download Windows 7; create a bootable USB, upgrade your Windows, perform a clean installation, or do virtualization. Or you can also Dual Boot Windows 11 and Windows 7
Windows 7 ISO Free Download for VirtualBox

Use a great OS with low spec requirements. Here you will use the direct link to download the original untouched ISO file full version of Windows 7. It is the offline installer of Windows 7 that can be used on 32-bit systems and 64-bit systems.
Microsoft Windows 7 was the successor of Windows XP and was later succeeded by Windows 8.1. The OS is great in terms of stability and performance. And on installing the OS, you will get tons of powerful tools.
The OS comes in different editions each for a specific purpose. So, here are all the editions of Windows 7 with links to download them too.
Related: Free Download Windows XP ISO for VirtualBox

Windows 7 Starter
The most basic edition of Windows 7. This edition was for users with low-spec PC. It was available for 32-bit CPU architectures PC only and was for basic uses. The edition lacked tons of features but was the most affordable edition of Windows 7.

Windows 7 Home Basic
Home basic was for home users. It was the edition with multi-media support. This edition of Windows 7 has an Aero theme with Aero visual graphic support. Windows has all the basic features and tools needed for a day-to-day user.

Windows 7 Home Premium
In Windows 7 Home Premium, you will find all the entertainment tools. Home Premium also has an Aero theme but also a clear glassy look. In this edition of Windows 7, Microsoft also added the Media Center too.

Windows 7 Professional
Professional edition was released for small businesses. This edition of Windows had all the networking tools required for a business. As a comparison to Home Premium, you will find Professional improved in terms of performance and number of features.

Windows 7 Enterprise
You will find Enterprise more appealing as compared to previous editions. This edition was released for large companies and organizations. It was suitable for both national and international firms. All the tools required for a big company are present in this edition with additional security.

Windows 7 Ultimate
Ultimate editions it the most powerful edition in Windows 7. You will find all the other features present in Ultimate. Features such as Home Group, Jump list, Snap, Windows Search, BitLocker, Windows Defender, Windows Firewall, and much more.
Windows 7 VirtualBox Image Download

Previously on Microsoft’s official site, an Image file of Windows 7 was available. You had the option to download Windows 7 ISO Image for VirtualBox or any other virtual machine.
The ISO IMAGE was provided with “.vbox” extension. Normally you would find them as “setup1.box” or “setup2.box” files.
All work needed was to download it and then directly use it on any Virtual Machine. However; now you won’t find the Windows 7 IMAGE.
And even if I will create one for you, still you can burn it on any device. You can’t create any sort of bootable device. As for just burning the IMAGE file, you will need to perform a great deal of work. Instead, you can download Windows 7 ISO file and use it on your virtual machine.
This way, you have the option to perform virtualization and to make a bootable device too.
How to download Windows 7 ISO Image for VirtualBox for free?
To download Windows 7 ISO Image for VirtualBox, you can visit iTechscreen. Here you can download all ISO Images of Windows, macOS, and Linux. Use the direct link to download Windows 7 ISO Image file for free and there is no need to create any sort of account.
Visit the site, and navigate to Windows 7 ISO. Select your Windows 7 edition and download the ISO file. Get the ISO file for free without any risk of malware, virus, or other threats.

Once you have downloaded the file then you can also use them on VirtualBox. Here are some examples of Windows installed on VirtualBox.
Related: How to Install Windows 11 on VirtualBox?
Related: How to install Windows 10 on VirtualBox?
Requirement for installing Windows 7
If you are having a VirtualBox then I am quite sure that you have all the specs to run Windows 7. However; these are the required minimum specs to run Windows 7 on any system.
- 1 GHz of Processor or above
- 32-bit or 64-bit supported processor
- 15 Gb Hard Disk Space for 32 bit or 20GB Space for 64bit
- DirectX 9 Graphics to use Windows Aero Feature
Use the downloaded Windows 7 ISO to create a bootable USB
Yes, you can use the downloaded Windows 7 file to create a bootable USB. Once you have created a bootable USB, then you can use it to perform a clean installation or to upgrade your system.
Is it legal to download Windows 7?
You can download Windows 7 setup file without any issue. However; you will need to purchase product keys to activate the OS. Using any sort of script file or activator to activate your Windows 7 is totally illegal.
How can I update my Windows 7?
Back in 2020, Windows reached its end of life. This means no more updates for Windows will be provided. The only way to update your Windows is to manually download the updated files. And to download the updated files, you will need to go to the Microsoft Windows catalog.
What is the best version of Windows 7?
In the entire Windows 7 series, Windows 7 Ultimate is probably the best one out there. Ultimate has all the tools and features other Windows editions have. Not only the performance is improved in this edition but the stability is also better. Out of all the Windows 7 editions, you are recommended to use Windwos7 Ultimate.
Where can I download the Genuine ISO file of Windows 7?
To download genuine untouched Windows 7 ISO files, you can visit iTechscreen. Here you can download all versions of Windows files that can be used to upgrade, for a clean installation, or for virtualization purposes. As there is the Windows 7 ISO file for VirtualBox.
Download Windows 7 IMAGE or ISO?
If you are confused between downloading the ISO or Image file of Windows 7 then you are recommended to download the ISO file. As you can perform a clean installation, upgrade your Windows, do virtualization or create a bootable USB with the ISO file. Whereas, Image files can be only used for virtualization only. On other hand to create a bootable device Image will take hours of work.
This article will examine how to set up and use Windows 7 on a new virtual machine using Oracle VM VirtualBox 7.0 on the Windows 11 or 10 operating system.
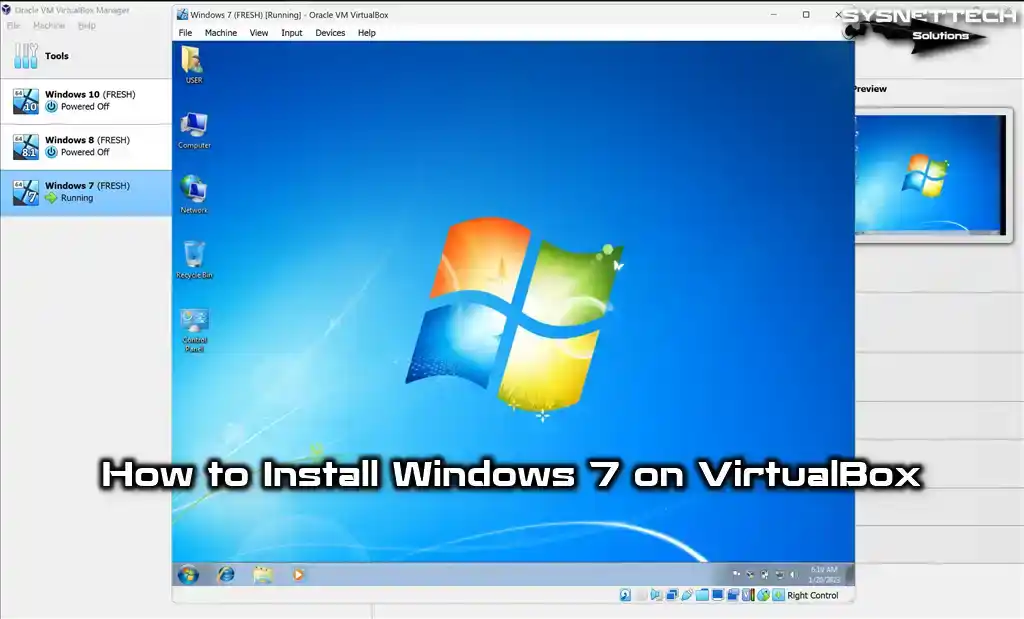
How to Set Up Windows 7 Ultimate 64 Bit on Windows 10/11 using Oracle VM VirtualBox 7
Following the Windows Vista system, Microsoft unveiled Windows 7 on October 22, 2009, catering to personal computers, tablets, media devices, and laptops, focusing on enhancing performance and security.
Windows 7 has Starter, Home Basic, Home Premium, Professional, Enterprise, and Ultimate editions.
This Windows version was developed to deliver an enhanced user experience and improved convenience in the interaction between users and computers. Windows 7 supports processors with fewer cores and 32 Bit and 64 Bit architectures.
Shortly after releasing this operating system, Microsoft promptly issued the Service Pack 1 (SP1) update package to address system vulnerabilities, bugs, and performance issues.
Windows 7 is Microsoft‘s most widely used and favorite operating system today. Today, most companies and individuals still use this version of Windows.
This operating system is almost the smoothest, but Microsoft terminated support for the Windows 7 operating system on January 19, 2015. On the other hand, Extended Support ended entirely on January 14, 2020.
For this explanation, we strongly advise against installing an outdated operating system on your host computer. Instead, we recommend utilizing virtualization software like VMware or VirtualBox to run and experience more aged systems, such as Windows 7, on a virtual machine. This approach ensures a separate and isolated environment for compatibility and security purposes.
How to Create a New Virtual Machine for Windows 7 OS
First, you need to correctly create a virtual computer and configure the performance settings of the devices. Once you have successfully established the Oracle software on your host computer, click its shortcut to launch the program. From there, carefully follow the steps below to create a new virtual machine.
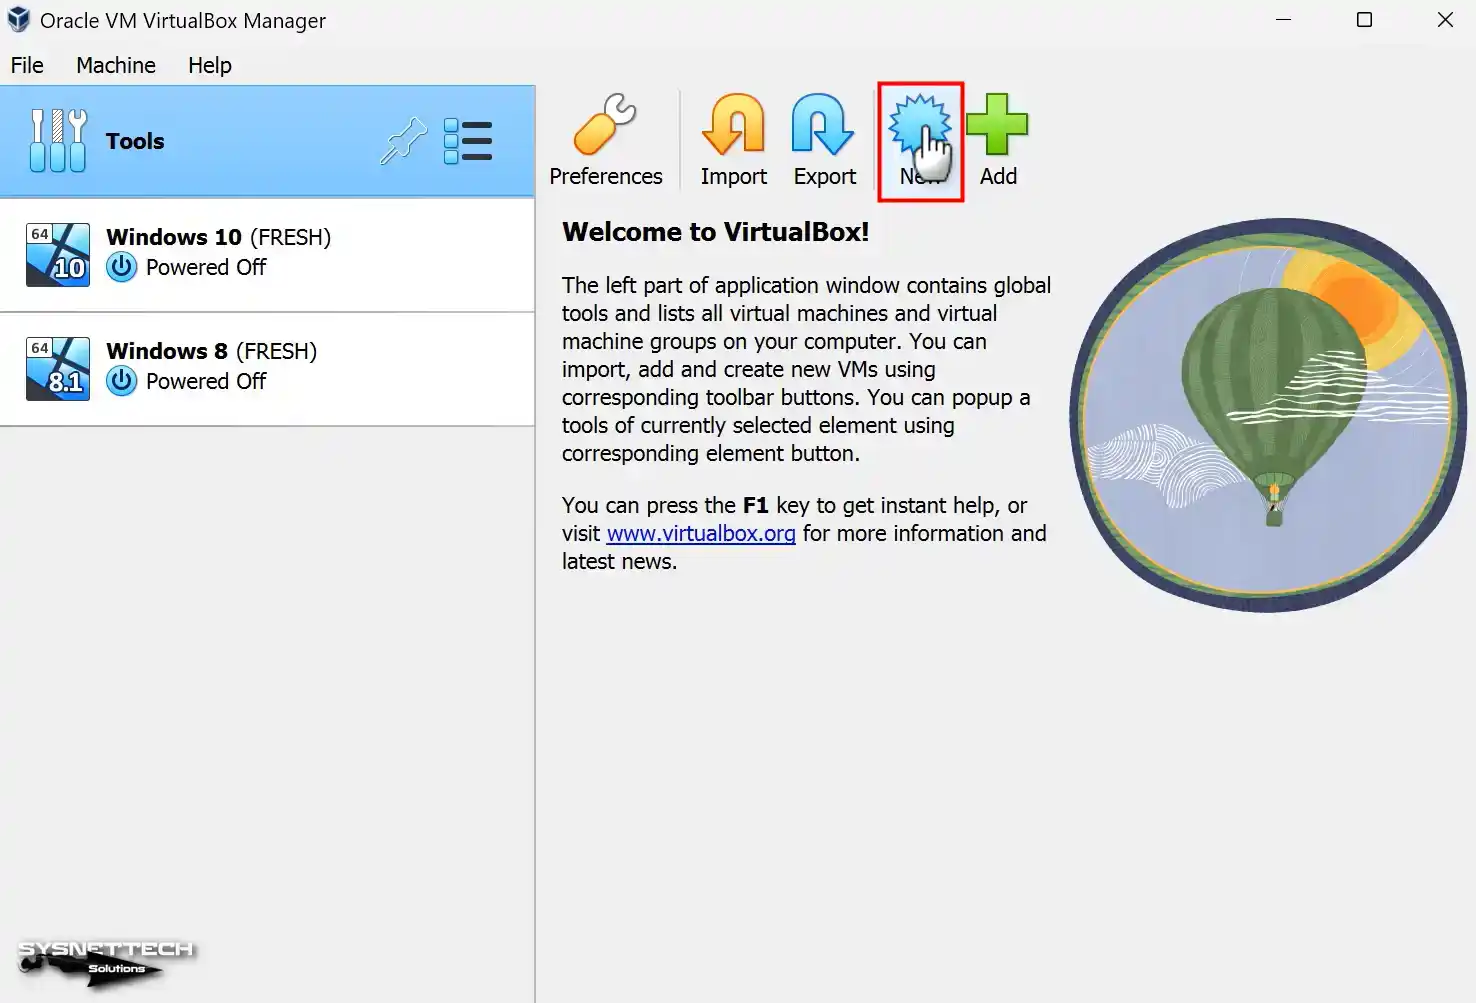
Step 1
After running the virtualization software on your Windows 11 or Windows 10 system, click Machine / New on the program’s main page or click New with the big icon as in the image below.
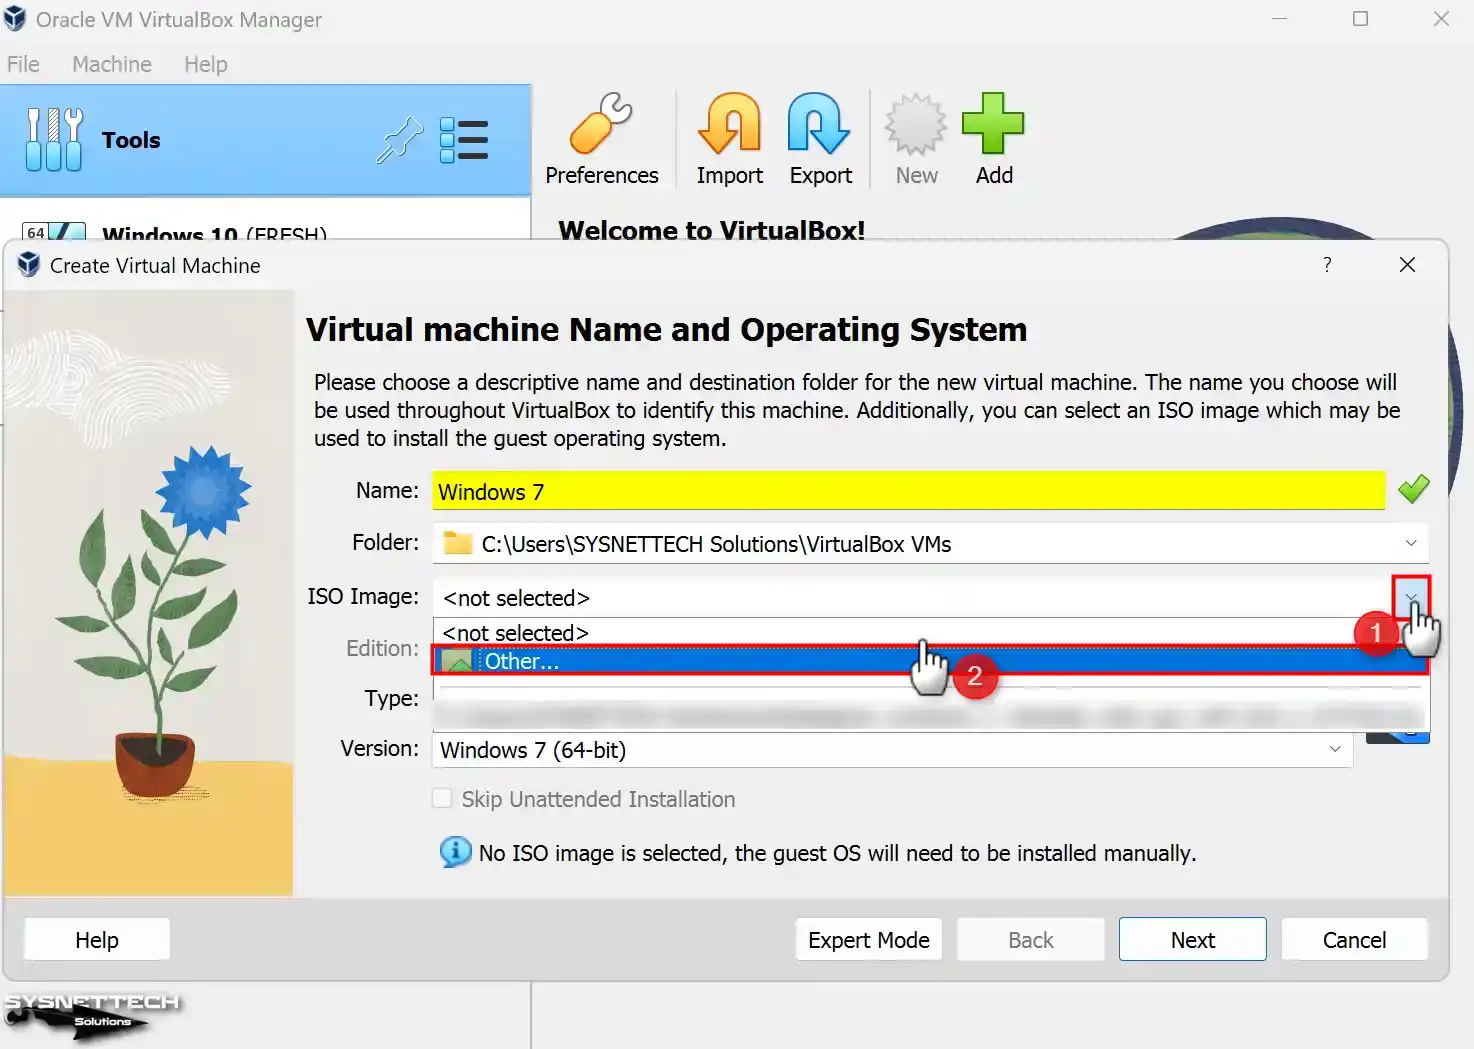
Step 2
When you type the name of the operating system you will install on your Virtual PC in the Name area, VirtualBox will automatically set the Type and Version values. For example, suppose you type Windows 7 in the operating system name. In that case, the version is set to 64 Bit automatically, and if you are going to install 32 Bit, configure the architecture of the system manually.
To add a Windows 7 ISO file to the virtual machine, expand the drop-down menu from the ISO Image section and click Other.
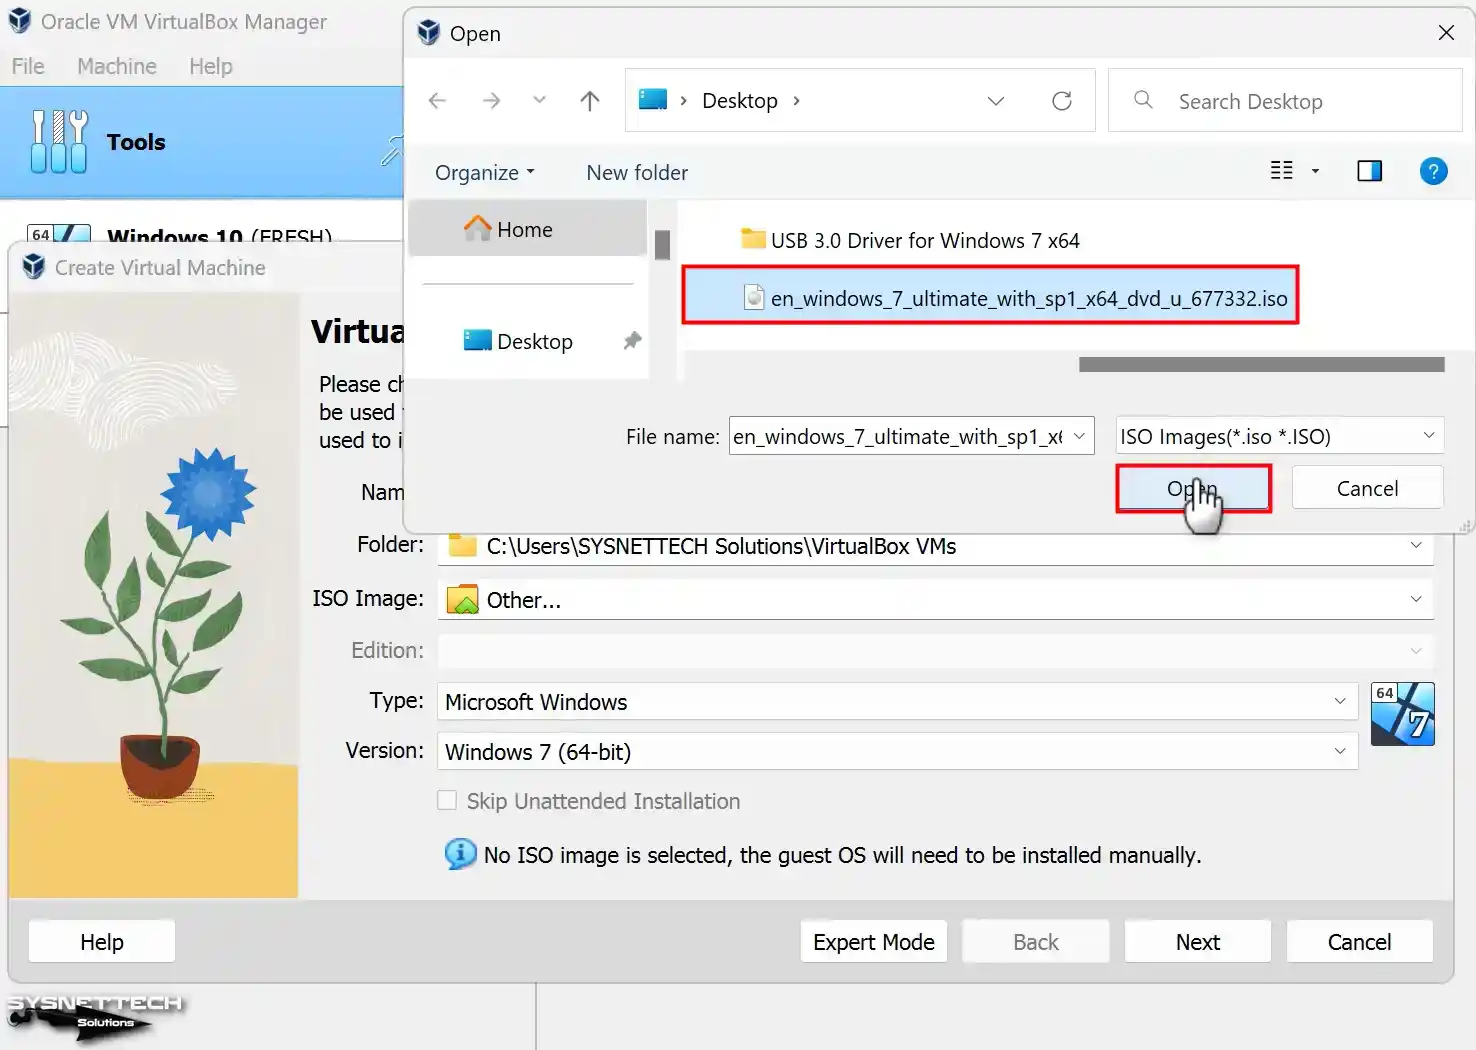
Step 3
Choose the Windows 7 image file you downloaded to your computer from this source in the newly opened window. Once chosen, click the “Open” button to use the file.
Step 4
In VirtualBox’s 7.x versions, you can now use the unattended installation feature to prepare a guest machine with preconfigured settings. However, since preparing a VM with the manual method will be more stable, select the Skip Unattended Installation option and click Next.

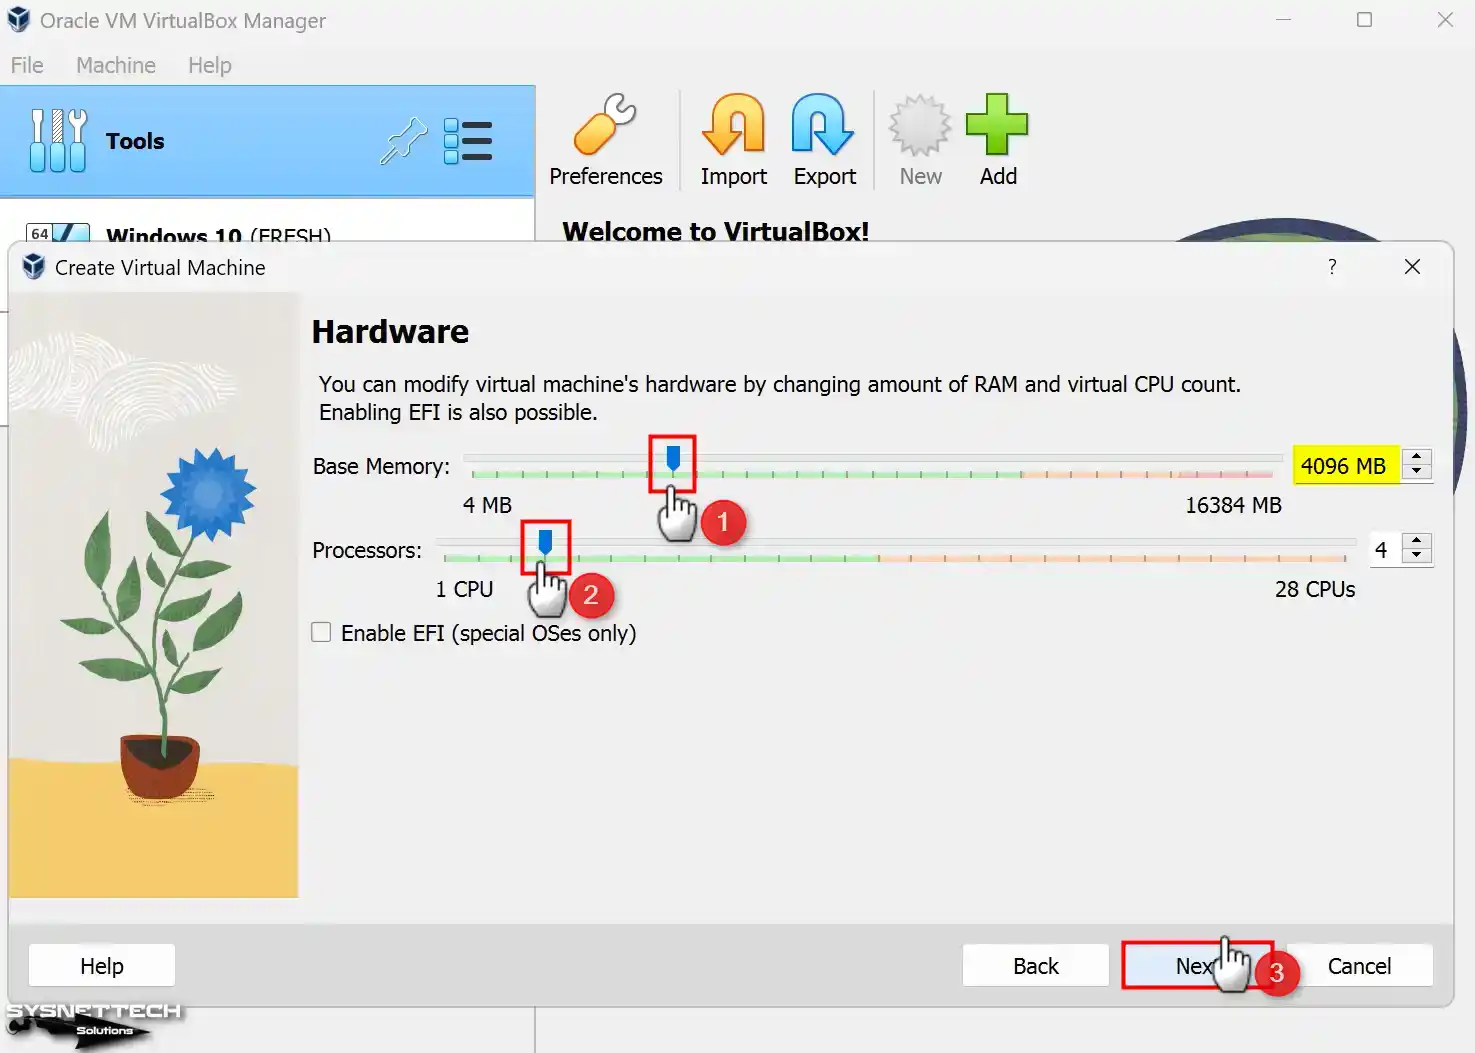
Step 5
For the Memory Size setting, set a suitable value for the Windows 7 VM depending on the RAM capacity of your host computer. Suppose your host computer has a total of 8 GB RAM. In that case, it is advised to configure the allocated memory for the virtual machine to 4 GB, which is acceptable for smooth operation.
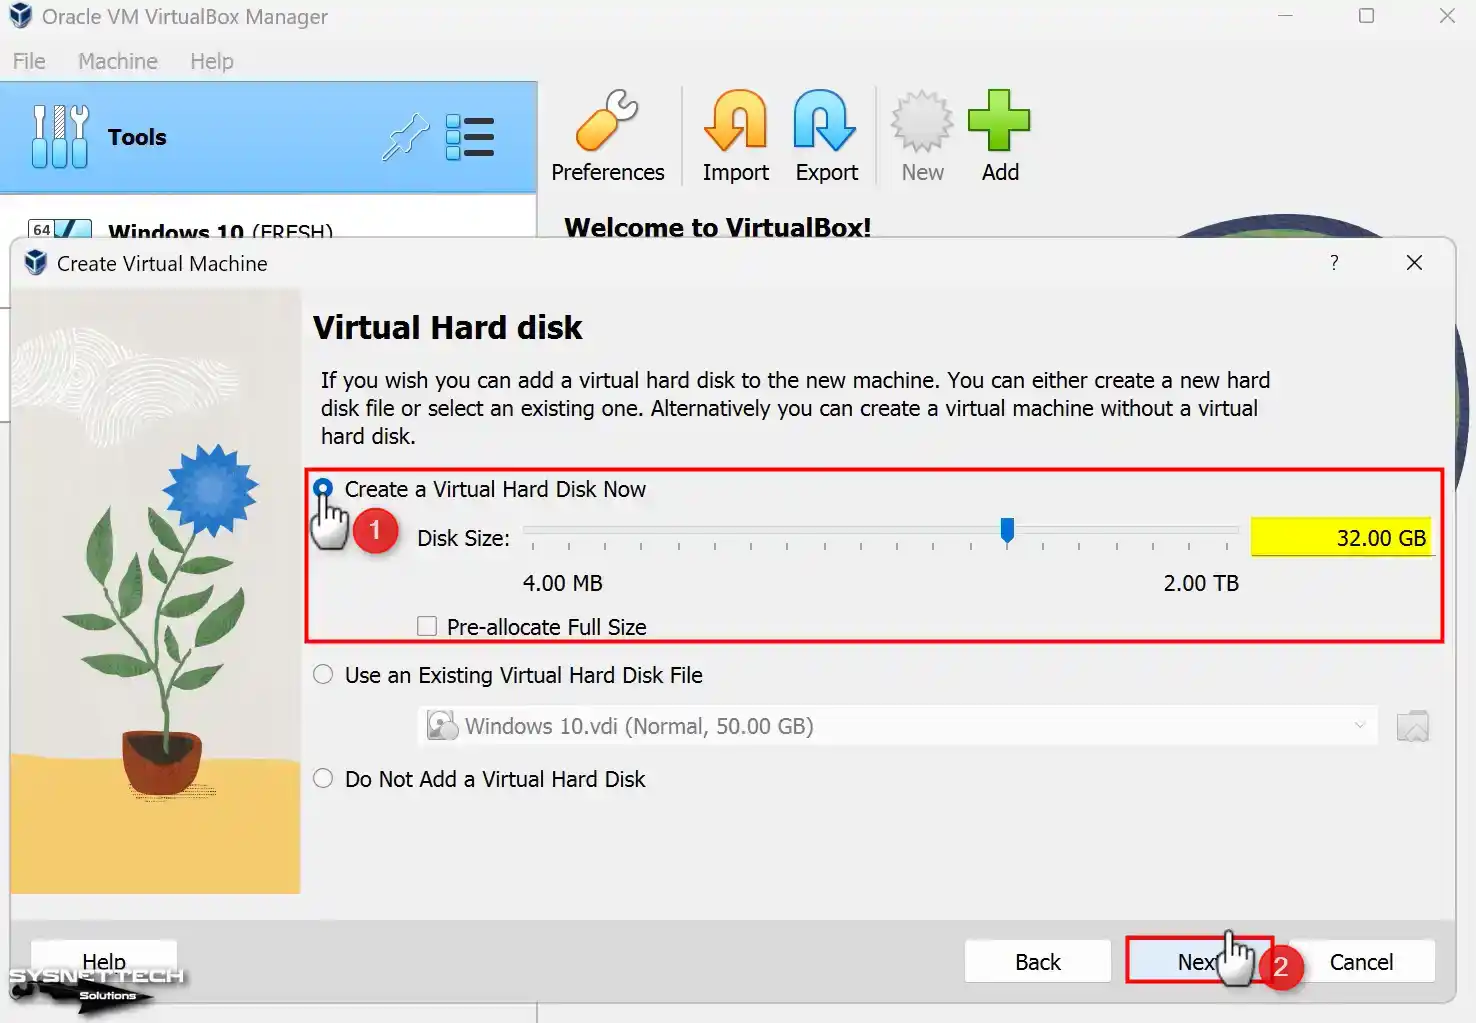
Step 6
Since installing Windows 7 from scratch, you must now select Create a virtual hard disk in the Hard disk configuration window. Suppose you have a VM previously installed with Oracle virtualization software. For that topic, you need to add the virtual HDD of that system with the Use of an existing virtual hard disk file option.
In the 6.x versions of VirtualBox, select VDI (VirtualBox Disk Image) developed by Oracle for the virtual disk type and continue. VHD is used for Microsoft proprietary virtualization software. VMDK is a virtual disk file commonly used by VMware Workstation.
Also, you must select in this window how the virtual disk file will be stored on your physical HDD. Suppose you want to fill the capacity of your host disk sparingly. In that case, you should choose the Dynamically Allocated option. If you have a more aged PC, it is recommended to allocate disk space on your host’s disk equal to the capacity of the virtual disk using the Fixed Size option.
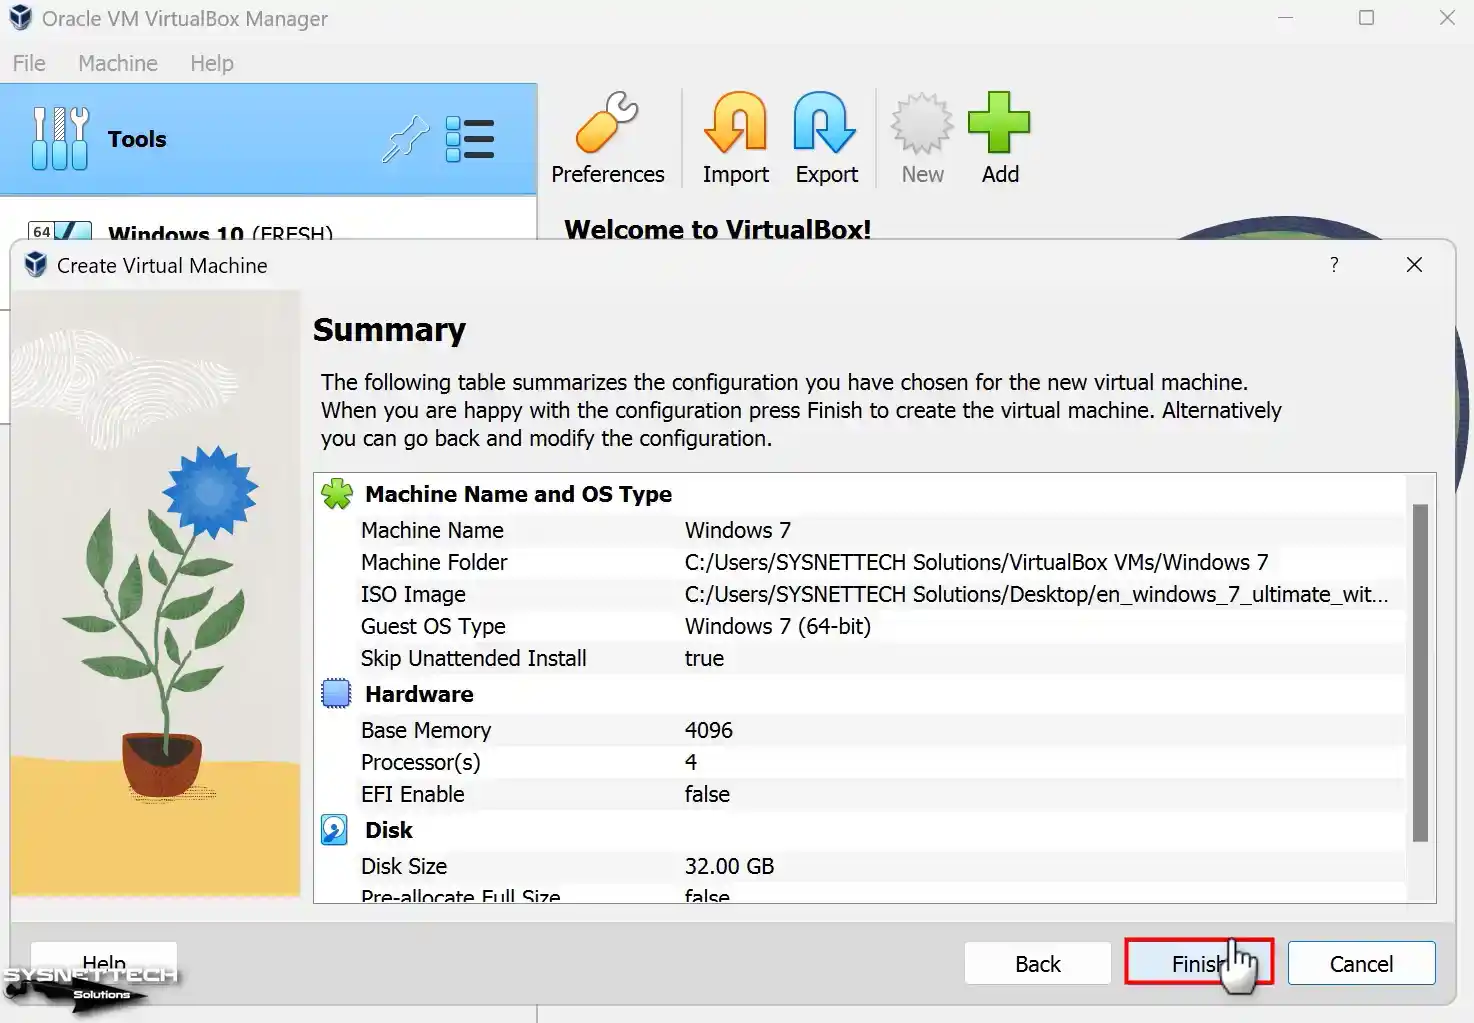
Step 7
Review the hardware settings of the Windows 7 guest machine you have prepared and close the wizard.
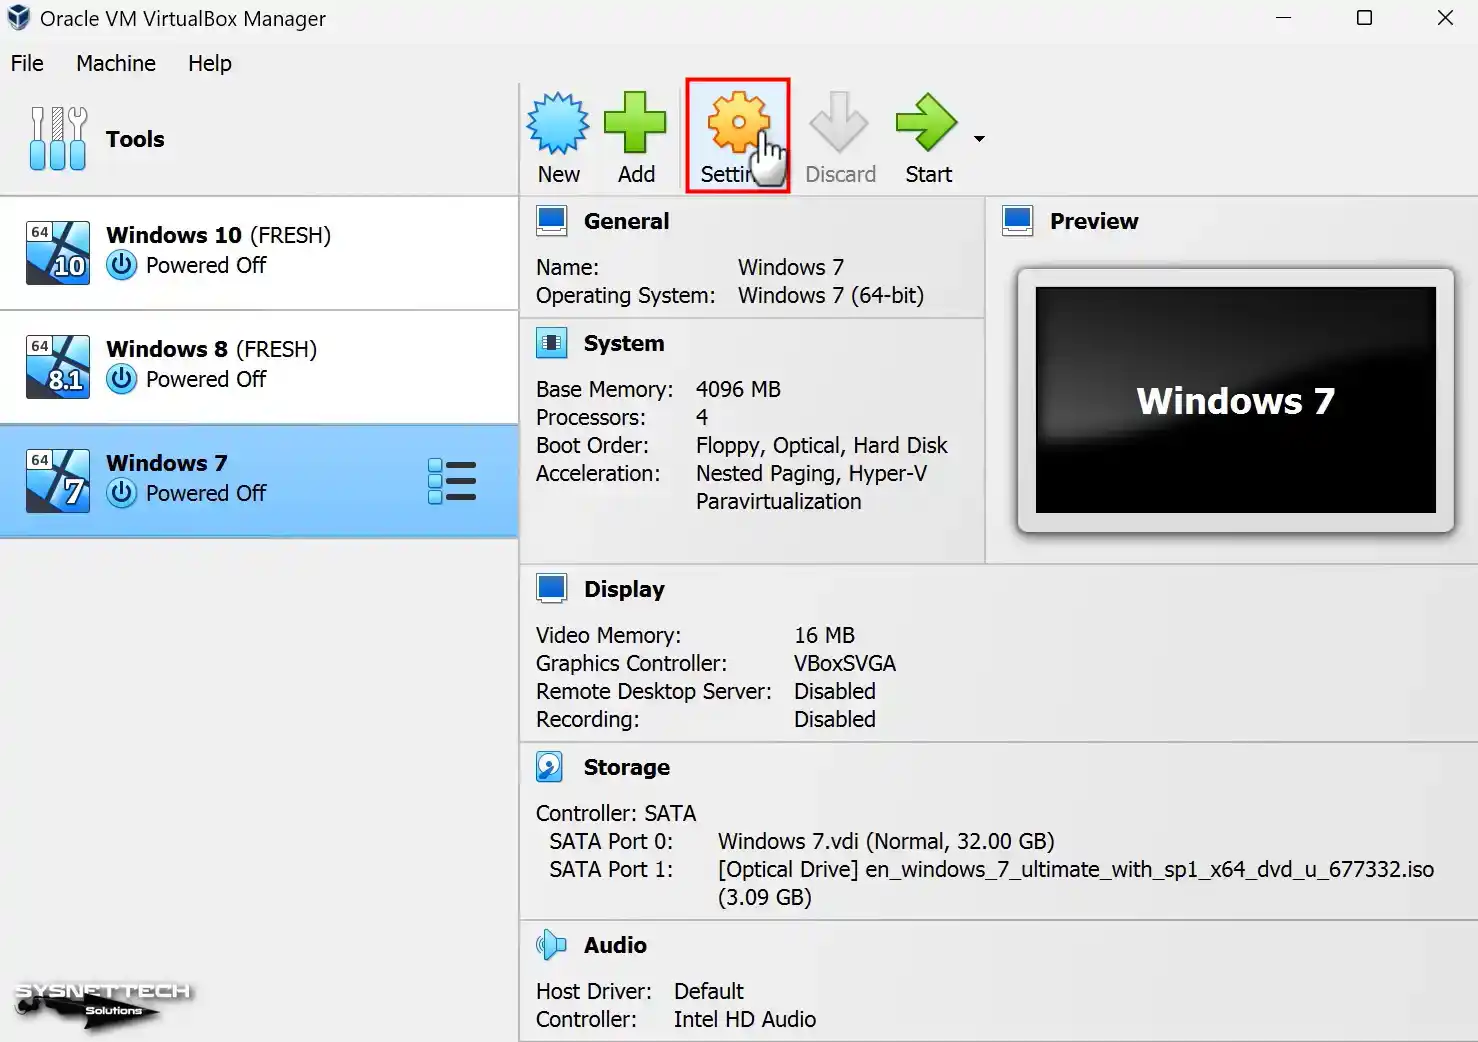
Step 8
Click Settings to configure the settings of the virtual computer you created more professionally.
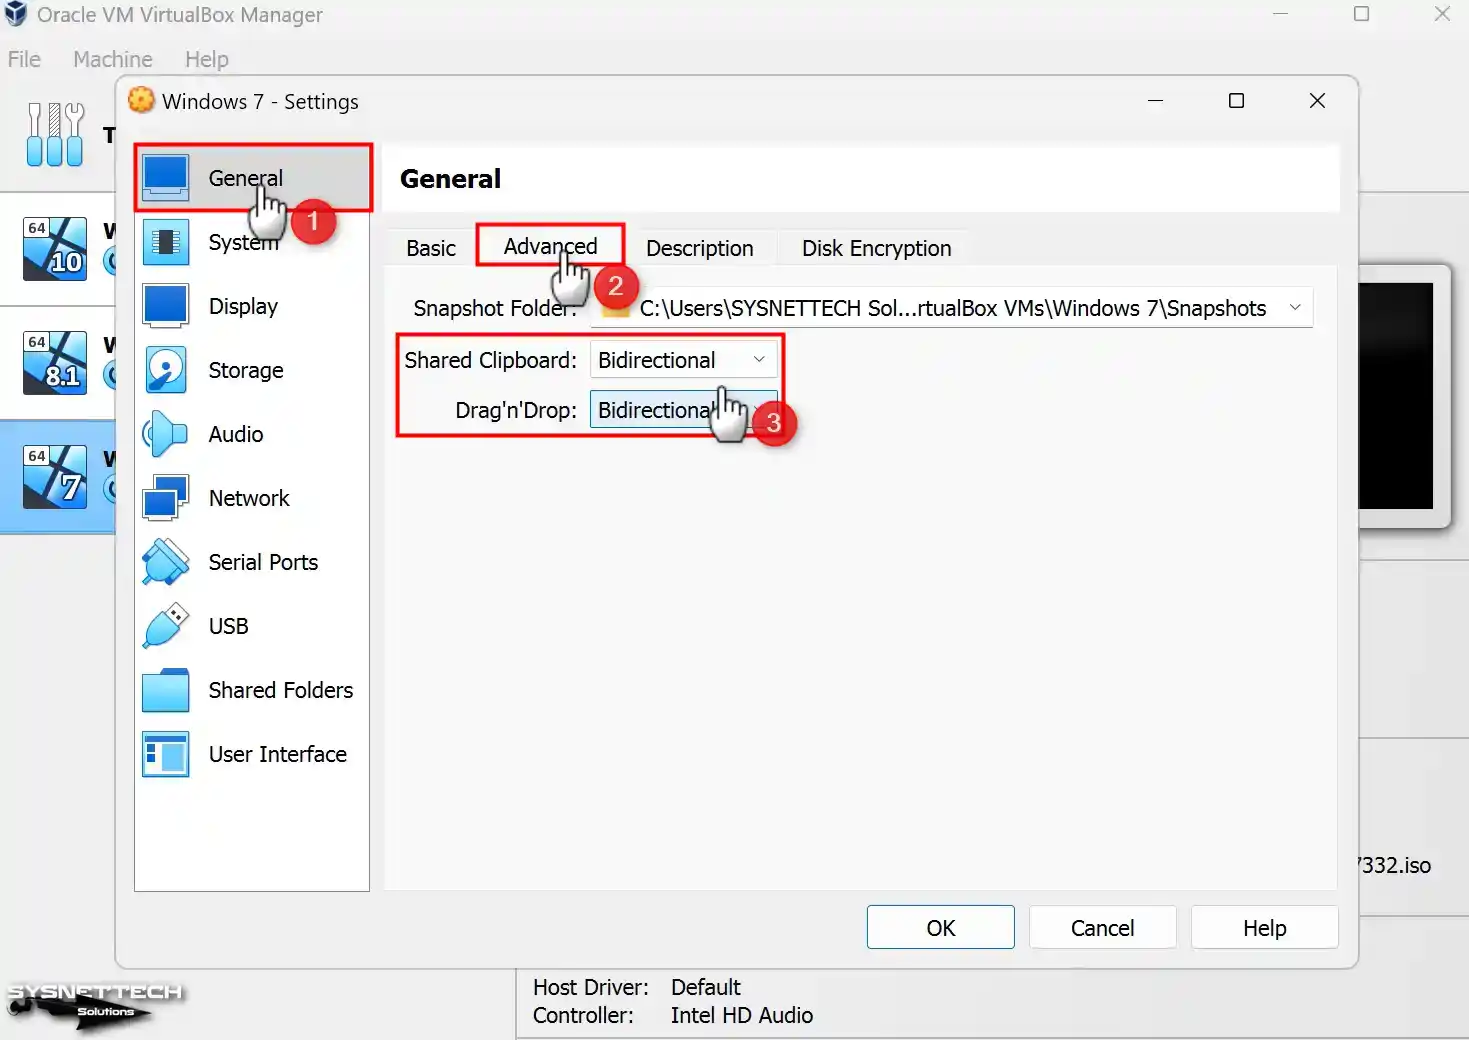
Step 9
In the Windows 7 VM settings, configure the Shared Clipboard and Drag and Drop properties as Bidirectional in the General / Advanced tab to copy files or text between the host and the VM with copy/paste and transfer files by drag/drop method.
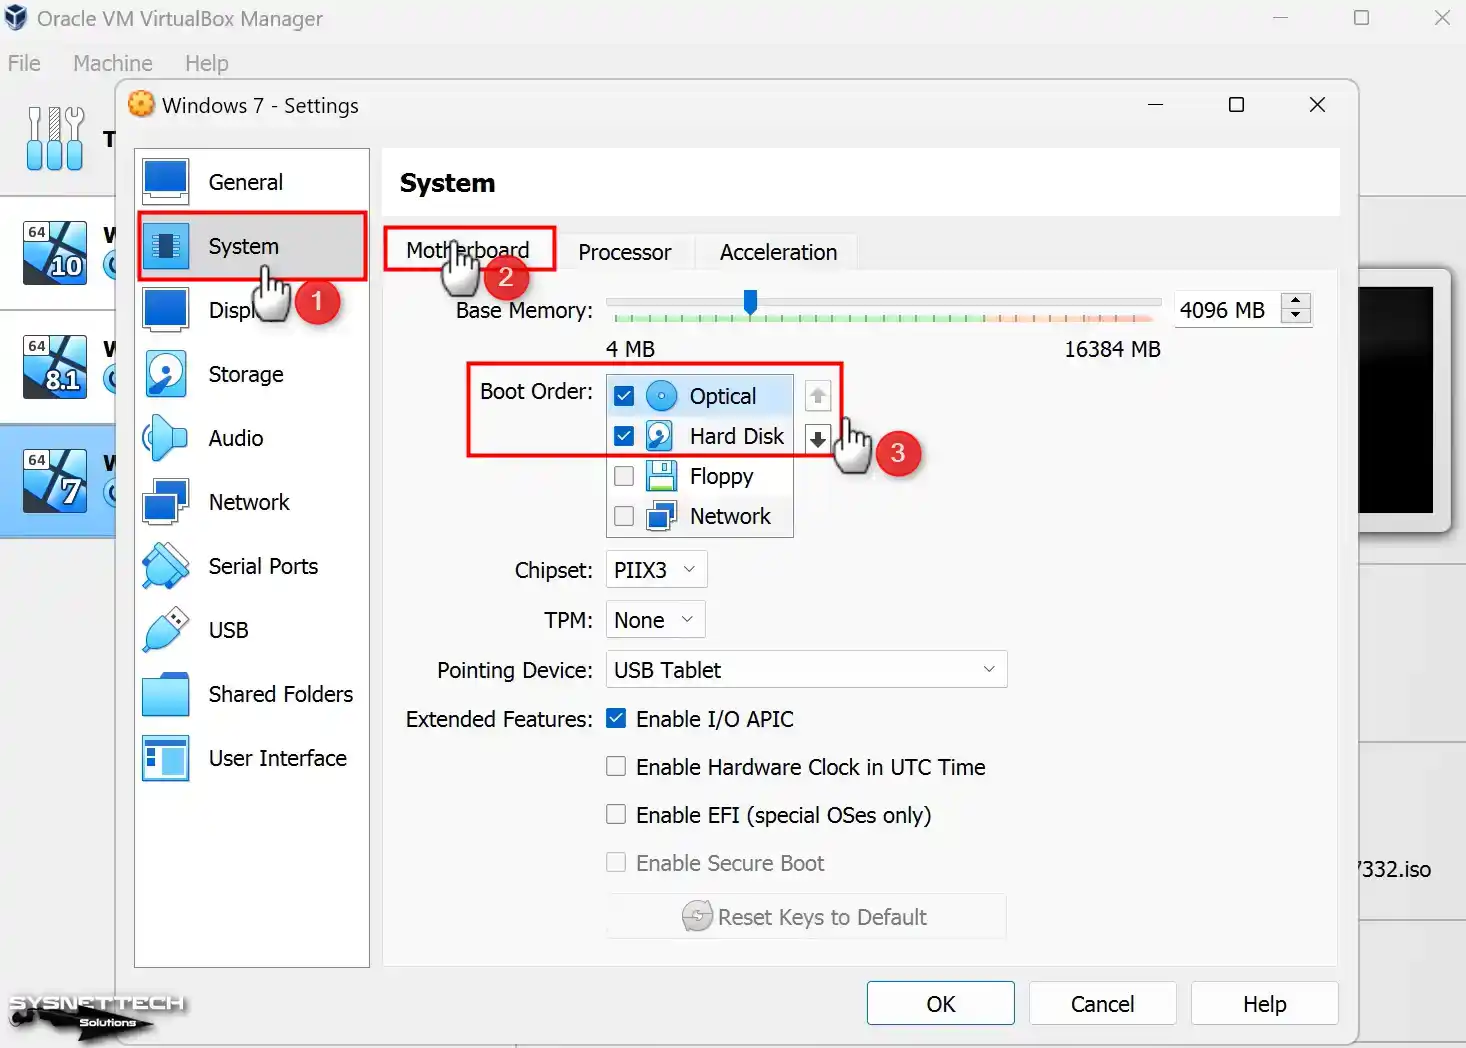
Step 10
To establish Windows or Linux operating systems on a physical computer, you must modify the boot order in the BIOS settings. Then, insert the operating system’s installation media into the optical drive and start the computer, booting from the media.
The boot order must be changed when installing a system on virtual machines. You need to set the Boot Order settings of the System / Motherboard hardware in the Windows 7 virtual computer settings. Since Floppy is legacy hardware, disable the device and configure the first boot order as Optical.
Step 11
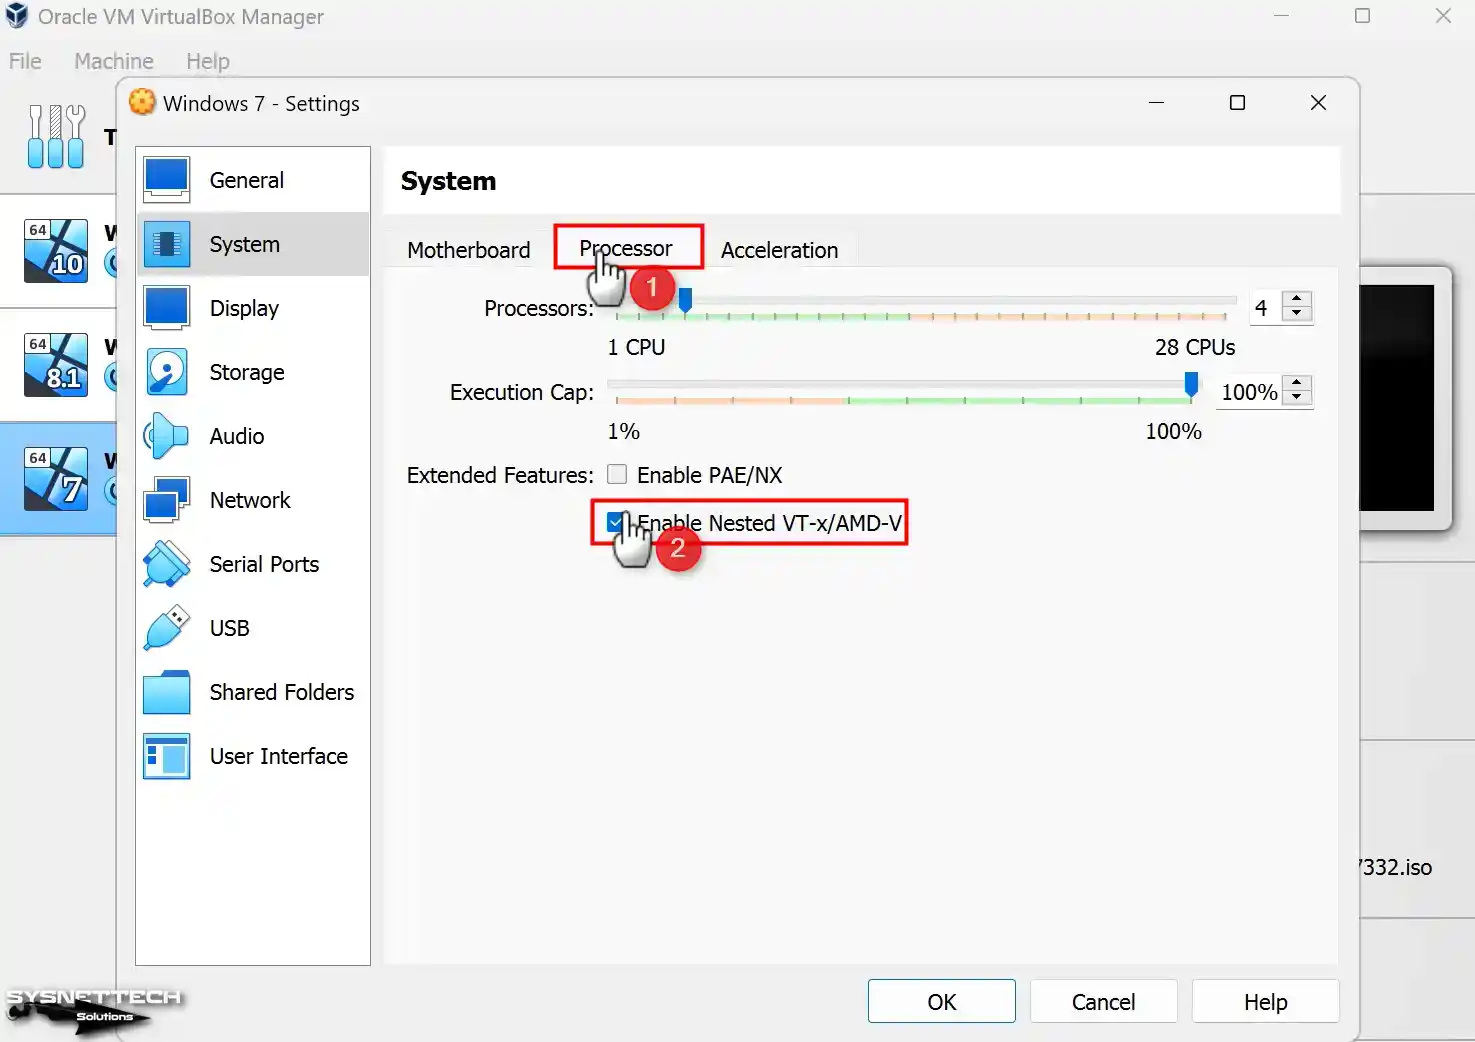
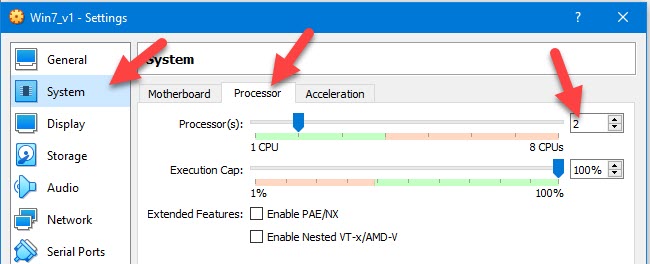
You have the flexibility to add multiple virtual CPUs to the virtual appliance based on the performance capabilities of your host CPU. Specifically for Windows 7, you can configure the Processor set to allocate four virtual CPUs.
Also, you can enable Nested VT-x/AMD-V if you want to operate a VM inside a VM using virtualization software such as VirtualBox on your guest operating system.
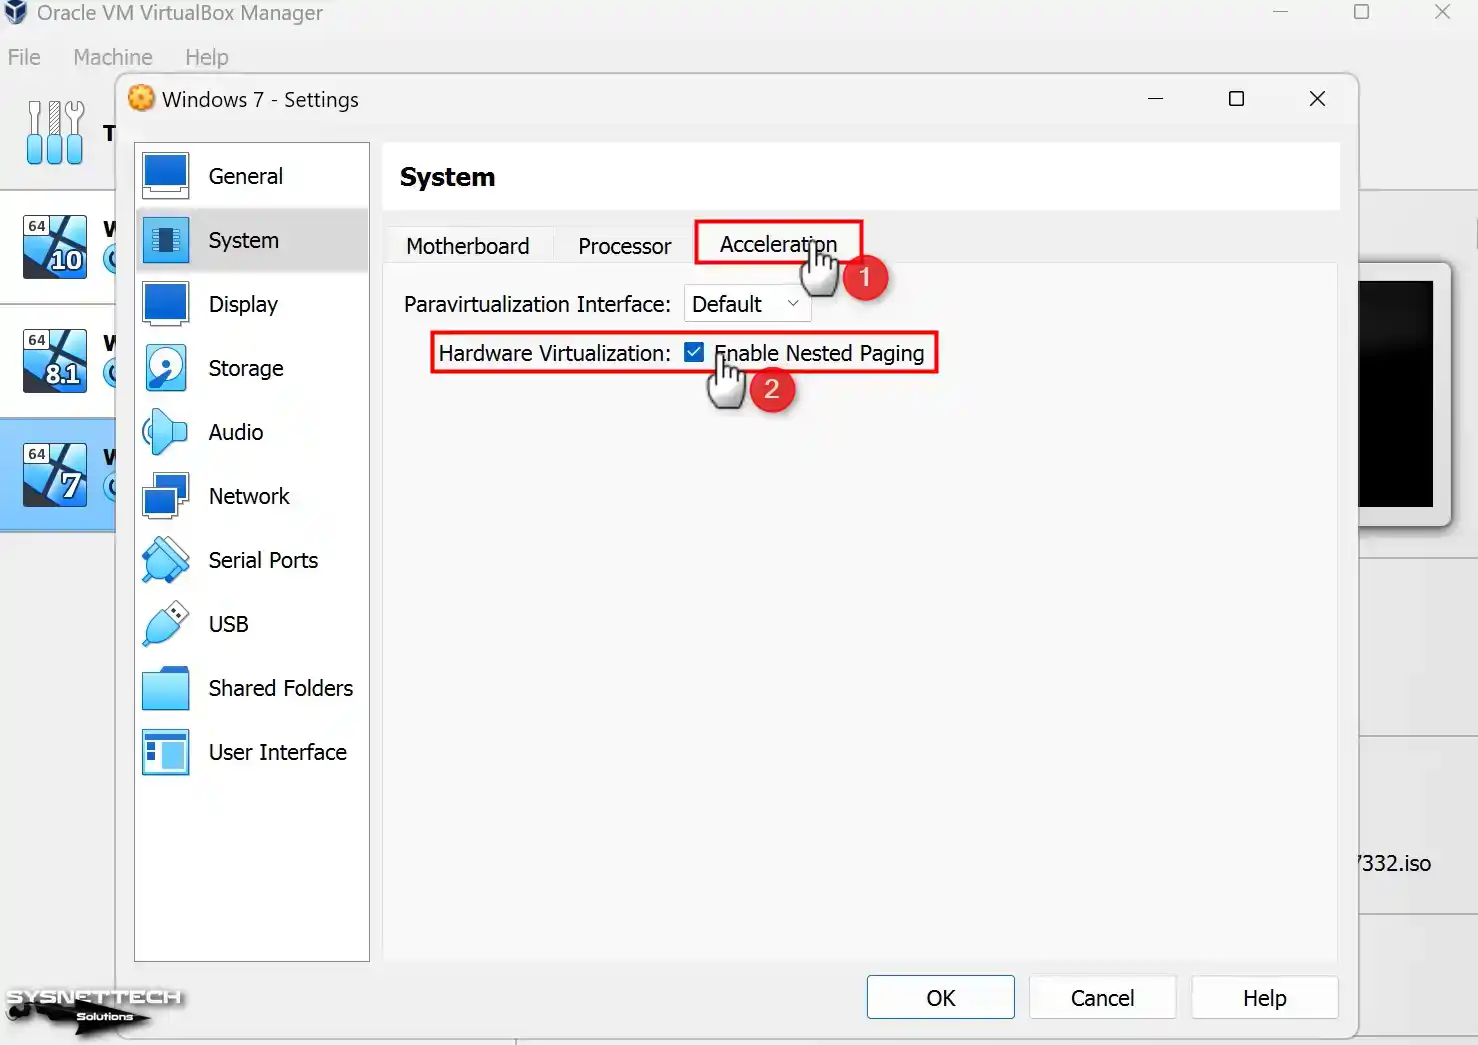
Step 12
Enable Nested Paging so the guest machine can better access your host’s RAM hardware and improve memory management.
Step 13
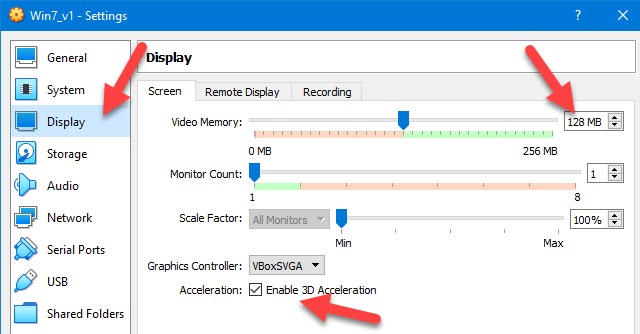
Activate the 3D Acceleration option and configure the Video Memory value to 256 MB to improve virtual computer image quality and adequately run applications or games containing 3D graphics.

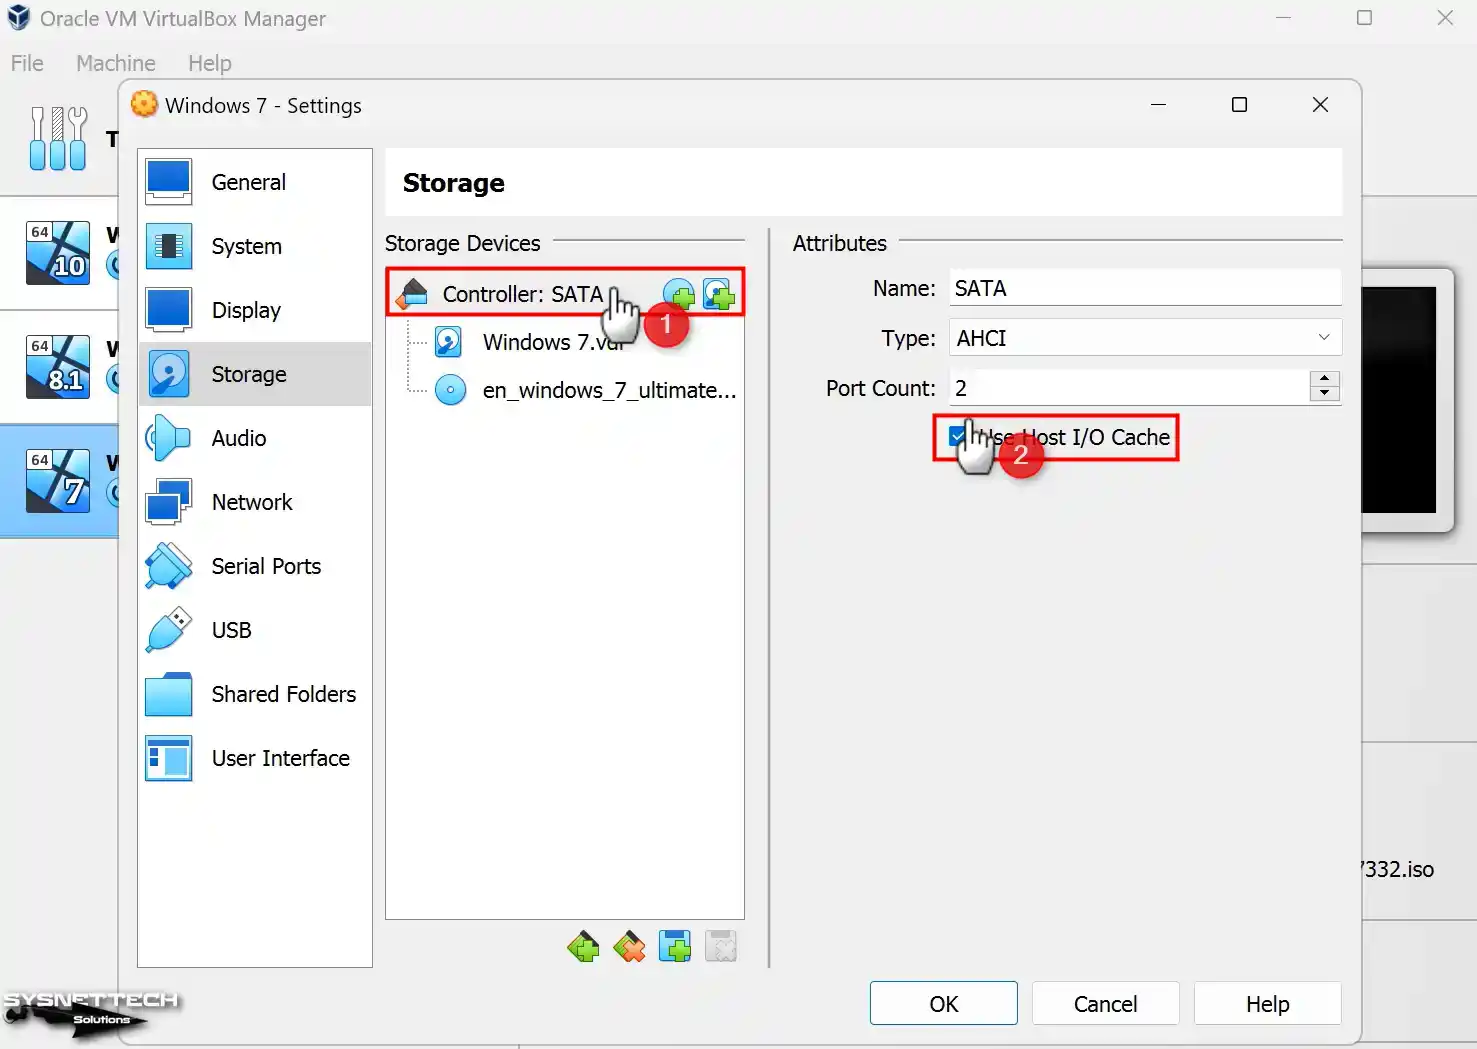
Step 14
For the performance of the virtual computer, enable the Host I/O Cache feature on the SATA controller in the Storage settings.
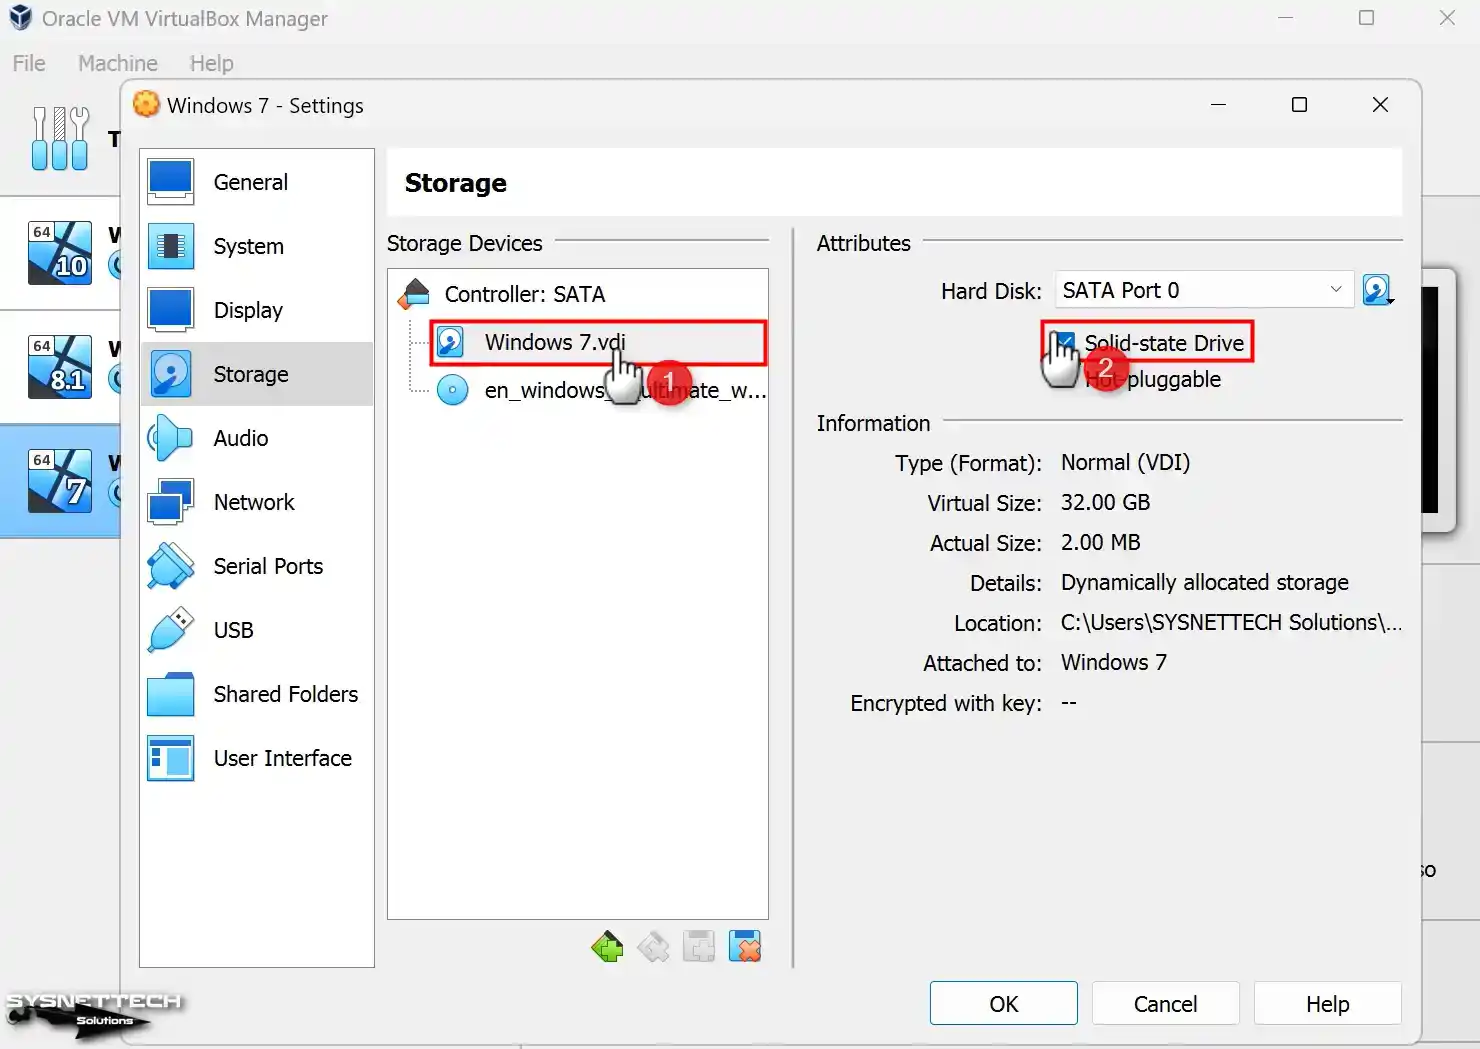
Step 15
Configure Windows7.vdi virtual disk file as Solid-State Drive (SSD) disk type.
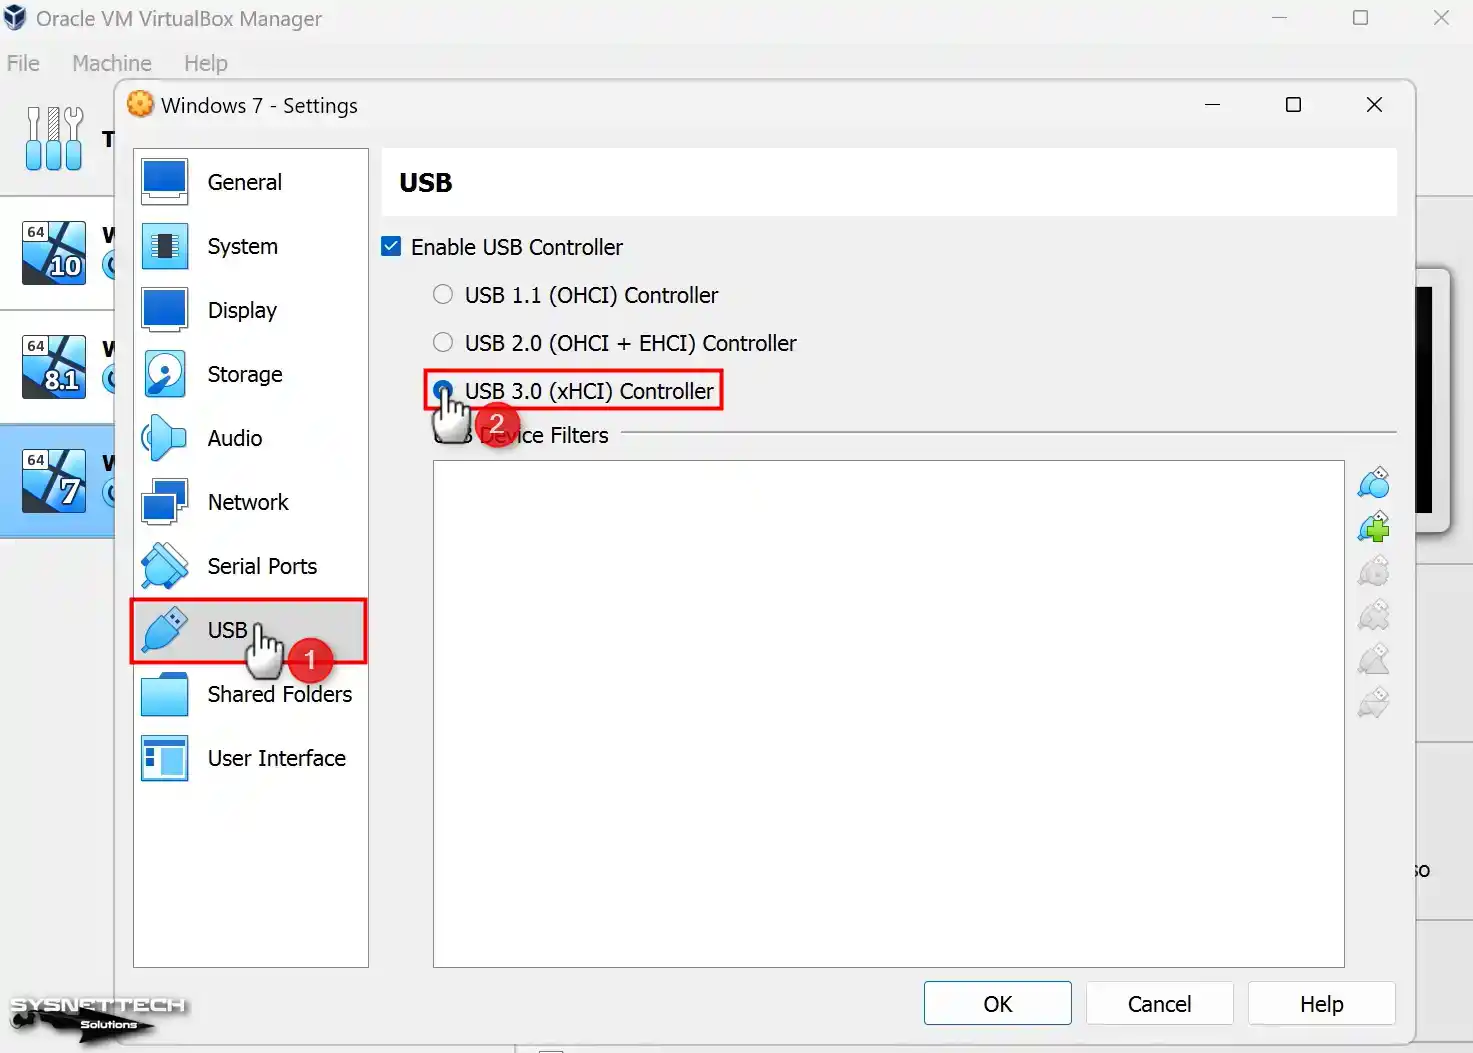
Step 16
In your virtual computer, make sure that the 3.0 (xHCI) controller is enabled in the settings of the USB appliance so that you can transfer files faster using a USB 3.x supported storage or flash memory.
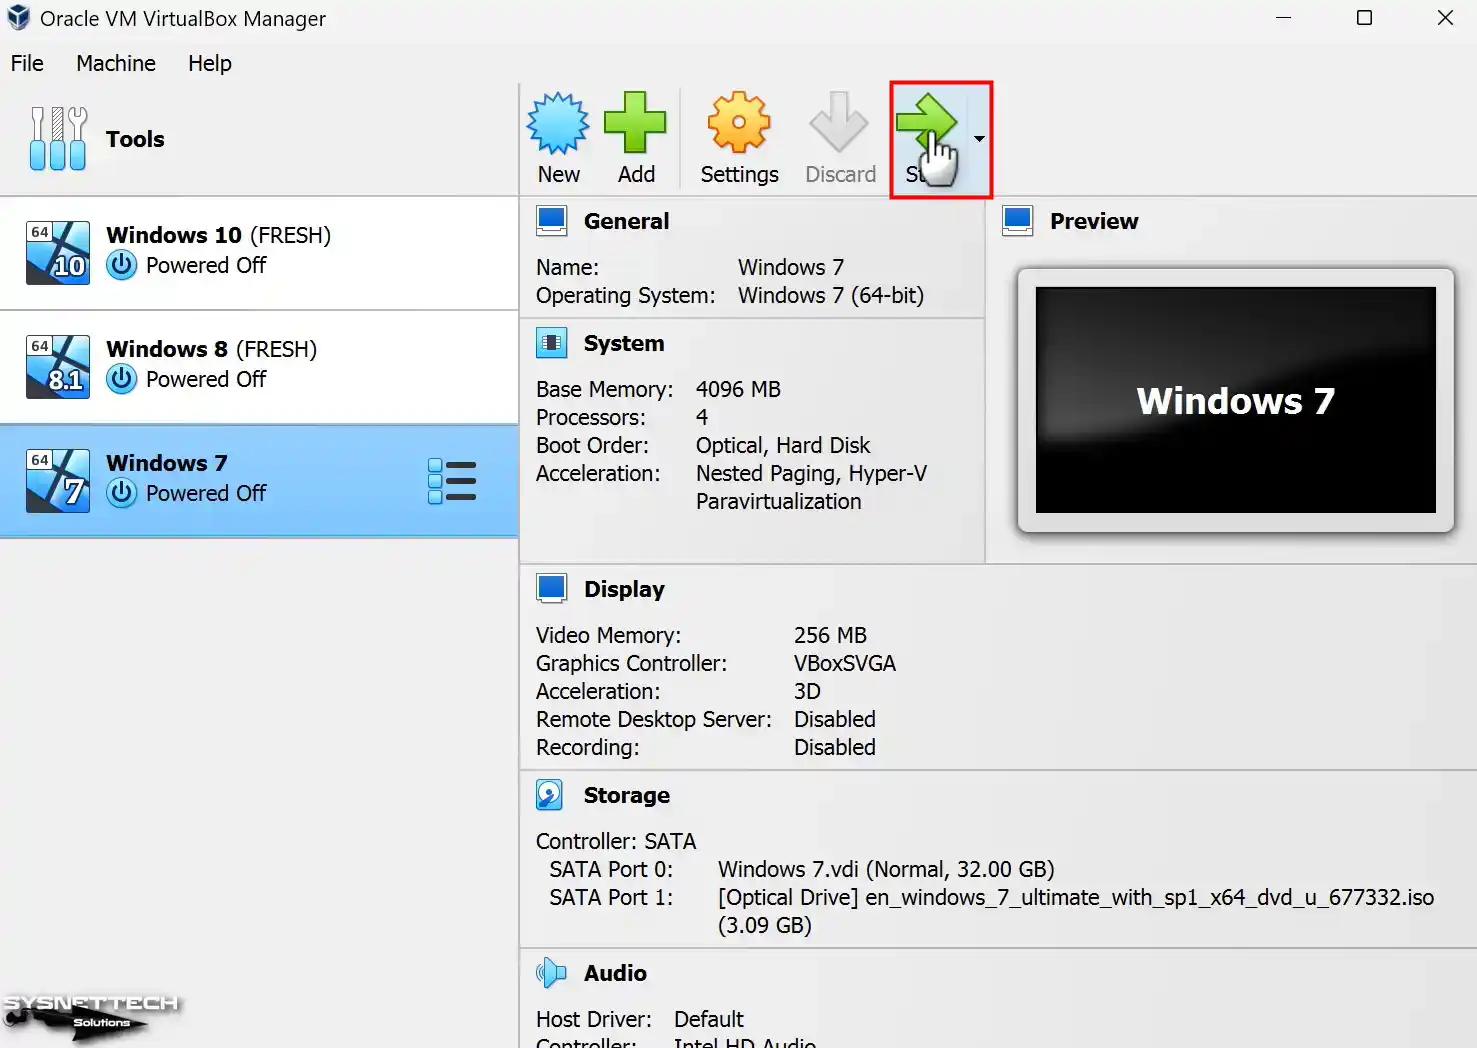
Step 17
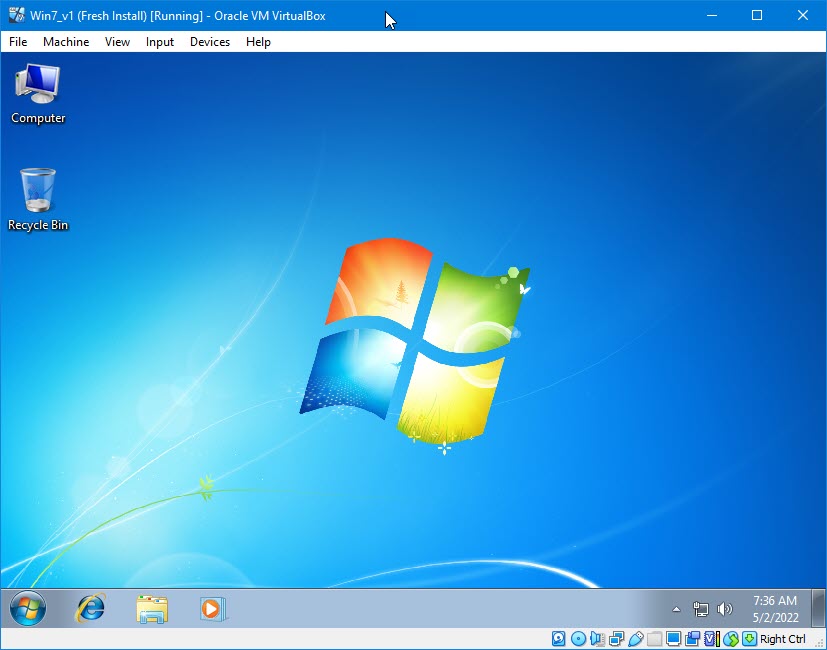
Click the Start button to begin your Windows 7 virtual PC.
How to Install Windows 7
Once you have prepared your virtual computer and selected the boot media, you can install Windows 7 using VirtualBox. After launching your virtual machine, you must follow the same installation stages as installing the operating system on a physical computer.
Step 1
When the Windows 7 setup screen opens, select the display language, time settings, and keyboard layout you want to use for your OS and click the Next button.

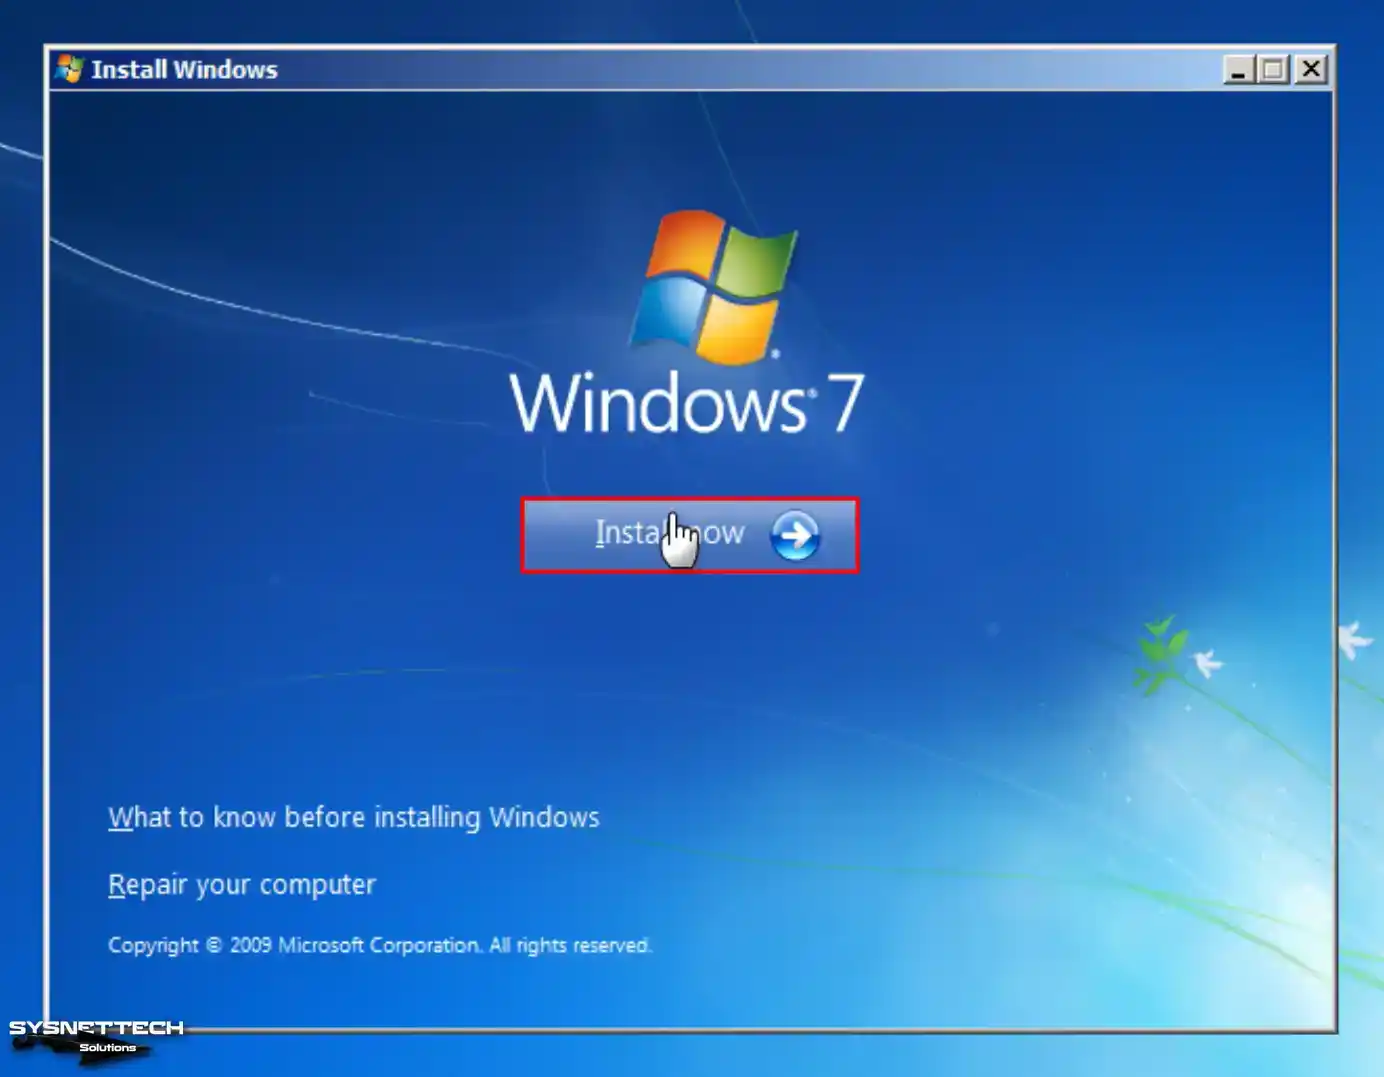
Step 2
After making the necessary basic settings, click the Install Now button and continue.
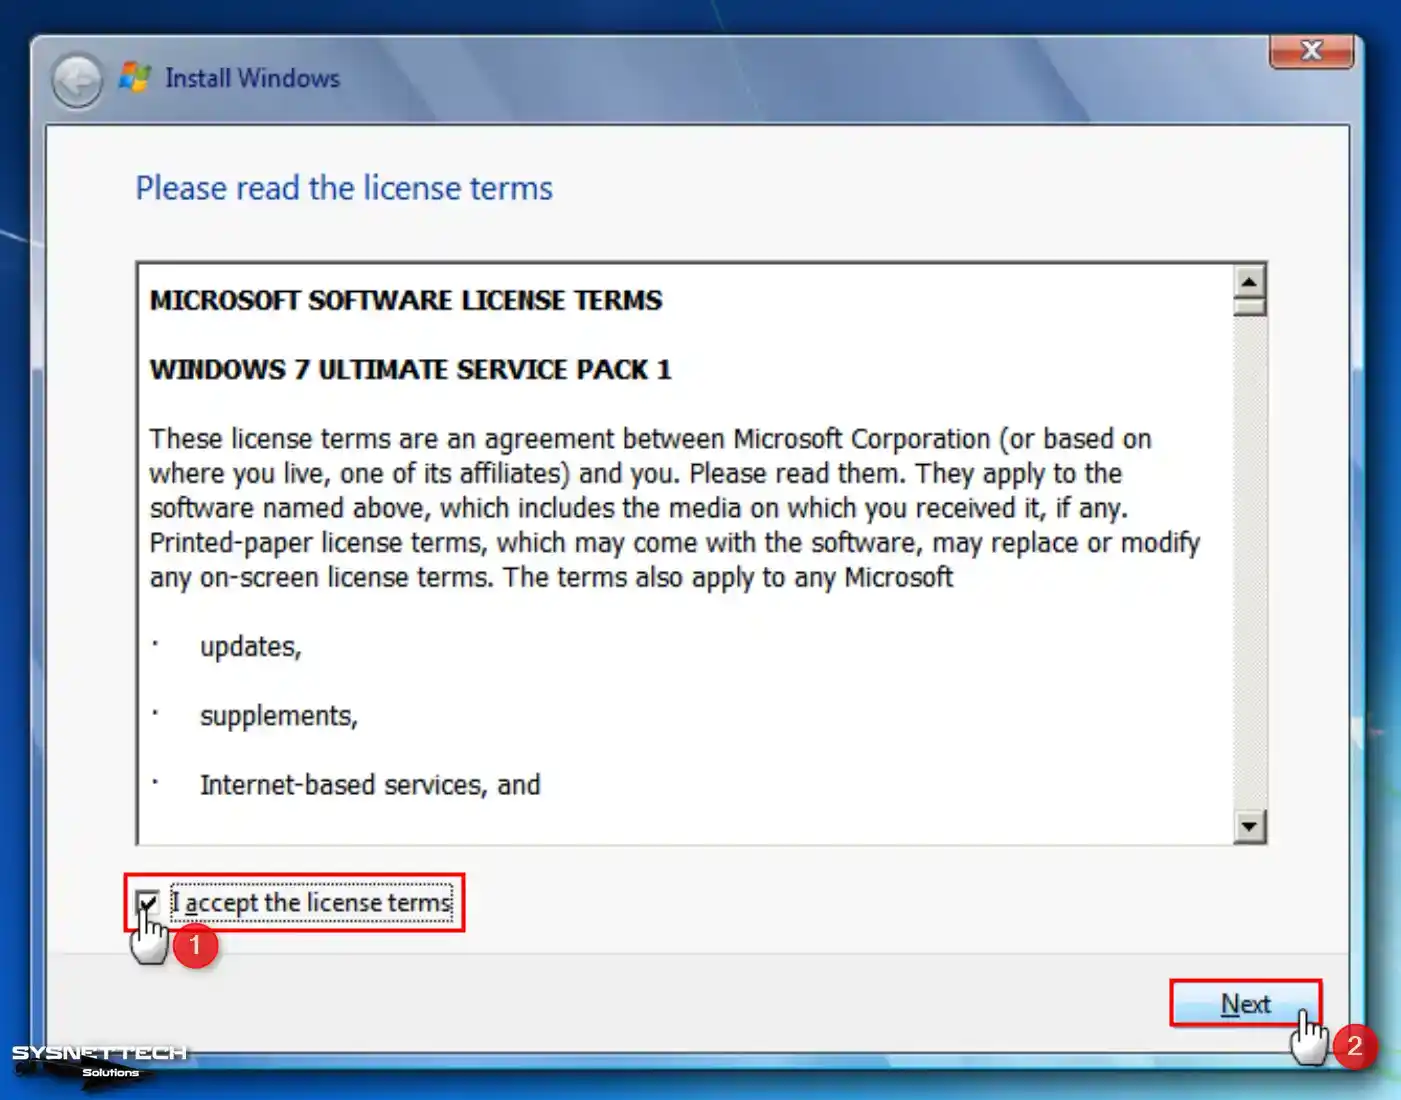
Step 3
Kindly provide your consent by agreeing to the license agreement for the Windows 7 Ultimate Service Pack 1 (SP1) platform and continue by clicking the “Next” button.
Step 4
Click on the Custom option at this step, as you will perform a clean system installation.

Step 5
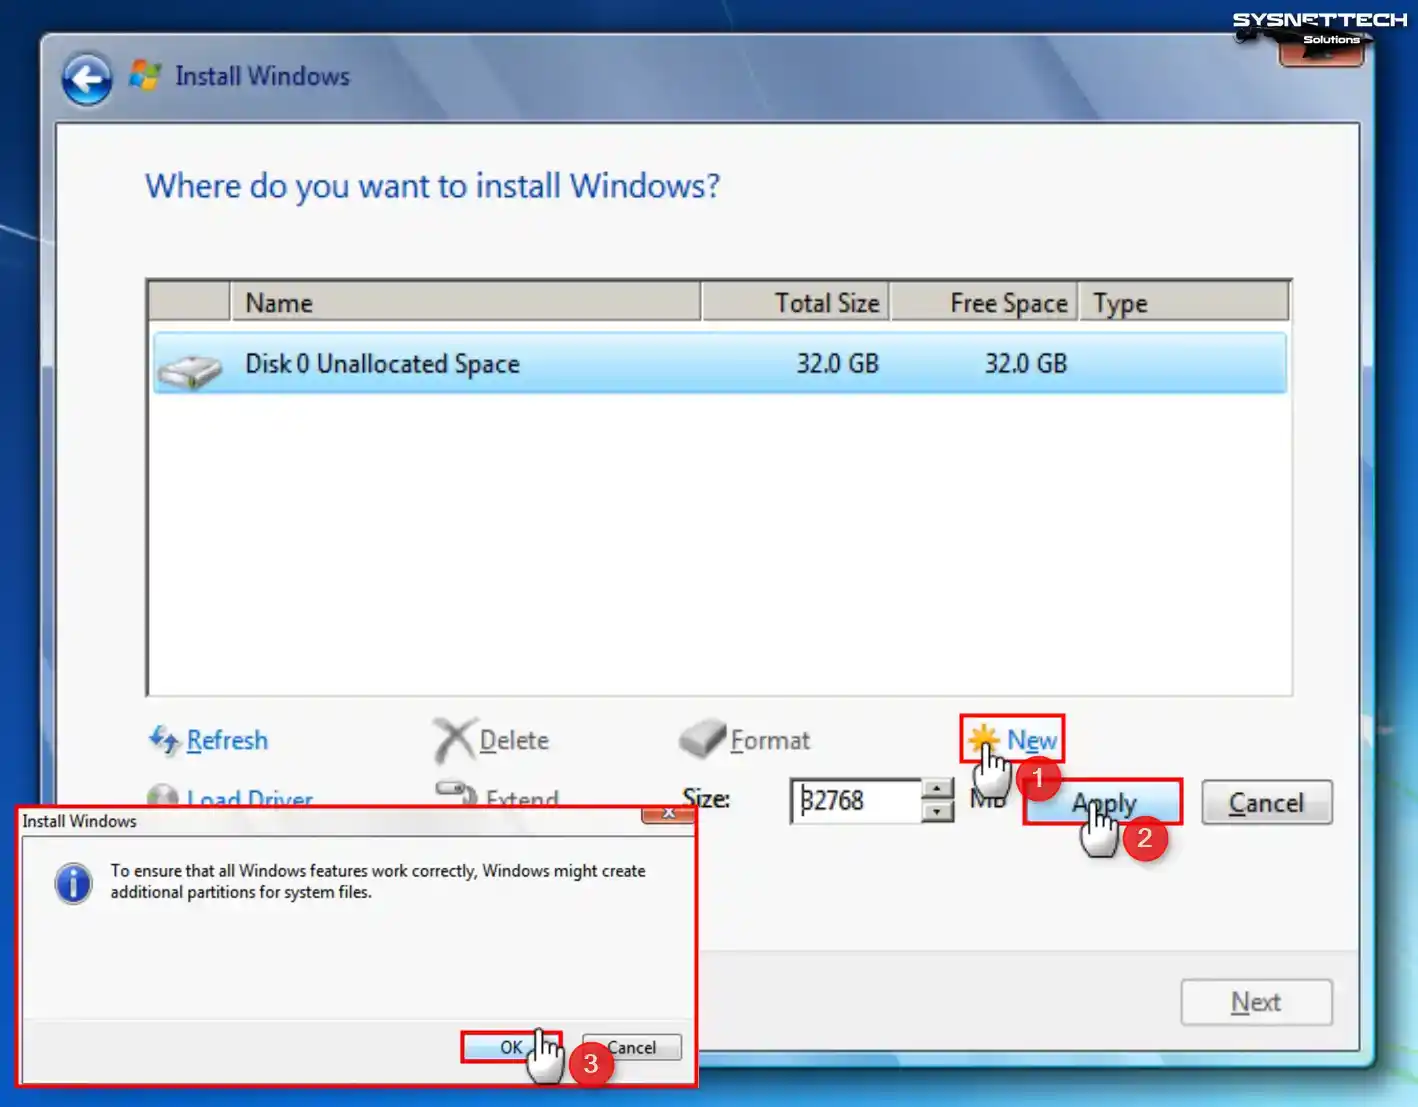
Click Drive Options in the disk configuration window of the Windows setup wizard.
To establish a fresh partition on the virtual disk, choose the disk, select “New”, and then click the “Apply” button to validate the automatic disk space allocation. Also, when you receive an information message that additional fields will be created so that Windows can work correctly, click OK and continue.
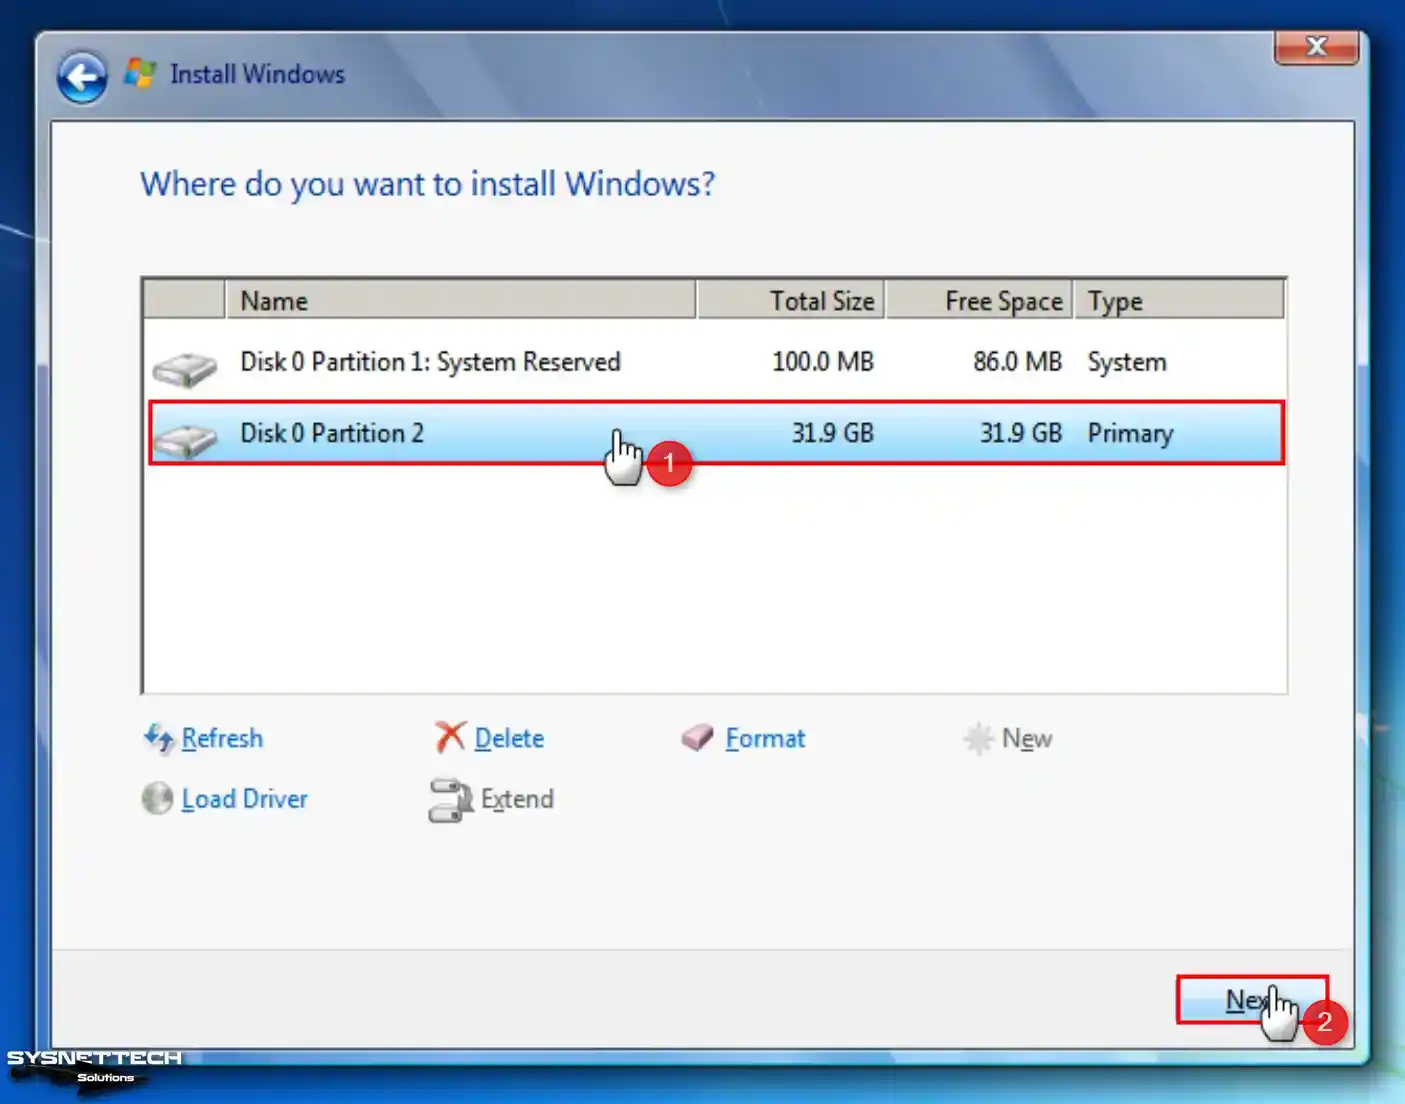
Step 6
Select the partition you created (Disk 0 Partition 2) and click Next.
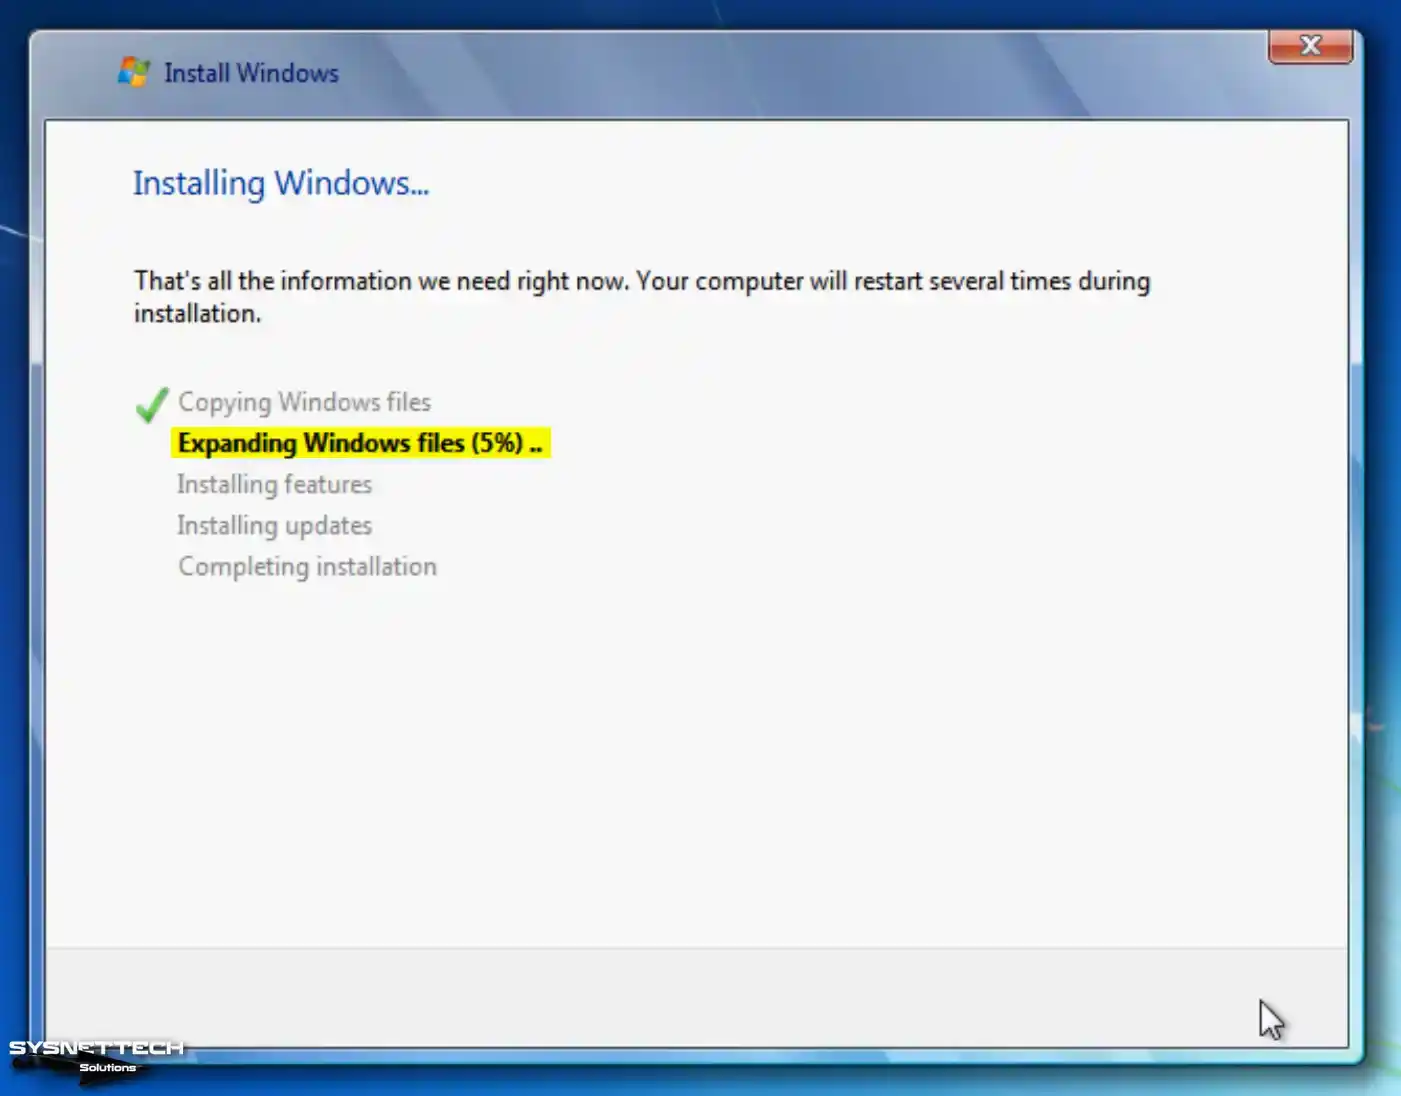
Step 7
Wait while the setup wizard expands the Windows files for installation.
Step 8
After the installation files are copied to the disk, wait to restart your virtual computer within the specified time or directly click the Restart Now button.

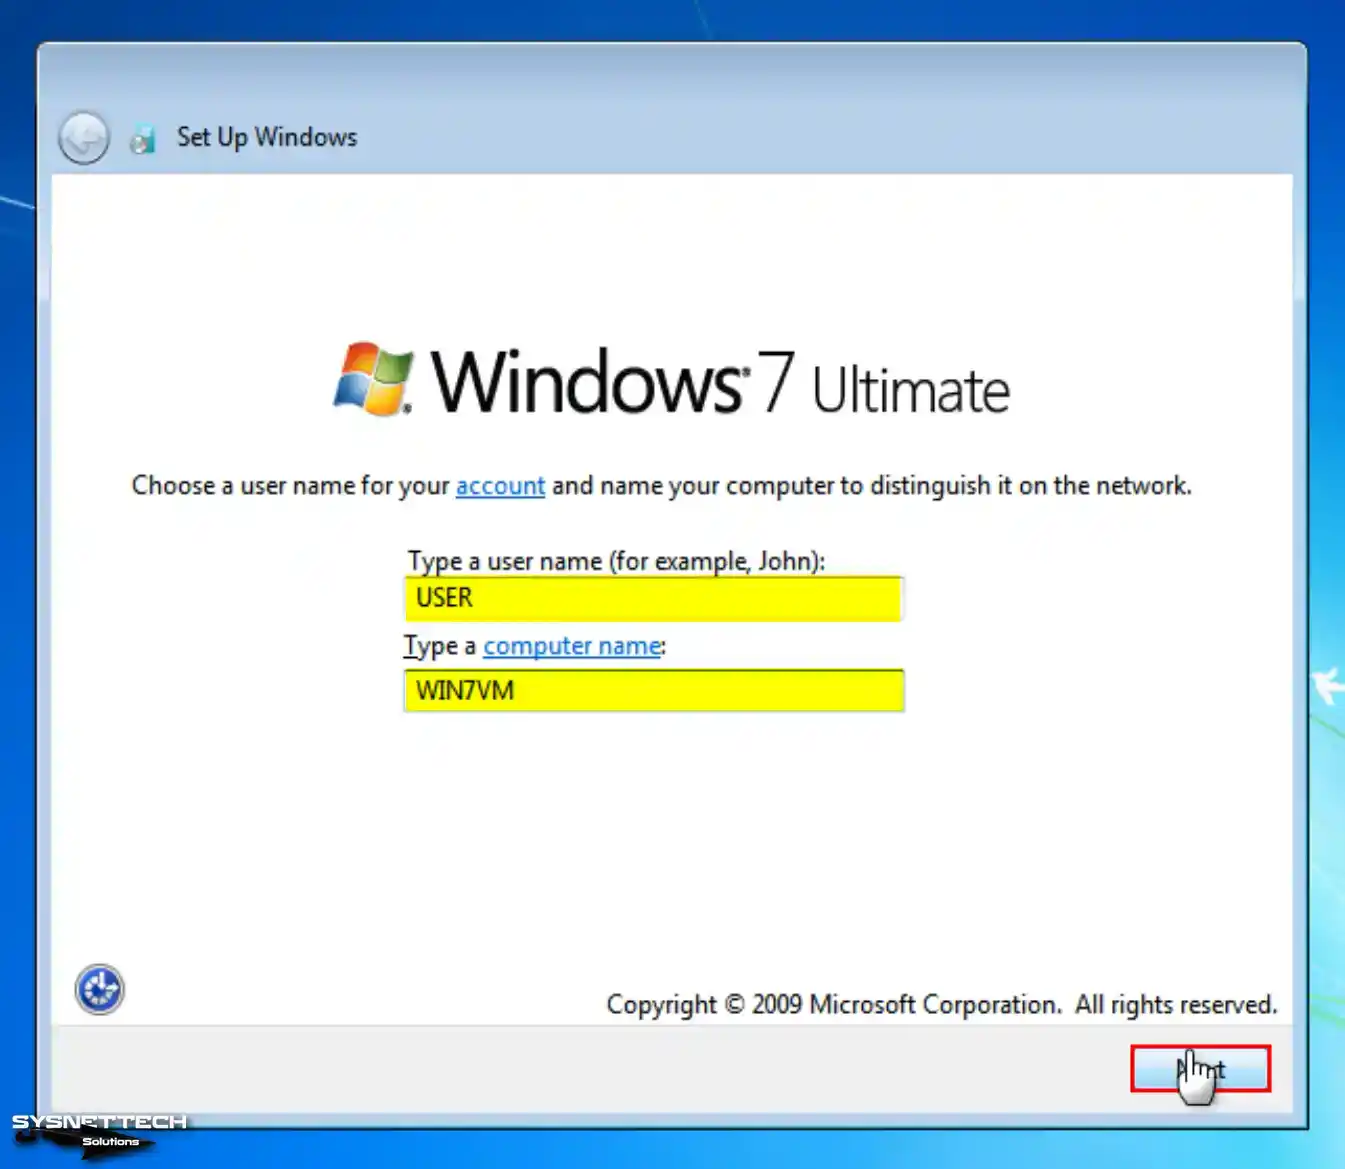
Step 9
After your system restarts, type a new name for your user account and the computer name and click Next.
Step 10
To configure a password for your virtual system, kindly complete the necessary fields depicted in the image provided and proceed accordingly. If you would instead not create a password, kindly click the “Next” button.

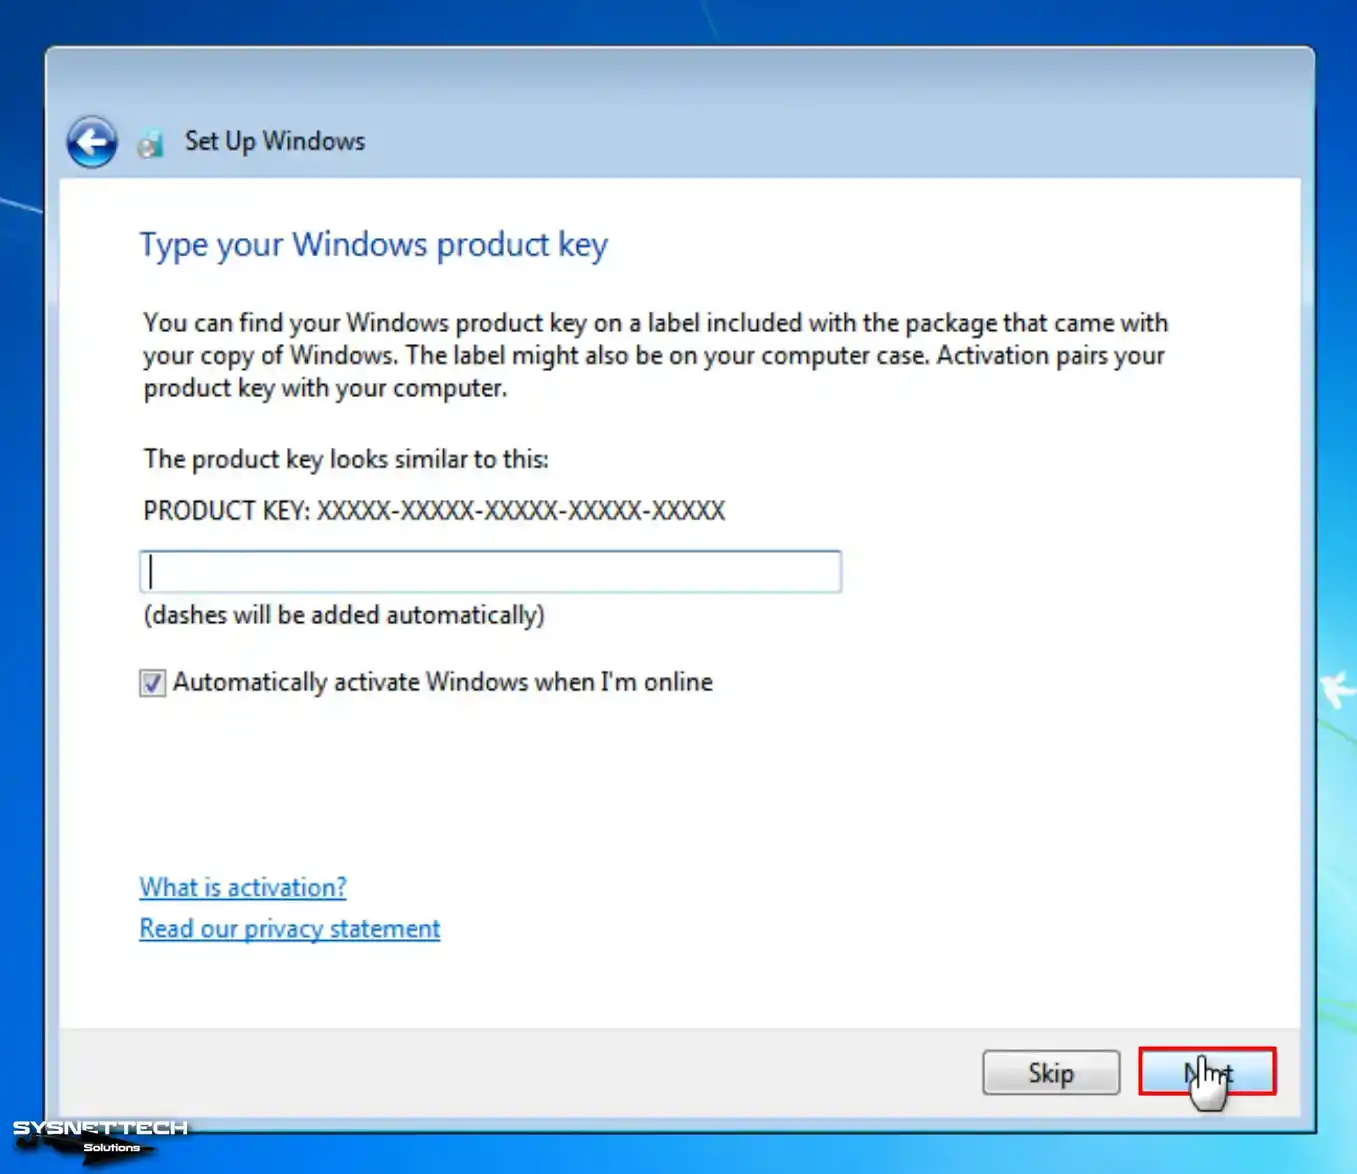
Step 11
To use a licensed operating system on your guest machine, type your product key and click Next. Suppose you select Automatically Activate Windows When I’m Online after typing your product key. In such a scenario, your system will be activated automatically upon accessing the Internet.
If you do not hold a Windows 7 product key, you can continue by clicking Skip or Next.
Step 12
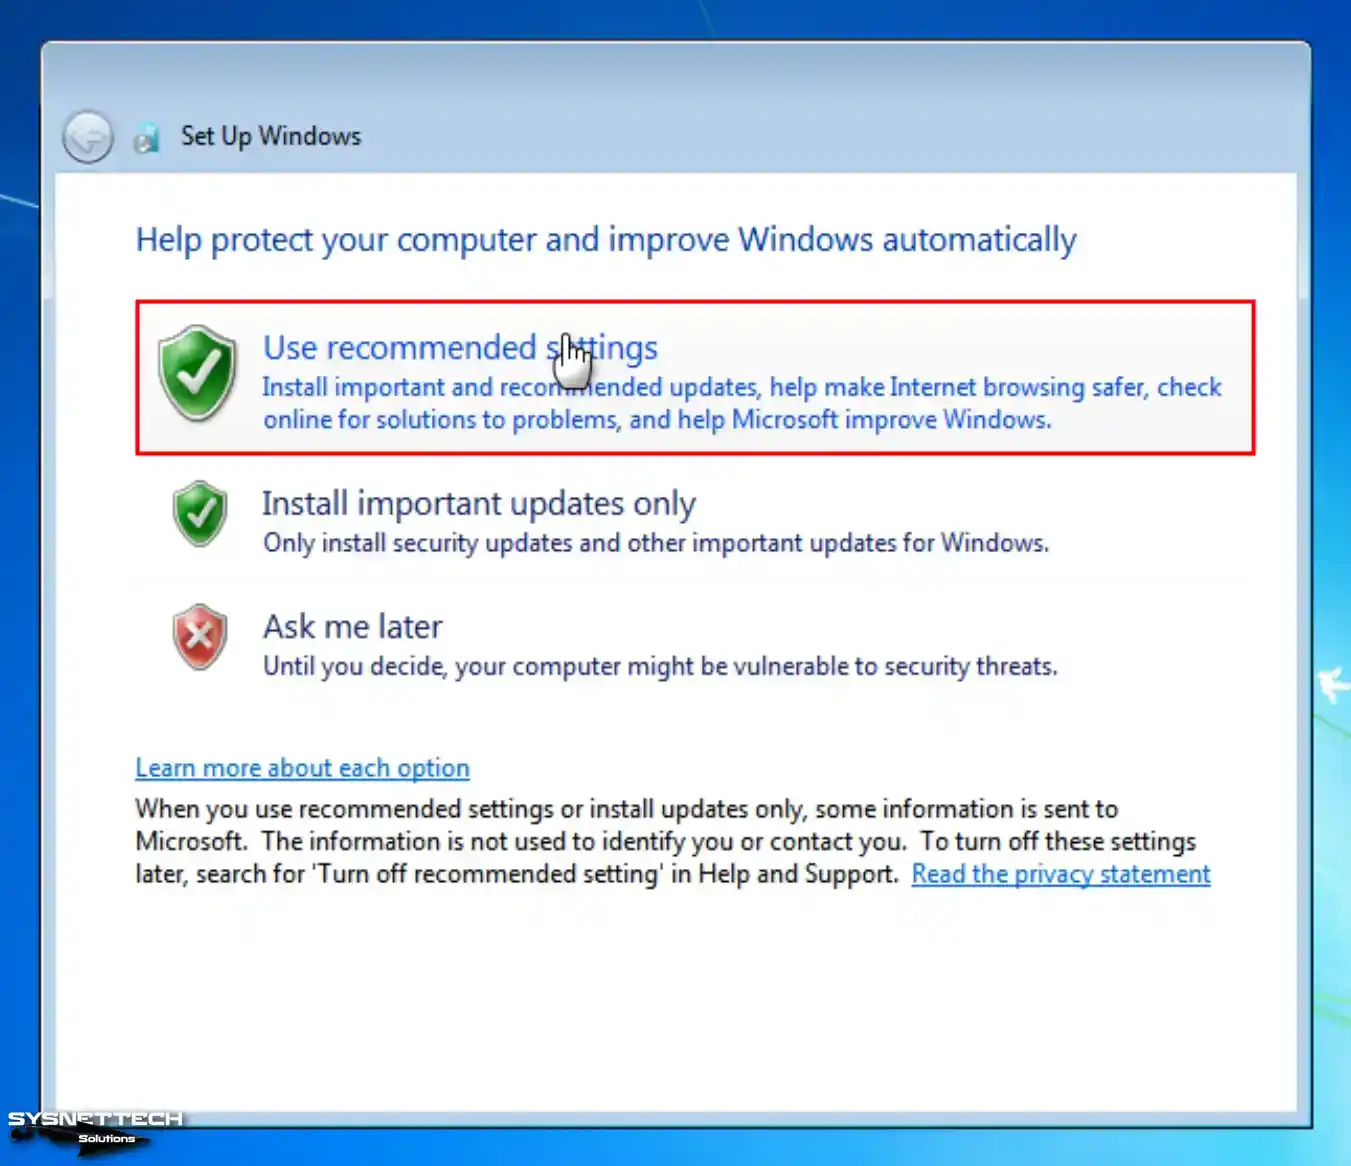
Click Use Recommended Settings for Windows firewall and system updates.
Step 13
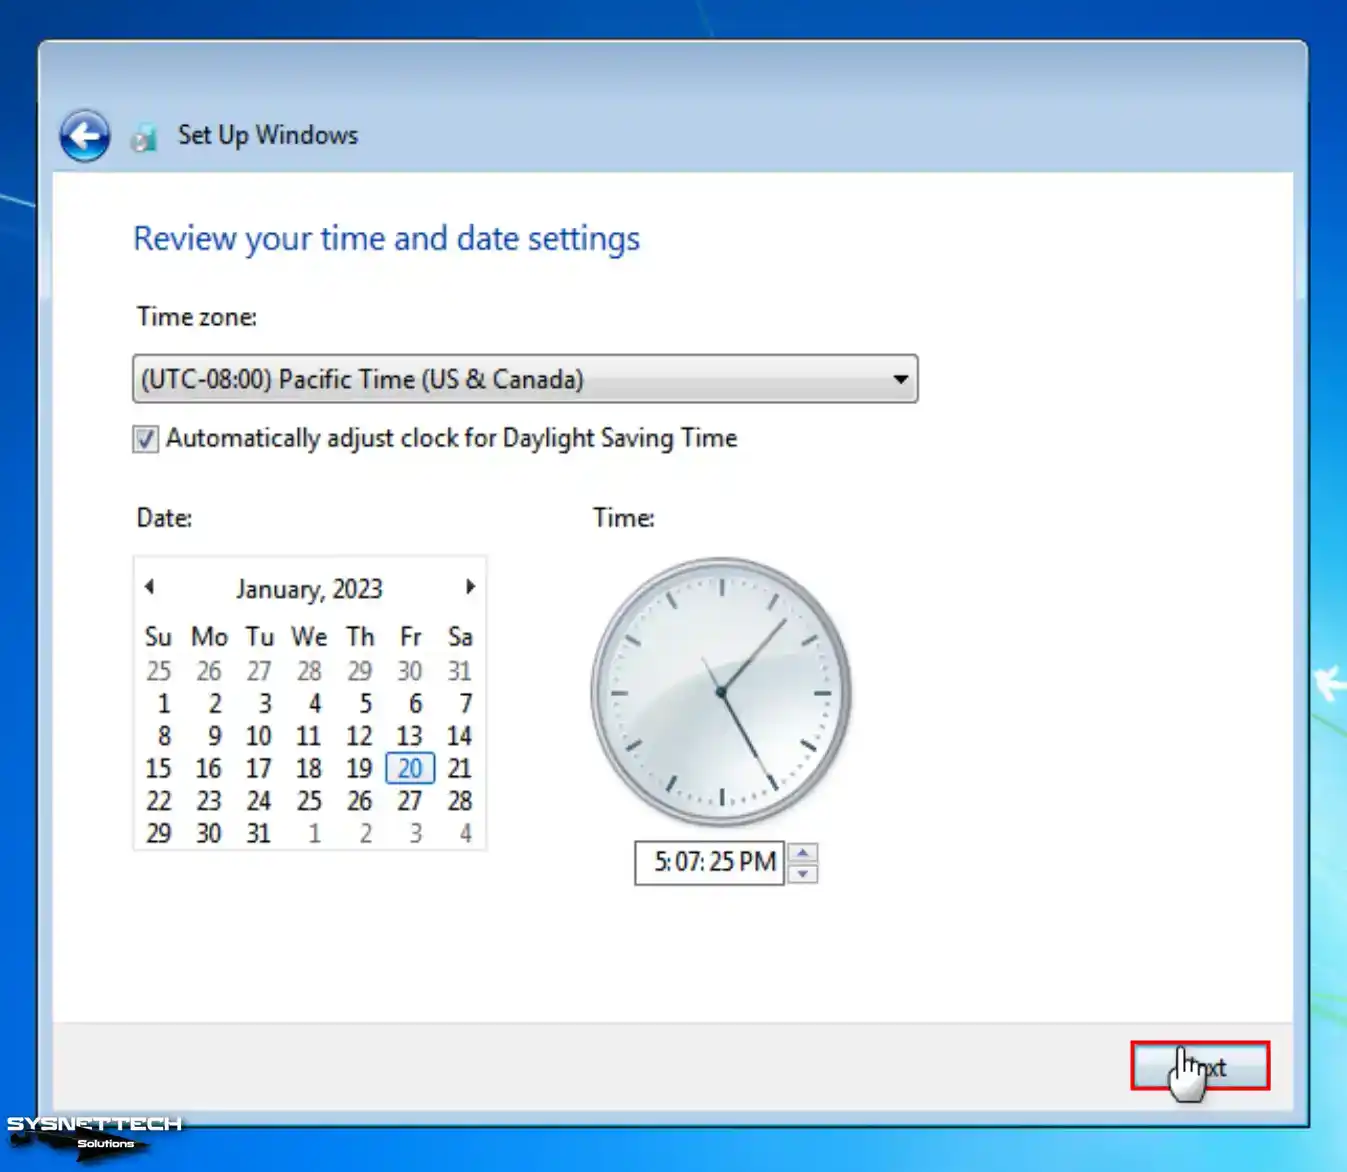
Choose your time zone according to your country and make your date settings.
Step 14
Select the current location of your virtual computer for network and sharing settings.

Step 15
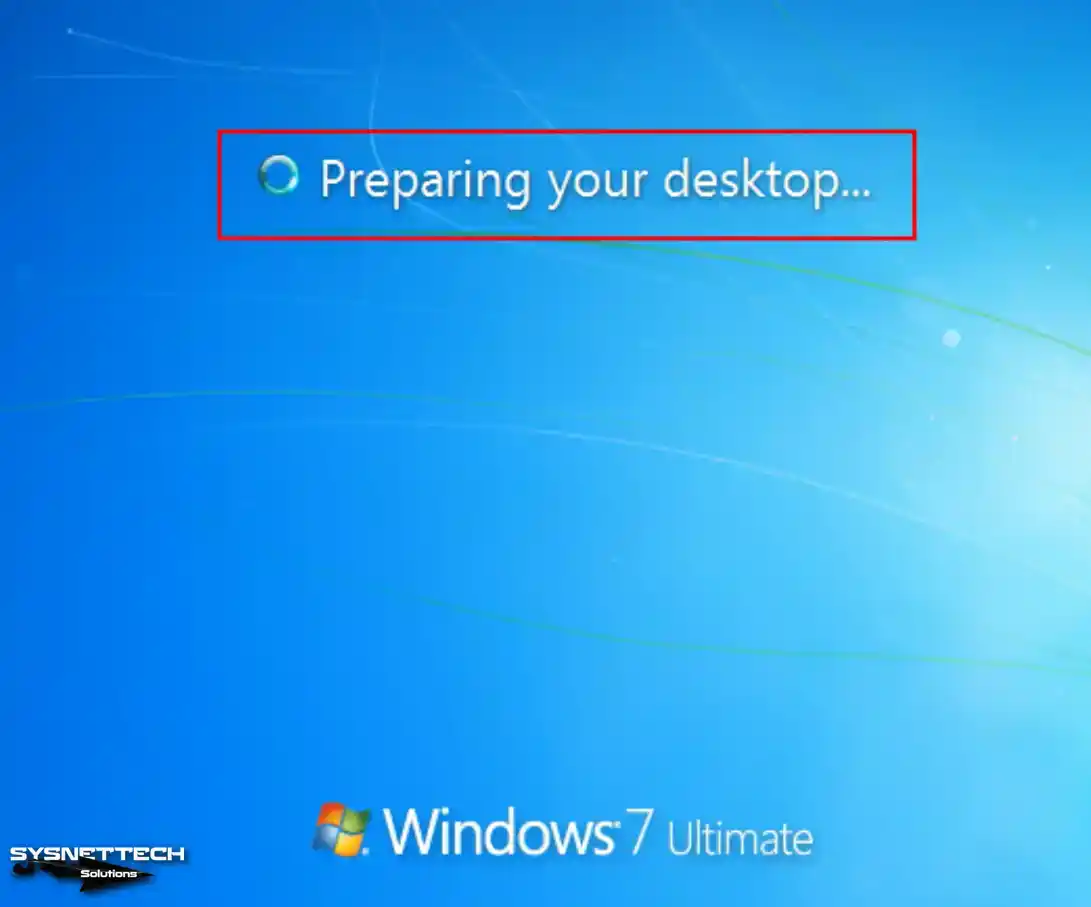
Wait while the Windows 7 desktop layout is being prepared.
Step 16
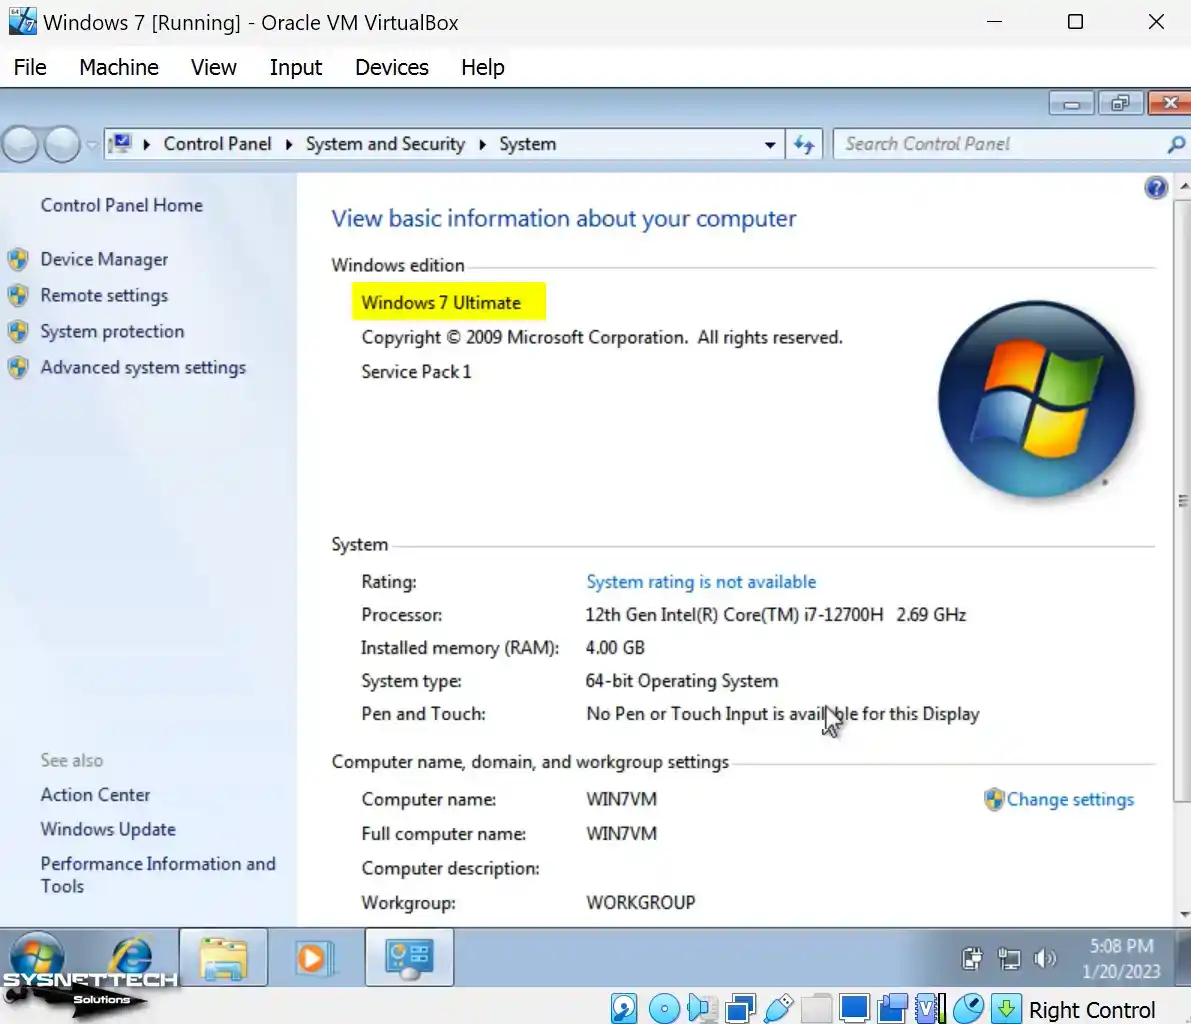
To examine the system properties of Windows 7, you can right-click on My Computer and subsequently select Properties.
How to Install Guest Additions
After installing Windows 7 on the virtual computer, you must install Guest Additions to configure the screen resolution as full screen, use it in scale mode, and copy files to the host.
Step 1
Before installing Guest Additions on Windows 7, open Device Manager on your virtual machine and check for not installed drivers or drivers that need to be installed correctly.
When you examine the image below, you can see that the driver for the Base System Device and Standard VGA Graphics Adapter devices is not installed.

Step 2
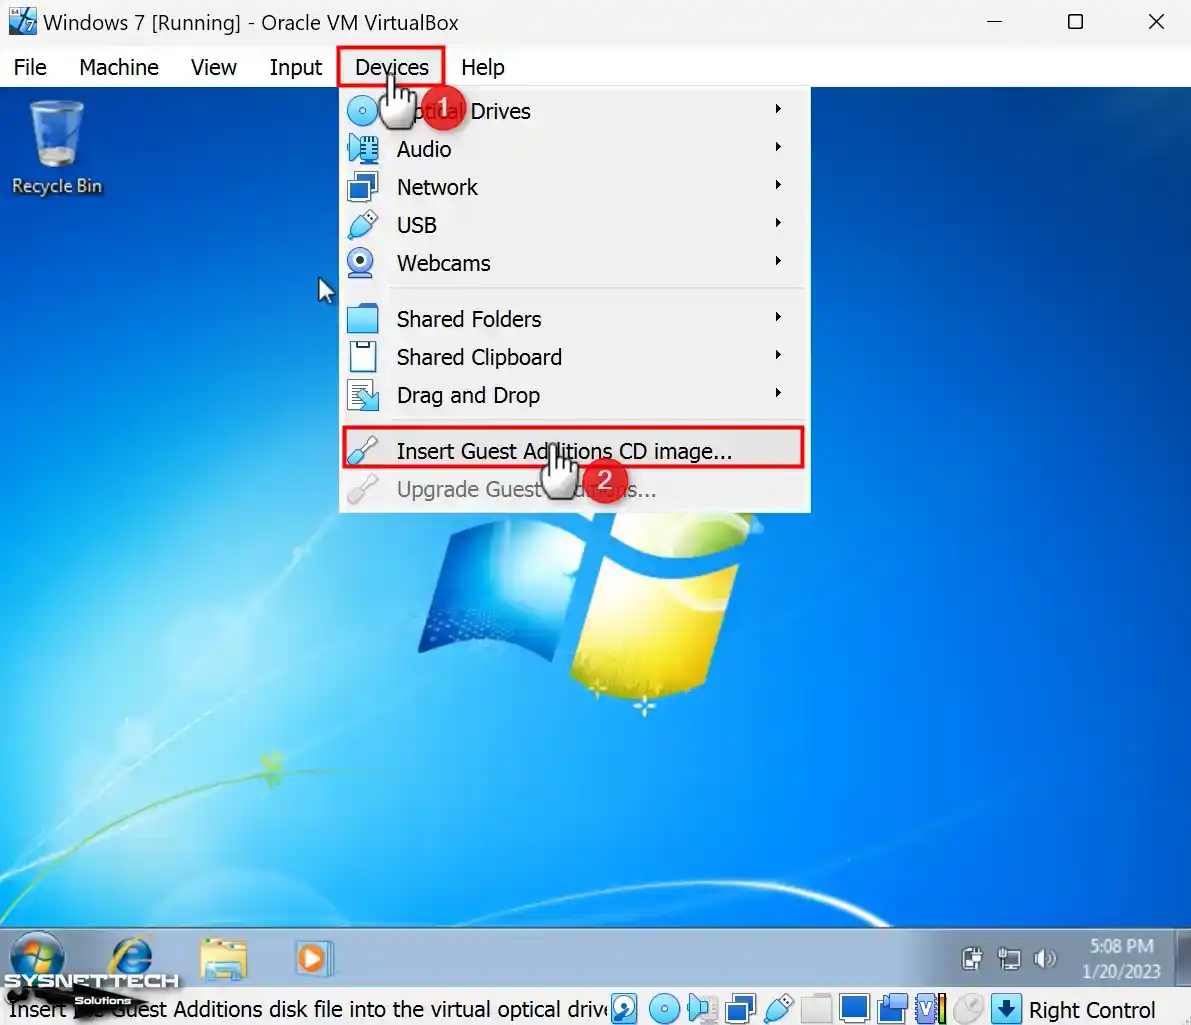
Click Devices / Insert Guest Additions CD Image in the Oracle VM VirtualBox tool menu.
Step 3
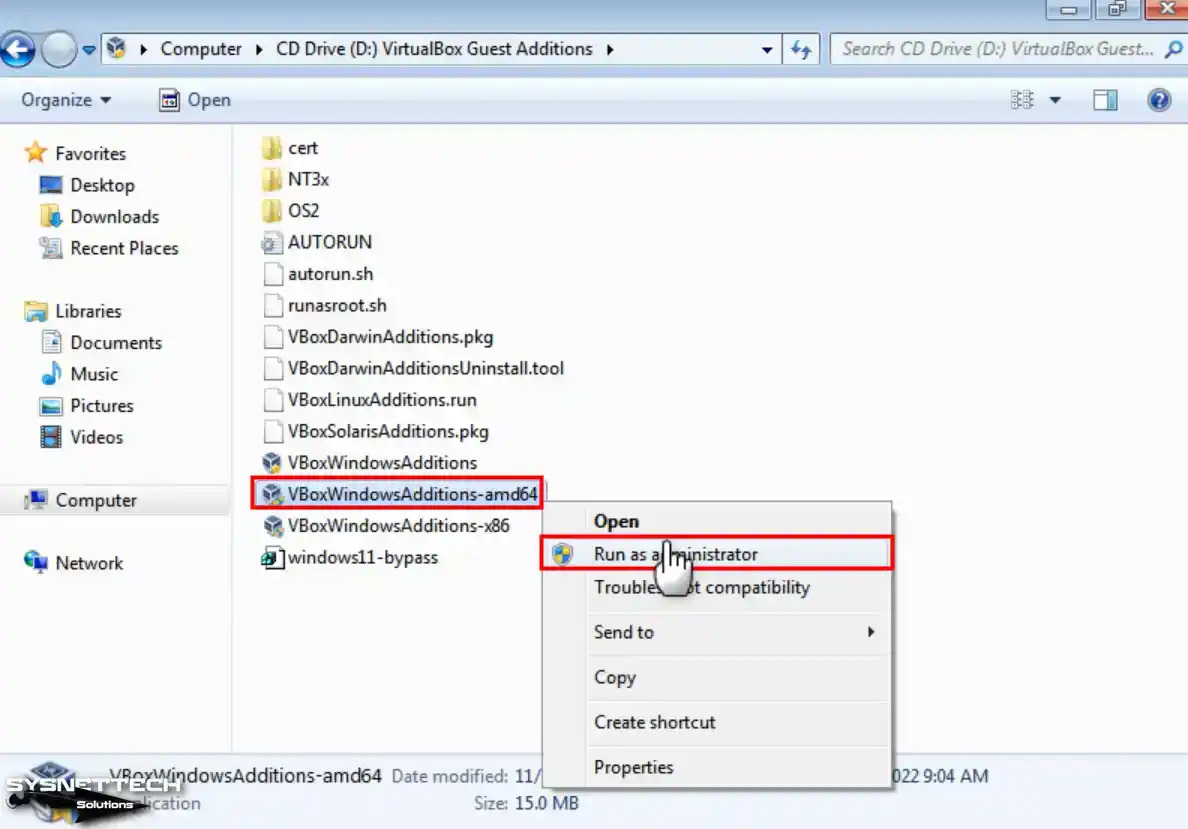
If the image file of the guest addons is not detected automatically on the guest machine, open My Computer, and after viewing the contents of the image file, run the VBoxWindowsAdditions-amd64 file as an administrator and click the Yes button in the User Account Control window.
Step 4
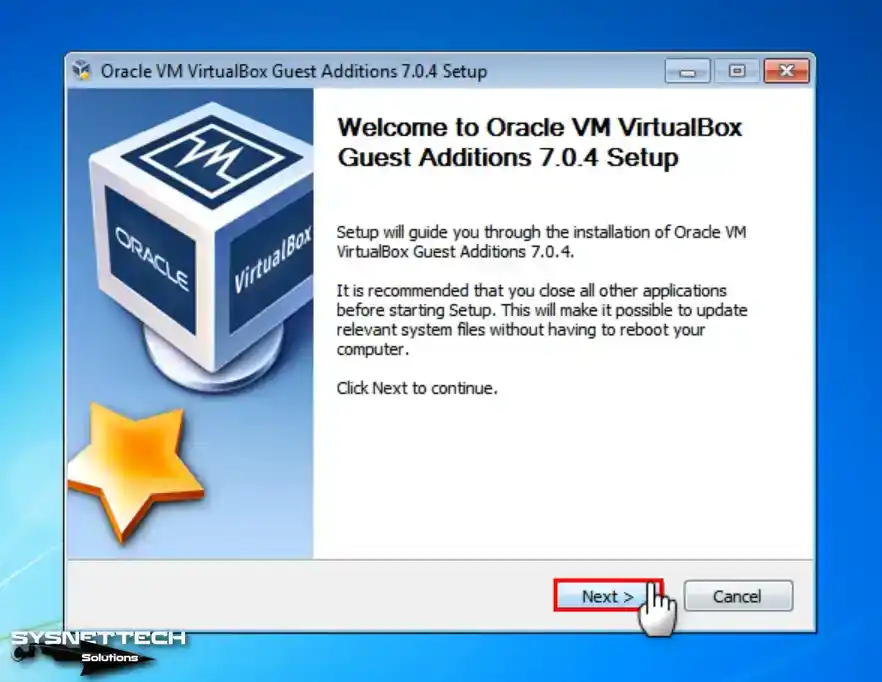
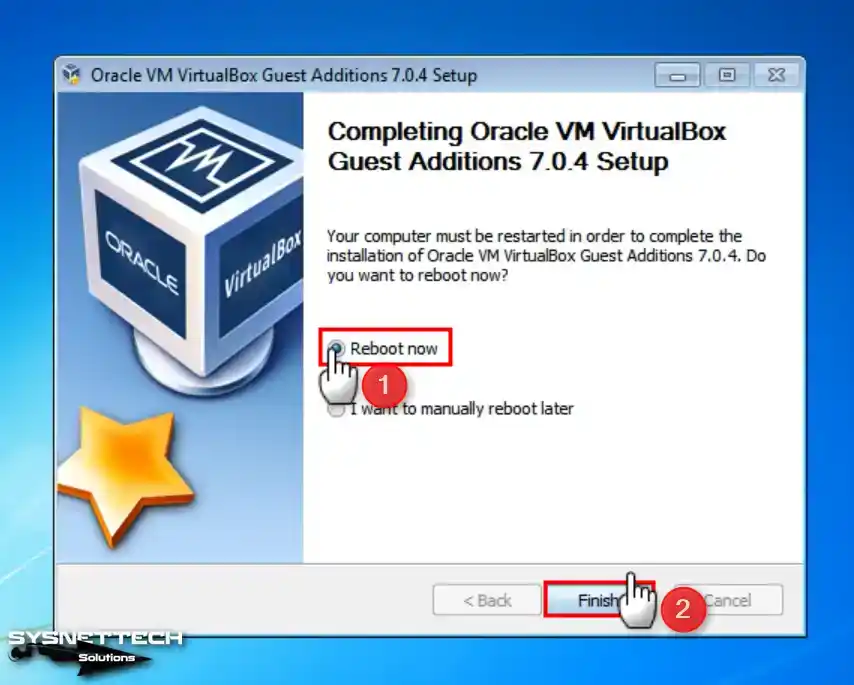
When the Guest Additions setup wizard opens, click Next directly.
Step 5
Leave the installation location of guest additions as default in your virtual system.

Step 6
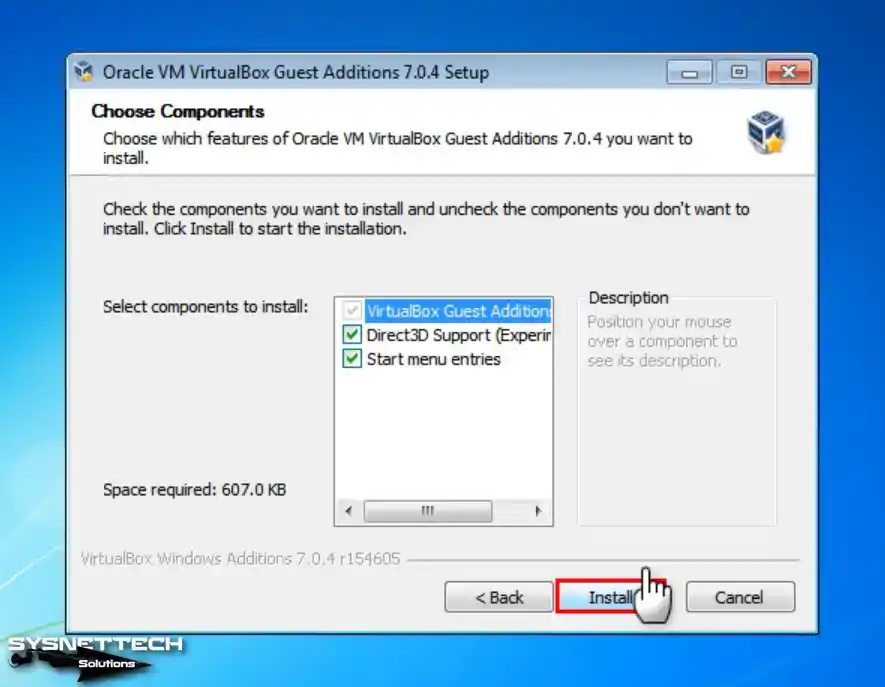
Check that the Direct3D feature is enabled in the Choose Components window and click the Install button.
Step 7
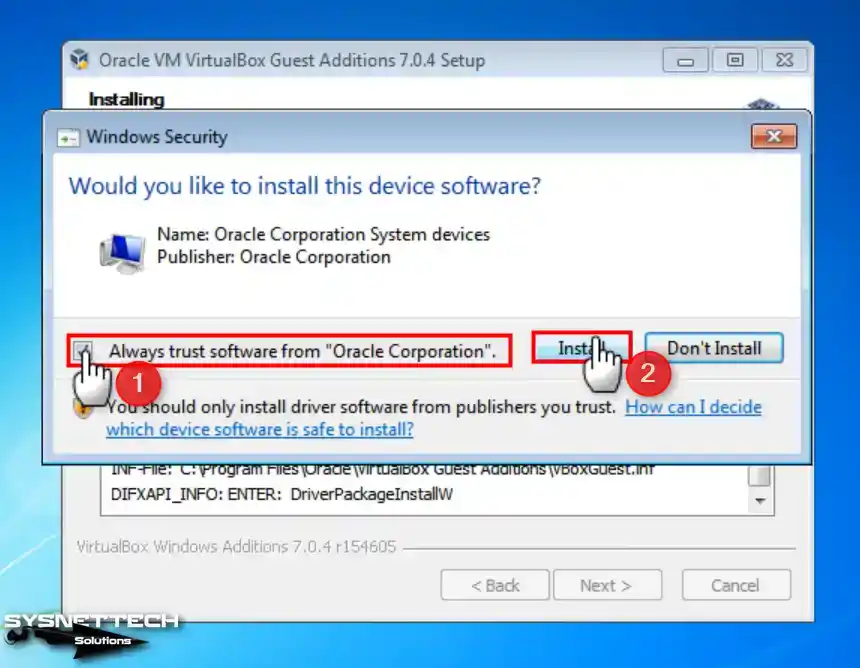
Check the option always to trust the software from Oracle and click the Install button again.
Step 8
Once the guest plugins are installed on the guest machine, please restart your system to confirm the changes take effect.
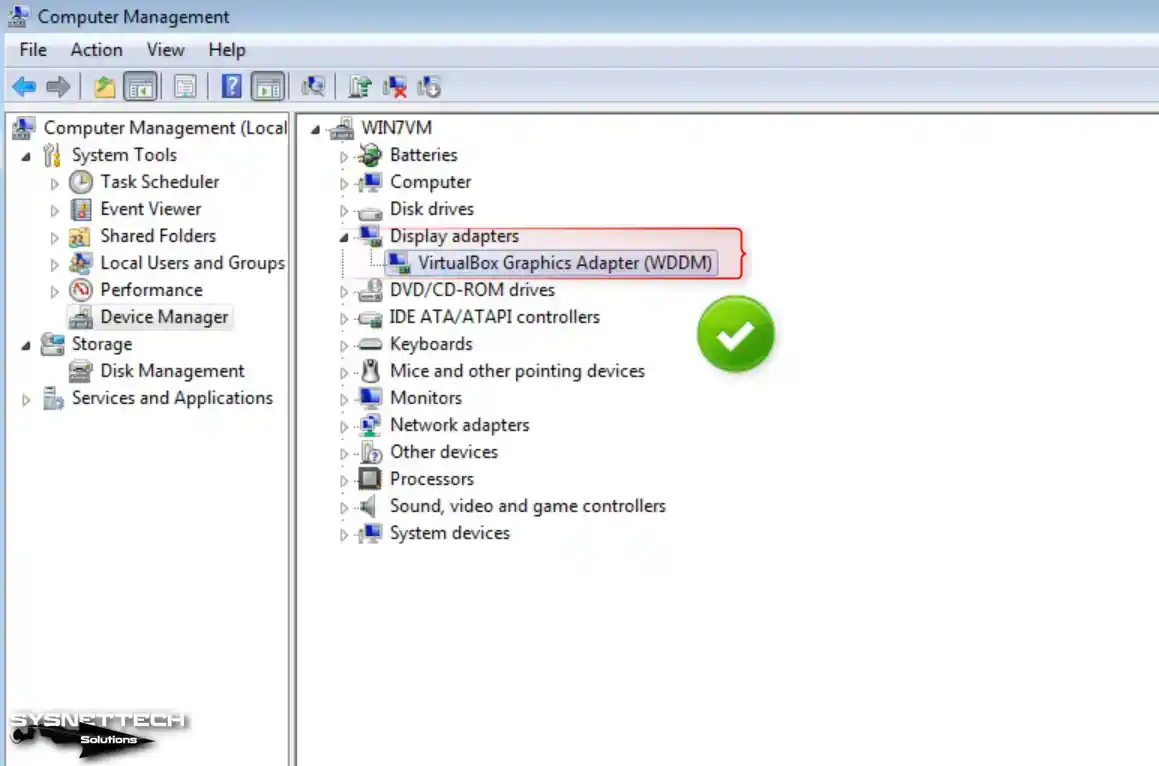
Step 9
When your guest machine is turned on, open Device Manager again and check that the drivers for the graphics adapter and other devices are installed correctly.
Step 10
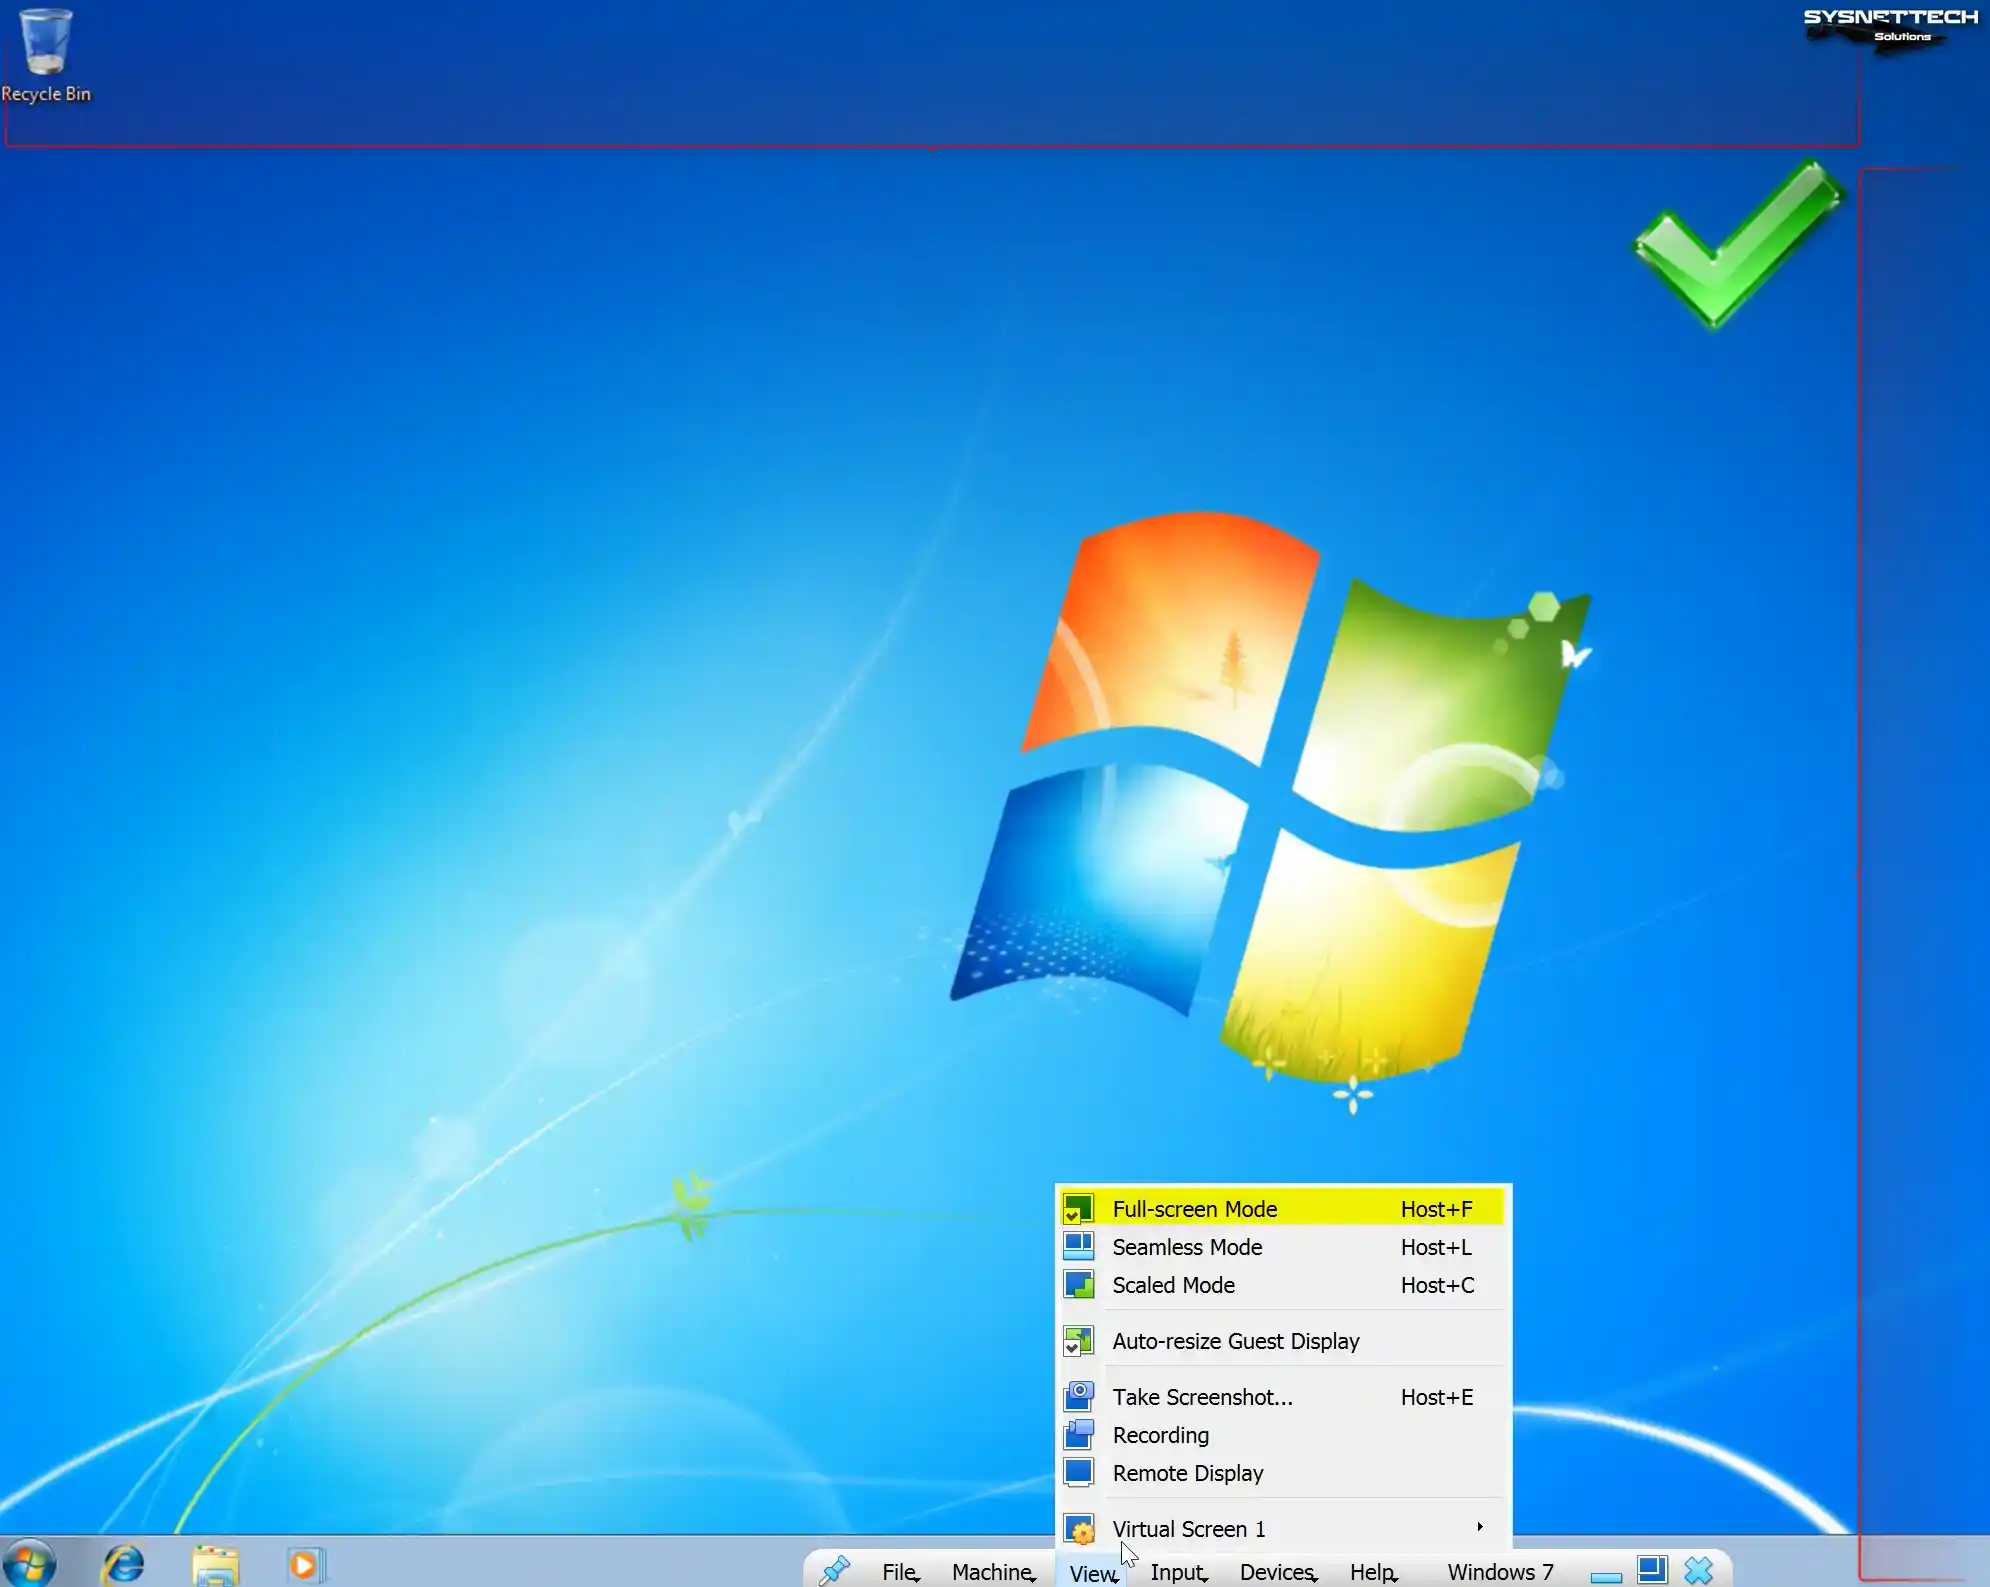
Click View / Full-Screen Mode from the tool menu to adapt your Windows 7 VM to your host’s screen size. Nevertheless, you possess a 2K or 4K display. In that case, it is crucial to remember that adjusting the display scale settings to a higher value in the virtualization software’s configuration will enhance the text size of the operating system.
Step 11
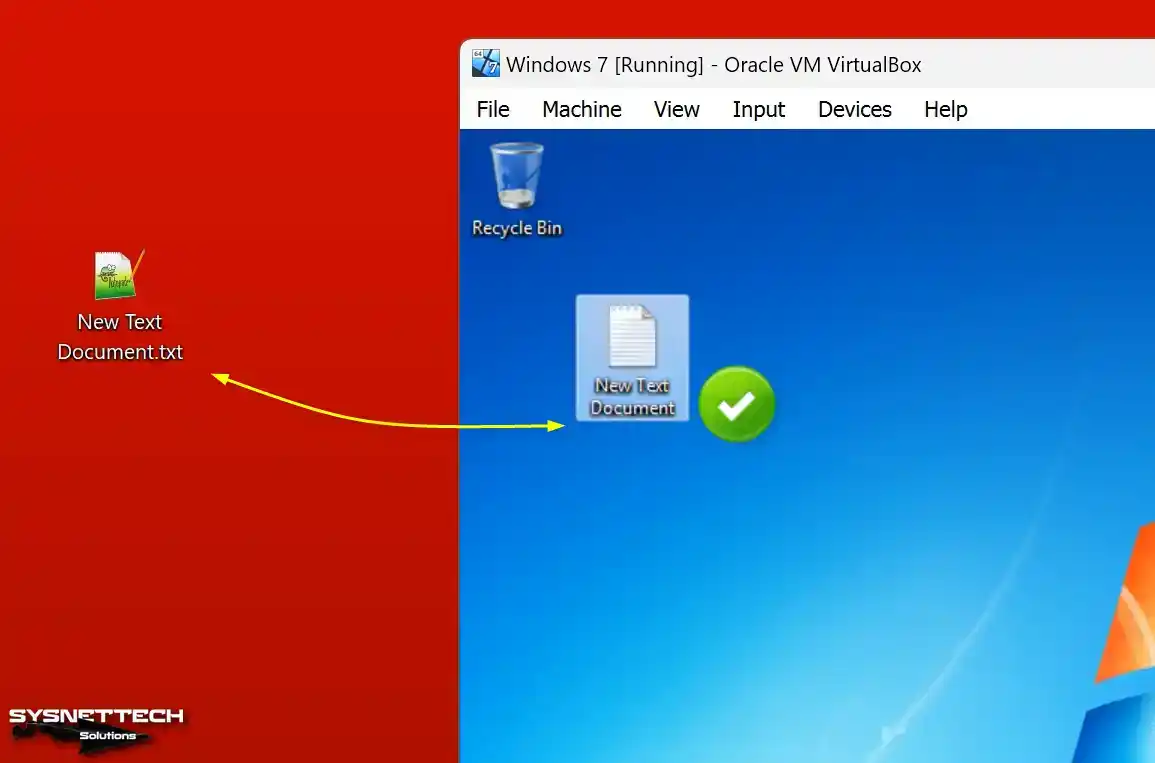
Kindly generate a new text document on your host computer and proceed by dragging and dropping it into the desktop location of your virtual PC. Upon reviewing the image below, you will observe a smooth and error-free file transfer.
How to Test Internet Connection
You can see that the network settings are configured when you want to access the Internet through the virtual machine. This is because the network services of VirtualBox are running correctly in the background of your host.
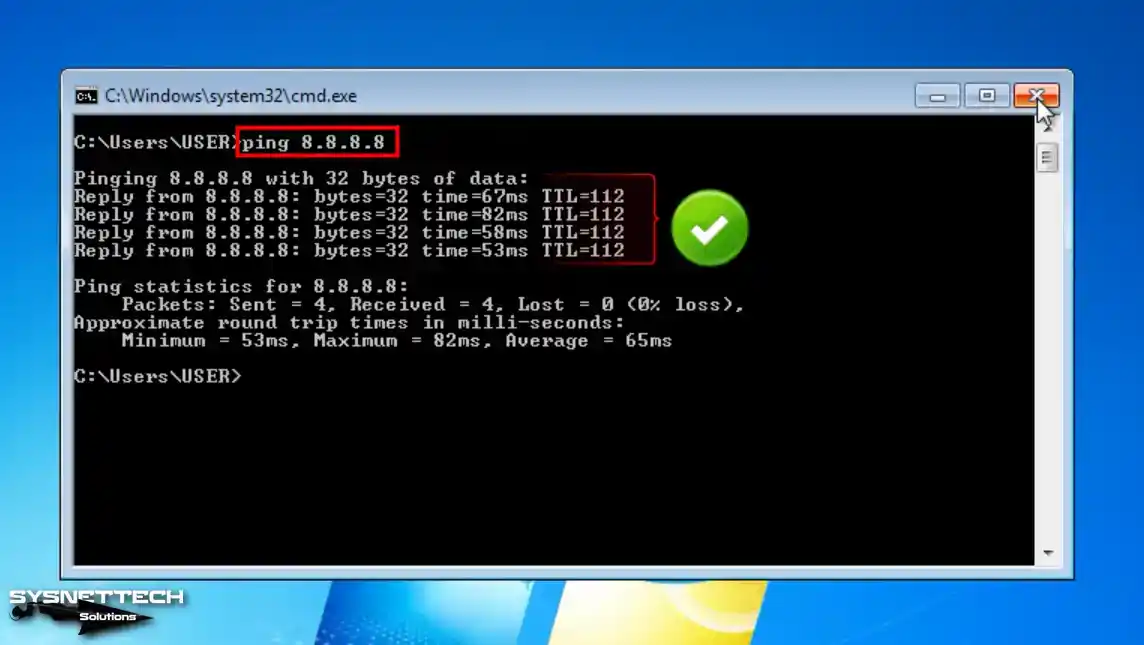
Step 1
Open the CMD command prompt on your guest machine, ping 8.8.8.8, and check that it can access Google servers.
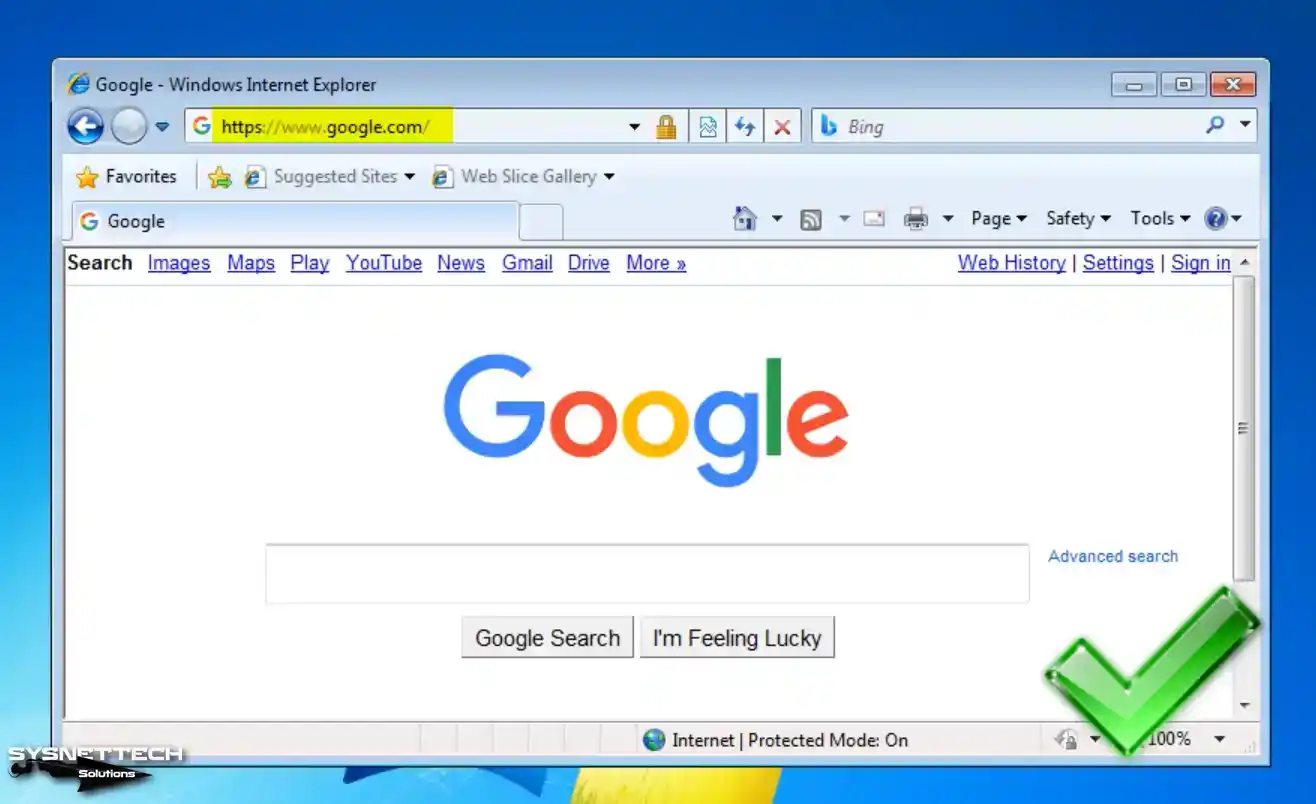
Step 2
Once the ping is successfully executed, proceed to establish a connection with the Google search engine using Internet Explorer. Verify that your Internet settings are accurately configured.
How to Configure Shared Folder
Although the drag-and-drop file transfer between the host and the virtual PC is working, sometimes copying files to the virtual machine may take time. It is valuable to create a Shared Folder to avoid such problems.
Step 1
Click Devices / Shared Folders / Shared Folders Settings on the Win7 guest machine.

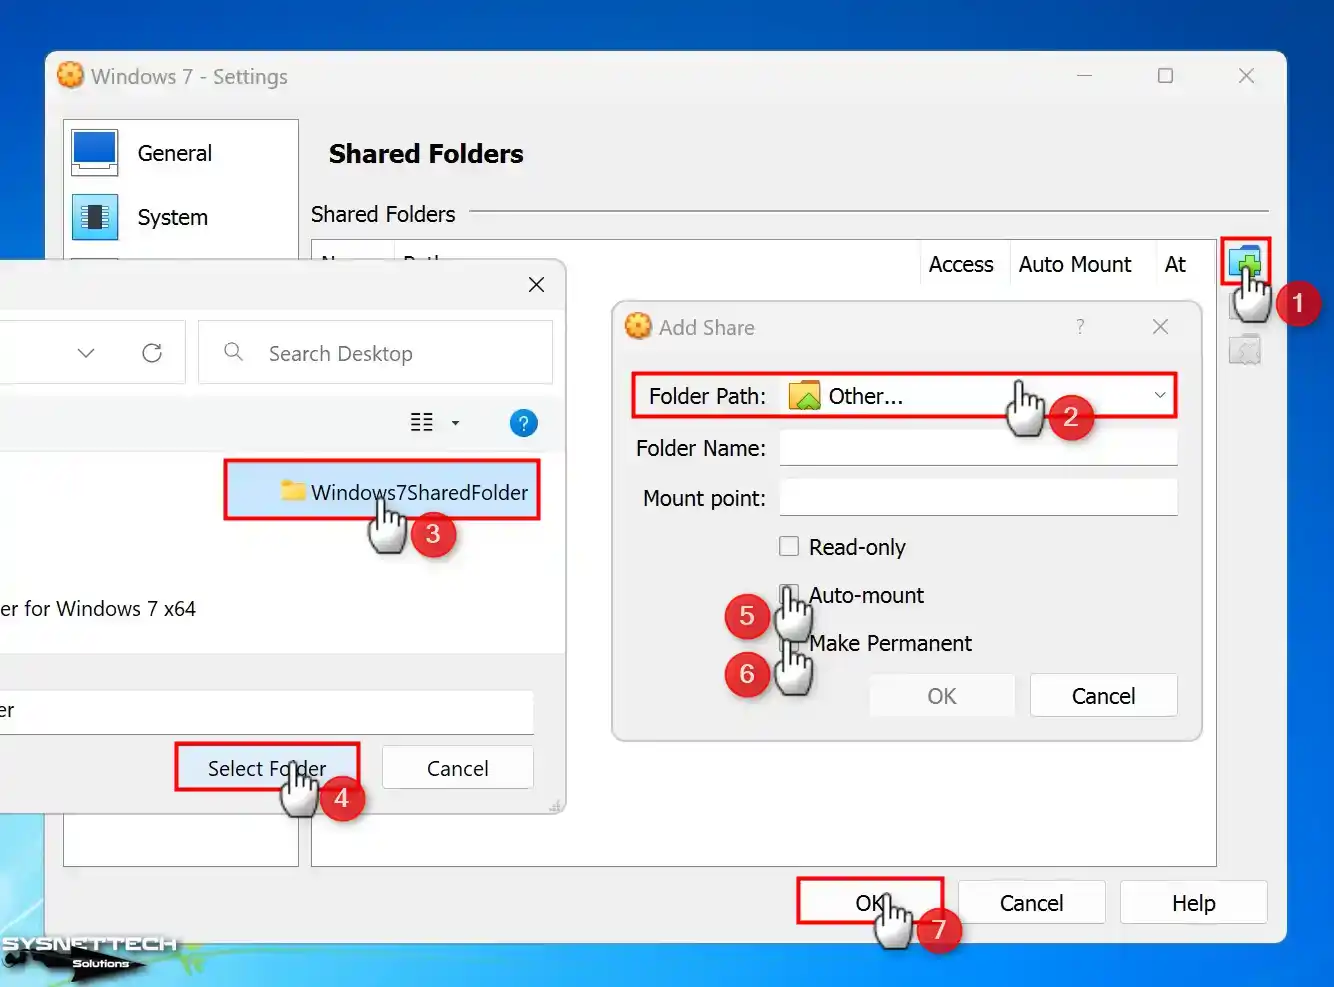
Step 2
When Shared Folders opens its settings, click the green + button and open the sharing settings. In the Add Share window, select a common folder between your host and your VM for the Folder Path.
Enable Auto-Mount and Make Permanent to map the shared folder as a network drive and on My Computer. After checking the location of the public folder again, click OK.
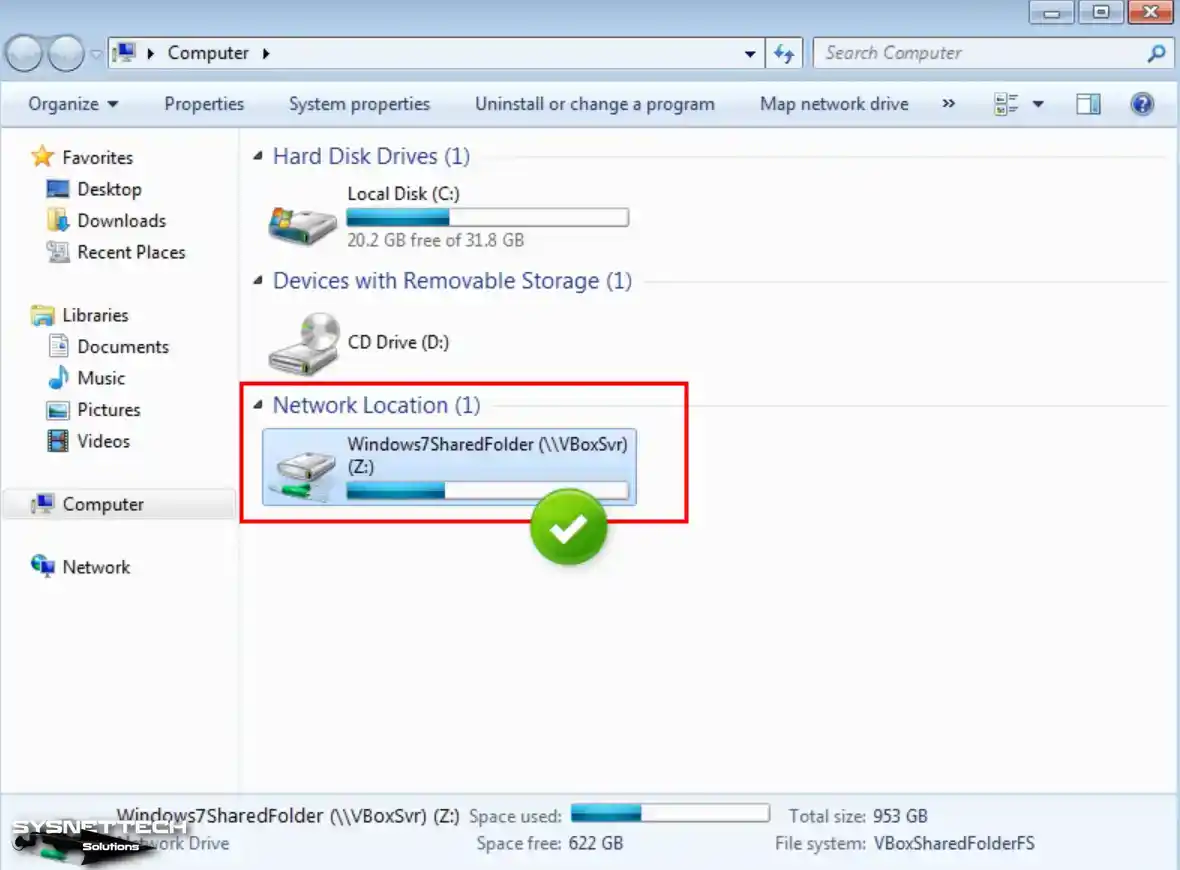
Step 3
Check that you can access the shared folder via the My Computer shortcut of the virtual machine.
Also, check that the VBOXSVR device is available on the network. If VBOXSVR is not visible, you can access Shared Folder after enabling the network and sharing settings.
Step 4
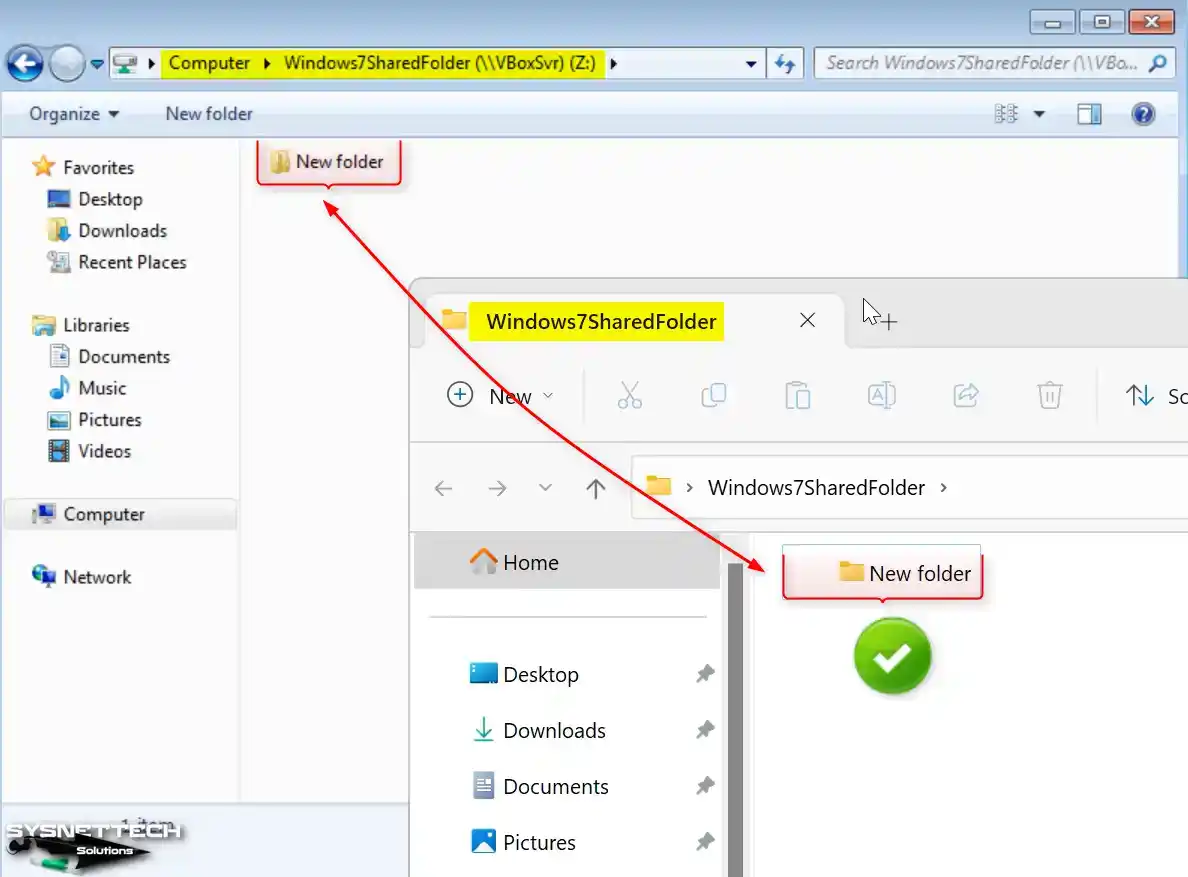
It will instantly be synchronized when you create a file or folder from your host system and a guest machine in the shared folder.
How to Install USB Driver and Use Flash Memory in VM
To use USB devices such as Flash Memory on a Windows 7 guest machine, you must enable USB 3.0 in the VM’s settings.
Step 1
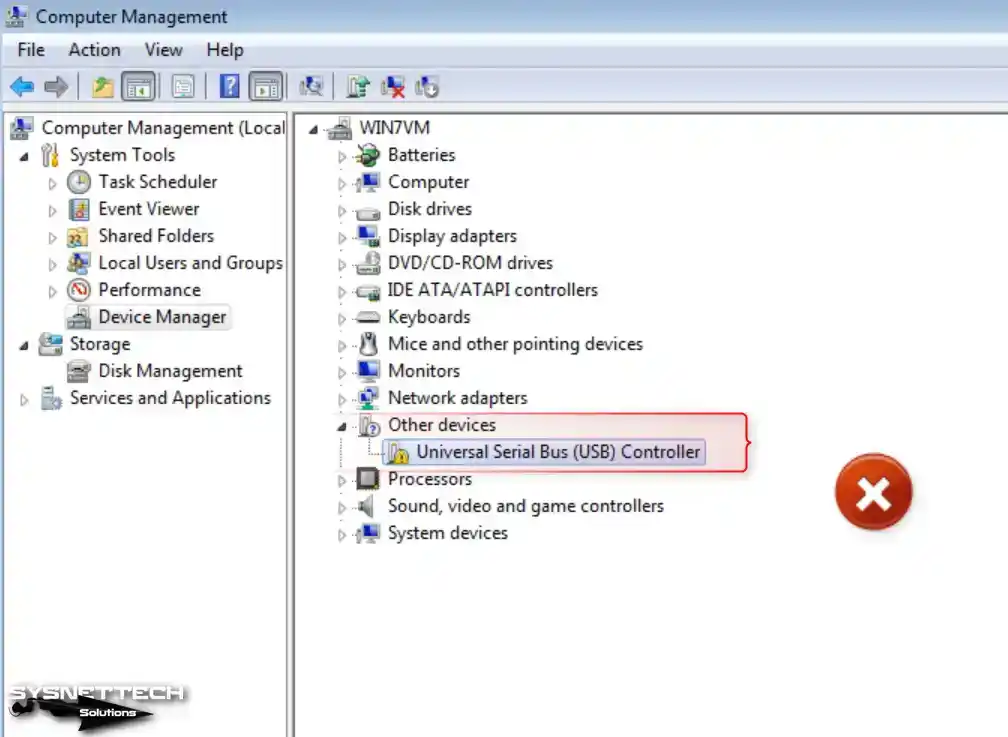
Upon launching your virtual machine, you will notice that the Universal Serial Bus (USB) Controller device driver is not automatically installed within the device manager. Download the USB 3.0 driver package for Windows 7 64 Bit from the table below the article to your host and copy the installation files to the VM.
Step 2
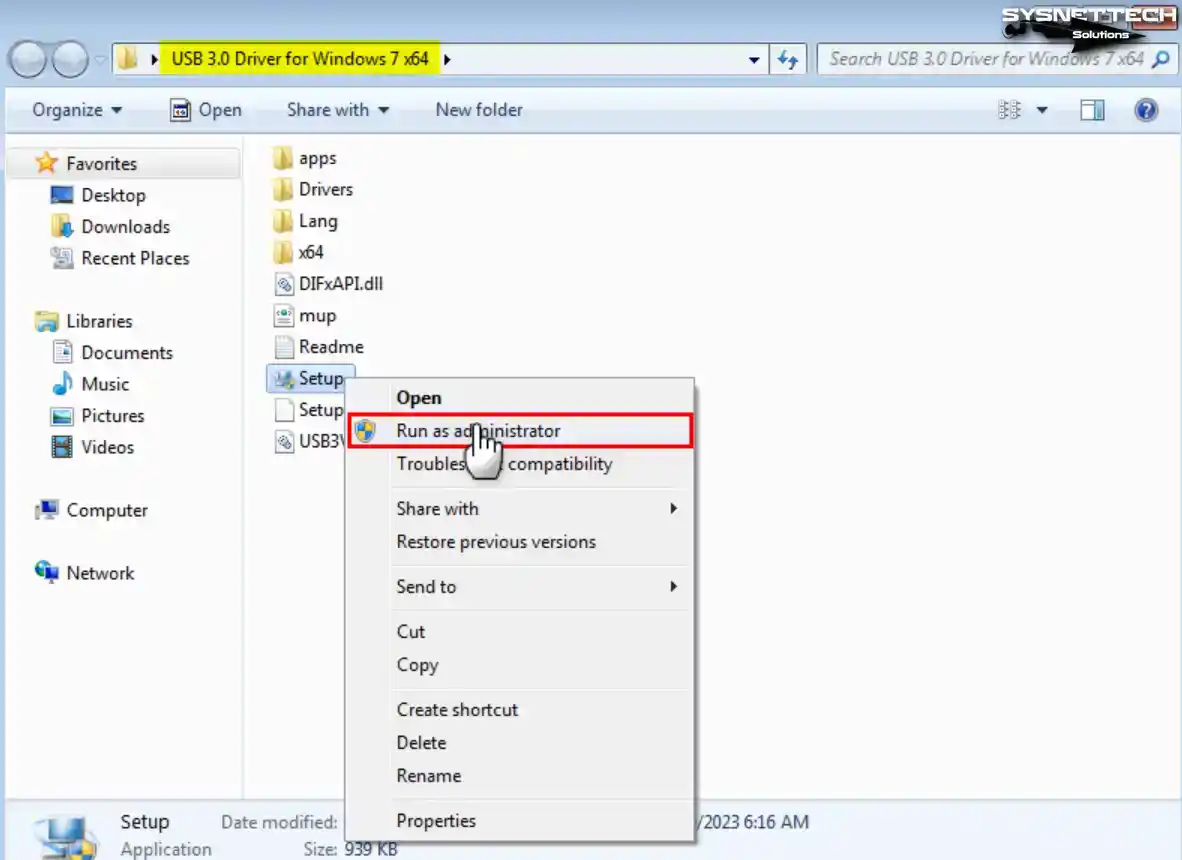
Open the USB 3.0 Driver folder and run the Setup file as an administrator.
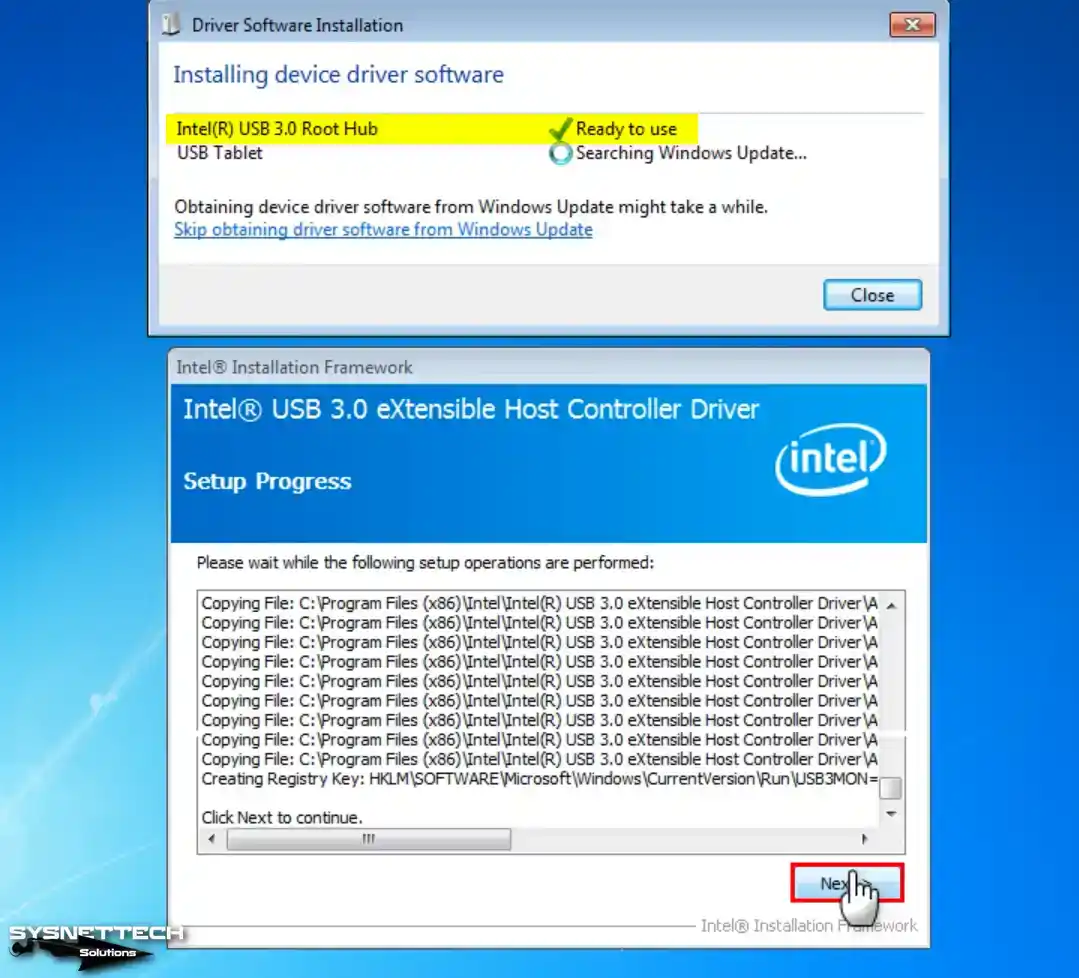
Step 3
After checking the drivers to be installed on your system in the Intel USB 3.0 eXtensible Host Controller Driver window, click Next.

Step 4
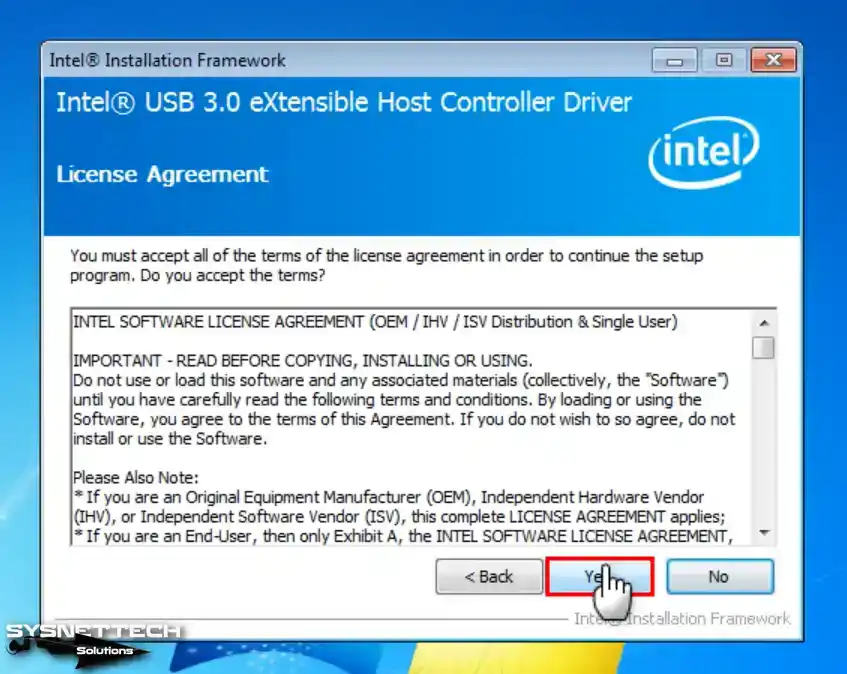
Click Yes to accept the USB 3.0 Driver’s license agreement and continue.
Step 5
Click Next in the information window, informing you not to run the USB driver from a USB storage device.

Step 6
While installing USB 3.0 drivers on Windows 7, the device manager configures the devices automatically.
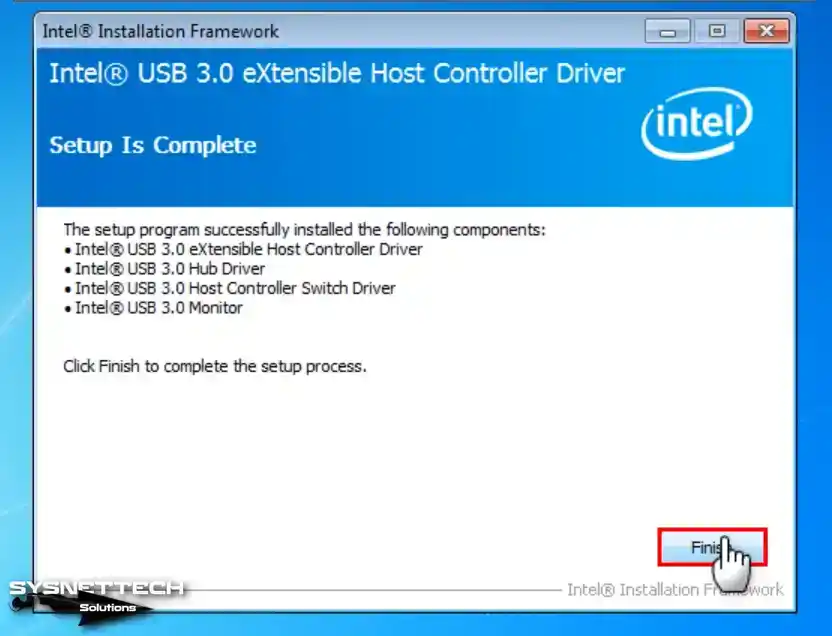
Step 7
Click the Finish button when the USB setup wizard is complete.
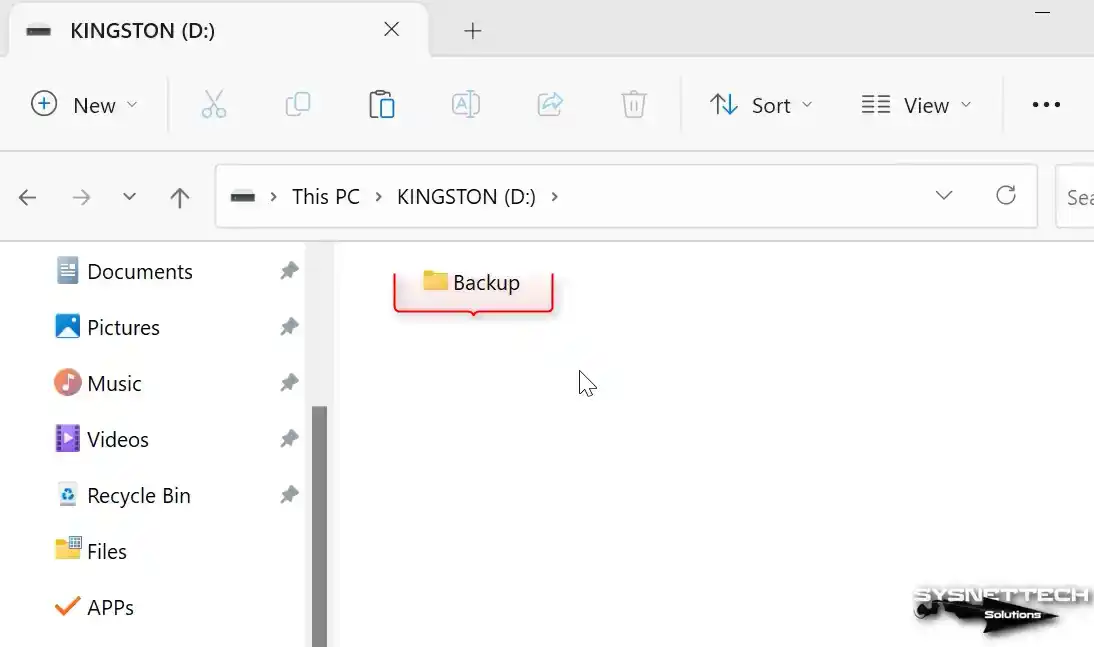
Step 8
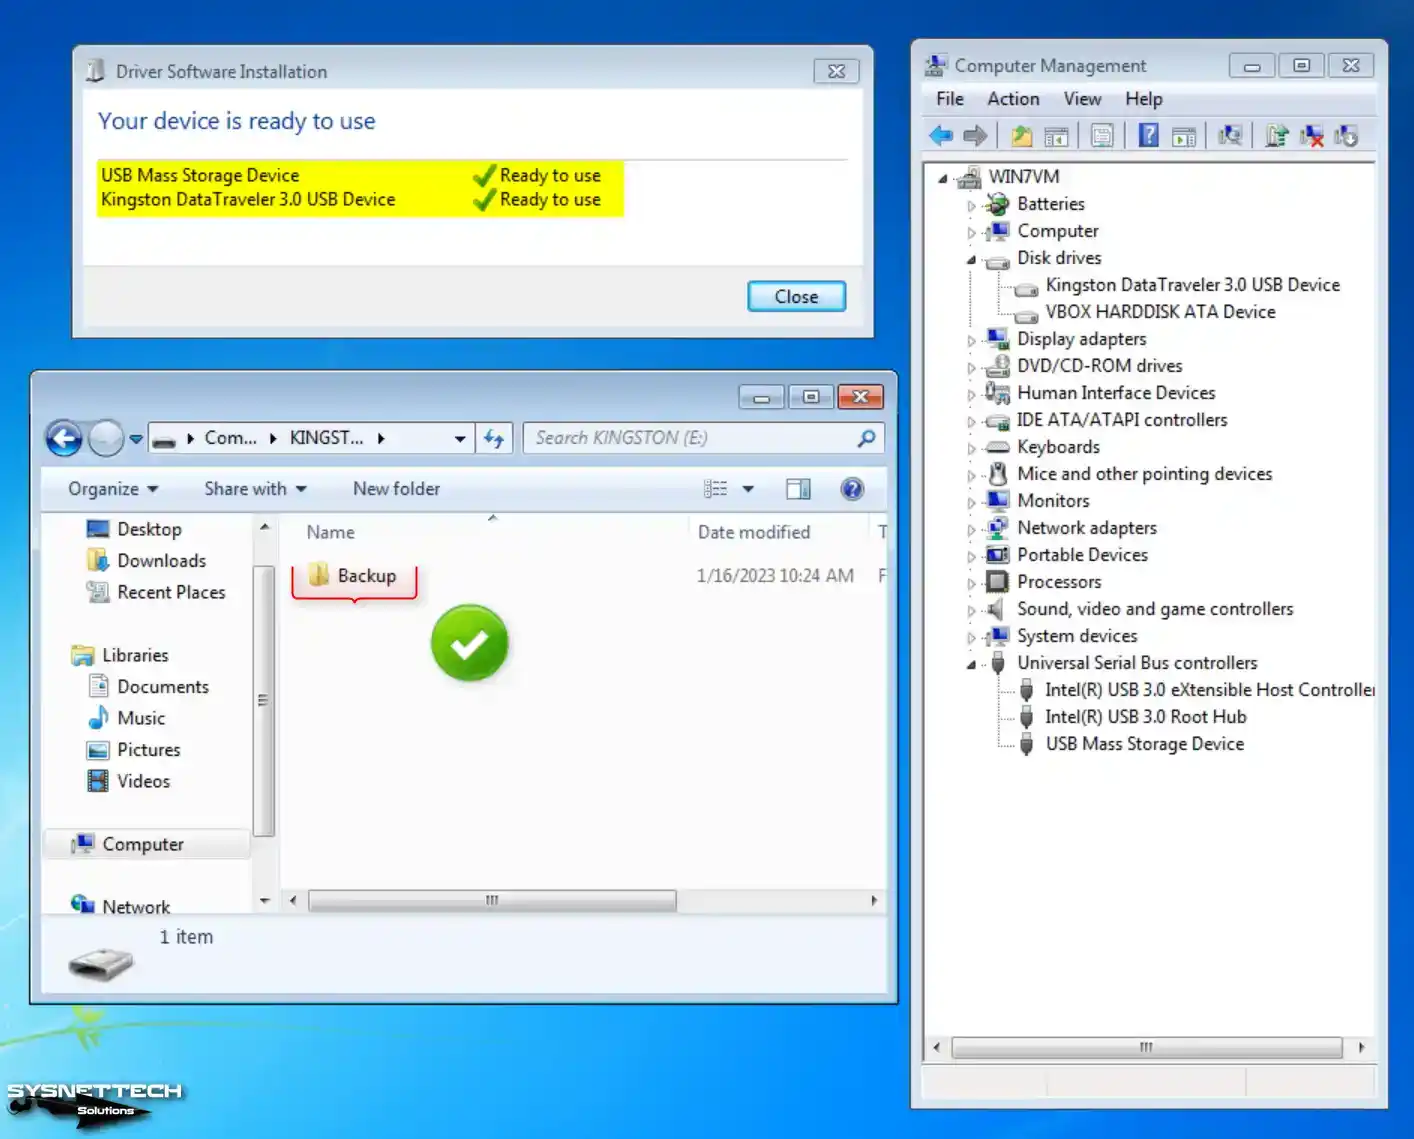
Connect a USB 3.0/3.1 compatible flash stick to any ports on your host PC and create a folder named Backup as an illustrative example.
Step 9
Click Devices / USB / Kingston DataTraveler 3.0 (Name of Your USB Device) on the Windows 7 guest machine.
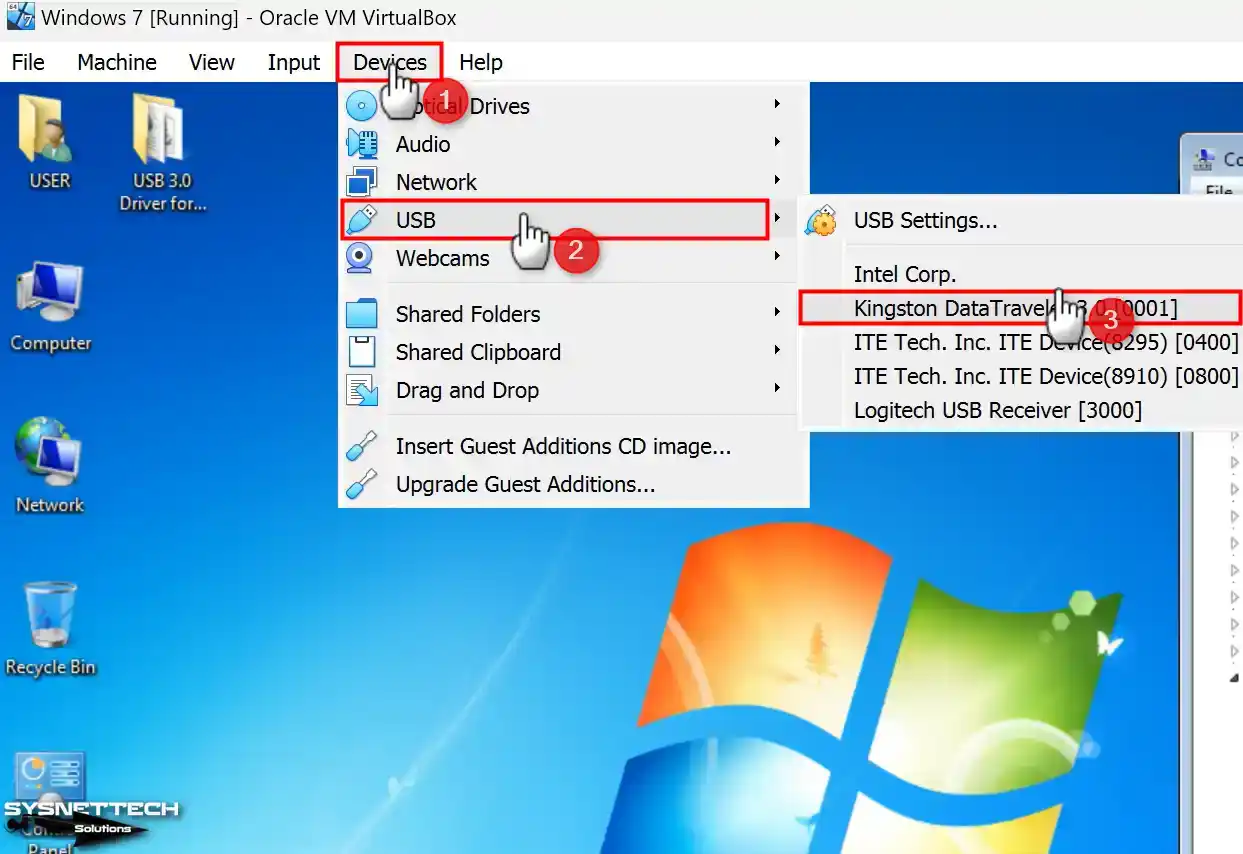
Step 10
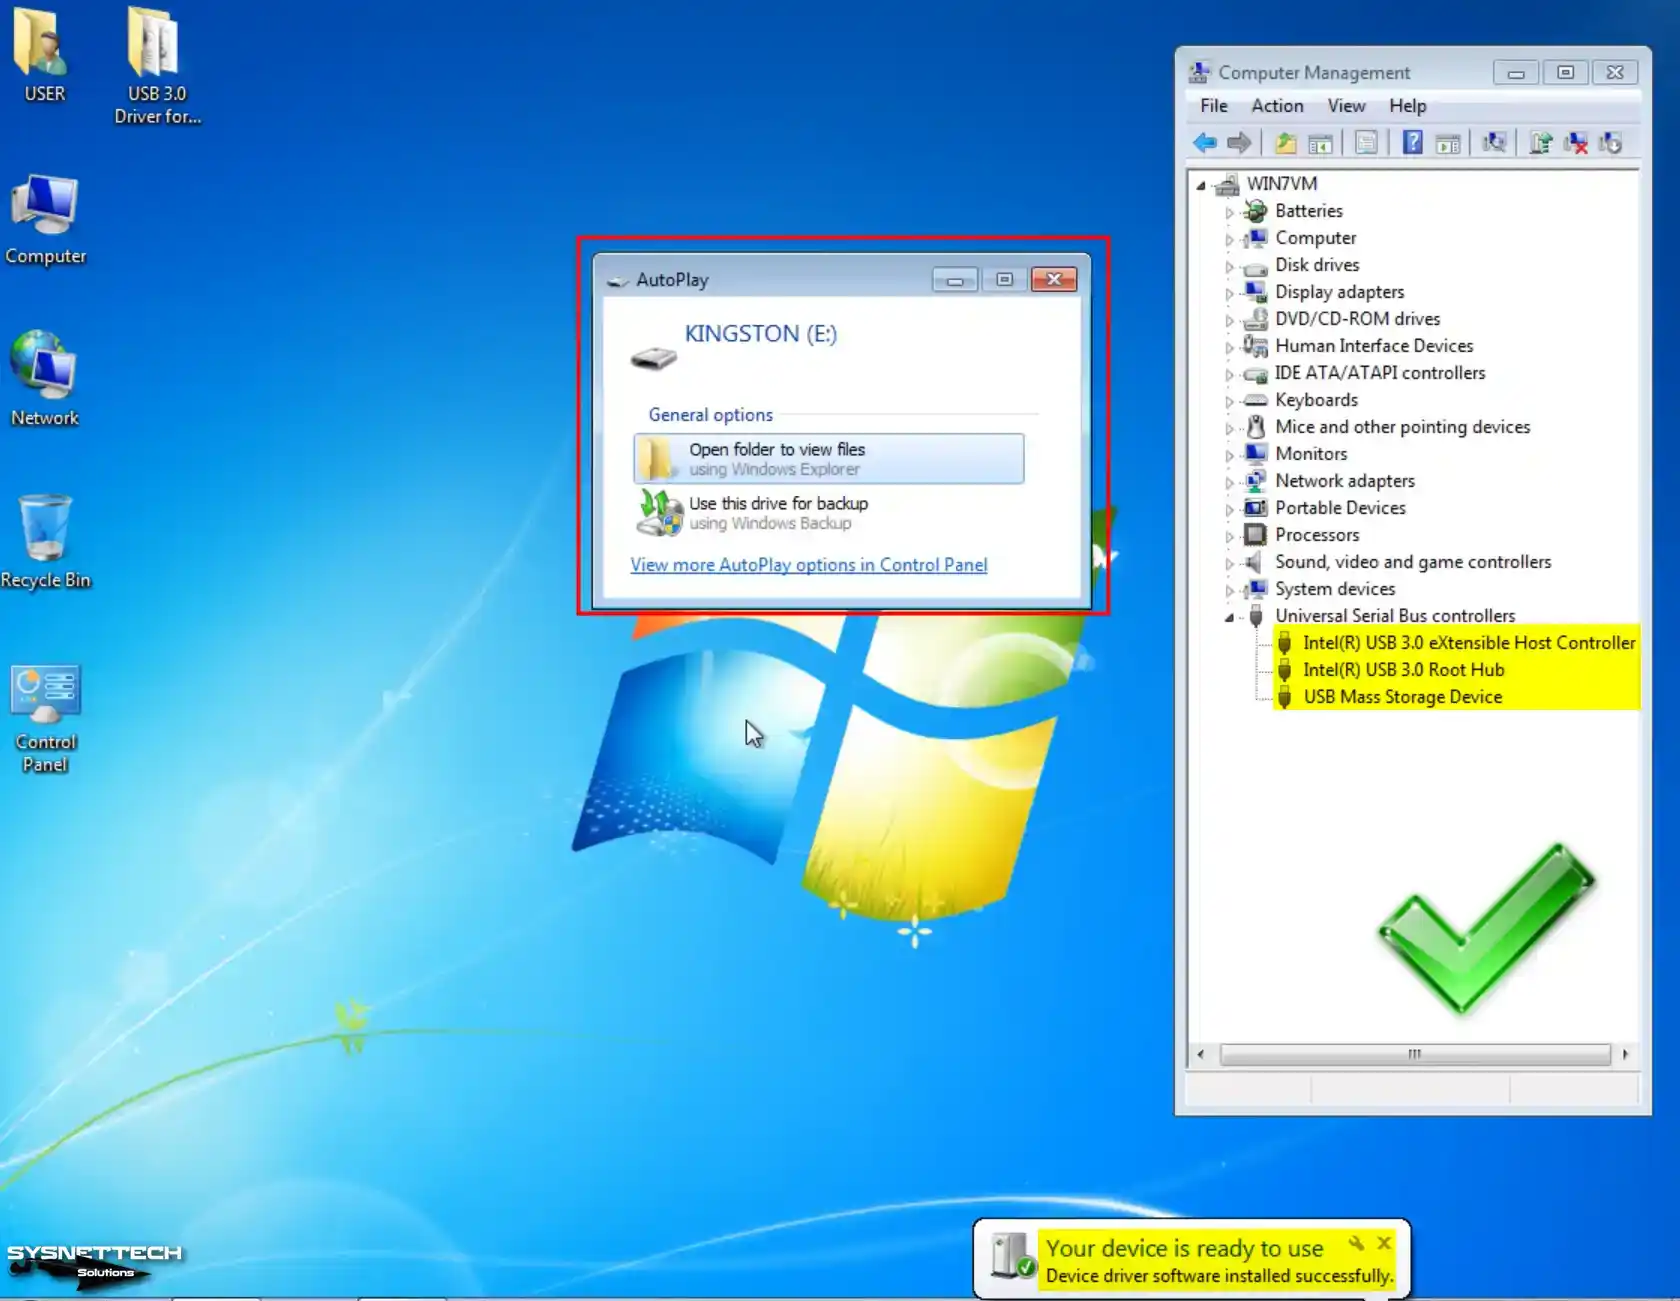
Your USB 3.0 memory inserted in your host machine will be automatically identified to your virtual computer.
- Intel(R) USB 3.0 eXtensible Host Controller
- Intel(R) USB 3.0 Root Hub
- USB Mass Storage Device
Step 11
Upon navigating to My Computer on your guest machine, you will observe successfully mounting your USB 3.0 or 3.1 flash memory within the virtual system.
Video
Installing Old Versions
VirtualBox
YouTube Video
Slide
Windows 7 ISO ve USB 3.0 Driver
The USB 3.0 Driver for Windows 7 x64
Windows 7 Ultimate SP1 EN 64 Bit
Related Articles
♦ How to Install Windows Vista on VirtualBox
♦ How to Install Windows 8 on VirtualBox
♦ How to Install Windows 10 on VirtualBox
♦ How to Upgrade Oracle VM VirtualBox
♦ How to Install VirtualBox on Ubuntu
Here is the working VirtualBox image of Windows 7; you can download and use it in minutes. It will work on most of the host Operating Systems like Windows 10/11 or Linux and macOS as long as you have the Oracle VirtualBox software.
Windows 7 is an outdated OS from Microsoft now. It is highly not recommended to use in the production environment. For any specific reasons, you still need to use it as a virtual machine; the below pre-installed image will make your life easy.
About this Windows 7 Pre-Installed VirtualBox Image:
- This image has Windows 7 ultimate OS type.
- You do not need to activate the Windows from the control panel.
- VirtualBox guest additionals are installed to provide better performance and multiple screen resolutions.
- The administrator account doesn’t have a password.
How to Use Windows 7 VirtualBox Image on Windows host
- Make sure your host computer has enough hardware resources. You should be able to allocate a minimum of 2GB RAM and 2 processor cores and have free disk space of 50GB.
- Download and install the latest Oracle VirtualBox.
- Download the pre-installed image of Windows 7 from our official link.
- You need to have the 7Zip program to extract the content. The downloaded zip file has the virtual hard disk file of the virtual machine. Since it doesn’t have the configuration file, we need to create a new VM and attach the extracted VDI file.
- Create a new virtual machine and select Windows 7 as the guest VM.
- In the disk creation screen, select the existing disk option and browse the extracted VDI file.
- Other steps are usual and straightforward in VirtualBox.
- Once you power on the VM, it should boot without any issues. The Windows 7 virtual machine will be ready in 2 minutes.
The above steps are identical if you are going to use this pre-installed image on Linux or macOS computers.
Read Also: Windows XP VirtualBox VDI Image
Important Settings/Steps
- If the virtual machine performs slow, you can increase the RAM and processor core numbers. It worked fine for me with 2GB RAM and 2 Processor cores.
- To get the full screen and other display enhancements by VirtualBox guest additions, you need to increase the video memory (to 128MB) and enable 3D acceleration. By default, these settings are not enabled. You need to change them while the virtual machine is powered off.
- If required, you need to run the Windows update or install the specific Windows 7 updates. This image doesn’t have any Windows updates.
- Always take a snapshot before you make any significant changes.
- It is highly recommended to set the admin password.
- Since Windows 7 is officially not supported by Microsoft anymore, do not use it as your regular Operating System.
We believe this Windows 7 pre-installed VirtualBox image is helpful in some way to use for testing, development or running any legacy applications and games.
If any of the above solutions did not fix the Windows PC issues, we recommend downloading the below PC repair tool to identify and solve any PC Issues.
Dinesh is the founder of Sysprobs and written more than 400 articles. Enthusiast in Microsoft and cloud technologies with more than 15 years of IT experience.