Когда появилась самая первая версия Server Core многие администраторы избегали его по той причине, что они могли использовать исклюительно возможности командной строки, а это не всегда удобно. Однако, в Windows Server 2012 ситуация поменялась, теперь стало возможным использовать гибридный режим, т.е. возможно как отключение, так и включение графического интерфейса.
Отключение GUI
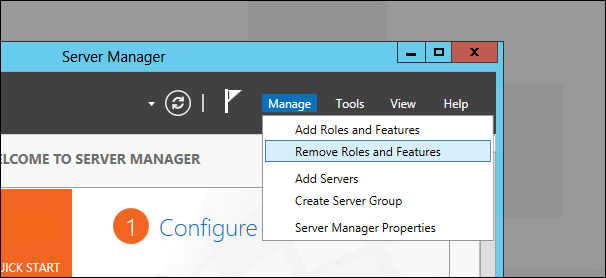
В Windows Server 2012 GUI последовал примеру общей архитектуры интерфейса управления и работы операционной системы и стал «фичей». Это в свою делает процесс удаления графического интерфейса простым до невозможности. Для начала необходимо запустить «Server Manager».
Нажмите «Manage», а затем выберите пункт «Remove Roles or Features» из меню.
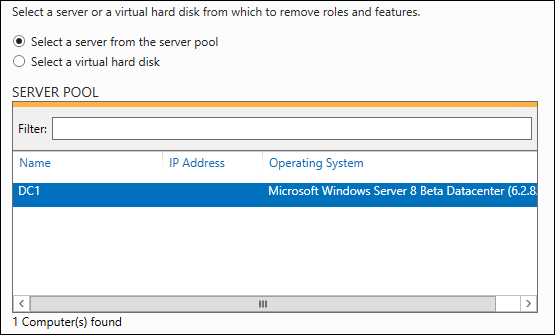
Далее нажмите «Next» для того, чтобы проскочить предварительные пункты мастера настройки, далее выберите необходимый вам сервер из доступного пула (в нашем случае это сервер DC1) и нажмите «Next».
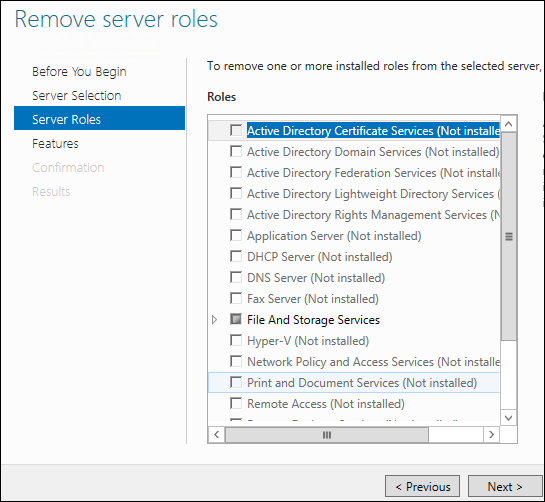
Так как GUI не является ролью, нажмите «Next», чтобы пропустить мастер ролей и перейти к следующей секции.
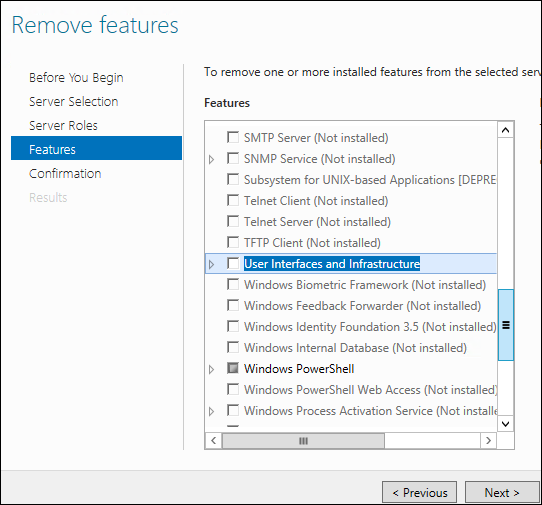
Когда вы дойдете до мастера фич, вам будет необходимо снять галочку с чек-бокса «User Interfaces and Infrastructure», а затем нажать «Next».
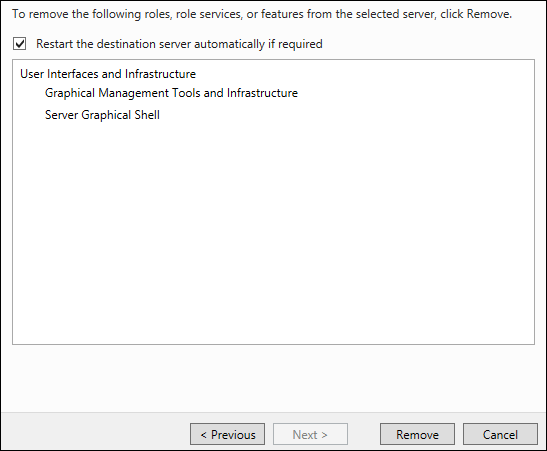
Поставьте отметку на «Restart Destination Server» и нажмите «Remove».
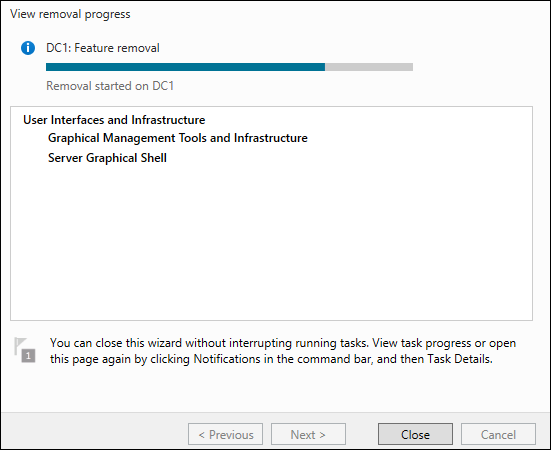
После этого действия GUI будет удален.
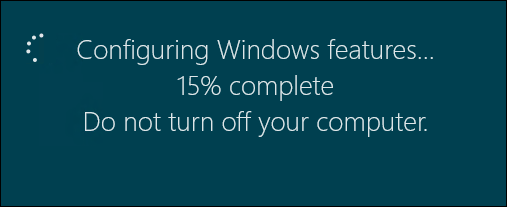
После удаления всех необходимых данных сервер будет автоматически перезагружен.
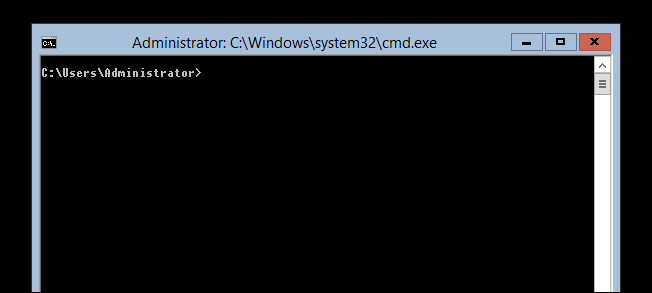
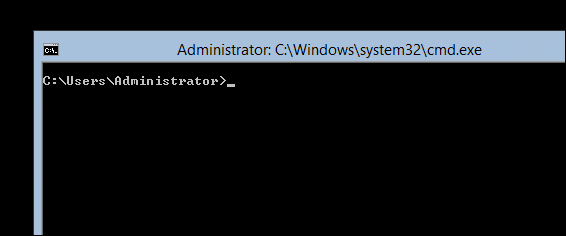
После того как сервер вновь загрузиться, а вы залогинитесь – с этого момента вы сможете использовать только командную строку для взаимодействия с сервером.
Включение GUI
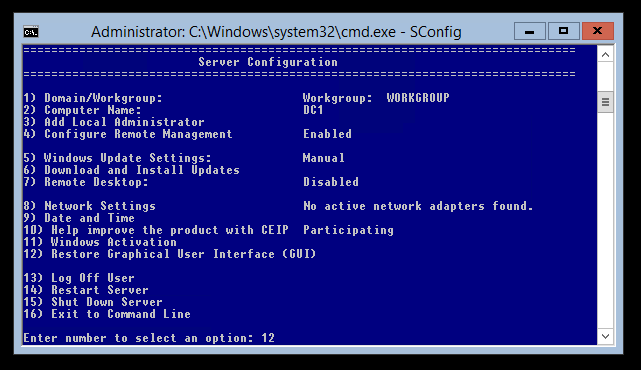
После того как мы успешно удалили GUI, было бы очень неплохо знать как же все-таки его вернуть обратно. Для этого мы используем утилиту «SConfig» — так что просто наберите в командной строке «sconfig» и нажмите Enter.
В самом низу экрана можно увидеть пункт меню 12, который как раз отвечает за восстановление графического интерфейса – все что нам остается сделать, это набрать 12 и нажать «Enter».
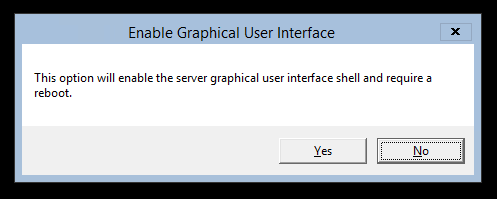
На экране появится уведомление о том, что в случае включения GUI потребуется перезагрузка сервера – смело нажимаем «Yes» для завершения операции восстановления графического интерфейса.
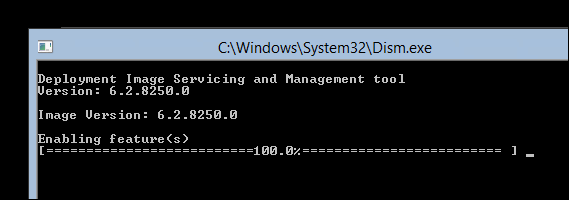
После этого запуститься DISM, который произведет добавление необходимых файлов для активации графической оболочки.
После окончания вышеуказанного процесса вам будет предложено перезагрузить сервер, наберите «y» и нажмите для перезагрузки.
Отключение GUI с помощью PowerShell
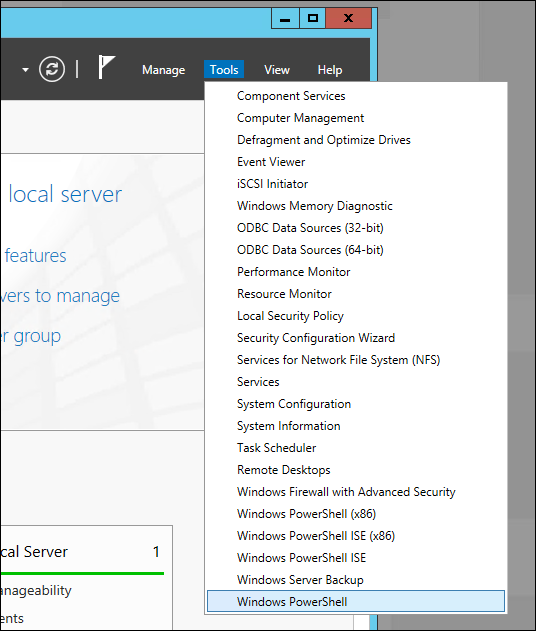
Также мы можем осуществить все вышеперечисленный операции как по удалению, так и по возвращению GUI гораздо быстрее, если воспользуемся командами PowerShell. Для этого необходимо открыть «Server Manager», нажать на «Tools» и запустить PowerShell.
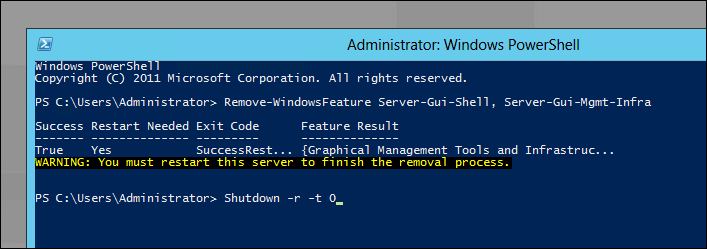
Для того чтобы удалить GUI мы используем командлет Remove-WindowsFeature:
Remove-WindowsFeature Server-Gui-Shell, Server-Gui-Mgmt-Infra
В свою очередь Remove-WindowsFeature является просто алиасом команды, а значит мы вполне можем также использовать следующие команды:
Uninstall-WindowsFeature Server-Gui-Shell, Server-Gui-Mgmt-Infra
После ввода команды и нажатия клавиши «Enter» начнется процедура удаления графического интерфейса.
После завершения операции удаления бинарников необходимо будет перезагрузиться, для того чтобы изменения вступили в силу. Набираем следующую команду и нажимаем «Enter»:
Shutdown –r -t 0
После перезагрузки для работы будет доступна только командная строка.
Включение GUI с помощью PowerShell
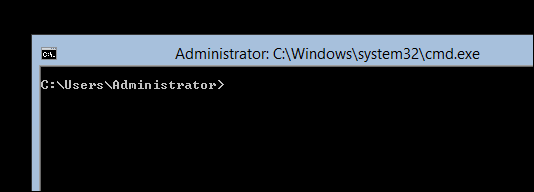
Первое что нам нужно сделать, это попасть в PowerShell, набираем из командной строки PowerShell и нажимаем «Enter».
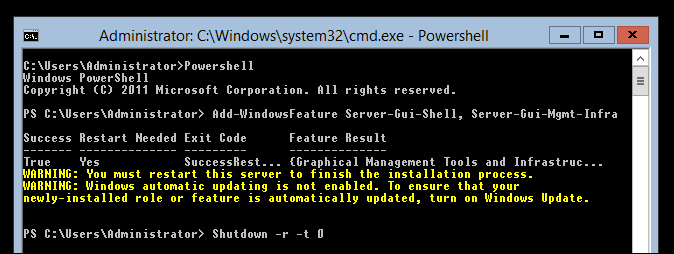
Теперь нам понадобится командлет Add-WindowsFeature для того чтобы вернуть GUI обратно:
Add-WindowsFeature Server-Gui-Shell, Server-Gui-Mgmt-Infra
Это также является алиасом для следующих команд:
Install-WindowsFeature Server-Gui-Shell, Server-Gui-Mgmt-Infra
После завршения процедуры добавления компонентов необходимо перезагрузить сервер с помощью команды shutdown:
Shutdown –r -t 0
После перезагрузки сервера графический интерфейс будет снова доступен.
P.S> Загрузить Windows Server 2012 RC можно здесь.
С уважением,
Георгий А. Гаджиев
Эксперт по информационной инфраструктуре,
Microsoft
В этой статье я постарался собрать в одном месте основные команды cmd и PowerShell, которые полезны при настройке и управлении Windows Server Core. Думаю, этот гайд будет полезен как новичкам, так и опытным системным администраторам, как справочник по базовым командам Server Core.
Содержание:
- Настройка Windows Server Core с помощью SCONFIG
- Основные команды PowerShell для настройки Server Core
- Установка обновлений в Server Core
- Часто используемые команды в Server Core
Напомним, что Server Core это особый режим установки Windows Server без большинства графических инструментов и оболочек. Управление таким сервером выполняется из командной строки или удаленно.
Преимущества Windows Serve Core:
- Меньшие требования к ресурсам;
- Повышенная стабильность, безопасность, требует установки меньшего количества обновлений (за счет меньшего количества кода и используемых компонентов);
- Идеально подходит для использования в качестве сервера для инфраструктурных ролей (контроллер домена Active Directory, DHCP сервер, Hyper-V сервер, файловый сервер и т.д.).
Server Core лицензируется как обычный физический или виртуальный экземпляр Windows Server (в отличии от Hyper-V Server, который полностью бесплатен).
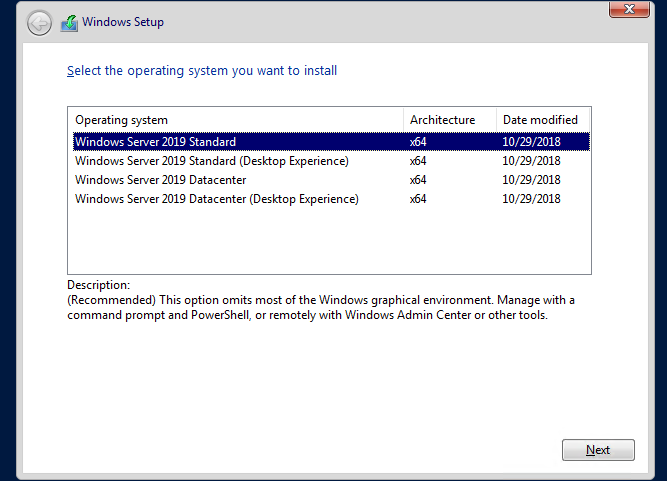
Для установки Windows Server 2016/2019 в режиме Core нужно выбрать обычную установку. Если вы выберите Windows Server (Desktop Experience), будет установлен GUI версия операционной системы (в предыдущих версиях Windows Server она называлась Server with a GUI).
После установки Windows Server Core перед вами появляется командная строка, где нужно задать пароль локального администратора.
При входе на Server Core открывается командная строка (cmd.exe). Чтобы вместо командной строки у вас всегда открывалась консоль PowerShell.exe, нужно внести изменения в реестр. Выполните команды:
Powershell.exe
Set-ItemProperty -Path 'HKLM:SoftwareMicrosoftWindows NTCurrentVersionWinLogon' -Name Shell -Value 'PowerShell.exe'
И перезагрузите сервер:
Restart-Computer -Force
Если вы случайно закрыли окно командной строки, нажмите сочетание клавиш Ctrl+Alt+Delete, запустите Task Manager -> File -> Run -> выполните
cmd.exe
(или
PowerShell.exe
).
Настройка Windows Server Core с помощью SCONFIG
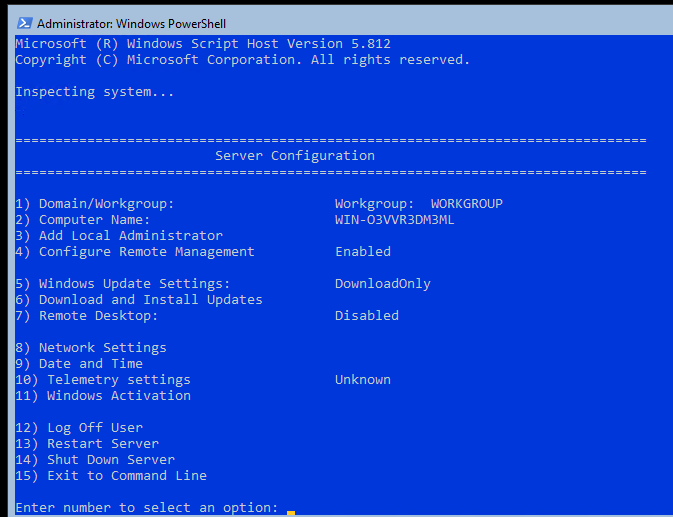
Для базовой настройки Server Core можно использовать встроенный скрипт sconfig. Просто выполните команду sconfig в консоли. Перед вами появиться меню с несколькими пунктами:
С помощью меню Server Configuration можно настроить:
- Добавить компьютер в домен или рабочую группу;
- Изменить имя компьютера (hostname);
- Добавить локального администратора;
- Разрешить/запретить удаленное управления и ответы на icmp;
- Настроить параметры обновления через Windows Update;
- Установить обновления Windows;
- Включить/отключить RDP;
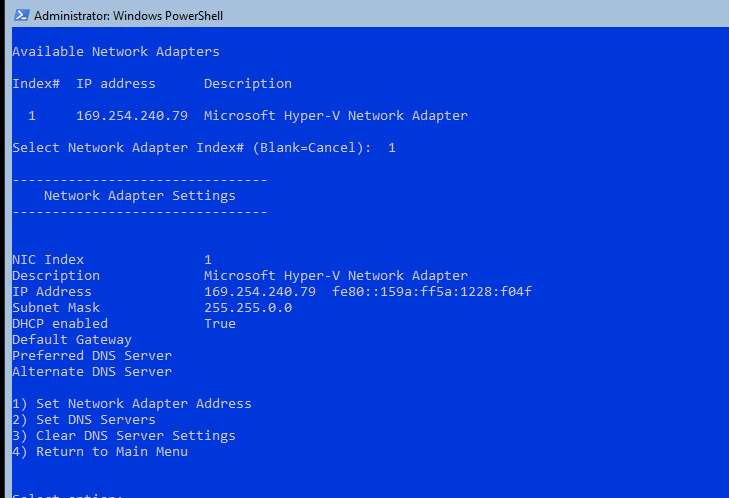
- Настроить параметры сетевых адаптеров (IP адрес, шлюз, DNS сервера);
- Настроить дату и время;
- Изменить параметры телеметрии;
- Выполнить logoff, перезагрузить или выключить сервер.
Все пункт в меню
sconfig
пронумерованы. Чтобы перейти в определенное меню наберите его номер и Enter.
В некоторых пунктах меню настройки sconfig есть вложенные пункты. Там также, чтобы перейти к определенной настройке, нужно сделать выбор цифры пункта меню.
Не будем подробно рассматривать все пункты настройки sconfig, т.к. там все достаточно просто и очевидно. Однако в большинстве случаев администраторы предпочитают использовать для настройки новых хостов с Server Core различные PowerShell скрипты. Это намного проще и быстрее, особенно при массовых развёртываниях.
Основные команды PowerShell для настройки Server Core
Рассмотрим основные команды PowerShell, которые можно использовать для настройки Server Core.
Узнать информацию о версии Windows Server и версии PowerShell:
Get-ComputerInfo | select WindowsProductName, WindowsVersion, OsHardwareAbstractionLayer
$PSVersionTable
Для перезагрузки Server Core нужно выполнить команду PowerShell :
Restart-Computer
Чтобы выполнить выход из консоли Server Core, наберите:
logoff
Настройка параметров сети
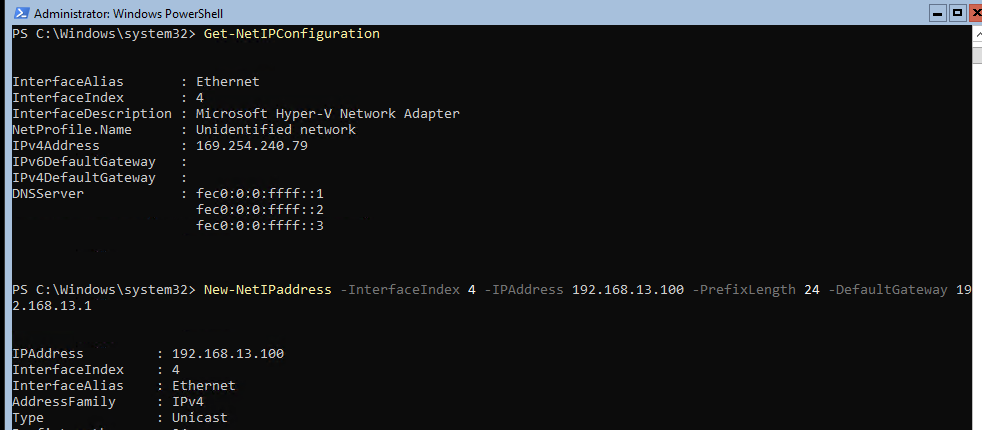
Теперь нужно из PowerShell нужно настроить параметры сети (по умолчанию Windows настроена на получение адреса от DHCP). Выведите список сетевых подключений:
Get-NetIPConfiguration
Теперь укажите индекс интерфейса сетевого адаптера (InterfaceIndex), который нужно изменить и задайте новый IP адрес:
New-NetIPaddress -InterfaceIndex 4 -IPAddress 192.168.13.100 -PrefixLength 24 -DefaultGateway 192.168.13.1
Set-DNSClientServerAddress –InterfaceIndex 4 -ServerAddresses 192.168.13.11,192.168.13.
111
Проверьте текущие настройки:
Get-NetIPConfiguration
Если нужно сбросить IP адрес и вернуться к получению адреса от DHCP, выполните:
Set-DnsClientServerAddress –InterfaceIndex 4 –ResetServerAddresses
Set-NetIPInterface –InterfaceIndex 4 -Dhcp Enabled
Включить/отключить сетевой адаптер:
Disable-NetAdapter -Name “Ethernet0”
Enable-NetAdapter -Name “Ethernet 0”
Включить, отключить, проверить статус поддержки IPv6 для сетевого адаптера:
Disable-NetAdapterBinding -Name "Ethernet0" -ComponentID ms_tcpip6
Enable-NetAdapterBinding -Name "Ethernet0" -ComponentID ms_tcpip6
Get-NetAdapterBinding -ComponentID ms_tcpip6
Настроить winhttp прокси сервер для PowerShell и системных подключений:
netsh Winhttp set proxy <servername>:<port number>
Настройка времени/даты
Вы можете настроить дату, время, часовой пояс с помощью графической утилиты
intl.cpl
или с помощью PowerShell:
Set-Date -Date "09/03/2022 09:00"
Set-TimeZone "Russia Time Zone 3
Задать имя компьютера, добавить в домен, активация
Чтобы изменить имя компьютера:
Rename-Computer -NewName win-srv01 -PassThru
Добавить сервер в домен Active Directory:
Add-Computer -DomainName "corp.winitpro.ru " -Restart
Если нужно добавить дополнительных пользователей в администраторы, можно настроить групповую политику или добавить вручную:
Add-LocalGroupMember -Group "Administrators" -Member "corpanovikov"
Для активации Windows Server нужно указать ваш ключ:
slmgr.vbs –ipk <productkey>
slmgr.vbs –ato
Или можно активировать хост на KMS сервере (например, для Windows Server 2019):
slmgr /ipk N69G4-B89J2-4G8F4-WWYCC-J464C
slmgr /skms kms-server.winitpro.ru:1688
slmgr /ato
Разрешить удаленный доступ
Разрешить удаленный доступ к Server Core через RDP:
cscript C:WindowsSystem32Scregedit.wsf /ar 0
Разрешить удаленное управление:
Configure-SMRemoting.exe –Enable
Enable-NetFirewallRule -DisplayGroup “Windows Remote Management”
Текущие настройки:
Configure-SMRemoting.exe -Get
Разрешить Win-Rm PowerShell Remoting:
Enable-PSRemoting –force
Сервером с Windows Server можно управлять удаленно c другого сервера (с помощью ServerManager.exe), через браузер с помощью Windows Admin Center (WAC), с любой рабочей станции с помощью инструментов администрирования RSAT, подключаться к нему по RDP, PowerShell Remoting или SSH (в современных версиях Windows есть встроенный SSH сервер).
Настройка Windows Firewall
Информация о настройке Windows Firewall есть в статье по ссылке. Здесь оставлю несколько базовых команд.
Включить Windows Defender Firewall для всех профилей:
Set-NetFirewallProfile -Profile Domain,Public,Private -Enabled True
Изменить тип сети с Public на Private:
Get-NetConnectionProfile | Set-NetConnectionProfile -NetworkCategory Private
Полностью отключить Windows Firewall (не рекомендуется):
Get-NetFirewallProfile | Set-NetFirewallProfile -enabled false
Разрешить подключение через инструменты удаленного управления:
Enable-NetFireWallRule -DisplayName “Windows Management Instrumentation (DCOM-In)”
Enable-NetFireWallRule -DisplayGroup “Remote Event Log Management”
Enable-NetFireWallRule -DisplayGroup “Remote Service Management”
Enable-NetFireWallRule -DisplayGroup “Remote Volume Management”
Enable-NetFireWallRule -DisplayGroup “Remote Scheduled Tasks Management”
Enable-NetFireWallRule -DisplayGroup “Windows Firewall Remote Management”
Enable-NetFirewallRule -DisplayGroup "Remote Administration"
Установка обновлений в Server Core
Для управления параметрами обновлений предпочтительно использовать групповые политики Windows Update, но можно задать параметры и вручную.
Отключить автоматическое обновление:
Set-ItemProperty -Path HKLM:SoftwarePoliciesMicrosoftWindowsWindowsUpdateAU -Name AUOptions -Value 1
Автоматически скачивать доступные обновления:
Set-ItemProperty -Path HKLM:SoftwarePoliciesMicrosoftWindowsWindowsUpdateAU -Name AUOptions -Value 3
Получить список установленных обновлений:
Get-Hotfix
Или
wmic qfe list
Для ручной установки обновлений Windows можно использовать утилиту wusa:
Wusa update_name.msu /quiet
Также для установки и управления обновлениями из командной строки удобно использовать PowerShell модуль PSWindowsUpdate.
Управление ролями, службами и процессами Windows
Для получения списка всех доступных ролей в Windows Server Core выполните команду PowerShell:
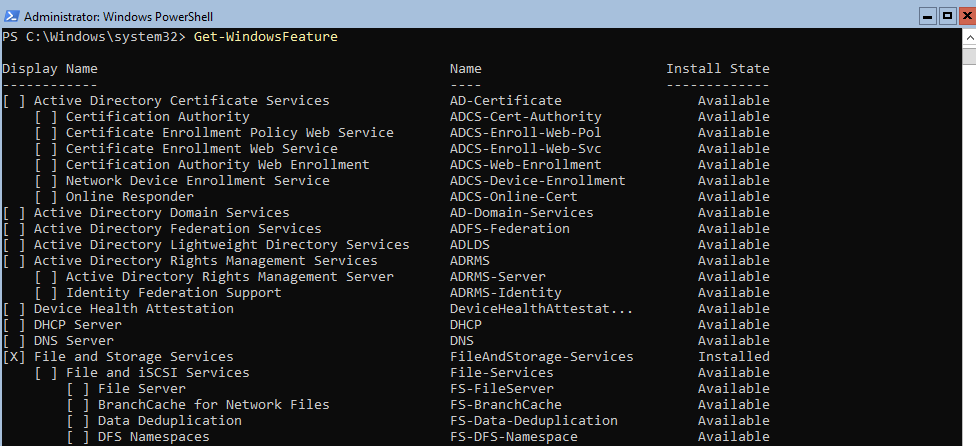
Get-WindowsFeature
Получить список всех установленных ролей и компонентов в Windows Server(можно быстро понять, для чего используется сервер):
Get-WindowsFeature | Where-Object {$_. installstate -eq "installed"} | ft Name,Installstate
Например, для установки службы DNS воспользуйтесь такой командой:
Install-WindowsFeature DNS -IncludeManagementTools
Список всех служб в Windows:
Get-Service
Список остановленных служб:
Get-Service | Where-Object {$_.status -eq “stopped”}
Перезапустить службу:
Restart-Service -Name spooler
Для управление процессами можно использовать стандартный диспетчер задач (taskmgr.exe) или PowerShell модуль Processes:
Get-Process cmd, proc1* | Select-Object ProcessName, StartTime, MainWindowTitle, Path, Company|ft
Часто используемые команды в Server Core
Ну и наконец, приведу список различных полезных мне команд, которые я периодически использую в Server Core.
Информация о статусе и здоровье физических дисков (используется стандартный модуль управления дисками Storage):
Get-PhysicalDisk | Sort Size | FT FriendlyName, Size, MediaType, SpindleSpeed, HealthStatus, OperationalStatus -AutoSize
Информация о свободном месте на диске:
Get-WmiObject -Class Win32_LogicalDisk |
Select-Object -Property DeviceID, VolumeName, @{Label='FreeSpace (Gb)'; expression={($_.FreeSpace/1GB).ToString('F2')}},
@{Label='Total (Gb)'; expression={($_.Size/1GB).ToString('F2')}},
@{label='FreePercent'; expression={[Math]::Round(($_.freespace / $_.size) * 100, 2)}}|ft
Информация о времени последних 10 перезагрузок сервера:
Get-EventLog system | where-object {$_.eventid -eq 6006} | select -last 10
Список установленных программ:
Get-ItemProperty HKLM:SoftwareWow6432NodeMicrosoftWindowsCurrentVersionUninstall* | Select-Object DisplayName, DisplayVersion, Publisher, InstallDate | Format-Table –AutoSize
Скачать и распаковать zip файл с внешнего сайта:
Invoke-WebRequest https://contoso/test.zip -outfile test.zip
Expand-Archive -path '.test.zip' -DestinationPath C:UsersAdministratorDocuments
Чтобы скопировать все файлы из каталога на удаленный компьютер по сети можно использовать Copy-Item:
$session = New-PSSession -ComputerName remotsnode1
Copy-Item -Path "C:Logs*" -ToSession $session -Destination "C:Logs" -Recurse -Force
Для установки драйвера можно использовать стандартную утилиту:
Pnputil –i –a c:distrhpdp.inf
Также Microsoft предлагает специальный пакет Server Core App Compatibility Feature on Demand (FOD), который позволяет установить в Windows Server 2019 некоторые графические инструменты и консоли (MMC, Eventvwr, Hyper-V Manager, PerfMon, Resmon, Explorer.exe, Device Manager, Powershell ISE). Этот FOD доступен для загрузки в виде ISO при наличии активной подписки. Установка выполняется командой:
Add-WindowsCapability -Online -Name ServerCore.AppCompatibility~~~~0.0.1.0
Установка Server Core App Compatibility Feature on Demand будет использовать дополнительно около 200 Мб оперативной памяти в Server Core.
В этой статье я постарался собрать самые нужные команды, которые нужно постоянно держать под рукой при работе с Windows Server Core. Время от времени я буду обновлять статью и добавлять новые команды, которые покажутся мне нужными для повседневной работы.
What happens if you install Windows Server 2012 without the GUI features and then realize that you want to turn on the GUI? For those who are used to GUI based Windows Server administration, seeing a command line interface can be daunting. This guide will help you to go from the command line interface, using PowerShell, to installing and turning on the GUI.
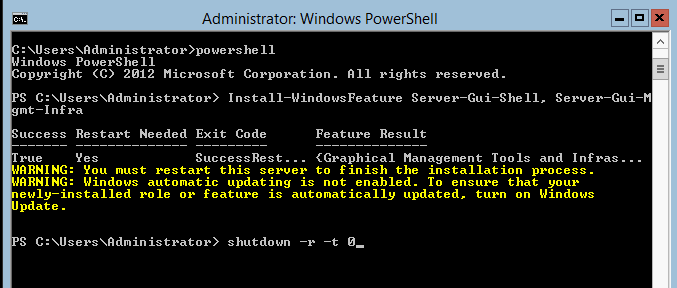
The first step in this is to enter the PowerShell. At the command line prompt, just enter PowerShell and you will see something like the below:
The next step is to type Install-WindowsFeature Server-Gui-Shell, Server-Gui-Mgmt-Infra in order to get the
You will see a text based installer. This part of the Windows Server 2012 GUI installation is rather easy and there is plenty of time to grab a drink.
Once this is complete, you do need to reboot the server before the GUI will be turned on. Unless you have something else going on that you need to shutdown first, you can shutdown and reboot immediately with shutdown -r -t 0 as seen below:
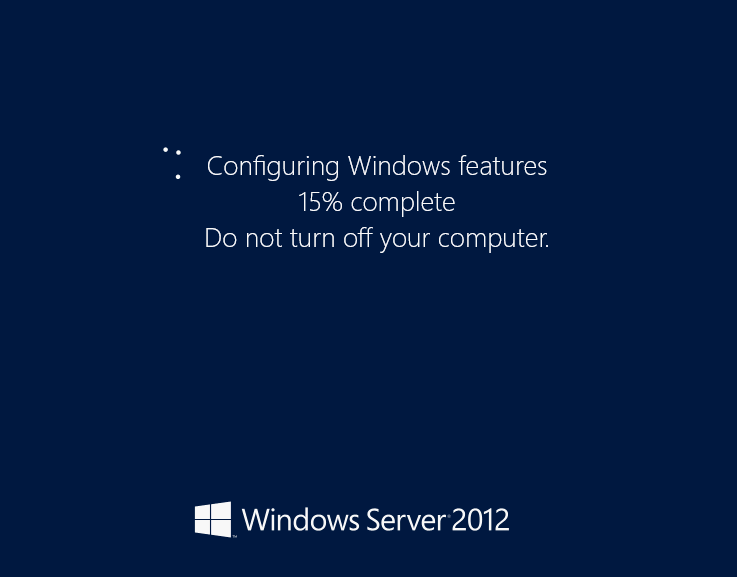
The system will then reboot and go through the Windows Server 2012 configuration changes.
When the system boots, you will see that the GUI is turned on. The Server Manager dashboard is present on login and everything works.
Conclusion
If you are accustomed to the Windows Server 2012 GUI, you may be a bit nervous seeing a command line only interface. Fear not, the guide above uses less than 90 characters of typing to install and turn on the GUI. In total this took me only a few minutes to do the run-through. Also, this guide assumed one has a command line only installation. If you already have the GUI installed, you can use SConfig to turn on the GUI easily.
-
Question
-
I am trying to install windows 2012 R2 standard Server. I completed the installation windows is not booting properly . After entering the user name and password only c:\user\administrator display in the screen, if i type exit on it then only a
black screen and mouse pointer display. not sure what to do from here
All replies
-
1. it’s usual for server core
2. try to run server manager (just type servermanager in cmd)
3. try to view installed GUI feature using powershell
type powershell
get-windowsfeature *GUI*
verify that you have Server-Gui-Mgmt-Infra and Server-Gui-Shell installed
4. if 3 is false , install GUI features
Install-WindowsFeature Server-Gui-Mgmt-Infra,Server-Gui-Shell -Restart
Roman Levchenko, MCITP, MCTS http://www.rlevchenko.com
-
Edited by
Thursday, February 27, 2014 6:13 AM
-
Proposed as answer by
R.LevchenkoMVP
Thursday, February 27, 2014 6:37 AM
-
Edited by
-
-
Proposed as answer by
Agasthya.S.P
Wednesday, February 3, 2016 8:23 PM
-
Proposed as answer by
-
hi,
cmd > powershell
In powershell:
Install-WindowsFeature Server-Gui-Mgmt-Infra,Server-Gui-Shell -Restart
-
Neither worked, all unrecognized
-
it’s installing, I’m must have typed something wrong
-
It’s installing now, I must have typed something wrong
-
If you found a post to be the answer, please mark it appropriately. It helps to keep the forums tidy by highlighting which response is the answer to the question. It helps future readers. Thanks!
— Chris Ream —
**Remember, if you find a post that is helpful, or is the answer, please mark it appropriately.**
-
I’m back to the same place. I need to remove powershell, so I can install GUI version of Active Directory users and computers
-
No, you don’t need to remove PowerShell.
Do you want a core installation or a GUI installation? The default installation will be core, i.e. no GUI installed. But, it is possible to install the GUI using PowerShell or DISM afterwards. From the difficulties you are experiencing,
I would recommend that you either re-do your installation one more time, making sure you have selected the option to install with GUI instead of taking the default which is the core installation.The fact that you say that the command recommended by Roman returns unrecognized to you, I would ask if you are sure you are installing Windows Server and not Hyper-V Server. Windows Server would recognize the command Roman provided. What’s the
name of the ISO file you are using for installation?
.:|:.:|:. tim
-
Proposed as answer by
Susie Long
Wednesday, March 5, 2014 9:00 AM
-
Proposed as answer by
-
Hi,
Do you have any progresses on this issue by now?
Please feel free to let us know if this issue persists.
Best Regards,
Amy Wang
-
I want to run Windows Server 2012 normally, with GUI
It was installed and I was going through installing Active Directory Domain Services and upon finishing I did not see Active Directory Users and Computers, upon rebooting I get the cmd prompt and can’t go any farther
-
Look you should install the server fresh but do not chose core as they only installs the basic core of Hyper-V for a server farm
The above doesn’t make any sense at all.
-
Corret Paul in Hyper-V we can only install basic core.
Thanks
NM
Warm Regards, Niraj Mehta
-
thanks for this info. worked great!
-
hi
i am still seeing this problem which i have told you before plz resolve this issue which i am looking on my desktop. i want to say again that when i boot my server microsoft window server 2012 but it still shows me a window where it shows powershell dos
prompt message still. plz can you explain that which command i must apply that clear my desktop and i may use my serverRegards
iffi
-
iffi,
You have not provided any information about what you installed or your configuration. Have you tried the various commands that are shown in the responses to this post? Those commands are what will add the GUI to a Windows Server 2012 R2 core
installation. If you have installed Hyper-V Server, there is nothing you can do to create a GUI. But we don’t have any information about your installation.
. : | : . : | : . tim
-
I managed to have this happen to me after installing the full GUI version of the OS. Don’t ask how, its embarrassing! lol
Anyway, PowerShell would not function so Install-Feature was not an option. Server manager would not open so, enabling features with the UI was not an option. In fact, nothing would run from the command prompt except taskmgr.
The solution was to run the following command from the command prompt that had opened when I logged into the server:
Dism /online /enable-feature /featurename:Server-Gui-Mgmt /featurename:Server-Gui-Shell /featurename:ServerCore-FullServer /all
This installed the GUI features and all the requisites for those features.
Once the installation is complete, which will take quite awhile, reboot the server with the command
shutdown /r /t 0 This shuts the server down for reboot with a wait time of zero (immediate).
You should be back in business after the reboot.
-
Edited by
EVC
Tuesday, January 26, 2016 3:23 PM -
Proposed as answer by
Vimal Thiagaraj
Tuesday, February 9, 2016 7:10 AM
-
Edited by
-
Thanks for the post. This did work out for me perfectly.
-
Does anyone know the root cause of this? I have ran into the exact same situation that you described. Currently running the command you listed, and it is working.
-
It may be embarrassing, but I’m seeing this issue as well and perhaps I could benefit from the info.
-
I think it has something to do with the loss or corruption of the .Net 4 feature. Just my best guess.
-
I ran into the same problem and found it easier to download the non-core version and upgrade.
R, J
-
I ran into the same problem and found it easier to download the non-core version and upgrade.
R, J
Where did you find that? It might be a good idea to include that info.
Bill
-
thing is, it WAS a full install. I believe the removal of dot net 4.5 is the key. Engineer installing some software removed 4.5 and that’s when the issue happens. The above DISM command cleared it up.
-
If my solution worked please put a vote for it so others know to use it. Someone just mentioned .Net 4 as well. I’m really thinking this has something to do with .Net 4 being removed. When this happened to me, I was messing around with
.Net 4 due to a compatibility issue with a piece of software. -
i had the same problem here . i tried to remove the .net framework 4.5 on server manager than the server rebooted and came with the same issue. only started in command prompt. nothing is available. not powershell not server manager. if you do ctrl alt end
you can go to task manager and start firefox.exe for example you can download .netframework install it but after reboot stays the same. you can try install .netframework on prompt command but wont work. i used the command above listed
Dism /online /enable-feature /featurename:Server-Gui-Mgmt /featurename:Server-Gui-Shell /featurename:ServerCore-FullServer /all
after a few seconds asked if i wanted to rebbot. said yes and voila. everithing is back.thank you so much guys…
-
Proposed as answer by
Tryggr
Tuesday, June 28, 2016 3:22 PM -
Unproposed as answer by
Tryggr
Tuesday, June 28, 2016 3:23 PM
-
Proposed as answer by
-
Thanks a Lot EVC… It Worked for me ..Appreciate your Help …!!!!!
-
I work in a LAB with an MSDN license. I’m probably the wrong person to ask that question. On that note, if you have an MSDN subcription, just download one that isn’t a core and install over the top of the core to give it a GUI (the easy way). As shown
here, there are other ways. I did not find them particularly convenient other than it forced me to learn a bunch of basic Powershell commands (such as Restart-Computer, Stop-Computer, and so on).
R, J
-
Edited by
Crakdkorn
Sunday, June 5, 2016 6:57 PM
-
Edited by
-
Tried the reinstallation of GUI twice and still back at the black screen with cmd window. Restarted several times. The OS in question is Windows Server 2012. Please help.
Regards,
AR
-
Tried the reinstallation of GUI twice and still back at the black screen with cmd window. Restarted several times. The OS in question is Windows Server 2012. Please help.
Regards,
AR
-
Have you followed the suggestions in the old post? By replying to an old post, it is hard to tell what you have done.
From where did you obtain the distribution you are using? During the installation, are you sure you did NOT select the default installation option? There are four selections — Std Core, Std, Datacenter Core, and Datacenter. If you accept
the default, you will get core, which means no GUI.What steps did you follow?
. : | : . : | : . tim
-
I had to run the DISM command that EVC proposed, which took an extremely long time to run. It hangs on black screens for 5+ minutes, so it looks concerning. But with patience it finally completed. Once it came back up the Server Manager was very slow
to load, but did come up. I still didn’t have the full GUI though. Checked via powershell and the 2 gui features were «available» but not installed. Followed the steps from
R.Levchenko and now everything is back up and running. Thanks everyone. -
This was the one for me. Many thanks!
-
Dism /online /enable-feature /featurename:Server-Gui-Mgmt /featurename:Server-Gui-Shell /featurename:ServerCore-FullServer /all
This resolved my issue thanks Vimalanathan Sigamani T
dd
-
Edited by
Grandotto
Thursday, August 18, 2016 12:16 AM
-
Edited by
-
Dism /online /enable-feature /featurename:Server-Gui-Mgmt
/featurename:Server-Gui-Shell /featurename:ServerCore-FullServer /allThis worked for me as well. Thanks guys
-
Thanks Vimalanathan,
This really helped me and fixed the issue.
-
This worked perfectly for me. Seems the admin that I gave the server to might have removed dot net 4.5.
jimmypi
-
I managed to have this happen to me after installing the full GUI version of the OS. Don’t ask how, its embarrassing! lol
Anyway, PowerShell would not function so Install-Feature was not an option. Server manager would not open so, enabling features with the UI was not an option. In fact, nothing would run from the command prompt except taskmgr.
The solution was to run the following command from the command prompt that had opened when I logged into the server:
Dism /online /enable-feature /featurename:Server-Gui-Mgmt /featurename:Server-Gui-Shell /featurename:ServerCore-FullServer /all
This installed the GUI features and all the requisites for those features.
Once the installation is complete, which will take quite awhile, reboot the server with the command
shutdown /r /t 0 This shuts the server down for reboot with a wait time of zero (immediate).
You should be back in business after the reboot.
This seems to be working for me now. The previous commands did not work. But this is actually installing now.
I agree that it has something to do with the removal of .NET 4.0/4.5. I was trying to uninstall/reinstall IIS because a contractor royally screwed up the server by installing Apache. We use IIS on everything, so I’m trying to undo everything he did. Apparently
I unintentionally (not knowingly) removed a vital piece of the Server puzzle by uninstalling (removing) .NET 3.5 and .NET 4.5 when I uninstalled IIS. Everything was fine until the reboot.TL;DR
If you blew out .NET 4.5, EVC’s solution is the one you need. Forget everything else in this thread.
-
Edited by
Kim Dorris
Saturday, October 15, 2016 4:09 AM
correct typos
-
Edited by
-
You’re right, I did remove .NET 4 feature and suddenly all were gone except for Command Prompt. Your answer do the trick. Thanks.
-
Wow, it works. The latest release will prompt to restart the server. Someone ruined the .NET Framework 4.5 and after uninstalling the .NET Framework, I ruined the server LOL. Thanks EVC.
-
I agree. same thing happened here too.
-
if this does not work. try this:
https://www.linkedin.com/pulse/20140618170857-12975178-procedure-to-recover-gui-in-windows-2012-and-2012r2-net-framework-feature-dependency-in-windows-2012-2012-r2
-
if this does not work, try this:
https://www.linkedin.com/pulse/20140618170857-12975178-procedure-to-recover-gui-in-windows-2012-and-2012r2-net-framework-feature-dependency-in-windows-2012-2012-r2
-
Thank you for this post! A year later and it saved me.
-
Thanks guys… I was also facing same issue and tried this solution.. It perfectly worked for me.
Thanks again.
-
Thanks a ton for the solution, it saved my day.
-
I had this problem today I try the steps Don’t work for me
-
Yes, that was exactly what happened to me. Trying to install .NET 3.5 was not working, I thought had something to do with having a newer version and I went and removed .NET 4.0. BOOM no more GUI. Thanks for the solutions. It worked like a charm.
-
You can do it in 4 simple steps using powershell.
Just follow the below instructions and you are done.
1. c:\user\administrator\ipowershell
2. c:\user\administrator\Import-Module
Servermanager3.
c:\user\administrator\Install-WindowsFeature
Server-Gui-Mgmt-Infra,Server-Gui-Shell –Source wim:d:\sources\install.wim:4
4.c:\user\administrator\shutdown
/r /t 0 (Restart the server)Thank me Later
-
Edited by
RaviBhati
Thursday, May 31, 2018 7:33 AM
-
Edited by
-
The cmd mentioned before
cmd > powershell
In powershell:
Install-WindowsFeature Server-Gui-Mgmt-Infra,Server-Gui-Shell -Restart
It worked for me. Just be patient. It takes about 15 minutes after it gets stuck at 68% to process it. Thank you! Nivi
-
Edited by
TechSuperMario
Tuesday, October 22, 2019 12:46 AM
-
Edited by
Практически во всех операционных системах множество функций можно запустить не только «кликом», но и с помощью определенной команды. Это касается и версии Windows для серверов. Большинство из тех команд, что используются для управления сервером, схожи с теми, что предназначены для обычной Windows. Я перечислю основные команды, которые в той или иной степени будут полезны при управлении ОС Windows Server.
Как запустить команды в терминале Windows Server
Как и в десктопной версии, все указанные команды можно запустить с помощью командной строки.
Для получения указанных прав нужно действовать следующим образом:
- Открыть строку поиска в панели «Пуск».
- Ввести в поле запрос «командная строка», можно и cmd.
- Когда соответствующее приложение выйдет, нажать на пункт «Запуск от имени администратора».
Команды можно запускать с помощью утилиты Windows PowerShell, которую также можно найти среди предустановленных программ.
Комьюнити теперь в Телеграм
Подпишитесь и будьте в курсе последних IT-новостей
Подписаться
Команды для Windows Server
Все указанные команды предназначены для самых разных задач. Я постараюсь рассортировать их по функционалу. В общей сложности вышло 65 команд, без учета дополнительных параметров и атрибутов в некоторых из них.
Настройка подключений
arp – данная команда предназначена для просмотра и изменения записей в кэше ARP. Это протокол, представляющий собой таблицу соответствия IP-адресов с MAC-адресами сетевых устройств.
dnscmd – диагностирует, исправляет ошибки в конфигурациях и еще выполняет множество других действий при администрировании сервера DNS.
ftp – передает туда и обратно файлы на компьютер, в котором запущена служба протокола FTP. У команды есть несколько параметров. Вот некоторые из них, которые будут наиболее полезны:
|
bye |
Завершает сеанс FTP на удаленном компьютере; есть аналогичная этой команда – FTP Quit |
|
delete |
Стирает указанные файлы на удаленном компьютере |
|
mget |
Копирует файлы с удаленного на локальный компьютер, используя текущий тип перемещения файлов |
|
mkdir |
Создает новую папку на удаленном компьютере |
|
open |
Подключается к указанному FTP-серверу |
|
rmdir |
Стирает выбранный каталог на удаленном ПК |
|
status |
Показывает текущее состояние FTP-подключений |
|
ftp trace |
Переключает трассировку пакетов, отображает внутренние вызовы функций FTP при запуске команды |
|
type |
Задает или отображает тип перемещения файла |
|
user |
Указывает пользователя для удаленного компьютера |
|
mdelete |
Стирает файлы на удаленном компьютере |
getmac – данный запрос определяет mac-адрес компьютера, а еще он используется для отображения mac-адресов сетевых адаптеров.
hostname – показывает наименование узла в полном имени компьютера.
ipconfig – этот параметр отображает актуальные на момент проверки параметры протокола TCP/IP. Он также применяется для обновления некоторых характеристик, задаваемых при автоматической конфигурации сетевых интерфейсов, задействующих протокол DHCP. К данной команде можно добавлять следующие атрибуты:
|
/all |
Выдает все доступные конфигурации IP |
|
/displaydns |
Отображает кэш DNS |
|
/flushdns |
Сбрасывает кэш DNS |
|
/registerdns |
Обновляет и повторно регистрирует параметры DNS |
|
/release |
Освобождает IP-адреса |
|
/renew |
Обновляет сведения для сетевых адаптеров |
|
/setclassid |
Меняет DHCP Class ID |
|
/showclassid |
Отображает DHCP Class ID |
msg – запускает отправку сообщения указанному удаленному пользователю.
mstsc – запускает подключение к удаленному рабочему столу.
net view – показывает имя компьютера в текущем домене.
netsh – сетевое служебное приложение, позволяет локально или удаленно отображать или изменять конфигурацию сети компьютера. Программу можно запустить как в командной строке, так и в Windows PowerShell.
shadow – удаленное управление активным сеансом другого пользователя.
netstat – показывает состояние TCP-подключений и портов, на которых компьютер прослушивается, статистику Ethernet, таблицу маршрутизации IP-адресов, а без использования параметров команда отображает лишь активные TCP-подключения.
nbtstat – отображает статистику протокола и активных подключений TCP/IP посредством NetBT, причем как для локального, так и для удаленных компьютеров. При использовании без параметров эта команда выдает только справочные данные.
nslookup – выдает сведения, используемые для диагностики DNS. Чаще всего используется для определения IP-адреса по доменному имени.
tracert – производит трассировку. Если говорить проще – показывает путь, по которому проходят пакеты данных при отправке из вашего компьютера в конечную точку. При этом показывает последовательно каждый этап маршрута, позволяет узнать, на каком этапе происходят крупные потери или задержки.
pathping – точно так же, как и tracert, выполняет трассировку, дополнительно предоставляя сведения о задержке сети и сетевой утрате в промежуточных узлах.
ping – проверяет подключение и доступность указанного компьютера на уровне TCP/IP. В результате показывается сообщения с информацией о получении соответствующих ответов, а также время кругового пути. Это основная команда для проверки и устранения неполадок подключения, доступности и разрешения имен.
qappsrv – показывает полный список доступных удаленных рабочих столов в текущем сеансе.
quser – выдает информацию о пользовательских сеансах на удаленный рабочий стол в текущем сеансе. Команда позволяет определить, вошел ли конкретный пользователь на конкретный сервер узла сеансов. После сканирования выдаются следующие сведения:
- имя пользователя;
- наименование сеанса на узле;
- идентификатор сеанса;
- состояние – активно или отключено;
- время простоя – означает промежуток времени с момента последнего нажатия клавиши или перемещения мыши в сеансе;
- дата и время входа пользователя.
rpcinfo – выводится список программ, установленных на удаленных компьютерах.
rasphone – инструмент для управления сетевыми подключениями, в основном используется на модемных линиях или в PPPOE, PPPTP.
route – можно просмотреть и изменить записи в локальной таблице маршрутизации IP. Если использовать без параметров, команда даст справку.
telnet – осуществление подключения по протоколу telnet. Позволяет проверять доступность портов. По умолчанию он не установлен, поэтому такая команда не всегда может сработать.
Работа в системе
at – запрос отвечает за планирование выполнения команд или запуска приложений в заданное время. Используется только совместно со службой расписания и с правами администратора.
compmgmt.msc – эта команда откроет инструмент «Управление компьютером», в котором можно просмотреть запланированные задачи, события, общие папки и пользователей. Также там есть инструмент для управления дисками, еще отображается раздел со списком служб и приложений.
control – запускает «Панель управления». Есть множество ее подвидов, позволяющих запустить окна для управления отдельными элементами. Среди них актуальными будут следующие:
- control admintools – переход в раздел «Администрирование» в панели управления.
- control color – открытие раздела Персонализация» из параметров системы, где можно настроить экран, темы, цвета и так далее.
- control folders – параметры «Проводника».
- control Userpasswords – свойства локальной учетной записи.
devmgmt.msc – команда запускает «Диспетчер устройств», утилиту для управления основными аппаратными и программными компонентами.
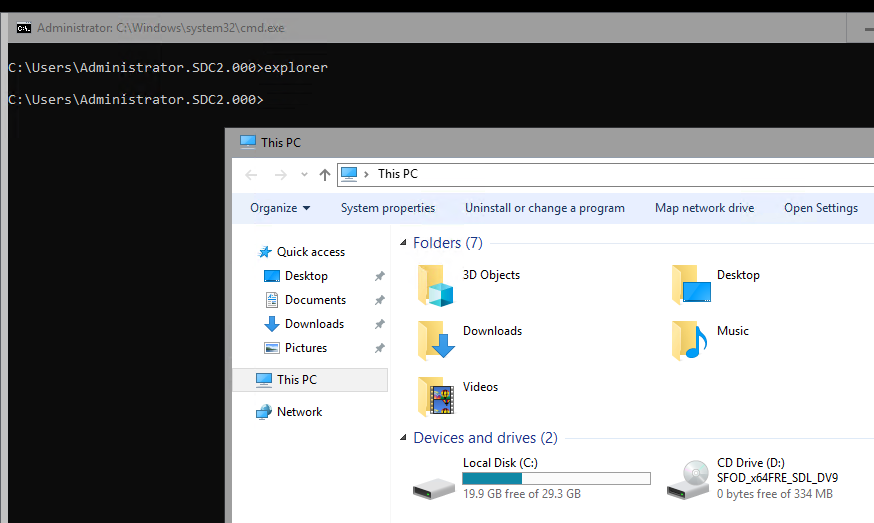
explorer – позволяет открыть «Проводник Windows».
logman – создает сеансы трассировки событий, управляет ими и журналами производительности, а также поддерживает многие функции мониторинга системы из командной строки.
mmc – открывает определенную консоль MMC, можно в режиме автора и с указанием версии – 32 или 64-разрядной.
mode – показывает состояние системы, изменяет параметры, перестраивает порты или устройства. При задаче команды без параметров отображаются все управляемые атрибуты консоли и доступные устройства com.
msconfig – открывает инструмент для тонкой настройки системы, управления загрузкой и автозагрузкой, а также активными службами и сервисами.
msinfo32 – запускает утилиту «Сведения о системе», где отображен полный список установленного оборудования, а также системных и программных компонентов на локальном компьютере.
PowerShell – запуск нового сеанса для утилиты Windows PowerShell через окно командной строки.
PowerShell_ise – запускает сеанс в интегрированной среде сценариев Windows PowerShell (ISE). В таком режиме можно применять необязательные настройки для открытия некоторых файлов, проводить запуск без определенного профиля и так далее.
regedit – открывается редактора реестра.
secedit – анализируется и настраивается безопасность системы, текущая конфигурация сравнивается с актуальными шаблонами безопасности.
services.msc – открывается консоль для работы со службами и сервисами.
shutdown – выключение/перезагрузка локальных или удаленных компьютеров. Для той или иной процедуры стоит использовать соответствующий параметр.
- shutdown /r – перезагрузка компьютера после завершения работы.
- shutdown /s – полное завершение работы компьютера.
systeminfo – выдача подробной информации о конфигурации компьютера и его операционной системы, включая сведения о безопасности, идентификатор продукта и свойства оборудования.
wuauclt – открывает раздел параметров «Обновления Windows».
Работа с локальными и виртуальными жесткими дисками
attach vdisk – подключает виртуальный жесткий диск с дальнейшим его отображением в меню главного компьютера в качестве локального. Для отключения его отображения должна быть использована команда detach vdisk.
chkdsk – этот запрос запускает утилиту для проверки дисков и метаданных на наличие логических и физических ошибок. При использовании без параметров лишь отображает состояние и не исправляет ошибки. Для устранения ошибок следует дополнительно вводить параметр /f. Параметр /r запустит поиск поврежденных секторов.
cleanmgr – запускает инструмент «Очистка диска», отвечающий за удаление ненужных файлов с жесткого диска компьютера. Введя отдельные параметры, можно настроить утилиту на стирание временных файлов, кэша интернета, а также провести перезапуск файлов bin.
convert – преобразует диск из одного формата в другой.
defrag – выполняет дефрагментацию файловой системы. Определяет также степень фрагментации диска, объединяет файлы для повышения производительности ОС.
dfrg.msc – с помощью этого запроса включается дефрагментатор дисков.
diskpart – открывает одноименный интерпретатор, позволяющий управлять подключенными локальными дисками, разделами, томами компьютера и виртуальными дисками тоже.
expand vdisk – расширяет созданный виртуальный жесткий диск до определенного размера, указанного в параметрах. Предварительно для выполнения данной команды рекомендуется отключить VHD.
ntbackup – запускает из командной строки резервное копирование и восстановление компьютера и файлов.
recover – проводится восстановление данных, доступных для чтения, с поврежденного или дефектного диска. Эта команда считывает файл и сектор, а затем восстанавливает данные.
sfc /scannow – выполняется проверка целостности всех защищенных системных файлов и по возможности восстановление файлов с проблемами.
Работа с файлами и папками
copy – копирует нужный файл из исходного расположение в другое.
del – удаляет один или несколько файлов. Есть аналогичная – erase. Используя определенные параметры, можно активировать запрос для подтверждения удаления, также запустить принудительное стирание файлов, доступных только для чтения.
expand – разархивирует один или несколько сжатых файлов.
fsmgmt.msc – включается консоль с общими папками в системе.
manage-bde – активирует и дезактивирует BitLocker, задает способы разблокировки, обновляет методы восстановления и разблокирует защищенные диски.
md – создает новый каталог или подкаталог. Похожая команда – это mkdir.
mqbkup – запускает инструмент для архивирования и резервного копирования сообщений MSMQ, параметров реестра на запоминающее устройство, также проводит восстановление ранее сохраненных сообщений и параметров.
Интерфейс командной строки
cls – проводит очистку командной строки.
color – меняет цвет и фон утилиты.
exit – закрывает командную строку.
help – отображает полный список команд, доступных для задействования в данном инструменте.
Заключение
Как видно, команды для Windows Server практически ничем не отличаются от тех, что используются в обычной версии системы. Разница состоит лишь в задачах – для серверной версии в ход обычно идут несколько иные запросы – команды для командной строки в Windows Server больше акцентированы на работу с подключениями и дисками.
16 Replies
-
type sconfig on the cmd window
0 of 2 found this helpful
thumb_up
thumb_down
-
if you closed out both the sconfig and cmd window then ctrl-alt-del (or ctrl-alt-end on a remote session) and start the task manager. then go to file > run new task and from there type sconfig and or cmd.
0 of 1 found this helpful
thumb_up
thumb_down
-
Hey ceez
Thanks but I am not looking for sconfig. I want to open the whole Server Manager Dashboard
Was this post helpful?
thumb_up
thumb_down
-
it is to my understanding that the full server manager window does not exist on server core, I might be wrong but now I am curious.
Was this post helpful?
thumb_up
thumb_down
-
Sconfig looks like this:
Press «Enter», SConfig will appear.
ServerManager looks like this:
Press «Enter» and Server Manager will appear.
Was this post helpful?
thumb_up
thumb_down
-
ceez wrote:
it is to my understanding that the full server manager window does not exist on server core, I might be wrong but now I am curious.
It can, but you have to go with the minimal install. Nice thing about Server 2012 is that you can switch between a full GUI and Core with a few simple PowerShell cmdlets. It’s really easy.
Here’s an example. Opens a new window
Was this post helpful?
thumb_up
thumb_down
-
-
FreshEffect wrote:
Hey
What command do you use to launch Server Manager from CMD or powershell in Windows Server 2012 R2?
I have a few servers that are running without the Graphical Shell, and sometimes I close server manager by accident. The only way I know how to get it back is to log out & in again. Frustrating…
Thanks
Just type in ServerManager, and that should reopen it. Also, you do not have to manage Server 2012 or 2012 R2 at the server itself anymore. Use RSAT tools from your Windows 8.1 or even a Windows 7 machine (won’t have server manager but all the other tools you need) and learn PowerShell remoting. You will be much more efficient that way and learn some new skills.
Was this post helpful?
thumb_up
thumb_down
-
this is a screenshot of the server manager shortcut on my win8 machine that I use to manage our 2012 hyper-v’s.
it calls ServerManager.exe
Was this post helpful?
thumb_up
thumb_down
-
mmm. Feeling kind of stupid now
I tried some other combinations like serverman & svrmngr. Didn’t think about writing it out in full. hahaha
Thanks Alot Bill
Was this post helpful?
thumb_up
thumb_down
-
Bill Kindle wrote:
ceez wrote:
it is to my understanding that the full server manager window does not exist on server core, I might be wrong but now I am curious.
It can, but you have to go with the minimal install. Nice thing about Server 2012 is that you can switch between a full GUI and Core with a few simple PowerShell cmdlets. It’s really easy.
Here’s an example. Opens a new window
I wonder if this will work on hyper-v server 2012r2. gotta give it a try one day.
Was this post helpful?
thumb_up
thumb_down
-
Bill Kindle wrote:
Just type in ServerManager, and that should reopen it. Also, you do not have to manage Server 2012 or 2012 R2 at the server itself anymore. Use RSAT tools from your Windows 8.1 or even a Windows 7 machine (won’t have server manager but all the other tools you need) and learn PowerShell remoting. You will be much more efficient that way and learn some new skills.
I knew someone was going to mention RSAT
I am deploying new servers & vm’s so I Remote Desktop into them to set each one up. It helps with my workflow if i connect into them cause then I know I am not forgetting something.
Not to clued up with PSRemoting. Came across it a few times now. Will look into it.
Was this post helpful?
thumb_up
thumb_down
-
ceez wrote:
Bill Kindle wrote:
ceez wrote:
it is to my understanding that the full server manager window does not exist on server core, I might be wrong but now I am curious.
It can, but you have to go with the minimal install. Nice thing about Server 2012 is that you can switch between a full GUI and Core with a few simple PowerShell cmdlets. It’s really easy.
Here’s an example. Opens a new window
I wonder if this will work on hyper-v server 2012r2. gotta give it a try one day.
No, it does not. Two entirely separate technologies. One is a standalone Type-1 hypervisor. The other (Server 2012 R2) can have the Hyper-V role enabled, but when you do enable that feature, Server 2012 R2 rides on top of the Hyper-V at that point.
Was this post helpful?
thumb_up
thumb_down
-
FreshEffect wrote:
Bill Kindle wrote:
Just type in ServerManager, and that should reopen it. Also, you do not have to manage Server 2012 or 2012 R2 at the server itself anymore. Use RSAT tools from your Windows 8.1 or even a Windows 7 machine (won’t have server manager but all the other tools you need) and learn PowerShell remoting. You will be much more efficient that way and learn some new skills.
I knew someone was going to mention RSAT
I am deploying new servers & vm’s so I Remote Desktop into them to set each one up. It helps with my workflow if i connect into them cause then I know I am not forgetting something.
Not to clued up with PSRemoting. Came across it a few times now. Will look into it.
There’s 0 difference between using Server Manager via RSAT or doing the extra step of using RDP to the server. This is the old way. Server Manager is the new way and referred to heavily on the new MCSA exams. Time to start using it ;-).
Was this post helpful?
thumb_up
thumb_down
-
Bill Kindle wrote:
There’s 0 difference between using Server Manager via RSAT or doing the extra step of using RDP to the server. This is the old way. Server Manager is the new way and referred to heavily on the new MCSA exams. Time to start using it ;-).
True but you cant install Exchange, Antivirus, Backup software, configure other software or copy files with RSAT.
Was this post helpful?
thumb_up
thumb_down
-
FreshEffect wrote:
Bill Kindle wrote:
There’s 0 difference between using Server Manager via RSAT or doing the extra step of using RDP to the server. This is the old way. Server Manager is the new way and referred to heavily on the new MCSA exams. Time to start using it ;-).
True but you cant install Exchange, … with RSAT
False — Can be done with PowerShell and further assisted by Server Manager that comes with RSAT.
http://dilshansaminda.wordpress.com/2013/07/17/microsoft-exchange-2013-installation-with-powershell/ Opens a new window
http://social.technet.microsoft.com/wiki/contents/articles/14506.how-to-install-exchange-2013-on-win… Opens a new window
FreshEffect wrote:
Antivirus…. with RSAT.
If you are using core or even the minimal interface, not really necessary because you don’t log on locally to the server you are managing with RSAT. If you are using ForeFront, you have PowerShell cmdlets Opens a new window that can be used.
FreshEffect wrote:
Bill Kindle wrote:
There’s 0 difference between using Server Manager via RSAT or doing the extra step of using RDP to the server. This is the old way. Server Manager is the new way and referred to heavily on the new MCSA exams. Time to start using it ;-).
Backup software, configure other software or copy files with RSAT.
Backup Software supports PowerShell, WSB, Backup Assist to name a couple backup products support PowerShell cmdlets. There are others too. As for configuring software and copying files, you can still do some of this via PowerShell or RSAT tools. The point I was trying to make is that you should very rarely have to use RDP anymore for server administration.
Was this post helpful?
thumb_up
thumb_down















 I tried some other combinations like serverman & svrmngr. Didn’t think about writing it out in full. hahaha